

Page 1
BILLY EBIKE USER MANUAL
Joyrides, redened.
Page 2
TABLE OF
CONTENTS
00
TABLE OF CONTENTS 1
01 - WELCOME TO THE ENKI FAMILY..........................2
02 - WARNING!..............................................................3
03 - SETTING UP YOUR EBIKE.....................................4
04 - SAFETY CHECKLIST - BEFORE YOU RIDE.........16
05 - STARTING & OPERATING PROCEDURES...........17
06 - WARRANTY...........................................................19
TABLE OF CONTENTS
Page 3
WELCOME TO
THE ENKI
FAMILY
01
WELCOME TO THE ENKI FAMILY 2
Welcome to our Enki Cycles family! Now that you’re a
proud owner of your very own Billy ebike we want to
keep you safe and ensure your Billy is in the best condition possible so you can continue to experience the fun
for many miles ahead.
We’ve created this owner’s manual to share important
safety, performance and service information with you.
Please read it before you take your rst ride and keep it
for reference.
While we do include tips for a safer riding experience,
it’s not a comprehensive guide accounting for all circumstances. Because not every situation can be predicted and we cannot give you every rule and mechanical skill necessary to safe riding, it’s your responsibility
to gauge your skillset and riding conditions in order to
ride this electric bike safely.
Please ensure that you are familiar with the legal regulations for the use of electric bikes in your country before
riding.
WELCOME
We look forward to hearing and seeing your experiences with your Billy ebike online. If you ever have a question regarding your Billy or want to tell us about your
adventures, connect with us on social or contact us
directly and one of our experienced team members will
be there to help.
INSTAGRAM – https://www.instagram.com/enkicycles
FACEBOOK – https://www.facebook.com/enkicycles
EMAIL – [email protected]
WEBSITE – https://enkicycles.com
HASHTAGS - #enkicycles #billyebike #joyridesredened
#notallridesaremadeequal
Be sure to use the hashtags above when you post
about your experiences. When we nd them we’ll help
you share the love so more people can learn us. Thanx!
CONNECT WITH US
This manual contains information on the Billy electric
bikes by Enki Cycles. Always keep it handy and refer to
it when required. Updated at the date listed below, we
reserve the right to make changes at any time without
prior notice. Please ensure that you return to our support page frequently to download the latest version.
Updated June 27 2018. ©Copyright 2018 Enki Cycles.
READ THIS MANUAL
Page 4
WARNING!
02
WARNING! 3
This manual contains many WARNINGS regarding the
safe operation of your ebike and outlines consequences
if safe setup, operation and maintenance are not performed. All information in this manual should be carefully reviewed and if you have any questions you should
contact Enki Cycles immediately. The warnings contained within the manual and marked by this
triangular Caution Symbol below and should be given
special care.
WARNING
RISK OF DEATH OR SERIOUS INJURY
Whenever you ride your Billy ebike, you risk death or
serious injury from loss of control, collisions and falls. In
order to ride safely and minimize the risk of injury,
you
must read and follow all instructions and warnings in
this user manual.
WARNING
As a parent or guardian, you are responsible for the activities and safety of your minor or child (while he or she
is operating a Billy ebike). Please ensure that their Billy
ebike is in good repair and safe operating condition and
that your child understands its proper use. It is also important that both you and your child learn, understand,
and obey all applicable local motor vehicle and trac
laws. Always make sure your child is wearing proper protective equipment, including a helmet and wrist
guards.
THE BILLY ELECTRIC BICYCLE IS NOT RECOMMENDED FOR CHILDREN UNDER THE AGE OF 14.
FOR CHILDREN 14 YEARS OF AGE AND OLDER,
ADULT SUPERVISION IS REQUIRED.
SPECIAL NOTE TO PARENTS AND
GUARDIANS
MAXIMUM RIDER WEIGHT: 300lbs (136kg)
DO NOT ALLOW CHILDREN UNDER THE AGE OF 14
TO USE THIS PRODUCT
ADULT SUPERVISION IS REQUIRED
GENERAL WARNINGS
While the use of helmets may not be required in your
country, state or territory, we advise that you use a helmet whenever you ride your Billy ebike to minimize the
risk of brain injury, should you encounter a fall or accident during your riding experience.
HELMET USE
WE RECOMMEND TAKING YOUR BILLY
EBIKE TO A CERTIFIED ELECTRIC BIKE
SPECIALIST OR BICYCLE ASSEMBLY.
THIS IS REQUIRED FOR VALID WARRANTY.
Page 5
SETTING
UP YOUR
EBIKE
03
SETTING UP YOUR EBIKE 4
When shipped, your bike arrives securely packaged,
but bolts may become loose and other parts can come
out of alignment during transit. It is important that you
inspect and correctly set up your new bike before riding
to minimize the risk of injury.
Follow the below steps to correctly unbox your new Billy ebike.
A. REMOVE FROM BOX
B. REMOVE ZIP TIES AND PADDING
C. INSTALL HANDLEBAR
D. UNFOLD THE EBIKE
INSIDE THE BOX:
1 x Billy ebike
1 x smaller box containing a battery charger and cable.
1 x smaller box containing reectors and folding pedals.
Any extra items that you may have ordered will also be
included in the box.
UNBOXING
In order to correctly setup your Billy ebike, you will need
the following tools:
1 x 6mm allen wrench
1 x 5mm allen wrench
1 x 3mm allen wrench
1 x at head screwdriver
1 x small phillips head screwdriver
1 x 18mm spanner
1 x 15mm spanner
1 x bicycle tire pump with schrader valve attachment
TOOLS YOU WILL NEED
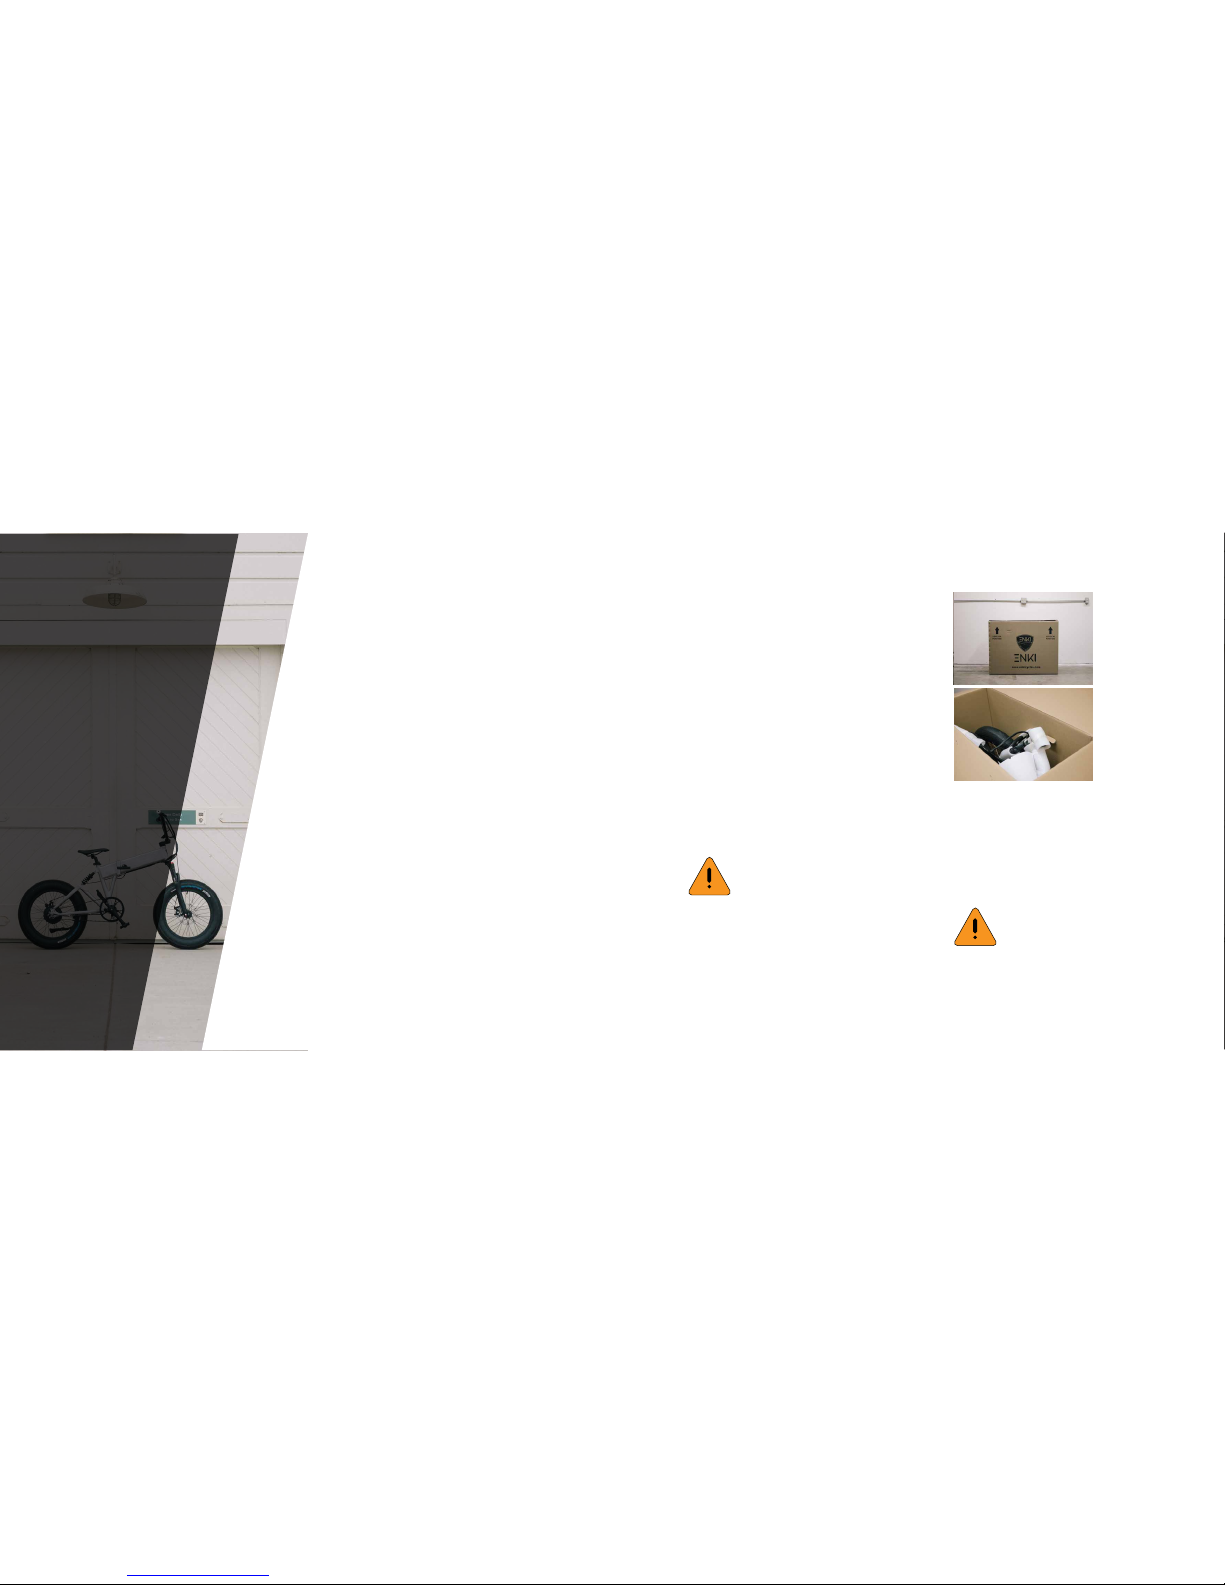
Your Billy ebike ships securely as pictured above.
Open the box from the top and with the help of another
person, lift out of the box.
Place the bike on the ground carefully ensuring it stays
upright with the bike resting on the wheels and bottom
guard.
A. REMOVE FROM BOX
YOUR BILLY EBIKE IS HEAVY, AND IT
IS RECOMMENDED THAT YOU ENLIST
THE HELP OF ANOTHER PERSON TO
AVOID INJURY.
WHILE WE TAKE EVERY CARE POSSIBLE TO ENSURE YOUR EBIKE REACHES YOU IN THE BEST CONDITION
POSSIBLE, VIBRATIONS FROM SHIPPING, TRANSIT AND GENERAL HANDLING CAN CAUSE BOLTS AND FASTENERS TO LOOSEN. IT’S IMPORTANT
THAT YOU CHECK ALL BOLTS, NUTS
AND FASTENERS TO MINIMIZE THE
RISK OF INJURY WHEN YOU RIDE.
Page 6
SETTING UP YOUR EBIKE 5BILLY EBIKE USER MANUAL
B. REMOVE TIES & PADDING
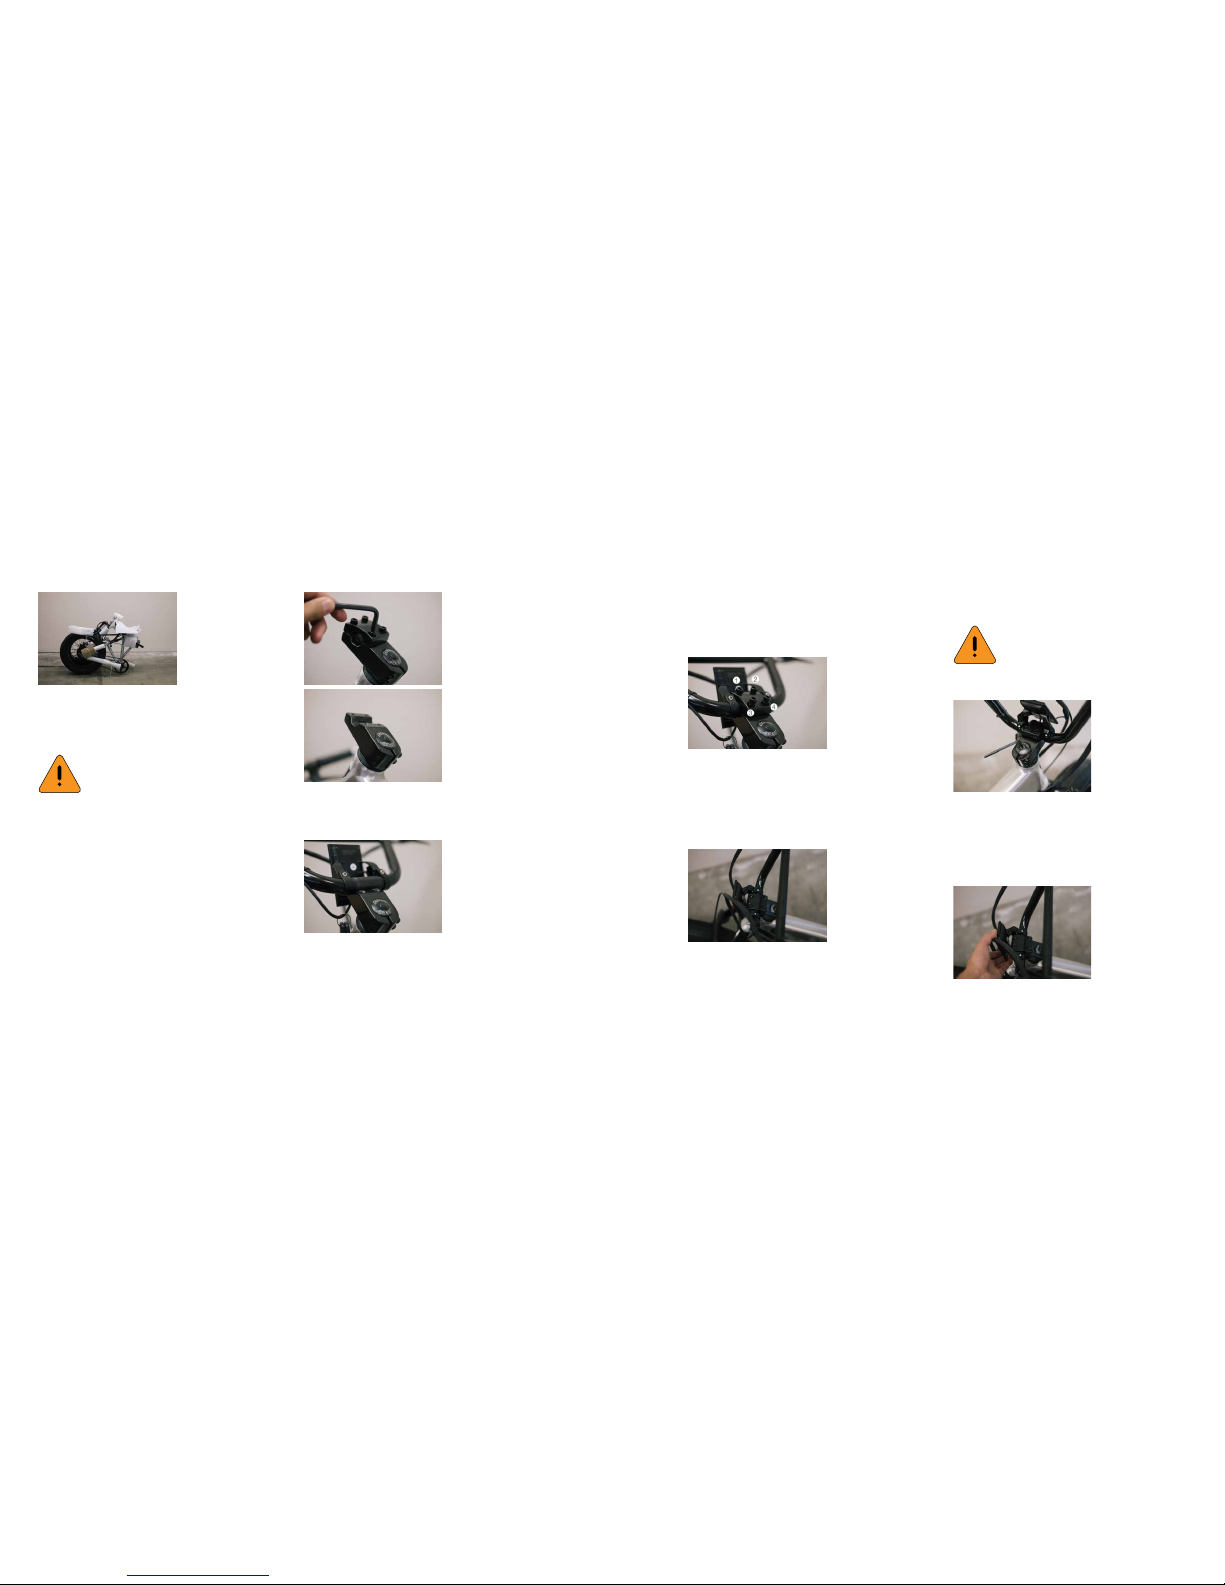
Using a 6mm allen wrench, undo the four bolts at the
top of the head stem and remove the top piece.
Pointing the handlebars with the levers facing down,
place the knurled center section of the bar in mounting
point of the head stem.
C. INSTALL HANDLEBAR
The installation is made easier if the display is rotated
forward. If the display is secured and will not rotate easily, loosen the securing bolts slightly with a 3mm allen
wrench.
Replace the previously removed top piece and install
the four bolts by hand to ensure correct installation.
Slightly tighten each bolt at opposite ends (e.g. 1, then
4, then 2, then 3) a little at a time to ensure even pressure is applied across the top piece.
Just before the bolts are fully tightened, adjust the handlebar so that the vertical bars are in line with the forks
and the brake levers face forward.
Tighten the four bolts to ensure a secure connection of
the handlebar to the head stem.
Straighten the handlebar so that a forward facing handlebar coincides with a forward facing front tire, then
secure by removing the rubber cover and tightening the
top cap bolt.
Using scissors, carefully cut and remove zip ties and
padding, ensuring you do not mark or damage the bike
or its components.
USE OF SCISSORS OR BLADES RISK
SCRATCHING OR HARMING YOUR
EBIKE. TAKE EXTREME CARE.
BE CAREFUL NOT TO OVER TIGHTEN
AS EXCESSIVE FORCE MAY DAMAGE
THE HEAD STEM THREADS.
Page 7
SETTING UP YOUR EBIKE 6BILLY EBIKE USER MANUAL
Adjust the display position so that it can be easily
viewed when sitting on the bike, then nally secure the
handlebar by tightening the two pinch bolts using a
5mm allen wrench.
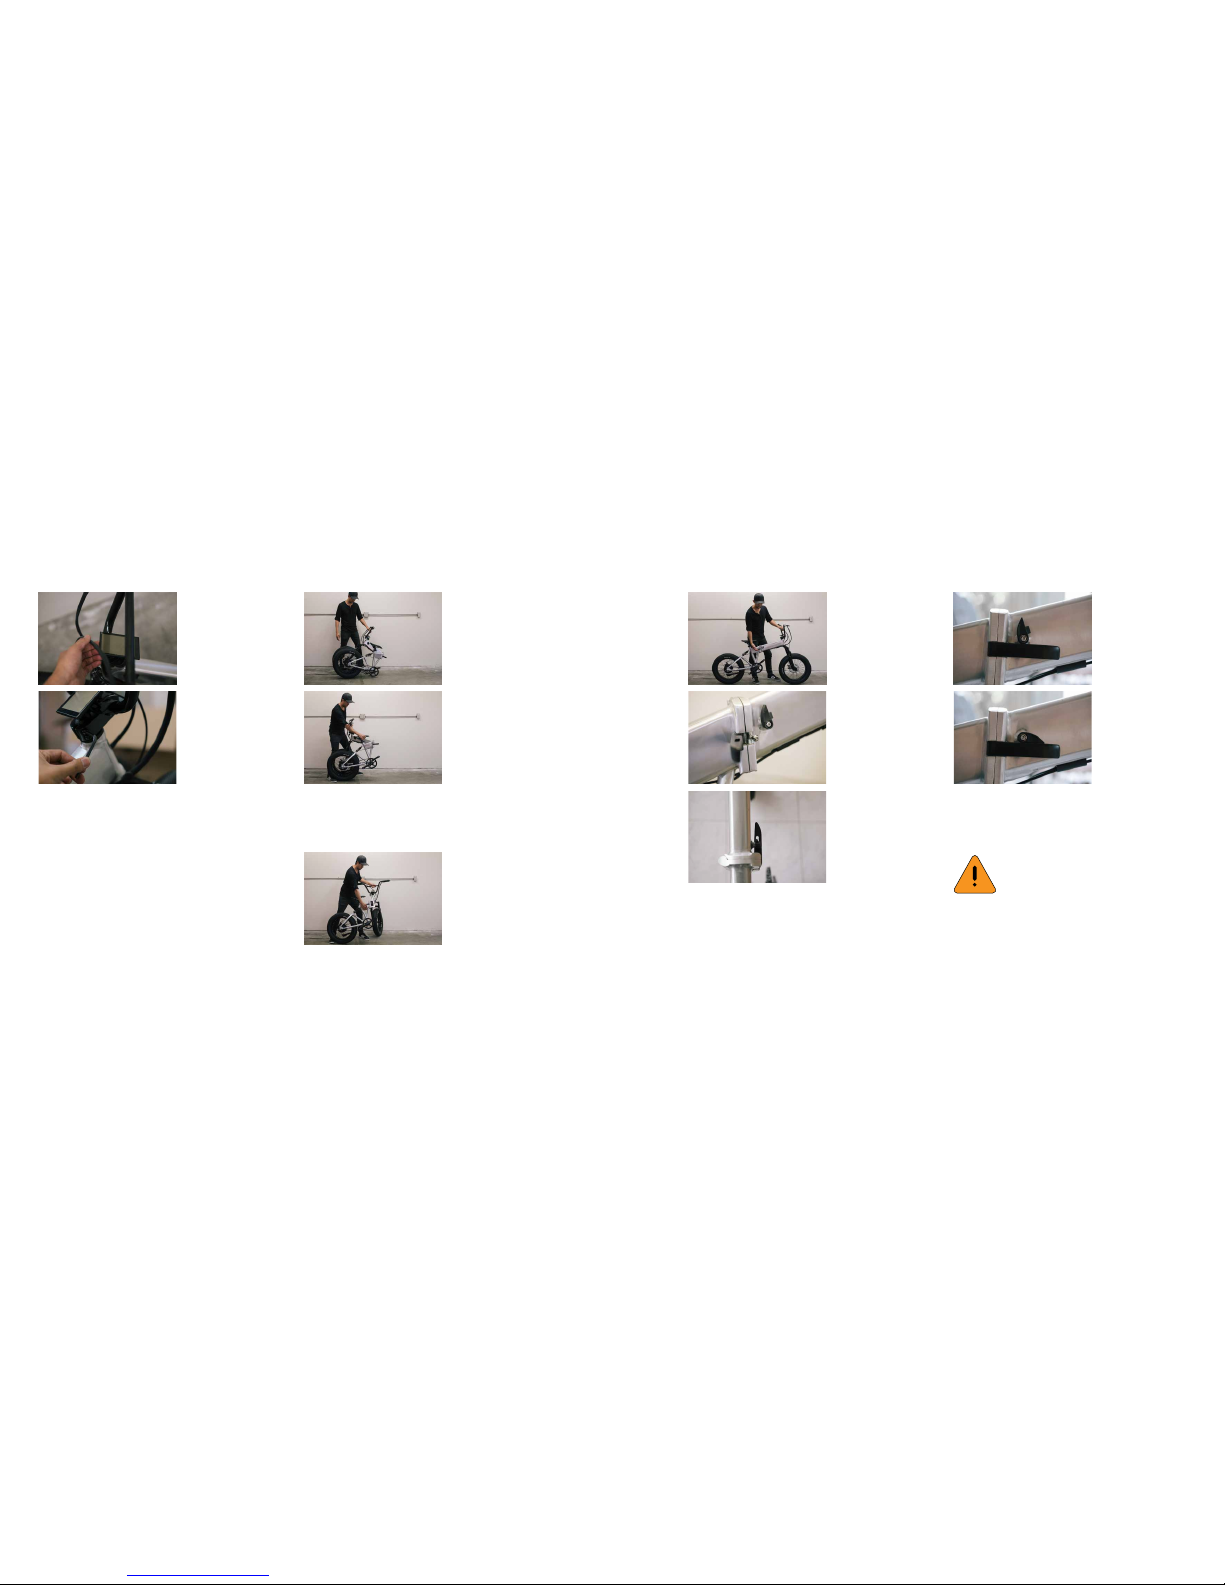
Standing toward the ‘tire’ side of the folded ebike, place
an anchoring foot behind the tire and raise the bike so
that the bike is no longer resting on the crank guard.
Slowly swing the handlebar half of the bike outwards in
a motion that closes the center hinge.
D. UNFOLD THE EBIKE
Clasping the clamp lever handle, draw it closed by
swinging it across the frame break so that there is an
even gap between the lever handle and the front half of
the frame. It is designed to sit very close to the frame,
but not actually touch it.
Rotate the lock clasp clockwise so that the locking tab
sits inside the hole of the clamp lever handle and the
lock clasp sits ush against the handle.
DO NOT RIDE THE EBIKE UNLESS
THE FRAME IS FULLY UNFOLDED AND
BOTH THE CLAMP LEVER AND LOCK
CLASP ARE SECURED. SEVERE CONSQUENCES WILL RESULT.
Page 8
SETTING UP YOUR EBIKE 7BILLY EBIKE USER MANUAL
BILLY EBIKE
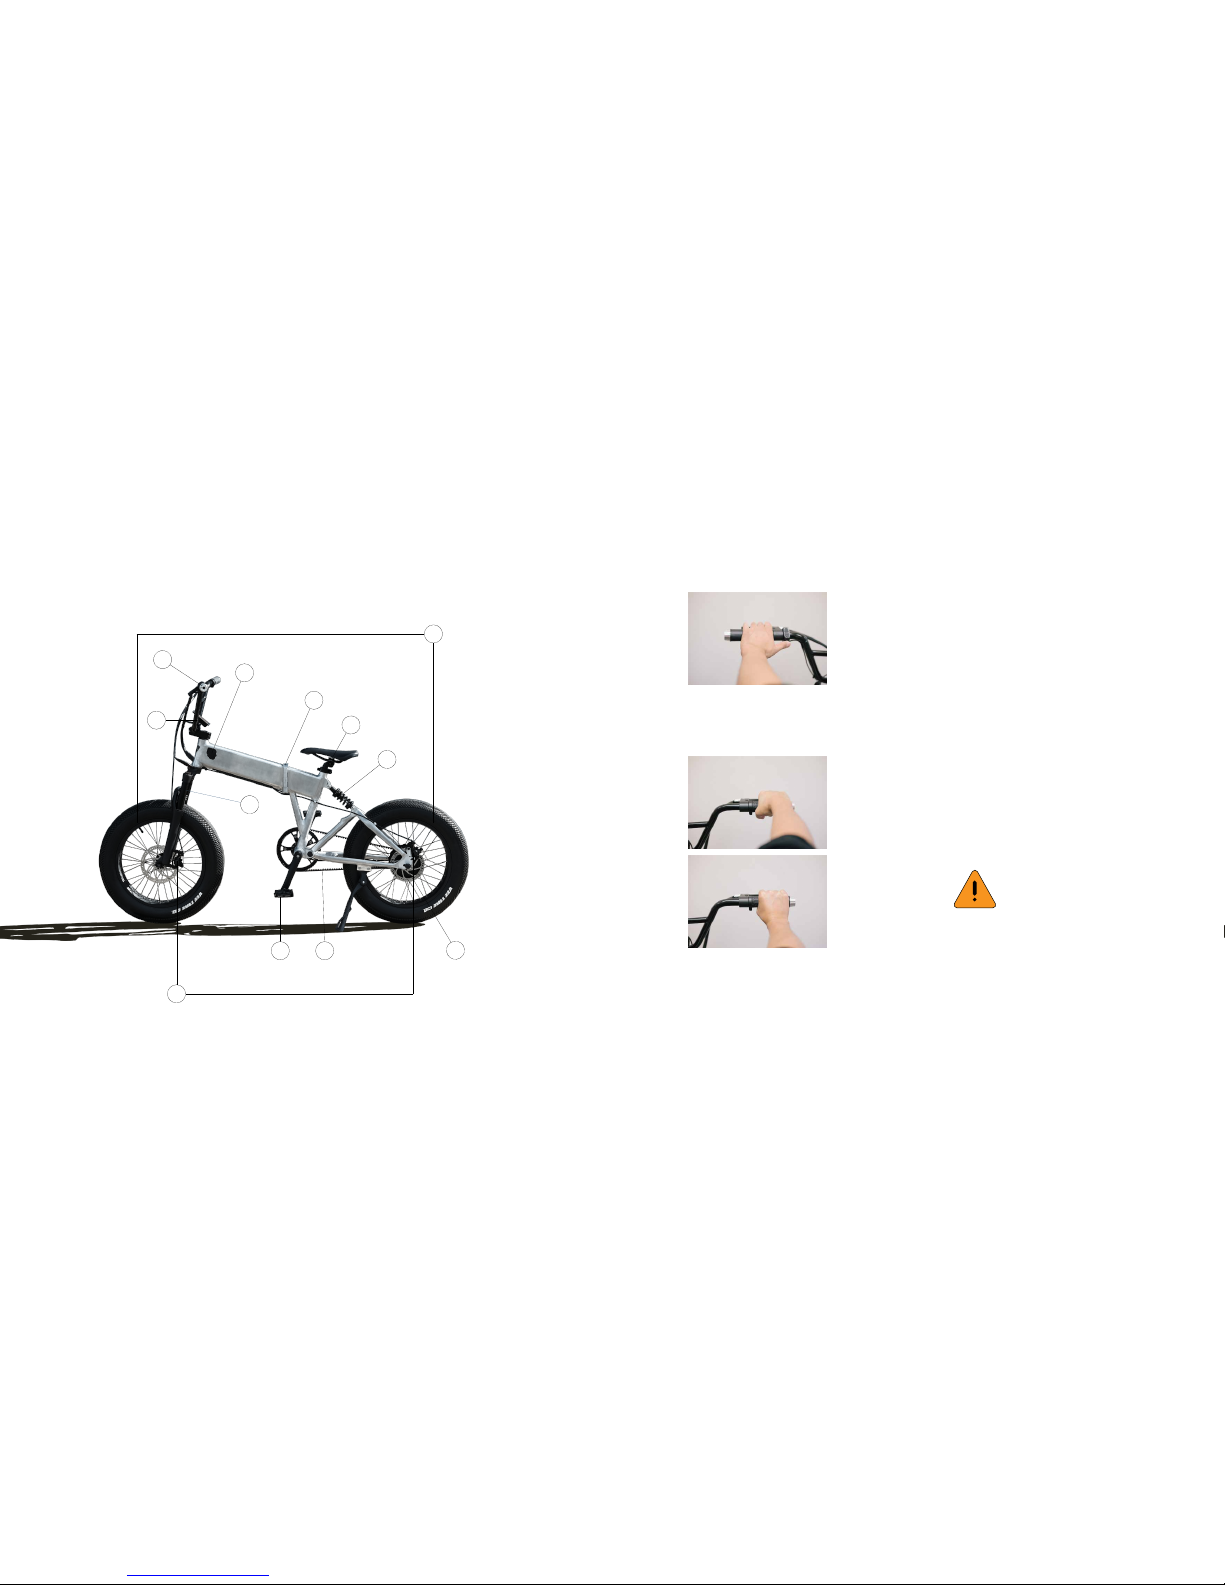
By the left grip on the handlebar you will nd the 3 button keypad that controls the ebike power and display
system.
The right side grip is a motorcycle style twist throttle.
Twisting the grip down towards the rider dictates the
level of throttle applied.
1. HANDLEBARS
Brake lever positioning varies from region to region.
While we ocially ship correct congurations to regions, It is important to understand which regional versional version you have so that you know which lever
controls which brake.
Region: USA
Left brake controls front brake
Right brake controls rear brake
Region: Europe
Left brake controls front brake
Right brake controls rear brake
Region: Australia
Left brake controls rear brake
Right brake controls front brake
Region: UK
Left brake controls rear brake
Right brake controls front brake
2
1
3
4
11
6
7
8
9
10
5
12
FAILURE TO UNDERSTAND WHICH LEVER CONTROLS WHICH BRAKE CAN
LEAD TO ACCIDENTS AND SERIOUS
INJURY.
Page 9
SETTING UP YOUR EBIKE 8BILLY EBIKE USER MANUAL
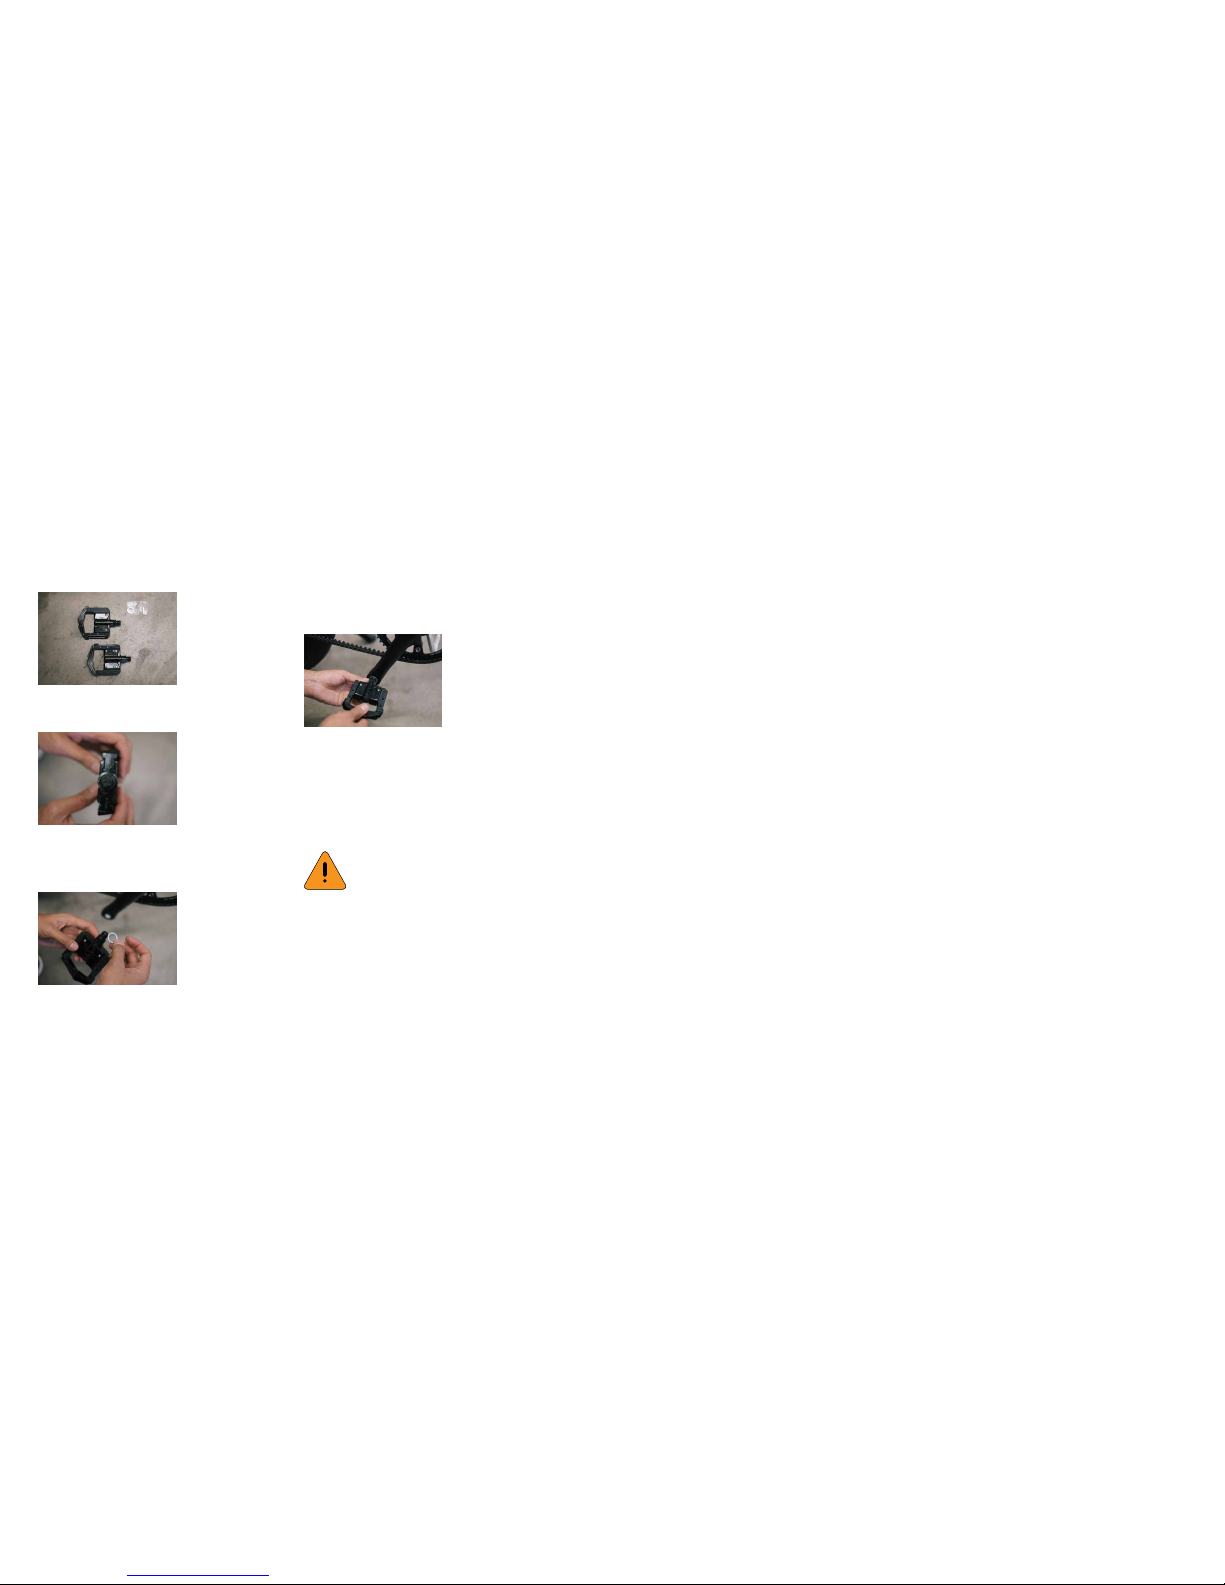
To install the right pedal, nd the pedal labelled “R” and
place one of the supplied washers on.
Next, locate the right side crank and attach the pedal to
the arm by threading in a clockwise motion.
To install the left side pedal, locate the pedal labelled
“L”, install the other supplied washer, then attach to the
left side crank arm by threading in an anti-clockwise
motion.
Your Billy ebike ships with the pedals detached.
Each pedal is labelled according to the side of the bike
they belong on. “R” for right, and “L” for left.
2. FOLDING PEDALS
READ PEDAL LABELS CAREFULLY TO
AVOID ATTEMPTED INSTALLATION OF
INCORRECT PEDALS AND DAMAGING
COMPONENTS.
Page 10
SETTING UP YOUR EBIKE 9BILLY EBIKE USER MANUAL
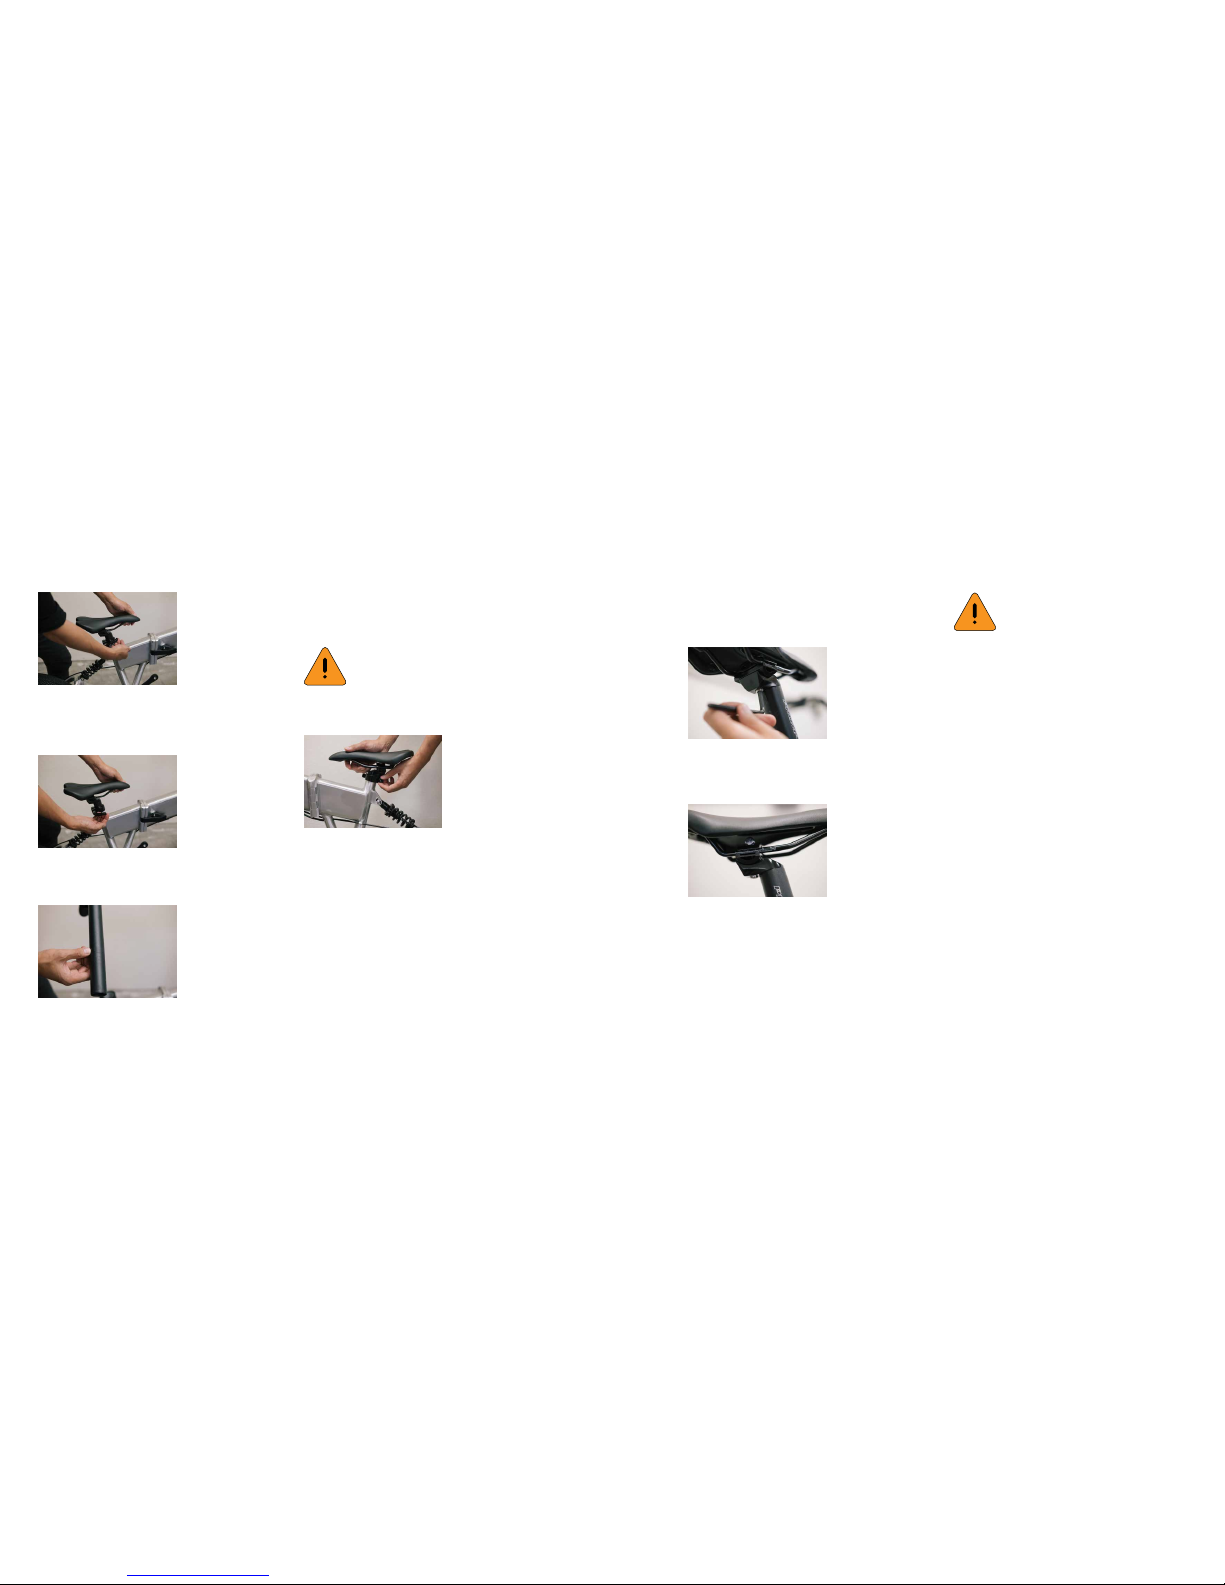
Seat adjustment is achieved without tools via the quick
release system. To adjust, locate the quick release lever
at the top of the seat tube.
Open by pulling towards the rear of the bike. The seat post
should now be loose enough to adjust the seat height.
3. SEAT ADJUSTMENT
When raising the seat height, ensure that you do not extend the seat height past the minimum insertion point
marking on the seat tube.
If the seat post is loose when the quick release is fully
engaged it may be necessary to adjust the clamp further to secure the seatpost correctly. This is achieved
by turning the adjustment dial clockwise when the
clamp is released.
Alternatively, if the clamp is too dicult to compress
fully, it may be necessary to loosen the clamp slightly.
This is achieved by turning the dial in an anti-clockwise
direction when the clamp is released and then trying
again.
The seat can be adjusted further by either moving it
slightly backward or forward, as well as the angle the
seat sits; either more upwards or downwards.
To adjust, loosen the securing bolt with a 5mm allen
wrench and turn in an anti-clockwise direction.
Once the bolt is loose enough, there should be enough
play in the seat rail clamp to allow the seat to slide back
and forth. Ensure that you only slide the seat so that the
seat rail clamp’s edges sit within the range marked on
the seat post rails.
To adjust the seat angle, loosen the securing seat clamp
bolt further. Once loose enough, there will be enough play
in the seat to allow for the angle to be slightly adjusted.
Secure the seat angle and slide by tightening the seat
clamp bolt.
EXTENDING THE SEAT POST PAST
THE MINIMUM INSERTION POINT MAY
LEAD TO COMPONENT FAILURE AND
SERIOUS INJURY.
EXTENDING THE SEAT POST CLAMP
OUTSIDE OF THE MARKED RANGE
CAN LEAD TO COMPONENT FAILURE
AND SERIOUS INJURY.
Page 11
SETTING UP YOUR EBIKE 10BILLY EBIKE USER MANUAL
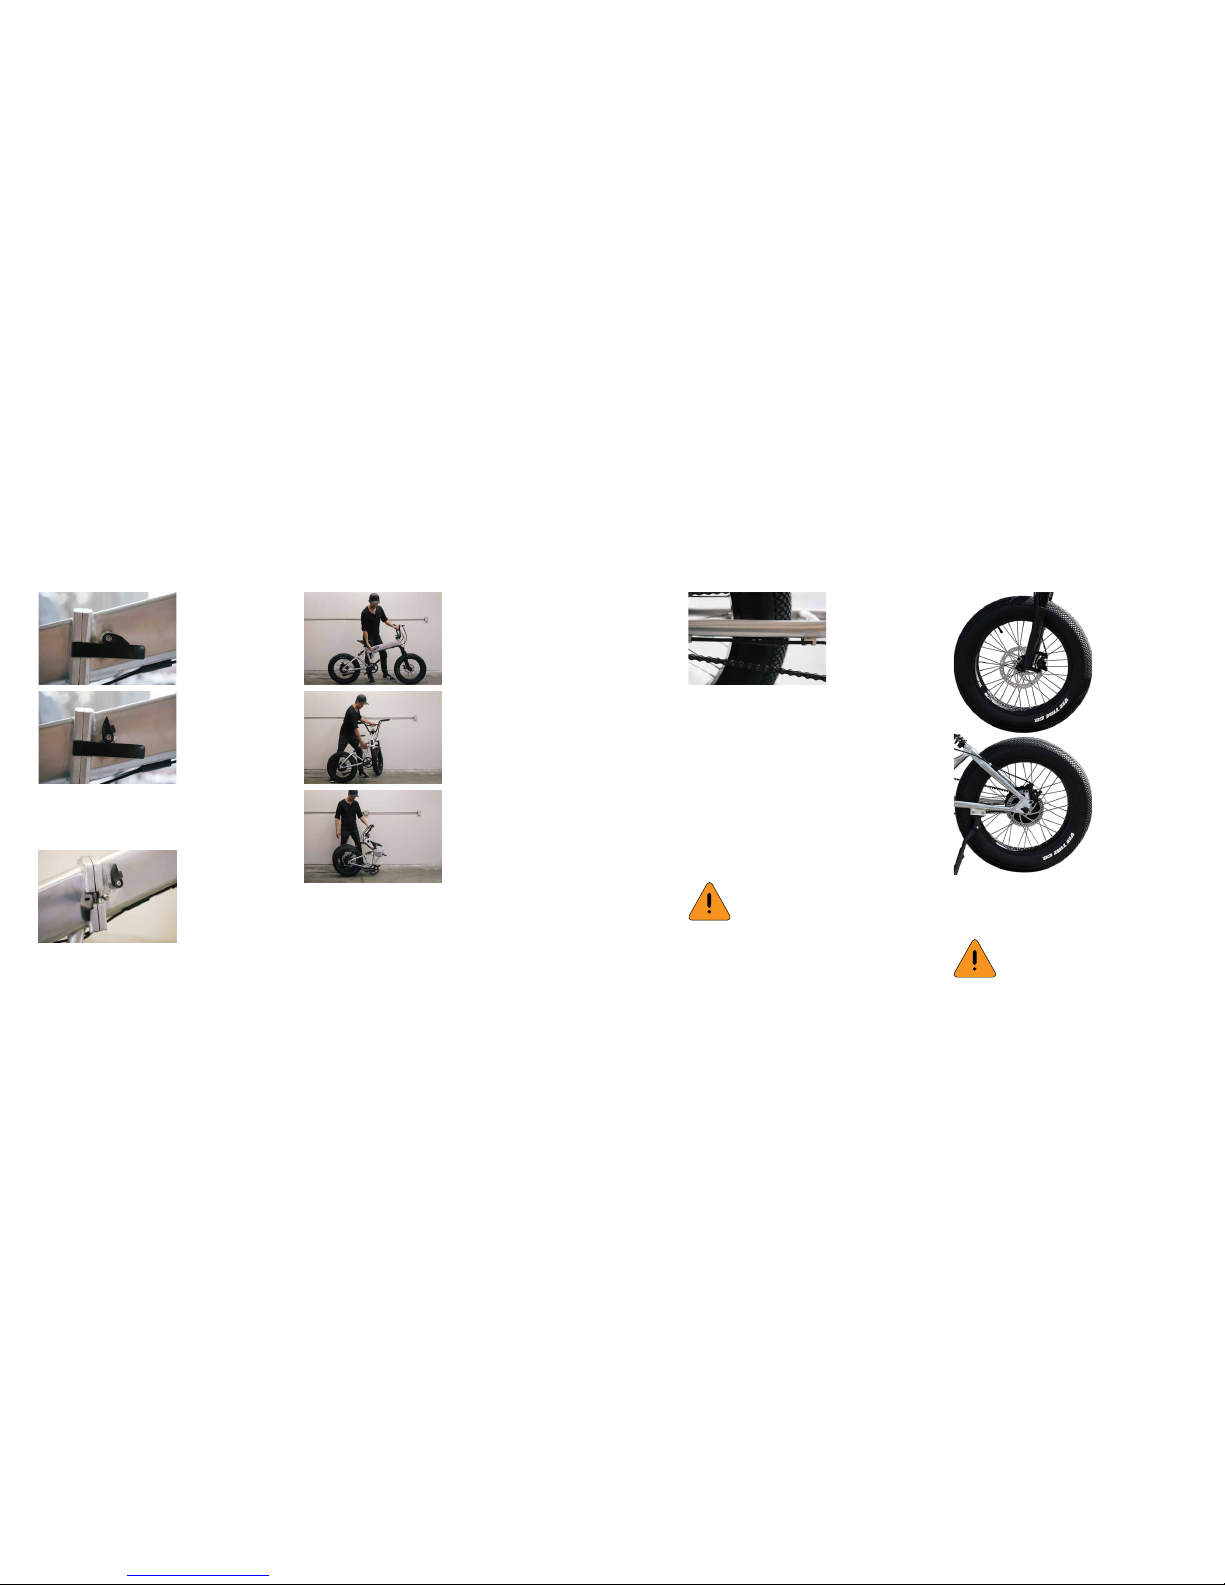
Rotate the lock clasp anti-clockwise so that the locking
tab that sits inside the hole of the clamp lever handle no
longer secures the clamp lever handle in place.
Swing the clamp lever handle outwards to release the
clamp.
4. FOLDING
With an anchoring foot behind the rear wheel to stop it
from rolling backward as you fold, use one hand to hold
the frame close to the seat post and the other hand to
hold the front half of the bike. Fold the bike in half using
a swinging motion, until the front wheel aligns with the
rear wheel. Allow the bike to rest on the lower guard for
storage with a smaller footprint.
Ensure the motor cable is securely connected to the
controller connector cable.
If disconnected, simply line up the arrow on the motor cable with that on the connector cable, and press
together carefully. Notice that one side has a ‘female’
connection with holes and other a ‘male’ connection
with pins. The connection is made such that the pins t
exactly into the holes on the other side.
If there is resistance do not force the two together, as
this may bend pins out of place and destroy your connection. Simply put apart gently, then try again by aligning the arrow guides together and pushing carefully.
5. REAR HUB MOTOR
Your Billy ebike comes equipped with front and rear
mechanical disc brakes, designed to help you slow
down and stop as required.
6. BRAKES
DO NOT RIDE THE EBIKE WITHOUT THE MOTOR CABLES PROPERLY CONNECTED. DOING SO COULD
DAMAGE COMPONENTS AND RESULT
IN SERIOUS INJURY.
KEEP IN MIND THAT WHILE YOUR
BIKE’S BRAKES ARE STRONG, WE
HOLD NO RESPONSIBILITY
IN THE EVENT OF FAILURE.
Page 12
SETTING UP YOUR EBIKE 11BILLY EBIKE USER MANUAL
It is therefore recommended to service your brakes regularly to ensure:
i. the brake pads are in suitable usable condition
ii. the brakes are adjusted correctly so that calipers and
pads make appropriate contact with the brake rotor
iii: lever pulls translate to sucient braking power
IF YOU DON’T HAVE THE MECHANICAL EXPERTISE
AND/TOOLS TO REGULARLY MAINTAIN YOUR BILLY EBIKE’S BRAKES, WE ADVISE YOU TO SEEK THE
HELP OF A CERTIFIED BICYCLE MECHANIC.
Your brake levers are equipped with motor inhibitors
designed to cut the power to the motor whenever the
levers are pressed. For safety, we recommend that you
press the brakes whenever you are operating the ebike,
if you have no intention to be propelled by its electric
motor.
Alternatively, you can switch your pedal assist (PAS)
level to 0 or switch the power o by holding the Mode
button, to ensure that an accidental twist of the throttle
or press of the pedal doesn’t result in the ebike being
propelled unintentionally.
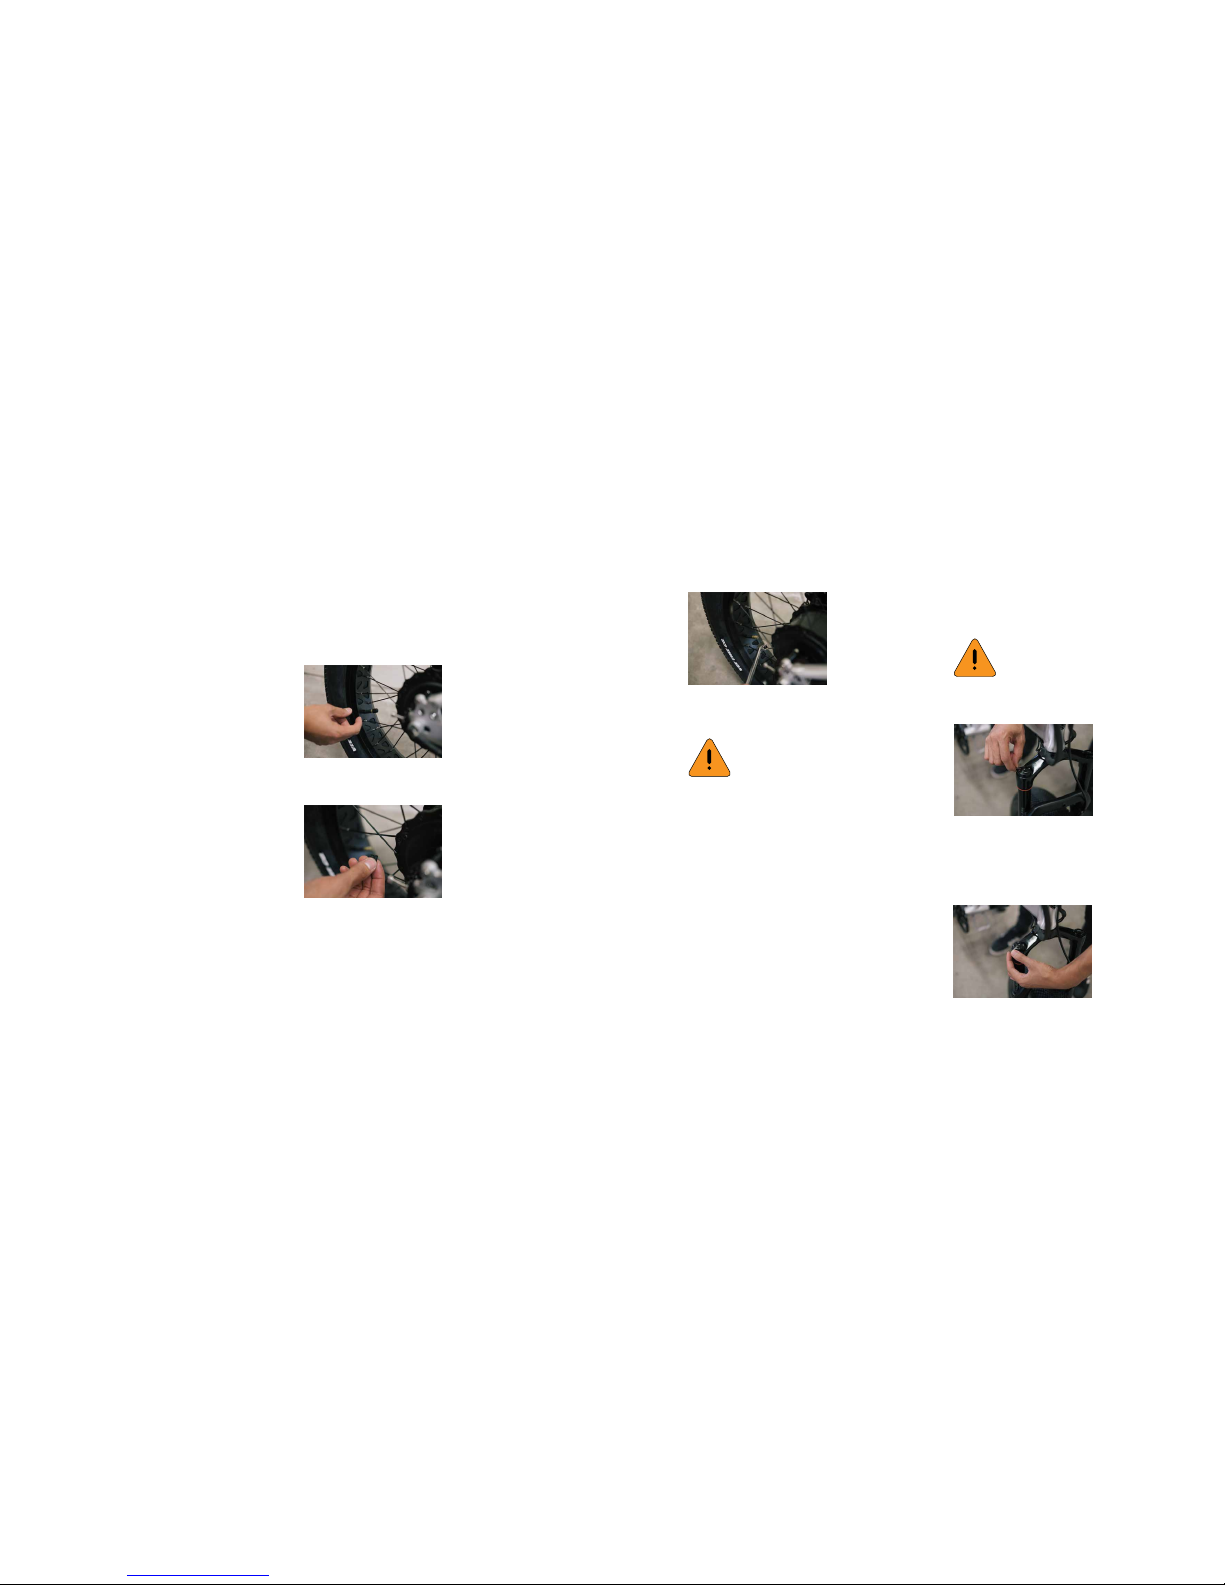
The recommended tire pressure is 8-20 PSI (0.6-
1.4bar). 20psi is ideal for hard surfaces like asphalt and
concrete. For softer, looser surfaces like gravel, it is advisable to reduce the pressure for better traction and a
more comfortable ride.
To inate, locate the ination valve on the tire.
v
Remove the valve cap by twisting in an anti-clockwise
motion.
7. TIRE PRESSURE
Attach a schrader valve compatible tire pump and in-
ate to the desired pressure.
Your Billy ebike comes equipped with an adjustable
front air suspension fork designed to help absorb
bumps during your ride.
Billy’s suspension fork features a lock out dial. When
fully locked out (the lock icon on the dial is closest to
the frame), the fork will be fully rigid, meaning it will ride
like a standard rigid bicycle.
8. FRONT SUSPENSION FORK
DO NOT OVER INFLATE PAST 20PSI
OR UNDER-INFLATE BELOW 8PSI. DOING SO MAY DAMAGE THE TIRE AND
RESULT IN SERIOUS INJURY.
WHILE SUSPENSION IS DESIGNED TO
HELP ABSORB SHOCKS, IT DOES NOT
GUARANTEE YOUR SAFETY WHILE
RIDING. EXERCISE EXTREME CARE TO
AVOID THE RISK OF INJURY.
Page 13
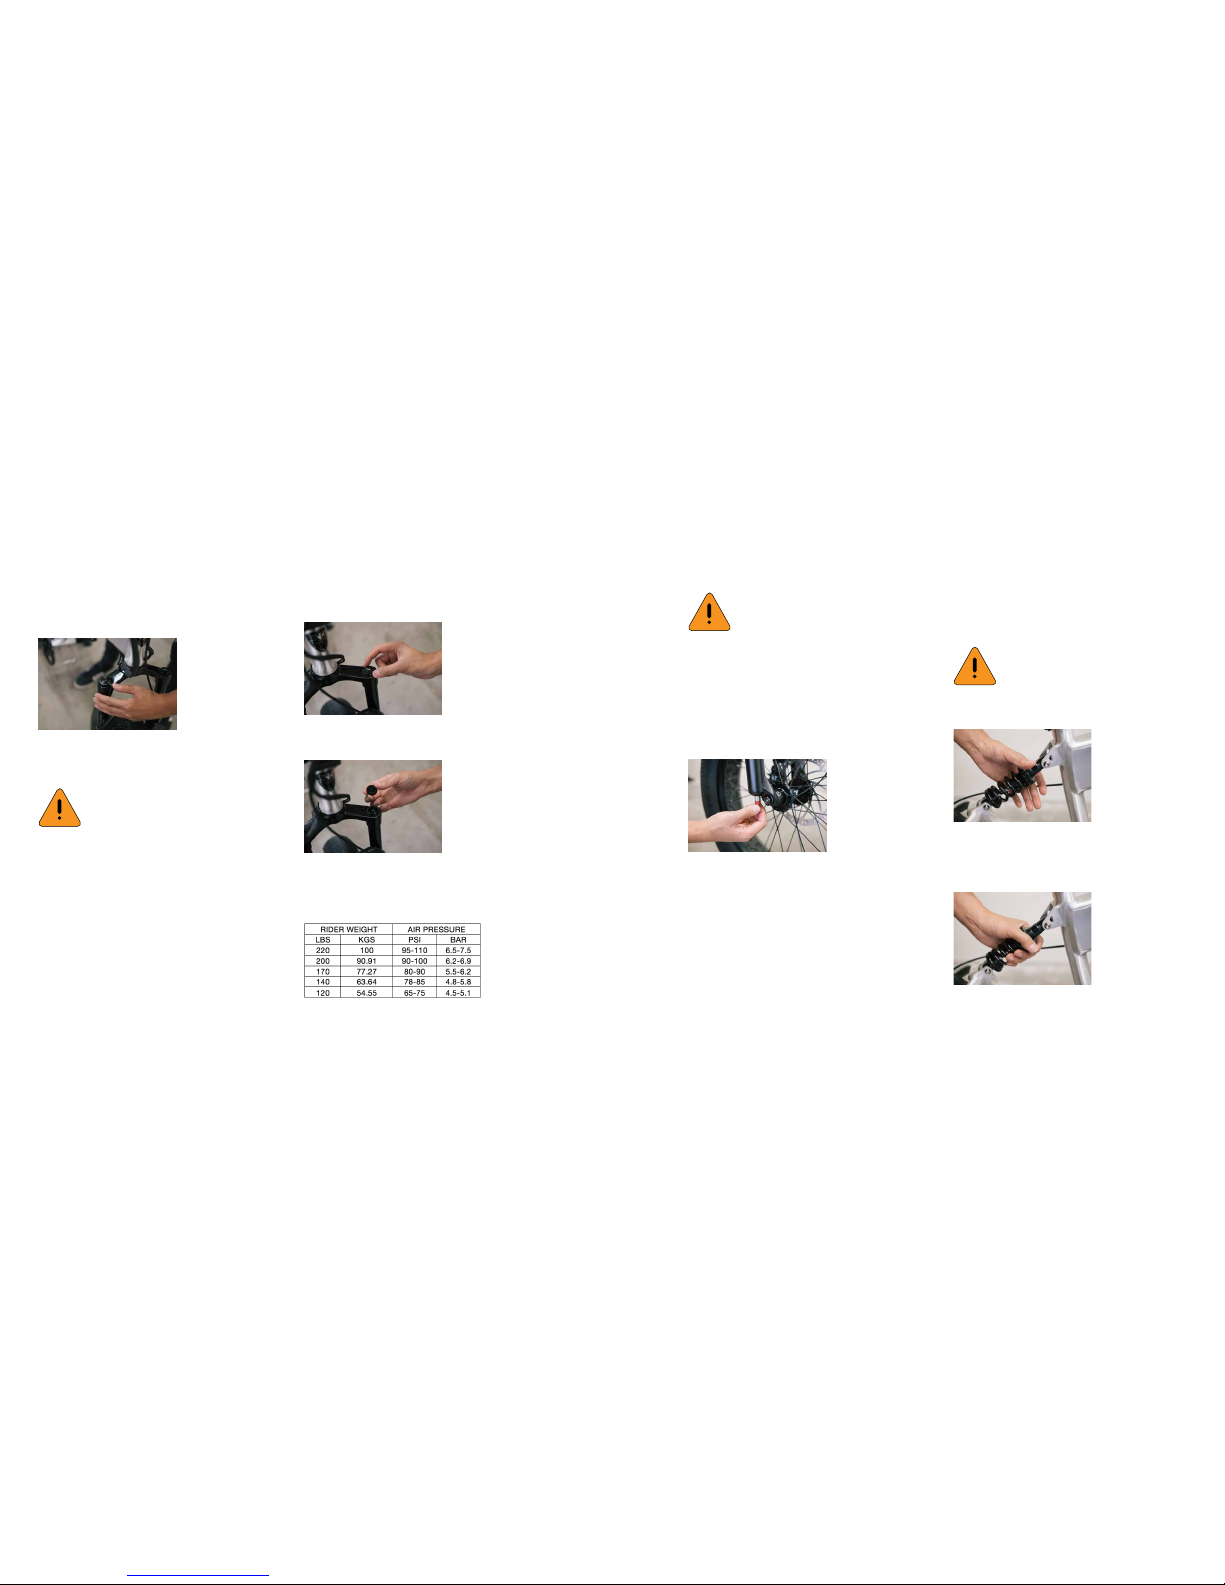
SETTING UP YOUR EBIKE 12BILLY EBIKE USER MANUAL
As you turn it anti clockwise, it will progressively allow
more spring.
When the dash (-) icon faces closest to the frame, the
suspension forks are in full suspension mode.
ADJUSTING SUSPENSION PRELOAD
It is also possible to adjust the amount of preload on
the air suspension.
Remove the “Air” cap by turning in an anti-clockwise
direction and inate using a high-pressure air suspen-
sion pump. Recommended starting pressures are listed
below based on rider weight.
ADJUSTING SUSPENSION DAMPING
At the bottom of the fork leg you will nd a rebound
damping dial. This determines the rate of return when
the suspension is compressed.
Turning it completely clockwise will set a slow rate
of return. Check this by holding the front brake and
pumping the fork up and down. Turning it completely
anti-clockwise produces a faster rate of return. Setting
a faster rate of return is more ideal for bumpy terrain,
where the suspension needs to return to full length
quickly in between bumps. Setting a slower rate of return might be better for smoother terrain, where bumps
are a further distance apart. You can make small adjustments until the setting is right for you.
Your Billy ebike comes equipped with a pre-load adjustable rear coil suspension to help absorb bumps during
your ride.
To adjust, locate the textured threaded stopper that sits
at the end of the suspension spring, towards the top of
the rear suspension unit.
9. REAR SUSPENSION
DO NOT FORCE THE DIAL HARD IN
EITHER DIRECTION. DOING SO MAY
DAMAGE THE FORKS AND RESULT IN
SERIOUS INJURY.
ONLY ATTEMPT TO ADJUST FORK
PRELOAD/SAG IF YOU ARE EXPERIENCED WITH SUSPENSION TUNING.
OTHERWISE, PLEASE CONSULT A
QUALIFIED BICYCLE MECHANIC.
WHILE SUSPENSION IS DESIGNED TO
HELP ABSORB SHOCKS, IT DOES NOT
GUARANTEE YOUR SAFETY WHILE
RIDING. EXERCISE EXTREME CARE TO
AVOID THE RISK OF INJURY.
Page 14
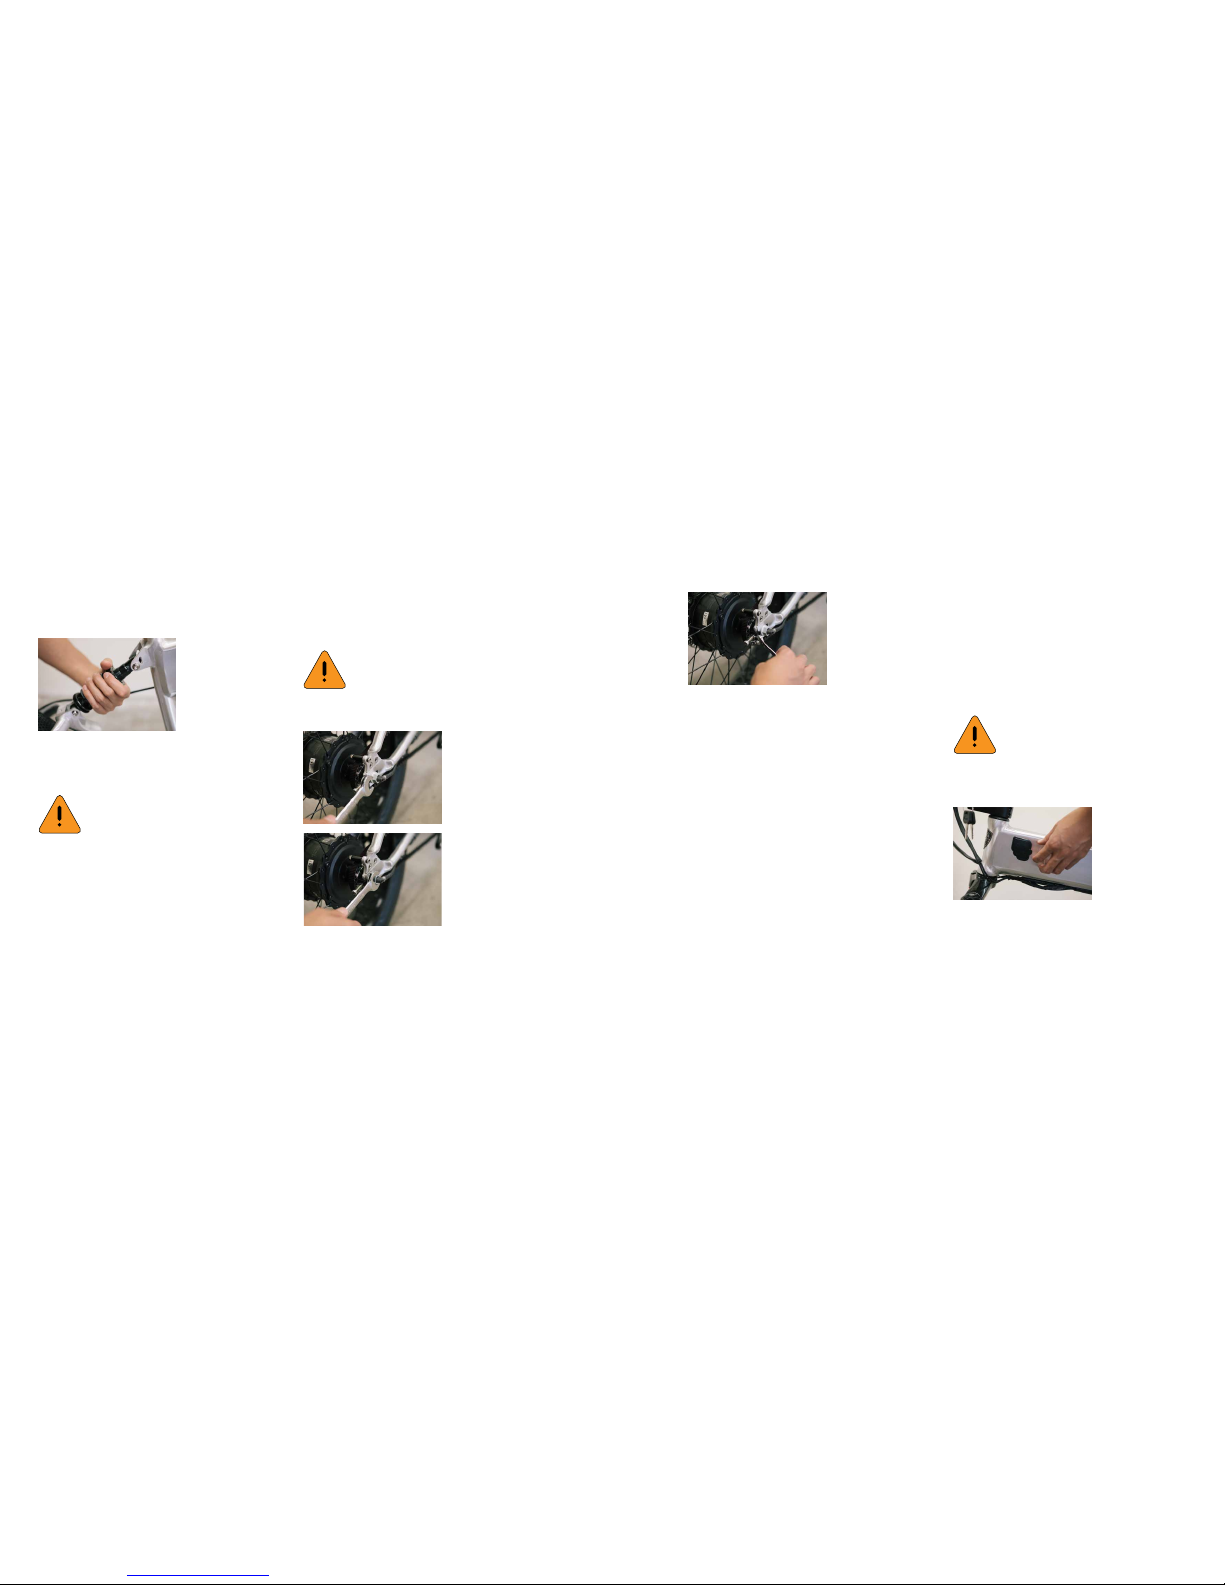
SETTING UP YOUR EBIKE 13BILLY EBIKE USER MANUAL
Twisting the stopper in an anti-clockwise direction reduces the amount of preload.
Twisting the stopper in a clockwise direction increases
the amount of preload.
Your Billy ebike comes equipped with either a belt or
chain drive system. It is important to maintain belt/chain
tension to ensure optimum energy is being transferred
from the crank to the rear wheel.
In order to correctly adjust the drive tension, you must
rst locate and loosen both of the rear axle nuts using
an 18mm spanner.
10. DRIVE SYSTEM
Next, locate and adjust the tensioner accordingly.
For increased tension, turn the tensioning nut in a
clockwise direction.
For reduced tension, turn the tensioning nut in an anti-clockwise direction.
Once you have achieved the desired amount of tension,
tighten both the rear axle nuts using an 18mm spanner.
When setting up your Billy ebike for the rst time, we
recommend that you charge the battery to full overnight. This allows the battery to balance.
As you use the battery, when possible try to use the
battery until it is completely empty and then charge it
until it is completely full before using it again. Fully cycling the battery like this should help extend the life of
the battery.
Your battery can be charged either on or o the ebike.
To charge on the ebike, locate and peel open the rubber
door to expose the battery’s ports and power button.
11. BATTERY
ONLY ATTEMPT TO ADJUST REAR
PRELOAD IF YOU ARE EXPERIENCED
WITH SUSPENSION TUNING. OTHERWISE, PLEASE CONSULT A QUALIFIED
BICYCLE MECHANIC.
ONLY ATTEMPT TO ADJUST YOUR
DRIVE SYSTEM IF YOU ARE EXPERIENCED WITH CYCLE MAINTENANCE.
OTHERWISE, PLEASE CONSULT A
QUALIFIED BICYCLE MECHANIC.
ONLY OPERATE YOUR BATTERY AND
CHARGER BETWEEN 50 DEGREES
FAHRENHEIT (10C) AND 80 DEGREES
FAHRENHEIT (27C) TO AVOID COMPONENT FAILURE AND MINIMIZE THE
RISK OF INJURY.
Page 15
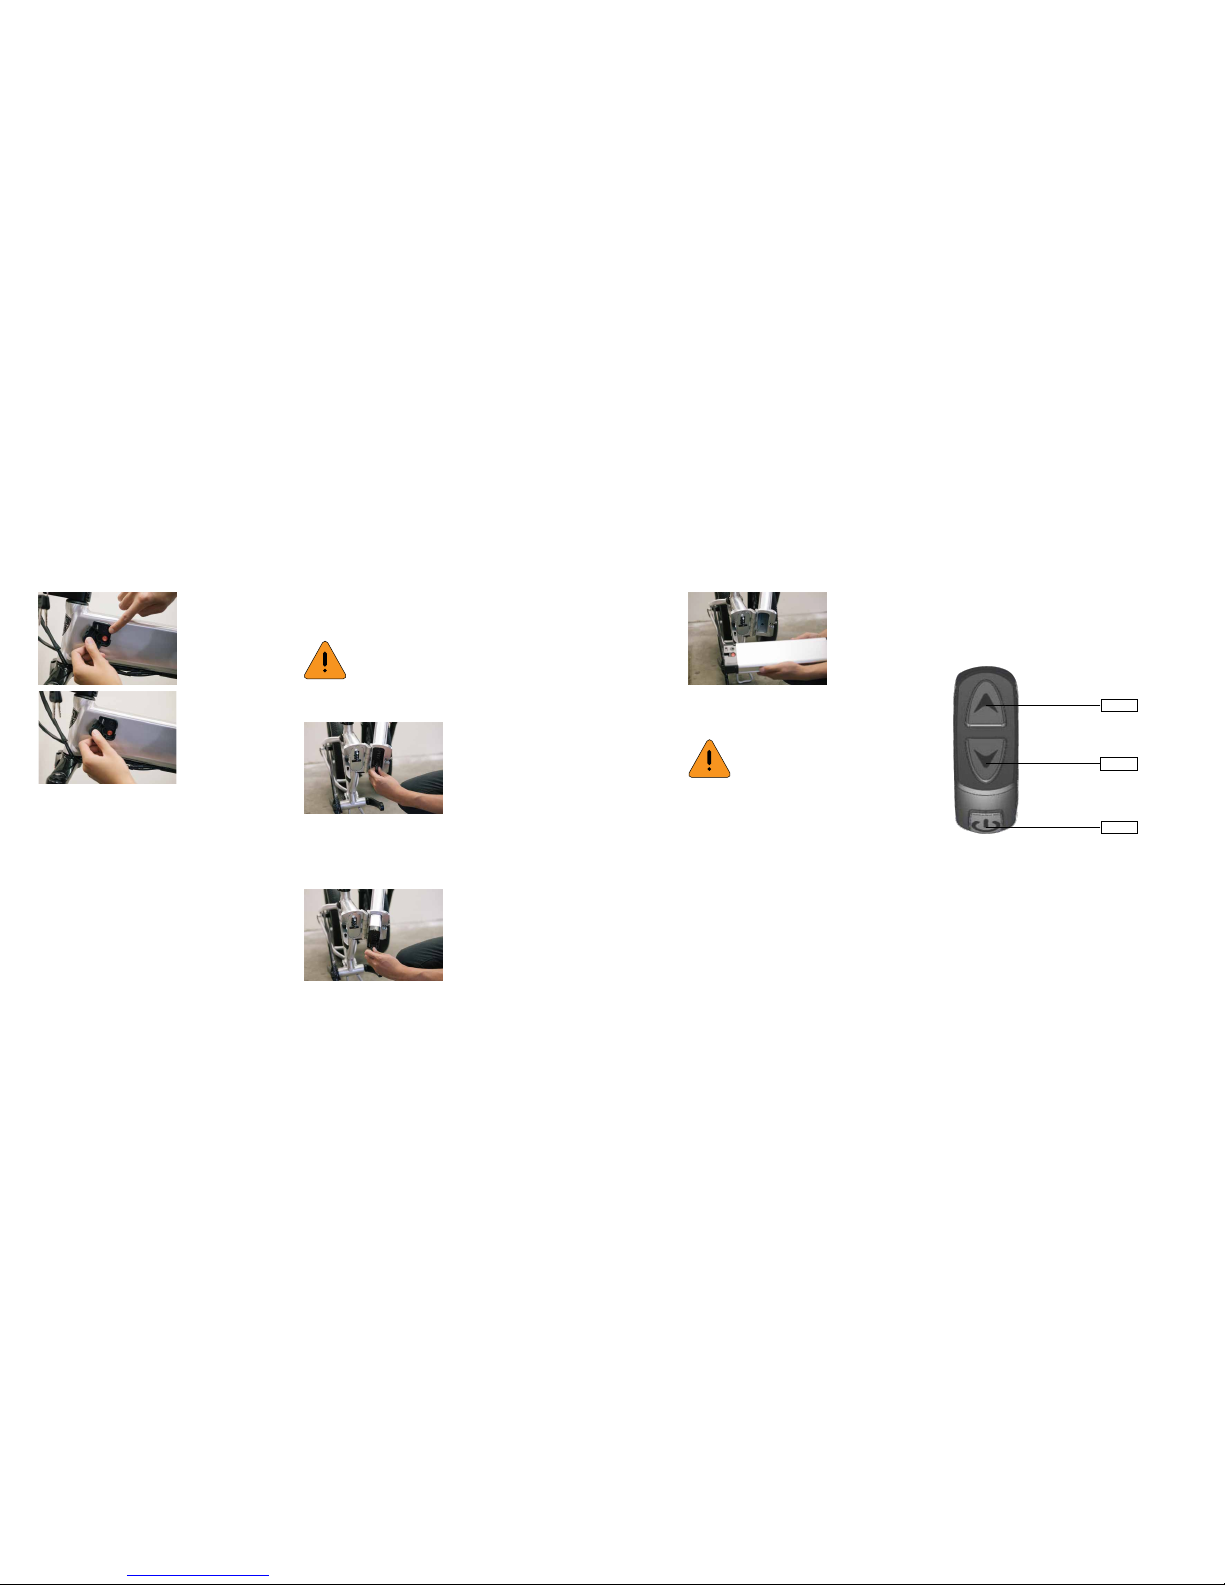
SETTING UP YOUR EBIKE 14BILLY EBIKE USER MANUAL
Ensure that the ebike’s power button is switched to the
o position (0).
Before powering on the charger, insert the charger cable into the charging port towards the top right of the
battery port. Once attached securely, switch your charger on.
While charging, the charger’s red light will illuminate.
Once charging is complete, the charger will indicate so
by illuminating the green light.
Lithium batteries and electricity can cause serious injury
when incorrectly maintained or handled or used inappropriately, dropped, or exposed to water.
To charge the battery away from the ebike, fold the bike
in half and use the supplied key to unlock the battery
from its mounted position.
Slide the battery out completely and charge in a cool
dry location until fully charged.
Your new Billy ebike comes equipped with a display and
3 button keypad to allow you to operate and customize
your ebike riding experience, as well as navigate through
trip and system information. References to these buttons
will be made as Up, Down and Mode.
To power on the ebike, hold down the Mode button for a
few seconds until the display turns on.
Similarly, to power o the ebike, hold down the Mode
button for a few seconds until the display turns o.
12. DISPLAY
WE URGE YOU TO EXERCISE EXTREME CARE WHEN USING YOUR
EBIKE’S BATTERY AND ELECTRICITY
RELATED COMPONENTS AND DEVICES TO MINIMIZE THE RISK OF SERI-
IF YOU NOTICE SOMETHING UNUSUAL DURING THE CHARGING PROCESS, TURN THE POWER OFF IMMEDIATELY AND CONTACT US FOR
ASSISTANCE TO AVOID POSSIBLE IN-
Mode
Down
Up
Page 16
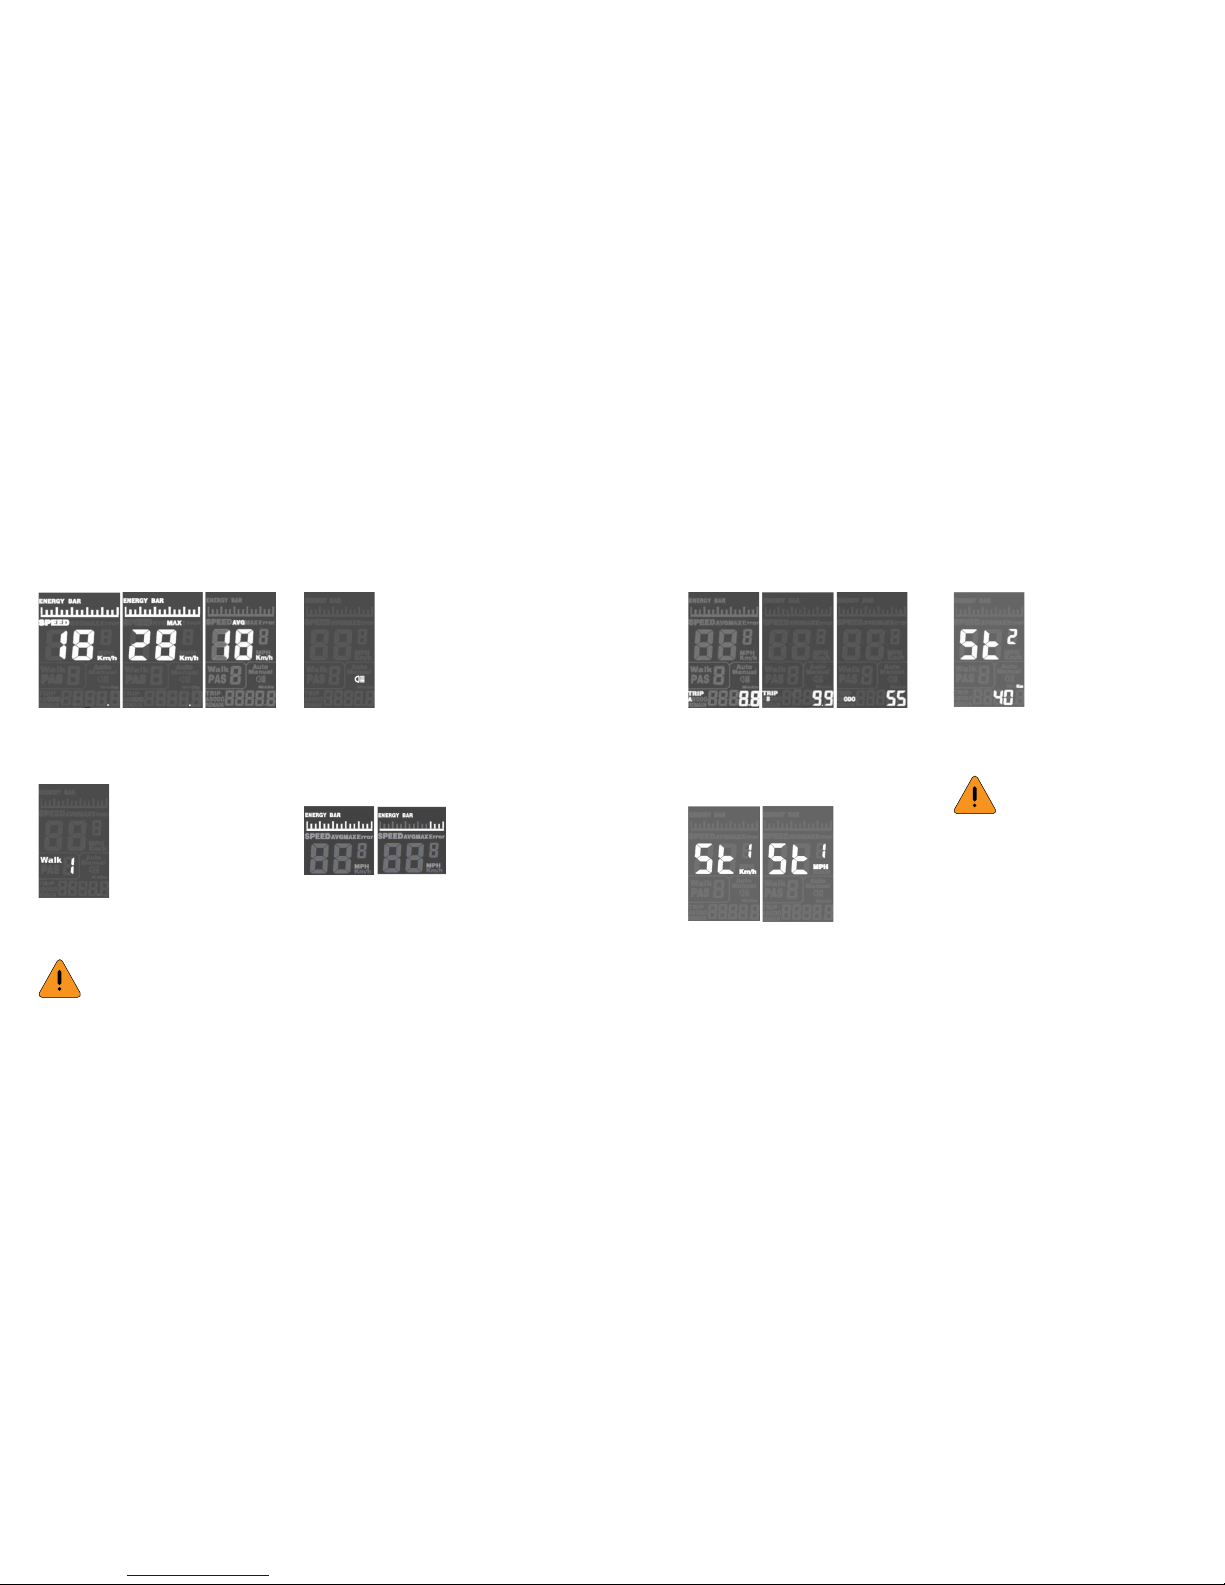
SETTING UP YOUR EBIKE 15BILLY EBIKE USER MANUAL
When powered on, pressing the Mode button will cycle
through the various speed interfaces of real time speed,
average speed and maximum speed.
Pressing the Down button for 3 seconds activates the
“Walk mode”, where the ebike will travel at a constant
speed of 6km/h.
Pressing the Up button for a few seconds illuminates
the display for viewing ease when lighting conditions
are low. Once illuminated, pressing Up again for a few
seconds returns the display to the standard non-illuminated view.
When fully charged, the energy bar across the top right
of the display will show bars spanning the width of the
display.
When the energy bar is at extremely low levels, it will
only show four bars and begin ashing until the motor
and display shut o altogether.
Pressing the Mode button also cycles through the various trip and odometer readings of the display.
Pressing both Up and Down simultaneously enters the
system setup menu.
The rst setup option allows you to switch between imperial (miles) and metric (kilometres) forms of measure-
ment by pressing Up or Down. Conrm your selection
by pressing Mode and return to the setup menu.
t
The next setup menu option allows you to set the maximum speed in terms of kilometres per hour. Use the Up
and Down buttons to customize your maximum speed.
WE SHALL NOT BE HELD RESPONSIBLE FOR INAPPROPRIATE OR ILLEGAL BEHAVIOUR WITH REGARD TO MAXIMUM SPEEDS AS DICTATED BY
YOUR LOCAL BIKE LAWS.
Exit the setup menu by holding the Mode button for at
least 2 seconds.
DO NOT RIDE THE EBIKE WHEN WALK
MODE IS ACTIVATED. IT IS ONLY DESIGNED TO ASSIST PUSHING.
YOU MUST BE AWARE OF YOUR LOCAL EBIKE LAWS AND RIDE WITHIN
THE ALLOWABLE PUBLIC ROAD LEGAL LIMITS UNLESS YOU ARE RIDING
ON PRIVATE OFF ROAD LAND.
Page 17
SAFETY CHECKLIST - BEFORE
YOU RIDE
SAFETY CHECKLIST 16
04
Before you ride it’s important to check whether key
components of your ebike are set up and/or operating
correctly. The following checks will help ensure safe
operation of your ebike and reduce the risk of potential
injury during operation.
1. TIRES - Check tires are inated correctly and look
for signs of excessive wear like loss of tread or cracking that may indicate the need for replacement. Inspect
rims for signs of warping or other damage.
2. BRAKES - Ensure both front and rear brakes are
working correctly by pulling them and initially rocking the ebike back and forth. The amount of ‘braking’
you feel should be strong and your levers should not
be touching the bars as you pull on them. Conversely,
when released, you should not be able to hear or feel
the disc pads rubbing against the brake rotors. Ensure
also that levers are tightly secured to the handlebars
and are lubricated.
3. FOLDING CLAMP - Ensure that the folding hinge
clamp is secured tightly with the locking clasp in place.
BEFORE YOU RIDE
Failure to do so may result in disaster.
4. DISPLAY AND BATTERY - Power on the ebike to
check the battery level and cycle through the menu
to see if anything looks unusual. Notice any warning
codes displayed.
5. STEERING - Check that the forward facing handlebar is coinciding with a forward facing wheel to ensure
everything is as straight as possible and steering is correct. Turn the handlebar from side to side to ensure everything is appropriately tight.
6. BELT - Ensure correct belt tension and look for signs
of unusual wear.
7. CRANKS & PEDALS - Ensure cranks and pedals
are secured. Notice any signs of wear, odd creaks or
sounds when rotated, as well as joint dryness and the
need for lubrication.
8. FRAME - Inspect the frame for signs of damage and/
or cracking.
9. FORKS - Inspect forks to verify smooth operation
and notice any damage, signs of premature wear, or
leaks.
10. MOTOR - Ensure the motor is operating as per
usual and look for signs of wear, hotspots, or unusual
sounds.
11. BATTERY - Inspect battery for signs of damage or
unusual heat or smells that might indicate battery failure.
WHILE IT’S IMPORTANT TO PERFORM
CHECKS BEFORE YOU RIDE, THESE
ACTIONS DO NOT REPLACE THE NEED
FOR FREQUENT AND DETAILED SERVICING FROM EXPERIENCED EBIKE
MECHANICS.
Page 18
STARTING &
OPERATING
PROCEDURES
STARTING & OPERATING 17
05
It’s important to understand the functionality as well as
the limitations of your Billy ebike to ensure you continue to enjoy the riding experience it provides for many
years to come.
1. MAXIMUM RIDER WEIGHT - The maximum rider
weight of your Billy ebike is 300lbs, or 136kgs. Riding
with a weight larger than this may cause the ebike components to fail and may lead to serious injury.
2. SPEED SENSOR - Your Billy ebike’s motor and controller are designed to provide you assistance as you
pedal. Once you begin pedalling, the system senses rotations in the crank, in turn switching on the hub motor
to propel you further. Once you stop pedalling the sys-
tem senses this, and cuts o power to the motor. The
amount of power the motor is ‘told’ to output and the
corresponding top speed is dictated by the PAS level
selected.
3. THROTTLE - Just like a motorcycle’s throttle, the
amount you twist your ebike’s throttle dictates the
amount of ‘power’ sent to your ebike’s hub motor. This
is predetermined by the PAS level selected, but all
things remaining equal, a small twist of only a few degrees of the wrist sends the system the signal that you
only want to propel along slowly, and a full twist - all the
way through until the twist throttle can twist no more tells the system that you want to send as much power
to the motor as possible and that you want to go as fast
as possible NOW.
4. PEDAL ASSIST (PAS) - The level of PAS you set
dictates the amount of power and speed that will be
achieve whether you’re wanting assistance as you pedal, or when you twist the throttle. Your Billy ebike comes
with 5 programmed levels of PAS, with 0 being no assistance and 5 being the most assistance possible.
The levels in between 0 and 5 are incremental levels of
speed and power.
After you have powered on the bike and display, simply
press the Up and Down buttons to aect the level of
PAS.
5. EXTENDING BATTERY LIFE - The following tips can
help extend your range and overall battery life:
+ Where possible, assist the motor by pedalling. Particularly when climbing hills or accelerating from standstill.
+ Avoid excessive overloading of the motor through
constant full throttle use, or large weight load. This will
lead to over heating and potential damage of internal
components.
+ Reduce power output particularly when climbing hills
by dropping the PAS to 1 or 2.
+ Cycle the battery from full to empty where possible.
+ Accelerate slowly by starting in a low PAS and
switching up as you pedal along.
+ Avoid constant stopping and starting, instead try to
maintain a constant pace.
+ Avoid operating your ebike in extreme temperature
environments such as snowy or heatwaves.
UNDERSTANDING THE OPERATING
PROCEDURES OF YOUR EBIKE WILL
HELP MINIMIZE THE POTENTIAL RISK
OF INJURY.
Page 19

STARTING & OPERATING 18BILLY EBIKE USER MANUAL
6. PARKING & STORAGE - The following tips can help
you when parking and storing your Billy ebike:
+ Switch o the bike when pushing it to avoid accidental acceleration from the motor.
+ Use a lock to reduce the chance of theft, and fold
your bike, so that your bike lock can thread through
both wheels and as well as the frame.
+ Remove your battery to aid maneuverability and to
lighten the total weight of the bike. It also prevents anyone from tampering with it while stored.
+ Time spent parked outdoors and exposed to the elements should be followed by time in a dry location to
minimize the risk of corrosion and waterlogging. Much
like a regular bike, use in wet conditions mandates a
more regular maintenance schedule to ensure your bike
does not become corroded and to ensure all systems
are always working safely.
+ Ensure any racks used to secure or transport your
Billy ebike are capable of supporting an ebike of such
weight and size.
7. MAINTAINING YOUR BIKE - The following tips can
help you to maintain your bike:
+ Maintenance schedule: It’s important that you regularly service and maintain your Billy ebike to ensure it runs
in optimal condition and you continue to enjoy riding it
for many years to come. If you don’t have the mechanical expertise and/tools to regularly maintain your Billy
ebike’s brakes, drive system, electrics and suspension,
we advise you to seek the help of a certied bicycle
mechanic.
+ Washing your Billy: It’s important to regularly clean
your Billy ebike to maintain its upkeep and prevent it
from corrosion. Don’t blast it from short distances using
high pressure water, instead use a damp cloth to wipe
o dirt and debris. Once clean, lubricate joints, connections and general metallic surfaces to minimize the
chances of rust and corrosion.
ENKI CYCLES SHALL NOT BE HELD
RESPONSIBLE FOR THE THEFT OR
DAMAGE OF YOUR BIKE.
Page 20
WARRANTY
WARRANTY 19
06
Your Billy ebike has been primarily designed for at,
paved roads. You should therefore never ride on stairs,
jump or perform wheelies or similar activities.
Billy ebikes are not approved for participation in competitions.
Commercial use does not form part of the intended use.
Operation, maintenance and service instructions described in this manual are part of the intended use.
No liability or warranty shall be accepted if the use of
the Billy ebike deviates from this intended use, if safety
instructions are not observed, in the event of overload-
ing, or if faults are not properly rectied. Similarly, no
liability and warranty shall be accepted in the case of
assembly errors, willful intent, accidents, and/or if care
and maintenance specications are not followed. Any
modication of the gear transmission ratios and alter-
ations to the electrical system (tuning) voids all claims
under warranty and guarantees.
Maximum load capacity is 300 lbs (136 kg).
Enki Cycles provides a lifetime warranty for the Billy
ebike frame when used under its intended use conditions.
Enki Cycles provides a 90 day warranty for the failure of
forks, handlebars, head stems, drive system, kickstand,
and electronics, including motor, LCD display, and con-
trollers. These items are not classied as wear and tear
items.
This warranty does not cover any damage or defects resulting from failure to follow instructions in
the owner’s manual, acts of God, accident, misuse,
neglect, abuse, commercial use, alterations, modication, improper assembly, wear and tear, installation of parts or accessories not originally intended
or compatible with the bicycle as sold, operator error, water damage, extreme riding, stunt riding, or
improper follow-up maintenance.
WARRANTY
Wear and tear is not covered under warranty. Examples
of such wear and tear items include:
+ Cables
+ Hand grips
+ Chains
+ Sprockets
+ Tires and tubes
+ Brake pads and rotors
+ Saddle covers
WARRANTY EXCLUSIONS
ANY OR ALL MODIFICATIONS TO
ELECTRONICS VOIDS ALL CLAIMS TO
WARRANTY.
 Loading...