

ENHANCED VISION DaVinci Pro User Manual
User
Manual
1

DaVinci Pro User Manual Outline
Congratulations on your purchase of DaVinci Pro with OCR
(Optical Character Recognition) from Enhanced Vision.
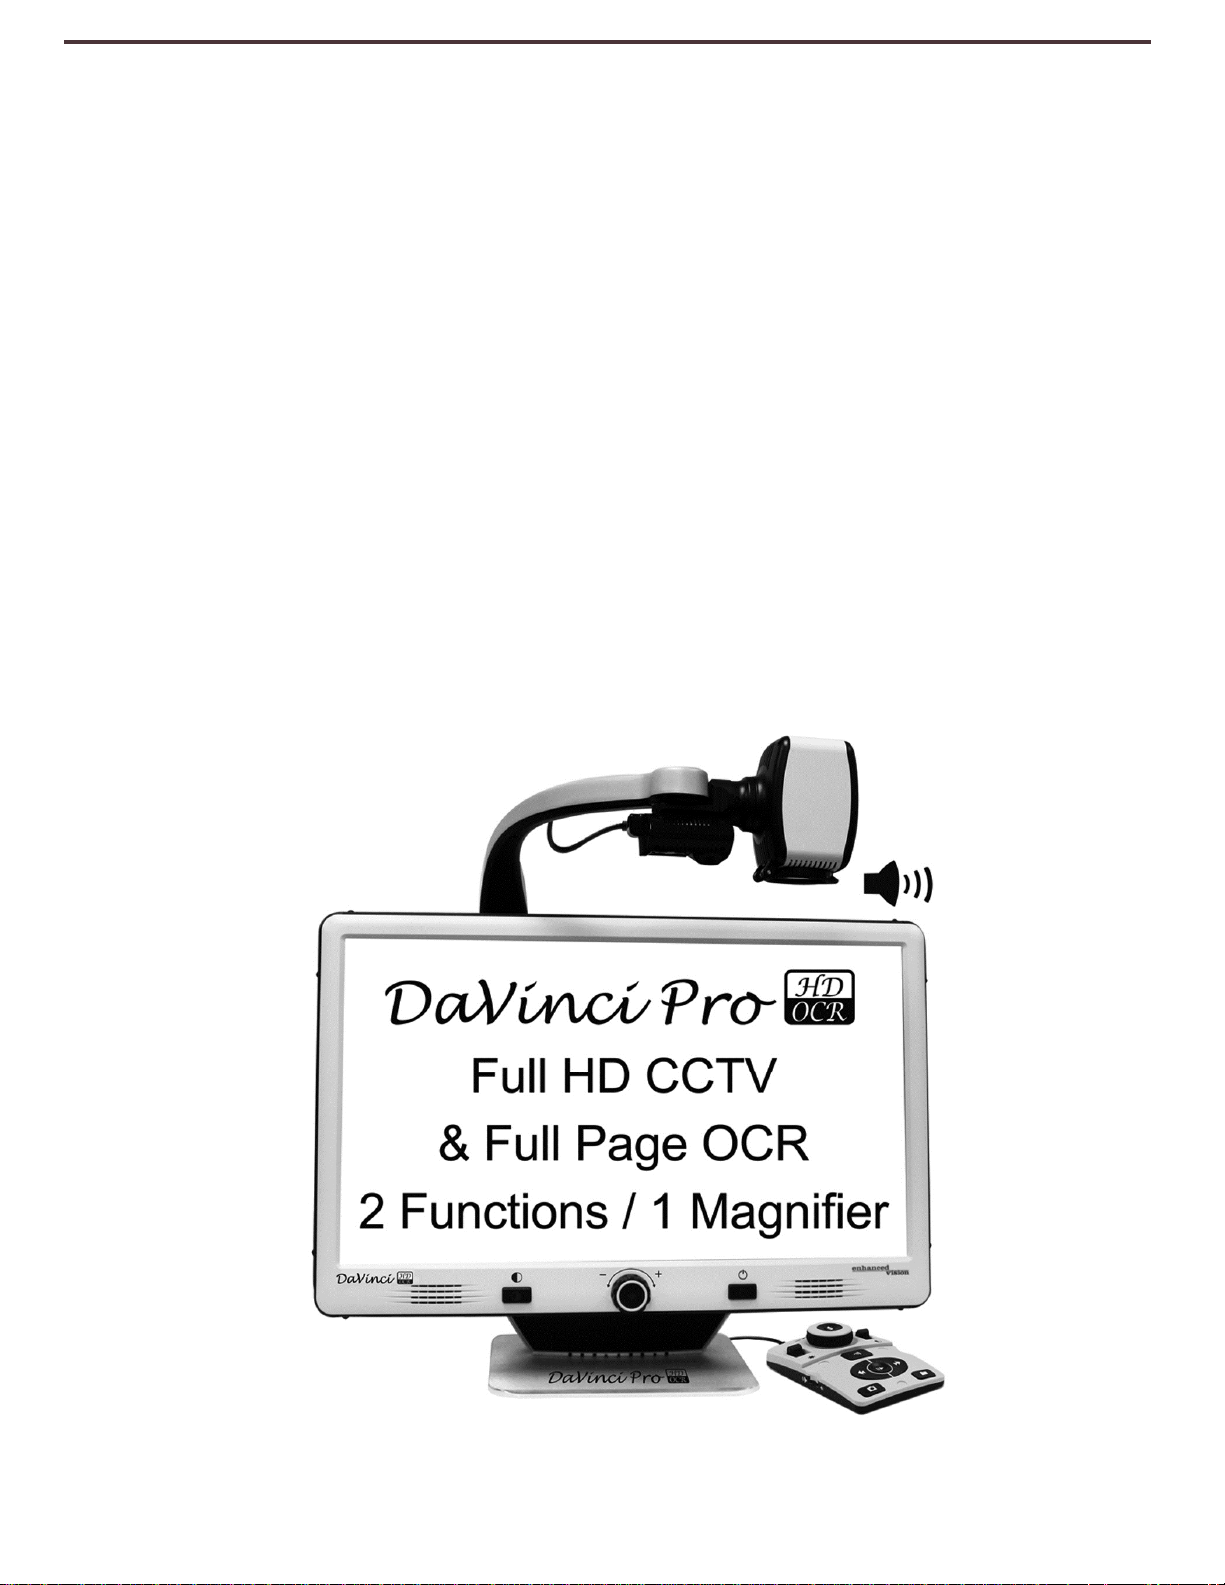
DaVinci Pro is a fully integrated solution, offering the advantages of a CCTV and OCR combined
into one system. DaVinci Pro enables individuals with low vision to retain the joys of reading
by listening along or viewing in color, enhanced high-contrast positive or negative modes.
With easy-to-use buttons and dials, you can enlarge or reduce the text in seconds, change
viewing options for easier visibility and much more.
Prior to using this system, please carefully review and follow the instructions provided within
this booklet. Your DaVinci Pro is ready to use right out of the box. By reviewing all the DaVinci
Pro features and controls before use and following the directions carefully, you’ll be able to
enjoy all the great benefits from your purchase. Enhanced Vision products are designed to give
you the highest quality image, OCR accuracy, convenient easy-to-use features and years of
reliable service. Thank you for choosing the Enhanced Vision DaVinci Pro.
Product enhancements and revisions are an integral part of what we do
here at Enhanced Vision. Please visit -
http://www.enhancedvision.com/low-vision-product-line.html
and select your Enhanced Vision Product. You will find the most
up-to-date version of the User Manual at the bottom of the page
2

FCC COMPLIANCE NOTICE
This device complies with Part 15 of the FCC Rules. Operation is subject to the following two
conditions: (1) This device may not cause harmful interference, and (2) this device must accept
any interference received, including interference that may cause undesired operation. This
equipment has been tested and found to comply with the limits for a Class B digital device,
pursuant to Part 15 of the FCC Rules. These limits are designed to provide reasonable
protection against harmful interference in a residential installation. This equipment generates,
uses, and can radiate radio frequency energy and, if not installed and used in accordance with
the instructions, may cause harmful interference to radio communications. However, there is
no guarantee that interference will not occur in a particular installation. If this equipment does
cause harmful interference to radio or television reception, which can be determined by
turning the equipment off and on, you are encouraged to try to correct the interference by one
or more of the following measures:
– Reorient or relocate the receiving antenna.
– Increase the separation between the equipment and receiver.
– Connect the equipment into an outlet on a circuit different from that to which the receiver is
connected.
– Consult the dealer or an experienced radio/TV technician for help.
Unauthorized changes or modification to this system can void your authority to operate this
equipment.
If your Low Vision device has an option to connect to a TV, it must be used with shielded
interface cables in order to meet FCC emissions limits for Class B digital devices. It is your
responsibility to use the shielded interface cables supplied with the equipment.
3

TABLE OF CONTENTS
Safety and Care . . . . . . . . . . . . . . . . . . . . . . . . . . . . . . . . . . . . . . . . . . . . . . . . . . . . . . . . . . . . . 5-7
DaVinci Pro and Accessories . . . . . . . . . . . . . . . . . . . . . . . . . . . . . . . . . . . . . . . . . . . . . . . . . . . 8-9
Setting up DaVinci Pro . . . . . . . . . . . . . . . . . . . . . . . . . . . . . . . . . . . . . . . . . . . . . . . . . . . . . . 10-15
DaVinci Modes Overview . . . . . . . . . . . . . . . . . . . . . . . . . . . . . . . . . . . . . . . . . . . . . . . . . . . . . . 16
Using DaVinci Pro in CCTV Mode. . . . . . . . . . . . . . . . . . . . . . . . . . . . . . . . . . . . . . . . . . . . . . 17-26
DaVinci Pro Console Configuration . . . . . . . . . . . . . . . . . . . . . . . . . . . . . . . . . . . . . . . . . . . . 27-32
Using DaVinci Pro OCR/Text to Speech . . . . . . . . . . . . . . . . . . . . . . . . . . . . . . . . . . . . . . . . 33-35
DaVinci Pro System Menu Overview. . . . . . . . . . . . . . . . . . . . . . . . . . . . . . . . . . . . . . . . . . . . . . 36
User Settings Menu. . . . . . . . . . . . . . . . . . . . . . . . . . . . . . . . . . . . . . . . . . . . . . . . . . . . . . . . . 38-41
Product Settings Menu . . . . . . . . . . . . . . . . . . . . . . . . . . . . . . . . . . . . . . . . . . . . . . . . . . . . . 42-43
Factory Settings . . . . . . . . . . . . . . . . . . . . . . . . . . . . . . . . . . . . . . . . . . . . . . . . . . . . . . . . . . . . . . 44
Library Menu. . . . . . . . . . . . . . . . . . . . . . . . . . . . . . . . . . . . . . . . . . . . . . . . . . . . . . . . . . . . . . 45-48
Saving and Downloading. . . . . . . . . . . . . . . . . . . . . . . . . . . . . . . . . . . . . . . . . . . . . . . . . . . . . . . 49
Deleting Images . . . . . . . . . . . . . . . . . . . . . . . . . . . . . . . . . . . . . . . . . . . . . . . . . . . . . . . . . . . . . . 50
Help Menu . . . . . . . . . . . . . . . . . . . . . . . . . . . . . . . . . . . . . . . . . . . . . . . . . . . . . . . . . . . . . . . . . . 51
Power States. . . . . . . . . . . . . . . . . . . . . . . . . . . . . . . . . . . . . . . . . . . . . . . . . . . . . . . . . . . . . . . . . 52
Tips and Tricks . . . . . . . . . . . . . . . . . . . . . . . . . . . . . . . . . . . . . . . . . . . . . . . . . . . . . . . . . . . . . . . 53
Troubleshooting, Specifications & Warranty information . . . . . . . . . . . . . . . . . . . . . . . . . . 54-56
Other Products from Enhanced Vision . . . . . . . . . . . . . . . . . . . . . . . . . . . . . . . . . . . . . . . . . 57-59
4

SAFETY AND CARE
To ensure your safety and obtain the most benefit from DaVinci Pro, please review these safety
precautions carefully.
DaVinci Pro is designed to enlarge and enhance text and read print aloud in order to improve
the quality of life for people who are visually impaired. The extent to which this product can
improve the ability to see images depends on a person’s individual condition and level of visual
impairment.
DaVinci Pro is not designed to restore vision, correct eye conditions or halt degenerative vision
loss. An eye care professional can determine the usefulness and suitability of DaVinci Pro for a
patient’s individual condition.
Precautions for Use
• Follow all warnings, cautions, and instructions marked on the product.
• Use DaVinci Pro on a stable, level surface such as a solid desk or table, according to its
intended design specifications.
• Avoid placing DaVinci Pro on an unstable table, cart or stand. It may fall causing serious
damage to the unit or bodily injury.
• Use DaVinci Pro indoors only – it should NOT be exposed to extreme or rapid changes in
temperature or humidity. Do not place DaVinci Pro near a radiator, heater or areas exposed to
long hours of direct sunlight. These conditions may cause damage to the unit’s electronics or
optics.
• At least once per week, clean DaVinci Pro with a soft dry cloth or an electrostatic dusting
cloth. DO NOT use liquid cleaners on its plastic surfaces. No additional methods of sterilization
or cleaning are recommended or required.
• Do not use DaVinci Pro near flammable materials or liquids.
5

Additional Electrical Safety Precautions
• The power supply cord is a disconnect device for electrical equipment. The socket-outlet
should be installed near the equipment and be easily accessible.
• This product is equipped with a 3-wire grounding type plug as a safety feature. This plug has
a third (grounding) pin and can only be plugged into a grounding-type power outlet. If
necessary, contact an electrician to replace your power outlet with a grounding-type power
outlet.
• Do not use DaVinci Pro in, near or around water. DaVinci Pro is not designed to offer
protection against contact with liquids of any kind.
• Use only the power supply provided with your DaVinci Pro. Using unauthorized power
supplies may cause serious damage to DaVinci Pro’s electronic components.
• Using any other power supply than the one provided by Enhanced Vision for DaVinci Pro will
void the warranty.
• Always place the power cord away from traffic areas to avoid damage of power supply.
• Prevent the risk of electrical shock by NOT attempting to disassemble the unit. Please refer
all service to an authorized repair facility.
• Please ensure that you make connections that match those shown in Figure 2 on page 10.
Additional Mechanical Safety Precautions
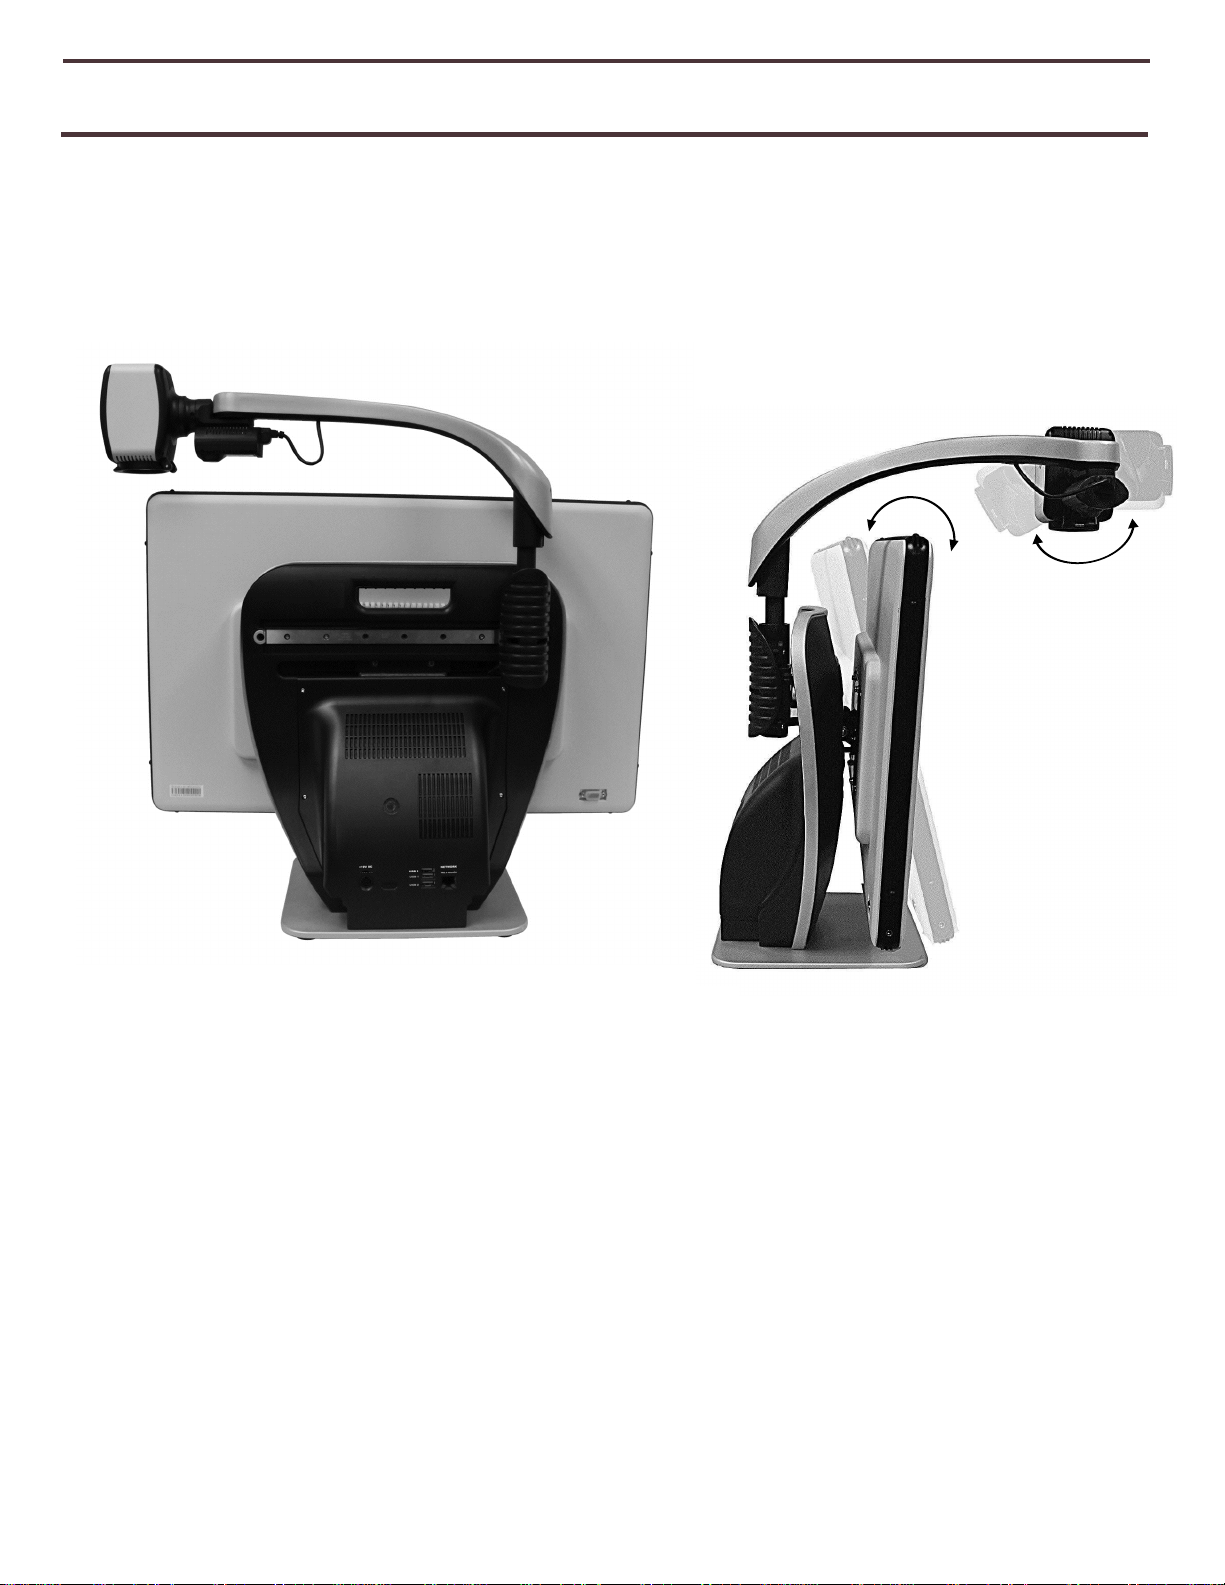
Your DaVinci Pro features an adjustable Camera Arm. It has a variety of usable orientations.
Please do not attempt to forcibly reposition or adjust the camera arm outside of the ranges
demonstrated on Page 17. It may cause damage to the device.
Transporting DaVinci Pro
• Use caution if you are repositioning DaVinci Pro a short distance across a desk or table. Make
sure you do not pull on any power cords or connector cables.
• Disconnect and secure all power and video cables before moving the unit.
• Carry the unit only by the recessed handle located on the back. Do not carry DaVinci Pro by
the Camera Arm. (See Figure 1 Safe Transport Page 10)
6
Caring for DaVinci Pro
• Always turn the power OFF by pressing the power button on the front of the device for five
seconds when DaVinci Pro is not in use. (Please avoid trying to Shut Down the device by
spontaneously removing from power)
• Optionally you may also place the device into “Standby” state which is a power saving
mode by pressing the power button for less than 5 seconds.
• Ensure that your DaVinci Pro is completely OFF before cleaning.
• Clean DaVinci Pro with a soft dry cloth or an electrostatic dusting cloth. DO NOT use liquid
cleaners on its plastic surfaces.
• The protective glass covering the camera can be cleaned as needed with the lens cloth
provided within the packaging of DaVinci Pro.
Susceptibility to Interference:
There may be temporary degradation of the image when DaVinci Pro is subjected to a
strong radio frequency field, electro-static discharge or transient electrical noise. An
electro-static discharge (caused by static electricity) may cause the screen to go blank. If
this happens, disconnect the AC power from the electrical outlet, wait 30 seconds, and
connect the AC power again.
7
8

DaVinci Pro Packaging & Accessories
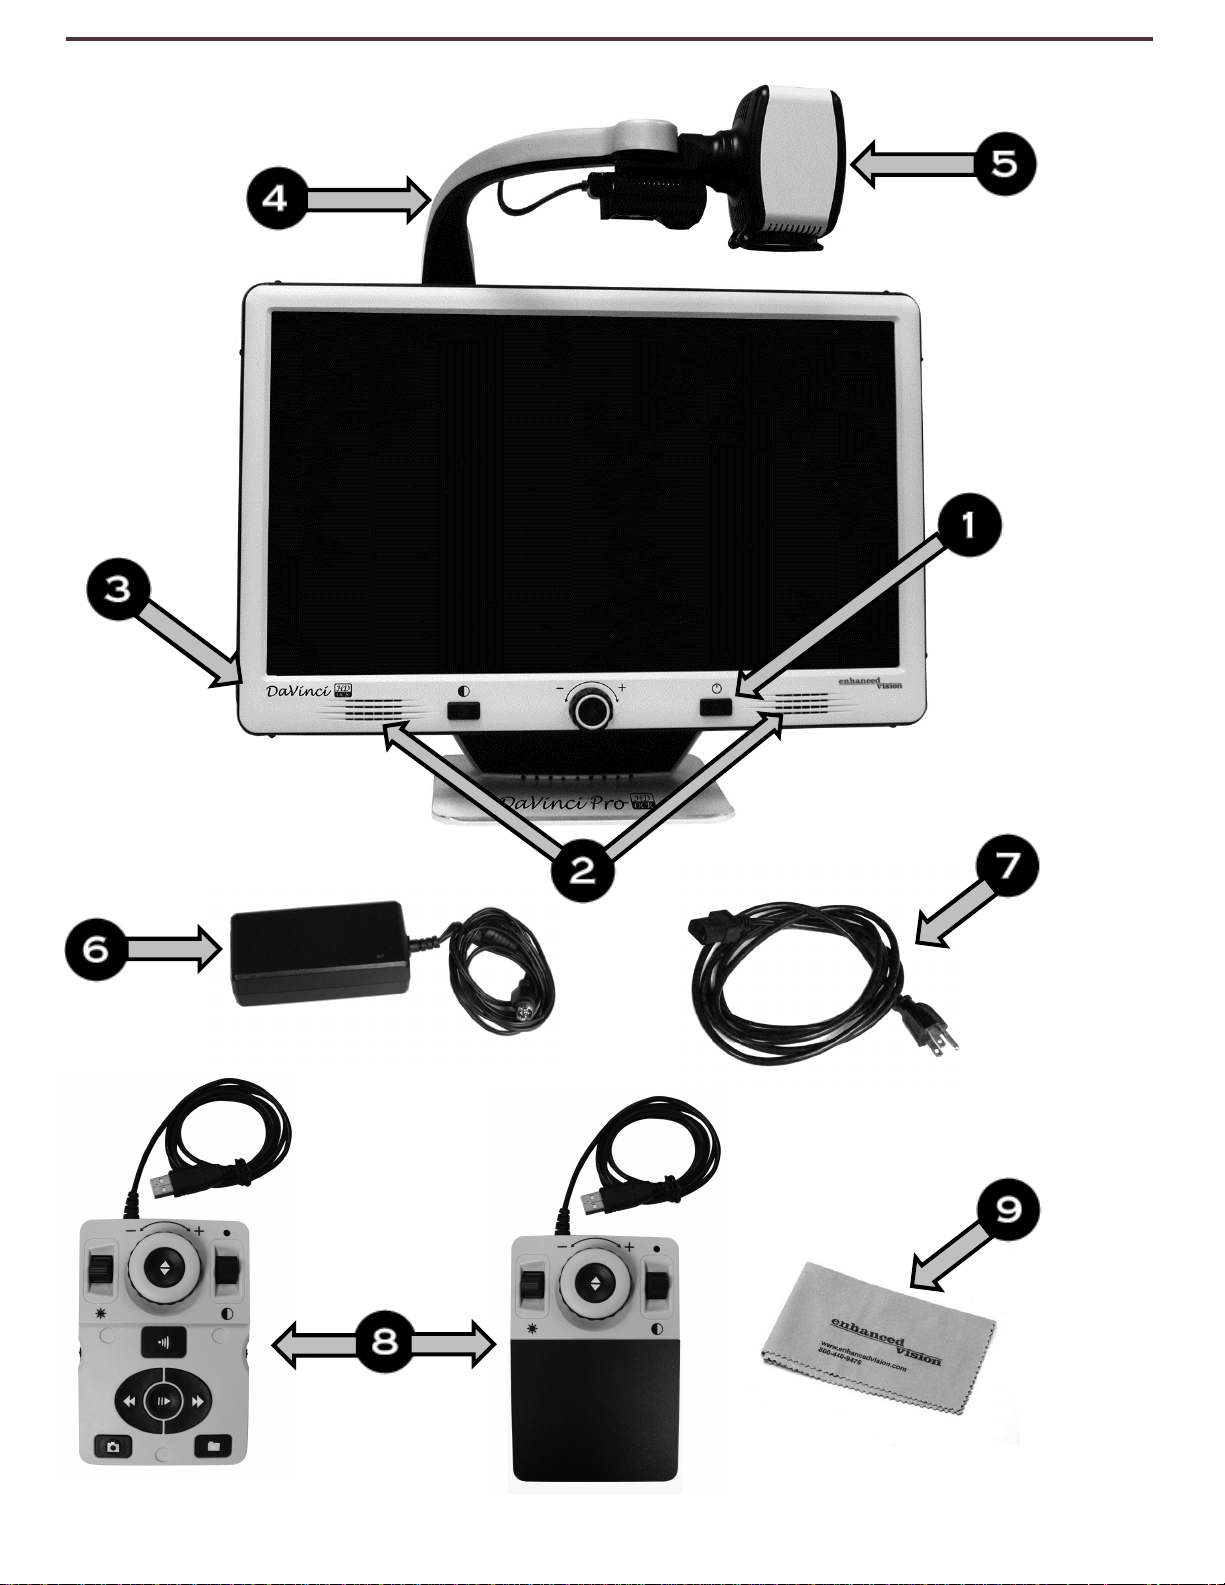
Take a few moments to familiarize yourself with the items included with your DaVinci Pro:
1. Power button
2. Speaker (x2)
3. 3.5mm jack for Headphones
4. Camera Arm
5. Camera Arm LED Button
6. DaVinci Pro 19V power supply
7. DaVinci Pro Power Cord (power cord style may vary based upon country)
Accessories included:
8. Control Console & Console Cover: This allows you to control DaVinci Pro functions. Can be
used in cover on or cover off configuration.
*Must be plugged in to use DaVinci Pro and have access to the menu items for OCR/Text-ToSpeech
9. Lens Cloth: permits cleaning of the LCD display or lenses
Optional Accessories:
Headphones: On the left-hand side of DaVinci Pro, there is an available 3.5mm input jack for
use of standard headphones.
Microphone (Not Pictured): Use this to Record a Custom Voice Tag while saving files
Note: Sound from DaVinci Pro speakers will not be available while the headphone jack is in
use.
9
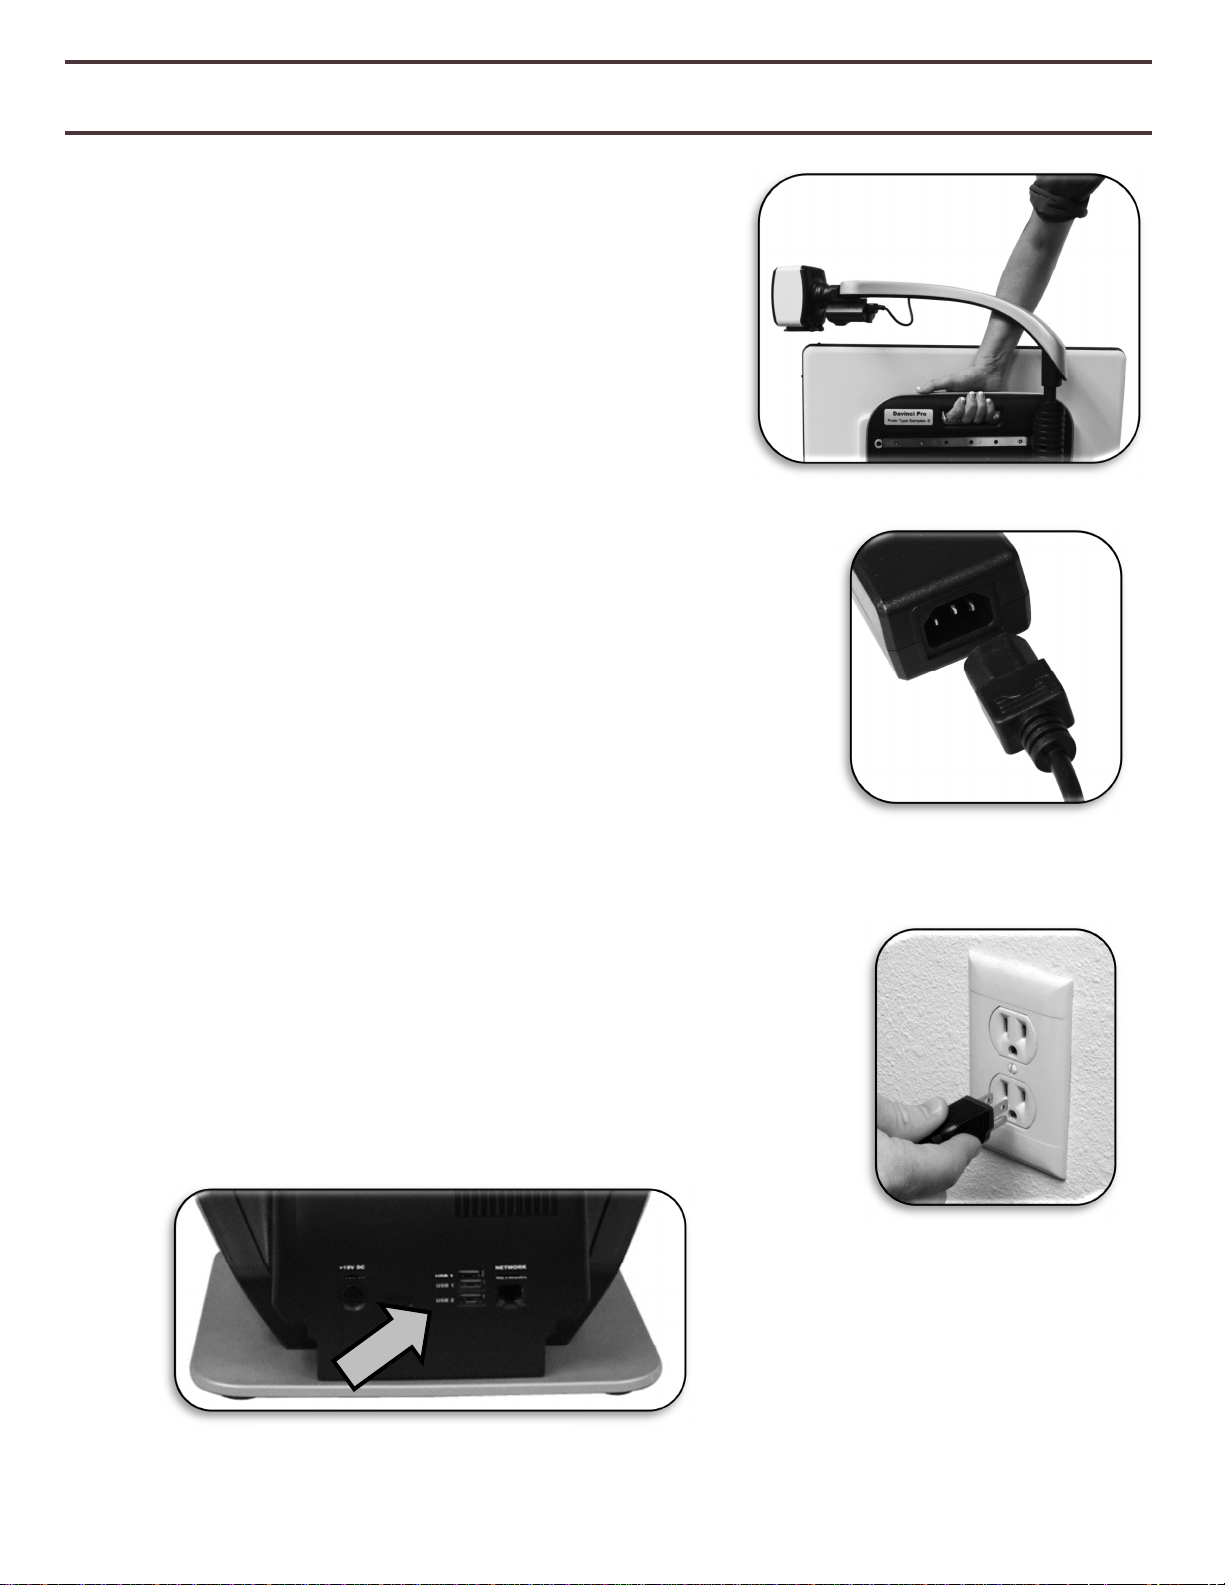
Setting Up DaVinci Pro
Figure
4 Rear Panel Connections
1. Find a steady and level location, such as a table or
desk, where you will be comfortable using DaVinci Pro.
Carry DaVinci Pro only by the recessed handle on the
backside of the unit for a secure grip. DO NOT lift
DaVinci Pro unit by the camera arm. Gently place it on
the table or desk (see Figure 1 Safe Transport).
2. Connect the Control Console cord to either of the two
USB ports on the back of your DaVinci Pro, (See Figure 4
Rear Panel Connections).
3. Connect the power cord to the power supply (See Figure 2
Power Supply). Connect the power cord to an available electrical
outlet (See Figure 3 Connecting to an Outlet). Connect the other
end of the power supply to DaVinci Pro where it is labeled
“19VDC” (Also Shown Figure 4 Rear Panel Connections). To offer
Figure 1 Safe Transport
additional protection during an electrical storm, a surge
protector may also be used and is recommended.
4. To turn DaVinci Pro on, Power Button once. A DaVinci Pro
Logo should appear followed by a message indicating that the device
is initializing with a startup chime. Afterwards An image should
appear on your Display and enter into “Live CCTV View”.
5. IMPORTANT: To maximize the life of your DaVinci Pro always
allow DaVinci Pro to do a complete Shutdown before removing
from wall power. Press the power button and hold it for 5
seconds to initiate the shutdown sequence. This process takes an
additional 10 seconds when the Status LED Indicators also turn
off.
Figure 2 Power Supply
Figure 3 Connecting
to an Outlet
10
Using DaVinci Pro for the First Time
DaVinci Pro is a CCTV & OCR product that can function in a variety of modes. The unit consists
of the Built in Monitor, Cameras and Mechanical assembly. The OCR & CCTV camera structure
can be moved or tilted depending on your target. Whichever mode you choose for your
DaVinci Pro you will have several options in how you customize it to fit your unique needs and
preferences. Please familiarize yourself with these options to discover which settings are right
for you. Once the device is connected press the Power button shown as Item 1 on DaVinci Pro
and Accessories on page 8. This will turn on your DaVinci Pro. Figure 4 Rear Panel
Connections on page 10 shows where to connect your Control Console to the USB Ports. After
your Device is on and connected it will be ready to use.
Button Combinations
Some Features on DaVinci Pro are accessed through a combination of buttons on your control
console. Throughout the User Manual there will be references to these ‘button combinations’
(e.g. Press “[Mode Up] and [Find/Enter]”). This indicates that the buttons should be pressed
together. Control buttons, levers, etc. are enclosed in [ ].
11
Figure 5 Combination Keys
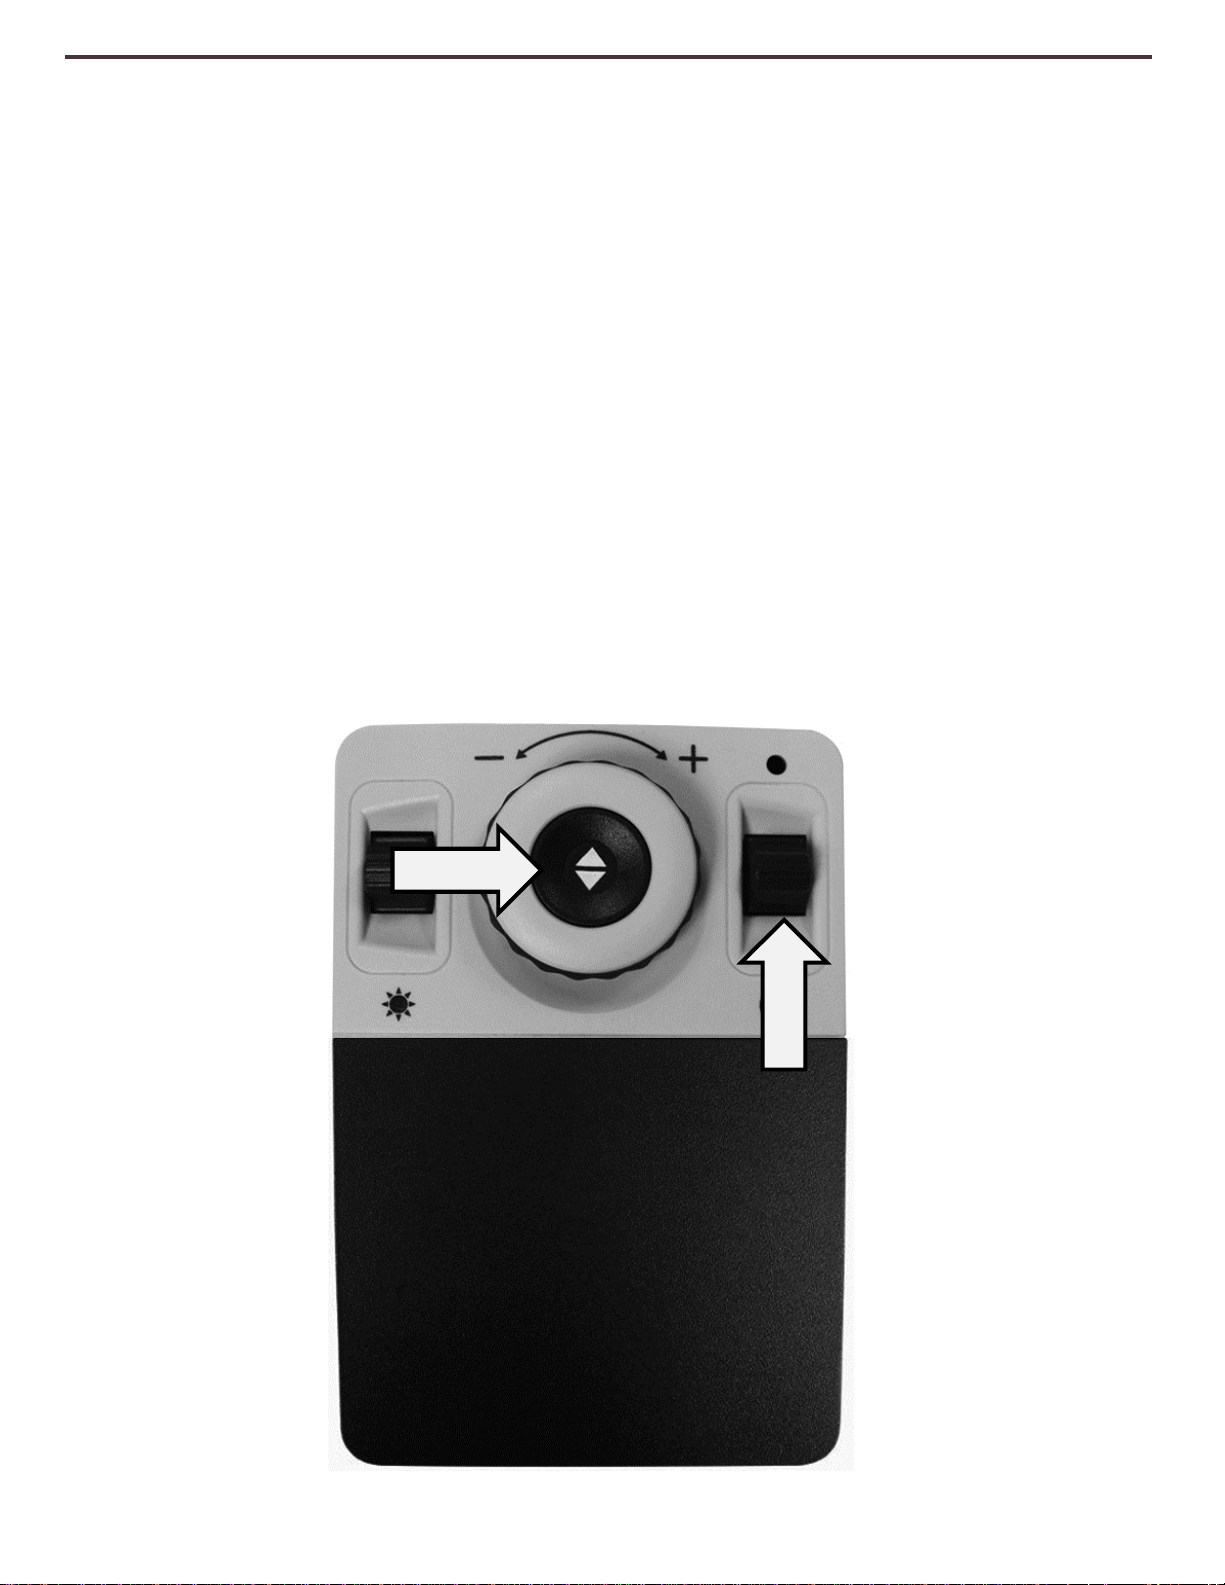
DaVinci Pro Basic CCTV Control Console
Brightness
Zoom
Wheel
Color
Mode
Find
Markers
Volume
2
6
3
4
1
5
See the following Page for Basic Console Controls in Detail
12

BASIC CCTV
CONTROL CONSOLE BUT
T
ONS DEFINED
1. Find – Press and Hold to activate the “Find” feature
which will minimize your magnification level.
When you release the button it will return to your
previous magnification level.
You use this feature to “Find” your target easily which
can sometimes be challenging at higher magnification
levels.
2. Zoom Wheel – Turn clockwise/counter-clockwise to
increase/decrease the zoom level.
3. Brightness – Press Up/Down to increase/decrease the
screen brightness.
4. Color Mode – Press Mode Up/Down to toggle through
different color viewing modes.
5. Markers – When in Live CCTV Mode scroll wheel up or
down to enable Line and Window Markers (If enabled
in the menus)
6. Volume – Rotate to increase/decrease system volume.
13
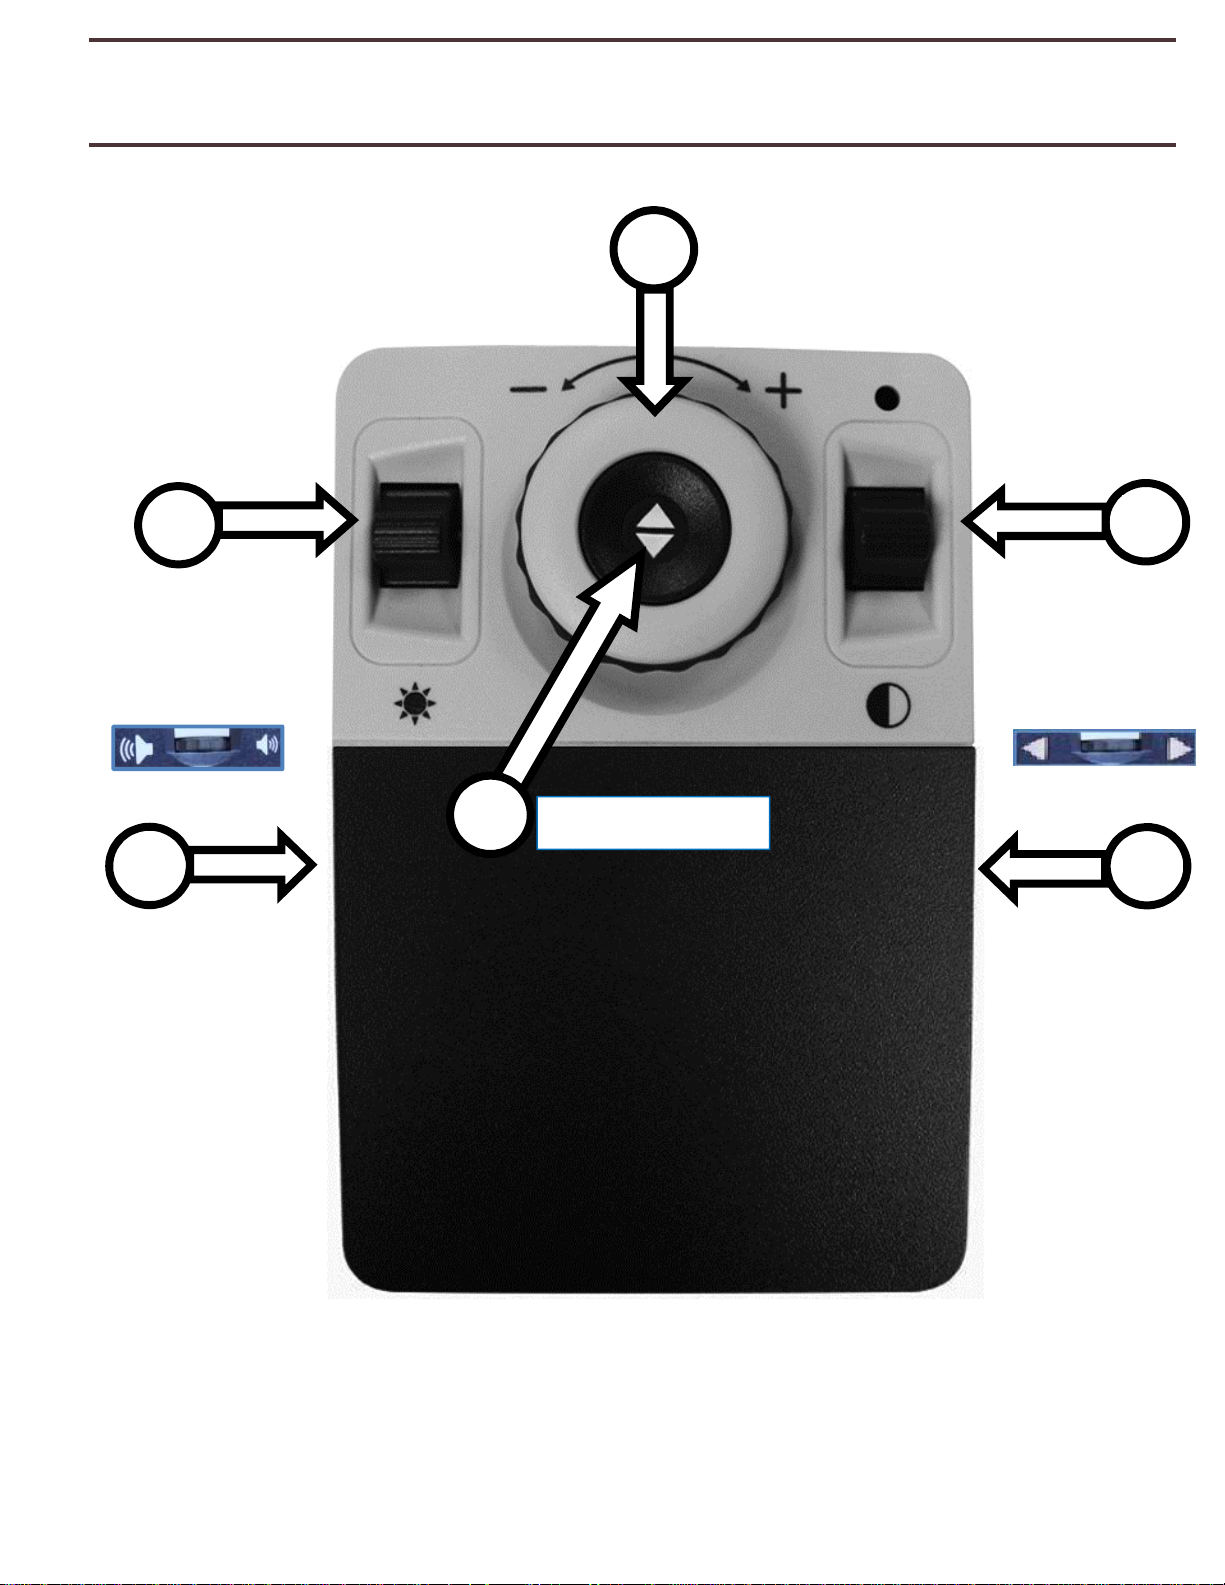
DaVinci Pro Advanced CCTV Control Console
Markers
Library
Brightness
Zoom
Wheel
Color
Mode
Find
Volume
2
3
4
1
7
5
See the following Page for Advanced Console Controls in Detail
6
14

ADVANCED CCTV
CONTROL CONSOLE BUT
T
ONS DEFINED
1. Find – Press and Hold to activate the “Find” feature
which will minimize your magnification level.
When you release the button it will return to your
previous magnification level.
You use this feature to “Find” your target easily which
2. Zoom Wheel – Turn clockwise/counter-clockwise to
3. Brightness – Press Up/Down to increase/decrease the
can sometimes be challenging at higher
magnification levels.
increase/decrease the zoom level.
screen brightness.
4. Color Mode – Press Mode Up/Down to toggle through
different color viewing modes.
5. Markers – When in Live CCTV Mode scroll wheel up or
down to enable Line and Window Markers (If enabled
in the menus)
6. Library – Press and Hold Library for 2 seconds enters
the Library. Rotate Zoom Wheel to Navigate. Select
Exit & Press find to go back to live mode.
7. Volume – Rotate to increase/decrease system volume.
15
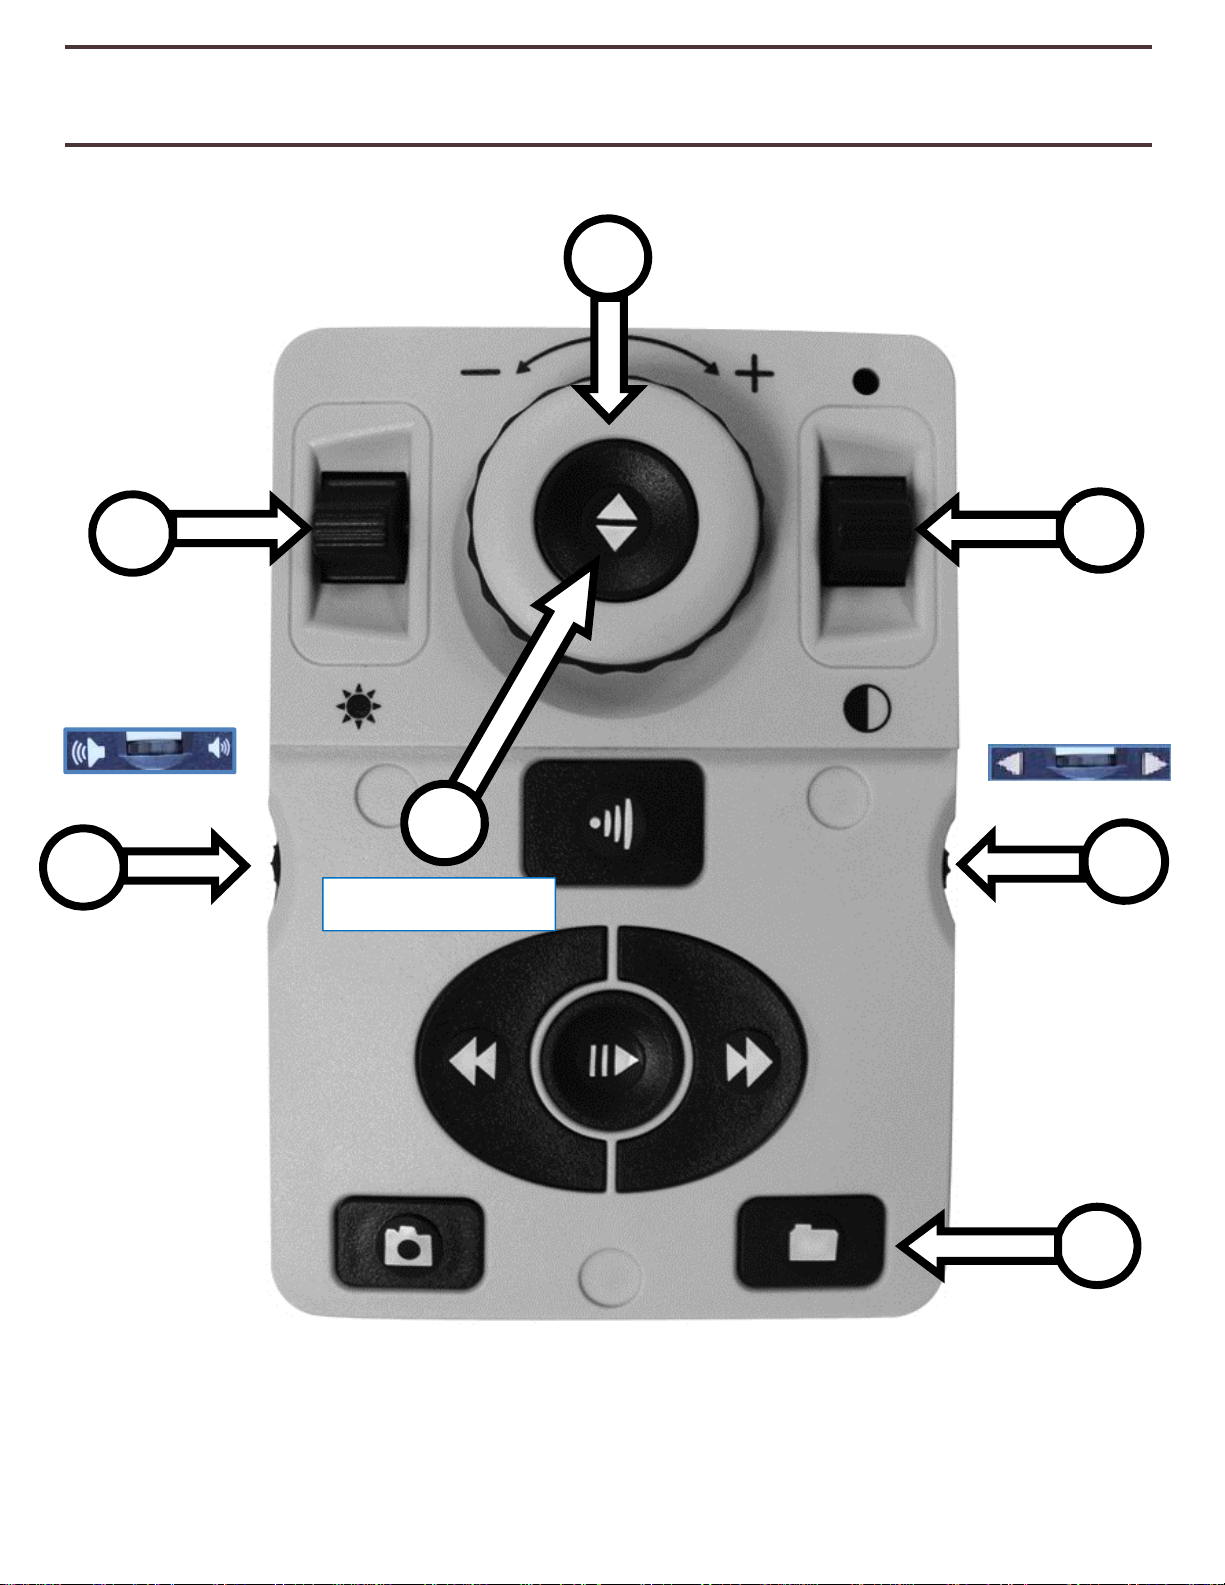
DaVinci Modes Overview
DaVinci Modes
Davinci Pro has two main “Modes” of operation that can be switched/toggled by pressing the
CCTV/OCR Front Panel Center Button which is shown below.
Figure 6 CCTV/OCR Toggle
CCTV Mode
The CCTV Mode is the default mode that will display
immediately after you power the device on. This is a
high quality live image that is designed for Real-Time
1080p High Definition viewing.
OCR Mode
The OCR Mode is designed to assist you in reading
documents automatically by scanning documents for
OCR (Optical Character Recognition) and then reading
these documents back with our Premium TTS Engine
(Text to Speech).
16
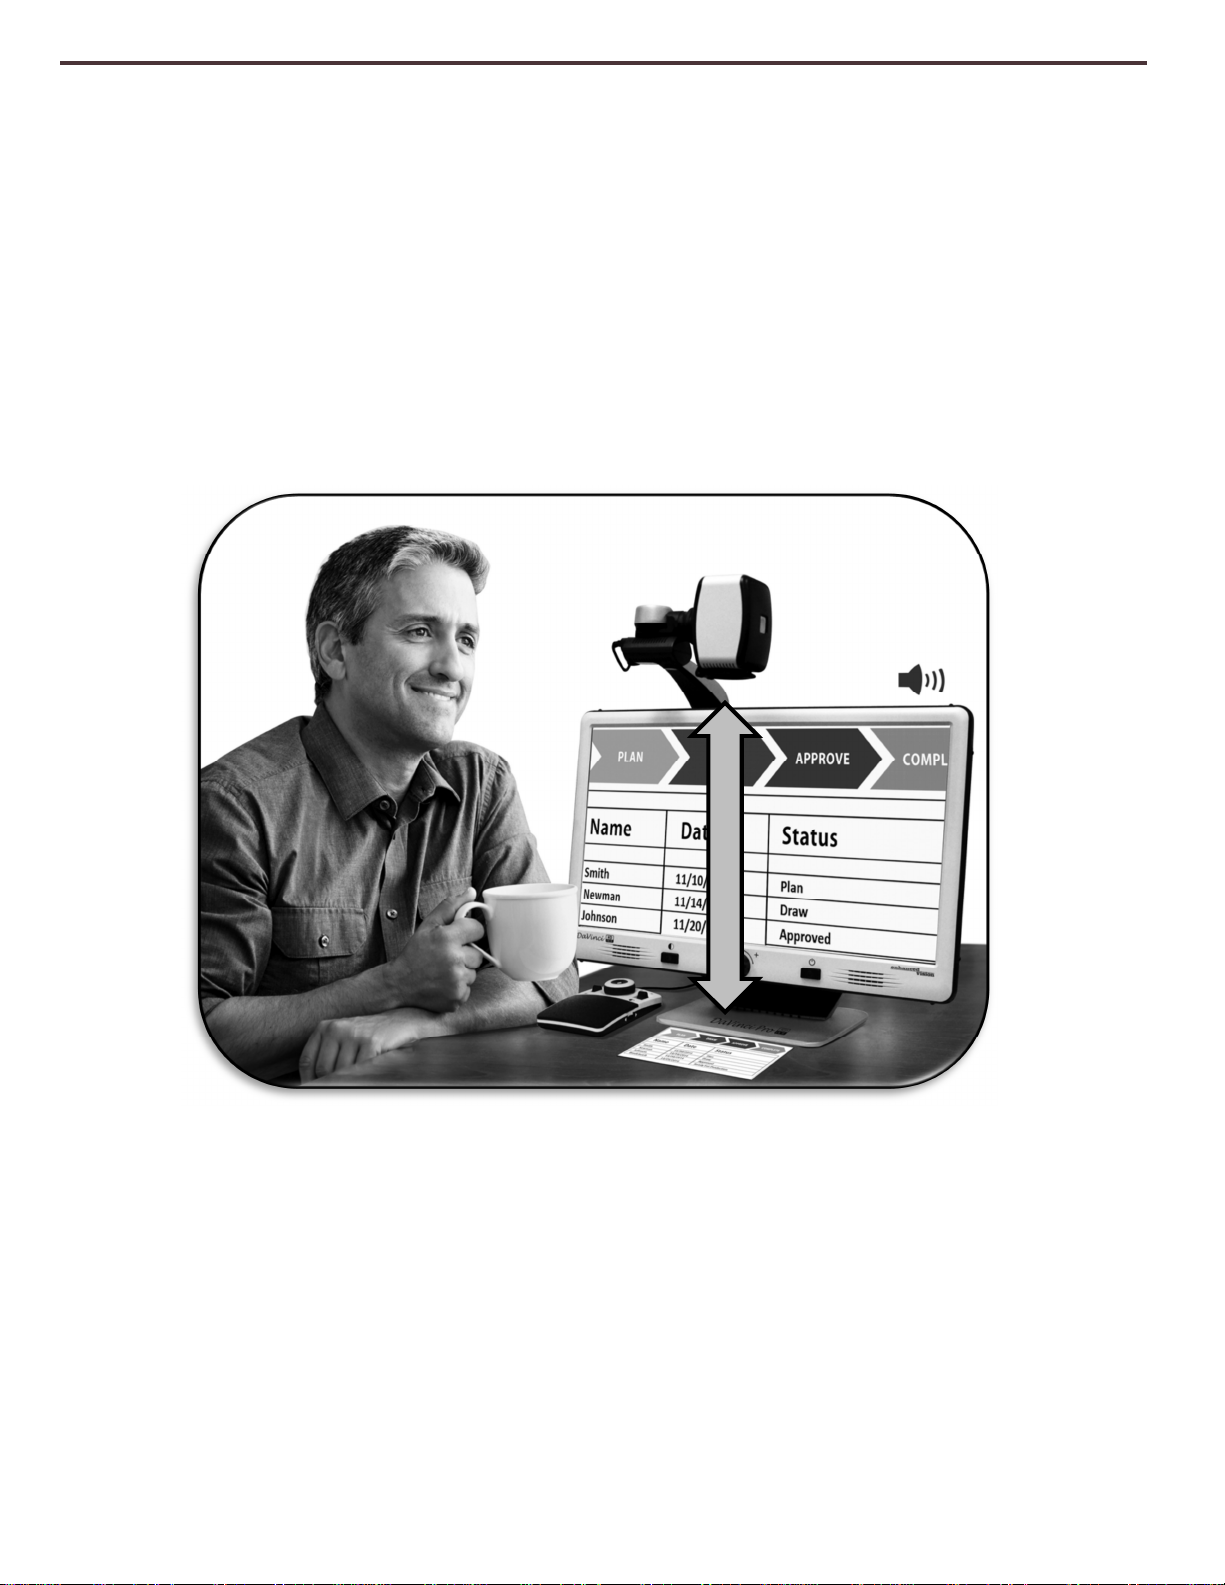
Using DaVinci Pro in CCTV Mode
DaVinci Pro camera is attached to a specifically designed arm that allows the camera to
slide left to right or to pivot in multiple directions. When the Device is in CCTV mode it
is operated by simply moving this arm or camera assembly and pointing it at your target.
The image will then be viewable on the LCD Monitor.
DaVinci Pro LCD is mounted on to a bracket that allows the user to tilt the screen to
adjust for the best viewing position. Choose an angle or position that is most
comfortable for viewing.
Figure 7 Range of Motion
17
Desktop Mode
The Camera can be adjusted downward for reading, writing and enjoying crafts or other
hobbies. This makes it ideal for classroom use. When the camera is rotated downward,
“Desktop” is announced. DaVinci Pro can slide freely, left or right, along the specially
designed bracket mechanism. It is best to close the Close-up Lens when objects are
placed 12”-19” away from the Camera for optimal viewing clarity.
12” - 19” (Recommended)
18
 Loading...