

ENHANCED VISION DaVinci, DaVinci HD OCR User Manual
User Manual

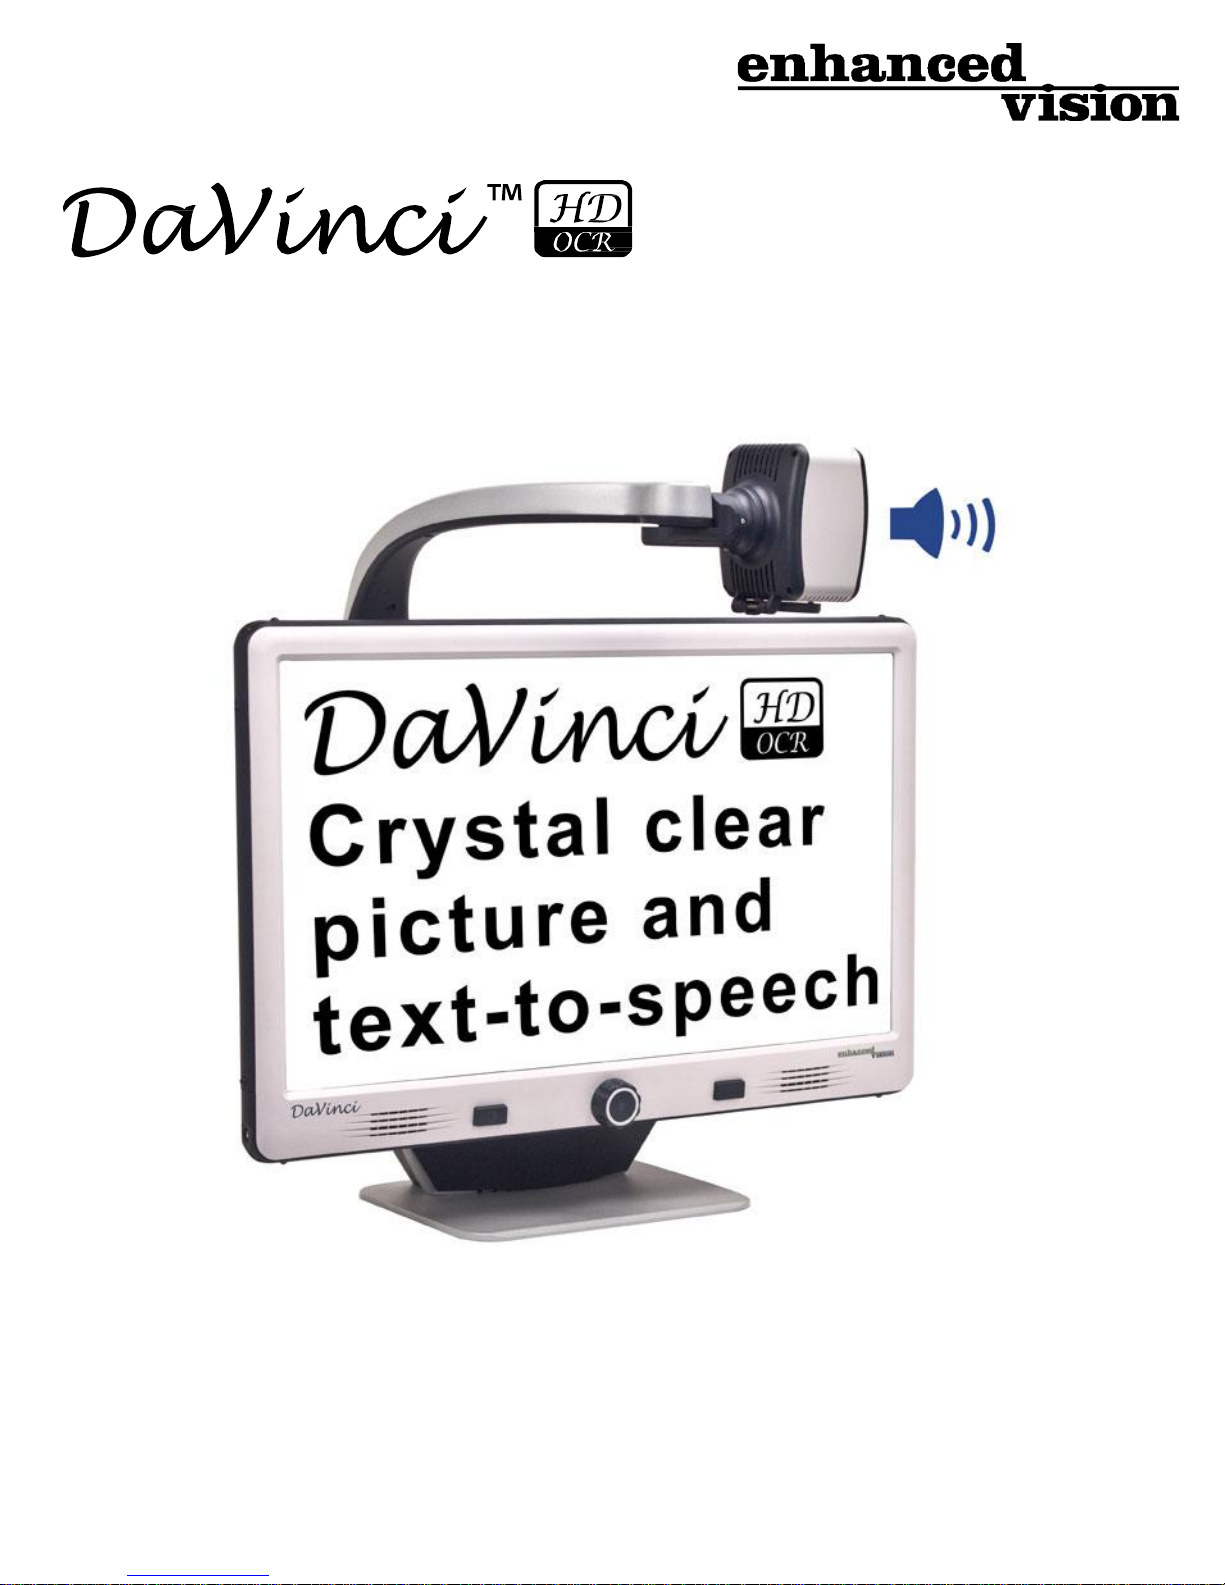
Congratulations on your purchase of the DaVinci HD Magnifier with
OCR. Enhanced Vision products are designed to give you the
highest quality and convenience available. The DaVinci product can
enable people with low vision to read, write, see objects at any
distance and have text read to them.
The unique design of this product provides the ultimate in flexibility
and offers a large range of magnification with multiple viewing options
that make reading easier than ever. The DaVinci is a fully integrated
solution, offering the advantage of a built-in HD LCD screen and
OCR. Prior to using this system, please carefully read and follow the
instructions provided within this booklet. A thorough understanding of
the functionality will allow you to fully benefit from the flexibility and
great features of this device.
If you have any questions, please contact the eye care professional
or the supplier from whom you have acquired the unit.
Product enhancements and revisions are an integral part of what
we do here at Enhanced Vision. Please visit -
http://www.enhancedvision.com/low-vision-product-line.html
and select your Enhanced Vision Product. You will find the most
up-to-date version of the User Manual at the bottom of the page.

FCC COMPLIANCE NOTICE
This device complie s with Part 15 of the FCC Rules. Operation is
subject to the following two conditions: (1) This device may not cause
harmful interference, and (2) this device must accept any interference
received, including interference that may cause undesired operation.
This equipment has been tested and found to comply with the limits for
a Class B digital device, pursuant to Part 15 of the FCC Rules. These
limits are designed to provide reasonable protection against harmful
interference in a residential installation. This equipment generates, uses,
and can radiate radio frequency energy and, if not installed and used
in accordance with the instructions, may cause harmful interference to
radio communications.
However, there is no guarantee that int erference will not occur in a
particular installation. If this equipment does cause harmful interference
to radio or television reception, which can be determined by turning
the equipment off and on, the user is encouraged to try to correct the
interference by one or more of the following measures:
– Reorient or relocate the receiving antenna.
– Increase the separation betwee n the equipment and receiver.
– Connect the equipment into an outlet on a circuit different from that to
which the receiver is connected.
– Consult the dealer or an experienced radio/TV technician for help.
Unauthorized changes or mod
ifi
cation to this system can void the user’s
authority to operate this equipment.
If your Low Vision device has an option to connect to a TV, it must be
used with shielded interface cables in order to meet FCC emissions
limits for Class B digital devices. It is the responsibility of the use r to use
the shielded interface cables supplied with the equipment.
FCC Compliance Notice

TABLE OF CONTENTS
I
mportant Safety Precautions ................................................................ 5 - 8
DaVinci Setup ..........................................................................
................. 9
DaVinci Package Contents ......................................................................... 10 - 11
Using DaVinci .................................................................................................. 12 - 33
Button Definitions, Button Combinations and Camera .......... 13 - 14
Distance, Self, & Desktop Modes .............................................. 15 - 17
Adjusting Magnification ….................................................................. 18
Changing the Viewing Mode / Color Modes ................................ 19 - 21
Using & Adjusting Markers / Brightness ...…................................ 22 - 23
Volume Adjustment /VGA Toggle / Camera LED On/Off …........ 24
OCR/ Text-To-Speech Mode ..................................................... 25 - 28
Saving, Recalling, & Deleting Files ……........................................
29
- 30
System Configuration Settings ............................................... 31 - 33
Language Setting / Product Information ........................................... 34 - 35
Troubleshooting ...................................................................................... 36
DaVinci Specifications ............................................................................ 37 - 38
Warranty Information ................................................................................. 39
Table of Contents
DaVinci Control Console ……......................................................... 12

IMPORTANT SAFETY PRECAUTIONS
For your safety and to obtain the most benefit from the DaVinci, please
read these safety precautions very carefully.
The DaVinci is designed to enlarge and enhance images and read
print aloud in order to improve the quality of life for people who are
visually impaired. The extent to which this product can improve the
ability to see images depends on a person’s individual condition and
level of visual impairment.
The DaVinci is not designed to restore vision, correct eye conditions or
halt degenerative vision loss. An eye care professional can determine
the usefulness and suitability of the DaVinci for a patient’s individual
condition. Please follow these safety precautions:
• Use the DaVinci on a stable, level surface such as a solid desk or
table, according to its intended design specifications.
• Avoid placing the DaVinci on an unstable table, cart or stand. It may
fall causing serious damage to the unit or bodily injury to the user.
• Use the DaVinci indoors only – it should NOT be exposed to extreme
or rapid changes in temperature or humidity. Do not place the
DaVinci near a radiator, heater or areas exposed to long hours of
direct sunlight.
• Always place the power cord away from traffic areas to avoid
damage of power supply.
• Prevent the risk of electrical shock by NOT attempting to
disassemble the unit. Please refer all service to an authorized
repair facility.
Important Safety Precautions
5

To Move the DaVinci to Another Location
• Use caution if you are repositioning the DaVinci a short distance
across a desk or table. Make sure you do not pull on
any power cords or connector cables.
Caring for the DaVinci
• Always turn the power OFF on the DaVinci when the system
is not in use.
• Always turn the power OFF before cleaning the DaVinci.
• Clean the DaVinci with a soft dry cloth or an electrostatic dusting
cloth. DO NOT use liquid cleaners on its plastic surfaces.
• Clean the camera lens and Close-up Lens as needed with the lens
cloth provided within the DaVinci’s packaging (See figure 1).
F
igur
e 1
Important Safety Precautions
6

• Follow all warnings, cautions, and instructions marked on
the product.
• The attached power cord is a disconnect device for electrical
equipment. The socket-outlet should be installed near the
equipment and be easily accessible.
• This product is equipped with a 3-wire grounding type plug as a
safety feature. This plug has a third (grounding) pin and can only
be plugged into a grounding-type power outlet. If necessary,
contact an electrician to replace your power outlet with a
grounding-type power outlet.
• Do not use the DaVinci in, near or around water. The DaVinci
is not designed to offer protection against contact with liquids
of any kind.
• Do not use the DaVinci near flammable liquids.
• At least once per week, clean the DaVinci with a soft dry
cloth or an electrostatic dusting wipe. No additional methods of
sterilization or cleaning are recommended nor required.
Important Safety Precautions
7
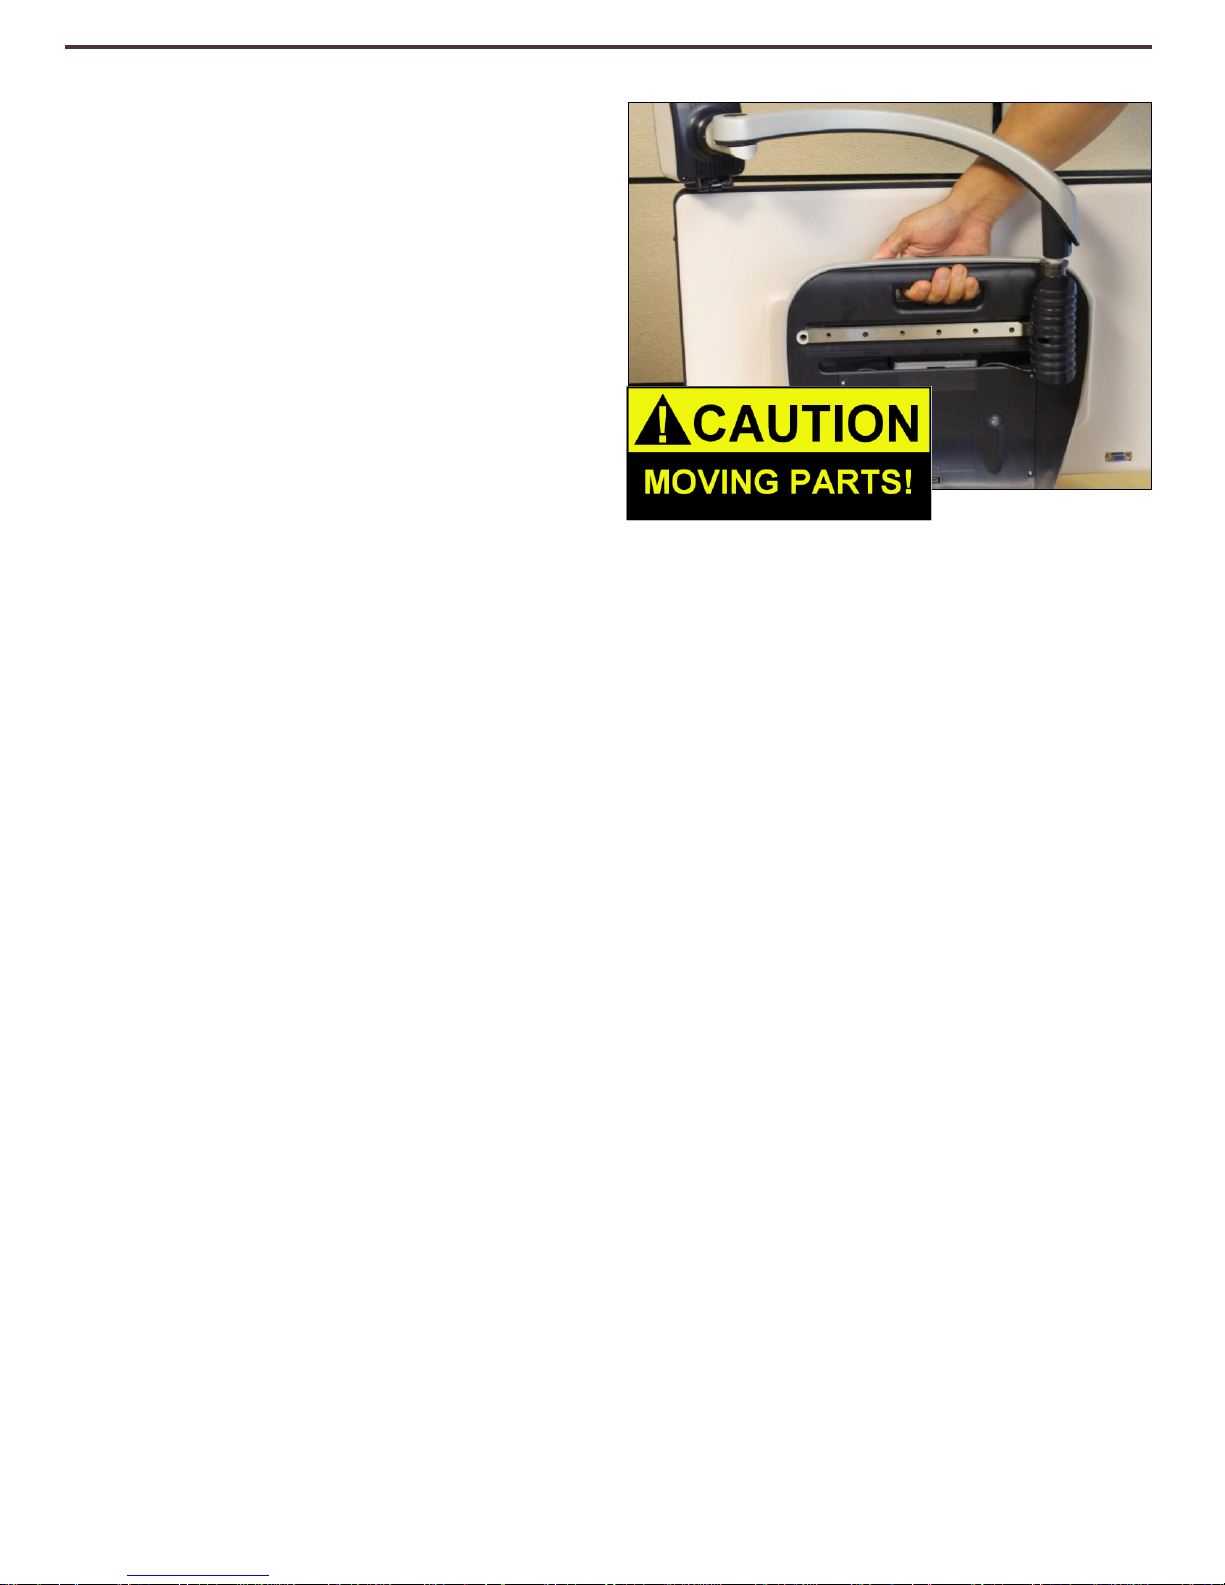
•
This product contains moving
parts. Please use caution when
moving the adjustable slide arm or
when transporting the DaVinci to
avoid possible injury to hands and
fingers.
•
To avoid personal injury or damage
to the DaVinci, do not make any
other type of connections to the
input jacks.
Susceptibility to Interference
There may be temporary degradation of the image when the DaVinci is
subjected to a strong radio frequency field, electro-static discharge or
transient electrical noise. An electro-static discharge (caused by static
electricity) may cause the screen to go blank. If this happens, disconnect
the AC power from the electrical outlet, wait 30 seconds, and connect the
AC power again.
Compliance Warnings
•
Electromagnetic compatibility: The use of accessories and cables other
than those specified by Enhanced Vision may result in increased
emissions or decreased immunity of the DaVinci.
•
Placement of equipment: The DaVinci should not be used adjacent to or
stacked with other equipment.
8
Important Safety Precautions
DAVINCI SETUP
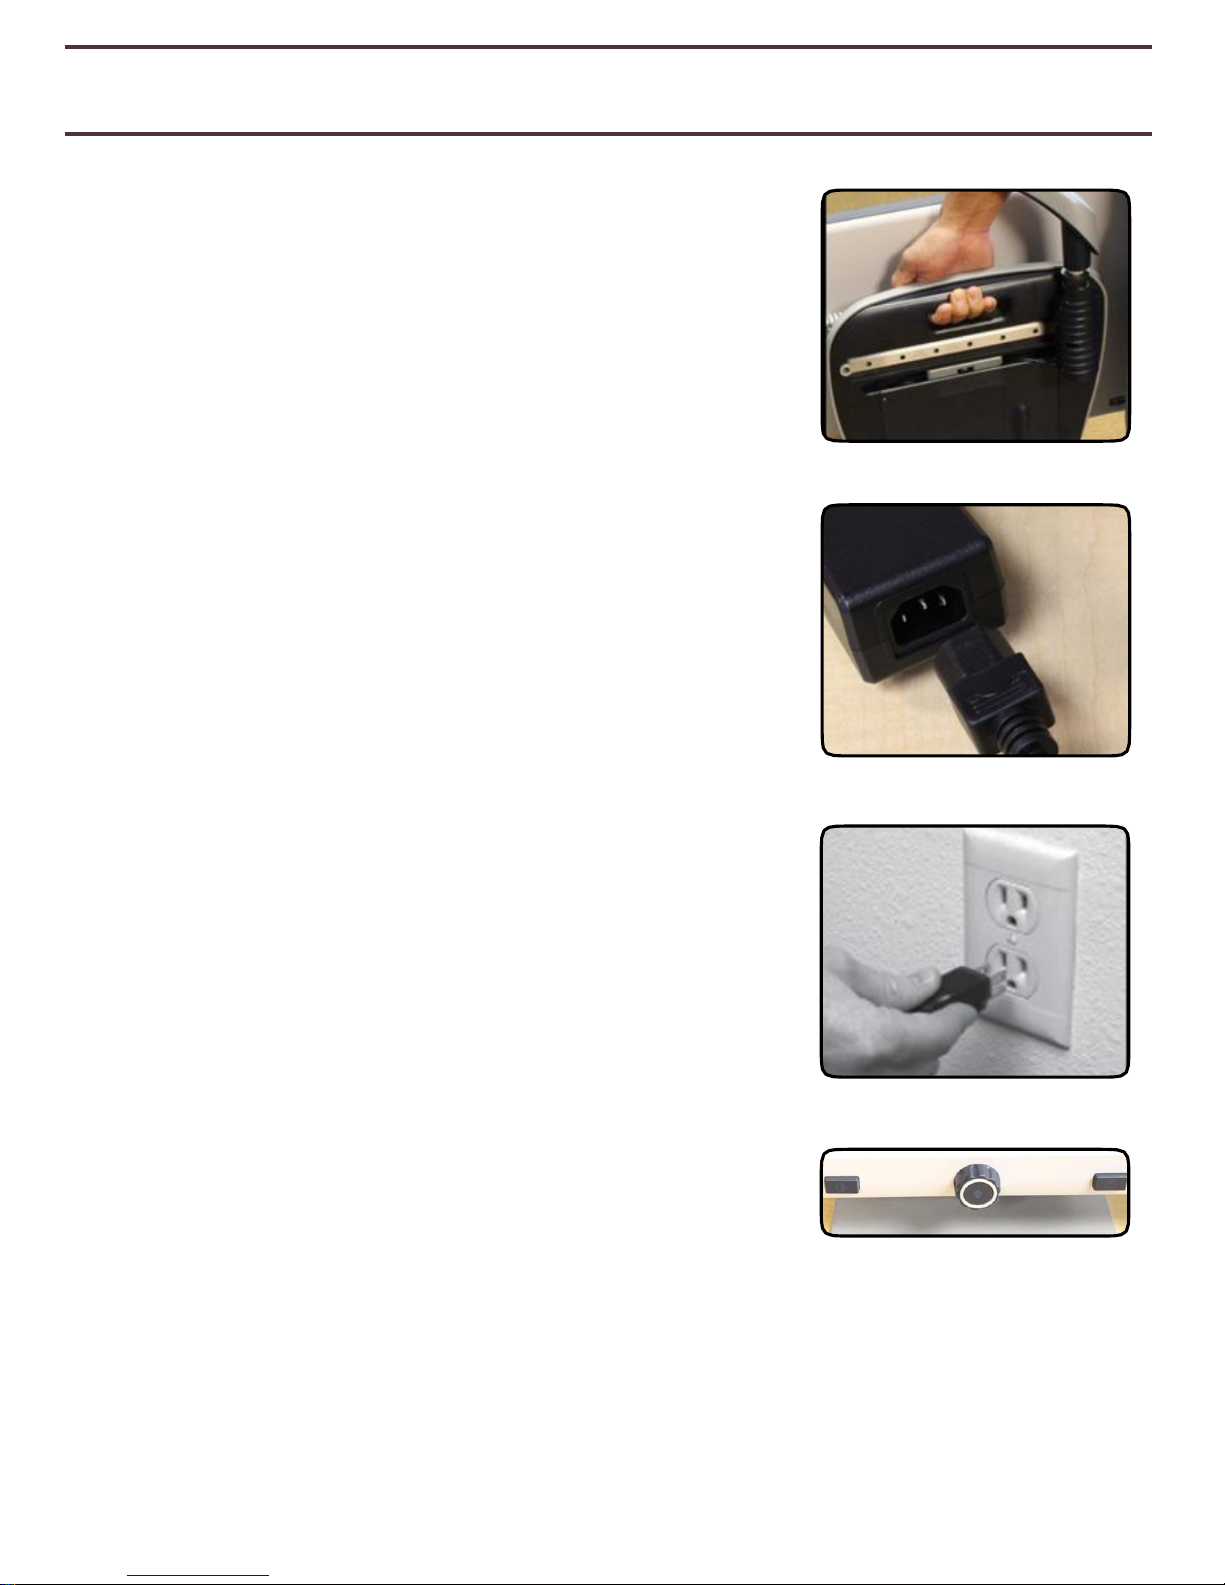
1. Unpacking and transporting the DaVinci.
During unpacking and transporting, be sure to lift
the DaVinci by the built-in carrying handle. Do
not attempt to lift or carry the LCD by the base
or the camera arm. (See Figure 1)
2. Setup the DaVinci. Place the DaVinci on a flat,
level surface such as a table or desk.
3. Connect the AC power. Connect the attached
power cord to the power supply. (See Figure 2)
Connect the power cord to an available electrical
outlet. (See Figure 3) To offer additional protection
during an electrical storm, a surge protector may
also be used and is recommended. Connect the
other end of the power supply to the DaVinci
where it is labeled “+19VDC”
F
igur
e 1
F
igur
e 2
The DaVinci will automatically power on the
first time it is connected to an available
electrical outlet.
Pressing the Power button on the front, right side,
of the DaVinci (See Figure 4) for less than 5
seconds will put the device in Standby. Pressing
the Power button again will wake the DaVinci up
from Standby.
F
igur
e 3
To turn the DaVinci off, press and hold the Power
Button for more than 5 seconds or until “EV
DaVinci” appears on the screen.
F
igur
e 4
DaVinci Setup
9

DAVINCI PACKAGE CONTENTS
DaVinci is comprised of the following items and features
1. 24” LCD Screen: displays high quality image
2. HD Camera: rotates 340 degrees to capture and enlarge the image
3. Carrying Handle: used for lifting the DaVinci
4.
Close-up Lens
: used for up close high magnification
5. Arm: rotating arm that holds the camera
6. Lock: used to lock arm from sliding horizontally
7. LED Lamp
Accessories included:
8. 3.5mm jack for Headphones
9. Control Console: allows the user to control the DaVinci functions
*Must be plugged in to use and have access to the menu items for
OCR/Text-To-Speech.
10. Power Supply
11. Power Cable
12. Lens Cloth: permits cleaning of the LCD display and lenses.
Accessories NOT included:
13. X-Y Table: X-Y table and Mini X-Y table are available for your DaVinci,
place underneath your DaVinci camera and make reading even easier!
DaVinci Package Contents
10

2
1 5 7 8 3 6 4
10
11
13
DaVinci Package Contents
12
9
11
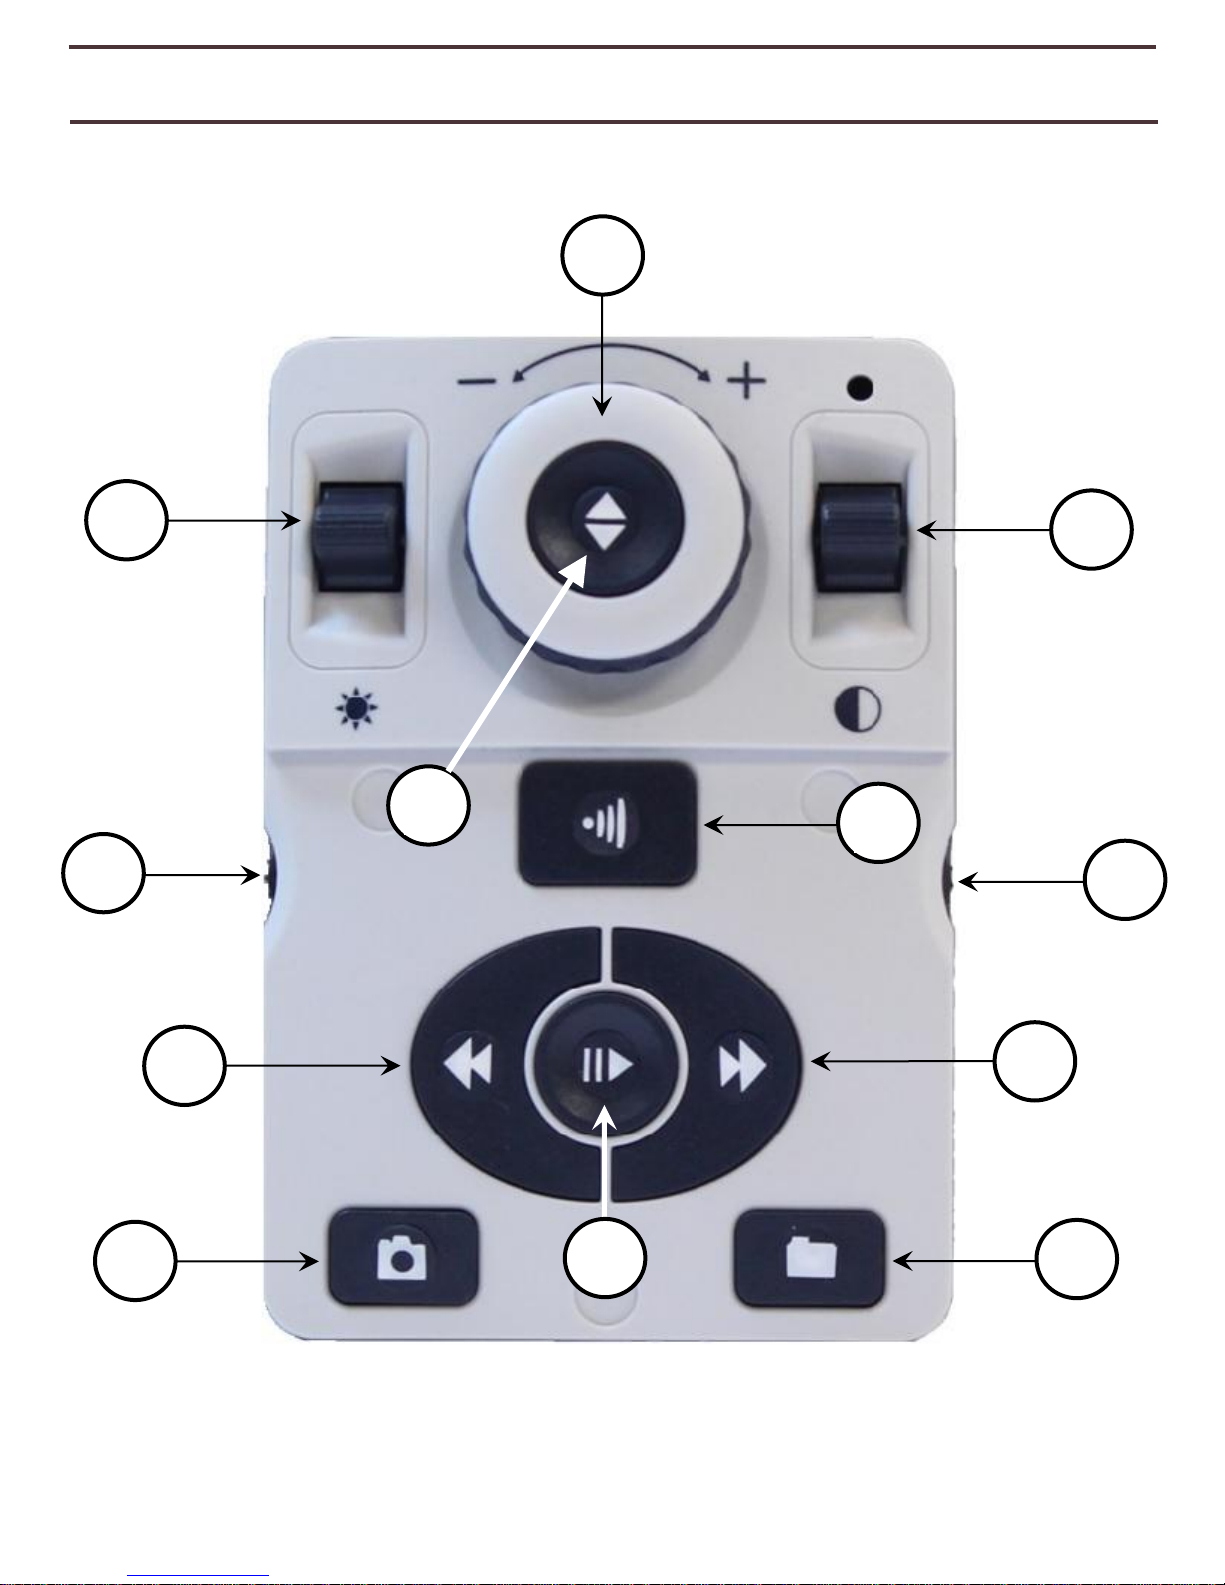
Brightness
Zoom
Mode
Volume
OCR /
Capture
OCR Speed
Markers
Previous
Sentence
Next
Sentence
Save
Library
(Recall)
Play /Pause
Find
2 1 3
4
5 6 7
8 9 11
12
Using DaVinci
12
USING DAVINCI
DaVinci Control Console
NOTE: When the lower cover is placed on the Control Console, OCR related menu
options are de-activated in the DaVinci Menus
See the following Page for Console Controls Detail

1. Brightness – When in desktop/live mode, press Up/Down to increase/decrease brightness
When in OCR mode, press [Brightness] Up/Down to move to the Next/Previous word. ‘Press and
hold’ [Brightness] Up/Down to advance 2 words per second. Note: Word navigation is only
available when OCR is paused.
2. Zoom Wheel – Turn clockwise/counter-clockwise to increase/decrease the magnification level.
In the menu or [Recall] mode, turn clockwise/counter-clockwise to advance through the menu
items or saved files
3. Mode – Press to advance through viewing modes. ‘Press and hold’ for 2 seconds to return to
‘Normal’ color from any ‘Enhanced’ color mode. Press [Mode Up] for 2 seconds for the color
mode menu
4. Find – When used above Minimum Zoom, a box outline will indicate what will be displayed at that
zoom level to assist with document positioning.
When used in combination with the [Mode] button, this allows one to enter the Main Menu (press
“[Find] and [Mode Up]”).
When in the menu, press [Find] to select a menu item. To exit menu, press [Mode Up].
5. OCR/Capture – Press to capture an image for OCR (starts Zoning Preview if enabled in menu).
Press again to exit out of OCR and back to desktop/live mode.
6. Volume – Rotate to increase/decrease volume in desktop/live mode or OCR mode
7. OCR Speed / Markers – When in OCR mode, rotate clockwise/counter-clockwise to
increase/decrease OCR Playback speed (Speed 1-10 only during OCR Playback). Pressing this
wheel will reset the OCR Playback speed to 5.
When in desktop/live mode, rotate clockwise/counter-clockwise to cycle through enabled markers
(Column, Line & Window). Pressing this wheel will remove visible markers.
8. Previous Sentence (In OCR Mode) – Press to move to the previous sentence. ‘Press and hold’
for more than 2 seconds to move to a previous sentence, two sentences per second.
When in [Recall] - jumps to top of current list or jumps to previous bottom of list
9. Next Sentence (In OCR Mode) – Press to move to the next sentence. ‘Press and hold’ for more
than 2 seconds to move to the next sentence, two sentences per second.
When in Recall - Jumps to bottom of current list or jumps to top of next list
10. Save (desktop/live mode) – ‘Press and hold’ for 2 seconds or more to save the current image.
In OCR mode, ‘Pressing and hold’ for 2 seconds during OCR Playback to save the current OCR
11. Pause/Play – Toggle operation: Used to pause, or resume play, during OCR Playback
12. Library (Recall) – Enters the Image/OCR File recall menu (Press for 2 seconds)
Using DaVinci
13
BUTTON DEFINITIONS
 Loading...