

Page 1

®
Users Manual
Page 2

C
ongra
tula
tions on y
our pur
chase of the Acroba
t HD
. Enhanc
ed V
ision
pr
oducts are desig
ned to give y
ou the highest
quality
and
c
onvenienc
e available.
T
he Acroba
t HD pr
oduc
t can enable people with low vision t
o r
ead
,
write and t
o see objec
ts a
t an
y distance. T
he unique design of this
pr
oduc
t provides the ultimate in fle
xibilit
y and off
ers a lar
ge r
ange of
magnifica
tion with multiple viewing options tha
t make r
eading easier
than ever. T
he Acroba
t HD is a fully integrated solution, offering the
advantage of a built
-in L
CD scr
een.
Prior t
o using this system, please car
efully r
ead and f
ollo
w the
instructions pr
ovided within this book
let
. A thor
ough understanding
of the func
tionalit
y will allo
w y
ou to fully benefit fr
om the fle
xibilit
y
and grea
t featur
es of this device.
I
f y
ou have an
y questions
, please contact the ey
e-car
e professional
or
the supplier from whom y
ou have ac
quir
ed the unit.
P
roduc
t enhancemen
ts and revisions are an integral par
t of wha
t we
do
her
e a
t Enhanc
ed V
ision. Please visit -
http://w
ww
.enhanced
vision.com/lo
w-vision-pr
oduc
t-line.html
and select your Enhanc
ed V
ision P
roduct. Y
ou will find the most
up-to-date v
ersion of the U
ser M
anual a
t the bott
om of the page.
Page 3

FCC COMPLIANCE NOTICE
Thi
s devic
e complies wit
h Part 1
5 o
f the FCC Rules
. Operation i
s subject
t
o the following two condition
s: (1) Thi
s devic
e may not cause harmful
interf
erence, and (2) this device
must accept any interference received
,
including interference that may cause u
ndesired operation.
Thi
s equipment has been tested and found t
o compl
y wit
h the limits for a
Class B digital device, pursuan
t t
o Part 1
5 o
f the FCC Rules
. These limits are
designe
d t
o provid
e reasonabl
e protection against harmful interference i
n
a residential installation
. Thi
s equipme
nt generates
, uses, and can radiate
radio frequen
cy energ
y and
, i
f not installed and use
d i
n accordance wit
h
the instructions, may cause harmful interferenc
e t
o radio communications.
However
, there i
s n
o guarantee tha
t interferenc
e will n
ot occu
r i
n a
particular
installation. If this equipment does cause
harmful
interference
t
o radio o
r televisio
n reception
, which can b
e determine
d by turning
the equipment o
ff and on, the use
r i
s encourage
d t
o tr
y t
o c
orrec
t the
interferenc
e by one o
r more o
f the followin
g measures:
–
Reorient
or relocate the receiving antenna.
– Increas
e the separatio
n betwee
n the equipment and receiver.
– Connec
t the equipment int
o a
n outle
t o
n a circuit d
ifferen
t from
tha
t t
o which the receive
r i
s connected.
– Consu
lt the deale
r o
r a
n experience
d radio/T
V technicia
n for help.
Unauthorized changes o
r modificati
on to thi
s syste
m can voi
d th
e use
r’s
aut
hority
to
operate this equipment.
I
f you
r Low Visio
n devic
e has a
n option t
o connec
t t
o a T
V, i
t must b
e use
d wit
h
shielde
d interface cables i
n order t
o meet FCC emission
s limits for Class B digital
devices
. I
t i
s the responsib
ility o
f the use
r t
o use the shielde
d interface cables
supplied w
ith
the equipment.
FCC Compliance Notice
Page 4

Important Safety Precautions ...............................................................
5 - 8
Acrobat HD
Acroba
t HD Pack
age Contents .....................................................
9 -10
Acroba
t HD S
etup
...............................................................................
11
U
sing Acroba
t HD ...............................................................................
12 - 29
Advanced Programming
..........................................................................
30 - 31
T
roubleshooting
...........................................................................................
32
Specifications ...............................................................................................
33
W
arranty Statement ..................................................................................
34
Other Enhanced Vision Products
........................................................
35 - 36
Contact Information .................................................................................
37
Table of Contents
Page 5

F
or y
our safety and t
o obtain the most benefit and lif
e fr
om the Acrobat
HD
, please r
ead these safety pr
ecautions ver
y car
efully.
T
he Acroba
t HD is desig
ned t
o enlarge and enhanc
e images in or
der t
o
improve the qualit
y of lif
e f
or people who are visually impaired.
T
he extent t
o which this pr
oduc
t can improve the ability t
o see
images depends on a person’s individual c
ondition and lev
el of
visual impair
ment.
T
he Acroba
t HD is not desig
ned t
o r
estore vision, c
orrect ey
e
c
onditions or halt degenerativ
e vision loss
. A
n ey
e-car
e professional
can determine the usefulness and suitabilit
y of the Acr
oba
t HD for a
pa
tien
t’s individual condition. P
lease f
ollo
w these safety pr
ecautions:
•
Use the Acrobat
HD on a stable,
level surface
such as a solid
desk or
table
, accor
ding t
o its intended desig
n specifica
tions.
•
Av
oid
placing the Acrobat
HD on an unstable table,
cart or
stand
. I
t ma
y fall causing ser
ious damage t
o the unit or bodily
injur
y t
o the user.
•
Use the Acrobat
HD indoors only
– it
should NOT
be e
xposed to
extr
eme or rapid changes in t
emperatur
e or humidity. D
o not
plac
e
the Acroba
t HD near a r
adiator
, heater or ar
eas e
xposed to long
hours of direct sunlight.
•
Always
place
the
power cord away fr
om tr
affic ar
eas to av
oid
damage of power supply.
•
Prevent
the r
isk
of
electrical shock by
NOT att
empting to
disassemble the unit
. P
lease refer all ser
vice to an authorized
r
epair facility.
Important Safety Precautions
5
Important Safety Precautions
Page 6

T
o Move the Acrobat HD to Another Location
•
Use caution if y
ou are
repositioning the Acrobat
HD a short
distanc
e acr
oss a desk or table
. Make sure y
ou do not pull on
any pow
er cords or c
onnector cables.
Caring for the Acrobat HD
•
Always
turn
the
power
OFF on the Acrobat
HD when the system
is not in use.
•
Always
turn
the
power
OFF before
cleaning the Acrobat
HD.
•
Clean the Acrobat
HD with a soft dry cloth or
an electrosta
tic
dusting cloth.
DO NOT
use liquid cleaners on its plastic surfaces.
•
Clean the lens glass as needed with the lens
cloth pr
ovided
within the Acroba
t HD’
s packaging (S
ee figur
e 1).
F
igur
e 1
6
Important Safety Precautions
Page 7

•
Follow
all war
nings,
cautions,
and instruc
tions marked on the
pr
oduct.
•
The a
ttached
power cord is a disc
onnect
device for electrical
equipment. T
he socket-
outlet should be installed near the
equipmen
t and be easily accessible.
•
This
pr
oduct is
equipped with a 3-
wire grounding type
plug as a
safety feature. T
his plug has a thir
d (grounding) pin and can only
be plugged into a grounding-t
ype power outlet
. I
f nec
essary,
contac
t an electrician t
o replac
e y
our power outlet with a
grounding-t
ype power outlet.
•
Do not use the Acrobat
HD in, near or ar
ound water. The
Acroba
t HD is not desig
ned to off
er protec
tion against contac
t with
liquids of an
y k
ind.
•
Do not use the Acrobat
HD near flammable liquids.
•
At least once
per week,
clean the Acrobat
HD with a soft dry
cloth or an
electrosta
tic
dusting cloth.
DO NOT
use liquid
cleaners on its plastic surfaces. No additional methods
of
steriliza
tion or cleaning ar
e rec
ommended or r
equired.
Important Safety Precautions
7
Page 8

•
This pr
oduct con
tains moving
parts. P
lease use caution when
mo
ving the adjustable slide
ar
m or when tr
anspor
ting the
Acroba
t HD t
o avoid possible
•
To avoid personal injury or
damage to
the Acrobat
HD, do
not
make an
y other t
ype of c
onnec
tions t
o the camera input jacks other
than those indicated in the phot
os below.
Susceptibility to Interference
T
her
e ma
y be t
emporary degrada
tion of the image when the Acroba
t HD
is subjected t
o a str
ong radio fr
equenc
y field
, electro
-sta
tic discharge or
tr
ansien
t electrical noise
. A
n electro
-sta
tic dischar
ge (caused b
y sta
tic
electricit
y) ma
y cause the scr
een to go blank
. I
f this happens
, swit
ch the
unit off and on again.
8
Important Safety Precautions
Page 9

A
ll r
equir
ed acc
essories f
or operation ar
e included in your Acroba
t HD
pack
age.
Acrobat HD is comprised of the following items and features:
1.
22”
, 24" or 27"
LCD Screen: displa
ys high qua
lit
y image
2.
C
amer
a: r
otates 340 degrees t
o captur
e and enlar
ge the image
3.
Carr
ying Handle: used f
or lifting the Acroba
t HD
4.
Z
oom L
ens
: used up close high mag
nifica
tion
5.
Arm: r
otating ar
m tha
t holds the camera
6.
L
ock
: used to lock ar
m from sliding horizon
tally
Accessories included:
7.
R
emot
e Contr
ol:
(batteries included): allows the user to contr
ol
the Acroba
t HD func
tions fr
om a distance
8.
L
ens Cloth:
per
mits cleaning of the L
CD display
Accessories NOT included:
9. R
olling C
ase
(optional): Provides protec
tion f
or the Acroba
t HD and
makes tr
anspor
tation ev
en easier
10. DVI t
oggle box (optional): A
llow
s the display of the Acr
oba
t HD to be
shar
ed along with a standar
d DVI output of a c
omput
er and
permits
swit
ching between either source
11.
X-
Y T
able: X
-Y table and Mini X-Y table ar
e available f
or y
our
Acrobat, plac
e under
nea
th y
our acr
obat camer
a and make
read
ing ev
en easier!
Acrobat HD Package Contents
9
ACROBAT HD PACKAGE CONTENTS
Page 10

2 1
4 7
8
3
5
9
6 10 11
10
Acrobat HD Package Contents
Page 11

ACROBAT HD SETUP
1. Unpacking and transporting the
Acrobat HD
During unpacking and tr
anspor
ting
, be sur
e t
o lif
t
the Acroba
t HD b
y the built
-in carrying handle.
D
o not attempt t
o lif
t or carry the L
CD b
y the
base
. (S
ee F
igur
e 1)
2. Setup the Acrobat HD
P
lac
e the Acr
oba
t HD on a flat, lev
el sur
fac
e such
as a table or desk.
3. Connect the AC power
C
onnec
t the a
ttached power cord t
o an
a
vailable w
all outlet
. (S
ee F
igur
e 2) T
o off
er
addi
tional protec
tion dur
ing an electrical storm,
a
sur
ge protector ma
y also be used and is
rec
om
mended.
4. T
urn the power on
On the r
ear
, r
igh
t side of the Acr
oba
t HD
, flip the
swit
ch fr
om the 0 t
o l position (S
ee F
igur
e 3). T
he
LCD scr
een and Acr
oba
t HD C
amer
a will
aut
oma
tically turn
ON in a few sec
onds. An image
of wha
t the C
amer
a is poin
ting a
t should appear
on the L
CD scr
een.
Turn the power OFF b
y flipping the same swit
ch
back to the 0 position. However
, lea
ve the power
ON for this tr
aining sec
tion.
Once the Acr
oba
t HD has been power
ed on y
ou
can then use the Red “Power” butt
on located in
the upper r
igh
t corner of the Acroba
t HD R
emot
e
t
o power the Acr
oba
t HD on/off.
F
igur
e 1
F
igur
e 2
F
igur
e 3
Acrobat HD Setup
11
Page 12

USING ACROBAT HD
Adjust the camera position
T
he Acroba
t HD camer
a is a
ttached t
o a specially desig
ned ar
m tha
t allows
the
camer
a t
o slide lef
t or r
ight, or t
o pivot in multiple directions
. (S
ee F
igure
1, 2, 3 and 4)
F
igur
e 1
F
igur
e 2
F
igur
e 3
F
igur
e 4
12
Using Acrobat HD
Page 13

Adjusting the V
iewing Angle
T
he Acroba
t HD C
amer
a r
otates 340 degrees
, pr
oviding unsur
passed
fle
xibilit
y f
or the visually impaired. Do NOT force the camer
a bey
ond its
340-
degr
ee angular r
ange as this ma
y damage the unit.
T
he Acroba
t HD may be used to see objec
ts in the distance, viewing
oneself and r
eading or wr
iting. To change the viewing mode
, simply
tur
n the position of the Camer
a by r
ota
ting it on the arm.
Distance Viewing Mode
T
he camer
a can r
otate forward t
o captur
e people
, objec
ts and sc
enery.
“Distance Viewing” is displayed in the upper-lef
t corner of the scr
een when
chang
ing t
o this viewing angle
. B
e sur
e t
o open the R
eading L
ens f
or
Distance Viewing (S
ee F
igur
e 1).
T
his Distanc
e mode enables up t
o 25X ma g
nifica
tion f
or objec
ts 3 f
eet
away. I
n this mode, although the camer
a can view objec
ts a
t an infinit
e
distance, the recommended distanc
e fr
om camer
a t
o the distan
t objec
t
is within 3-30 f
eet t
o achiev
e maximum mag
nifica
tion benefit.
(S
ee F
igur
e 2).
F
igur
e 1
F
igur
e 2
Using Acrobat HD
13
Page 14

Self V
iewing Mode
T
he C
amer
a can be r
otated backwar
ds t
o provide y
ou with the
equivalen
t of a full-length mirror. “Self V
iewing” is displa
yed in the
upper
-left corner of the scr
een when chang
ing t
o this viewing angle
.
I
n this posi
tion, y
ou can use the Acrobat HD to help you put on make
-
up
, shave or
perfor
m other personal hygiene (S
ee F
igur
e 1).
F
or optimum clarity
, use the Z
oom Lens and position yourself between
7.5”-22” away from the C
amera.
7.5” - 22” (Recommended)
F
igur
e 1
14
Using Acrobat HD
Page 15

Reading and W
riting Mode
T
he C
amer
a can be adjust
ed do
wnward f
or r
eading
, wr
iting and
enjo
ying cr
afts or other hobbies (S
ee F
igur
e 1). T
his makes it ideal f
or
classr
oom use. When the camer
a is r
otated do
wnward,
“R
eading-Mode” is displa
yed in the upper
-lef
t corner of the scr
een.
T
he Acroba
t HD can slide fr
eely
, lef
t or r
ight, along the specially
desig
ned br
acket mechanism.
I
t is best t
o close the Z
oom Lens when objec
ts ar
e plac
ed 12”-19” away
fr
om the C
amer
a f
or optimal viewing clarity.
12” - 19” (Recommended)
F
igur
e 1
Using Acrobat HD
15
Page 16

Adjusting Magnification
T
he Acroba
t HD off
ers a lar
ge r
ange of mag
nification capabilities
.
T
he f
ollo
wing directions can be used with the R
emot
e or C
amera
(S
ee F
igur
e 1 & 2).
1. T
o adjust the mag
nifica
tion pr
ess and hold the + or - butt
ons located
on the R
emot
e or C
amer
a un
til y
ou r
each y
our desired mag
nifica
tion.
2. “Z
oom I
n” will appear in the upper left corner of y
our monit
or
when y
ou
are increasing mag
nifica
tion. ”Max Z
oom,” will appear a
t the
maximum
magnifica
tion.
3. “Z
oom O
ut”
will appear in the upper left corner of y
our monit
or
when
y
ou ar
e decr
easing mag
nifica
tion.
“M
in Z
oom,” will appear a
t the
minimum mag
nifica
tion.
NO
TE: The extent of
the magnifica
tion is dependent
upon the distance
from
the C
amer
a t
o the object.
F
igur
e 1
F
igur
e 2
16
Using Acrobat HD
Page 17

Changing the V
iewing Mode
T
he Acroba
t HD w
as desig
ned t
o pr
ovide optimum viewing for people with
c
ertain visual c
onditions b
y off
ering a r
ange of choices in both tex
t and
background c
olors.
U
se the M
ode key (S
ee F
igur
e 1 & 2) t
o toggle
betw
een full c
olor viewing
, Black and W
hite, enhanc
ed positive,
enhanc
ed nega
tiv
e, and y
our 5 favorite c
olor selec
t modes. The 5
favorite c
olor selec
t modes can be modified t
o any of the 28 c
olor
selec
t options b
y f
ollo
wing the instruc
tions provided on page 24.
T
he f
ollo
wing directions can be used with the R
emot
e or C
amera.
Adjusting V
iewing Modes
1. Y
ou can choose a viewing mode by pr
essing the "Mode" butt
on on
the R
emot
e or C
amer
a (S
ee figur
e 1 & 2).
2. Each push will allo
w y
ou t
o cycle thr
ough all sev
en viewing modes
(S
ee ne
xt page).
F
igur
e 1
F
igur
e 2
Using Acrobat HD
17
Page 18

V
iewing Modes
Full Color Image
T
his mode gives a true c
olor repr
esentation of the image being mag
nified.
Black-and-White Image
T
his mode gives a black and whit
e r
epr
esentation of the image being mag
-
nified.
Enhanced-Positive Image
T
his mode provides a whit
e background with
black text. I
t incr
eases the contr
ast t
o off
er cr
isp
text images f
or r
eading.
Enhanced-Negative Image
T
his mode provides a black background with
whit
e text. I
t incr
eases the contr
ast t
o off
er cr
isp
text images f
or r
eading.
Color Select 1
I
n factor
y default this mode provides a blue
backg
round with yello
w text. T
his is one of the
Crisp,
Clear Text
I
mages!
Enhanc
ed P
ositive
Crisp,
Clear Text
I
mages!
Enhanc
ed Nega
tive
most commonly used color c
ombinations. To change this mode t
o an
y of
the 28 available f
ollo
w the instruc
tions on page 24.
Color Select 2
I
n factor
y default this mode provides a black background with green text.
T
o change this mode t
o any of the 28 available f
ollo
w the instructions on
page 24.
Color Select 3
I
n factor
y default this mode provides a black backg
round with yello
w text.
T
o change this mode t
o any of the 28 available f
ollo
w the instructions on
page 24.
Color Select 4
I
n factor
y default this mode is tur
ned off
. F
ollo
w the instruc
tions on page
24 t
o tur
n this c
olor mode on.
Color Select 5
I
n factor
y default this mode is tur
ned off
. F
ollo
w the instruc
tions on page
24 t
o tur
n this c
olor mode on.
18
Using Acrobat HD
Page 19

Changing Favorite Color Modes
T
he Acroba
t provides 28 selec
table color modes
,
and allows selec
ting up t
o 5 favorites f
or use
, as
descr
ibed on page 17. T
he f
ollo
wing directions
can be used t
o change the favorite c
olor modes
on your Acrobat:
1. Press and hold the "Mode" butt
on f
or at least 3
sec
onds t
o beg
in the “Enter
ing S
etup” M
enu.
2. Scroll with the "+" t
o "6. C
olor Select"
3. Press the "Mode" butt
on.
4. Choose with "+ or -" which c
olor selec
t mode favor
-
it
e y
ou would like t
o change 1, 2, 3, 4 or 5.
5. Press the "Mode" butt
on.
6. Choose if y
ou w
ould like this favorite "
On
" or "Off"
b
y pr
essing the "+" or "-".
7. Press the "Mode" butt
on.
8. Press the “+ or -”
butt
on t
o pr
eview each of the 28
available c
olor modes.
9. Press the "Mode" butt
on t
o selec
t and save the
desir
ed favorite c
olor mode.
Using Acrobat HD
19
Page 20

Adjusting Brightness (Color Mode Only)
T
he f
ollo
wing directions can be used if y
ou would like
adjust the br
igh
tness of the screen when in C
olor M
ode:
1. Press and hold the
“Mode” butt
on f
or a
t least 3 sec
onds
t
o beg
in the “Enter
ing S
etup” M
enu.
2. Scroll with the
“+”
to “4. Br
igh
tness C
olor”
3. Press the
“Mode” butt
on.
4. Press the “+ or -”
butt
on t
o incr
ease or decr
ease scr
een br
igh
tness.
5. Press the
“Mode” butt
on t
o set and save the screen br
igh
tness.
A
djusting Br
igh
tness (Color Selec
t M
ode)
T
he f
ollo
wing directions can be used if y
ou would like
adjust the br
igh
tness of the scr
een in C
olor Selec
t M
ode:
1. Press and hold the
“Mode” butt
on f
or a
t least 3 sec
onds
t
o beg
in the “Enter
ing S
etup” M
enu.
2. Scroll with the
“+”
to “5. Br
igh
tness C. S
el”
3. Press the
“Mode” butt
on.
4. Press the “+ or -”
butt
on t
o incr
ease or decr
ease scr
een br
igh
tness.
5. Pr
ess the
“Mode” butt
on t
o set and save the color select scr
een br
igh
tness.
20
Using Acrobat HD
Page 21

Adjusting the White Balance with the Remote Control
T
he c
olor whit
e is often affect
ed b
y the ligh
ting used in a r
oom. The
Acroba
t HD W
hit
e Balanc
e contr
ol allows y
ou t
o achiev
e optimum clarity.
T
he f
ollo
wing directions can be used t
o adjust the W
hit
e Balanc
e with the
R
emote:
1. Press the W
hit
e Balance “WB” butt
on (S
ee figur
e 1) on the R
emote, and
w
ait 2 sec
onds for the key t
o bec
ome ac
tive.
2. R
epea
t Step 1 t
o scr
oll thr
ough all f
our settings.
a. W.B. Auto aut
oma
tically adjusts t
o the lighting in the r
oom
b. W.B. War
m casts a r
ed tone c. W.B. Nor
mal casts a balanced
t
one
d. W.B. C
ool casts a blue t
one
F
igur
e 1
Using Acrobat HD
21
Page 22

Adjusting the White Balance with the Camera
T
he f
ollo
wing directions can be used t
o adjust the
W
hit
e Balanc
e fr
om the C
amera:
1. Press and hold the M
ode butt
on f
or 3
sec
onds to
“Enter
ing S
etup” M
enu.
2. Press the + t
o scr
oll to
“2.
Whit
e Balanc
e”.
3. Press the M
ode butt
on to initiate the W
hite
Balanc
e feature.
4. Press the +/- t
o scr
oll thr
ough the four
settings.
5. Press the M
ode butt
on t
o e
xit this feature.
F
igur
e 1
22
Using Acrobat HD
Page 23

Using Line Markers with the Remote control
Line Markers ar
e used t
o frame an image between two horizon
tal lines
.
T
hese lines ma
y be used as a r
eading guide f
or long passages of text, as a
guide t
o help keep y
our plac
e as y
ou move fr
om one side of the page t
o
the other
, or just t
o make writing easier.
T
he f
ollo
wing directions can be used t
o add/remove Line Mar
kers with the
R
emote:
1. Press and hold the Line Markers On/Off
(“LM ON/OFF”) button for at
least 1 sec
ond.
2. T
o mov
e the Upper Line Marker pr
ess the “ULM+/-”
butt
ons.
3. T
o mov
e the Low
er Line Mar
ker pr
ess the “LLM+/-”
butt
ons.
4. To
remove Line Markers pr
ess and hold the “LM ON/OFF” button for at
least 1 sec
ond.
F
igur
e 1
Using Acrobat HD
23
Page 24

Using Line Markers with the Camera
T
he f
ollo
wing directions can be used t
o add/remove
Line M
arkers fr
om the C
amera:
1. Press and hold the "Mode" butt
on f
or at least 3
sec
onds t
o beg
in the “Enter
ing S
etup” M
enu.
2. T
he menu will automatically indicate “1. Line
Mar
kers.
3. Press the "Mode" butt
on.
4. T
he menu will indicate “1. Line M
akers O
ff”
5. Press the “-”
butt
on t
o ac
tivat
e "Line Mar
kers On."
6. Press the "Mode" butt
on t
o set line marker.
7.
Next the menu indicates “1. Upper Line ADJ”
8.
Pr
ess the +/- butt
ons to raise or lower
the Upper
Line Mar
ker.
9. Press the "Mode" butt
on t
o set the Upper Line
Marker.
10. T
he menu will now indicate “2. Low
er Line Mar
ker.
11. Press the "+/-" buttons t
o r
aise or Low
er the Lower
Line Mar
ker.
12. Press the M
ode butt
on t
o set the Low
er Line
Marker.
13. T
o r
emove Line Mar
kers r
epea
ts st
eps 1-4.
14. Press the
“+”
butt
on t
o r
eturn t
o the “1. Line
Markers O
ff” M
enu.
15. Press the M
ode butt
on t
o e
xit the Menu.
F
igur
e 1
24
Using Acrobat HD
Page 25

Using Left handed mode
T
he f
ollo
wing directions can be used if y
ou would like
t
o switch between lef
t and r
igh
t handed mode:
1. Press and hold the "Mode" butt
on f
or at least 3
sec
onds t
o beg
in the “Enter
ing S
etup” M
enu.
2. Scroll with the "+" t
o "3. L
eft Handed M
ode"
3. Press the "Mode" butt
on.
4. T
he menu will indicate “1. Left Handed O
ff”
5. Press the
“+”
butt
on t
o ac
tivat
e " 2. L
eft Handed
On."
6. Press the "Mode" butt
on t
o set L
eft Handed mode On
or Off.
Adjusting Brightness
T
he f
ollo
wing directions can be used if y
ou would like
adjust the br
igh
tness of the screen:
1. Press and hold the "Mode" butt
on f
or at least 3
sec
onds t
o beg
in the “Enter
ing S
etup” M
enu.
2. Scroll with the "+" t
o "4. Br
igh
tness"
3. Press the "Mode" butt
on.
4. Press the “+ or -”
butt
on t
o incr
ease or decr
ease
scr
een br
igh
tness.
5. Press the "Mode" butt
on t
o set and save the scr
een
brigh
tness.
Using Acrobat HD
25
Page 26

Using the Object Locator
T
he Acroba
t HD Objec
t Locator featur
e can help y
ou quick
ly locate
something y
ou'r
e look
ing f
or on a page
, or a specific par
t of an objec
t
y
ou want t
o view mor
e closely.
T
he f
ollo
wing directions can be used to locate a desir
ed objec
t with the
R
emot
e and C
amera:
1. Press and hold do
wn the "F
ind" butt
on on R
emot
e (S
ee F
igur
e 1) or
C
amer
a (S
ee F
igur
e 2).
T
he Acroba
t HD will aut
oma
tically z
oom out t
o the
widest field of view
, and a "
tar
get" (as sho
wn in
F
igur
e 3) will appear in the cent
er of the monitor
scr
een.
2. Mov
e y
our wor
k or r
eading mater
ial un
til y
ou
have located the desir
ed item within the
"
tar
get" ar
ea.
3. R
elease the "F
ind" butt
on, and it will mag
nify the it
em y
ou located
within the tar
get
ed ar
ea.
F
igur
e 1
F
igur
e 2
26
Using Acrobat HD
Page 27

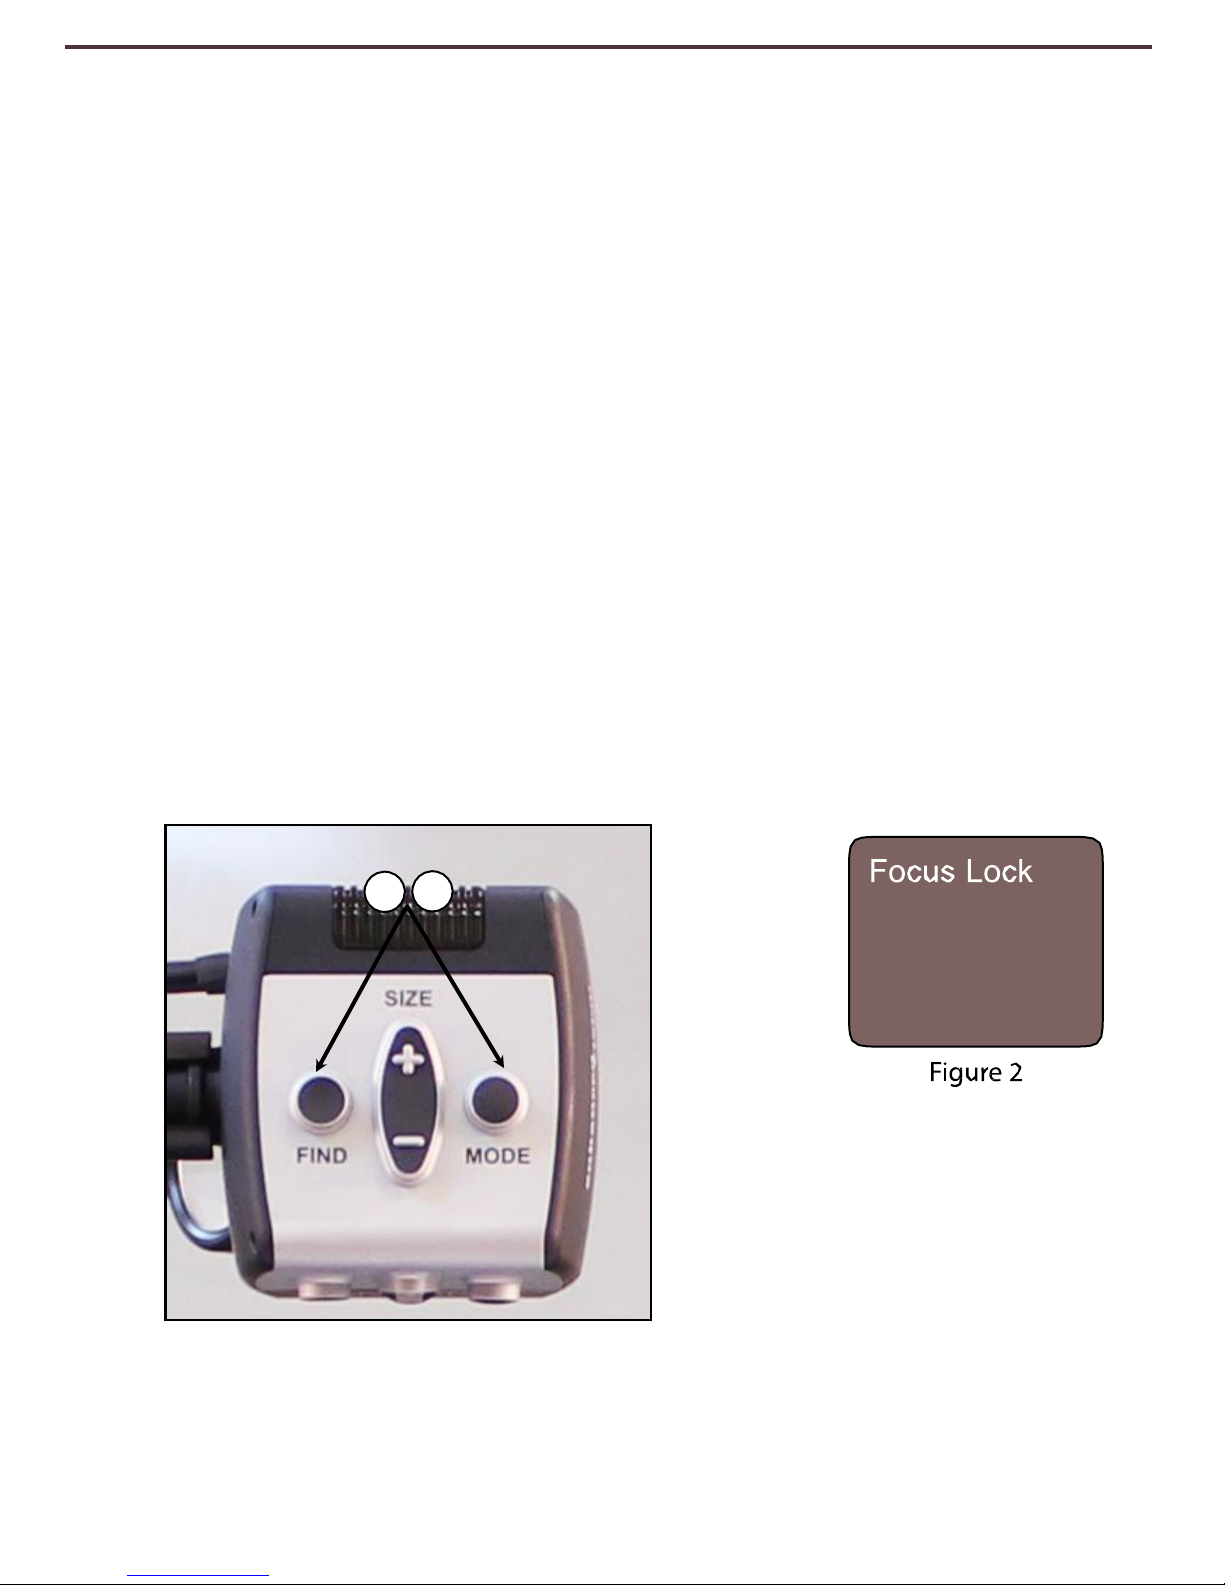
Using Intelligent Focus Lock with the Remote Control
W
hen T
he Acroba
t HD is turned on, it is aut
oma
tically set on auto f
ocus. This is
the most convenien
t setting f
or ever
yda
y ac
tivities
, such as r
eading fr
om a
single page to a book
, r
eading a pr
escr
iption bottle or work
ing with ar
ts and
F
ocus L
ock allows y
ou t
o main
tain f
ocus on a specific
objec
t a
t a fix
ed distance, such as wr
iting. The Acroba
t
HD Int
elligen
t Focus L
ock featur
e will automa
tically
r
efocus on the objec
t y
ou ar
e viewing after chang
ing
the magnifica
tion size. T
he Acroba
t HD will keep y
our
wr
iting in f
ocus
, rather than y
our hand when it c
omes
into the C
amera's fr
ame.
T
he f
ollo
wing directions can be used t
o apply the
F
ocus L
ock featur
e using the R
emote:
1. P
lac
e y
our not
epaper
, sta
tionery, check
book or
other writing mater
ial on the table.
2. Press the “L
ock” butt
on on the R
emot
e (S
ee F
igure
1).
F
igur
e 1
3. T
he word "Focus L
ock" will appear and remain in the upper left corner of
the monit
or (See F
igur
e 2).
4. T
o R
etur
n t
o Auto-Focus, pr
ess the “L
ock” butt
on on the R
emote
(S
ee F
igur
e 1).
Using Acrobat HD
27
Page 28
Using Intelligent Focus Lock with the Camera
T
he f
ollo
wing directions can be used to apply the F
ocus L
ock featur
e using
the C
amera:
1. P
lac
e y
our not
epaper
, sta
tionery, check
book or other wr
iting mater
ial
on the table.
2. T
o initiate the F
ocus L
ock featur
e simultaneously pr
ess the “F
ind” and
“
Mode” butt
ons for a
t least 1 sec
ond on the Camer
a (S
ee F
igur
e 1).
3. T
he word "Focus L
ock" will appear and remain in the upper left corner of
the monit
or (See F
igur
e 2).
4. T
o R
etur
n t
o Auto-Focus
, simultaneously pr
ess the “F
ind” and
“Mode”
butt
ons for a
t least 1 sec
ond on the Camer
a (S
ee F
igur
e 1).
2 4
F
igur
e 1
28
Using Acrobat HD
Page 29

Using the Freeze Function
Freez
e allows y
ou t
o take a snap shot of wha
t the Acroba
t HD is
mag
nifying in or
der f
or y
ou t
o have ext
ended time t
o view the image
.
T
his is par
ticular
ly helpful when tak
ing not
es in a classr
oom.
T
he f
ollo
wing directions can be used to apply the Freez
e mode using the
R
emot
e contr
ol only:
1. Pr
ess and hold the “Freez
e” butt
on f
or a
t least 2 sec
onds (See Figure 1).
2. T
he pic
tur
e or video will fr
eez
e and in the upper left corner of the
scr
een will indicate “Freez
e” (S
ee F
igur
e 2).
3. T
o r
elease the Freez
e mode
, pr
ess an
y key or change the
viewing angle.
F
igur
e 1
Using Acrobat HD
29
Page 30

ADVANCED PROGRAMING
Advanced Programming Options
T
he Acroba
t HD has advanc
ed capabilities f
or modifying the pr
ogr
amming of the
included r
emot
e contr
ol (when using multiple units) as w
ell as chang
ing the default
language used within the setup menus. These settings ar
e c
omplet
ely optional and
should not be changed under nor
mal circumstances. T
he informa
tion list
ed on the
f
ollo
wing pages ar
e f
or t
echnical referenc
e pur
poses only
. P
lease see y
our Enhanc
ed
V
ision r
epr
esentativ
e or call our t
oll-fr
ee technical suppor
t should it be nec
essar
y f
or y
ou
t
o modify these settings.
Remote Codes
B
y default
, a single r
emot
e contr
ol (and
c
orr
esponding r
emot
e contr
ol c
ode) is factor
y
pr
ogr
ammed and used f
or all Acroba
t camer
a
functions. While acceptable f
or most single
-use
applica
tions
, when 2 or mor
e Acroba
ts ar
e used
within close proximit
y t
o each other (lab
setting), exclusive r
emot
e contr
ol ov
er each
unit ma
y be desired. T
herefore
, it is possible t
o
modify the sending/receiving c
odes of the
remot
e contr
ol and Acr
oba
t head f
or ex
clusiv
e
use
, if desired. Up t
o 15 unique c
odes can be
assig
ned
. F
or pr
oper c
ommunica
tion, both the
R
emot
e contr
ol (tr
ansmit) and camer
a head
(receiv
e) must be set t
o matching ID codes
.
P
lease r
efer t
o the char
t on the r
ight f
or mor
e
informa
tion.
Remote Control (T
ransmit) Code Change:
•
#28 (default/factor
y r
eset):
Push MODE and FIND for 3 secs.
•
#15: P
ush MODE and LLM
- f
or 3 secs.
•
#24: P
ush MODE and ULM
- f
or 3 secs.
•
#25: P
ush MODE and LLM+ f
or 3 secs.
•
#27: P
ush MODE and ULM+ f
or 3 secs.
•
#07: P
ush + and FIND for 3
secs.
•
#11: P
ush + and LLM- f
or 3 secs.
•
#14: P
ush + and ULM
- for 3 secs.
•
#23: P
ush + and LLM+ f
or 3 secs.
•
#31: P
ush + and ULM+ f
or 3 secs.
•
#08: P
ush - and FIND for 3
secs.
•
#09: P
ush - and LLM
- f
or 3 secs.
•
#10: P
ush - and ULM
- for 3 secs.
•
#12: P
ush - and LLM+ f
or 3 secs.
•
#13: P
ush - and ULM+ f
or 3 secs.
Language Select
T
he default language used for the on screen displa
y (
OSD
) ma
y be changed b
y accessing
the
Advanc
ed P
rogr
amming Featur
es menu on the Acr
obat. T
his is accomplished using a
special
key c
ombina
tion sequenc
e (4321), ac
cessed b
y pr
essing the [+] and [MODE] buttons
on Acr
oba
t camer
a head
. Language selec
tion can be adjusted within the sec
ond menu level.
P
lease r
efer t
o the char
t on the f
ollo
wing page f
or detailed ref
erence.
30
Advanced Programming
Page 31

ACROBAT HD FEATURES MENU
Secret
4321
code to
enter menu using SIZE +:
4 press, mode
3 press, mode
2 press, mode
1 press, mode
** Items currently selected appear
in GREEN **
2
nd
Menu Level
FEATURES MENU
1. REMOTE CTRL CODES
Select different IR codes to avoid
multiple remote control conflicts
REMOTE CTRL CODES SUB
MENU
1. SC 28
(Default)
Size + or
Size - to
navigate
Press
MODE to
enter menu
Size + or Size –
to navigate
2. SC 15
2. LANGUAGES
Size + or Size –
to navigate
3. SC 24
Press Mode to
Select Code
Size + or
Size - to
navigate
Press
MODE to
enter menu
Size + or Size –
to navigate
4. SC 25
3. 50-60Hz MAINS
Size + or Size –
to navigate
Languages Sub Menu
1. ENGLISH
Size + or Size –
to navigate
2. FRENCH
Size + or Size –
to navigate
3. GERMAN
Size + or Size –
to navigate
4. ITALIAN
Size + or Size –
to navigate
5. SPANISH
Size + or Size –
to navigate
6. JAPANESE
Size + or Size –
to navigate
7. PREVIOUS MENU
Size + or
Size - to
navigate
Press Mode to
Select
LANGUAGE
Press Mode to
Select
LANGUAGE
Press
MODE to
enter menu
4. EXIT
Press
5. SC 27
Size + or Size –
to navigate
6. SC 07
Size + or Size –
to navigate
7. SC 11
Size + or Size –
to navigate
8. SC 14
Size + or Size –
to navigate
9. SC 23
Size + or Size –
to navigate
10. SC 31
Size + or Size –
to navigate
11. SC 08
Size + or Size –
to navigate
12. SC 09
Size + or Size –
to navigate
13. SC 10
Size + or Size –
to navigate
14. SC 12
Press Mode to
Select Code
Press Mode to
Select Code
For use in 50Hz based countries
(Europe, UK,
Australia…)
to avoid
flicker
For use in 60Hz based countries
(USA,
Canada…)
50-60HZ MAINS SUB MENU
AC 50HZ FORMAT
Size + or Size –
to navigate
AC 60HZ FORMAT
Size + or Size –
to navigate
PREVIOUS MENU
Mode
Press
Mode
Press
Mode
Size + or Size –
to navigate
15. SC 13
Size + or Size –
to navigate
16. PREVIOUS MENU
Press MODE
Advanced Programming
31
Page 32

TROUBLESHOOTING
Q. How should I clean the Acrobat HD?
A. A
t least once per w
eek, clean the Acroba
t HD with a sof
t dr
y
cloth or an electrosta
tic dusting cloth.
DO NOT
use liquid
cleaners on an
y of the plastic sur
faces.
Q. The Remote Control is not functioning properly. What should I do?
A. Aft
er ensur
ing y
ou have fresh batter
ies installed in the r
emot
e
control, please r
eset the r
emot
e contr
ol back t
o factor
y settings
.
Simply pr
ess and hold the [FIND]
and [MODE]
butt
ons on the
r
emot
e contr
ol f
or a
t least 3 sec
onds
, or un
til the LED indicator
beg
ins t
o flash. T
hen, attempt nor
mal operation of the r
emot
e
contr
ol func
tions.
Q.
Can I use the Acrobat HD with a computer?
A. Yes, the L
CD of the Acroba
t can be used along with a c
omputer.
A
lthough the Acroba
t will not mag
nify c
omput
er images
, it is
possible t
o use the Acroba
t’s built
-in L
CD with either the Acroba
t
camer
a or a c
omput
er (equipped with a standar
d DVI
c
onnec
tion). This per
mits a single LCD displa
y t
o be used f
or
either pur
pose
. An optional DVI t
oggle bo
x is specifically
desig
ned for this applica
tion. P
lease contac
t y
our local Enhanc
ed
V
ision dealer f
or
mor
e details.
32
Troubleshooting
Page 33

ACROBAT HD SPECIFICATIONS
Product Dimensions:
20” LCD: 21”H x 19”W x 8”D (53cm x 48.25cm x 20cm)
22” LCD: 21”H x 20”W x 8”D (53cm x 51cm x 20cm)
24” LCD: 21”H x 22”W x 8”D (53cm x 56cm x 20cm)
27” LCD: 21”H x 25”W x 8”D (53cm x 63.5cm x 20cm)
Product Weight:
20” LCD: 18.4 lbs / 8.35 kg
22” LCD: 18.6 lbs / 8.5 kg
24” LCD: 19.6 lbs /8.9 kg
27” LCD: 21 lbs / 9.5 kg
Display:
Type: TFT Active Matrix LCD Average lifetime: 25,000 hours
Monitor (common to *20”, *22",*24 & *27" models):
Resolution: 1600 x 900 (20" model)
Resolution: 1920 x 1080 (22”, 24” & 27" models)
Response Rate: 5 milliseconds (20”, 22" & 24" monitors)
Response Rate: 3 milliseconds (27” monitor)
* all monitor specifications subject to change without prior notice
Magnification range:
20” LCD: 1.6X (minimum) - to 74.2X (maximum)
22” LCD: 1.7X (minimum) - to 79.3X (maximum)
24” LCD: 1.9X (minimum) - to 86.8X (maximum)
27” LCD: 2.0X (minimum) - to 99.5X (maximum)
20”, 22” 24” Field of View (Near Mode): 10.8 inches (min); .24 (max)
27” Field of View (Near Mode): 11.6 inches (min); .24 (max)
20”, 22” & 24” Working Distance (Near Mode): 17 inches
27” Working Distance (Near Mode): 18.4 inches
Video output Resolution on LCD:
SMPTE 296M – HD 720p 60/50
Viewing Modes:
Color, Black & White, High Contrast, Positive/Negative, Digital Color Select (5 modes)
Power Supply:
Input voltage/current: 120-240 VAC / 0.3-0.5A (nominal)
Frequency: 60/50 Hz
Power usage: 27W (nominal)
Equipment Classification (IEC 601-1):
Type of Protection: Class 1
Degree of Protection: Type B
Mode of Operation: Continuous
Operating temperature range: 10-40°C / 50-104°F
Storage/transport temperature range: 0-60°C / 32-140°F
Warranty: 2 years
Acrobat HD Specifications
33
Page 34

WARRANTY STATEMENT
Enhanced V
ision
Acrobat Video Magnifier W
arranty Policy
Enhanced Vision pr
oduc
ts ar
e desig
ned t
o give y
ou the highest qualit
y image
,
convenien
t features, ease of use and r
eliable ser
vice. The Acrobat HD has been
inspected and tested prior to shipping. Enhanced Vision warr
ants the Acr
oba
t HD
against defects in material and work
manship under nor
mal use for
two years
fr
om
the date of original pur
chase. Enhanced Vision, a
t its option, will a
t no char
ge either
r
epair the pr
oduc
t or r
eplac
e it dur
ing the warrant
y per
iod. Ther
e ar
e no other
e
xpr
essed or implied warranties accompan
ying this pr
oduct.
T
his warrant
y does not cover: a) Defec
ts or damage from misuse, use in other than
nor
mal and cust
omar
y manner
, ac
ciden
t or neglec
t; b
) Defec
ts or damage fr
om
impr
oper operation, maintenance, installa
tion, adjustment, altera
tions or modifica
tion;
c) Defec
ts or damage from spills of food or liquid; d) All plastic sur
faces and all other
ext
ernally exposed parts that ar
e scratched or damaged due t
o nor
mal use; e)
Damage due t
o operation of the Acrobat HD with equipmen
t not supplied by
Enhanc
ed V
ision.
•
You must provide pr
oof of pur
chase, bear
ing the date of pur
chase
, in or
der t
o
receiv
e warrant
y ser
vice.
•
An
yone using this pr
oduc
t does so knowingly assuming cer
tain r
isks
, due t
o the
need t
o utiliz
e vision enhanc
ement devices.
•
A 2-year ext
ended warrant
y option is a
vailable within 12 months from the date of
pur
chase
. P
lease contac
t Enhanced Vision f
or detailed informa
tion.
Service Process
I
n the even
t tha
t t
echnical suppor
t or r
epair ser
vic
e is needed
, please contac
t your local
Enhanced Vision r
epr
esentativ
e or the Enhanced Vision warrant
y ser
vic
e center.
I
f warrant
y ser
vic
e is r
equired, please contac
t Enhanced Vision at (800)440-9476 ext.3
Monda
y thr
ough Frida
y, between 8 a.m. and 5 p
.m. P
acific S
tandard T
ime (PST
) t
o r
equest
a r
etur
n author
iza
tion number. Warranty repairs will not be accepted without a valid
return authorization number
.
You may wish to keep the original product packaging in case warranty service is
required. The manufacturer cannot provide packaging for warranty repairs.
NOTE: Please completely fill out and send in the enclosed warranty registration
card.
34
Warranty Statement
Page 35

OTHER ENHANCED VISION PRODUCTS
DaVinci
DaVinci is a high performance desktop video
magnifier (CCTV), featuring HD, text-to-speech (OCR)
and a 3-in-1 camera. With HD you will experience high
definition color and contrast giving you a beautiful,
crystal clear picture and vibrant colors. Experience the
joy of reading with our new text- to-speech feature.
DaVinci will read any printed text aloud with the push of
a button.
Magnification: 24” LCD: 2x (min.) - to 80x (max.)
Pebble-mini
Pebble-mini’s ultra-compact design makes it the ideal
hand-held magnifier whether you’re home or on the
go. Easily read prescriptions, mail, labels, price tags,
menus and so much more. 3.0”LCD screen. Freeze
frame and image capture.
28 available viewing modes.
Magnification 2X to 10X
Amigo
Amigo is a truly portable desktop magnifier. Optimal
viewing is achieved with a tilting 6.5 inch viewing
screen. Amigo provides 3.5 to 14x digital magnification
and the lightest weight in its class. Amigo is battery
operated and can be taken anywhere.
Magnification: 3.5X – 14X (digital)
Other Enhanced Vision Products
35
Page 36

Transformer
Transformer is the most flexible and portable solution
for reading, writing and viewing magnified images
at any distance. Compatible with popular magnification
software and the latest Windows operating systems.
Transformer’s unique design is perfect for work,
home or school. Weighs less than 3 pounds. Battery
operated up to 4 hours. 28 custom color select
modes.
Magnification 2.4X to 30X
(based on 17”screen)
Merlin elite
See and hear the difference!
Merlin elite is a high performance desktop video
magnifier (CCTV), featuring HD and text-to-speech
(OCR). High definition color and contrast provides a
beautiful, crystal clear picture and vibrant colors. Merlin
elite’s unique design allows for a wide field of view,
displaying more text on the screen.
Magnification: 2.4x - 70x
Merlin ultra HD
Merlin ultra HD’s camera technology produces an
even truer, more natural image. Easily read books
and magazines, read and write letters, manage
your financial records, view color photos, do
crossword puzzles, and even pursue a favorite
hobby.
Magnification:
20” LCD: 1.9x (min) to 51.2x (max)
22” LCD: 2.1x (min) to 55.9x (max)
24” LCD: 2.3x (min) to 61.2x (max)
36
Other Enhanced Vision Products
Page 37

Accessories
DVI T
oggle Box
A
llows y
ou to toggle between either the Acroba
t HD or y
our
c
omput
er displa
y (DVI c
onnec
tion).
Smart Video
C
onnec
ts Enhanc
ed V
ision’s lo
w vision devic
es t
o a c
omput
er
monitor.
Carrying Cases
Conv
enien
t cases f
or storage and tr
anspor
t of all Enhanc
ed V
ision
products.
Battery
R
echar
geable batter
ies f
or Enhanc
ed V
ision’s lo
w vision devices.
Contact information:
(US Office) Phone: (714)465-3400 Fax: (714)374-1821
(UK Office) Phone: +44 (0)115 9442317 Fax: +44 (0)115 9440720
(DE Office) Phone: +49 (0) 6078 969827-0 Fax: +49 (0) 6078 969827-33
www.enhancedvision.com
T
echnical Support:
Main Toll Free (800) 440-9476 ext. 3
Local Phone: (714) 465-3400 ext. 3
E-mail: evsupport@enhancedvision.com
Other Enhanced Vision Products
37
Page 38

NOTES
Notes
Page 39

Notes
NOTES
Page 40

T
he Acrobat HD video mag
nifier is desig
ned t
o enlarge and
enhanc
e images t
o improve the liv
es of people who have
lo
w vision. T
he extent t
o which the Acroba
t HD can improv
e
the abilit
y t
o see images and tex
t depends on a person
's
individual c
ondition and lev
el of visual impair
ment. T
he
Acroba
t HD is not desig
ned t
o r
estore vision, c
orrect ey
e
c
onditions or halt degenerativ
e vision loss
. A
n ey
e-car
e
prof
essional can best determine the suitabilit
y of the
Acroba
t HD for a pa
tien
t's specific c
ondition. F
or mor
e
informa
tion, please visit
www
.enhancedvision.com.
www.enhancedvision.com
(800) 440-9476 (US Office, toll free)
(714) 465-3400 (US Office)
+44 (0) 115 9442317 (UK Office)
Tel. +49 (0) 6078 969827-0 (DE Office)
Fax +49 (0) 6078 969827-33
(DE Office)
Part # MAN-0007-00 Rev X2
March, 2014
Copyright © 2009 by Enhanced Vision. All rights reserved.
Product specifications subject to change without prior notice.
 Loading...