

Page 1
Page 2
2
Please Read all of these instructions regarding your unit and retain them for future reference.
Read this manual fully and carefully before operating this in-car DVB-T receiver.
Keep this manual handy as a reference for operating procedures and safety
information.
Pay close attention to all warnings in this manual and follow the instructions carefully.
Do not allow other people to use this system until they have read and understood the
operating instructions.
Do no block or cover the slots and openings in the cabinet. These openings are provided
for ventilation and to ensure reliable operation of the product and to protect it from
overheating.
Do not operate this in-car DVB-T receiver if doing so in any way will divert your attention
of your vehicle. Always observe safe driving rules and follow all traffic regulations. If
you experience difficulty in operating the system or reading the display, park you
vehicle in a safe location and make necessary adjustment.
Do not push objects of any kind into this product through openings as they may touch
dangerous voltage points or short-out parts that could result in a fire or electric shock.
Do not put this unit near the liquids. Electrical shock could result. Also, this unit damage,
smoke, and overheat could result from splashing liquids on receiver.
Be sure to run the vehicle engine while using this unit to avoid battery exhaustion.
CAUTION: TO REDUCE THE RISK OF ELECTRIC SHOCK –
DO NOT REMOVE COVER (OR BACK)
NO USER-SERVICEABLE PARTS INSIDE REFER SERVICING
TO QUALIFIED SERVICE PERSONNE;
The lighting flash with arrowhead symbol within an
equilateral triangle is intended to alert the user to the
presence of uninsulated dangerous voltage within the
product’s enclosure that may be of sufficient magnitude to
constitute a risk at electric shock to persons.
The exclamation point within an equilateral triangle is
intended to alert the user to the presence of important
operating and maintenance (servicing) instructions in the
literature accompanying the appliance
Page 3
3
On Safety
Do not attempt to install or service your DVB-T receiver by yourself. Installation or servicing
by people without training and experiencing in electronic equipment and automotive
accessories may be dangerous and could expose you to the risk of electric shock or other
hazards.
If the receiver does not work properly, please pull out the plug for safety. Contact us for
further technical support.
If any solid object or liquid fall into the cabinet, unplug the unit and have it checked by
qualified personnel before operating it any further.
On Placement
Do not install the in-car DVB-T receiver where it may (-) obstruct the driver’s vision, (ii)
impair the performance of any of the vehicle’s operating systems or safety features,
including air bags, hazard lamp buttons or (iii) impair the driver’s ability to safely operate
the vehicle.
On Operation
The unit may not work because of improper operation. The limited warranty does not cover
consequent losses that rise from improper usage.
Precaution
Page 4

4
Table of Contents
I. Quick Guide for First-time User .......................................................... 9
I.1. DVB-T TV Watching .......................................................................... 9
I.2. DVB-T Radio Listening ..................................................................... 12
II. DVB-T TV/Radio Menu ..................................................................... 13
II.1. Radio ...................................................................................... 13
II.2. Program List ............................................................................ 13
II.3. Automatic Channel Search ......................................................... 14
II.4. DVB-T Audio Settings ................................................................ 14
II.5. Channel Information ................................................................. 15
II.6. Channel Management ................................................................ 15
II.7. Subtitle ................................................................................... 17
II.8. Teletext ................................................................................... 17
II.9. System Settings ....................................................................... 18
II.9.1 Display Setting ......................................................................... 18
II.9.2 Time Setting ............................................................................ 18
II.9.3 Region/Language ...................................................................... 19
II.9.4 Software Version ...................................................................... 19
II.9.5 Reset Default ........................................................................... 19
III. Trouble Shooting Q&A ..................................................................... 20
IV. Specification .................................................................................. 21
Page 5
5
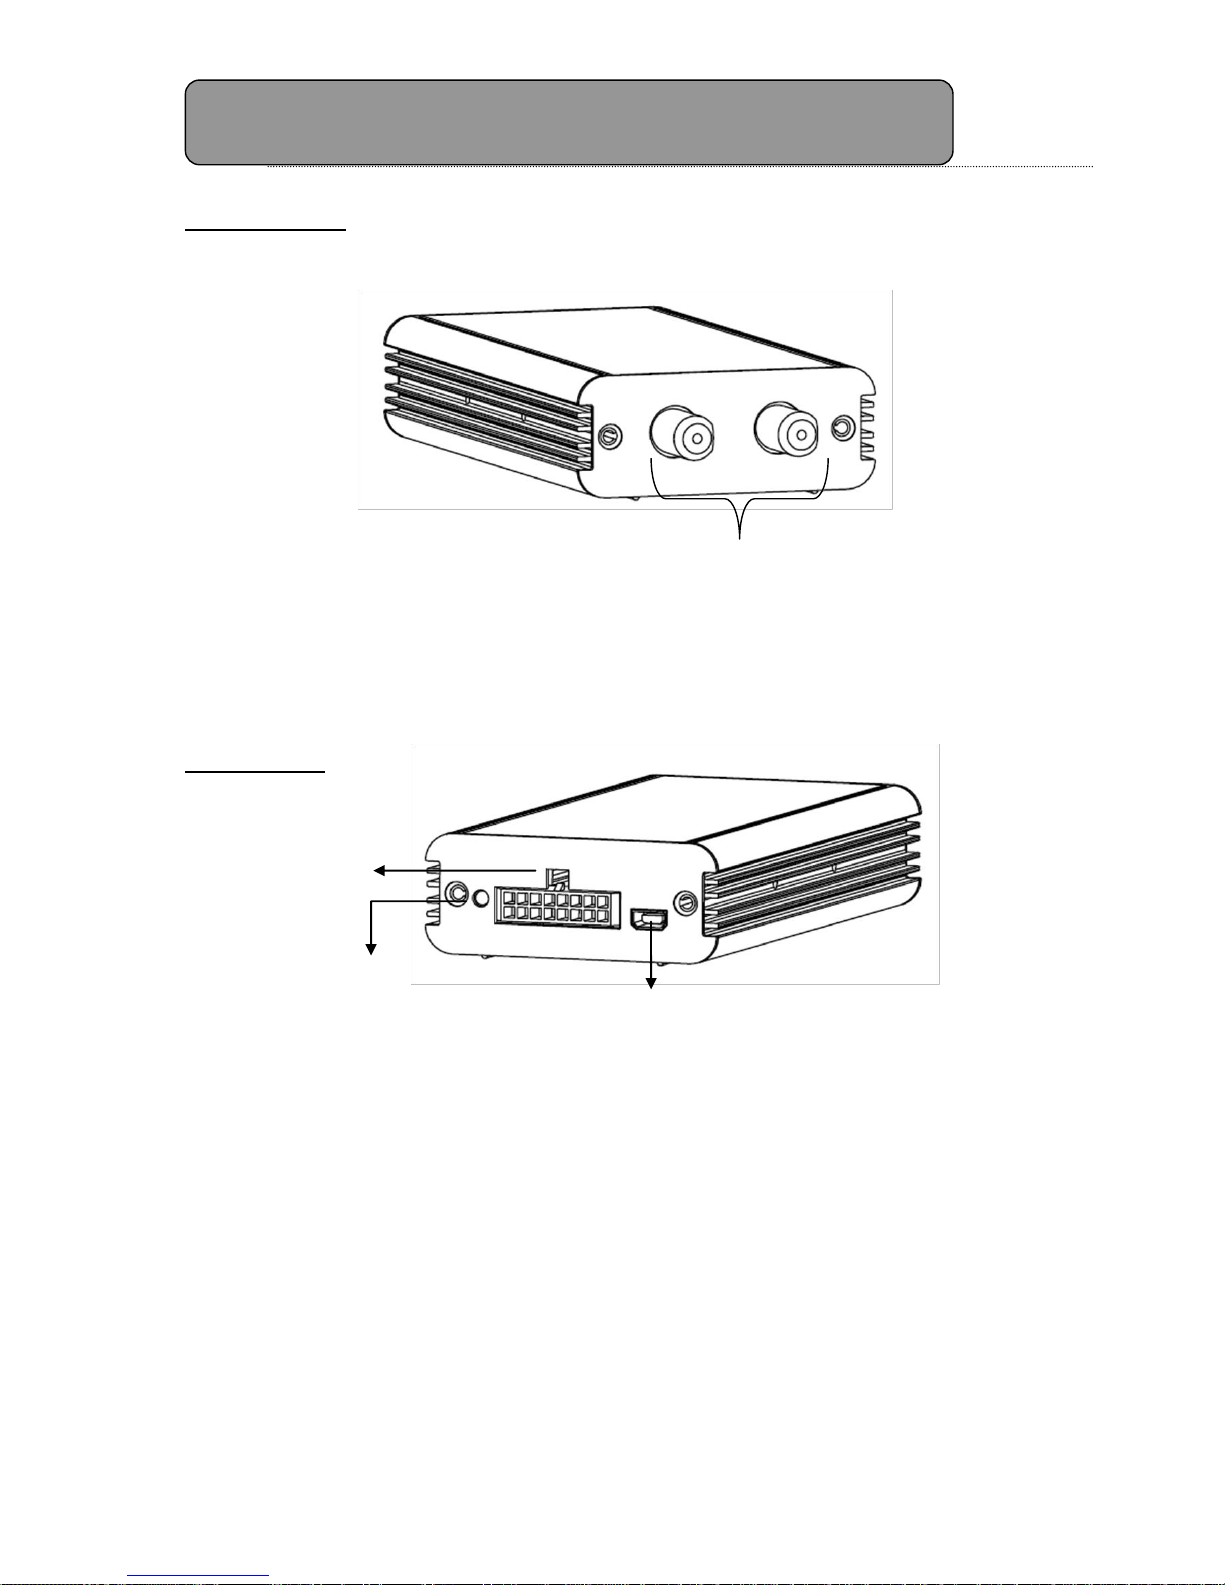
Front Panel
(1) Ant. In: Antenna connection port (NOTE: This unit provides +5V
antenna power on these inputs for the supplied powered active
antennas)
Back Side
(2) Power: “Power” LED indicates if the 12V or 24V power supply has been
successfully applied to the in-car DVB-T receiver.
(3) Power/AV/IR Port: Port for connecting power, the infrared receiver
module, and digital TV audio/video signal output.
(4) Software Upgrade: earphone connection jack for software upgrade use
Warning: Make sure all Power Cables are connected correctly.
Warning: Please connect the antennas before switching the unit on.
If you turn the unit on before connecting the antennas, the receiver may not receive any signal.
Please connect the antennas first and then turn on the unit.
Unit Description & Installation Guide
(1) Ant. in
(3) Power/AV/IR port
(4) Software Upgrade
(2) Power LED
Page 6
6
Antenna Connection
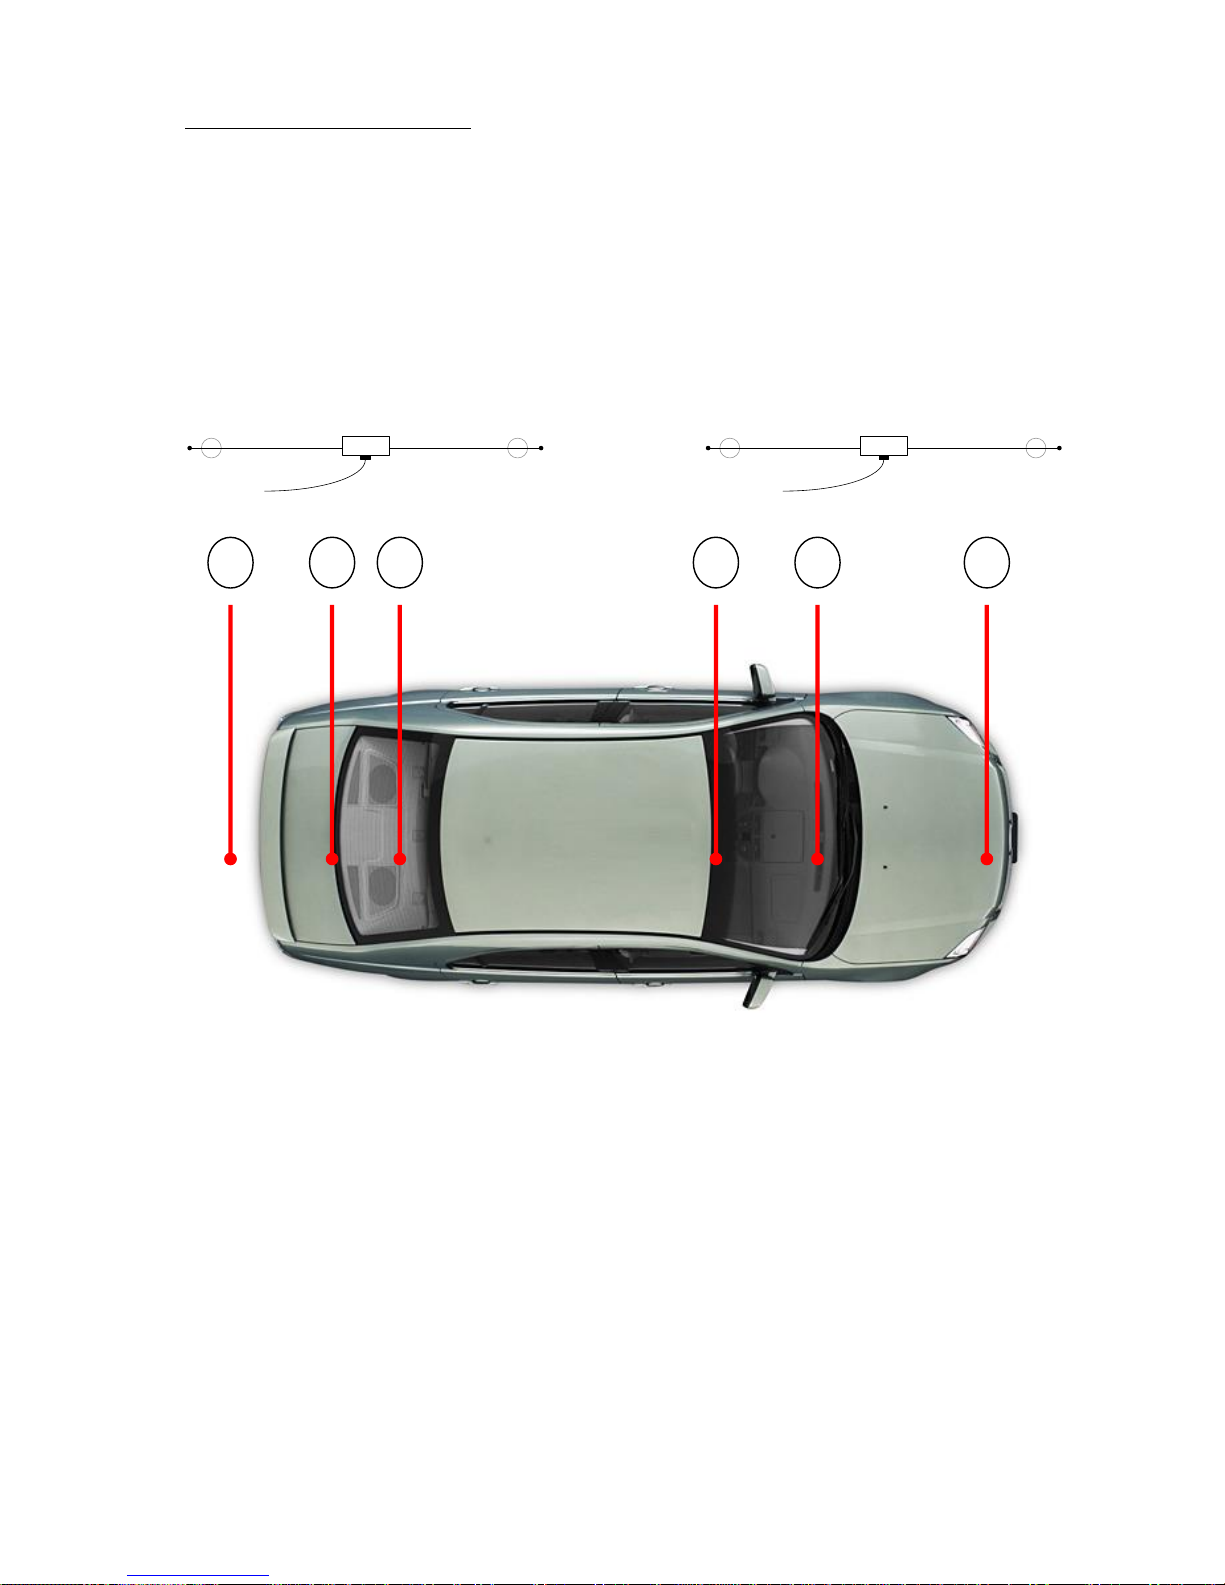
DVB-T reception will vary from vehicle to vehicle and you may have to try several
mounting positions to determine which position provides the strongest signal in your
vehicle.
We recommend for one antenna to be mounted at the front and one at the rear of the
vehicle.
Please refer to the Diagram below for some of our recommendations:
Rear Location Front Location
(1) Behind the Rear Bumper. (providing it’s not Metal)
(2) Bottom of Rear Windscreen
(3) Top of Rear Windscreen
(4) Top of Front Windscreen
(5) Bottom of Front Windscreen
(6) Behind the Front Bumper. (providing that it’s not Metal)
Once a suitable position is found, carefully route the antenna cables to the receiver unit
and then connect to the Antenna Inputs.
1
2 3 4 6 5
Page 7
7
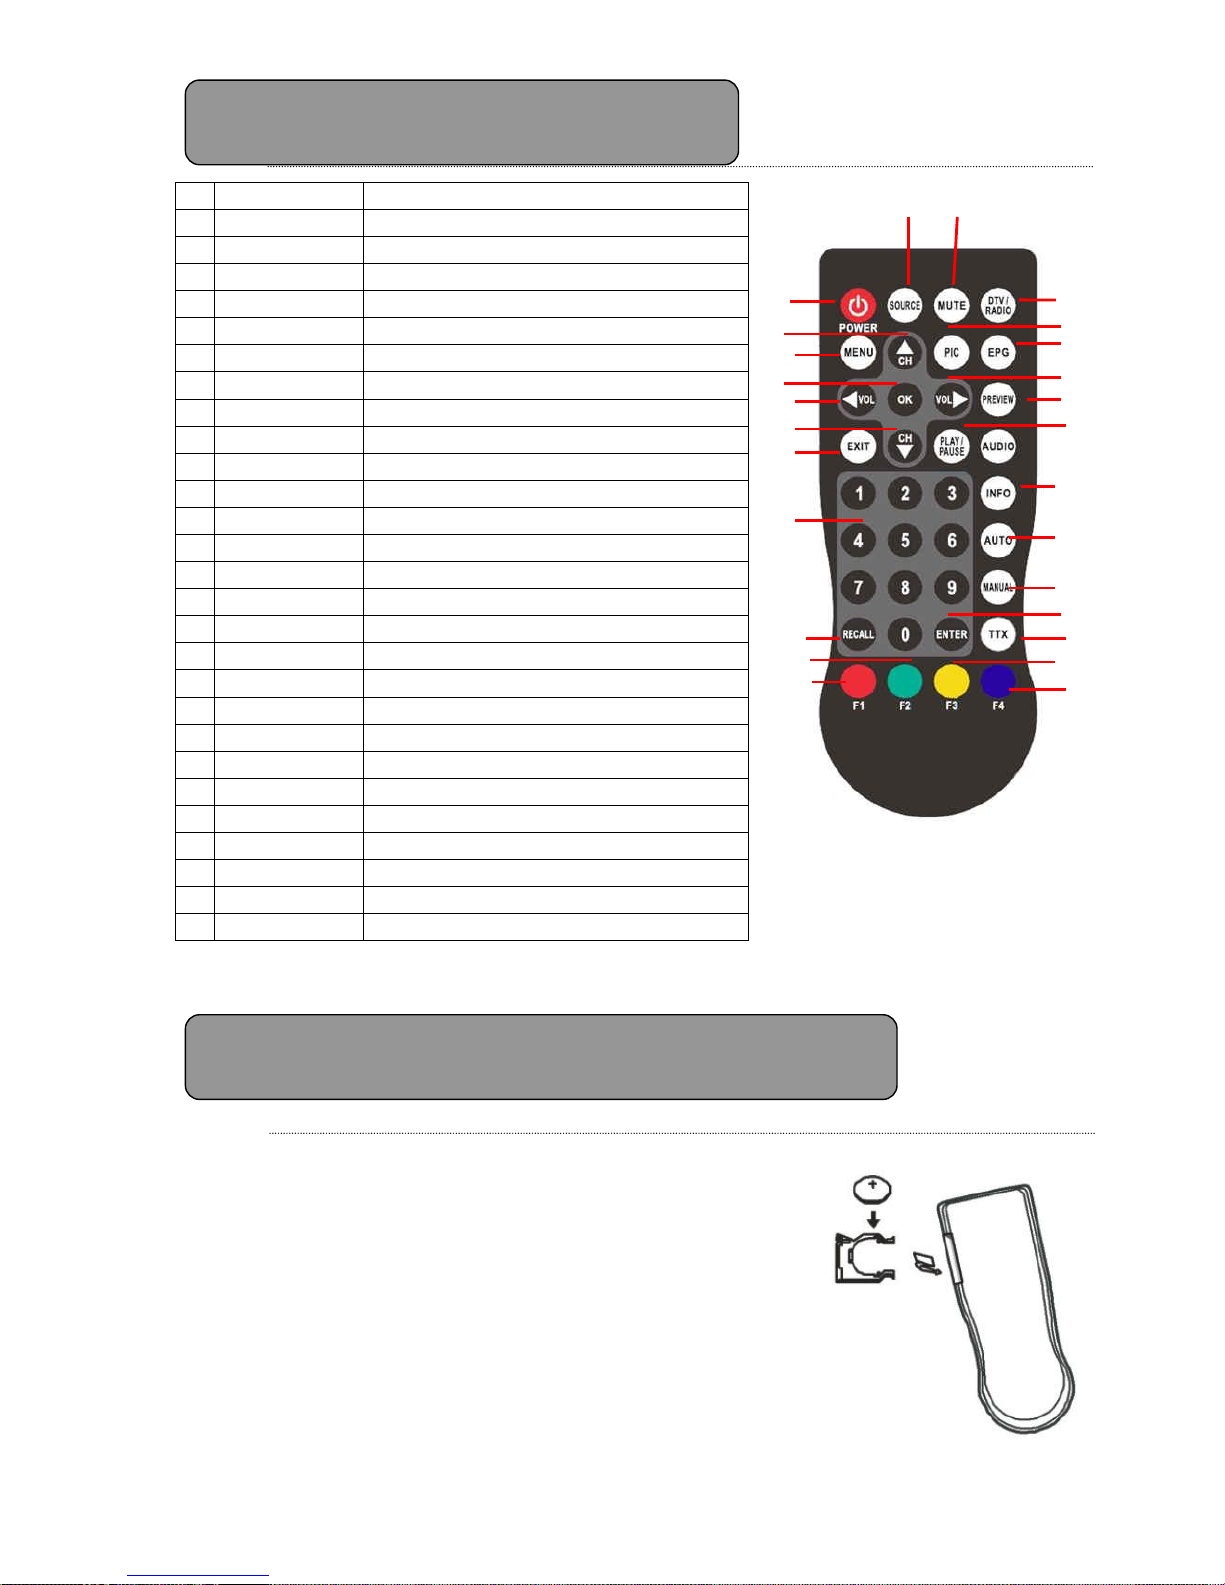
Button name
Function
1
SOURCE
No function
2
POWER
Select power-on or stand-by
3
CH ▲
Select channel up or move the cursor up
4
MENU
Enter the setup menu
5
OK
Select the highlighted item
6
VOL
Select volume down or move the cursor left
7
CH▼
Select channel down or move the cursor down
8
EXIT
Exit the current setup
9
Digital keys
10
RECALL
Return to the last selected channel
11
GREEN BUTTON
Hot key to enter Teletext pages in Teletext mode
12
RED BUTTON
Subtitle key in normal operation mode or the hot
13
MUTE
Mute control
14
DTV/RADIO
Select digital TV or digital radio
15
PIC
No function
16
EPG
Electronic Program Guide
17
VOL
Select volume up or move the cursor right
18
PREVIEW
Enter preview mode in DVB-T TV
19
PLAY/PAUSE
Select play or pause
20
AUDIO
Select second language and stereo audio
21
INFO
Display digital TV system information
22
AUTO
To scan channels automatically
23
MANUAL
To manually select channels
24
ENTER
To enter the selected channel number
25
TTX
To display teletext content
26
YELLOW BUTTON
Select page up in the EPG mode or the hot key to
27
BLUE BUTTON
Select page down in the EPG mode or the hot key
Before attempting to operate your remote control,
install the battery as described below.
1. Turn the remote control face down.
2. Press down on the ridged area of the battery cover
and slide it off.
3. Slide another battery in.
Remote Control Operations
Remote Control Battery Installation
(1)
(13)
(14)
(15)
(16)
(17)
(18)
(19)
(20)
(21)
(22)
(23)
(24)
(25)
(26)
(27)
(2)
(3)
(4)
(5)
(6)
(7)
(8)
(9)
(10)
(11)
(12)
Page 8
8
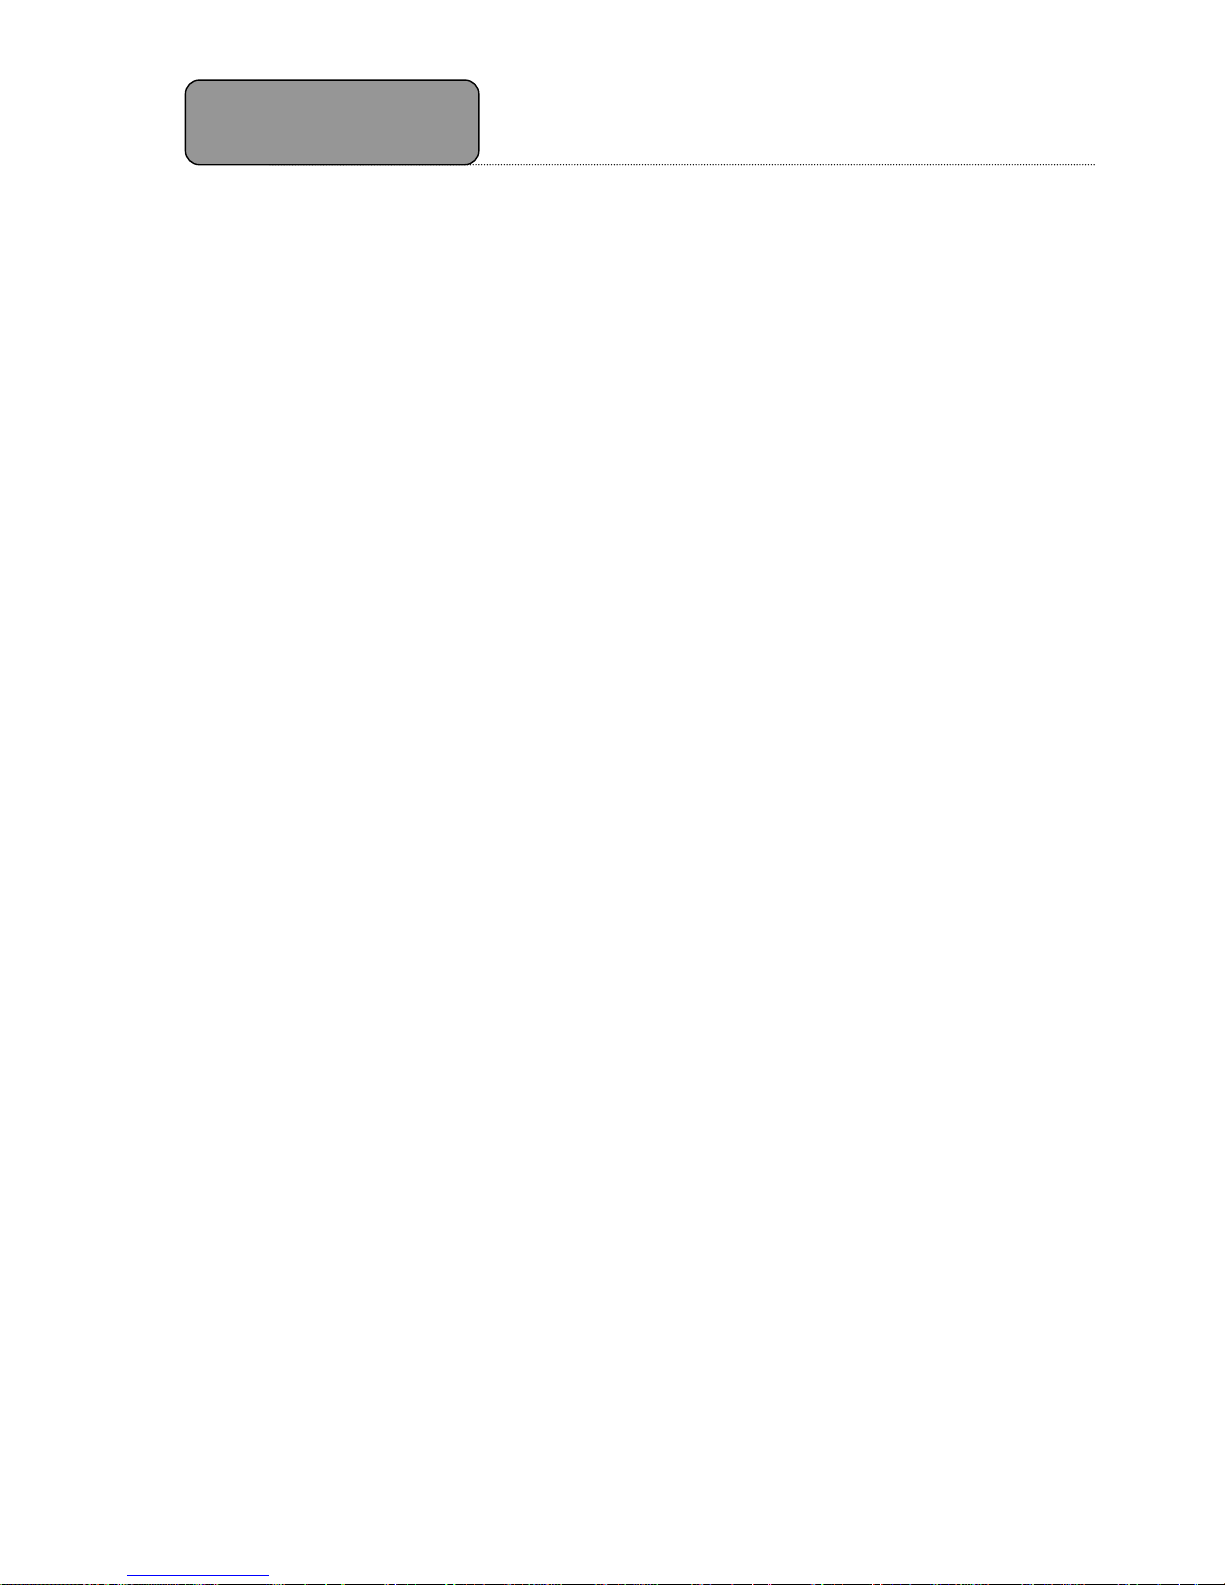
o Connection cable
o Remote control
o IR extension cable
o 2 pcs active antennas (optional)
Accessories
Page 9
9
I. Quick Guide for First-time User
I.1. DVB-T TV Watching
Step 1: Turn on the unit
1. Turn on the vehicles ACC or IGN. (Or start the vehicle)
2. When the unit has power, the POWER LED indicator will illuminate GREEN.
3. Using the remote, press the POWER button to turn it on. The LED on the IR
Sensor will illuminate GREEN and the operation LED on the unit will also
illuminate Green.
NOTE: If the Operation LED does not turn on, please check if the remote
battery is inserted properly.
If the LED on the IR extension cable remains Red, please check if the remote
battery is inserted correctly. If it’s still not working, please refer to the trouble
shooting section.
Step 2: Press [CH▲ ]/[CH]/[VOL]/[VOL] buttons to select “TV”
options and press [OK]/[VOL] button to enter the TV mode
Power LED
Page 10
10
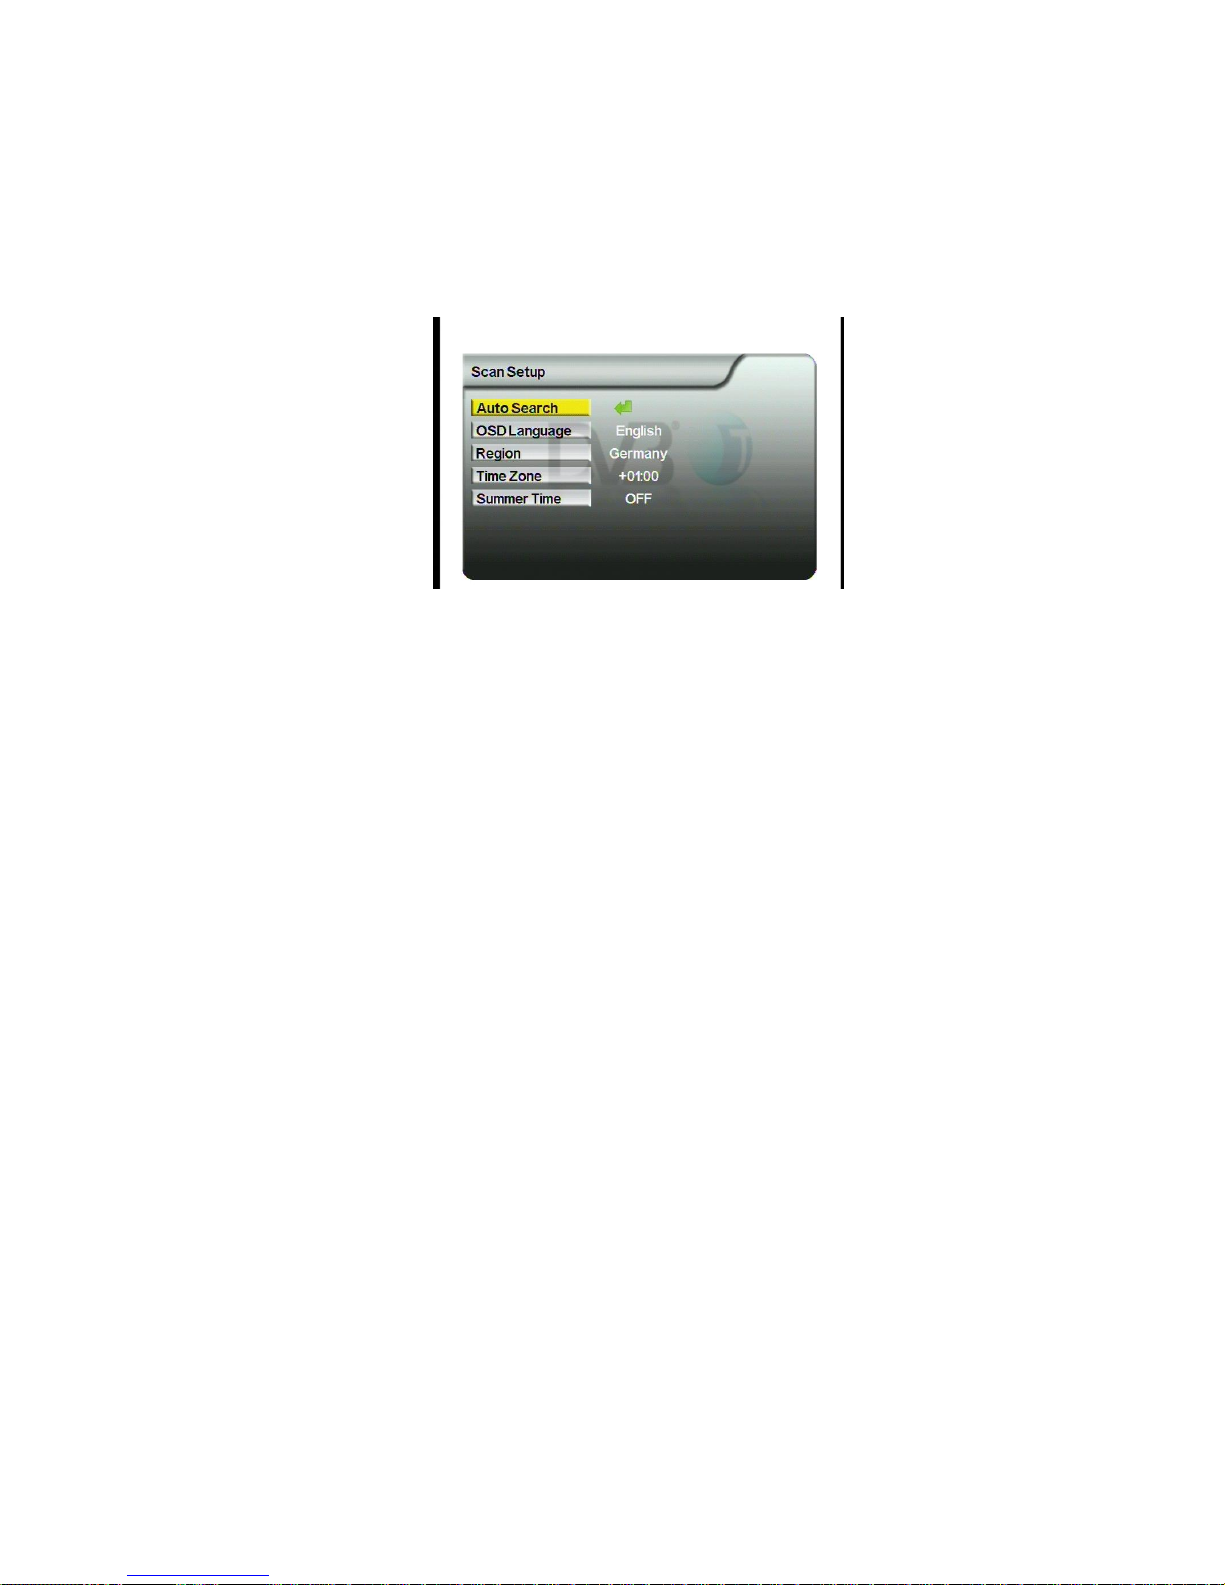
Step 3: Press [OK] button to enter the scan setup.
Step 4: Select your own OSD Language, your located region, whether it’s
summer time at present.
1. Use [CH▲]/[CH] buttons to highlight the item.
2. Use [VOL] button to set the highlight item.
3. Press [CH▲]/[CH] buttons to scroll up and down the options.
4. Select one by pressing the [OK] button or exit the setting by pressing
the [EXIT]/[MENU] button.
NOTE: Time zone setting will be automatically updated once the Region
setting is changed.
Page 11
11
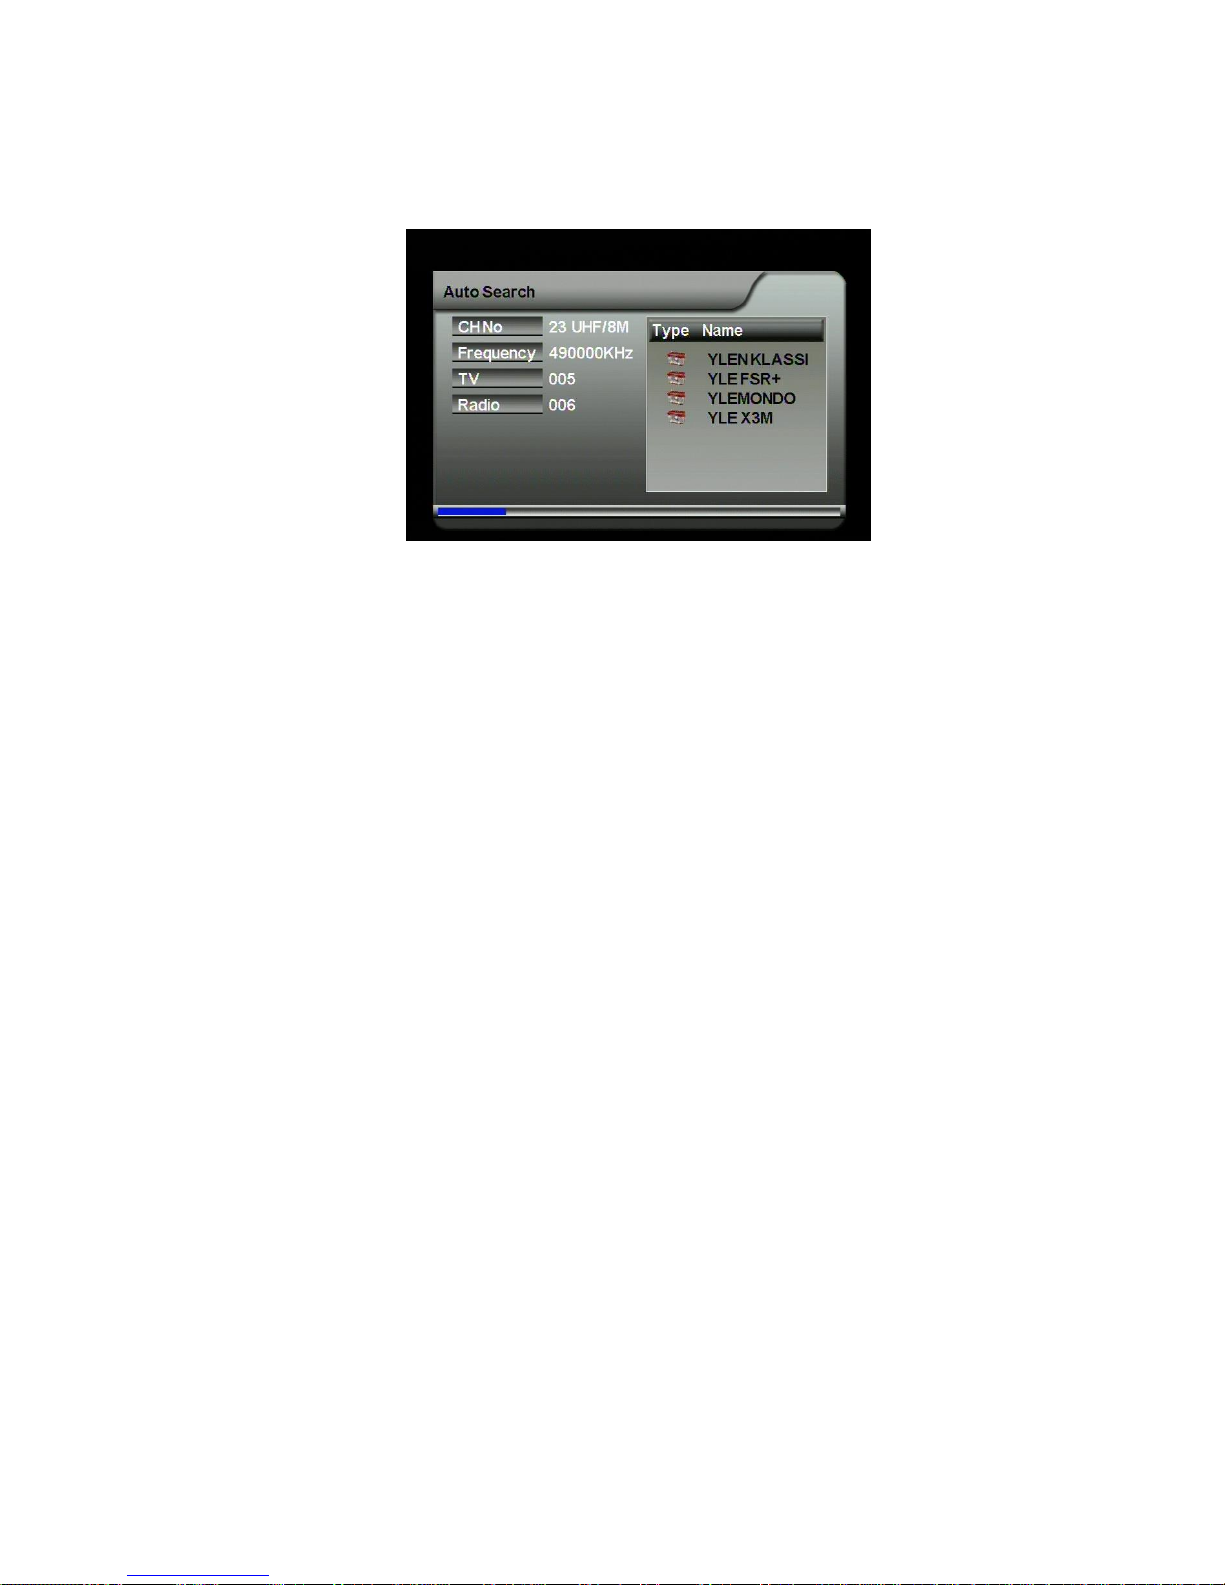
Step 5: Perform auto search to find available DVB-T channels.
1. Use [CH▲]/[CH] buttons to highlight the Auto Search item.
2. Press [OK] button to start.
Step 6: Job well-done! You can now sit back and enjoy your mobile TV.
NOTE: Keep [OK] button pressed to change the aspect ratio of current TV
program.
Page 12
12
I.2. DVB-T Radio Listening
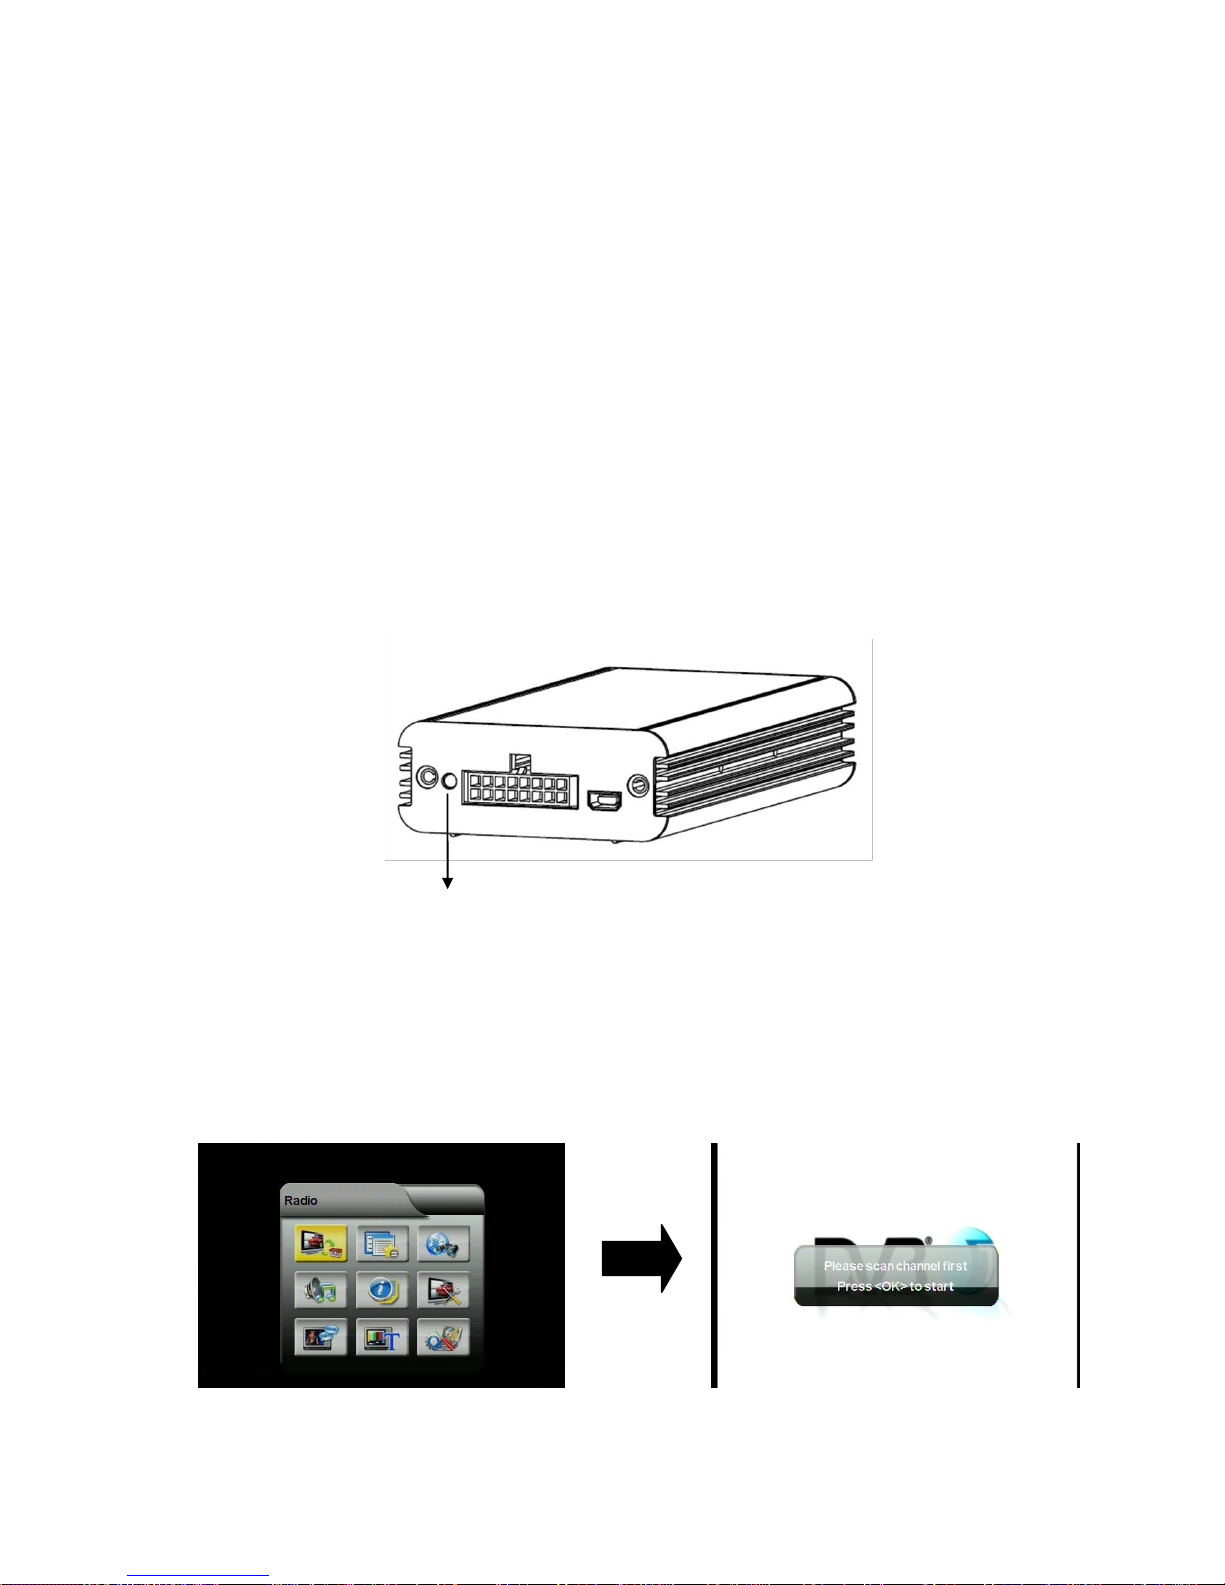
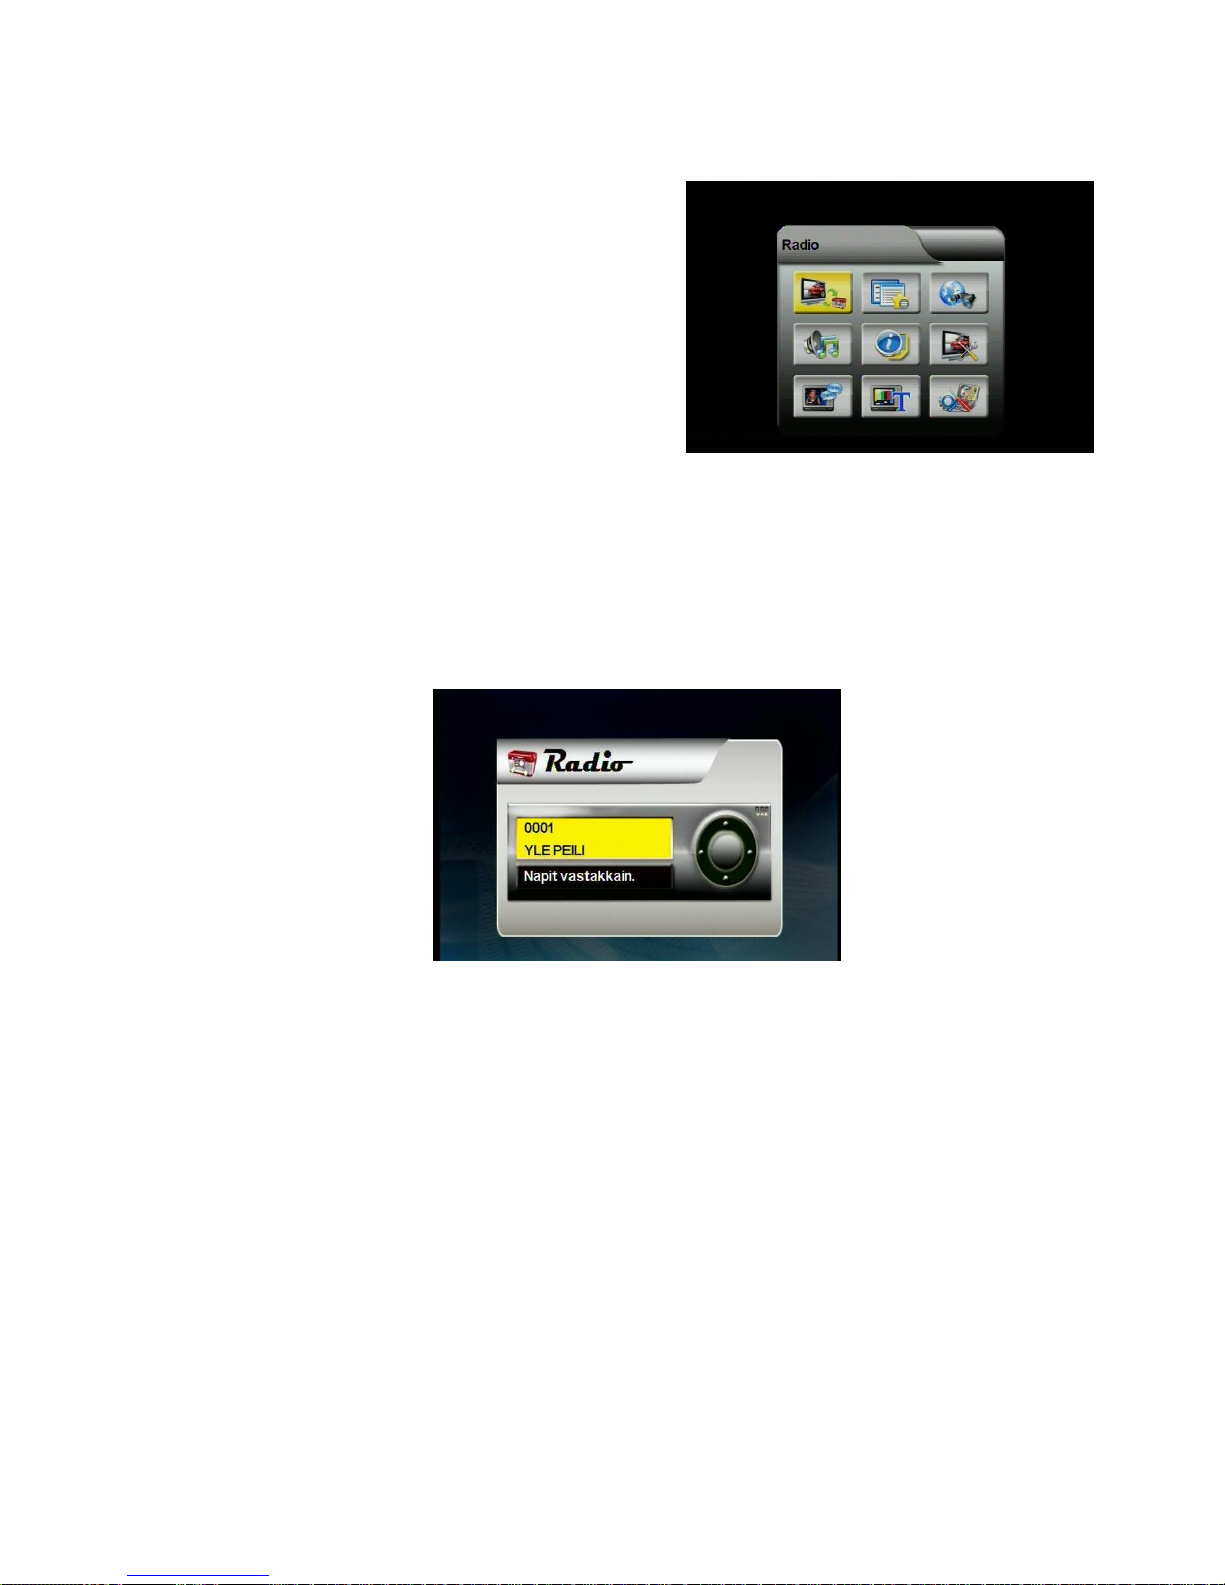
1. Press [Menu] to trigger DVB-T TV Menu.
Use [CH▲] / [CH] / [VOL] / [VOL]
buttons to browse DVB-T menu to
highlight Radio menu item and then
press [OK] button to enter the radio
mode.
2. Press [CH▲]/[CH]buttons to select your preferred radio channel.
3. The radio service will instantly start.
Page 13
13
II. DVB-T TV/Radio Menu
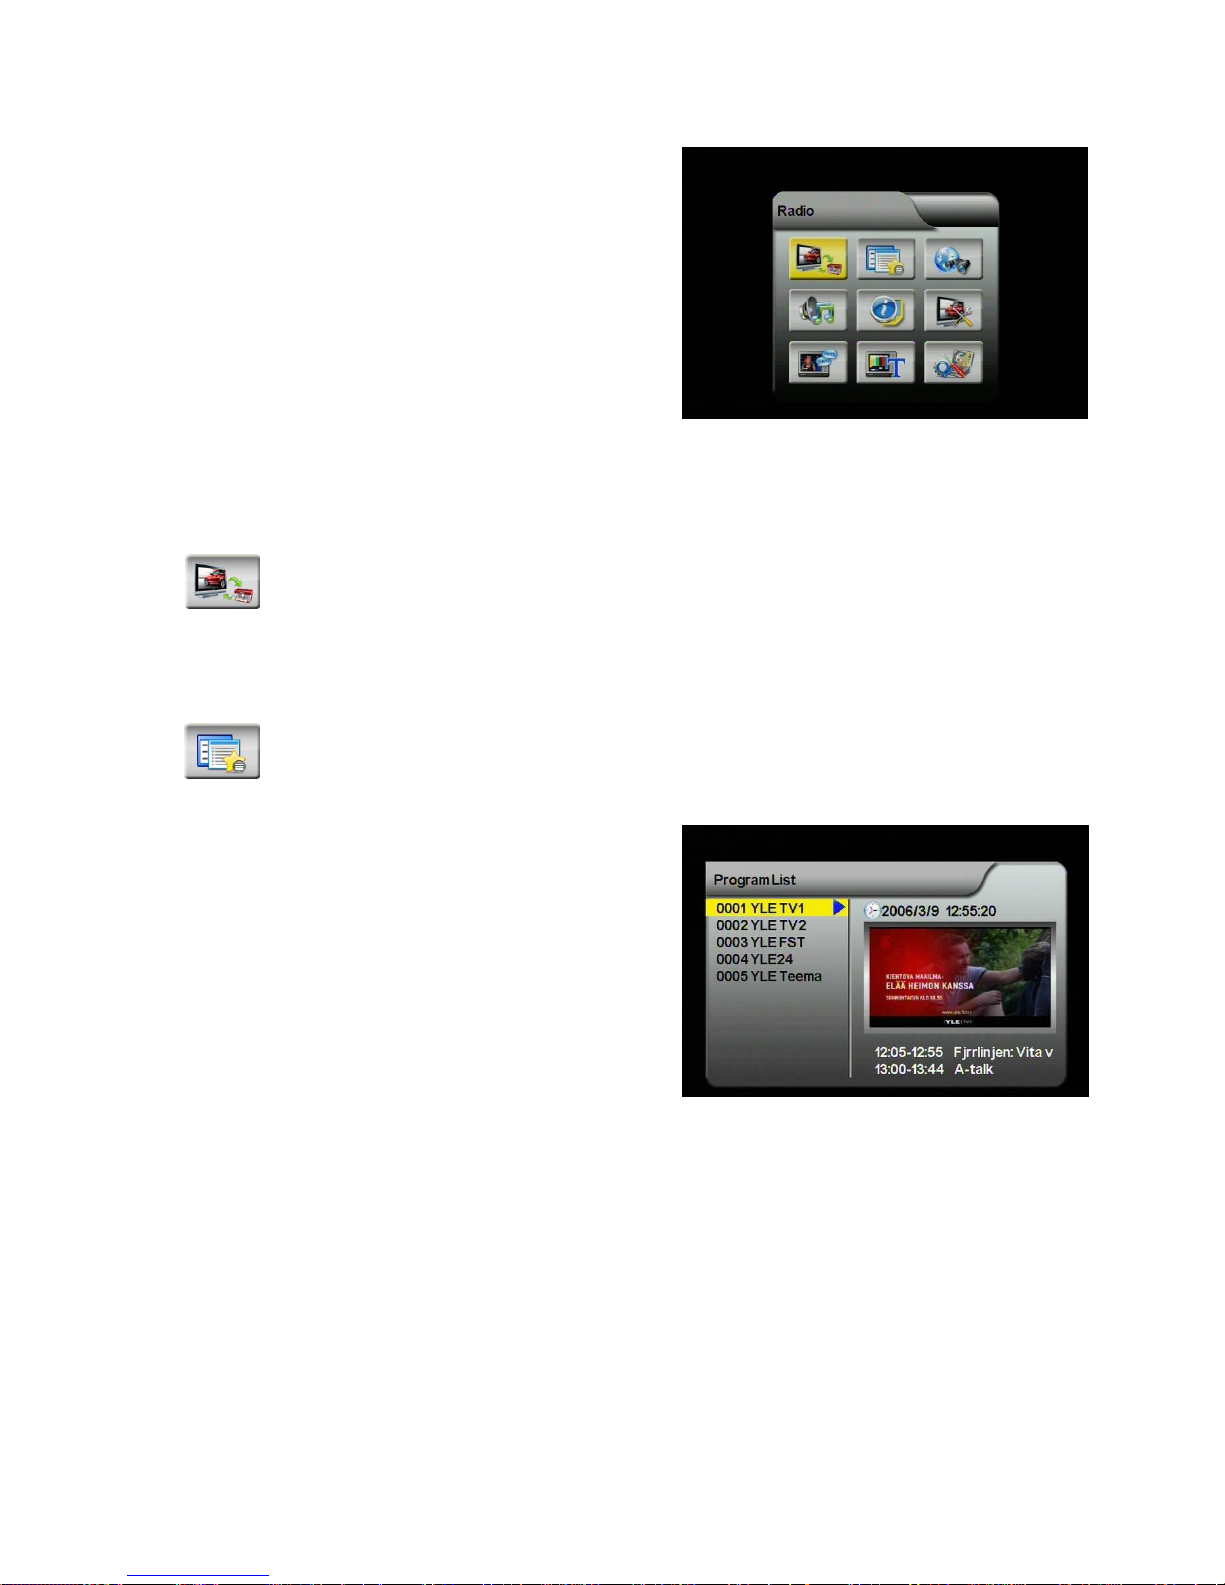
After entering the DVB-T TV or Radio
service, press [MENU] button to show
DVB-T TV/Radio menu. By navigating the
different options, you can have access to
the program list, the channel management,
the automatic channel search function, the
DVB-T audio settings, the channel info, the
subtitle function, the teletext, and the
system setting.
II.1. Radio
To switch to DVB-T Radio program
II.2. Program List
To display channel information, preview the program, and to
access the Electronic Program Guide (EPG)
1. Browse the TV menu screen using
[CH▲] / [CH] / [VOL] / [VOL]
buttons to highlight “Program List”
option. Press [OK] button to enter.
NOTE: you can also press [EPG]
button to enter Program List while
enjoying DVB-T TV/Radio.
2. Press [CH▲]/[CH] buttons to scroll up/down the channel list to preview
the program.
3. Press [VOL] button to show the details of the channel.
4. Press [EXIT]/[MENU] button to exit.
Page 14
14
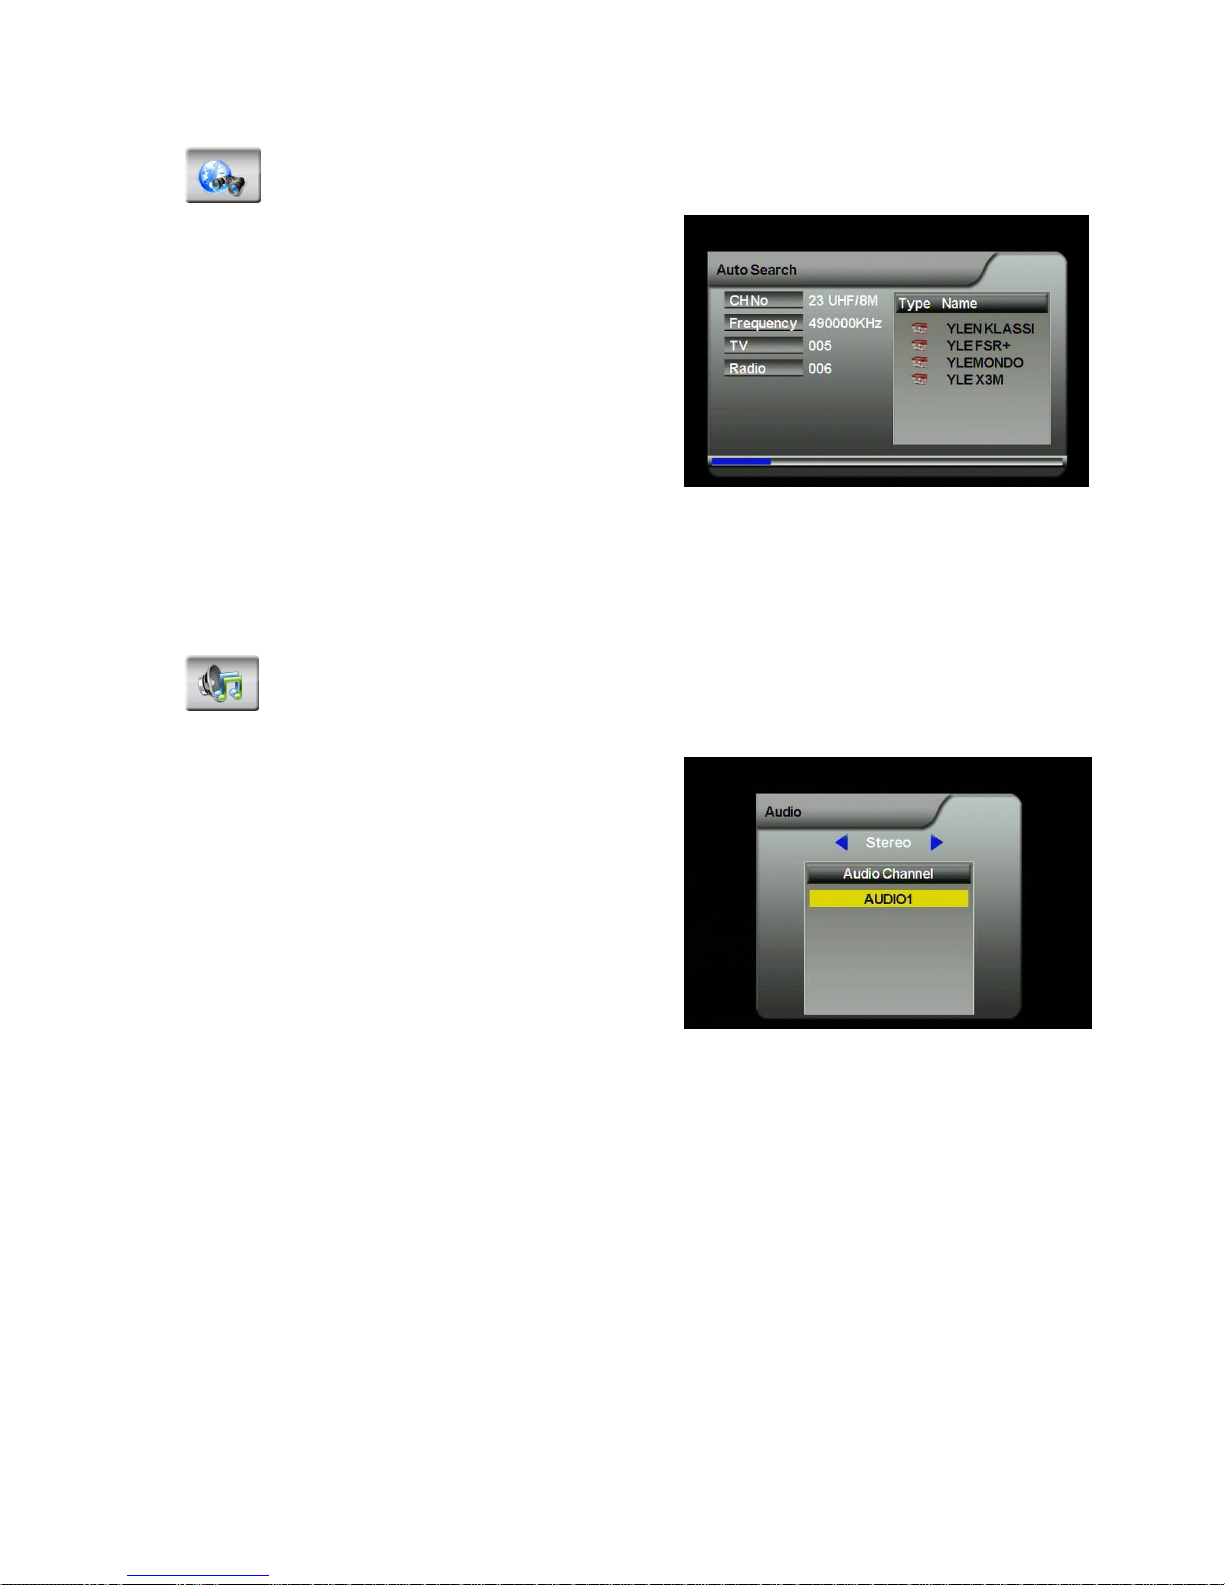
II.3. Automatic Channel Search
To search available channels automatically.
1. Browse the TV menu screen using
[CH▲] / [CH] / [VOL] / [VOL]
buttons to highlight the automatic
search option. Press [OK] button to
enter.
NOTE: you can also press [AUTO]
button to enter Automatic Channel
Search while enjoying DVB-T TV/Radio.
2. Press [OK] button to start the channel search.
II.4. DVB-T Audio Settings
To select either master or secondary language as well as the
audio channel of current service.
1. Browse the TV menu screen using
[CH▲] / [CH] / [VOL] / [VOL]
buttons to highlight the audio option.
Press [OK] button to enter the audio
menu.
NOTE: you can also press [AUDIO]
button to enter Channel Information
while enjoying DVB-T TV/Radio.
2. Use [VOL]/[VOL] buttons to select stereo/left/right audio channel.
Scroll the available language using [CH]/[CH] buttons. Press [OK]
button to select the language.
3. Press [EXIT]/[MENU] key to exit.
Page 15
15
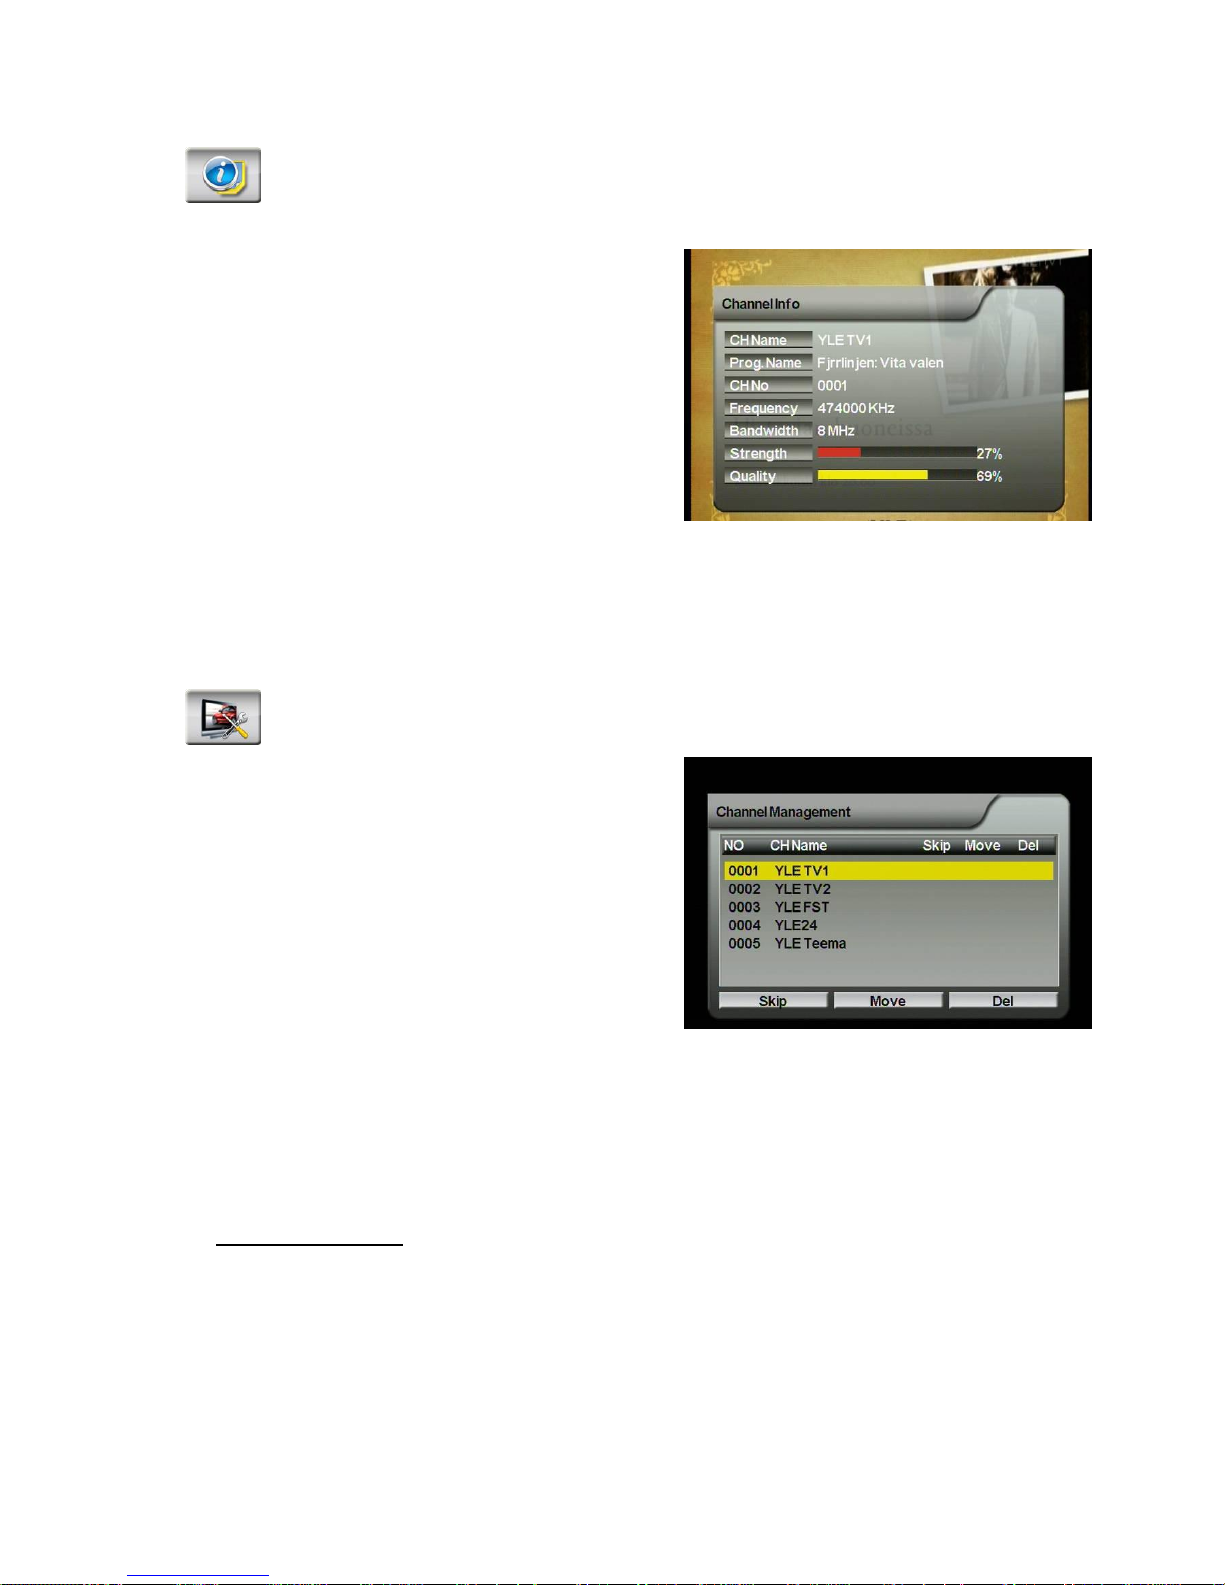
II.5. Channel Information
Provide the information of current service’s system parameters
and signal information.
1. Browse the TV menu screen using
[CH▲] / [CH] / [VOL] / [VOL]
buttons to highlight the channel
information option.
NOTE: you can also press [INFO]
button to enter Channel Information
while enjoying DVB-T TV/Radio.
2. Press [OK] button to display the channel information.
3. Press [EXIT]/[MENU] button to exit.
II.6. Channel Management
To rearrange and to edit the TV channel listing using skip, move,
lock, and delete functions.
1. Browse the TV menu screen using
[CH▲] / [CH] / [VOL] / [VOL]
buttons to highlight the “Channel
Management” option.
2. Press [OK] button to enter Channel
Management menu.
3. Press [CH▲]/[CH] buttons to scroll up/down the channel list. Press [OK]
button to enter the editing menu for a chosen channel.
4. Press [EXIT]/[MENU] button to exit anytime.
Skip a Channel
1. After entering the channel editing menu, select the “SKIP” visual-button on
screen by pressing [VOL]/[VOL] buttons.
2. Press [OK] button to activate or deactivate it.
NOTE: this function “temporarily” removes the channel from the program list.
Page 16

16
Users can restore the channels by deactivating the function.
Page 17
17
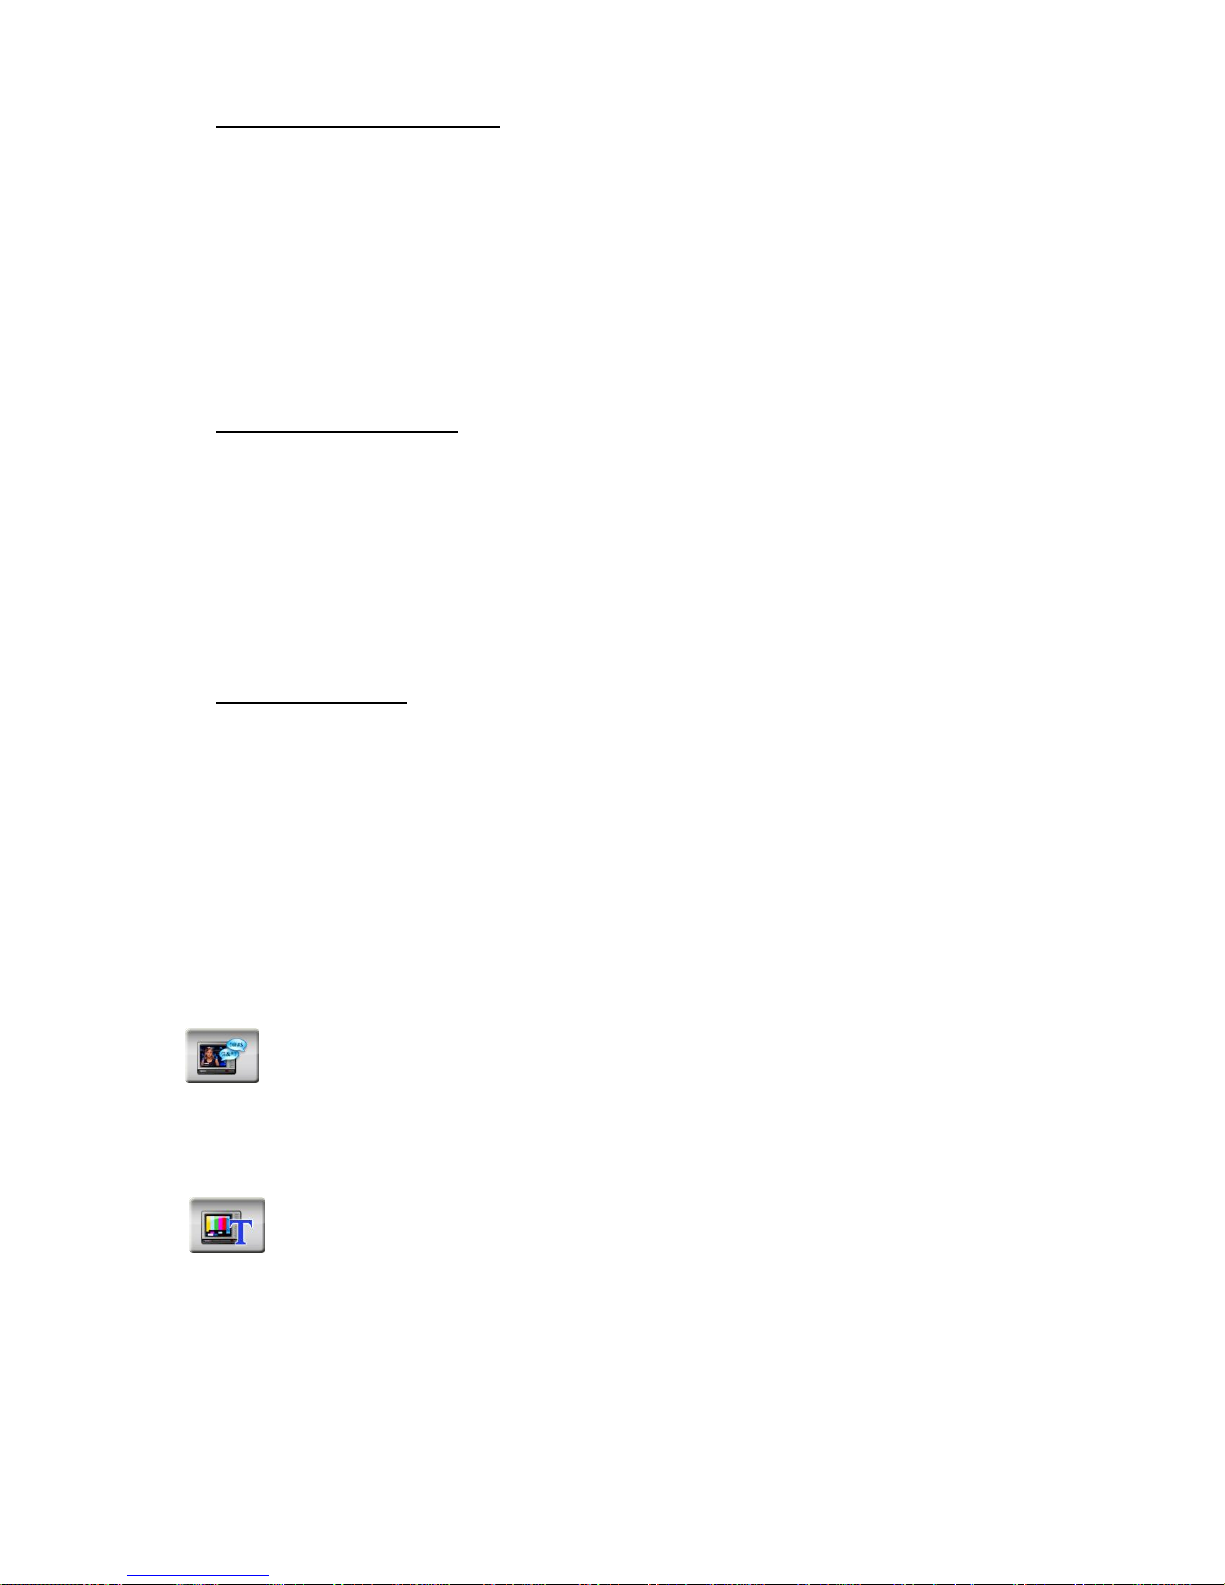
Lock a Channel Access
1. After entering the channel editing menu, select “LOCK” visual-button on
screen by pressing [VOL]/[VOL] buttons.
2. Press [OK] button to activate or deactivate it.
NOTE: Users need to key passwords when they watch locked channels. Please
refer to IV.2.9. Parental Lock page for further details.
Channel Movement
1. After entering the channel editing menu, select the “MOVE” visual-button
on screen by pressing [VOL]/[VOL] buttons.
2. Use [CH▲]/[CH] buttons to move the channel up or down in the list.
3. Press [OK] button to save the new listing.
Channel Delete
1. After entering the channel editing menu, select the “DELETE” visual-button
on screen by using [VOL]/[VOL] buttons.
2. Press [OK] button to delete the channel.
NOTE: this function will “permanently” delete the channel from the current
program list. Users restore the channels only by performing auto search.
II.7. Subtitle
To activate or deactivate the subtitle function.
II.8. Teletext
To enter the teletext menu.
Page 18
18
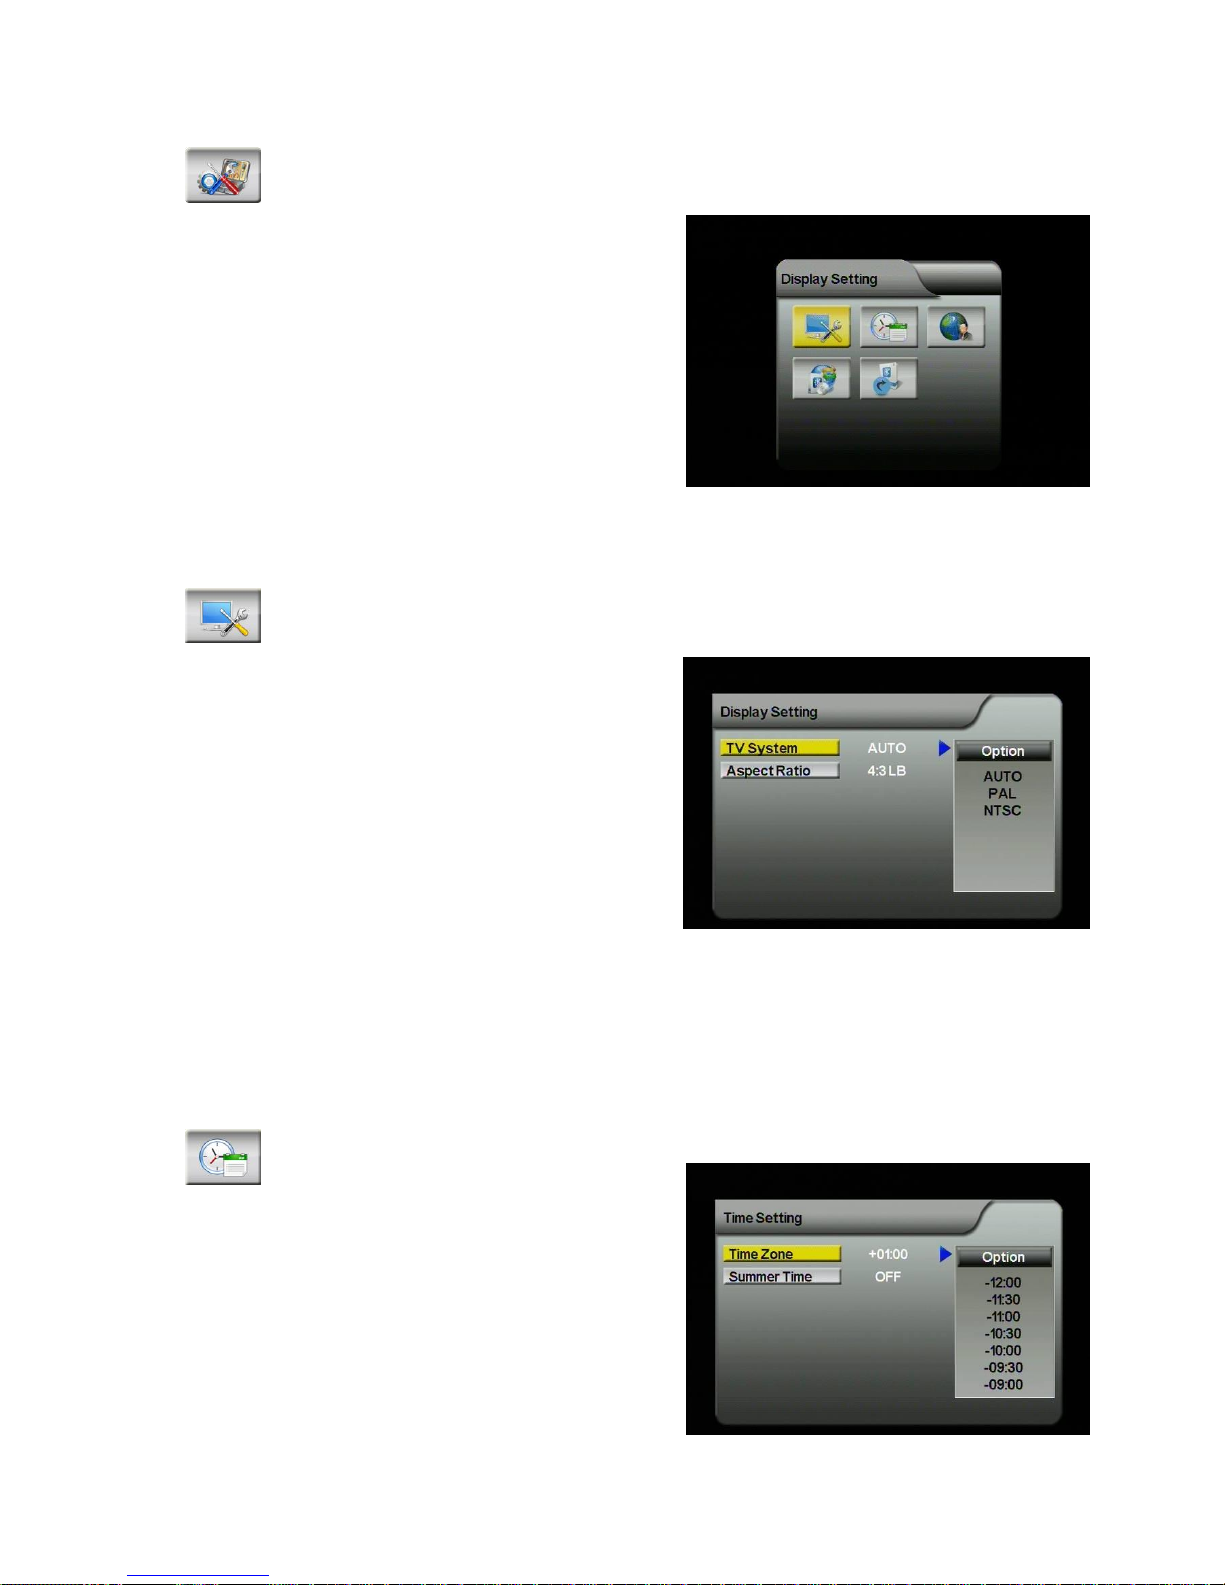
II.9. System Settings
To enter system settings menu.
In this menu you can have access to
display setting, region/language settings,
time settings, software version, and reset
default.
II.9.1 Display Setting
To set up TV system (PAL, NTSC, AUTO) and the aspect ratio.
1. Browse the System Settings menu
screen using [CH] / [CH] /
[VOL] / [VOL] buttons to
highlight the item you want to
adjust.
2. Press [VOL] button and use [CH]
/[CH] to scroll up and down the
options.
3. Select one by pressing the [OK]
button or exit the setting by pressing the [EXIT]/[MENU] button.
4. After adjusting, press [EXIT]/[MENU] button to exit the “Display Settings”.
II.9.2 Time Setting
To set time and summer time settings.
1. Browse the System Settings menu
screen using [CH] / [CH] /
[VOL] / [VOL] buttons to
highlight “Time Setting”. Press [OK]
to enter.
2. Press [VOL] button and use
[CH]/[CH] to scroll up and down
Page 19
19
the options.
3. Select one by pressing the [OK] button or exit the setting by pressing the
[EXIT]/[MENU] button.
4. After adjusting, press [EXIT]/[MENU] button to exit the “Time Settings”.
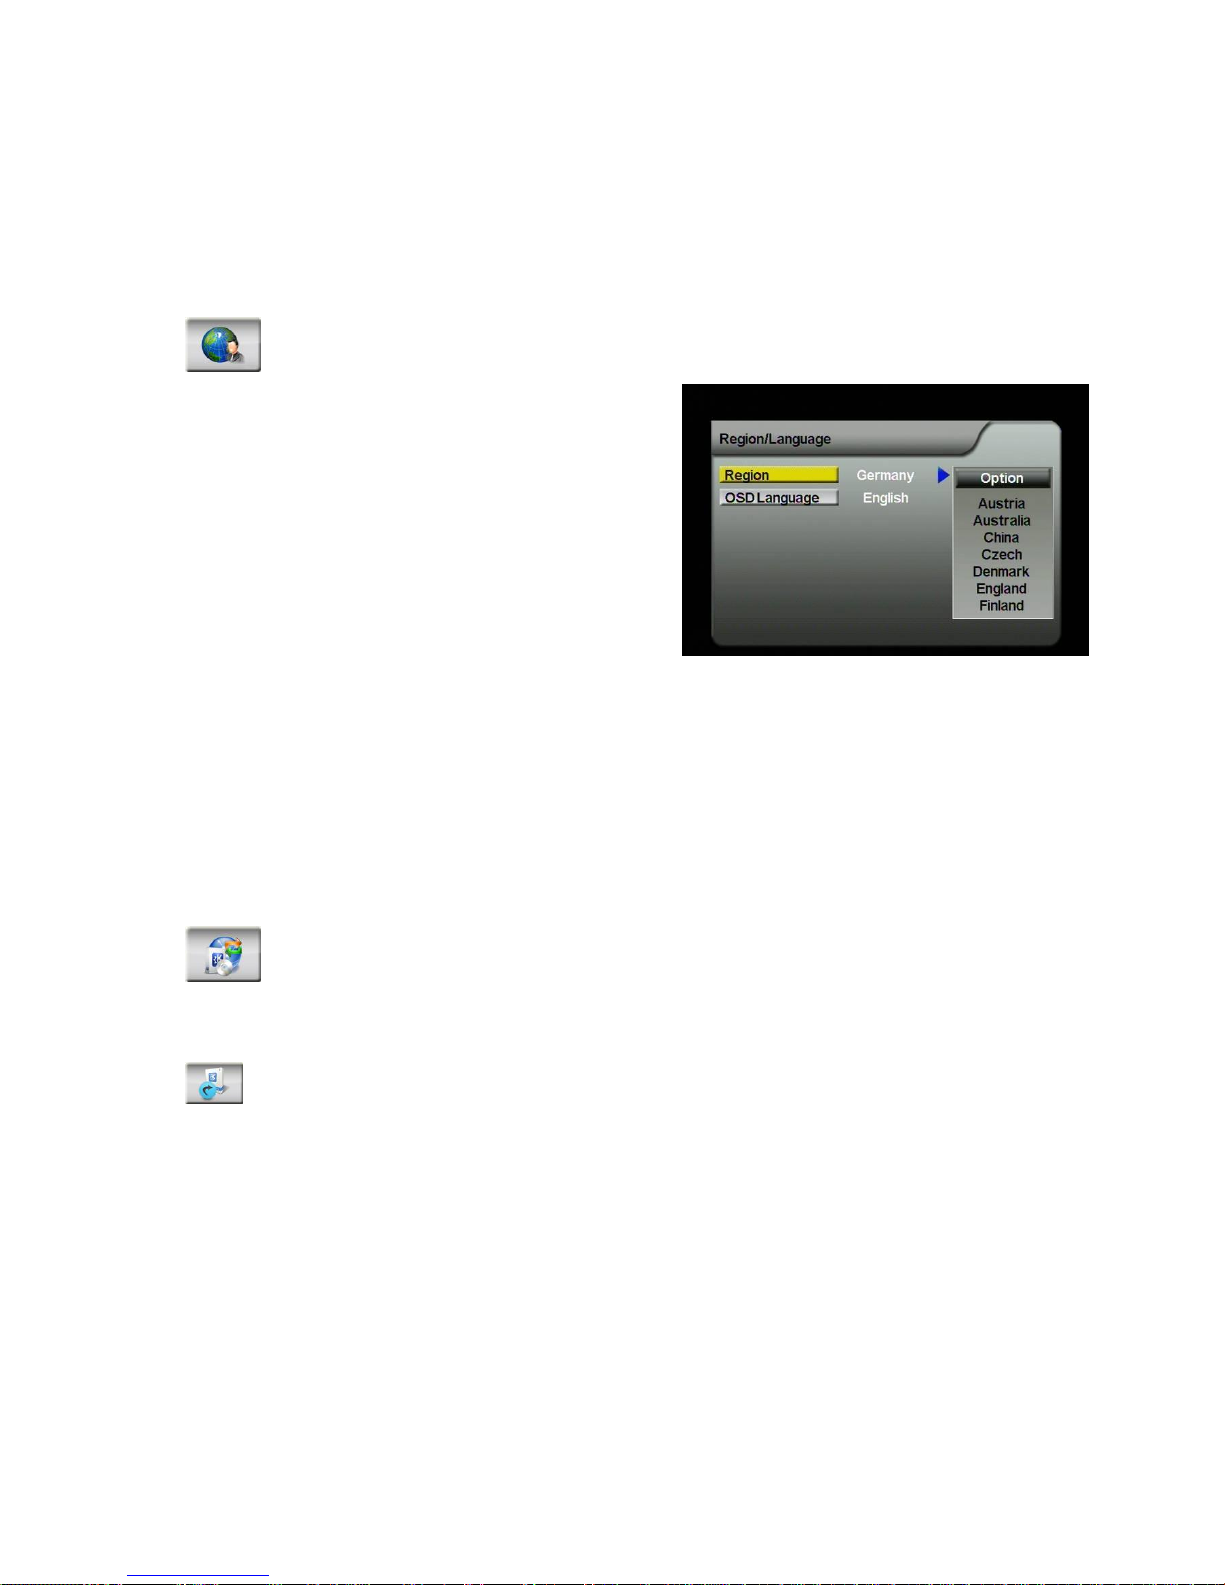
II.9.3 Region/Language
To set up the OSD language and DVB-T regional settings.
1. Browse the System Settings menu
screen using [CH] / [CH] /
[VOL] / [VOL] buttons to
highlight the item you want to
adjust.
2. Press [VOL] button and use
[CH]/[CH▼] to scroll up and down
the options.
3. Select one by pressing the [OK] button or exit the setting by pressing the
[EXIT]/[MENU] button.
4. After adjusting, press [EXIT]/[MENU] button to exit the “Region &
Language Settings”.
II.9.4 Software Version
To display system’s software version.
II.9.5 Reset Default
To reset system to default settings.
Page 20
20
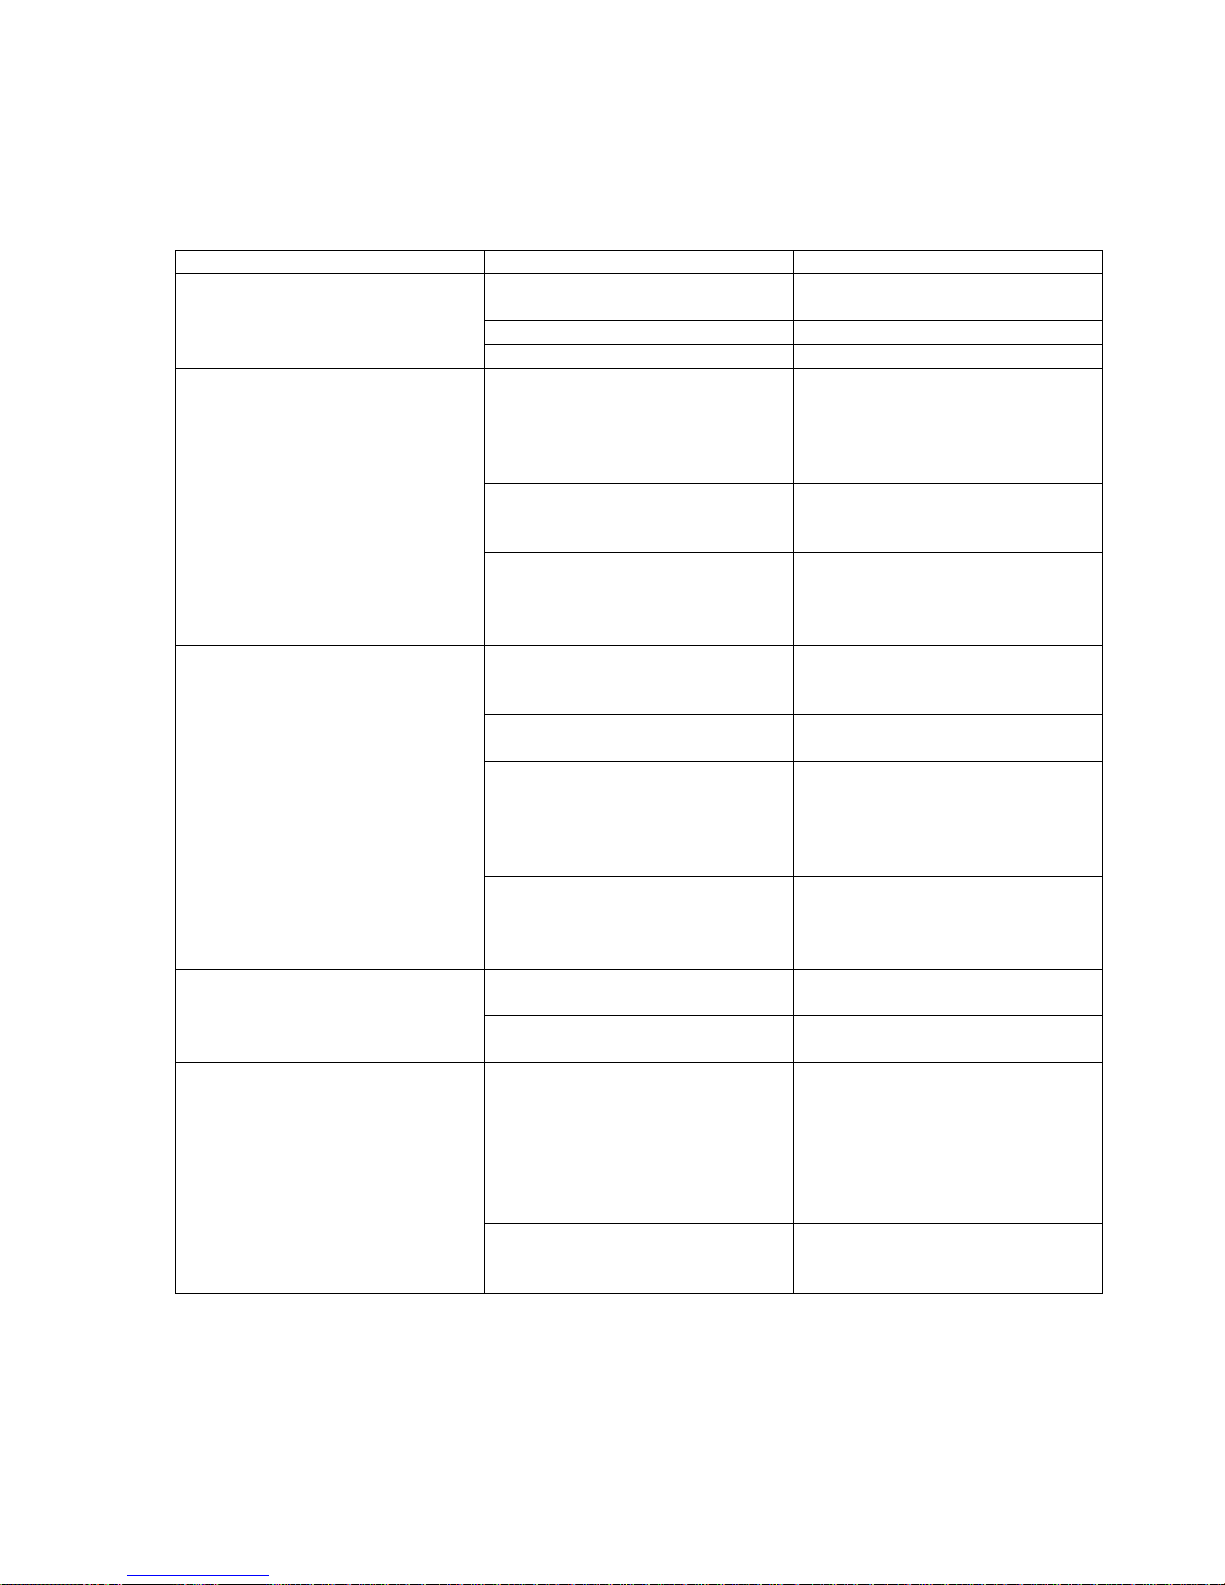
III. Trouble Shooting Q&A
Most of the troubleshooting issues can be easily solved. The common cases and
their respective solutions are listed in the table below. If the problem persists,
please contact the after sales service.
Problem
Possible Reason
Solution
No picture, no audio.
The power cord is not properly
inserted into the unit.
Check the power wire
connection.
The unit is not switched on.
Press [POWER] button.
Unit is in stand-by mode.
Press [POWER] button.
In DVB-T mode, the number of
DVB-T channels is not as much
as we expected.
The number of available
channels is limited due to the
local broadcasting system. The
available channels can vary
depending on the area.
Perform “Auto Search” or
“Manual Search” to rescan all
the channels.
The signal quality of some TV
channels is too low.
Please use active antennas
instead of passive antennas for
better reception quality.
Some TV channels are not
available.
Only the locally free
broadcasted channels can be
viewed. They can differ
depending on the area.
In DVB-T mode, all of the
channels show “no signal or
random mosaic tiles appear on
the display.”
Some TV channels signal
quality is too low.
Please use active antennas
instead of passive antennas for
better reception quality.
The antennas are not properly
connected.
Please check the connection of
the antennas.
No DVB-T service is provided in
the area.
Check your country DVB-T
coverage map. It is not
possible to watch digital
TV/listen to digital radio in
non-covered areas.
Incorrect Regional Setting
Please check whether
“Regional Setting” is correct,
and perform “Auto Search” to
rescan al of the channels.
The video is fine but there is no
sound.
The audio volume is too low.
Press [VOL] button to raise
the volume.
The audio is muted.
Press [MUTE] button to disable
the mute function.
The remote control does not
work
No power.
Check the remote control
battery. NOTE: the remote
control is supplied with a small
plastic insulator that must be
removed for the unit to
function. Check that the plastic
insulator has been removed.
No “line-of-sight” between unit
and controller
Ensure there are no obstacle
between the controller and the
unit.
Page 21
21
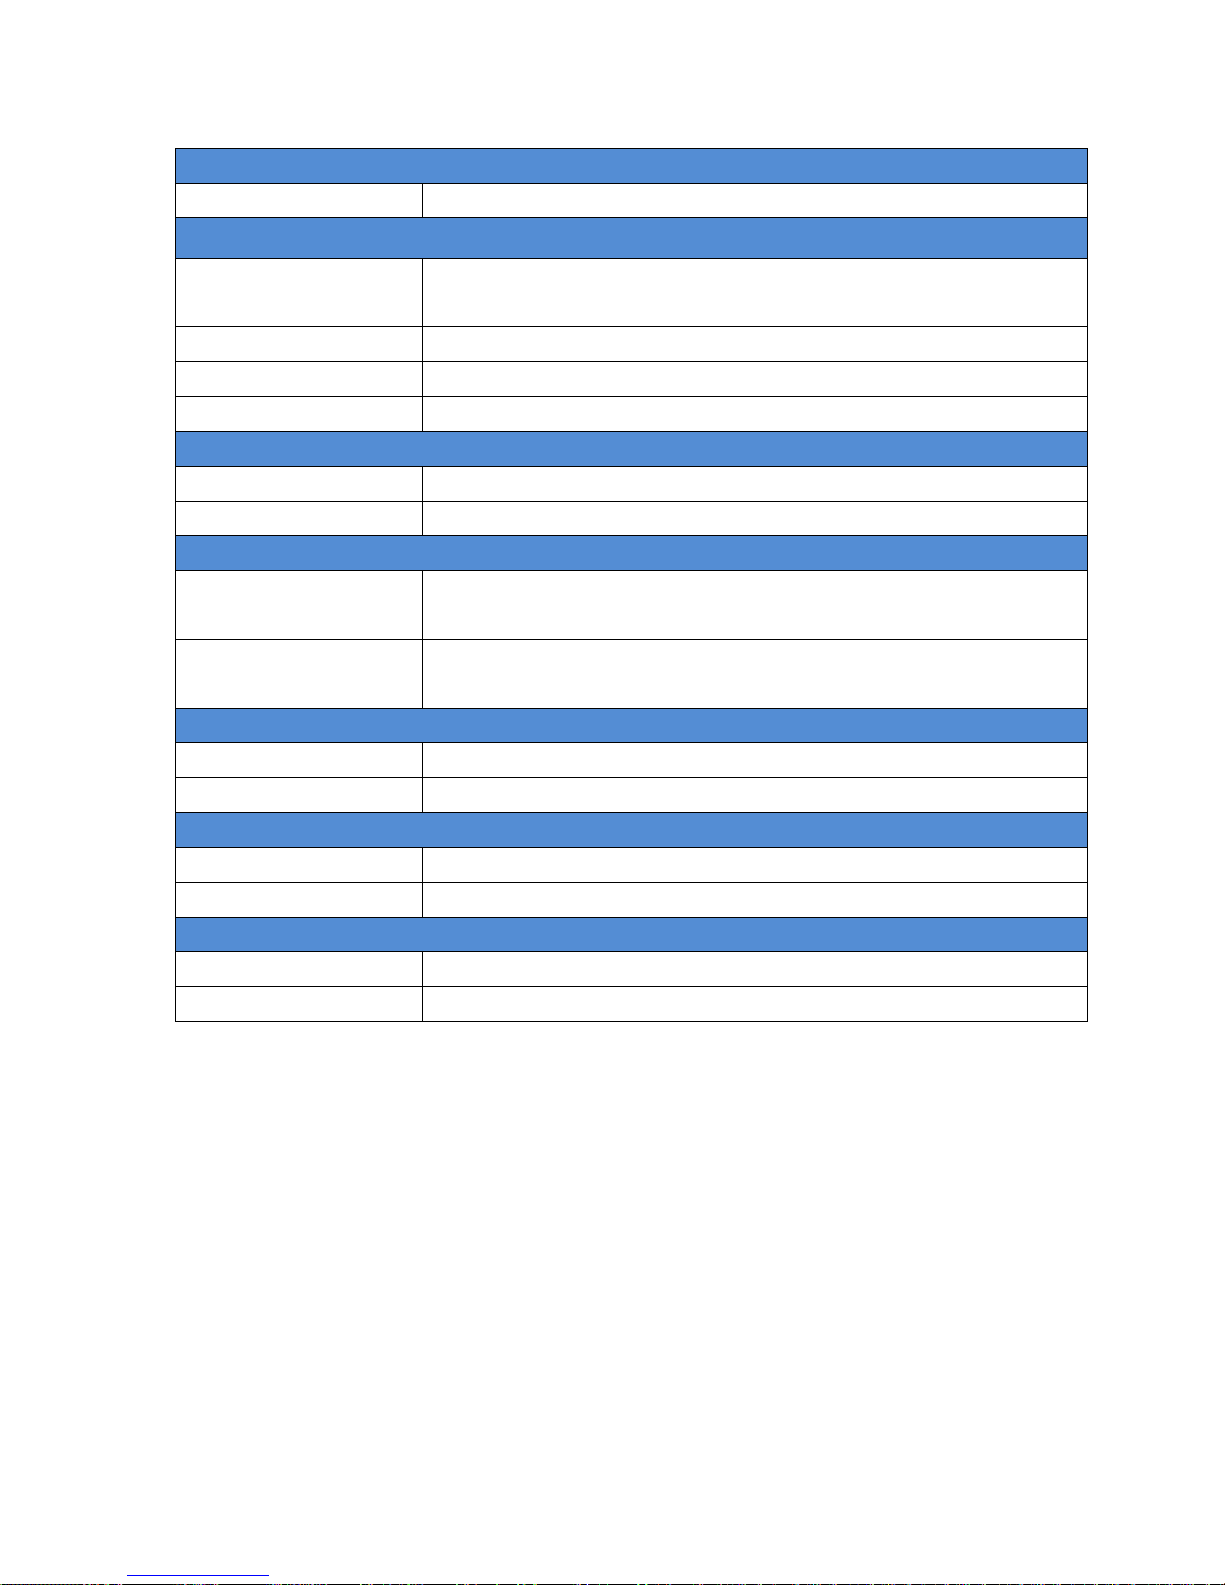
IV. Specification
Features
DVB-T Reception
Best in class performance of DVB-T TV reception (Diversity-2)
RF Input
Antenna
Passive and active antenna supported.
F-type antenna
Frequency range
VHF (170-230 MHz) and UHF band (470-862 MHz)
RF input impedance
75 Ohm
Channel bandwidth
6/7/8 MHz
TV System
Transmission standard
ETS 3 00 7 44 DVB-T compliance
Video/Audio decoder
MPEGII
S/W Feature
OSD Language
English, German, French, Portuguese, Spanish, Italian, Dutch,
Finnish
Features
DVB-T TV/Radio, Auto Channel Search, Multi–Language EPG,
Channel Preview, Teletext, Subtitle
Interface
Power/AV/IR Port
Connector interface between ARA and monitor
Software Upgrade
Earphone jack plug-in port for software upgrade use
Power
Input voltage
12-24 V DC
Power consumption
4.8 W
Dimension and Weight
Dimension
58 x 24 x 129 mm
Weight
203 g
 Loading...