

Engine Series of HDD Enclosure, LanDrive Series User Manual & Installation Manual
User Manual
& Installation Guide
Overview
The LanDrive enclosure adds the convenience of network-attached storage to homes and in
small businesses, providing you a central storage location for your data and letting you
share data across your network.
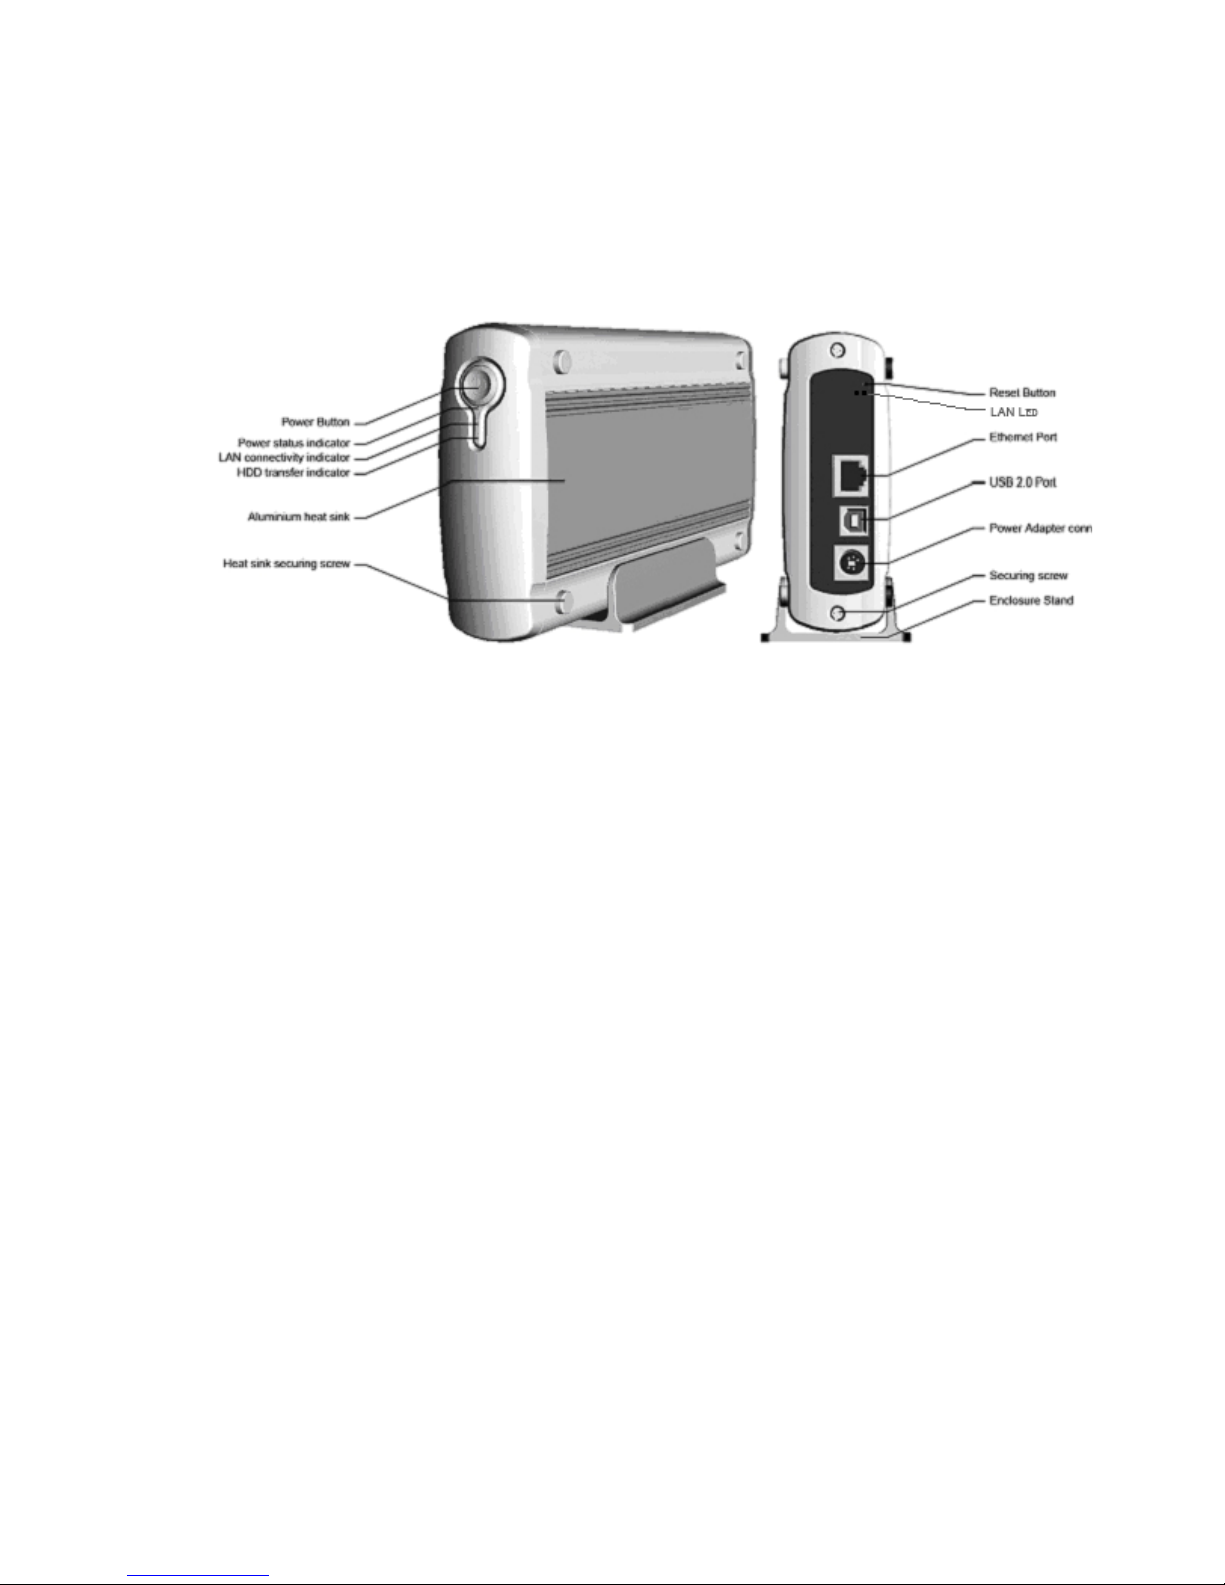
At the first glance
What’s in the Package
LanDrive main unit
LanDrive vertical stand
Securing screws
Network cable (Optional)
USB cable
Power Adapter
User Guide
Minimum System Requirements
Apple Safari; Linux Mozilla; Internet Explorer 5.x; Netscape 6.2.x & up
Windows XP/2000/Me/98se, Mac OS 10.3.x or above, Linux
3.5” IDE UMDA or SATA Hard drive formatted to FAT32 format
-1-
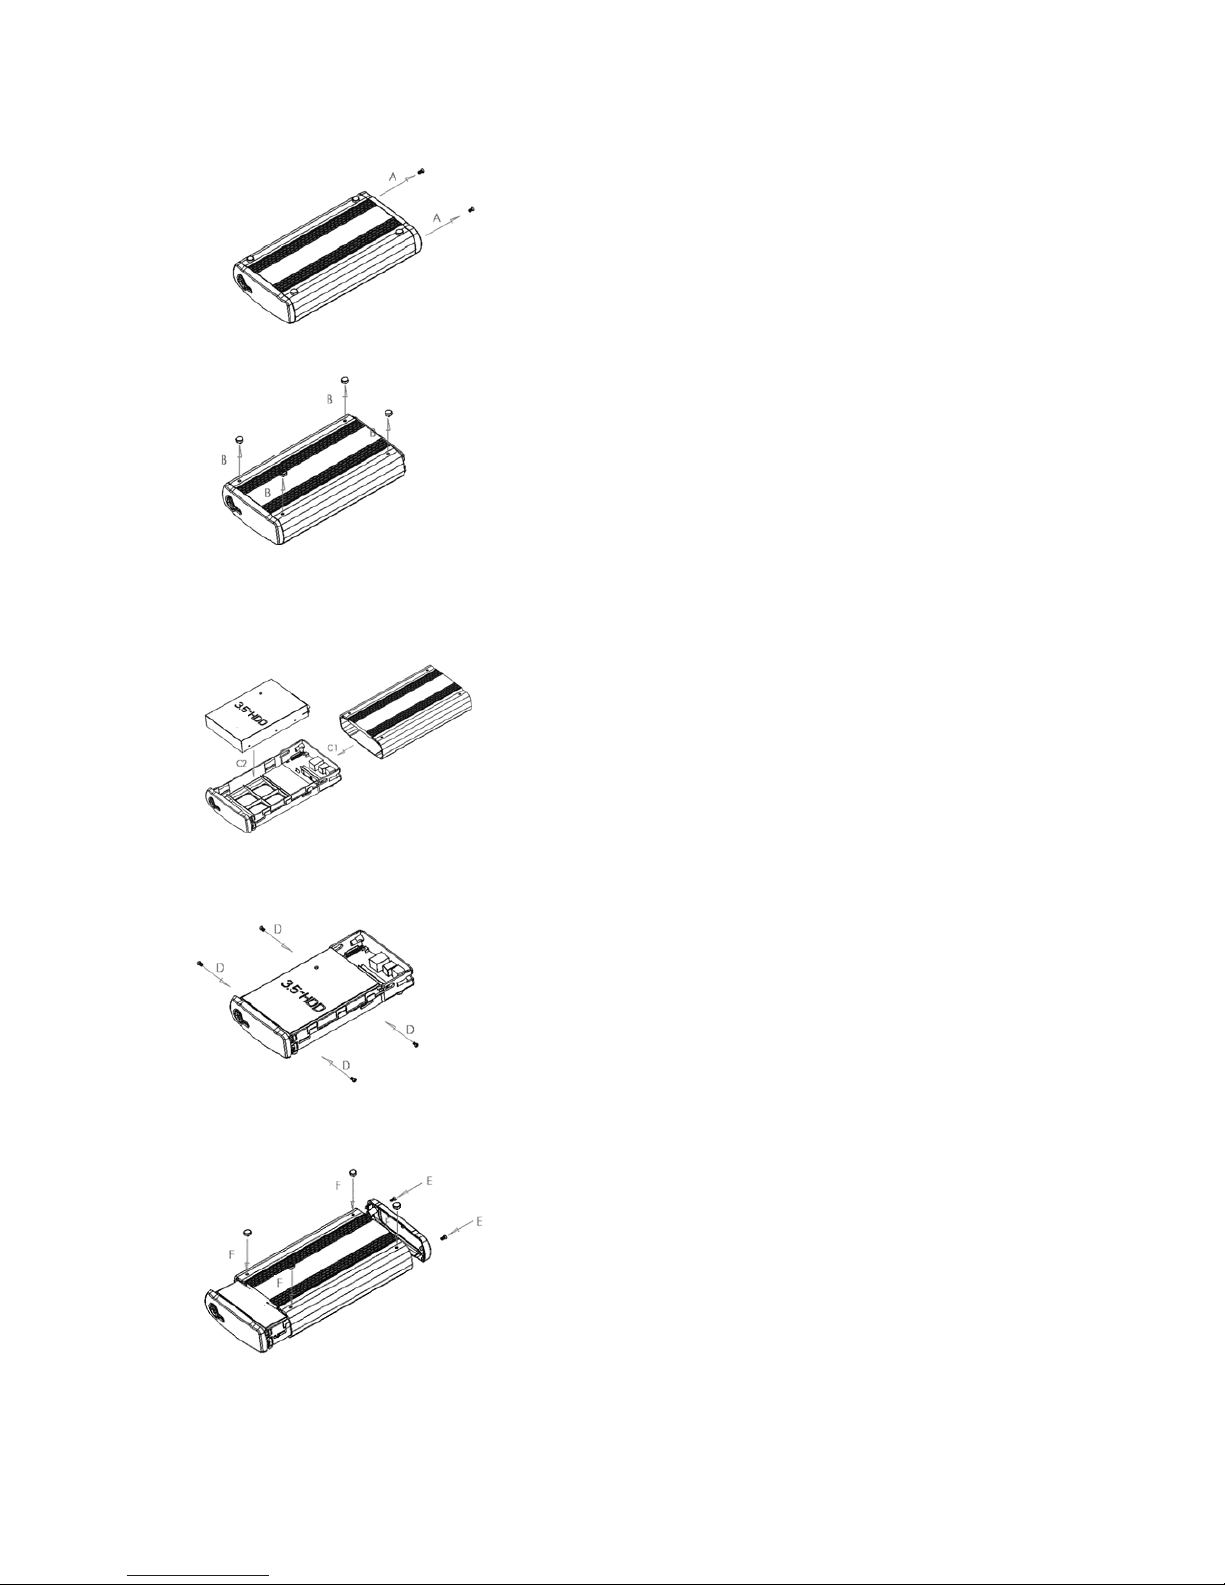
Hardware Installation
A. Remove the two screws on the back of the enclosure
with a Philips screwdriver.
B. Loosen the four screws on the surface of the unit.
These screws will be used later to minimize the gap
between the heat sink and your hard drive.
C. The plastic bracket should slide out effortlessly. Insert
your hard drive, connect the IDE or SATA cable and
the power cable from the enclosure accordingly.
Please ensure that your hard drive jumper setting is
configured at Master.
D. Secure your hard drive to the bracket with the four
screws that are included in the package.
E. Reverse the procedure by re-inserting the bracket to
the aluminum casing and
F. securing all the screws that was previously removed.
Congratulations, you have completed the hardware
installationm,
-2-

Connecting the LanDrive to your Computer
The LanDrive is a multifunctional hard drive enclosure. In addition to being a network
storage device, you can also use it as a standalone external hard drive via the USB
interface.
Max OS X
Driver installation is not required for systems using Mac OS 10.1.2 or above. Simply
connect the LanDrive using the included USB cable and access the data by clicking the
“Untitled” HDD icon located on your Desktop.
Windows XP & Windows ME
Driver installation is not required for Windows XP and Windows Me. Simply connect the
LanDrive using the included USB cable and access the data via “My Computer”.
Windows 98 (Download Drivers)
To utilize the USB connectivity, please download driver from CD driver.
Please ensure that you install the device driver before connecting the USB port. When you
complete the driver installation, reboot your computer, connect the LanDrive to your
computer and access the data via “My Computer”
You can also access data in the LanDrive connecting it directly using the Ethernet cable with your
computer. The LanDrive will have a default IP of 169.254.0.1 when connected directly.
Connecting to your Network
Connect the power adapter to the back panel of the LanDrive and plug the other end to a
wall outlet or power strip. Connect the network cable to the LAN port on the back of the
LanDrive and the other end of the network cable to a port on your hub, switch or router.
The Ethernet port on the LanDrive is Auto-MDI/MDIX, which means you can connect it using either
a crossover or a direct network cable.
-3-
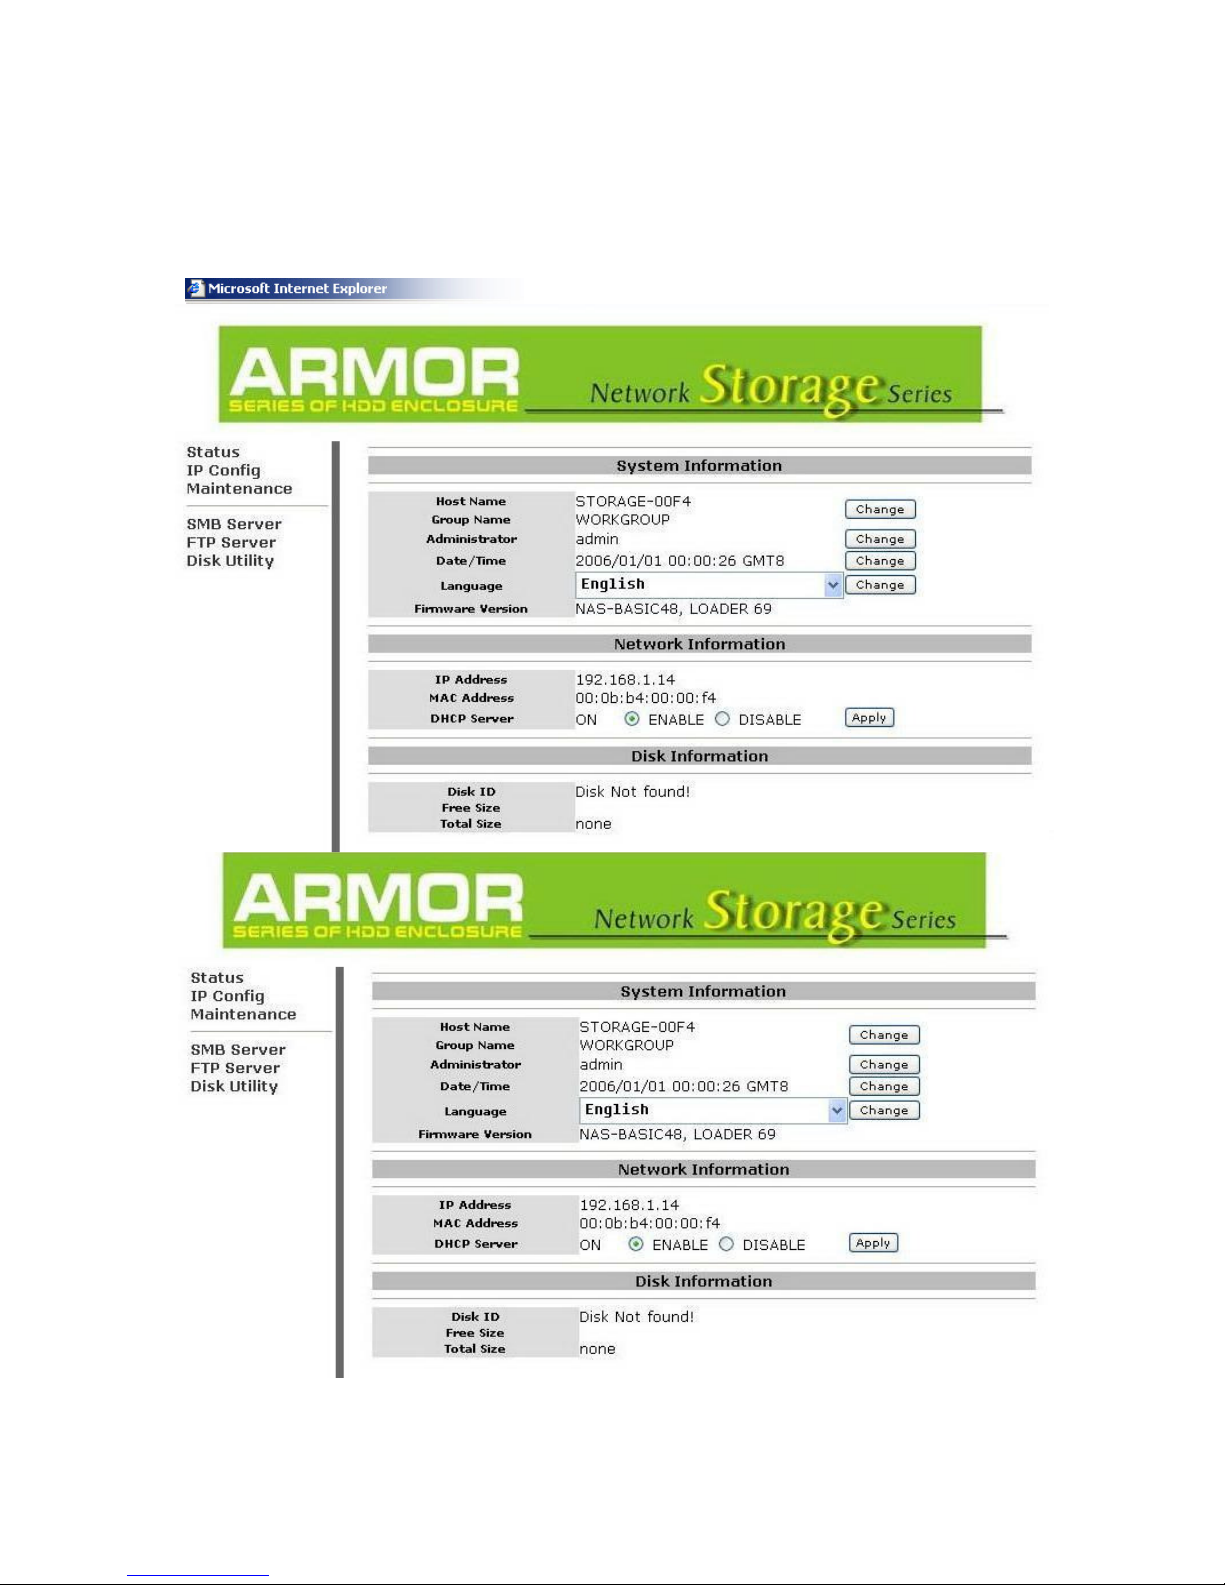
Configuring the LanDrive
The LanDrive features a web-based control interface to manage your settings. If you are
using an operating system other than Windows, please refer to next section labeled “Other
Operating Systems”.
Open your web browser and enter http://Storage or
http://Storage-XXXX in the URL address field. You
can also enter the IP address of the LanDrive.
Enter the default login information:
Username: admin
Password: admin
For security purposes, your login information can
be changed via the web control interface.
When two new LanDrives are simultaneously connected to your network, you need to distinguish
between the two by typing “http:// Storage-XXXX” with their unique MAC address. For the MAC address,
you can find it from the control menu, please check the following photo
Configuring the LanDrive (Other Operating Systems)
When you are planning to perform administrative tasks from a different operating system,
you will need to input IP address of the LanDrive in the browser URL address bar.
If you do not know the IP address of the LanDrive, you will have to do this additional
 Loading...