

Page 1
!
multitrack sequencer
USER GUIDE
Social Entropy Electronic Music Instruments
Page 2

Page 3
•
Do not expose the unit to rain, moisture, dripping or splashing and avoid placing objects filled with liquid, such as cans or
cups, on or near the unit.
•
Do not expose the unit to direct sunlight or use it in ambient temperatures exceeding 30°C as this can lead to malfunction.
•
Do not open the main casing of the unit. There are no user repairable or adjustable parts inside. Service and repairs
should be performed by trained service technicians only.
•
The adapter is not safety grounded and may only be used indoors.
•
To ensure good ventilation for the adapter, do not place it in tight spaces. To prevent risk of electric shock and fire
because of over-heating, ensure that curtains and other objects do not prevent adapter ventilation.
•
Do not expose the power adapter to direct sunlight, nor use it in ambient temperatures exceeding 40°C.
•
In the EU, only use CE approved power cords.
SPECIFICATIONS SUBJECT TO CHANGE
Social Entropy LLC reserves the right to modify or change any specifications without notice or obligation at any time, including
changes to hardware features, software capabilities, colors and/or design.
Any company names, products or logos used in this manual are trademarks of their respective owners.!
IMPORTANT SAFETY AND MAINTENANCE INSTRUCTIONS
1. Do not use this product near water - for example, in the rain, near a bathtub or sink, in a wet basement, or near a
swimming pool.
2. This product, in combination with an amplifier and headphones or speakers, may be capable of producing sound
levels that could cause permanent hearing loss. Do not operate for a long period of time at a high volume level or at
a level that is uncomfortable.
3. Never use aggressive cleaners on the casing. Remove dust, dirt, and fingerprints with a soft, dry, non-abrasive
cloth. If the unit is extremely dirty use a slightly damp cloth using only water. If the dirt still persists use a damp cloth
with a conservative amount of dishwashing liquid.
4. Install in accordance with the instructions. Make sure you place the unit on a stable surface before use.
5. The product should be located away from heat sources such as radiators, heat registers, or other products that
produce heat.
6. Connect the unit to an easily accessible electrical outlet that is close to it.
7. The product should only be connected to a power supply of the type described in the operating instructions or as
marked on the product.
8. Unplug the unit during lightning storms, before cleaning or when not in use for long periods of time.
9. Care should be taken so that objects do not fall and liquids are not spilled into the enclosure through openings.
10. When transporting the unit, use the original box and padding.
11. Social Entropy LLC is not responsible for any damage caused by improper operation of this instrument.
Page 4
!
Page 5

TABLE OF CONTENTS
"
BACKGROUND! 1 .........................................................................
CONCEPTS! 2 ...............................................................................
DIAGRAM CONVENTIONS! 3 .......................................................
THE BASICS
WHAT’S IN THE BOX! 6 .................................................................
FRONT PANEL! 7 ...........................................................................
REAR PANEL! 8 .............................................................................
PHYSICAL SPECIFICATIONS! 8 .......................................................
SEQUENCER BASICS! 9 .................................................................
TRACKS! 9 ..........................................................................................................
SONGS! 11 .........................................................................................................
FUNCTIONS! 12 ..................................................................................................
QUICK START
QUICK START! 14 ..........................................................................
CONNECTIONS ! 14 .................................................................................
CONNECTING MIDI! 14 ...................................................................................
CONNECTING AUDIO! 14 ................................................................................
CONNECTING POWER! 14 ...............................................................................
SELECT A TRACK! 15 .................................................................................
CREATE A PATTERN! 15 .............................................................................
MODIFY A PATTERN! 16 ............................................................................
CREATE SNAPSHOTS! 16 ..........................................................................
CREATE A SONG! 17 ................................................................................
REFERENCE GUIDE
TRACKS! 20 ..................................................................................
SELECTING TRACKS! 20 ............................................................................
SELECTING PATTERNS AND PATTERN CHAINS FOR A TRACK! 21 ..............
SELECTING PATTERNS USING MIDI! 23 .............................................................
MUTING TRACKS! 24 ................................................................................
SOLOING TRACKS! 25 ..............................................................................
Page 6

SETTING THE TRACK MIDI CHANNEL! 26 ..................................................
MIDI EFFECTS! 27 .....................................................................................
VELOCITY OFFSET! 27 .......................................................................................
GATE OFFSET! 27 ..............................................................................................
DELAY OFFSET! 28 ............................................................................................
NOTE REPEAT! 28 .............................................................................................
UTILITY MODE! 29 ....................................................................................
SETTING TRACK KNOB CONTROLLER NUMBERS! 29 .........................................
PATTERN PROGRAM CHANGE MESSAGES! 31 ...................................................
SYSTEM EXCLUSIVE DUMPS! 32 ........................................................................
TRANSPOSING TRACKS USING MIDI! 33 ..........................................................
SETTING STEP PITCH USING MIDI! 34 ...............................................................
TRACK QUANTIZATION! 35 ..............................................................................
CV/GATE OUTPUT MODE! 36 ...........................................................................
PATTERNS! 37 ...............................................................................
TIME MODE! 37 ........................................................................................
SETTING PATTERN LENGTH! 38 .........................................................................
EXTENDING A PATTERN! 39 ..............................................................................
SETTING PATTERN TIME SCALE! 40 ....................................................................
SETTING PATTERN SHUFFLE! 42 .........................................................................
SKIPPING PATTERN STEPS! 44 ...........................................................................
REALIGN A PATTERN! 45 ...................................................................................
TEMPO LOCK! 45 .............................................................................................
TAP TEMPO! 46 ................................................................................................
INCREMENT/DECREMENT TEMPO! 46 ..............................................................
PATTERN TYPES! 47 ...................................................................................
CHANGING PATTERN TYPES! 47 .......................................................................
DRUM TYPE PATTERNS! 48 ........................................................................
SELECTING DRUM INSTRUMENTS! 48 ...............................................................
PROGRAMMING DRUM TYPE PATTERNS! 49 .....................................................
GRID PROGRAMMING! 49 ...............................................................................
ADDING OR REMOVING A TRIGGER! 49 ......................................................
SETTING NOTE REPEAT! 50 ............................................................................
SETTING STEP DELAY! 50 ...............................................................................
REALTIME RECORDING! 51 ...............................................................................
STEP RECORDING! 52 ......................................................................................
MUTING DRUM INSTRUMENTS! 54 ..................................................................
SOLOING DRUM INSTRUMENTS! 55 .................................................................
DRUM ROLLS! 56 .............................................................................................
CHANGING THE DRUM ROLL RESOLUTION! 57 ............................................
LATCHING DRUM ROLLS! 58 .........................................................................
RECORDING A DRUM ROLL! 59 ....................................................................
SETTING DRUM NOTE MAPPINGS! 60 ..............................................................
Page 7

SYNTH TYPE PATTERNS! 61 .......................................................................
PROGRAMMING A SYNTH TYPE PATTERN! 61 ...................................................
GRID PROGRAMMING! 61 ...............................................................................
ADDING OR REMOVING A STEP EVENT! 62 ..................................................
POLYPHONIC PROGRAMMING! 63 ...............................................................
SELECTING THE PITCH SLOT TO PROGRAM! 63 .............................................
CHANGING STEP PITCHES! 64 ......................................................................
QUICKLY ENTERING MULTIPLE PITCHES! 66 ...................................................
TRANSPOSING POLYPHONIC STEPS! 67 ........................................................
SETTING STEP LENGTH! 68 ............................................................................
FINE TUNING GATE LENGTH! 68 ...................................................................
ADDING SLIDE! 70 ........................................................................................
SETTING NOTE REPEAT! 70 ............................................................................
SETTING VELOCITY OR ACCENT! 71 ..............................................................
SETTING STEP DELAY! 72 ...............................................................................
REALTIME RECORDING! 73 ...............................................................................
QUANTIZATION! 73 ......................................................................................
STEP RECORDING! 74 .......................................................................................
TRANSPOSING SYNTH PATTERNS! 77 ...............................................................
ALL ACCENT! 79 ...............................................................................................
NO ACCENT! 79 ...............................................................................................
ALL SLIDE! 80 ...................................................................................................
NO SLIDE! 80 ...................................................................................................
REALTIME RECORDING TRANSPOSE, ACCENT AND SLIDE! 81 ............................
REALTIME ARPEGGIATOR! 82 ............................................................................
CHANGING THE ARPEGGIO DIRECTION! 83 ................................................
CHANGING THE ARPEGGIO OCTAVES! 83 ...................................................
LATCHING THE ARPEGGIATOR! 84 ................................................................
RECORDING AN ARPEGGIO! 85 ...................................................................
CHORD MEMORY! 86 ......................................................................................
STEP FUNCTIONS! 87 ...............................................................................
OPERATING ON ALL DRUM INSTRUMENTS! 87 .............................................
STEP ROTATE! 88 ...........................................................................................
STEP CLEAR! 88 .............................................................................................
STEP COPY! 89 ..............................................................................................
STEP PASTE! 90 ..............................................................................................
PATTERN FUNCTIONS! 91 .........................................................................
OPERATING ON ALL DRUM INSTRUMENTS! 91 .............................................
APPLY TRANSPOSE! 92 ..................................................................................
PATTERN ROTATE! 93 .....................................................................................
PATTERN CLEAR! 94 .......................................................................................
PATTERN COPY! 94 ........................................................................................
PATTERN PASTE! 95 .......................................................................................
PATTERN RANDOMIZE! 96 ............................................................................
PATTERN DIRECTION! 97 ...............................................................................
Page 8

SNAPSHOTS! 98 ...........................................................................
RECORDING SNAPSHOTS! 99 ..................................................................
RECALLING SNAPSHOTS! 100 ..................................................................
SONGS! 101 .................................................................................
PLAYING SONGS! 101 ..............................................................................
ENTERING SONG PLAY MODE! 101 ..................................................................
SELECTING SONGS! 102 ..................................................................................
CREATING SONG CHAINS! 102 ........................................................................
SONG LOCATION SHORTCUTS! 103 .................................................................
RECORDING SONGS! 104 ........................................................................
REALTIME SONG RECORD! 104 ........................................................................
SONG STEP RECORD! 105 ................................................................................
SELECTING CURRENT SONG STEP ! 106 ........................................................
SETTING SONG STEP REPEATS! 107 ...............................................................
ASSIGNING SNAPSHOTS TO SONG STEPS! 108 ...........................................
SETTING THE LAST SONG STEP! 108 .............................................................
GLOBAL CONFIG! 109 ..................................................................
SETTING KNOB CHANNELS! 110 ..............................................................
SETTING KNOB CONTROLLER NUMBERS! 111 ..........................................
DUMP MACHINE STATE! 112 .....................................................................
CV EXPANSION MODE! 113 .....................................................................
CV MODE: 8 TRACKS! 114 ................................................................................
CV MODE: 4 SYNTHS! 115 ................................................................................
CV MODE: 1 DRUM! 116 ..................................................................................
CV MODE: 6 CONTROLS AND CLOCKS! 117 .....................................................
SETTING INPUT MIDI CHANNEL! 118 ........................................................
ENABLING MIDI THRU! 119 .......................................................................
SYNC SOURCE! 120 .................................................................................
SENDING MIDI CLOCK! 121 .....................................................................
FORMAT ALL PATTERNS! 122 ....................................................................
USB MIDI! 123 ..........................................................................................
DIMMING LEDS! 124 ................................................................................
CHECKING OS VERSION! 125 ..................................................................
SUPPORT FOR ELEKTRON TURBOMIDI! 126 ..............................................
UPDATING FIRMWARE! 127 ..........................................................
FACTORY RESET! 128 .....................................................................
CV GATE OUTPUT EXPANSION! 129 ..............................................
INSTALLING THE CV EXPANSION BOARD! 129 .........................................
Page 9

ENABLING CV EXPANSION MODE! 131 ...................................................
DRUM TYPE PATTERNS! 131 ......................................................................
SYNTH TYPE PATTERNS! 131 ......................................................................
HARDWARE SLIDE CIRCUIT! 131 ................................................................
CV CONVERTER MODE! 132 .....................................................................
ENABLING CV CONVERTER MODE! 132 ............................................................
DISABLING CV CONVERTER MODE! 133 ...........................................................
SELECTING USB OR DIN MIDI INPUT! 133 .........................................................
MONOPHONIC/POLYPHONIC CONVERSION! 134 ...........................................
SETTING CONVERSION MIDI CHANNELS! 135 ..................................................
ENABLING HARDWARE SLIDE! 136 ....................................................................
CV/GATE OUTPUT MODE! 137 ..........................................................................
MIDI IMPLEMENTATION CHART! 138............................................
Page 10

BACKGROUND
"
Social Entropy started business developing the Quicksilver upgrades for the TR-606
and TB-303. This was specifically a challenge because we were adding new
features and capabilities to a machine that already had a defined interface, buttons
and labelling. There were many places where adding extra capability just didn’t
make sense in the context of the interface.
As part of our creative process, we always enjoy a dedicated hardware device that
had a particular workflow, whether it was for drums or synthesizer. This is where
the old machines really shine. But we also wanted even greater control over
multiple machines and the ability to control any device with the same type of
dedicated interface, whether it was a VST, a sound module or even a modular
synthesizer.
At this point we decided it was time to design and build a sequencer of our own. A
machine that had the best parts of a dedicated hardware sequencer, streamlined
workflow and connectivity to multiple devices.
Four years later, we are finally ready to release Engine. We hope you enjoy it as
much as we do!!
USER GUIDE 1
Page 11

CONCEPTS
"
Engine is a multitrack step sequencer with eight polyphonic tracks. Composing music with
Engine consists of selecting tracks, assigning patterns or pattern chains to a track, setting
pattern types and recording steps into the patterns. These configurations can be captured
into snapshots and sequenced into a song structure. The remainder of this manual will
focus on these activities.
Engine is all about the ability to both compose and perform live from a dedicated
interface. This means several things in the context of Engine.
First, almost everything that you can do as a live performance can be recorded directly
into a sequence. This includes pitches, arpeggiators, drum rolls, accents, slides, etc. The
sequencer can enter or leave record mode from almost any of the live performance
modes, making it extremely easy to capture an interesting musical event.
Second, most changes to a sequence are quantized to the loop point. This means that
changing the selected pattern, snapshot, scale, shuffle or length won’t cause patterns to
fall out of sync with each other during live performance. There are still a few functions
that apply immediately, such as muting and transpose which can be used for other
interesting performance options.
Almost all functions can be used momentarily or they can be double-clicked (pinned) to
stay in a function without being forced to hold down a button. This is great when certain
functions are needed consistently for live performance, such as track muting or drum
muting.
Everything in Engine can be done while the sequencer is running. This means that your
performance doesn’t need to be interrupted by stopping the sequencer to access certain
functions or enter certain modes.
USER GUIDE 2
Page 12
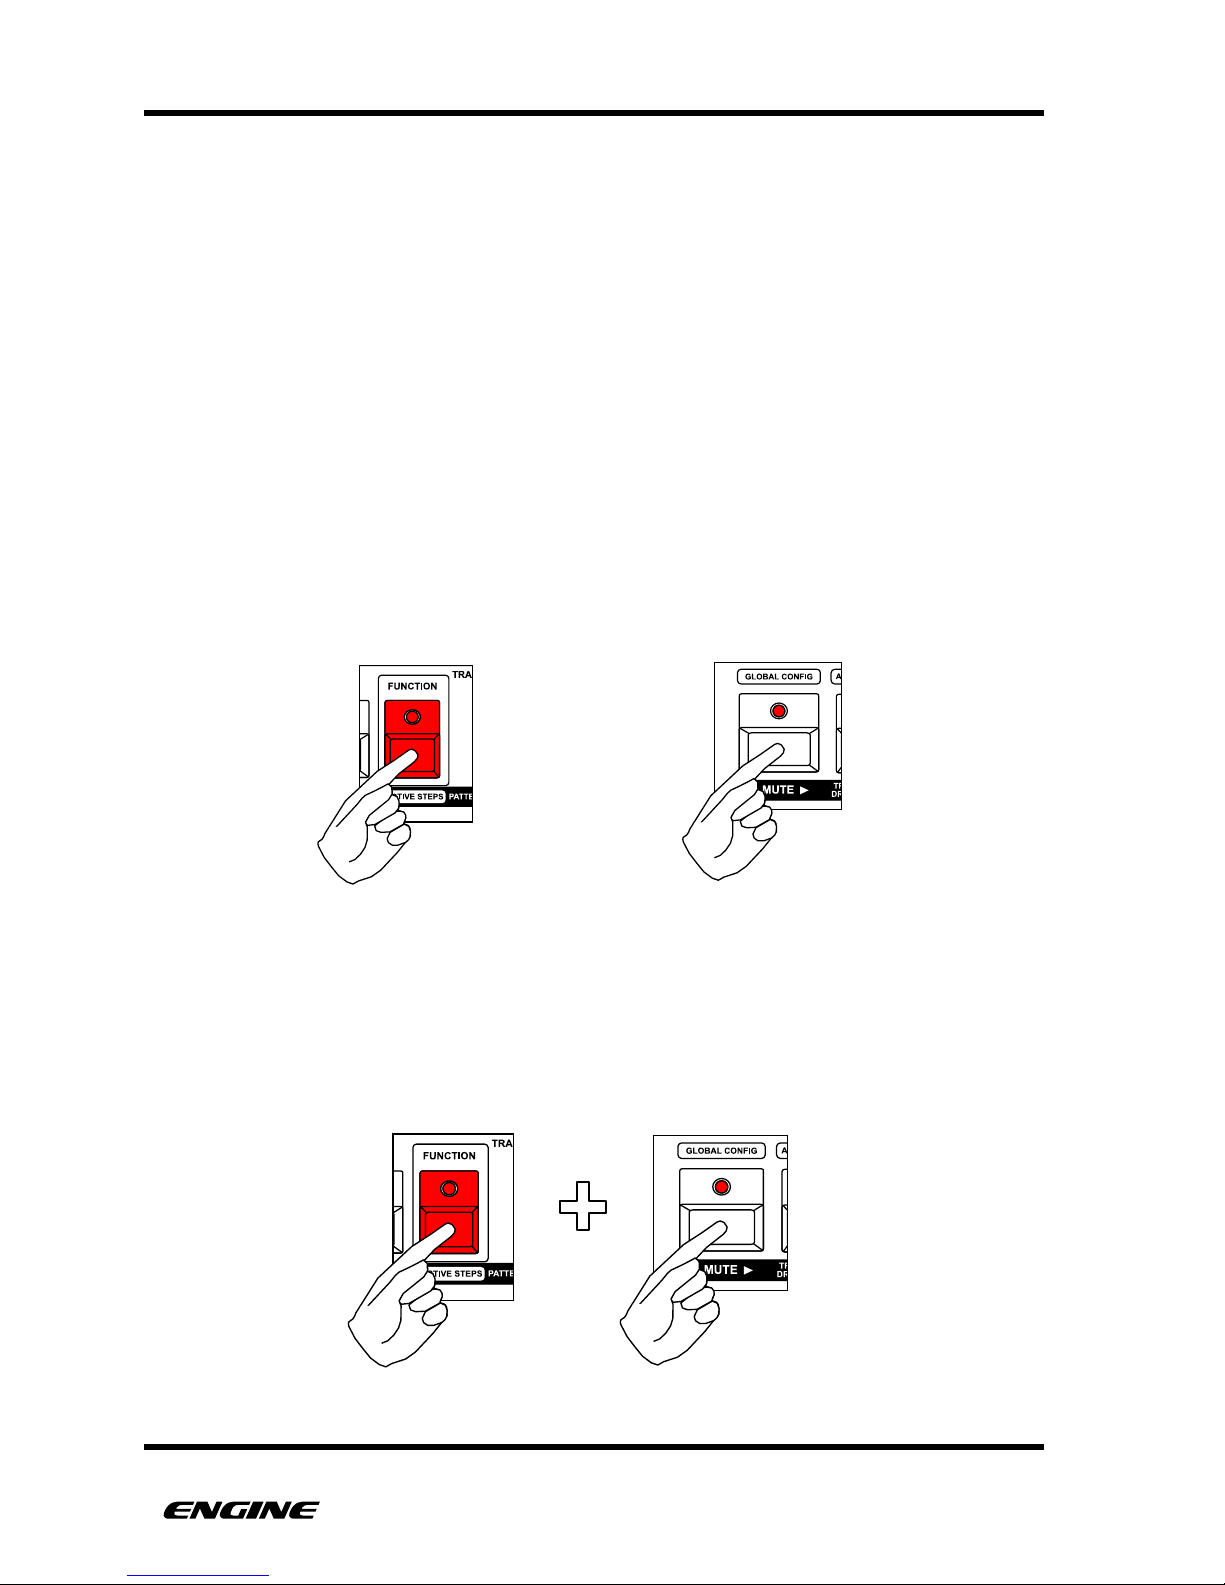
DIAGRAM CONVENTIONS
"
Throughout this document, diagrams are used to illustrate the buttons used to perform
various actions.
Some diagrams will not show buttons being held or pinned to stay in a certain mode
while functions are performed. For example, for functions associated with TIME MODE, it
is assumed that the TIME button is being held or pinned, the TIME button will not be
shown in every diagram."
"
To illustrate that a button should be pressed and held, the button will be displayed as
RED."
"
To illustrate that a button should be pressed and released (clicked), the button will be
displayed as WHITE."
"
Example:
When multiple buttons are used to perform an action, the diagram will use a plus sign to
show the combination of buttons used.
Example:
!
USER GUIDE 3
This shows one button being clicked
This shows one button being held
This shows one button being held and then a second button being clicked
Page 13
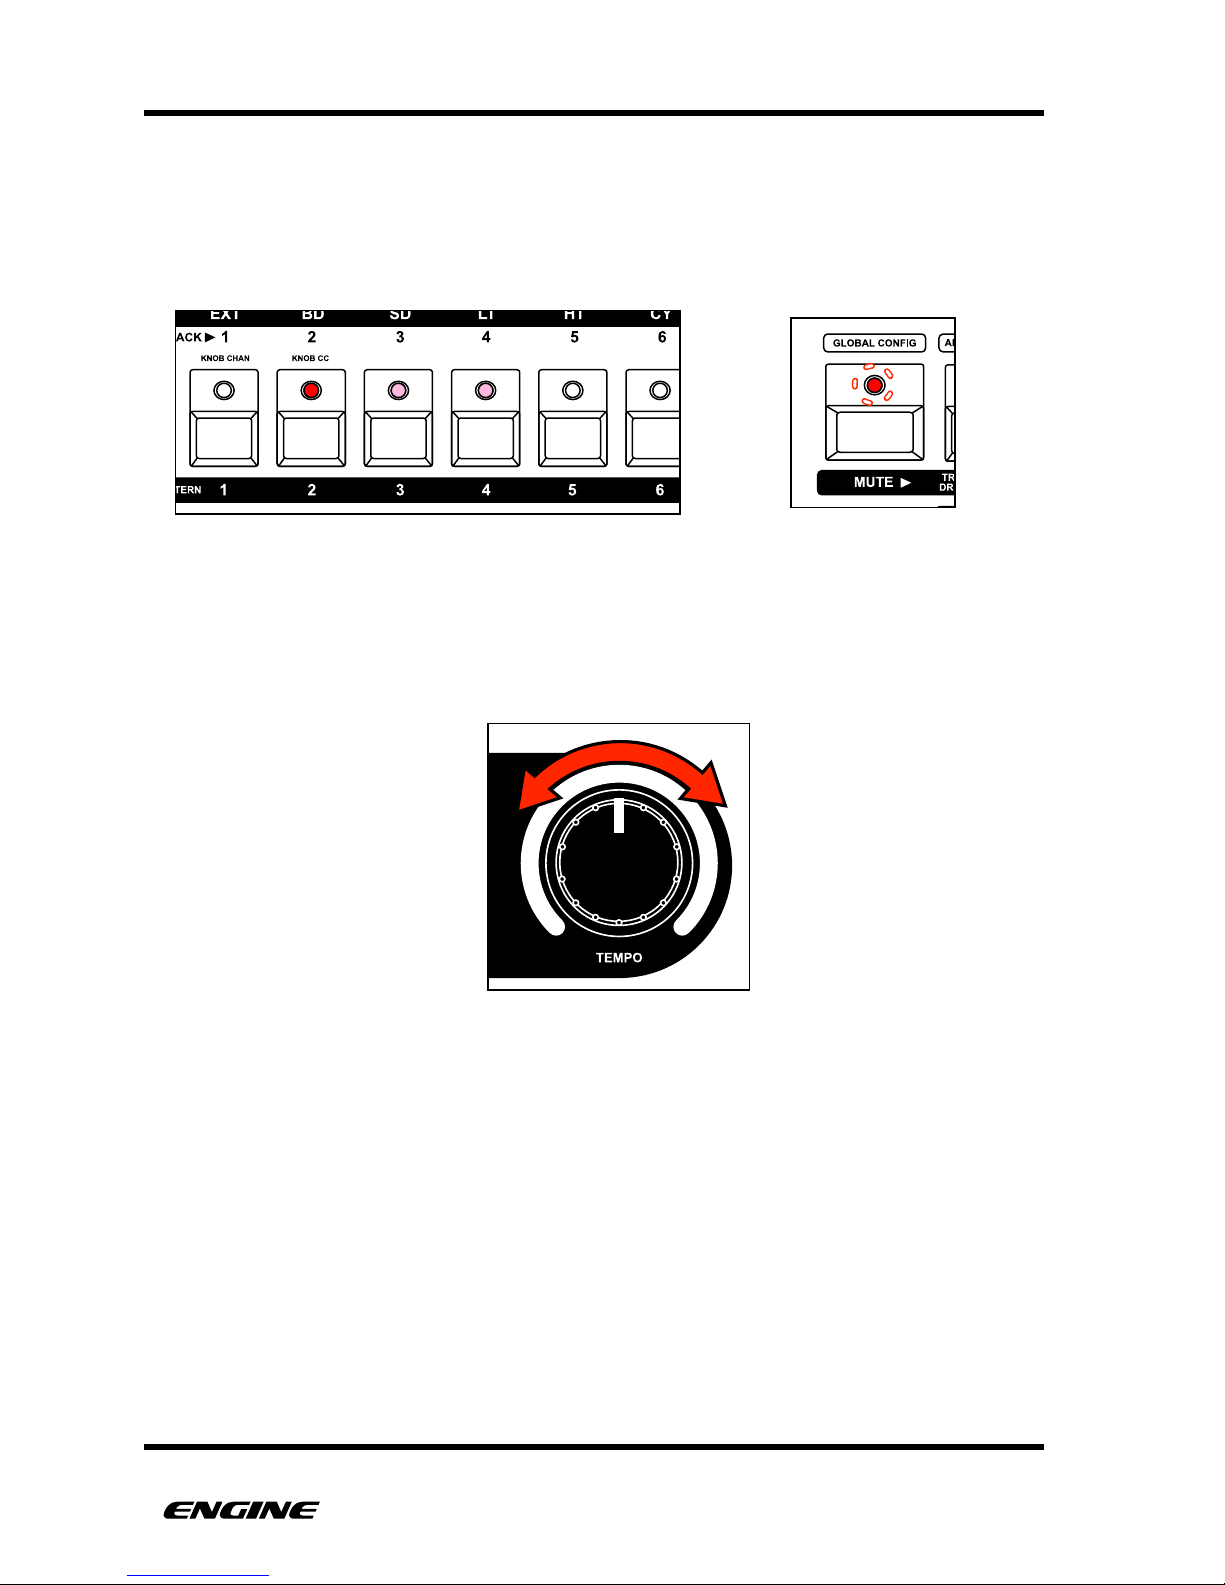
A brightly lit LED is represented as red, a dim LED is represented in pink.
When an LED is blinking, it is represented with a dotted line around the LED.
Example:
When a knob should be turned, it will be shown with a red arrow.
!
USER GUIDE 4
Showing that a knob should be turned
A blinking LED
One brightly lit LED and two dimly lit LEDs
Page 14

THE BASICS!
USER GUIDE 5
Page 15

WHAT’S IN THE BOX
"
Included in the box are the following:
• 1x Engine hardware sequencer: white/red or white/blue edition
• 1x USB cable
• 1x 9V DC international power supply
• 5x International power plug attachments
• 1x Quickstart postcard
• 1x Sticker!
USER GUIDE 6
Page 16
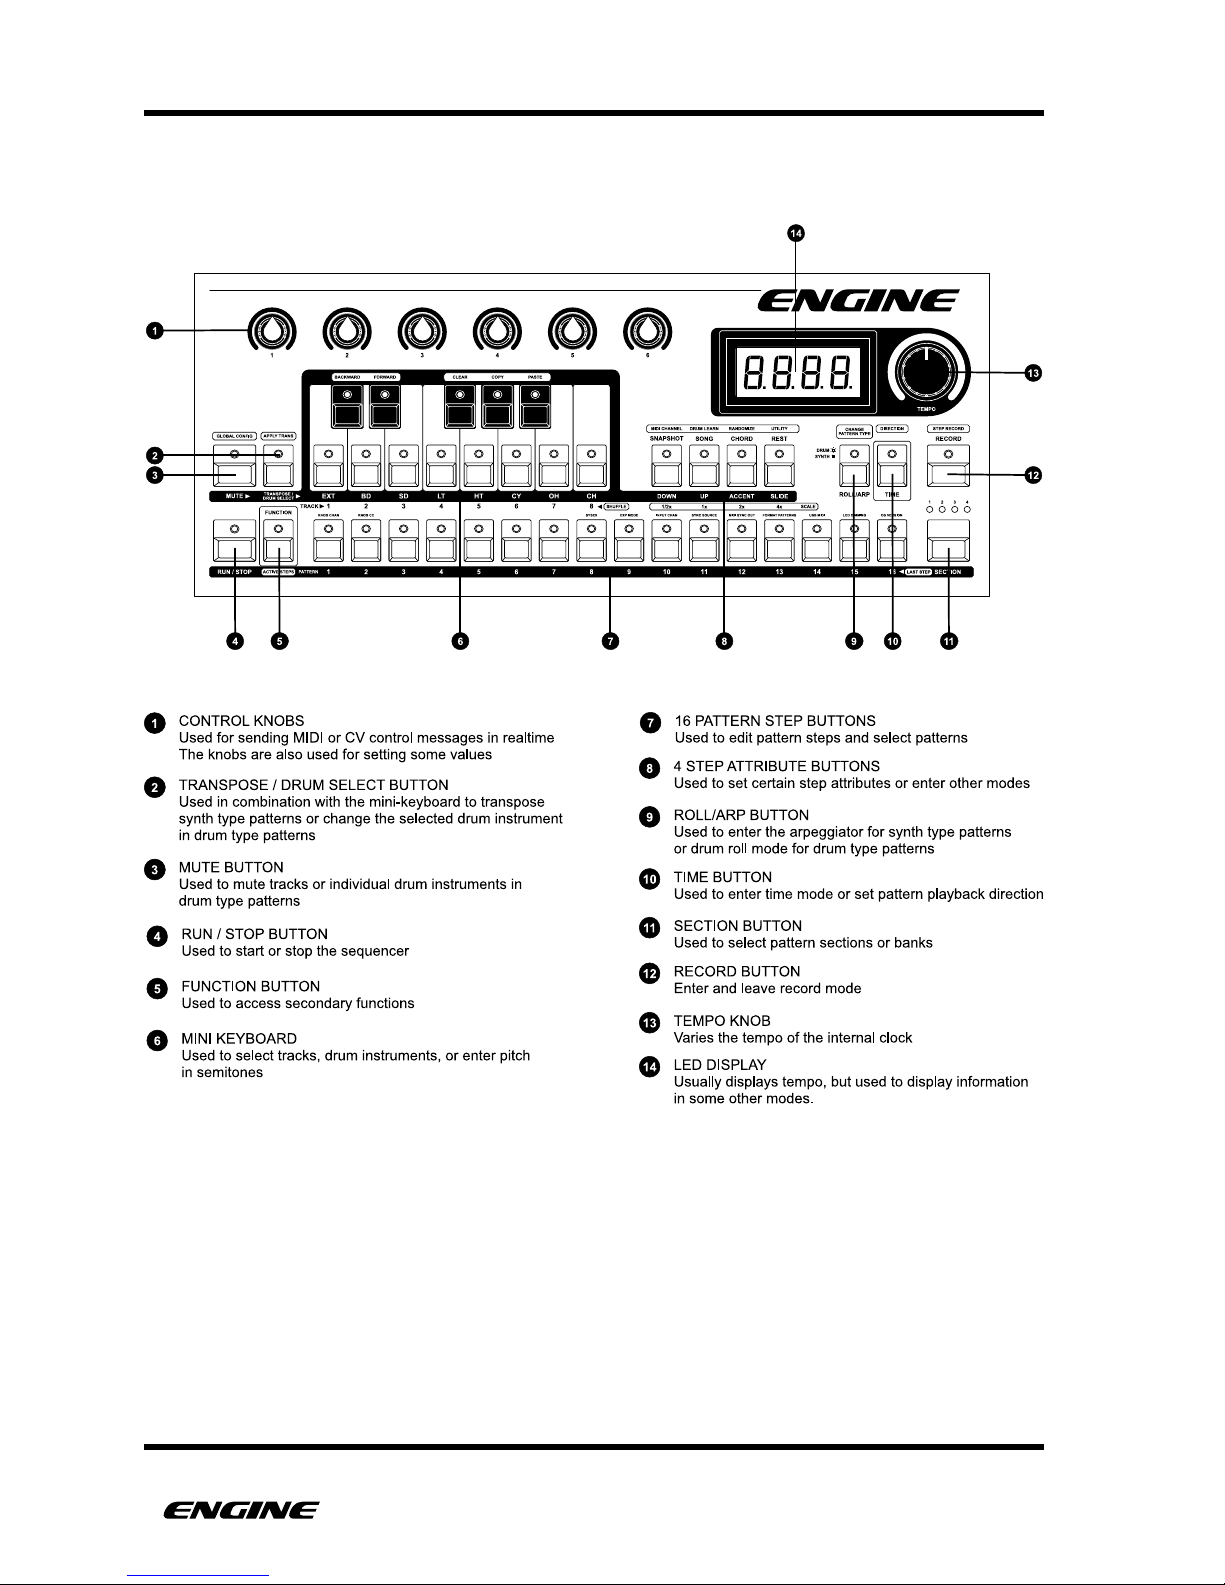
FRONT PANEL
USER GUIDE 7
Page 17
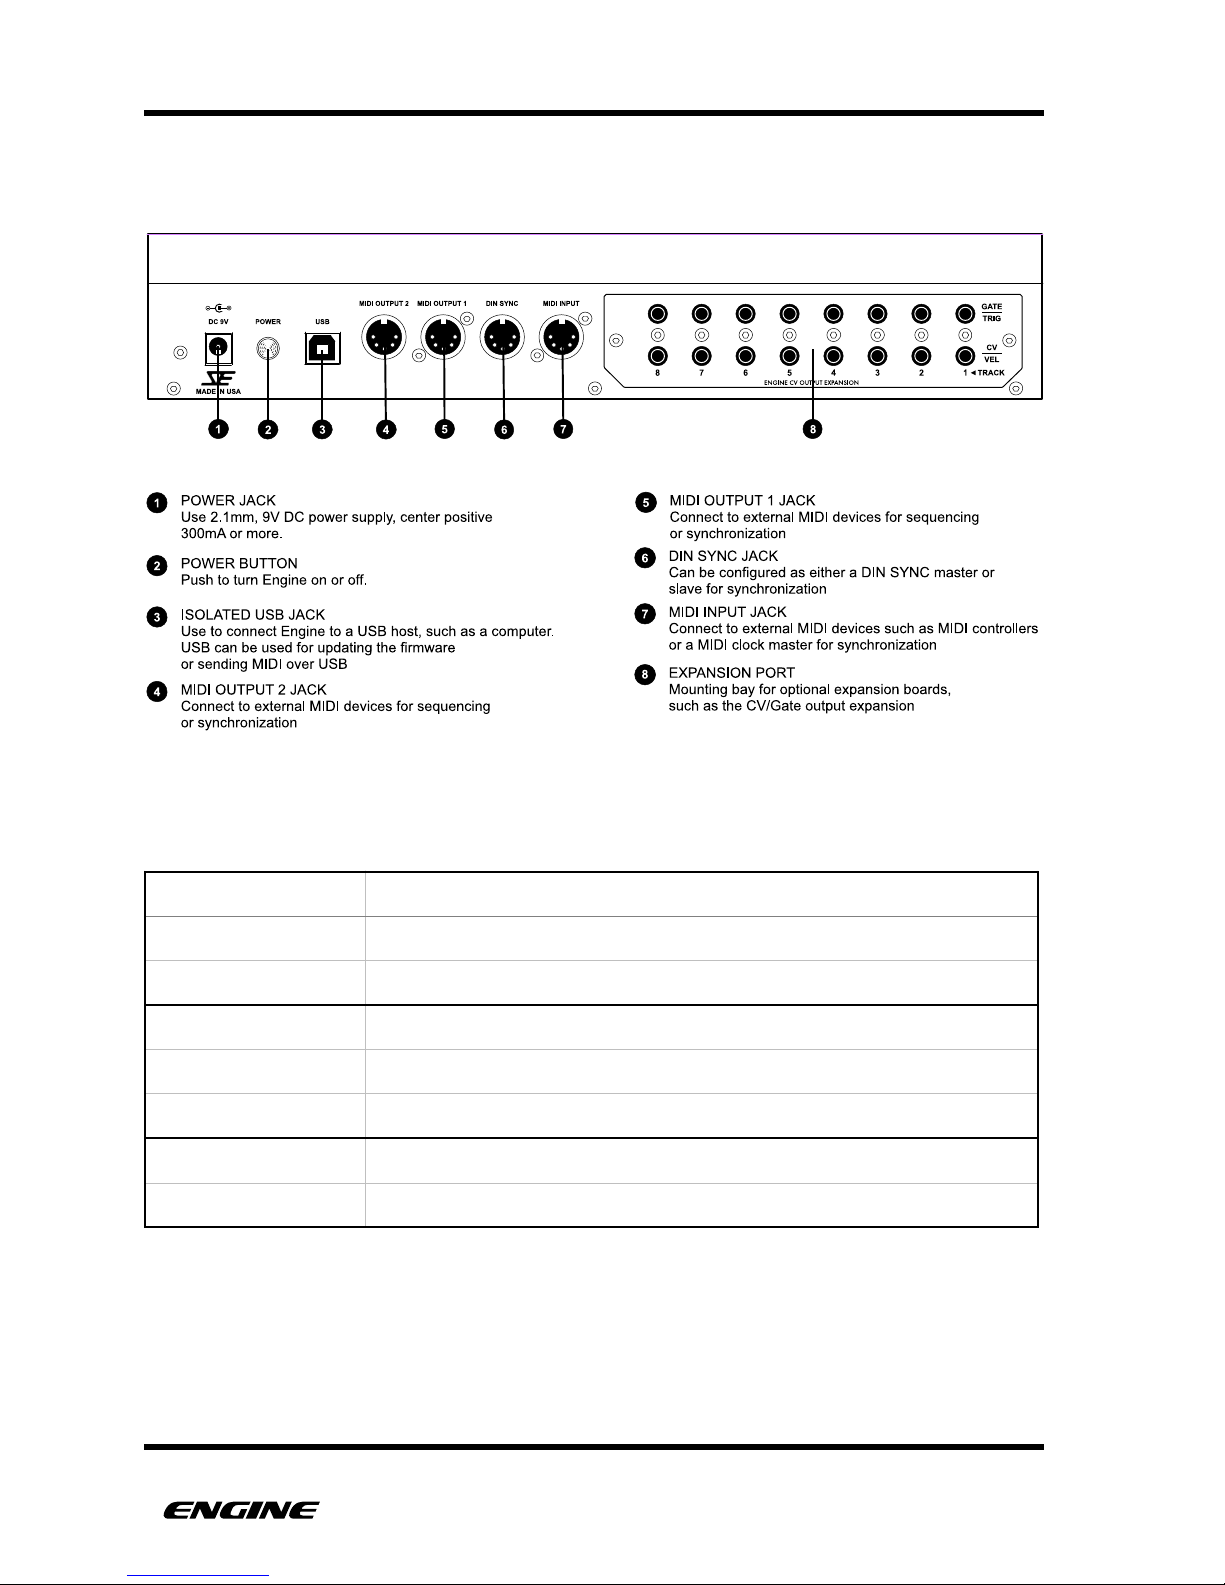
REAR PANEL
PHYSICAL SPECIFICATIONS
DIMENSIONS
327 (W) x 66 (D) x 133 (H) mm
12-7/8 (W) x 2-5/8 (D) x 5-1/4 (H) inches
WEIGHT
1.2kg (excluding power supply, options)
2 lbs 9 oz (excluding power supply, options)
POWER
9V DC 300mA, 2.1mm center positive
USER GUIDE 8
SOCIAL ENTROPY ELECTRONIC MUSIC INSTRUMENTS
Page 18

BASICS
SEQUENCER BASICS
"
This section covers the basic features and building blocks of Engine.
The Engine sequencer works with five main components; TRACKS, PATTERNS, STEPS,
SNAPSHOTS and SONGS. "
TRACKS
A good place to start is the TRACK. Engine has eight tracks which play simultaneously.
A track shouldn’t be confused with a song, on some synthesizers/sequencers the term
“track” is used to describe a song structure.
A track contains settings for a selected pattern or pattern chain, MIDI channel, drum note
mappings, accent velocity, MIDI effects and track mute status.
Each track has four dedicated banks of sixteen patterns (64 patterns per track). A track
can play a single pattern or a chain of patterns can be selected to play back in sequence.
"
PATTERNS
Within each track is a selected pattern (or chain of patterns). A pattern contains all of
the steps that make up a musical passage up to 64 steps.
There are two distinct pattern types, DRUM type patterns and SYNTH type patterns. Each
pattern type has different capabilities specifically designed for programming either drum
or synth type sequences, we will cover these differences in more detail later in the
manual.
Each pattern contains settings for type, timing scale, shuffle and last step (length) in
addition to programmed steps. Synth type patterns also include settings for pattern
transpose and chord memory. Drum type patterns store the individual drum instrument
mute status.
There are 512 total patterns spread across the 8 tracks
STEPS
Steps are the lowest level component that make up a pattern. A STEP typically represents
one musically significant event, such as a 16
th
note, although this can change depending
on the timing scale.
A step has different STEP ATTRIBUTES depending on the pattern type it belongs to.
USER GUIDE 9
Page 19
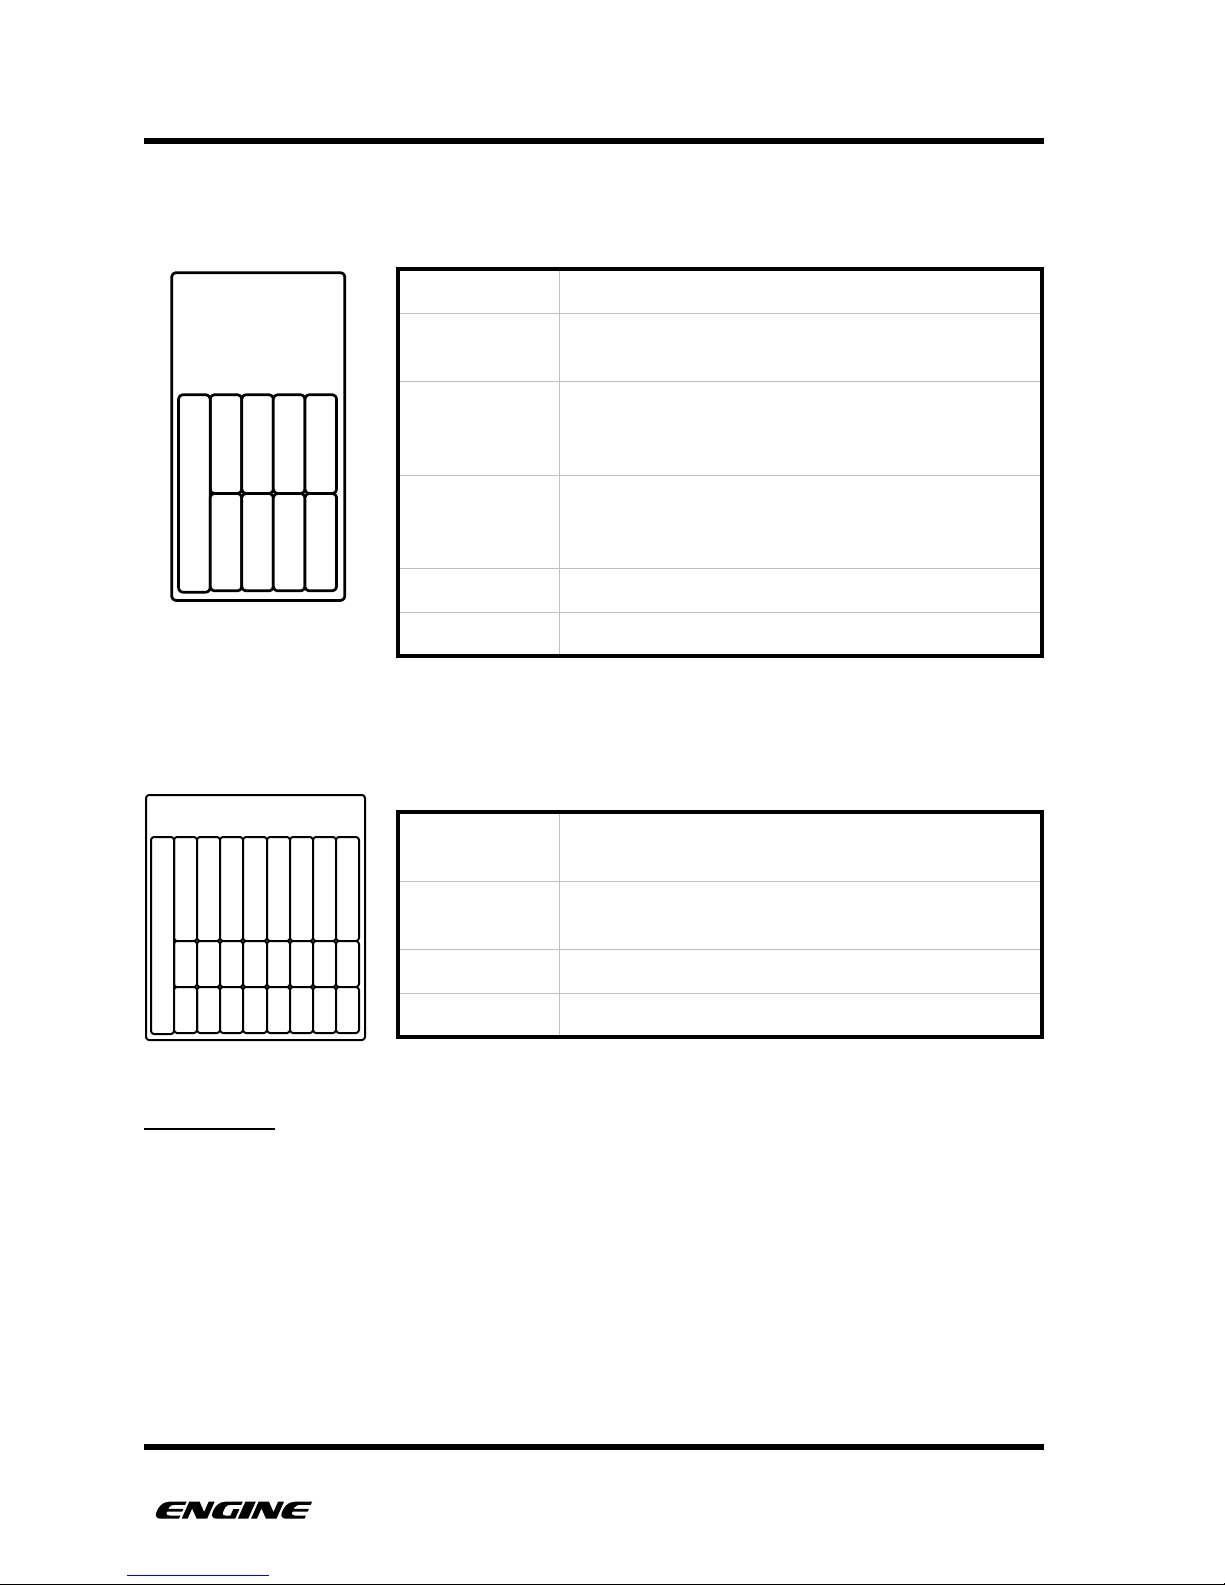
BASICS
For SYNTH type patterns, a step has attributes that determine PITCH, TIME, VELOCITY
(ACCENT), GATE LENGTH (SLIDE), REPEAT and ACTIVE.
"
For DRUM type patterns, a step has attributes that determine TRIGGER, ACCENT and
REPEAT for eight drum instruments, in addition to ACTIVE.
SNAPSHOTS
Snapshots are useful for storing the current state of Engine across all tracks. This allows
all settings to be recalled with a single button press. This can be used to build a song
structure in realtime for live performance.
A SNAPSHOT stores the settings for selected patterns or pattern chains per track, MIDI
effects, the mute status of tracks, the mute status of individual drum instruments in drum
type patterns and the transpose value of synth type patterns.
There are 4 banks of 16 snapshots for a total of 64 available snapshot locations.!
PITCH 1-4
Defines the pitches of the step
VELOCITY
The velocity of the note to be played, accent is a
quick way to set the velocity to a preset value
GATE LENGTH
Defines the note length, slide is created when a
note overlaps the next note, also known as legato.
This is interpreted by most 303 clones as a “slide”
TYPE
The step type can be a step, tie or rest. The total
length of a note is determined by the combination
of a step event along with subsequent tie events
ACTIVE
Determines if the step will be played or skipped
REPEAT
Activates the note repeat effect for the step
TRIGGER
Defines which drum instruments will be played on
this step
ACCENT
Tiggers the note to be played at higher velocity
per drum instrument
ACTIVE
Determines if the step will be played or skipped
REPEAT
Activates the note repeat effect for the step
USER GUIDE 10
SYNTH
STEP
TYPE
VELOCITY
GATE
ACTIVE
REPEAT
PITCH 1
PITCH 2
PITCH 3
PITCH 4
DRUM STEP
EXT
BASSDRUM
SNARE
LOW TOM
HI TOM
CYMBAL
OPEN HAT
CLOSED HAT
ACC
ACC
ACC
ACC
ACC
ACC
ACC
ACC
ACTIVE
RPT
RPT
RPT
RPT
RPT
RPT
RPT
RPT
Page 20
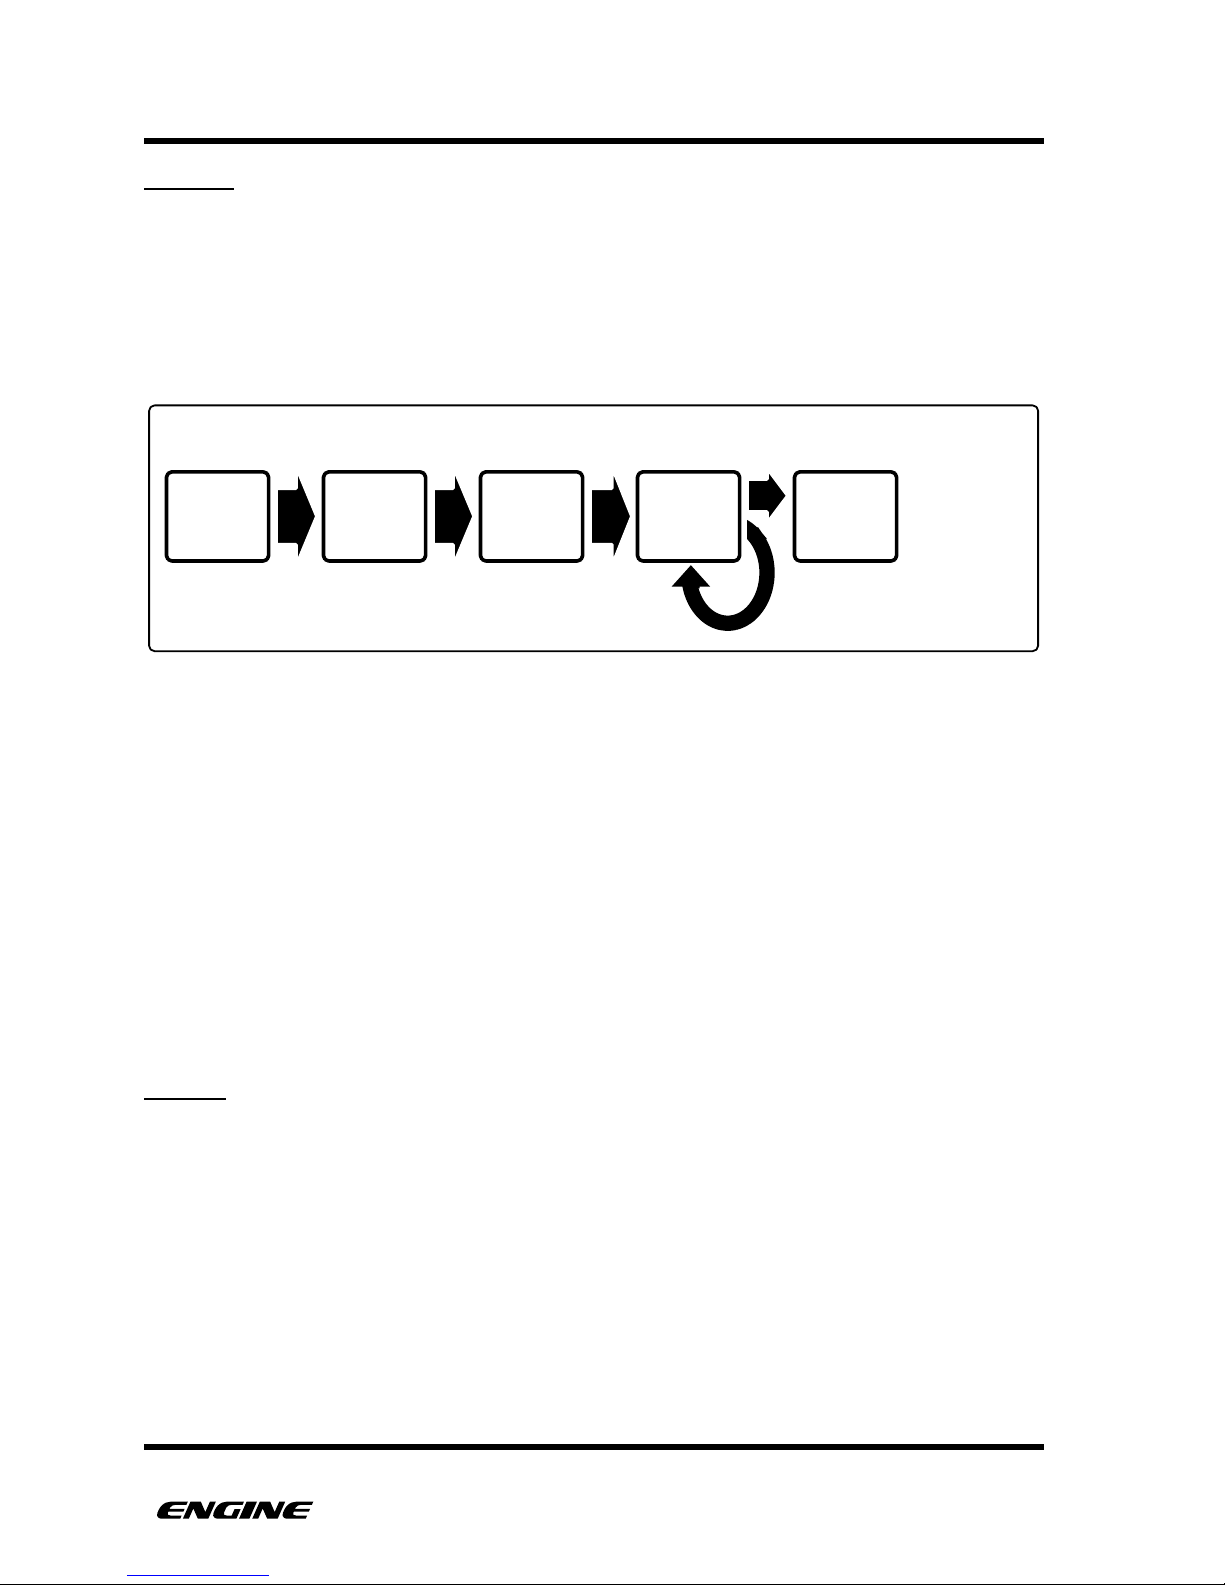
BASICS
SONGS
"
A SONG is a sequence of snapshots. SONGS allow for an entire performance to be
constructed with different snapshots and played back in sequence automatically.
Each SONG is made up of a series of SONG STEPS (not to be confused with pattern
STEPS). A SONG can contain up to 64 individual SONG STEPS.
"
Each SONG STEP has settings for:
•
SNAPSHOT – Snapshot location recalled on the song step
•
REPEATS – How many times a SNAPSHOT will play before advancing to the next
step. Playback of the longest pattern or pattern chain in the snapshot counts as one
repeat.
A SONG also contains settings for SONG LENGTH. After reaching the last song step, a
SONG will loop back to the beginning or move to the next song in the chain.
There are 32 total songs in memory.
MODES
There are many modes accessible using different buttons on the front panel. "
Some examples of available modes are:
•
MUTE MODE - Mute individual tracks
•
TRANSPOSE MODE - Transpose a synth type pattern
•
PATTERN SELECT MODE - Select the pattern or pattern chain assigned to a track
•
TIME MODE - Edit time parameters for a pattern, such as scale, shuffle or last step
Each available mode will be covered in detail later in this manual.!
USER GUIDE 11
PATTERN
SONG
SNAPSHOT
REPEAT
SONG
STEP 1
SONG
STEP 2
SONG
STEP 3
SONG
STEP 4
SONG
STEP 5
SNAPSHOT
SNAPSHOT SNAPSHOT SNAPSHOT
. . .
Page 21

BASICS
FUNCTIONS
"
FUNCTIONS perform actions on step, pattern or track data. Most functions are initiated
in FUNCTION MODE through various combinations of buttons, but some functions are
available as realtime performance capabilities in other modes.
Some examples of functions are:
•
PATTERN CLEAR - Clearing pattern data.
•
STEP COPY - Copy step data to the step copy buffer.
•
PATTERN ROTATE - Move pattern data forward or backwards one step at a time.
•
ALL ACCENT - A realtime performance function that plays every note accented.
•
RANDOMIZE - Randomize pattern data.
Each function is documented in full detail throughout the remainder of this manual.!
USER GUIDE 12
Page 22

QUICK START!
USER GUIDE 13
Page 23

QUICK START
QUICK START
"
This guide should help you get started as quickly as possible. It covers basic entry of
PATTERN data into a single track and then constructing a simple SONG.
CONNECTIONS
Before using Engine, you will need to connect the machine to power and a sound source
to be controlled using MIDI, USB-MIDI or optionally CV/Gate. For this exercise we will
use only the MIDI output.
CONNECTING MIDI
Engine has a MIDI input and two MIDI output ports.
The MIDI input port can be used for syncing Engine to other devices, or it can be used to
connect a MIDI controller for realtime recording into patterns.
The MIDI output ports are used to send programmed MIDI events to other devices, in
order to generate sound. MIDI clock can also be sent to synchronize other devices to
Engine.
To begin, we recommend starting with one MIDI device such as a synthesizer that can be
used as a sound source for programmed patterns. Connect MIDI output 1 from Engine to
the MIDI input of the synthesizer.
CONNECTING AUDIO
Connect audio cables before turning on audio amplifiers.
Connect the audio output of the MIDI device to a mixer or other audio input. A
headphone output can be used for private listening.
This will allow us to hear the results of our sequencing.
CONNECTING POWER
Use the included 9V power supply to power Engine. The power supply is world voltage
compatible, you must choose the correct plug attachment for your region and attach it to
the power supply.
Once the power supply is connected, push the power switch to turn Engine on. You
should see the LEDs light in sequence as Engine boots.
USER GUIDE 14
Page 24

QUICK START
SELECT A TRACK
First we will select the track we want to sequence. The default mode for Engine is TRACK
SELECT mode, meaning that you can use the eight white buttons of the mini keyboard to
select one of the eight available tracks.
After initialization, Engine automatically creates synth type patterns in tracks 1 through 4
and drum type patterns in tracks 5 through 8. These can be changed to suit your studio.
MIDI channels are automatically assigned to match the track number. These channels can
also be changed to match your studio.
NOTE: All of these actions can be done while the sequencer is running!
1. Select a track by pressing one of the eight white buttons on the mini keyboard:
•
Because our sound source is a synthesizer, select a track from 1 to 4
2. Match the MIDI channel of the track to the MIDI channel of the synthesizer
•
Double click the FUNCTION button to pin FUNCTION MODE
•
Press and hold the MIDI CHANNEL (snapshot) button
•
Select the desired MIDI port and channel by turning control knob 1.
•
The current MIDI port and channel is shown on the LED display
3. Click the FUNCTION button to leave function mode.
4. The track is now ready to be sequenced
CREATE A PATTERN
Now we will quickly create a new pattern. There are multiple ways of entering pattern
data, but for this exercise we will use the grid programming method. For details on other
methods, please refer to the REFERENCE GUIDE section of this manual.
1. If you have not done so, press the RUN/STOP button to start the sequencer
2. By default the pattern is 16 steps long, the chase LED should move across the 16
pattern steps and loop back to step 1
3. Now click and hold one of the 16 step buttons to enter a note event
4. To set the length of the note, while still holding the step button, click a second step
button located after the first. The length will be shown with dim LEDs.
5. While still holding the step button, set the pitch of the note in semitones using the
mini keyboard buttons
6. While still holding the step button, set the octave of the pitch using the DOWN and
UP buttons
USER GUIDE 15
Page 25

QUICK START
7. While still holding the step button, you can also set the ACCENT and SLIDE
attributes
8. While still holding the step button, a specific note velocity can be set using
controller knob 1. The current velocity of the note is displayed on the numeric
display.
9. While still holding the step button, fine tune the gate length of the note using
control knob 2. The current gate length will be displayed on the numeric display.
If slide is set, the display will show “SLD”.
10.Release the step button and repeat from step 3 to enter new notes
MODIFY A PATTERN
Now that you have created a pattern, you can do something dynamic with it.
•
Try the ALL ACCENT function by pressing and holding the TRANSPOSE button then
press the ACCENT button, all notes will play with accent while ACCENT button is
held."
•
Try the ALL SLIDE function by pressing and holding the TRANSPOSE button then
press the SLIDE button, all notes will be played legato while the slide button is held."
•
Release the TRANSPOSE button
•
Modify the pattern length by pressing and holding the TIME button and then
pressing a pattern step button. The new length will take effect the next time the
pattern loops."
•
Release the TIME button
CREATE SNAPSHOTS
Now we will save your pattern setup into a snapshot.
1.Select SNAPSHOT MODE by double-clicking the SNAPSHOT (down) button. The
SNAPSHOT LED will blink.
2.Record a snapshot by pressing and holding the RECORD button and then click
PATTERN STEP 1.
3.Now let’s transpose the pattern on track 1 without leaving SNAPSHOT mode. Make
sure that track 1 is selected by pressing the TRACK 1 button (low C on the minikeyboard).
USER GUIDE 16
Page 26

QUICK START
4.Press and hold the TRANSPOSE button, now select a semitone transpose amount by
pressing one of the buttons of the mini-keyboard.
5.Release the TRANSPOSE button
6.Now we will save the transposed pattern setup into a new SNAPSHOT location. We
are still in SNAPSHOT mode and the SNAPSHOT LED should be blinking.
7. Press and hold the RECORD button and then click PATTERN STEP 2. This saves the
snapshot to location 2.
8.You can now switch back and forth between the two snapshots by clicking PATTERN
STEP 1 or PATTERN STEP 2. The snapshot will change when the pattern loops and
you should hear the pattern transpose automatically.
9.Click the SNAPSHOT button to leave SNAPSHOT mode.
CREATE A SONG
Using the two snapshots we have recorded, we will build a simple song.
1.Select SONG MODE by clicking the SONG (transpose up) button.
2.For this example we will use song step record mode to create the song. To enter
step record, press and hold FUNCTION and then click RECORD. The FUNCTION
and RECORD LEDs will start blinking.
3.For our song structure we will play snapshot 1 three times, then switch to snapshot 2
for one repetition, then loop back to the beginning.
4.The current song step number is shown on the numeric display, it should be showing
“St 1” for step 1.
5.Although it should already be selected, click PATTERN STEP 1 to select snapshot 1
for this step.
6.Now click the TRACK 3 (mini-keyboard E) button to set the step repeats to 3. The
first 3 track LEDs will show the number of repetitions.
7. Now we move to song step 2 by clicking the FORWARD (D sharp) button. The
numeric display should change to show “St 2”.
8.Now click PATTERN STEP 2 to assign snapshot 2 to this song step.
9.The number of repeats should already be set to 1, which is shown by a (blinking)
LED on the TRACK 1 button.
10.Now we need to assign song step two as the last step in this song. Click the REST
(slide) button to assign this step as the last song step. The REST LED will light.
11. Now leave song step record by clicking the FUNCTION button.
USER GUIDE 17
Page 27

QUICK START
12.If the sequencer is already running, you should hear and see the song progress
from snapshot 1 to snapshot 2. The LEDs and display will change to show the song
progress. After playing snapshot 2, the song loops back to snapshot 1.
Now that you know how to create patterns, snapshots and songs, you can explore
polyphonic programming, drum programming, realtime recording, arpeggios and drum
rolls and more across all eight tracks!!
USER GUIDE 18
Page 28

REFERENCE GUIDE
"
USER GUIDE 19
Page 29
TRACKS
TRACKS
There are eight tracks in Engine. Tracks define a pattern or chain of patterns, along with
other settings for things like MIDI channel, controller assignments, MIDI effects, etc. All
eight tracks play simultaneously.
Depending on the pattern type selected, a track can play a 4-note polyphonic synth
sequence or an 8-note polyphonic drum trigger sequence. Patterns in each track can
have different lengths and timing characteristics.
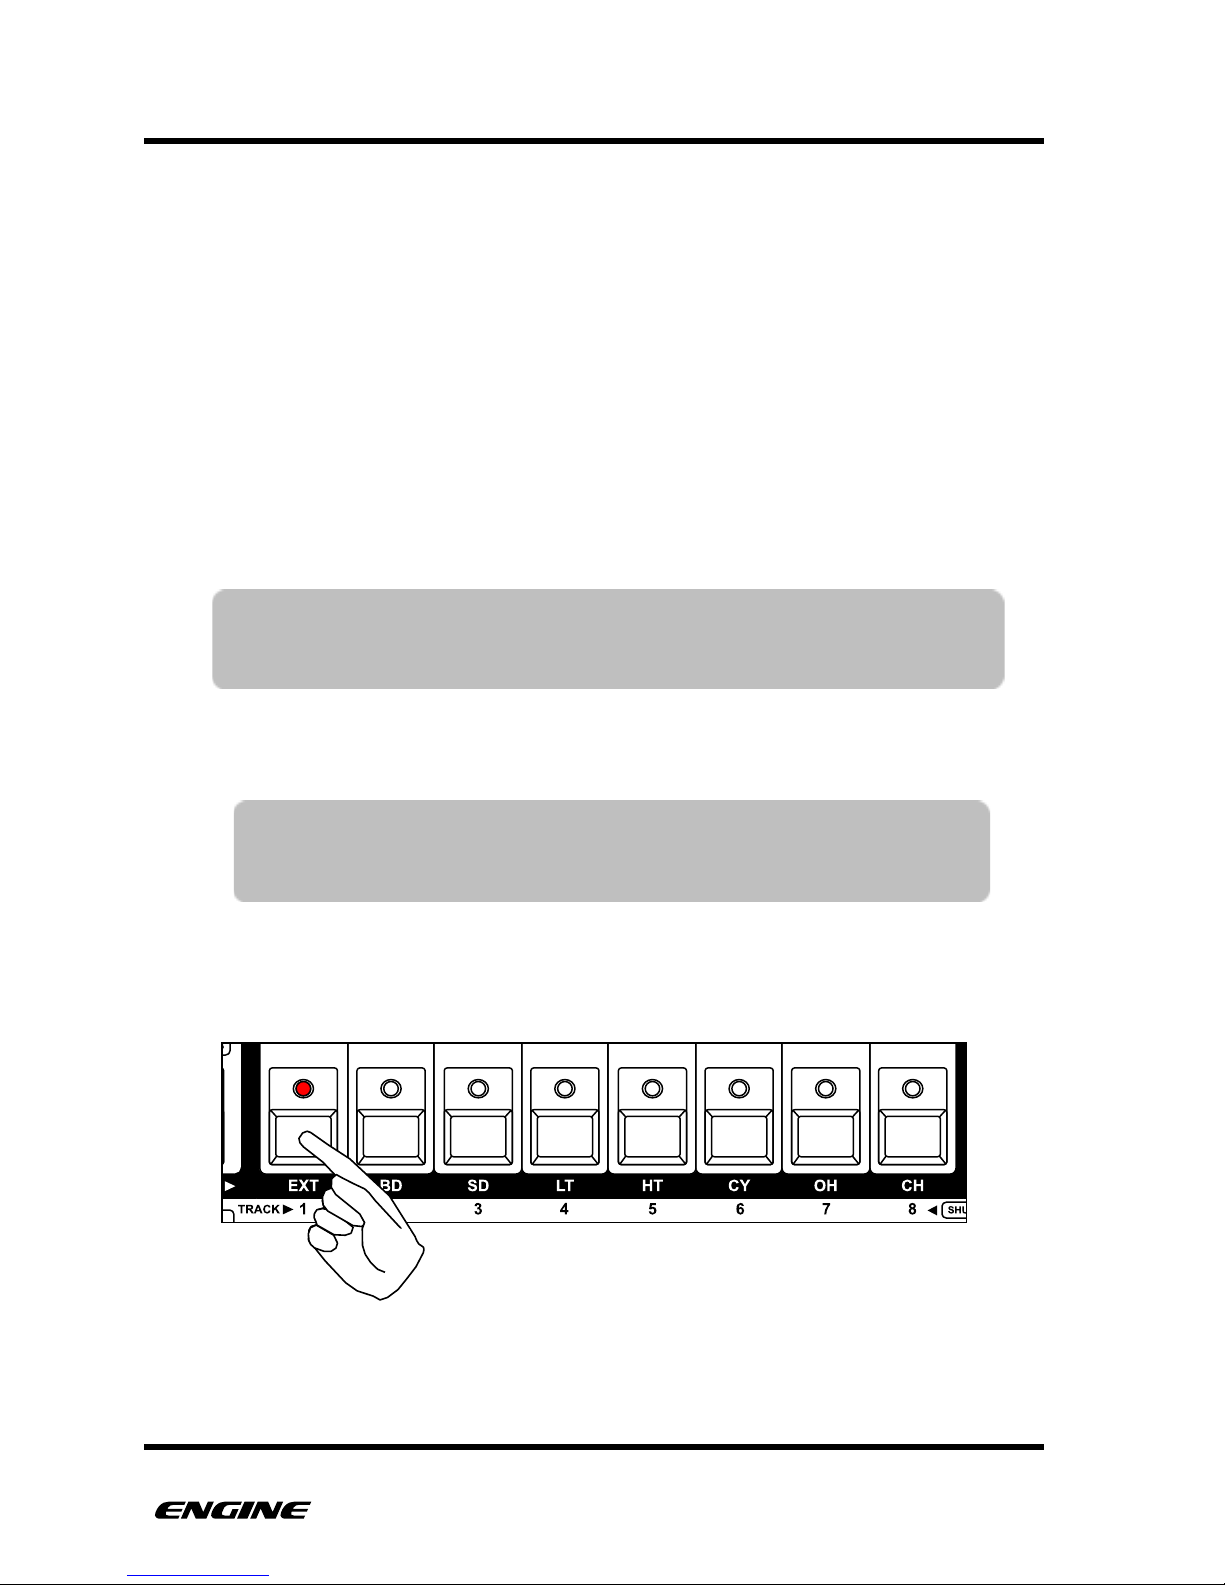
SELECTING TRACKS
When Engine is powered on, it will default to TRACK SELECT mode.
TRACK SELECT mode is the normal mode, when no other modes are active.
In Track Select mode the eight white buttons of the mini keyboard are used to select the
track you wish to work with.
You can change the selected track by clicking one of the white mini keyboard buttons. The
step LEDs will change to show the programmed pattern for the selected track.
!
USER GUIDE 20
TIP: Engine remembers the state of the selected track and instrument when
turning the machine off. The selected track will be recalled when
turning the machine back on.
TIP: The track LEDs flicker briefly each time a note is played in that
track. This gives a good visual indicator of what tracks are
playing. Muted tracks will not flicker.
Page 30
TRACKS
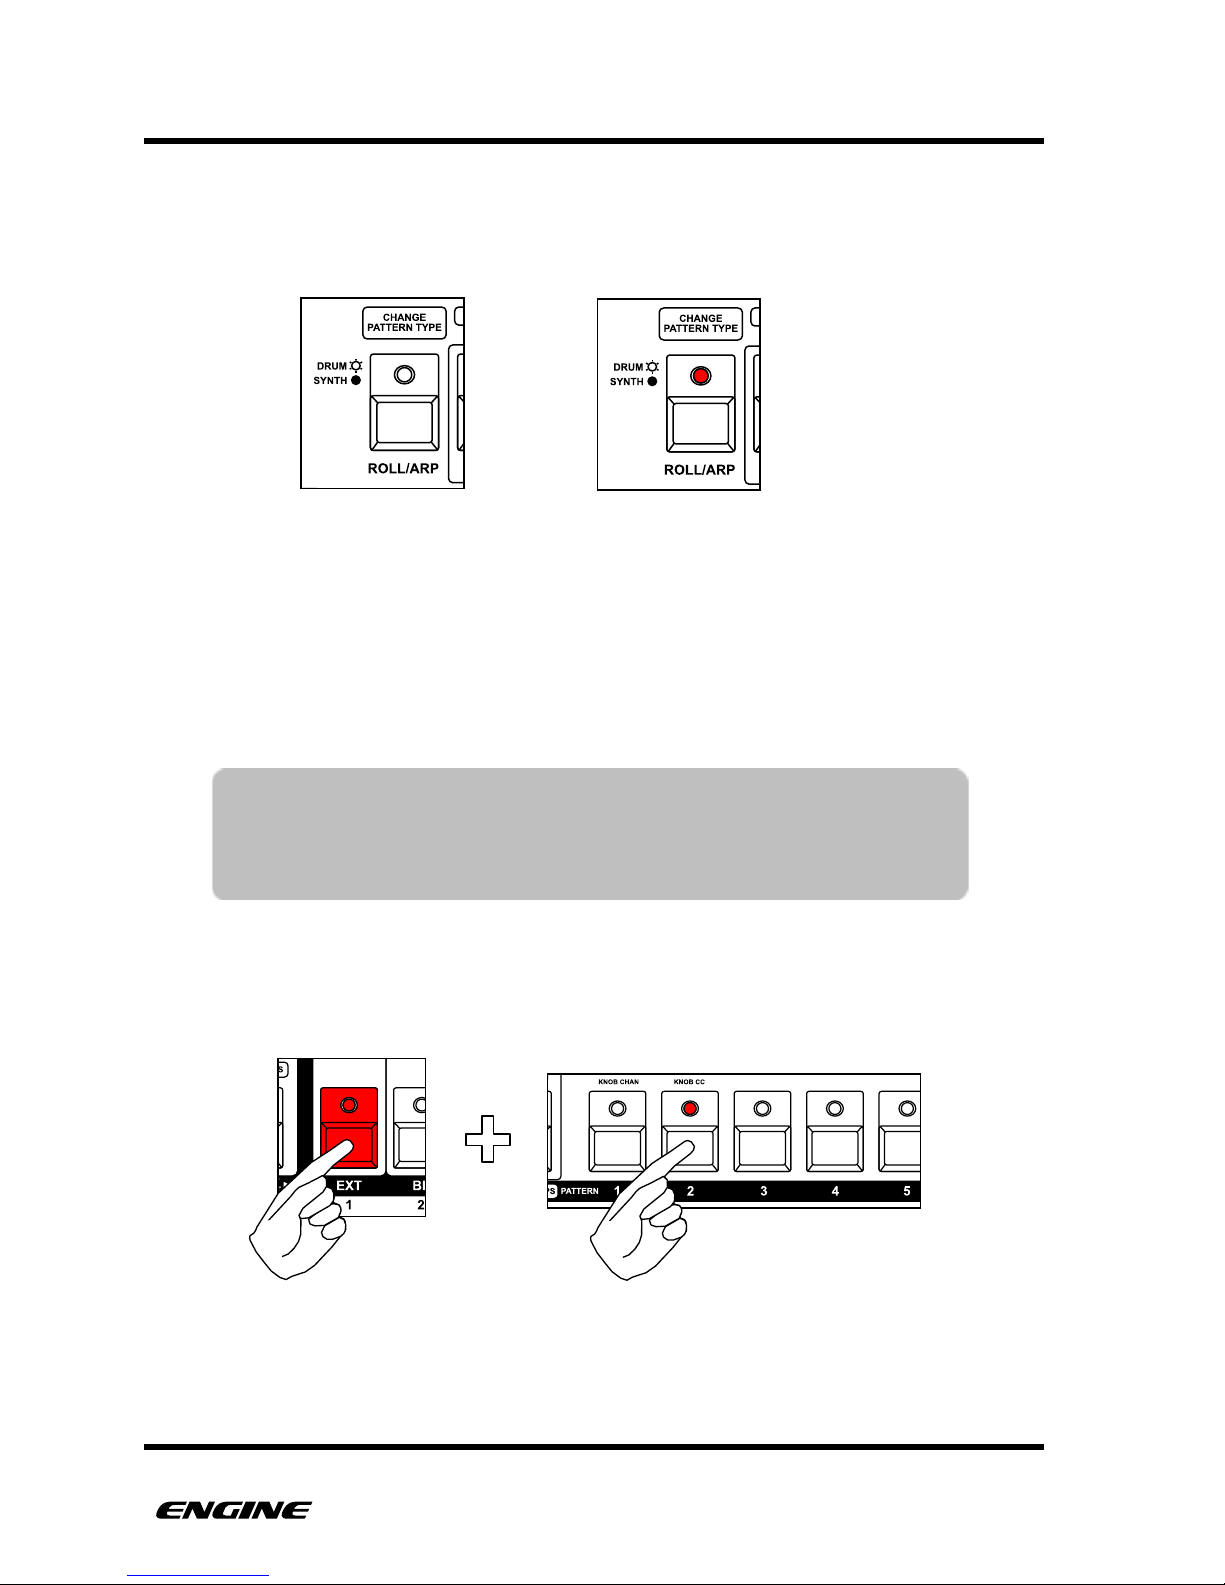
The Pattern Type LED will also change to show the type of pattern assigned to the selected
track. For Drum type patterns the Pattern Type LED will be lit, for Synth type patterns the
LED will not be lit.
SELECTING PATTERNS AND PATTERN CHAINS FOR A TRACK
TRACK SELECT mode is also where you will assign patterns or pattern chains to the
selected track. While holding one of the TRACK buttons, the pattern step LEDs change to
show the selected pattern for the track.
While in TRACK SELECT, use the pattern step buttons and the section button to select the
pattern and pattern bank assigned to the track. There are four banks of 16 patterns
available per track. The section button is used to switch between the four banks.
!
USER GUIDE 21
TIP: You can also double click the selected track button to pin it, then
you can select patterns and pattern chains without having to hold
the selected track button down. To unpin the selected track, just
click the selected track button again.
Synth type pattern
Drum type pattern
Assigning pattern 2 to track 1
Page 31
TRACKS
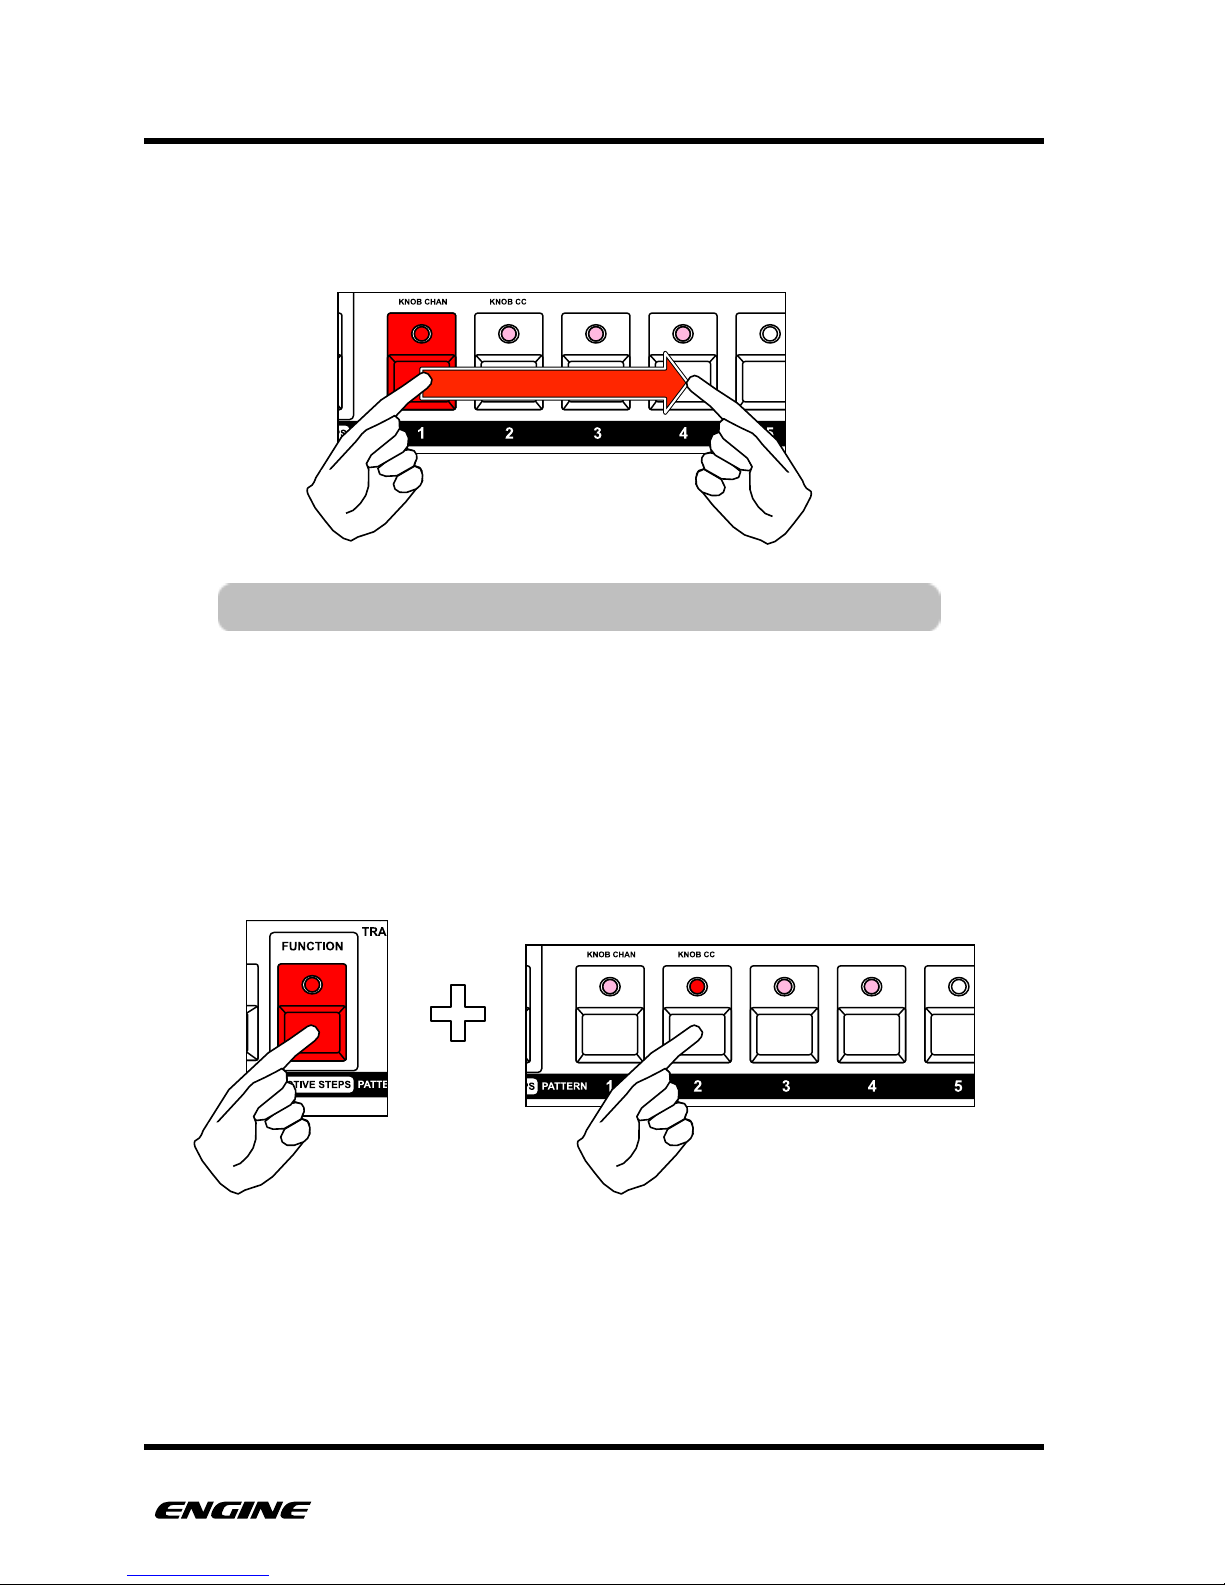
To select a pattern chain, press and hold the pattern step button for the first pattern in the
chain, then click the pattern step button for the last pattern in the chain. The pattern
chain should light across all selected patterns.
When chaining patterns, one pattern will be shown as the current pattern for editing. This
pattern is designated with a bright LED, while other patterns in the chain are shown with
dim LEDs. The currently playing pattern is shown with a blinking LED.
To change the selected edit pattern within a chain, while still holding the selected track
button, press and hold the function button and then click one of the patterns in the pattern
chain to make it the edit pattern. You will only be able to select patterns within the
current chain.
You can select different patterns and pattern chains for each of the eight tracks. The
patterns and pattern banks for each track are not shared, this means there are a total of
512 patterns available across the eight tracks. You can use the pattern copy/paste
functions to move patterns between tracks if needed.
USER GUIDE 22
NOTE: You cannot chain patterns across multiple pattern banks.
Page 32

TRACKS
SELECTING PATTERNS USING MIDI
Individual patterns can be selected using MIDI program change messages. There are 64
patterns per track (16 patterns x 4 banks) which can be selected with the corresponding
MIDI program change number.
Each track will listen for program change messages on the MIDI channel assigned to that
track. !
USER GUIDE 23
Page 33
TRACKS
MUTING TRACKS
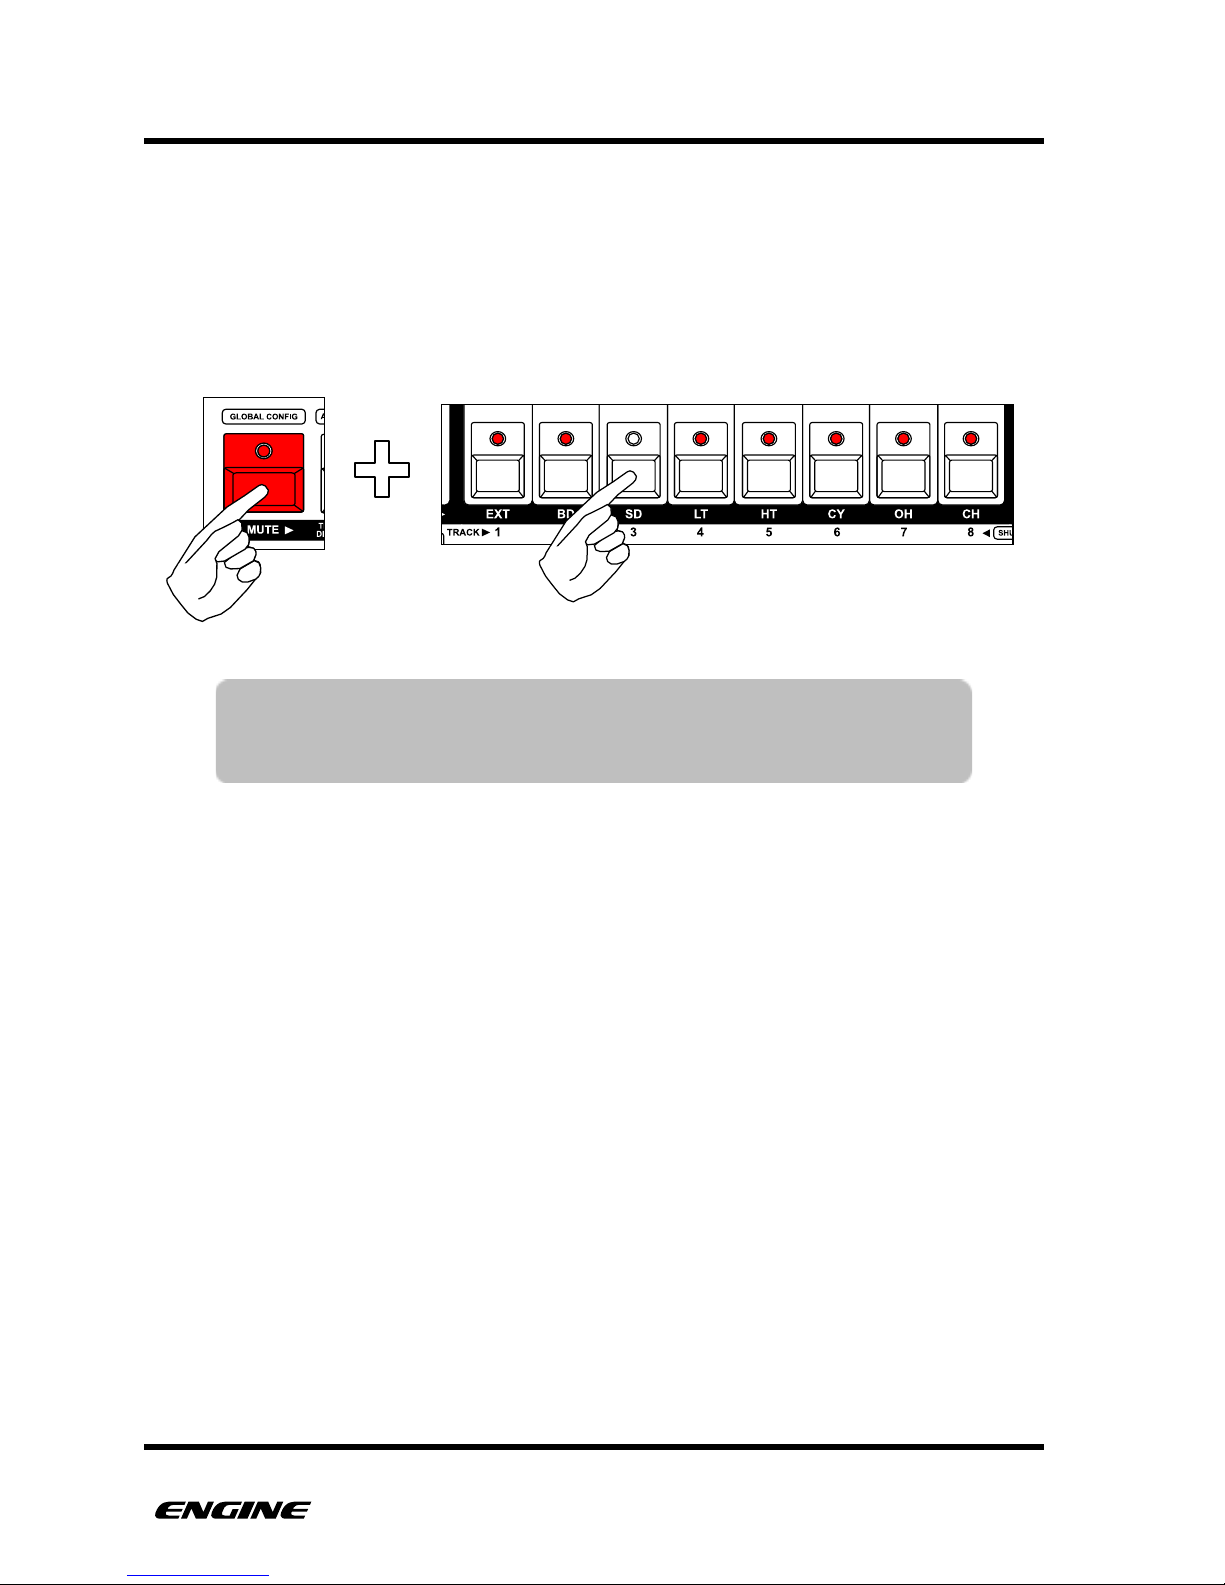
Each track can be muted individually for creating variations or live performance. To mute
a track, while in TRACK SELECT (normal) mode, press and hold the MUTE button, then
click the track you wish to mute or unmute. Muted tracks are shown as an unlit track LED,
while unmuted tracks are shown with a lit LED.
USER GUIDE 24
TIP: The MUTE button can be double clicked to pin the track mute
function. This is useful for live performance when muting and
unmuting tracks is a common action.
Page 34
TRACKS
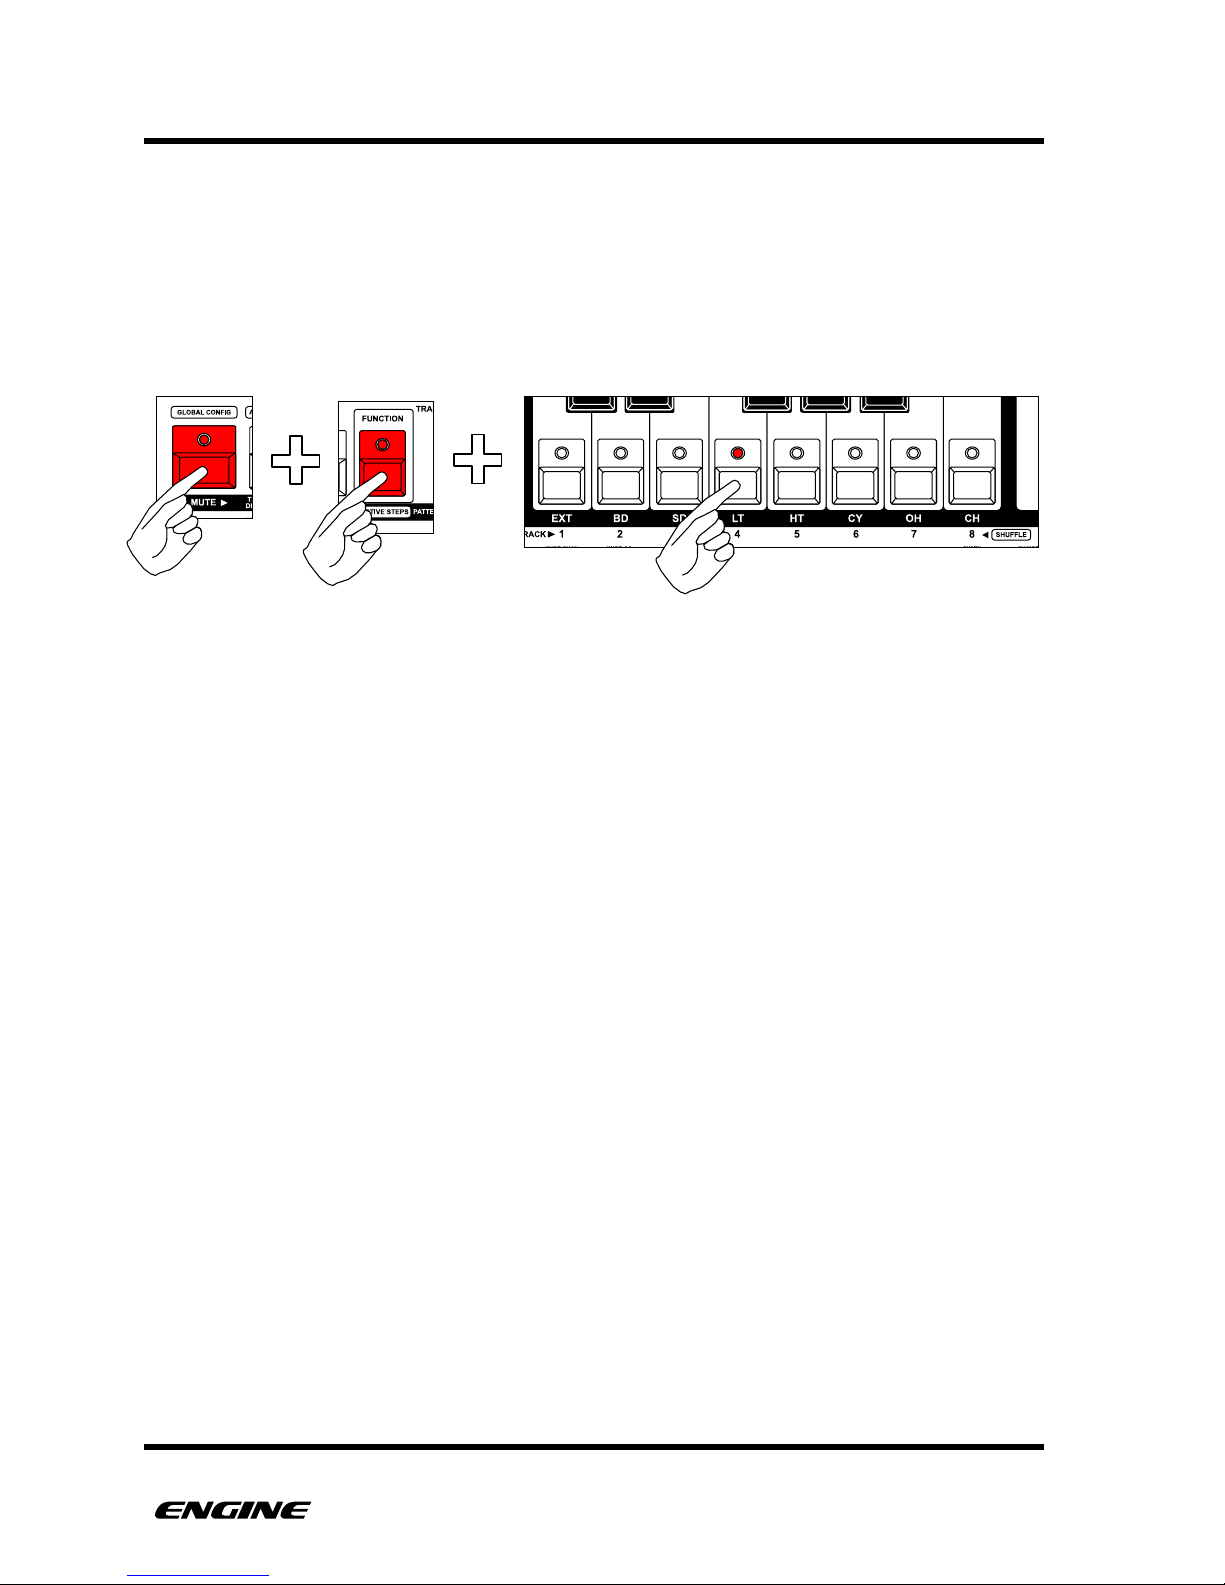
SOLOING TRACKS
A track can be soloed, which will mute all other tracks. To solo a track, while in TRACK
SELECT (normal) mode, press and hold the MUTE button, then press and hold the
FUNCTION button, then click the track you wish to solo. The selected track will be
unmuted, all other tracks will be muted.
USER GUIDE 25
Page 35
TRACKS
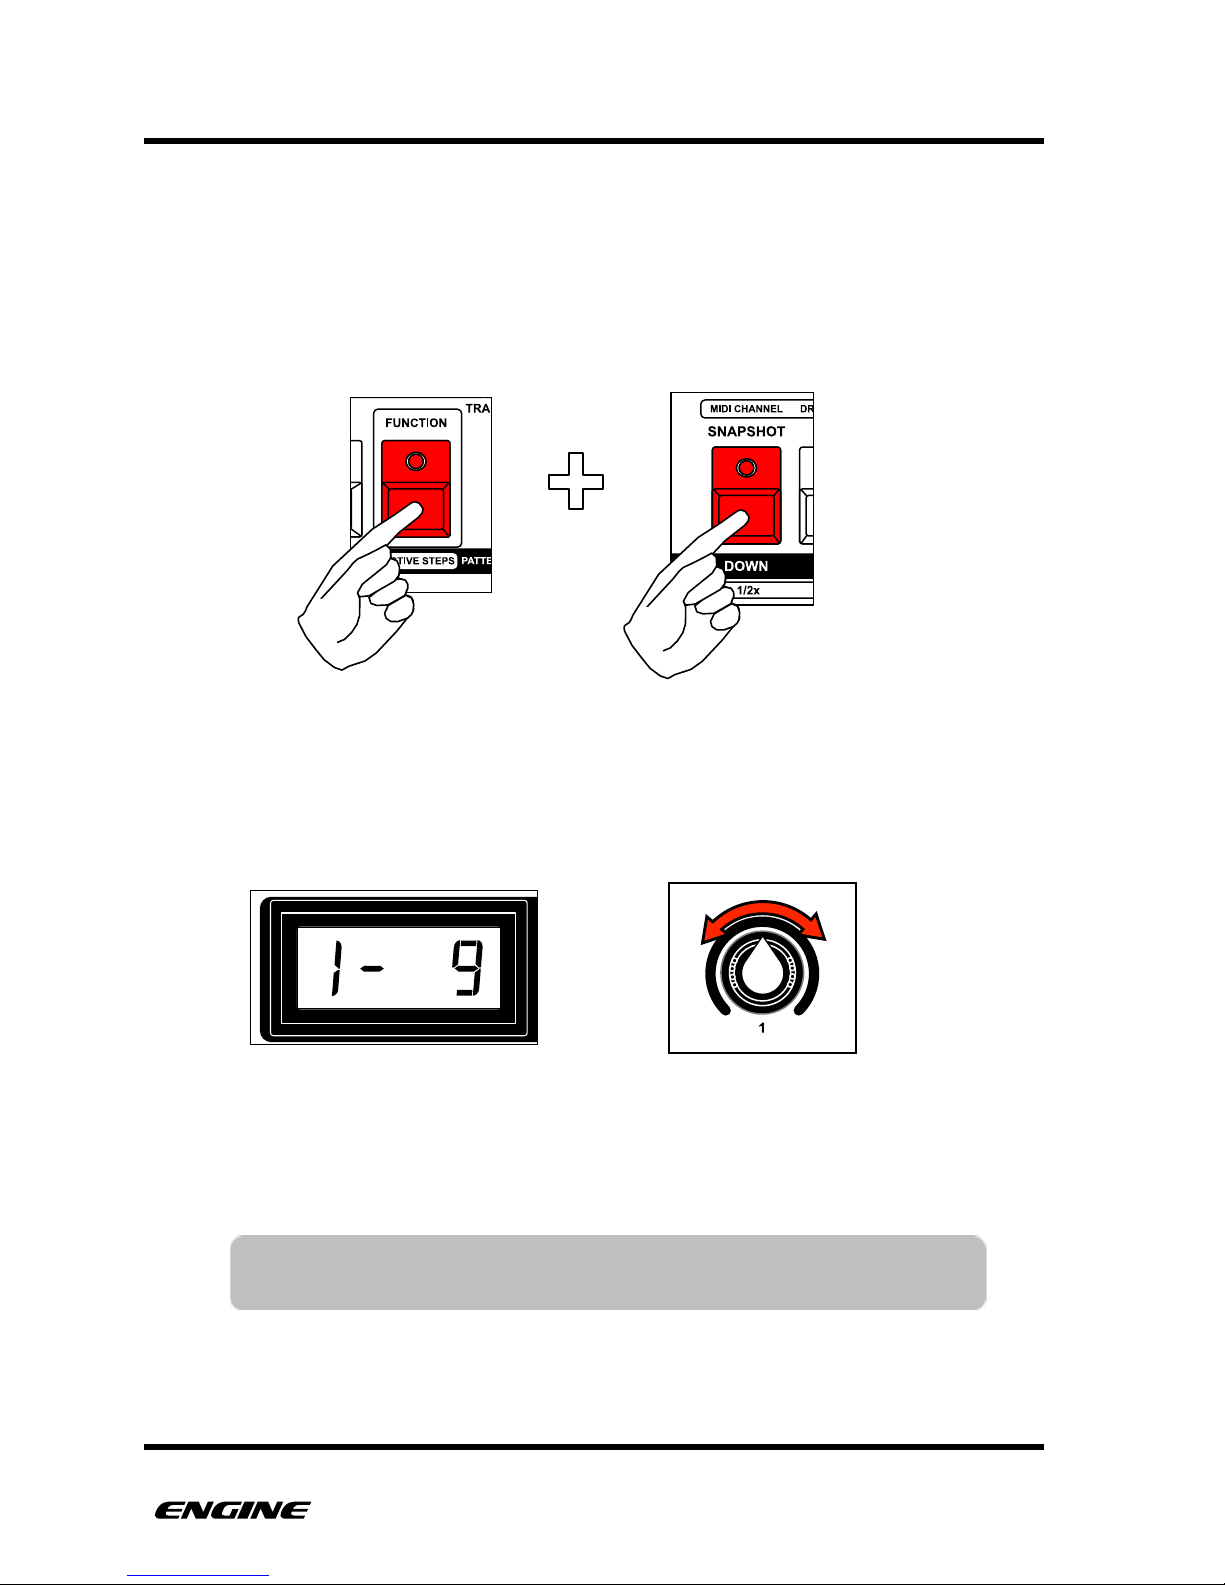
SETTING THE TRACK MIDI CHANNEL
The MIDI output channel and output port can be set for each track. To view the MIDI
output channel for a track, press and hold (or double-click) the FUNCTION button, then
press and hold the MIDI CHANNEL (down) button.
The display will show the port and MIDI output channel for the selected track.
To change the MIDI channel, while in MIDI channel mode, rotate control knob 1. The
LED display will change to show the new MIDI channel and port. USB MIDI output uses
port assignment 1. This means that tracks assigned to port 2 will not be output over USB
MIDI.
Use the track select buttons to switch tracks while in the MIDI channel mode, to quickly set
the output channel for multiple tracks.
USER GUIDE 26
TIP: You can assign the same MIDI output channel to multiple tracks to
control a single device from multiple patterns.
MIDI output port 1, channel 9
Page 36
TRACKS
MIDI EFFECTS
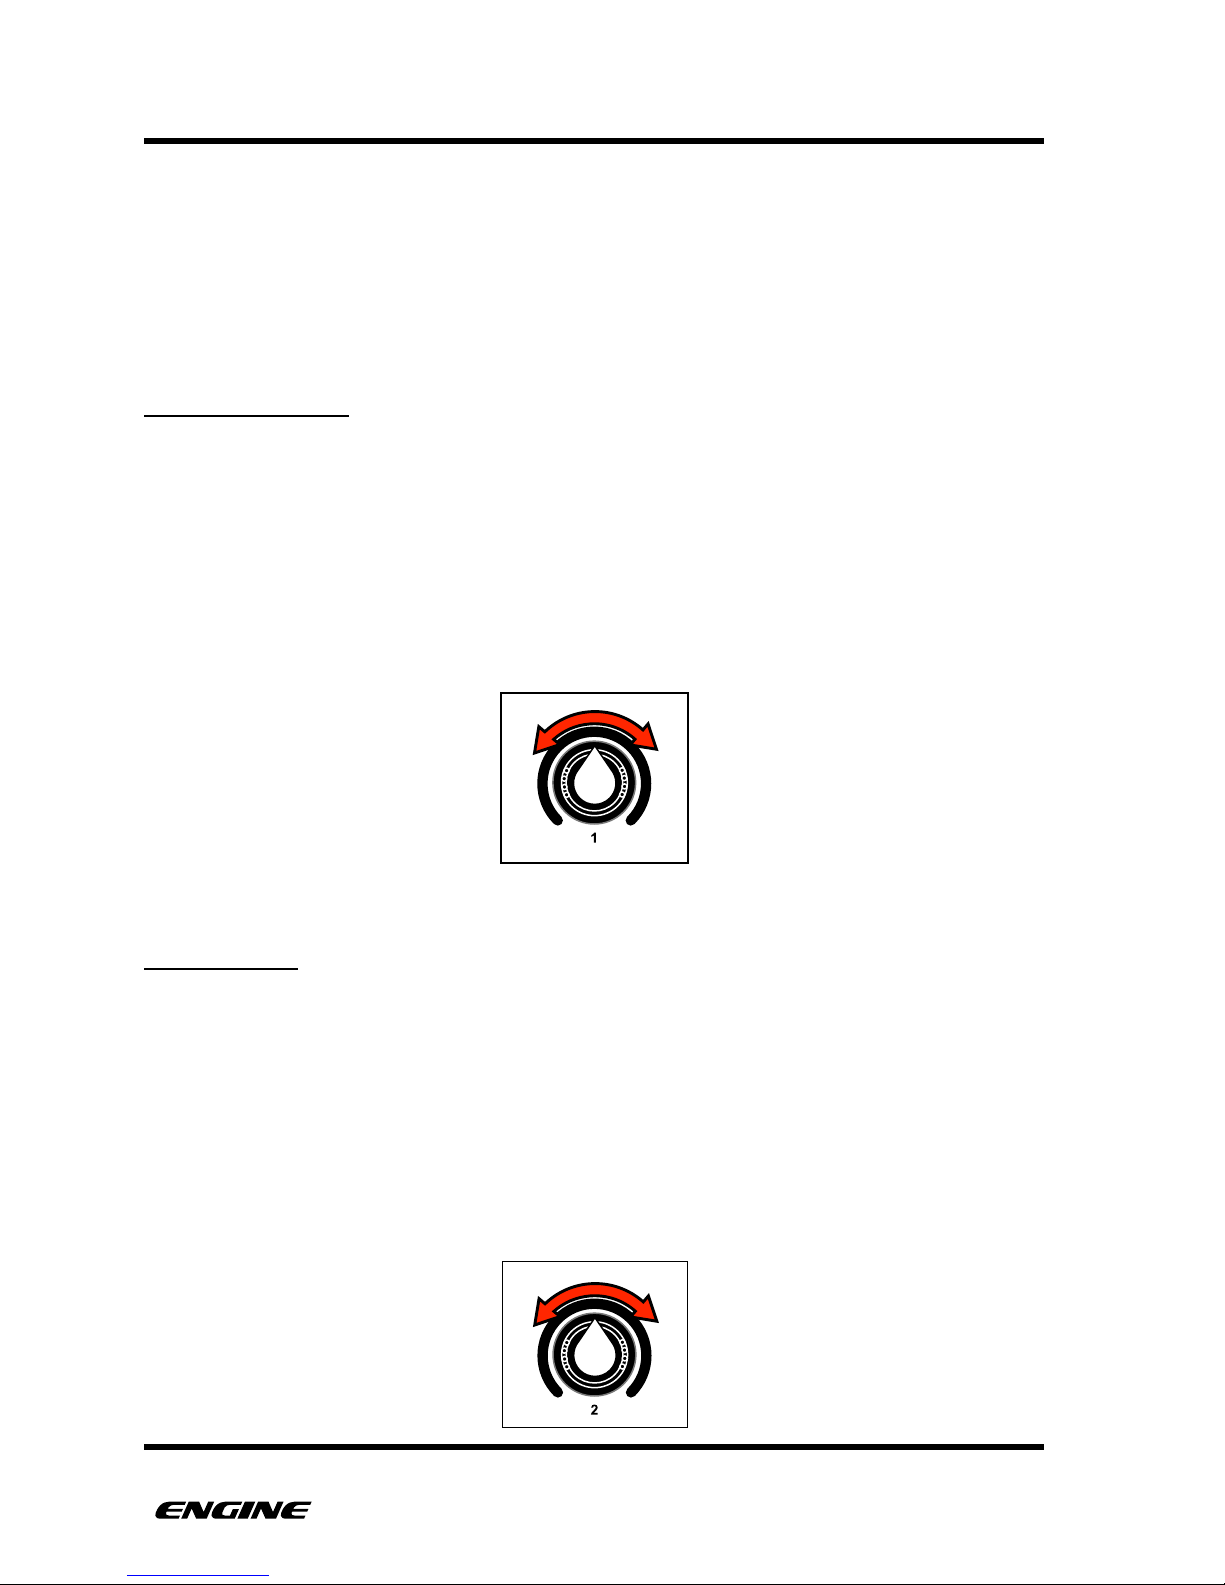
Each track has a set of MIDI EFFECTS that change how an entire pattern plays. MIDI
EFFECTS are accessible in FUNCTION MODE using the control knobs.
MIDI EFFECTS settings can be saved in snapshot locations, but are not saved with pattern
data. If a new pattern is recalled, it will have the current track MIDI EFFECTS applied to
it.
VELOCITY OFFSET
A velocity offset effect can be applied to all MIDI notes generated by the pattern. This
can be either a positive or negative offset from -63 to +64.
This is especially useful when you have a mix of high velocity (accented) and unaccented
notes. The velocity offset can be used as a creative volume control to fade out certain
notes in the sequence or normalize all notes to a high velocity.
To set the velocity offset, while in FUNCTION MODE, rotate control knob 1. The current
velocity offset value will show briefly on the LED display.
GATE OFFSET
The gate offset effect will shorten or lengthen all notes in a synth pattern by up to one
step. The offset can be set from -32 to +31.
The gate offset can be used creatively to change note playback from more staccato to
more legato style. It is especially effective when you have a mix of notes that are longer
(or have slide) and short single step notes.
To set the gate offset, while in FUNCTION MODE, rotate control knob 2. The current
gate offset value will show briefly on the LED display.
USER GUIDE 27
Page 37
TRACKS
DELAY OFFSET
The delay offset effect will add or subtract a delay amount to the start of all programmed
steps. This can be used to increase quantization or remove shuffle in realtime.
To set the delay offset, while in FUNCTION MODE, rotate control knob 3. The current
delay offset value will show briefly on the LED display.
NOTE REPEAT
The note repeat effect creates a ratchet type effect for steps that have note repeat set.
Please see the sections on GRID PROGRAMMING to learn how to set note repeat on a
pattern step.
When a step with note repeat enabled is played it will quickly retrigger the same note
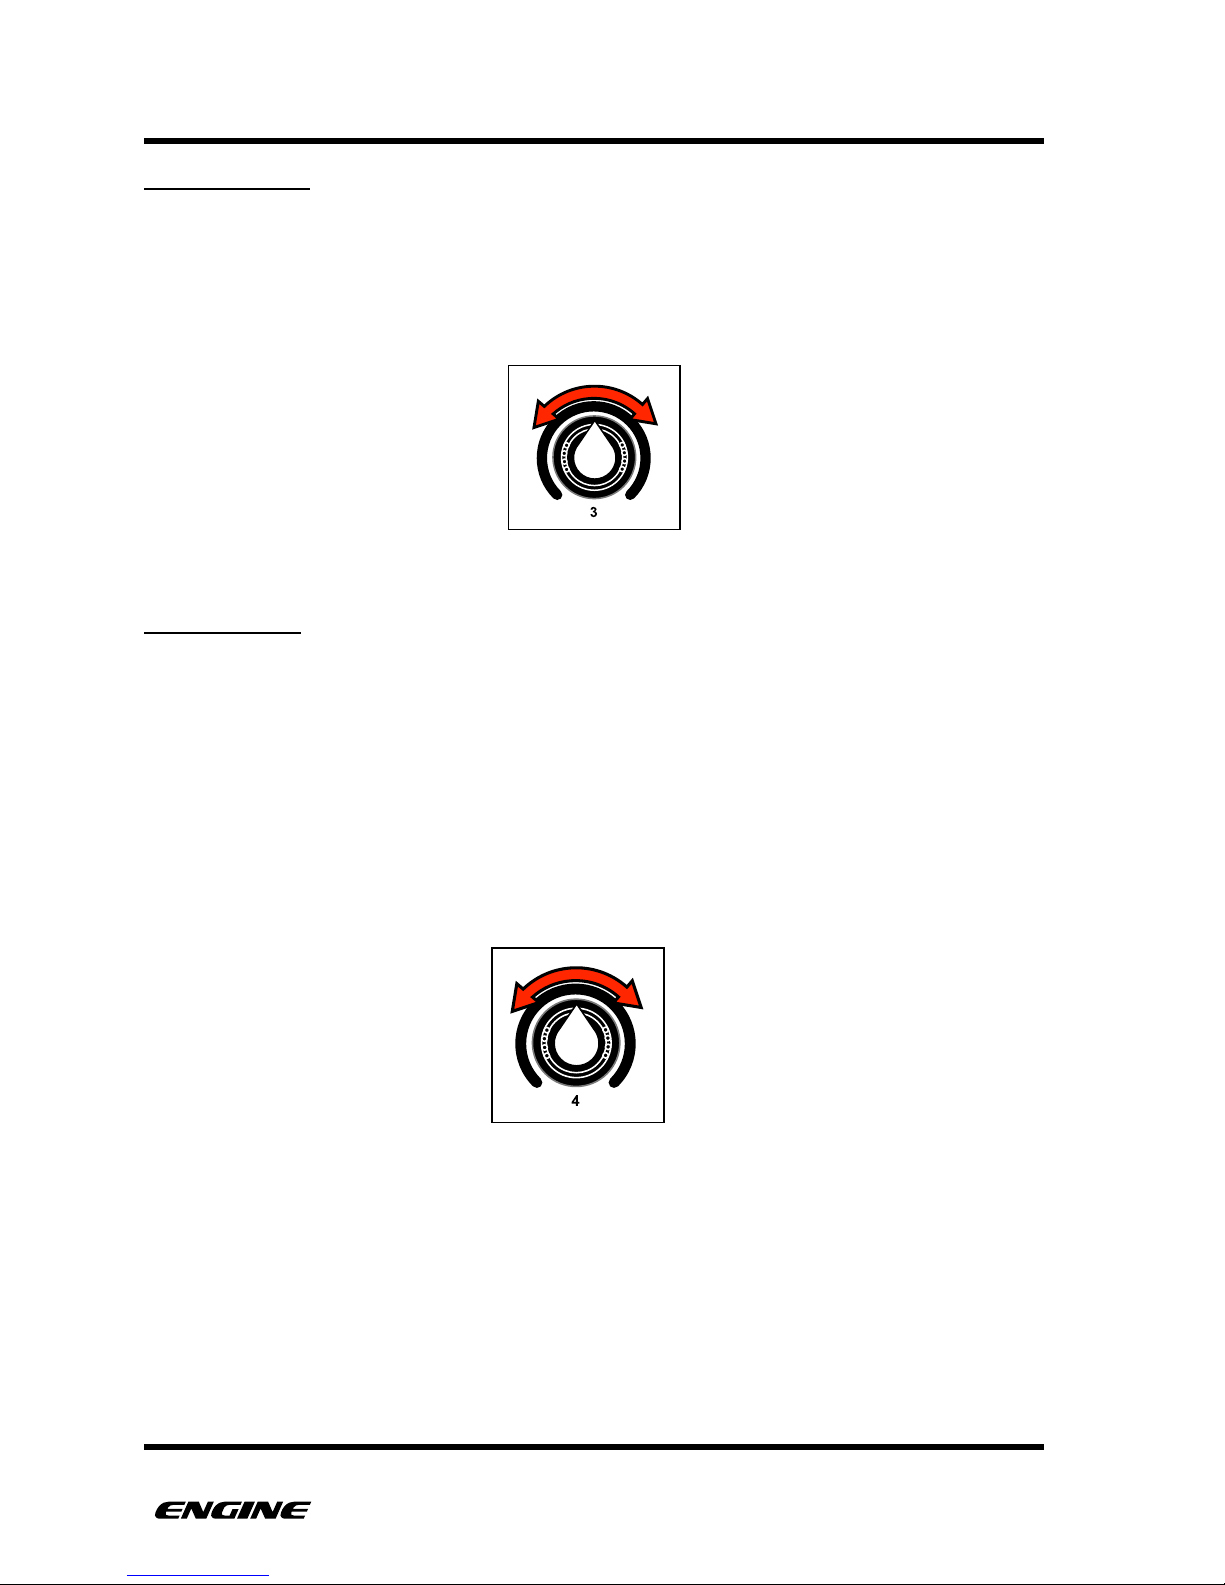
multiple times. The number of times the note retriggers can be adjusted using control
knob 4. The range for note repeat varies from 0 to 4 repeats per step.
The current note repeat value will show briefly on the LED display.
"
"
USER GUIDE 28
Page 38
TRACKS
UTILITY MODE
There are some additional utility functions that can be accessed with the UTILITY (slide)
button while in FUNCTION mode. This includes configuring the per track knob controller
numbers, defining program changes for patterns, designating a track to listen to incoming
MIDI for transposition and dumping patterns via MIDI system exclusive messages.
To enter TRACK UTILITY mode, click the UTILITY (slide) button while in FUNCTION mode.
To exit TRACK UTILITY mode, click the FUNCTION button."
SETTING TRACK KNOB CONTROLLER NUMBERS
The MIDI controller number for each control knob can be set separately per track. This
allows each control knob to be used to control a different parameter per track if needed.
To use track controller numbers, set the knob channels to “tr” in GLOBAL CONFIG mode.
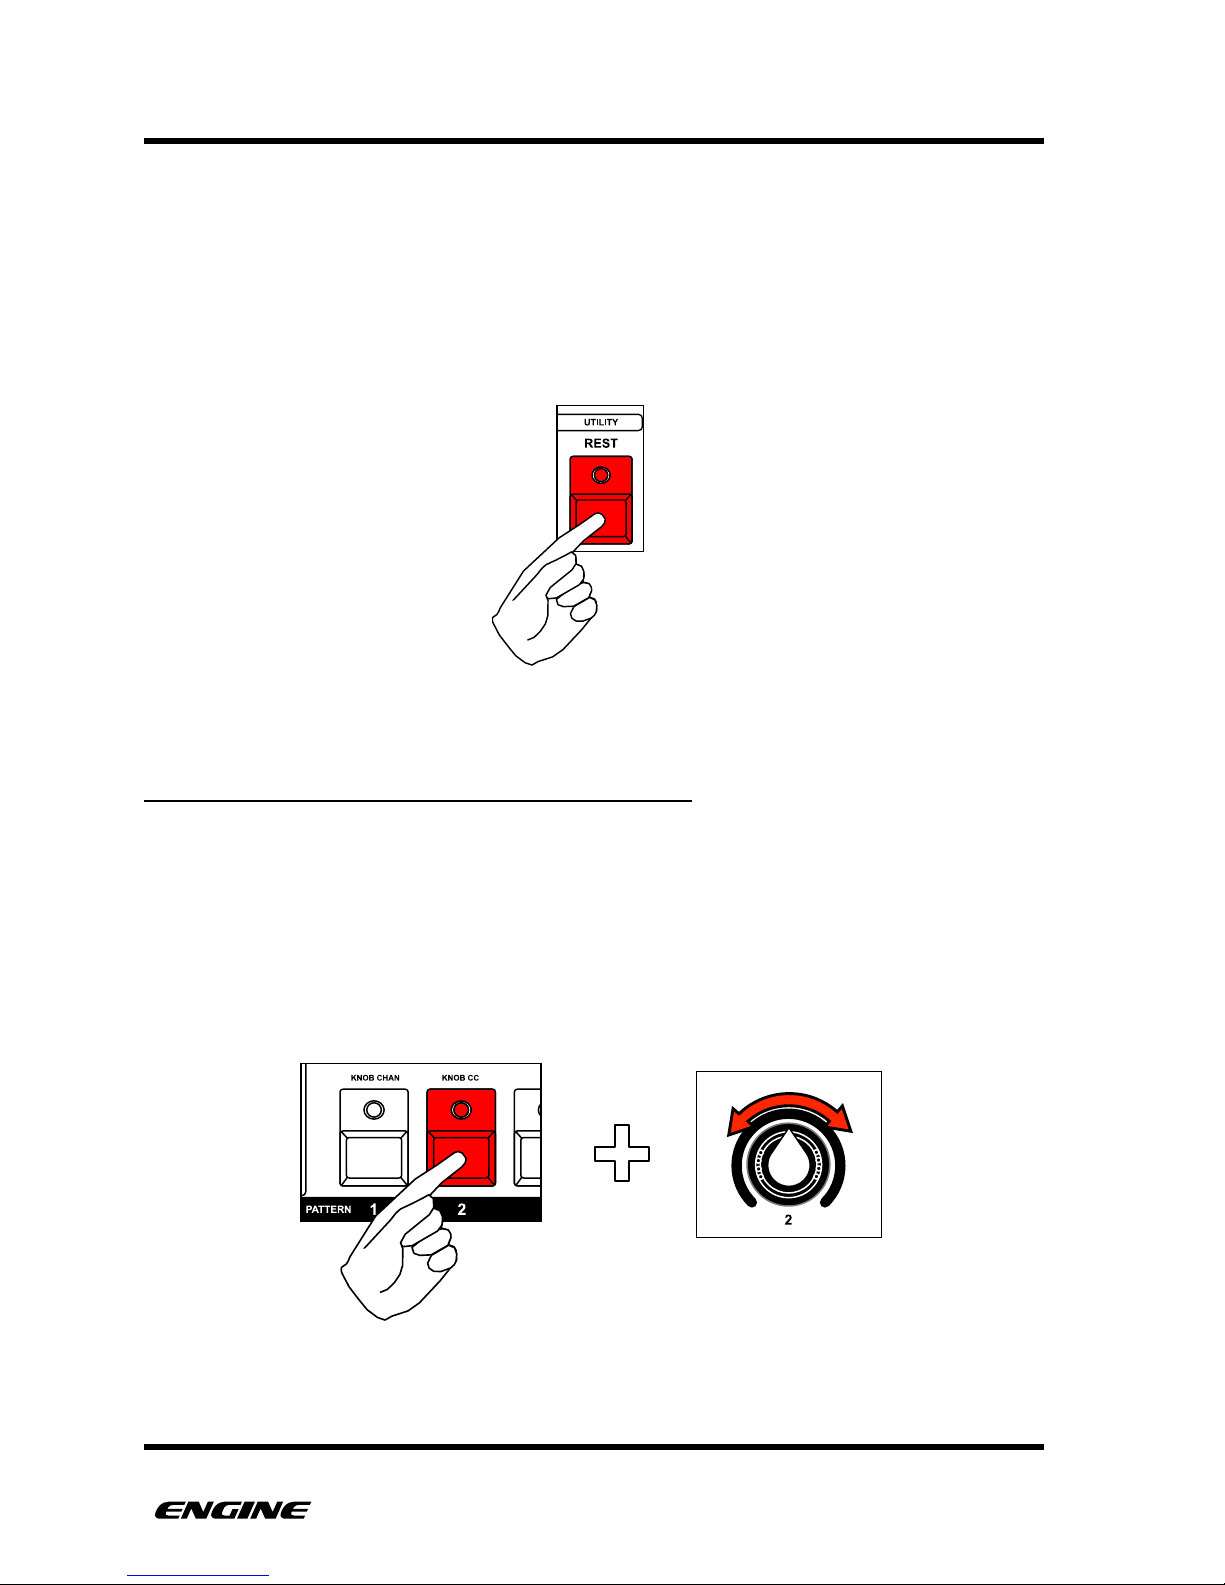
To set the MIDI controller number for a control knob for the selected track, while in
UTILITY mode, press and hold pattern step button 2, then turn the control knob you wish
to set. The controller number of the knob will be displayed on the LED display. You can
set the controller number from the range 0 to 127.
USER GUIDE 29
Setting MIDI controller number for knob 2
Page 39
TRACKS
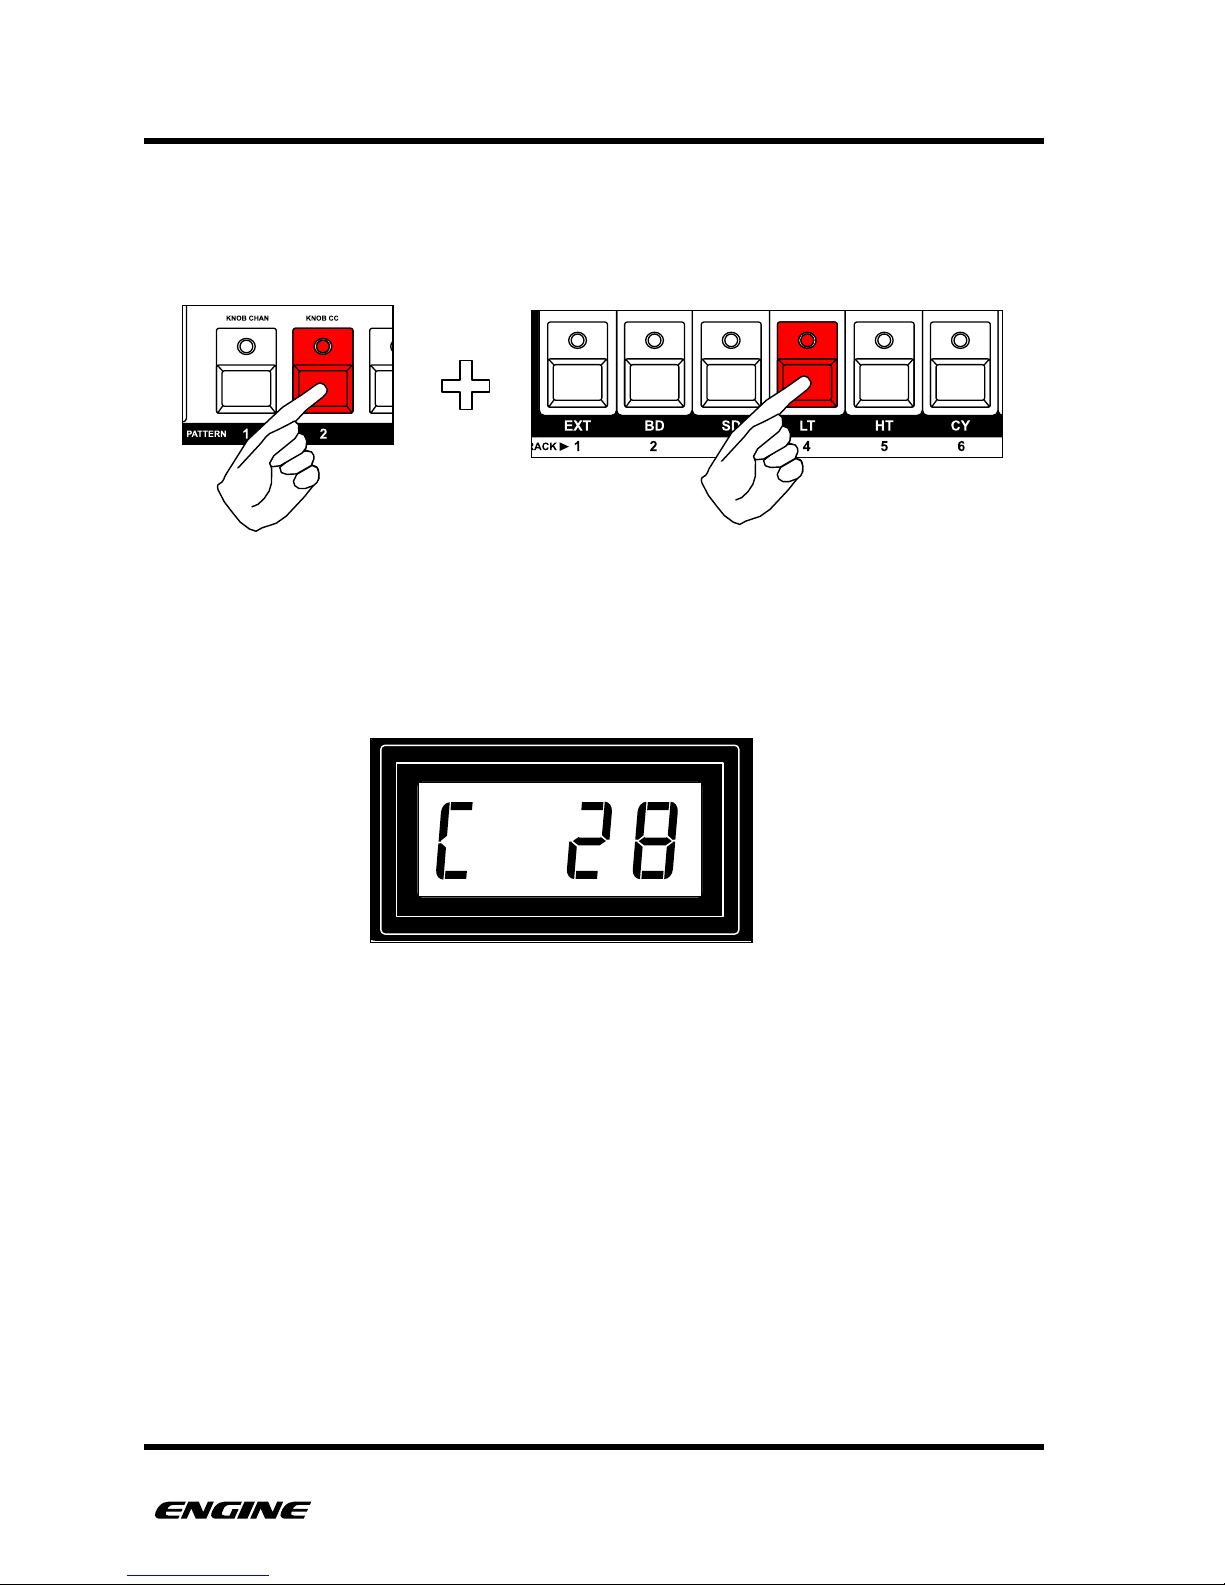
If you just want to view the current controller assigned to a knob without changing it,
while holding pattern step button 2, press and hold the track select button corresponding
to the controller knob that you wish to view.
The current controller number of the corresponding knob will be displayed on the LED
display.
USER GUIDE 30
Viewing MIDI controller number for knob 4
Page 40
TRACKS
PATTERN PROGRAM CHANGE MESSAGES
A pattern can be configured to send a MIDI program change message when it is
switched. This allows a pattern to change the selected patch on a synthesizer or drum
machine automatically. The program change message will be sent on the MIDI channel
defined for the track.
The selected program change message can be set from 1 to 128 or OFF (default).
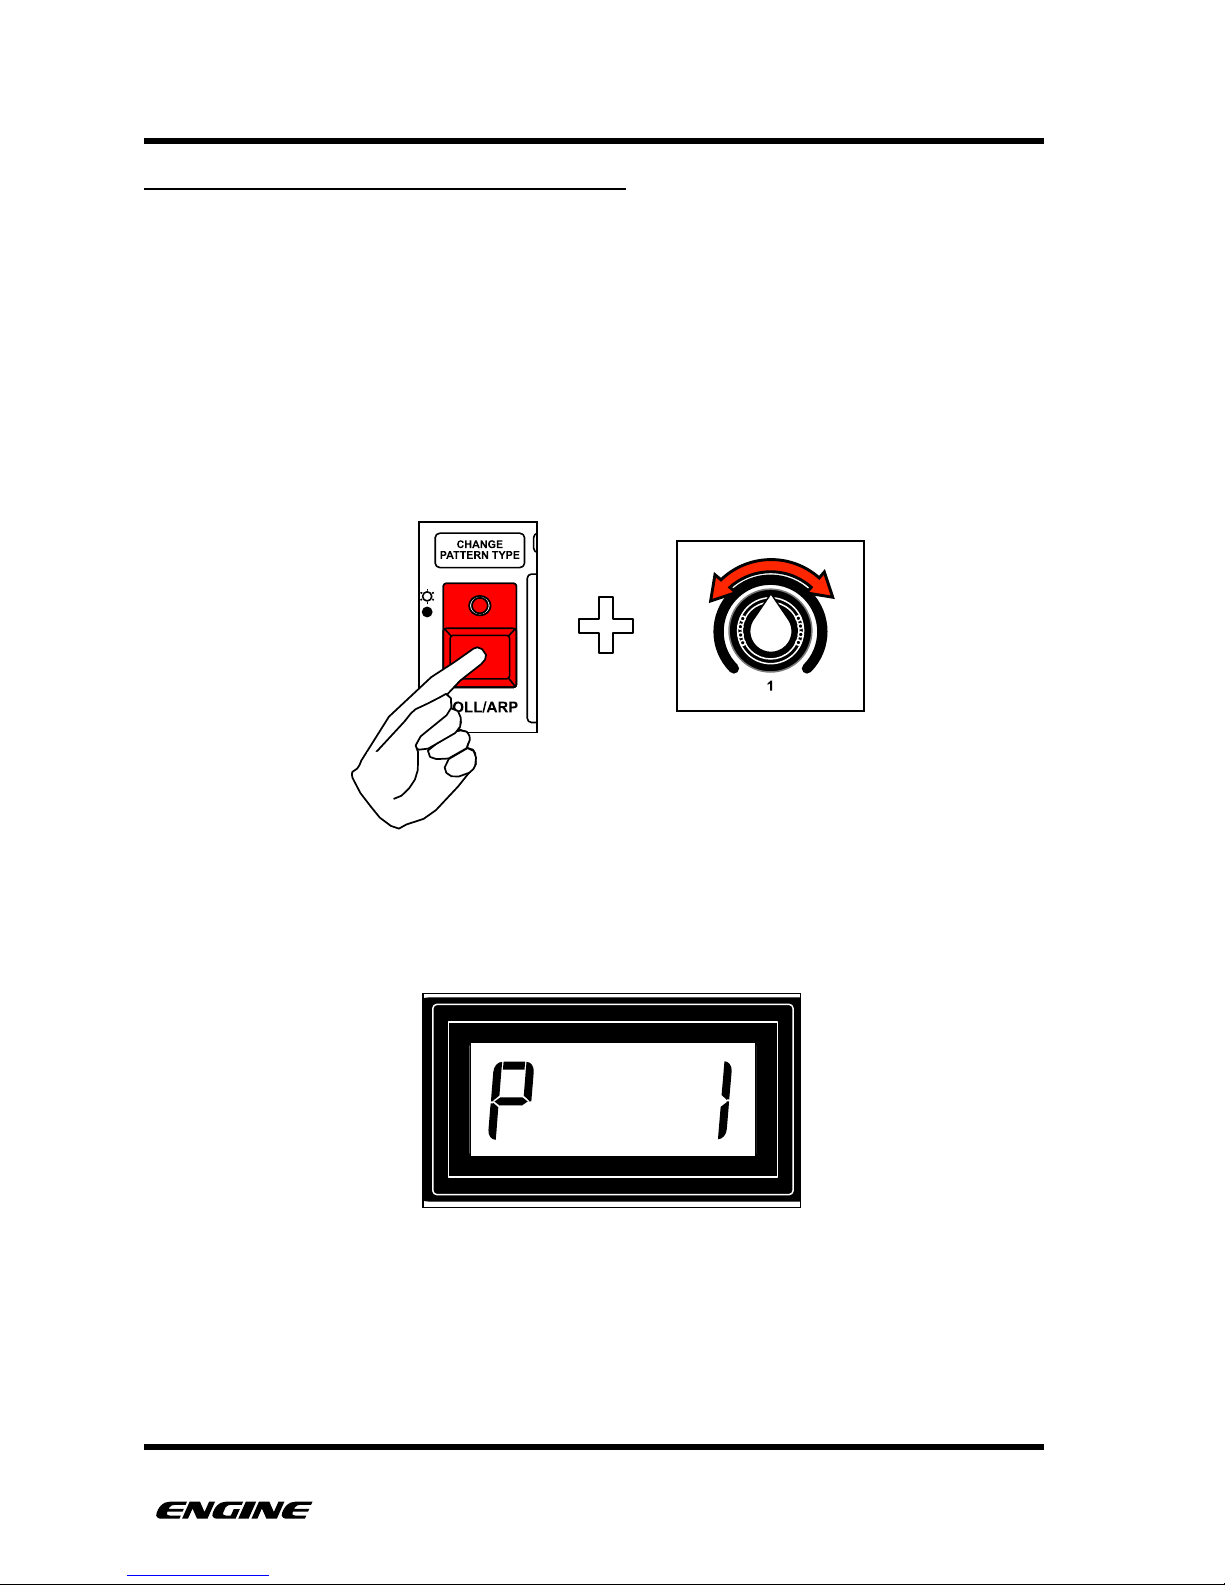
To define a PROGRAM CHANGE number for the current edit pattern, while in UTILITY
MODE, press and hold the CHANGE PATTERN TYPE (roll/arp) button, then rotate control
knob 1.
The current program number will be shown on the LED display while holding the
CHANGE PATTERN TYPE button.!
USER GUIDE 31
Page 41
TRACKS
SYSTEM EXCLUSIVE DUMPS
Engine patterns can be saved to an external device using MIDI system exclusive. This can
be used to store individual patterns or the entire machine state.
Pattern data can also be shared with other compatible machines, such as the Quicksilver
TB-303, Quicksilver TR-606, Quicksilver TR-808 and Abstrakt Instruments Avalon Bassline.
Drum type patterns can be shared with Quicksilver 606 and Quicksilver 808, while synth
type patterns are compatible with Quicksilver 303 and Avalon Bassline. Engine can also
receive pattern dumps from all Quicksilver machines and Avalon Bassline.
Pattern dumps are sent from the current contents of the pattern buffer, this means you
must first copy a pattern using the PATTERN COPY function, then dump the pattern using
system exclusive.
This is also true for receiving a MIDI system exclusive message for a single pattern. After
receiving the pattern dump, the pattern will be placed into the pattern buffer and must be
pasted into the final pattern location.
For dumps of the entire machine state, the patterns will be placed directly into their
original locations.
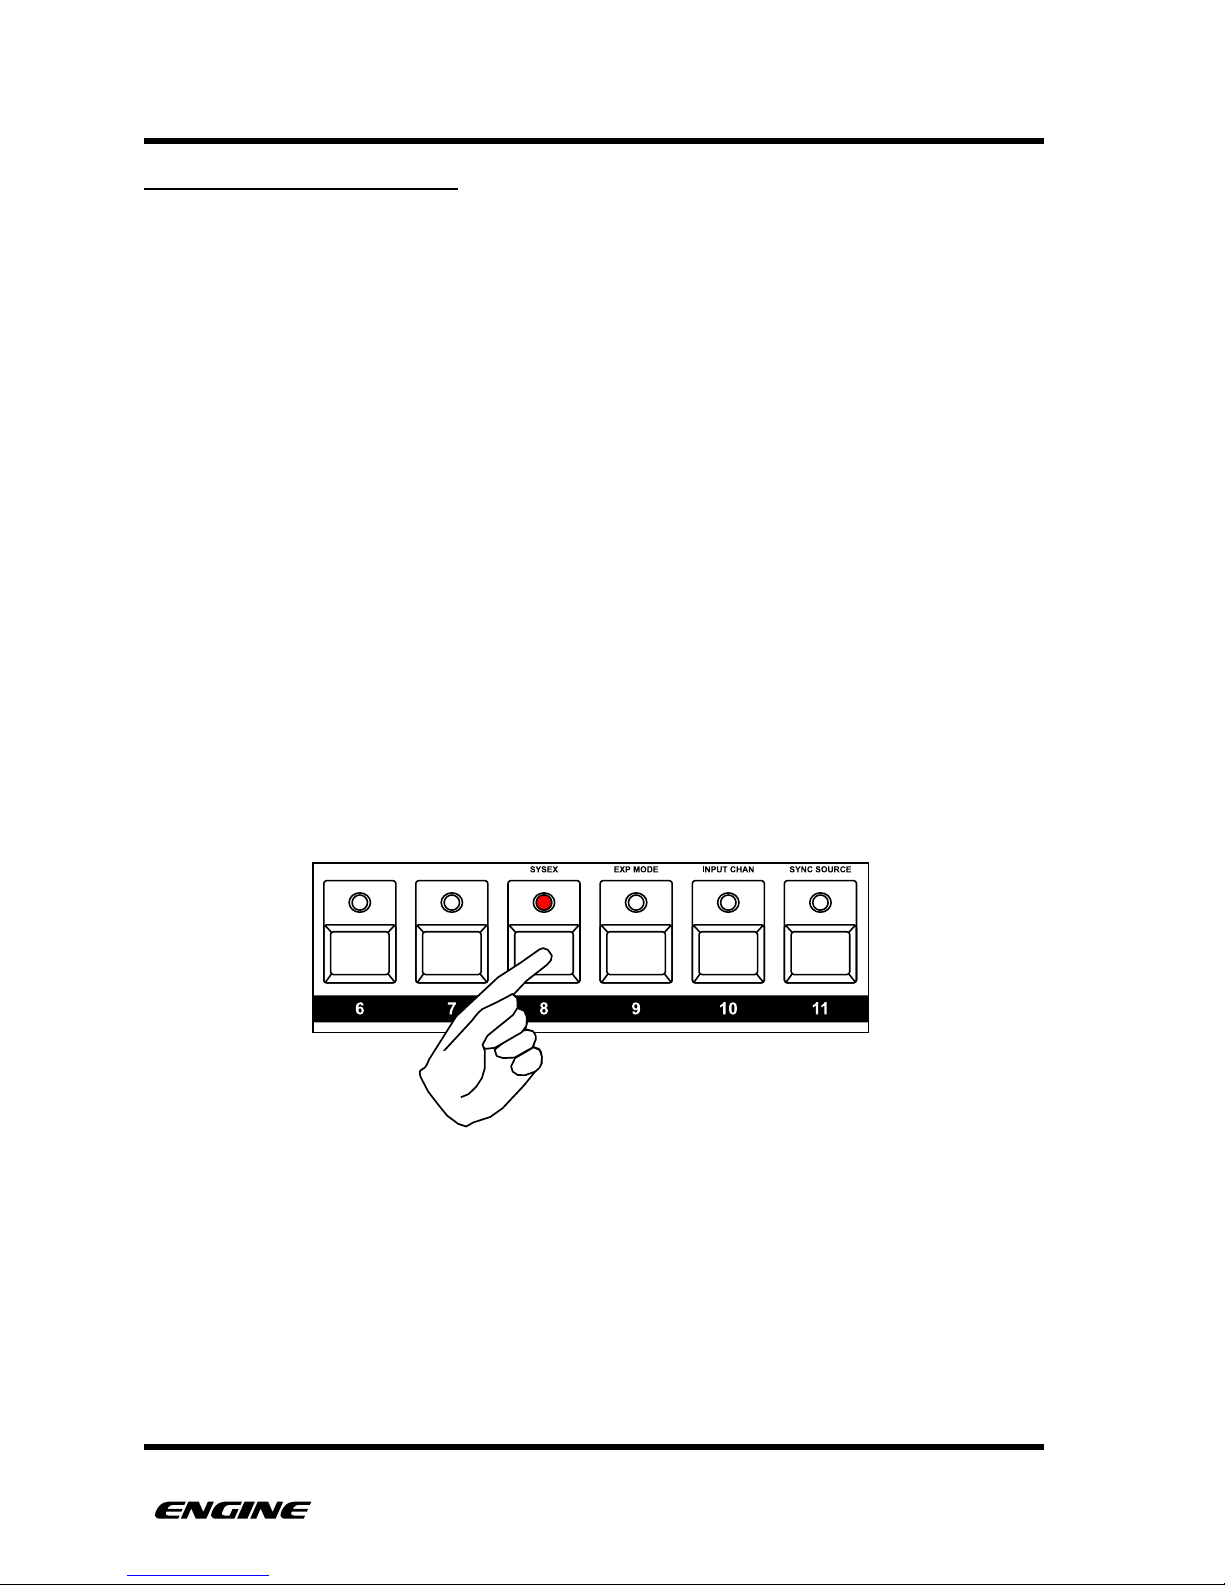
To dump a pattern via sysex, first copy the pattern to the copy buffer. Then, in UTILITY
MODE, dump the pattern in the copy buffer by pressing the SYSEX (step 8) button.
USER GUIDE 32
Page 42
TRACKS
TRANSPOSING TRACKS USING MIDI
Each track can be configured to listen to incoming MIDI notes to apply transposition. This
is extremely useful if you wish to transpose multiple tracks simultaneously. Some tracks
can be assigned to transpose, while others do not transpose. Transposition applies only
to synth type patterns
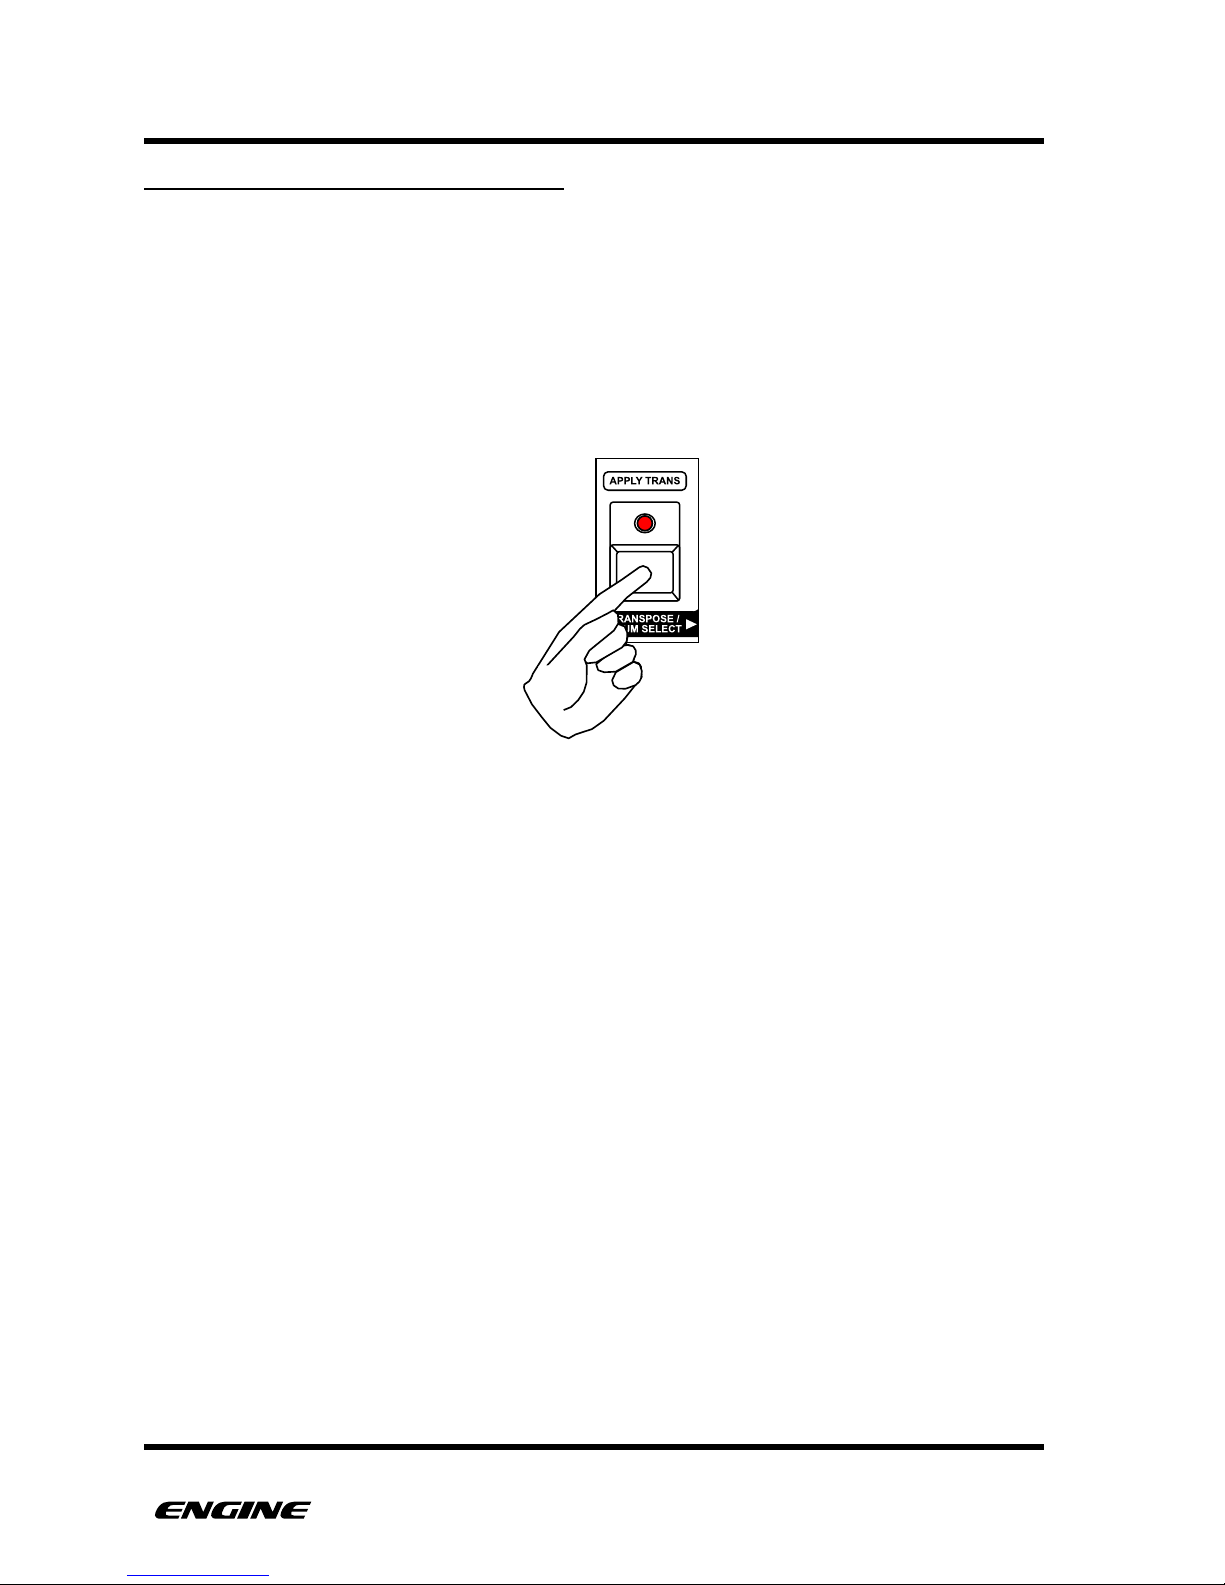
To enable or disable MIDI transpose for a track, in UTILITY MODE, click the TRANSPOSE
button. When transpose is enabled for the track, the TRANSPOSE LED will be lit, if
transpose is disabled , the LED will be off.
The MIDI transpose function respects the settings for MIDI input channel and track
channels, this means that you can transpose different tracks using different channels,
which can be a creative option.
USER GUIDE 33
Page 43
TRACKS
SETTING STEP PITCH USING MIDI
Each track can be configured to listen to incoming MIDI notes to set the pitch of a
selected step in grid recording. This is useful if you wish to use an external controller to
set the pitch of steps or enter chords in grid recording.
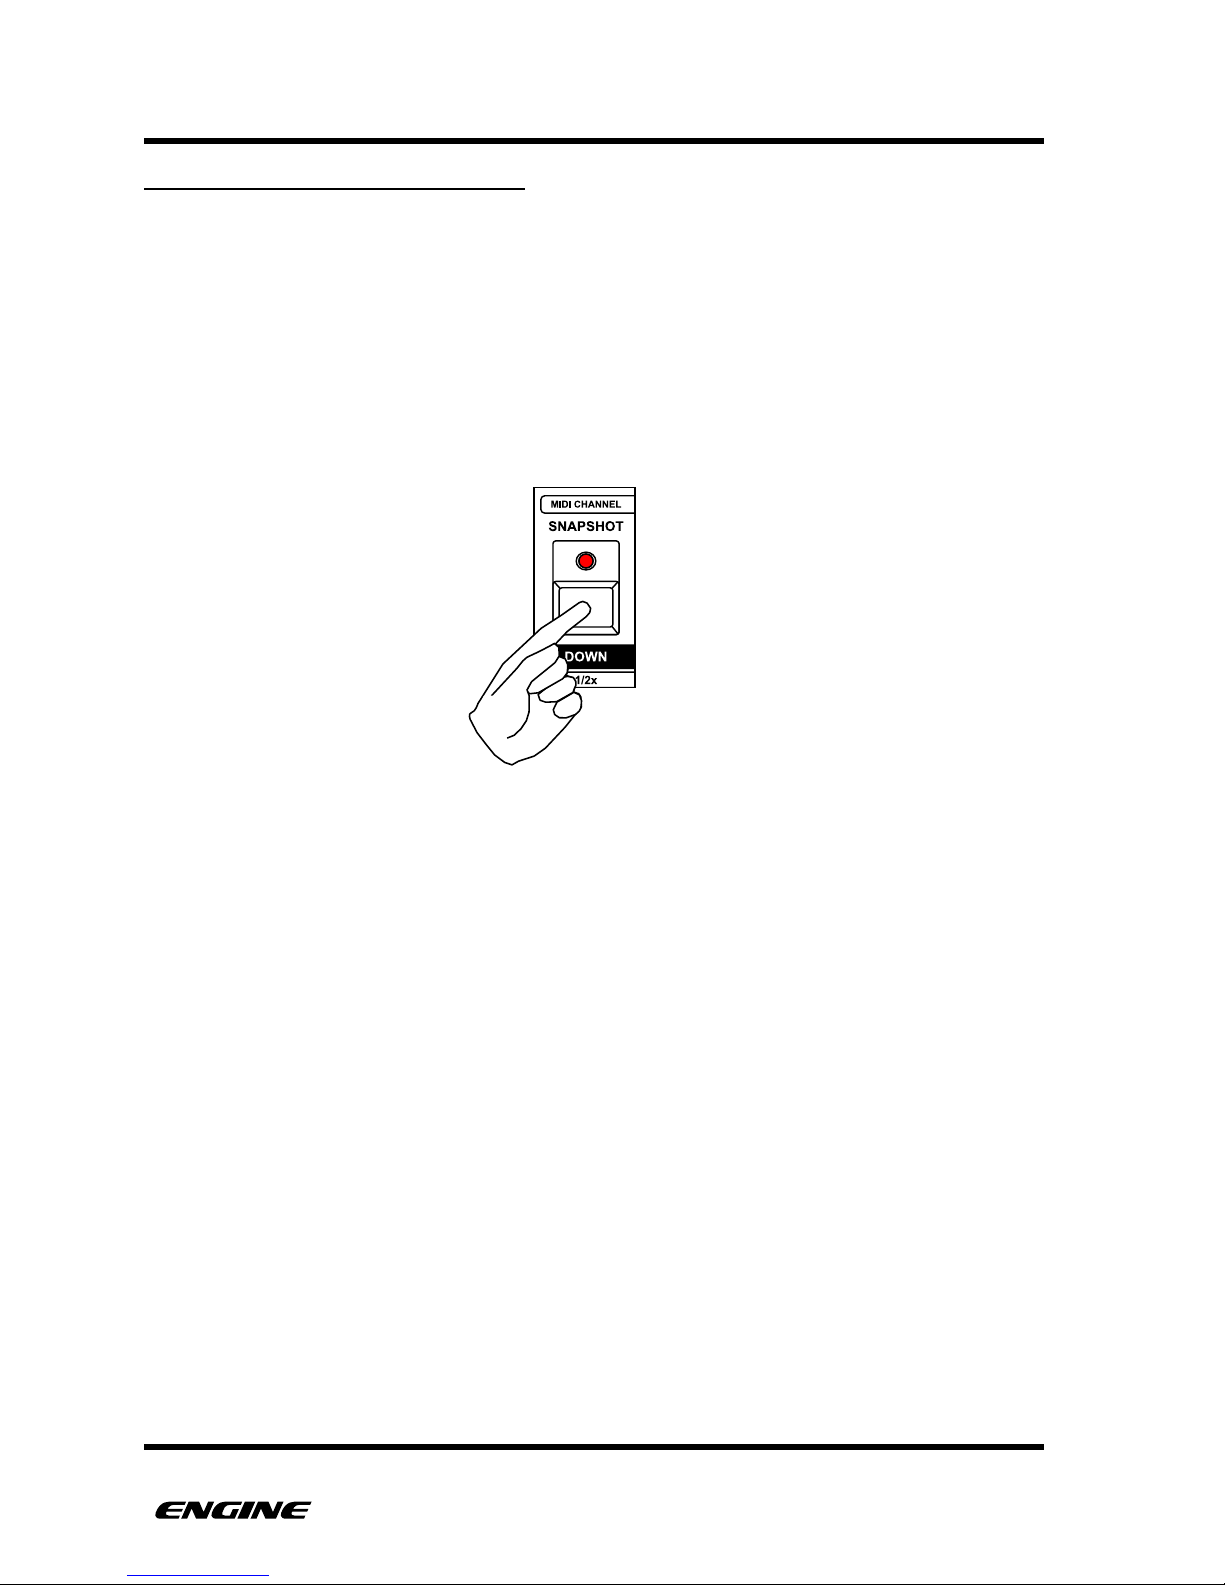
To enable or disable MIDI pitch entry for a track, in UTILITY mode, click the OCTAVE
DOWN button. When MIDI pitch entry is enabled for the track, the OCTAVE DOWN
LED will be lit, if MIDI pitch entry is disabled , the LED will be off.
MIDI pitch entry respects the settings for MIDI input channel and track channels.!
USER GUIDE 34
Page 44
TRACKS
TRACK QUANTIZATION
Quantization can be enabled or disabled per track. Quantization only applies to input
during realtime recording of synth type patterns.
Quantization is enabled by default. This forces incoming notes to be a multiple of 50%
gate length, the same as a 303 type sequencer. The beginning of a note will be hard
quantized to the step.
When quantization is disabled, the gate length of the note will be set to the nearest clock
tick, allowing more expressive sequences to be captured. The start of the note will be
recorded with the nearest delay value for the step.
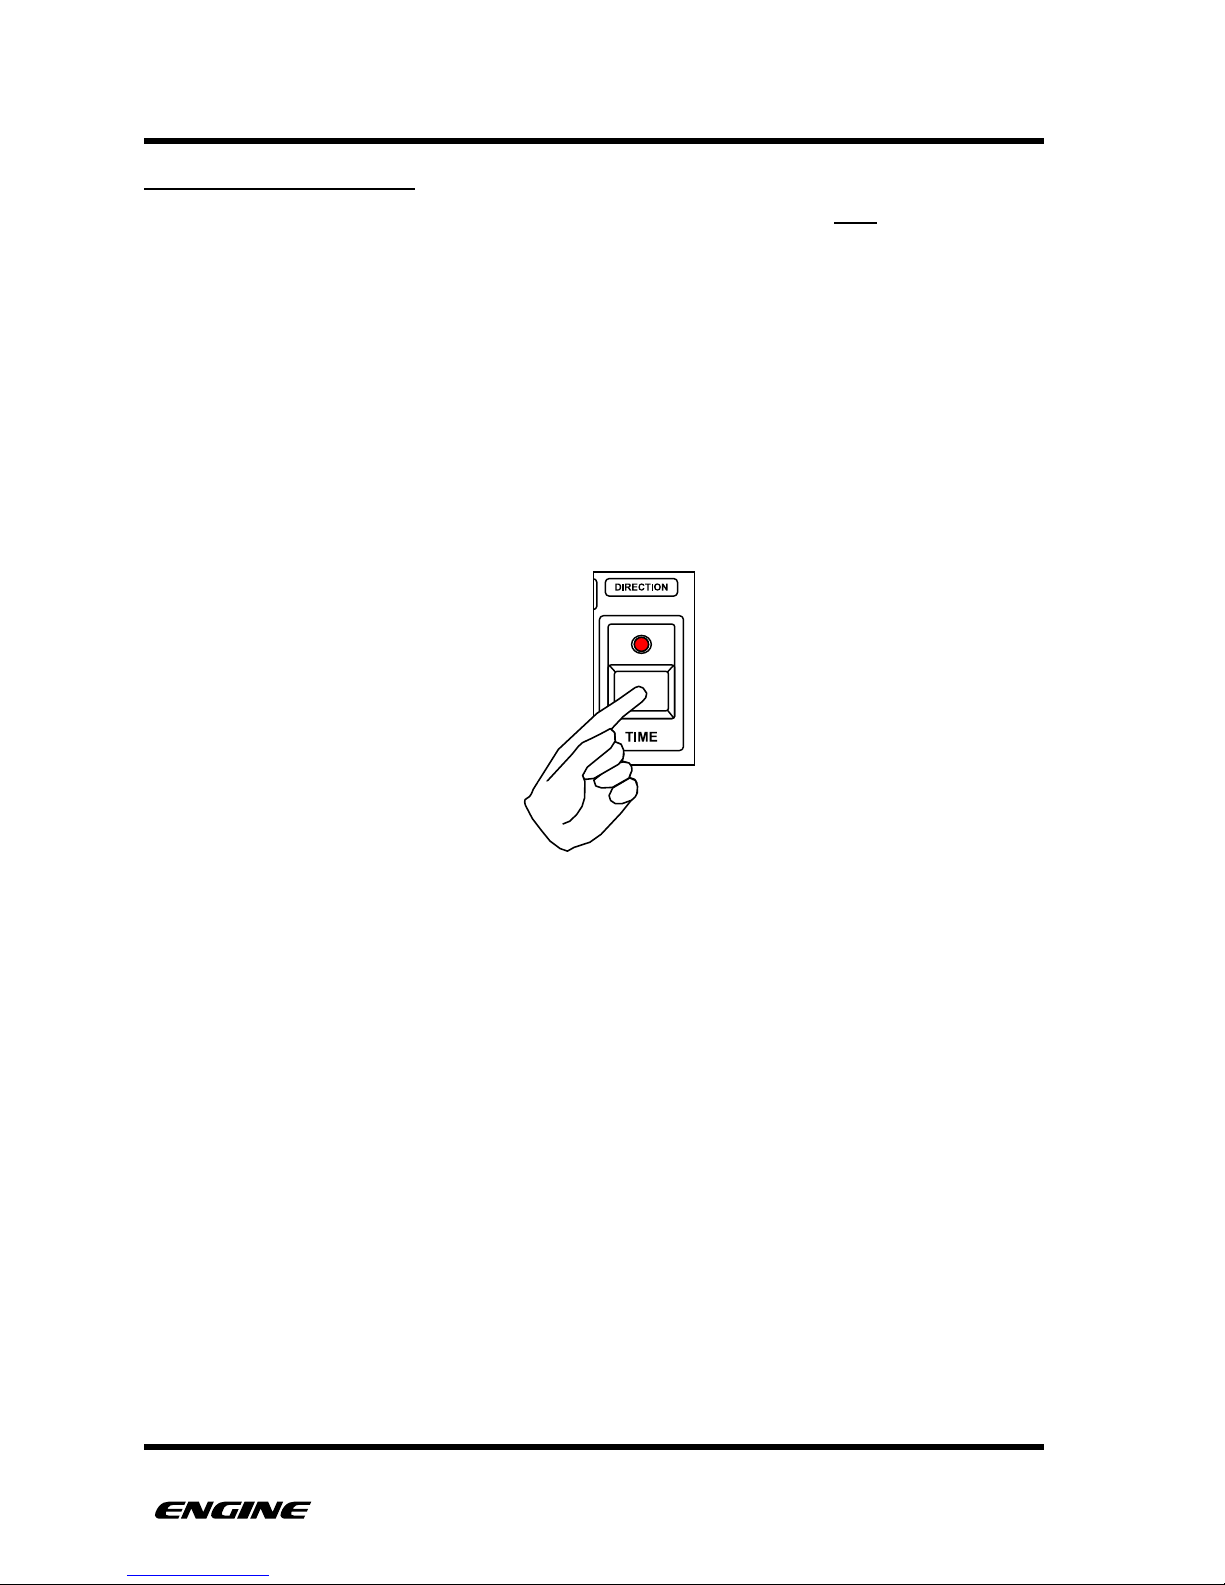
To enable or disable TRACK QUANTIZATION, while in UTILITY MODE, click the TIME
button.
When quantization is enabled, the TIME LED will be lit, when quantization is disabled, the
TIME LED will be unlit.
USER GUIDE 35
Page 45
TRACKS
CV/GATE OUTPUT MODE
When the CV/Gate output expansion board is installed, each track can be configured to
send out CV using either Volt/Octave or Hz/Volt and Gate using either positive trigger or
negative trigger. This allows the CV outputs to be used with a wide range of different
analog devices. Each of the eight tracks can have a different setting for CV MODE.
The available modes are:
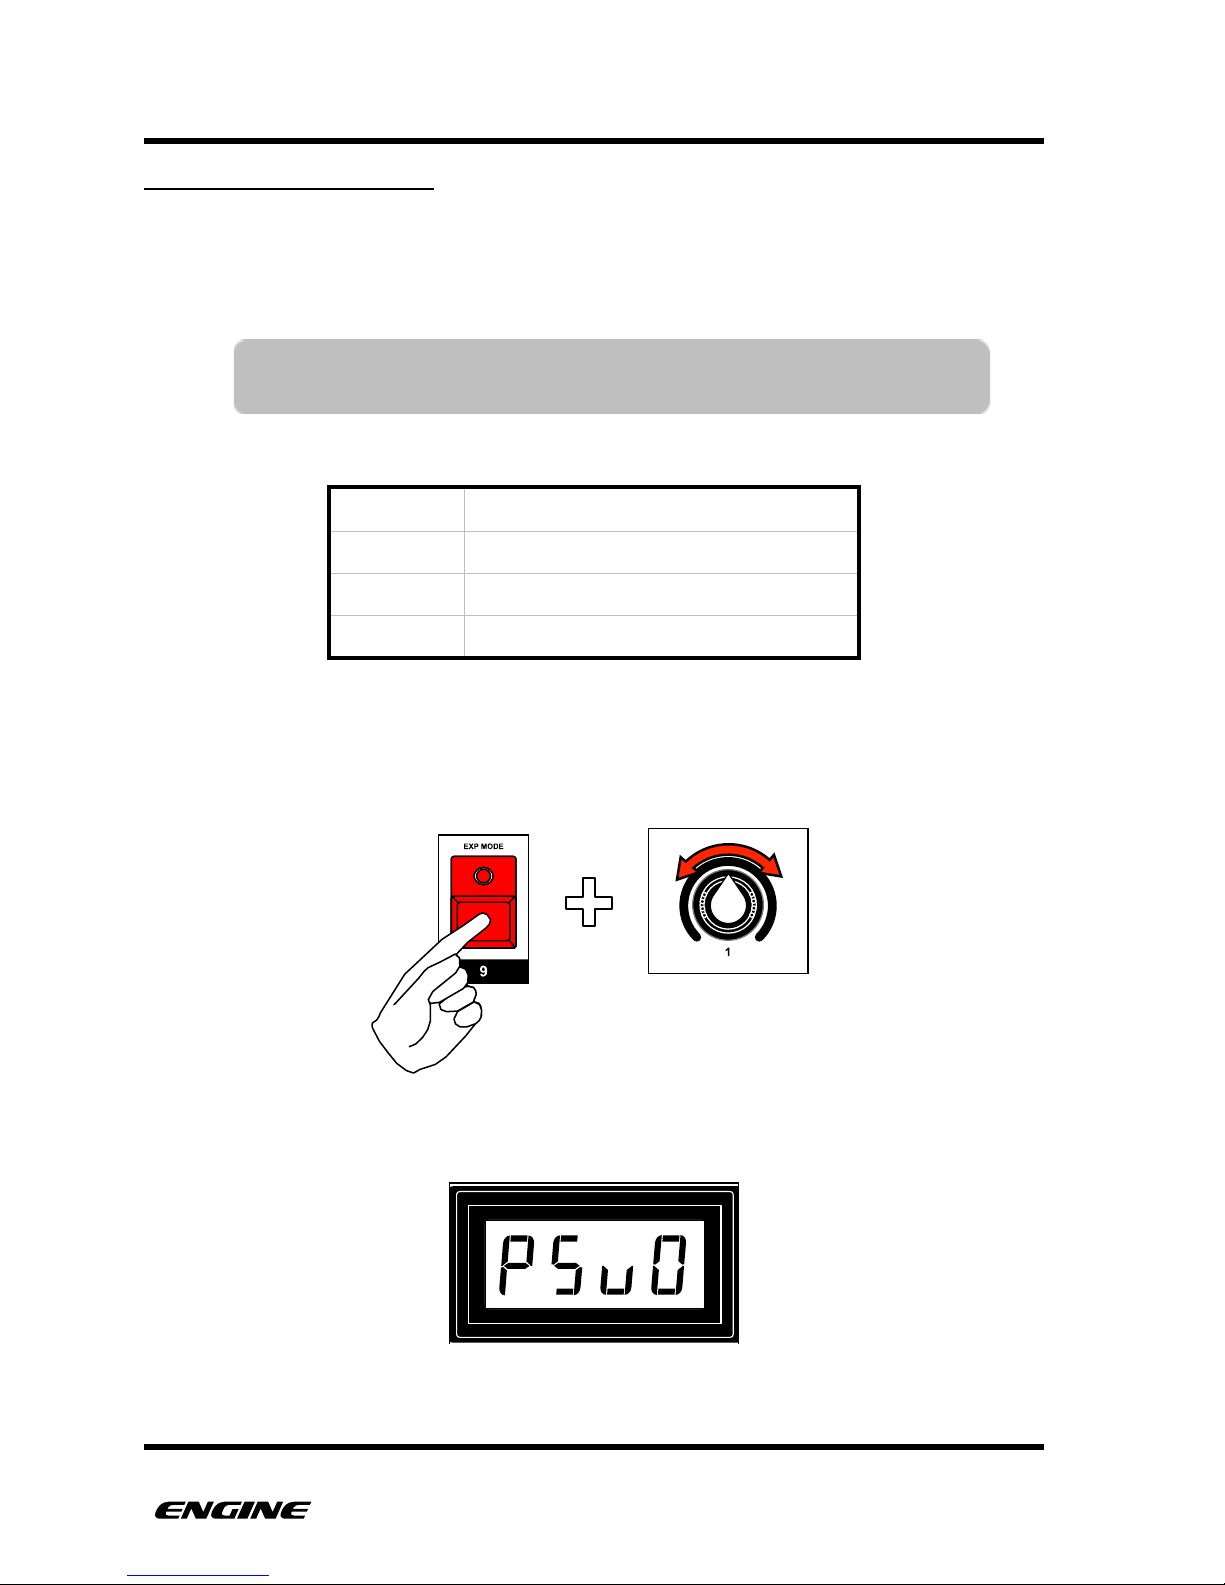
To set the CV MODE for a track, while in UTILITY MODE, press and hold EXP MODE
(step 9) button. Then rotate control knob 1 to select the desired mode.
The current CV/Gate output mode will be shown on the LED display while holding the EXP
MODE button.!
PSvO
Positive gate, 1 volt per octave
nGvO
Negative gate, 1 volt per octave
PShv
Positive gate, hertz per volt
nGhv
Negative gate, hertz per volt
USER GUIDE 36
NOTE: The CV MODE can only be set when the CV/Gate expansion
board is installed and enabled.
Page 46
PATTERNS
PATTERNS
Patterns are where the programming action takes place. Patterns and pattern chains are
assigned to tracks, selecting patterns was covered in the TRACK SELECT section of the
manual.
Each pattern has separate settings for PATTERN TYPE, LENGTH, TIME SCALE, SHUFFLE
and SKIPPED STEPS. This means that you could have patterns within a pattern chain that
have completely different settings, which can create interesting variations on timing and
groove.
TIME MODE
Time mode is used to set all of the timing parameters for a pattern. This includes the
pattern length, timing scale, shuffle and skipped steps. An initialized pattern is
automatically set to a length of 16 steps, 4/4 timing, zero shuffle with no skipped steps.
The TIME button has a black line surrounding it, with the word TIME below it. This is a
visual indicator to understand the TIME functions of the other buttons. Other button labels
that are below the button and in a white rectangle surrounded by black indicate a TIME
function.
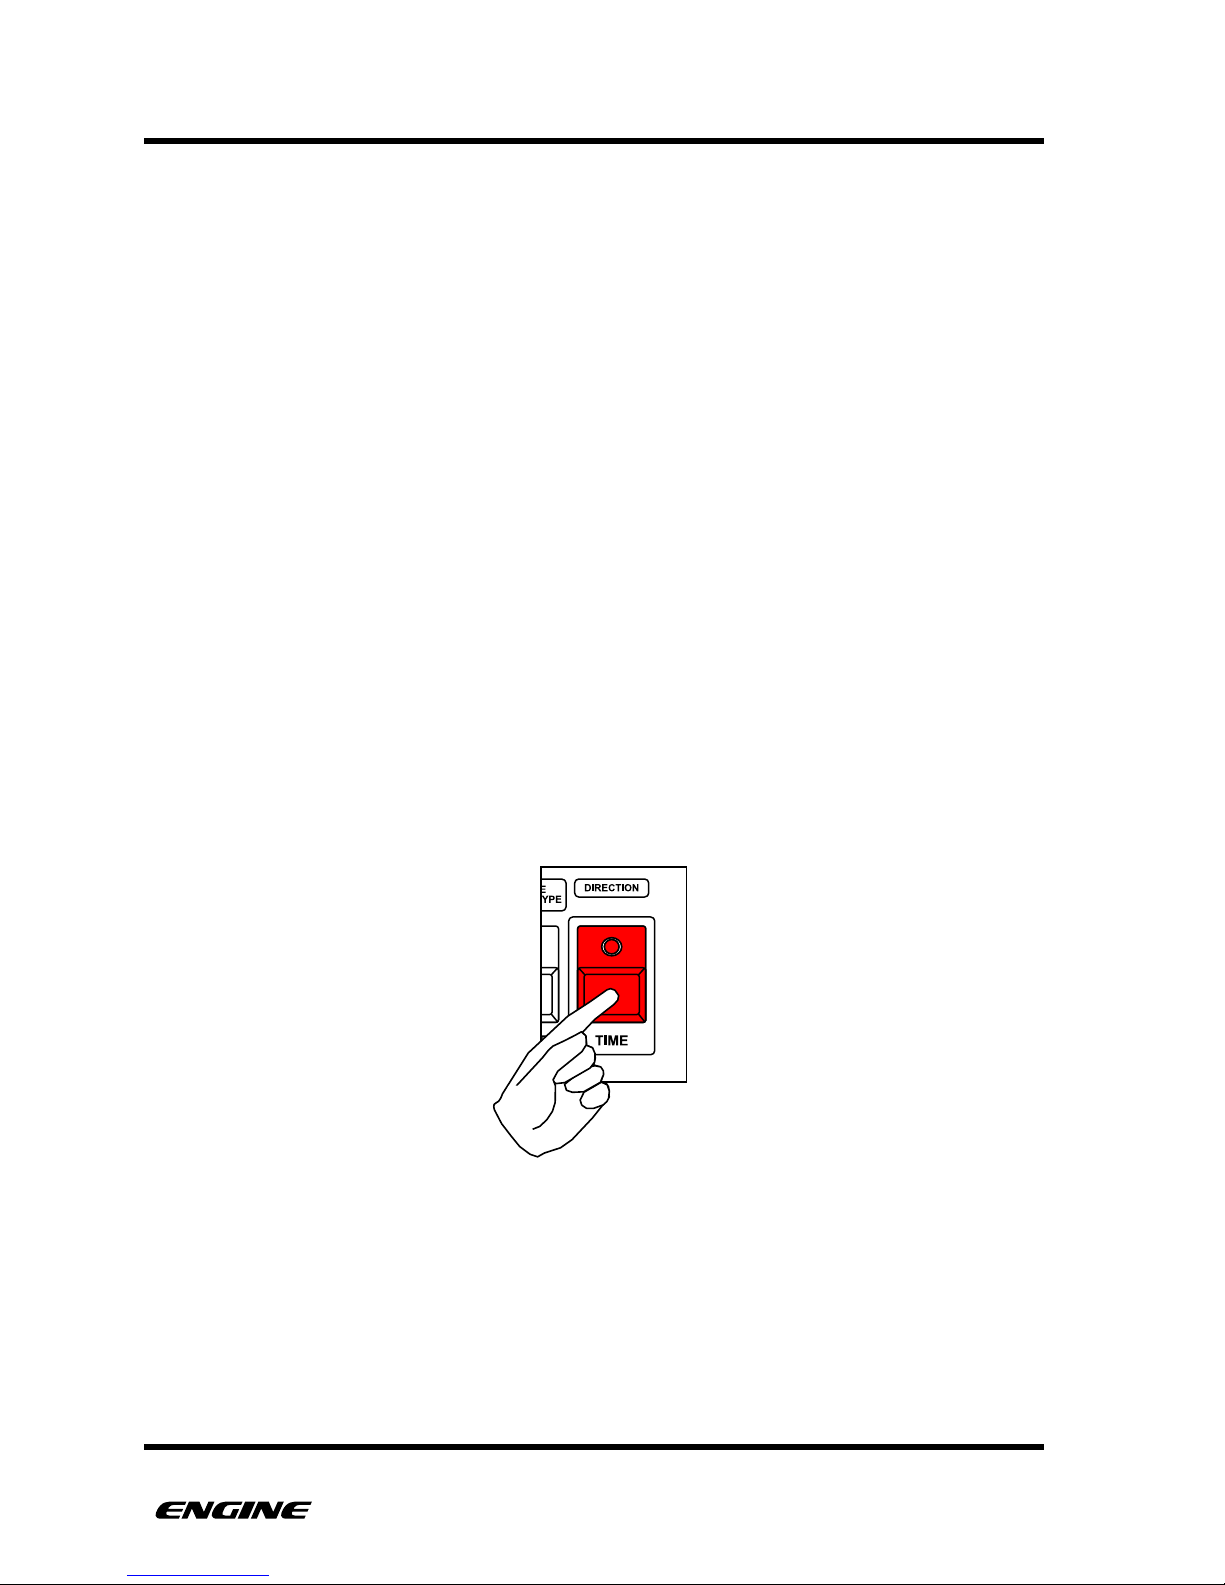
To enter time mode, press and hold (or double click) the TIME button.
For all TIME MODE functions documented in subsequent sections, it is assumed that you
are holding the TIME button, or have double-clicked the TIME button to pin TIME MODE.
USER GUIDE 37
Page 47
PATTERNS
SETTING PATTERN LENGTH
The pattern length is set by selecting the last step of the pattern. The last step can be set
in any of the four pattern sections, allowing a maximum pattern length of 64 steps.
When changing the pattern length while the sequencer is running, the change will not
take effect until the pattern loops.
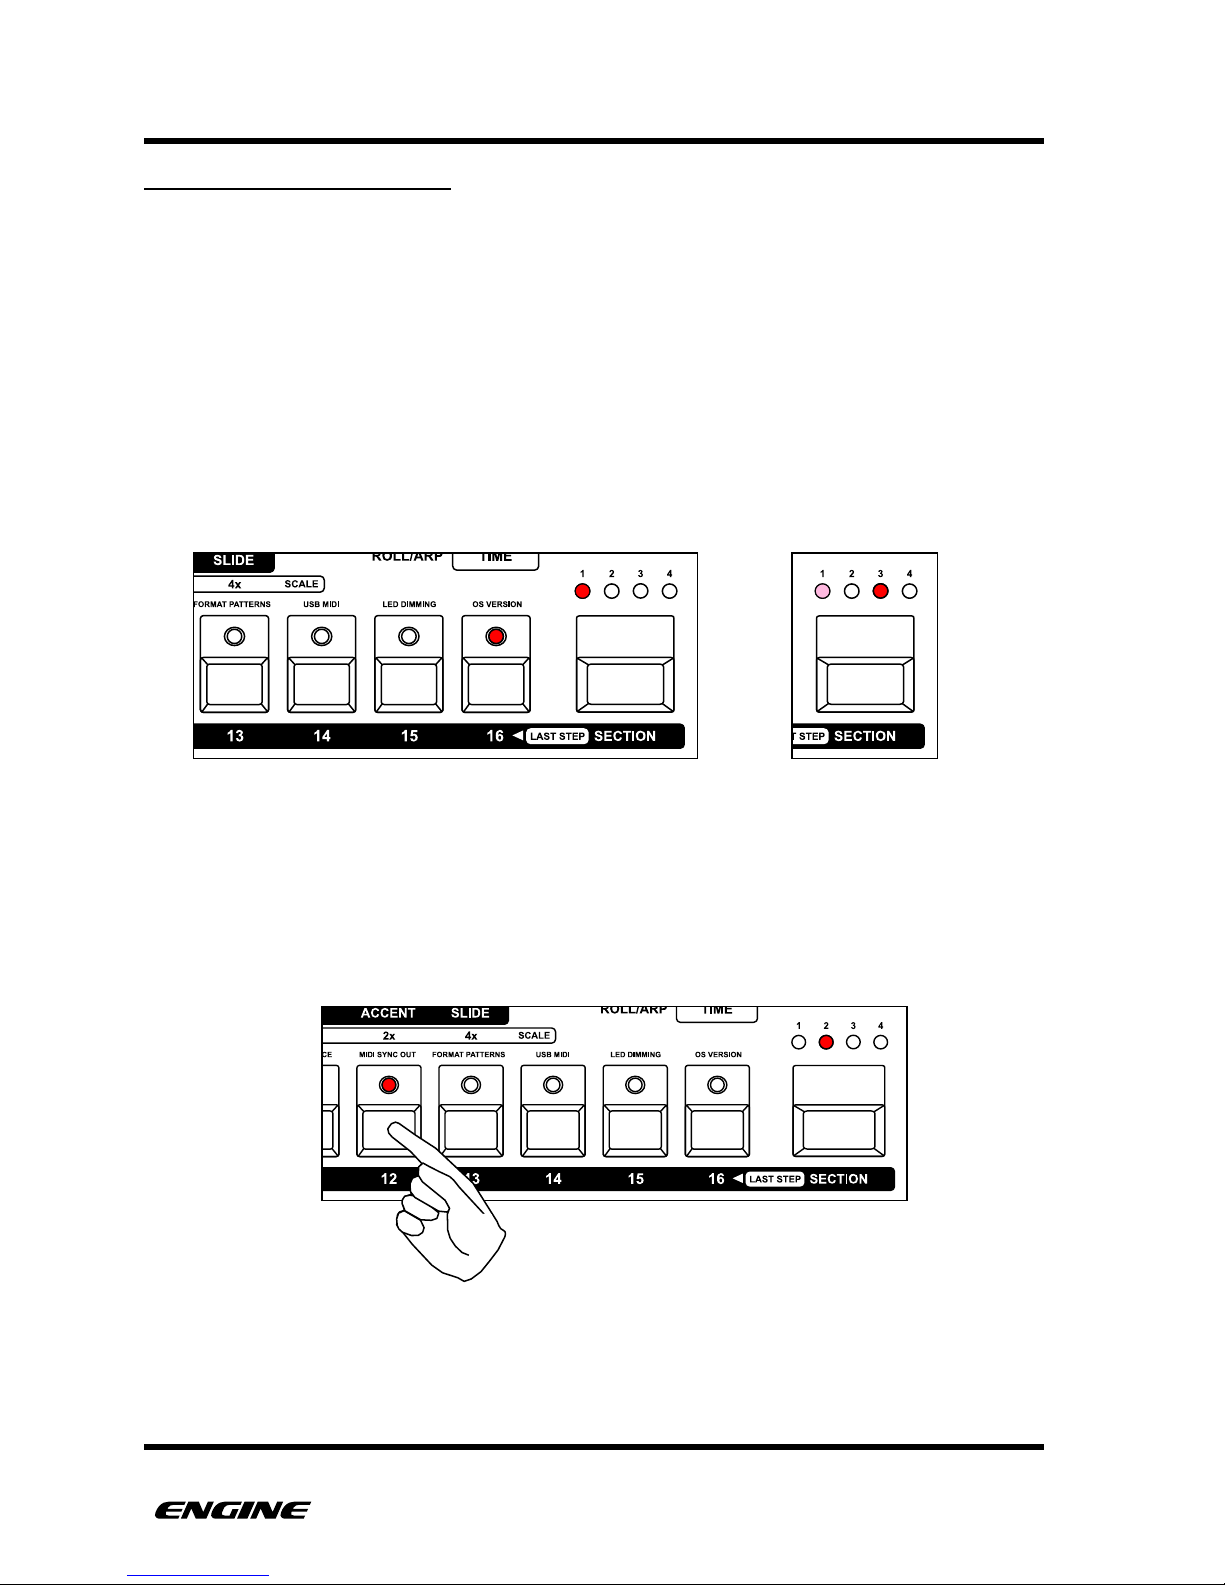
In TIME mode, the section button can be used to select between the four sections of the
pattern.
The last step of the pattern is shown on the pattern step LEDs if the last step is within the
selected section. If the last step is not in the current selected section, the section LED for
the section which contains the last step will light dimly.
To set a new pattern length, while in TIME mode, select the section which will contain the
new last step and click the pattern step button for the desired last step. For example, to
set a pattern to be 28 steps long, select section two and click the pattern step button 12.
Setting the last step this way will reactivate any skipped steps in the pattern. To change
the pattern length without reactivating skipped steps, you must use the ACTIVE STEPS
function to skip or activate steps at the end of the pattern.
USER GUIDE 38
Last step set to step 16
Last step in section 1
Setting step 28 to last step
Page 48
PATTERNS
EXTENDING A PATTERN
Sometimes you may wish to increase the length of a pattern during live performance. If
you just set the length, there could be empty sections played until new notes are entered
into the pattern, which would disrupt the flow of the performance. In order to avoid this
situation, use the PATTERN EXTEND function.
PATTERN EXTEND will copy the notes from the previous section into subsequent sections
automatically, this allows the pattern to play uninterrupted while continuing to edit the
longer pattern. Extend also works well when creating variations on an existing pattern,
because you don't have to manually re-enter all of the note events to make a small
change.
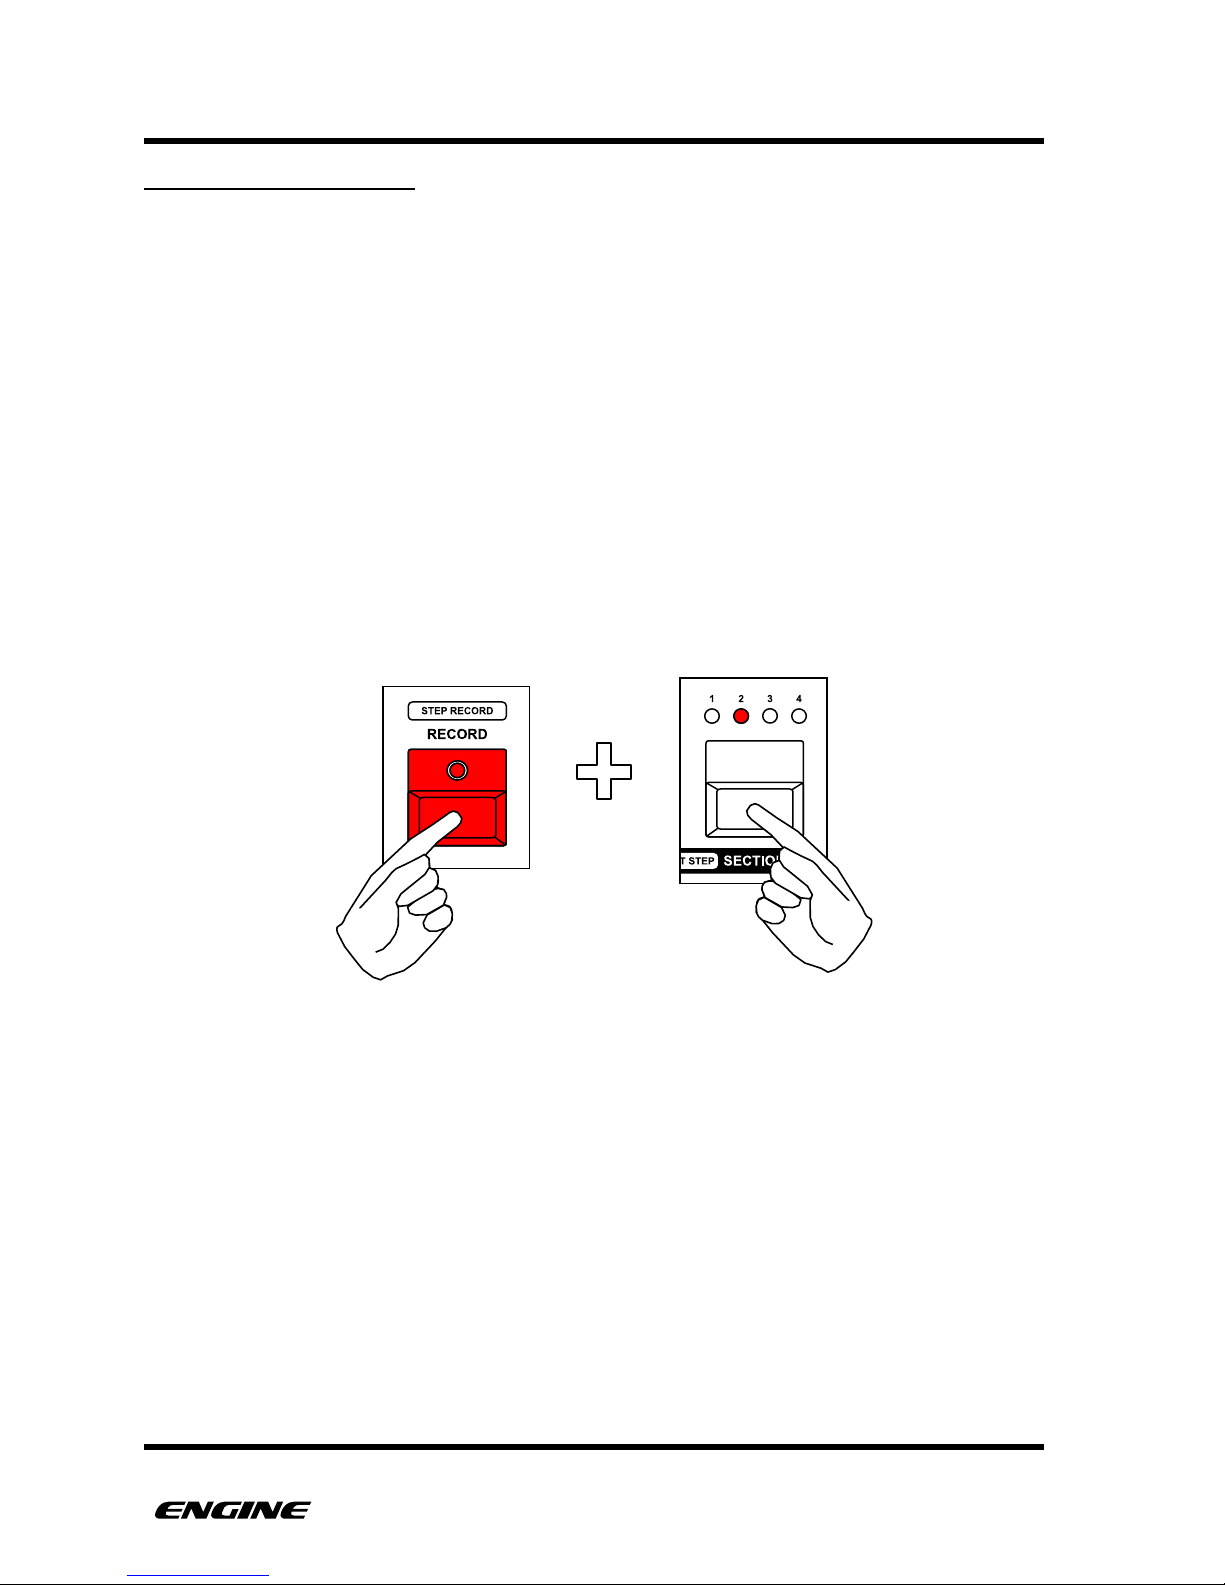
To extend a pattern, while in TIME mode, press and hold the RECORD button while
clicking the SECTION button. For example, to extend a pattern from 16 to 32 steps,
starting with section one selected, press and hold RECORD, then click the section button
to copy section one to section two. The last step of the pattern will also be changed
automatically from step 16 to step 32.
USER GUIDE 39
Page 49
PATTERNS
SETTING PATTERN TIME SCALE
Patterns can be assigned different timing scales, which changes the “resolution” of the
pattern steps.
This is also useful for setting the speed that a pattern plays back for polyrhythmic
sequencing.
There are eight available timing scales to choose from:
"
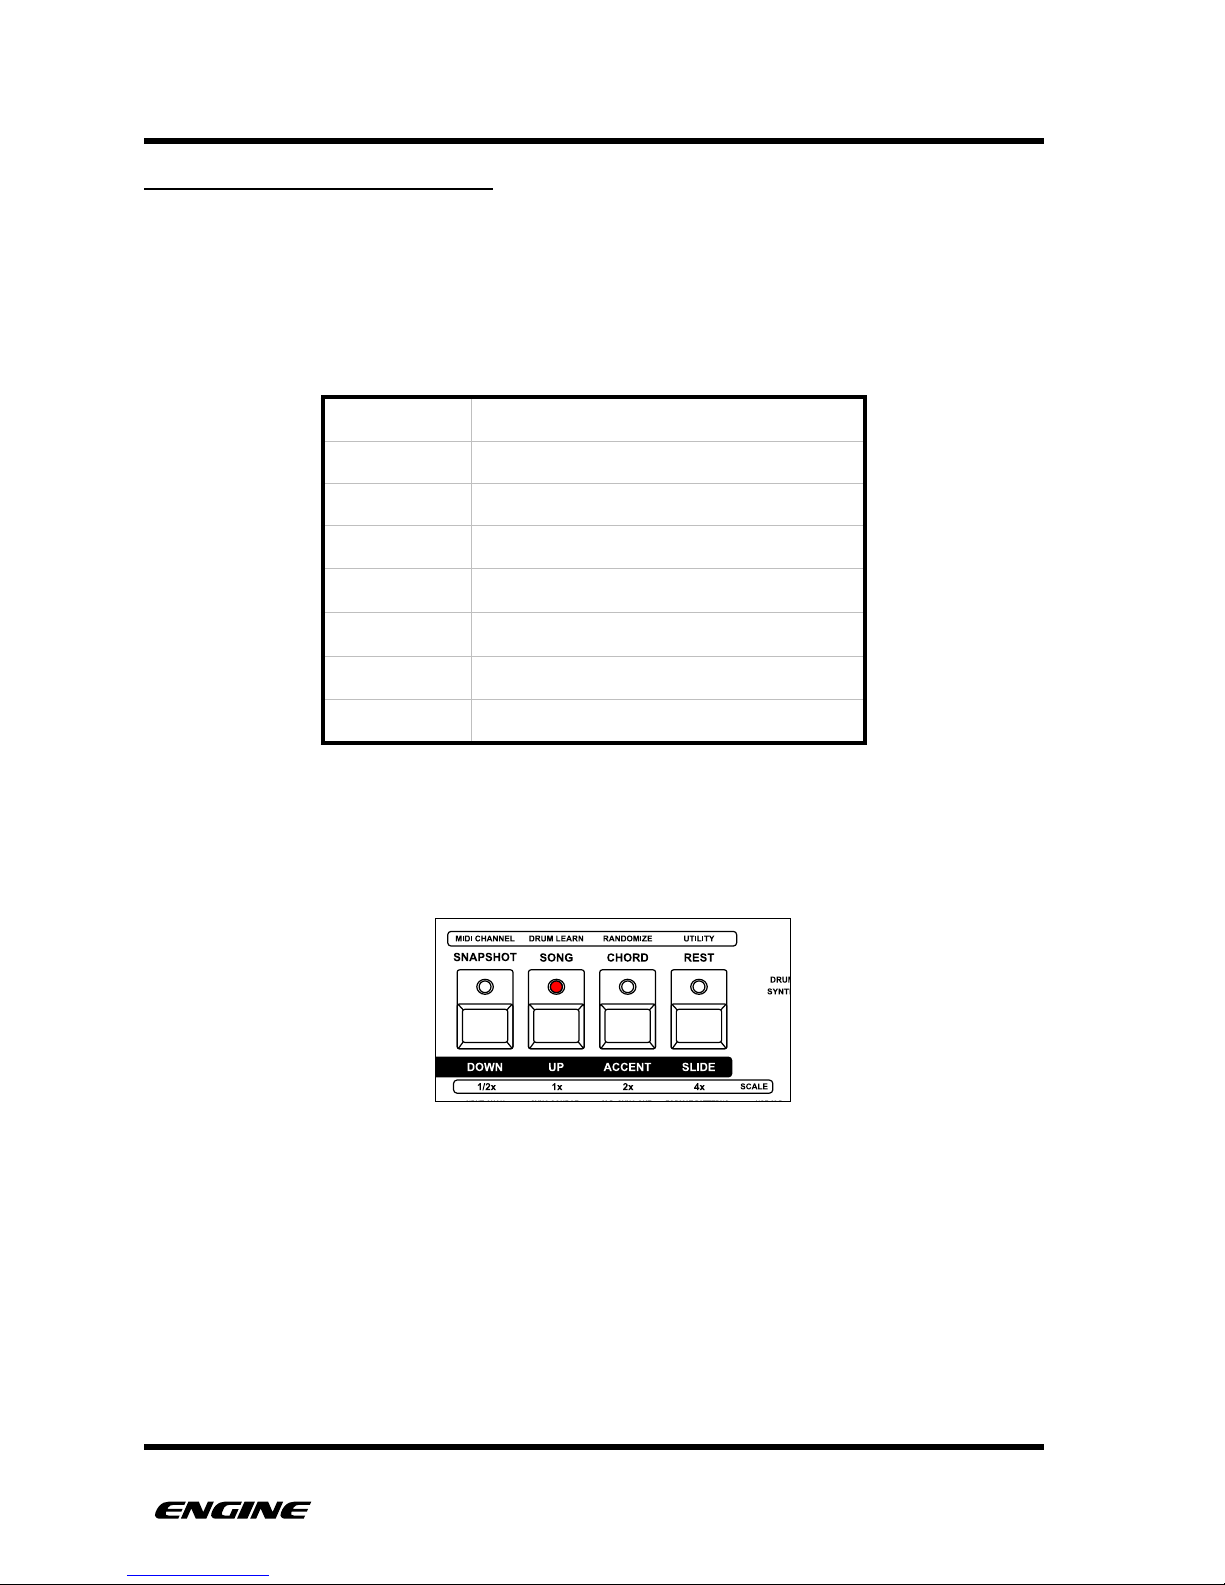
The current time scale of the pattern is displayed on the four attribute LEDs, the 4/4 scales
are shown with a brightly lit LED while the triplet version of the scale is displayed with a
dimly lit LED.
1/2x
each step represents 1/32 note
1x
each step represents 1/16 note (default)
2x
each step represents 1/8 note
4x
each step represents 1/4 note
1/2x (triplet)
each step represents 1/32 note triplet
1x (triplet)
each step represents 1/16 note triplet
2x (triplet)
each step represents 1/8 note triplet
4x (triplet)
each step represents 1/4 note triplet
USER GUIDE 40
1x setting for 4/4 16th notes
Page 50
PATTERNS
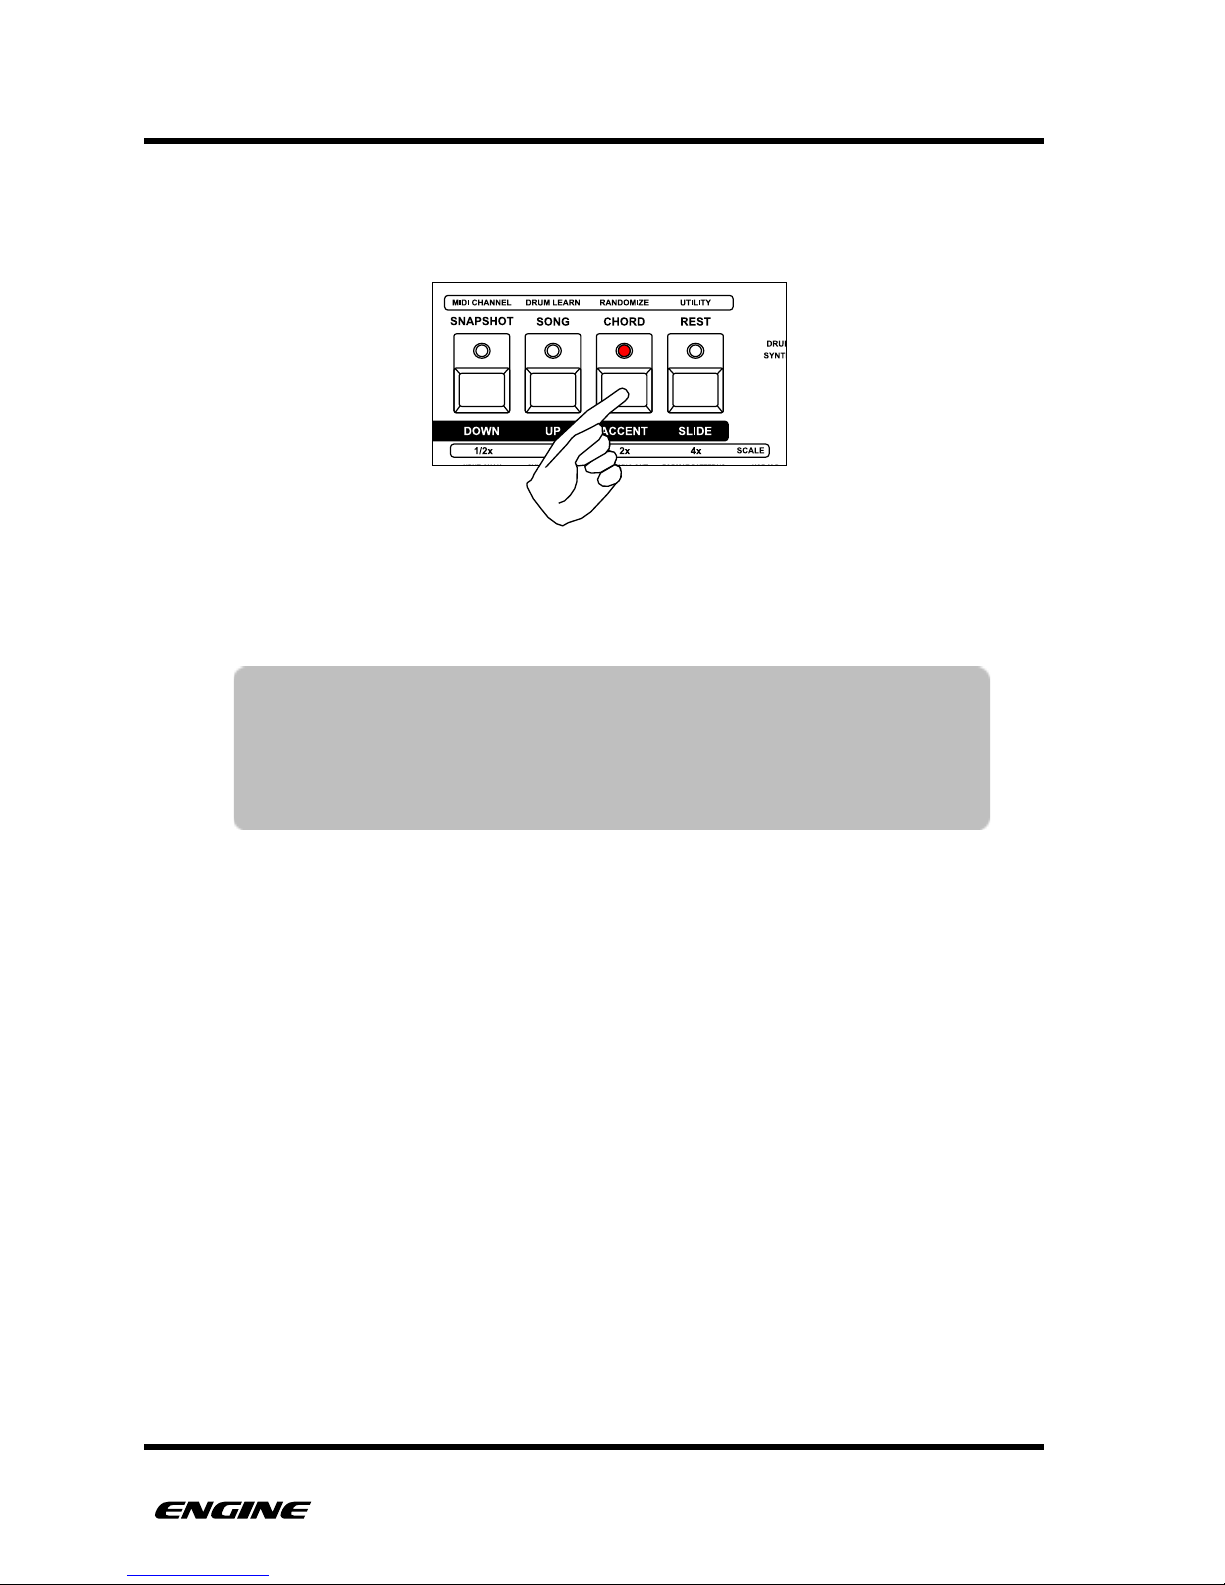
To change the timing scale of a pattern, while in TIME mode, click one of the four
attribute buttons. To change to the triplet version of a scale, double-click one of the four
attribute buttons.
Changes to the time scale while the sequencer is running will not take effect until the
pattern loops, this keeps the pattern in sync during live performance.
USER GUIDE 41
TIP: As a convenience, when switching scales between 4/4 and triplet,
the last step is automatically changed to keep the pattern in sync.
For example, switching from 1x time scale to 1x (triplet) on a 16
step pattern will automatically change the last step to step 12. The
last step can be freely changed to any other step as needed.
Page 51
PATTERNS
SETTING PATTERN SHUFFLE
Each pattern can have separate shuffle timing during playback. The amount of shuffle
available depends on the selected scale and the pattern type. Shuffle can be applied to
any pattern that uses a 4/4 based timing scale.
DRUM type patterns have the following shuffle levels available for the 4/4 timing scales
(including no shuffle):
SYNTH type patterns have the following shuffle levels available for the 4/4 timing scales
(including no shuffle):
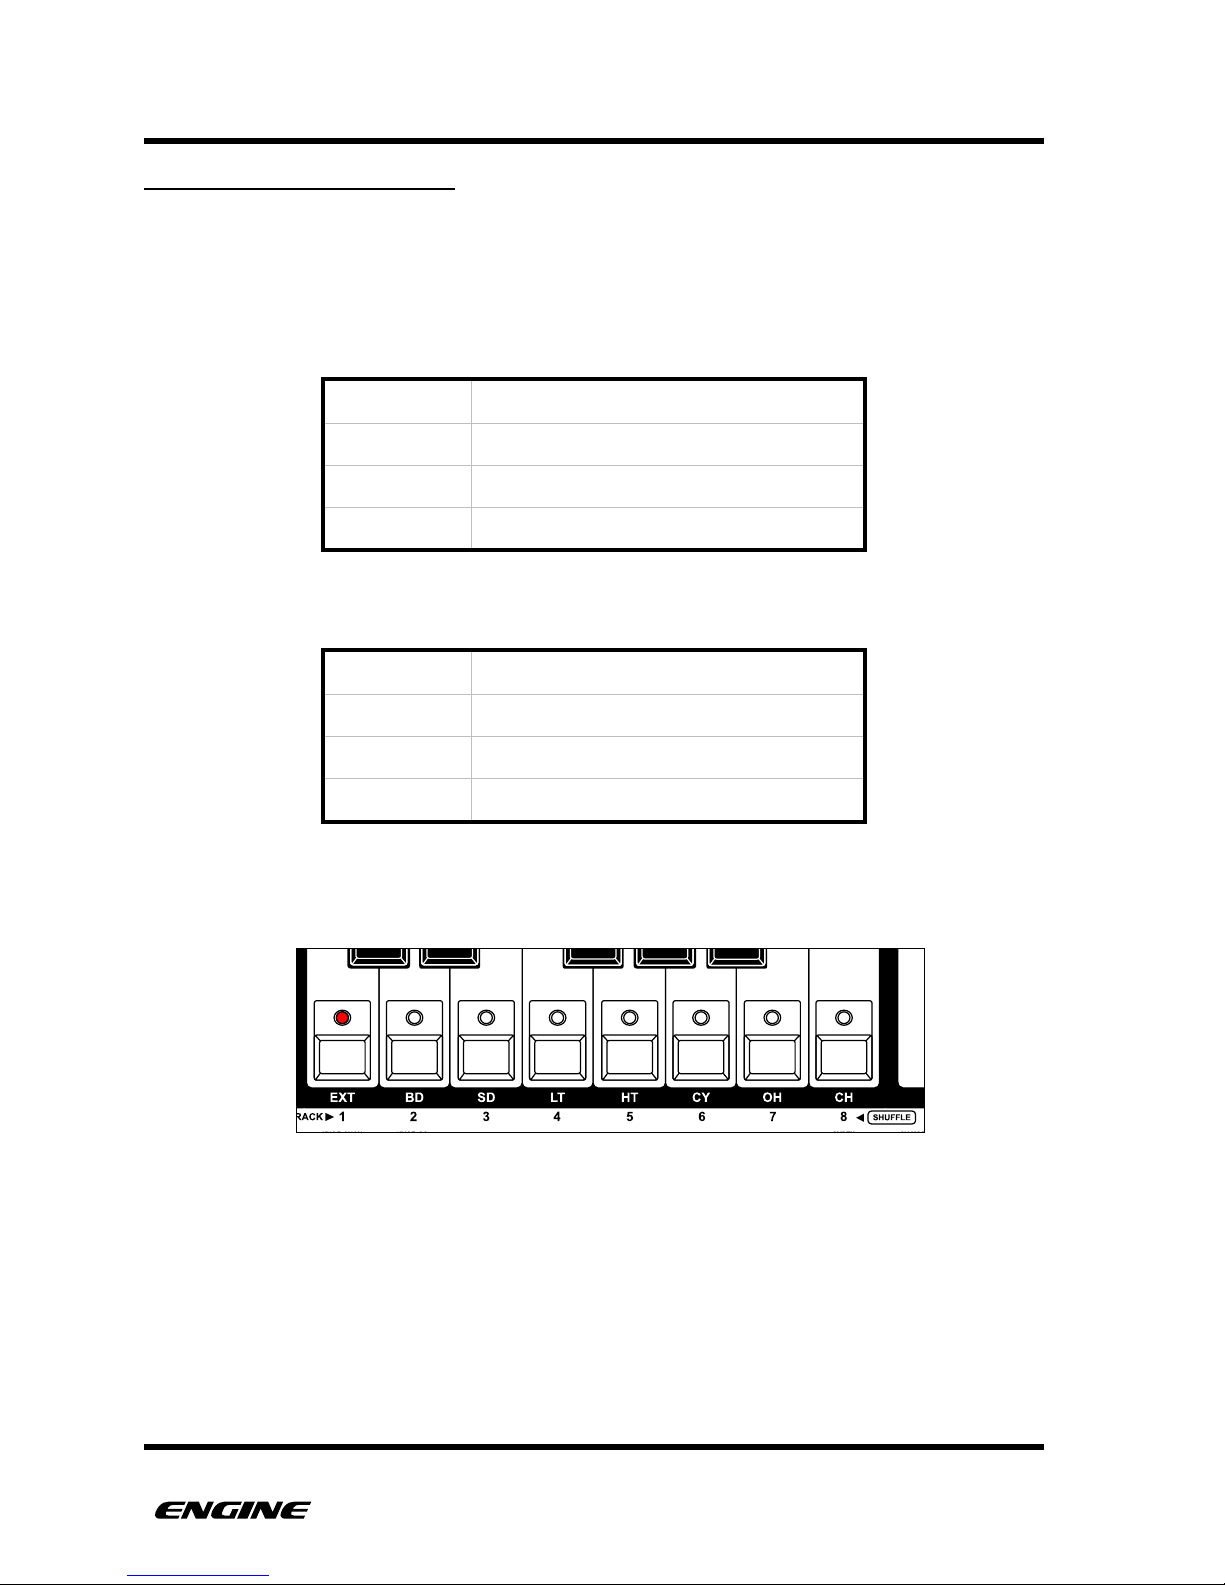
The current shuffle level is displayed on the LEDs on the mini keyboard, with level one
meaning "no shuffle”.
1/2x
5 levels of shuffle
1x
7 levels of shuffle
2x
8 levels of shuffle
4x
8 levels of shuffle
1/2x
4 levels of shuffle
1x
6 levels of shuffle
2x
8 levels of shuffle
4x
8 levels of shuffle
USER GUIDE 42
Page 52
PATTERNS
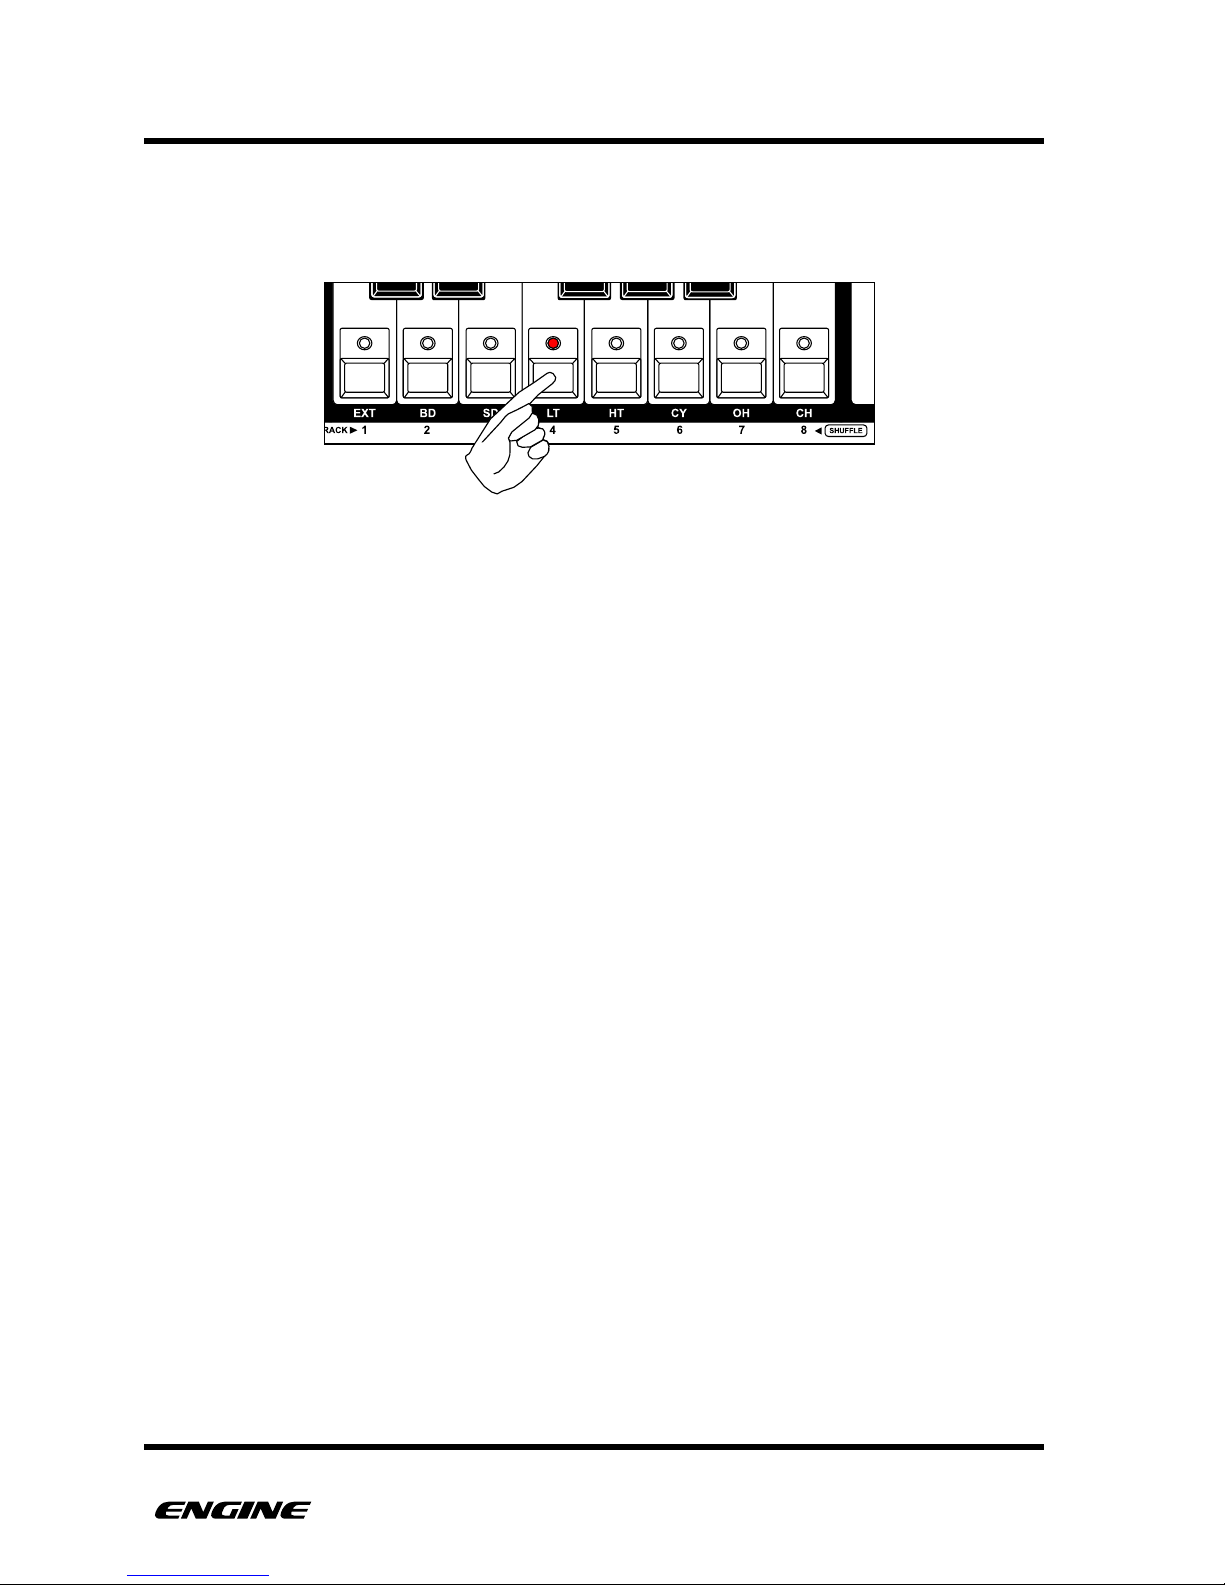
To change the shuffle level, while in TIME mode, click one of the white mini keyboard
buttons. If the shuffle level is not available for the current pattern type and scale, the level
cannot be selected.
Changes to the shuffle level while the sequencer is running will not take effect until the
pattern loops.
USER GUIDE 43
Page 53
PATTERNS
SKIPPING PATTERN STEPS
It is possible to generate interesting pattern variations and timings by setting some steps to
be skipped during playback. This capability is a more "advanced" function of TIME
mode.
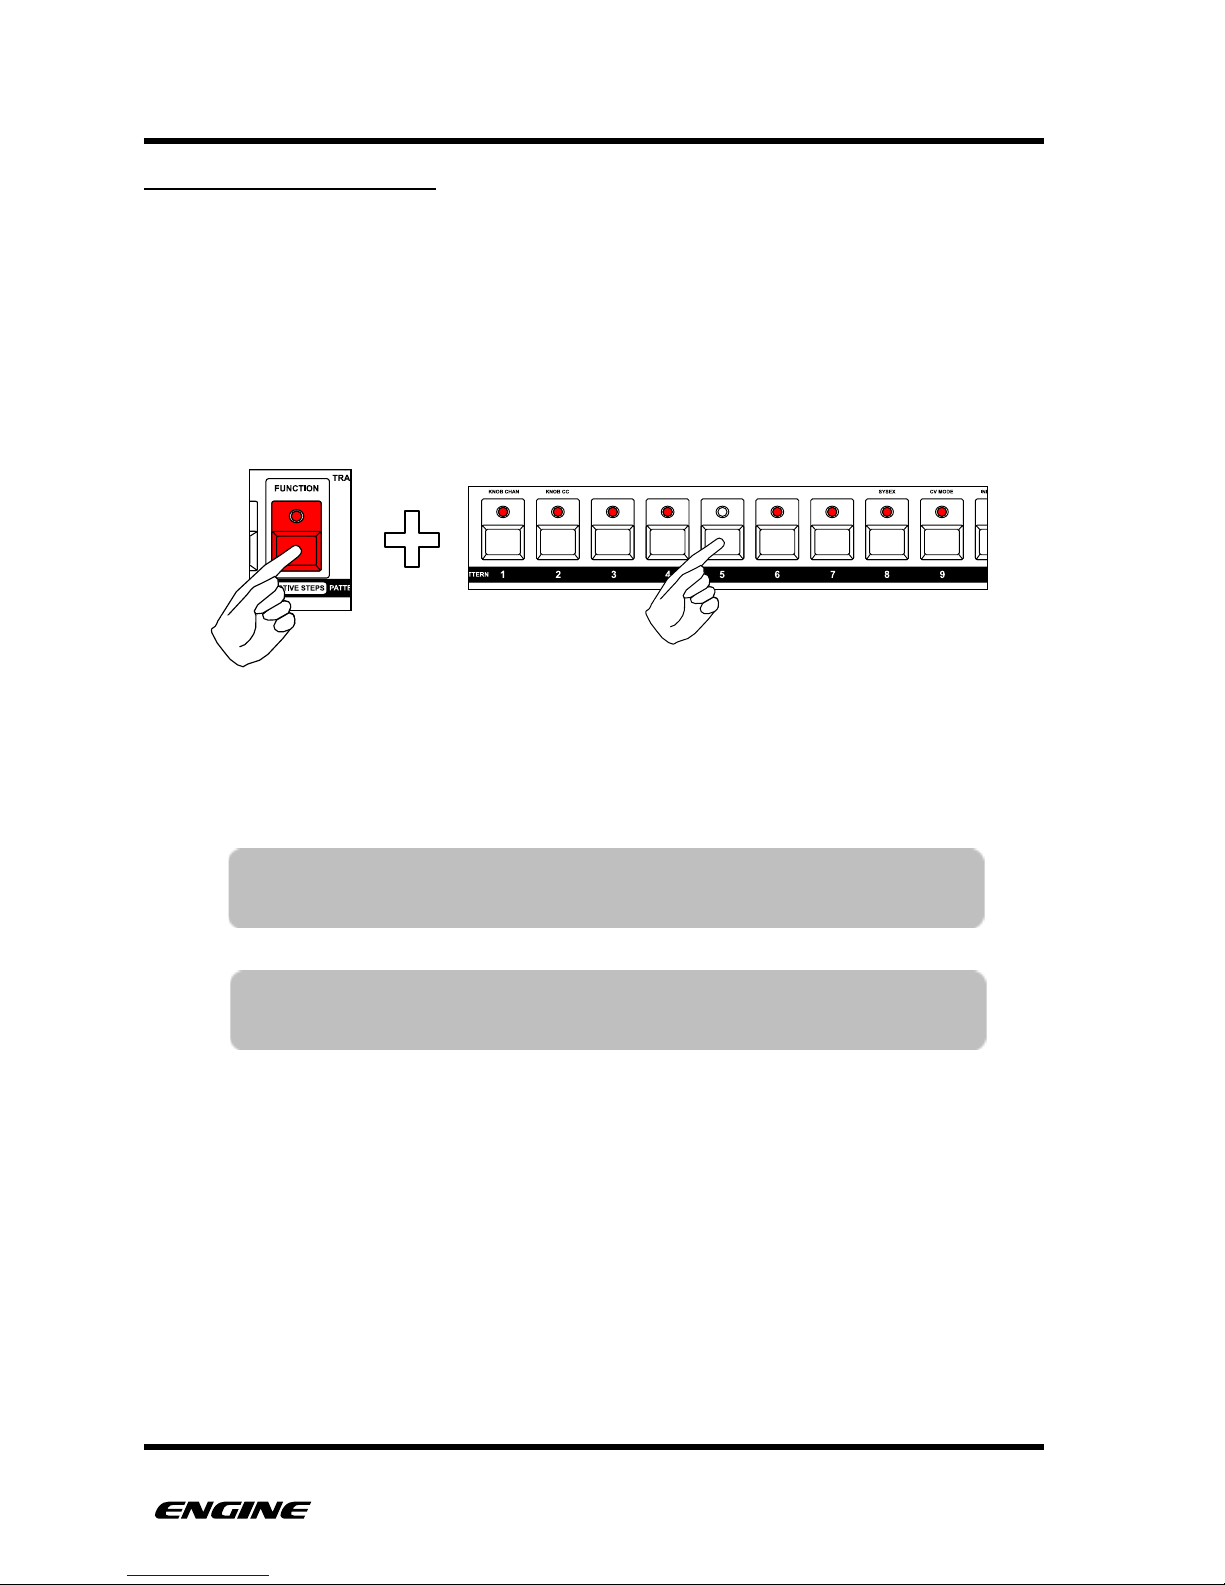
To see the current active steps, while in TIME mode, press and hold the FUNCTION
button. The active steps will be shown with brightly lit pattern step LEDs. While
continuing to hold the FUNCTION button, you can deactivate steps by clicking pattern
step buttons.
Skipped steps will be immediately deactivated, even while the sequencer is running. This
means it is possible for a pattern lose sync with other playing tracks. In this case it may
be useful to realign the pattern using the REALIGN function.
USER GUIDE 44
TIP: You can automatically set the last step and all previous steps to
active by double-clicking a pattern step button.
NOTE: Setting the last step using the PATTERN LENGTH function will
automatically reactivate any skipped steps.
Page 54
PATTERNS
REALIGN A PATTERN
It is possible to realign a pattern if it falls out of sync with other tracks. This is particularly
useful if the pattern has fallen out of sync because of changes to the pattern length or
skipped steps.
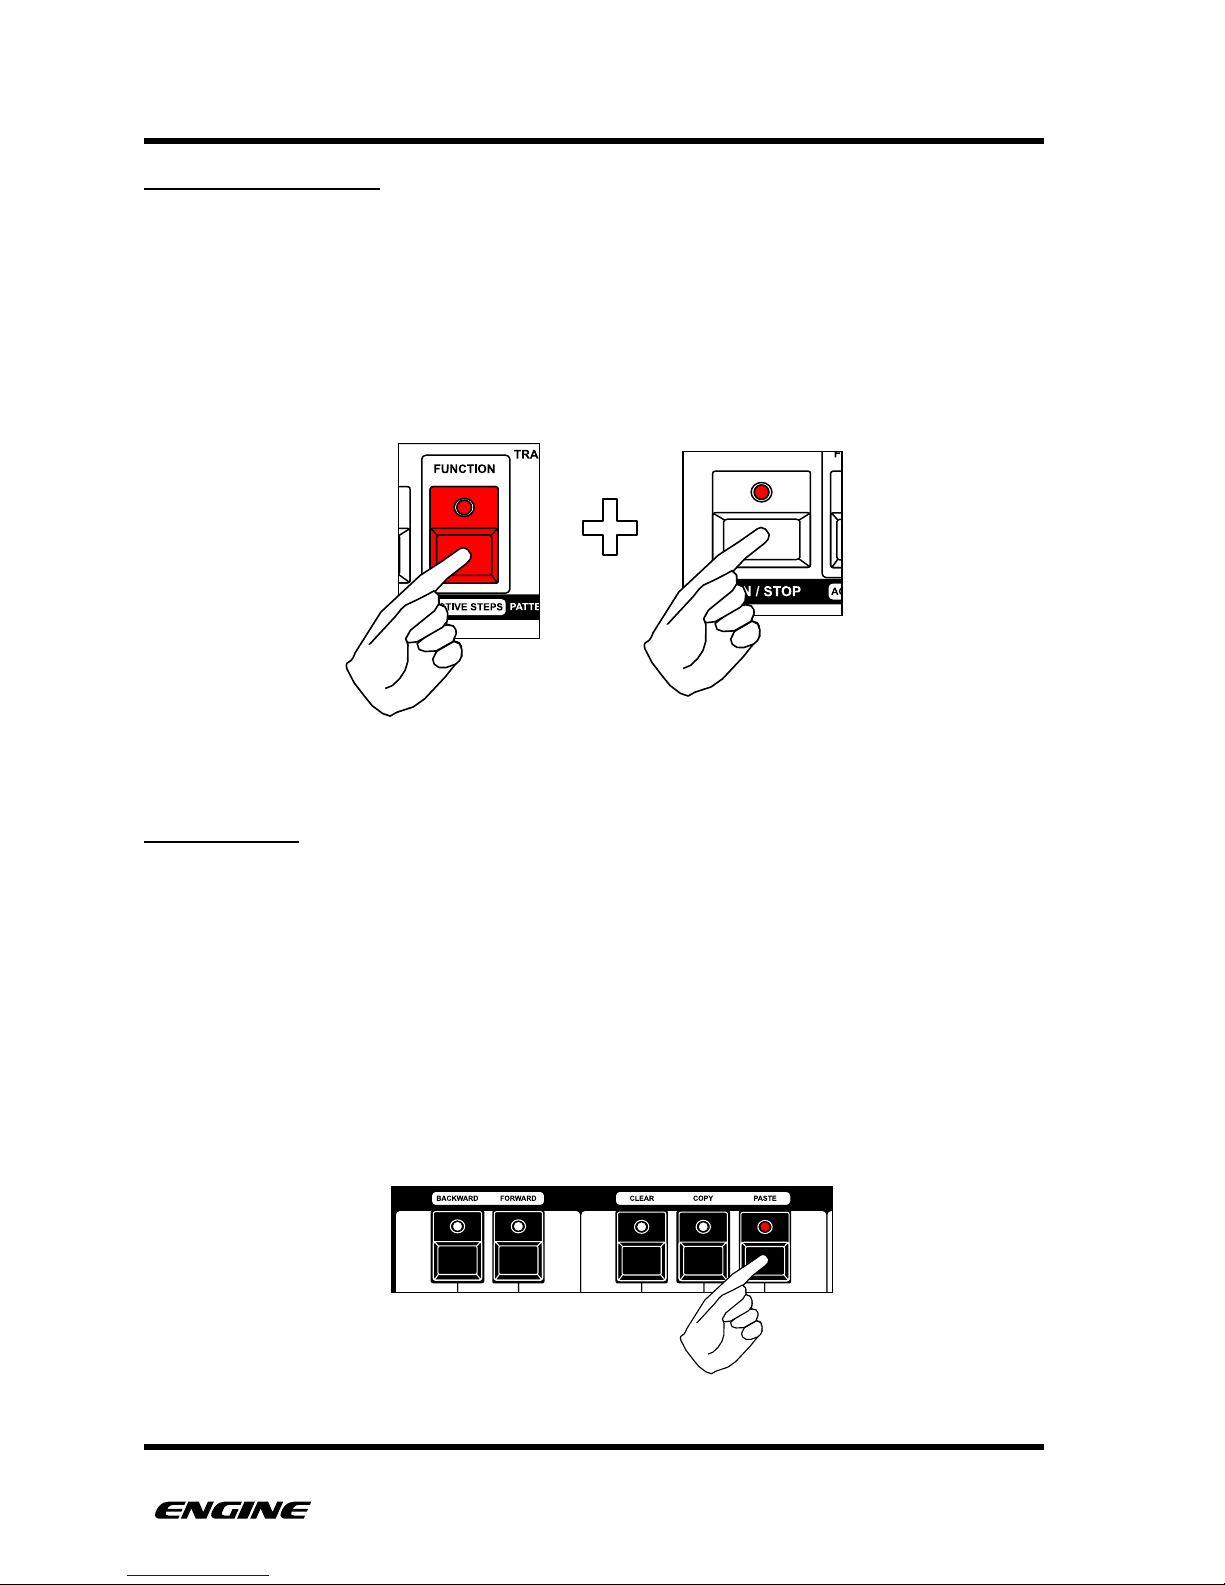
To realign the pattern, while in TIME mode, press and hold the FUNCTION button and
then click the RUN/STOP button. The pattern will realign itself when all tracks have
looped.
TEMPO LOCK
The tempo lock function can be used to prevent the internal tempo from being changed
when moving the tempo knob. This is useful in live situations where accidental changes of
the tempo are unacceptable.
To engage the tempo lock, while in TIME MODE, click the black “A sharp” button on the
mini keyboard. The LED will light to show that tempo lock is active. To disengage, click
the A sharp button again.
When disengaging tempo lock, the tempo knob will only begin changing tempo after it
passes through the current tempo value.
USER GUIDE 45
Page 55
PATTERNS
TAP TEMPO
It is possible to manually enter a tempo using the tap tempo function. This is useful when
setting a tempo in relation to another sound source.
To set the tempo using tap tempo, first engage the tempo lock. While tempo is engaged,
the black “F sharp” button on the mini keyboard can be tapped in time to establish the
current tempo. The new tempo will be displayed on the LED display.
INCREMENT/DECREMENT TEMPO
In TIME MODE, the current tempo can be changed incrementally while the tempo lock is
engaged. This allows the tempo to be adjusted manually without disengaging the tempo
lock.
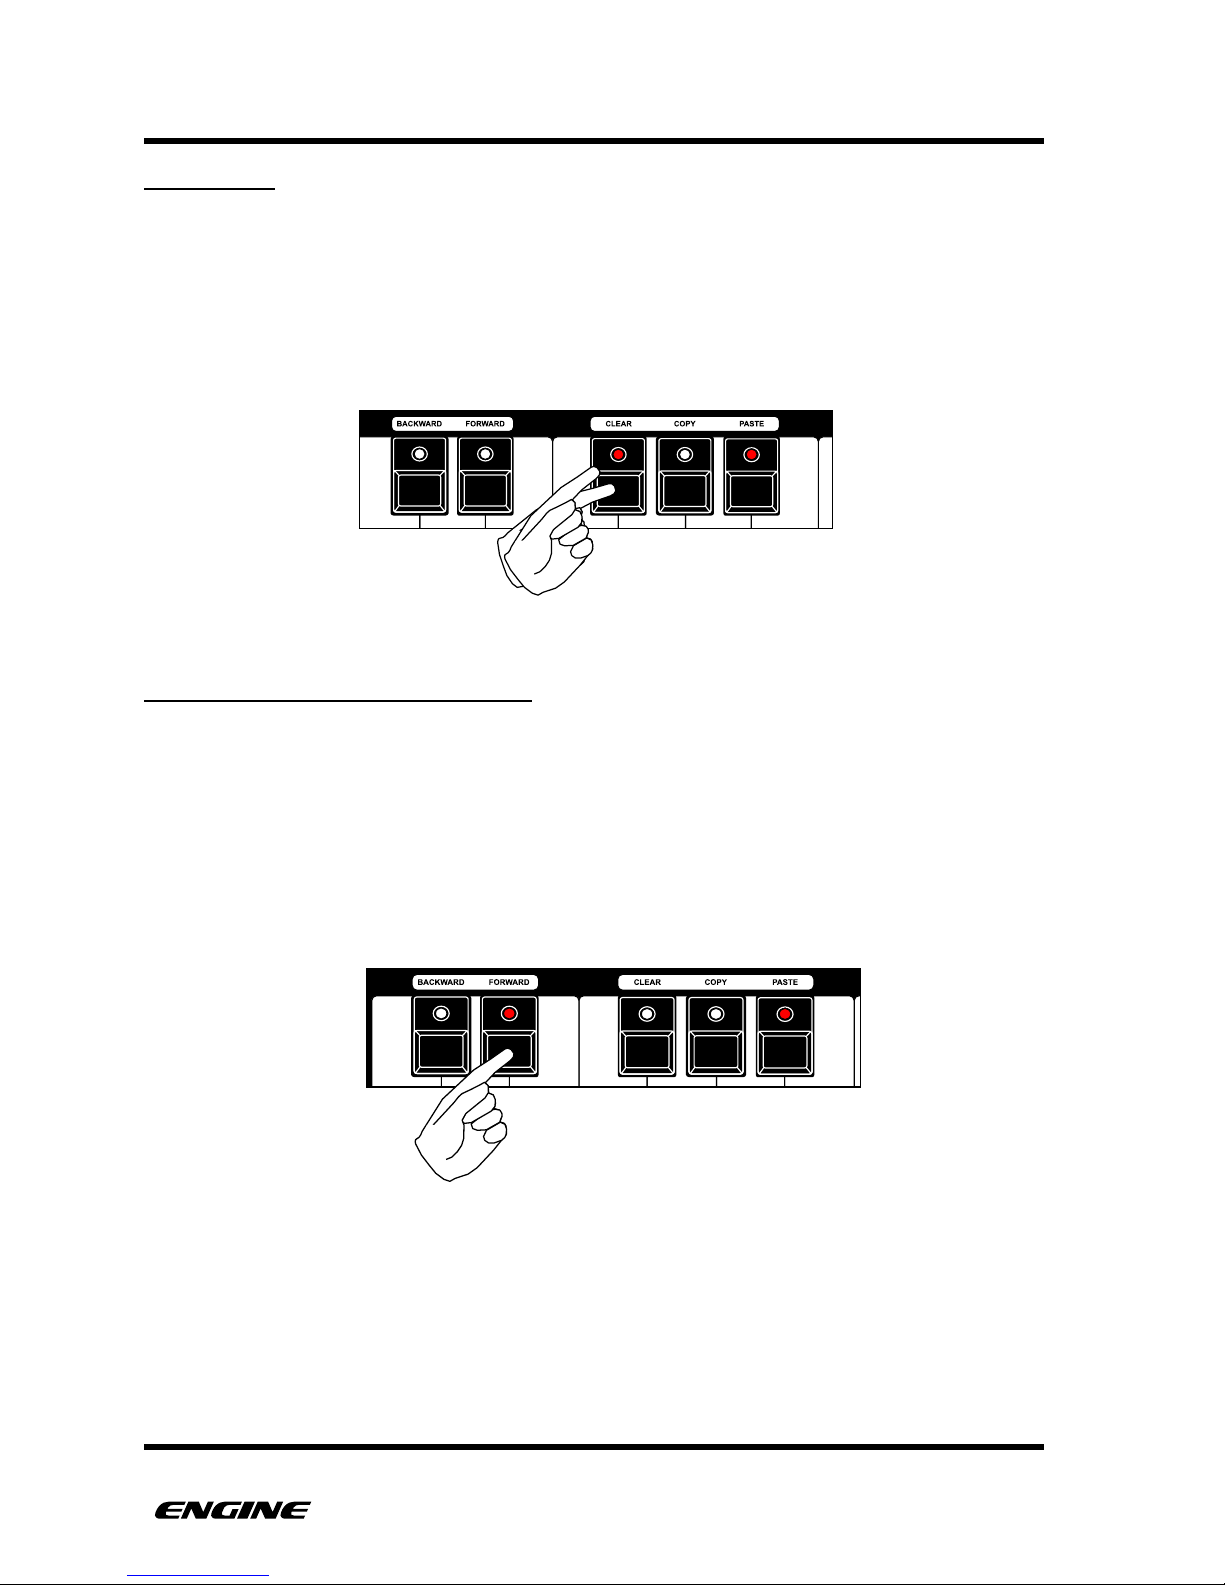
To set the tempo incrementally, use the BACKWARDS and FORWARDS (C sharp and D
sharp) buttons on the mini keyboard. Clicking the BACKWARDS button will decrement
the tempo, clicking the FORWARDS button will increment the tempo. The new tempo will
be displayed on the LED display.
If you continue to hold the button, the tempo will begin to increment or decrement
continuously.
USER GUIDE 46
Page 56
PATTERNS
PATTERN TYPES
Engine has two different types of patterns, DRUM type patterns and SYNTH type patterns.
Tracks can have any combination of drum or synth types patterns, meaning you can use
synth or drum type patterns in any of the eight available tracks.
In the next sections we will cover both types of patterns and how they can be used.
CHANGING PATTERN TYPES
Any pattern can be changed to a DRUM or SYNTH type pattern at any time. This allows
for any mix of DRUM and SYNTH type patterns in any track.
The current pattern type is visible on the PATTERN TYPE led, with DRUM patterns showing
a lit LED and SYNTH type patterns showing an unlit LED.
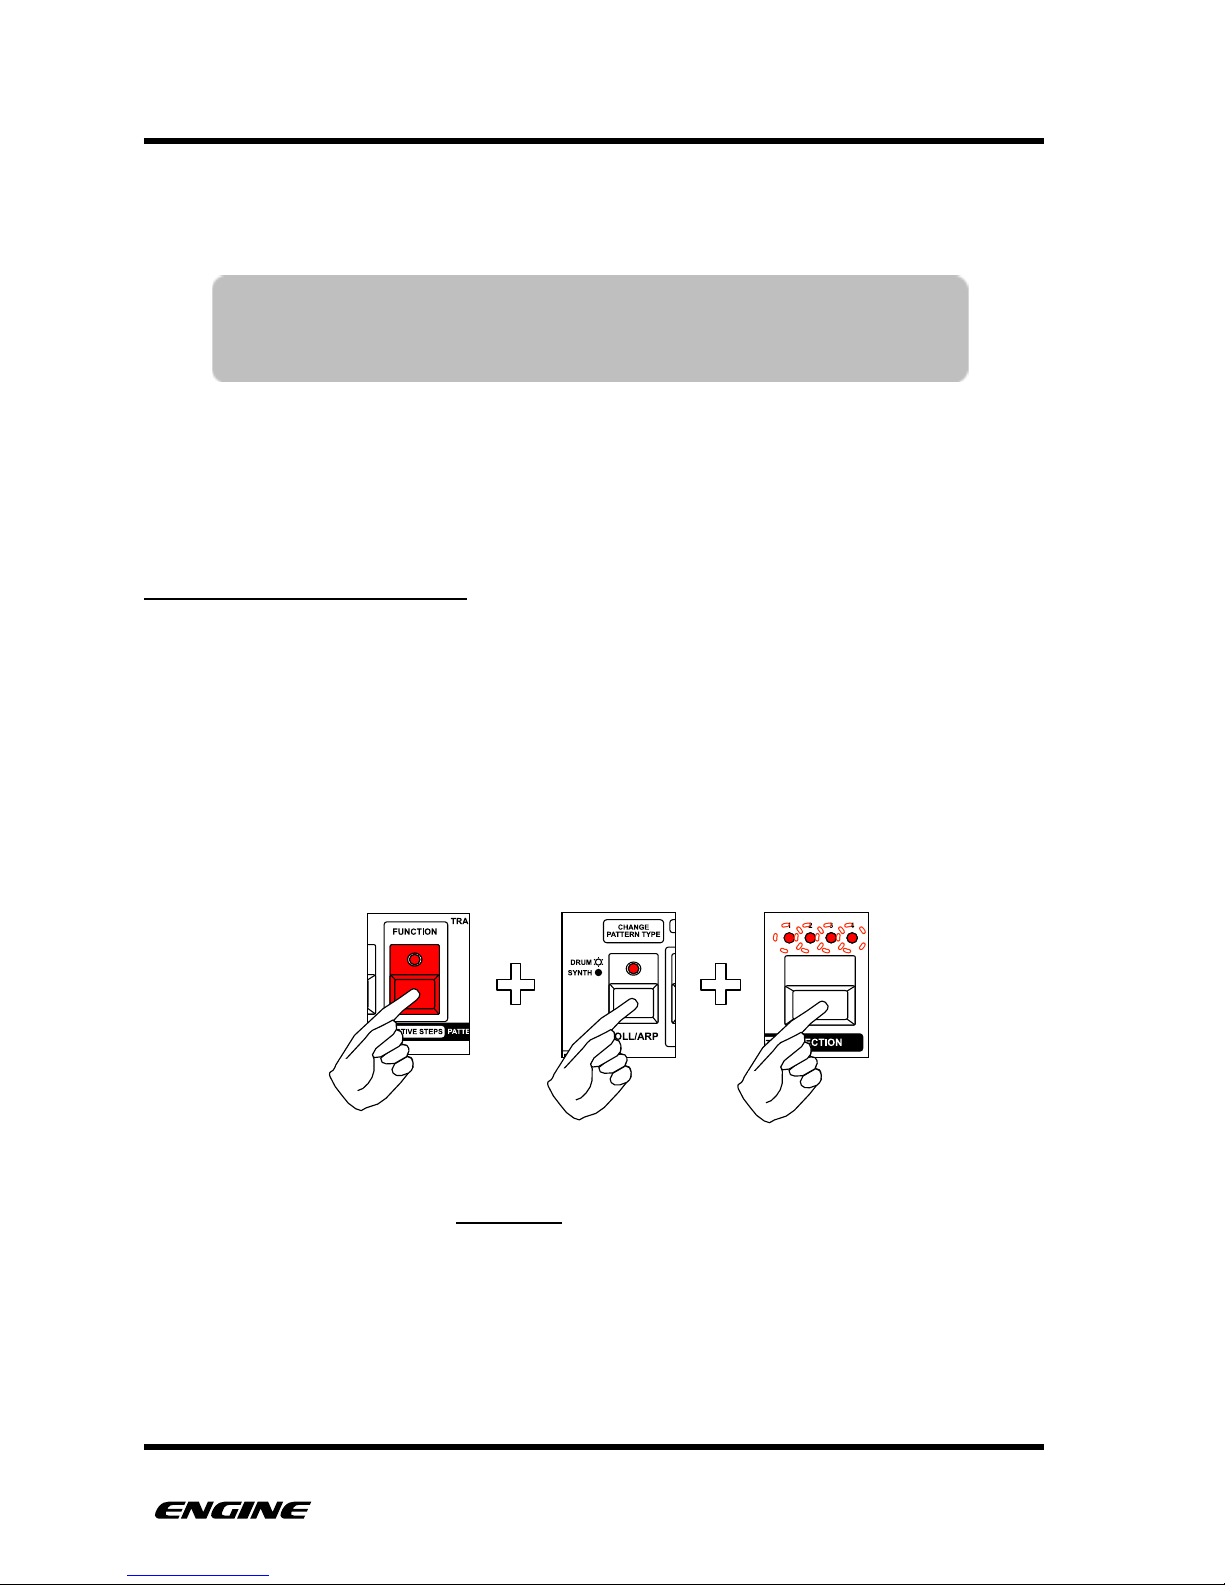
To change the current pattern type, press and hold (or double click) the FUNCTION
button, then press and hold the CHANGE PATTERN TYPE (roll/arp) button. The four
section LEDs will blink to warn that this operation is destructive. To confirm the pattern
type change, click the SECTION button.
Changing the pattern type is a destructive operation, meaning that the programmed notes
in a sequence will be erased when changing the type! This is necessary because the
pattern memory format for each type of pattern is completely different.
USER GUIDE 47
TIP: Each pattern type has different capabilities for programming, but
that doesn't mean that a drum type pattern couldn't be used to
sequence a synth or vice versa.
Page 57
PATTERNS
DRUM TYPE PATTERNS
Drum type patterns are well suited for programming percussion sequences. A drum
pattern has eight individual drum instruments that can be programmed, allowing a
complete drum sequence to be created using a single track.
SELECTING DRUM INSTRUMENTS
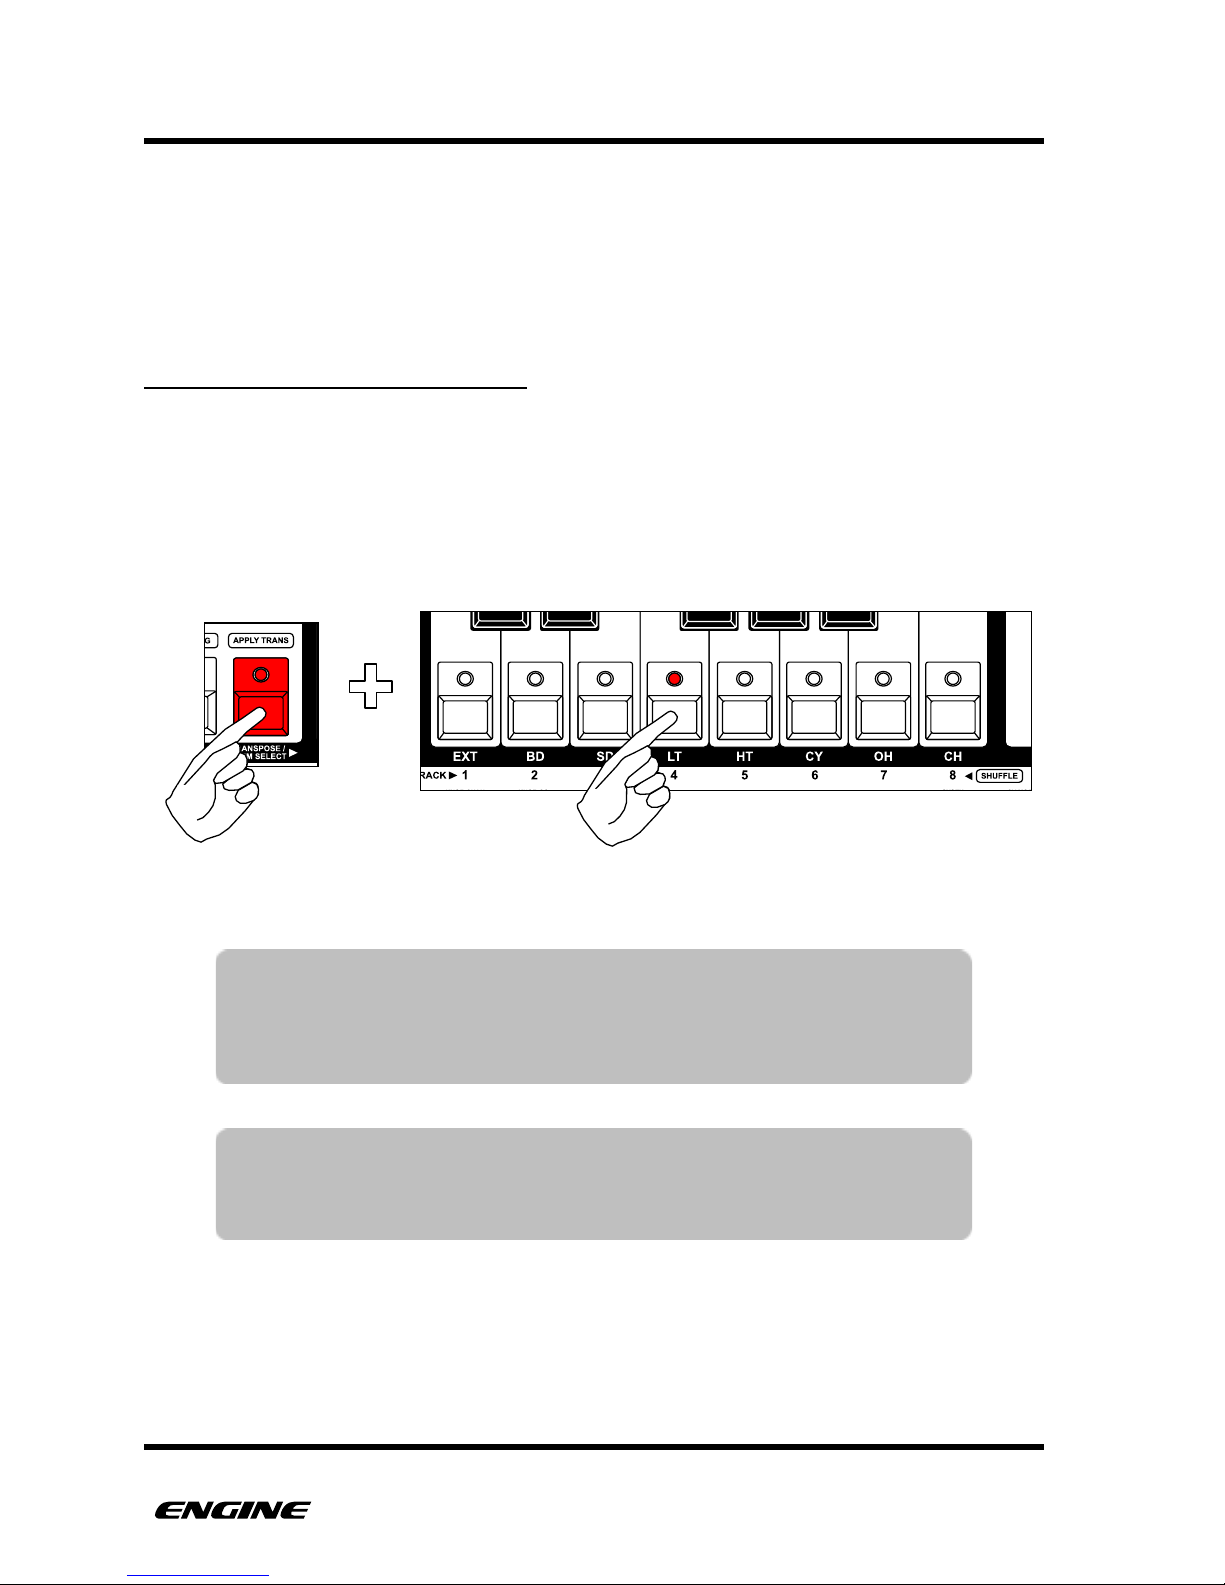
When editing a drum pattern, you can select which drum instrument is currently displayed
on the step LEDs by holding the TRANSPOSE/DRUM SELECT button to the left of the mini
keyboard and then selecting the drum instrument using the white buttons of the mini
keyboard. They are labeled as EXT for external, BD for bass drum, SD for snare drum, LT
for low tom, HT for high tom, CY for cymbal, OH for open hihat and CH for closed hihat.
USER GUIDE 48
TIP: While holding the DRUM SELECT button, the track LEDs flicker
briefly each time a drum instrument is played. This gives a good
visual indicator of what instruments are playing. Muted
instruments will not flicker.
Selecting the LOW TOM drum instrument
TIP: When the sequencer is not playing, the drum instrument will be
played as it is selected. This makes it easier to preview the drum
sound.
Page 58
PATTERNS
PROGRAMMING DRUM TYPE PATTERNS
Drum type patterns can be programmed using grid programming, step programming or
realtime recording. Each method has it's strengths, so you can choose the appropriate
method for your situation. Realtime recording and step recording can also be used
simultaneously with grid programming, allowing for very interactive sequencing.
GRID PROGRAMMING
Grid programming mode is the default mode and is always active, meaning that you
don’t need to enter record mode to use grid programming. Grid programming is the
"classic" method of entering triggers using the pattern step buttons. You can see the
programmed steps directly on the step LEDs. Accented triggers are shown with a brightly
lit LED, unaccented triggers are shown with a dim LED.
ADDING OR REMOVING A TRIGGER
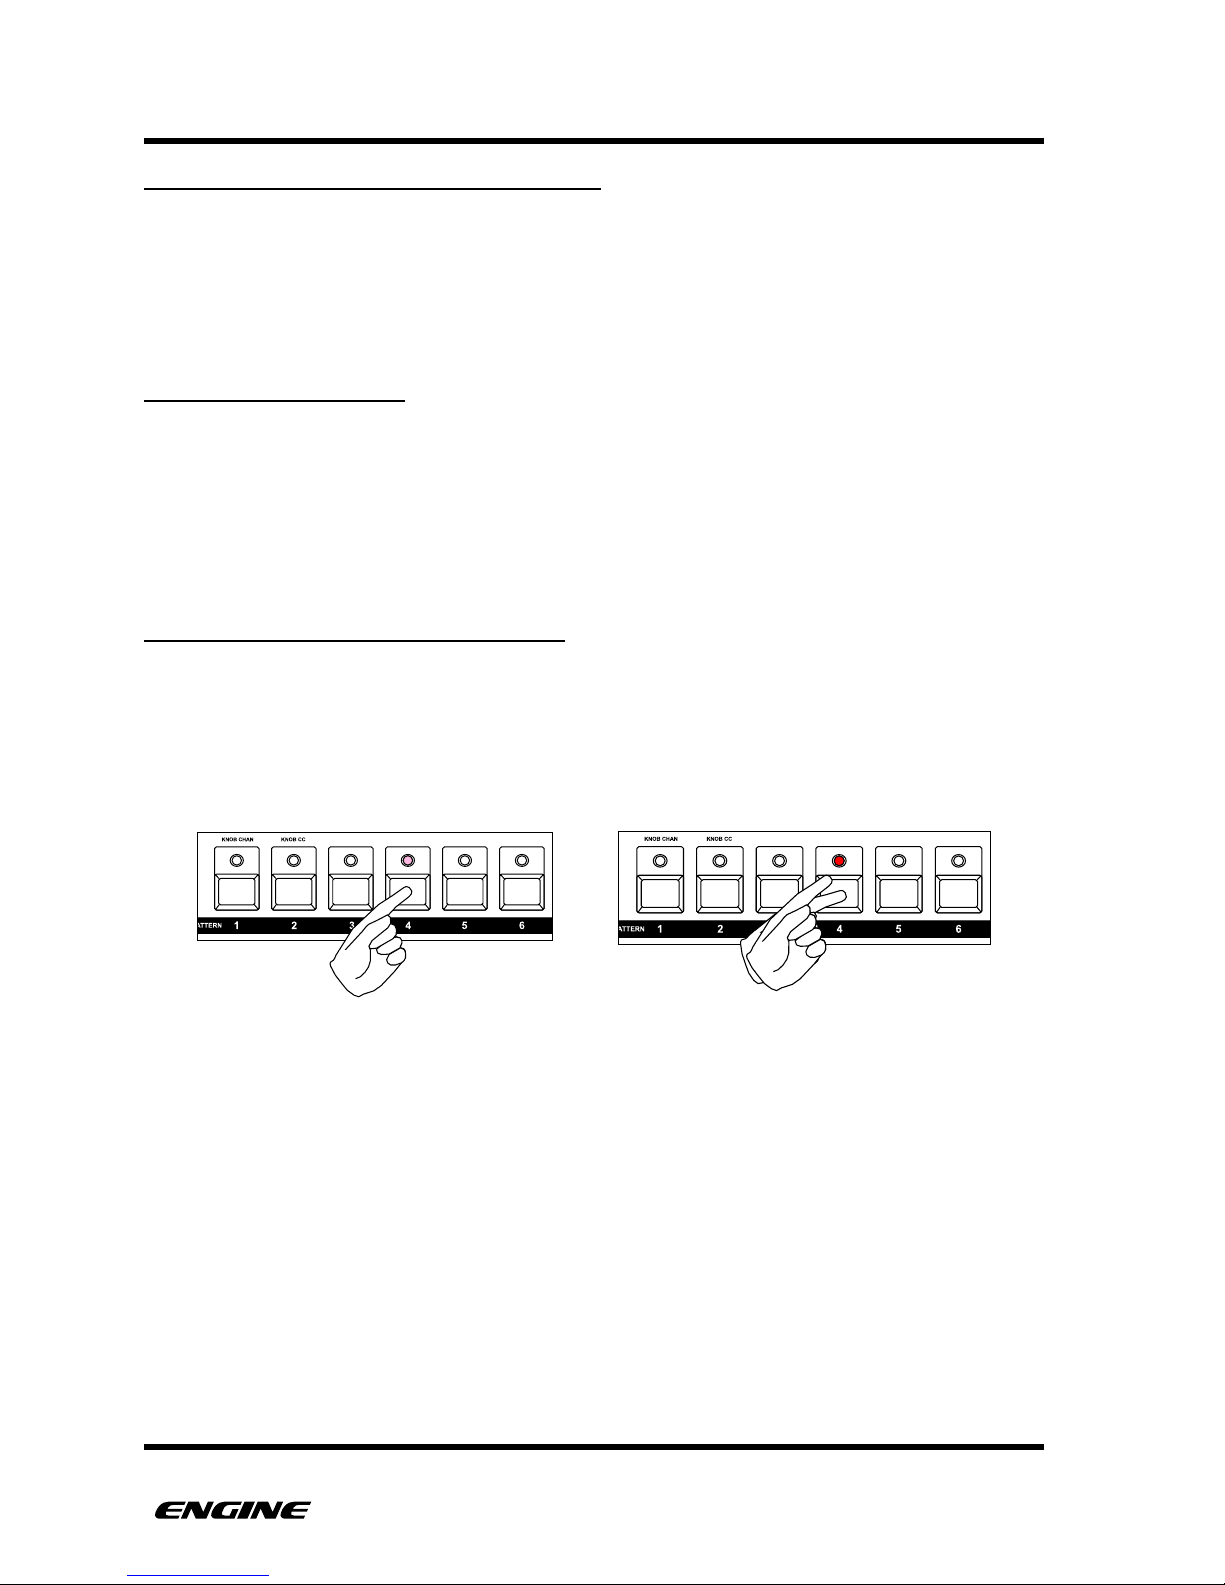
After selecting the appropriate drum instrument, use the pattern step buttons to enter
triggers for the instrument. Clicking a pattern step button once enters an unaccented
trigger. To enter an accented trigger, double click the pattern step button.
USER GUIDE 49
Adding an unaccented trigger
Adding an accented trigger
Page 59
PATTERNS
SETTING NOTE REPEAT
Each trigger can be enabled for the note repeat MIDI EFFECT. This will cause the step to
be retriggered according to the note repeat setting for the track. This creates a flam type
effect.
If the track MIDI EFFECT has a note repeat setting of zero, you will not hear any repeats.
For details on using the note repeat MIDI EFFECT, please see the MIDI EFFECTS section
under FUNCTION MODE.
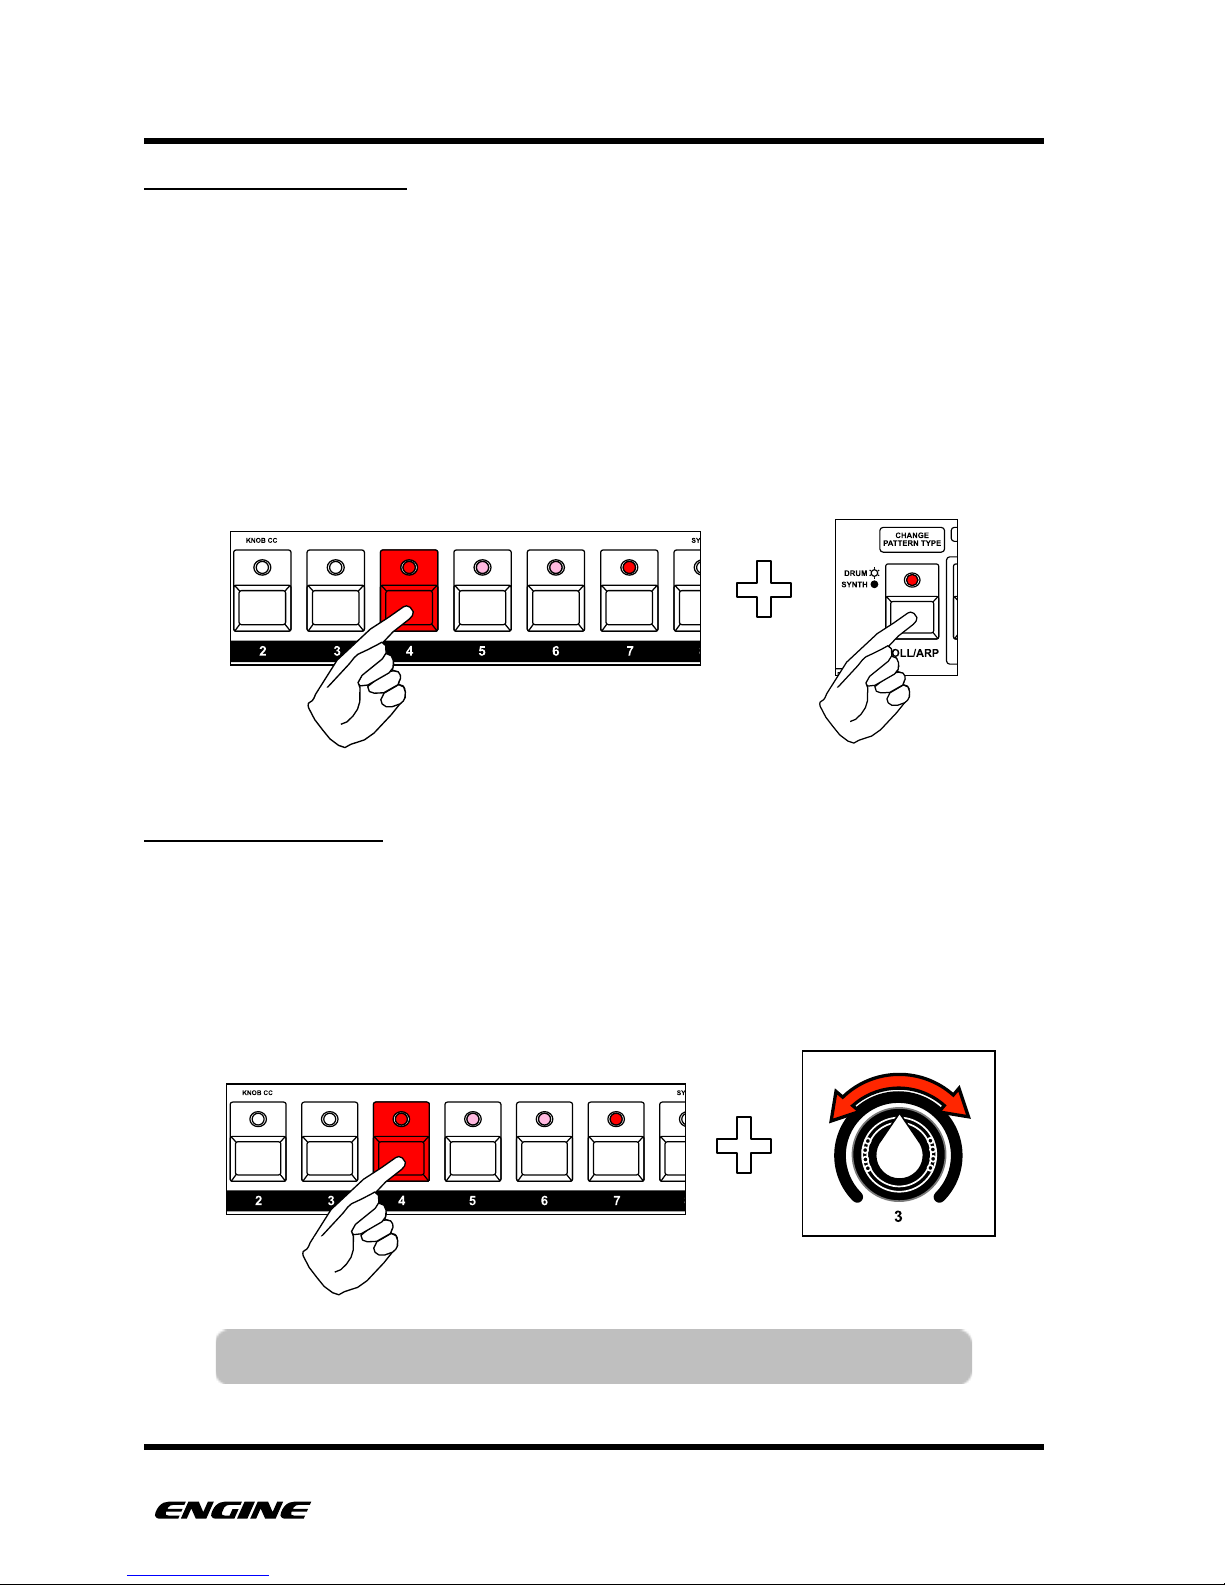
To set note repeat for a step, press and hold the pattern step button. Then click the ROLL/
ARP button to turn note repeat on or off. The current note repeat setting is indicated by
the ROLL/ARP LED.
"
SETTING STEP DELAY
Each step of a drum type pattern can have a delay added to the start of the step. This
can create a more humanized feel in programmed patterns. The amount of delay
available will vary based on the current TIME SCALE for the pattern.
To set the delay for a step, press and hold the pattern step button. Then use control knob
3 to set a delay for the step. The current delay will be shown on the LED display.!
USER GUIDE 50
NOTE: Step delay applies to all drum instruments on the step.
Page 60
PATTERNS
REALTIME RECORDING
Drum type patterns can also be recorded in realtime, which can be useful for capturing
the expression of a live performance.
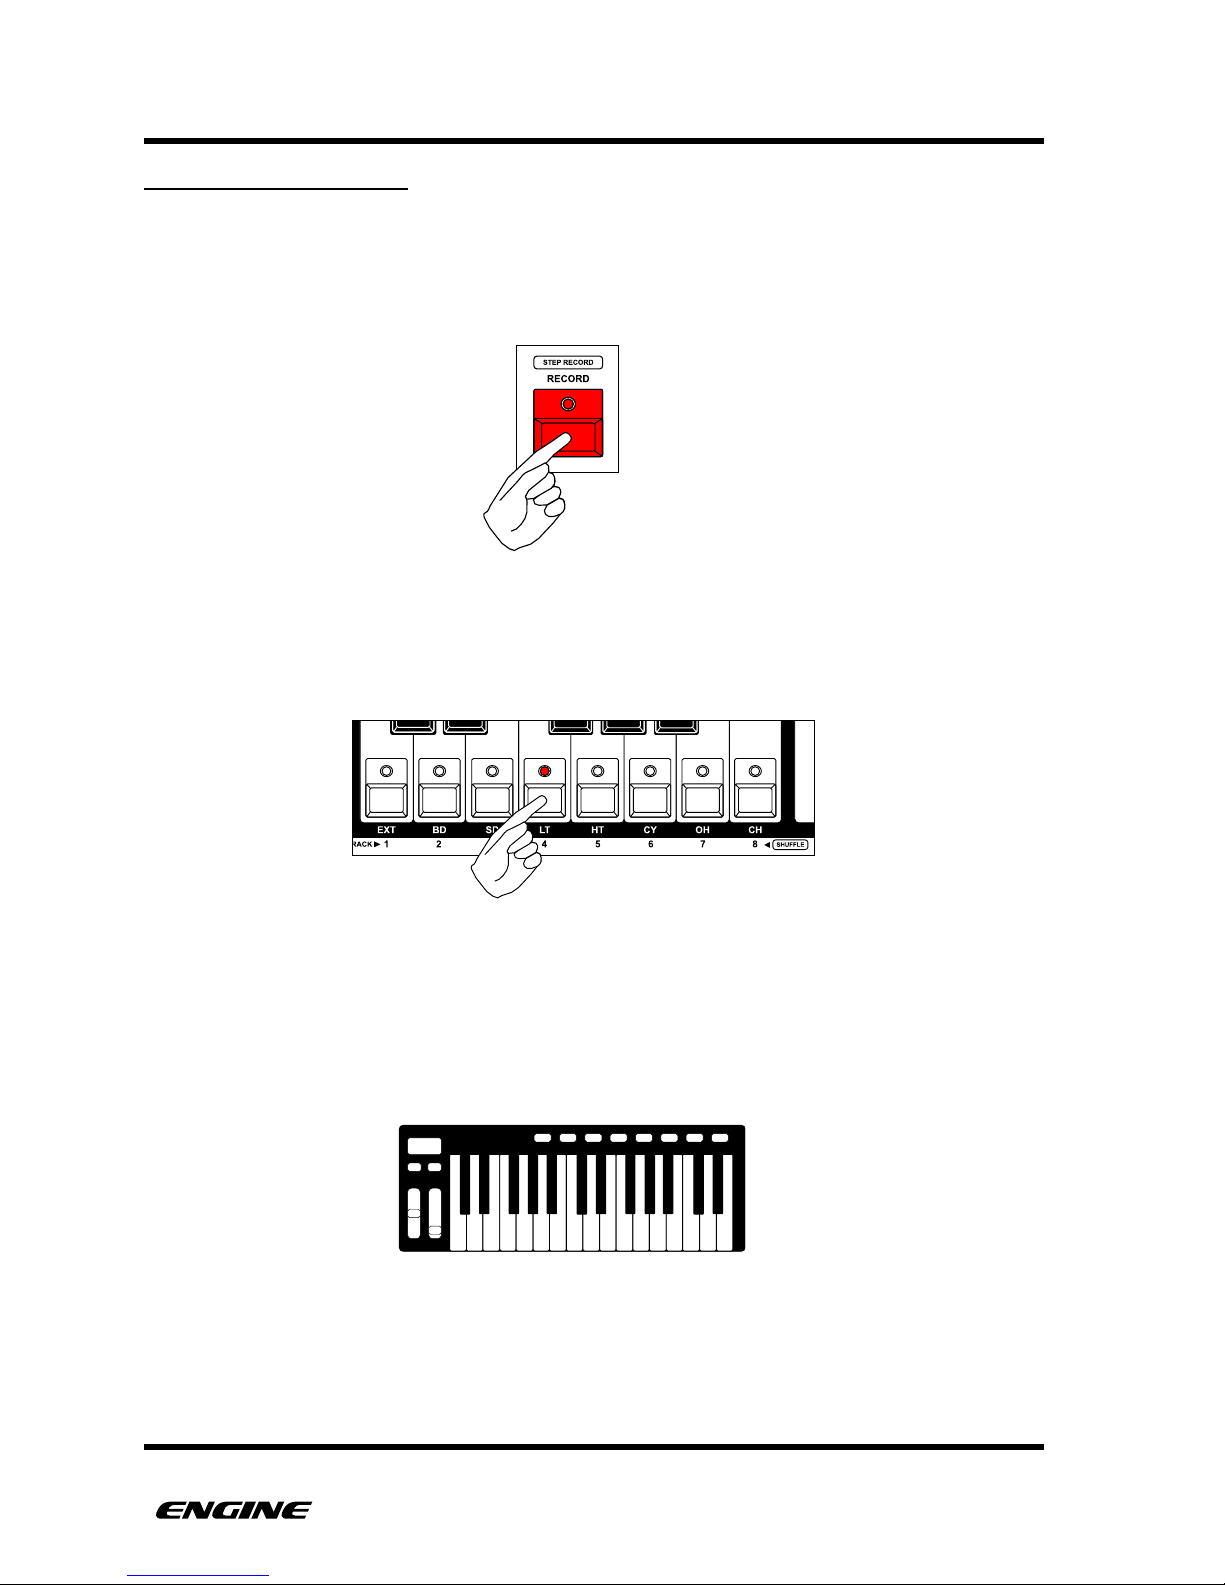
To begin realtime recording, press and hold (or double click) the RECORD button.
In RECORD mode, the eight white buttons of the mini keyboard become drum pads for
realtime recording. All eight of the drum instruments can be played simultaneously into
the pattern in realtime.
To add accents, you can press and hold the accent button while playing the drum
instrument pads.
Realtime input from an external MIDI controller can also be recorded, the velocity of the
incoming notes will automatically map to accented notes.
USER GUIDE 51
Page 61
PATTERNS
STEP RECORDING
Step recording is an alternate way to enter drum triggers by moving from one step to the
next in sequence. This can be done while the sequencer is running or stopped.
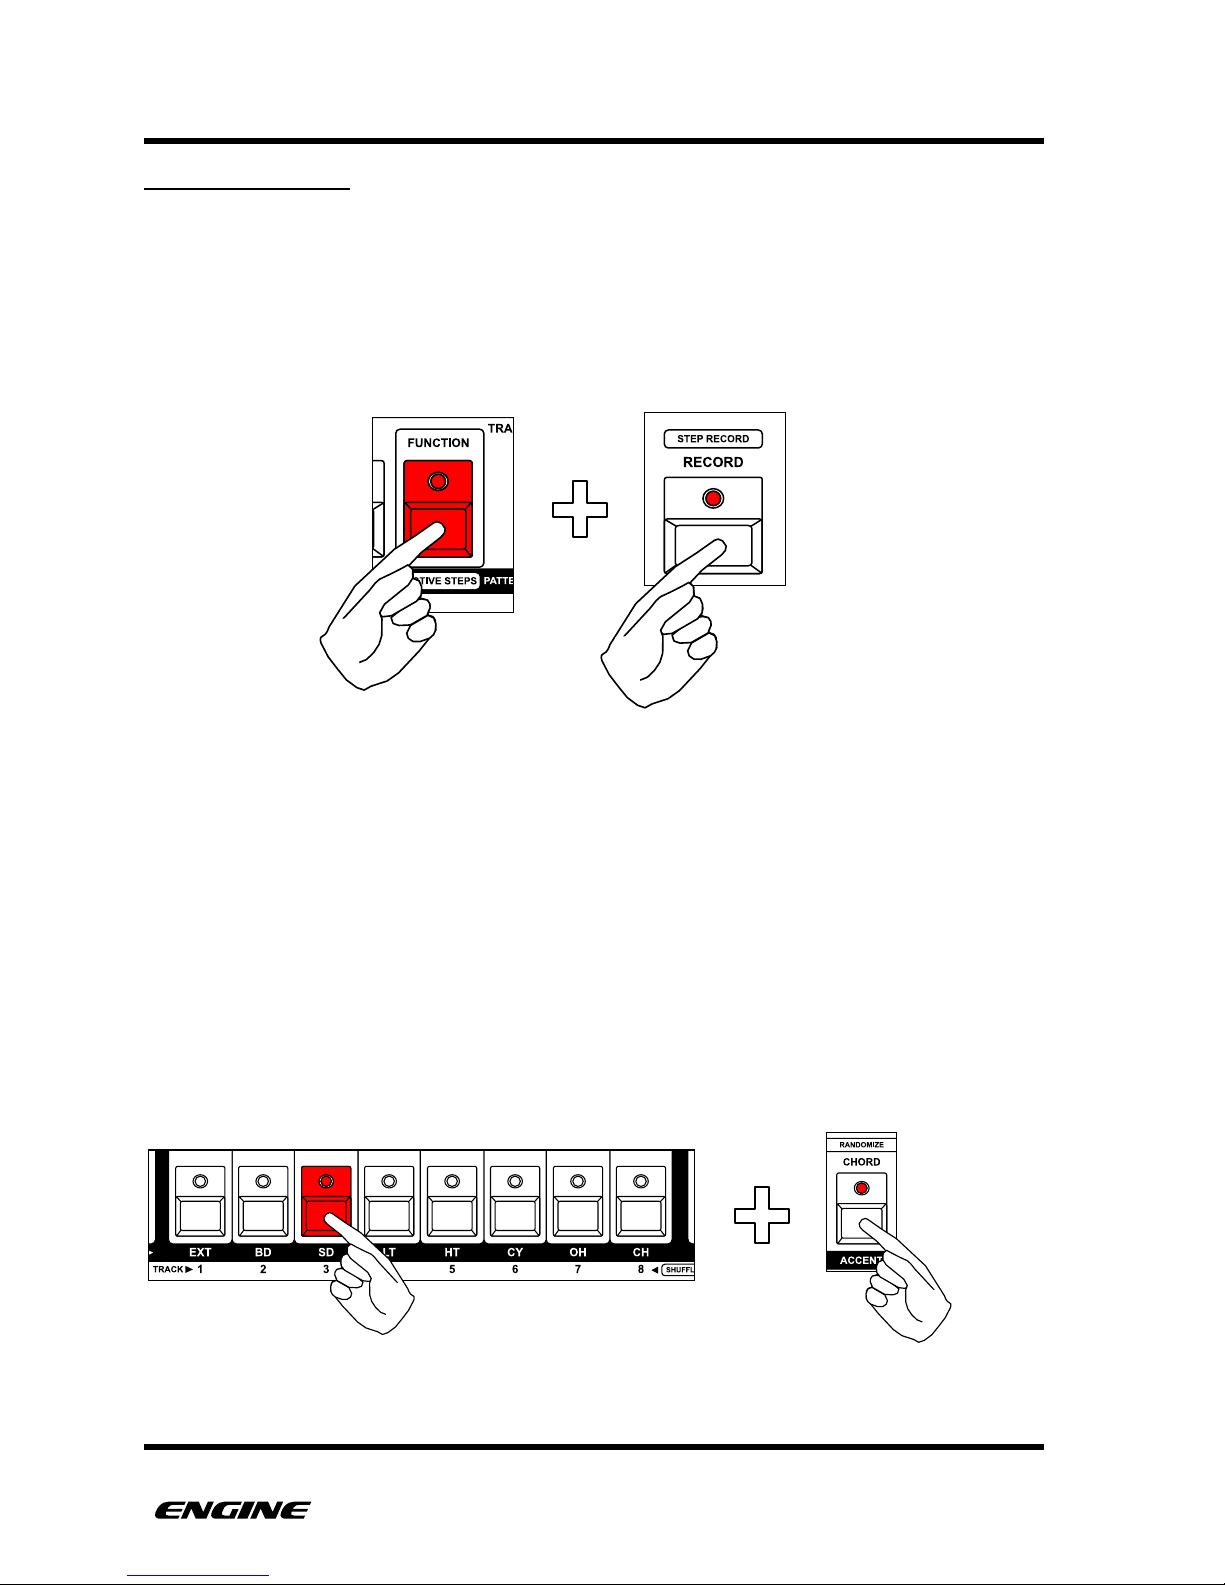
To enter STEP RECORD, press and hold (or double click) the FUNCTION button, then
click the RECORD button. Both the FUNCTION and RECORD LEDs will blink to indicate
you are in STEP RECORD mode.
The current step location is indicated on the pattern step buttons with a bright blinking
LED. You can begin entering step events from the beginning of the sequence immediately
or you can jump to a particular step by clicking a pattern step button.
In STEP RECORD mode, the white buttons of the mini-keyboard function as drum pads for
the 8 drum instruments. To enter triggers, click the white buttons of the mini keyboard
buttons, the step will automatically advance to the next step.
If you hold down multiple drum instrument buttons simultaneously, you can add drum
triggers for multiple instruments on the same step.
You can also add ACCENT to a step by clicking the ACCENT button while holding the
drum instrument button.
USER GUIDE 52
Page 62
PATTERNS
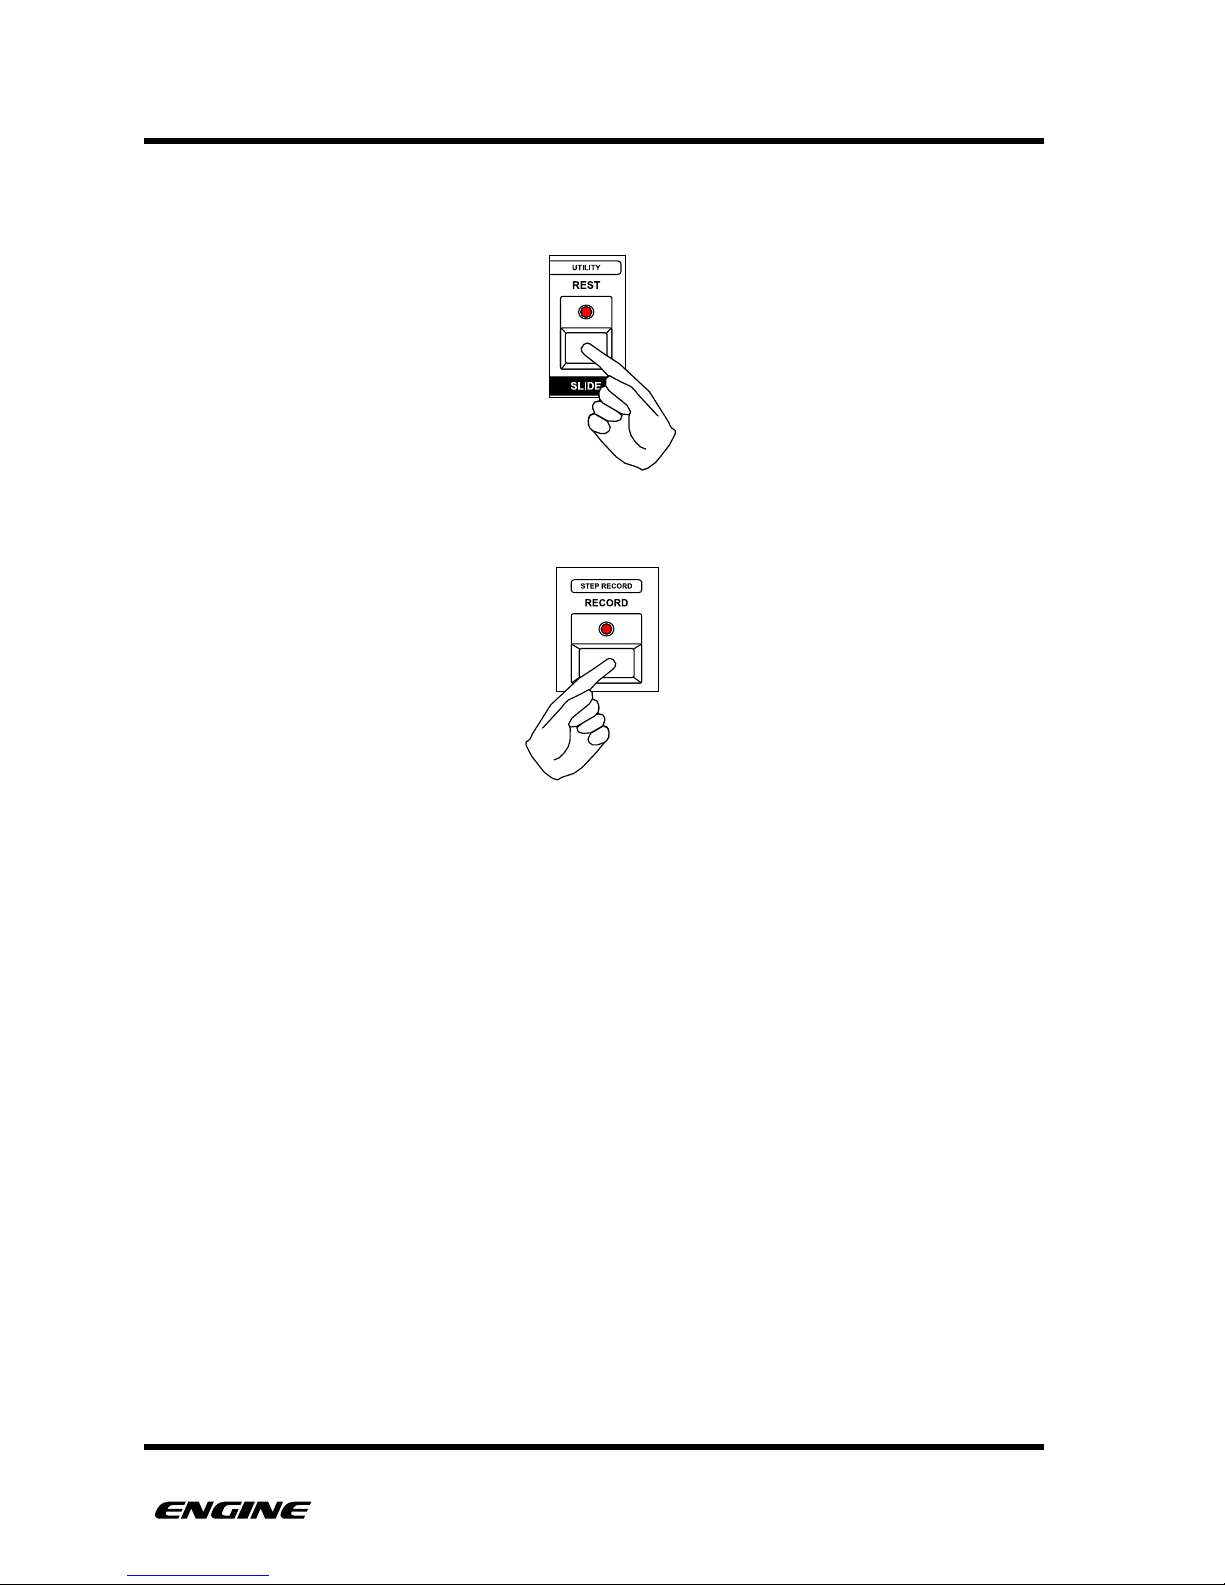
To enter a REST event, click the REST button, any existing event will be erased from the
current step.
To advance one step without entering any new data, click the RECORD button.
To leave STEP RECORD mode, click the FUNCTION button.
USER GUIDE 53
Page 63
PATTERNS
MUTING DRUM INSTRUMENTS
Individual drum instruments can be muted within a DRUM type pattern to create pattern
variations.
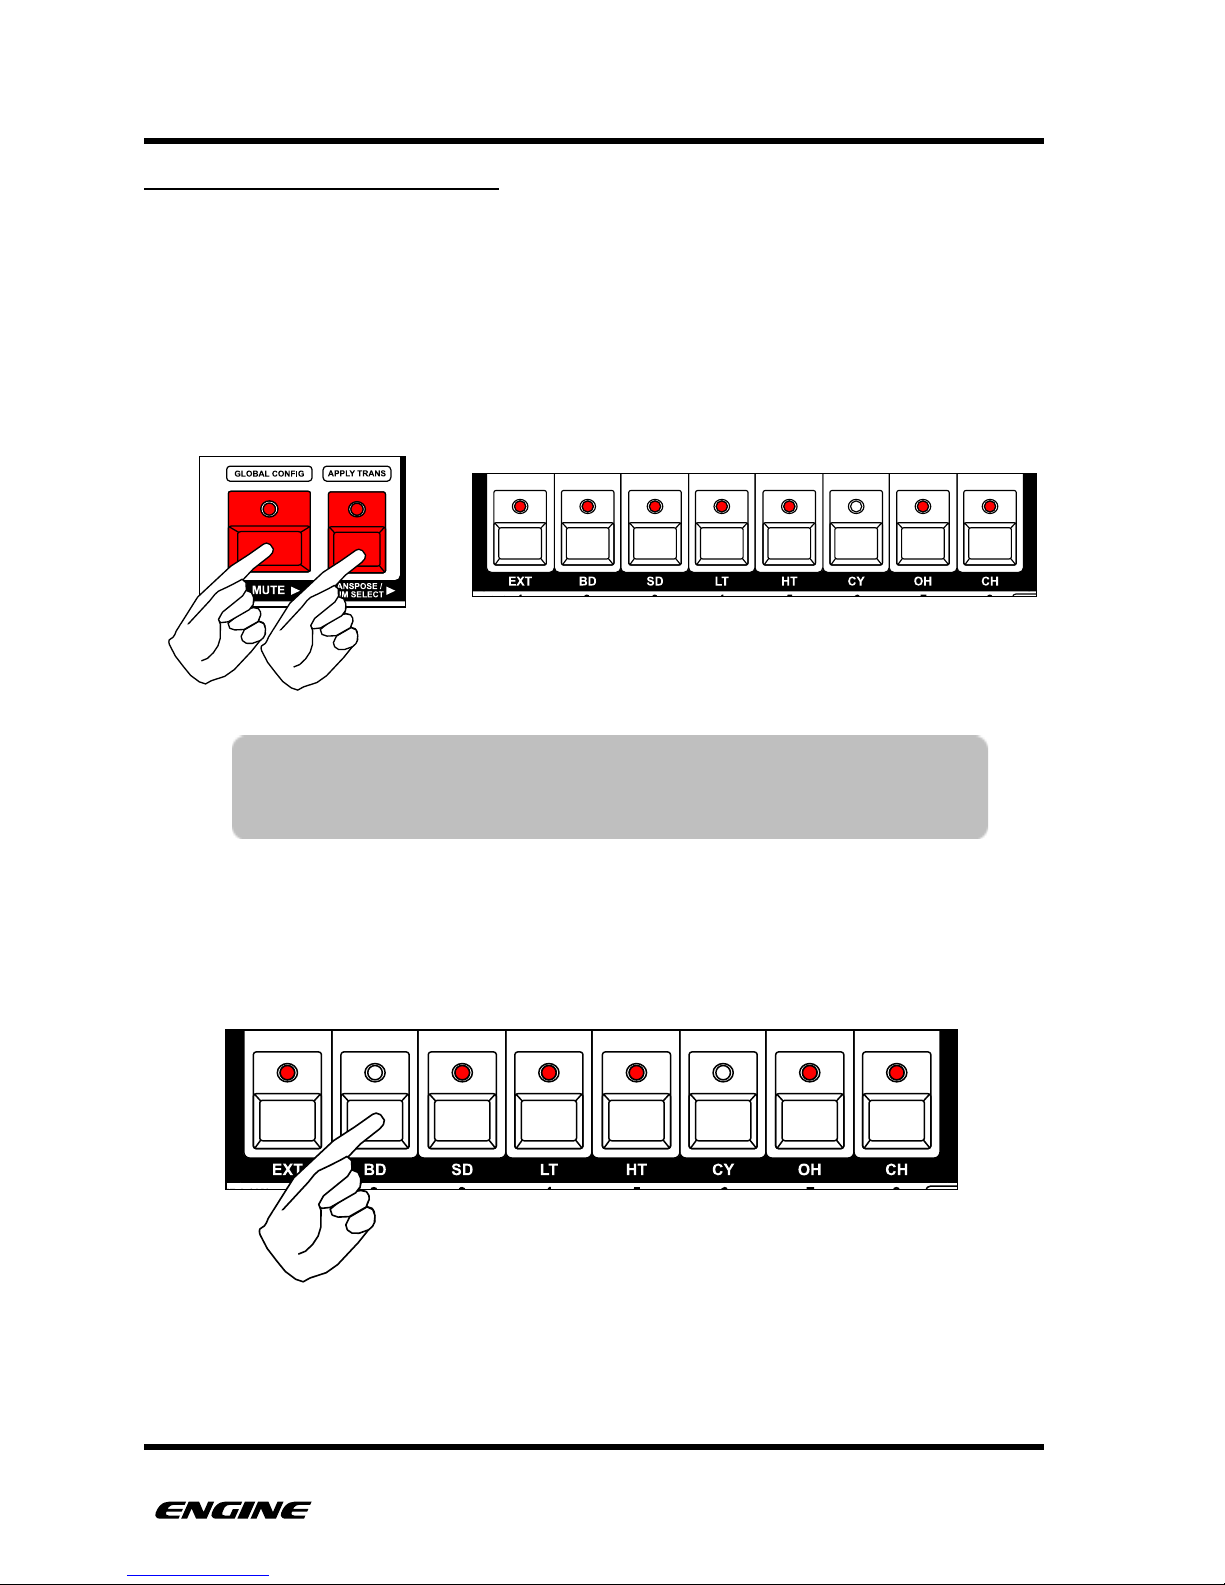
To enter drum instrument mute mode, first press and hold (or double click) the
TRANSPOSE/DRUM SELECT button, then press and hold (or double click) the MUTE
button. The current mute status for each drum instrument is shown on the LEDs of the
eight white mini keyboard buttons. Unmuted instruments are shown as lit LEDs, while
muted instruments are shown as unlit LEDs.
To change the drum instrument mutes, while in drum instrument mute mode, click the white
mini keyboard buttons to mute or unmute instruments.
USER GUIDE 54
TIP: The MUTE and DRUM SELECT buttons can be double clicked to
pin the instrument mute function. This is useful for live performance
when muting and unmuting individual drum instruments.
The CYMBAL instrument is muted
Page 64
PATTERNS
SOLOING DRUM INSTRUMENTS
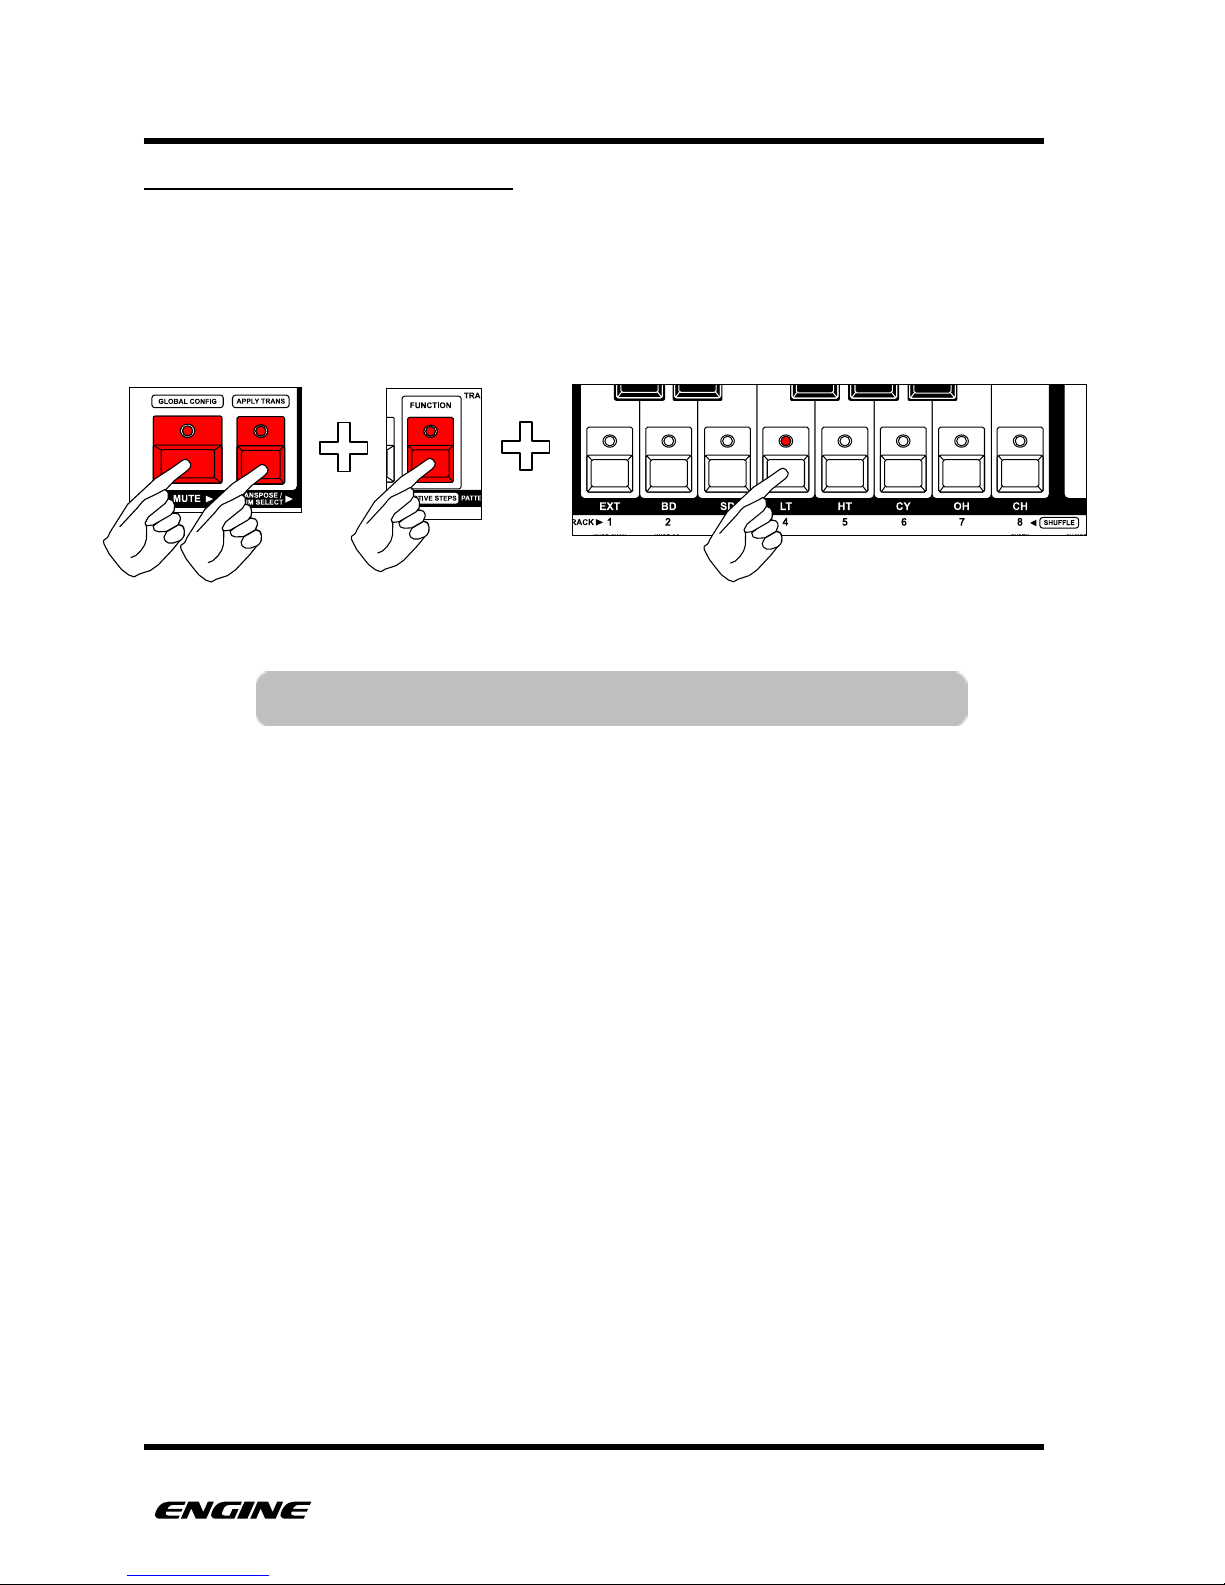
A single drum instrument can be soloed, which will mute all other instruments. To solo a
drum instrument, while in DRUM INSTRUMENT MUTE mode, press and hold the
FUNCTION button, then click the drum instrument you wish to solo. The selected
instrument will be unmuted, all other instruments will be muted.
USER GUIDE 55
NOTE: Soloing a drum instrument does not effect TRACK MUTES.
The LOW TOM instrument is soloed
Page 65
PATTERNS
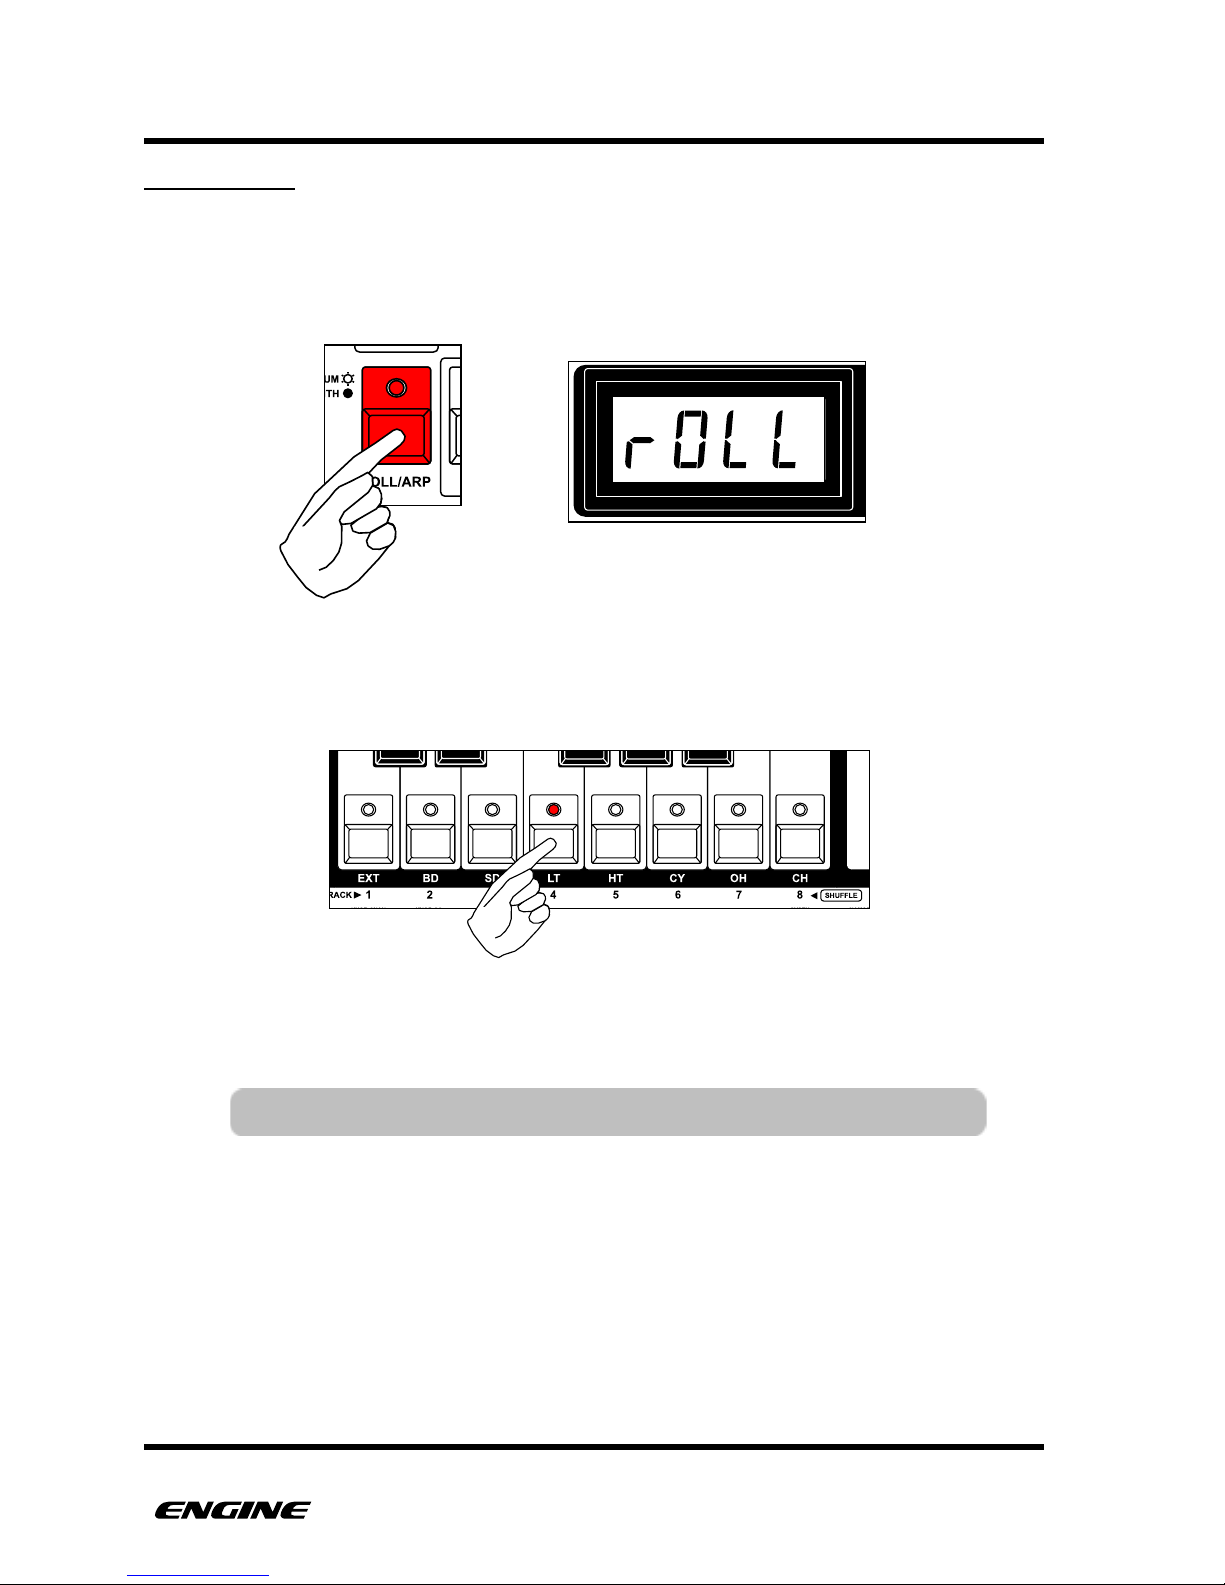
DRUM ROLLS
Drum type patterns include a DRUM ROLL function than can be used for realtime
performance or recorded directly into the pattern sequence.
To enter DRUM ROLL mode, press and hold (or double-click) the ROLL/ARP button.
While in DRUM ROLL mode, the white mini keyboard buttons can be used to play drum
rolls for each of the eight drum instruments. The ACCENT button can also be pressed to
add accents in realtime.
While playing a drum roll, the sequenced pattern for that instrument is overridden. When
the drum roll is released, the sequenced pattern resumes.
USER GUIDE 56
TIP: Drum rolls can also be played using an external MIDI controller.
Page 66
PATTERNS
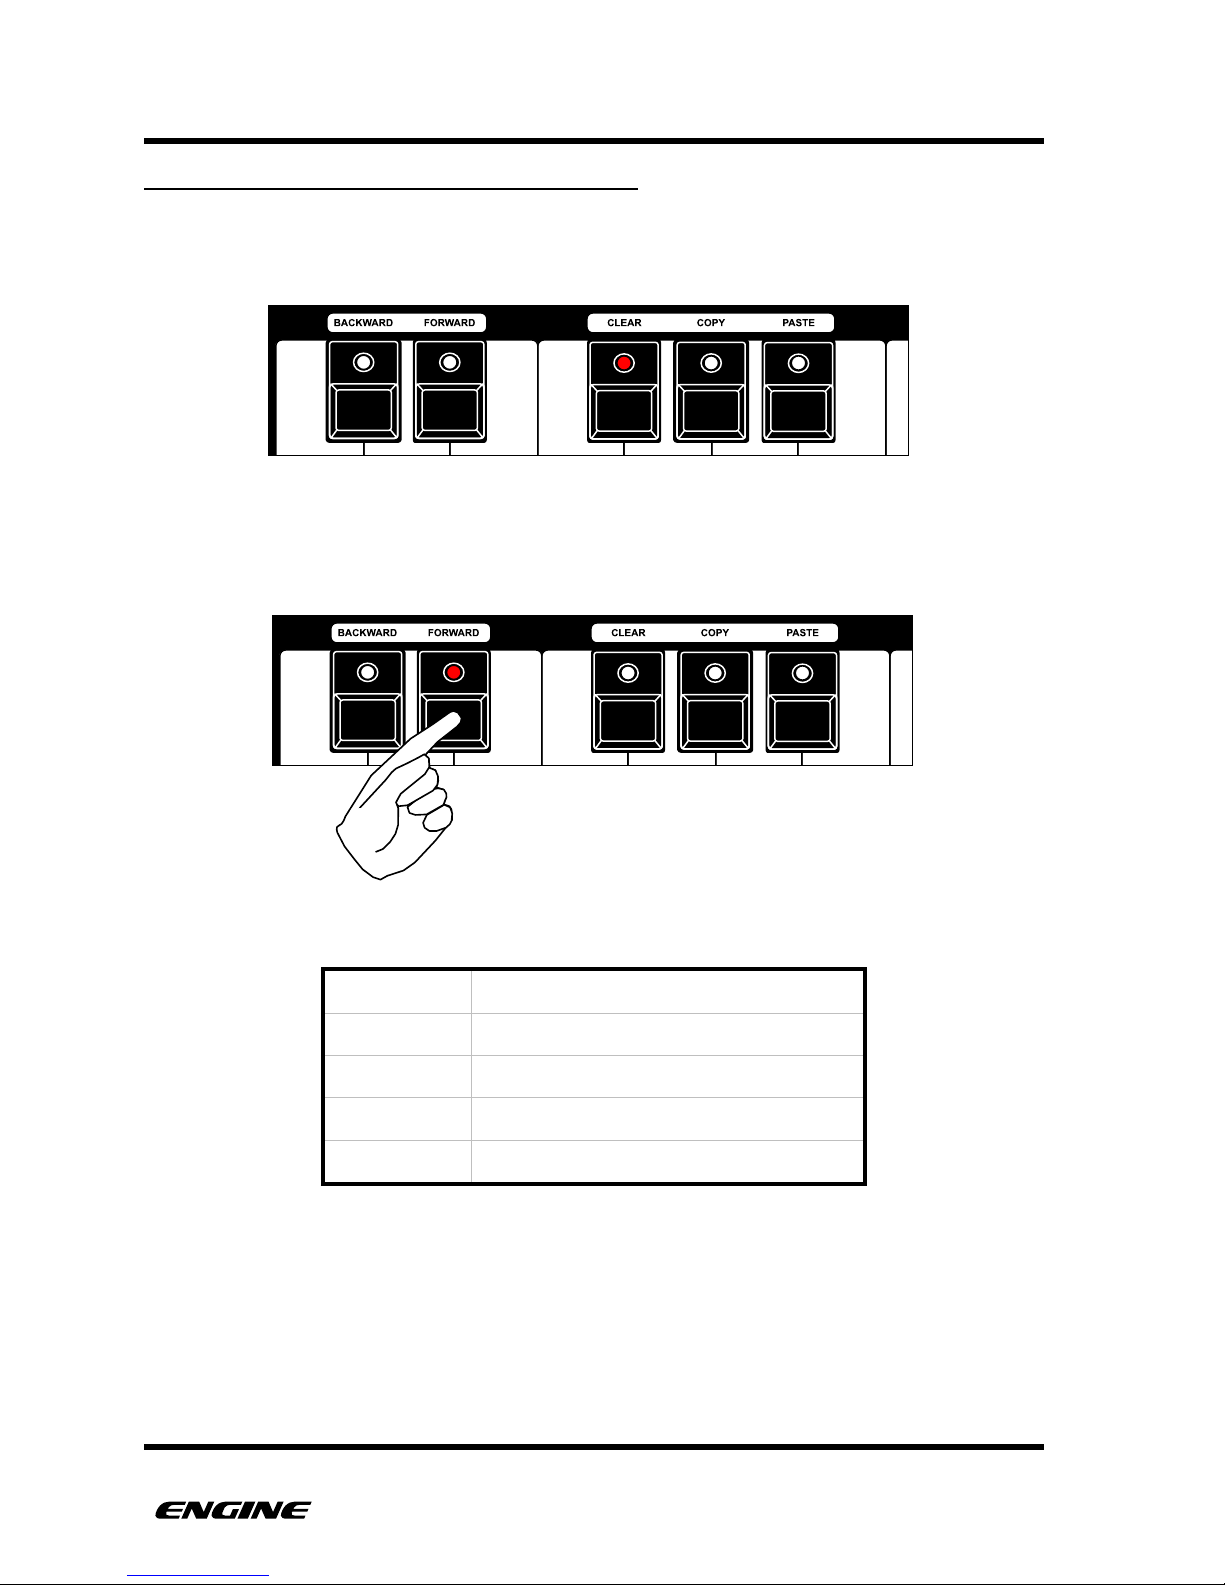
CHANGING THE DRUM ROLL RESOLUTION
The resolution of the DRUM ROLL can be changed to create interesting variations. The
current resolution will be displayed on the LEDs of the black mini-keyboard buttons.
To change the drum roll resolution, while in DRUM ROLL mode, press any of the black
mini keyboard buttons.
The available resolutions (in relation to a 4/4 16th note pattern):
OFF
C sharp button
32nd notes
D sharp button
16th no tes
E sharp button (default)
8th notes
F sharp button
Quarter notes
A sharp button
USER GUIDE 57
Page 67
PATTERNS
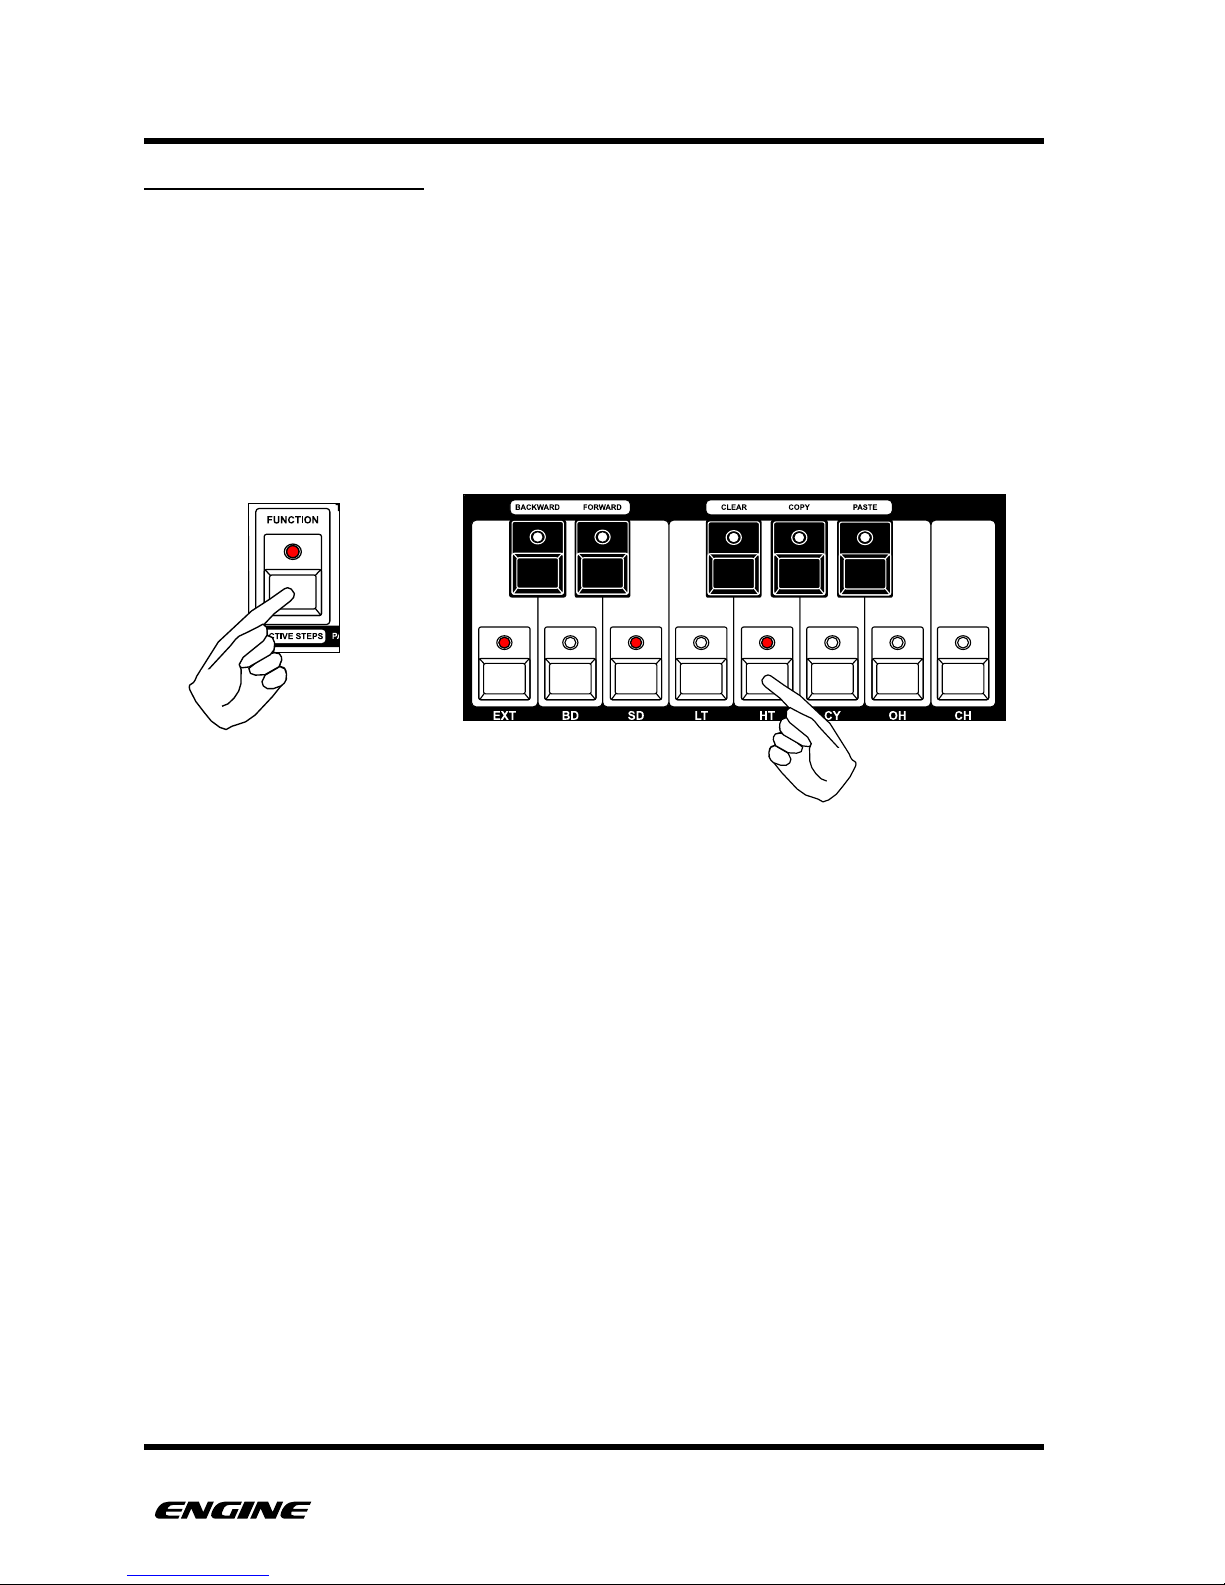
LATCHING DRUM ROLLS
While a drum roll is playing, you can latch the roll. When a drum roll is latched, it will
continue to play, even when leaving ROLL mode.
You can add additional instruments or remove instruments from the drum roll while the roll
is latched, by clicking the buttons of the mini keyboard.
To latch the roll, click the FUNCTION button. To unlatch the roll, click the FUNCTION
button again.
USER GUIDE 58
Page 68
PATTERNS
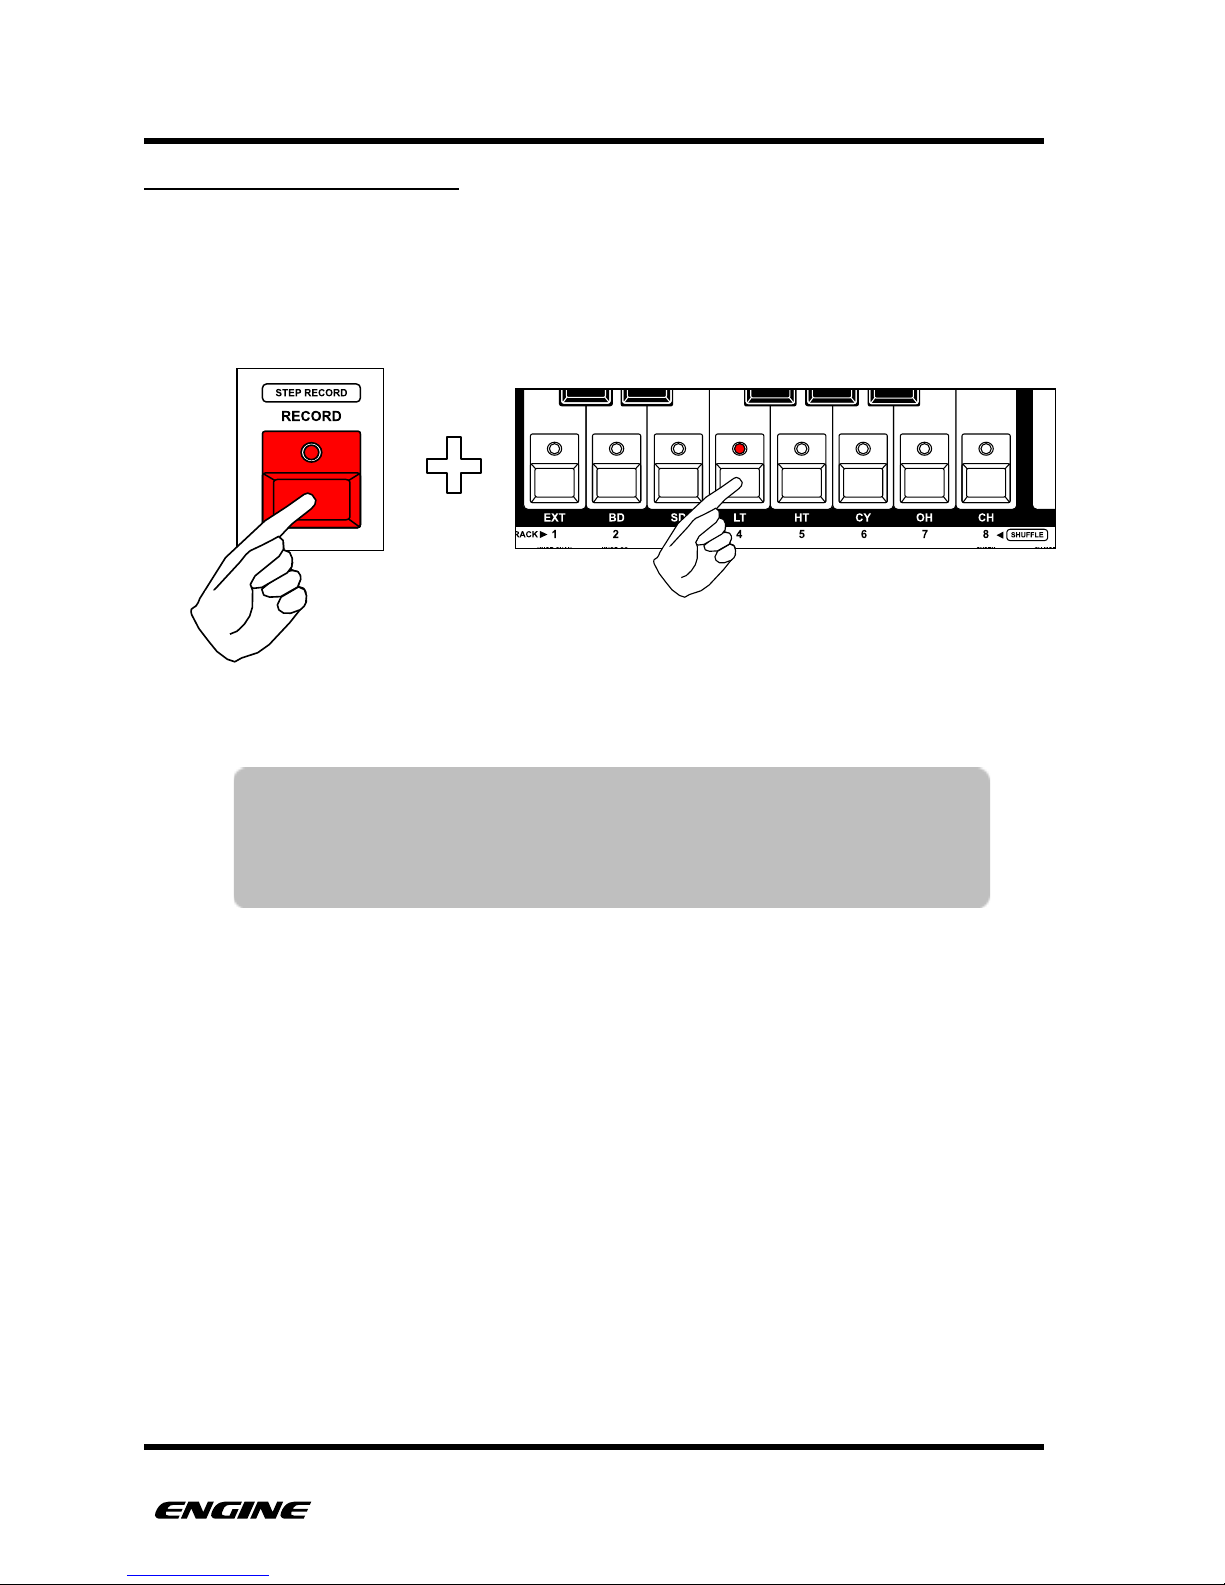
RECORDING A DRUM ROLL
If you find an interesting drum roll, you can instantly record it directly into the pattern. To
record a drum roll, while in DRUM ROLL mode, press and hold (or double-click) the
RECORD button. Momentary recording of a drum roll can create interesting musical
combinations in the sequenced pattern.
USER GUIDE 59
NOTE: Drum rolls cannot be recorded at a higher resolution than the
timing scale of the pattern. This means that a 32nd note roll will
only be recorded as 16th notes in a 4/4 16th note pattern. The
other notes of the drum roll will be ignored.
Page 69
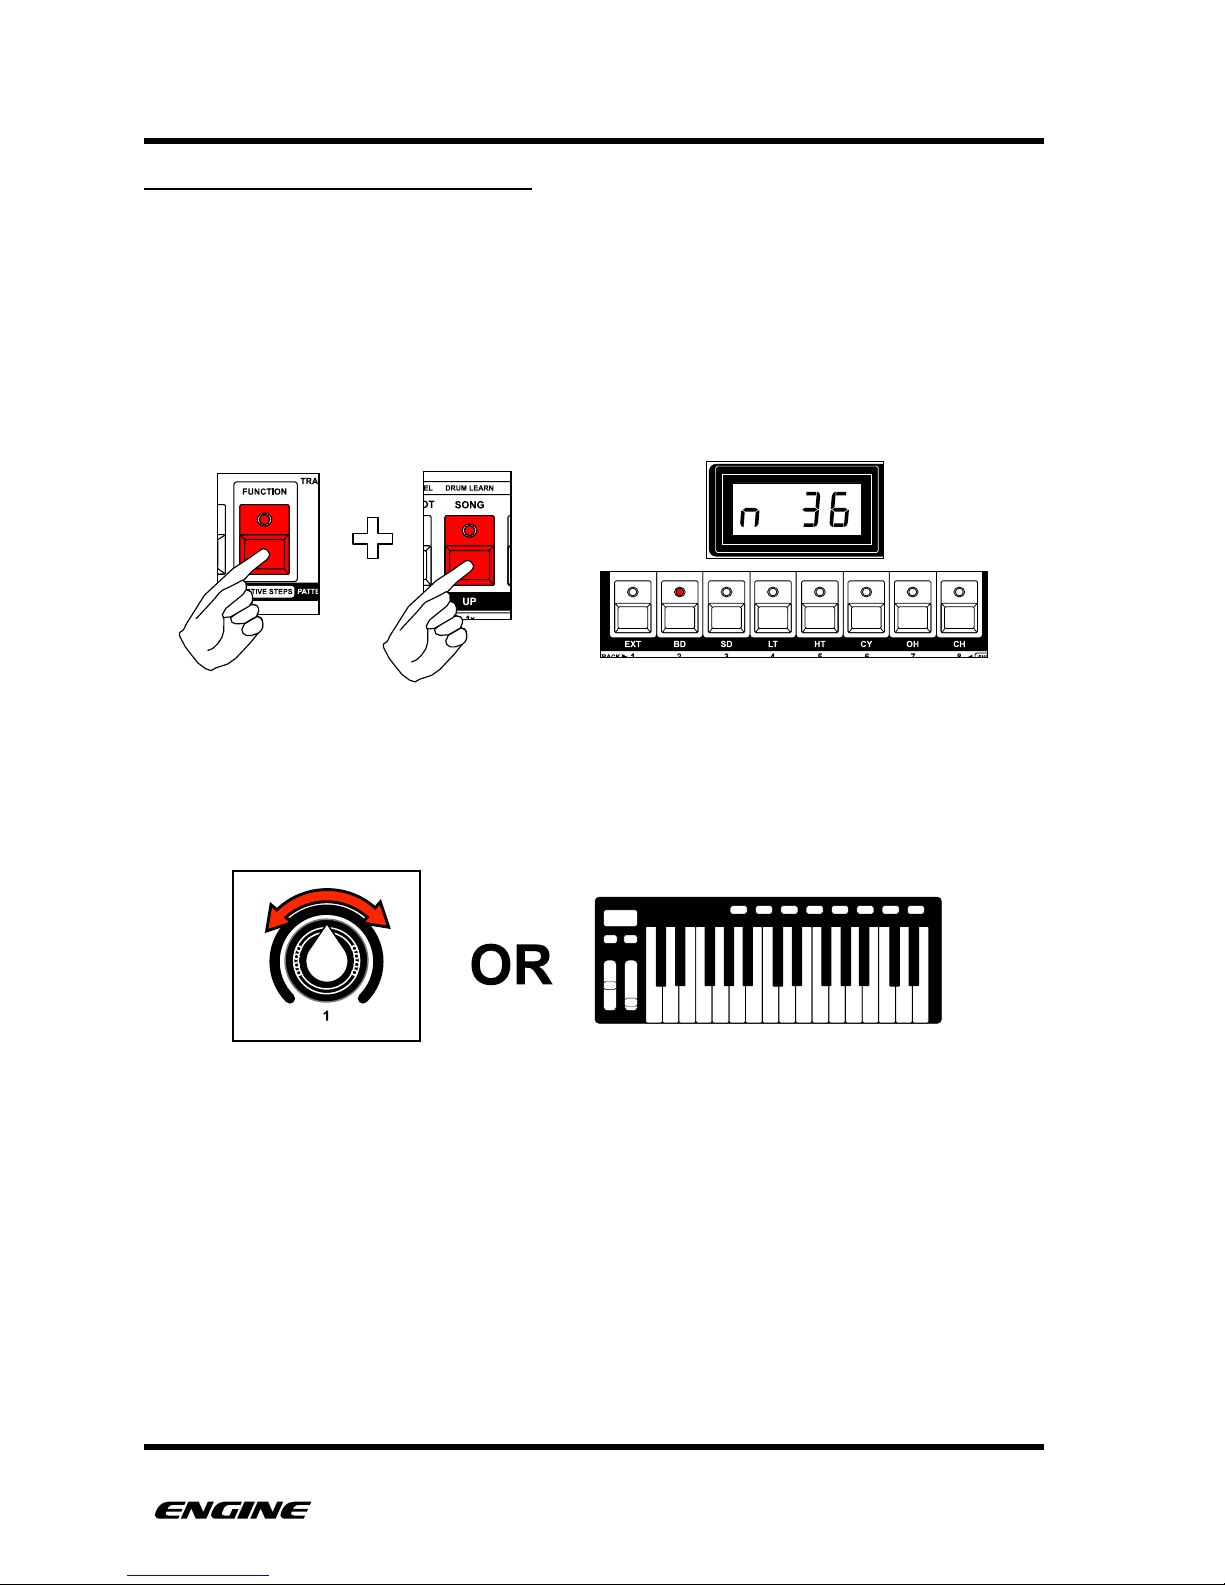
PATTERNS
SETTING DRUM NOTE MAPPINGS
By default, the note values for the drum instruments map to the standard GM notes for a
drum kit. The assigned notes for each drum instrument can be changed per track in
DRUM LEARN mode.
To enter DRUM LEARN mode, press and hold (or double click) the FUNCTION button
and then press and hold the DRUM LEARN (song) button. The current selected drum
instrument is shown on the white keys of the mini keyboard and the current note
assignment for the selected instrument is shown on the LED display.
To change the note assignment, while in DRUM LEARN mode, turn control knob 1 or send
a MIDI note from an external MIDI controller.
Use the white mini keyboard buttons to switch instruments while in DRUM LEARN mode,
to quickly set the MIDI note for multiple instruments.
USER GUIDE 60
The BASS DRUM instrument is set to note number 36
Page 70
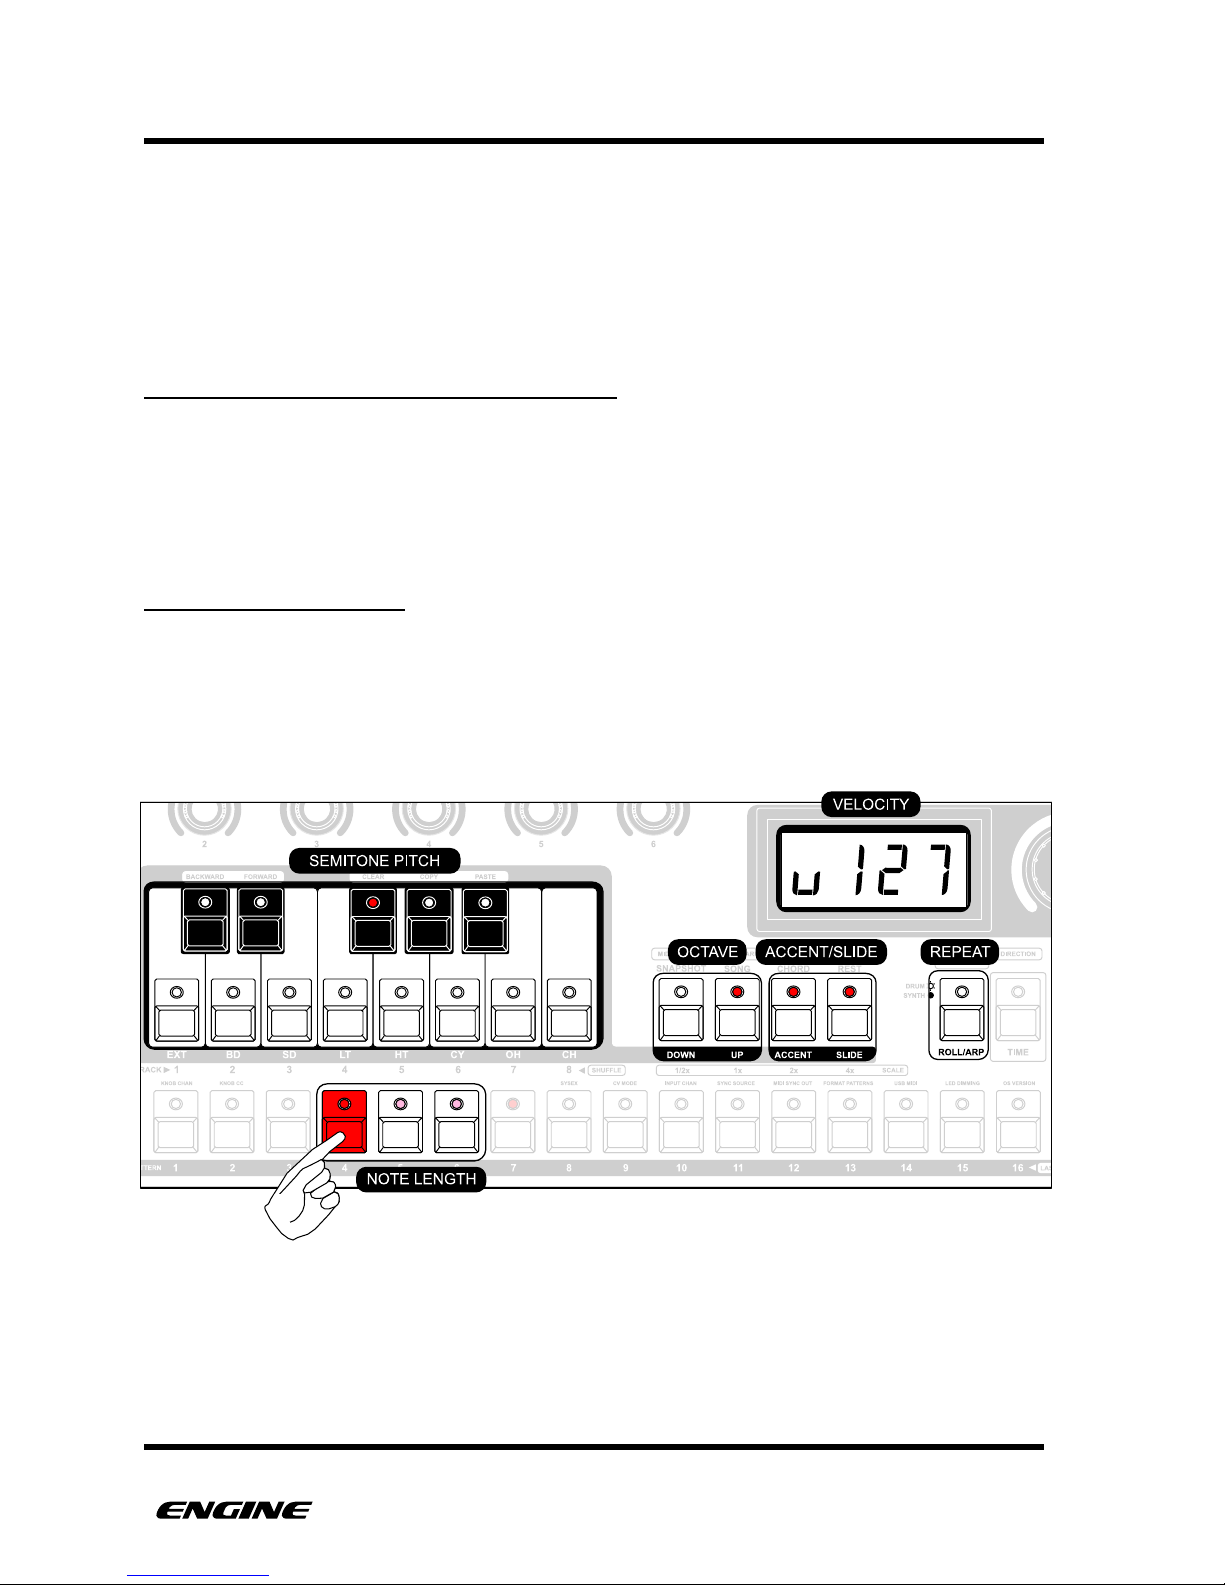
PATTERNS
SYNTH TYPE PATTERNS
Synth type patterns store the pitches, length and velocity of each step, making them well
suited for programming melodic sequences. Synth type patterns are polyphonic up to
four notes and they can use the CHORD MEMORY function to automatically play
polyphonic chords over MIDI. "
PROGRAMMING A SYNTH TYPE PATTERN
Synth type patterns can be programmed using grid programming, step programming or
realtime recording. Each method has it's strengths, so you can choose the appropriate
method for your situation. Realtime recording and step recording can also be used
simultaneously with grid programming, allowing for very interactive sequencing.
GRID PROGRAMMING
Grid programming mode is the default mode and is always active, meaning that you
don’t need to enter record mode to use grid programming. Grid programming is the
"classic" method of entering notes using the pattern step buttons. You can see the
programmed steps and step lengths directly on the step LEDs. All of the step attributes
are visible and can be edited while holding down a step button.
USER GUIDE 61
Page 71
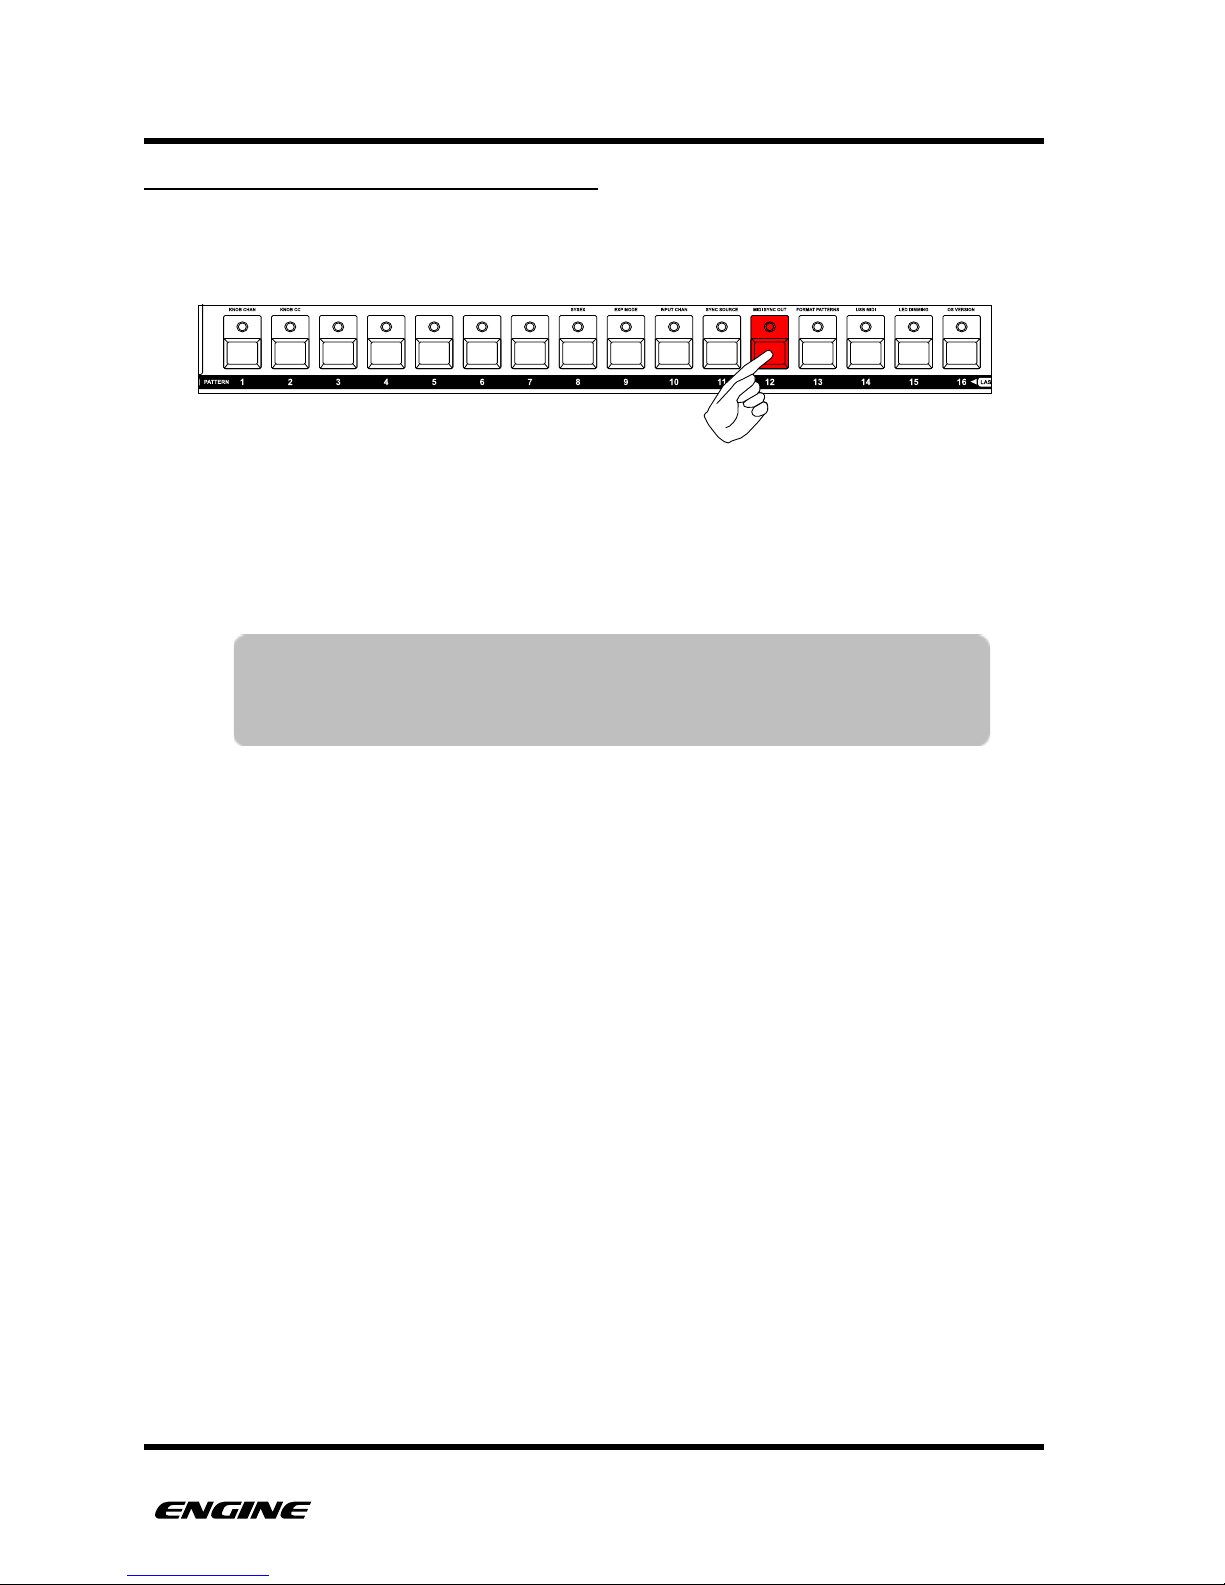
PATTERNS
ADDING OR REMOVING A STEP EVENT
To add a new step event, click the pattern step button where you wish to place the event.
Continue to hold down the step button to see and edit other attributes of the step.
To remove the step, you can quickly click the step button.
If you wish to edit an existing step, you can press and hold the step button and the step
will not be removed when releasing the step button.
USER GUIDE 62
TIP: When the sequencer is not playing, the pitch of the step will be
played as it is selected. This makes it easier to preview the
programmed notes.
Page 72
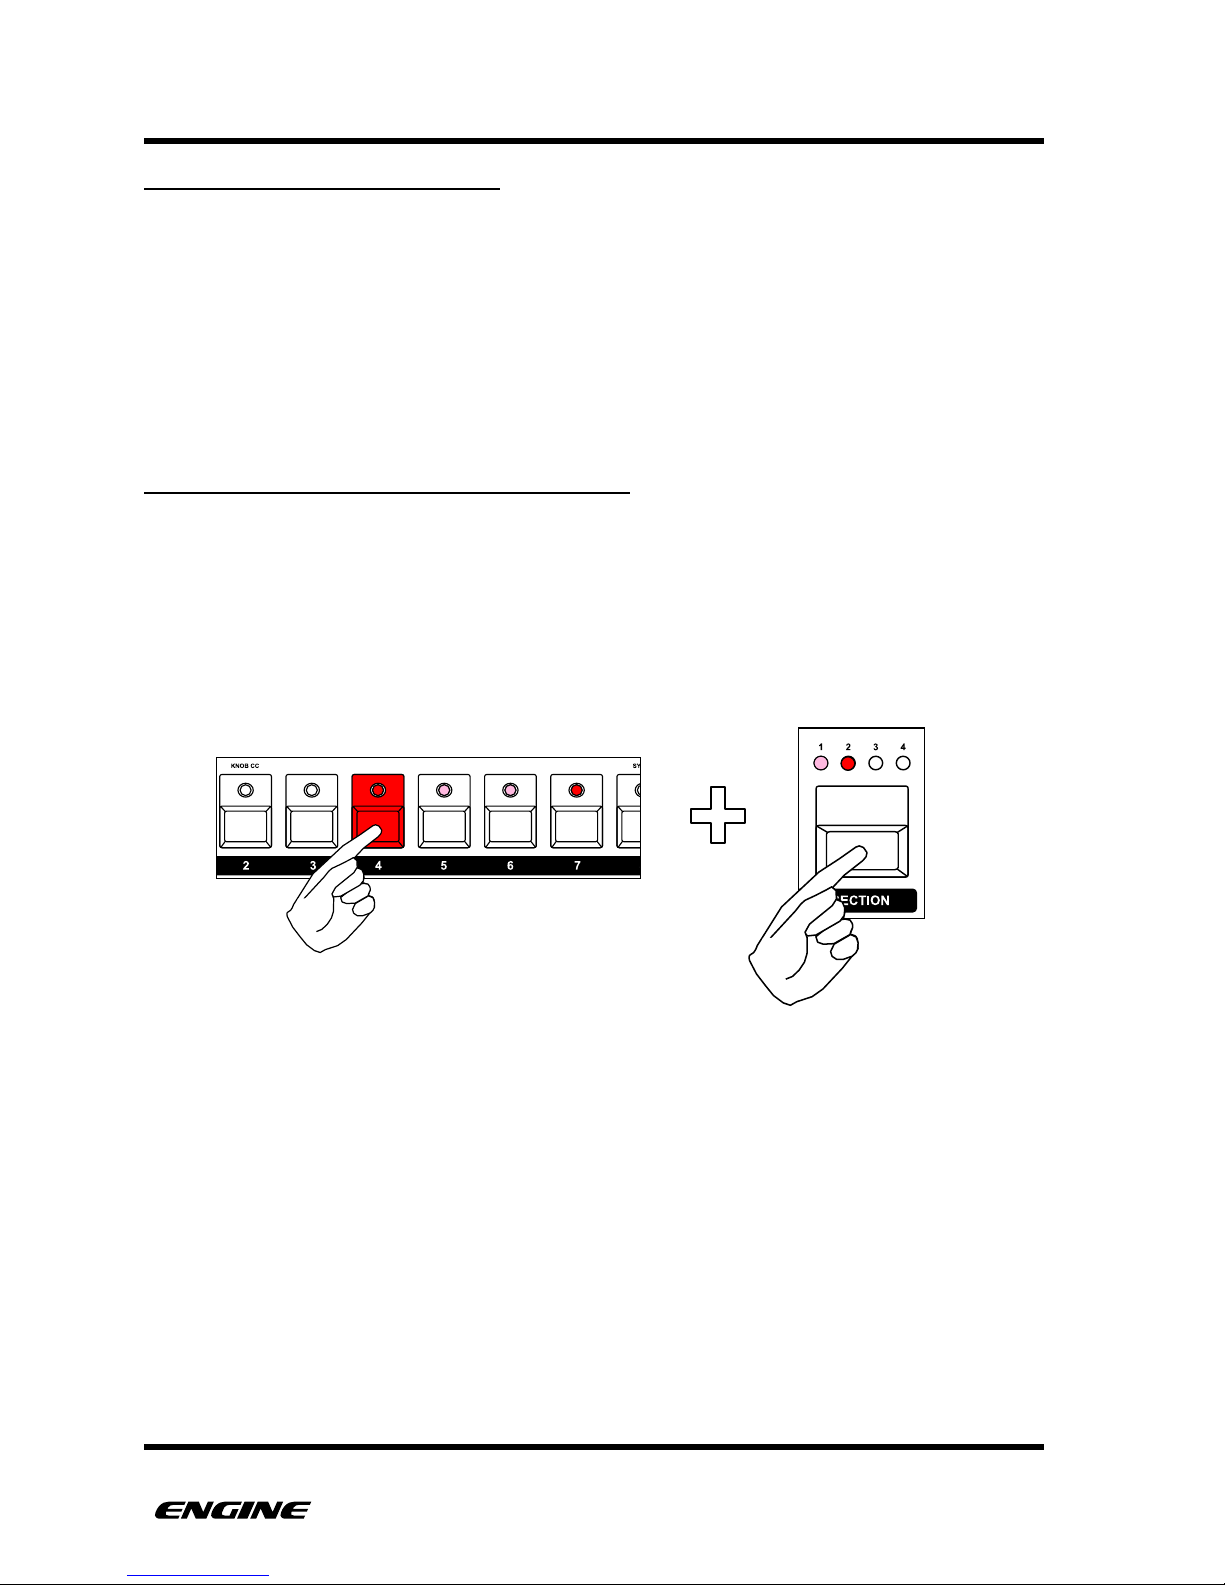
PATTERNS
POLYPHONIC PROGRAMMING
Each step can have separate pitches programmed in four available pitch slots. This allows
for programming chords or other polyphonic note data per step.
The velocity and gate length of the four pitch slots is shared, this means that setting
VELOCITY/ACCENT or GATE LENGTH/SLIDE for a step will effect all programmed pitch
slots.
The CV signal for a track is always related to pitch slot 1.
SELECTING THE PITCH SLOT TO PROGRAM
When initially pressing and holding a step button, PITCH SLOT 1 is selected. This is
displayed by a brightly lit SECTION 1 LED. If other pitch slots (2, 3 or 4) are currently
programmed, the corresponding SECTION LED will be lit dimly. Pitch slots that are not
programmed will have an unlit SECTION LED.
To select a different pitch slot, while holding a step button, click the SECTION button. This
will cycle between the four pitch slots.
When a pitch slot is selected, the programmed pitch will be shown on the mini-keyboard
and octave LEDs. If no pitch is programmed, the mini-keyboard will have no LEDs lit.
USER GUIDE 63
Page 73
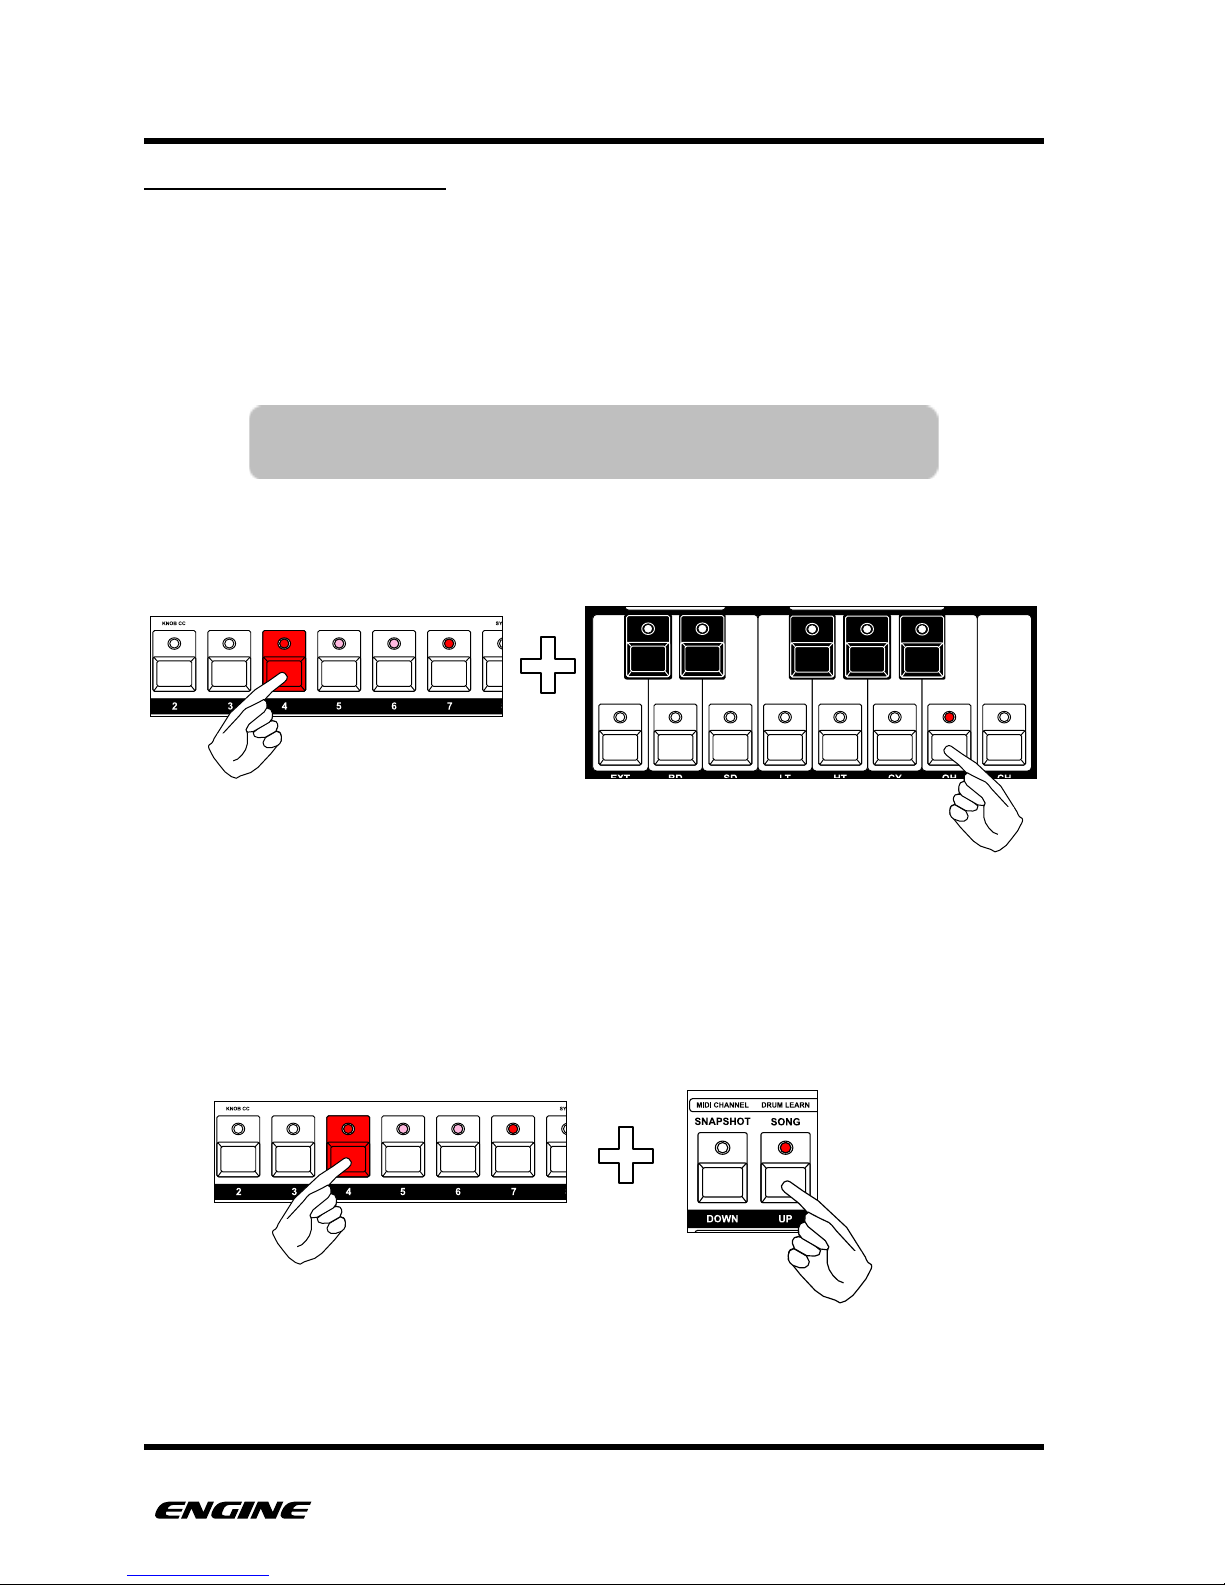
PATTERNS
CHANGING STEP PITCHES
While holding a step button, you can see and change the programmed pitch for the step.
The semitone pitch is displayed on the mini keyboard, while the octave of the note is
shown on the UP and DOWN octave LEDs to the right of the mini keyboard.
To change the step pitch, while holding the step button, press any semitone button on the
mini keyboard.
If PITCH SLOT 2, 3 or 4 is currently selected, you can deactivate the pitch by clicking the
mini-keyboard button for the current programmed semitone.
You cannot deactivate PITCH SLOT 1, it will always be played if the step is triggered.
To change the octave of the selected pitch slot, press the octave UP or DOWN buttons to
the right of the mini keyboard.
USER GUIDE 64
TIP: If pitch entry over MIDI is enabled for the selected track,
you can also set the step pitch using a MIDI controller.
Page 74
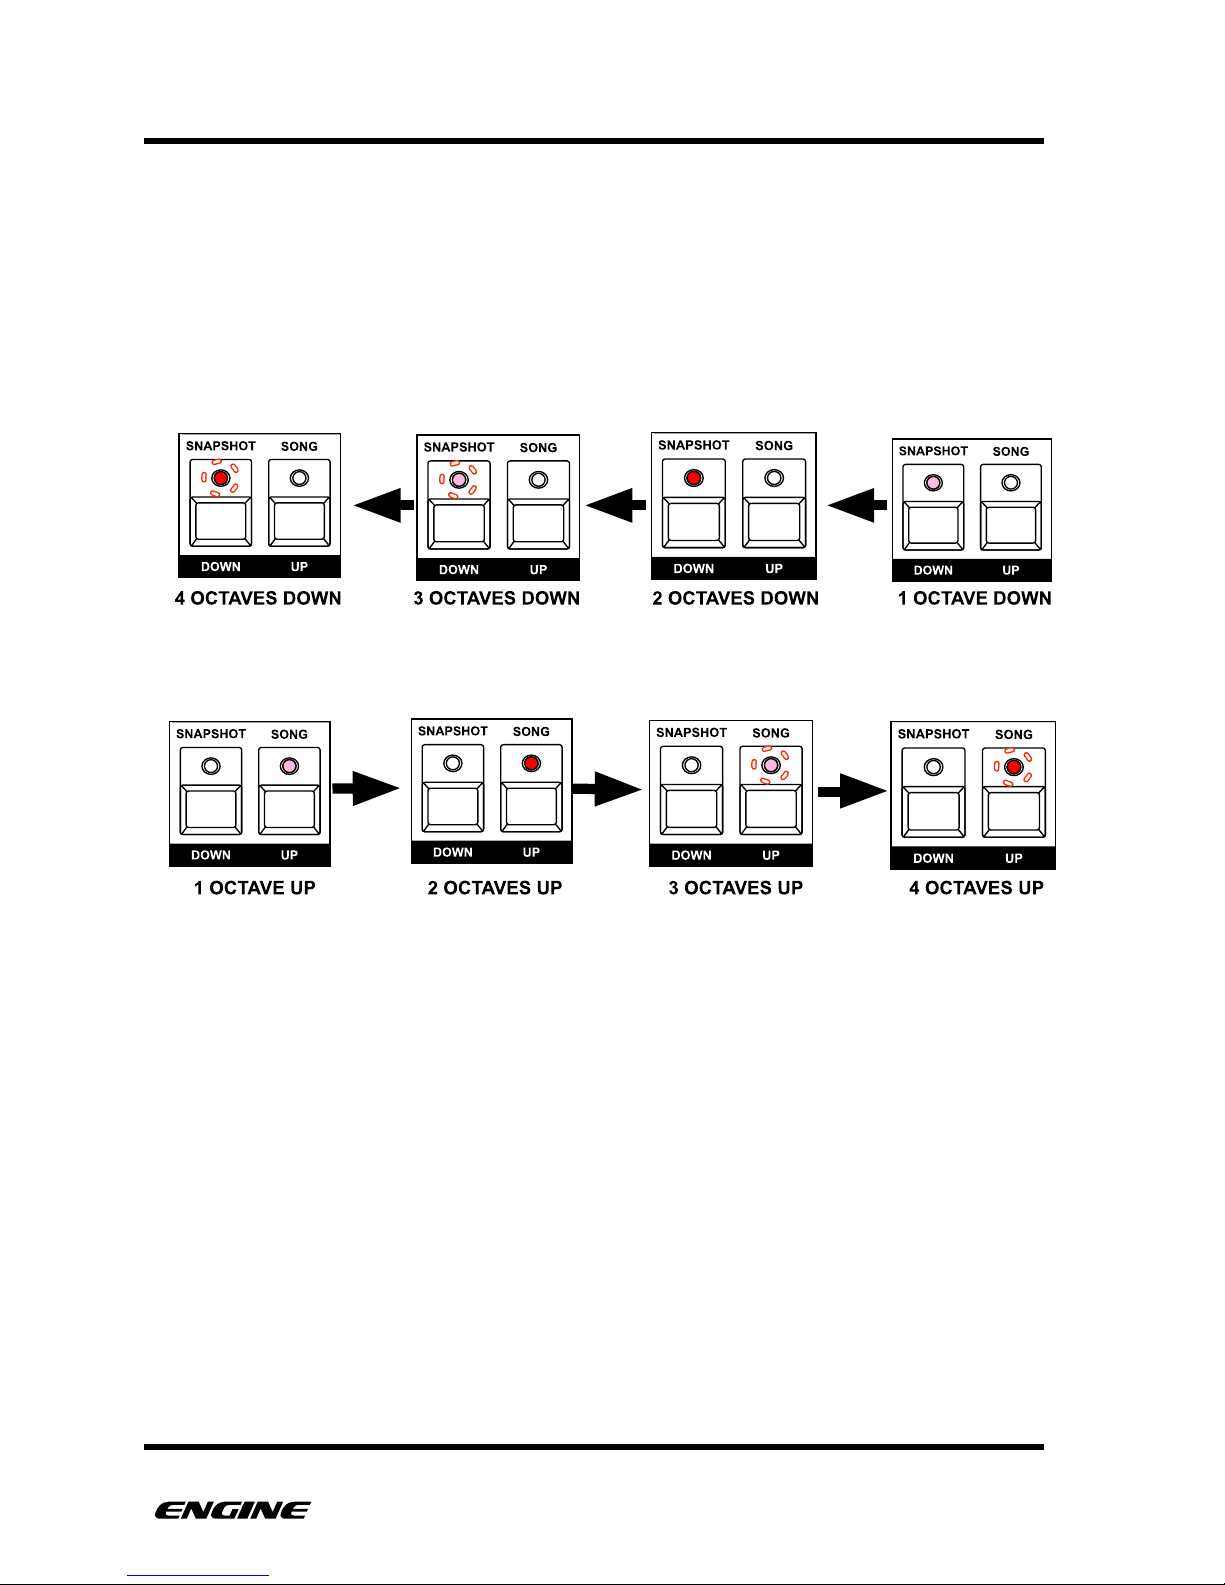
PATTERNS
You can select from nine octaves using the octave UP and DOWN buttons. The LEDs of
the octave buttons will light differently according to the selected octave. For example,
one octave down will light the DOWN LED dimly, two octaves down will light the DOWN
LED brightly, three octaves down will blink the DOWN LED dimly, four octaves down will
blink the DOWN LED brightly.
!
USER GUIDE 65
Page 75
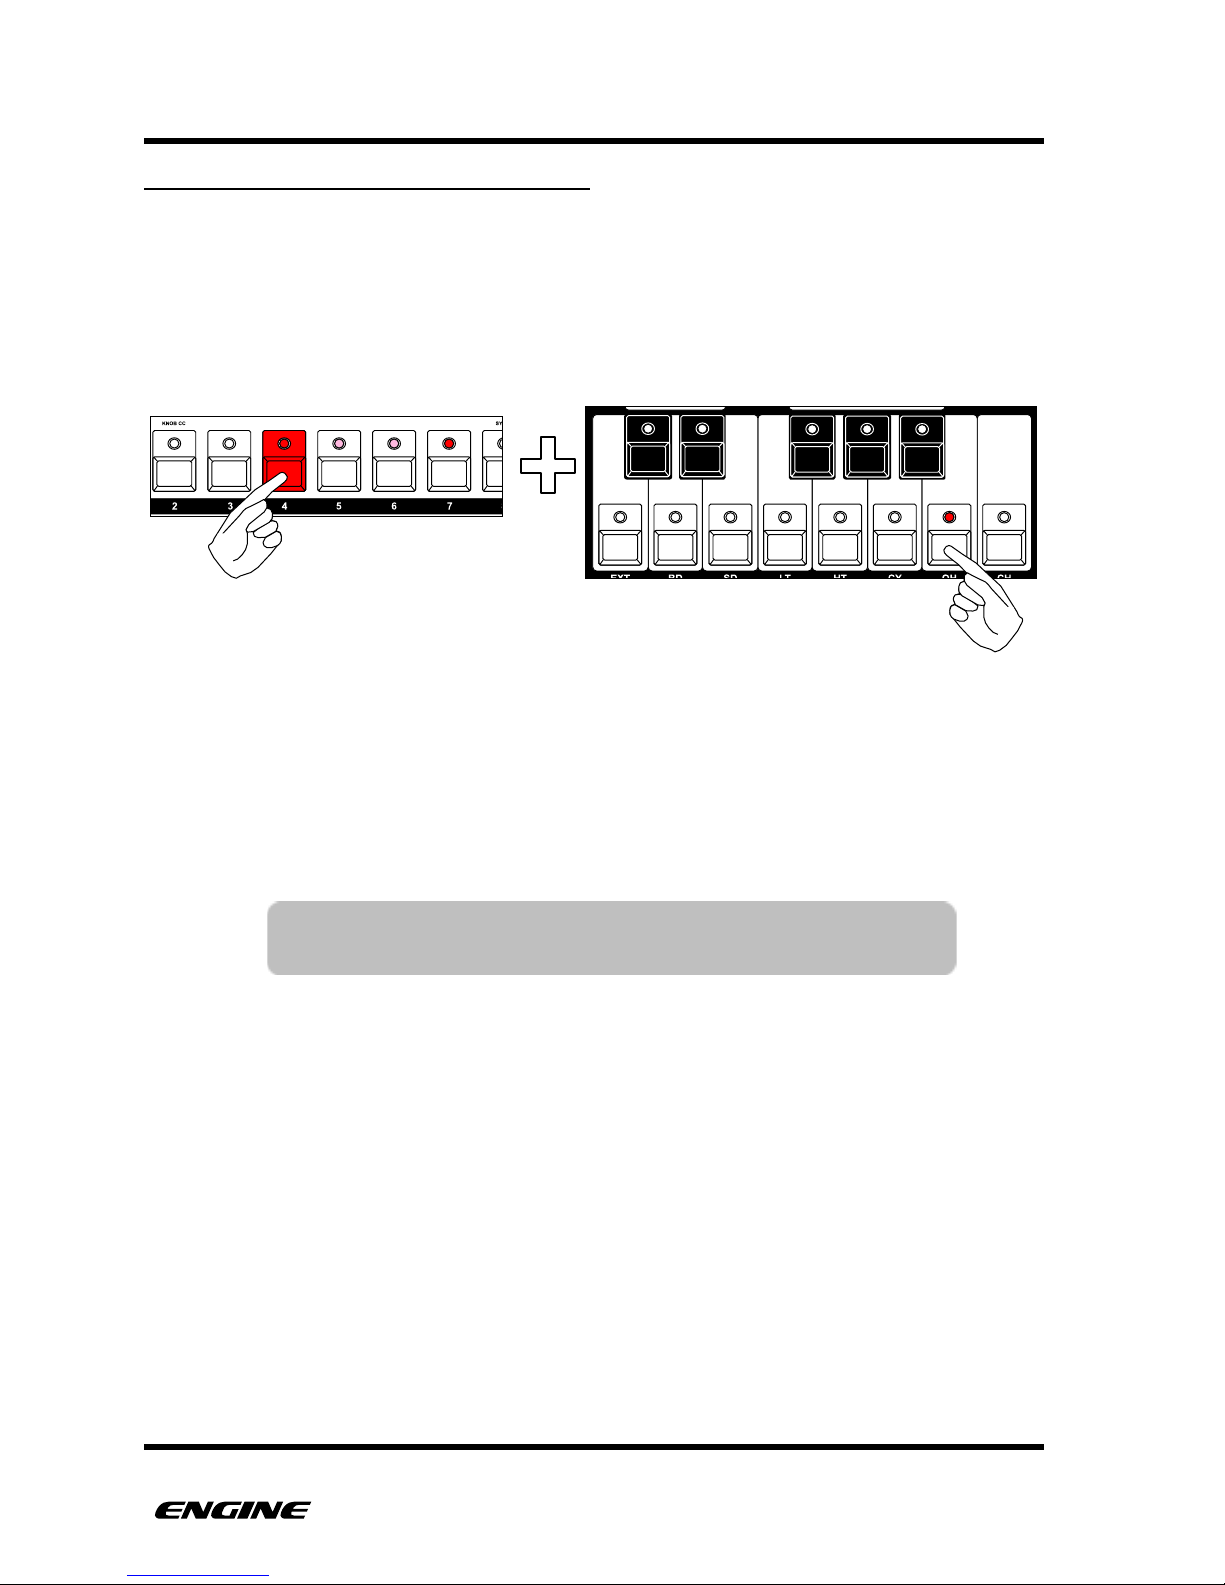
PATTERNS
QUICKLY ENTERING MULTIPLE PITCHES
If you wish to quickly enter a polyphonic step, while holding the the step button you can
press and hold multiple pitches on the mini-keyboard. This is useful for quickly entering
chords on a step.
Each additional keyboard button (up to four) will automatically increment the selected
pitch slot and store the pitch value.
When entering multiple pitches with this method, higher pitch slots will automatically be
deactivated.
For example, if the current step has four pitch slots programmed, and pitch slot one is
currently selected, then holding a second keyboard button will automatically enter pitch
slot two and deactivate pitch slots three and four.
USER GUIDE 66
TIP: This also works when setting the step pitch using a MIDI
controller.
Page 76
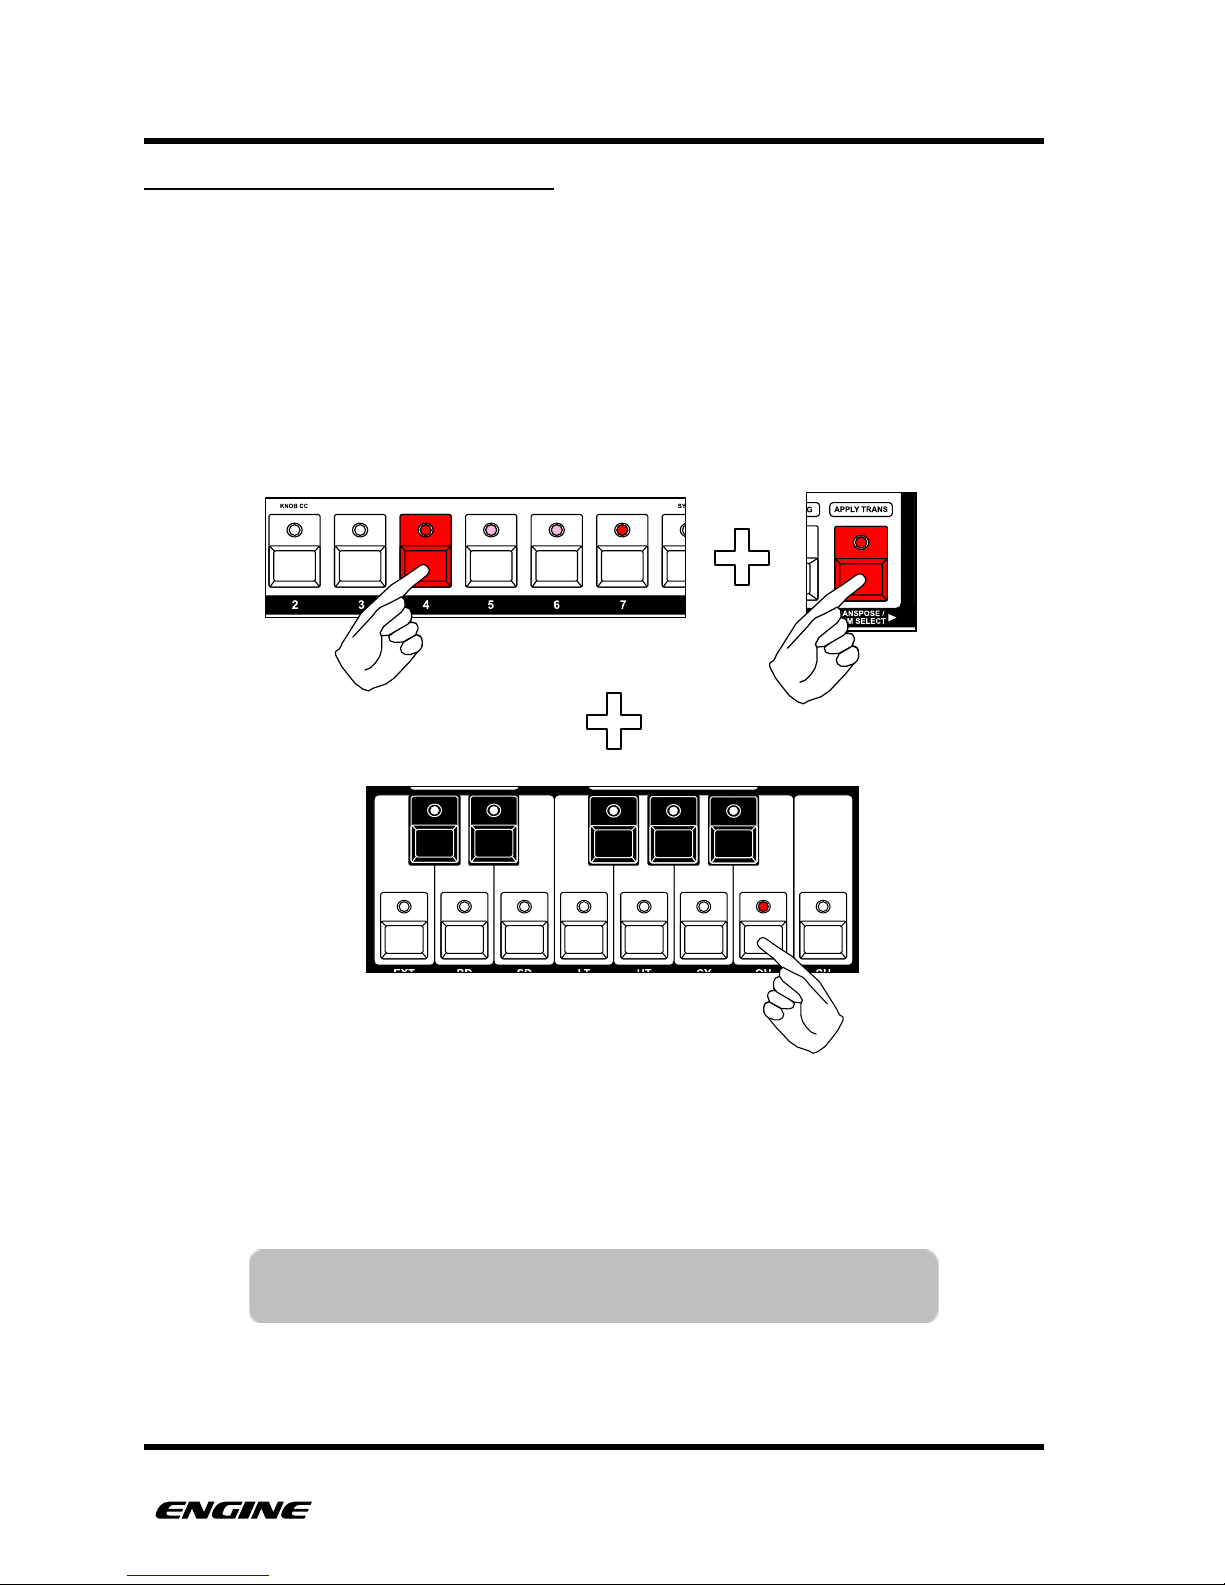
PATTERNS
TRANSPOSING POLYPHONIC STEPS
Sometimes you may wish to transpose all pitch slots at the same time, by the same
amount. The step transpose function allows you to do this.
The step transpose function uses the mini-keyboard and octave buttons to transpose all
pitches on the current step by semitones or octaves.
While holding a step button for grid programming, press and hold the TRANSPOSE
button. Click the buttons of the mini-keyboard or the octave up and down buttons to
transpose all active pitches on the step.
The keyboard LEDs will show the current selected pitch, but will apply any changes as an
offset to all pitches on the step.
USER GUIDE 67
TIP: This also works when setting the step pitch using a MIDI
controller.
Page 77
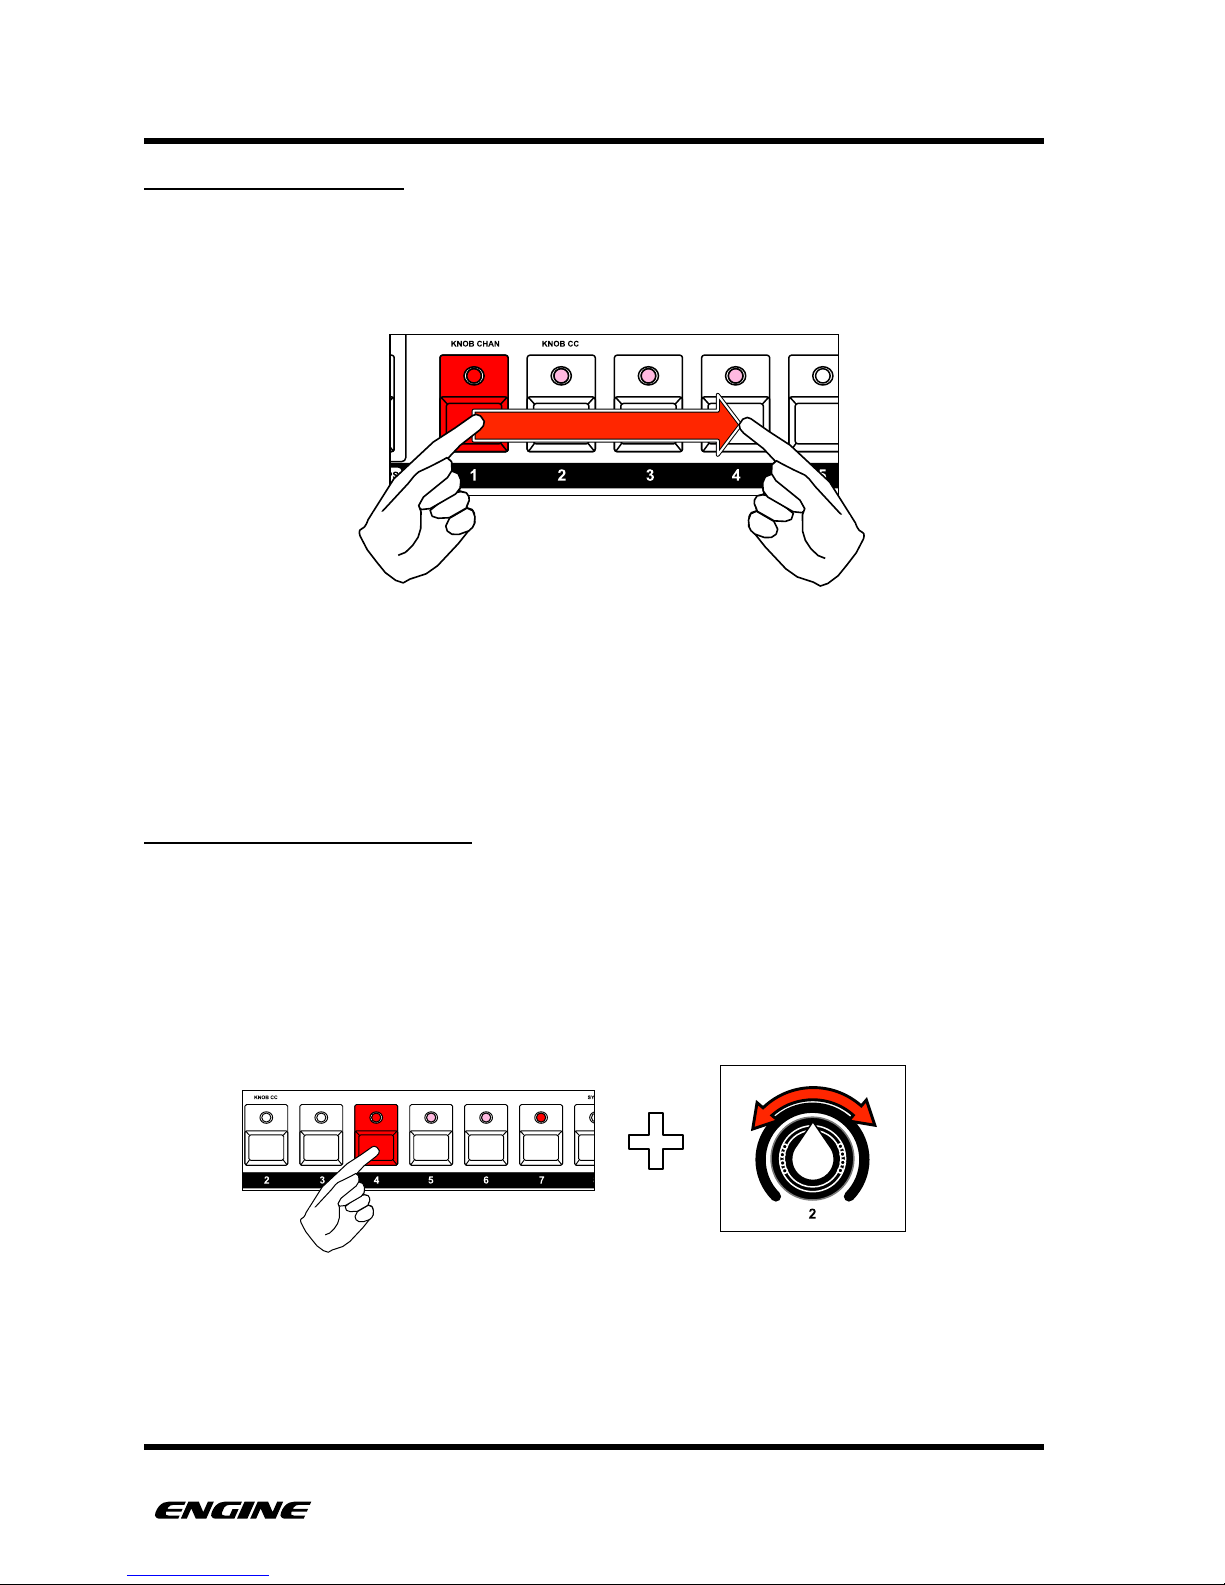
PATTERNS
SETTING STEP LENGTH
To set the overall length of a step, press and hold the step button and then click a second
step button. The beginning of the step is shown with a brightly lit step LED, and the length
of the note is shown by a chain of dimly lit step LEDs.
You can shorten the step by clicking a second step button closer to the start of the step.
To make the step one step long again, click the first step button to turn it off, and then
click it again to turn it back on. This removes any programmed step length."
FINE TUNING GATE LENGTH
The length of each step can be fine tuned to create longer or shorter note events. By
default a note is created with 50% gate length. This means that by default, a note
behaves the same as the sequencer on a TB-303.
You can change the gate length of any step by rotating control knob 2 while holding the
step button. The LED display will show the current gate length of the step in clock ticks.
USER GUIDE 68
Page 78

PATTERNS
If you turn the control knob completely clockwise, the note will be set to SLIDE, indicating
that the note length will overlap with the next note. The LED display will show “SLD”
when a note is set to slide.
When fine tuning the length of a note that extends over several steps, only the length of
the last step is modified. This means that you can fine tune the “tail” of a step even for
long notes.
The available resolution of note length changes with different time scales. For 1x scale,
the available length is between 1 and 12 clock ticks. When changing to different time
scales, the step length of steps will change in proportion to the selected scale. This means
that note length is set relative to the sequencer tempo, not absolute time.
When a pattern is set with shuffle timing, notes that are set with a length greater than the
step time will be automatically truncated during playback to prevent unwanted slides.
When turning a step off and then back on, the gate length will be reset back to one half
the step resolution.
USER GUIDE 69
TIP: Slides can also be set quickly using the SLIDE button while
holding the step button.
Page 79
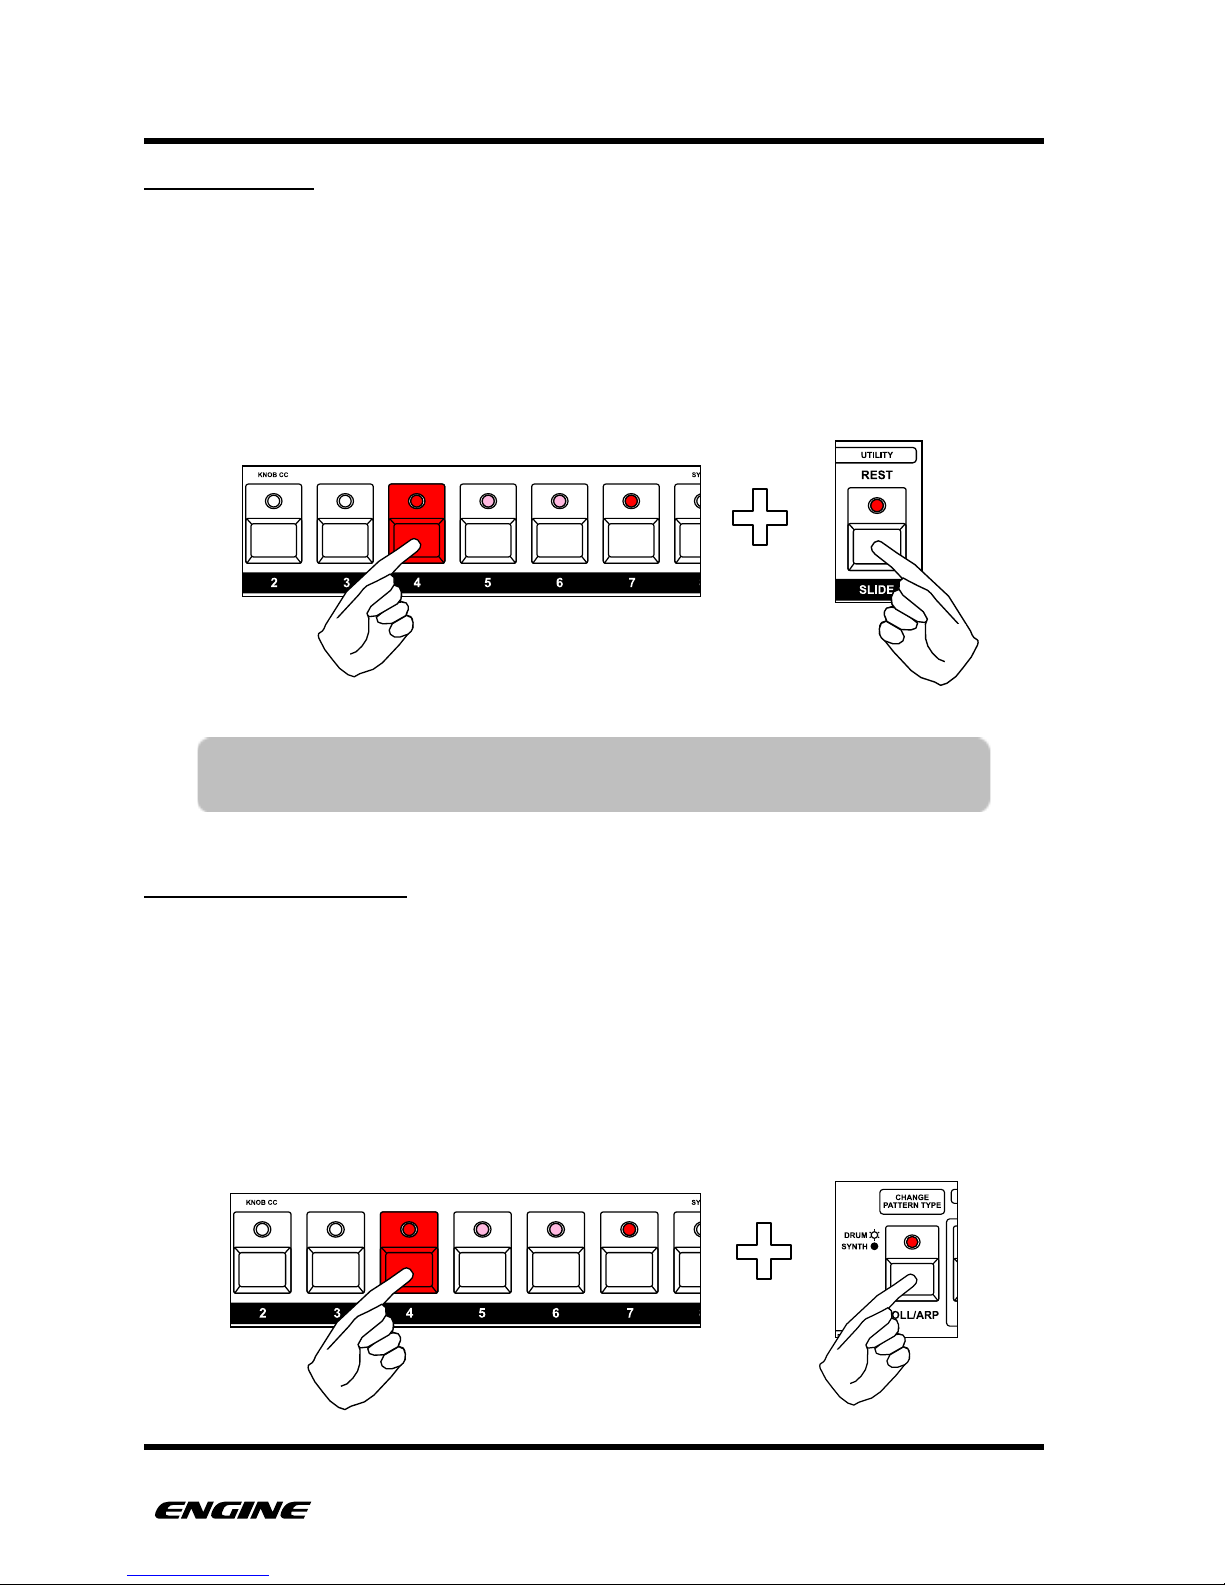
PATTERNS
ADDING SLIDE
A step can have a programmed SLIDE attribute. Slide causes the note length to be
extended so that it is played legato, meaning that the next note will be started before
ending the previous note, so that they overlap. On many synthesizers, this will trigger a
slide or portamento between notes.
To set slide on a note using the SLIDE button, press and hold the pattern step button.
Then click the SLIDE button to turn slide on or off. (cv hardware slide)
SETTING NOTE REPEAT
Each step can be enabled for the note repeat MIDI EFFECT. This will cause the note to be
retriggered according to the note repeat setting for the track. If the track MIDI EFFECT
has a note repeat setting of zero, you will not hear any note repeats. For details on using
the note repeat MIDI EFFECT, please see the MIDI EFFECTS section under FUNCTION
MODE.
To set note repeat for a step, press and hold the pattern step button. Then click the ROLL/
ARP button to turn note repeat on or off. The current note repeat setting is indicated by
the ROLL/ARP LED.
USER GUIDE 70
TIP: SLIDE can also be set using the note length knob, by rotating control
knob 2 clockwise and setting the note length to maximum.
Page 80
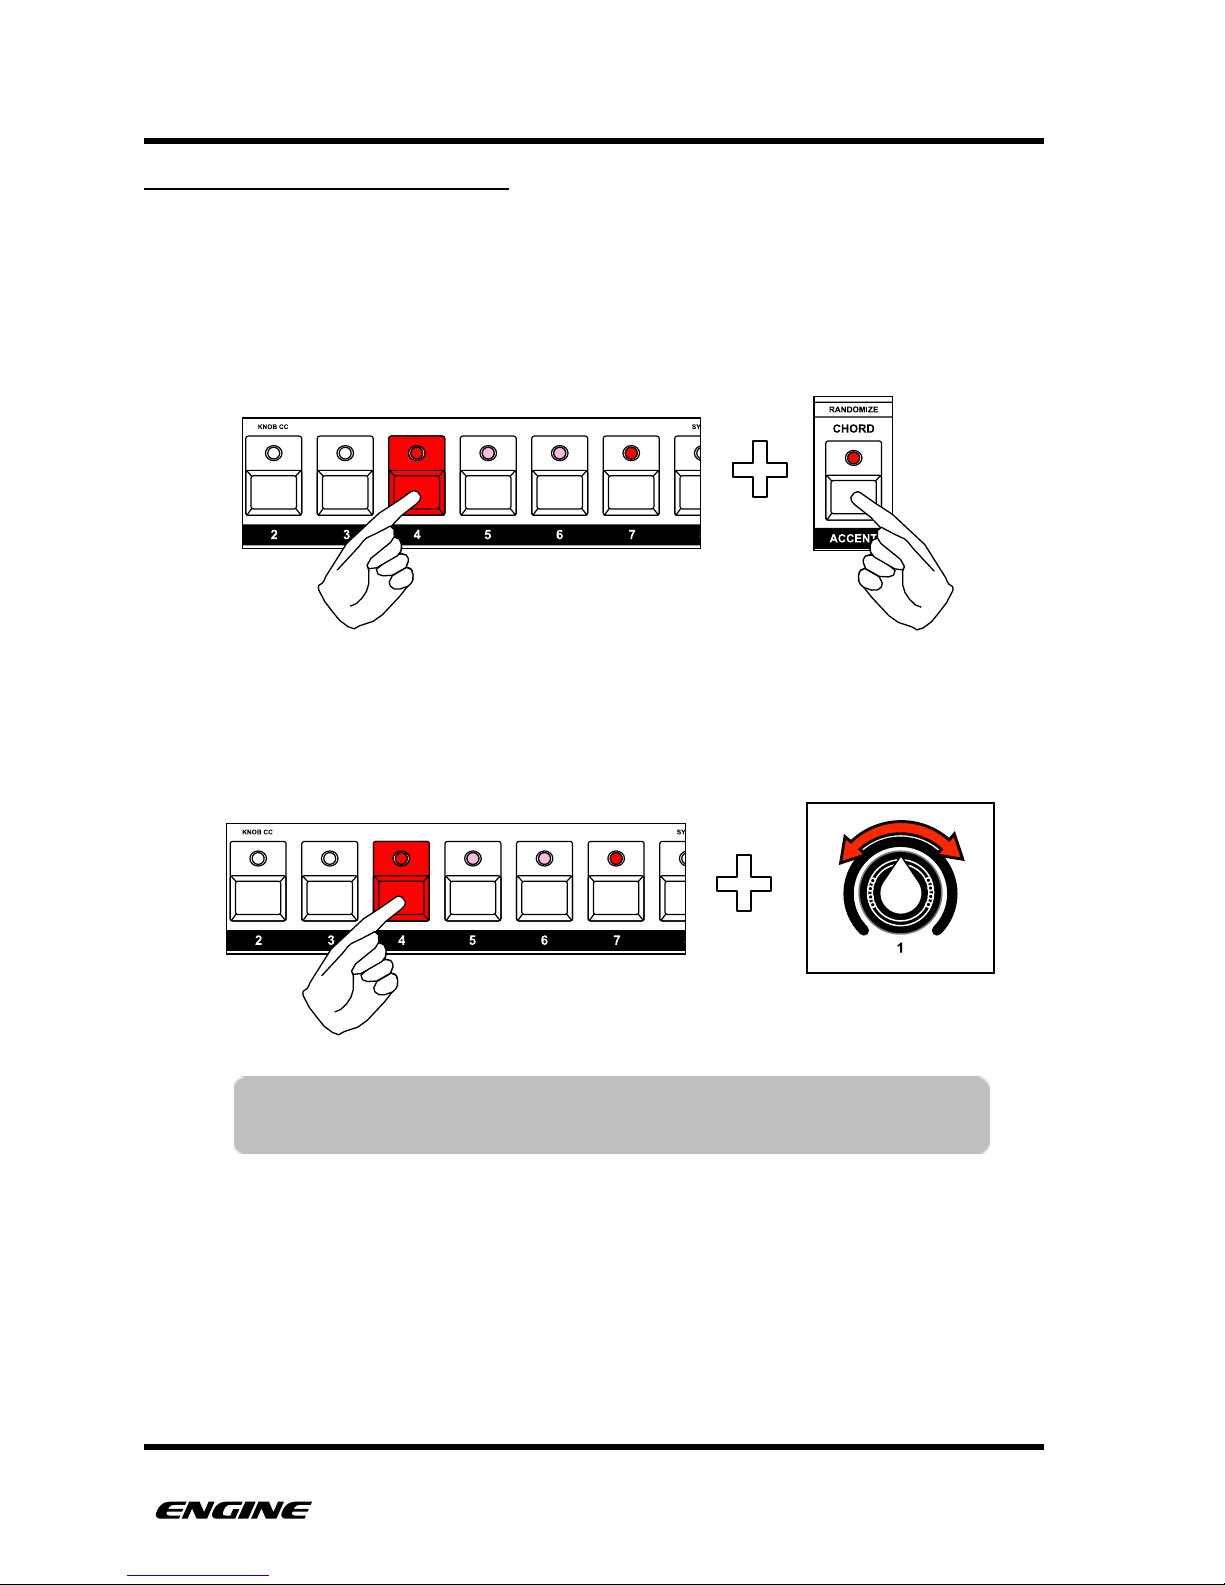
PATTERNS
SETTING VELOCITY OR ACCENT
Each step of a synth type pattern can have a velocity set from 0-127. For quick
programming, the ACCENT button can be used to set a predefined velocity for accented
or unaccented notes.
To set the velocity of a note using the ACCENT button, press and hold the pattern step
button. Then click the ACCENT button to accent turn on or off.
To set a precise velocity for the step, while holding the step button, use control knob 1 to
set a velocity value from 0-127. The current velocity of the step is shown on the LED
display.
USER GUIDE 71
TIP: You can quickly enter an accented step by double clicking the
pattern step button as you enter the step event.
Page 81
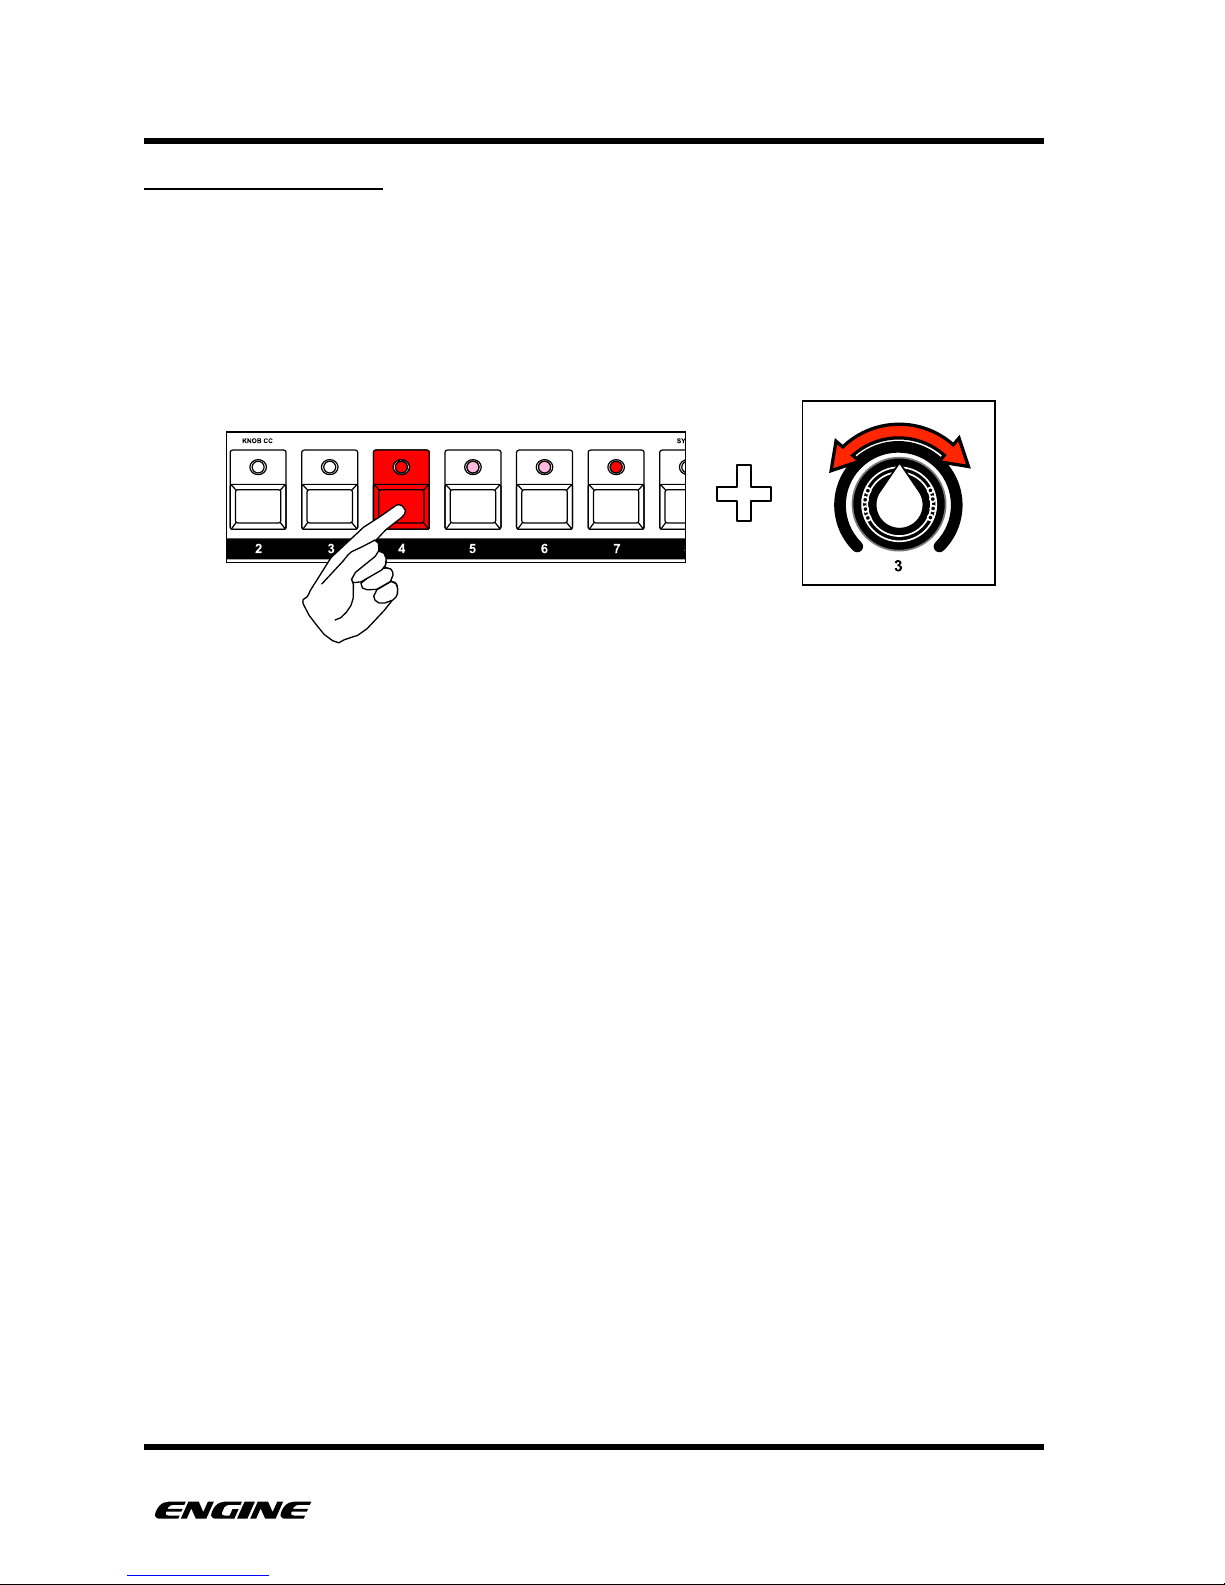
PATTERNS
SETTING STEP DELAY
Each step of a synth type pattern can have a delay added to the start of the step. This
can create a more humanized feel in programmed patterns. The amount of delay
available will vary based on the current TIME SCALE for the pattern.
To set the delay for a step, press and hold the pattern step button. Then use control knob
3 to set a delay for the step. The current delay will be shown on the LED display.
USER GUIDE 72
Page 82
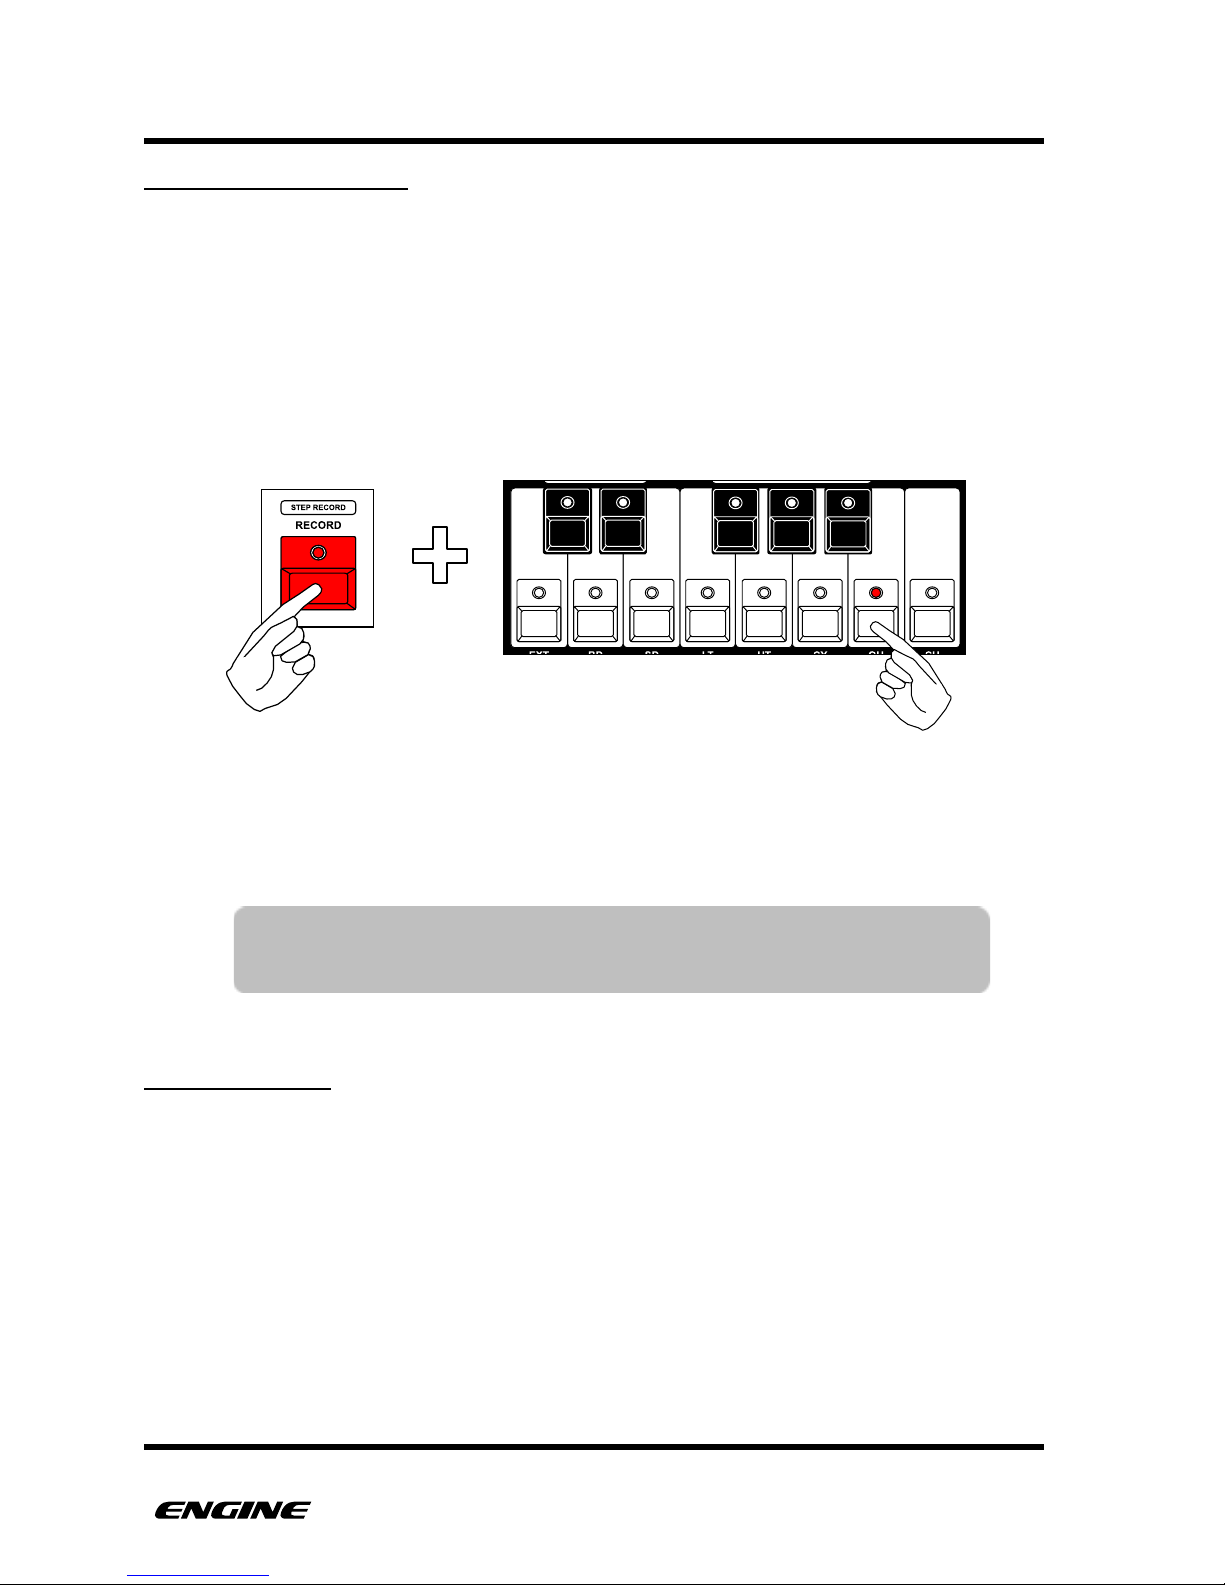
PATTERNS
REALTIME RECORDING
The pattern information for a SYNTH type pattern can be recorded in realtime using the
mini keyboard or from an external MIDI controller. This allows a more expressive
performance to be recorded directly into a pattern.
To enter RECORD mode, press and hold or double click the RECORD button. In record
mode, the mini keyboard can be used to play notes into the pattern. Chords and
polyphonic performances (up to four notes) will be recorded directly into the sequence.
Playing notes legato will automatically be recorded as slides.
You can also continue to use grid recording on individual steps while in REALTIME
RECORD mode. To do this, click and hold any pattern step button. The step attributes
can be displayed and edited, when releasing the step button you can return to step
recording.
QUANTIZATION
When realtime recording, the length of played notes can be quantized to the nearest half
step or note lengths can be recorded to the nearest clock tick. This allows you to control
how “expressive” the recorded sequence is. For classic bassline programming,
quantization should be left on, which will force all notes to 50% gate length.
USER GUIDE 73
TIP: When using an external MIDI controller, the incoming velocity will
be recorded into steps automatically.
Page 83
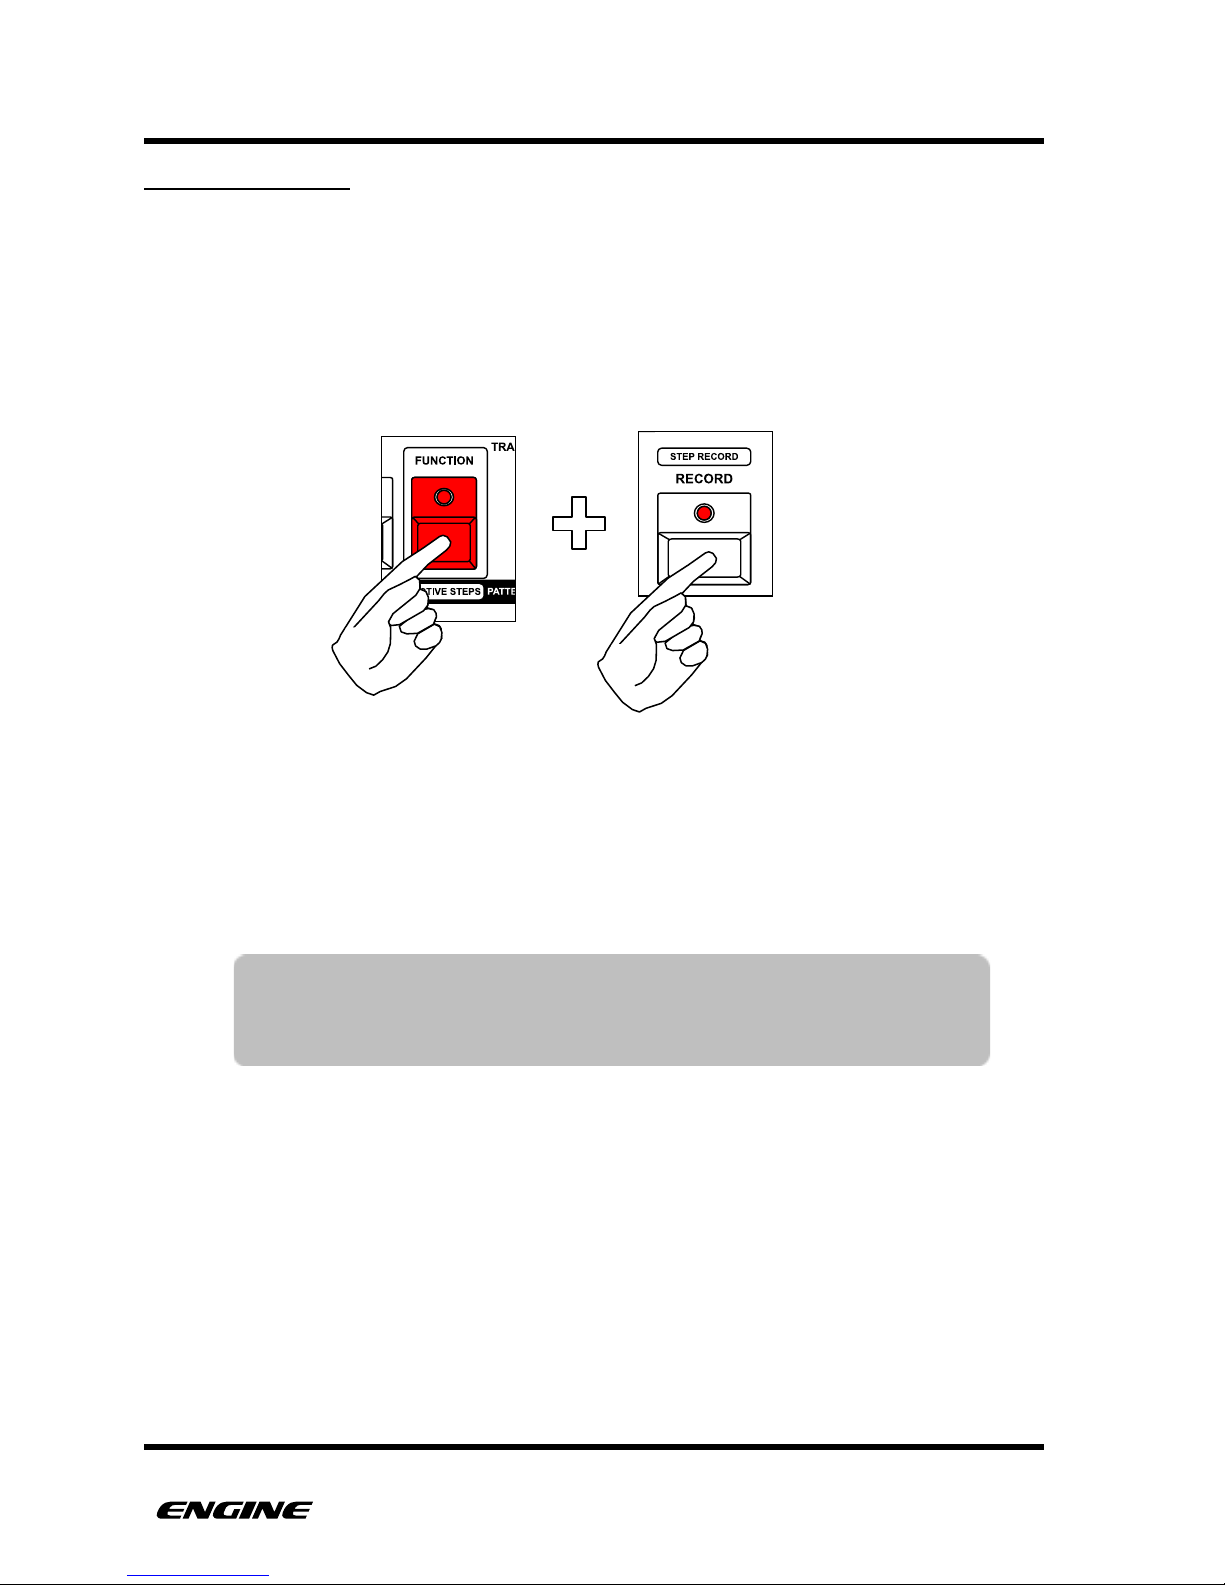
PATTERNS
STEP RECORDING
Step recording is an alternate way to enter a monophonic sequence of notes and timing
by moving from one step to the next in sequence. This can be done while the sequencer is
running or stopped.
To enter STEP RECORD, press and hold (or double click) the FUNCTION button, then
click the RECORD button. Both the FUNCTION and RECORD LEDs will blink to indicate
you are in STEP RECORD mode.
The current step location is indicated on the pattern step buttons with a bright blinking
LED. You can immediately jump to a particular step by clicking a pattern step button, or
begin entering step events from the beginning of the sequence.
To enter steps, you can click pitches on the mini keyboard buttons, the step will
automatically advance to the next step.
If you play the keyboard legato (hold down two notes simultaneously) it will automatically
create a slide and advance to the next step.
USER GUIDE 74
TIP: When the sequencer is not playing, the selected pitch will be
played as it is entered. This makes it easier to preview the
programmed notes.
Page 84
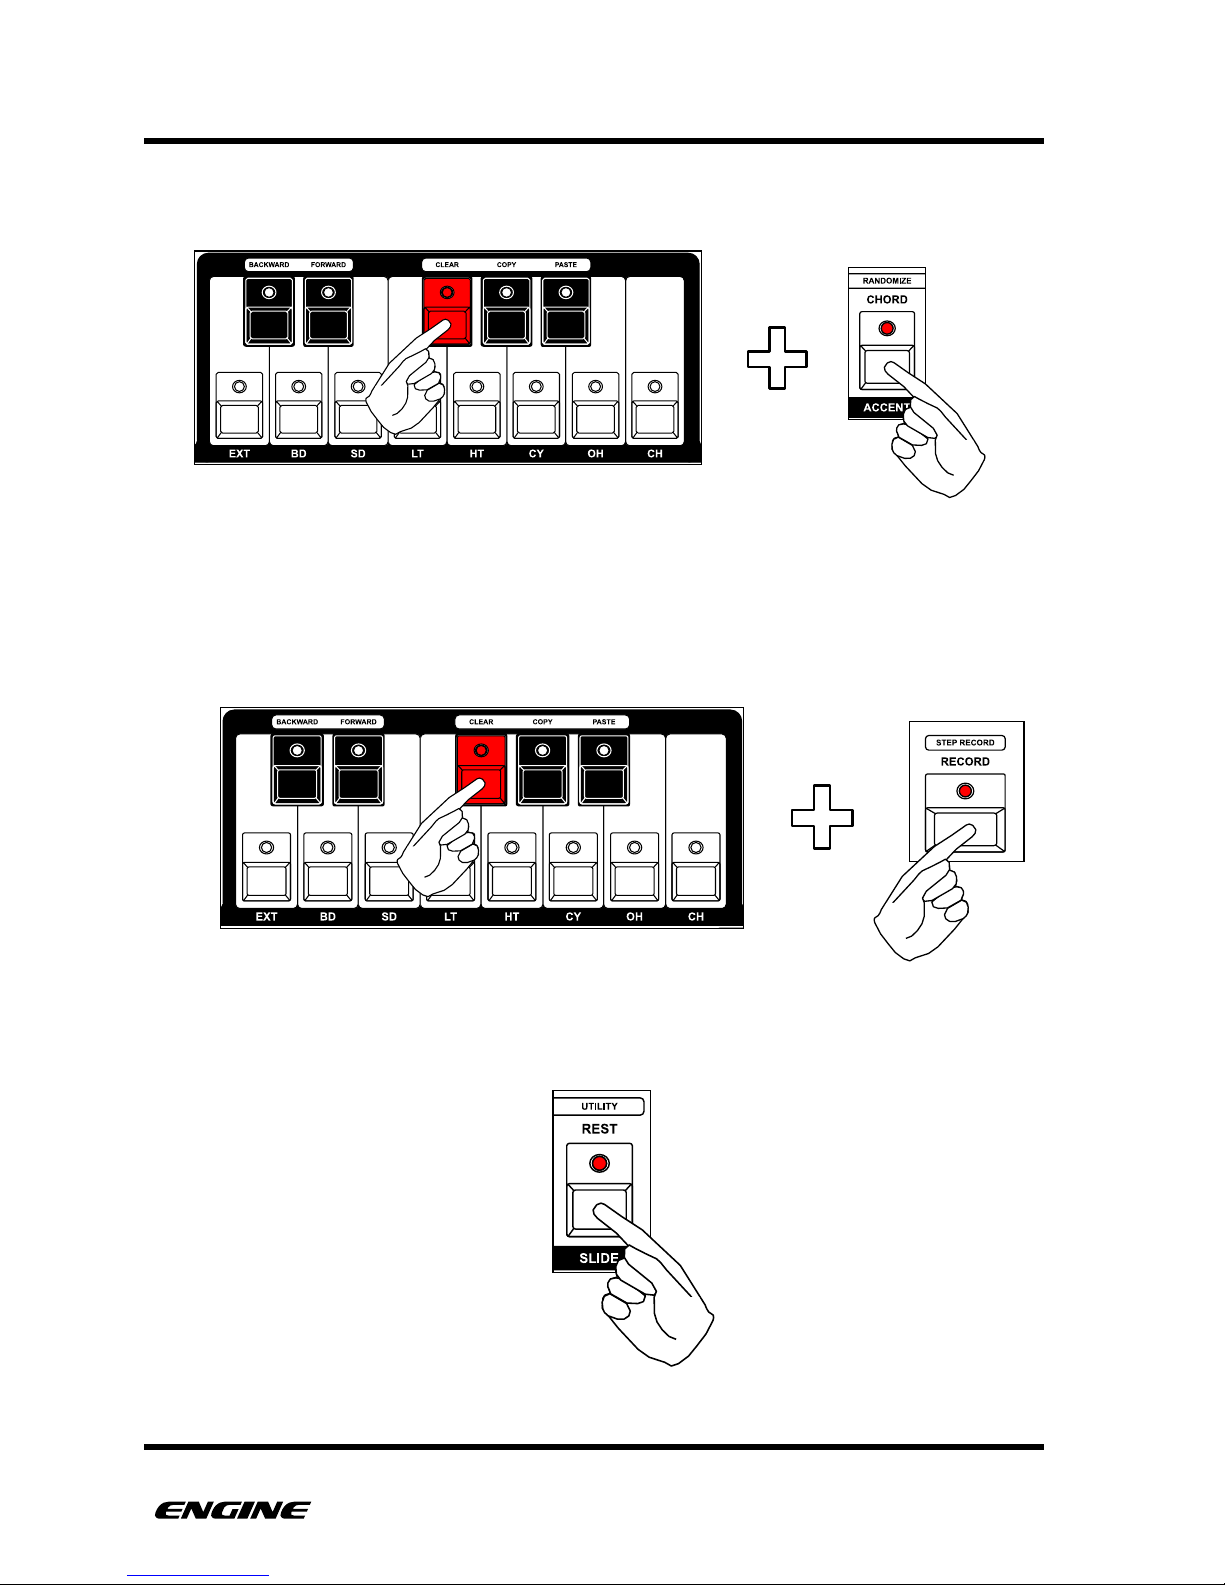
PATTERNS
You can also add ACCENT to a step by clicking the ACCENT button while holding the
keyboard button.
"
"
"
To increase the length of the current step, keep holding the current mini keyboard button
and click the RECORD button, this will lengthen the step event by one step and advance
the current step.
To enter a REST event, click the REST button, any existing event will be erased from the
current step.
USER GUIDE 75
Page 85
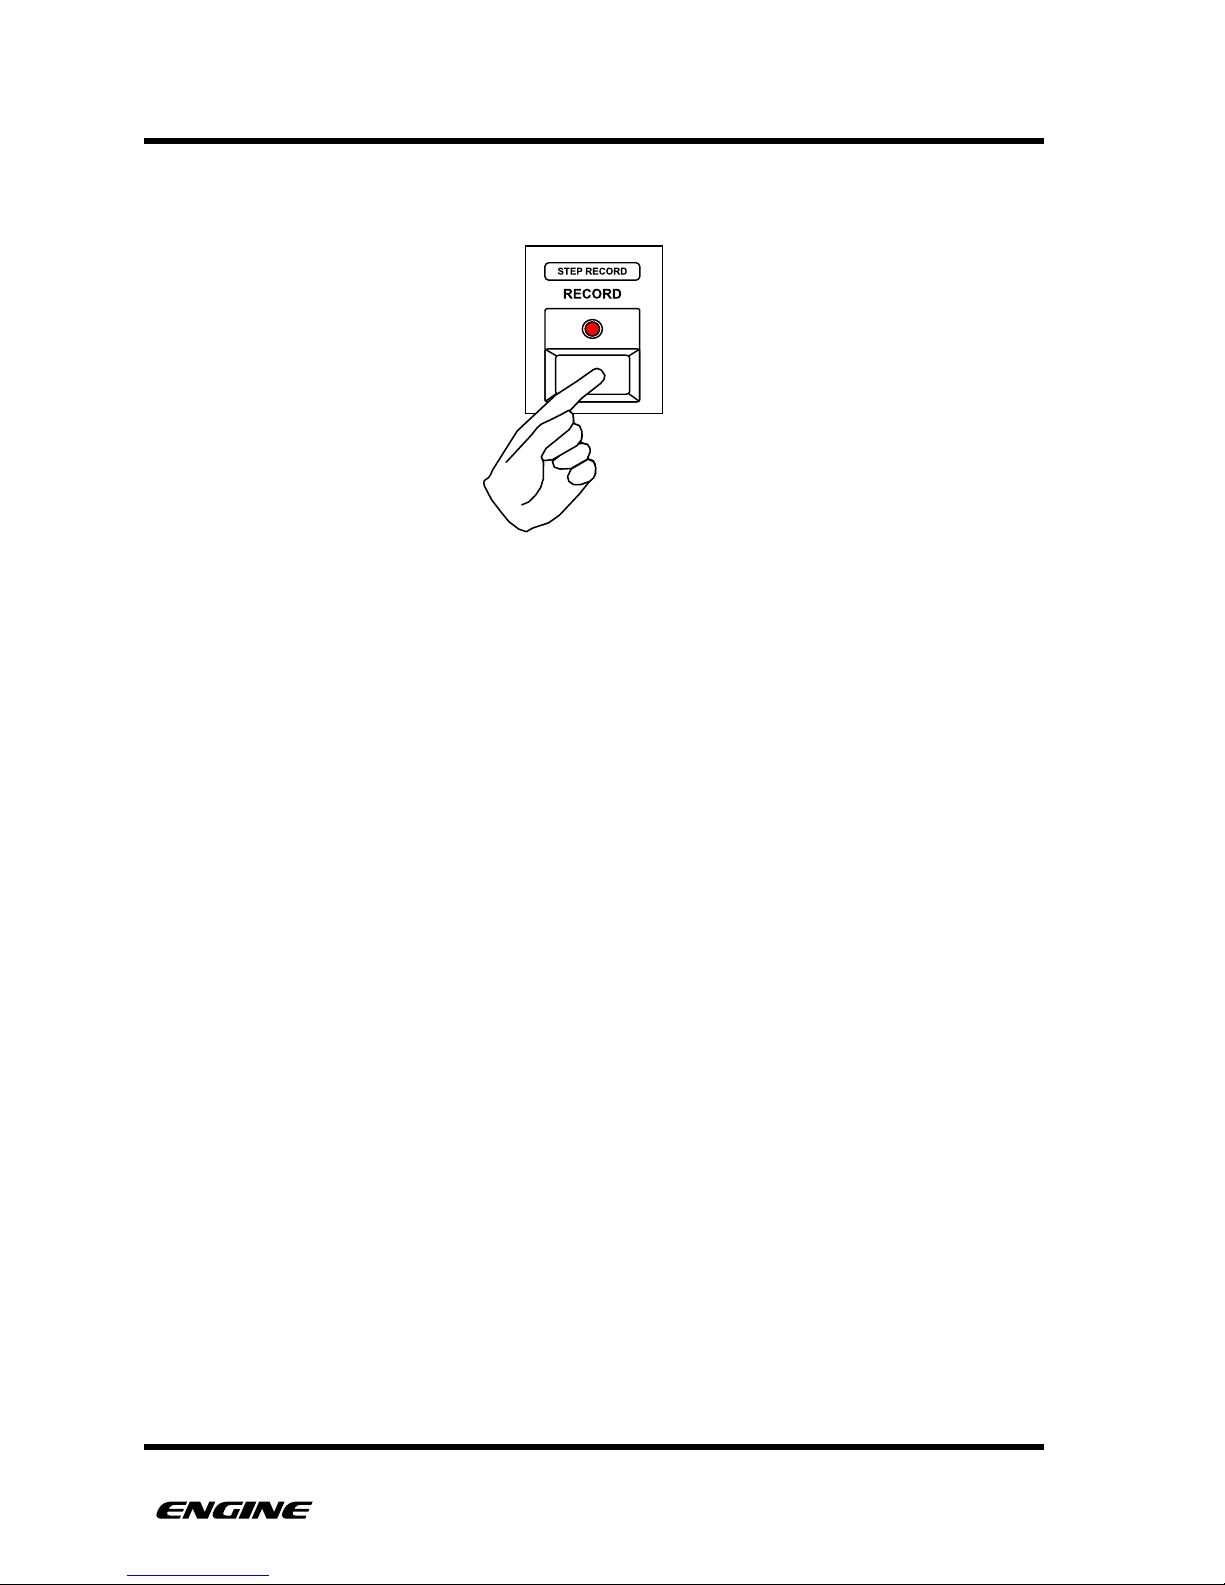
PATTERNS
To advance one step without entering any new data, click the RECORD button.
To leave STEP RECORD mode, click the FUNCTION button.
You can also continue to use grid recording on individual steps while in STEP RECORD
mode. To do this, click and hold any pattern step button. The step attributes can be
displayed and edited, when releasing the step button you can return to step recording.!
USER GUIDE 76
Page 86
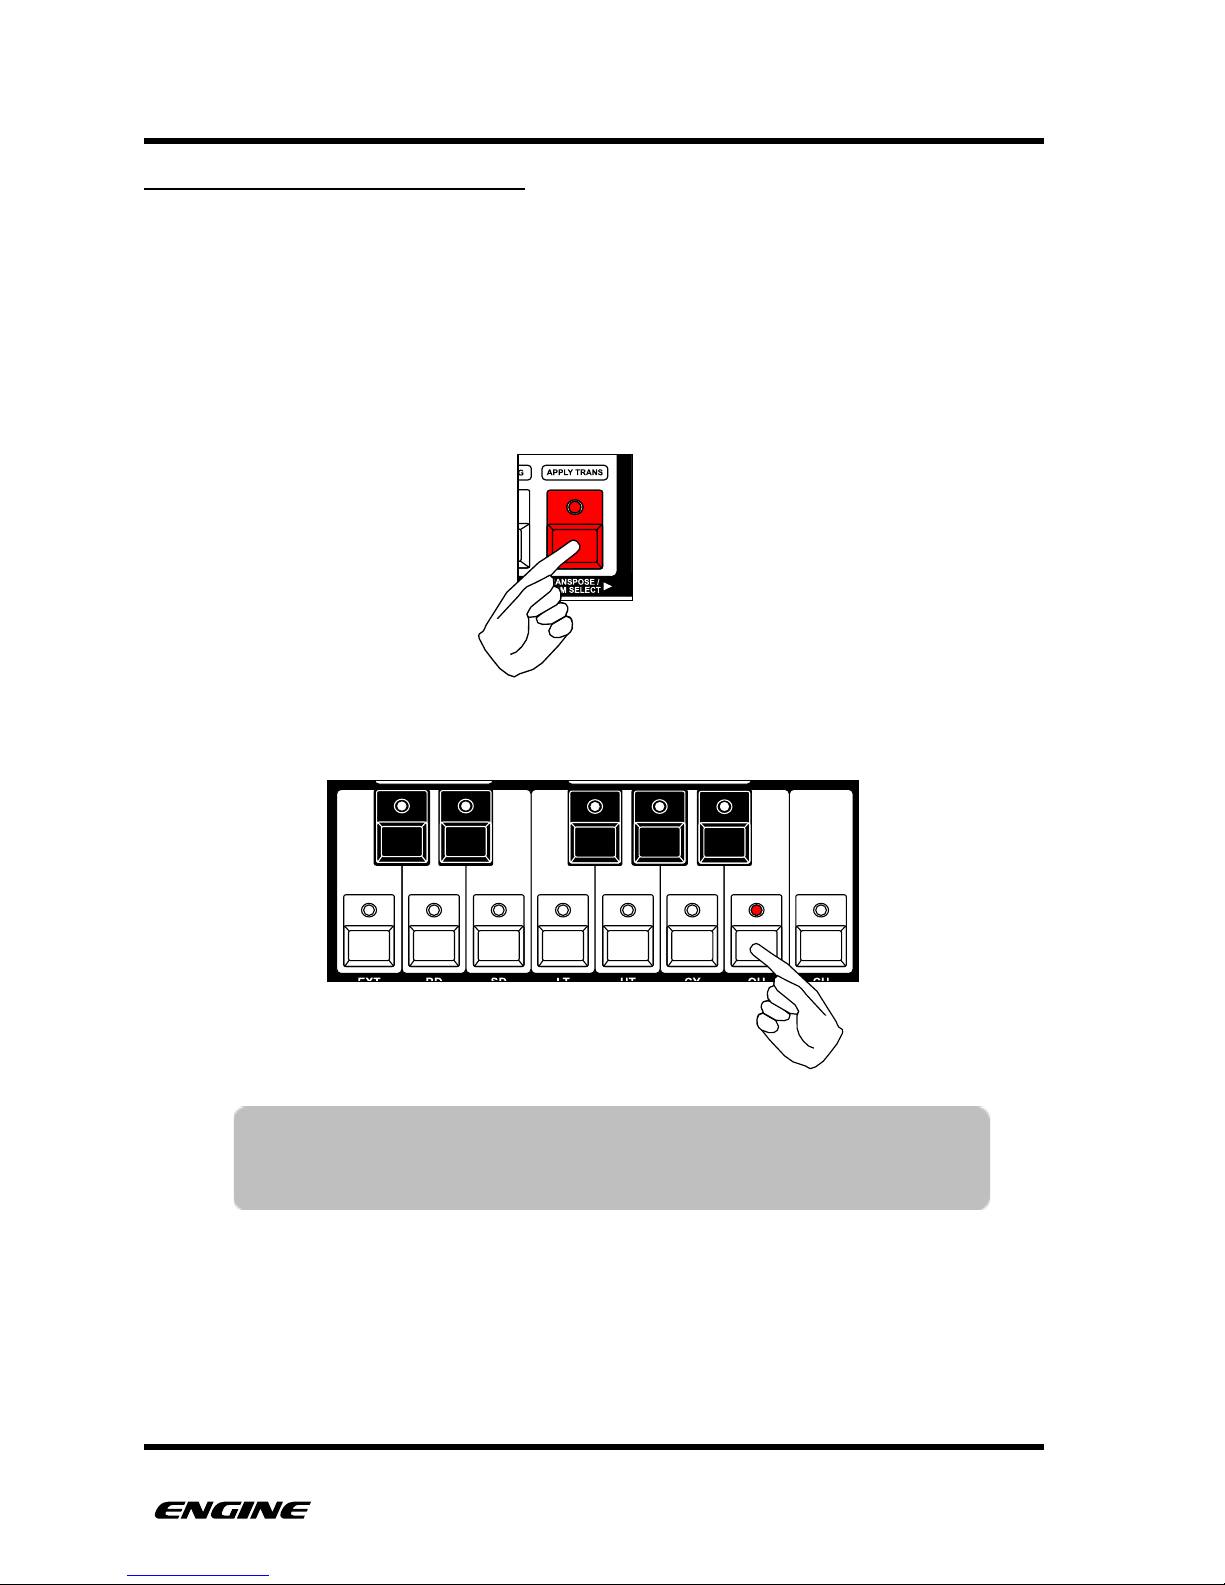
PATTERNS
TRANSPOSING SYNTH PATTERNS
An entire synth type pattern can be transposed in semitones or octaves. This can be used
to create musical progressions or to quickly experiment with different note ranges. Along
with pattern copy/paste, pattern transpose can be used to create layers and variations
across tracks.
To enter TRANSPOSE mode, press and hold (or double-click) the TRANSPOSE/DRUM
SELECT button. The current transposition value will be shown on the mini keyboard LEDs
and the octave DOWN and UP LEDs.
To change the pattern transposition in semitones, click one of the mini keyboard buttons.
USER GUIDE 77
TIP: While holding the TRANSPOSE button, the mini-keyboard LEDs
flicker briefly each time a note is played. This gives a good visual
indicator of what notes are playing. Muted tracks will not flicker.
Page 87
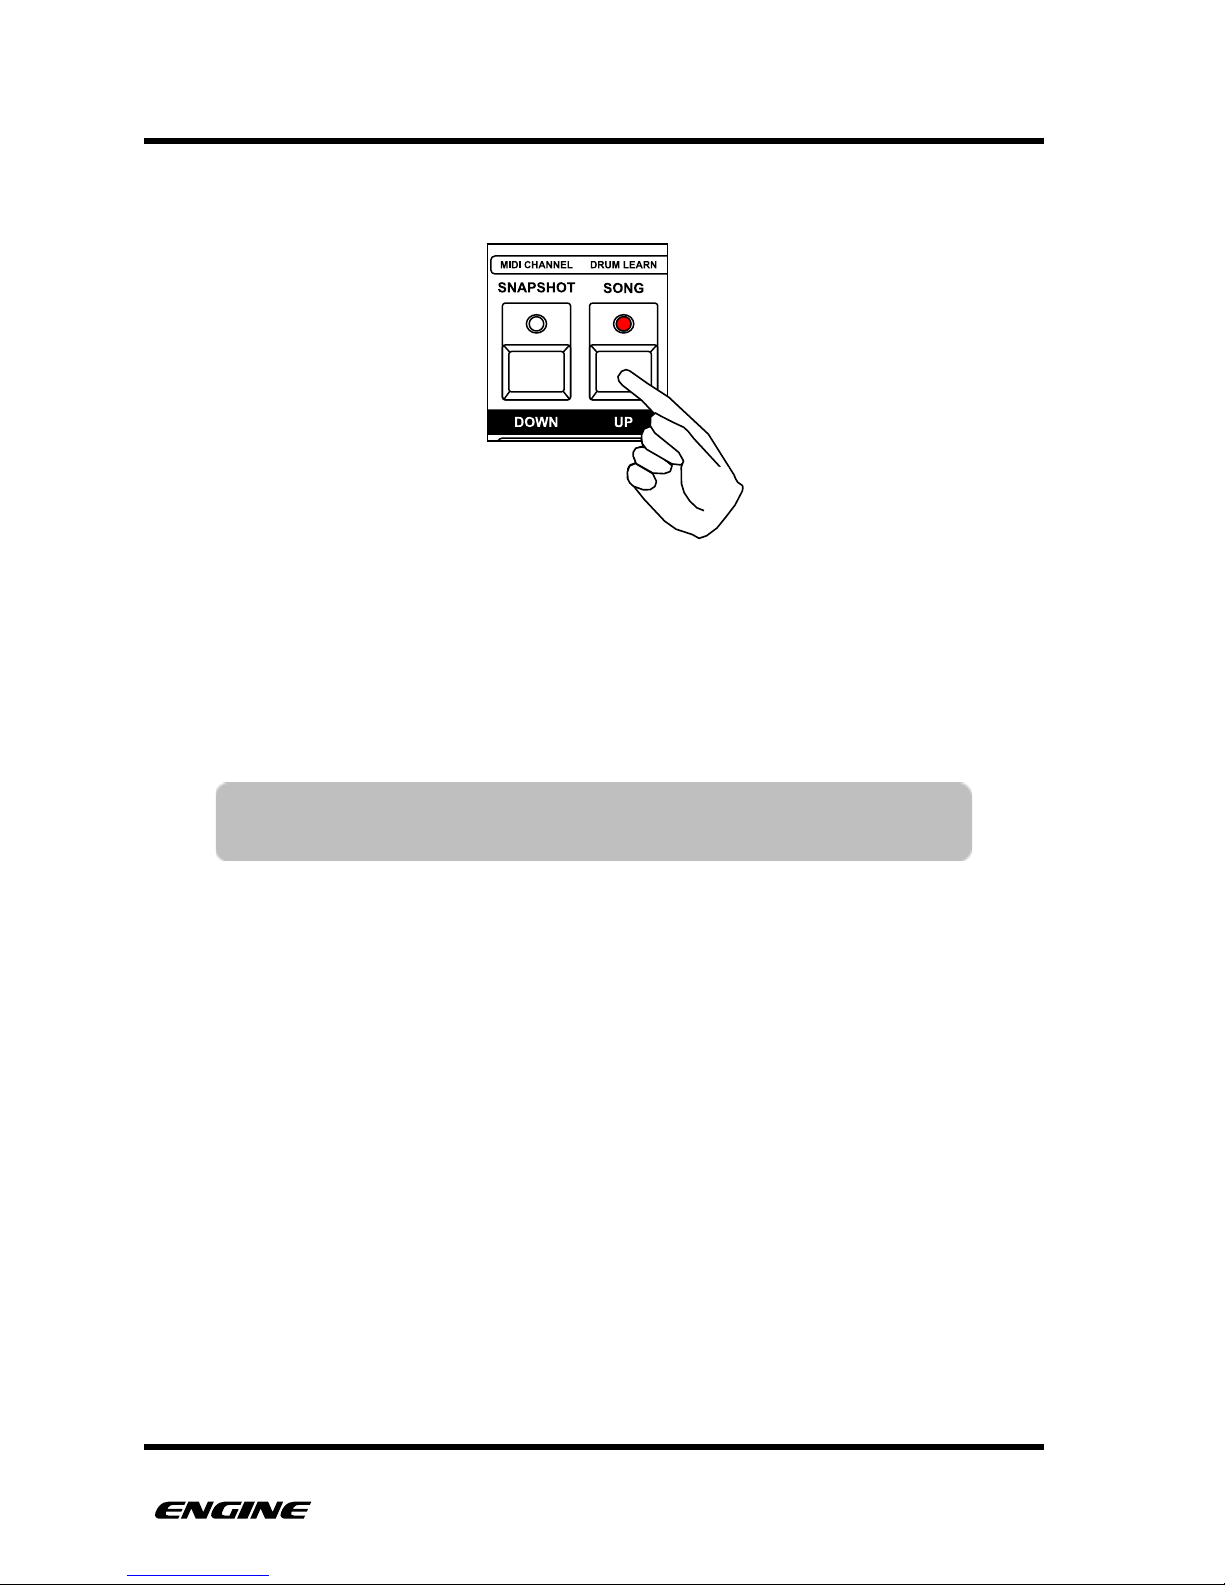
PATTERNS
To change the pattern transposition in octaves, click either the DOWN or UP buttons.
The LEDs of the octave buttons will light differently according to the selected octave. For
example, one octave down will light the DOWN LED dimly, two octaves down will light
the DOWN LED brightly, three octaves down will blink the DOWN LED dimly, four
octaves down will blink the DOWN LED brightly.
Pattern transposition takes effect immediately even if the sequencer is playing.
USER GUIDE 78
TIP: You can use MIDI to transpose multiple patterns at the same time
by turning on MIDI transpose listen in TRACK UTILITY mode.
Page 88
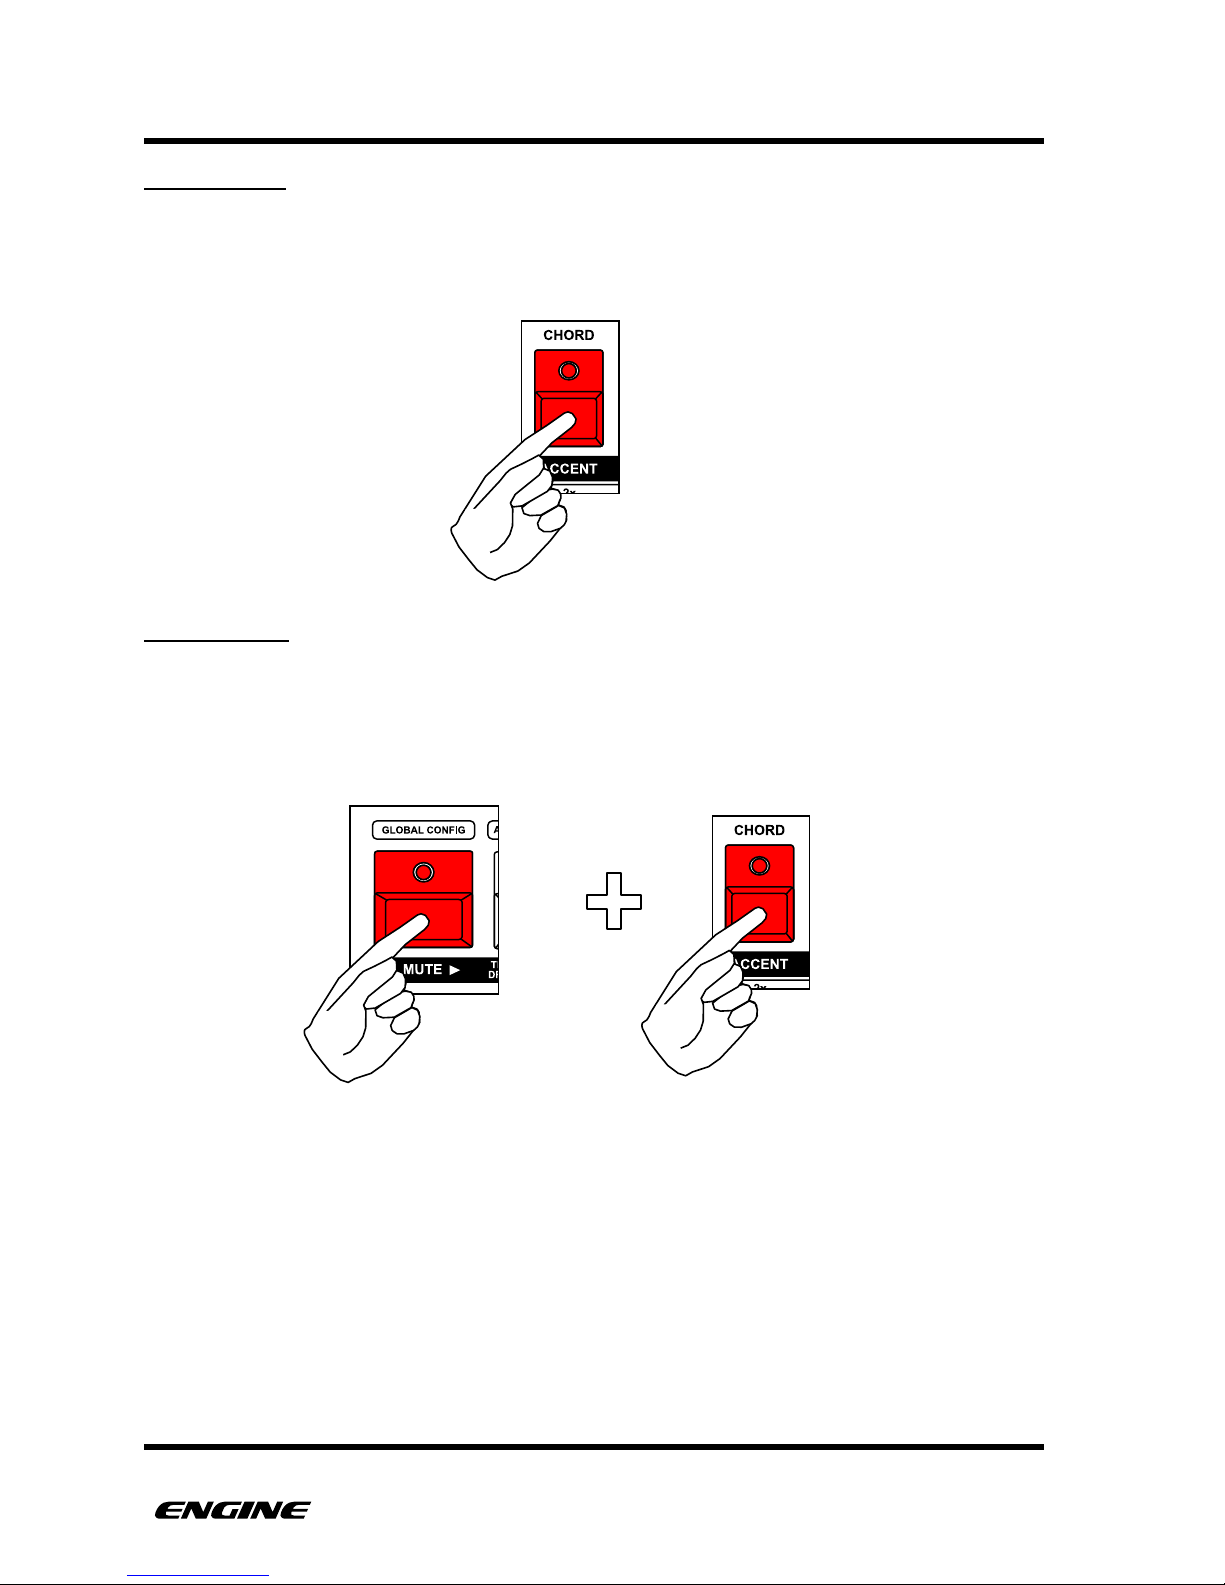
PATTERNS
ALL ACCENT
To play back all pattern steps as accented notes, press and hold the ACCENT button
while in transpose mode. Notes will resume normal playback when the ACCENT button is
released.
NO ACCENT
To play back all pattern steps as unaccented notes, press and hold the MUTE button and
then press and hold the ACCENT button while in transpose mode. Notes will resume
normal playback when the ACCENT button is released.
USER GUIDE 79
Page 89
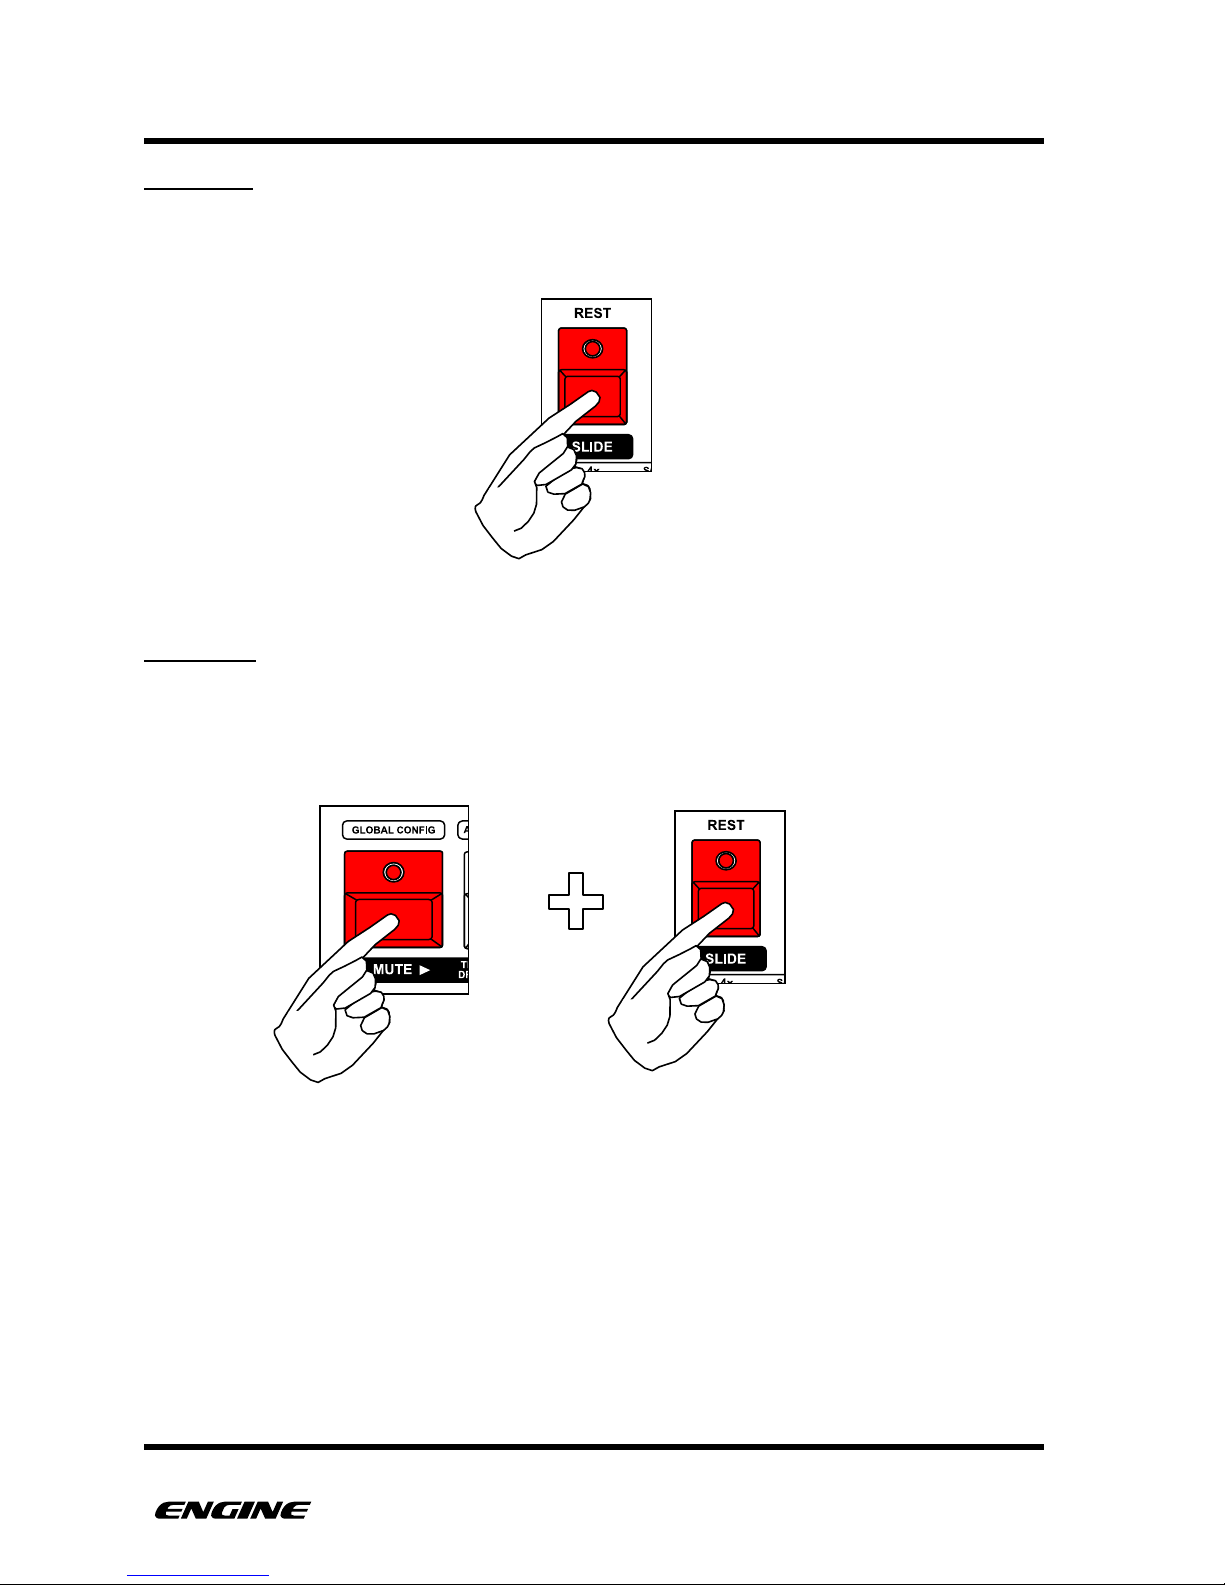
PATTERNS
ALL SLIDE
To play back all pattern steps with slides, press and hold the SLIDE button while in
transpose mode. Notes will resume normal playback when the SLIDE button is released.
NO SLIDE
To play back all pattern steps without slide, press and hold the MUTE button and then
press and hold the SLIDE button while in transpose mode. Notes will resume normal
playback when the SLIDE button is released.
USER GUIDE 80
Page 90
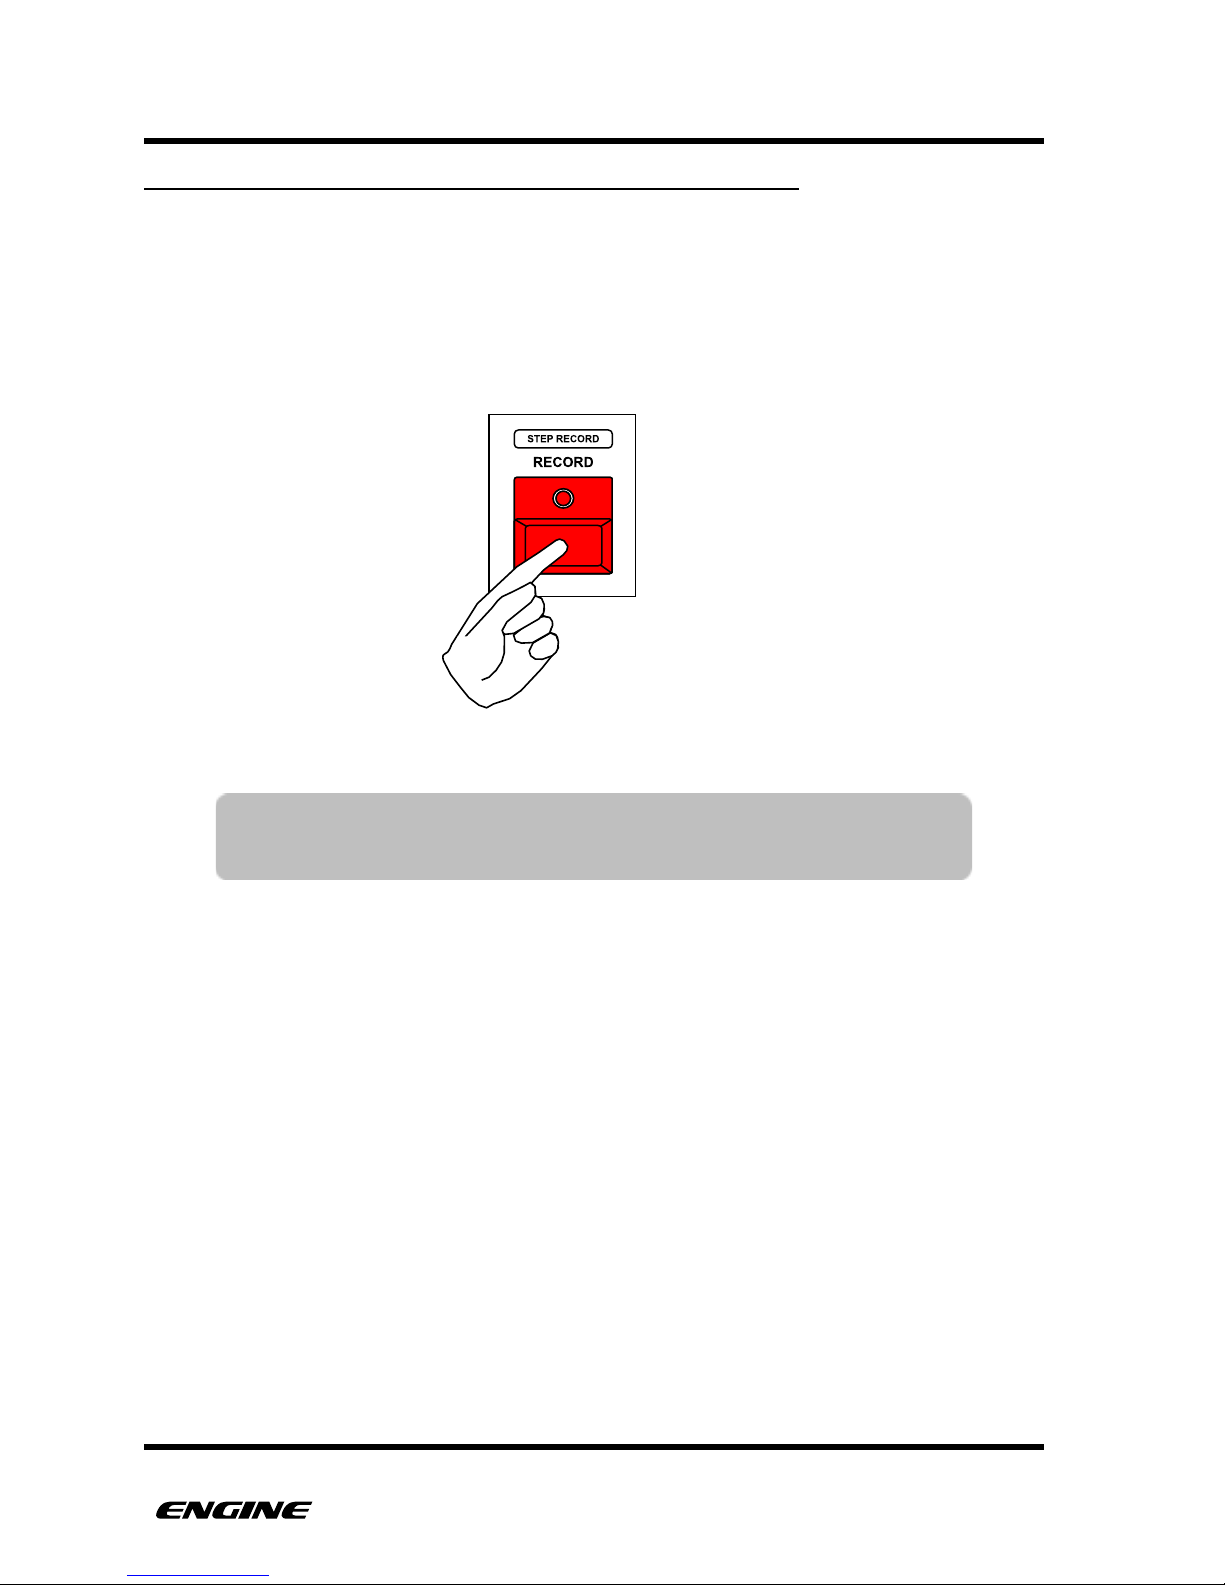
PATTERNS
REALTIME RECORDING TRANSPOSE, ACCENT AND SLIDE
Pattern transposition, accents, slides and muting of accents and slides can be recorded
directly into a pattern in realtime. This is extremely useful for adding variation to a
recorded pattern, or fixing and modifying accent and slide events.
To realtime record the transpose functions, press and hold (or double-click) the RECORD
button while in transpose mode.
While in realtime transpose record, the mini-keyboard and octave down/up buttons can
be used to transpose pattern notes. This transposition is recorded permanently into the
pattern data.
Using the ACCENT and SLIDE buttons, you can add accent and slide events to pattern
data. Using the MUTE button in combination with the ACCENT or SLIDE buttons, you can
erase accent and slide events from pattern data.
USER GUIDE 81
TIP: You can jump directly into and out of transpose mode while
already in realtime record mode.
Page 91
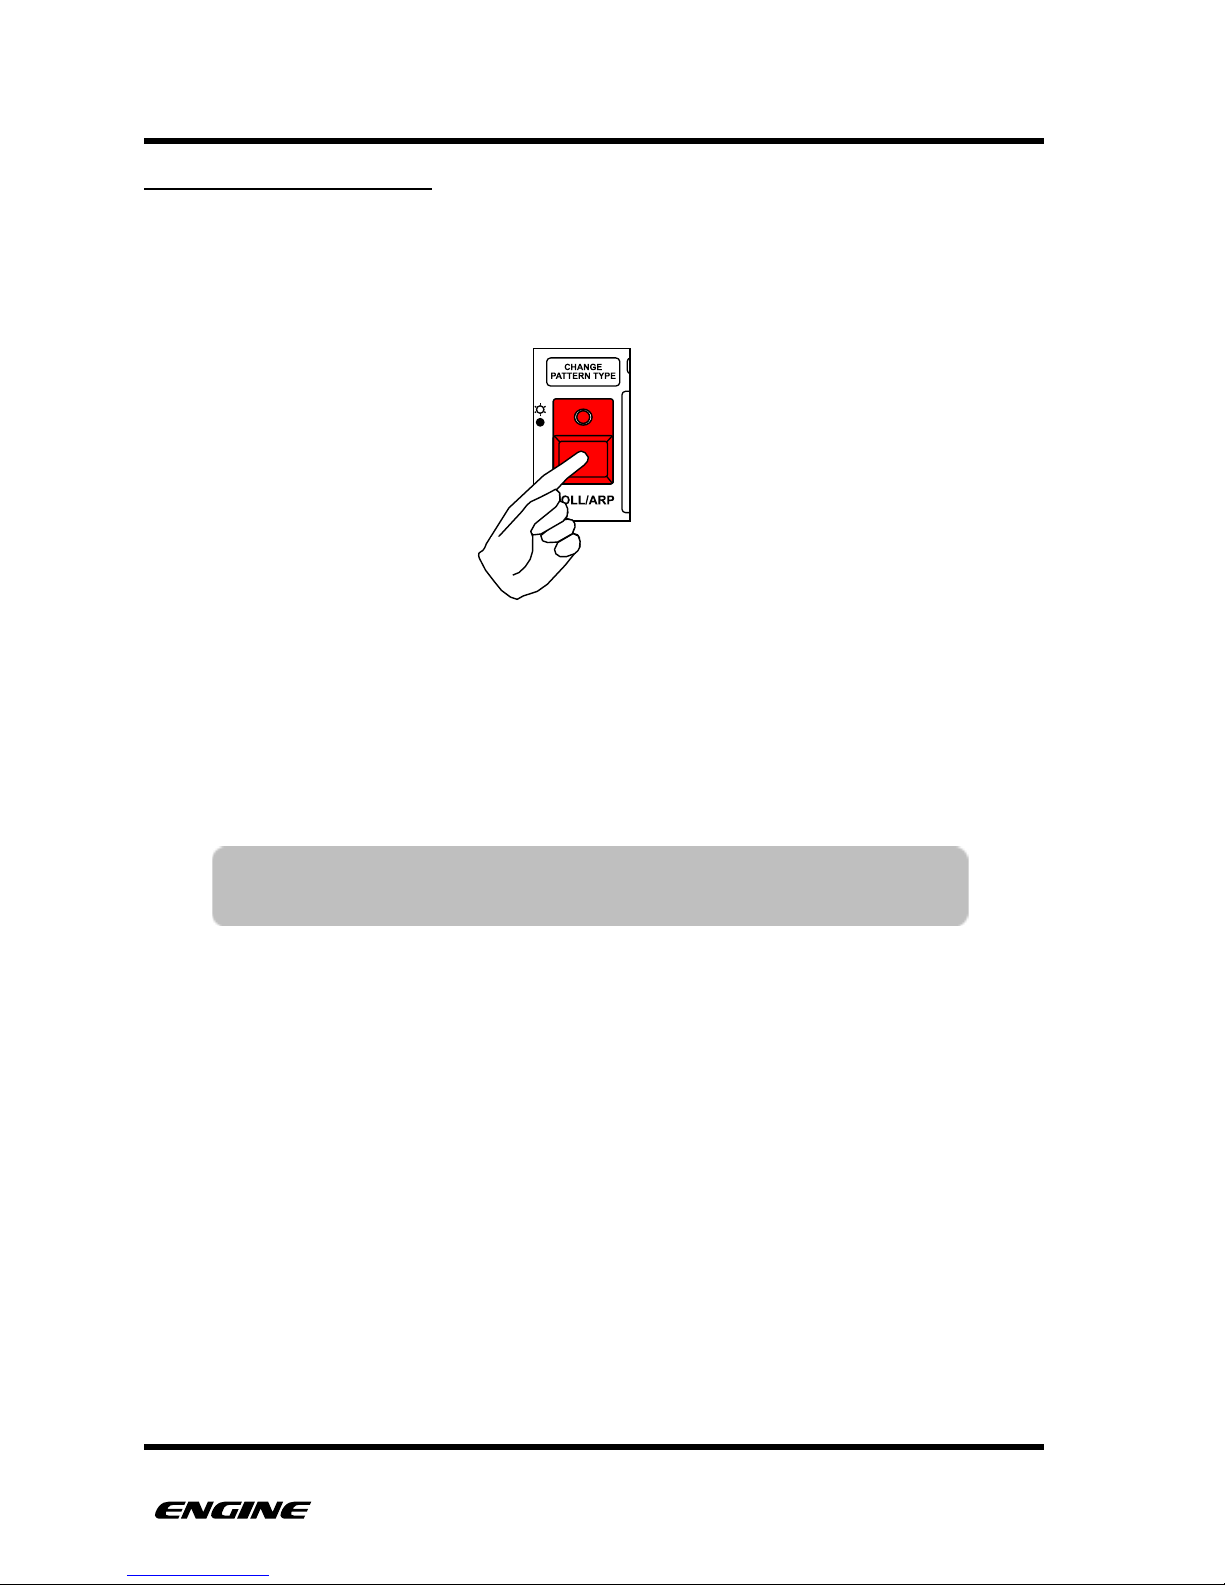
PATTERNS
REALTIME ARPEGGIATOR
Synth type patterns include an arpeggiator than can be used for realtime performance or
recorded directly into the pattern sequence.
To enter ARPEGGIATOR mode, press and hold (or double-click) the ROLL/ARP button.
While in ARPEGGIATOR mode, the mini keyboard can be used to play arpeggios. Before
playing notes on the mini keyboard, the octave can be set using the octave DOWN and
UP buttons. The ACCENT button and SLIDE buttons can also be pressed to add variation
in realtime.
While playing an arpeggio, the sequenced pattern is overridden. When the arpeggio is
released, the sequenced pattern resumes.
USER GUIDE 82
TIP: The arpeggiator can also be played using an external MIDI
controller.
Page 92
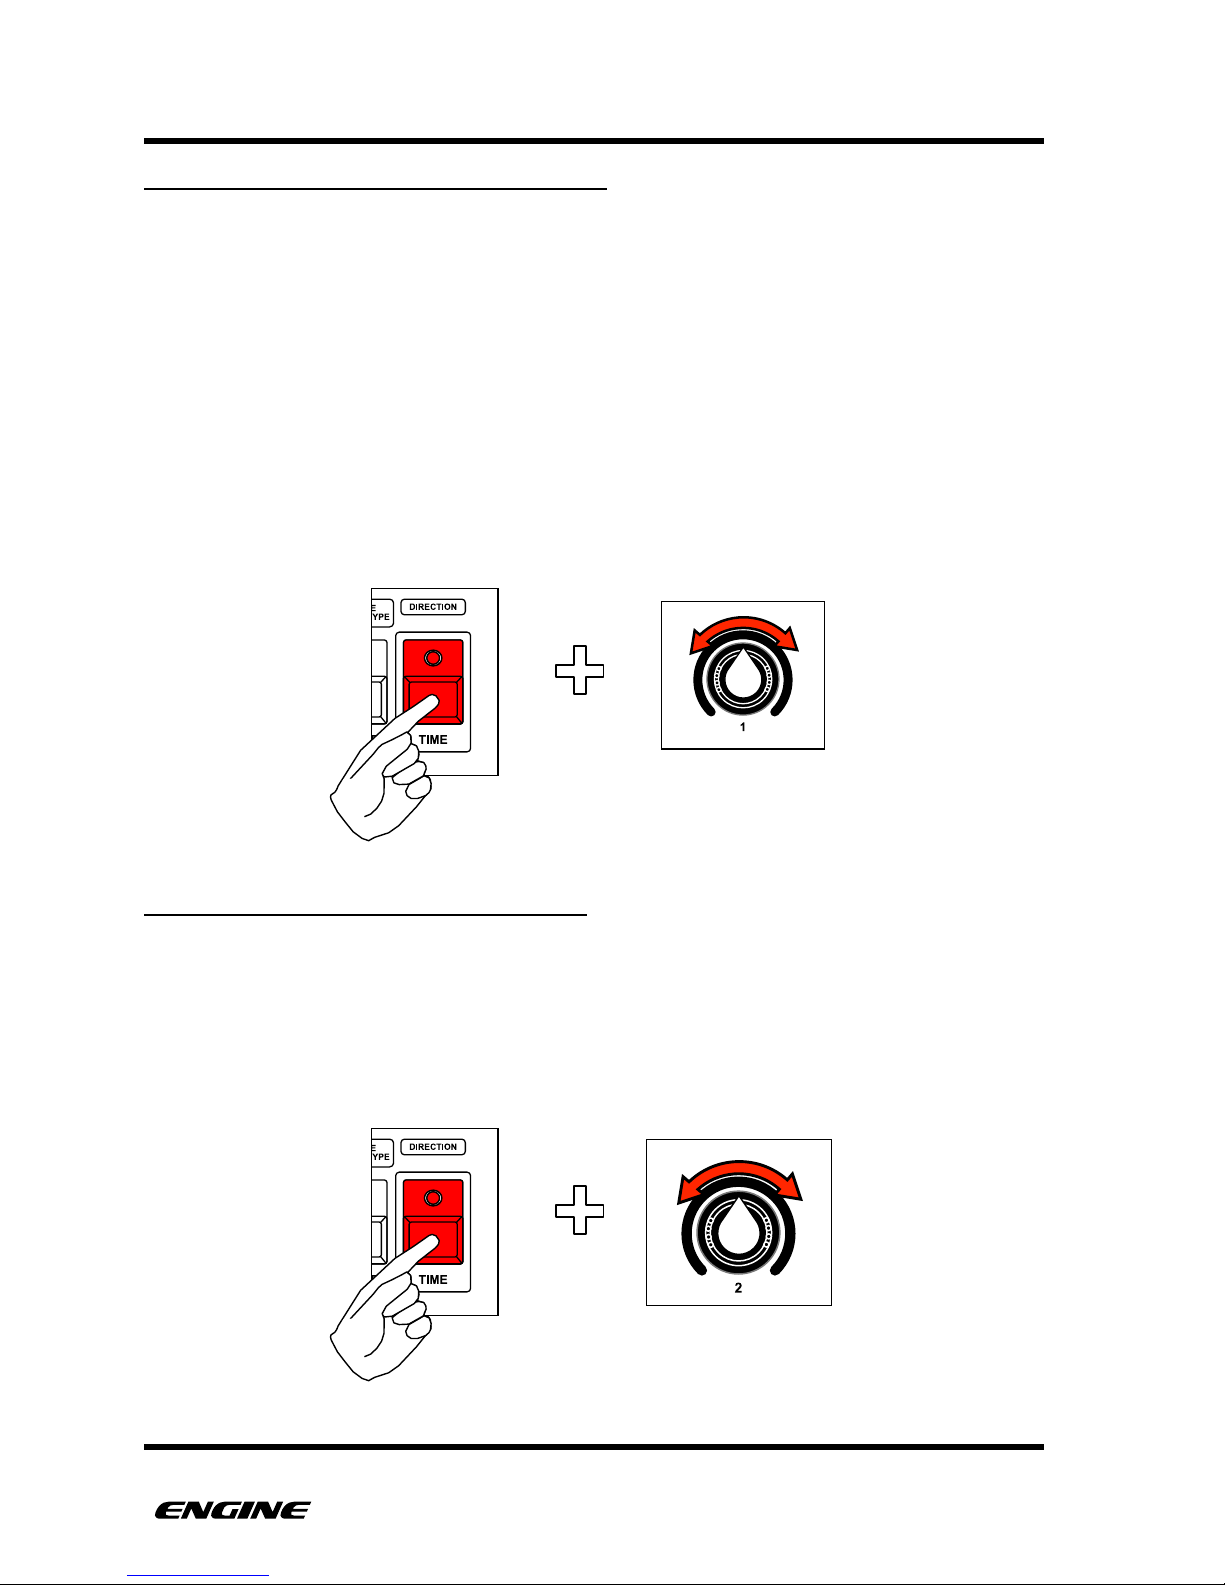
PATTERNS
CHANGING THE ARPEGGIO DIRECTION
The direction of the arpeggio can be changed to create interesting variations.
The available directions are:
•
as played
•
up
•
down
•
up/down
•
random"
To change the arpeggio direction, while in ARPEGGIO mode, press the TIME button. The
current direction will be displayed on the LED display. To change the direction, turn
control knob 1. The new direction will be displayed on the LED display.
CHANGING THE ARPEGGIO OCTAVES
The arpeggio can be programmed to play over multiple octaves. The available range is
from zero to +3 octaves.
To change the number of octaves, while in ARPEGGIO mode, press the TIME button and
then turn control knob 2. The number of arpeggio octaves will be displayed on the LED
display.!
USER GUIDE 83
Page 93
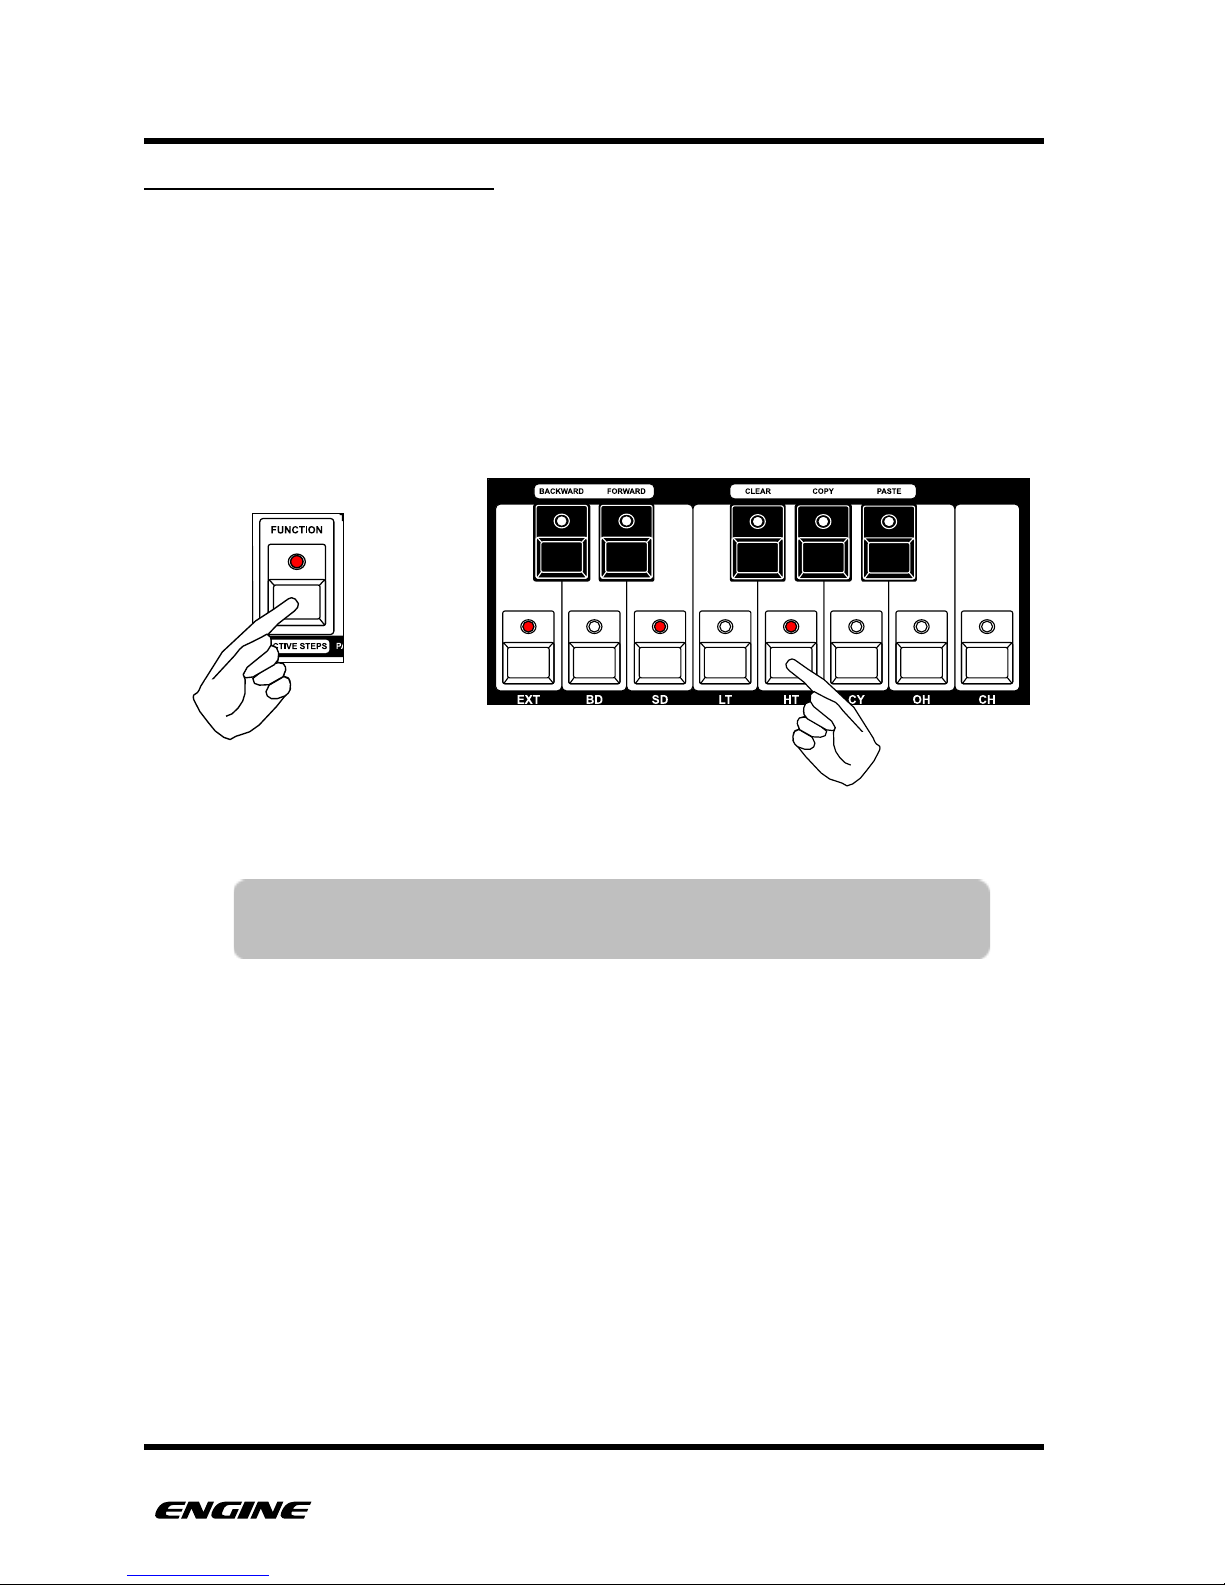
PATTERNS
LATCHING THE ARPEGGIATOR
The arpeggiator can be latched. When the arpeggiator is latched, it will continue to play,
even when leaving ARPEGGIO mode.
You can add additional notes or remove notes from the arpeggio while the arpeggiator is
latched, by clicking the buttons of the mini keyboard.
To latch the arpeggiator, while in arpeggio mode, click the FUNCTION button. To
unlatch the arpeggiator, click the FUNCTION button again.
USER GUIDE 84
TIP: You can have different arpeggiators playing and latched in
multiple tracks simultaneously.
Page 94
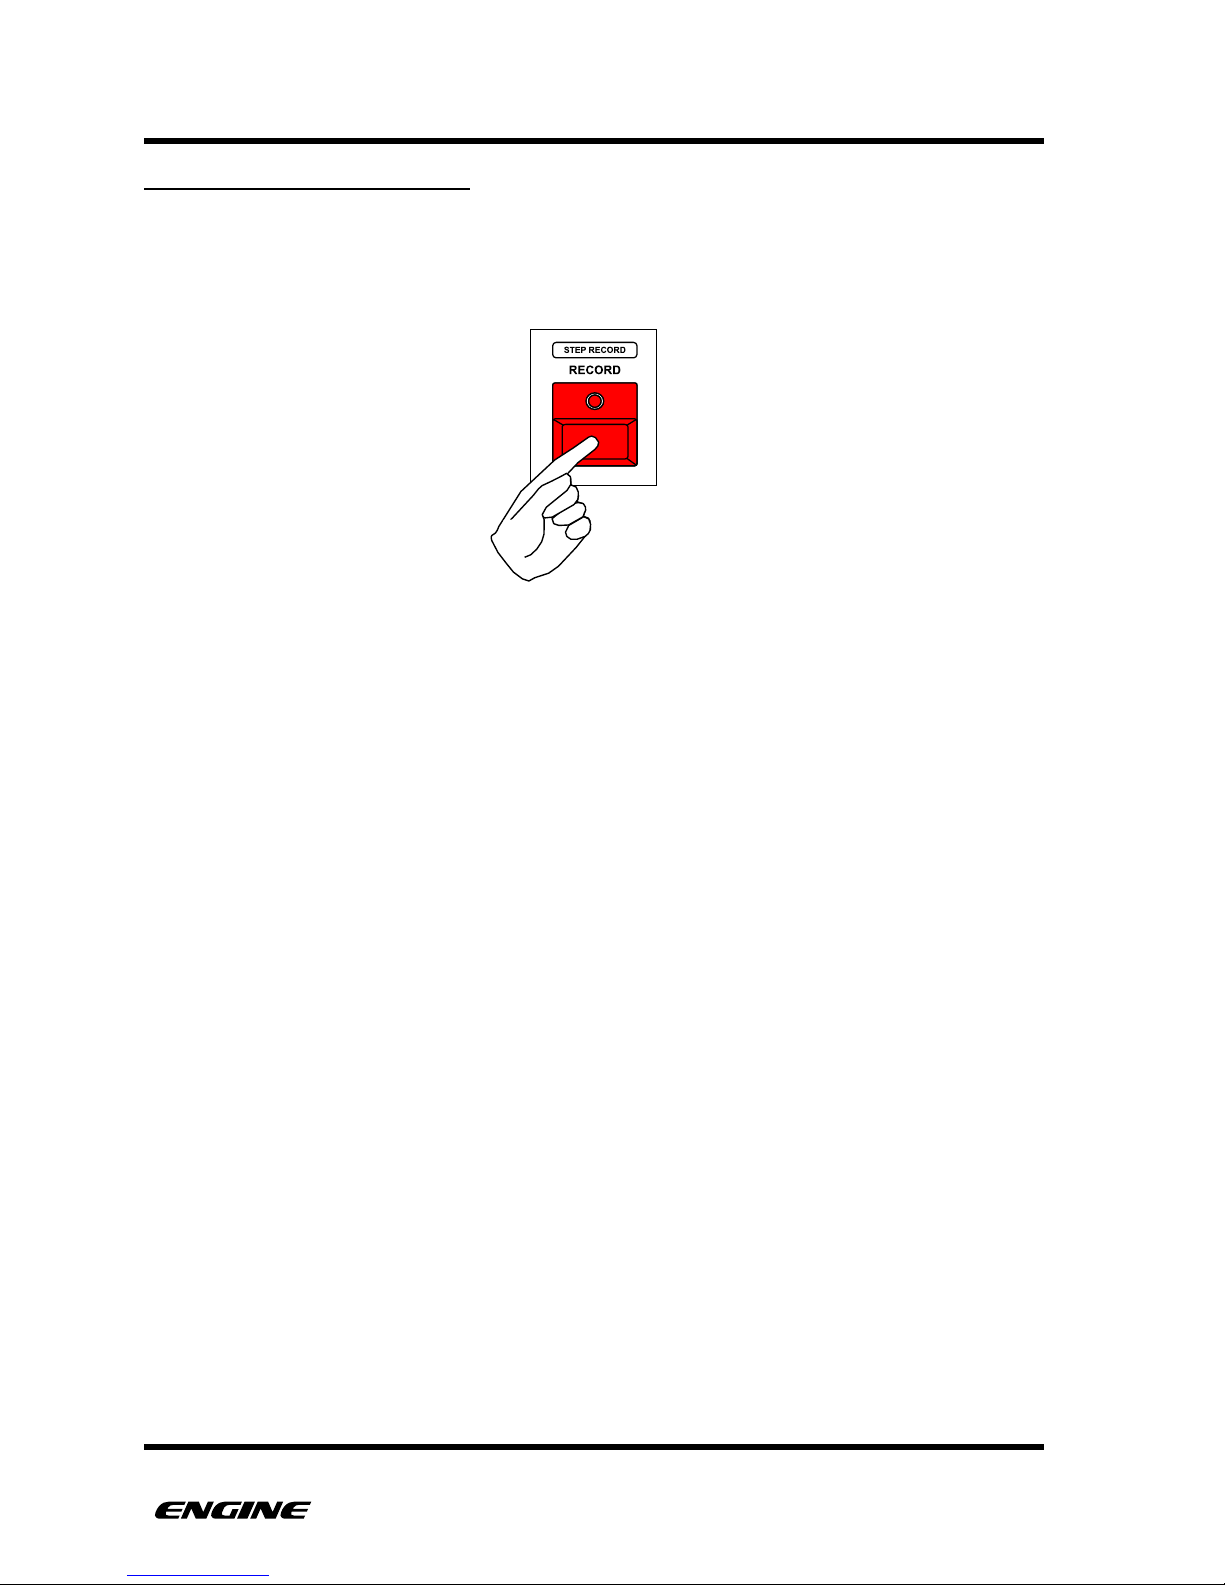
PATTERNS
RECORDING AN ARPEGGIO
If you find an interesting arpeggio, you can instantly record it directly into the pattern. To
record an arpeggio, while in ARPEGGIO mode, press and hold (or double-click) the
RECORD button.
Momentary recording of an arpeggio can create interesting musical combinations in the
sequenced pattern.
USER GUIDE 85
Page 95
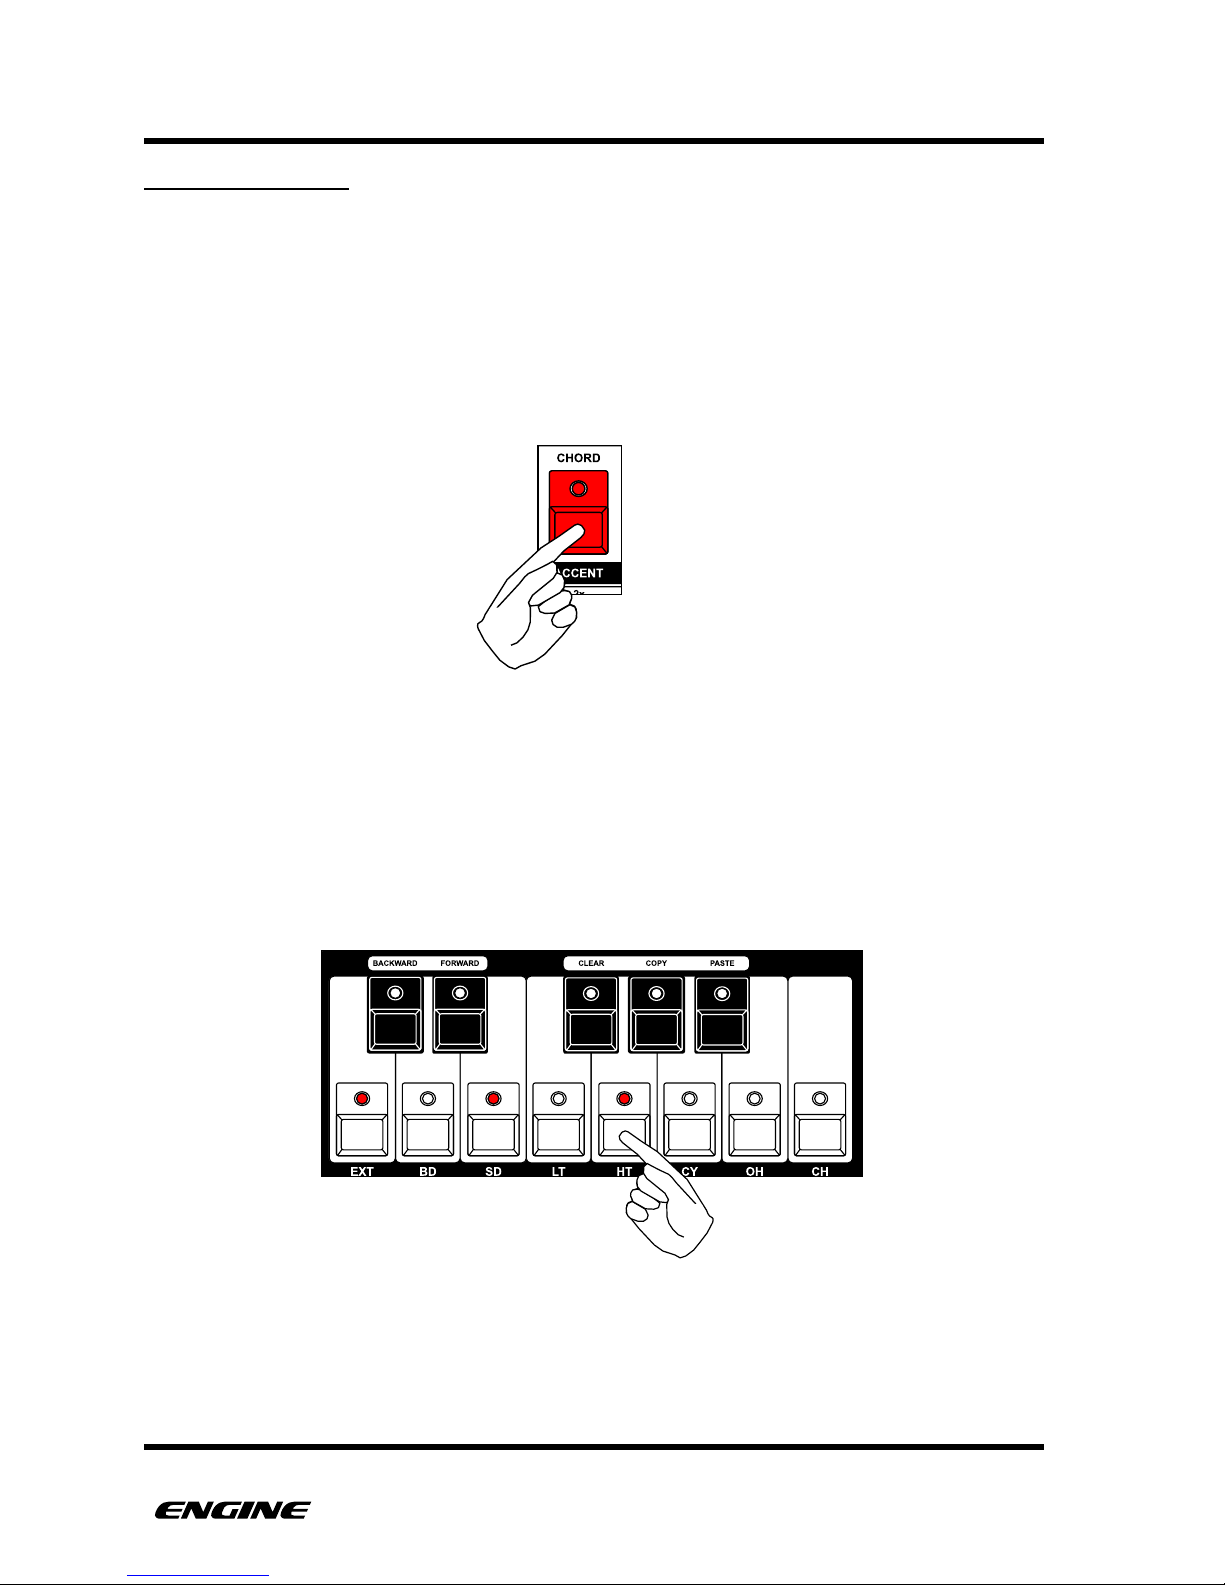
PATTERNS
CHORD MEMORY
Although each step in a synth type pattern can hold polyphonic data, the CHORD
MEMORY function can be used to automatically create polyphonic playback over MIDI.
Use CHORD MEMORY to define a chord shape that will be played for each step.
CHORD MEMORY will use the programmed pitch in PITCH SLOT 1 as the basis for the
chord. Programmed pitches for PITCH 2,3 or 4 are not used for CHORD MEMORY.
To enter CHORD MEMORY mode, press and hold (or double click) the CHORD button.
The current chord shape will be shown on the mini-keyboard LEDs. If no chord is defined,
there will be no LEDs lit.
To define a new chord shape, while in CHORD MEMORY mode, click up to three of the
mini keyboard buttons. The lowest note represents the basis of the chord and will be
played with PITCH 1 from the programmed sequence. Additional notes in the chord
shape will be played as an interval from the base pitch, transposing the chord according
to the base pitch.
To remove or change the chord, click lit mini keyboard buttons to remove notes from the
chord. If there is only one lit note in the chord, or no lit notes, there will be no chord
played.
USER GUIDE 86
Page 96
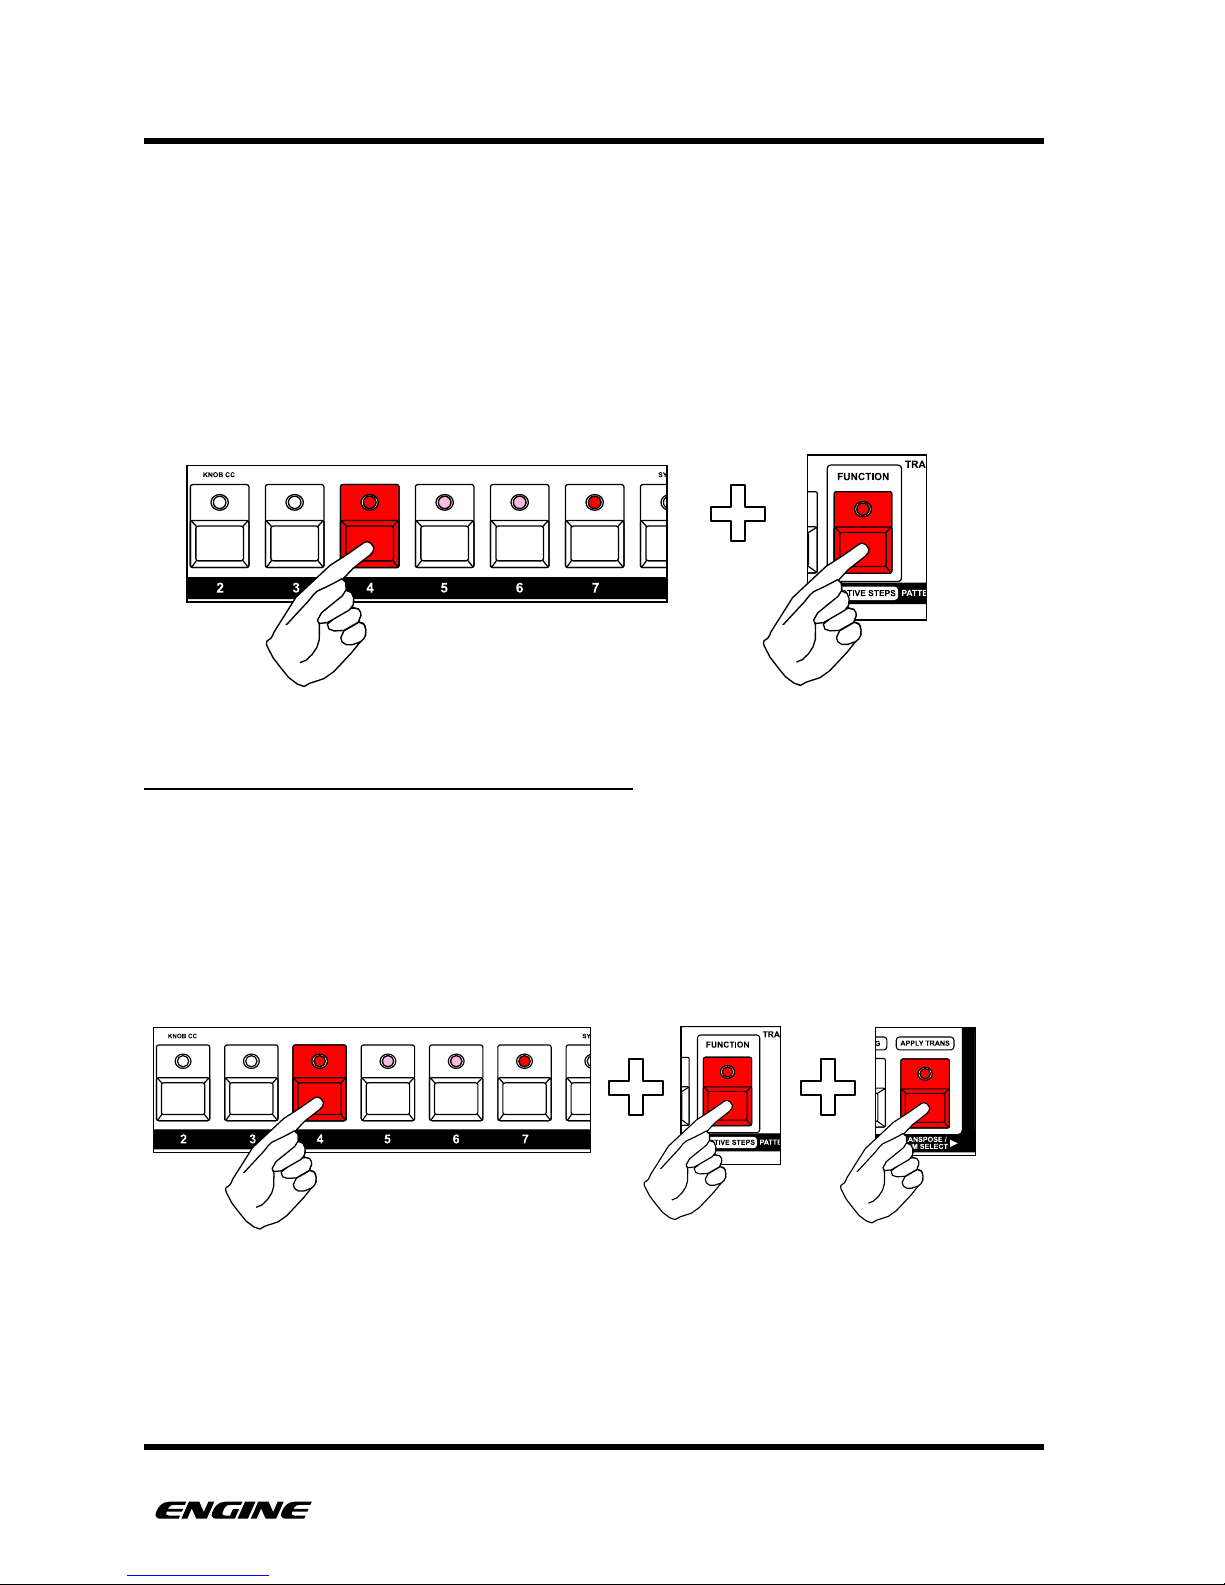
PATTERNS
STEP FUNCTIONS
While holding a pattern step, you can also apply several functions to the individual step,
such as rotate, clear, copy and paste. This can be used to make fine adjustments to a
pattern during composition.
To use a step functions, while holding a pattern step, press and hold the FUNCTION
button. Now the black (sharp) buttons of the mini-keyboard can be used to apply a
function to the step.
OPERATING ON ALL DRUM INSTRUMENTS
For DRUM type patterns, you can choose to apply the step function to all drum
instruments, or a single instrument.
By default, the step function will only apply to the selected drum instrument. If you wish to
only apply the function to all drum instruments, press and hold the TRANSPOSE/DRUM
SELECT button while performing the function.
USER GUIDE 87
Page 97
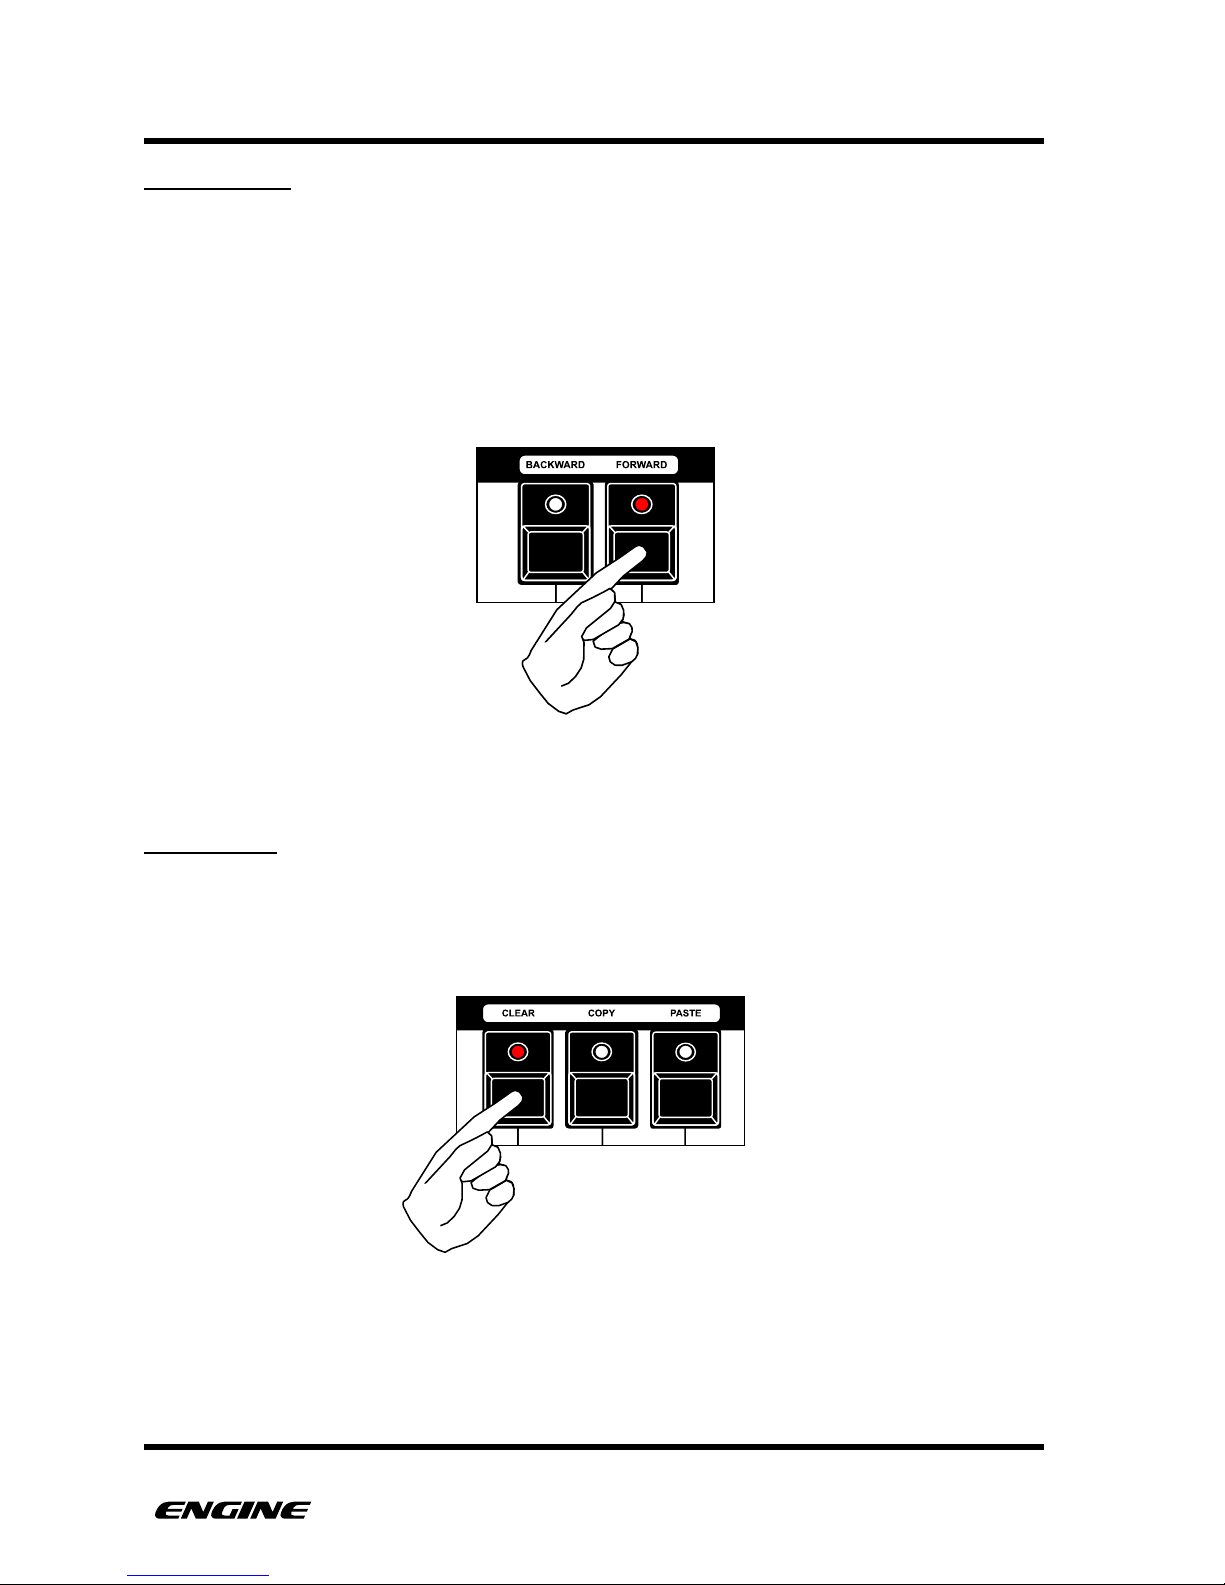
PATTERNS
STEP ROTATE
Rotating a step backwards or forwards will move the selected step location within the
programmed pattern. This is useful when only one note is recorded into the wrong step
location.
To rotate a step, while holding the pattern step button and FUNCTION, click the black
mini-keyboard button labelled BACKWARD (C#) or the black mini-keyboard button
labelled FORWARD (D#).
You can move a step forwards or backwards multiple steps, any previous notes on the
effected steps will be overwritten.
STEP CLEAR
You can clear a selected step by clicking the black mini-keyboard button labelled CLEAR
(F#). This will remove the step event. This serves the same purpose as clicking a pattern
step button to turn it off.
USER GUIDE 88
Page 98
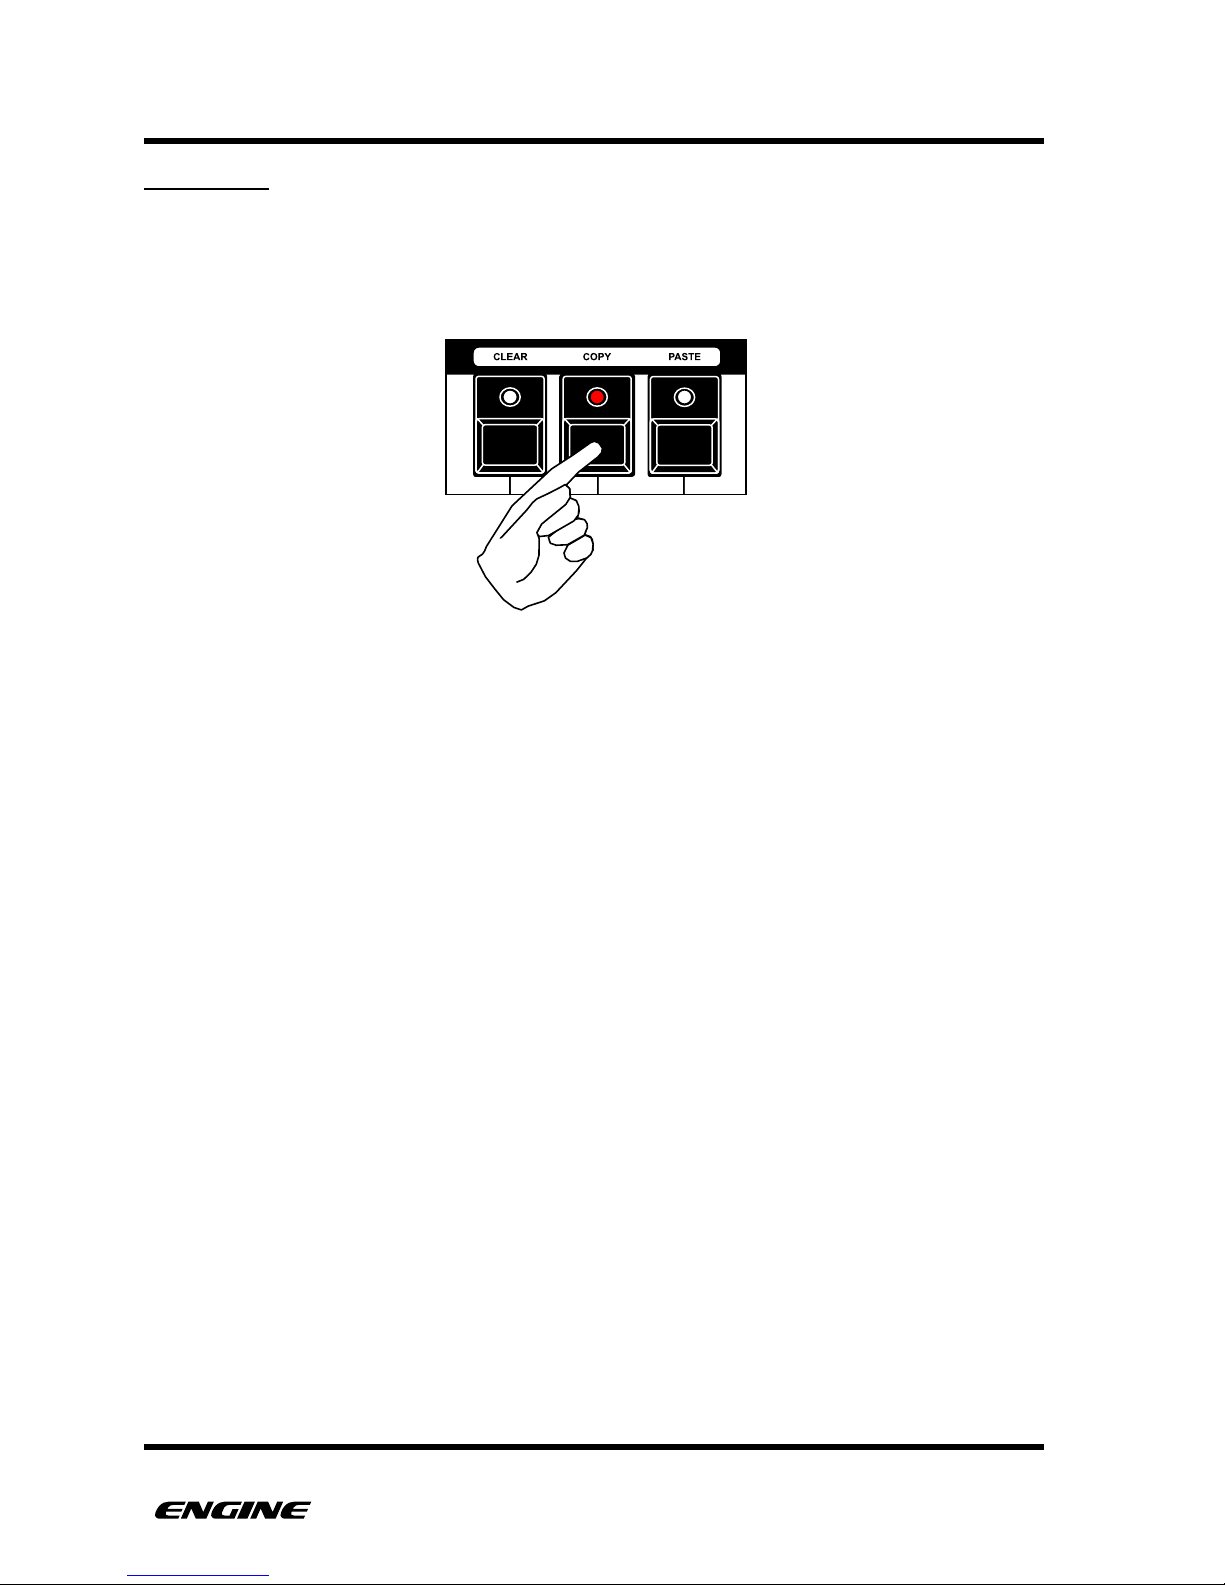
PATTERNS
STEP COPY
You can copy a selected step by clicking the black mini-keyboard button labelled COPY
(G#). This will copy the selected step into the clipboard.
The length of a synth type note is also copied.
USER GUIDE 89
Page 99
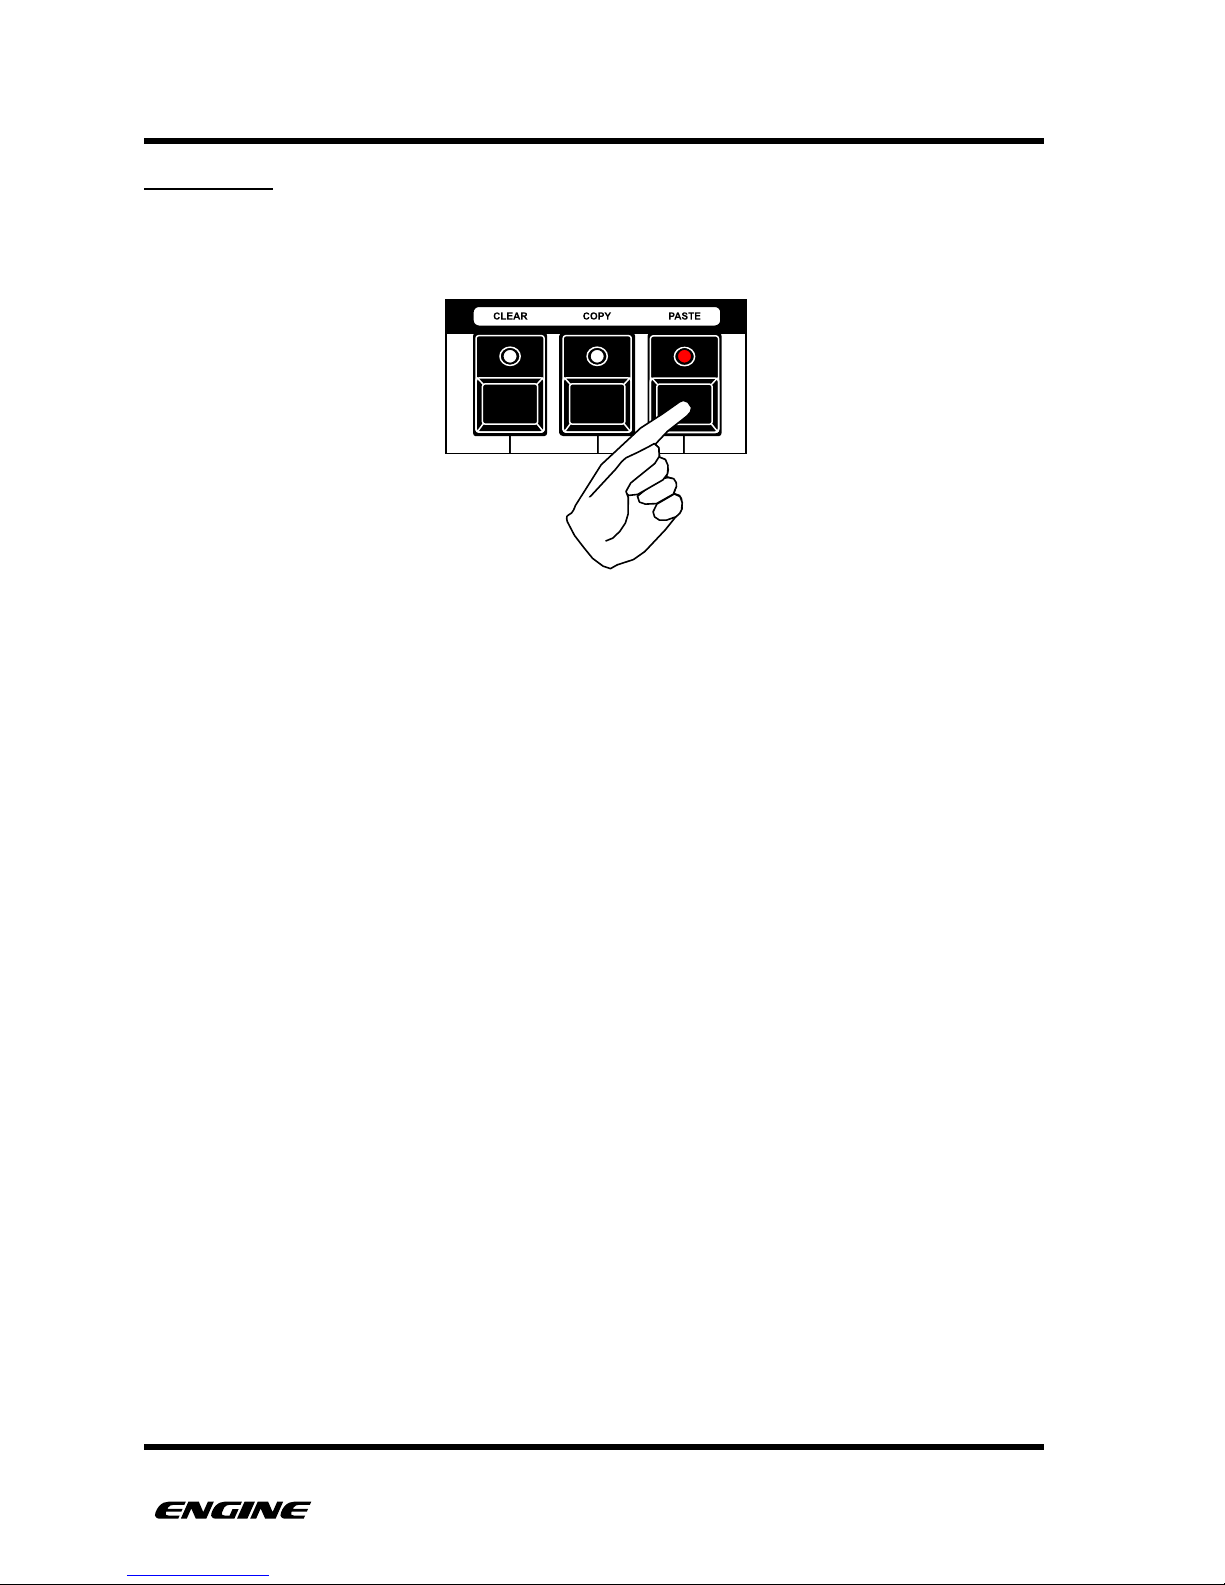
PATTERNS
STEP PASTE
You can paste a previously copied note by clicking the black mini-keyboard button
labelled PASTE (A#). This will paste the clipboard step into the selected step.
The length of the clipboard note is also pasted into the pattern, overwriting any previous
step data.
The clipboard note can be pasted multiple times. This can be useful when a particular note
needs to be repeated in several locations, avoiding the need to manually recreate the
note on each step.
USER GUIDE 90
Page 100
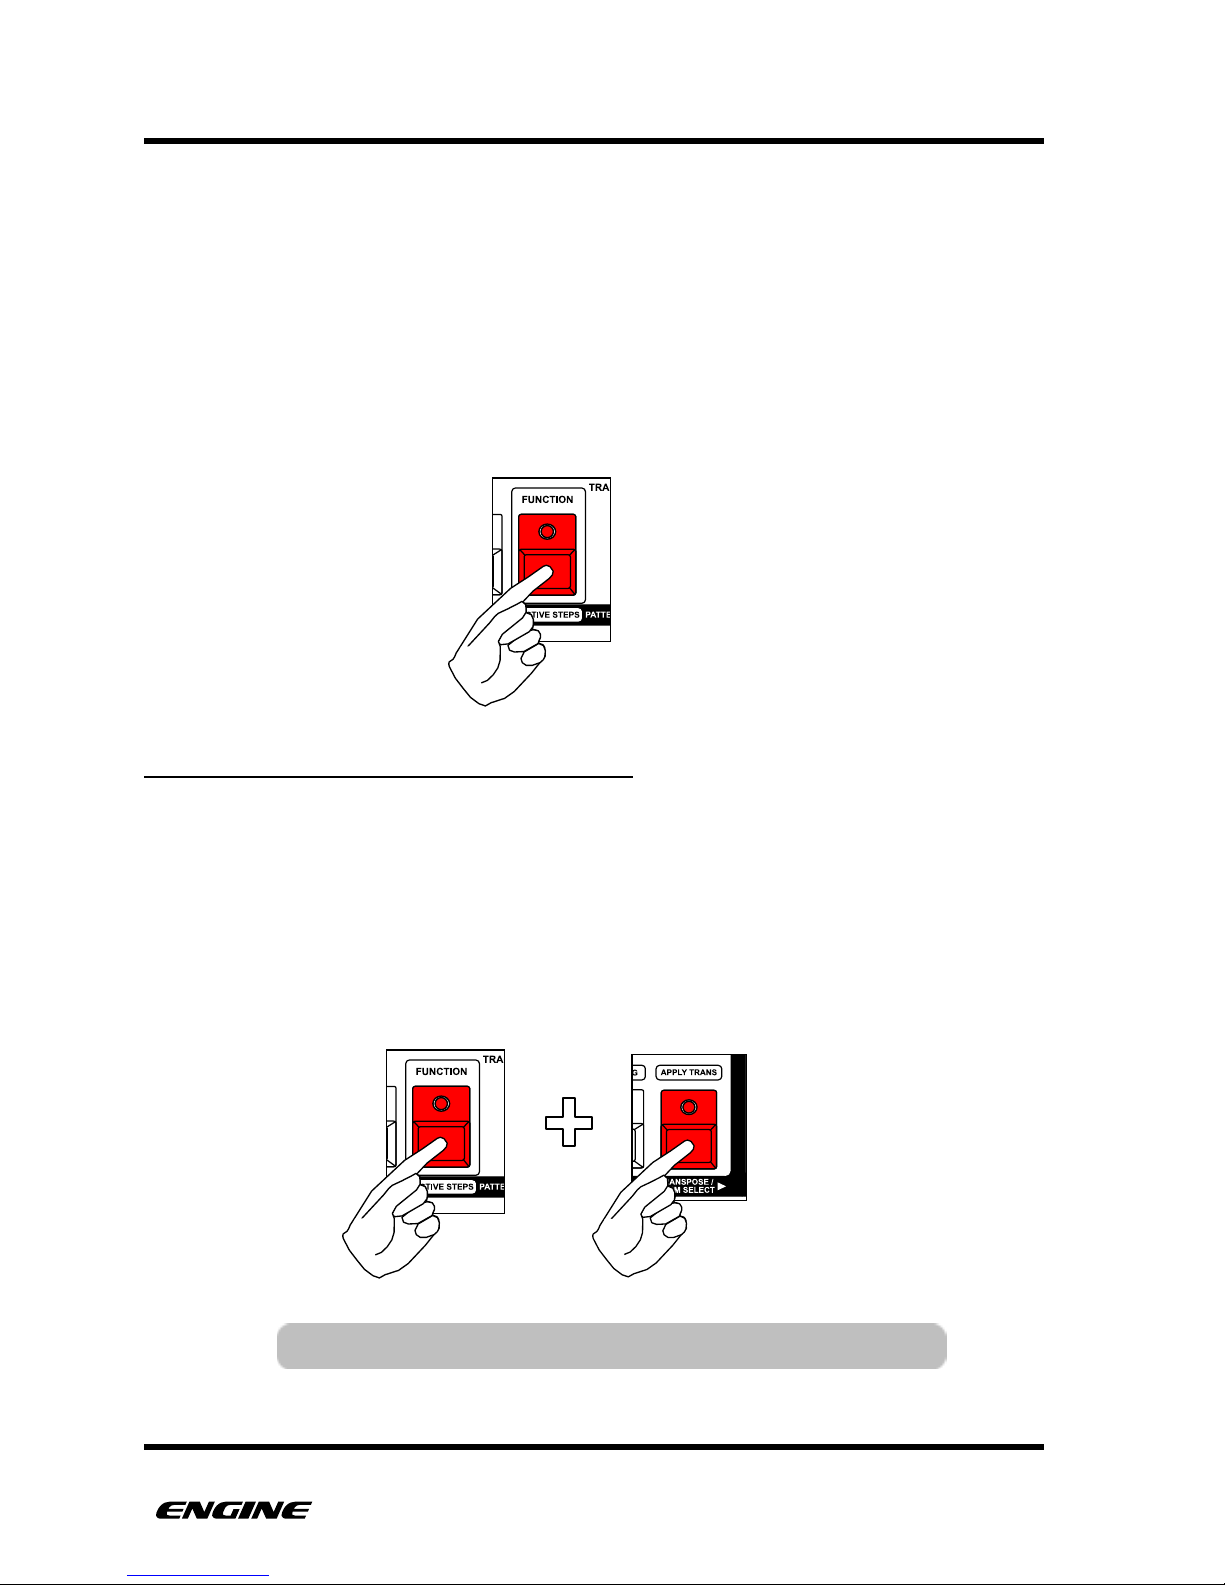
PATTERNS
PATTERN FUNCTIONS
There several useful functions that operate on patterns, which are available in FUNCTION
MODE. These include things like pattern copy and paste, clear, rotate, randomize and
reverse.
To enter FUNCTION MODE, press and hold (or double click) the FUNCTION button. The
FUNCTION button is outlined with a color and text above the button. All of the available
functions in function mode are shown as colored text surrounded by a colored line above
the relevant button.
OPERATING ON ALL DRUM INSTRUMENTS
By default, pattern functions only apply to the currently selected drum instrument. To
operate on all drum instruments, press and hold the TRANSPOSE/DRUM SELECT button
before performing the pattern function.
While holding the TRANSPOSE/DRUM SELECT button, the white keys of the minikeyboard display the selected drum instrument. You can select a different drum
instrument directly from the mini-keyboard. This makes it easy to apply pattern functions to
different instruments individually.!
USER GUIDE 91
NOTE: This capability only applies to DRUM type patterns.
 Loading...