

Page 1
U
s
e
r
'
s
M
a
n
u
a
l
Literature order number:120-0002-01
EnGenius Technologies
Customer Service
USA:888-735-7888
Canada:888-397-2788
SN-920 ULTRA
Page 2

Table of Contents
Call On-Hold
Registering additional Base Units
Custom Name
26
28-31
37-39
40-41
42-50
50-53
53-54
57
Congratulations
Handset
Diagram
Features
Base Unit
Diagram
Features
Charging Cradle
Diagram
Features
Getting Started
Base Unit Set-up
Charging Cradle Set-up
Basic Operations
Modes
Making Calls
Manual Dail Pre-dial tone
Manual Dail Post-dial tone
Redial
Directory Dial
Memory Dial
Answering Calls
Handset in Charging Cradle
Handset not Charging Cradle
Voice Volume
1
3
4
8
9
10
11
12-13
13-15
16-19
20
21
21
21-22
22-23
25
25
26
Muting a Call
Call Waiting
Transferring a Calls
Disconnecting Calls
Advanced Operations
2-Way Radio
Handset-to-Handset
Base-to-Handset
Handset-to-Base
Base Unit Options
Ring Volume
Voice Volume
Main Menu Function Chart
Handset / Base Registration
Registering a Handset
De-registering Handset
Handset Menu Options
Key Guard
Directory
Caller ID
Sounds
Ring Volume
Ring Type
Key Volume
Key Tone
Settings
Area Code
Tone/Pulse
Backlight
Reset
27
28
31
32
33
34
35
35
36
39
42
54
54
54
55
56
56
57
Page 3
Call Manager
Contrast
This device complies with Part 15 of the FCC Rules.
Operation is subject to the following two conditions:
1)this device may not cause harmful interference, and
Privacy of communications may not be ensured when using
When selecting a location for the base unit, it is better to locate
from any person to be in compliance of FCC safety regulations.
handset is on. Should not carry the handset in a breast pocket.
Dial Prefix
58-59
59
60
Product Specifications
Safety Instruction
Regulatory Information
61
62-66
67-68
2)this device must accept any interference received,
including interference that may cause undesired
operation.
this phone.
CAUTION:
the base unit as high as possible to avoid obstructions that
might interfere with the radio transmission and getting a clear
signal.
In any case, the base unit must be located 8 inches (20cm)
Person with pacemaker: Should always keep the handset
more than 8 (20 cm) from their pacemaker when the
If you have any reason to suspect that interference is taking
place, turn off your handset immediately.
inches
For hands-free operation of the handset, the device has been
tested for RF exposure compliance with the EnGenius
provided belt-clip and leather pouch. Other belt-clips, holsters
or similar accessories that have not been tested may not
comply with RF exposure requirements and should not be
used.
Page 4

You have purchased an exceptional business communications
expandable design allows the system to grow with your business.
business settings from multi-level office buildings, construction
military level digital security, music or message on-hold capability,
Congratulations!
~1~
~2~
and flexibility of this unique telecommunications system cannot
be overlooked for the Small Office / Home environment.
tool from the leading Industrial Cordless Phone System
manufacturer.
The EnGenius SN-920 ULTRA Industrial Cordless Phone
System is the second generation of the
Cordless Phone and 2-Way Radio
are ideal for the Small Office Home Office (SOHO) user. The
With sophisticated digital signal processing and six times the
power of typical cordless phones, the EnGenius system provides
cordless phone and two-way communications in a wide variety of
TM
TM
Longest Range
system. EnGenius systems
Intellectual Property Rights Notice
EnGenius SN-920 ULTRA User's Manual
Copyright 2000 EnGenius Technologies.
All rights reserved.
No part of this User's Manual may be reproduced, stored in a
retrievable system, or transmitted, in any form or by any means,
electronic or mechanical, including photocopying, recording, or
α
otherwise, without permission of EnGenius Technologies.
sites, warehouses, farms, business complexes and other
demanding business environments. The EnGenius system is
capable of supporting up to 4 lines (4 base units) and 36
handsets. The EnGenius system is able to provide you increased
mobility within your business environment.
EnGenius is a trademark used herein under exclusive license and
Industrial Cordlessis a trademark of EnGenius Technologies.
TM
All rights to patents, including patents pending EnGenius
products are the exclusive properties of EnGenius Technologies.
Another unique feature of the EnGenius system is the ability to
use the handsets as digital, full duplex, two-way radios. The
digital two-way radio mode allows members of the work group to
be in contact with their co-workers while leaving phone lines
available for incoming or outgoing calls. Users can designate
their handsets to receive all incoming calls or receive only
intercom (2-way) and transferred calls, with the Call Manager
feature. Additionally, an incoming call can be answered, placed
on-hold or transferred to the appropriate person, from any
handset.
The many EnGenius system features inc lude: long-range, 2-way
radio and cordless phone operation, system expandability,
80 minute battery recharge and the new 4-line LCD display with
Caller ID/Call Waiting readout capability have given birth to a new
product category in the cordless phone industry known as
Industrial Cordless Phone Systems. The convenience, mobility
TM
Page 5
~3~
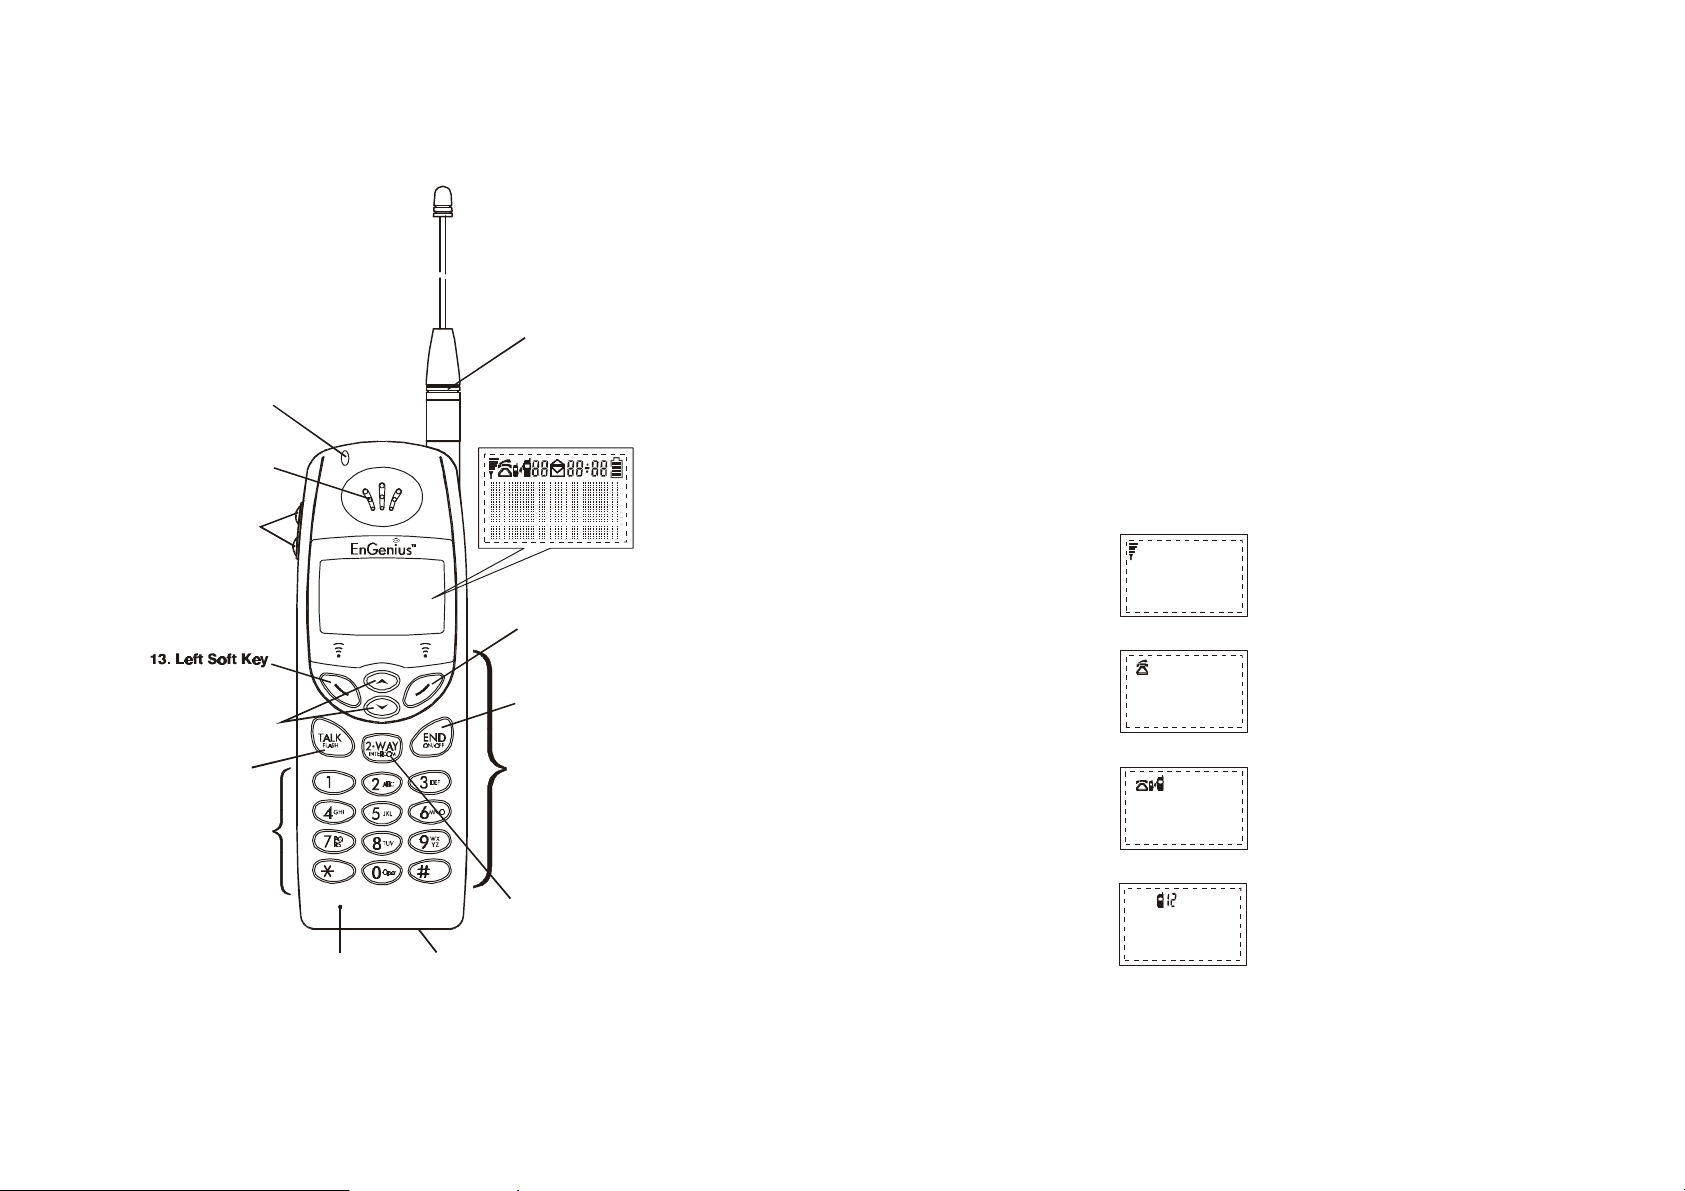
Handset Diagram
~4~
4. Liquid Crystal Display (LCD)
The display has Light Emitting Diode (LED) for backlighting.
The next two lines consist of user-programmable alphanumeric
~
~
Handset Features
1. Antenna
2. Earpiece
1. Antenna
17. Status LED
4. LCD
2. Earpiece
7. Volume key
14. Right Soft Key
16. End/ON/OFF
15. Scrolling Keys
6. Talk/Flash
9. Dialing keys
5. Keypad
8. 2way/Intercom
¡E
3. Microphone
Functions as mouthpiece.
*
*
The first line of the LCD consists of eight icons.
*
Characters.
*
The last line displays the soft key functions.
* Receive Signal Strength Indicator (RSSI)
The number of bars is
proportional to the signal
strength of the RF signal
received.
* Call in-progress(ON/OFF Hook)
* Intercom Mode: Active
* Handset ID
3. Microphone
12. Headset Adapter Port
Page 6
~6~
7. Volume key
17. Status LED
Located on side of handset: up / down buttons control volume.
(repeat every 30 seconds):
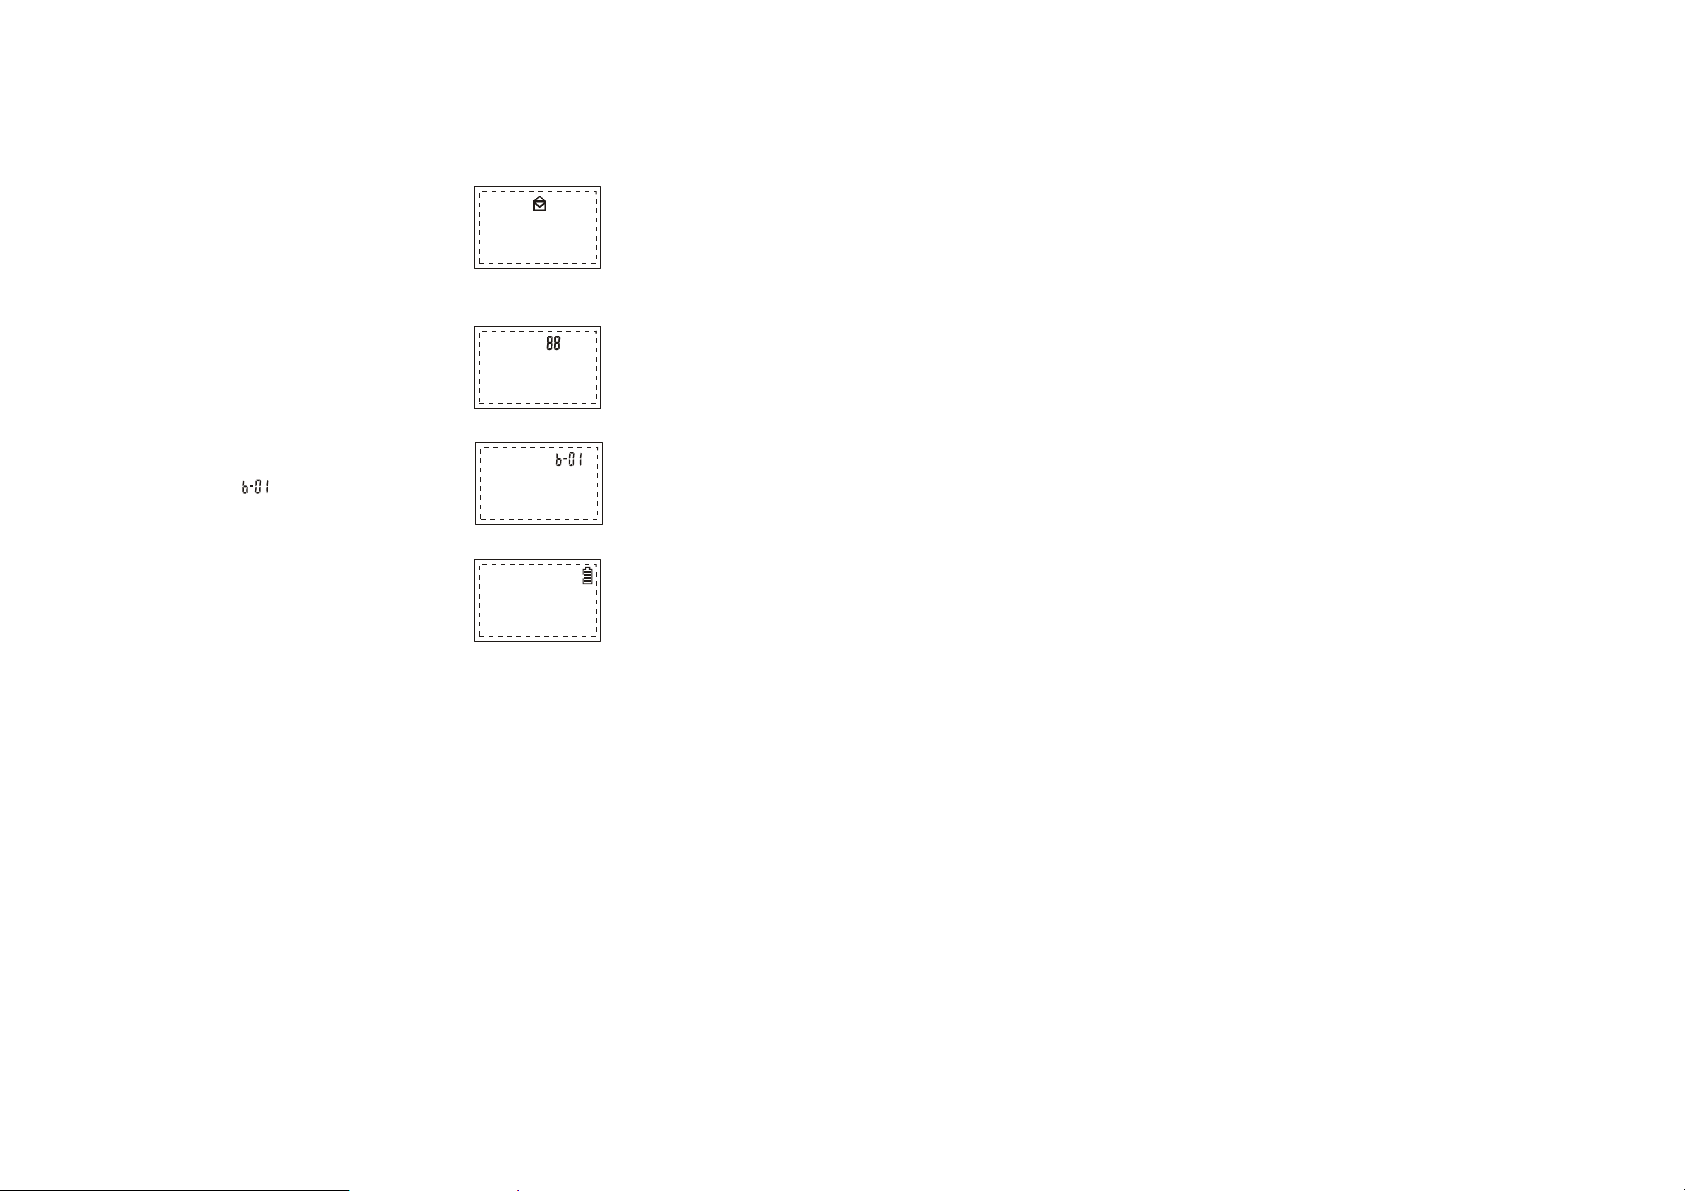
* Caller ID Log
~5~
Unread messages: Closed Envelope
Read messages: Open Envelope
No information or no Caller ID Service:
No Envelope is Displayed.
8. 2-WAY/INTERCOM
Used to place an intercom call to another handset or base.
* Two-digit Number Display
Tracks Caller ID log and Phone
Directory record location.
* Line or Base Indicator
Indicates the base that is active.
(Example: )
* Battery Strength
Number of bars is proportional to the
amount of battery time remaining.
5. Keypad
19 button face keypad.
Backlight option can be set to OFF,
ON, or 8 seconds time out.
6. Talk / Flash
Answer incoming phone or two-way
radio (intercom) call. Place an
outgoing phone call.
This button also acts as the flash
button for functions like call waiting
and toggling between calls.
9. Dialing Keypad
Used for dialing phone numbers and entering alphanumeric
information into Phone Directory.
10. Ringer (not shown)
Emits several sounds to indicate various events or alarms.
Single Beep
Successful operation
Double Beep
Failed operation or invalid key. Also, indicates
power on / off.
Periodic Short Single Beep
(every two seconds):
Low battery warning.
Periodic Long Series of Beeps
Indicates a call on-hold.
Continuous Beep
(2 seconds): Indicates out of range while
in talk mode.
11. Battery Pack Slot (on back of handset)
12. Headset Adapter Port (on bottom of handset)
13. Left Soft Key
14. Right Soft Key
15. Scrolling Keys
16. END
On / Off for power and to end (hang-up) a call
Blinking: Stand by
Solid: On a call or the first 8 seconds after power on
(not shown)
Page 7
~7~
Additional Handset Features
Caller ID (requires Caller ID service from phone service provider)
~8~
SN-920 ULTRA
VOLUME
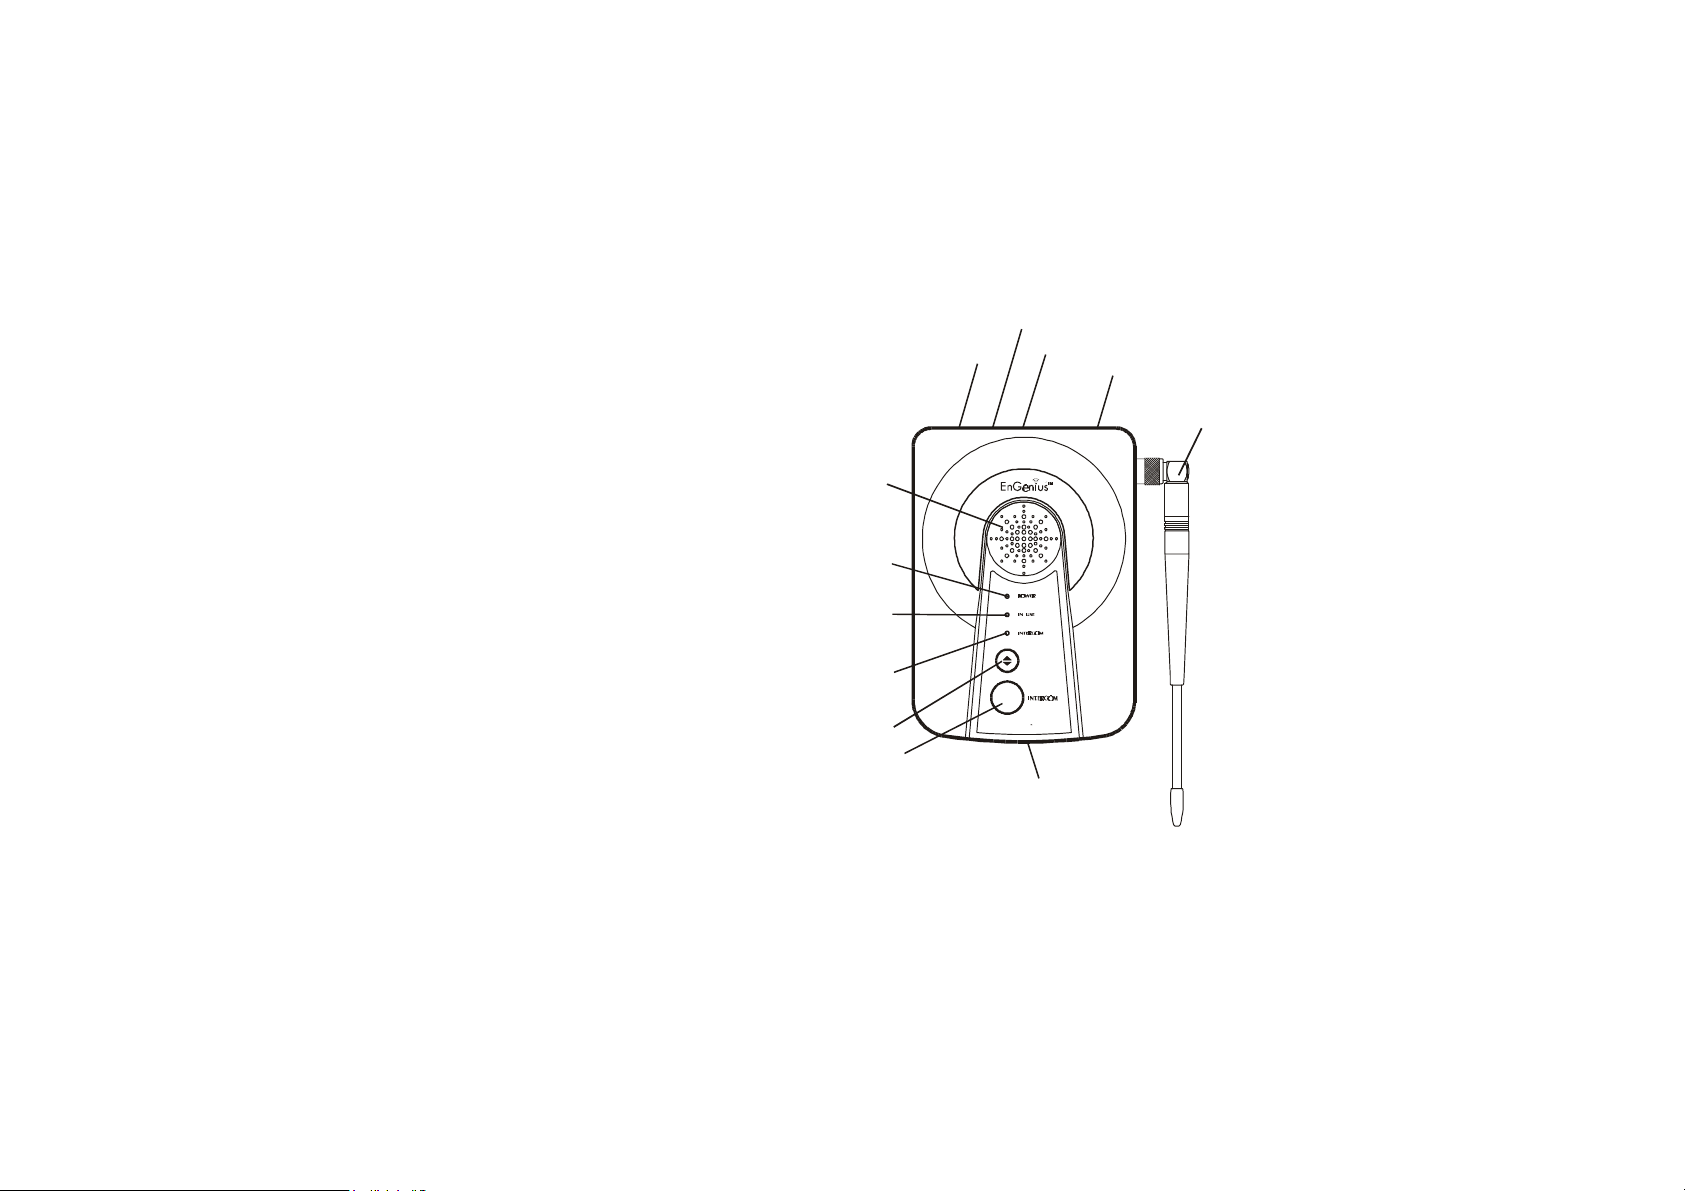
1. Antenna
12.AC adaptor
8. In use LED
9. Intercom LED
4. Page / Intercom
*
Call Waiting with Caller ID (requires Call Waiting and Caller ID
Base Unit Diagram
services from local phone service provider)
*
Call Manager option: User programmable option for handset to
allow all calls or only transferred and intercom calls
*
Touch any key to answer call
*
Call transfer to another handset within the system
*
Unique, system assigned Security ID (1 of 65,000)
*
Phone Directory: up to 30 phone numbers (20 digits) and
6. Audio-in Jack
10. Line Out
11. Line In
names (14 characters)
30 number memory speed dial for Phone Directory
*
Last number redial
*
*
Caller ID log: stores up to 30 calls of caller information including
*
2. Speaker
caller's name, number, date and time
Intercom communications with base unit
*
Handset-to-handset communication independent of the base
*
(Digital, full duplex two-way radio)
Three level ringer volume adjustment (low, high & vibrate)
*
Four ring types
*
Six level voice volum e control adjustment
*
Ring or vibration alert option
*
Tone / pulse dial option
*
Low battery alarm and display
*
Change battery while call on-hold
*
Keypad illumination
*
Three level key tone volume control (low, high & off)
*
Four different key tone sound selections
*
Auto power management
*
Hold
*
Mute
*
*
Flash
7. Power LED
3. Volume
PAGE
INDUSTRIAL CORDLESS PHONE SYSTEM
5. Microphone
Page 8

~9~
Base Unit Features
Additional Base Unit Features
Swivel base for ease of positioning. (Note: Reverse thread
~10~
2. Spare Battery
1. Handset Charger/Cradle
3. Handset Charging Indicator
4. Spare Battery Charging Indicator
1. Antenna
antenna adapter; to remove, turn clockwise).
2. Speaker
3. Volume
4. Page / Intercom
5. Microphone
Charging Cradle Diagram
5. AC Adapter
6. Audio-in Jack(3.5 mm)
7. Power LED
LED indicates base unit has AC power.
8. In Use LED
LED indicates a phone call, base / handset intercom call, or
handset registration is in progress.
9. Intercom LED
LED indicates when base is in intercom mode.
10. Line In
11. Line Out
12. AC Adapter Port
*
Supports up to 9 handsets per base unit. One handset can be
registered to 4 base units.
*
Assigns handset security code during registration
*
Adjustable four level ringer and voice volu me control
Compartment
Page 9
~11~
Charging Cradle Features
LED is not lit: Slot is empty or proper connection is not
~12~
7. For best performance, computers, faxes, telephone answering
GETTING STARTED
1. Handset Charging Cradle
Holds handset
Charges handset battery pack each time handset is placed
in cradle. 80 minute rapid charge.
2. Spare Battery Compartment
Spare battery recharged when placed in this slot.
80 minute rapid charge.
3. Handset Charging Indicator
LED is not lit: Slot is empty or proper connection is not
made.
LED is blinking red: Battery is charging.
LED is green: Battery is fully charged.
4. Spare Battery Charging Indicator
made.
LED is blinking red: Battery is charging.
LED is green: Battery is fully charg ed.
5. AC Adapter Port
Additional Charging Cradle Features
*
Handset and a spare battery pack can be charged at the same
time
*
Fully discharged battery packs can be charged in
approximately 80 minutes
*
A trickle charge feature will maintain charge on a nearly fully
charged battery
*
It is impossible to overcharge the batteries using this charger
Fully charge battery packs before first use
*
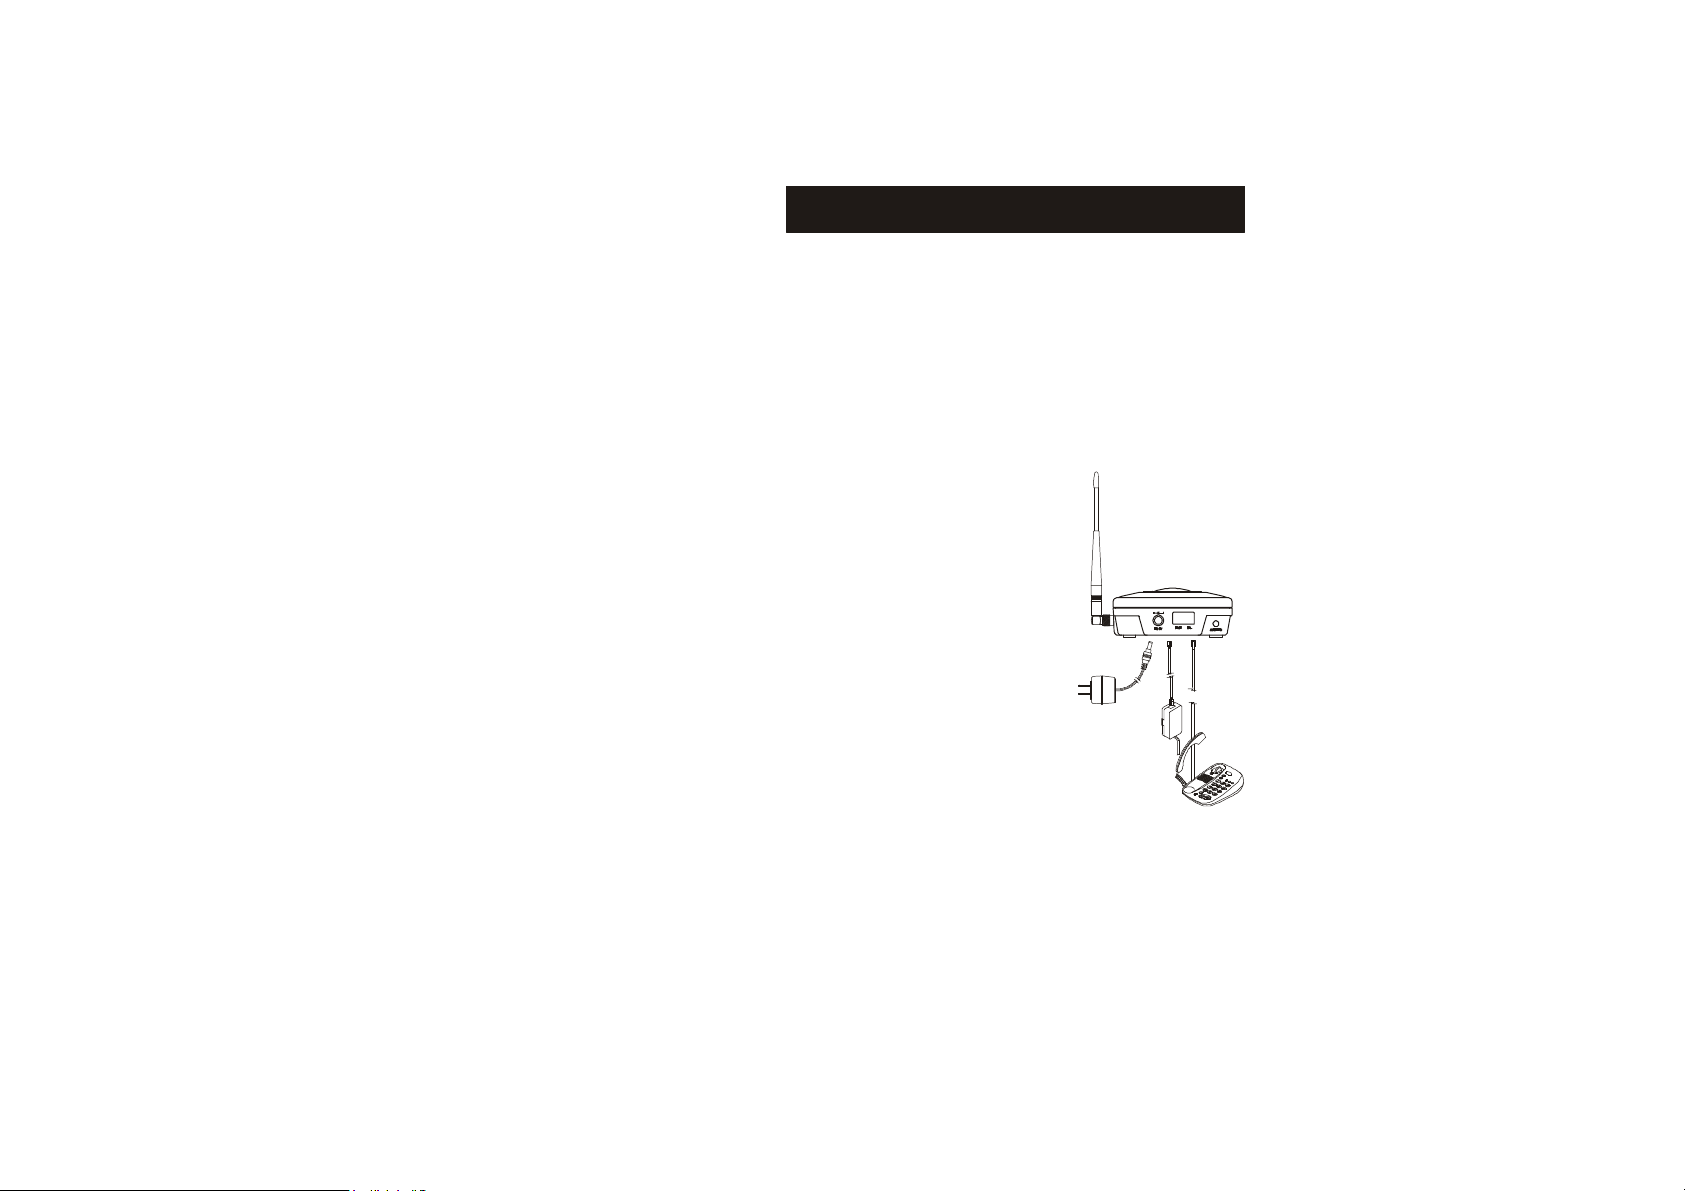
Base Unit Setup
There are three possible base unit setups:
*
Base unit alone
*
Base unit plus telephone answering device
*
Base unit plus standard telephone
Basic Instructions
1. Plug the small end of the 9V DC power adapter into the
"DC IN" port on the back of the base unit.
2. Plug the two-pronged 9V DC
power adapter into a standard
120 V AC electrical outlet.
3. Plug telephone line cord into
the next receptacle on the
back marked LINE.
4. Plug the telephone line cord into
the telephone wall outlet.
5. A standard telephone or answering
machine can be plugged into the
adjacent receptacle on the back of the
base unit marked TEL.
6. The Music/Message On-Hold feature can
be achieved by plugging either end of the
included audio cable into the audio-in port
on the back of the base unit.
machines, televisions, stereos and other cordless devices
should be at least 1 meter (approximately 3 feet) from the
base unit.
Page 10
~13~
The location for the handset charging
on the back of the charger unit.
The charging unit has spare battery charging slot
Follow instructions that came with the answering
device or telephone if different from those described here.
NOTE:
~14~
It takes about 80 minutes to fully charge a battery
in either the (front) handset slot or the (rear) spare battery
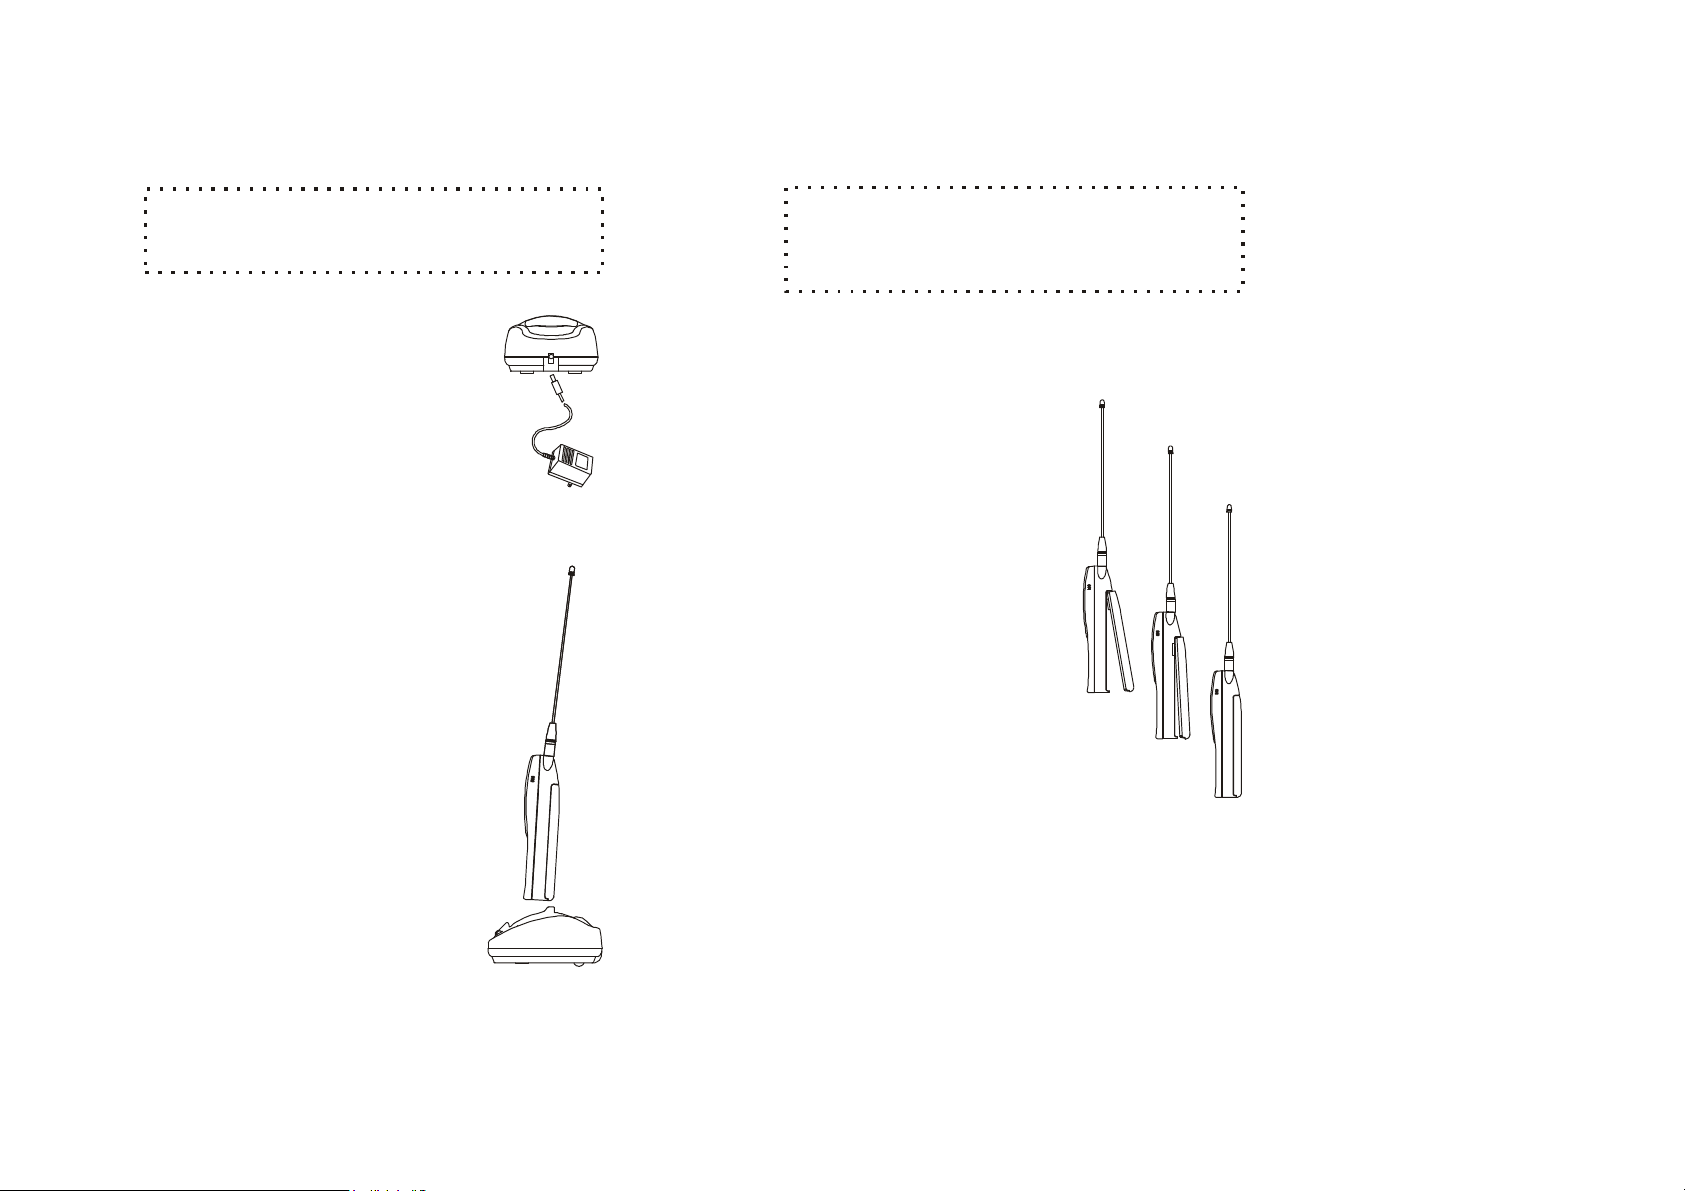
Charging SetupCradle
requires a standard 120V AC
cradle
electrical wall outlet.
1. Plug the small end of the 12V
DC adapter into the receptacle
NOTE:
slot.
Battery Light Indicators
LED is not lit: Slot is empty or proper
*
connection is not made.
LED is blinking red: Battery charging.
*
LED is green: Battery is fully charged.
*
Installing New Battery
2. The two-pronged 12V DC adapter
is then plugged into the wall outlet.
Charging a Battery
The battery charger can charge the handset and
a spare battery pack at the same time.
behind the handset charging slot.
1. To charge the handset, simply place the
handset, with battery pack attached, into
the charging slot with the handset facing
the front of the charger. If the handset is
properly in the cradle, the cradle's
PHONE indicator light will be illuminated.
2. To simultaneously charge a spare
battery, insert the spare battery pack
with pack contacts facing down and
towards the rear into the rear charging
slot.
1. To remove the handset battery:
Turn the handset face down and
locate the battery pack release
on the bottom of the handset.
Push the release towards the
top of the phone and lift up.
2. To install battery pack:
Carefully slide the top battery
pack tabs into battery pack
area of handset aligning the
metal contacts of handset
and battery pack. Press down
on the bottom end of the battery
pack. The battery pack should
"click" into a secured position
on the handset.
Page 11

~15~
Hydride (Ni-MH) battery packs. Each battery provides up to thre
Low Battery Indicator
~16~
Both the base unit and handset have levels of operation at which
These levels or modes of operation will be referred to throughout
- this is the default mode. The intercom and volume
has been entered. The IN USE and POWER LEDs are illuminated.
Charge the batteries when one of the following happens:
*
Phone beeps twice every two seconds
*
Battery icon is empty
*
Phone does not respond when a key is pressed
*
LCD and backlighting become dim
Battery Replacement
BASIC OPERATIONS
Operation Modes
time only certain procedures or functions can be performed.
this manual and vary from base unit to handset.
Your EnGenius phone system uses rechargeable Nickel Metal
hours of talk-time, based on range, terrain and environmental
conditions, or up to 40 hours of standby time. These high
performance battery packs have an average life span of about
300 charges (a charge is defined as going from empty to fully
charged). Additional or replacement new SN-920 ULTRA battery
packs are available as part number: SN-920 ULTRA-BA.
CAUTION!
replaced. Replace only with the same or equivalent type
recommended by the manufacturer. Dispose of used
batteries according to the manufacturer's instructions.
CAUTION!
Danger of explosion if battery is incorrectly
Do not open the plastic battery pack encasing.
e
Base Operation Modes
The base unit operates in three different modes: IDLE, TALK, and
REGISTRATION.
IDLE MODE
keys are active in IDLE mode. The POWERLED is red.
TALK MODE
incoming or outgoing intercom call and an incoming or outgoing
phone call. Volume key is active in TALK mode. POWER, INUSE
and INTERCOM (during an intercom call) LEDs are red.
REGISTRATION MODE
simultaneously holding down the intercom and volume keys for
three seconds. There are no active base unit keys once this mode
The IN USE LED will come on and stay active for approximately
30 seconds and then turn off.
HandsetOperationModes
The handset operates in one of five different modes: IDLE,
MENU, TALK, REGISTRATION and CRADLE.
- the base operates in this mode during an
- the base enters this mode by
Page 12

~17~
IDLE MODE
~18~
The functions available through the MENU
selection are covered in greater detail under Handset
If the handset remains inactive in MENU mode for 30 seconds
(no keys are pressed or no incoming calls), it will exit MENU
00:00:08
This is the default operating mode.
* The LCD will show the following
screen and icon placement in the
IDLE mode:
* If there is no on-going activity, the
EnGenius
SN-920
REDIAL MENU
handset automatically goes into
SLEEP/IDLE mode to save battery
power.
* The handset can be turned off
completely by holding down the
END key for 3 seconds.
The idle screen display(custom name) can be
NOTE:
edited (in the menu mode) with the handset owner's name
or other custom greeting.
The 2-digit number near the top center of the LCD shows
the handset's ID.
In MENU mode, the handset
*
settings and information
contained in memory can be
changed. (For example: the Caller
ID log and Phone Directory).
All keys, except 2-WAY , are
*
(Intercom)
active in MENU mode
*
mode and return to IDLE mode
NOTE:
Menu Options.
TALK MODE
*
When the handset is in IDLE mode,
pressing the TALK key or answering
an incoming or intercom call will
activate TALK Mode.
*
The screen will look like this in
TALK Mode:
*
All keys are active in the TALK Mode.
Volume
HOLD
MENU MODE
In the TALK mode the TALK key functions as a
** Pressing the RIGHT SOFT FUNCTION
key activates MENU mode.
The screen will look like this in MENU
Mode:
Main Menu:
2:DIRECTORY
3:CALLER ID
4:SOUNDS
5:SETTINGS
6:REGISTER
¡õ¡ô
R
NOTE:
FLASH key. Pressing the TALK key will temporarily place
the call on hold while answering another call with the Call
Waiting feature. Pressing the TALK key again will return you
to the original call. Call Waiting requires telephone service
provider subscription.
Page 13

~19~
* Do not register your handset if it has been registered at the
REGISTRATION MODE
~20~
You can enter a phone number before or after connecting to dial
the advantage of reaching the correct party with the first phone
5551221_
Dialing
5551221
00:00:08
Volume: 5
Making Calls
factory. If, when you first turn on the phone, "00" is displayed
near the top center of the LCD (to the right of the icon),
the handset has not been registered at the factory.
* Specific instructions on how to register the handset are
covered in detail under Handset / Base Registration in the
Advanced Operations section.
* If the handset is not registered
with the base unit, any attempt
to make an outgoing call or
intercom call to another handset
will fail. The LCD will read:
CRADLE MODE
* Placing the handset into the charger
cradle activates the handset CRADLE
mode.
* While in the CRADLE mode, the battery
charging unit recharges the handset
battery pack.
* An incoming or intercom call while
in the CRADLE mode will generate
this screen:
* Removing the handset from the
cradle during an incoming call
automatically answers the call and
places the handset in TALK Mode.
* Placing the handset in the cradle
or pressing END will end a call.
Station not
Incoming Call
On Base 1
SILENT
tone.
ManualDial(Pre-Dial Tone)
ENTERING A NUMBER BEFORE CONNECTING TO
DIAL TONE
Selecting a phone number before connecting to dial tone offers
call.
*
From the IDLE mode, enter the number
you wish to call. The number you input
will appear on the handset screen as
typed. For example, the number
555-1221 would appear as:
*
If an incorrect number has been entered,
select the CLEAR option by pressing the
RIGHT SOFT FUNCTION key to clear the
entire number, then re-enter the number
you wish
*
The DELETE option is selected by
pressing the LEFT SOFT FUNCTION
key. DELETE will delete one digit
at a time from right to left, similar
to a backspace key
*
When the correct number is displayed
on the screen, press TALK to complete
the call
*
You will hear a dial tone and see the
following three screens as the number is
dialed:
DELETE CLEAR
to Line 1
HOLD MUTE
Page 14

~21~
Manual Dial(Post-Dial Tone)
While the handset is in the IDLE mode, you can press TALK to
make a call. There are three ways to make a call in the TALK
~22~
From IDLE mode, press the RIGHT
SOFT FUNCTION key to select the
While in the Main Menu, select the
directory scolling option by pressing
Information stored in location 01 will
*
ADD
OPTION
See Directory View Mode for additional instructions
If the handset is unable to link to the base unit, it will return
VOLUME: 5
Smith
5551212
REDIAL
MEMORY
ENTERING A NUMBER AFTER CONNECTING TO
DIAL TONE
Mode:
* When dial tone is heard and
the handset is waiting for a phone
number to be entered, the following
screen will appear:
* Enter the desired phone number
from the numbered key pad. The
screen will show the following
display:
* After a number is dialed, this
screen will be displayed:
Redial
While in the TALK mode, press the
*
LEFT SOFT FUNCTION key to s elect
the REDIAL option. The following
screen will be displayed:
* The last number dialed will be re dialed
VOLUME: 5
REDIAL MEMORY
5551222
00:00:00
VOLUME: 5
HOLD MUTE
5552222
MENU option.
*
the 2 key.
*
be displayed first. Use the Up or
Down arrows to scroll through the
directory to locate the number of
your choice.
Press TALK to dial the phone
*
number displayed.
When the handset has dialed the
*
selected phone number, the screen
will display:
NOTE:
on how to use the phone directory feature.
to IDLE mode. The handset will display "No Connection" for
five seconds or until a key is pressed.
HOLD
DirectoryDial
Memory Dial
*
To call a number stored in the Phone
Directory, you can access the Phone
Directory log by entering the menu or
you can simply press the Up or Down
Scrolling Arrows to access the Phone
In the TALK mode, the following
*
screen will be displayed:
* To select MEMORY DIAL, press the
RIGHT SOFT FUNCTION key.
VOLUME: 5
Page 15

~23~
* The following screen will appear:
index code (e.g. 1=01)for the stored
Telephone numbers stored in the Phone Directory
have been indexed with a number from 01 to 30. To access
the correct index number or location, follow these steps:
All handsets that have been registered for use with the base unit,
received. The handset can be set to either ring or vibrate with an
~24~
Incoming Call
Private Name
Unknown Name
Private Name
Hayter, S
LOCATION:??
* Enter the 2 digit Phone Directory
Receiving an incoming call
* Handset is on the charger
cradle-No caller ID service
On Base 1
phone number.
* The phone number stored in the
location will be dialed.
NOTE:
For example, if the location is 3, press 0 then 3.
If the index number is 12, press 1 then 2.
Answering Calls
and are in the IDLE mode, will ring when an incoming call is
incoming call.
NOTE:
Under SETTINGS, the user has the option of
receiving incoming/intercom/transferred calls from 1 to 4
base units. This option is accessed via the Call Manager
function, under SETTING. Depending upon number of
base units the handset is registered to.
* Handset is off the cradle-No
caller ID service
Receiving an incoming call with caller ID
service **
* Caller ID service, but the ID has
been blocked by the caller:
Private
* Caller ID service, but not supported
by the originating party:
Unknown
* Caller ID service, but only the
number has been transmitted:
555-1212
* Caller ID service, all information
has been transmitted:
555-1212
Page 16

~26~
Voice Volume
Placing a Call On-Hold
Adjusting the volume on the handset can be done only during a
* When in the TALK Mode, the volume control button on the left
VOLUME: 5
00:00:00
Call hold L1
VOLUME: 5
~25~
: The first handset to answer a call will connect to
they will still be able to participate in handset to handset
Handset in Charging Cradle
Pick-up handset from charging cradle to answer the call.
Handset not in Charging Cradle
Press "TALK" or any key (except END) to accept the
incoming call.
NOTE
the base unit and will operate in TALK mode. Other
registered handsets will be locked out of the call. However
calls or receive the call if transferred.
Caller ID service must be ordered from your local phone
**
company for these screen displays to function. Services may
vary in your area.
call or when in the TALK Mode.
side of the handset can be used to adjust the volume to 6
different levels.
* Volume level 3 is set as default.
* The top button increases volume and the lower button
decreases volume.
* The screen during volume adjustment
displays the following:
1. When a call is in progress it can be
put on hold by pressing the LEFT
SOFT FUNCTION key which selects
the HOLD option:
The display will then show:
REDIAL MEMORY
HOLD
UNHOLD MENU
2. To bring the call back on line, press
the LEFT SOFT FUNCTION key again.
The display will return to this screen:
The handset will double beep three times every 30
seconds when a call is on hold as a reminder that you
HOLD MUTE
Page 17

~28~
1. During an active call, a transfer can be initiated by pressing
If you have Call Waiting service through your telephone company
1. In the TALK mode, the TALK key operates as a FLASH function
second call. Unlike when using the HOLD feature, the LCD will
not change to reflect that the first call is "temporarily on hold."
~27~
Picking up a Call on Hold
When MUTE is activated (ON), the handset user
The handset that placed the call on-
hold, can simply take the call off-hold
by pressing the
key. Another registered handset can
pick up the call on hold by pressing 2WAY and the base ID (ie:01), then
choosing the "UNHOLD" option.
LEFT SOFT FUNCTION
NOTE:
cannot be heard by the caller, but the user can still hear the
caller. The MUTE feature is automatically turned off when
the call is ended.
NOTE:
The base unit will maintain the communications
link with the incoming call as long as it is on hold. No
other outgoing call or page from the base can be
completed until the call on hold is ended by the handset
or has timed out.
Muting a Call
A call must be
to select the MUTE function.
1. Use the RIGHT SOFT FUNCTION
key to select MUTE.
The display will then show:
2. To remove MUTE, press the : LEFT
SOFT FUNCTION key again.
in the TALK mode
00:00:00
VOLUME: 5
HOLD MUTE
00:00:00
Call Muted
UNMUTE
Call Waiting: Receiving a Second Call
and you wish to take a second incoming call, you will use the
FLASH feature.
allowing you to place the first call on hold and answer the
2. Pressing TALK again will return you to the original call, placing
the second call on hold .
3. You can terminate either call by pressing END during the call.
Transferring a Call
Calls can be transferred between registered handsets while a
phone call is in progress.
the 2-WAY key on the originating handset.
Page 18

~30~
* The number is the same as the originating handset
* The target handset is not registered with the base unit
00:00:00
EXTENSION #:??
Transferring Calls Using the Hold Option
If you wish to announce the call that you are about to transfer,
00:00:00
Base I on Hold
~29~
distinctive ring, signaling an incoming
2. The originating handset LCD will
show a prompt for the target
handset ID number:
00:00:00
Enter
Extension #: ??
The call transfer can be
cancelled at any point by
pressing END
3. Enter the ID number of the
target handset.
* The call will be transferred to the
target handset:
Done
A handset ID number is invalid if:
NOTE:
* The number is 0
follow the steps below.
* The target handset will ring with a
call.
* The target handset LCD will show the
following readout:
If the target handset
NOTE:
Incoming Call
On Base 1
SILENT
does not respond within 30
seconds, the call is transferred
back to the originating handset.
If an invalid handset ID number
has been entered, an error
message will be displayed:
Repeat steps 1-3.
Invalid
Retry=2 WAY
1. During an active call, place the
call on hold by pressing the LEFT
SOFT FUNCTION key.
* The LCD will then display the
following screen:
2. Press the 2-WAY key.
* The originating handset LCD will
show a prompt for the target
handset ID number:
* The handset to handset call can be
cancelled at this point by pressing
END
3. Enter the ID number of the target
handset.
* The target handset will ring and the
screen will light up, signaling an incoming
call
UNHOLD MENU
Enter
Page 19

~31~
* The target handset LCD will show
~32~
The EnGenius SN-920 ULTRA Industrial Cordless Phone System
intercom calls can be placed from or to base units and handsets.
Enter
Extension # ??
Paging
extension#:11
Volume: 5
the following readout:
* Upon answering, the originating
and target handset users can talk.
Intercom from
Handset 12
SILENT
ADVANCED OPERATIONS
Digital 2-Way Radio Mode
Handset to Handset Calls
4. Pressing th
key on the will select the
"XFER" function, initiating transferring
the call to target handset.
5. Pressing END will terminate a
handset to handset call, the
originating handset will then display:
RIGHT SOFT FUNCTION
handset
00:00:30
Volume: 3
MUTE XFER
00:00:00
Base I on Hold
UNHOLD MENU
Disconnecting Calls
From the TALK mode, you can end a
call by pressing END or by placing the
handset in the cradle. The handset will
return to the IDLE mode.
The LCD will show the following:
EnGenius
SN-920
REDIAL MENU
offers private, 2-way radio calls from handset to handset, even
when handsets are beyond the range of the base unit. 2-way or
Intercom calls can be established between a handset and an
available and registered base unit or second handset. Handsetto-Handset (2-way Radio) communication can be achieved
anywhere providing the two communicating handsets are within
range of each other.
1. To initiate a handset to handset call
press the 2-WAY key and enter the
"extension" ID number desired.
(The extension number or handset
ID number is the 2 digit number
located to the right of the icon):
* The LCD will then display this screen:
* Once the voice link is successfully
established, the handsets' LCD will
display:
MUTE
2. The 2-WAY call can be terminated
by either handset, at any time,
pressing END.
Page 20

~33~
Paging from Base to Handset
1. Pressing the base unit PAGE or
establish a voice link with the base.
~34~
Paging from Handset to Base
For a handset to intercom a base unit, follow the steps below:
Enter
Extension # ??
Paging
extension#:01
INTERCOM key, will page all
registered handsets. The first
handset to answer the page will
2. The INTERCOM LED will flash until a
handset responds. The light will stay
lit until the link is terminated.
3. The base unit will page for 10
seconds, then terminate the page
if no handset responds.
Intercom from
Base 1
SILENT
1. On the handset press 2-WAY.
2. At the extension prompt, input the 2
digit number for the base unit which
will be a 0 followed by the base unit
number of 1, 2, 3 or 4.
3. The handset LCD will show a paging
prompt:
4. Before a handset answers, the page
can be cancelled from the base by
pressing PAGE again. How ever,
once a handset answers, only the
answering handset can end the
intercom call.
A page to a handset cannot be initiated from the
NOTE:
base while an incoming call is ringing into the system. The
IN USE LED flashes to indicate an incoming call is in
progress.
4. The base will ring once, then
automatically connect the intercom
call from a handset.
Answer Incoming Calls with a Handset to Base
Intercom Call in progress
There are three options for the handset:
1. Press TALK to switch to the incoming call.
2. Press END to terminate the intercom call and allow the
incoming call to ring on all handsets.
3. Do nothing and ignore the incoming phone call.
Page 21

~35~
1. When the base unit is not in use (TALK or INTERCOM mode),
Base Unit Options
2. The 3 levels of voice volume are: low, medium and high. Each
the next level until the maximum level is reached and then it will
~36~
Main Menu Function Chart
1
-
4
Ring Volume
the VOLUME key will control the ring volume.
2. There are 4 ring volume levels: low, medium, high and off.
Pressing the VOLUME key will move the volume to the next
Level:
LOW MEDIUM HIGH OFF LOW
NOTE:
A ringing volume tone will sound briefly to indicate
the ringer volume level selected.
Voice Volume
1. While the base is INTERCOM mode, the VOLUME key will
control the voice volume.
time the VOLUME key is pressed the volume will be adjusted to
return to low again:
LOW MEDIUM HIGH LOW.
x
i
f
e
S
r
O
E
P
8
Y
N
l
a
*
*
i
R
E
T
S
6
I
G
E
R
S
G
N
I
5
T
T
E
S
U
S
N
D
E
N
4
M
U
N
O
I
S
A
M
D
I
r
e
3
l
l
a
C
Y
R
O
T
2
C
E
R
I
D
d
r
a
u
1
G
y
e
K
a
a
t
r
s
B
H
e
i
t
t
t
g
s
i
e
e
e
r
g
s
s
e
e
e
e
R
D
R
R
.
.
.
.
1
2
3
4
e
n
1
2
3
4
o
T
4
y
e
K
e
e
t
e
e
m
l
m
a
e
w
i
e
T
N
D
i
V
*
*
*
r
e
b
y
r
t
m
n
u
E
N
r
n
a
t
w
i
o
e
i
e
l
d
t
i
p
E
C
V
O
*
*
*
r
e
b
e
m
m
u
a
d
N
N
d
A
*
*
k
c
k
o
l
c
n
o
L
U
*
*
e
m
u
l
o
3
V
y
e
K
e
p
y
T
2
g
n
i
R
e
m
u
l
o
1
V
g
n
i
R
e
e
e
e
n
n
n
n
o
o
o
o
T
T
T
T
*
*
*
*
h
w
f
g
f
i
o
H
L
O
*
*
*
1
2
3
4
g
g
g
g
n
n
n
n
i
i
i
i
R
R
R
R
*
*
*
*
e
t
a
h
r
w
g
b
i
i
o
H
L
V
*
*
*
d
e
r
n
s
e
D
t
t
s
s
a
r
u
6
j
t
7
6
5
4
3
2
1
1
d
-
n
1
A
o
*
C
r
e
g
a
n
a
M
l
l
a
C
e
m
a
n
m
o
t
s
u
C
t
e
s
e
R
t
h
g
i
l
k
c
a
B
e
s
l
u
P
/
e
n
o
T
e
d
o
c
a
e
r
A
e
s
l
l
s
c
a
a
e
C
B
R
*
m
a
r
R
D
I
I
a
P
D
C
*
*
*
s
d
n
o
c
e
f
n
f
s
O
O
8
*
*
*
e
s
e
l
n
u
o
P
T
*
*
Page 22

~37~
Handset / Base Registration
~38~
3. Place base unit into REGISTRATION mode by pressing and
until you hear a single beep (about 3 seconds). The red "In-
8. The result of the registration or deregistration procedure is
No connection
Table full
Reg OK
New ID = X
holding the and buttons at the same time
VOLUMEPAGE
Main Menu Options
When the handset is in the IDLE mode,
or when a call is on hold, the Main
Menu can be accessed by pressing
the RIGHT SOFT FUNCTION key.
Once in the main menu, a list of
available options will be displayed,
two menu options at a time as shown:
1. Use the or scrolling keys
to view all of the menu options.
2. At any time while in the Main Menu,
an option can be selected by using
the corresponding number from the
keypad.
Main Menu:
1:KEY GUARD
2:DIRECTORY
3:CALLER ID
4:SOUNDS
5:SETTINGS
6:REGISTER
¡õ¡ô
Registration
Your handset(s), if purchased as a system, is pre-registered at the
factory and does not need to be re-registered to the base unit
purchased with the handset. Additional handset displaying "00"
as their handset ID must be registered to the base unit. Charge
the handset battery fully before registering.
Handset Registration
1. Plug in the base unit to AC power and place a fully charged
battery pack into the new handset.
2. Verify base unit's power light is on and turn on the handset
power by pressing and holding the END key for 2 seconds.
Use" light will come on. Handset registration must be
peformed within 30 seconds after entering the registration
r
mode.
4. Pressing the RIGHT SOFT key, on the handset, selects the
MENU
5. Press the number "" key on the handset keypad, this will
place the handset into the registration menu.
6. Press the number " " key on the handset keypad, this
completes the handset registration.
7. Repeat steps 3 through 6 for each handset you want to
register to that base.
displayed on the LCD for 5 seconds. There are 4 possible
results:
* Registration is successful.
* Failed registration or deregistration.
Base failed to respond to handset.
Steps must be repeated to retry
procedure.
* Base has already registered
maximum number of hand sets (9)
it can support. A handset must
be deregistered before a new
one can be added to the system.
function.
6
1
Page 23

~40~
4. Press the LEFT SOFT FUNCTION
5. Deregistration is successful.
The handset has now been de-registered
from all base units. The handset ID number
will be reset to "00" as seen in the middle
Dereg from
Register a Second, Third or Fourth Base Unit
A handset can be registered to a maximum of 4
base units. All base units that come from the factory are
unit's identification number must be changed from factory
1. Plug in the new base unit to AC power and place a fully
2. Verify base unit's power light is on and turn on the handset
~39~
Dereg from
all bases?
* Handset registered to a base with same ID.
ID Conflict
key for "."
Base X
YES
9. Press END to return to the handset main menu.
NOTE 1:
Upon successful registration, your handset will
display "Reg OK New ID = "
NOTE 2:
Your handset will automatically exit the
of the top LCD line.
REGISTRATION mode after 30 seconds.
NOTE 3:
You can register your handset to a maximum of 4
base units. The handset ID number in the middle
of the top line of the handset display will not
change after registering the first base unit
(known as the primary base unit).
NOTE:
registered as base unit 01.
SECURITY FUNCTION:
A third option is available for
deregistering all the handsets at once and generating a
new base ID code (system registration reset). This option
can be selected by pressing "",
a new base number (1-4). Both the handset and base
MENU63
"", "", then enter
must be in the registration mode.
If there is more than one base unit and a handset
NOTE:
is to be registered to more than one base unit, the base
default number of "1" to either "2", "3", or "4".
De-Registering a Handset from all Base Units
1. Press the RIGHT SOFT FUNCTION key to select .
2. Press the "" key to select the REGISTER option.
3. Press the "" key to select
6
4
RESET HAND. The LCD will
display the following screen:
MENU
YES NO
charged battery pack into the handset.
power by pressing and holding the END key for 2 seconds.
all bases
Page 24

~42~
Press "MENU", "1" to set KEY GUARD.
1. To access the KEY GUARD option from the IDLE made, press
telephone numbers (up to 20 digits each) and names (up to 14
memory. Entries in the Phone Directory may be viewed or edited
Main Menu:
1:KEY GUARD
2:DIRECTORY
3:CALLER ID
Keypad
Locked
Press 1 to
~41~
3. Place base unit into REGISTRATION mode by pressing and
The red "In-Use" light will come on. Handset registration must
be preformed within 30 seconds after entering the registration
holding the and buttons at the same time
VOLUMEPAGE
until you hear a single beep (about 3 seconds).
Handset Menu Options
Key Guard
Mode.
4. Pressing the RIGHT SOFT BUTTON, on the handset, selects
the function.
MENU
5. Press the number "" button on
the handset keypad, this will
place the handset into the
registration menu.
6. Press the number "" button on
the handset keypad.
6
Reg Menu
1. Register
2. Deregister
3
3. Reset Base
4. Reset Hand
7. The handset Display will now
request that you "Enter base ID
(1-4): X"
8. Enter a number
from the keypad. Choose a
"4"
"1", "2", "3", or
Enter base
ID (1-4): X
base ID number different from
base ID number you are already
using.
the RIGHT SOFT FUNCTION key to select the MENU option.
2. While in the MAIN MENU press the
"1" key to select KEY GUARD:
3. Selecting the KEY GUARD option
LOCKS the keypad from use. The
screen will display the following:
4. To unlock the keypad press the
LEFT SOFT FUNCTION key. The
screen will display the following:
5. Press the "1" key to confirm unlocking
the keypad.
9. Repeat steps 1 through 8 for
each new base you want to
register.
NOTE:
Upon successfully changing the base ID number,
the display will say "Base ID = X, Dereg All." This means
that you have successfully created a new identification
number for that base unit. All handsets previously
Directory
This feature allows you to store up to 30 frequently used
characters each) in a directory that resides in the handset
at any time. The Phone Directory may be viewed by pressing the
or arrow keys from the idle mode.
registered to that base unit (if any) were de-registered. You
may now begin registering handsets to the base unit.
Follow steps 3 through 6 of Handset Registration section.
4:SOUNDS
5:SETTINGS
6:REGISTER
Unlock
confirm
UNLOCK
¡õ¡ô
Page 25

~44~
Memory full
Number?
~43~
DIRECTORY VIEW MODE
DIRECTORY EDIT MODE
Press "MENU", "2" to access Directory screen
1. To view the Directory from the IDLE
mode, press the RIGHT SOFT
FUNCTION key to select the
MENU option.
2. While in the Main Menu, press
the "" key to select DIRECTORY:
2
3. Information in the Phone Directory is
stored vertically, as shown in Table 1
below. The up and down arrow keys
are used to move through the directory
records.
Main Menu:
1:KEY GUARD
2:DIRECTORY
3:CALLER ID
4:SOUNDS
5:SETTINGS
6:REGISTER
¡õ¡ô
While in the DIRECTORY VIEW mode,
the LCD will display the following screen:
To enter the DIRECTORY EDIT mode,
either ADD or OPTION must be selected.
ADD
* Press the LEFT SOFT FUNCTION
key to select ADD. This choice will
allow an entry to be added to the
Phone Directory.
* If the directory is full, the following
Jane Doe
5551212
ADD OPTION
will be displayed on the LCD:
Quit
Index Code
01
02
Table 1
Information
Name #1
Telephone #1
Name #2
* To return to the DIRECTORY VIEW
mode, press the LEFT SOFT
FUNCTION key.
Telephone #2
* If there are available spaces, the first
empty space will be accessed
30 Name #30
Telephone #30
automatically and the following
screen will appear:
SAVE DELETE
Note: Press the RIGHT SOFT BUTTON and enter the Index
Code to dial the phone directory number.
* If information is to be stored in a
specific location, use the
scrolling keys to find the correct
location for the new information.
The location number will appear as
a 2 digit number to the left of the
battery icon.
Page 26

~45~
* Select ADD again using the LEFT
~46~
In the name editing mode, as indicated on the LCD
prompt, all letters will automatically be entered in the upper
FUNCTION key to select SAVE. The new entry will be displayed
SOFT FUNCTION key. The following
screen will then appear:
1.Enter a new phone number
by pressing the corresponding
keypad number key once.
The following characters
Note:
require a special key combination:
press the # key two times
Space:
(##).
press the # key three times
Dash:
(###).
2. Press the
LEFT SOFT FUNCTION
key to SAVE the phone number.
OR
To correct an incorrect entry, press
the RIGHT SOFT FUNCTION key to
select the DELETE option. DELETE
will delete one number at a time
from right to left.
3. A prompt will appear to enter a name
that goes with the phone number.
The name field can be left blank by
selecting SAVE with the LEFT SOFT
FUNCTION key.
4. To enter the letters of a name, press
Number?
SAVE DELETE
the corresponding keypad number
one or more times depending on
the order to the characters on the
key. See Table 2 for a listing of
available characters that can be
used in the name field.
For example: press "2" once for the
letter "A," twice for the letter "B," etc.
NOTE:
case. Since this is the default setting, using the * key will
then allow you to enter lower case letters. This function will
stay locked in the lower case mode until the * key is
pressed again, or the name edit mode is terminated.
NOTE:
Each time you enter a character, the cursor
automatically advances to the next character field as long
as you press a different keypad key to enter each character.
However, if you need to press a keypad key two or more
times to enter consecutive characters, you need to first
press the key to advance the cursor to the next
Name?
*=CAPS LOCK
SAVE DELETE
character field. Selecting DELETE with the RIGHT SOFT
BUTTON or pressing the key will backspace the
cursor to the previous field. The will advance the
cursor.
The directory will store a name and a phone
NOTE:
number, or just a phone number, but not a name by itself.
5. When the name is entered correctly, press the LEFT SOFT
on the screen and the DIRECTORY VIEW mode will
automatically be activated.
Page 27

~48~
Edit Option
Choosing OPTION while in the DIRECTORY EDIT mode allows a
directory record to be edited, deleted or a number to be viewed.
Options
2:Clear Entry
3:View Number
5551212
JANE DOE
* CAPS LOCK
~47~
Key
'+ ,. * ( ) & 1
Table 2
1
2
3
4
5
6
7
8
9
0
*
#
NOTE:
Unique character Key 2: C, Key 6: N
OPTION
Characters
A B C C 2
D E F 3
G H I 4
J K L 5
~
M N O N 6
Press key
to select OPTION. The following screen
will be displayed:
P Q R S 7
T U V 8
W X Y Z 9
0
TOGGLES CASE
SPACE -
This option allows a phone record to be changed.
1. Select the "1" key from the keypad.
~
The following screen will be
displayed:
RIGHT SOFT FUNCTION
¡õ¡ô
1:Edit
SAVE DELETE
Example:
In the DIRECTORY EDIT mode, to enter the name
"Jane Doe" use the following key sequence:
5 (J) * 2 (a) 66 (n) 33 (e) # (space) * 3 (D) * 666 (o) 33 (e)
2. Use the RIGHT SOFT FUNCTION
key to delete the phone number or
simply type the new number over the
old entry.
3. If a name is a part of the record, you
will receive the following prompt:
SAVE DELETE
Page 28

~49~
4. The cursor will appear under the first
~50~
Clear Entry Option
This option allows a record to be completely removed from the
Caller ID information will then appear on the LCD and also be
Options
2:Clear Entry
3:View Number
Confirm Clear
ADD
Empty
View Option
This option allow a record to be viewed in the phone directory.
letter of the name. Type new
information over the existing name
or press the RIGHT SOFT
FUNCTION key to select DELETE.
Selecting DELETE will move the cursor to the far
NOTE:
right edge of the LCD screen. Pressing the RIGHT SOFT
FUNCTION key repeatedly will move the cursor right to left
across the LCD screen, deleting each letter above cursor.
Phone Directory.
1. While in the Options Menu press the
"2" key to select clear entry:
2. At this point, the record previously
accessed while in the DIRECTORY
VIEW mode can be deleted by
pressing the LEFT SOFT FUNCTION
key to select YES as shown on the
LCD screen:
1:Edit
Entry?
YES No
5. Once the new information is entered,
press the LEFT SOFT FUNCTION
key to save the new entry.
6. If the name is unchanged press the
LEFT SOFT FUNCTION key to re save and exit to the DIRECTORY
3. Deleting the records will bring up
the following prompt, at which time
a new record can be added to the
directory (refer to steps under ADD) :
JANE DOE
5551212
SAVE DELETE
4. S electing NO will return the handset
to the DIRECTORY VIEW mode.
Caller ID
To use this option you must first subscribe to the Caller
ID service offered by your local telephone company.
stored automatically in the handset for later retrieval.
Page 29

~51~
Press "MENU", "3" to access Caller ID screen.
~52~
9.While in the CALLER ID VIEW mode, the displayed number can
Delete?
1. From the IDLE mode, press the
LEFT SOFT FUNCTION key to
select MENU.
2. To access the Caller ID information
stored in the handset, press the
"3" key from the keypad to select
Caller ID.
NOTE:
Shows the number of new Caller ID entries
Main Menu:
1:KEY GUARD
2:DIRECTORY
3:CALLER ID
4:SOUNDS
5:SETTINGS
6:REGISTER
since the last time the Caller ID log was checked. The
value in the top LCD line to the right of the envelope
icon.
¡õ¡ô
6. Date and time information can be
viewed by pressing the LEFT
SOFT FUNCTION key:
The 2 digit number to the right of the envelope
NOTE:
7145551212
09/02 11:12
Name Delete
icon tracks the number of unviewed Caller ID records.
7. The displayed information may be
deleted with the RIGHT SOFT
FUNCTION key. The display will
show:
YES NO
3. Press the key to view the
most recent call or the key
to view the oldest call information:
NOTE:
Caller ID information is stored in a table with
02 Newcalls
View:
¡õ¡ô
the newest entry on the top of the table. Using the
to view the Caller ID log ensures starting at the "top" of
the table.
4. The Caller ID log will store up to
three information fields:
7145551212
* Caller phone number, if transmitted.
Name
Time Delete
* Caller name, if transmitted.
* Date and time stamp.
5. The first Caller ID screen will
display the first two informational fields.
8. Press the LEFT SOFT FUNCTION
key to confirm the deletion, or
press the RIGHT SOFT FUNCTION
key to cancel the command.
: Once the caller ID capacity (30 records) has been
NOTE
reached, the oldest record is removed from the table.
be dialed by pressing TALK.
10.Press END to return to the Main Menu.
Page 30

~53~
To make use of this option you must subscribe to both Call
* When on a call, you will be alerted to an incoming call with a
Caller ID with Call Waiting Option
~54~
5. Ring levels are: HIGH, LOW and
VIBRATE. Use the scrolling keys
One of four distinctive ring tones may be selected for the handset
by pressing the or scrolling keys and pressing the
Waiting and Caller ID service with your local telephone company.
SOFT FUNCTION key to SAVE
setting.
to select ring level. Press the LEFT
short beep. The phone number and name of the incoming
caller will be displayed simultaneously.
* You can place the first call on hold and answer the second
call by pressing TALK. Pressing TALK again will switch back
6. Selecting END returns handset
to the Sounds Menu.
Ring Type
Press "MENU", "4" , "2" to access Ring Type menu.
to the first call.
LEFT SOFT BUTTON to save.
Sound
Ring Volume
Press "MENU", "4", "1" to access Ring
Volume menu.
1. From the IDLE mode press the
RIGHT SOFT FUNCTION key to
enter the Main Menu:
2. Select the SOUNDS option by
pressing the "4" key from the
keypad.
3. Select RING VOLUME by pressing
"1".
4. Once in this option, the current ring
volume level will be displayed on the
second line of the LCD:
Main Menu:
1:KEY GUARD
2:DIRECTORY
3:CALLER ID
4:SOUNDS
5:SETTINGS
6:REGISTER
Ring Volume
High
SAVE
¡õ¡ô
Sounds Menu
1.Ring Volume
2.Ring Type
3.Key Volume
4.Key Volume Tone
¡ô¡õ
Key Volume
Press "MENU", "4" , "3" to access Key Volume menu.
The key volume is the loudness of the sound of the keys when
pressed . Choices are: HIGH, LOW and OFF.
Key Tone
Press "MENU", "4" , "4" to access Key Tone menu.
The key tones are the type of sound that the keys produce when
pressed. Choices are Tone 1, Tone 2, Tone 3 and Tone 4.
Settings (Setting Handset Preferences)
This menu option can be used to set: local area code, dial mode,
and the backlight. Selecting reset within this option allows you to
reset these preferences (plus all sound settings) back to the
factory settings. Custom Name is the name that appears on the
LCD in the IDLE mode.
Page 31

~55~
From the IDLE mode, press the
Press "MENU", "5", "1" to access Area code screen.
~56~
Tone/Pulse Mode
The length of time the backlight stays lit when the han
Dial Mode"
8 Sec
*
RIGHT SOFT FUNCTION key
to enter the Main Menu. Press
the "5" key from the keypad to
select SETTINGS.
Area Code
Main Menu:
1:KEY GUARD
2:DIRECTORY
3:CALLER ID
4:SOUNDS
5:SETTINGS
6:REGISTER
¡õ¡ô
Press "MENU", "5", "2" to access Tone/Pulse screen.
The handset may be set to either tone or pulse mode.
1. After selecting this option, the LCD
will show the current setting as
shown:
SAVE
Tone
¡õ¡ô
By setting the local area code, when a
telephone number is auto-dialed from the
Phone Directory or Caller ID containing
the selected area code, the phone will
not include the area code when the number
is dialed.
1. When this option is selected, the
local area code is displayed
as shown:
The field for the area code has
a maximum of three numbers.
2. The area code can be edited by typing
the new numbers over the current digits.
The key can be used to delete
the number above the cursor and the
Key can be used to move to the
desired number.
3. Press the key
LEFT SOFT FUNCTION
to save the new area code setting or
press END to return to the Settings
Menu without saving the number.
Use the scrolling keys to
change the setting.
Setting Menu
1:Area code
2:Tone/Pulse
3:Backlight
4:Reset
5:Custom name
6:Call Manager
7:Contrast
8:Dial Prefix
Move cursor:
714
¡õ¡ô
¡õ¡ô
2. Press the LEFT SOFT FUNCTION
key to save the new dial mode or
press END to return to the Settings
Menu without saving.
Backlight
Press "MENU", "5", "3" to access Backlight screen.
use may be set with three options: 8 sec, Off and On.
1. The scrolling keys may
be used to choose one of the three
options.
2. Press the LEFT SOFT FUNCTION
key to save the new backlight setting
or press END to return to the
Settings Menu without saving.
: It is recommended that the backlight be kept at the
NOTE
factory setting of 8 seconds. Leaving the backlight on will
deplete the battery life more quickly.
dset is in
SAVE
Page 32

~57~
Reset
Custom Name
Press "MENU", "5", "4" to access Reset menu.
Choosing this option allows the handset parameters (dial mode,
backlight, ring and key tone settings and ring/voice volume) to be
This option allows either a name or a greeting to be selected that
~58~
Call Manager
Press "MENU", "5", "6" to access Call Manager screen.
name edit mode (see Table 2: Available Characters under
EnGenius
EnGenius
Receive Calls
1. Accessing this option displays the
current name setting.
=Caps lock
*
SAVE Delete
reset to the factory settings. Also, this option
will delete all the Phone Directory entries and all the Caller ID
entries.
1. The Reset parameters option LCD
will show:
Factory Set?
YES NO
2. The Reset DIR option LCD will show:
Delete all
DIR entries
YES NO
3. The CID option LCD will
show:
Delete all
CID entries
YES NO
4. In all cases, press the LEFT
SOFT FUNCTION key to
select YES and the RIGHT
SOFT FUNCTION key to
select NO.
5. Choosing YES, NO or the END key
will return the handset to the Settings
Menu.
Press "MENU", "5", "5" to access Custom name screen.
will be displayed on the LCD in IDLE mode or when the handset
is turned on.
2. The custom name can then be
edited by using the numbered
keys on the keypad to overwrite
the existing characters.
3. In this option the second and third
lines of the LCD can be used. The
keys can be used to
move the cursor from one line to the
other and from one side of the line
to the other.
4. Use LEFT SOFT FUNCTION key to
save the new custom name or the
RIGHT SOFT FUNCTION key to
delete the name. END will return
the handset to the Settings Menu.
This procedure is similar to the phone directory
NOTE:
Directory Option).
This option allows the handset to receive
calls from 1 to 4 base units.
1. Once in the Settings Menu press the
"6" key from the keypad to select the
Call Manager option. The screen
will display:
SN-920
SAVE Delete
from base 1:
SAVE Yes No
¡õ¡ô
¡õ¡ô
Page 33

~60~
Dial Prefix
Press "Menu", "5", "8" to access the Dial Prefix screen.
Allows you to enter up to an eight-digit dialing prefix (i.e.:
No Dial Prefix default selection. Press the RING SOFT FUNCTION
key to select "Edit" then enter the Dial Prefix number via the
If you have elected to use a Dial Prefix, enter a phone number,
screen will ask you "Use Prefix?" select "Yes" by pressing the LEFT
~59~
2. The scrolling keys may
be used to select a base unit number
from 1 to 4. Pressing the RIGHT SOFT
FUNCTION key moves the from
YES to NO and back to YES in the
selection process.
Pressing the LEFT SOFT FUNCTION
key will save the setting.
1010555 for long distance service).
Use the UP/DOWN scrolling keys to toggle between the Yes or
3. Repeat the process until all base units
from which calls are to be accepted
have been selected for the handset.
Contrast
Press "MENU", "5", "7" to access Contrast screen.
This option adjusts the contrast
for the handset's LCD screen.
1. While in the Settings Menu, select
the "" key from the keypad. The
7
LCD will display the current contrast
setting:
2. Use the scrolling keys to
change the contrast setting from 1 to
16 (1 is the lightest setting and 16 is
darkest).
3. The LEFT SOFT FUNCTION key will
save the new setting. Press END to
return the handset to the Settings
Menu. Pressing END again returns
the handset to the Main Menu.
keypad. Press the LEFT SOFT FUNCTION key to select "Save".
prior establishing dial tone, then pre ss the " TALK" Key. The
SOFT FUNCTION key or select "No" by pressing the RIGHT SOFT
FUNCTION key.
Contrast:12
Adjust=
¡õ¡ô
SAVE
Page 34

~61~
Product Specifications
~62~
r
e
t
r
p
a
e
g
d
r
A
a
A
h
C
A
C
N
NANANANANANANANANANANANAN
)
D
D
T
(
t
e
s
d
n
a
H
e
l
b
a
t
r
o
P
t
i
n
U
e
s
a
B
s
n
o
i
t
a
c
i
f
i
c
e
p
S
l
a
c
i
r
t
c
e
l
E
z
H
M
8
2
9
2
0
9
z
h
M
8
2
9
2
0
9
y
c
n
e
u
q
e
r
F
M
H
C
M
P
i
D
N
A
h
s
A
W
p
m
m
b
k
0
0
s
5
3
2
e
7
6
Y
3
M
C
P
r
D
e
t
A
p
s
a
W
p
d
m
b
A
k
0
s
C
0
2
e
A
9
Y
3
l
r
e
g
o
e
c
r
n
i
r
t
w
u
d
n
o
o
o
o
P
S
C
t
C
r
u
r
h
e
e
p
c
t
w
w
e
u
o
o
e
O
P
P
p
t
S
i
m
s
n
a
r
T
x
e
l
K
p
S
u
F
D
d
n
e
o
i
p
s
a
i
h
v
i
s
s
-
p
D
e
b
e
s
k
l
2
m
u
3
4
i
9
1
P
T
)
D
D
T
(
x
e
l
K
p
S
u
F
D
d
n
e
o
i
p
s
a
i
h
v
i
s
s
-
p
D
e
b
e
s
k
l
2
m
u
3
4
i
9
1
P
T
x
s
n
e
l
t
e
o
l
e
i
a
t
n
p
R
a
n
l
u
a
a
u
t
D
h
d
a
o
C
D
f
r
M
o
e
r
s
e
U
b
m
u
N
e
l
b
a
t
c
a
r
t
d
e
e
R
x
A
M
D
C
g
n
i
p
p
o
H
y
c
n
e
u
q
e
r
F
A
M
D
C
g
n
i
p
p
o
H
y
c
n
e
u
q
e
r
F
s
s
e
c
c
A
e
l
p
i
t
l
u
M
i
/
F
)
i
2
-
/
B
i
0
d
B
1
0
d
R
l
2
E
a
l
d
c
B
i
a
n
p
c
o
i
@
y
c
(
p
T
B
e
y
,
0
i
s
T
m
7
,
B
r
B
i
e
p
0
0
2
>
2
-
d
n
o
c
e
s
r
e
p
0
0
2
>
e
t
a
R
g
n
i
p
p
o
H
y
c
n
e
u
q
e
r
F
4
d
-
d
B
5
A
.
d
6
I
1
3
0
E
/
1
x
x
-
a
a
A
I
<
M
M
T
r
o
)
o
0
d
t
1
u
R
O
E
i
B
B
d
@
5
(
/
B
r
0
m
o
7
o
B
4
-
d
d
n
A
6
I
I
i
0
E
/
1
B
-
A
d
I
<
2
T
y
n
y
i
t
t
i
i
a
l
v
i
a
G
t
i
u
s
a
Q
n
n
n
e
e
c
e
S
i
t
r
o
n
e
V
A
v
i
e
c
e
R
NAF
s
e
Y
t
r
o
p
p
u
S
l
a
s
r
e
v
e
R
e
n
i
L
Important Safety Instructions
0
4
5
/
9
1
m
1
2
m
L
x
6
U
8
5
,
/
s
x
0
1
s
5
9
1
L
A
U
C
3
0
e
l
S
b
i
C
t
8
,
a
0
6
t
r
a
P
,
5
1
t
r
a
P
C
C
8
6
t
r
a
P
,
5
1
t
r
a
P
C
C
F
e
c
n
a
i
l
p
m
o
C
n
o
i
t
a
l
u
g
e
R
)
0
p
5
5
1
9
6
m
2
-
1
o
S
T
L
S
C
E
U
R
O
d
i
,
(
C
0
A
R
5
O
g
A
9
n
D
S
i
1
/
r
L
N
C
a
A
e
U
C
C
H
C
F
3
0
S
C
,
0
0
5
1
9
2
1
S
L
S
U
R
,
C
0
E
5
O
P
9
D
M
1
/
L
N
C
A
U
C
C
C
F
e
c
n
a
i
l
p
m
o
C
y
t
e
f
a
S
m
4
4
e
a
0
r
c
x
1
n
g
2
/
x
u
5
1
o
6
1
3
s
e
h
c
n
i
4
/
1
5
x
8
/
3
1
x
8
/
7
s
e
h
c
n
i
8
/
5
1
x
5
x
8
/
7
6
t
u
o
h
t
i
w
s
n
o
i
s
n
e
m
i
D
.
8
4
1
e
c
i
t
o
n
t
u
s
o
e
c
h
t
n
i
u
w
o
s
4
n
s
s
o
e
i
m
t
c
a
a
n
r
c
u
g
i
f
m
o
i
0
9
c
m
5
:
2
e
2
y
p
r
3
s
e
1
t
t
x
d
a
n
4
B
a
3
h
x
s
t
i
n
6
g
4
W
i
s
e
d
e
g
n
s
a
m
h
a
c
r
m
g
o
m
t
7
1
t
9
4
h
4
/
g
x
i
s
r
4
e
2
c
e
1
n
h
t
x
u
o
s
2
e
7
8
v
1
1
r
e
s
t
e
h
r
g
i
r
e
e
r
W
u
t
c
a
f
u
n
a
m
e
a
h
n
T
n
:
e
e
t
t
n
o
A
N
BEFORE USING YOUR TELEPHONE EQUIPMENT, BASIC
SAFETY INSTRUCTIONS SHOULD ALWAYS BE FOLLOWED TO
REDUCE THE RISK OF FIRE, ELECTRIC SHOCK AND INJURY
TO PERSONS AND DAMAGE TO PROPERTY.
Cordless Safety Tips
Your cordless phone gives you the freedom and flexibility to stay
in touch while you move around. However, the safe and
responsible use of the phone depends entirely on you. Avoid
accidents by not reaching for the phone or talking on the phone if
that distracts you from working safely. Your life and the lives of
others are at stake.
1. When using your cordless phone ensure your safety and the
safety of others:
Always watch where you are walking and standing.
Don't let a phone call distract you from working safely.
2. In an Emergency
If an emergency occurs, dial 911. Remember: if you are in an
area where your phone is searching or scanning for a signal or
there is no signal, it is highly probable that a call to 911 will not
go through. Locate the nearest landline phone and call for
help.
Cordless 911 calls may not automatically provide emergency
personnel with your name, phone number or location. Tell the
dispatcher:
Your name and phone number, including area code.
The nature of the emergency.
Whether police, fire or medical assistance is needed.
The exact location of the emergency, including cross streets,
mileposts or landmarks.
Page 35

~63~
3. Power Outage
~64~
short out parts that could result in the risk of fire, electric shock,
When the power supply cord or plug is damaged or frayed.
In the event of a power outage, your cordless telephone will
not allow you to make an outgoing call or take an incoming call.
The cordless base station requires electricity for operation.
You should have a telephone which does not require electricity
available for use during power outages, or alternatively having
proper backup power for the base station.
4. Notice to Hearing Aid Wearers: This phone system is
compatible with inductively coupled hearing aids.
5. Notice to Cardiac Pacemaker Wearers: Preliminary studies
done by FDA and others have shown that, although
interference to the implanted cardiac pacemaker may occur
when operating very closely, wireless telephones "do not seem
to pose a significant problem for pacemaker wearers."
However, until more is known, FDA suggests that people with
pacemakers may want to take precautions when using or
carrying a wireless telephone to ensure that there is ample
distance between the telephone and the pacemaker.
6. Slots or openings in the product's housing back, side and
bottom, are provided for ventilation. These openings must not
be blocked or covered. Placing the product on a bed,
carpeting, or other similar surface may block these opening
and should be avoided. This product should never be placed
near or over a radiator or heat register. This product should not
be placed in a built-in installation unless proper ventilation is
provided.
7. This product should be operated only from the type of power
source indicated on the marking label. If you are not sure of
the type of power supply to your home, consult your dealer or
local power company.
8. Do not overload wall outlets and extension cords as this can
result in the risk of fire or electric shock.
9. Never push objects of any kind into this product through
housing slots as they may touch dangerous voltage points or
or injury. Never spill liquid of any kind on this product.
Product Safety Tips
1. Read and understand all instructions.
2. Follow all warnings and instructions including those marked
on the product.
3. Unplug this product from the wall telephone jack and power
outlet before cleaning. Do not use liquid cleaners or aerosol
cleaners. Use damp cloth for cleaning.
4. Do not use the telephone near water, for example, near a
bathtub, washbowl, kitchen sink, laundry tub, wet basement
or swimming pool.
5. Do not place this product on an unstable cart, stand or table.
The product may fall, causing serious damage to the product.
10. To reduce the risk of electric shock or burns, do not
disassemble this product. Take this product to qualified
service personnel when service or repair work is required.
Opening or removing covers may expose you to dangerous
voltages, electrical current or other risks. Incorrect
reassembling of the product can cause electric shock when
the product is subsequently used.
11. Warning: Changes or modifications to this product not
expressly approved by EnGenius could void the warranty and
the FCC authorization to operate the equipment.
12. Unplug the base station from the wall outlet and refer
servicing to qualified service personnel under the following
conditions:
If liquid had been spilled into the product.
„h
„h
If the product has been exposed to rain or water.
„h
Page 36

~65~
If the product does not operate normally by following the
~66~
fire; the cells may explode. Do not expose batteries to water.
operating instructions. Adjust only those controls that are
covered by the operating instructions because improper
adjustment of other controls may result in damage and will
often require extensive work by qualified service personnel
to restore the product to normal operations.
If the product has been dropped or housing has been
damaged.
If the product exhibits a distinct change in performance.
13. Avoid using telephone during an electrical storm. There may
be a risk of electrical shock from lightning.
14. Do not use the telephone to report a gas leak while in the
vicinity of the leak.
15. The antenna on the desk station does not retract. To prevent
injury, do not place the telephone where persons can step,
trip or fall on the telephone.
16. Do not place metal objects on the antenna.
17. Do not install the base station or cordless handset charger
near microwave ovens, radio equipment, or non-cable
connected televisions. These appliances may cause electrical
interference to the base station or cordless handset.
18. The base station must be placed on a hard, flat surface and
connected to both a phone wall jack and an AC power outlet.
19. Do not stick foreign objects into any of the holes on the base
station or cordless handset. You could harm the speakers,
earpieces, microphones, or yourself.
20. Battery Safety Precautions: To reduce the risk of fire, injury or
electric shock, or property damage, and to properly dispose
of batteries, please read and understand the following
instructions:
BATTERY MUST BE RECYCLED OR DISPOSED OF
PROPERLY. DO NOT DISPOSE BATTERY IN MUNICIPAL
WASTE.
Only use EnGenius approved Nickel-Metal Hydride (NiMH)
rechargeable batteries in the cordless handset and battery
charger.
DO NOT use other rechargeable batteries or non-
rechargeable batteries, or mixed types of batteries. The
batteries could short-circuit, and the battery shell may be
damaged causing a hazardous condition. Instruction labels
are located in the handset and charging unit battery
compartment.
Always follow basic safety precautions when using and
disposing of batteries. Do not dispose of the batteries in a
Check with local codes for special disposal instructions.
Periodically clean the charge contacts on both the charger
and handset.
DO NOT mix old and new batteries in this product.
Position positive (+) battery contact to match diagram in
cordless handset.
Charge the batteries provided with, or identified for use with,
this product only in accordance with the instructions and
limitations specified in the instruction manual.
Exercise care in handling batteries in order not to short the
batteries with conducting materials such as rings, bracelets,
and keys. The batteries or conducting material may
overheat and cause burns or fire.
Do not open or mutilate the batteries. Released electrolyte
is corrosive and may cause damage to the eyes or skin.
the electrolyte may be toxic if swallowed.
During charging, batteries heat up. This is normal and is not
dangerous.
Do not use non-EnGenius charging devices. This could
damage the batteries.
SAVE THESE SAFETY INSTRUCTIONS
Page 37

~68~
harmful interference in a residential installation. Some cordless
and wireless telephones operate at frequencies that may cause
Increase the separation between the handset and/or base
~67~
Regulatory Information
1. This telephone system complies with Part 68 of the FCC rules.
On the bottom of the base station is a label that contains,
among other information, the FCC Registration Number, Ringer
Equivalence Number (REN) and the Universal Service Order
Code (USOC), which is RJ-11C. Your telephone company may
ask you for this information.
2. The REN is useful to determine the quantity of devices you
may connect to your telephone line and still have all of those
devices ring when your telephone number is called. In most,
but not all areas, the sum of the REN's of all devices connected
to one line should not exceed five (5.0). To be certain of the
number of devices you may connect to your line, as determined
by the REN, you should contact your local telephone company
to determine the maximum REN for your calling area.
3. If your telephone equipment causes harm to the telephone
network, the telephone company may ask you to disconnect
the system from the line until the problem has been corrected
or they may discontinue your service temporarily. If possible,
they will notify you in advance. But if advance notice isn't
practical, you should be notified as soon as possible. You will
be informed of your right to file a complaint with FCC or DOC.
4. Your telephone company may make changes in its facilities,
equipment, operations, or procedures that could affect the
proper functioning of your telephone system. If they do and if
possible you will be notified in advance to give you an
opportunity to maintain uninterrupted telephone service. If you
experience trouble with this telephone system, disconnect it
from the network until the problem has been corrected or until
you are sure that the equipment is not malfunctioning.
6. This telephone system equipment has been tested and found
to comply with the limits for Class B digital device, pursuant to
Part 15 of the FCC Rules and RS210 of the DOC Rules. These
limits are designed to provide reasonable protection against
interference to nearby TV's, VCR's, radio, computers, or other
electronic devices. To minimize or prevent such interference,
the telephone system should not be placed or operated near
these devices. If interference is experienced, moving the base
station or handset farther away from them will often reduce or
eliminate the interference.
7. However, there is no guarantee that interference will not occur
in a particular installation. If this telephone system does cause
harmful interference to other electronic devices, which can be
determined by turning the system off and on, the user is
encouraged to try to correct the interference by one or more of
the following measures:
and the device that experiences interference.
Connect the base station into a power outlet on a circuit
different from that to which the other device is connected.
or, connect the base station to another telephone outlet.
Consult the dealer or an experienced ele ctronic technician
for help.
5. This telephone system may not be used on coin service
provided by the telephone company. Connection to party lines
is subject to state tariffs. Privacy of communications may not
be ensured when using this phone.
Page 38

EnGenius Optional Outdoor Antenna
lnstallation lnstructions
TM
For safety and optimum performance, be sure to read these
For your safety, keep the antenna away from electric power lines to
Antenna lnstallation
1. Find a mast (metal pole) that is longer than five meters and 25 to
Bracket
Guide pipe
Antenna
instructions carefully.
Order lnformation
Please order the EnGenius SN-900 Ultre Outdoor Antenna and/or
cable.
Warning
TM
50mm (1"to 1.9") in diameter.
2. Assemble the antenna body and six whips.
3. Connect brackets to guide
pipe, sliding the brackets on
from the bottom.
4. Fit the guide pipe and
bracket on mast firmly.
whip x 6
avoid electric shock.
5. Thread the coaxial cable
through the guide pipe and
For FCC compliance, the outdoor antenna must not be located
within 8 inches (20cm) of any person.
connect one end of the
coaxial cable to the antenna.
Site Selection
The higher the antenna is installed, the better the communication
will be. lf you can install the antenna higher than surrounding
obstructions, the communication range will be better.
The antenna must be on the roof and maintain a three meter
(10 feet) clearance in all directions to meet RF safety requirements.
Less than 3 M
(incorrect)
Over 3 M
(correct)
Over 3 M
(correct)
Over 3 M (correct)
Less than 3 M
(incorrect)
Note:Use only EnGenius antenna and cable. The base
station antenna connector has reverse thead that
only works with cables supplied by EnGenius.
Mast
6. Connect the other end of
the coaxial cable to the base
station.
Page 39

8. Do not short circuit the battery pack.
than specified access doors may expose you to dangerous voltages
SAVE THESE INSTRUCTIONS
The metal bands on the
battery pack should never come in contact with a conductive
When using EnGenius SN-900 Ultra, always follow basic safety
precautions to reduce the risk of injury, fire, and electical shock,
including the following practices:
1.Read and understand all instuctions
included in the user's
manual and this antenna installation instructructions. ln anddition,
observe all warnings and instructions marked on the product.
2. Avoid using a telephone during thunderstorms.
There may be a
remote chance of electrical shock from lightning.
3. Do not use a telephone in the vicinity of a gas leak.
Report a suspected gas leak immediately, but use a telephone
away from the area where gas may be leaking. Because this
product is a wireless model, make sure the base is also removed
form the area.
4.Do not use this product near water, or when you are wet.
For example, do not use it in a wet b asement or shower, or next to a
swimming pool, bathtub, kitchen sink, or laundry tub.
5.Unplug this product form any line or power source before
cleaningor if it comes in contact with any liguids.
Do not use liquids or aerosol sprays for cleaning. Use only a damp
cloth when cleaning. Do not plug the product back in until it has
dried thoroughly.
6.Install this product in a protected location
where it is not at risk
of falling and no one can trip over and line or power cord. Protect
cords from damage or fraying. Do not place and objects on the
power cord.
7. This product should be operated only from the type of power
source indicated on the marking label.
lf you are not sure of the type of power supplied to your home,
consult your dealer or local Power Company. lf this product has
user replaceable betteries, replace batteries only as described in
your user's manual. Do not burn or puncture batteries because
they contain caustic chemicals.
surface at the same time. Also, do not let two battery metal bands
touch each other.
9.Do not block slots and openings in the cabinet and the back or
bottom, these are provided for ventilation.
overheating, do not block these openings by placing the product on
the bed, sofa, rug, or other similar surfaces. This product should
never be placed near or over or over a radiator or exceed
environmental specifications listed in the user's manual. In
addition, this product should not be placed in a built-in installation
where proper ventilation is not available.
10.Never push objects of and kind into this product through
cabinet slots
out parts that could result in a risk of fire or electrical shock.
11.To reduce the risk of electrical shock, do not disassemble this
product.
Customer Service or email us at
info@engeniustech.com. Opening or removing cadinet parts other
or other risks. Lncorrect reassembling can cause electrical
shock when the appliance is subsequently used.
12.Do not overload wall outlets and extension cords as this can
result in the risk of fire or electrical shock.
13.Unplug this product from the wall outlet if any of the following
situations should occur:
when the power supply cord or plug is damaged or frayed.
lf liquid has been spilled into the product.
lf
the product has been exposed to rain or water.
lf the product does not operate normally by following the operating
instructios. Adjust only those controls that are covered by the
operating instructions.
lf the product has been dropped and the cabinet has been
damaged.
lf the product exhibits a distinct change in performance.
lf service or repair work is required, contact EnGenius
To protect it from
the
as they may touch dangerous voltage points or short
TM
 Loading...