

Page 1
User Manual (English)
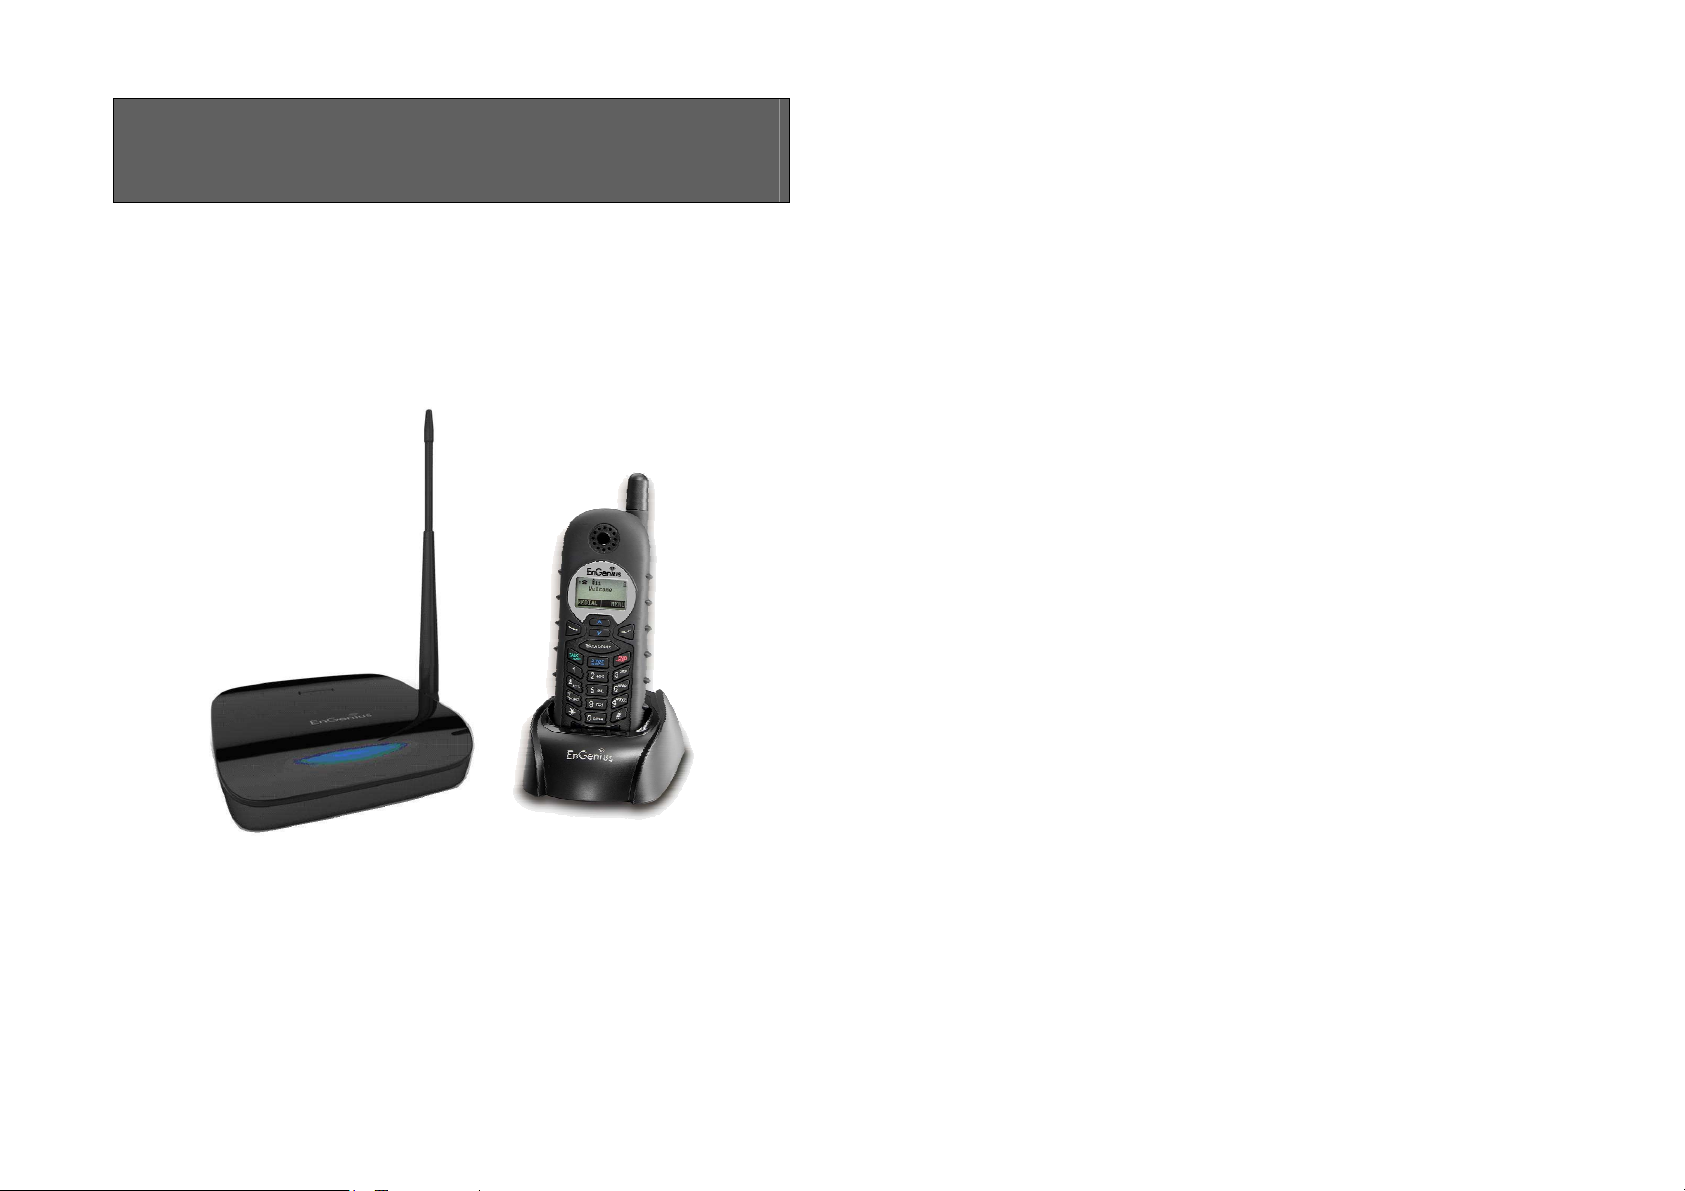
EP800
Digital Long Range Cordless Phone
Table of Contents
Safety Instructions...................................................................4
General Safety Instructions..................................................4
Product Safety Instructions..................................................5
Battery Safety Instructions...................................................7
Regulatory Information ............................................................8
Equipment Checklist..............................................................10
Handset Illustration................................................................11
Handset Features..................................................................13
Basic Handset Features.....................................................13
Additional Handset Features..............................................15
Base Illustration.....................................................................21
Base Features .......................................................................22
Basic Base Station Features..............................................22
Charger Illustration ................................................................23
Charger Features...................................................................24
Getting Started ......................................................................25
Base Station Installation.....................................................25
Handset and Charger Installation.......................................26
Basic Operations ...................................................................27
Operation Modes................................................................27
A. Base Operation Modes ..............................................27
B. Handset Operation Modes .........................................27
Making a Telephone Call ...................................................29
Making an 2-Way/ Intercom Call........................................29
Making a Broadcast ...........................................................30
A. Handset to Handset Calls...........................................30
Redial.................................................................................31
Receiving a Telephone Call...............................................31
Receiving an Intercom Call................................................32
Ending a Call......................................................................32
Adjusting Handset Receiver (Earpiece) Voice Volume ......33
Adjusting Handset Speakerphone Voice Volume...............33
Placing a Call On Hold.......................................................33
Mute...................................................................................34
~2~
Page 2

Do Not Disturb (Silent Ring)...............................................34
Key Guard..........................................................................34
Battery Recharge and Replacement..................................35
Advanced Operations............................................................36
Handset Registration..........................................................36
Handset Group Subscription..............................................37
Call Transfer.......................................................................38
Phonebook Operations ......................................................39
Call Barring ........................................................................42
Programmable Feature Call...............................................45
Caller ID.............................................................................46
Multi-Base Setting..............................................................48
Call Manager......................................................................49
Visual Message Waiting Indicator (VMWI).........................50
Adjust Handset Microphone Gain.......................................50
Adjust Headset Ring ..........................................................51
Baby Monitor......................................................................51
Index......................................................................................58
Technical Specifications........................................................62
Safety Instructions
Caution: Your wireless telephone gives you freedom and flexibility to stay
in touch while you move around. However, when using your phone
equipment, safety instructions should be followed to avoid the risks of fire,
electric shock, injury to person, and damage to property.
General Safety Instructions
1. When using your wireless phone, ensure your safety and the safety of
others:
a. Always watch where you are walking and standing.
b. Don’t let a phone call distract you from working safely.
2. In an emergency:
a. If an emergency occurs, dial the emergency phone number.
Remember: if you are in an area where your phone does not have a
clear signal from the base station, it is highly probable that the call
may not go through. Locate the nearest landline telephone or other
communications device to call for help.
b. Emergency calls may not automatically provide emergency
personnel with your name, phone number or location.
3. Notice to Hearing Aid Users: This phone system is compatible with
inductively coupled hearing aids.
4. Notice to Cardiac Pacemaker Users: Although interference to the
implanted cardiac pacemaker may occur when operating very closely,
wireless telephones “do not seem to pose a significant problem for
pacemaker wearers.” However, until more is known, suggests that
people with pacemakers may want to take precautions when using or
carrying a wireless telephone to ensure that there is ample distance
between the telephone and the pacemaker. Do not carry the handset in
a breast pocket. If you have any reason to suspect that interference is
taking place, turn off your handset immediately.
~3~
~4~
Page 3

Product Safety Instructions
1. Read and understand all instructions.
2. Follow all warnings and instructions including those marked on the
product.
3. Changes or modifications to this product not expressively approved by
the manufacturer will void the warranty and the CE authorization to
operate the equipment. Use only manufacturer provided accessories.
4. Do not use the telephone near water. Never spill liquid of any kind on
this product.
5. Unplug the product from the wall telephone jack and power outlet before
cleaning. Do not use liquid or aerosol cleaners. Use damp cloth for
cleaning.
6. Do not place this product on an unstable cart, stand, or table. The
product may fall and cause personal injury or damage to the product or
other property.
7. Power Outage: In the event of a power outage, your handset charger will
not recharge the handset battery, and the base station will not allow you
to make an outgoing call or take an incoming call. Both the charger and
the base station require electricity for operation. You should have a
telephone that does not require electricity available for use during power
outage, or have a temporary backup power supply.
8. Slots or openings in the product’s housing are provided for ventilation.
These openings must not be blocked or covered. Placing the product on
a bed, carpeting, or other similar surface may block these openings and
should be avoided. This product should never be placed near or over a
radiator or heat register, or in a built-in installation unless proper
ventilation is provided.
9. Never push objects of any kind into this product through housing
slots/openings as they may damage the product, touch dangerous
voltage points or short out parts that could result in fire, electric shock, or
injury.
10. This product should be operated only from the type of power source
indicated on the marking label. If you are not sure of the type of power
supply to your home, consult your dealer or local power company.
11. Do not overload wall power outlets and extension cords as this may
result in fire or electric shock.
12. To avoid electric shock or burn, do not disassemble this product. Send
this product to an authorized service center when service or repair work
is required. Call Customer Service for locations near you. Opening or
removing covers may expose you to dangerous voltages, electrical
currents or other risks. Incorrect reassembling of the product may cause
electric shock when the product is subsequently used.
13. Avoid using the product during a storm. There may be a risk of electric
shock from lightning.
14. Do not place the product where persons can step, trip, or fall on it.
15. Do not place conductive objects over or near the antenna.
16. Do not use the product to report a gas leak while in the vicinity of the leak.
17. Do not install the base station or the handset charger near microwave
ovens, radios, TV sets, speakers, or other electrical equipment. These
appliances may cause interference to the product or experience
interference from the product.
18. Unplug the base station or the charger adaptor from the power outlet and
refer to an authorized service center under the following conditions:
a. If liquid has been spilled into the product.
b. When the power supply cord or plug is damaged or frayed.
c. If the product has been exposed to rain or water.
d. If the product does not operate normally by following the operating
instructions.
e. If the product has been dropped or housing has been damaged.
f. If the product shows a distinct change in performance.
~5~
~6~
Page 4

Battery Safety Instructions
1. Use only manufacturer approved Li-ion rechargeable batteries and
charger. Do not use other types of rechargeable batteries or nonrechargeable batteries. The batteries could short-circuit, and the battery
enclosure may be damaged causing a hazardous condition.
2. Follow the charging instruction in this manual and instruction labels and
markings in the handset and charger compartments.
3. The battery should not be charged in the place where the temperature is
less than 0℃ or greater than 40℃.
4. Battery must be recycled or disposed of properly. Do not dispose the
battery in a fire. The cells may explode.
5. Do not dispose of the battery in municipal waste. Check with local codes
for disposal instructions.
6. Exercise care in handling the batteries in order not to short-circuit the
battery with conductive materials such as rings, bracelets, keys,
pocketknife, and coins. The battery or conductive material may overheat
and cause burn or fire.
7. Do not expose batteries to rain or water.
8. Do not open or mutilate the battery. Released electrolyte is corrosive
and may cause injury to eyes or skin. The electrolyte may be toxic if
swallowed.
9. During charging, the battery heats up. This is normal and is not
dangerous.
Regulatory Information
EP800
This device complies with CE Rules. Operation is subject to the
following two conditions:
1) this device may not cause harmful interference, and
2) this device must accept any interference received, including
interference that may cause undesired operation.
1.
This telephone system complies with rules of the EN 301 357-2 (RF)、
EN 301 489 (EMC)、EN 60950 (Safety) and EN 50371 (RF safety).
2.
The REN is useful to determine the quantity of devices you may connect
to your telephone line and still have all devices ring when your telephone
number is called. In most, but not all, areas the sum of the REN’s of all
devices connected to one line should not exceed 5.0. To be certain of
the number of devices you may connect to your phone line, you should
contact you local telephone company for the maximum REN in your area.
3.
If your telephone equipment causes problems to the telephone network,
the telephone company may ask you to disconnect your phone system
from the line until the problem has been corrected. Consult with your
local phone company for your rights if this happens.
4.
Your telephone company may make changes in its facilities, equipment,
operations, or procedures that could affect the proper functioning of your
telephone system. Consult with your local phone company for your
rights if this happens.
5.
This telephone system may not be used on coin service provided by the
telephone company. Connection to party lines is subject to state tariffs.
6.
This telephone system has been tested and found to comply with the
limits for rules of the EN 301 357-2 (RF)、EN 301 489 (EMC)、EN
60950 (Safety) and EN 50371 (RF safety). These limits are designed to
provide reasonable protection against harmful interference in a general
public installation. Operations of these devices may still encounter
interference from/to nearby TV’s, VCR’s, radios, computers, or other
electronic devices. To minimize or prevent such interference, the
telephone system should not be placed or operated near other electronic
devices.
~7~
~8~
Page 5

7.
However, there is no guarantee that interference will not occur in a
particular installation. If this telephone system does cause interference
to other electronic devices, which can be determined by turning the
system off and on, the user is encouraged to try to correct the
interference by one or several of the following measures:
a.
We recommend at least 20 feet between the system and other
electronic devices.
b.
Connect the base station to a power outlet on a circuit separate from
that used by the device experiencing interference. Consult the dealer
or an experienced electronic technician for help.
Equipment Checklist
1. In a Base + Handset package, please find the following components:
a. Base Station x 1 (antenna installed)
b. Base AC/DC Adaptor x 1
c. Handset x 1 (antenna installed)
d. Handset Antenna x 1 (Long ×1)
e. Desktop Charger x 1
f. Charger AC/DC Adaptor x 1
g. 1700mA Li-ion Battery Pack x 1
h. Telephone Cord x 1
i. CD (User’s Manual), Quick Guide
2. Optional Accessory
a. Outdoor Antenna Kit (including antenna and cable)
b. Lightning Protection Kit
c. High-gain handset antenna
d. Headset
e. Antenna Splitter
~9~
~10~
Page 6
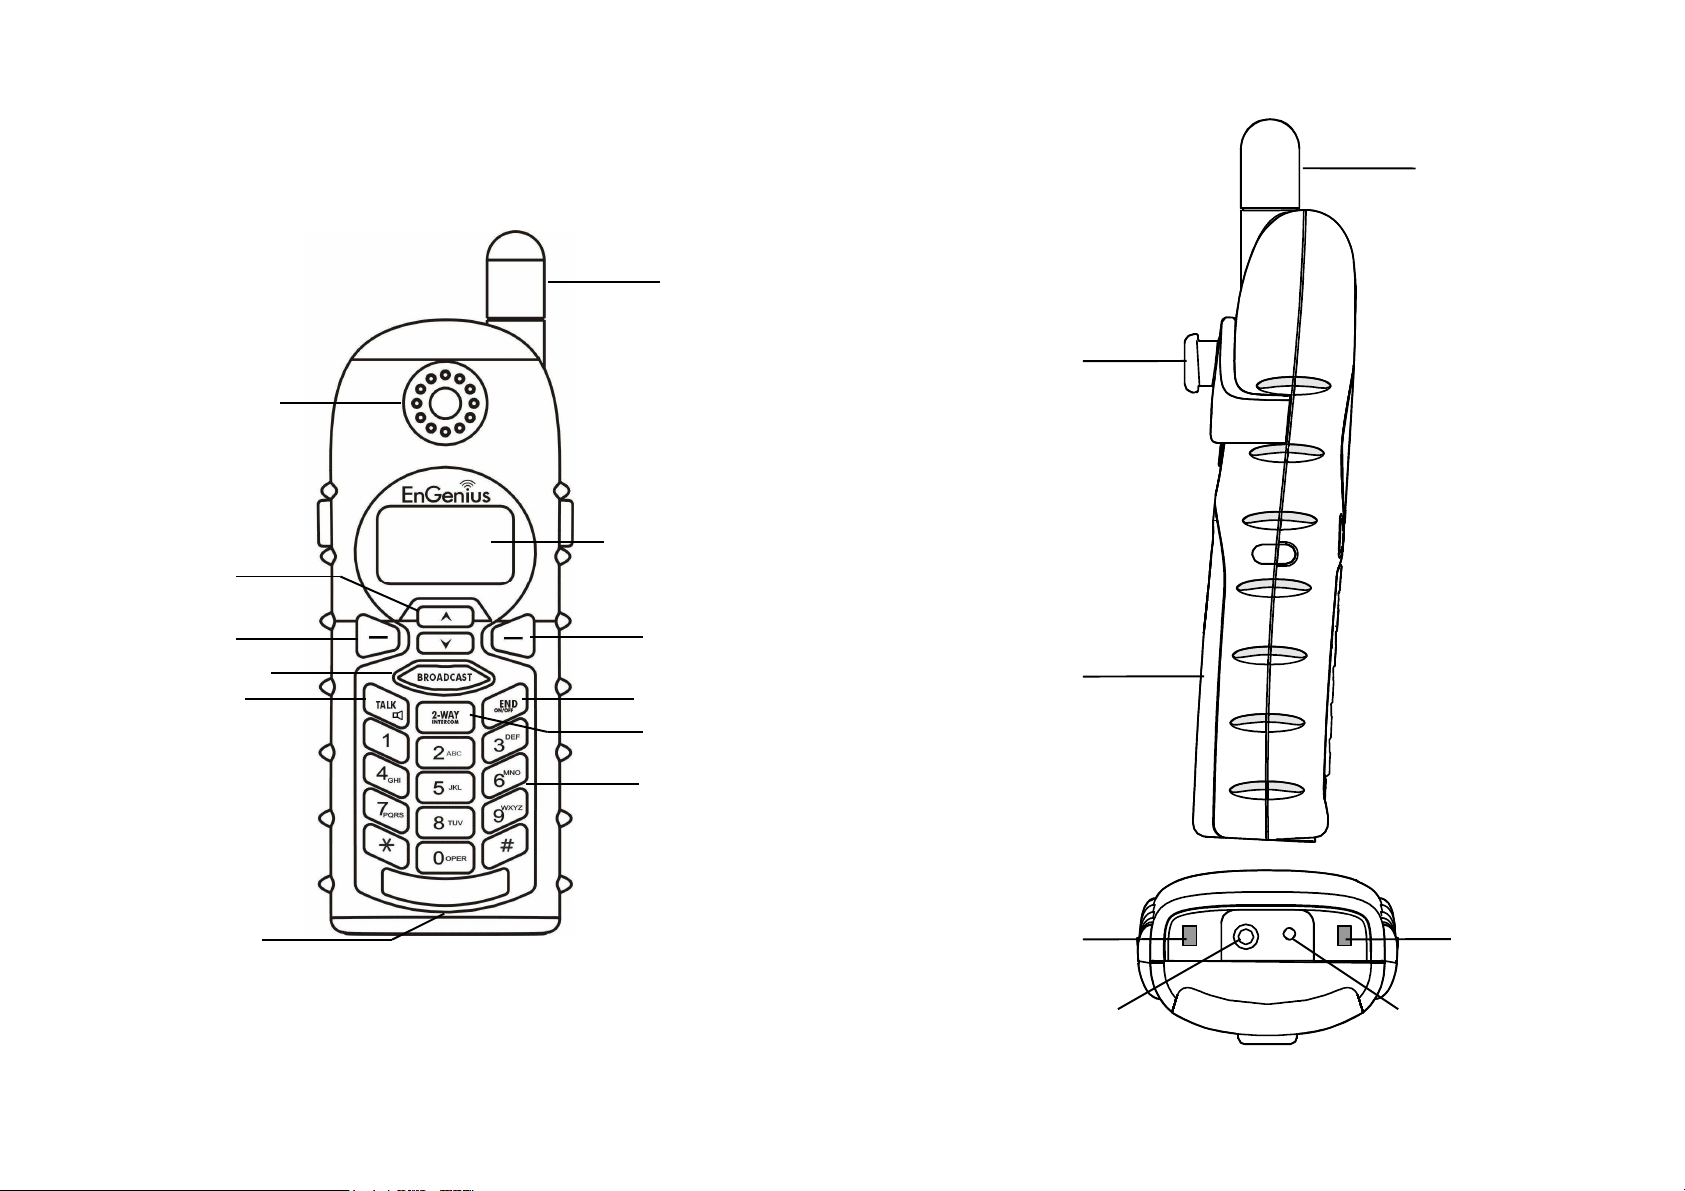
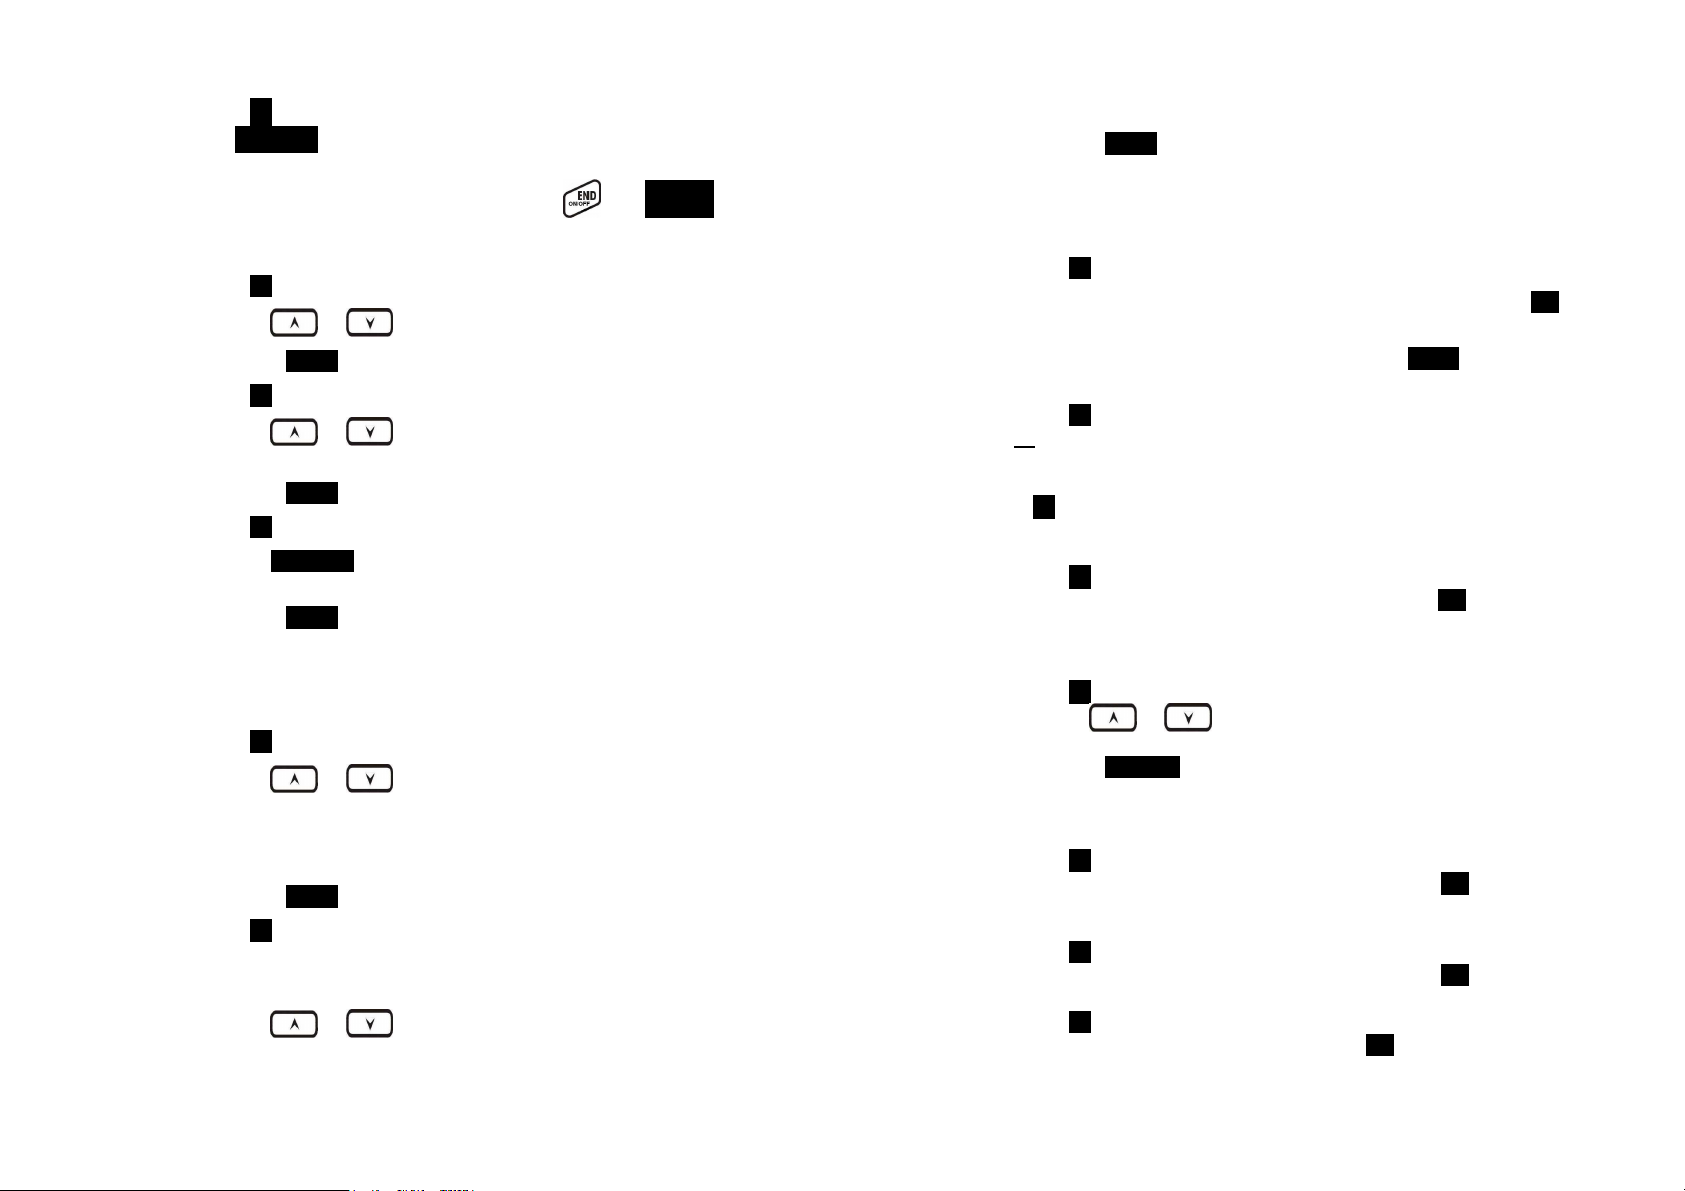
Handset Illustration
Soft key
Soft keySoft key
Soft key
Display
DisplayDisplay
Display
End / Power Off
End / Power OffEnd / Power Off
End / Power Off
Dialing key
Dialing keyDialing key
Dialing key
Int
IntInt
Int
ercom
ercomercom
ercom
Antenna
AntennaAntenna
Antenna
Talk / Flash
Talk / FlashTalk / Flash
Talk / Flash
Broadcast
BroadcastBroadcast
Broadcast
Soft key
Soft keySoft key
Soft key
Microphone
MicrophoneMicrophone
Microphone
Up / Down
Up / DownUp / Down
Up / Down
Antenna
AntennaAntenna
Antenna
Battery Cover
Battery CoverBattery Cover
Battery Cover
Clip
ClipClip
Clip
Charging
Charging Charging
Charging
Contact
ContactContact
Contact
Charging
Charging Charging
Charging
Contact
ContactContact
Contact
Earphone
Earphone Earphone
Earphone
Jack
JackJack
Jack
DC Jack
DC JackDC Jack
DC Jack
Receiver
Receiver
ReceiverReceiver
~11~
~12~
Page 7

Handset Features
Basic Handset Features
4-line LCD (Liquid Crystal Display)
a. The LCD display has LED (Light Emitting Diode) for backlighting.
b. The 1st line of LCD consists of icons.
c. Icons explanation from left to right
(1)
(2)
(3) Speech mode
(3.2) Headset mode
(4) Sound and Indication
(5) Disable PA
(6)
(7)
d. The 2nd and 3rd lines of the LCD, maximum 16 characters each,
e The last line displays the left and right soft keys.
RSSI level (Receive Signal Strength Indicator)
During a call, the number of bars is proportional
to the radio signal strength received.
Link mode
(2.1) Call in-progress (ON/OFF-Hook)
The number on the right side of phone symbol
indicates which the phone line of Base Station
is active if Multi-Base is on.
(2.2) Intercom in-progress
Indicates if Intercom mode is active
Indicate the Handset ID which is making intercom with.
(3.1) Speaker Indicator
Indicate if the speaker is active
(4.1) Enable ringer
(4.2) Disable ringer
(4.3) Ringer and vibrate mode
(4.4) Vibrate mode
(4.5) Message waiting indicator
Indicate if the incoming broadcast is disabled.
Two-Digit Handset ID
Displays the 2-digit Handset ID of own.
11
Battery Strength
Number of bars is proportional to the amount of battery time remaining.
display status, message, menu selections, or user-editable
alphanumerical characters.
2. Ringer
a. Rings to an incoming call and intercom call.
b. Distinctive alert sounds indicating various events:
(1) Single beep: successful key entry.
(2) Double beep: indicates power on/off.
(3) Triple beep: failed operation.
(4) Periodic 1-Long-2-Short beep (every 1 minute): low battery warning、
out of range、call on hold
Re: No any beep for invalid key entry
3.
TALK/FLASH ( )
a. Places or answers a telephone or intercom call
b. Sends a Flash signal to phone line to retrieve a dial tone after the call
ends, or to perform the call waiting feature provided by local phone
companies during a call.
4.
SPEAKERPHONE ( )
Press and hold the key for over 2 second to enable/disable the
speakerphone during incoming, outgoing or intercom call.
5.
2-WAY INTERCOM ( )
a. Places an intercom call to another handset, a group handset (group
paging) or all registered handsets.
b. Intercom calls are digital, full duplex, and are conducted without the
assistance from the base station.
6.
BROADCAST ( )
a. Half duplex broadcasting to handsets for immediate announcement
b. Half duplex broadcasting to base stations
Re:Press the key on the left top corner of handset to activate
the broadcast function.
7.
Left/Right Soft Keys (
)
a. Make menu selection.
8.
Up( ) /Down( ) Scrolling Keys
a. Scroll through records and menu selections.
~13~
~14~
Page 8

b. Adjust receiver voice volume when in the Talk mode.
c.
d.
9.
a.
b. Leaves current menu operation, up one level.
c. Press for 3 seconds to off the power
Press to review call log when in the Standby mode.
Press to enter phonebook when in the Standby mode.
END; On/Off Key ( )
Ends a call.
Additional Handset Features
1. Multiple handsets registration
a.
b. ID 11-19: individual Handset IDs.
c. ID 91-99: Group IDs. Handsets can “subscribe” from the handset
2. Ringer Vibrator
a. Two options for Line (incoming call) ringing & Intercom ringing.
b. Six-level ringer volume selections (Off/Low/Medium/High/Vibrate/
c.
3. Caller ID
Displays incoming call phone number and name on the LCD (needs
4. Call waiting with caller ID
Displays 2nd incoming call information on the same phone line when 1st
5. Name tagging with caller ID
Match the caller ID with the phone book entries; once matched, the LCD
6. DND (Do Not Disturb, i.e., Silent Ring)
Up to 9 handsets can be registered to a base station
menu to group(s) and be paged when a landline caller or an
intercom caller enters a Group ID.
Vibrate & High) for each option.
Eight ringer type selections for each option.
Caller ID service from local telephone company)
call is in progress (needs Call Waiting with Caller ID service from local
telephone company)
screen will display the name or nickname instead of pure caller ID info
(needs Call Waiting with Caller ID service from local telephone
company).
7. Call Logs
a. Redial: Stores 10 phone numbers (up to 26 digits each) dialed most
recently. Can perform last-number redial on all 10 numbers.
b. Received & New Call Log: Total 50 entries (16-digit phone number,
16-character names, and Date/Time stamp), needs Caller ID service
from local telephone company.
c. Phone numbers and names can be saved into phonebook while in
display.
8. Call Barring: Block outgoing call and incoming call.
a. Outgoing call:
a-1. Block the users from dialing long distance calls or international
calls
a-2. Up to 5 digits of each call barring setting; up to 5 entries
allowed.
b. Incoming call:
b-1. PA On/Off: Enable or disable the broadcast from other handsets
or base station. When PA is Off, the handset can’t receive broadcast
from base station or other registered handsets, but it can broadcast
to base station or other registered handsets.
b-2. Line On/Off: Enable or disable the capability to receive incoming
call from telephone line. When Line is Off, the handset can’t receive
incoming call from telephone line, but it can still make outgoing call.
b-3. Int. On/Off: Enable or disable the intercom from other handsets
or base station. When Int. is Off, the handset can’t receive intercom
from base station or other registered handsets, but it can intercom to
base station or other registered handsets.
c. This changing requires to entering the “Call Settings” (MENU-4-3).
[Note] You need to key in the accurate user ID and password to perform
this feature. The default password is “0000”.
9.
Any Key Answer (except and SILENT Soft Key)
~15~
~16~
Page 9

10. Key-guard
a. When the keyguard is selected, all keys will be locked.
Press UNLOCK (Left) soft key followed by “*” to release it.
b. The keyguard will be automatically enabled once returning back to
idle mode for 15 seconds.
11. Dialing Prefix
a. Up to 14 digits, including pause(s), one access code can be pre-
programmed to be added automatically in front of the dialed number
when dialing from call logs, phonebook, and dial-and-send dialing.
12. Call Hold
a. Places call on hold
13. Mute
a. Press MUTE (Left) soft key during talk, the handset microphone will
be muted.
Press UNMUTE (Left) soft key to release it.
14. Phonebook
a. 50 entries, each stores a phone number or handset ID (up to 26
digits) and name (up to16 characters)
b. Alphabetically sorted display and search by letter.
c. Dial from display.
d. During the stand-by mode, you can enter the phone book by
pressing scrolling key.
e. Phone book transfer via air
i. Transfer specific phonebook to one handset or all registered
handsets
ii. Transfer all phonebooks to one handset or all registered
handsets
15. Key tone
a. Four-level key tone volume selections (Off/Low/Medium/High).
b. Four key tone type selections.
16. Call Timers
a. Display call time duration for current call during and immediately
after the call.
17. Programmable Feature Call
a. Allow user to pre-program the most frequently used Feature code
into EP800 which is adjunct to the PBX system.
b. Up to 10 entries can be saved.
c. Once the feature code is being programmed, you can quickly
perform those functions during the call by pressing OPTION soft key.
18. Menu Display
a. To avoid mis-setup in the “Call Settings”(MENU-4), “Phone Settings”
(MENU-5), “Base Settings” (MENU-6) and Multi-base Setting
(MENU-7-3), these settings can be hidden.
b. Handset password is required before enter Menu Display (MENU-8),
the default handset password is “0000”.
c. When disabling the settings, these setting will not displayed any
longer, unless enabled by entering Menu Display again.
19. PA On/Off
a. Enable or disable the broadcast function.
b. When PA is Off, the handset can’t receive broadcast from base
station or other registered handsets; But it can broadcast to base
station or other registered handsets.
20. Group Setting
a. Allow handset to subscribe to one or several groups.
Re: Up to 9 groups (91~99) can be subscribed.
21. Custom Name
a. Allow changing the “EP800” screen to the desired wording or info,
such as the user’s name.
Re: Up to 32 characters can be entered.
22. Change Pwd
a. Allow changing the handset password which requires entering in Call
Barring (MENU-4-3) and Menu Display (MENU-8) .
Re:Default is “0000”.
23. DTMF Duration
a. From MENU-6-1 to select variable duration of DTMF tone.
b. Default is 100ms.
c. When entering the Base Settings, PIN is required. Default is “0000”.
Re: Better to check with your phone company first before changing it.
~17~
~18~
Page 10

24. Programmable Flash key timing
a. From MENU-6-2 to select flash key timing
b. 9-level (100 ms - 900 ms) timing selections, default= 600 ms.
c. The default value (600 ms) works in most areas. Changing this
setting may cause Flash key not working. Change only when you
are certain of the new value would work.
d. When entering the Base Settings, PIN is required. Default is “0000”.
25. Assign next handset ID for new handset
a. Using registered handset from MENU-6-3 to assign a next handset
ID to a new handset.
b. If not assign next handset ID, the system will automatically assign a
handset ID to a new handset..
c. When entering the Base Settings, PIN is required. Default is “0000”.
26. Clear Handset
a. Using registered handset from MENU-6-4 to remove the other
registered handset, in case the other registered handset is defected.
b. Once clear the other registered handset, the user is able to register a
new handset for instead.
c. When entering the Base Settings, PIN is required. Default is “0000”.
27. Change PIN
Allow changing the base PIN which requires entering the “Base Settings”
(MENU-6-5).
a. Using registered handset to change PIN from MENU-6-5.
b. Default PIN is “0000”.
c. When entering the Base Settings, PIN is required. Default is “0000”.
28. Auto Hang Up feature
a. Using registered handset from MENU-6-6 to turn on/off the Auto
hand up feature.
b. If turning on the feature, the handset will automatically hang up the
call when the far-end hangs up the call.
c. When entering the Base Settings, PIN is required. Default is “0000”.
29. Area Code
The area code function allows calls within local and country area codes
to be dialed without the prefix.
a. Enter MENU-4-7-1 to set the “Local” area code.
b. Enter MENU-4-7-2 to set the “Country” area code.
Re: Up to 3 digits can be entered.
~19~
30. Multiple Base setting
a.
Re: For best performance, maintain a distance of at least 5 meters
31. Set Time
The set time function allows user to set date/time to support the DTMF
a. Enter MENU-6 to set Base Settings.
b.
c. Enter Base PIN (Default is “0000”).
d. Enter “7” to enter Set Time.
e. Enter 4 digits for MM/DD(Month/Day), then enter 4 digits for hr:mm
f. Press SAVE (left soft key) to finish the setting.
32. Mic Gain
Allow changing the handset microphone gain based on the handset in
33. Headset Ring
Allow changing the ringer emitted either from handset speaker or
34. Baby Monitor
Allow setting the handset monitoring the baby room via intercom call.
Up to 4 base stations can be set in one system.
(about 15 feet) between any two base stations.
caller ID (DTMF caller ID doesn’t attach date/time when receiving from
PSTN, using this setting, user is able to review the date/time when the
caller ID received).
Press or scrolling key to select desired base station
when Multi-Base is set.
(Hour:Minute)
different environment – Quiet, Normal and Noisy environment.
This requires entering the “Phone Settings” (MENU-5-1).
receiver of headset.
This requires entering the “Phone Settings” (MENU-5-9).
When setting Baby Monitor ON, this dedicated handset will not answer
any incoming call, except the 2-way intercom.
This requires entering the “Call Settings” (MENU-4-5).
~20~
Page 11

Base Illustration
Page / Registration
Page / RegistrationPage / Registration
Page / Registration
Power LED: blue color
Power LED: blue colorPower LED: blue color
Power LED: blue color
Reset Button
Reset ButtonReset Button
Reset Button
DC Jack
DC JackDC Jack
DC Jack
Phone Jack
Phone JackPhone Jack
Phone Jack
Line Jack
Line JackLine Jack
Line Jack
Base unit Diagram
In use LED: white color
In use LED: white color
In use LED: white colorIn use LED: white color
Base Features
Basic Base Station Features
1. Antenna
a. The antenna port has a
antenna or cable, turn counterclockwise; to install, turn
clockwise. Improper installation may damage the connector.
b. When using an outdoor antenna, locate the antenna (not the
base station itself) as high as possible for a clear transmission
path.
2. LED
a. Power (blue color): it indicates base station has power.
b. In-Use (white color): it indicates an active telephone line.
3. RESET Button
a. Restores base station to factory settings
b. Reset button is intended to prevent accidental system reset.
c. All handsets (including administrator) and additional base(s)
need to be re-registered after a base station reset.
4. Page Button (PAGE)
To search a misplaced handset; press “PAGE” button, all registered handsets
beep for 30 seconds.
Press “PAGE” again or any key on handset to stop.
5. Registration Button (PAGE)
Enters registration mode along with handset, assigns handset ID (11-19).
6. Line Jack
Standard RJ-11C/CA-11A connector to plug in the telephone line
7. Telephone Jack
Another RJ-11C to plug in the optional answering machine
8. DC In: to plug in the power adaptor
normal thread connector
; to remove
~21~
~22~
Page 12
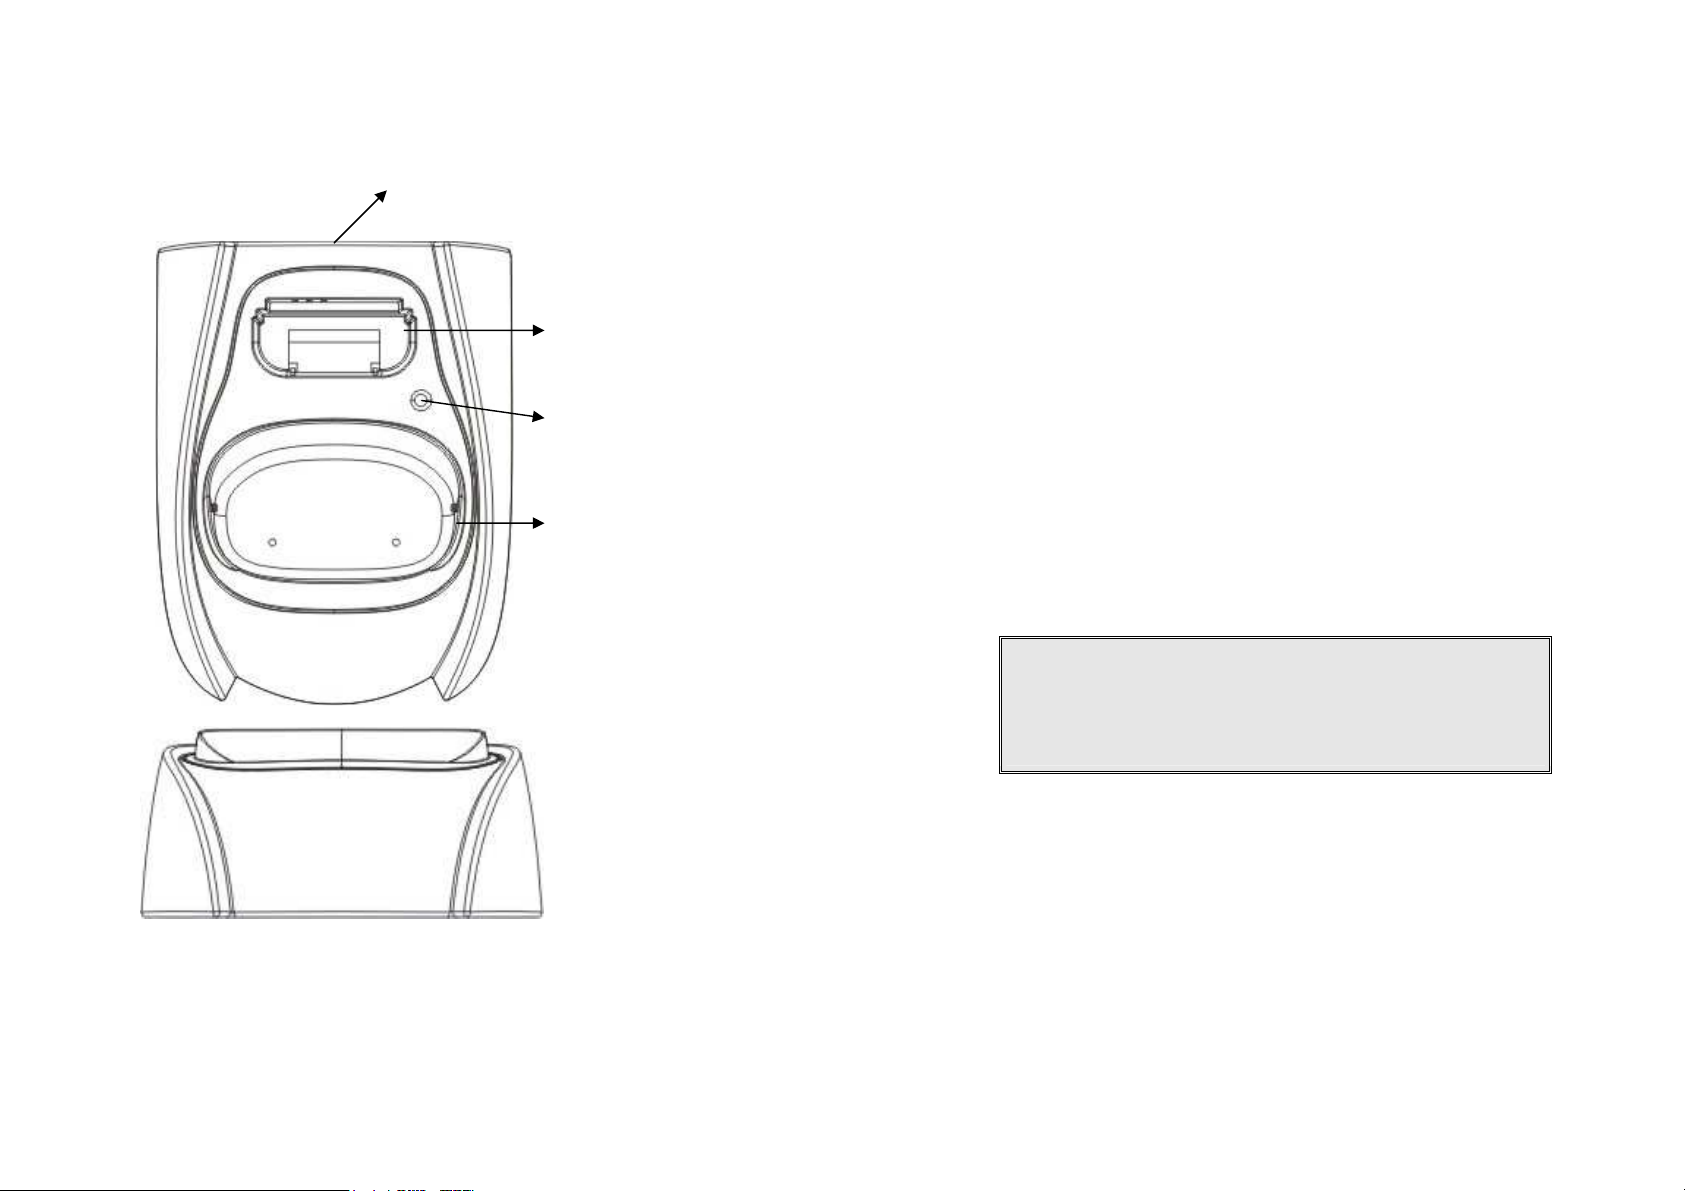
Charger Illustration
DC In
Spare Battery
Charging Slot
Spare Battery
Charging Indicator
Handset Charging
Slot
Charger Features
1. DC In
Connects to Charger AC Adaptor.
2. Handset Charging Slot
a. Charge handset battery when handset is placed in cradle.
b. Refer to the handset LCD for charging status
(1) Charging: battery status bar is running and the LCD screen showed:
“Charging”.
(2) Fully Charged: battery status bar stands still and the LCD screen would
display “Charge Complete”
(3) Charge Fail: Should there be any error occurred during charging mode,
the LCD screen would display “Charge Fail”
3. It is impossible to overcharge the battery using this charger.
4. The adaptor for charging station can be used as travel charger as well.
However, you can’t turn off the power while you charge the handset via
travel charger. A warning message” “Unplug Travel Charger then OFF”
will be shown on the LCD.
Notes:
1. Fully charge battery packs before first use.
2. Handset will be “power on” automatically when placing on the
charging slot.
3. However, if you run drain the battery, it will take around one
minute for handset to auto power on.
~23~
~24~
Page 13
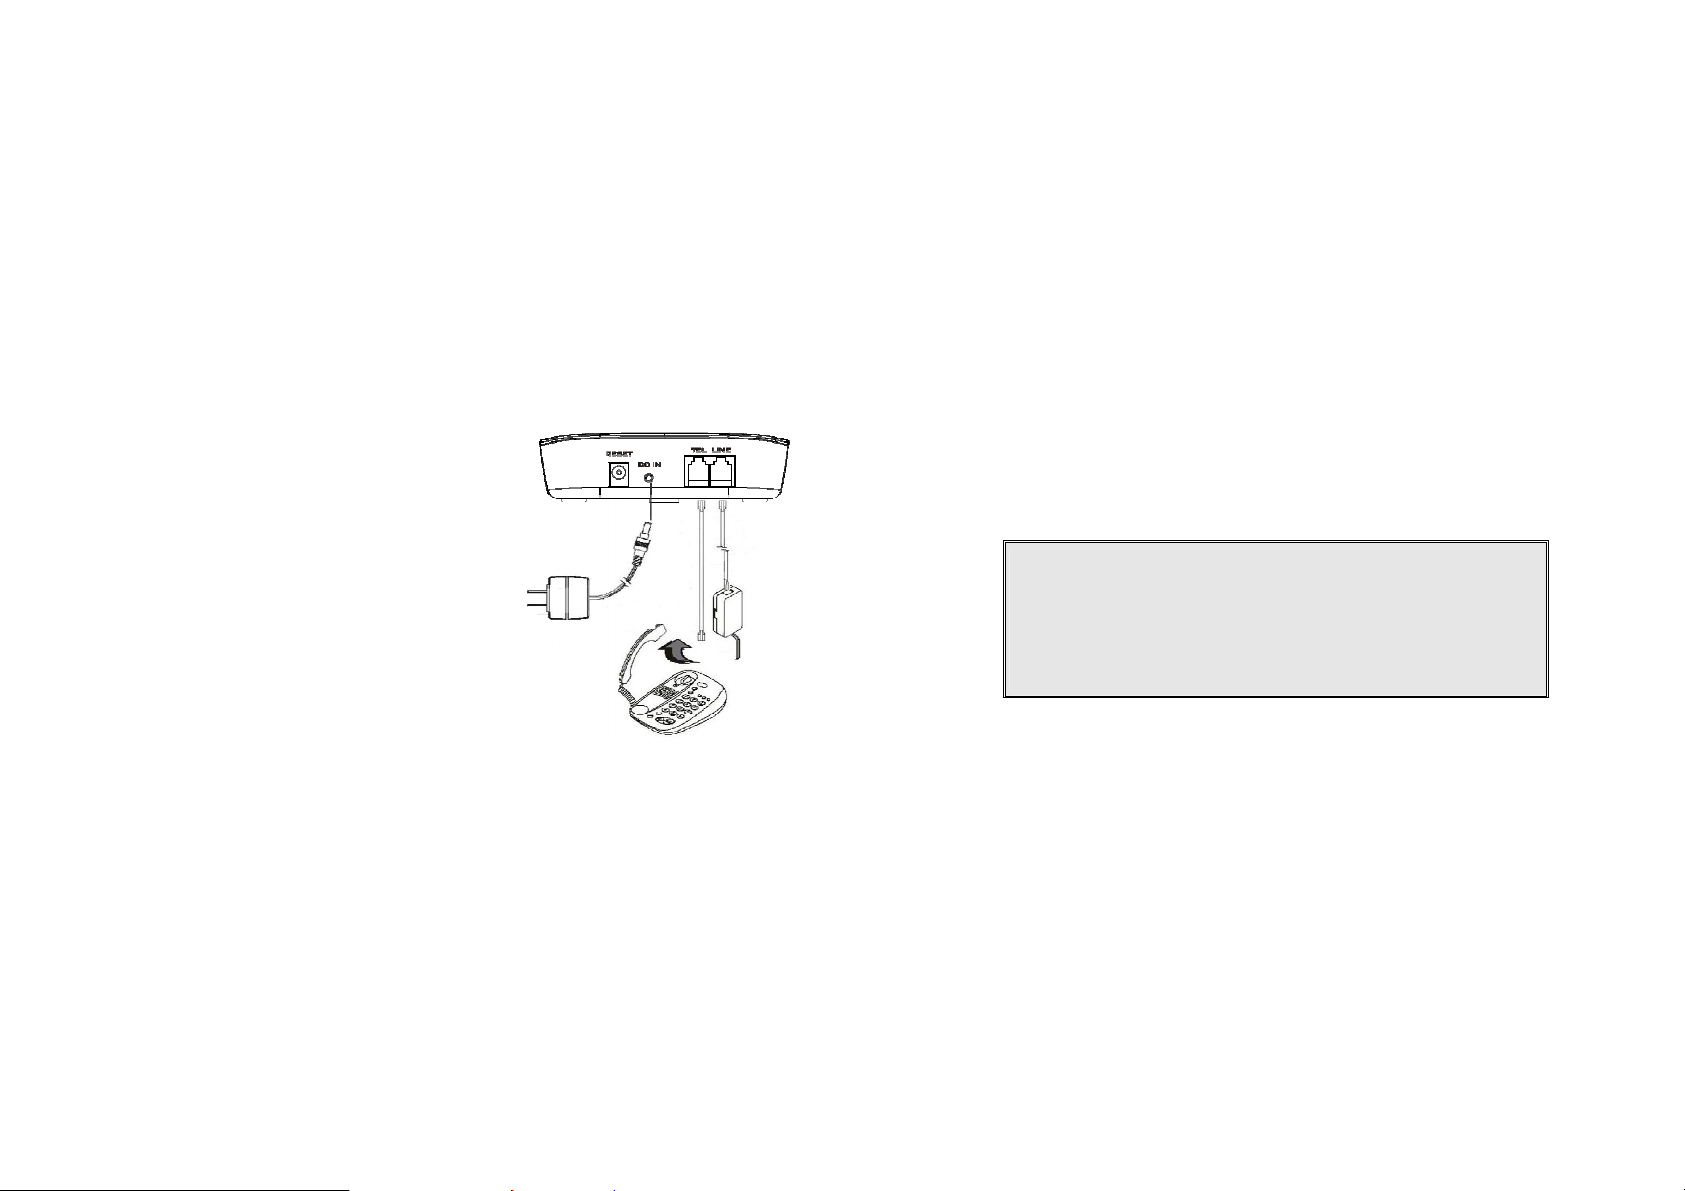
Getting Started
Base Station Installation
There are three possible base station setups:
Base station alone
Base station plus telephone answering device
Base station plus standard telephone
For best performance, maintain at least a distance of 1 meter (about 3 feet)
between the base station and other electronic devices (e.g., TV, computer,
stereo, fax machine, answer machine, cordless phone, etc.)
1. Install base station antenna.
The base station’s antenna port has a
normal-thread connector; to install
antenna or cable, turn clockwise; to
remove, turn counter-clockwise.
Improper installation may damage the
connector.
2. Plug the transformer end of the base
station AC/DC adaptor into a standard
AC electrical power outlet, plug the
other end into the “DC In” jack on the
back of the base station.
a. The base adaptor’s DC plug is
same dimension as the charger’s
DC plug. The charger adaptor’s
DC plug can fit into the base’s DC
In jack.
3. Plug phone cord into the “LINE” Jack
4. A standard telephone or answering machine can be plugged into the
adjacent jack on the back of the base station marked TEL
Handset and Charger Installation
1. Plug the transformer end of the Charger AC/DC adaptor into a standard
AC electric power outlet, plug the other end into the “DC In” jack on the
back of the Charger.
2. Install battery pack onto the handset.
3. Install handset antenna.
4. Place handset onto the charger slot.
5. Fully charge the battery for three hours before use.
6. The phone system is now ready to perform basic functions such as
making and receiving phone calls and intercom calls. No base station or
handset programming is needed for basic operations.
Note:
1. Handset(s) packaged along with a Base Station are preregistered at the factory. If you have a new handset, you will
need to register the handset with the base station in order to be
recognized as a member handset by the base(s) and by other
handsets. See Handset Registration.
2. Fully charge battery packs before the first usage.
~25~
~26~
Page 14
Basic Operations
information contained in memory can be changed.
Operation Modes
Both the base station and handset have levels of operation at which time
only certain procedures of functions can be performed.
A. Base Operation Modes
1. STANDBY mode- this is the default mode. The page key is active in
standby mode only. The base “Power” (blue color) LED will light up
during this mode.
2. TALK mode- the base station operates in this mode during phone call.
The “In Use” (white color) LED will light up during this mode.
3. REGISTRATION mode- the base station enters this mode by pressing
the PAGE button for three seconds. The “Power” (blue color) LED will
be blinking in “Registration” mode, also a prompt sound will be emitted.
B. Handset Operation Modes
1. STANDB mode- this is the default mode.
a. If there is no on-going activity, the handset
automatically goes into SLEEP/STANDBY mode
b.
to save battery power.
The handset can be turned off completely by
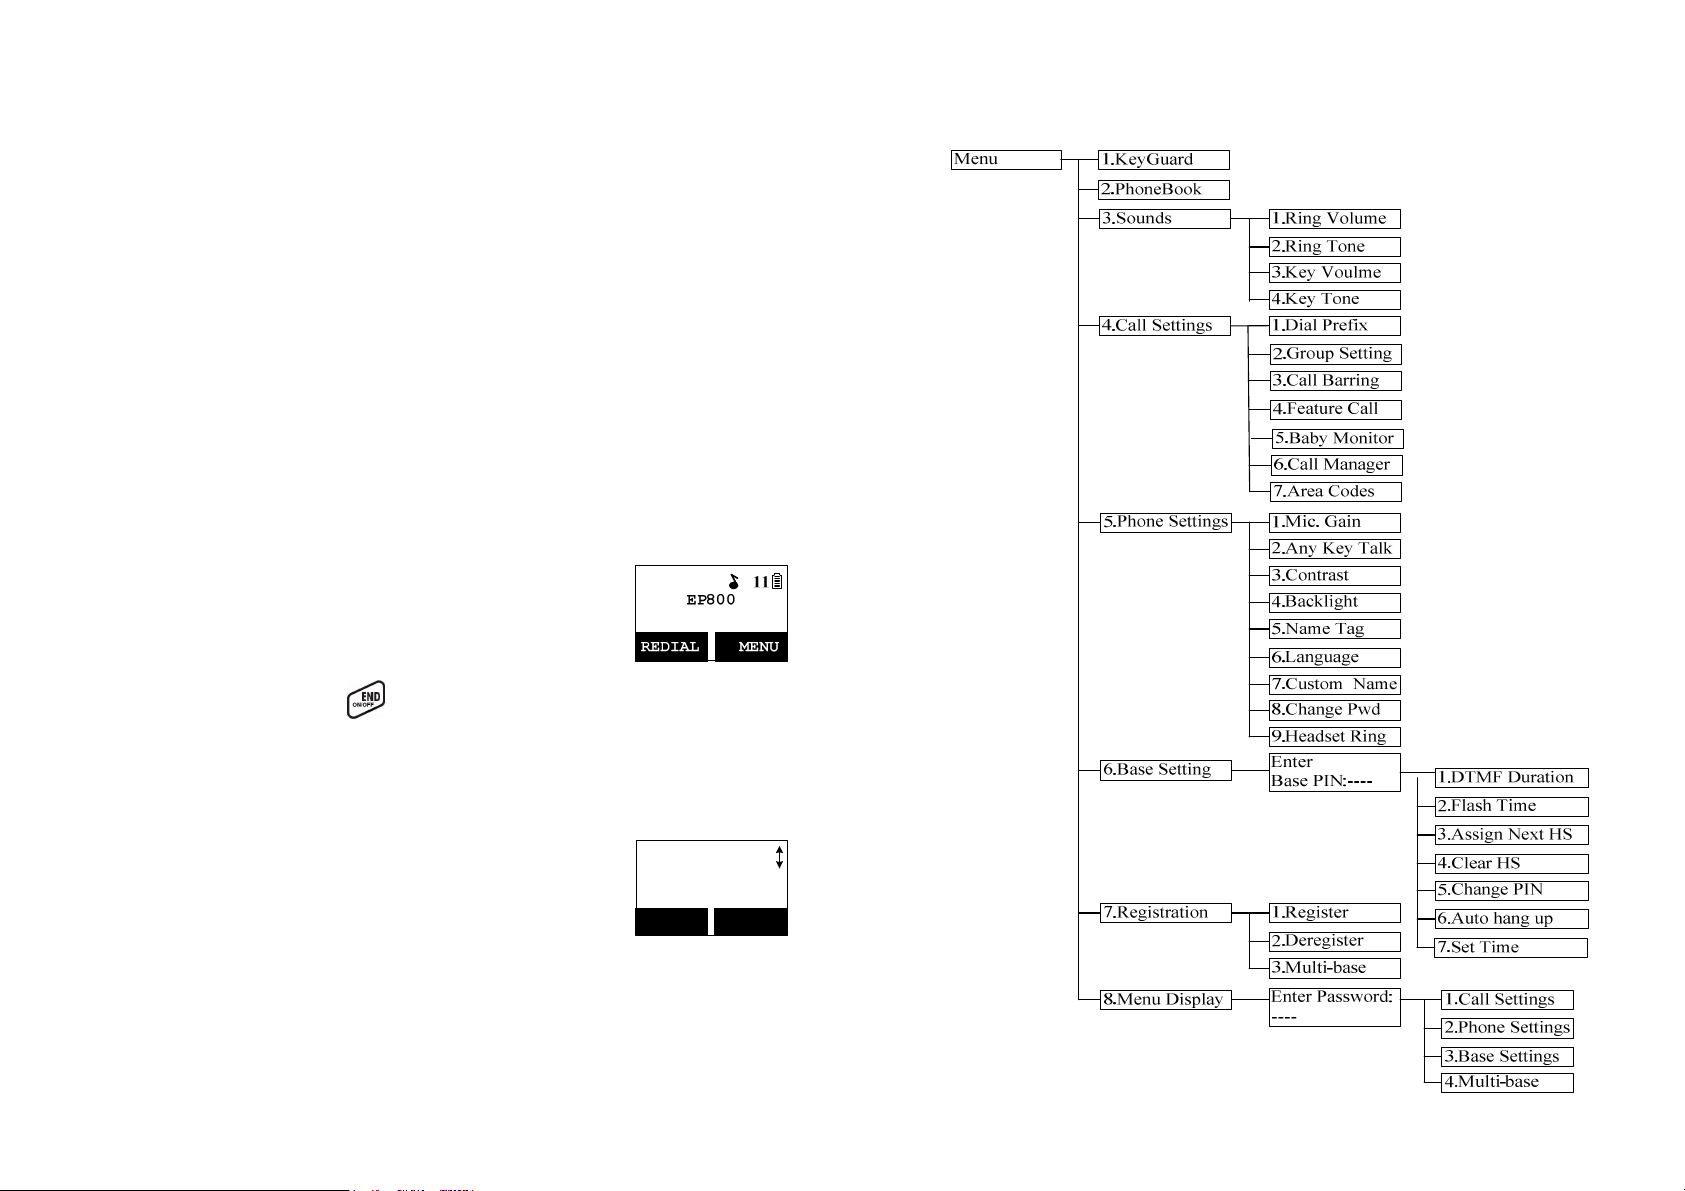
3. Menu Tree
holding down the key for 3 seconds.
c. The standby screen display (custom name) can
be edited.
d. The 2-dight number represents the handset ID
2. MENU mode
a. Press the Right soft function key to activate Menu
mode.
b. In Menu mode, the handset settings and
c. The functions available through the Menu
selection are covered in greater detail from page
53.
d. The Menu structure display as below:
~27~
Main Menu
1.KeyGuard
SELECT BACK
~28~
Page 15
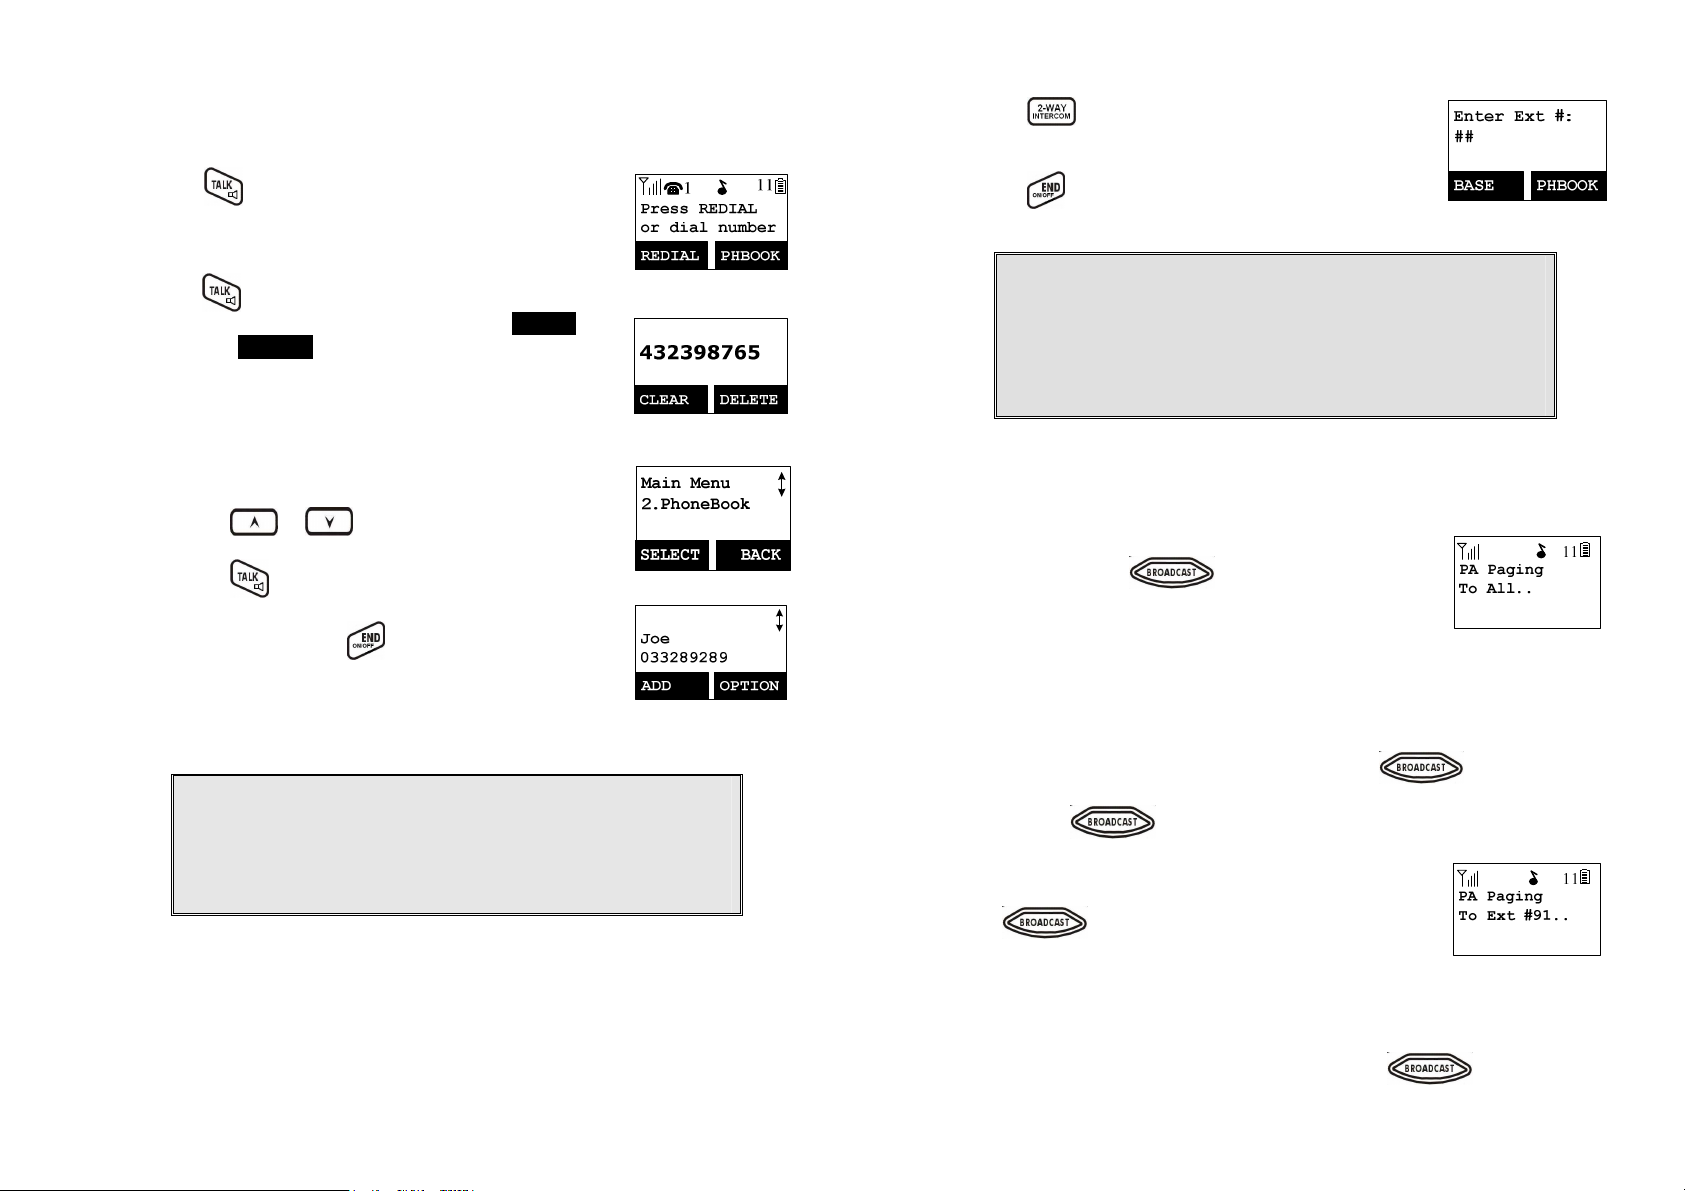
Making a Telephone Call
1.
Press , wait for dial tone, and then enter phone
number.
2. Alternatively, you can enter phone number first then
press key.
When using this method, you can use the CLEAR
(Left) and DELETE (Right) soft keys to edit the number
entered. “Delete” erases the last digit entered. “Clear”
erases the entire line but remains in the dial-and send
dialing.
3. Speed dial by access the entries in the phone book
(Menu2)
a.
Press or scrolling key to enter the
phone book
b.
Press to dial out the number
4.
To abort dialing, press key.
Notes:
1.
If a link cannot be established, the LCD will show “Base not
found” after a 6-second time out.
2.
A call duration timer will start displaying the length of the call
after link is established.
Making an 2-Way/ Intercom Call
The EP800 Cordless Phone System offers private, Intercom/ 2-way radio
calls independence of base station. Intercom/ 2-way communication can be
placedbetween handsets.
1.
Press key followed by a two-digit handset ID
or Group ID.
2.
Press key to end the call.
Notes:
1. Intercom calls can be made regardless if the Base Station is
present.
2. If a Group ID is entered, the first handset (belonging to that
group) that answers will establish a link with the caller. See
Handset Group Subscription.
3. If a link cannot be established, the LCD shows “Paging
timeout” after a 35-second time out.
Making a Broadcast
A. Handset to Handset Calls
1. Broadcasting all handsets
a.
Press and hold key (left top corner of
keys) from one handset.
b. Hear a long “Du…” sound while the initiating
handset broadcasting to all handsets within
communication coverage.
c. Start to speak the message to be broadcasted once you hear the “Du
Du” sound; the speakerphone of destination handsets will be opened
up. if it received the voice.
Re: the initiating handset press and hold the key is needed
during the speaking or broadcasting.
d.
Release key to end the broadcasting.
2. Broadcasting a group of handsets
a.
b. Hear a long “Du…” sound while the initiating
c.
Enter the Group ID and then press and hold
key (left top corner of keys).
handset broadcasting to all handsets.
Start to speak the message to be broadcasted once you hear the “Du
Du” sound; the speakerphone of destination handsets will be opened
up. if it received the voice.
Re: the initiating handset press and hold the key is needed
~29~
~30~
Page 16
during the speaking or broadcasting.
d.
Release key to end the broadcasting.
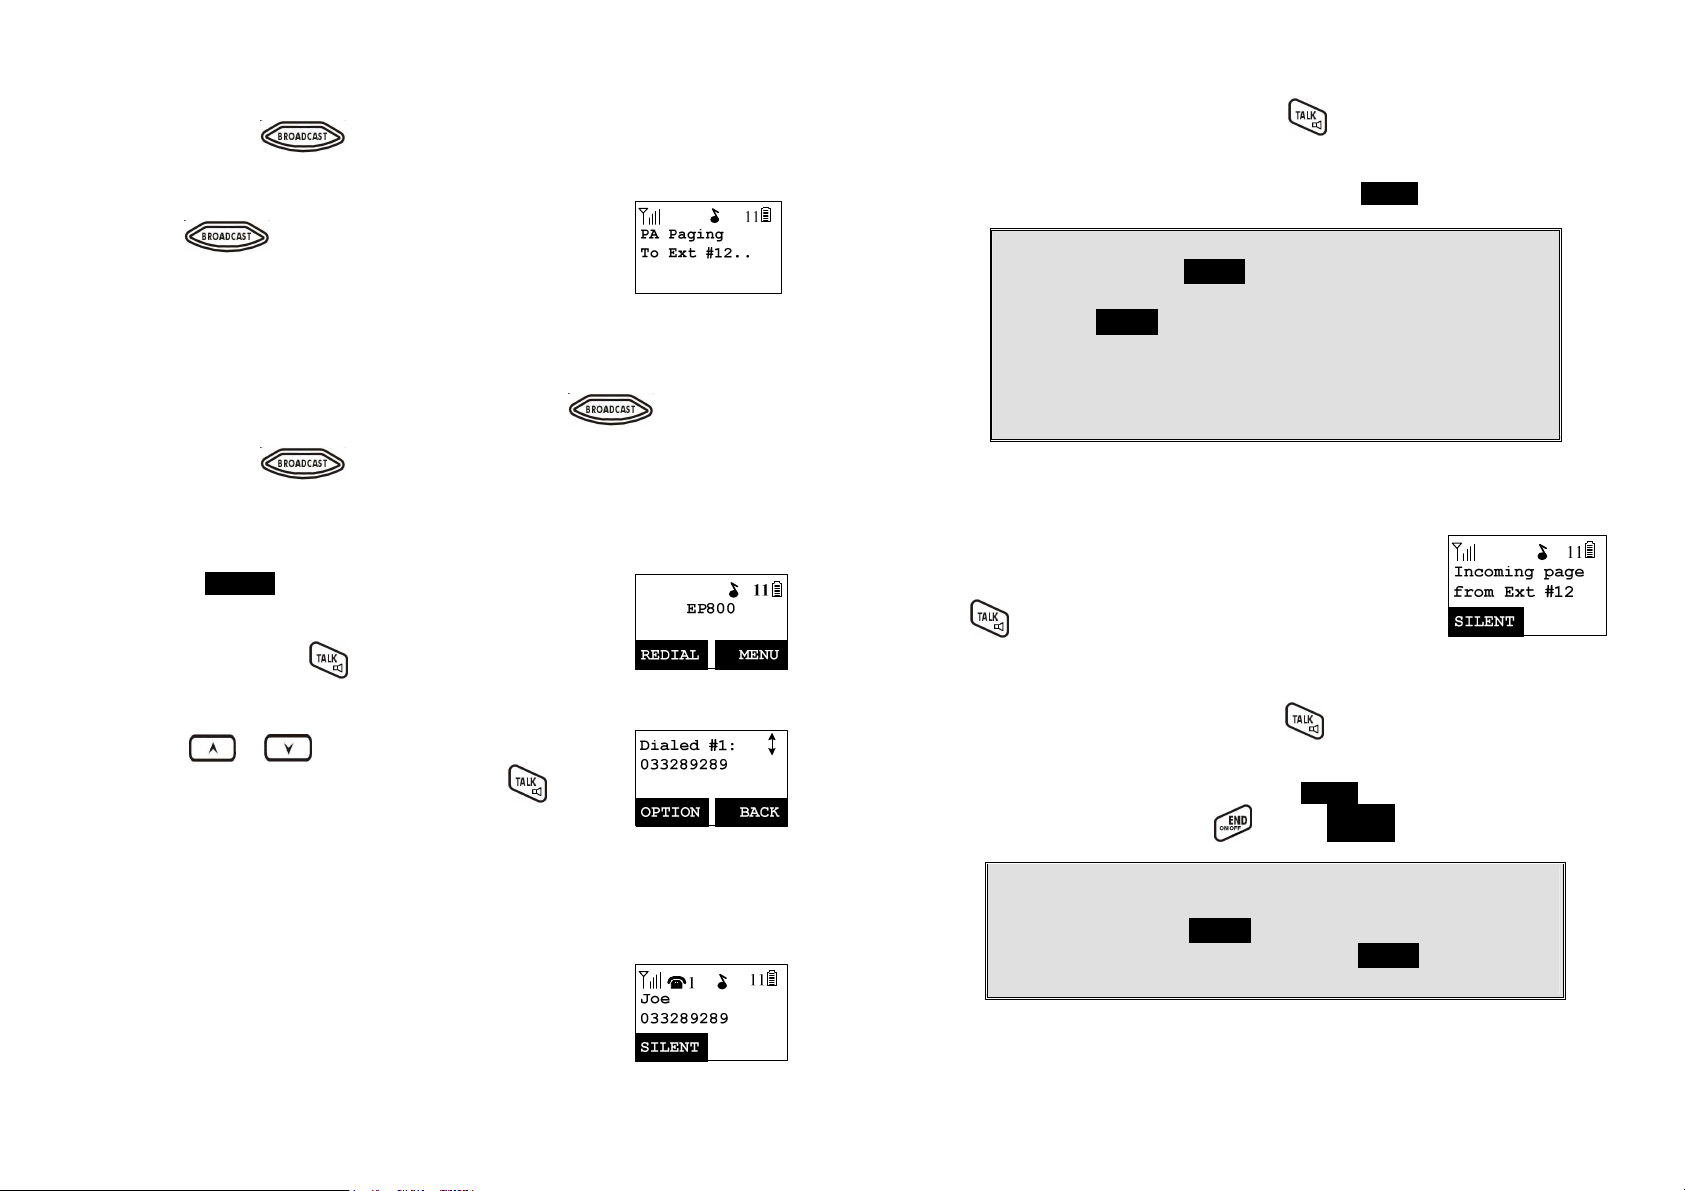
3. Broadcasting an individual handset
Enter the Handset ID and then press and hold
a.
key (left top corner of keys).
b. Hear a long “Du…” sound while the initiating
handset broadcast all handsets within
communication coverage.
c. Start to speak the message to be broadcasted once you hear the “Du
Du” sound; the speakerphone of destination handsets will be opened
up. if it received the voice.
Re: the initiating handset press and hold the key is needed
during the speaking or broadcasting
d.
Release key to end the broadcasting.
Redial
1. Press REDIAL (Left) soft key.
The LCD shows the last phone number dialed. To dial
2.
this number, press
key.
3.
Use or key to scroll through the last 10
phone numbers dialed. Select and press
key to
dial the selected number.
[Note] Intercom numbers (Handset ID) are not stored in
the last 10 numbers dialed log.
Receiving a Telephone Call
1. When an incoming call arrives, the LCD will show the
caller ID message, and the ringer will ring or vibrate
unless the ringer has been turned off.
If the handset is on the charger cradle (ringer will be
2.
temporarily switched to “Ring” if it has been set to
“Vibrate”), lift the handset and press key to start
conversation.
Re: You can turn on the “Any Key Talk” from MENU-5-2
Notes:
1. You can press SILENT (Left) soft key if you choose to ignore
the call. Unlike turning off the ringer (from the handset menu),
the SILENT key operation is valid only for the current call.
2. If Caller ID service is available, the LCD will display the
incoming call information. If the LCD shows “Private” or
“Unknown”, the caller’s information may have been blocked by
the caller or the originating phone company.
Receiving an Intercom Call
When an intercom call arrives (called from other
1.
handsets, ex. Handset 12), the ringer will ring or
vibrate unless the ringer has been turned off. Press
to answer the intercom call.
If the handset is on the charger cradle (ringer will be
2.
temporarily switched to “Ring” if it has been set to
“Vibrate”), lift the handset and press key to start
conversation.
If the handset is not on the cradle and MENU-6-2 “Any Key Talk” setting is
3.
“On”, press any key (except and the SILENT soft key) to answer.
Notes:
1. The LCD displays the caller’s Handset ID.
2. You can press the SILENT (Left) soft key if you choose to ignore
the call. Unlike turning off the ringer the SILENT key operation is
valid only for the current call.
Ending a Call
~31~
~32~
Page 17
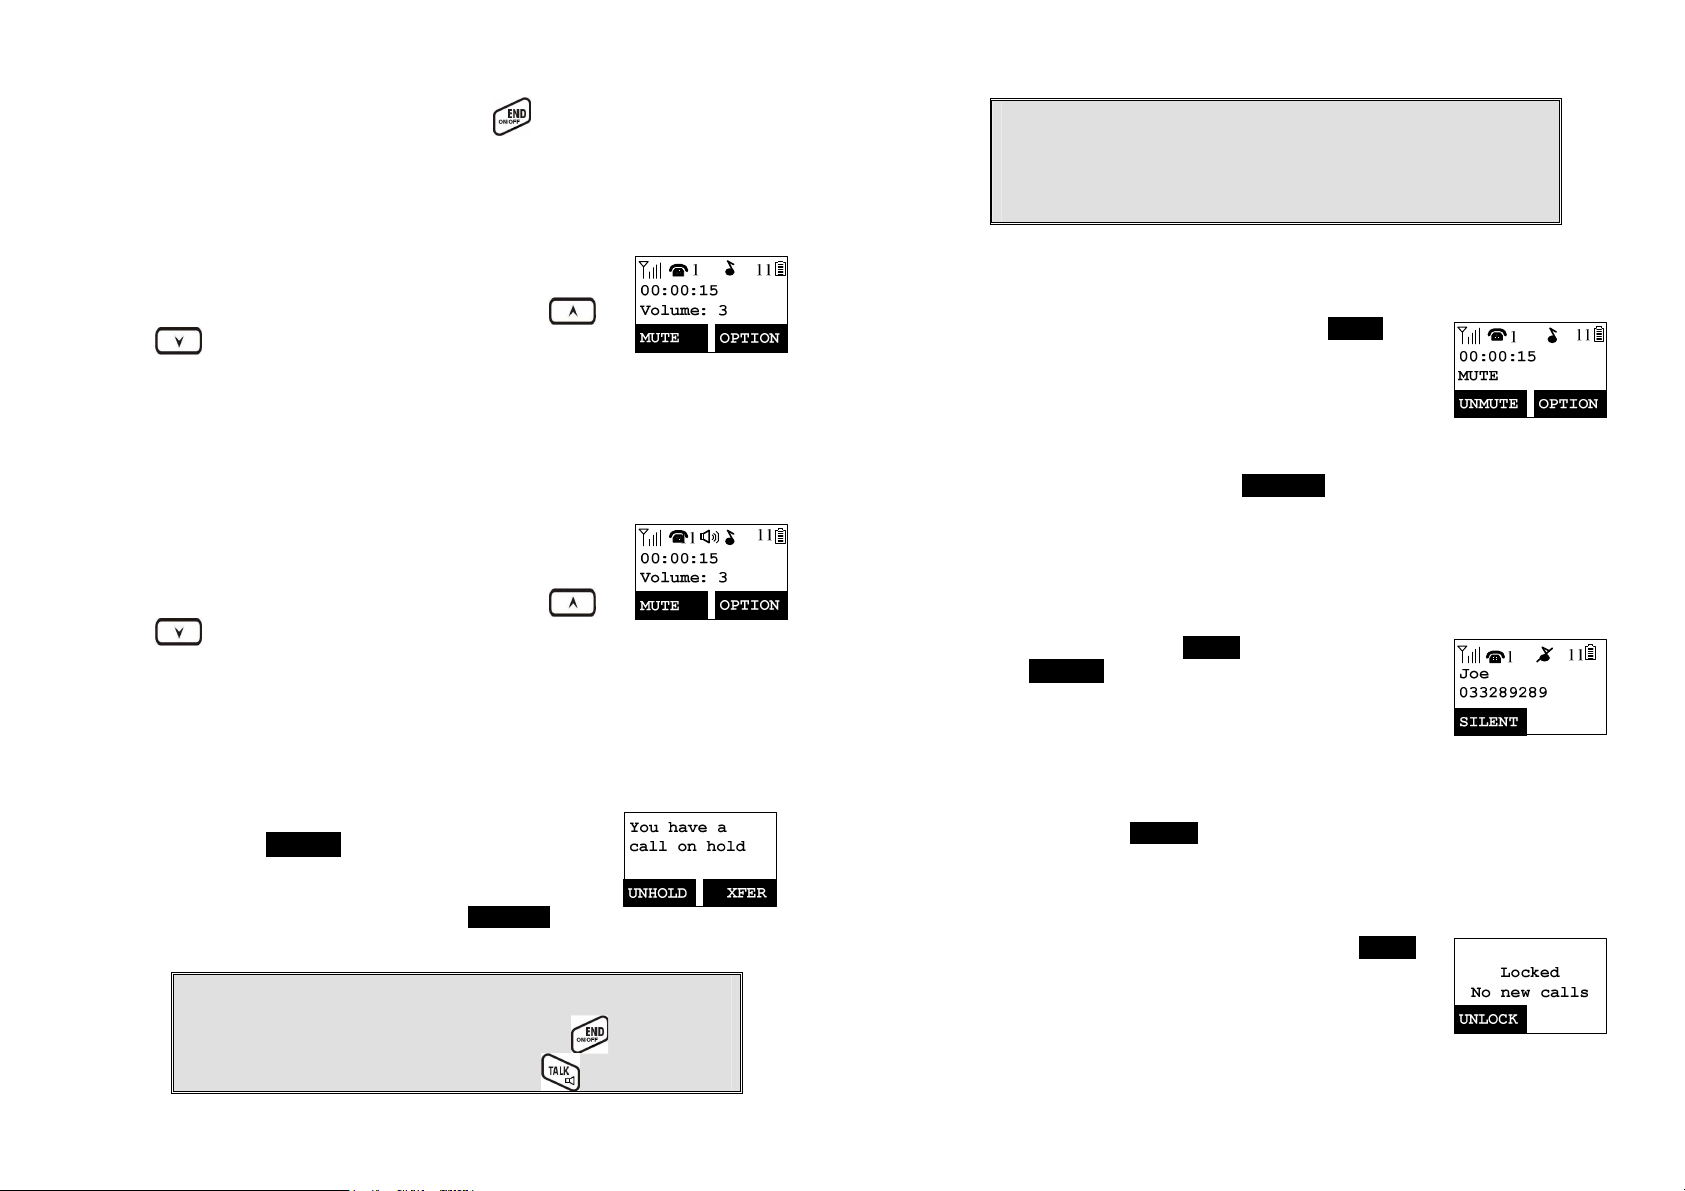
To end a telephone or intercom call, press key, or place handset into
option. The handset keypad is locked. No key entry is
charger cradle.
Adjusting Handset Receiver (Earpiece) Voice Volume
1. Voice volume can only be adjusted during a call.
2.
There are 6 levels of volume selections. Use or
key to adjust
3. The new setting remains effective for all future calls
until changed.
Adjusting Handset Speakerphone Voice Volume
1. Voice volume can only be adjusted during a call (in
speakerphone mode).
2.
There are 6 levels of volume selections. Use or
key to adjust
3. The new setting remains effective for all future calls
until changed.
Placing a Call On Hold
When a call is in progress, it can be put on hold by
1.
pressing the
OPTION (Left) soft
“*”.
To return to the conversation, press UNHOLD (Left)
2.
soft key
Notes:
1. The call being placed on hold can be “un-hold” by the handset
that puts it on hold. But if the handset press key to go back
standby, then other handsets can press to pick this held
key and followed by
call.
2. Handset LCD displays a call is being on hold. An alert tone
(double beep) every 30 seconds will remind the handset that a
call is being on hold.
3. If the operation (e.g., call transfer) after putting a call on-hold
fails, the held call may be dropped.
Mute
1. After a link is established, you can press MUTE (Left)
soft key to mute the handset microphone.
When mute is active, the other end will not hear your
2.
voice, but still can speak to you.
3. To leave the mute state, press UNMUTE (Left) soft key. Mute is effective
only for the current call.
Do Not Disturb (Silent Ring)
1. Enter the key sequence MENU-3-1, then select “Off”.
Press SELECT (Left) soft key to confirm your choice.
This will turn off the ringer until it is turn on again from
the menu.
Re: When setting the ringer “Off”, the standby screen
will show “Ringer off”.
For temporary silencing the ringer when an incoming
2.
call arrives, press SILENT (Left) soft key.
Key Guard
1. To prevent accidental dialing, you can press MENU
(Right) soft key, then press“1” to select KeyGuard
accepted.
~33~
~34~
Page 18

To unlock the keypad, press UNLOCK (Left) soft key,
2.
then, within 2 seconds, press the digit “*” to unlock.
Once returning back to standby mode for 15 seconds,
3.
the keyguard will be automatically enabled.
4. Key Guard is in effect until unlocked.
Battery Recharge and Replacement
1. Charge the battery when one or several of the following happen:
a. Phone beeps twice (every 60 seconds in talk mode, every 10
minutes in standby mode).
b. Battery icon is empty.
c.
d. LCD and backlighting become dim.
e. Talk range shortfall is experienced.
2.
3. Battery talk time and standby time vary depending on the talk/standby
Phone does not respond when a power on/off key is pressed.
You can replace the handset battery after placing the call-in-progress on
hold and press key. To retrieve the call on held, press talk key
again after replaced battery and power the handset on..
pattern and the operating distance. Putting the handset back to charger
cradle as often as possible is recommended for best performance. Use
only manufacturer provided battery and charger!
Advanced Operations
Handset Registration
1. If your handset(s) is purchased as part of a system, it has been preregistered with the base station at the factory.
2. If Handset ID as “00,” that means it is a new handset or the ID has been
erased. You need to register the handset with the base station.
3. Registration:
a. Press MENU-7 to enter the registration mode
b.
c. Press handset key “1”, this completes the
d. Repeat above steps for all additional handsets.
4. De-registration:
a. You can de-register the handset you’re using from
Press and hold the base’s PAGE button for 3
seconds until the In Use LED (white color) lighting
up and flashing, also the base station will emit
prompt sound to remind you the base station is in
the registration mode..
registration process. The base station will assign a
handset ID between 12 and 19 automatically. The
assigned ID will be displayed on the handset LCD,
indicating successful registration.
the base station. De-registration will reset the
Handset ID to 00, erase the system security code,
and free up the handset ID for future registration.
b. After deregistration, the handset will not be able to
use the base station to make or receive phone
calls, nor can it intercom other handsets.
c. Press MENU-7 to enter the registration mode
Press and hold the base’s PAGE button for 3
d.
seconds until the In Use LED (white color) lighting
up and flashing, also the base station will emit
prompt sound to remind you the base station is in
the de-registration mode.
e. Press the handset number key “2”, this completes
the de-registration process. Upon successful de-
~35~
~36~
Page 19
registration, the handset display will show ”Please
register”.
Notes:
1. The base station has a 30 second registration timeout starting
from pressing the PAGE button. The handset has a 6 second
registration timeout starting from the registration or deregistration option has been selected. The base station and
handset will automatically exit registration mode after timeout.
2. Repeat registration or de-registration process if unsuccessful.
Handset Group Subscription
1. Up to nine handset groups (91-99) can be defined and
handsets can decide which group(s) they want to be
in.
2. For example, Group 1 represents the Customer
Service Group, Group 2 represents the Sales Group,
and Group 3 is the Marketing Group. Suppose that
Handset 11 wants to receive incoming rings for all
Sales and Marketing related calls. Then handset 11
will need to “subscribe” to Group 2 and Group 3.
3. Group Selections:
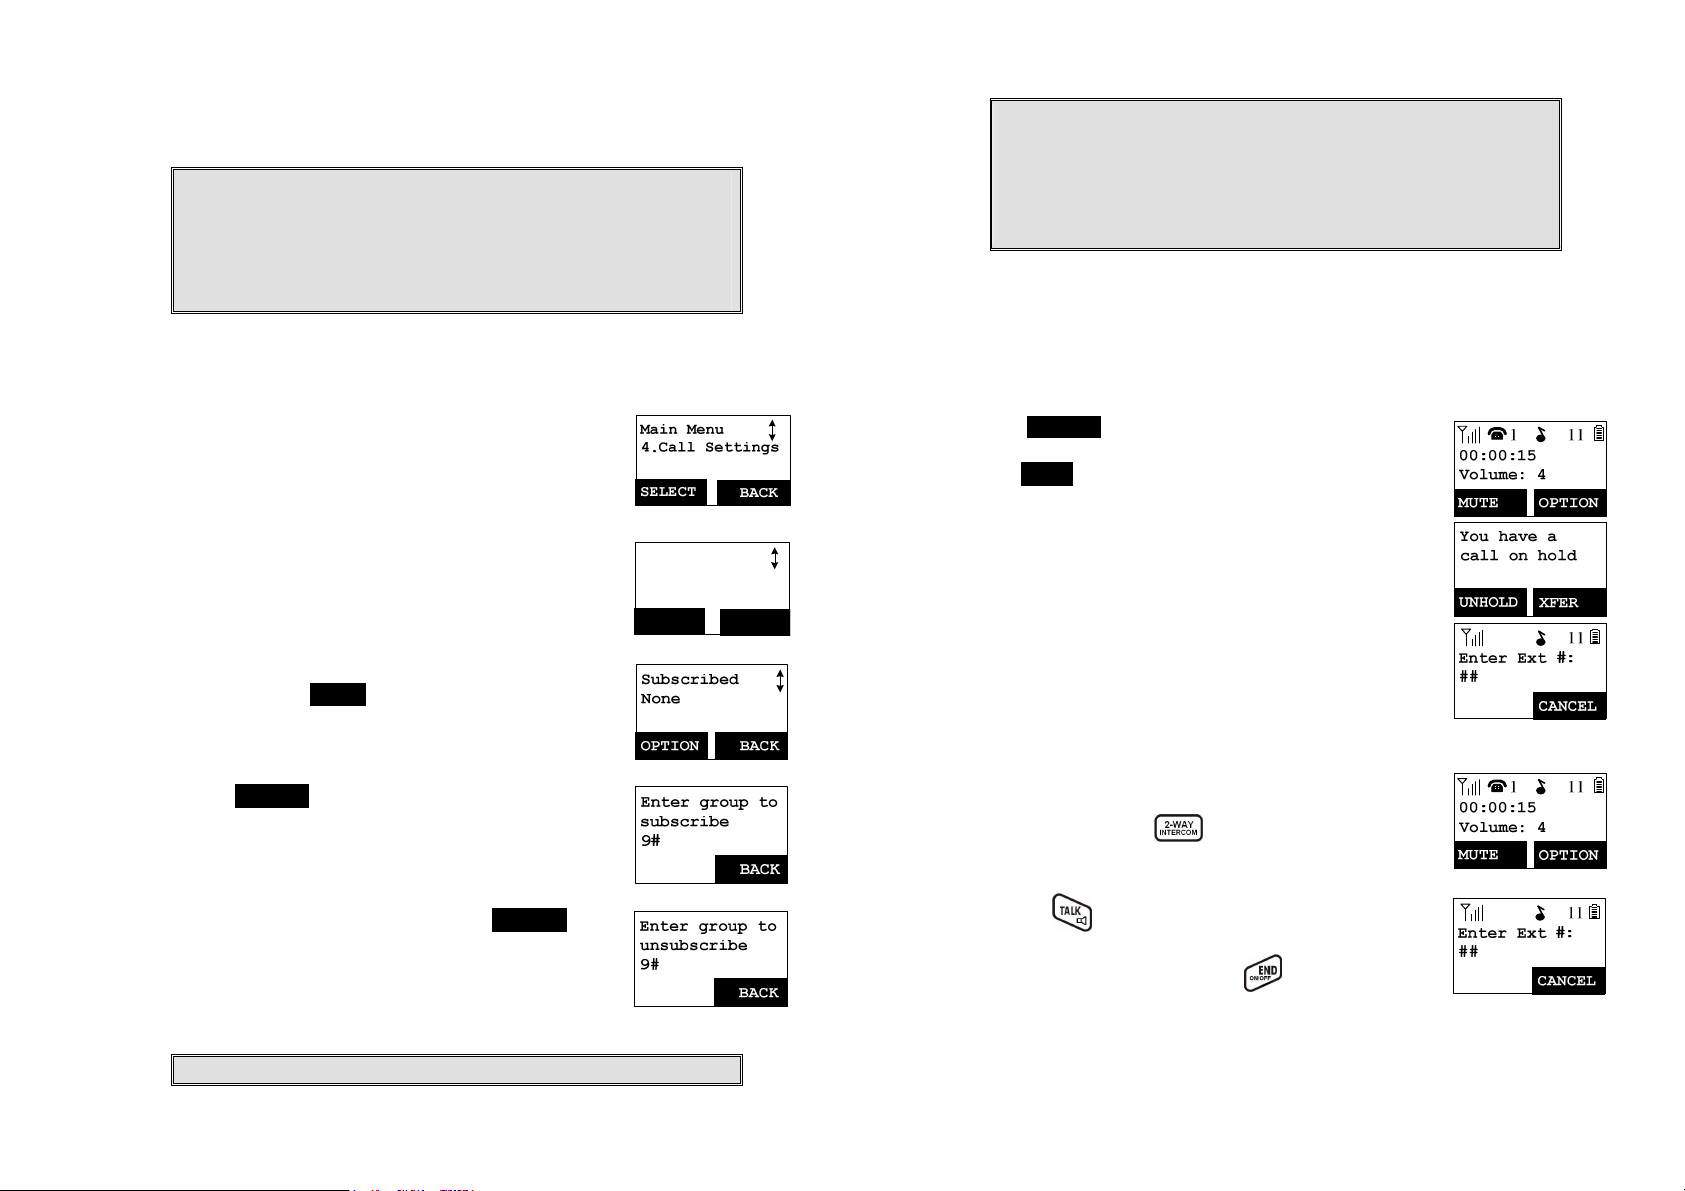
a.
Press handset MENU-4 to enter the Call Settings
menu
b.
Press number “2”, handset enters group setting
menu.
c. Press OPTION soft key and followed by “1” key to
subscribe the group (“9#”, #:1~9). Enter 1~9.
d. Repeat for all desired groups.
Call Settings
2.Group Setting
SELECT
BACK
1. The handset can change group affiliations at any time.
2. The base station is not responsible for group assignments.
Consequently, it cannot de-subscribe a handset from a group.
3. When an intercom caller enters a group ID, all handsets
subscribed to this group will ring. The first handset to answer will
establish a link with the caller. Afterward, it is a one-to-one call,
not a one-to-many call.
Call Transfer
While a telephone call is in progress, you can transfer it between different
handsets.
Direct transfer
Press OPTION (Left) soft key to put the call on hold.
1.
2. Press XFER (Right) soft key, followed by the
destination handset ID, then the held call will be
transferred directly.
After the call transferred to destination handset, the
original handset will go back to standby mode
automatically.
Indirect transfer
If you want to talk to the destination handset before the
call transferred, you can follow with below method:
1.
During the call, press key, followed by entering
the destination handset ID.
e. Delete group selections by pressing OPTION soft
key and followed by “2” to Unsubscribe the group.
2.
Press the of the destination handset to answer
the intercom call, you can now talk to the destination
handset. After the talking, press to end the
intercom call, then the destination handset is able to
pick up the incoming call automatically.
Notes:
~37~
After the call transferred to destination handset, the
~38~
Page 20
original handset will go back to standby mode
for the
next character field if you press a different key for the next character.
automatically.
Notes: If the destination handset does not answer after handset
paging or transferring timeout, the call is routed back to the
originating handset.
Phonebook Operations
1. You can store up to 50 entries in the phonebook.
Each entry can contain a phone number or handset ID
(up to 26 digits) and a name (up to16 characters).
To access the phonebook, press MENU (Right) soft
2.
key, followed by 2 ; or press scrolling key while
the handset is in standby mode.
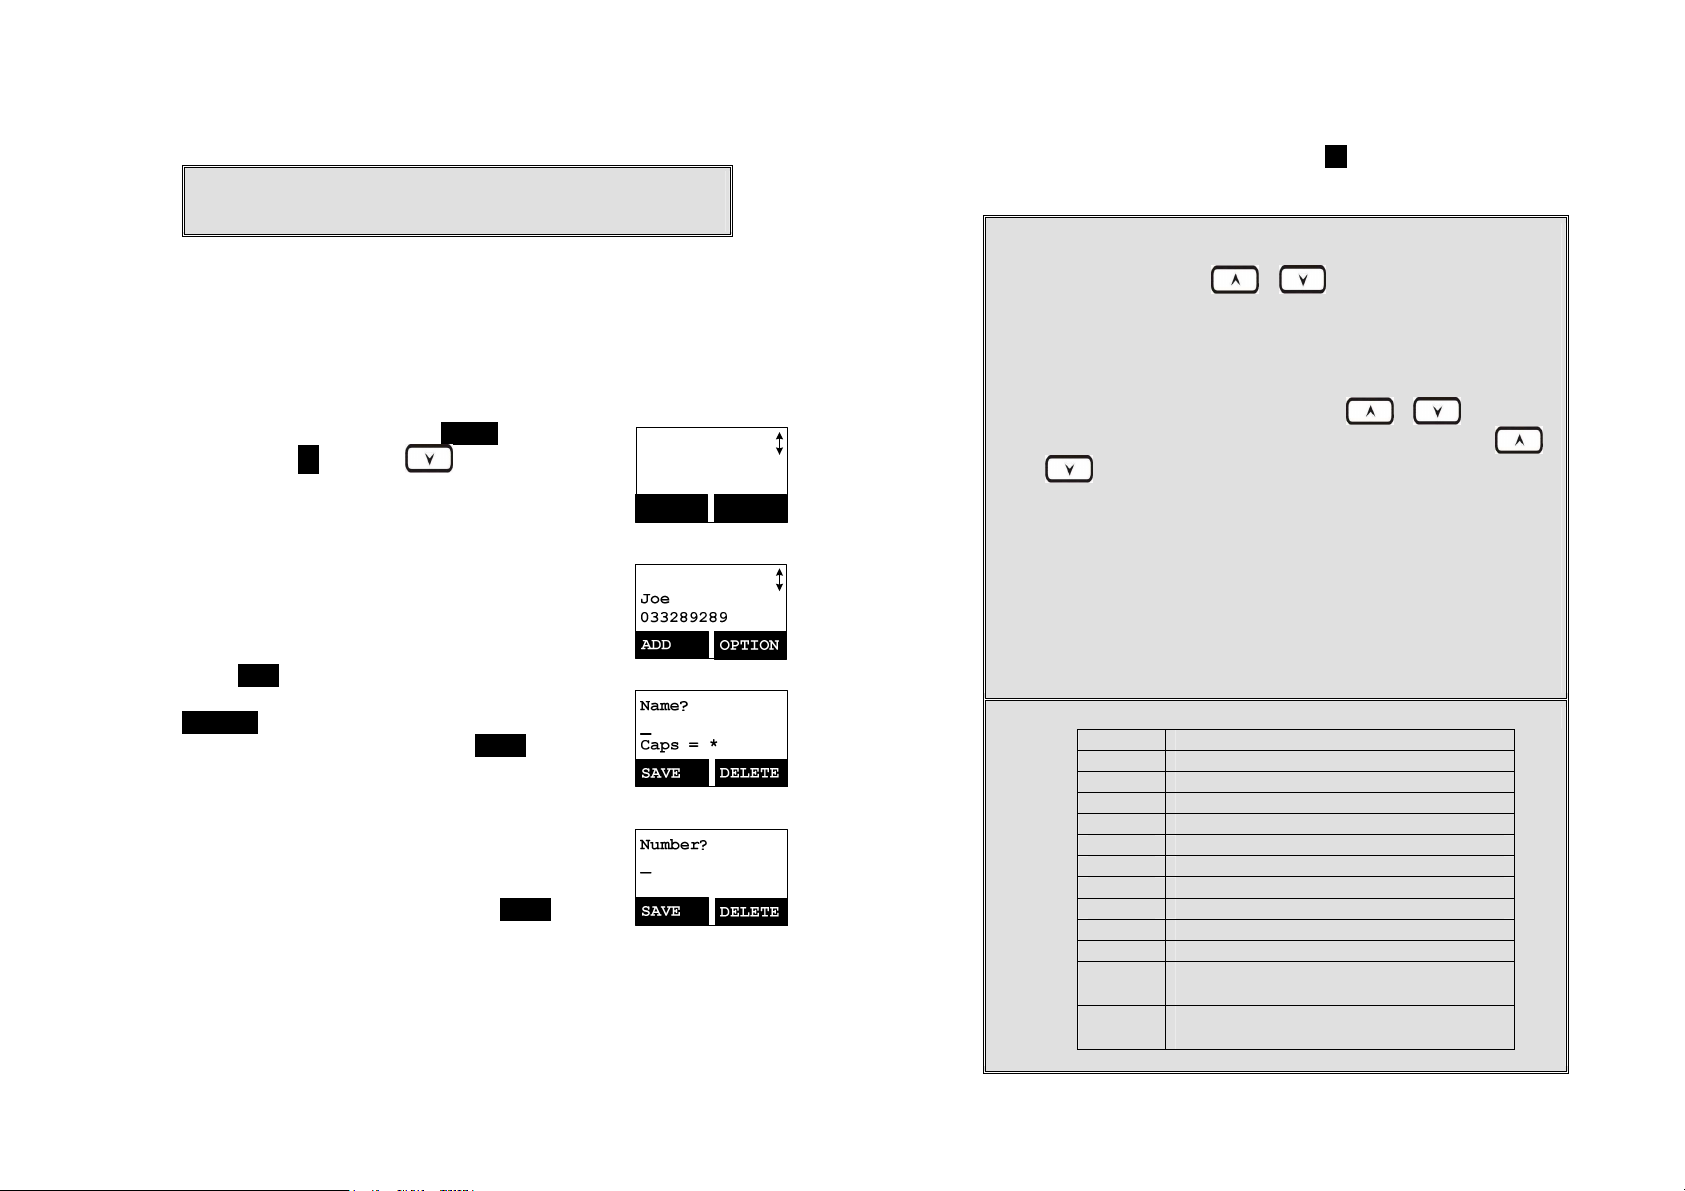
3. To add a new entry:
a. Press ADD (Left) soft key.
b. Enter the name when LCD prompts “Name?” Use
DELETE (Right) soft key to delete the last digit
entered. When completed, press SAVE (Left) soft
key to save.
Re: Up to 16 characters can be entered as the
name.
c. You will then be prompted to enter a number
name just entered.
Re: Up to 26 digits can be entered as the number.
d. After entering the number, press the SAVE (Left)
soft key to save this entry into phonebook.
e. Enter a phonebook entry without a name, the all
records without name will be placed on top of the
phonebook list.
f. To enter the name, press the corresponding
keypad number one or more times according to the
Main Menu
2.PhoneBook
SELECT BACK
order of the character on the key.
See table below for a list of available characters
and their orders. For example, press 2 once for
the character “A”, twice for “B”, etc.
Notes:
1.
When enter a phone number, the cursor automatically advances to
the next digit field. Use or scrolling key to move the
cursor backward or forward to insert or delete (the digit above the
cursor, or left of the cursor if cursor is on the right of the last digit).
2.
When entering a name, the cursor automatically advances to the
If you need to enter consecutive characters from the same key, you
can wait for the cursor to advance or use or scrolling key
to move the cursor backward or forward manually. Also use
or to move the cursor to insert (to the left of the cursor) or
delete (the character above the cursor, or left of the cursor if cursor
is on the right of the last character).
3.
By default, all letters are entered in the upper case. Use the * key to
toggle between upper and lower cases.
4.
A “Pause” entry represents a 1 second delay in dialing the following
digits, which is useful when calling a sequence of segmented
numbers (e.g., access code, credit card number, auto-attendant
entries, etc.) Pause is entered by pressing the # key twice (LCD
displays P). Entering pause twice (PP) will result in 2 seconds pause
in the dialing.
5.
Character Table:
Key Characters and Orders
1 ‘ + , . * ( ) & 1
2 A B C 2
3 D E F 3
4 G H I 4
5 J K L 5
6 M N O 6
7 P Q R S 7
8 T U V 8
9 W X Y Z 9
0 0
*
#
Caps – when in character editing.
*– when in number editing.
Space & # – when in character editing
# & P (Pause) – when in number editing
~39~
~40~
Page 21
4. The entries are alphabetically sorted and stored as a list in an ascending
order (A to Z) from the top of the list.
5. The first line of LCD display shows name and the 2nd line shows the
phone number. If the phone number is longer than 16 digits, press
OPTION (Right) soft key and select Option 3 “View Number” to view the
complete number.
6. To search for a record:
a.
Use scrolling key to enter the Phone Book mode.
b. Press a key that corresponds to the first character of the name you
are looking for.
c. For example, you are looking for “EnGenius”, and then press the
number 3 once.
d.
Use
or scrolling key to locate the exact record you are
looking for.
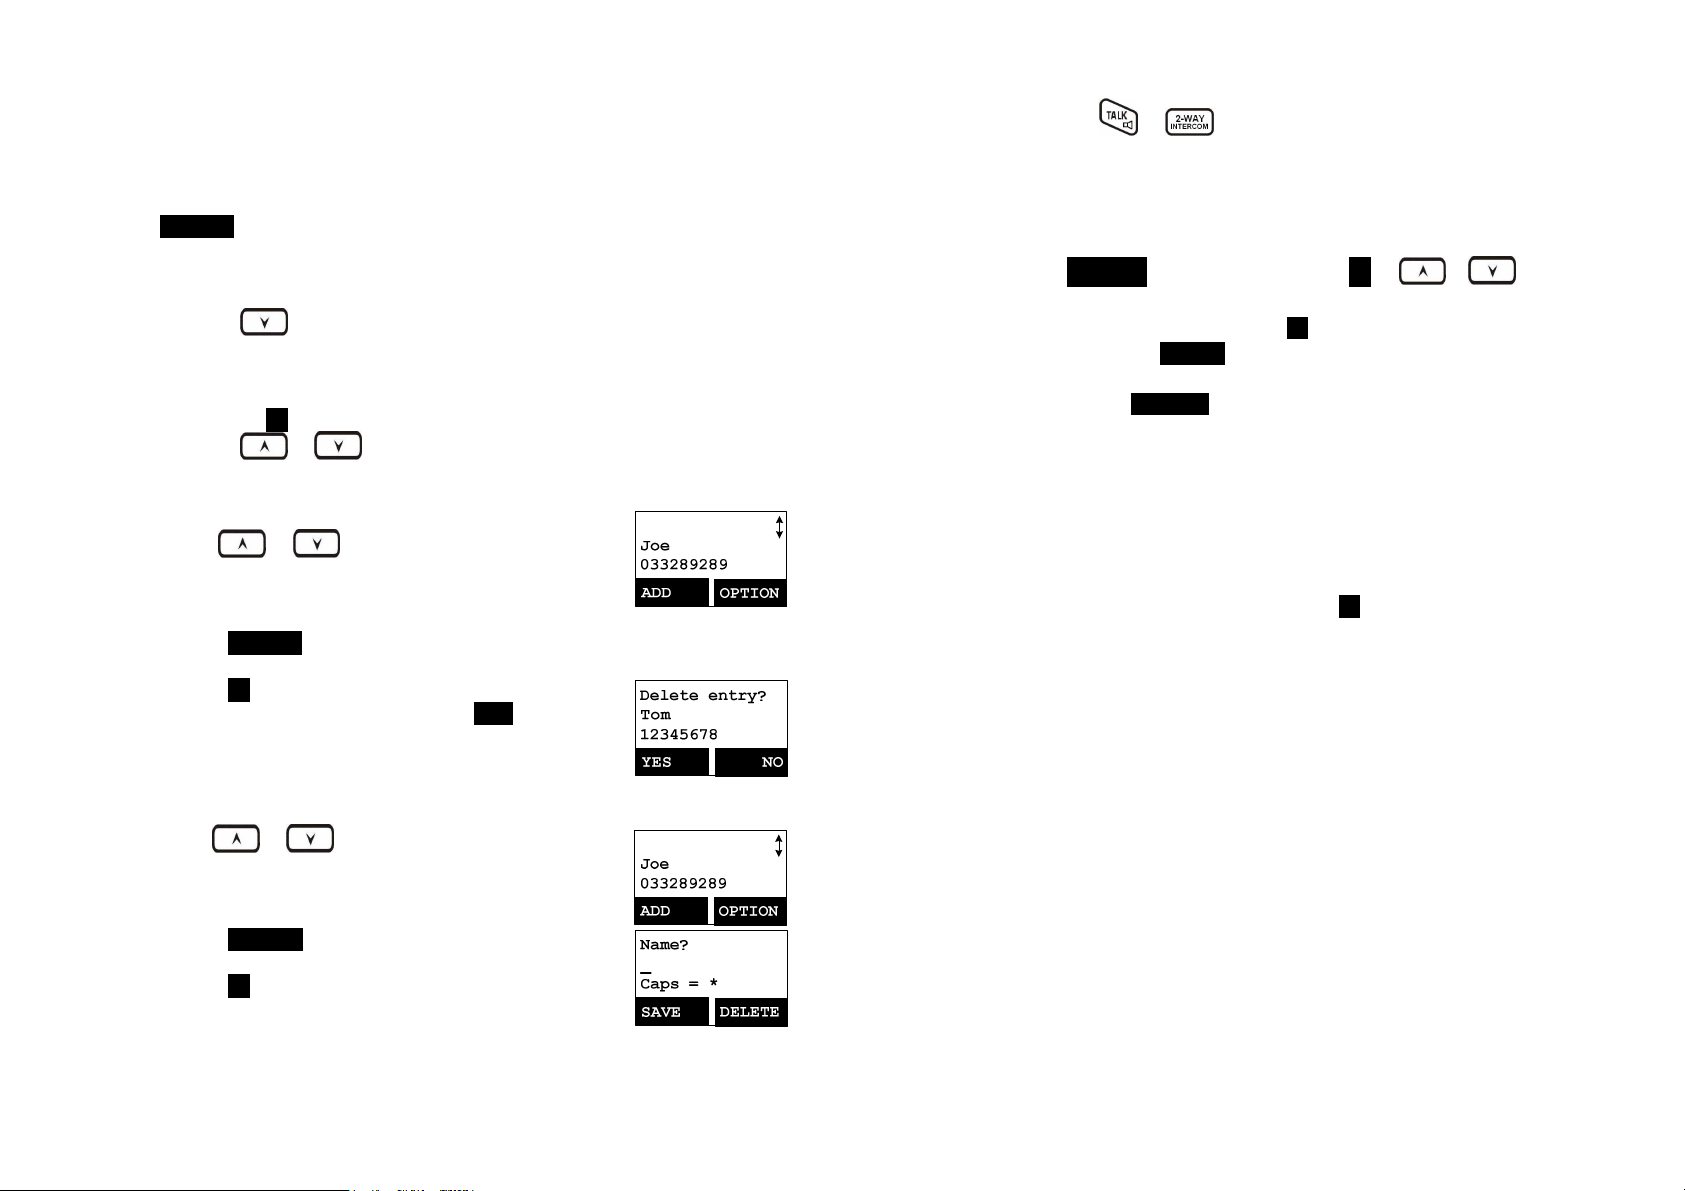
7. To erase phonebook:
a.
Use
or scrolling key or the alphabetical
search method to locate the record to be erased or
edited.
b. Press OPTION (Right) soft key to enter option
menu.
c. Press 1 to erase the desinated phone entry.
d. LCD shown “Delete entry?” Press YES (Left) soft
key to confirm your change.
8. To edit phonebook:
a.
Use
or scrolling key or the alphabetical
search method to locate the record to be erased or
edited.
b. Press OPTION (Right) soft key to enter option
menu.
c. Press 2 to edit the desinated phone entry.
9. Dial from display:
a.
Press or to dial the phone number or Handset ID
displayed.
10. To transfer phonebook:
To transfer phonebook, both parties have to enter the phonebook transfer
mode firstly by following below:
a.
Press OPTION right soft key follow by 5 or or scrolling
key to transfer when handset in phonebook mode.
b. For phone sending party, press 1 to enter sending mode.
i. Either press TX ALL(left softkey) to transfer all phonebook entries
to another handset(s).
ii. Or press TX ONE (right softkey) to transfer one entry to another
handset(s).
iii. Press 2-digit handset ID or group ID, then select all phonebook
entries or one entry to be transferred.
Re : “00” means all handsets
iv. During phonebook transferring, LCD shows “Sending” and 2-digit
countdown on the LCD to indicate the phonebook numbers which
are waiting for sending.
c. For phonebook receiving party, press 2 to enter receiving mode.
i. When entering the receiving mode, LCD shows “Ready”.
ii. Start to receive phonebook, LCD shows “Get phonebook from
Ext. # : xx”.
iii. A beep emitted when receiving each phonebook.
iv. When the phonebook receiving, 2-digit countdown on the LCD to
indicate the phonebook numbers which are waiting for receiving.
Re: The phonebook transfer through the wireless interface, it may partially
miss transmission by interference.
Call Barring
1. Block the users from dialing the long distance calls or international calls.
And also block the incoming call from outside line or other registered
handset.
You need the password to enter the setting. The default password of
handst is “0000”.
~41~
~42~
Page 22
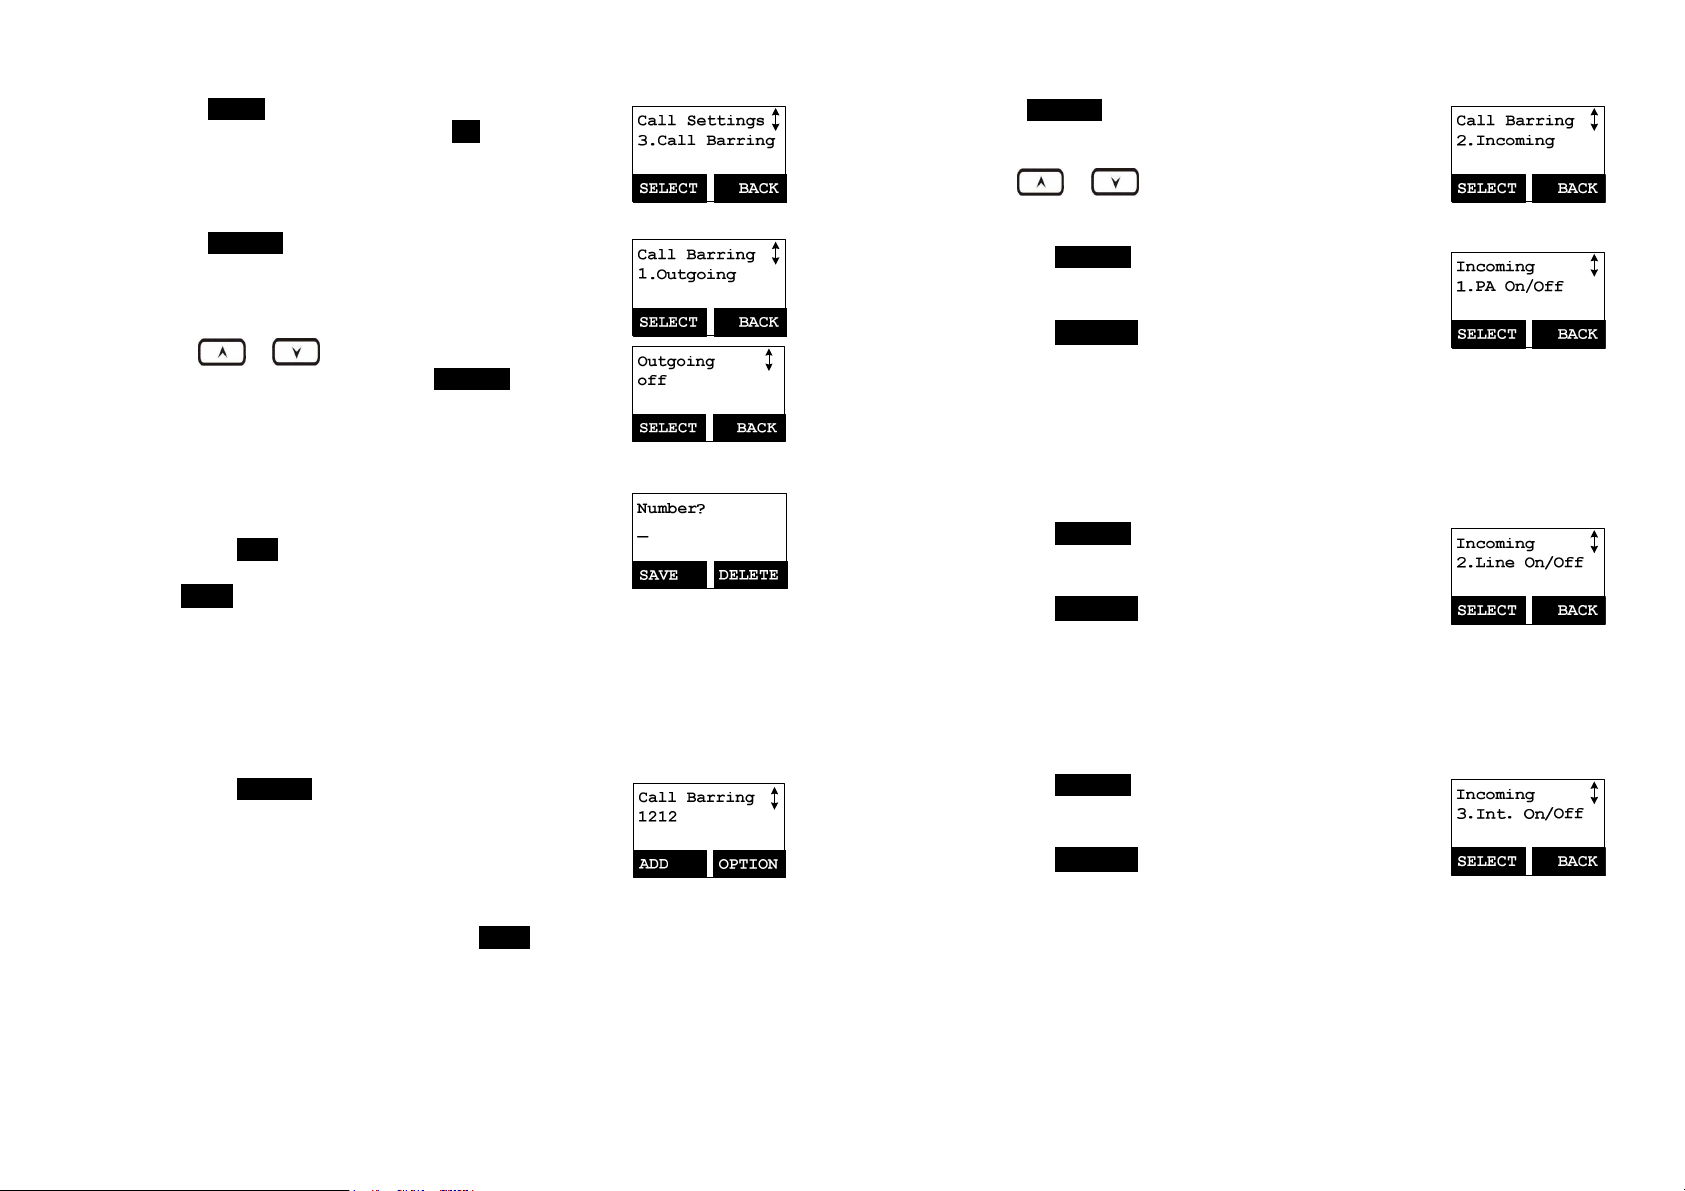
Press MENU-4-3 to enter Call Barring. Enter the
2.
password of handset, followed by OK (Left) soft key
Block Outgoing Call
Press SELECT left soft key to select to block
1.
“Outgoing” and confirm your selection.
2.
Use
or scrolling key to switch between
On and Off of this setting. Press SELECT left soft key
to confirm your selection.
Re:The default of Call Barring is “Off”.
3. To add the Call Barring code
a. Once turn on the Call Barring feature, you can key
in the “Call Barring” code.
Press ADD (Left) soft key then start entering the
Call Barring code After the number entered, press
SAVE (Left) soft key to save it.
(1) Up to 5 digits can be edit to be Call Barring code. For
example, if you want to block all call dialing to
Manhanttan, NY area, you can enter 1212 as the
Call Barring code.
(2) If you base station is adjuct to a PBX system, please
also include that specific number to retrieve the
PSTN tone.
b. Press OPTION right soft key to delete or edit the
Call Barring codes.
c. Up to 5 sets of Call Barring codes can be
programmed.
d. If wants to block all outgoing calls, enter “****
*” 5 “*” keys followed by, press SAVE (Left) soft
key to save it, all outgoing calls will be restricted.
Block Incoming Call
1. Press SELECT left soft key to confirm your selection
for “Incoming”.
Use
item.
a.
Press SELECT left soft key to confirm your
or scrolling key to select blocking
selection for receiving or blocking broadcasting.
Press CHANGE left soft key to switch between On
and Off of this setting.
Re: “On” means to be able to receive broadcast
from other hansets or base station. “Off” means to
restrict the broadcast from other handsets or base
station.
b.
Press SELECT left soft key to confirm your
selection for receiving or blocking line call.
Press CHANGE left soft key to switch between On
and Off of this setting.
Re: “On” means to be able to receive calls from
outside line; “Off” means to restrict calls from
outside line .
c,
Press SELECT left soft key to confirm your
selection for receiving or blocking intercom call.
Press CHANGE left soft key to switch between On
and Off of this setting.
Re: “On” means to be able to receive intercom
calls from other handsets or base station; “Off”
means to restrict intercom calls from other handset
or base station.
~43~
~44~
Page 23
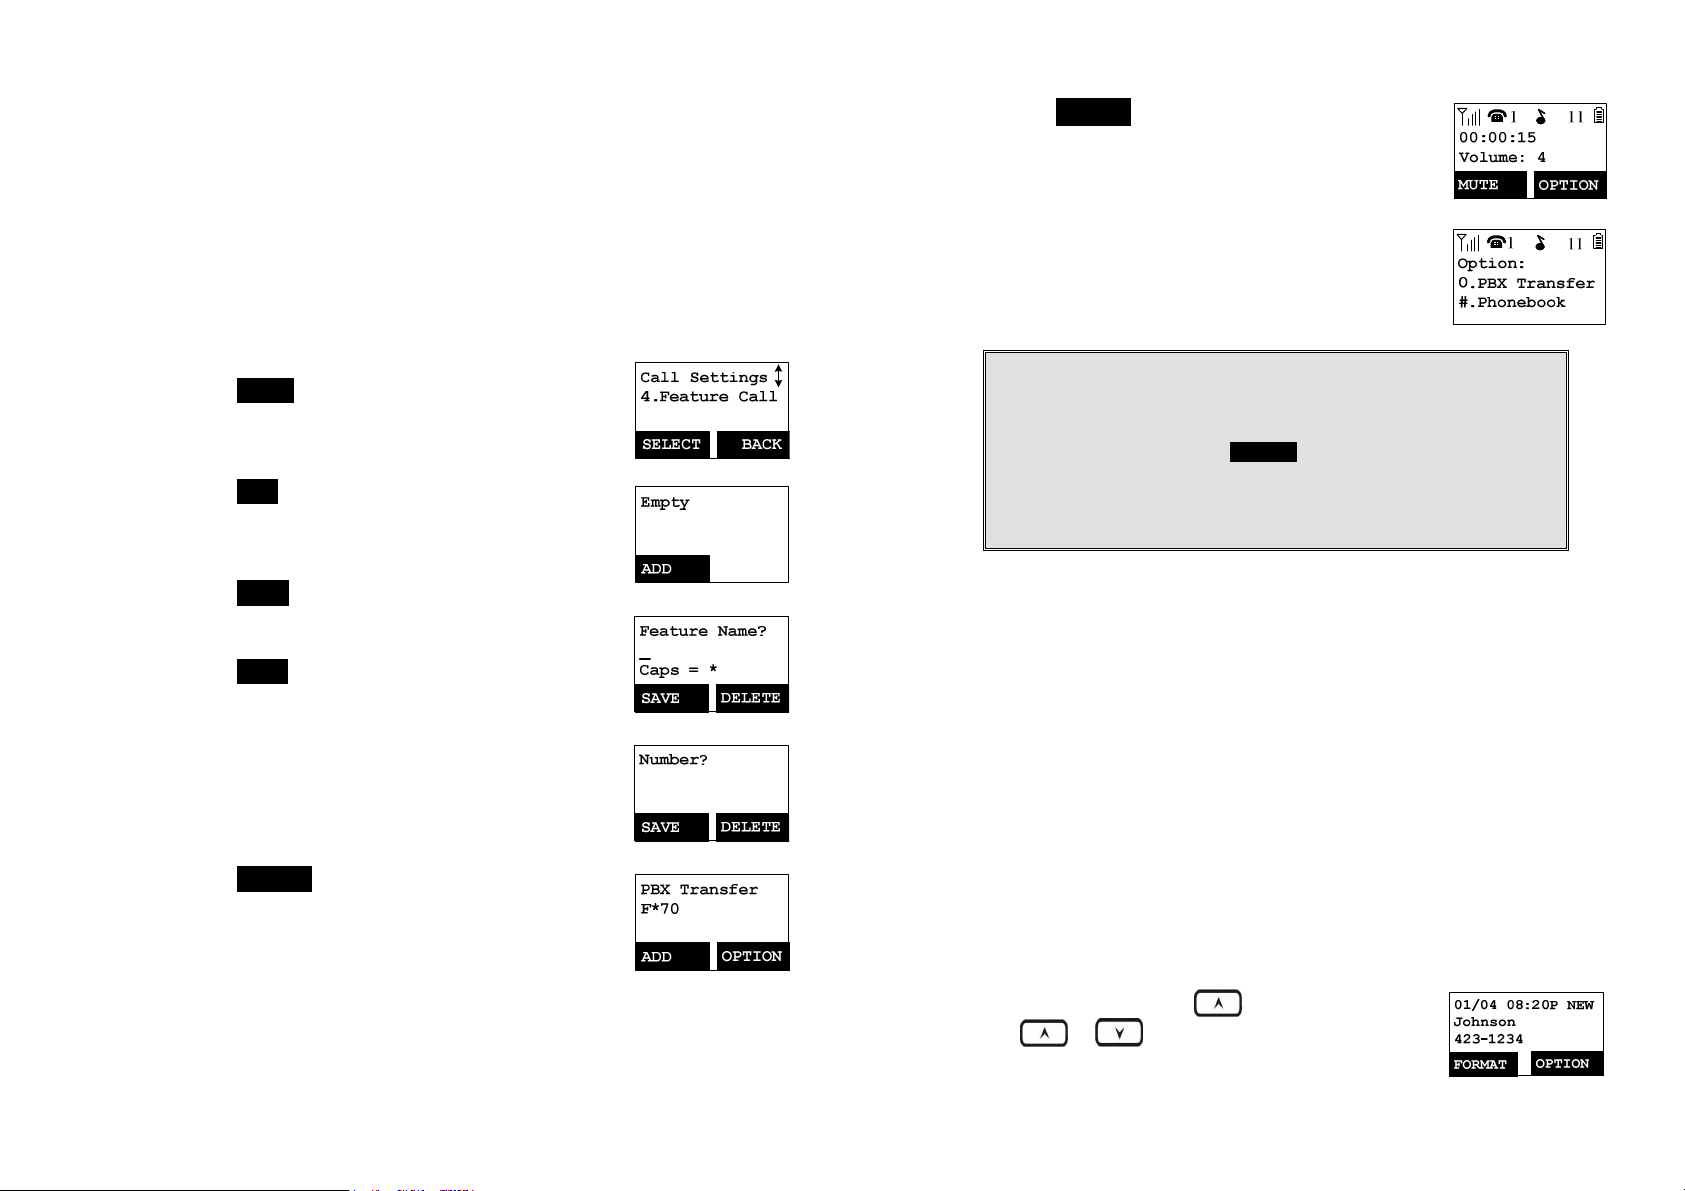
Programmable Feature Call
1. If EP800 base station is installed behind a PBX system, it is feasible to
pre-program some feature call along with the PBX’s feature code into the
system.
2. Up to 10 most frequently used feature call codes can be preprogrammed.
Name and enter feature call codes:
3.
a.
Press MENU (Right) soft key while the handset is
in the standby mode.
b.
Press “4”, followed by “4” to enter the “Feature Call”
menu.
c.
Press ADD (Left) soft key to add a new entry of
feature call.
d.
Key in the name of feature call, like editing a
phonebook entry, i.e. “PBX Transfer”.
Press SAVE (Left) soft key to confirm.
e.
Key in the feature call code of the correspondence
PBX feature i.e. F*70.
Press SAVE (Left) soft key to confirm.
Re: “F” represent the Flash signal.
f.
The 1st feature call and correspondence feature call
code you entered will appear on the LCD screen.
g.
Press OPTION (Right) soft key to delete or edit the
feature call you programmed into the system.
h.
Repeat the same operations to program 2nd and
even more feature call that you will use frequently.
4.
Using pre-programmed feature call during the call.
a.
Press OPTION (Right) soft key while the handset is
in the talk mode.
b. Press the correspondence number of the feature
call which you want to perform i.e. press “0” to
perform the “PBX Transfer”.
Notes:
1.
This feature call would be useful if the EP800 base station is adjunct
to a PBX system,
2.
if you have not pre-programmed any feature call into the system,
only “#.Phonebook” in the OPTION menu.
3.
The EP800’s programmable feature call may not function with all
PBX or Key phone systems due to the diversity of various proprietary
systems.
Caller ID
1. Contact with your local phone company to subscribe to this feature. The
phone system receives and displays Caller ID information transmitted by
your local phone company. This information may include the calling phone
number, name, date and time. This unit can store up to 50 calls of caller ID
information.
2. The display will show the date and time of call on the first line, followed by
the name on the second line, and the phone number on the third line. An
unread record will have a “NEW” at the end of the first line of display.
3. When viewing a call record, the number can be dialed, stored to the phonebook or
deleted.
View Call Log
1.
To view the call log, press to enter the Call Log.
Press or key to scroll through the numbers
and names when available.
~45~
~46~
Page 24
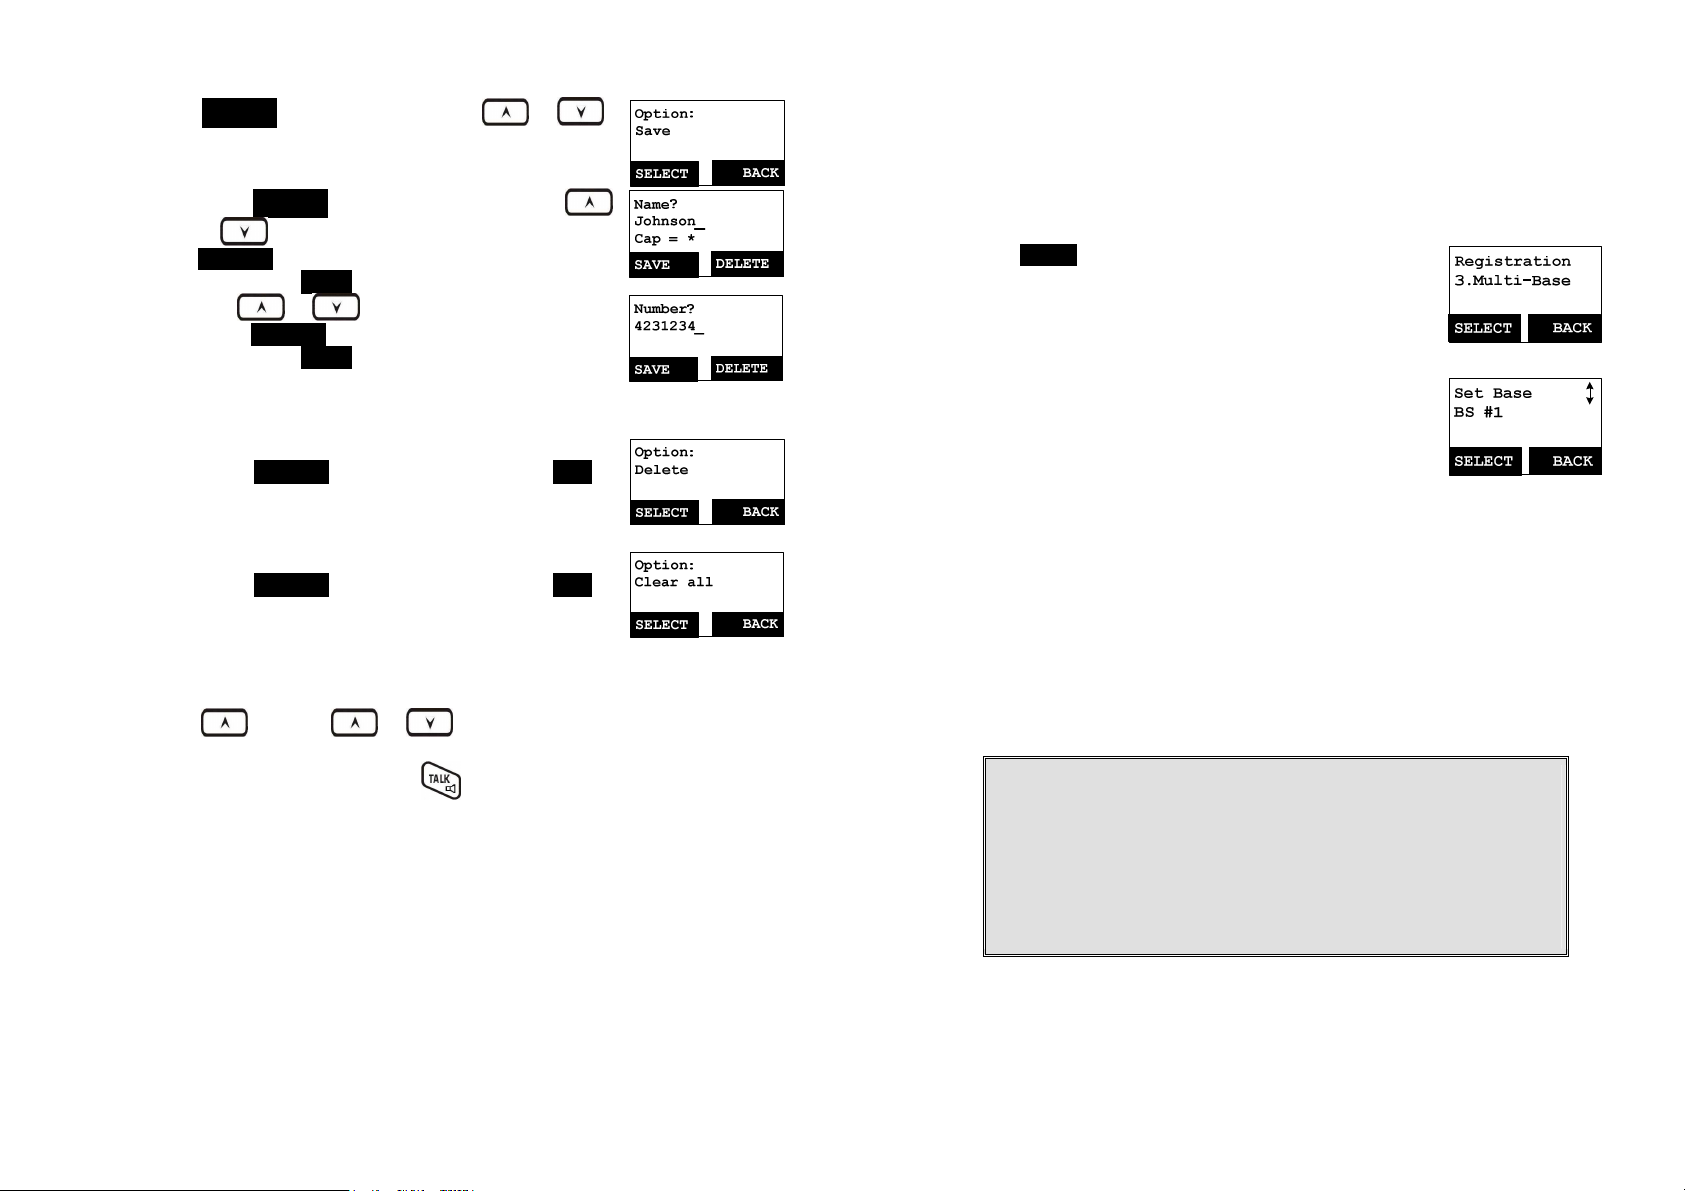
2.
Press OPTION right soft key, you can or
key to choose save, delete, clear all.
a. Save call log:
(1)
(2)
(3)
b. Delete call log:
(1) Press SELECT right soft key followed by YES
c. Clear All:
(1) Press SELECT right soft key followed by YES
Call a Caller ID
1.
2.
Press SELECT right soft key, you can use
or key to scrool the name, and press
DELETE to edit the name.
Then press SAVE left soft key to save the name.
Use or key to scrool the number, and
press DELETE to edit the number.
Then press SAVE left soft key to save the
number.
After above process, the call log saved into
phonebook.
left soft key to confirm deleting.
left soft key to confirm clearing all caller ID
records.
Press key, use or key to scrool the call log.
When display a caller ID, Press to dial this number.
Multi-Base Setting
“Multi-Base” setting allows expanding coverage or lining capacity. When
adding 2nd, 3rd or 4th base station, using one of the handsets which registered
to the 1st base station (i.e. the handset with ID 11), followed by below
processes:
Press MENU right soft key followed by “7” to enter the
1.
registration mode.
Press & hold the base station PAGE button for thress
2.
seconds, the base station will emit the prompt sound
(also the base In Use LED is flashing).
Press digit “3” of handset to enter the Multi-Base
3.
setting.
Select BS # 1
4.
Repeat above step 1 ~ 4 to continuously add the 2nd,
5.
3rd or 4th base station.
Re:The base ID for 1st base station is “10”, for 2nd
base station is “20”, for 3rd base station is “30”, for
4th base station is “40”.
Notes:
1. When initial setting the “Multi-Base”, you have to select the BS #1
first, then followed the above steps to select 2nd, 3rd or 4th base.
2. For synchronization mechanism, all handsets must be register again
before start using multi-base scenario. i.e. the initial handset ID with
1x must register to BS1, and the rest handsets must be registered to
2nd, 3rd or 4th base station respectively.
3. After all above processes, the “Multi-Base” is complete then.
~47~
~48~
Page 25
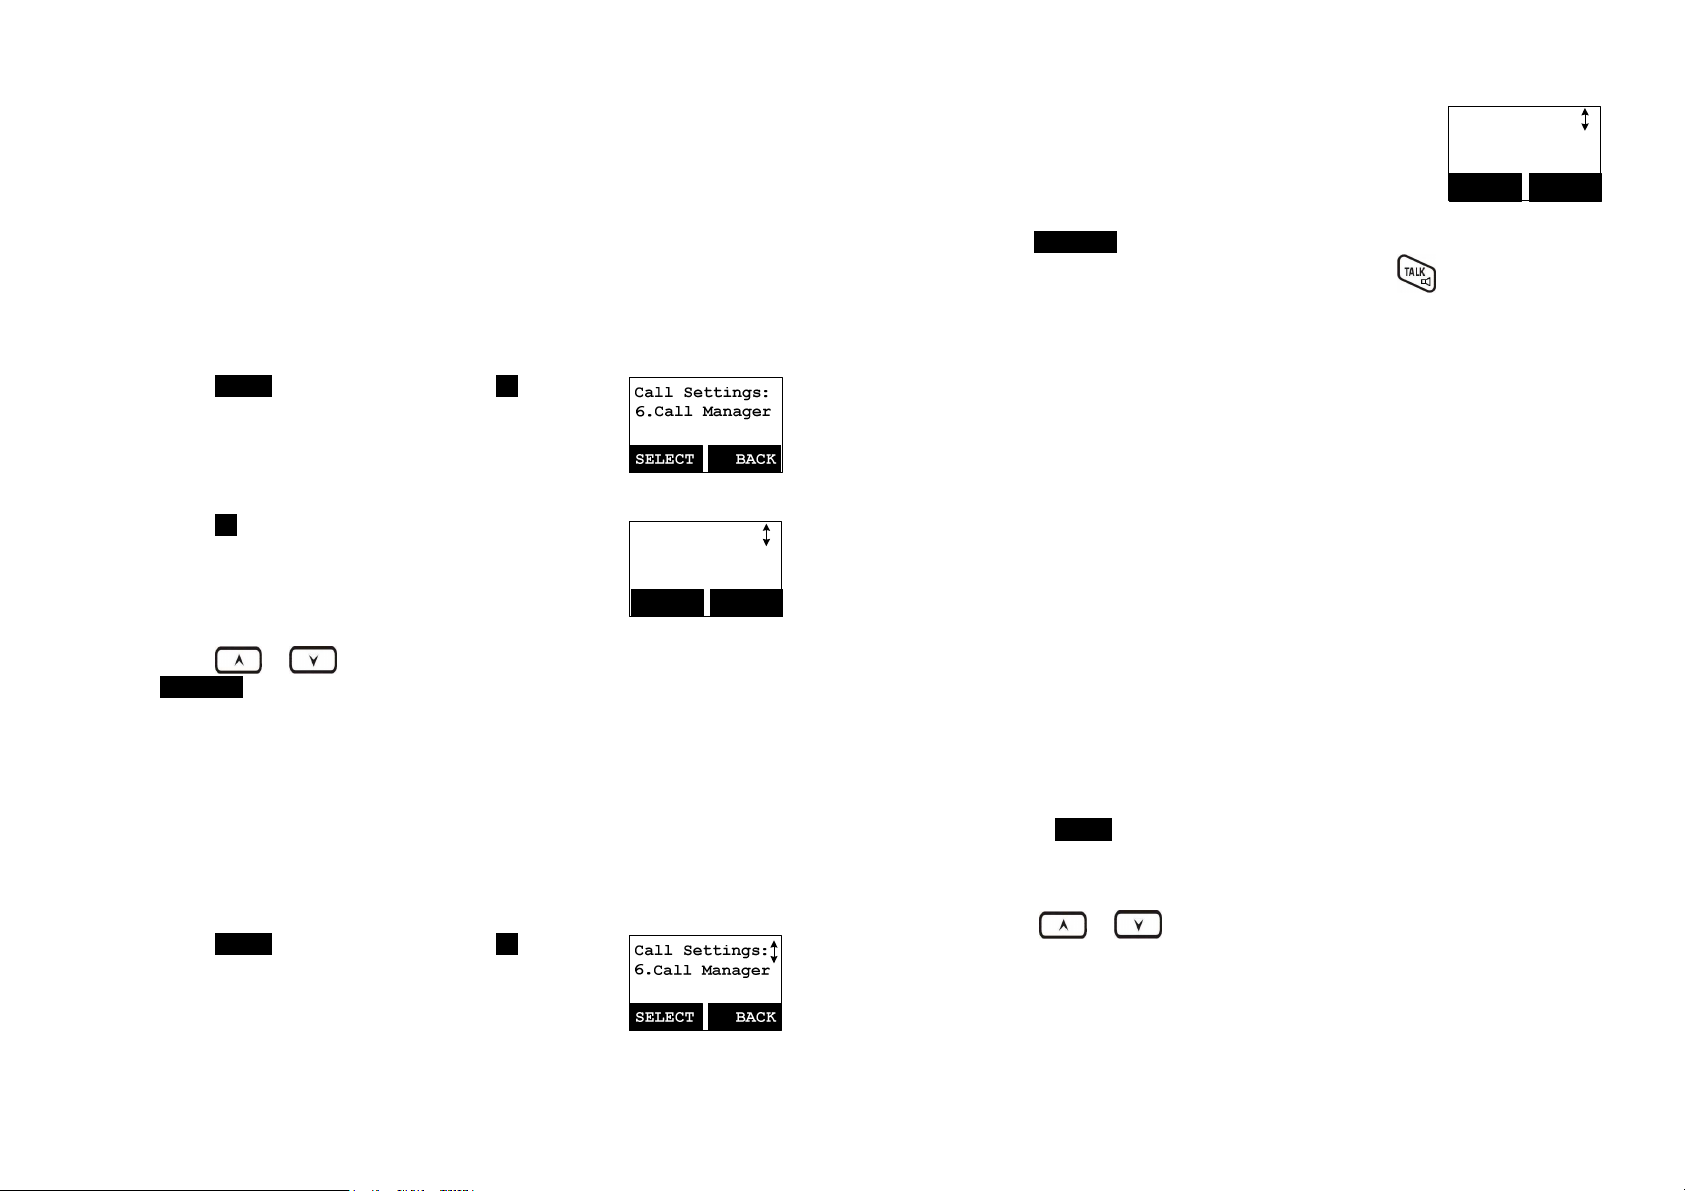
Call Manager
“Call Manager” feature allows two options:
1.One is the handset to be set to receive incoming calls or make outgoing
calls (2-way intercom, broadcast and transferred call are allowed). The
option is selectable by base station 1 to base station 4.
Re: “Call Manager” item will be hidden if Multi-Base function is disabled.
2.The other option is the handset to be set to access to available bases
automatically or manually.
For 1st option (Subscribe BS):
Press MENU right soft key followed by 4 to enter the
1.
Call Settings mode.
Press “6” to select Call Manager.
Re: “Call Manager” item available or selectable only if
Multi-Base function is enabled.
Press 1 to set Subscribe BS.
2.
Re:When entering the submenu of Subscribe BS,
the LCD will show the available bases which
already subscribed.
3.
Press or key to select the desired base station (#1~4), press
CHANGE left soft key to set the Subscribe BS ON/OFF.
4. If set the Subscribe BS ON, that means the handset is able to access
the line of the desired base station, so the handset is able to make
outgoing call or answer incoming call via the desired base station.
On the contrary, if set the Subscribe BS OFF, then the handset can’t
access the line of the desired base station, so the handset isn’t able to
make outgoing call or answer incoming call via the desired base station.
For 2nd option (BS Selection):
Press MENU right soft key followed by 4 to enter the
1.
Call Settings mode.
Press “6” to select Call Manager.
Call Manager
1.Subscribe BS
SELECT BACK
Press “2” to set BS Selection.
2.
Re:Default setting is “OFF”.
Press CHANGE left soft key to set the BS Selection ON/OFF.
3.
Re:If BS Selection set “ON”, when pressing
key, the LCD will show the available bases (Lines),
i.e. 1, 2, 3, 4. Press digit “1”, you can access to base
1 to get the line.
Note::::When single base, no “Call Manager” setting in “Call Settings”.
Call Manager
2.BS Selection
SELECT BACK
Visual Message Waiting Indicator (VMWI)
VMWI feature supported the FSK message which received from telephone
line; It will activate a message icon of handset and flash the LED of base.
Notes:
1. A subscription to telephone company voice mail service is required.
2. If the handset still indicates the icon even after you have listened all messages,
turn it off by pressing and holding “Caller ID” key on the handset.
Adjust Handset Microphone Gain
In case you will use the handset in different workplace or environment, to
perform better voice quality for the other end, you can adjust the handset
microphone gain to suit for variable place.
a. Press MENU right soft key while the handset is in the standby
mode.
b. Press “5” (Phone Settings), followed by “1” to enter the “Mic. Gain”
menu.
c.
Use or key to scroll the “Standard”, “Medium” and
“Low” options.
If you are using the handset in quiet environment, like office or
d.
meeting room, the level of “Standard” is recommended.
If you are using the handset in a noisy environment, like factory or
outdoor place, the level of “Medium” or “Low” is recommended.
~49~
~50~
Page 26

Adjust Headset Ring
When using headset, to avoid missing the call due to the ringer emitted from
receiver of headset, you can change the ringer emitting from either handset
speaker or receiver of headset.
a. Press MENU right soft key while the handset is in the standby
mode.
b. Press “5” (Phone Settings), followed by “9” to enter the “Headset
Ring” menu.
c. Select “On”, the ringer will be emitted from the receiver of headset;
If select “Off”, the ringer will be emitted from handset speaker.
Baby Monitor
You can set any one handset as a “baby unit” to monitor the movement of
baby or older person.
When enabling the baby monitor, the “baby unit” will automatically enter the
monitoring mode via 2-way intercom.
For example, if setting handset A as a “baby unit”, when making an intercom
call from handset B, the handset A will automatically enter monitoring mode
without ringing; Also you can hear the all movements around the handset A
via the handset B.
a. Press MENU right soft key while the handset is in the standby
mode.
b. Press “4” (Call Settings), followed by “5” to enter the “Baby
Monitor” menu.
c. Press “CHANGE” to switch ON or OFF (default is OFF).
Re: To avoid any disturbance, during the monitoring, the dedicated
handset will not answer any incoming call, except the intercom.
Menu Operations
~51~
~52~
Page 27
1. Press MENU right soft key to enter menu mode while the phone is in
standby mode.
Re: You can either press or , followed by SELECT left soft key
to confirm the selected menu. Or Press the digit directly to confirm the
selected menu. For example, press MENU right soft key followed by 4
and 1 to select the Ring Volume.
2. Press 1 to select KeyGuard (see Key Guard operation on page 34 ).
3. Press 2 to add, delete, edit, view and edit the phonebook (see
Phonebook instruction on page 39 ).
4. Press 3 to set Sounds settings:
a. Press 1 to select Ring Volume:
Two options for ring volume: Line (for incoming call) and Intercom (for
intercom call). Set each option respectively.
When setting each option, use or to scroll through 6
options: “Off”, “Low”, “Medium”, “High”, “Vibrate” and “Vibrate & High”.
Press SELECT left soft key to save selection. Default = Medium.
b. Press 2 to select Ring Tone:
Two options for ring tone: Line (ring tone for incoming call) and
Intercom (ringer for intercom call). Set each option respectively.
Use the or to scroll through 8 ringers, press SELECT left
soft key to save selection. Default = 1.
c. Press 3 to select Key Volume when a key is pressed:
Use or to scroll through 4 options: Off, Low, Medium, and
High. Press SELECT left soft key to save selection. Default =
Medium.
d. Press 4 to select Key Tone:
Use the or to scroll through 4 options: 1, 2, 3 and 4.
Press SELECT left soft key to save selection. Default = 1.
5. Press 4 to set Call Settings:
a. Press 1 to set Dial Prefix:
(1)
Press or to turn on or off the dial prefix feature.
Default = Off.
(2) If “On” is selected, the handset is prompted to enter the prefix
number, up to 14 digits can be entered.
(3) Use Delete right soft key to edit prefix number.
(4) Press SAVE left soft key to confirm the selection.
(5) When this feature is turned on, the LCD will prompt the user
“Dial Prefix? Yes or No” on each outgoing phone call from call
logs, phonebook, and dial-and-send dialing, the current prefix is
also displayed.
Re: the prefix number will be added automatically in front of the
dialed number if press YES left soft key.
(6) This feature is useful for access code, calling card, and credit
card calls, etc.
b. Press 2 to Group Select: see Handset Group Subscription on page
37 .
c. Press 3 to set Call Barring: see Call Barring operation on Page 42.
d. Press 4 to set Feature Call: see Feature Call operation on Page 45.
e. Press 5 to set Baby Monitor: see Baby Monitor operation on Page
51.
f. Press 6 to set Call Manager: see Call Manager operation on Page
49.
g. Press 7 to set Area Code:
The area code setting allow calls within local and regional area codes
to be dialed without prefix.
(1) Set Local Area Code :
Press MENU-4-7-1 to set the LAC. Enter the local area code (3digit) then press SAVE left soft key to confirm selection.
(2) Set Country Area Code :
Press MENU-4-7-2 to set the country code. Enter the code (3digit) then press SAVE left soft key to confirm selection.
6. Press 5 to set Phone Settings:
a. Press 1 to set Mic Gain: See Mic Gain operation on Page 50.
~53~
~54~
Page 28
b. Press 2 to set Any Key TALK:
Use CHANGE left soft key to select and confirm “On” or “Off".
Default is “Off”.
Re: When set “on”, press any key (except
and SILENT key) to
answer the incoming call.
c. Press 3 to set LCD Contrast:
(1)
(2)
Use or to scroll through option 1~8. Default is 6.
Press SAVE left soft key to confirm selection.
d. Press 4 to set LCD Backlight:
(1)
(2)
Use or to scroll through option 1~3 (1.8 seconds
2.On 3.Off ). Default is “8 seconds”.
Press SAVE left soft key to confirm selection.
e. Press 5 to set Name Tag:
(1)
(2)
Use CHANGE left soft key to select and confirm “On” or “Off".
Default is “Off”.
Press SAVE left soft key to confirm selection.
Re: When Set “On”, the handset match the caller ID with the phone
book entries; once matched, the LCD screen will display the name
or nickname instead of pure caller ID info (needs Call Waiting
with Caller ID service from local telephone company)
f. Press 6 to set Language:
(1)
Use or to scroll through option (English, Spanish,
French, Italian, German, Dutch, Polish, Czech, Hungary,
Romanian, Turkish).
(2)
Default is “English”.
Press SAVE (Left) soft key to confirm selection.
g. Press 7 to set Custom Name:
(1) Enter characters using the Character Table and method
discussed in the Phonebook section.
(2)
Use or to move the cursor backward or forward to
insert (to the left of the cursor) or delete (the character above the
cursor, or left of the cursor if cursor is on the right of the last
character).
(3) Press SAVE (Left) soft key to confirm setting.
Re: Once entering the custom name, the greeting of LCD in standby
mode will be changed as the entering.
Defalut greeting is “EP800”.
h. Press 8 to Change Password:
(1)
(2)
Enter original password (4 digits) of handset then press OK left
soft key when enter this menu.
Enter new password (4 digits) then press SAVE left soft key to
confirm new password.
i. Press 9 to set Headset Ring: See Headset Ring operation on Page
51.
7. Press 6 to set Base Settings:
When enter this menu, you must enter Base PIN code first (4 digits).
Re: The PIN code is for Base Settings. Default is “0000”.
a. Press 1 to set DTMF Duration.
(1)
Enter the DTMF duration (90~200ms), press OK left soft key to
confirm the setting. Default is 100ms.
Re: Please check with your dealer before you change it. If the duration
not matches with PSTN or PBX setting, it may operate faultily.
b. Press 2 select flash key timing. Default is 600ms.
(1)
(2)
Use or to scroll through option 1~9 (100~900ms). Or
press digit key (1~9) directly.
Press SELECT left soft key to confirm selection.
Re: The default value (600 ms) works in most areas. Changing this
setting may cause Flash key not working. Change only when you
are certain of the new value would work.
c.
(1)
(2)
Press 3 to set Assign Next HS
Enter 2-digit handset ID followed by pressing OK left soft key.
When register a new handset, the base will assign the specific
handset ID which assigned in advance to the new handset.
d.
(1)
(2)
e.
(1)
Press 4 to set Clear HS
Enter 2-digit handset ID followed by pressing OK left soft key.
The base will erase the handset ID from system.
Press 5 to Change PIN:
Enter the new Base PIN followed by OK left soft key.
Re: Default Base PIN is “0000”.
~55~
~56~
Page 29

f.
(1)
Press 6 to set Auto Hang Up:
Use CHANGE left soft key to select and confirm on or off. The
Re: When setting “on”, the EP800 will automatically hang up if the far
end caller hung up already. However, this function depends on if
there is “dial tone or busy tone” signal sent out by PBX or PSTN,
after the call hung up.
g.
(1)
Press 7 to Set Time to support DTMF Caller ID:
Use SAVE left soft key to select and confirm the Date and Time
you have set (see Set Time operation on page 20).
8. Press 7 to register, de-register handset and set Multi-Base: see Handset
Registration operation on Page 36, and Multi-base Setting on Page 48.
9. Press 8 to set Menu Display:
To avoid mis-setup of Call Settings (MENU-4), Phone Settings (MENU-5)
and Base Settings (MENU-6), you can hide these menus, so that other
handset users won’t have chance to mis-settup these settings.
Re: When entering the Menu Display, you have to enter password first.
a. Press 1 to set hiding/un-hiding of the Call Settings menu.
(1)
Use CHANGE left soft key to select and confirm on or off.
b. Press 2 to set hiding/un-hiding of the Phone Settings menu.
(1)
Use CHANGE left soft key to select and confirm on or off.
c. Press 3 to set hiding/un-hiding of the Base Settings menu.
(1)
Use CHANGE left soft key to select and confirm on or off.
d. Press 4 to set hiding/un-hiding of the Multi-base Settings menu.
(1)
Use CHANGE left soft key to select and confirm on or off.
Re: Select “On” means the menu will be displayed on screen. Select “Off”
means the menu will be hidden.
Index
2
2-Way Intercom, 14, 29
A
Adjusting Receiver (Earpiece) Voice Volume, 33
Adjusting Handset Speakerphone Voice Volume, 33
Adjust Handset Microphone Gain, 50
Adjust Headset Ring, 51
Area Code, 19, 54
B
Base ID, 48
Base Illustration, 21
Base Operation, 27
Base PIN, 18, 19, 20
Base Station, 5, 6, 9, 10, 14, 15, 20, 22, 25, 26, 27, 28, 30, 36, 43
Base Station Features, 22
Base Station Installation, 25
Battery, 5, 7, 10, 24, 26, 27, 35
Battery Recharge and Replacement, 35
Battery Safety Instructions, 7
Battery Strength, 13
Block Incoming Call, 43
Block Outgoing Call, 43
Broadcast, 14, 16, 18, 31, 44, 49
Broadcasting a Group of Handsets, 30
Broadcasting all Handsets, 30
Broadcasting an Individual Handset, 31
BS Selection, 49
C
Call Barring, 16, 18, 42, 43, 54
Call Log, 16, 17, 46, 47
Call Timer, 17
Call Transfer, 33, 37
Call Hold, 17
Caller ID, 15, 20, 31, 32, 46, 47, 50, 55, 56
Call in-progress, 13
Call Manager, 49, 50, 54
Call Settings, 16, 18, 20, 37, 49, 50, 51, 54, 57
Call Waiting, 14, 15
Call Waiting with Caller ID, 15, 55
~57~
~58~
Page 30

Cardiac Pacemaker, 4
Change PIN, 18, 19, 56
Charger Features, 24
Charger Illustration, 23
D
De-registration, 36
DND, 15
Do Not Disturb (Silent Ring), 15, 34
DTMF Tone, 18
DTMF Duration, 18, 56
E
Electric Shock, 4, 5, 6
Emergency, 4
Equipment Checklist, 10
F
Flash, 14, 19, 36, 45, 48, 50, 56
Feature Call, 17, 45, 54
G
General Safety Instructions, 4
Group ID, 15, 30, 38, 42
Group Setting, 18, 37
Group Selections, 37, 54
H
Handset and Charger Installation, 26
Handset Charging Slot, 24
Handset Features, 13, 15
Handset Group Subscription, 37, 54
Handset ID, 13, 15, 17, 19, 22, 27, 30, 31, 32, 36, 38, 39, 42, 48, 56
Handset Registration, 36, 57
Handset to Handset Call, 30
Hearing Aid, 4
I
IDLE Mode, 17, 27, 35
K
Key Guard, 34, 53
Key Tone, 17, 53
Key Volume, 53
L
Line Jack, 22
Lithium-Ion (Li-Ion), 7, 10
Line Reversal, 56
M
Making a Broadcast, 30
Making a Telephone Call, 29
Making an 2-Way/ Intercom Call, 29
Memory, 27
Menu Display, 18, 57
Menu Mode, 27, 53
Multiple Handsets Registration, 15
Multi-Base Setting, 18, 48, 57
Mute, 17, 33
N
Name Tagging, 15, 55
O
Outdoor Antenna, 10, 22
P
Phonebook, 14, 16, 17, 39, 45, 46, 47, 53, 55
Phone Settings, 18, 20, 50, 51, 54, 57
Placing a Call On Hold, 33
Power Outage, 5, 9, 25, 26
Product Safety Instructions, 5
Programmable Flash, 19
Programmable feature call, 17, 45, 46
R
Receiving a Telephone Call, 31
Receiving an Intercom Call, 32
Redial, 16, 31
REG, 22, 37, 48
Registration Key, 22
Registration Mode, 22, 27, 36, 48
Regulatory Information, 8
REN
, 8
Reset Button, 22
Ringer, 14, 15, 20, 31, 32, 34, 51, 53
~59~
~60~
Page 31

Ringer Volume, 14, 15
RSSI, 13
S
Safety Instructions, 4
Set Time, 20
SILENT, 15, 32, 34
Spare Battery, 10
Speed Dial, 29
Speakerphone, 14, 30, 31, 33, 48
Subscribe BS, 49
T
Talk Mode, 14, 27, 46
Talk/Flash, 14
Technical Specifications, 62
Transformer, 25, 26
Two-Digit Address Index, 13
V
Vibrator, 15
View Call log, 46
Visual Message Waiting Indicator, 50
W
Warning Message, 24
Technical Specifications
Electrical Specifications
Frequency 863-865 MHz 863-865 MHz
RF Output Power
Channel Spacing 50 kHz 50 kHz
Number of Channels 38 38
Modulation GMSK GMSK
TDD Frame Length 10 ms 10 ms
Number of Slots/Frame
Receiver Sensitivity
Antenna Gain 2 dBi
Antenna Connector TNC Proprietary
Telephone Interface RJ11 x 2 NA
Channel Coding
Transmission Data Rate
Speech Coding 8 kbps G.729A 8 kbps G.729A
User Data Rate 32kbps duplex 32kbps duplex
Duplex
Multiple Access FDMA FDMA
Number of System ID 65,536 65,536
Ring Signal 20-50 Hz, 12-90 Vrms
Flash Time
Power Source AC/DC 12V/1A Adapter
Charger Current
Charge Time NA 3hours
Regulation Compliance
Operating Temperature
Charging Temperature
Notes:
1.
NA = Not Applicable.
2.
The manufacturer reserves the right to change designs and specifications
without notice.
Base Station Portable Handset
Peak: 8 dBm Peak: 7 dBm
Average: 5 dBm Average: 5 dBm
2 2
<-116dBm (@ BER 10-2) <-116dBm (@ BER 10-2)
Long: 2.5 dBi
Short: 1.5 dBi
½ rateConvolutional +
CRC
42.667kbps 42.667kbps
Time Division Duplex
(TDD)
100-900 ms
programmable
NA
EN 301 357-2 (RF) EN 301 357-2 (RF)
EN 301 489 (EMC) EN 301 489 (EMC)
EN 60950 (Safety) EN 60950 (Safety)
EN 50371 (RF safety)
0 – 50 °C -10 – 60 °C
NA 0 – 40 °C
½ rateConvolutional + CRC
Time Division Duplex (TDD)
NA
NA
3.7 V/1100mAh Li-Ion
Battery
550mA
(550/850 mA for desktop
charger)
~61~
~62~
Page 32

Uživatelská příručka (Český)
EP800
Digitální bezdrátový telefon s dlouhým
dosahem
Služby zákazníkům EnGenius
Singapur: 65-62271088, http://www.engeniustech.com.sg/
Obsah
Bezpečnostní pokyny ......................... ............. ............. ............ 4
Obecné bezpečnostní pokyny .............................................. 4
Zásady bezpečného používání produktu ............................. 5
Bezpečnostní pokyny - baterie ............................................. 7
Regulatorní informace ............................................................. 8
Kontrolní seznam zařízení ..................................................... 10
Obrázek sluchátka ................................................................. 11
Funkce sluchátka ................................................................... 13
Základní funkce sluchátka .................................................. 13
Doplňkové funkce sluchátka .............................................. 15
Obrázek základny .................................................................. 21
Funkce základny .................................................................... 21
Funkce základny .................................................................... 22
Základní funkce základnové stanice .................................. 22
Obrázek nabíječky ................................................................. 23
Funkce nabíječky ...................... ............................ ................. 24
Začínáme ..................... ................. .................... ................. .... 25
Instalace základnové stanice ............................................. 25
Instalace sluchátka a nabíječky ........................... ............... 26
Základní operace ................................................................... 27
Provozní režimy ................................................................. 27
A. Provozní režimy základny .......................................... 27
B. Provozní režimy sluchátka ......................................... 27
Uskutečnění telefonního volání .......................................... 29
Uskutečnění 2cestného volání / volání vnitřní komunikace 29
Vysílání .............................................................................. 30
A. Volání mezi sluchátky ................................................ 30
Znovu vytočit ......................... ............................................. 31
Příjem telefonního volání ................................................... 31
Příjem volání vnitř
Ukončení volání ................................................................. 33
Nastavení hlasitosti hlasu přijímače sluchátka ................... 33
Nastavení hlasitosti funkce hlasitého telefonu sluchátka ... 33
Přidržení volání .................................................................. 33
Ztlumit ................................................................................ 34
ní komunikace ....................................... 32
~2~
Page 33

Nerušit (tiché vyzvánění) .................. ............... ............... .... 34
Zámek tlačítek ........................... ............................. ............ 34
Nabíjení a výměna baterie ................................................. 35
Rozšířené použití ................................................................... 36
Registrace sluchátka .......................................................... 36
Přihlášení sluchátka ke skupině ......................................... 37
Přepojení volání ................................................................. 38
Používání telefonního seznamu ......................................... 39
Blokování volání ................................................................. 42
Programovatelné funkční volání ......................................... 45
ID volajícího ....................................................................... 46
Nastavení více základen .................................................... 48
Správce volání ................................................................... 49
Vizuální indikátor čekající zprávy (VMWI) .......................... 50
Nastavení zesílení mikrofonu sluchátka ............................. 50
Úpravy vyzvánění sluchátka .............................................. 51
Elektron. chůva .................................................................. 51
Rejstřík .................................................................................. 59
Technické údaje ........... ............... ............... ................ ............ 63
Bezpečnostní pokyny
Pozor: Tento bezdrátový telefon vám poskytuje volnost a flexibilitu a
umožňuje vám zůstat ve spojení, když jste v pohybu. Nicméně při
používání telefonního přístroje je nutno dodržovat bezpečnostní zásady,
aby se zabránilo vzniku požáru, úrazu elektrickým proudem, zranění osob
nebo poškození majetku.
Obecné bezpečnostní pokyny
1. Při používání tohoto bezdrátového telefonu zajistěte bezpečnost svoji a
ostatních:
a. Vždy sledujte kam jdete a kde stojíte.
b. Nenechte se telefonním voláním rozptylovat od bezpečné práce.
2. V nouzové situaci:
a. V nouzové situaci vytočte číslo tísňového volání. Nezapomeňte:
pokud se nacházíte na místě, na kterém telefon nemá čistý signál ze
základnové stanice, je velmi pravděpodobné, že volání neprojde.
Vyhledejte nejbližší pozemní telefonní linku nebo jiné komunikační
zařízení a zavolejte pomoc.
b. Tísňová volání nemusí automaticky poskytovat pracovníkům
tísňových linek vaše jméno, telefonní číslo nebo místo.
3. Poznámka pro uživatele naslouchadel: Tento telefonní systém je
kompatibilní s induktivně propojenými naslouchadly.
4. Poznámka pro uživatele kardiostimulátorů: Ačkoli při velmi blízkém
používání může dojít k rušení implantovaného kardiostimulátoru,
bezdrátové telefony „zřejmě nepředstavují vážný problém pro uživatele
kardiostimulátorů.“ Nicméně dokud není známo více informací,
doporučujeme, aby lidé s kardiostimulátory při používání nebo nošení
bezdrátového telefonu udržovali dostatečnou vzdálenost mezi telefonem
a kardiostimulátorem. Nenoste sluchátko v náprsní kapse. Máte-li
podezření, že dochází k rušení, ihned sluchátko vypněte.
~3~
~4~
Page 34

Zásady bezpečného používání produktu
1. Přečtěte si a seznamte se se všemi pokyny.
2. Dodržujte veškerá varování a pokyny včetně těch uvedených na
produktu.
3. Změny nebo úpravy tohoto produktu bez výslovného souhlasu výrobce
způsobí propadnutí záruky a oprávnění CE k provozování přístroje.
Používejte pouze příslušenství poskytnuté výrobcem.
4. Telefon nepoužívejte v blízkosti vody. Zabraňte potřísnění produktu
jakoukoli tekutinou.
5. Před čištěním odpojte produkt z telefonní a elektrické zásuvky.
Nepoužívejte tekutá či aerosolová čistidla. K čištění používejte vlhký
hadřík.
6. Neumísťujte výrobek na nestabilní vozíky, stojany nebo stoly. Mohlo by
dojít k pádu produktu, zranění osob nebo poškození produktu nebo
jiného majetku.
7. Výpadek napájení: V případě výpadku napájení nabíječka sluchátka
nenabíjí baterii sluchátka a základnová stanice neumožňuje uskutečnit
odchozí volání ani přijmout příchozí volání. Nabíječka i základnová
stanice vyžadují k provozu elektrickou energii. Musíte mít k dispozici
telefon, který v případě výpadku napájení nevyžaduje elektrickou energii,
nebo záložní zdroj pro dočasné napájení.
8. Štěrbiny nebo otvory v plášti produktu jsou určeny k větrání. Tyto otvory
nesmí být zakryty ani jinak omezeny. Neumísťujte produkt na postel,
koberec nebo jiný podobný povrch, na kterém může dojít k zablokování
těchto otvorů. Je zakázáno umísťovat tento výrobek do blízkosti nebo
nad radiátor nebo článek topení nebo do omezeného prostoru bez
dostatečného větrání.
9. Nikdy nezasunujte žádné předměty do štěrbin/otvorů tohoto produktu,
protože by mohlo dojít k poškození produktu, ke kontaktu se součástmi
pod vysokým napětím nebo ke zkratu součástí, což by mohlo mít za
následek požár, úraz elektrickým proudem nebo zranění.
10. Tento produkt smí být napájen pouze typem zdroje napájení uvedeným
na typovém štítku. Pokud si nejste jisti, jaké napájecí napětí je ve vaší
domácí elektrické zásuvce, obraťte se na prodejce nebo dodavatele
energie.
11. Nepřetěžujte elektrické zásuvky a prodlužovací kabely, protože by mohlo
dojít k požáru nebo úrazu elektrickým proudem.
12. Nedemontujte tento produkt, aby se zabránilo úrazu elektrickým
proudem nebo popálení. Pokud produkt vyžaduje servis nebo opravu,
odešlete jej autorizovanému servisnímu středisku. Zavolejte na nejbližší
pobočku služeb zákazníkům. V případě otevření nebo demontáži krytů
může dojít k vystavení nebezpečným napětím, elektrickým proudům
nebo jiným nebezpečím. Při následném používání nesprávně
sestaveného produktu může dojít k úrazu elektrickým proudem.
13. Tento produkt nepoužívejte za bouřky. Hrozí nebezpečí zásahu bleskem.
14. Neumísťujte tento produkt na místa, na která mohou osoby stoupat,
zakopnout nebo spadnout na produkt.
15. Neumísťujte vodivé předměty nad nebo v blízkosti antény.
16. Dojde-li k úniku plynu, nepoužívejte produkt v blízkosti místa úniku.
17. Základnovou stanici ani nabíječku sluchátka neumísťujte v blízkosti
mikrovlnných trub, rádií, televizorů, reproduktorů nebo jiného
elektrického vybavení. Tyto spotřebiče mohou způsobit rušení produktu
nebo mohou být rušeny produktem.
18. V následujících případech odpojte základnovou stanici nebo adaptér
nabíječky z elektrické zásuvky a obraťte se na autorizované servisní
středisko:
a. Do produktu vnikla tekutina.
b. Napájecí kabel je poškozený nebo polámaný.
c. Pokud byl výrobek vystaven vodě či dešti.
d. Produkt nefunguje správně při dodržení pokynů pro používání.
e. Došlo k pádu produktu nebo k poškození pláště.
f. Produkt vykazuje výraznou změnu výkonu.
~5~
~6~
Page 35

Bezpečnostní pokyny - baterie
1. Používejte pouze nabíjecí baterie Li-ion a nabíječku schválenou
výrobcem. Nepoužívejte jiné typy nabíjecích baterií nebo nenabíjecí
baterie. Mohlo by dojít ke zkratu baterií a k porušení pláště baterií a
ohrožení bezpečnosti.
2. Dodržujte pokyny pro nabíjení v této příručce, pokyny na štítcích a
značky v přihrádkách sluchátka a nabíječky.
3. Nenabíjejte baterii na místě s teplotou nižší než 0℃ nebo vyšší než 40℃.
4. Baterii je nutno recyklovat nebo řádně zlikvidovat. Nevhazujte baterii do
ohně. Články mohou vybuchnout.
5. Nelikvidujte baterii s komunálním odpadem. Vyhledejte pokyny pro
likvidaci v místních vyhláškách.
6. S bateriemi manipulujte opatrně, aby nedošlo ke zkratování baterie
vodivými materiály, například prsteny, řetízky, klíči, kapesním nožem a
mincemi. Baterie nebo vodivý materiál se mohou přehřát a způsobit
popálení nebo požár.
7. Baterie nevystavujte dešti ani vodě.
8. Baterii neotevírejte ani nerozebírejte. Uvolněný elektrolyt je korozivní a
může způsobit zranění očí nebo kůže. V případě pozření může být
elektrolyt toxický.
9. Během nabíjení se baterie zahřívá. To je normální a není to nebezpečné.
Regulatorní informace
EP800
Toto zařízení splňuje pravidla CE. Provoz vyžaduje splnění následujících
dvou podmínek:
1) toto zařízení nesmí způsobovat škodlivé zasahování, a
2) toto zařízení musí přijmout jakoukoli interferenci, včetně interferencí,
které můžou způsobovat nežádoucí funkce.
1. Tento telefonní systém splňuje pravidla EN 301 357-2 (RF)、EN 301 489
(EMC)、EN 60950 (Bezpečnost) a EN 50371 (Bezpečnost RF).
2. REN je užitečné pro určení kvality zařízení, která připojujete k telefonní lince a
zároveň všechna zařízení vyzvánějí, když někdo volá vaše telefonní číslo. Ve
většině zemí, ne však ve všech, by neměl součet REN všech zařízení
připojených k jedné lince přesáhnout 5.0. Abyste si byli jisti, kolik zařízení může
být k telefonní lince připojeno, požádejte místní telefonní společnost o maximální
REN ve vaší oblasti.
3. Pokud toto telefonní zařízení způsobuje problémy telefonní sítě, může vás
telefonní společnost požádat, abyste váš telefonní systém ze sítě odpojili, dokud
nebude problém odstraněn. Pokud k tomu dojde, požádejte místní telefonní
společnost o informace o vašich právech.
4. Poskytovatel telefonního připojení může provádět změny svého vybavení,
zařízení, operací nebo postupů, které mohou mít vliv na správné fungování
telefonního systému. Pokud k tomu dojde, požádejte místní telefonní společnost
o informace o vašich právech.
5. Tento telefonní systém nelze používat se službou mincovního automatu
poskytovanou telefonní společností. Připojení ke společným přípojkám podléhá
státním sazbám.
6. Tento telefonní systém byl testován a vyhodnocen jako vyhovující limitům pro
pravidla EN 301 357-2 (RF)、EN 301 489 (EMC)、EN 60950 (Bezpečnost) a EN
50371 (Bezpečnost RF). Tato omezení mají poskytnout rozumnou ochranu před
škodlivým rušením ve veřejných instalacích. Provoz těchto zařízení může být
přesto rušen nebo může rušit okolní televizory, videorekordéry, rádia, počítače a
další elektronická zařízení. Aby se toto rušení minimalizovalo, nesmí být tento
telefonní systém umístěn nebo provozován v blízkosti jiných elektronických
zařízení.
~7~
~8~
Page 36

7. V žádném případě však není možné zaručit, že v určité konkrétní situaci k rušení
nedojde. Způsobuje-li tento telefonní systém rušení ostatních elektronických
zařízení, což lze určit zapnutím a vypnutím systému, doporučujeme uživateli, aby
se rušení pokusil odstranit jedním nebo více z následujících opatření:
a. Doporučujeme zachovat vzdálenost alespoň 6 m mezi systémem a ostatními
elektronickými zařízeními.
b. Připojte základnovou stanici k elektrické zásuvce v okruhu, který je oddělen
od okruhu používaného rušeným zařízením. Požádejte o pomoc prodejce
nebo zkušeného elektrotechnika.
Kontrolní seznam zařízení
1. Krabice s kombinací základna + sluchátko obsahuje následující
součásti:
a. Základnová stanice x 1 (nainstalovaná anténa)
b. Adaptér střídavého/stejnosměrného napájení základny x 1
c. Sluchátko x 1 (nainstalovaná anténa)
d. Anténa sluchátka x 1 (dlouhá ×1)
e. Stolní nabíječka x 1
f. Adaptér střídavého/stejnosměrného napájení nabíječky x 1
g. Baterie 1700mA Li-ion x 1
h. Telefonní kabel x 1
i. Disk CD (Uživatelská příručka), Stručná příručka
2. Volitelné příslušenství
a. Sada venkovní antény (včetně antény a kabelu)
b. Ochranná sada proti blesku
c. Anténa sluchátka s velkým zesílením
d. Náhlavní souprava
e. Anténní rozdělovač
~9~
~10~
Page 37

Obrázek sluchátka
A
A
připoj
připoj
Přijímač
Nahoru /
Dolů
Softwarové
tlačítko
Vysílání
Hovor /
blikání
nténa
Displej
Softwarové
tlačítko
Konec / Vypnout
napájení
Tlačítko
vytáčení
nténa
Spona
Víčko
přihrádky
baterie
Vnitřní
komunikace
Mikrofon
Nabíjecí
kontakt
Nabíjecí
kontakt
Zásuvka pro
ení
Zásuvka pro
ení
~11~
~12~
Page 38

Funkce sluchátka
Základní funkce sluchátka
1. 4řádkový displej z tekutých krystalů (LCD)
a. Displej LCD je vybaven podsvícením LED (světelná dioda).
b. 1
c. Popis ikon zleva doprava
(1)
(2)
(3)
(4)
(5)
(6)
(7)
d. 2. a 3. řádek displeje LCD mají každý maximální kapacitu 16 znaků a
e Na posledním řádku je zobrazeno levé a pravé softwarové tlačítko.
.
řádek displeje LCD obsahuje ikony.
Úroveň RSSI (síla přijímaného signálu)
Během volání odpovídá počet čárek síle
přijímaného rádiového signálu.
Režim spojení
(2.1) Probíhá volání (sluchátko
zavěšeno/vyvěšeno)
Číslo na pravé straně symbolu telefonu ukazuje
telefonní linku základnové stanice, která je
aktivní, pokud je zapnutá funkce Více základen.
(2.2) Probíhá vnitřní komunikace
Ukazuje aktivní režim vnitřní komunikace
Ukazuje ID sluchátka, se kterým probíhá vnitřní komunikace.
Režim řeči
(3.1) Indikátor reproduktoru
Ukazuje zda je reproduktor aktivní
(3.2) Režim náhlavní sady
Zvuk a indikace
(4.1) Aktivovat vyzvánění
(4.2) Deaktivovat vyzvánění
(4.3) Režim vyzvánění a vibrací
(4.4) Režim vibrací
(4.5) Indikátor čekající zprávy
Deaktivovat PA
Ukazuje, zda je deaktivováno příchozí vysílání.
Dvoučíselné ID sluchátka
Zobrazuje 2číselné ID sluchátka.
11
Síla baterie
Počet čárek odpovídá zbývajícímu času baterie.
zobrazují stav, zprávu, výběry nabídky nebo alfanumerické znaky
upravitelné uživatelem.
2. Vyzvánění
a. Vyzvánění při příchozím volání a volání vnitřní komunikace.
b. Odlišné výstražné zvuky signalizují různé události:
(1) Jedno pípnutí: úspěšné stisknutí tlačítka.
(2) Dvojí pípnutí: signalizuje zapnutí/vypnutí napájení.
(3) Trojí pípnutí: neúspěšná operace.
(4) Pravidelné 1-dlouhé-2-krátká pípnutí (každou minutu): upozornění na
nízký stav baterie、mimo dosah、přidržené volání
Věc: Žádné pípnutí pro neplatné stisknutím tlačítka
3.
TALK/FLASH (
)
a. Uskutečňuje nebo přijímá telefonní volání nebo volání vnitřní
komunikace
b. Odesílá signál blikání telefonní lince pro obnovení oznamovacího
tónu po ukončení volání nebo pro použití funkce čekajícího volání,
kterou poskytují místní telefonní služby, během volání.
4.
HLASITÝ TELEFON (
)
Stisknutím tohoto tlačítka aktivujete/deaktivujete hlasitý telefon během
příchozího nebo odchozího volání nebo během volání vnitřní komunikace.
5.
2CESTNÁ VNITŘNÍ KOMUNIKACE (
)
a. Provede volání vnitřní komunikace na jiné sluchátko, skupinu sluchátek
(skupinové stránkování) nebo na všechna zaregistrovaná sluchátka.
b. Volání vnitřní komunikace jsou digitální, plně duplexní a jsou
prováděna bez pomoci ze základnové stanice.
6.
VYSÍLÁNÍ (
)
a. Poloduplexní vysílání na sluchátka pro okamžité oznámení
b. Poloduplexní vysílání na základnové stanice
Věc: Stisknutím tlačítka na levém horním rohu sluchátka
aktivujete funkci vysílání.
7.
Levé/pravé softwarové tlačítko (
)
a. Slouží k výběru v nabídce.
8.
Tlačítka pro posouvání nahoru(
) /dolů( )
a. Slouží k posouvání záznamů a výběrů nabídek.
b. Upravte hlasitost hlasu příjemce v režimu hovoru.
~13~
~14~
Page 39

c.
j
d.
Stisknutím
Stisknutím
upravíte hlasitost v pohotovostním režimu.
vstoupíte do telefonního seznamu v pohotovostním
režimu.
9.
KONEC; tlačítko Zap./Vyp. (
a.
Ukončí volání.
)
b. Přejde z aktuální operace nabídky o jednu úroveň nahoru.
c. Stisknutím a podržením 3 sekundy vypnete napájení
Doplňkové funkce sluchátka
1. Registrace více sluchátek
a.
b. ID 11-19: ID jednotlivých sluchátek.
c. ID 91-99: ID skupiny. Sluchátka lze „přihlásit“ z nabídky sluchátka
2. Vibrační vyzvánění
a. Dvě možnosti pro linkové vyzvánění (příchozí volání) a vyzvánění
b. Výběr šesti úrovní hlasitosti vyzvánění (Vypnuto/ Nízký/Střední/
c.
3. ID volajícího
Zobrazuje telefonní číslo příchozího volání a jméno na displeji LCD
4. Čekání hovorů s ID volajícího
Zobrazuje informace o 2
5. Označování jmen s ID volajícího
Porovnává ID volajícího s položkami telefonního seznamu; po vyhledání
K základnové stanici lze zaregistrovat až 9 sluchátek
do skupiny (skupin) a lze je stránkovat, když volající z pevné linky
nebo volající vnitřní komunikace zadá ID skupiny.
vnitřní komunikace.
Vysoký/Vibrace/ Vibrace a vysoká) pro každou možnost.
Výběr osmi typů vyzvánění pro každou možnost.
(vyžaduje službu ID volajícího od místní telefonní společnosti)
.
.
volání (vyžaduje službu Čekání hovorů s ID volajícího od místní
1
příchozím volání na stejné lince, když probíhá
telefonní společnosti)
shody se na displeji LCD zobrazí jméno nebo přezdívka místo čistých
informací o ID volajícího (vyžaduje službu Čekání hovorů s ID volajícího
od místní telefonní společnosti).
6. DND (Nerušit, tzn. Tiché vyzvánění)
7. Protokoly volání
a. Opakovat vytáčení: Ukládá 10 naposledy vytočených telefonních
čísel (každé může obsahovat 26 číslic). Umožňuje opakovat
vytáčení všech 10 naposledy vytočených čísel.
b. Protokol přijatých a nových volání: Celkem 50 položek (16číselné
telefonní číslo, 16znaková jména a razítko Datum/Čas), vyžaduje
službu ID volajícího od místní telefonní společnosti.
c. Telefonní čísla a jména zobrazená na displeji lze uložit do
telefonního seznamu.
8. Blokování volání: Umožňuje blokovat odchozí a příchozí volání.
a. Odchozí volání:
a-1. Blokuje uživatelům vytáčení meziměstských nebo
mezinárodních volání
a-2. Až 5 číslic každého nastavení blokování volání; až 5 položek.
b. Příchozí volání:
b-1. PA zap./vyp.: Umožňuje aktivovat nebo deaktivovat vysílání z
iných sluchátek nebo základnové stanice. Když je PA vypnuto,
sluchátko nemůže přijímat vysílání ze základnové stanice nebo
ostatních zaregistrovaných sluchátek, ale může vysílat základnové
stanici nebo ostatním zaregistrovaným sluchátkům.
b-2. Linka zap./vyp.: Umožňuje aktivovat nebo deaktivovat možnost
přijímat příchozí volání z telefonní linky. Když je linka vypnutá, sluchátko
nemůže přijmout příchozí volání z telefonní linky, ale může přesto
uskutečnit odchozí volání.
b-3. Int. On/Off (Vypínač): Umožňuje aktivovat nebo deaktivovat vnitřní
komunikaci z jiných sluchátek nebo základnové stanice. Když je Int.
vypnuto, sluchátko nemůže přijímat vnitřní komunikaci ze základnové
stanice nebo ostatních zaregistrovaných sluchátek, ale může odeslat vntřní
komunikaci základnové stanici nebo ostatním zaregistrovaným sluchátkům.
c. Aby bylo možné tuto změnu provést, přejděte na „Nastavení
volání“ (NABÍDKA-4-3).
[Poznámka] Aby bylo možné tuto funkci použít, je nezbytné zadat
přesné ID uživatele a heslo. Výchozí heslo je „0000“.
9.
Odpověď libovolným tlačítkem (vyjma a softwarového tlačítka TICHO
~15~
~16~
Page 40

g
10. Zámek-tlačítek
a. Když je vybrán zámek tlačítek, všechna tlačítka budou zamknuta.
Stisknutím (levého) softwarového tlačítka ODEMK a
„*“ odemkněte.
b. Zámek tlačítek bude automaticky aktivován po návratu do
11. Směrové číslo
a. Lze předprogramovat jeden přístupový kód o délce až 14 číslic včetně
12. Přidržet volání
a. Přidrží volání
13. Ztlumit
a.
14. Telefonní seznam
a. 50 položek, každá uchovává telefonní číslo nebo ID sluchátka (až
b. Abecedně seřazené zobrazení a vyhledávání podle písmene.
c. Vytáčení z displeje.
d. V pohotovostním režimu můžete vstoupit do telefonního seznamu
e. Přenos telefonního seznamu vzduchem
i. Přenos konkrétního telefonního seznamu do jednoho sluchátka
ii. Přenos všech telefonních seznamů do jednoho sluchátka nebo
15. Tón tlačítek
a. Výběr čtyřúrovňové hlasitosti tónu tlačítek
b. Výběr čtyř typů tónů tlačítek.
16. Časovače volání
a. Zobrazuje dobu trvání volání během a ihned po volání.
17. Programovatelné funkční volání
a. Umožňuje uživateli předprogramovat nejčastěji používaný funkční
b. Lze uložit až 10 položek.
nečinného režimu po 15 sekundách.
mezer, který bude automaticky přidán před vytáčené číslo při vytáčení
z protokolů volání, telefonního seznamu a vytáčení vytočit-a-odeslat.
Stisknutím (levého) softwarového tlačítka ZTLUMIT během volání
bude ztlumen mikrofon sluchátka.
Stisknutím (levého) softwarového tlačítka OBN ZVU obnovíte zvuk.
26 číslic) a jméno (až 16 znaků)
stisknutím tlačítka posouvání
nebo do všech zare
do všech zaregistrovaných sluchátek
(Vypnuto/Nízký/Střední/Vysoký).
kód do EP800, což je doplněk systému PBX (pobočková ústředna).
istrovaných sluchátek
.
c. Po naprogramování funkčního kódu můžete tyto funkce rychle
18. Zobrazení nabídky
a. Aby se zabránilo chybnému nastavení v nabídce „Nastavení
b.
c. Po deaktivaci se tato nastavení nebudou zobrazovat, dokud je znovu
19. PA zap./vyp.
a. Slouží k aktivaci nebo deaktivaci funkce vysílání.
b. Když je PA vypnuto, sluchátko nemůže přijímat vysílání ze základnové
20. Nastavení skupiny
a. Umožňuje přihlásit sluchátko k jedné nebo více skupinám.
21. Vlastní jméno
a. Umožňuje změnit obrazovku „EP800“ na požadované slovo nebo
22. Změnit heslo
a. Umožňuje změnit heslo sluchátka, které je vyžadováno při vstupu
23. Doba trvání DTMF
a.
b. Výchozí nastavení je 100 ms.
c. Při vstupu do nabídky Nastavení zákl. je vyžadován kód PIN. Výchozí
Věc: Před jeho změnou doporučujeme poradit se s vaší telefonní
24. Programovatelný interval blikání tlačítka
provádět během volání stisknutím softwarového tlačítka VOLBA.
volání“(NABÍDKA-4), „Nastavení telef.“ (NABÍDKA-5), „Nastavení
zákl.“ (NABÍDKA-6) a nastavení Více základen (NABÍDKA-7-3), lze tato
nastavení skrýt.
Před vstupem do nabídky Zobrazení nab. (NABÍDKA-8) je vyžadováno
heslo sluchátka, výchozí heslo sluchátka je „0000“.
neaktivujete vstupem do nabídky Zobrazení nab.
stanice nebo ostatních zaregistrovaných sluchátek, ale může vysílat
základnové stanici nebo ostatním zaregistrovaným sluchátkům.
Věc: Lze přihlásit až 9 skupin (91 ~ 99) .
informaci, například jméno uživatele.
Věc: Lze zadat až 32 znaků.
do nabídky Blokovat volání (NABÍDKA-4-3) a do nabídky Zobrazení
nab. (NABÍDKA-8) .
Věc: Výchozí heslo je „0000“.
V NABÍDKA-6-1 vvyberte proměnnou délku trvání tónu DTMF.
kód je „0000“.
společností.
~17~
~18~
Page 41

a. V nabídce NABÍDKA-6-2 vyberte interval blikání tlačítka
j
b. Výběr 9 úrovní intervalu (100 ms - 900 ms), výchozí = 600 ms.
c. Výchozí hodnota (600 ms) funguje ve většině oblastí. Změna tohoto
nastavení může způsobit, že blikající tlačítko nefunguje. Toto nastavení
změňte pouze, pokud si jste jisti, že nová hodnota bude fungovat.
d. Při vstupu do nabídky Nastavení zákl. je vyžadován kód PIN.
25. Přiřazení dalšího ID sluchátka novému sluchátku
a.
b. Pokud nepřiřadíte další ID sluchátka, systém přidělí ID sluchátka
c. Při vstupu do nabídky Nastavení zákl. je vyžadován kód PIN.
26. Vymazat HS
a.
b. Po vymazání jiného zaregistrovaného sluchátka může místo něj
c. Při vstupu do nabídky Nastavení zákl. je vyžadován kód PIN.
27. Změnit PIN
Umožňuje změnu kódu PIN základny, který je vyžadován pro vstup do
a. Pomocí zaregistrovaného sluchátka změňte kód PIN v nabídce
b. Výchozí kód PIN je „0000“.
c. Při vstupu do nabídky Nastavení zákl. je vyžadován kód PIN. Výchozí kód
28. Funkce Autom. zavěsit
a. Pomocí zaregistrovaného sluchátka v nabídce NABÍDKA-6-6
b. Po zapnutí této funkce bude sluchátko automaticky zavěšeno po
c. Při vstupu do nabídky Nastavení zákl. je vyžadován kód PIN.
29. Směrový kód
Funkce směrového kódu umožňuje vytáčet volání v rámci místních
Výchozí kód je „0000“.
Pomocí zaregistrovaného sluchátka v nabídce NABÍDKA-6-3 přiřaďte
další ID sluchátka novému sluchátku.
novému sluchátku automaticky.
Výchozí kód je „0000“.
Pomocí zaregistrovaného sluchátka v nabídce NABÍDKA-6-4
odeberte jiné zaregistrované sluchátko v případě, že je závadné.
uživatel zaregistrovat nové sluchátko.
Výchozí kód je „0000“.
nabídky „Nastavení zákl.“ (NABÍDKA-6-5).
NABÍDKA-6-5.
e „0000“.
zapněte nebo vypněte funkci automatického zavěšení.
ukončení volání druhou stranou.
Výchozí kód je „0000“.
směrových čísel nebo směrových čísel země bez zadání směrového čísla.
a. Vstupte do nabídky NABÍDKA-4-7-1 a nastavte „Místní“ směrové číslo.
b.
30. Nastavení více základen
a.
Věc: Pro dosažení optimálního výkonu udržujte mezi základnovými
31. Nastavit čas
Funkce nastavení času umožňuje uživateli nastavit datum/čas pro
a.
b.
c. Zadejte kód PIN základny (výchozí kód je „0000“).
d. Zadáním „7“ přejděte na Nastavit čas.
e. Zadejte 4 číslice pro MM/DD (Měsíc/Den) a potom zadejte 4 číslice
f.
32. Zesílení mik.
Umožňuje změnit zesílení mikrofonu sluchátka podle prostředí
33. Vyzvánění sluchátka
Umožňuje změnit vyzvánění vycházející z reproduktoru sluchátka nebo
34. Elektron. chůva
Vstupte do nabídky NABÍDKA-4-7-2 a nastavte směrové číslo „Země“.
Věc: Lze zadat maximálně 3 číslice.
V jednom systému lze nastavit až 4 základnové stanice.
stanicemi vzdálenost alespoň 5 metrů.
podporu funkce DTMF ID volajícího (funkce DTMF ID volajícího
nepřipojuje datum/čas při přijímání z veřejné telefonní sítě (PSTN); toto
nastavení umožňuje uživateli zobrazit datum/čas přijetí ID volajícího).
Vstupte do nabídky NABÍDKA-6 a proveďte Nastavení zákl.
Stisknutím tlačítka pro posouvání
požadovanou základnovou stanici, když je nastaveno Více
základen.
pro hr:mm (Hodina:Minuta)
Stisknutím ULOŽIT (levé softwarové tlačítko) dokončete nastavení.
sluchátka – Tiché, Normální a Hlučné.
Aby bylo možné tuto změnu provést, přejděte na nastavení „Nastavení
telef.“ (NABÍDKA-5-1).
z přijímače náhlavní sady.
Aby bylo možné tuto změnu provést, přejděte na nastavení „Nastavení
telef.“ (NABÍDKA-5-9).
Umožňuje nastavit sluchátko jako elektronickou chůvu v dětském
pokoji prostřednictvím vnitřní komunikace.
Při zapnutí funkce Elektron. chůva toto vyhrazené sluchátko nebude
odpovídat na žádné příchozí volání vyjma 2cestné vnitřní komunikace.
Aby bylo možné tuto změnu provést, přejděte na nastavení „Nastavení
volání“ (NABÍDKA-4-5).
nebo vyberte
~19~
~20~
Page 42

Obrázek základny
Stránka / Registrace
Schéma základnové jednotky
Zdířka pro připojení
střídavého napětí
Telefonní
přípojka
Tlačítko
Resetovat
Linková
zásuvka
Indikátor LED napájení:
modrá barva
Indikátor LED používání:
bílá barva
Funkce základny
Základní funkce základnové stanice
1. Anténa
a. Port antény je opatřen
konektorem
; chcete-li odpojit anténu nebo kabelovou přípojku,
otáčejte proti směru hodin; při instalaci otáčejte po směru hodin.
V případě nesprávné instalace může dojít k poškození
konektoru.
b. Při používání venkovní antény umístěte anténu (nikoli samotnou
základnovou stanici) co nejvýše, aby byla přenosová cesta bez
překážek.
2. Indikátor LED
a. Napájení (modrá barva): ukazuje, že je zapnuto napájení
základnové stanice.
b. Používání (bílá barva): ukazuje aktivní telefonní linku.
3. Tlačítko OBNOVIT
a. Obnoví tovární nastavení základnové stanice
b. Tlačítko Obnovit je určeno pro zabránění náhodného obnovení
systému.
c. Po obnovení základnové stanice je nezbytné znovu zaregistrovat
všechna sluchátka (včetně správce) a doplňkové základny.
4. Tlačítko Stránka (STRÁNKA)
Slouží k vyhledání chybně položeného sluchátka; po stisknutí tlačítka
„STRÁNKA“ budou všechna zaregistrovaná sluchátka 30 sekund pípat.
Dalším stisknutím tlačítka „STRÁNKA“ nebo libovolného tlačítka na sluchátku
bude pípání ukončeno.
5. Tlačítko Registrace (STRÁNKA)
Slouží ke vstupu do režimu registrace se sluchátkem, přiřazuje ID
sluchátka (11-19).
6. Linková zásuvka
Standardní zásuvka RJ-11C/CA-11A pro připojení telefonní linky
7. Telefonní zásuvka
Další zásuvka RJ-11C pro připojení volitelného záznamníku
8. Vstup stejnosměrného napájení: slouží k připojení napájecího adaptéru
normálním šroubovacím
~21~
~22~
Page 43

Obrázek nabíječky
DC In
Štěrbina pro nabíjení
náhradní baterie
Indikátor nabíjení
náhradní baterie
Štěrbina pro nabíjení
sluchátka
Funkce nabíječky
1. DC In
Slouží k připojení adaptéru střídavého napájení.
2. Štěrbina pro nabíjení sluchátka
a. Nabíjí baterii sluchátka, když je sluchátko umístěno v kolébce.
b. Stav nabíjení viz displej LCD sluchátka
(1) Nabíjení: indikátor stavu baterie se pohybuje a na displeji LCD je
zobrazeno: „Nabíjení“.
(2) Zcela nabito: indikátor stavu baterie stojí a na displeji LCD je zobrazeno
„Nabíjení dokonč.“
(3) Nabíjení selhalo: Dojde-li v režimu nabíjení k chybě, na displeji LCD se
zobrazí zpráva „Nabíjení selhalo“
3. Při použití této nabíječky nelze baterii přebít.
4. Adaptér pro nabíjecí stanici lze rovněž používat jako cestovní nabíječku.
Během nabíjení sluchátka cestovní nabíječkou ovšem nelze vypnout
napájení. Na displeji LCD se zobrazí varovná zpráva „Odpoj cest.
nabíječku potom VYP“.
Poznámky:
1. Před prvním použitím baterie zcela nabijte.
2. Po vložení do štěrbiny pro nabíjení se automaticky
„zapne“ napájení sluchátka.
3. Pokud je ovšem baterie vybitá, automatické zapnutí sluchátka
bude trvat přibližně jednu minutu.
~23~
~24~
Page 44

Začínáme
j
Instalace základnové stanice
Existují tři možnosti instalace základnové stanice:
Samotná základnová stanice
Základnová stanice plus telefonní záznamník
Základnová stanice plus běžný telefon
Pro dosažení maximálního výkonu udržujte mezi základnovou stanicí a
ostatními elektronickými zařízeními (například TV, počítač, stereo, fax,
záznamník, bezdrátový telefon atd.) vzdálenost alespoň 1 metr.
1. Nainstalujte anténu základnové stanice.
Port antény základnové stanice je opatřen
normálním šroubovacím konektorem;
chcete-li připojit anténu nebo kabelovou
přípojku, otáčejte po směru hodin; při
odpojování otáčejte proti směru hodin. V
případě nesprávné instalace může dojít k
poškození konektoru.
2. Připojte transformátorový konec adaptéru
střídavého/stejnosměrného napájení
základnové stanice ke standardní elektrické
zásuvce střídavého napájení, druhý konec
připojte k zásuvce „Vstup stejnosměrného
napájení“ na zadní straně základnové
stanice.
a. Zástrčka stejnosměrného napájení
adaptéru základny má stejnou velikost,
ako zástrčka stejnosměrného napájení
nabíječky. Zástrčku stejnosměrného
napájení adaptéru nabíječky lze připojit
k zásuvce vstupu stejnosměrného
napájení základny.
3. Připojte telefonní kabel k zásuvce „LINKA“
4. Standardní telefon nebo záznamník lze připojit k sousední zásuvce na
zadní straně základnové stanice označené TEL
Instalace sluchátka a nabíječky
1. Připojte transformátorový konec adaptéru střídavého/stejnosměrného
napájení nabíječky ke standardní elektrické zásuvce střídavého
napájení, druhý konec připojte k zásuvce „Vstup stejnosměrného
napájení“ na zadní straně nabíječky.
2. Vložte baterii do sluchátka.
3. Nainstalujte anténu sluchátka.
4. Vložte sluchátko do štěrbiny pro nabíjení.
5. Před používáním nechte baterii tři hodiny zcela nabít.
6. Telefonní systém je nyní připraven provádět základní funkce, například
uskutečňování a přijímání telefonních volání a volání vnitřní
komunikace. Aby bylo možné používat základní funkce, není třeba
programovat základnovou stanici ani sluchátko.
Poznámka:
1. Sluchátko(a) dodané se základnovou stanicí je již
zaregistrováno z výroby. Máte-li nové sluchátko, bude třeba jej
zaregistrovat v základnové stanici, aby bylo základnou
(základnami) a ostatními sluchátky rozpoznáváno jako členské
sluchátko. Viz Registrace sluchátka.
2. Před prvním použitím zcela nabijte baterie.
~25~
~26~
Page 45

Základní operace
Provozní režimy
Základnová stanice a sluchátko mají provozní úrovně, na kterých lze
provádět pouze určité procedury funkcí.
A. Provozní režimy základny
1. Režim POHOTOVOST- toto je výchozí režim. Tlačítko stránky je aktivní
pouze v pohotovostním režimu. V tomto režimu svítí indikátor LED
„napájení“ (modrý) základny.
2. Režim HOVOR- v tomto režimu funguje základnová stanice během
telefonického volání. V tomto režimu svítí indikátor LED
„používání“ (bílý).
3. Režim REGISTRACE- stisknutím a podržením tlačítka STRÁNKA po
dobu tří sekund přejde základnová stanice do tohoto režimu. Indikátor
LED „napájení“ (modrý) v režimu „Registrace“ bliká a také zazní
akustické upozornění.
B. Provozní režimy sluchátka
1. Režim POHOTOVOST- toto je výchozí režim.
a. Pokud neprobíhá žádná aktivita, sluchátko
automaticky přejde do režimu
SPÁNEK/POHOTOVOST pro úsporu energie
baterie.
b.
Chcete-li sluchátko vypnout úplně, stiskněte a
podržte tlačítko
c. Zobrazení obrazovky pohotovostního režimu
(vlastní jméno) lze upravit.
d. 2místné číslo představuje ID sluchátka
2. Režim NABÍDKA
a. Stisknutím pravého softwarového funkčního
tlačítka aktivujte režim Nabídka.
b. V režim Nabídka lze měnit nastavení sluchátka a
informace v paměti.
c. Funkce dostupné v režimu Nabídka jsou
podrobněji popsány od stránky 53.
d. Struktura režimu Nabídka je následující:
po dobu 3 sekund.
3. Strom nabídek
NABÍDKA 1.Zámek tlačítek
2 .Telefonní seznam
3.Zvuky
4.Nastavení volání
5.Nastavení telef. 1.Zesílení mik
6.Nastavení zákl.
7.Registrace. 1.Registrovat
8.Zobrazení nab. 1.Nastavení volání
1 .Hlas. vyzvánění
2.Tón vyzvánění
3.Hlas. tlačítek
4.Tón tlačítek
1.Směrové číslo
2.Nast. skupiny
3. Blokování volání
4.Funkční volání
5.Elektron. chůva
6.Správce volání
7.Směrové kódy
2.Volání lib tlač
3.Kontrast
4.Posvícení
5.Značka jména
6.Jazyk
7.Vlastní jméno
8.Změnit heslo
9.
Zadat PIN základny:---
2.Zrušit regist
3.Více základen
Zadejte heslo: ----
1.Doba trvání DTMF
2.Interval blikání
3.Přiřad další HS
4.Vymazat HS
5.Změnit PIN
6.Autom. zavěsit
7.Nastavit čas
2.Nastavení telef
3.Nastavení zákl
4.Více základen
~27~
~28~
Page 46

Uskutečnění telefonního volání
1.
Stiskněte
, vyčkejte na oznamovací tón a potom
zadejte telefonní číslo.
2. Rovněž můžete nejdříve zadat telefonní číslo a potom
stisknout tlačítko
.
Používáte-li tento způsob, můžete zadané číslo upravit
pomocí (levého) softwarového tlačítkaVYMAZAT a
(pravého) softwarového tlačítka ODSTR.
432398765
VYMAZAT
ODSTR
„Odstr“ vymaže poslední zadanou číslici.
„Vymazat“ vymaže celý řádek, ale zůstane ve vytáčení
vytočit-a-odeslat.
3. Rychlé vytáčení přistupováním k položkám v
telefonním seznamu (Nabídka
a.
Stisknutím tlačítka pro posouvání nebo
2)
vstupte do telefonního seznamu
b.
Stisknutím
vytočte číslo
4.
Vytáčení můžete přerušit stisknutím tlačítka
.
Poznámky:
1. Pokud spojení nelze navázat, na displeji LCD se zobrazí
zpráva „Základna nenalez“ po vypršení časového intervalu 6
sekund.
2. Po navázání spojení začne časovač délky trvání volání
zobrazovat délku volání.
Uskutečnění 2cestného volání / volání vnitřní komunikace
Bezdrátový telefonní systém EP800 nabízí soukromou vnitřní/2cestnou
rádiovou komunikaci nezávislou na základnové stanici. Vnitřní / 2cestnou
komunikaci lze uskutečňovat mezi sluchátky.
1.
Stiskněte tlačítko
a dvojmístné ID sluchátka
nebo ID skupiny.
2.
Stisknutím tlačítka
ukončete volání.
Poznámky:
1. Volání vnitřní komunikace lze uskutečňovat bez ohledu na
přítomnost základnové stanice.
2. Je-li zadáno ID skupiny, první sluchátko (patřící k této
skupině), které odpoví, naváže spojení s volajícím. Viz
Přihlášení sluchátka ke skupině.
3. Pokud spojení nelze navázat, na displeji LCD se zobrazí
zpráva „Čas limit stránk“ po vypršení časového intervalu 35
sekund.
Vysílání
A. Volání mezi sluchátky
1. Vysílání všem sluchátkům
a.
Stiskněte a podržte tlačítko
levém horním rohu) na jednom sluchátku.
b. Zazní dlouhý zvuk „Du…“ , během kterého se
inicializuje vysílání ze sluchátka na všechna sluchátka v
rámci komunikačního pokrytí.
c. Po zaznění zvuku „Du Du“ začněte namlouvat zprávu, kterou chcete
rozeslat jako vysílání; po obdržení hlasu se otevře hlasitý telefon
cílových sluchátek.
Věc: Během hovoru nebo vysílání je třeba inicializovat sluchátko
stisknutím a podržením tlačítka
d.
Uvolněním tlačítka
ukončete vysílání.
2. Vysílání skupině sluchátek
a.
Zadejte ID skupiny a potom stiskněte a podržte
tlačítko
(tlačítka v levém horním rohu).
b. Zazní dlouhý zvuk „Du…“, během kterého se inicializuje
vysílání ze sluchátka na všechna sluchátka.
c.
Po zaznění zvuku „Du Du“ začněte namlouvat zprávu, kterou chcete
rozeslat jako vysílání; po obdržení hlasu se otevře hlasitý telefon cílových
sluchátek.
Věc: Během hovoru nebo vysílání je třeba inicializovat sluchátko
(tlačítka v
.
~29~
~30~
Page 47

stisknutím a podržením tlačítka .
d.
Uvolněním tlačítka
ukončete
vysílání.
3. Vysílání konkrétnímu sluchátku
Zadejte ID sluchátka a potom stiskněte a podržte
a.
tlačítko
(tlačítka v levém horním rohu).
b. Zazní dlouhý zvuk „Du…“, během kterého se
inicializuje vysílání ze sluchátka na všechna
sluchátka v rámci komunikačního pokrytí.
c. Po zaznění zvuku „Du Du“ začněte namlouvat zprávu, kterou chcete
rozeslat jako vysílání; po obdržení hlasu se otevře hlasitý telefon
cílových sluchátek.
Věc: Během hovoru nebo vysílání je třeba inicializovat sluchátko
stisknutím a podržením tlačítka
d.
Uvolněním tlačítka
ukončete vysílání.
Znovu vytočit
1.
Stiskněte softwarové tlačítko OPA VYT (levé).
Na displeji LCD se zobrazí poslední vytočené číslo.
2.
Chcete-li toto číslo vytočit, stiskněte tlačítko
.
3.
Pomocí tlačítka
nebo procházejte
posledních 10 vytočených telefonních čísel. Výběrem
a stisknutím tlačítka
[Poznámka] Čísla vnitřní komunikace (ID sluchátka) nejsou
vytočte vybrané číslo.
uložena v seznamu posledních 10 vytočených čísel.
Příjem telefonního volání
1. Při příchozím volání se na displeji LCD zobrazí zpráva
s ID volajícího a ozve se vyzvánění nebo vibrace,
pokud nebylo vyzvánění zcela vypnuto.
Pokud se sluchátko nachází v kolébce nabíječky
2.
1
11
(vyzvánění bude dočasně přepnuto na „Vyzvánění“,
pokud nebylo nastaveno na „Vibrace“), zvedněte
sluchátko a stisknutím tlačítka
Věc:
Můžete zapnout funkci „Volání lib tlač“ z nabídky NABÍDKA-5-2
zahajte konverzaci.
Poznámky:
1. Chcete-li volání ignorovat, můžete stisknout (levé) softwarové
tlačítko TICHO. Na rozdíl od vypnutí vyzvánění (v nabídce
sluchátka) se použití tlačítka TICHO vztahuje pouze na
aktuální volání.
2. Pokud je k dispozici služba ID volajícího, na displeji LCD se
zobrazí informace o příchozím volání. Pokud se na displeji
LCD zobrazí „Soukromé“ nebo „Neznámé“, informace o
volajícím byly pravděpodobně zablokovány volajícím nebo
konkrétní telefonní společností.
Příjem volání vnitřní komunikace
Při příchozím volání vnitřní komunikace (z jiného
1.
sluchátka, například sluchátka 12) se ozve vyzvánění
nebo vibrace, pokud nebylo vyzvánění vypnuto.
Stisknutím
Pokud se sluchátko nachází v kolébce nabíječky
2.
(vyzvánění bude dočasně přepnuto na „Vyzvánění“,
pokud nebylo nastaveno na „Vibrace“), zvedněte
sluchátko a stisknutím tlačítka
Pokud se sluchátko nenachází v kolébce a nastavení „Volání lib tlač“ v
3.
nabídce NABÍDKA-6-2 je nastaveno na „Zapnuto“, přijměte volání
stisknutím libovolného (vyjma a softwarového tlačítka TICHO).
Poznámky:
1. Na displeji LCD se zobrazí ID sluchátka volajícího.
2. Chcete-li volání ignorovat, můžete stisknout (levé) softwarové
tlačítko TICHO. Na rozdíl od vypnutí vyzvánění se použití tlačítka
TICHO vztahuje pouze na aktuální volání.
přijměte volání vnitřní komunikace.
zahajte konverzaci.
~31~
~32~
Page 48

Ukončení volání
Chcete-li ukončit telefonní volání nebo volání vnitřní komunikace, stiskněte
tlačítko
, nebo umístěte sluchátko do kolébky.
Nastavení hlasitosti hlasu přijímače sluchátka
1. Hlasitost hlasu lze nastavit pouze během volání.
2. K dispozici je výběr 6 úrovní hlasitosti. Upravte
pomocí tlačítka
nebo
1
00:00:15
Hlasitost: 3
ZTLUMIT VOLBA
11
3. Nové nastavení bude platné pro všechna budou
volání, dokud nebude změněno.
Nastavení hlasitosti funkce hlasitého telefonu sluchátka
1. Hlasitost hlasu lze nastavit pouze během volání (v
režimu hlasitého telefonu).
2. K dispozici je výběr 6 úrovní hlasitosti. Upravte
pomocí tlačítka
nebo
00:00:15
Hlasitost:3
ZTLUMIT VOLBA
11
11
3. Nové nastavení bude platné pro všechna budou
volání, dokud nebude změněno.
Přidržení volání
Probíhající volání lze přidržet stisknutím (levého)
1.
softwarového tlačítka VOLBA
a „*”odemkněte.
Chcete-li se vrátit k rozhovoru, stiskněte (levé)
2.
softwarové tlačítko UVOLNIT
Poznámky:
1. Přidržené volání lze „uvolnit“ sluchátkem, které volání přidržuje.
Pokud ovšem stisknutím tlačítka vrátíte sluchátko do
.
pohotovostního režimu, lze stisknutím nebo na ostatních
sluchátkách toto přidržené volání zvednou .
2. Přidržené volání je zobrazeno na displeji LCD sluchátka.
Výstražný tón (dvojité pípnutí) každých 30 sekund upozorní
sluchátko na přidržené volání.
3. Pokud se nezdaří operace (například přesměrování volání) po
přidržení volání, přidržené volání bude pravděpodobně ztraceno.
Ztlumit
1. Po navázání spojení můžete stisknutím (levého)
softwarového tlačítka ZTLUMIT ztlumit mikrofon
sluchátka.
Když je mikrofon ztlumený, druhá strana neuslyší váš
2.
00:00:15
ZTLUMIT
OBN ZVU VOLBA
11
1
hlas, ale může k vám hovořit.
3. Chcete-li ukončit ztlumení mikrofonu, stiskněte (levé) softwarové tlačítko
UVOLNIT. Ztlumení je účinné pouze na aktuální volání.
Nerušit (tiché vyzvánění)
1.
Zadejte pořadí tlačítek NABÍDKA-3-1 a potom vyberte
„Vypnuto“. Stisknutím (levého) softwarového tlačítka
1
11
VYBRAT potvrďte výběr. Tím bude vyzvánění
vypnuto, dokud je znovu nezapnete v nabídce.
Věc: Po nastavení vyzvánění na „Vypnuto“ se na
obrazovce pohotovostního režimu zobrazí
„Vyzvánění vyp.“.
Chcete-li dočasně ztlumit vyzvánění při příchozím
2.
volání, stiskněte (levé) softwarové tlačítko TICHO.
Zámek tlačítek
1. Aby se zabránilo náhodnému vytáčení, můžete
stisknout (pravé) softwarové tlačítko NABÍDKA a
potom stisknutím“1” vyberte možnost Zámek tlačítek.
Klávesnice sluchátka bude uzamčena. Nelze zadávat.
~33~
~34~
Page 49

Chcete-li odemknout klávesnici, stiskněte (levé)
2.
softwarové tlačítko ODEMK a potom stisknutím číslice
„*“ během 2 sekund odemkněte.
Zámek tlačítek bude automaticky aktivován po návratu
3.
do pohotovostního režimu po 15 sekundách.
4. Zámek tlačítek zůstane zamknutý až do odemknutí.
Nabíjení a výměna baterie
1. Nastane-li některá z následujících situací nebo jejich kombinace, nabijte
baterii:
a. Telefon dvakrát pípne (každých 60 sekund v režimu hovoru,
každých 10 minut v pohotovostním režimu).
b. Ikona baterie je prázdná.
c.
d. Displej LCD a podsvícení se ztlumí.
e. Dochází k výpadků dosahu hovoru.
2.
3. Doba hovoru baterie a pohotovostní doba se liší v závislosti na způsobu
Telefon nereaguje na stisknutí tlačítka zapnutí/vypnutí napájení
Můžete vyměnit baterii sluchátka po přidržení probíhajícího volání a
stisknutí tlačítka
. Chcete-li obnovit přidržené volání, po výměně
baterie a zapnutí napájení telefonu znovu stiskněte tlačítko hovoru..
hovoru/pohotovosti a provozní vzdálenosti. Pro dosažení optimálního
výkonu doporučujeme vkládat sluchátko co nejčastěji do kolébky
nabíječky. Používejte pouze baterii a nabíječku dodanou výrobcem!
Rozšířené použití
Registrace sluchátka
1. Pokud bylo vaše sluchátko(a) zakoupeno jako součást systému, bylo
předem zaregistrováno v základnové stanici při výrobě.
2. Pokud má ID sluchátka hodnotu „00“, znamená to, že se jedná o nové
sluchátko nebo bylo ID vymazáno. Je třeba zaregistrovat sluchátko v
základnové stanici.
3. Registrační:
a.
b. Stiskněte a podržte tlačítko STRÁNKA základny 3
c. Stisknutím tlačítka „1“ sluchátka bude dokončen
.
d. Zopakujte výše uvedené kroky pro všechna
4. Zrušení registrace:
a. Registraci sluchátka, které používáte, můžete zrušit
b. Po zrušení registrace nebude sluchátko moci
c.
d. Stiskněte a podržte tlačítko STRÁNKA základny 3
e. Stisknutím tlačítka „2“ sluchátka bude dokončen
Stisknutím NABÍDKA-7 vstupte do režimu registrace
sekundy, dokud nezačne svítit a blikat indikátor
LED používání (bílá barva) ; základnová stanice
začne rovněž vydávat zvukové upozornění, že se
nachází v registračním režimu..
registrační proces. Základnová stanice automaticky
přidělí ID sluchátka mezi 12 a 19. Přiřazené ID bude
zobrazeno na displeji LCD sluchátka, což znamená,
že registrace byla úspěšná.
doplňková sluchátka.
ze základnové stanice. Zrušením registrace bude
vynulováno ID sluchátka na 00, bude vymazán
bezpečnostní kód systému a bude uvolněno ID
sluchátka pro budoucí registraci.
používat základnovou stanici k uskutečňování nebo
přijímání telefonních hovorů ani nemůže vnitřně
komunikovat s ostatními sluchátky.
Stisknutím NABÍDKA-7 vstupte do režimu registrace
sekundy, dokud nezačne svítit blikat indikátor LED
používání (bílá barva) ; základnová stanice začne
rovněž vydávat zvukové upozornění, se nachází v
režimu rušení registrace.
proces zrušení registrace. Po úspěšném zrušení
Registrace
1.Registrovat
VYBRAT
ZPET
Registrace
2.Zru t regist
VYBRAT ZPET
~35~
~36~
Page 50

registrace se na displeji sluchátka zobrazí
„Zaregistrujte“.
Poznámky:
1. Základnová stanice má časový limit registrace 30 sekund od
stisknutí tlačítka STRÁNKA. Sluchátko má časový limit
registrace 6 sekund od registrace nebo od výběru možnosti
zrušení registrace. Po vypršení časového limitu základnová
stanice a sluchátko automaticky ukončí režimu registrace.
2. V případě neúspěchu zopakujte postup registrace nebo zrušení
registrace.
Přihlášení sluchátka ke skupině
1. Lze definovat až devět skupin sluchátek (91-99) a
sluchátka se mohou rozhodnout ve které skupině
(skupinách) chtějí být.
2. Například Skupina 1 představuje skupinu Služby
zákazníkům, Skupina 2 představuje skupinu Odbyt
a Skupina 3 je skupina Marketing. Předpokládejme,
že sluchátko 11 chce přijímat příchozí vyzvánění
všech volání souvisejících s Odbytem a Marketingem.
V takovém případě je třeba „přihlásit“ sluchátko 11 do
Skupiny 2 a Skupiny 3.
3. Výběry skupin:
a.
Stisknutím tlačítka NABÍDKA-4 sluchátka vstupte
do nabídky Nastavení volání
b.
Stisknutím čísla „2“ sluchátko přejde do nabídky
nastavení skupiny.
c.
Stisknutím softwarového tlačítka VOLBA a
následně tlačítka „1“ přihlásíte sluchátko do
skupiny („9#“, #:1~9). Zadejte 1 ~ 9.
d. Zopakujte pro všechny požadované skupiny.
e. Chcete-li odstranit výběry skupin, stiskněte
softwarové tlačítko VOLBA a potom stisknutím
tlačítka „2“ odhlaste skupinu.
~37~
Hlavní nabídka
4.Nastavení volání
VYBRAT
Prihl? eno
dn
VOLBA ZPET
Zadejte skupinu
pro prihl? en
9#
ZPĚT
ZPET
Poznámky:
1. Přihlášení ke skupinám může sluchátko kdykoli měnit.
2. Základnová stanice nezodpovídá za přiřazení do skupin. Z
tohoto důvodu nemůže zrušit přihlášení sluchátka ke skupině.
3. Když volající prostřednictvím vnitřní komunikace zadá ID skupiny,
budou vyzvánět všechna sluchátka přihlášená k této skupině.
Sluchátko, které odpoví jako první, naváže spojení s volajícím.
Poté se jedná o volání mezi dvěma účastníky, nikoli o volání mezi
jedním a mnoha účastníky.
Přepojení volání
V průběhu volání můžete volání přepojovat mezi různými sluchátky.
Přímé přepojení
Stisknutím VOLBA (levého) softwarového tlačítka
1.
přidržte volání.
Stisknutím (pravého) softwarového tlačítka PŘENOS a
2.
potom ID cílového sluchátka bude přidržené volání
přepojeno přímo.
Po přepojení volání na cílové sluchátko se původní
sluchátko automaticky vrátí do pohotovostního režimu.
Zadej klapku #:
##
Nepřímé přepojení
Chcete-li hovořit s cílovým sluchátkem před přepojením
volání, můžete použít následující postup:
1.
Během volání stiskněte tlačítko
a potom zadejte
ID cílového sluchátka.
2.
Stisknutím na cílovém sluchátku odpovězte na
volání vnitřní komunikace; nyní můžete hovořit s cílovým
sluchátkem. Po hovoru ukončete volání vnitřní
komunikace stisknutím
a potom může cílové
Zadej klapku#:
##
sluchátko automaticky přijmout příchozí volání.
Po přepojení volání na cílové sluchátko se původní
~38~
11
STORNO
11
STORNO
Page 51

sluchátko automaticky vrátí do pohotovostního režimu.
j
Poznámky: Pokud cílové sluchátko neodpoví po časovém intervalu
stránkování sluchátek nebo přepojování, volání bude směrováno
zpět na původní sluchátko.
Používání telefonního seznamu
1. Do telefonního seznamu lze uložit až 50 položek.
Každá položka může obsahovat telefonní číslo nebo
ID sluchátka (až 26 číslic) a jméno (až 16 znaků).
Chcete-li přejít do telefonního seznamu, stiskněte (pravé)
2.
softwarové tlačítko NABÍDKA a potom stiskněte 2 ; nebo
stiskněte
sluchátko nachází v pohotovostním režimu.
3. Pokyny pro přidání nové položky:
a.
Stiskněte (levé) softwarové tlačítko PŘIDAT.
b. Zadejte jméno, když se na displeji LCD zobrazí
„Jméno?“ Pomocí (pravého) softwarového tlačítka
ODSTR odstraňte poslední zadanou číslici. Po
dokončení uložte stisknutím (levého) softwarového
tlačítka ULOŽIT.
Věc: Jako jméno lze zadat až 16 znaků.
c. Poté budete vyzváni, abyste zadali číslo pro právě
zadané jméno.
Věc: Jako číslo lze zadat až 26 číslic.
d. Po zadání čísla uložte tuto položku do telefonního
seznamu stisknutím (levého) softwarového tlačítka
ULOŽIT .
e. Zadejte položkutelefonního seznamu bez jména,
všechny záznamy bez jména budou umístěny na
začátku telefonního seznamu.
f. Chcete-li zadat jméno, jednou nebo víckrát
stiskněte odpovídající číslo na klávesnici podle
pořadí znaku na tlačítku.
Seznam dostupných znaků a jejich pořadí viz
tabulka níže. Například stisknutím tlačítka 2
tlačítko pro procházení, když se
ednou zadáte znak „A“, stisknutím dvakrát zadáte
znak „B“ atd.
Poznámky:
1. Při zadávání telefonního čísla se kurzor automaticky přesunuje na
další číselné pole. Pomocí tlačítka pro procházení nebo
posunujte kurzor dozadu nebo dopředu a vložte nebo odstraňte
(číslici nad kurzorem nebo nalevo od kurzoru, pokud se kurzor
nachází napravo od poslední číslice).
2. Při zadávání jména se kurzor automaticky přesune na další znakové
pole, pokud pro další znak stisknete odlišné tlačítko. Potřebujete-li
zadat další znaky ze stejného tlačítka, můžete počkat, až se kurzor
posune vpřed, nebo posuňte kurzor ručně dozadu nebo dopředu
pomocí nebo tlačítka pro procházení. Tlačítka
nebo rovněž použijte k posouvání kurzoru pro vložení (nalevo
od kurzoru) nebo odstranění (znak nad kurzorem nebo nalevo od
kurzoru, pokud se kurzor nachází napravo od posledního znaku).
3. Ve výchozí konfiguraci jsou všechna písmena zadávána jako velká.
Pomocí tlačítka * můžete přepínat mezi velkými a malými písmeny.
4. Položka „Pauza“ představuje 1 druhé zpoždění při vytáčení
následujících číslic, což je užitečné při volání řady segmentovaných
čísel (tzn. přístupový kód, číslo kreditní karty, položky automatické
obsluhy atd.) Pauza se zadává dvojím stisknutím tlačítka # (na
displeji LCD se zobrazí P). Dvojí zadání pauzy (PP) bude mít za
následek 2 druhou pauzu při vytáčení.
5. Tabulka znaků:
Tlačítko Znaky a pořadí
1 ‘ + , . * ( ) & 1
2 A B C 2
3 D E F 3
4 G H I 4
5 J K L 5
6 M N O 6
7 P Q R S 7
8 T U V 8
9 W X Y Z 9
0 0
*
#
Velká písm. – při úpravách znaků.
*– při úpravách čísel.
Mezera & # – při úpravách znaků
# & P (Pauza) – při úpravách čísel
~39~
~40~
Page 52

4. Položky jsou abecedně seřazeny a uloženy jako seznam v sestupném
pořadí (A až Z) od horní části seznamu.
5. Na prvním řádku displeje LCD je zobrazeno jméno a na 2
.
řádku je
zobrazeno telefonní číslo. Pokud je telefonní číslo delší než 16 číslic,
stiskněte (pravé) softwarové tlačítko VOLBA a výběrem volby 3
„Zobrazit číslo“ zobrazíte celé číslo.
6. Pokyny pro vyhledávání záznamu:
a.
Pomocí tlačítka pro procházení
přejděte do režimu Telefonní
seznam.
b. Stiskněte tlačítko, které odpovídá prvnímu znaku hledaného jména.
c.
d.
Hledáte-li například jméno „EnGenius“, stiskněte jednou tlačítko 3 .
Pomocí tlačítka pro procházení
nebo vyhledejte
konkrétní hledaný záznam.
7. Pokyny pro vymazání telefonního seznamu:
a.
Pomocí tlačítka pro procházení
nebo
nebo metodou abecedního vyhledávání vyhledejte
záznam, který chcete vymazat nebo upravit.
Stisknutím (pravého) softwarového tlačítka VOLBA
b.
přejděte do nabídky volby.
c.
Stisknutím 1 vymažte určenou položku
telefonního seznamu.
d. Na displeji LCD se zobrazí dotaz „Odstranit
zázn?“ Stisknutím (levého) softwarového tlačítka
ANO potvrďte změnu.
8. Pokyny pro úpravy telefonního seznamu:
a.
Pomocí tlačítka pro procházení
nebo
nebo metodou abecedního vyhledávání
vyhledejte záznam, který chcete vymazat nebo
upravit.
b. Stisknutím (pravého) softwarového tlačítka VOLBA
přejděte do nabídky volby.
Stisknutím 2 upravte určenou položku telefonního
c.
seznamu.
9. Vytáčení z displeje:
a.
Stisknutím
nebo vytočíte zobrazené telefonní
číslo nebo ID sluchátka.
10. Pokyny pro přenesení telefonního seznamu:
Aby bylo možné přenést telefonní seznam, musí obě strany nejdříve přejít
do režimu přenášení telefonního seznamu podle následujících pokynů:
a.
Stiskněte pravé softwarové tlačítko VOLBA a potom stisknutím 5 nebo
nebo tlačítka pro procházení
přeneste, když se sluchátko
nachází v režimu telefonního seznamu.
b.
Odesílající strana stisknutím 1 přejde do režimu odesílání.
i. Stisknutím TX VŠE (levé softwarové tlačítko) přenesete všechny
položky telefonního seznamu do druhého sluchátka (sluchátek).
ii. Nebo stisknutím TX JED (pravé softwarové tlačítko) přenesete
jednu položku do druhého sluchátka (sluchátek).
iii. Stiskněte 2číselné ID sluchátka nebo ID skupiny a potom vyberte
všechny nebo jednu položku telefonního seznamu pro přenesení.
Věc: „00“ znamená všechna sluchátka
iv. Během přenášení telefonního seznamu je na displeji LCD
zobrazeno „Odesílání“ a 2číselné odpočítávání na displeji LCD
ukazuje telefonní čísla, která čekají na odeslání.
c.
Strana přijímající telefonní seznam stisknutím 2 přejde do režimu
přijímání.
i. Při vstupu do režimu přijímání se na displeji LCD zobrazí
„Připraveno“.
ii. Po zahájení přijímání telefonního seznamu se na displeji LCD
zobrazí „Získat telefonní seznam z klap. # : xx“.
iii. Při přijímání každého telefonního seznamu zazní pípnutí.
iv. Během přijímání telefonního seznamu 2číselné odpočítávání na displeji
LCD ukazuje čísla telefonního seznamu, která čekají na přijetí.
Věc: Při přenášení telefonního seznamu prostřednictvím bezdrátového
rozhraní může dojít k částečné ztrátě způsobené rušením.
Blokování volání
1. Blokuje uživatelům vytáčení meziměstských nebo mezinárodních volání.
Rovněž blokuje příchozí volání z vnější linky nebo jiného zaregistrovaného
sluchátka.
~41~
~42~
Page 53

Pro přístup k nastavení je třeba zadat heslo. Výchozí heslo sluchátka je „0000“.
Stisknutím NABÍDKA-4-3 přejděte na Blokování
2.
volání. Zadejte heslo sluchátka a stiskněte (levé)
softwarové tlačítko OK
Blokování odchozího volání
Stisknutím levého softwarového tlačítka VYBRAT
1.
vyberte blokování „Odchozí“ a potvrďte výběr.
2.
Pomocí tlačítka pro procházení
nebo
přepínejte toto nastavení mezi Zapnuto a Vypnuto.
Stisknutím levého softwarového tlačítka VYBRAT
potvrďte výběr.
Věc: Výchozí nastavení Blokování volání je
„Vypnuto“.
3. Pokyny pro přidání kódu blokování volání
a. Po zapnutí funkce Blokování volání můžete zadat
kód „Blokování volání“.
Stiskněte (levé) softwarové tlačítko PŘIDAT a
potom začnete zadávat kód blokování volání. Po
zadání uložte číslo stisknutím (levého)
softwarového tlačítka ULOŽIT.
(1) Jako kód blokování volání lze upravit až 5 číslic.
Chcete-li například blokovat vytáčení volání na
Manhattan, oblast NY, můžete jako kód blokování
volání zadat 1212.
(2) Pokud je základnová stanice doplňkem systému
PBX (pobočková ústředna), zadejte rovněž
specifické číslo pro obdržení tónu veřejné telefonní
sítě (PSTN).
b. Stisknutím pravého softwarového tlačítka VOLBA
odstraňte nebo upravte kódy blokování volání.
c. Lze naprogramovat až 5 sad kódů blokování
volání.
d. Chcete-li blokovat všechna odchozí volání,
stiskněte tlačítka „*****“ 5 „*“, stisknutím
(levého) softwarového tlačítka ULOŽIT je uložte a
veškerá odchozí volání budou blokována.
Blokování příchozího volání
1.
Stisknutím levého softwarového tlačítka VYBRAT
potvrďte výběr pro „Příchozí“.
Pomocí tlačítka pro procházení
vyberte blokovanou položku.
nebo
a.
Stisknutím levého softwarového tlačítka VYBRAT
potvrďte výběr přijímání nebo blokování vysílání.
Stisknutím levého softwarového tlačítka ZMĚNIT
přepínejte toto nastavení mezi Zapnuto a
Vypnuto.
Věc: „Zapnuto“ znamená, že lze přijímat vysílání
ostatních sluchátek nebo základnové stanice.
„Vypnuto“ znamená, že je vysílání ostatních
sluchátek nebo základnové stanice blokováno.
b.
Stisknutím levého softwarového tlačítka VYBRAT
potvrďte výběr přijímání nebo blokování linkového
volání.
Stisknutím levého softwarového tlačítka ZMĚNIT
přepínejte toto nastavení mezi Zapnuto a Vypnuto.
Věc: „Zapnuto“ znamená, že lze přijímat volání z
vnější linky; „Vypnuto“ znamená, že jsou volání
vnější linky blokována.
c.
Stisknutím levého softwarového tlačítka VYBRAT
potvrďte výběr přijímání nebo blokování volání
vnitřní komunikace.
Stisknutím levého softwarového tlačítka ZMĚNIT
přepínejte toto nastavení mezi Zapnuto a Vypnuto.
Věc: „Zapnuto“ znamená, že lze přijímat volání
vnitřní komunikace z ostatních sluchátek nebo
základnové stanice; „Vypnuto“ znamená, že jsou
volání vnitřní komunikace z ostatních sluchátek
nebo základnové stanice blokovány.
~43~
~44~
Page 54

Programovatelné funkční volání
1. Pokud je základnová stanice EP800 nainstalována za systémem PBX
(pobočková ústředna), je možné přeprogramovat některé funkční volání
podle funkčního kódu PBX do systému.
2. Lze přeprogramovat až 10 nejčastěji používaných kódů funkčního volání.
3. Zvolte název a zadejte kódy funkčního volání:
a. Když se sluchátko nachází v pohotovostním
režimu, stiskněte (pravé) softwarové tlačítko
NABÍDKA.
b.
Stiskněte „4“ a potom stisknutím „4“ přejděte do
režimu „Funkční volání“.
c.
Stisknutím (levého) softwarového tlačítka PŘIDAT
přidejte nový záznam funkčního volání.
d.
Zadejte název funkčního volání, například úpravu
záznamu v telefonním seznamu, například
„Přepojení na PBX“.
Potvrďte stisknutím (levého) softwarového tlačítka
ULOŽIT.
e.
Zadejte kód funkčního volání odpovídající funkce
PBX, například F*70.
Potvrďte stisknutím (levého) softwarového tlačítka
ULOŽIT.
Věc: „F“ označuje signál blikání.
f.
Na displeji LCD se zobrazí 1
odpovídající zadaný kód funkčního volání.
g.
Stisknutím (pravého) softwarového tlačítka VOLBA
odstraňte nebo upravte funkční volání, které jste
naprogramovali do systému.
h.
Zopakujte stejný postup při programování 2
dalších často používaných funkčních volání.
.
funkční volání a
.
a
4.
Použijte předprogramované funkční volání během volání.
a.
Když se sluchátko nachází v režimu hovoru,
stiskněte (pravé) softwarové tlačítko VOLBA.
b. Stiskněte odpovídající číslo funkčního volání, které
chcete provést, například stisknutím „0“ provedete
„Přepojení na PBX“.
1
Mo ost :
0.PBX Prepojit
#.Telefonn? seznam
11
Poznámky:
1. Toto funkční volání bude použitelné, pokud je základnová stanice
EP800 doplňkem systému PBX (pobočková ústředna),
2. pokud jste do systému nepředprogramovali žádné funkční volání,
pouze „#.Telefonní seznam“ v nabídce VOLBA.
3. Programovatelné funkční volání EP800 nemusí fungovat s některými
systémy PBX nebo systémy tlačítkových telefonů z důvodu odlišnosti
různých individuálních systémů.
ID volajícího
1. Chcete-li se přihlásit k odběru této funkce, obraťte se na místní telefonní
společnost. Telefonní systém přijímá a zobrazuje informace o ID volajícího
od místní telefonické společnosti. Tyto informace mohou obsahovat
volající telefonní číslo, jméno, datum a čas. Tento přístroj může uchovávat
informace o ID volajícího až pro 50 volání.
2. Na prvním řádku displeje se zobrazuje datum a čas volání, na druhém
řádku jméno a na třetím řádku telefonní číslo. U nepřečteného záznamu
bude na konci prvního řádku displeje uvedeno „NOVÝ“.
Při zobrazení záznamu volání lze číslo vytočit, uložit do telefonního seznamu
3.
nebo odstranit.
~45~
~46~
Page 55

Zobrazení protokolu volání
1.
Chcete-li zobrazit protokol volání, stisknutím
přejděte na Protokol volání.
Stisknutím tlačítka
nebo procházejte
Nastavení více základen
Nastavení „Více základen“ umožňuje rozšířit pokrytí nebo linkovou
kapacitu. Chcete-li přidat 2., 3. nebo 4. základnovou stanici pomocí jednoho
ze sluchátek zaregistrovaných k 1. základnové stanici (tzn. sluchátko s ID
11), postupujte podle následujících pokynů:
čísla a jména (jsou-li k dispozici).
Stiskněte pravé softwarové tlačítko NABÍDKA a potom
Po stisknutí pravého softwarového tlačítka VOLBA
2.
můžete stisknutím tlačítka
nebo uložit,
VOLBA:
ULO T
1.
stisknutím „7“ vstupte do režimu registrace.
odstranit nebo vymazat vše.
a. Uložení protokolu volání:
(1)
Po stisknutí pravého softwarového tlačítka
VYBRAT
VYBRAT se můžete pomocí tlačítka
nebo
posunout na jméno a stisknutím
tlačítka ODSTR jméno upravit.
Potom jméno uložte stisknutím levého
softwarového tlačítka ULOŽIT.
(2)
Pomocí tlačítka
nebo se posuňte
na číslo a stisknutím tlačítka ODSTR číslo
upravte.
Potom číslo uložte stisknutím levého
softwarového tlačítka ULOŽIT.
(3)
Po provedení výše uvedeného postupu je
protokol volání uložen do telefonního seznamu.
b. Odstranění protokolu volání:
(1) Stiskněte pravé softwarové tlačítko VYBRAT a
potom stisknutím levého softwarového tlačítka
ANO potvrďte odstranění.
c. Vymazat vše:
(1) Stiskněte pravé softwarové tlačítko VYBRAT a
Mo ost :
Vymazat v
potom stisknutím levého softwarového tlačítka
ANO potvrďte vymazání všech záznamů ID
VYBRAT
volajících.
Volání ID volajícího
1.
Stiskněte tlačítko
a pomocí tlačítka nebo se
posuňte na protokol volání.
2.
Když je zobrazeno ID volajícího, stisknutím
vytočte toto číslo.
ZPET
Stisknutím a podržením tlačítka STRÁNKA základnové
2.
stanice po dobu tří sekund vydá základnová stanice
zvukové upozornění (rovněž bliká indikátor LED
používání).
Stisknutím číslice „3“ sluchátka vstupte do nastavení
3.
Více základen.
Výběr BS # 1
4.
Zopakováním výše uvedených kroků 1 ~ 4 postupně
5.
přidejte 2., 3. nebo 4. základnovou stanici.
Věc: ID 1
stanice „20“, 3
základnové stanice „40“.
Poznámky:
1. V případě výchozího nastavení „Více základen“ musíte nejdříve
ZPET
vybrat BS #1 a potom vybrat 2., 3. nebo 4. základnu podle výše
uvedených pokynů.
2. Z důvodu mechanizmu synchronizace je před zahájením používání
více základen nutné znovu zaregistrovat všechna sluchátka, tzn. ID
výchozího sluchátka s 1x musí být zaregistrováno u BS1 a zbývající
sluchátka musí být zaregistrována u 2., 3. nebo 4. základnové
stanice.
3. Po provedení všech výše uvedených postupů je konfigurace „Více
základen“ dokončena.
.
základnové stanice je „10“, 2. základnové
.
základnové stanice „30“ a 4.
~47~
~48~
Page 56

Správce volání
Funkce „Správce volání“ nabízí dvě možnosti:
1. Umožňuje nastavit sluchátko pro příjem příchozích volání nebo
uskutečňování odchozích volání (je povolena 2cestná vnitřní komunikace,
vysílání a přepojení volání). Tuto možnost lze vybrat prostřednictvím
základnové stanice 1 až 4.
Věc: Pokud je funkce Více základen deaktivována, položka „Správce
volání“ bude skryta.
2. Umožňuje nastavit sluchátko pro automatický nebo ruční přístup k
dostupným databázím.
Pokyny pro 1. možnost (Přihlásit BS):
Stiskněte pravé softwarové tlačítko NABÍDKA a potom
1.
stisknutím 4 vstupte do režimu Nastavení volání.
Stisknutím „6“ vyberte Správce volání.
Věc: Položka „Správce volání“ je zobrazena a k výběru
2.
3.
4. Pokud nastavíte položku Přihlásit BS na ZAP., znamená to, že sluchátko
Pokyny pro 2. možnost (Výběr BS):
1.
pouze, pokud je aktivována funkce Více základen.
Stisknutím 1 nastavte Přihlásit BS.
Věc: Při vstupu do podnabídky Přihlásit BS se na
displeji LCD zobrazí dostupné základny, které
jsou již přihlášeny.
Stisknutím tlačítka
nebo vyberte požadovanou základnovou
stanici (#1 ~ 4) a stisknutím levého softwarového tlačítka ZMĚNIT
nastavte položku Přihlásit BS na ZAP./VYP.
může přistupovat k lince požadované základnové stanice a uskutečňovat
odchozí volání nebo přijímat příchozí volání prostřednictvím požadované
základnové stanice.
Naopak pokud nastavíte položku Přihlásit BS na VYP., sluchátko nemůže
přistupovat k lince požadované základnové stanice a nemůže uskutečňovat
odchozí volání ani přijímat příchozí volání prostřednictvím požadované
základnové stanice.
Stiskněte pravé softwarové tlačítko NABÍDKA a potom
stisknutím 4 vstupte do režimu Nastavení volání.
Stisknutím „6“ vyberte Správce volání.
Stisknutím „2“ nastavte Výběr BS.
2.
Věc: Výchozí nastavení je „VYP.“.
Stisknutím levého softwarového tlačítka ZMĚNIT nastavte položku
3.
Správce volání
2.BS základny
VYBRAT ZPĚT
Výběr BS na ZAP./VYP.
Věc: Pokud je položka Výběr BS nastavena na
„ZAP.“, stisknutím tlačítka
zobrazí dostupné základny (linky), tzn. 1, 2, 3, 4.
Stisknutím číslice „1“ můžete přistupovat k základně
1 pro získání linky.
se na displeji LCD
Poznámka:Pokud je k dispozici pouze jedna základna, nastavení
„Správce volání“ v části „Nastavení volání“ není k dispozici.
Vizuální indikátor čekající zprávy (VMWI)
Funkce VMWI je podporována pro zprávu FSK přijatou z telefonní linky;
aktivuje ikonu zprávy sluchátka a blikání indikátoru LED HLASOVÁ ZPRÁVA
základny.
Poznámky:
1. Je vyžadováno přihlášení k odběru služby hlasové zprávy telefonní společnosti.
2. Pokud se ikona zobrazuje na displeji sluchátka i po vyslechnutí všech zpráv,
vypněte ji stisknutím a podržením tlačítka „ID volajícího“ na sluchátku.
Nastavení zesílení mikrofonu sluchátka
Používáte-li sluchátko na různých pracovištích nebo v různém prostředí
můžete upravit zesílení mikrofonu sluchátka podle konkrétního místa pro
zajištění lepší kvality hlasu na opačném konci.
a. Když se sluchátko nachází v pohotovostním režimu, stiskněte
pravé softwarové tlačítko NABÍDKA.
b. Stiskněte „5“ (Nastavení telef.) a potom stisknutím „1“ vstupte do
nabídky „Zesílení mik.“.
c.
Pomocí tlačítka
„Standardní“, „Střední“ nebo „Nízký“.
Používáte-li sluchátko v tichém prostředí, například v kanceláři
d.
nebo v zasedací místnosti, doporučujeme úroveň „Standardní“.
nebo přejděte na možnost
~49~
~50~
Page 57

Používáte-li sluchátko v hlučném prostředí, například v továrně
nebo venku, doporučujeme úroveň „Střední“ nebo „Nízký“.
Úpravy vyzvánění sluchátka
Abyste při používání sluchátka nezmeškali volání z důvodu vyzvánění z
přijímače náhlavní sady, můžete nastavit vyzvánění buď z reproduktoru
sluchátka nebo z přijímače náhlavní sady.
a. Když se sluchátko nachází v pohotovostním režimu, stiskněte
pravé softwarové tlačítko NABÍDKA.
b. Stiskněte „5“ (Nastavení telef.) a potom stisknutím „9“ vstupte do
nabídky „Vyzvánění náhlavní sady“.
c. Výběrem „Zapnuto“ bude vyzvánět přijímač náhlavní sady;
výběrem „Vypnuto“ bude vyzvánět reproduktor sluchátka.
Elektron. chůva
Každé sluchátko lze nastavit jako „elektronickou chůvu“ pro sledování
pohybu dítěte nebo starší osoby.
Po aktivaci funkce elektronické chůvy přejde „elektronická
chůva“ automaticky do režimu sledování s 2cestnou vnitřní komunikací.
Například pokud nastavíte sluchátko A jako „elektronickou chůvu“ a zavoláte
v rámci vnitřní komunikace ze sluchátka B, sluchátko A přejde bez zazvonění
automaticky do režimu sledování; ve sluchátku B můžete rovněž slyšet
veškeré pohyby okolo sluchátka A.
a. Když se sluchátko nachází v pohotovostním režimu, stiskněte
pravé softwarové tlačítko NABÍDKA.
b. Stiskněte „4“ (Nastavení volání) a potom stisknutím „5“ přejděte do
režimu „Elektron. chůva“.
c. Stisknutím „ZMĚNIT“ vyberte ZAP. nebo VYP. (výchozí je VYP.).
Věc: Aby se zabránilo jakémukoli rušení během sledování, vyhrazené
sluchátko nebude přijímat žádná příchozí volání s výjimkou
vnitřní komunikace.
Používání nabídky
~51~
~52~
Page 58

1. Stisknutím pravého softwarového tlačítka NABÍDKA vstoupíte do režimu
v
V
nabídky, když se telefon nachází v pohotovostním režimu.
Věc: Chcete-li potvrdit vybranou nabídku, můžete stisknout
a potom stiskněte levé softwarové tlačítko VYBRAT. Nebo
potvrďte vybranou nabídku přímým stisknutím číslice. Například
chcete-li vybrat nabídku Hlas. vyzvánění, stiskněte pravé softwarové
tlačítko NABÍDKA a potom stiskněte 4 a 1 .
2. Stisknutím 1 vyberte Zámek tlačítek (viz Používání zámku tlačítek na straně 34 ).
3. Stisknutím 2 můžete přidat, odstranit, upravit, zobrazit a upravit telefonní
seznam (viz Pokyny pro používání telefonního seznamu na straně 39
4. Stisknutím 3 proveďte nastavení zvuku:
a.
b.
c.
d.
Stisknutím 1 vyberte položku Hlas. vyzvánění:
K dispozici jsou dvě možnosti hlasitosti vyzvánění: Linka (pro příchozí
volání) a Intercom (pro volání vnitřní komunikace). Proveďte nastavení
obou možností.
Při nastavování těchto možností použijte
možností 6: „Vypnuto“, „Nízký“, „Střední“, „Vysoký“, „Vibrace“ a „Vibrace a
ysoká“. Stisknutím levého softwarového tlačítka VYBRAT uložte výběr.
ýchozí = Střední.
Stisknutím 2 vyberte Tón vyzvánění:
K dispozici jsou dvě možnosti tónu vyzvánění: Linka (tón vyzvánění
pro příchozí volání) a Intercom (vyzvánění pro volání vnitřní
komunikace). Proveďte nastavení obou možností.
Pomocí
levého softwarového tlačítka VYBRAT uložte výběr. Výchozí
nastavení = 1.
Stisknutím 3 vyberte Hlas. tlačítek při stisknutí některého tlačítka:
Pomocí
Střední a Vysoký. Stisknutím levého softwarového tlačítka VYBRAT
uložte výběr. Výchozí = Střední.
Stisknutím 4 vyberte Tón tlačítek:
Pomocí
nebo procházejte 8 vyzvánění a stisknutím
nebo procházejte 4 možnosti: Vypnuto, Nízký,
nebo
procházejte 4 možnosti: 1, 2, 3 a 4
vvvv
nebo k procházení
nebo
).
Stisknutím levého softwarového tlačítka VYBRAT uložte výběr.Výchozí
nastavení = 1.
Stisknutím 4 proveďte Nastavení volání:
5.
a.
(1)
(2)
(3)
(4)
(5)
(6)
b.
c.
d.
e.
f.
g.
6.
Stisknutím 1 nastavte Směrové číslo:
Stisknutím
směrového čísla. Výchozí nastavení = Vypnuto.
Pokud je vybráno „Zapnuto“, sluchátko bude vyzváno k zadání
směrového čísla, lze zadat až 14 číslic.
Pomocí pravého softwarového tlačítka Odstranit upravte
směrové číslo.
Stisknutím levého softwarového tlačítka ULOŽIT potvrďte výběr.
Když je tato funkce zapnutá, na displeji LCD se uživateli
zobrazí dotaz „Směrové číslo? Ano nebo Ne“ při každém
odchozím telefonním volání z protokolů volání, telefonního
seznamu a vytočení-a-odeslání, rovněž bude zobrazeno
aktuální směrové číslo.
Věc: Číslo předvolby bude automaticky vloženo před
vytáčené číslo, pokud stisknete levé softwarové tlačítko ANO.
Tato funkce je vhodná pro volání na přístupový kód, na
telefonní kartu, na kreditní kartu atd.
Stisknutím 2 vyberte skupinu: viz Přihlášení sluchátka ke skupině
na stránce 37
Stisknutím 3 nastavte Blokování volání: viz Používání funkce
Blokování volání na stránce 42
Stisknutím 4 proveďte nastavení Funkční volání: viz Používání
funkce Funkční volání na stránce 45
Stisknutím 5 nastavte Elektron. chůva: viz Používání funkce
Elektron. chůva na stránce 51
Stisknutím 6 proveďte nastavení Správce volání: viz Používání
funkce Správce volání na stránce 49
Stisknutím 7 nastavte Směrový kód:
Nastavení směrového kódu umožňuje vytáčet volání v rámci místních
nebo regionálních směrových čísel bez zadání směrového čísla.
(1) Nastavení místního směrového čísla:
Stiskněte NABÍDKA-4-7-1 a nastavte LAC. Zadejte místní
směrové číslo (3 číslice) a potom potvrďte výběr stisknutím levého
softwarového tlačítka ULOŽIT.
(2) Nastavení směrového čísla země:
Stiskněte NABÍDKA-4-7-2 a nastavte směrové číslo země.
Zadejte směrové číslo (3 číslice) a potom potvrďte výběr
stisknutím levého softwarového tlačítka ULOŽIT.
Stisknutím 5 proveďte Nastavení telef.:
.
nebo zapněte nebo vypněte funkci
.
.
.
.
~53~
~54~
Page 59
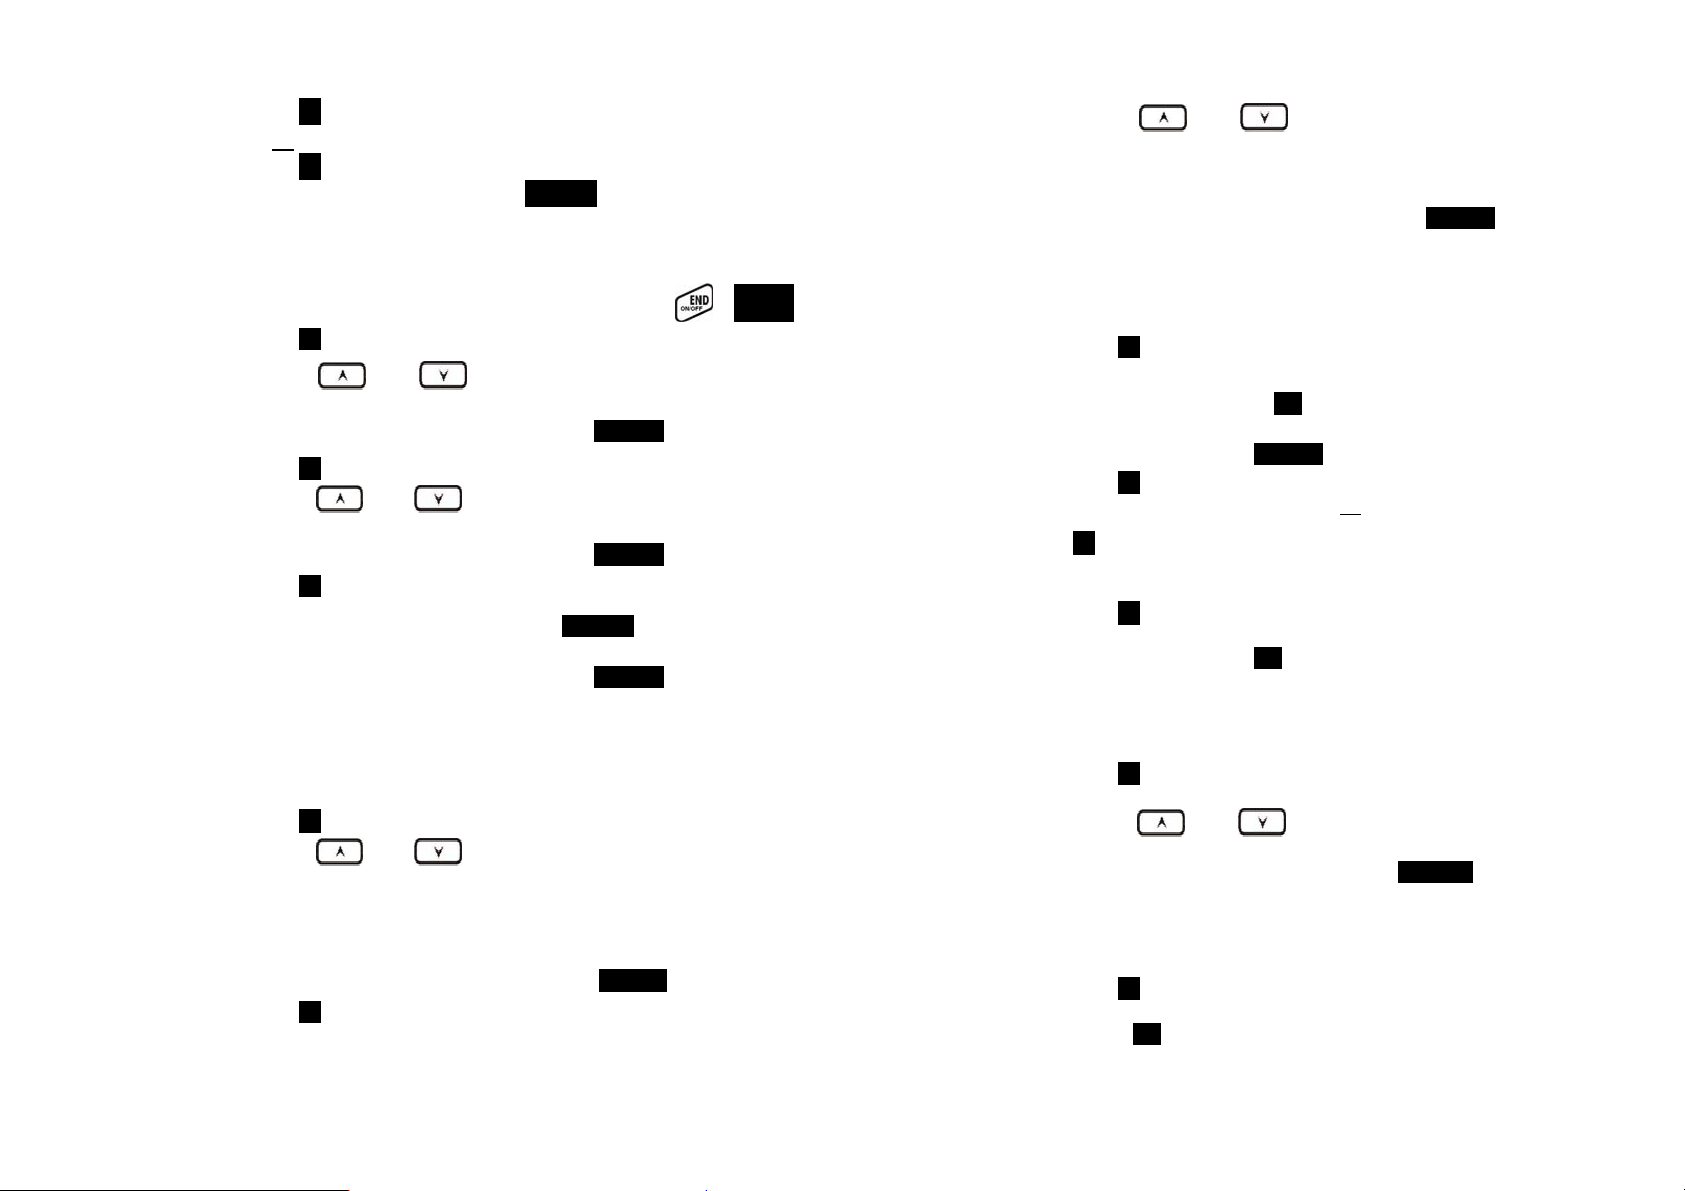
a. Stisknutím 1 nastavte Zesílení mik.: Viz Používání Zesílení mik. na
j
V
.
b.
stránce 50
Stisknutím 2 nastavte Volání lib tlač:
Pomocí levého softwarového tlačítka ZMĚNIT vyberte a potvrďte
možnost „Zapnuto“ nebo „Vypnuto“.
Výchozí nastavení je „Vypnuto“.
Věc: V případě nastavení „zapnuto“ můžete přijmout příchozí volání
stisknutím libovolného tlačítka (s výjimkou tlačítka a TICHO)
c.
(1)
(2)
d.
(1)
Stisknutím 3 nastavte Kontrast LCD:
Pomocí nebo procházejte možnosti 1 ~ 8. Výchozí
nastavení je 6.
Stisknutím levého softwarového tlačítka ULOŽIT potvrďte výběr.
Stisknutím 4 nastavte Podsvícení LCD:
Pomocí nebo procházejte možnosti 1 ~ 3 (1. 8
sekund 2. Zapnuto 3. Vypnuto). Výchozí nastavení je „8 sekund“.
(2)
e.
(1)
Stisknutím levého softwarového tlačítka ULOŽIT potvrďte výběr.
Stisknutím 5 nastavte Značka jména:
Pomocí levého softwarového tlačítka ZMĚNIT vyberte a potvrďte
možnost „Zapnuto“ nebo „Vypnuto“. Výchozí nastavení je „Vypnuto“.
(2)
Stisknutím levého softwarového tlačítka ULOŽIT potvrďte výběr.
V případě nastavení „Zapnuto“ sluchátko porovnává ID
Věc:
volajícího s položkami telefonního seznamu; po vyhledání
shody se na displeji LCD zobrazí jméno nebo přezdívka místo
čistých informací o ID volajícího (vyžaduje službu Čekání
hovorů s ID volajícího od místní telefonní společnosti)
f.
(1)
Stisknutím 6 nastavte Jazyk:
Pomocí nebo procházejte možnosti 1 ~ 10 (1.
Angličtina 2. Španělština 3. Francouzština 4. Italština 5.
Němčina 6. Holandština 7. Polština 8. Čeština 9. Maďarština 10.
Rumunština).
(2)
g.
Stisknutím 7 nastavte Vlastní jméno:
(1)
Výchozí nastavení je „Angličtina“.
Stisknutím (levého) softwarového tlačítka ULOŽIT potvrďte výběr.
Zadejte znaky pomocí Tabulky znaků a metody popsané v části
Telefonní seznam.
(2)
Tlačítka
nebo použijte k posouvání kurzoru pro
vložení dozadu nebo dopředu (nalevo od kurzoru) nebo
odstranění (znak nad kurzorem nebo nalevo od kurzoru, pokud
se kurzor nachází napravo od posledního znaku).
(3)
Stisknutím (levého) softwarového tlačítka ULOŽIT potvrďte
nastavení.
Věc: Po zadání vlastního jména se v pohotovostním režimu zobrazí
na displeji LCD pozdrav.
Výchozí pozdrav je „EP800“.
h.
(1)
Stisknutím 8 změňte heslo:
Zadejte původní heslo (4 číslice) sluchátka a potom stiskněte
levé softwarové tlačítko OK při vstupu do této nabídky.
(2)
Zadejte nové heslo (4 číslice) a potom stisknutím levého
softwarového tlačítka ULOŽIT potvrďte nové heslo.
i.
Stisknutím 9 nastavte Vyzvánění náhlavní sady: Viz Používání
Vyzvánění náhlavní sady na stránce 51
.
7. Stisknutím 6 proveďte Nastavení zákl.:
Před vstupem do této nabídky je nezbytné zadat kód PIN základny (4 číslice).
Věc: Kód PIN je pro Nastavení zákl. Výchozí kód je „0000“.
a.
(1)
Stisknutím 1 nastavte Doba trvání DTMF.
Zadejte dobu trvání DTMF (90 ~ 200 ms) a stisknutím levého
softwarového tlačítka OK potvrďte nastavení. Výchozí nastavení
e 100 ms.
Věc: Před změnou tohoto nastavení se poraďte s prodejcem. Pokud se
doba trvání neshoduje s nastavením veřejné telefonní sítě (PSTN) nebo
pobočkové ústředny (PBX), tato funkce nemusí fungovat správně.
b.
Stisknutím 2 vyberte interval blikání tlačítka. Výchozí nastavení je
600 ms.
(1)
(2)
Pomocí nebo procházejte možnosti 1 ~ 9 (100 ~
900 ms). Nebo stiskněte přímo tlačítko s číslicí (1 ~ 9).
Stisknutím levého softwarového tlačítka VYBRAT potvrďte výběr.
ěc: Výchozí hodnota (600 ms) funguje ve většině oblastí. Změna
tohoto nastavení může způsobit, že blikající tlačítko nefunguje.
Toto nastavení změňte pouze, pokud si jste jisti, že nová
hodnota bude fungovat.
c.
(1)
Stisknutím 3 proveďte nastavení Přiřad další HS
Zadejte 2číselné ID sluchátka a potom stiskněte levé softwarové
tlačítko OK.
(2)
Při registraci nového sluchátka přiřadí základnová stanice
specifické ID sluchátka, které je předem přiřazeno novému
~55~
~56~
Page 60

sluchátku.
y
d.
(1)
Stisknutím 4 proveďte nastavení Vymazat HS
Zadejte 2číselné ID sluchátka a potom stiskněte levé softwarové
tlačítko OK.
(2)
e.
(1)
Základna vymaže ID sluchátka ze systému.
Stisknutím 5 změňte kód PIN:
Zadejte nový kód PIN základny a potom stiskněte levé
softwarové tlačítko OK.
Věc: Výchozí kód PIN základny je „0000“.
f.
(1)
Stisknutím 6 nastavte Autom. zavěsit:
Pomocí levého softwarového tlačítka ZMĚNIT vyberte a
potvrďte zapnutí nebo v
pnutí. Čtečka
Věc: Při nastavení „zapnuto“ přístroj EP800 automaticky zavěsí,
pokud již zavěsil volající na druhém konci. Nicméně tato funkce
závisí na tom, zda PBX nebo PSTN po zavěšení volání odesílá
signál „oznamovacího tónu nebo obsazovacího tónu“.
g.
Stisknutím 7 proveďte nastavení Nastavit čas pro podporu ID
volajícího DTMF:
(1)
Pomocí levého softwarového tlačítka ULOŽIT vyberte a potvrďte
nastavení datumu a času (viz Používání funkce Nastavit čas na
Stisknutím 7 proveďte nebo zrušte registraci sluchátka a nastavení Více
8.
základen: Viz Používání registrace sluchátka na stránce 36
Více základen na stránce 48
Stisknutím 8 nastavte Zobrazení nab.:
9.
Aby se zabránilo chybnému nastavení nabídek Nastavení volání
(NABÍDKA-4), Nastavení telef. (NABÍDKA-5) a Nastavení zákl. (NABÍDKA-
stránce 20).
a Nastavení
.
6), můžete tyto nabídky skrýt tak, aby ostatní uživatelé neměli možnost
provádět chybná nastavení těchto nabídek.
Věc: Před vstupem do nabídky Zobrazení nab. je třeba zadat heslo.
a.
Stisknutím 1 nastavte skrytí/zobrazení nabídky Nastavení volání.
(1)
Pomocí levého softwarového tlačítka ZMĚNIT vyberte a
potvrďte zapnutí nebo vypnutí.
Stisknutím 2 nastavte skrytí/zobrazení nabídky Nastavení telef.
b.
(1)
Pomocí levého softwarového tlačítka ZMĚNIT vyberte a
potvrďte zapnutí nebo vypnutí.
c.
Stisknutím 3 nastavte skrytí/zobrazení nabídky Nastavení zákl.
(1)
Pomocí levého softwarového tlačítka ZMĚNIT vyberte a
potvrďte zapnutí nebo vypnutí.
d.
Stisknutím 4 nastavte skrytí/zobrazení nabídky nastavení Více
základen.
(1)
Věc: Výběrem „Zapnuto“ bude nabídka zobrazena na displeji. Výběrem
Pomocí levého softwarového tlačítka ZMĚNIT vyberte a
potvrďte zapnutí nebo vypnutí.
„Vypnuto“ bude nabídka skrytá.
~57~
~58~
Page 61

Rejstřík
2
2cestná vnitřní komunikace, 14, 29
B
Baterie5, 7, 10, 24, 26, 27, 35
Bezpečnostní pokyny - bateries, 7
Bezpečnostní pokyny, 4
Blikání, 14, 19, 36, 45, 48, 50, 56
Blokování odchozího volání, 43
Blokování příchozího volání, 43
Blokování volání, 16, 18, 42, 43, 54
Č
Časovač volání, 17
Čekání volání se službou ID volajícího, 15, 55
Čekání volání, 14, 15
D
DND, 15
Doba trvání DTMF, 18, 56
F
Funkce nabíječky, 24
Funkce sluchátka, 13, 15
Funkce základnové stanice, 22
Funkční volání, 17, 45, 54
H
Hlasitost tlačítek, 53
Hlasitost vyzvánění, 14, 15
Hlasitý telefon, 14, 30, 31, 33, 48
Hovor/blikání, 14
I
ID skupiny, 15, 30, 38, 42
ID sluchátka, 13, 15, 17, 19, 22, 27, 30, 31, 32, 36, 38, 39, 42, 48, 56
ID volajícího, 15, 20, 31, 32, 46, 47, 50, 55, 56
ID základny, 48
Instalace sluchátka a naječky, 26
Instalace základnové stanice, 25
K
Kardiostimulátor, 4
Kód PIN základny, 18, 19, 20
Kontrolní seznam zařízení, 10
L
Linková zásuvka, 22
Lithium-Ionová technologie (Li-Ion), 7, 10
N
Nabíjení a výměna baterie, 35
Náhradní baterie, 10
Naslouchadla, 4
Nastavení času, 20
Nastavení hlasitosti přijímače (náhlavní sady), 33
Nastavení hlasitosti reproduktoru sluchátka, 33
Nastavení skupiny, 18, 37
Nastavení telefonu, 18, 20, 50, 51, 54, 57
Nastavení více základen, 18, 48, 57
Nastavení volání, 16, 18, 20, 37, 49, 50, 51, 54, 57
Nastavení vyzvánění sluchátka, 51
Nastavení zesílení mikrofonu sluchátka, 50
Nerušit (tiché vyzvánění), 15, 34
O
Obecné bezpečnostní pokyny, 4
Obrázek nabíječky, 23
Obrázek základny, 21
Opakovaná volba, 16, 31
P
Paměť, 27
Používání základny, 27
Přepojení volání, 33, 37
Přidržení volání, 17
Přidržení volání, 33
Přihlášení BS, 49
Přihlášení sluchátka ke skupině, 37, 54
Příjem telefonního volání, 31
Příjem volání vnitřní komunikace, 32
Probíhající volání, 13
Programovatelné blikání, 19
Programovatelné funkční volání, 17, 45, 46
Protokol volání, 16, 17, 46, 47
~59~
~60~
Page 62

R
REG, 22, 37, 48
Reggistrace sluchátka, 36, 57
Registrace více sluchátek, 15
Registrační režim, 22, 27, 36, 48
Registrační tlačítko, 22
Regulatorní informace, 8
Rejstřík dvojčíselných adres, 13
REN, 8
Resetovací tlačítko, 22
Reverzování linky, 56
Režim hovoru, 14, 27, 46
Režim nabídky, 27, 53
Režim NEČINNOST, 17, 27, 35
RSSI, 13
Rychlé vytáčení, 29
S
Síla baterie, 13
Směrový kód, 19, 54
Správce volání, 49, 50, 54
Š
Štěrbina pro nabíjení sluchátka, 24
T
Technické údaje, 62
Telefonní seznam, 14, 16, 17, 39, 45, 46, 47, 53, 55
TICHO, 15, 32, 34
Tísňové volání, 4
Tón DTMF, 18
Tón tlačítek, 17, 53
Transformátor, 25, 26
U
Uskutečnění 2cestného volání/ volání vnitřní komunikace, 29
Uskutečnění telefonního volání, 29
V
Venkovní anténa, 10, 22
Vibrátor, 15
Vizuální indikátor čekající zprávy, 50
Volání mezi sluchátky, 30
Výběr BS, 49
Výběr skupiny, 37, 54
Výpadek napájení, 5, 9, 25, 26
Vysílání konkrétnímu sluchátku, 31
Vysílání skupině sluchátek, 30
Vysílání všem sluchátkům, 30
Vysílání, 14, 16, 18, 31, 44, 49
Vysílání, 30
Výstražná zpráva, 24
Vyzvánění, 14, 15, 20, 31, 32, 34, 51, 53
Z
Základnová stanice, 5, 6, 9, 10, 14, 15, 20, 22, 25, 26, 27, 28, 30, 36, 43
Zámek tlačítek, 34, 53
Zásady bezpešného používání produktu, 5
Zásah elektrickým proudem, 4, 5, 6
Změna PIN, 18, 19, 56
Značkování jmen, 15, 55
Zobrazení nabídky, 18, 57
Zobrazení protokolu volání, 46
Zrušení registrace, 36
Ztlumit, 17, 33
~61~
~62~
Page 63

Technické údaje
Údaje o napájení Základnová stanice Přenosné sluchátko
Frekvence 863 - 865 MHz 863 - 865 MHz
Výstupní výkon RF
Odstup kanálů 50 kHz 50 kHz
Počet kanálů 38 38
Modulace GMSK GMSK
TDD Délka rámce 10 ms 10 ms
Počet drážek/rámec 2 2
Citlivost přijímače
Zesílení antény 2 dBi
Konektor antény TNC Vlastní
Rozhraní telefonu RJ11 x 2 Není k dispozici
Kódování kanálů
Rychlost přenášení dat 42,667 kb/s 42,667 kb/s
Kódování hlasu 8 kb/s G.729A 8 kb/s G.729A
Rychlost uživatelských
dat
Duplex Časový duplex (TDD) Časový duplex (TDD)
Vícenásobný přístup FDMA FDMA
Počet ID systému 65,536 65,536
Signál vyzvánění 20 - 50 Hz, 12 - 90 Vrms NA
Interval blikání
Zdroj napájení Adaptér AC/DC 12V/1A
Proud nabíječky
Délka nabíjení NA 3 hodiny
Regulatorní shoda
Provozní teplota 0 – 50 °C -10 – 60 °C
Nabíjení teplota NA 0 – 40 °C
Poznámky:
1. NA = Není k dispozici.
2. Výrobce si vyhrazuje právo na změny konstrukce a technických údajů bez
předchozího upozornění.
Špička: 8 dBm Špička: 7 dBm
Průměr: 5 dBm Průměr: 5 dBm
<-116dBm (@ BER 10
½rychlostní konvoluční +
CRC
32 kb/s duplexní 32 kb/s duplexní
100 - 900 ms
programovatelný
NA
EN 301 357-2 (RF) EN 301 357-2 (RF)
EN 301 489 (EMC) EN 301 489 (EMC)
EN 60950 (Bezpečnost) EN 60950 (Bezpečnost)
EN 50371 (Bezpečnost RF)
-2
) <-116dBm (@ BER 10-2)
Dlouhá: 2.5 dBi
Krátká: 1,5 dBi
½rychlostní konvoluční +
CRC
NA
Baterie Li-Ion 3,7 V/1100
mAh
550 mA
(550/850 mA pro stolní
nabíječku)
~63~
Page 64

Gebruikershandleiding
(Nederlands)
EP800
Digitale draadloze telefoon voor grote
afstanden
EnGenius Customer Service
Singapore: 65-62271088, http://www.engeniustech.com.sg/
Inhoudsopgave
Veiligheidsrichtlijnen ................................................................ 4
Algemene veiligheidsinformatie ............................................ 4
Veiligheidsinstructies ............................................................ 5
Veiligheidsinstructies batterij ................................................ 7
Informatie over voorschriften ................................................... 8
Controlelijst apparatuur .......................................................... 10
Afbeelding handset ................. .. .. .......................... .. ... .. .. ........ 11
Functies van handset ............................................................. 13
Basisfuncties van handset ................................................. 13
Extra opties van het handtoestel ....................... .. ... .. .. .. .. ... . 15
Illustratie basisstation ............................................................ 21
Basisfuncties ......................................................................... 22
Basisfuncties van het basisstation ..................................... 22
Illustratie lader ....................................................................... 23
Functies lader ........................................................................ 24
Aan de slag ............................................................................ 25
Installatie basisstation ........................................................ 25
Installatie handtoestel en lader........................................... 26
Basisbewerkingen .................................................................. 27
Gebruikersmode ................................................................. 27
A. Gebruikersmode basisstation ..................................... 27
B Gebruikersmode handtoestel ...................................... 27
Een telefoongesprek voeren . .. .. .. ... .. .. .. .. ... ......................... 29
Tweerichting/intercom-gesprek .......................................... 29
Een bericht uitzenden ..................................... .. ... .. .. .. .. .. ... . 30
A. Van handtoestel naar handtoestel .............................. 30
Opnieuw kiezen .................................................................. 31
Een telefoongesprek ontvangen ......................................... 31
Een intercomgesprek ontvangen ........................................ 32
Een gesprek beëindigen ................................... .. ............... 32
Het spraakvolume van het handtoestel (oorstuk) instellen . 33
Het stemvolume van de Telefoonluidspreker instellen ....... 33
Een gesprek in de wachtstand plaatsen ....................... .. .. .. 33
Dempen ............................................................................. 34
~2~
Page 65

Niet storen (Stil bellen) ....................................................... 34
Toetsvergrendeling ............................................................ 34
Batterij opladen en vervangen ........................ .. .. ... .. .. .. .. ... . 35
Geavanceerde bewerkingen .................................................. 36
Registratie handtoestel ...................................................... 36
Groepsabonnement voor handtoestel ................................ 37
Gesprek doorschakelen ............ ... .. .......................... .. .. .. .. .. 38
Activiteiten met het telefoonboek ....................................... 39
Gesprek blokkeren ................ .. .. ... .. .. .. .. .. ... .. .. .. .. .. ... .. .. .. .. .. .. 42
Programmeerbare functieoproep ....................................... 45
Nummerweergave .............................................................. 46
Instellingen voor meerdere basisstations .. .. .. .. .. ... .. .. .......... 48
Gesprekbeheerder ............................................................. 49
Visuele indicator Bericht wacht (VMWI) .......... .. .. ... .. .. .. .. .. .. 50
Microfoonsterkte van handtoestel instellen ........................ 50
Beltoon van headset instellen ....................... .. .. ... .. .. .......... 51
Babymonitor ....................................................................... 51
Index ...................................................................................... 58
Technische specificaties ........................................................ 62
Veiligheidsrichtlijnen
Let op: Uw draadloze telefoon geeft u de vrijheid en flexibiliteit om in
contact te blijven terwijl u in beweging bent. Bij het gebruik van uw
telefoon dient u echter wel de veiligheidsvoorschriften te volgen om
gevaar van brand, elektrische schokken, persoonlijk letsel en schade aan
eigendommen te vermijden.
Algemene veiligheidsinformatie
1. Zorg bij het gebruik van uw draadloze telefoon voor uw veiligheid en die
van anderen:
a. Kijk altijd goed waar u loopt en staat.
b. Laat een telefoongesprek u niet afleiden van de werkveiligheid.
2. In een noodgeval:
a. Bij het optreden van noodgevallen moet u het alarmnummer bellen.
Bedenk wel: Als u ergens bent waar de telefoon geen duidelijk
signaal ontvangt van het basisstation, is de kans heel groot dat het
gesprek niet doorkomt. Zoek de dichtstbijzijnde vaste telefoon of
een ander communicatie-apparaat om hulp op te roepen.
b. Alarmoproepen geven het dienstdoend personeel niet automatisch
uw naam, telefoonnummer of locatie door.
3. Opmerking voor gebruikers met een gehoorapparaat: Dit
telefoonsysteem is compatible met inductief gekoppelde hoorapparaten.
4. Opmerking voor gebruikers van een pacemaker: Interferentie met de
geïmplanteerde pacemaker kan plaatsvinden bij gebruik op zeer korte
afstand, maar draadloze telefoons “lijken geen significant probleem te
vormen voor dragers van een pacemaker.” Totdat hier meer over
bekend is, wordt mensen met een pacemaker aangeraden om
voorzorgsmaatregelen te nemen bij het gebruik of vervoer van een
draadloze telefoon om er voor te zorgen dat er voldoende afstand is
tussen de telefoon en de pacemaker. Draag het toestel niet in een
borstzak. Schakel de telefoon onmiddellijk UIT als u vermoedt dat er
sprake is van storing.
~3~
~4~
Page 66

Veiligheidsinstructies
1. Lees en begrijp alle instructies voordat u aan de slag gaat met het
product.
2. Volg alle waarschuwingen en instructies op die op het product zijn
gemarkeerd.
3. Wijzigingen of aanpassingen aan dit toestel die niet uitdrukkelijk zijn
goedgekeurd door de fabrikant, maken de garantie ongeldig evenals de
CE-goedkeuring voor het gebruik van de apparatuur. Gebruik alleen
door de fabrikant geleverde accessoires.
4. Dit apparaat niet in de buurt van water gebruiken. Mors nooit
vloeistoffen op het toestel.
5. Trek de stekker uit het stopcontact voordat u het toestel reinigt. Gebruik
geen vloeibare reinigingsproducten of spuitbussen. Gebruik een
vochtige doek om het toestel te reinigen.
6. Plaats dit apparaat niet op een onstabiel karretje, steun of tafel. Het
apparaat kan vallen en persoonlijk letsel of schade aan het toestel of aan
andere eigendommen veroorzaken.
7. Stroomstoring: in het geval van een stroo mstoring za l de lader de batteri j van
het toestel niet herladen, en via het basisstation kunt u niet zelf bellen of een
binnenkomend gesprek beantwoorden. Zowel de lader als het basisstation
hebben elektriciteit nodig om hun werk te kunnen doen. Houd voor het geval
van stroomstoring een telefoon onder handbereik die zonder elektriciteit kan
werken, of zorg voor een tijdelijke stroomvoorziening als back-up.
8. Sleuven en openingen in de behuizing v an het appa raat zijn voor vent ilatie
bedoeld. Deze openingen mogen niet worden geblokkeerd of afgedekt. Door
het apparaat op een bed, vaste vloerbedekking of een soortgelijke ondergrond
te plaatsen, kunnen deze ope ningen geblo kkeerd raken. Dit apparaat m ag
nooit bij of boven een radiator of een verwarmingsapparaat worden geplaatst
of in een installatie worden ingebouwd, tenzij vo ldoende ventilatie is vo orzien.
9. Duw nooit objecten in dit apparaat door de sleuven van de behuizing
aangezien deze objecten gevaarlijke voltagepunten kunnen raken of een
kortsluiting kunnen veroorzaken in de onderdelen. Dit kan vuur of
elektrische schokken veroorzaken.
10. Dit apparaat moet alleen worden gebruikt met het type voeding dat op het
markeerlabel is aangegeve n. Als u niet zeke r bent van het stroo mtype in uw huis,
kunt u contact opnemen met uw leverancier of uw lokale elektriciteitsmaatschappij.
11. Overbelast stopcontacten en verlengsnoeren niet, omdat dit brand of
elektrische schokken kan veroorzaken.
12. De behuizing niet uit elkaar halen, om elektrische schokken te vermijden. Stuur
dit apparaat naar een geautoriseerd service centrum als onderhoud of
herstelwerkzaamheden vereist zijn. Bel d e klantendienst voor locaties bij u in de
buurt. Het openen of verwijderen van deksels kan u blootstellen aan gevaarlijke
spanningen of andere risico’s. Onjuiste hermontage van het apparaat kan bij
het daarop volgende gebruik elektrische sc hokken veroorzaken.
13. Gebruik het toestel niet tijdens een storm. Er kan een risico bestaan op
elektrische schokken door bliksem.
14. Plaats het apparaat niet op een plek waar iemand er op kan stappen, er
over struikelen, of er op vallen.
15. Plaats geen geleidende voorwerpen op of in de buurt van de antenne.
16. Gebruik het apparaat niet in de buurt van een gaslek wanneer u dit lek
meldt.
17. Plaats het basisstation of de lader van de handset niet in de buurt van
een magnetron, tv-toestel, luidsprekers of andere elektrische apparatuur.
Deze kunnen interferentie in het product veroorzaken of daarvan
ontvangen.
18. Haal de stekker van het basisstation of de lader uit het stopcontact en
neem contact op met een geautoriseerd service centrum onder de
volgende omstandigheden:
a. Als vloeistof in het apparaat is gemorst.
b. Als het (net)snoer of de stekker beschadigd is.
c. Als het apparaat is blootgesteld aan regen of water.
d. Als het apparaat niet normaal werkt bij het volgen van de handleiding.
e. Als het apparaat is gevallen of als de behuizing beschadigd is
f. Als het apparaat duidelijk anders presteert.
~5~
~6~
Page 67

Veiligheidsinstructies batterij
1. Gebruik alleen door de fabrikant goedgekeurde herlaadbare Li-on
batterijen en laders. Gebruik geen andere soorten herlaadbare batterijen
of niet-herlaadbare batterijen. De batterijen kunnen kortsluiten en het
batterijvak kan beschadigen wat een gevaarlijke situatie oplevert.
2. Volg de laadaanwijzingen in deze handleiding en op de instructielabels
en markeringen in de handset en de laadvakken.
3. De batterij moet niet worden opgeladenop een plek waar de temperatuur
lager is dan 0℃ of hoger dan 40℃
4. De batterij moet op een juiste wijze worden gerecycleerd of af gevoerd.
De batterij niet in het vuur gooien. De cellen kunnen ontploffen.
5. Gooi de batterij NIET bij het huishoudelijk afval. Neem contact op met
de gemeente voor instructies voor afvalverwerking.
6. Wees voorzichtig met het gebruik van de batterijen om te voorkomen dat
u ze kort sluit met geleidende materialen zoals ringen, armbanden,
sleutels, zakmes of munten. De batterij of geleidend materiaal kan
oververhitten en brandwonden of brand veroorzaken.
7. Stel batterijen niet bloot aan regen of water.
8. Open of beschadig de batterij niet. Vrijkomende elektrolyt is corros ief en
kan letsel aan huid of ogen veroorzaken. Elektrolyt is giftig, dus niet
inslikken.
9. Tijdens het laden wordt de batterij warm. Dit is normaal en wijst niet op
een defect.
Informatie over voorschriften
EP800
Dit apparaat voldoet aan CE-regels. Voor de bediening gelden de volgende
twee voorwaarden:
1) Dit apparaat mag geen schadelijke storingen veroorzaken.
2) Dit apparaat moet elke ontvangen storing aanvaarden, met inbegrip
van storing die ongewenste werking kan veroorzaken.
1. Dit telefoonsysteem voldoet aan de regels van EN 301 357-2 (RF)、EN 301 489
(EMC)、EN 60950 (Veiligheid) en EN 50371 (RF-veiligheid).
2. De REN is bruikbaar voor het bepalen van het aantal toestelle n dat u me t uw
telefoonlijn kunt verbinden waarbij toch de bel v an alle toestelle n overgaat als iemand
uw nummer belt. In de meeste , maar niet all e, ge bieden mag d e to tale R EN van alle
apparaten die op een lijn worden aangesloten , niet gro ter zi jn dan 5. Als u zek er wilt
zijn van het aantal toestellen dat u op uw telefoonlijn kunt aansluiten, moet u contact
opnemen met uw telefoonmaatschappij voor de maximale REN in uw gebied.
3. Als de telefoonapparatuur problemen oplevert voor het telefoonnetwerk, kan de
telefoonmaatschappij u verzoeken om uw telefoonsysteem los te koppelen van
de lijn tot het probleem is opgelost. Neem in dat geval contact op met uw
plaatselijke telefoonmaatschappij voor uw rechten.
4. Uw telefoonmaatschappij kan wijzigingen aanbrengen in de faciliteiten,
apparatuur, werking of procedures die de juiste werking van uw telefoonsysteem
kunnen beïnvloeden. Neem in dat geval contact op met uw plaatselijke
telefoonmaatschappij voor uw rechten.
5. Dit telefoonsysteem mag niet worden gebruikt voor een muntendienst die door
de telefoonmaatschappij wordt geboden. Verbinding met party-lijnen is
onderhavig aan landelijke tarieven.
6. Dit telefoonsysteem is getest e n voldoet aan de reg els van EN 301 3 57-2 (R F) 、EN
301 489 (EMC)、EN 60950 (Veiligheid) en EN 50371 (RF-veiligheid). Deze
beperkingen zijn bedoeld om te voorzien in redelijkerwi js ade quate besch erming
tegen schadelijke storing bij een installatie in een niet-commerciële omgeving .
Gebruik van deze apparaten kan nog steeds la st hebben van interfe rentie van of met
nabije tv’s, dvd spelers, radio’s, computers of andere elektronische appara ten. Om
een dergelijke interferentie te minimaliseren of voorko men, mo et het telefoon sy steem
niet in de buurt van andere elektronische sy stemen worden ge plaatst of gebrui kt.
~7~
~8~
Page 68

7. Er kan echter geen garantie worden gegeven dat er in een bepaalde installatie geen
storing zal optreden. Als dit telefoonsysteem schadelijke interferentie veroorzaakt aan
andere elektronische apparatuur, wat kan worden bepaald door het systeem uit en aan
te zetten, raden wij de gebruiker aan om de interferentie te corrigeren met een van de
volgende maatregelen:
a. We adviseren ten minste 7 meter tussen het systeem en andere
elektronische apparaten.
b. Sluit het basisstation aan op een stopcontact op een andere kring dan die
gebruikt wordt door de apparatuur welke last van interferentie heeft.
Raadpleeg de leverancier of een ervaren elektronische technicus voor hulp.
Controlelijst apparatuur
1. De verpakking voor basisstation en handset bevat de volgende
onderdelen:
a. Basiss ta tion x 1 (ant enne g eïns t alle er d)
b. Voedingsadapter x 1
c. Handset x 1 (antenne geïnstalleerd)
d. Handset antenne x 1 (Lang ×1)
e. Laadapparaat x 1
f. Lader voedingsadapter x 1
g. 1700 mA Li-ion batterijpak x 1
h. Telefoonsnoer x 1
i. CD (gebruikershandleiding), snelgids
3. Optioneel accessoire
a. Kit voor buitenantenne (inclusief antenne en snoer)
b. Beschermingskit tegen blikseminslag
c. Hoogvermogen-antenne voor handset
d. Koptelefoon
e. Antennesplitser
~9~
~10~
Page 69

Afbeelding handset
A
A
j
A
Ontvanger
Omhoog/
omlaag
ntenne
ntenne
Clip
Display
Schermtoets
Uitzenden
Microfoon
Schermtoets
Einde/uitschakelenSpreken/Flitser
Intercom
Kiestoets
vakdeksel
Batteri
Oplaadcontact Oplaadcontact
ansluiting
oortelefoon
Gelijkstroomaansluiting
~11~
~12~
Page 70

Functies van handset
f
Basisfuncties van handset
1. 4-regelig LCD (Liquid Crystal Display)
a. Het LCD-scherm gebruikt LED-verlichting.
De eerste regel van de LCD bestaat uit pictogrammen.
b.
c.
Uitleg pictogrammen van links naar rechts
(1)
(2)
(3)
(4) Geluid en indicatie
(5) PA uitschakelen
(6)
(7)
d. De tweede en derde regels van de LCD, maximaal 16 tekens elk,
e De laatste regel geeft de linker en rechter sneltoetsen weer.
RSSI-niveau (indicator sterkte ontvangen signa al)
Tijdens een gesprek geeft het aantal balken de
sterkte van het ontvangen radiosignaal aan.
Verbindingsmodus
(2.1) Gesprek actief (Op/van haak)
Het nummer aan de rechterkant van het
telefoonsymbool geeft aan welke lijn van het
basisstation actief is als Multi-Base is
ingeschakeld.
(2.2) Intercom actie
Geeft aan of de intercommodus is ingeschakeld
Geeft het ID van de handset aan waarmee de intercom gebruikt wordt.
Spraakmodus
(3.1) Indicator luidspreker
Geeft aan of de luidspreker actief is
(3.2) Hoofdtelefoonmodus
(4.1) Bel inschakelen
(4.2) Bel uitschakelen
(4.3) Bel- en trilmodus
(4.4) Trilmodus
(4.5) Indicator Bericht wacht
Geeft aan of de binnenkomende uitzending is uitgeschakeld.
Tweecijferige ID voor handset
Toont de tweecijferige ID van de eigen handset.
11
Batterijniveau
Het aantal strepen komt overeen met de resterende batterijtijd.
tonen status, bericht, menukeuzes, of door de gebruiker te bewerken
alfanumerieke tekens.
~13~
2. Belsignaal
a. Belt bij een binnenk om e nd telef oo ng es pr ek en intercomoproep.
b. Verschillende waarschuwingsgeluiden geven verschillende
gebeurtenissen aan:
(1) Enkele toon: geslaagde toetsinvoer.
(2) Dubbele toon: voeding aan/uit.
(3) Drievoudige toon: bewerking mislukt.
(4) Herhaalde 1 lange 2 korte tonen (elke 1 minuut): waarschuwing batterij
bijna leeg
Re: Geen geluid bij ongeldige toetsinvoer
3.
SPREKEN/FLITSER (
a. Start of beantwoordt een telefoon- of intercomgesprek
b. Stuurt een flitssignaal naar de telefoonlijn om een kiestoon op te halen
na afloop van het gesprek, of om de functie gesprek in wachtstand uit te
4.
Druk op de toets om de telefoonluidspreker tijdens inkomende,
5.
a. Plaatst een intercomoproep naar een andere handset, een groep
b. Intercomgesprekken zijn digitaal, volledig in twee richtingen, en
6.
a. Eenrichting-uitzending naar handsets voor een rechtstreekse melding
b. Eenrichting-uitzending naar basisstations
7.
a. Maak een menukeuze.
8.
a. Blader door records en menukeuzes.
b. Pas het spraakvolume van de ontvanger aan in de gespreksmodus.
c.
voeren die telefoonmaatschappijen tijdens een gesprek aanbieden.
TELEFOONLUIDSPREKER (
uitgaande of intercom-gesprekken in of uit te schakelen.
2-WEG INTERCOM (
handsets (groepsoproep) of alle geregistreerde handsets.
worden gevoerd zonder tu ssenkomst van het basisstation.
UITZENDING (
Re:druk op de toets
om de uitzendfunctie te activeren .
Sneltoetsen links/rechts (
Omhoog (
Druk op
, buiten bereik, gesprek in wachtstand
)
)
)
)
in de linkerbovenhoek van de handset
)
) /Omlaag ( ) bladertoetsen
om het belvolume aan te passen in de Stand-by
~14~
Page 71

modus.
d.
Druk op om het telefoonboek te openen in de Stand-by modus.
9.
EINDE; Aan/uit-toets (
a.
b. Verlaat de huidige menu-optie en gaat een niveau omhoog.
c.
Beëindigt een gesprek
Druk 3 seconden in om het toestel uit te schakelen.
)
Extra opties van het handtoe st el
1. Registratie meerdere handtoestellen
a.
b.
c.
2. Beller Triller
a.
b.
c.
3. Nummerweergave
Geeft het telefoonnummer en de naam van het binnenkomende gesprek
4. Gesprek in wachtstand met nummerweergave
Toont informatie over het tweede binnenk omende gesp rek op dezelfd e
5. Naam koppelen aan nummerweergave
Vergelijk het nummer van de beller met de records in het telefoonboek; als
6. DND (Niet storen, ofwel Stil bellen)
7. Gespreklogboeken
Op een basisstation kunnen maximaal negen handtoestellen worden
geregistreerd
ID 11-19: ID’s voor individuele handtoestellen.
ID 91-99: Groep-ID’s. Handtoestellen kunnen “een abonnement
nemen” in het menu voor handtoestellen op groepen en opgeroepen
worden als een beller of een intercom-beller een groeps-ID invoert.
Twee opties voor melding inkomend gesp rek over de lijn en via intercom.
Keuze voor zes belvolumes (Uit/Laag/Gemiddeld/Hoog/Trillen/Trillen
en hoog) voor elke optie.
Acht keuzes voor beltypes voor elke optie.
op de LCD weer (hiervoor moet de dienst Nummerweergave van de
telefoonmaatschappij zijn ingeschakeld)
telefoonlijn terwijl het eerste gesprek actief is (hiervoor is de dienst Gesprek in
wachtstand met nummerweergave van de telefoonmaatschappij nodig)
een overeenkomst is gevonden, verschijnt op het LCD-scherm de naam of
de bijnaam in plaats van de informatie voor nummerweergave (hiervoor is
de dienst Gesprek in wachtstand met nummerweergave van de
telefoonmaatschappij nodig)
a. Opnieuw kiezen: Bewaart de tien laatst gebel de telefoonnummers
(elk maximaal 26 cijfers). Kan alle tien nummers opnieuw kiezen.
b. Logboek Ontv angen en nieuw e gesprekken: I n totaal 50 reco rds
(telefoonnummer 16 cijfers, namen 16 tekens, en datum/tijd-stempel),
hiervoor is de dienst Nummerweergave van de telefoonmaatschappij nodig.
c. Telefoonnummers en namen kunnen in het telefoonboek worden
8. Gesprek blokkeren: blokkeer uitgaande en inkomende oproepen.
a. Uitgaande oproepen:
a-1. Blokkeer uitgaande interlokale of internationale oproepen.
a-2. Tot 5 cijfers voor elke blokkeerinstelling; maximaal 5 records
b. Binnenkomende oproep:
b-1. PA aan/uit: schakel de verzending uit van andere handtoestellen
b-2. Lijn aan/uit: schakel de mogelijkheid in of uit om
b-3. Int. Aan/uit: schakel de intercom uit van andere handtoestellen
c. Voor deze wijziging moet u de “Belinstellingen ” openen (MENU-4-3).
[NB] U moet het exacte gebruikers-id en wachtwoord typen om deze
9.
10. Toetsvergrendeling
a. Als de toetsvergrendeling geselecteerd is, worden alle toetsen vergrendeld.
b. Toetsvergrendeling wordt automatisch ingeschakeld als u langer
opgeslagen.
toegestaan.
of van het basisstation. Als PA is uitgeschakeld, kan het handtoestel
geen uitzending ontvangen van het basisstation of van andere
geregistreerde handtoestellen, maar het kan wel zelf uitzenden naar
het basisstation of naar andere geregistreerde handtoestellen.
binnenkomende oproepen van de telefoonlijn te ontvangen. Als Lijn
is uitgeschakeld, kan het handtoestel geen binnenkomende oproepen
van de telefoonlijn ontvangen, maar wel zelf naar buiten bellen.
of van het basisstation. Als Int. is uitgeschakeld, kan het handtoestel
geen intercom ontvangen van het basisstation of van andere
geregistreerde handtoestellen, maar het kan wel zelf via intercom
het basisstation of andere geregi st ree rd e hand to es t elle n bere ike n.
optie uit te voeren. Het standaardwachtwoord is “0000”.
Elke toets beantwoorden (behalve en de sneltoets SILENT)
Druk op de sneloets ONTGRENDELEN (links) gevolgd door “*” om ze
weer vrij te geven.
~15~
~16~
Page 72

11. Bel voorkiesnr.
a.
12. Gesprek in wachtstand
a. Plaatst oproepen in de wacht
13. Dempen
a. Druk op de sneltoets DEMPEN (links) tijdens een gesprek, waarna de
14. Telefoonboek
a. 50 ingangen, elk bevat een telefoonnummer of handtoestel-id
b.
c.
d. In de stand-by modus kunt u het telefoonboek openen door op de
e. Telefoonboek door de lucht overbrengen
15. Toetstoon
a. Vier instelbare niveaus voor toetstonen (Uit/Laag/Gemiddeld/Hoog).
b.
16. Oproeptimers
a.
17. Programmeerbare functieoproep
a. U kunt de meestgebruikte functiecode in de EP802
b. Maximaal 10 ingangen kunnen worden geregistreerd.
c.
18. Menu Weergave
dan 15 seconden niets hebt gedaan.
Maximaal 14 cijfers, inclusief pauze(s), u kunt een toegangscode
programmeren om automatisch voor het gebelde nummer te plaatsen als u
vanuit bellogboeken, het telefoonboek en het dialoogvenster bellen-enverzenden belt.
microfoon gedempt wordt.
Druk op de sneltoets GELUID (links) om het geluid weer te laten klinken.
(maximaal 26 cijfers) en naam (maximaal 16 tekens)
Alfabetisch gesorteerd, zoeken op letter.
Bellen vanuit de weergave.
bladertoets
te drukken.
i. Breng bepaalde telefoonboeken naar een of naar alle
geregistreerde handtoestellen over
ii. Breng alle telefoonboeken naar een of naar alle geregistreerde
handtoestellen over
Vier instelbare soorten toetstonen.
Geef de gesprekstijd weer voor het huidige gesprek tijdens en direct
na het gesprek.
voorprogrammeren.
Nadat de functiecode is geprogrammeerd, kunt u deze functies snel
uitvoeren tijdens het gesprek door op de sneltoets OPTIE te drukken.
~17~
a. Om een onjuiste instelling in de “Belinstellingen”(MENU-4),
“Telefooninstellingen” (MENU-5), “Basisinstellingen” (MENU-6) en Multibasisinstellingen (MENU-7-3) te vermijden, kunt u deze instellingen
verbergen.
b. Voordat u het Menuscherm (MENU-8) opent, is het wachtwoord
voor het handtoestel vereist, het standaardwachtwoord is “0000”.
c. Als de instellingen zijn uitgeschakeld, worden ze niet langer weergegeven,
behalve wanneer ze opnieuw zijn ingesc hakeld vanuit Menu w eergeven.
19. PA aan/uit
a. De uitzendfunctie in- of uitschakelen.
b. Als PA is uitgeschakeld, kan het handtoestel geen uitzending ontvangen van het
basisstation of van andere geregistreerde handtoestellen, maar het kan wel zelf
uitzenden naar het basisstation of naar andere geregistreerde handtoestellen.
20. Groepinstelling
a. Voeg het handtoestel toe aan een of meer groepen.
Re: Lidmaatschap is mogelijk van maximaal 9 groepen (91~99).
21. Aangep.naam
a. Verander het scherm “EP800” in de gewenste bewoordingen of info,
zoals de gebruikersnaam.
Re: U kunt maximaal 32 tekens invoeren.
22. Wachtw.wijzigen
a.
Het standaardwachtwoord is 0000.
23. Duur DTMF
a.
b. De standaardduur is 100 ms.
c. Bij het invoeren van de basisinstellingen is de PIN-code vereist. De
Re: Neem eerst contact op met de telefoonmaatschappij voordat u dit verandert.
24. Programmeerbare instelling Flash-toets
a.
b. 9 instelbare niveaus (100 ms – 900 ms), standaard= 600 ms.
c. De standaardwaarde (600 ms) werkt in de meeste gebieden.
Wijzig het wachtwoord dat nodig is voor Gesprek blokkeren (MENU-
4-3) en Menu weergeven (MENU-8) .
Selecteer in MENU-6-1 de variabele duur van de DTMF-toon.
standaardcode is 0000.
Selecteer in MENU-6-2 de tijd voor de Flash-toets
~18~
Page 73

Mogelijk werkt de Flash-toets niet als u deze waarde wijzigt. Wijzig
r
dit alleen als u zeker weet dat de nieuwe waarde werkt.
d.
Bij het invoeren van de basisinstellingen is de PIN-code vereist. De
standaardcode is “0000”.
25. Een nieu we ID aan een nieuw handtoestel toewijzen
a.
Gebruik een geregistreerd handtoestel en voer in MENU-6-3 de
volgende ID in voor een nieuw handtoe stel.
b.
Als u zelf geen ID toewijst, wijst het systeem automatisch een nieuw
ID toe aan een nieuw toestel.
c. Bij het invoeren van de basisinstellingen is de PIN-code vereist. De
standaardcode is “0000”.
26. Handtoestel wissen
a.
Gebruik een geregistreerd handtoestel om vanuit MENU-6-4 een
ander geregistreerd handtoestel te verwijderen, voor het geval het
andere geregistreerde handtoestel defect is.
b.
Nadat het andere geregistreerde handtoestel is gewist, kunt u een
nieuw handtoestel registreren.
c. Bij het invoeren van de basisinstellingen is de PIN-code vereist. De
standaardcode is “0000”.
27. PIN wijzigen
Wijzig de PIN-code die u nodig hebt voor de “Basisinstellingen” (MENU-6-5).
Gebruik een geregistreerd handtoestel om de PIN-code te wijzigen
a.
in MENU-6-5.
De standaard PIN-code is “0000”.
b.
c. Bij het invoeren van de basisinstellingen is de PIN-code vereist. De
standaardcode is “0000”.
28. Optie Auto ophangen
a.
Gebruik een geregistreerd handtoestel om in MENU-6-6 de functie
Auto ophangen in of uit te schakelen.
b.
Als u de functie inschakelt, beëindigt het handtoestel automatisch
een gesprek als de andere kant het gesprek beëindigt.
c.
Bij het invoeren van de basisinstellingen is de PIN-code vereist. De
standaardcode is “0000”.
29. Netnummer
De functie Netnummer maakt het mogelijk om naar andere netnummers
te bellen zonder de prefix.
a. Gebruik MENU-4-7-1 voor het netnummer.
b. Gebruik MENU-4-7-2 voor de landcode.
~19~
Re: U kunt maximaal 3 tekens invoeren.
30. Instellingen voor meerdere basisstations
a.
Re: Houd voor de beste prestaties een afstand aan van ten minste 5
31. Stel tijd in
Met de functie Stel tijd in kunt u de datum en tijd instellen ter
a. Gebruik MENU-6 voor de basisinstellingen.
b.
c. Voer de PIN-code in (standaard “0000”).
d. Voer “7” in om de tijd in te stellen.
e. Voer 4 cijfers in voor MM/DD(Maand/Dag), en vervolgens vier cijfers
f.
32. Microfoonversterking
Stel de sterkte van de microfoon in het handtoestel in afhankelijk van
33. Beltoon uit hoofdtelefoon
Laat de beltoon klinken vanuit de luidspreker van het handtoeste l of uit
34. Baby Monito
In één systeem kunnen maximaal vier basisstations worden
ingesteld.
meter tussen twee basisstations
ondersteuning van DTMF nummerweergave (dit voegt geen datum en
tijd toe bij ontvangst van een centrale; met deze instelling kan de
gebruiker de datum en tijd zien bij ontvangst van het beller-ID).
Druk op
selecteren.
voor uu:mm (uur:minuut)
Druk op OPSLAAN (linker sneltoets) om de instelling vast te leggen.
de omgeving: Stille, Normale en Rumoerige omgeving.
Hiervoor gebruikt u de Telefooninstellingen (MENU-5-1).
de hoofdtelefoon.
Hiervoor gebruikt u de Telefooninstellingen (MENU-5-9).
Laat de babykamer controleren via de intercomfunctie.
Als Baby Monitor is ingeschakeld, beantwoord het toestel geen
binnenkomende gesprekken behalve van de intercom.
Hiervoor gebruikt u de Belinstellingen (MENU-4-5).
of om eventueel het gewenste basisstation te
~20~
Page 74

Illustratie basisstation
Oproep / Registratie
Schema basisstation
Gelijkstroo
Reset-knop
Telefoonaansluiting
Lijnaansluiting
Voeding-LED: blauw
In gebruik-LED: wit
Basisfuncties
Basisfuncties van het basisstation
1. Antenne
a. De antennepoort heeft een aansluiting met een standaard
schroefdraad; om de antenne of kabel los te maken, moet u
deze naar links draaien; monteer door naar rechts te draaien.
Onjuiste installatie kan de aansluiting beschadigen.
b. Plaats een buitenantenne (niet het basisstation zelf) zo hoog
2. LED
a. Voeding (blauw): geeft aan dat het basisstation is ingeschakeld.
b. In gebruik (wit): geeft een actieve telefoonlijn aan.
3. RESET-knop
a. Zet de fabrieksinstellingen van het basissstation terug
b. De reset-knop is bedoeld om te voorkomen dat het systeem per
c. Alle handtoes t ellen (in clu s i ef het be hee r de r-toes t e l) e n
4. Oproepknop (PAGE)
Om een niet te vinden handtoestel op te sporen; druk op de knop PAGE waarna
alle geregistreerde handtoestellen 30 seconden geluid geven.
Druk nogmaals op PAGE of op een willekeurige toets op het handtoestel om dit
te stoppen.
5. Registratieknop (PAGE)
Opent de registratiemodus samen met het handtoestel; wijst het
handtoestel-ID toe (11-19).
6. Lijnaansluiting
Standaard RJ-11C/CA-11A connector waarin de telefoonlijn gestoken
wordt
7. Telefoonaansluiting
Een tweede RJ-11C om het optionele antwoordapparaat op aan te
sluiten
8. DC-ingang voor aansluiting van de voeding
mogelijk voor een ongestoord zendpad.
ongeluk wordt gereset.
aanvullende basisstations moeten na een reset van een
basisstation opnieuw geregistreerd worden.
~21~
~22~
Page 75

Illustratie lader
DC-ingang
Oplaadsleuf
reservebatterij
Oplaadindicator
reservebatterij
Laadsleuf voor
handtoestel
Functies lader
1. DC-ingang
Aansluiting voor voeding van lader.
2. Laadsleuf voor handtoestel
a. Laadt de batterij van het handtoestel als dit in de sleuf geplaatst is.
b. Zie de LCD van het handtoestel voor de status van het laden
(1) Bezig met laden: de statusbalk van de batterij loopt en op het LCD-
scherm staat: “Opladen”.
(2) Volledig geladen: de statusbalk van de batterij staat stil en op het LCD-
scherm staat “Laden gereed”
(3) Laden mislukt: als tijdens het laden een fout optreedt, staat op het LCD-
scherm “Laden mislukt”
3. Het is onmogelijk om met deze lader de batterij te vol te laden.
4. De adapter voor het laadstation kan ook als reislader gebruikt worden. U
kunt het handtoestel echter niet uitschakelen als u dit via de reislader
oplaadt. Op het scherm verschijnt de waarschuwing “Reislader losmaken
en dan uitschakelen”.
Opmerkingen:
1. Laad de batterijpakketten voor het eerste gebruik.
2. Het handtoestel wordt automatisch ingeschakeld als u het in de
laadsleuf plaatst.
3. Als de batterij echter geheel leeg is, duurt het ongeveer een
minuut voordat het handtoestel inschakelt.
~23~
~24~
Page 76

Aan de slag
Installatie basisstation
Er zijn drie manieren mogelijk om het basisstation te installeren:
Basisstation alleen
Basisstation plus antwoordapparaat
Basisstation plus standaardtelefoon
Voor de beste prestaties moet u ten minste 1 meter afstand bewaren tussen
het basisstation en andere elektronische apparaten (zoals tv, computer,
stereo, fax, antwoordapparaat, draadloze telefoon, enz.)
1. Antenne basisstation installeren.
De antennepoort van het basissstation
beschikt over een connector met
standaard schroefdraad; Installeer de
antenne of kabel door naar rechts te
draaien; draai los door naar links te
draaien. Onjuiste installatie kan de
aansluiting beschadigen.
2. Steek het transformatoreinde van de
voeding van het basis station in een
standaard stopcontact en het andere
einde in de aansluiting “DC In” achterop
het basisstation.
De gelijkstroomstekker van het
a.
basisstation heeft dezelfde
afmetingen als de
gelijkstroomstekker van de lader
De gelijkstroomstekker van de
voeding van de lader past in de DC
In-aansluiting van het basisstation.
3. Steek de telefoonkabel in de “LINE”-aansluiting
4. U kunt een standaard telefoon of antwoordapparaat in de aangrenzende
aansluiting TEL achterop het basisstation aansluiten
Installatie handtoestel en lader
1. Steek het transformatoreinde van de voeding van de lader in een
standaard stopcontact en het andere einde in de aansluiting "DC In"
achterop de lader.
2. Steek het batterijpakket in het handtoestel.
3. Installeer de antenne van het handtoestel.
4. Plaats het handtoestel op de lader.
5. Laad de batterij volledig in drie uur voor het gebruik.
6. Het telefoonsysteem is nu gereed voor het verrichten van basisfuncties
zoals bellen en intercomgesprekken. Voor basishandelingen hoeven
basisstation of handtoestel niet te worden geprogrammeerd.
Opm.:
1. Handtoestel(len) geleverd in combinatie met een basisstation
zijn op de fabriek reeds geregistreerd. Als u een nieuw
handtoestel hebt, moet u dit met het basisstation registreren
zodat het herkend wordt als deelnemend handtoestel door het
basisstation en door andere handtoestellen en basisstations.
Zie Registratie van het handtoestel.
2. Laad de batterijpakketten volledig voor het eerste gebruik.
~25~
~26~
Page 77

Basisbewerkingen
r
Gebruikersmode
Zowel het basisstation als de handtoestellen hebben gebruiksniveaus
waarop alleen bepaalde functies kunnen worden verricht.
A. Gebruikersmode basisstation
1. STAND-BY modus- dit is de standaardmodus. De page-toets is alleen
in de stand-by modus actief. De voedings-LED (blauw) licht in deze
modus op.
2. SPREEK-modus: het basisstation werkt in deze modus tijdens een
telefoongesprek. De In gebruik-LED (wit) licht in deze modus op.
3. REGISTRATIE-modus: het basisstation gaat naar deze modus door de
PAGE-knop drie seconden ingedrukt te houden. De voedings-LED
(blauw) knippert in de registratiemodus en een geluid klinkt.
B Gebruikersmode handtoestel
1. STAND-BY modus- dit is de standaardmodus.
a. Als er geen activiteit is, gaat het handtoestel
automatisch in de SLAAP/STAND-BY modus om
energie te sparen.
b.
U kunt het handtoestel volledig uitschakelen door
3. Menustructuu
de
c. U kunt de tekst op het scherm voor de stand-by
modus bewerken.
d. Het nummer van twee cijfers is het ID van het
handtoestel
2. MENU-modus
a.
Druk op de rechter sneltoets om de Menu-modus
in te schakelen.
b.
In de Menu-modus kunt u de instellingen van het
handtoestel en de informatie in het geheugen
bewerken.
De functies die in het menu beschikbaar zijn,
c.
worden uitgebreider behandeld vanaf pagina 53.
d.
De menustructuur is als volgt:
toets 3 seconden ingedrukt te houden.
~27~
~28~
Page 78

Een telefoongesprek voeren
1.
Druk op
telefoonnummer in.
2. U kunt ook eerst het telefoonnummer invoeren en dan
op
Als u dat doet, kunt u de sneltoetsen WISSEN (Links)
en VERWIJDEREN (Rechts) gebruiken om het
ingevoerde nummer te bewerken. “Verwijderen” wist
het laatst ingevoerde getal. “Wissen” verwijdert de
gehele regel maar dit blijft wel in het dialoogvenster
Kiezen en verzenden staan.
3. Gebruik Snelkiezen door de records in het
telefoonboek te gebruiken ( Menu2)
a.
Druk op
openen
b.
Druk op
4.
Druk op
Opmerkingen:
, wacht op de kiestoon, en voer het
drukken.
of om het telefoonboek te
om het nummer te kiezen
om het kiezen af te breken.
1. Als geen verbinding mogelijk is, verschijnt op het scherm na
een time-out van 6 seconden “Basisst. Niet gev.”
2. Nadat verbinding is gemaakt, geeft een timer de lengte van
het gesprek aan.
Tweerichting/intercom-gesprek
Het EP800 Draadloze telefoonsysteem ondersteunt privé
intercom/tweerichtings-gesprekken onafhankelijk van het basisstation.
Tweerichting/intercomgesprekken worden tussen handtoestellen opgezet.
~29~
1.
Druk op
het handtoestel of een groeps-ID.
2.
Druk op
gevolgd door het tweecijferige ID van
om het gesprek af te sluiten.
Opmerkingen:
1. Intercom-gesprekken zijn ook mogelijk als het basisstation
niet beschikbaar is.
2. Bij gebruik van een groeps-ID maakt het eerste handtoestel
dat antwoordt (en dat tot die groep behoort) verbinding met
de beller. Zie Abonnement groep handtoestellen.
3. Als geen verbinding mogelijk is, verschijnt op het scherm na
een time-out van 35 seconden “Oproeptime-out”.
Een bericht uitzenden
A. Van handtoestel naar handtoestel
1. Naar alle handtoestellen uitzenden
a.
Houd op één handtoestel de
ingedrukt (linkerbovenhoek van de toetsen).
b. Een lang aanhoudend “Du…” klinkt terwijl het
handtoestel verbinding maakt met alle
handtoestellen binnen bereik.
c. Zodra u “Du Du” hoort, kunt u uw bericht inspreken. De luidsprekers
van de handtoestellen die de stem ontvangen, worden actief.
Re: Tijdens het spreken of uitzenden moet u de toets
ingedrukt houden.
d.
Laat de toets
2. Naar een groep handtoestellen uitzenden
a.
b. Een lang aanhoudend “Du…” klinkt terwijl het
c.
d.
Voer het groeps-ID in en houd de toets
ingedrukt (linkerbovenhoek van toetsen).
handtoestel verbinding maakt met alle
handtoestellen.
Zodra u “Du Du” hoort, kunt u uw bericht inspreken. De luidsprekers
van de handtoestellen die de stem ontvangen, worden actief.
Re: Tijdens het spreken of uitzenden moet u de toets
ingedrukt houden.
Laat de toets
los om de uitzending af te sluiten.
los om de uitzending af te sluiten.
toets
~30~
11
11
Page 79

3. Uitzenden naar een enkel handtoestel
Voer het ID van het handtoestel in en houd de
a.
toets
toetsen).
b. Een lang aanhoudend “Du…” klinkt terwijl het
handtoestel verbinding maakt met het handtoestel.
c. Zodra u “Du Du” hoort, kunt u uw bericht inspreken. De luidspreke r
van het handtoestel dat de stem ontvangen, wo rdt actief.
Re: Tijdens het spreken of uitzenden moet u de toets
ingedrukt houden.
d.
Laat de toets
ingedrukt (linkerbovenhoek van
los om de uitzending af te sluiten.
11
Opnieuw kiezen
1.
Druk op de sneltoets OPNIEUW (Links).
Op het scherm verschijnt het laatst gebelde nummer.
2.
Druk op
3.
Gebruik
telefoonnummers te bladeren. Druk op
geselecteerde nummer te kiezen.
[NB] Intercomnummers (ID handtoestel) worden niet in
de lijst met laatste tien nummers vastgelegd.
om dit nummer te kiezen.
of om door de laatste tien gebelde
om het
Een telefoongesprek ontvangen
1. Als iemand u belt, verschijnt het ID van de beller op
het scherm en klinkt de bel of trilt het toestel behalve
wanneer de bel is uitgeschakeld.
Als het handtoestel op de lader staat (de bel is tijdelijk
2.
op "Bellen" geschakeld als "Trillen" was ingesteld)
pakt u het toestel op en drukt u op
gesprek te beginnen.
In MENU-5-2 kunt u inschakelen dat u met elke toets kunt beginnen.
Re:
om het
Opmerkingen:
1. U kunt op de sneltoets STIL (links) drukken als u het gesprek
wilt negeren. In tegenstelling tot het uitschakelen van de bel
(in het menu van het toestel) is STIL alleen voor het actuele
gesprek geldig.
2. Als Nummerweergave beschikbaar is, wordt de informatie over
het gesprek weergegeven. Als op het scherm “Privé” of
“Onbekend” staat, kan de beller of de telefoonmaatschappij
van de beller de informatie geblokkeerd hebben.
Een intercomgesprek ontvangen
Bij binnenkomst van een intercomgesprek (gebeld
1.
vanaf een ander handtoestel, bijv. Handtoestel 12),
klinkt de bel of trilt het toestel behalve wanneer de bel
is uitgeschakeld. Druk op
intercomgesprek te beantwoorden.
Als het handtoestel op de lader staat (de bel is tijdelijk
2.
op "Bellen" geschakeld als "Trillen" was ingesteld)
pakt u het toestel op en drukt u op
gesprek te beginnen.
Als het handtoestel niet op de lader staat en MENU-6-2 “Gespr.elke toets”
3.
is “Aan”, drukt u op een willekeurige toets (behalve
STIL) om op te nemen.
Opmerkingen:
1. Op het scherm verschijnt het ID van het handtoestel van de beller.
2. U kunt op de sneltoets STIL (links) drukken als u het gesprek wilt
negeren. In tegenstelling tot het uitschakelen van de bel (in het
menu van het toestel) is STIL alleen voor het actuele gesprek geldig.
om het
om het
en de sneltoets
Een gesprek beëindigen
Druk om een telefoon- of intercomgesprek te beëindigen op
het toestel op de lader.
of plaats
~31~
~32~
Page 80

Het spraakvolume van het handtoestel (oorstuk) instellen
1. Het spraakvolume kan alleen tijdens een gesprek
worden ingesteld.
2.
Er zijn zes volumeniveaus. Druk op
dit in te stellen.
3. De nieuwe instelling blijft voor volgende gesprekken
van kracht totdat hij wordt gewijzigd.
of om
Het stemvolume van de Telefoonluidspreker instellen
1. Het spraakvolume kan alleen tijdens een gesprek
worden ingesteld (in de modus Telefoonluidspreker).
2.
Er zijn zes volumeniveaus. Druk op
dit in te stellen.
3. De nieuwe instelling blijft voor volgende gesprekken
van kracht totdat hij wordt gewijzigd.
of om
Een gesprek in de wachtstand plaatsen
U kunt een actief gesprek in de wachtstand plaatsen
1.
door de OPTIE (linker) scherm toets in te drukken,
gevolgd door “*”.
Druk op de sneltoets VRIJGEV(en) (links) om terug te
2.
keren naar het gesprek
Opmerkingen:
1. Het in de wachtstand geplaatste gesprek kan weer uit de
wachtstand worden gehaald door het toestel dat het in de
wachtstand heeft gezet. Maar als op het toestel op wordt
gedrukt om in stand-by te gaan, kan op andere toestellen op
gedrukt worden om dit gesprek op te pakken.
2. Op het scherm van het toestel wordt aangegeven dat een
gesprek in de wachtstand staat. Een waarschuwingstoon
(dubbele piep) klinkt elke 30 seconden ter herinnering.
3. Als de handeling (bijvoorbeeld gesprek overzetten) mislukt na
het in de wachtstand plaatsen, kan dit gesprek worden
afgebroken.
Dempen
Nadat verbinding is gemaakt, kunt u op DEMPEN
1.
drukken (linker sneltoets) om de microfoon van het
toestel te dempen.
Als dempen actief is, kan de ander u niet horen maar
2.
wel met u praten.
3.
Druk op GELUID (linker sneltoets) om het dempen op te heffen. Dempen
is alleen voor het actuele gesprek van toepassing.
Niet storen (Stil bellen)
1.
Open MENU-3-1 en kies “Uit”. Druk op de sneltoets
KIES om de keuze te bevestigen. De bel wordt nu
uitgeschakeld tot u hem weer in het menu inschakelt.
Re: Als u de bel uitschakelt, verschijnt op het scherm
"Bel uit".
Om de bel tijdelijk uit te schakelen als een gesprek
2.
binnenkomt, drukt u op de linkersneltoets STIL.
Toetsvergrendeling
1. Om per ongeluk bellen te voorkomen, kunt u op de
rechter sneltoets MENU drukken en vervolgens“1”
kiezen om de optie Toetsvergrendeling te selecteren.
Het toetsenblok van het toestel wordt geblokkeerd.
Toetsinvoer is ni et mogelijk.
~33~
~34~
Page 81

A
A
Druk op de linker sneltoets ONTGR. om het
2.
toetsenblok vrij te geven en druk binnen twee
seconden op “*” om te ontgrendelen.
Als het toestel 15 seconden in de stand-by modus
3.
staat, worden de toetsen automatisch vergrendeld.
4. Toetsvergrendeling is actief tot u dit opheft.
Batterij opladen en vervangen
1. Laad de batterij onder een van de volgende omstandigheden op:
De telefoon piept tweemaal (elke 60 seconden in gespreksmodus,
a.
elke 10 minuten in stand-by modu s) .
b. Het batterij-pictogram is leeg.
c.
d. Scherm en verlichting worden vaag.
e. Het gespreksbereik loopt terug.
2.
3. De spreektijd en stand-by tijd van de batterij zijn afhankelijk van het
De telefoon reageert niet op het indrukken van de aan/uit-toets
U kunt de batterij van een handtoestel vervangen nadat u het actieve
gesprek in de wachtstand hebt gezet en op
gesprek weer uit de wachtstand te halen, drukt u weer op de
spreektoets nadat u de batterij hebt vervangen en het toestel hebt
ingeschakeld.
spreek/stand-by patroon en de we rk afstand. Aanbevolen wordt om het
toestel zo vaak mogelijk terug te zetten op de lader voor de beste
prestaties. Gebruik alleen de door de fabrikant geleverde batterij en
lader!
hebt gedrukt. Om het
Geavanceerde bewerkingen
Registratie handtoestel
ls uw handtoestel is gekocht als onderdeel van een systeem, is het op
1.
de fabriek rees bij het basisstation geregistreerd.
ls het ID van het toestel "00" is, betekent dit dat het een nieuw toestel
2.
is of dat het ID gewist is. U moet het toestel bij het basisstation registreren.
Registratie:
3.
a.
.
4. Registratie opheffen:
a. U kunt de registratie van een toestel op het
b. Nadat de registratie is opgeheven, kan het
c.
d. Houd de knop OPROEP 3 seconden ingedrukt tot
e. Druk op het handtoestel op “2” om het de-
Druk op MENU-7 om de registratiemodus te
openen
b. Houd de knop OPROEP 3 seconden ingedrukt tot
de LED In Gebruik (wit) oplicht en knippert. Het
basisstation laat ook een geluid horen om aan te
geven dat het in de registratiemodus staat.
c. Druk op het handtoestel op “1” om het
registratieproces af te ronden. Het basisstation
wijst automatisch een ID toe tussen 12 en 19. De
toegewezen ID wordt op het scherm van het
handtoestel getoond, samen met een bericht dat
de registratie geslaagd is.
d. Herhaal deze stappen voor alle andere toestellen.
basisstation ongedaan maken. Hierdoor wordt het
ID teruggezet op 00, de beveiligingscode wordt
gewist, en het ID van het toestel wordt voor
toekomstige registratie vrijgegeven.
handtoestel het basisstation niet meer gebruiken
voor het voeren en ontvangen van gesprekken en
evenmin kan het de intercom-functie gebruiken.
Druk op MENU-7 om de registra tiemo dus te op enen
de LED In Gebruik (wit) oplicht en knippert. Het
basisstation laat ook een geluid horen om aan te
geven dat het in de de-registratiemodus staat.
registratieproces af te ronden. Nadat de registratie
is opgeheven, verschijnt op het scherm van het
toestel "Registreer".
~35~
~36~
Page 82

Opmerkingen:
1. Het basisstation heeft een registratietime-out van 30 seconden
vanaf het indrukken van de knop OPRO EP. Het handtoestel
heeft een registratietime-out van 6 seconden vanaf selectie van
de registratie of de-registratie. Het basisstation en het
handtoestel gaan automatisch uit de registratiemodus na de
time-out.
2. Herhaal het registratie- of deregistratieproces indien dit niet
geslaagd is.
Groepsabonnement voor handtoestel
U kunt maximaal negen handtoestelgroepen (91-99)
1.
definiëren en de toestellen kunnen beslissen bij welke
groep(en) ze willen behoren.
Groep 1 is bijvoorbeeld voor de groep Klantendienst,
2.
Groep 2 voor Verkoop,
en Groep 3 Marketing. Stel dat toestel 11
binnenkomende gesprekken wil ontvangen voor alle
gesprekken met betrekking tot Verkoop en Marketing.
Dan moet toestel 11 “lid” worden van Groep 2 en van
Groep 3.
Groepskeuze:
3.
a.
b.
Druk op MENU-4 op het toestel om het menu
Belinstellingen te openen
Druk op “2” waarna het menu voor
groepsinstellingen verschijnt.
c.
Druk op de sneltoets OPTIE en op 1 om de groep
toe te wijzen (“9#”, #:1~9). Voer 1 tot 9 in.
d. Herhaal dit voor alle gewenste groepen.
2. Het basisstation is niet verantwoordelijk voor groepstoewijzingen.
Daarom kan het een toestel ook niet uit een groep verwijderen.
3. Als een intercom-beller een groeps-ID invoert, bellen alle
toestellen die tot deze groep behoren. Het eerste toestel dat
reageert, maakt verbinding met de beller. Daarna is het een eenop-een gesprek, niet een groepsgesprek.
Gesprek doorschakelen
U kunt een actief telefoongesprek tussen verschillende handtoestellen
schakelen.
Rechtstreeks overzetten
Duk op de (linker) OPTIE scherm toets om het gesprek
1.
in de wachtstand te plaatsen.
Druk op de sneltoets OVERDR (rechts) en op het
2.
nummer voor het gewenste toe se l , wa arn a he t gesprek
in de wachtstand direct wordt overgeschakeld.
Nadat het gesprek is overgeschakeld , ga at he t
oorspronkelijke toestel automatisch terug naar de
stand-by modus.
Indirect overschakelen
Op de volgende manier kunt u eerst met het doeltoestel
spreken voordat u het gesprek overschakelt:
1.
Druk tijdens het gesprek op
en vervolgens op het
nummer van het doeltoestel.
11
e. Verwijder groepskeuzes door op de sneltoets
OPTIE en “2” te drukken om het toestel bij de groep
af te melden.
Opmerkingen:
1. De toewijzing aan groepen kan op elk gewenst moment gewijzigd
worden.
~37~
2.
Druk op
op het doeltoestel om het
intercomgesprek te beantwoorden; u kunt nu met het
doeltoestel spreken. Druk na het gesprek op
het intercomgesprek af te sluiten, waarna het
doeltoestel het binnenkomende gesprek automatisch
overneemt.
Nadat het gesprek is overgeschakeld, gaat het
oorspronkelijke toestel automatisch terug naar de
stand-by modus.
~38~
om
11
Page 83

A
Opmerkingen: Als het doeltoestel niet reageert nadat het is
opgeroepen of een overdrachttime-out vindt plaats, wordt het
gesprek teruggeleid naar het oorspronkelijke toestel.
Activiteiten met het telefoonboek
1. U kunt maximaal 50 nummers in het telefoonboek
opslaan. Elke ingang bevat een telefoonnummer of
handtoestel-id (maximaal 26 cijfers) en naam
(maximaal 16 tekens).
2.
Om het telefoonboek te openen, druk MENU (Rechts)
soft key, opgevolgd door 2 ; of druk scrollend
terwijl de handset in standby mode is.
Opmerkingen:
1. Bij het invoeren van een telefoonnummer gaat de aanwijzer
automatisch door naar het veld voor het volgende cijfer. Gebruik
of om terug of vooruit te gaan om cijfers in te voegen of
te wissen (het cijfer boven de aanwijzer, of links van de aanwijzer als
dez rechts van het laatste cijfer staat).
2. Bij het invoeren van een naam gaat de aanwijzer automatisch naar
het veld voor de volgende letter door als u op een andere toets voor
het volgende teken drukt. Als u een letter meerdere malen na elkaar
nodig hebt, kunt u wachten tot de aanwijzer is opgeschoven of u
gebruikt de toetsen of om handmatig vooruit of terug te
gaan. Gebruik of ook om de aanwijzer te verplaatsen
om in te voegen (links van de aanwijzer) of wissen) het teken boven
de aanwijzer, of links van de aanwijzer als deze rechts van het
laatste teken staat).
3. Standaard worden alle letters als hoofdletters ingevoerd. Gebruik de
toets * om tussen hoofd- en kleine letters te wisselen.
3. Een nieuw contact toevoegen:
a.
Druk op de sneltoets TOEVOEGEN (Links).
b. Typ de naam als op het scherm “Naam?”
verschijnt. Gebruik de sneltoets VERW (rechts) om
het laatst ingevoerde cijfer te wissen. Druk als u
klaar bent op de sneltoets OPSLAAN (links).
Re: U kunt maximaal 16 tekens als naam invoeren.
c. Vervolgens wordt u om het bijbehorende nummer
gevraagd.
Re: U kunt maximaal 26 cijfers als nummer invoeren.
d. Druk na het invoeren van het nummer op de
sneltoets OPSLAAN (links) om deze combinatie in
het telefoonboek op te slaan.
e.
ls u een contact zonder naam invoert, verschijnt
deze bovenaan de lijst in het telefoonboek.
f. Druk om de naam in te voeren een of meer malen
op de overeenkomstige toets volgens de volgorde
van de tekens op de toets.
4. Een invoer “pauze” geeft een vertraging aan van 1 seconde bij het
kiezen van de volgende cijfers, wat handig is bij het kiezen van een
reeks verdeelde getallen (zoals een toegangscode, credit card
nummer, automatische invoer enzovoort.) Voer een pauze in door
tweemaal op de #-toets te drukken (het scherm toont P). De invoer
van twee pauses (PP) levert een vertraging van 2 seconden op.
5. Tekentabel :
Toets Tekens en volgorde
1 ‘ + , . * ( ) & 1
2 A B C 2
3 D E F 3
4 G H I 4
5 J K L 5
6 M N O 6
7 P Q R S 7
8 T U V 8
9 W X Y Z 9
0 0
Hoofdletters – bij het bewerken van tekens.
*
*– bij het bewerken van getallen.
#
Spatie en # – bij het bewerken van tekens
# en P (pauze) – bij het bewerken van
getallen.
Zie de onderstaande tabel voor een lijst met
beschikbare tekens en de volgorde daarvan. Druk
bijvoorbeeld eenmaal op 2 voor de letter “A”,
tweemaal voor “B”, enzov oo rt .
~39~
~40~
Page 84

4. De ingangen worden alfabetisch gesorteerd en opgeslagen als lijst in
oplopende volgorde (A tot Z).
5. De eerste regel op het scherm toont de naam en de tweede regel het
telefoonnummer. Als het telefoonnummer langer dan 16 tekens is, drukt
u op de sneltoets OPTIE (rechts) en selecteert u Optie 3 “Nummer
bekijken” om het volledige nummer te zien.
6. Een contactpersoon zoeken:
a.
Druk op
om het telefoonboek te openen.
b. Druk op de toets die overeenkomt met het eerste teken van de
naam waarnaar u zoekt.
c.
d.
Als u bijvoorbeeld naar “EnGenius” zoekt, drukt u eenmaal op 3 .
Druk op
of om naar de ingang te gaan die u zoekt.
7. Een contactpersoon wissen:
a.
Druk op
of of gebruik de alfabetische
zoekmethode om de record te zoeken die u wilt
wissen of bewerken.
Druk op de sneltoets OPTIE links om de menuopties
b.
te openen.
c.
Druk op 1 om de geselecteerde contactpersoon te
wissen.
d. Op het scherm verschijnt “contactpersoon wissen?"
Druk op de sneltoets JA om de keuze te bevestigen.
8. Het telefoonboek bewerken:
a.
Druk op
of of gebruik de alfabetische
zoekmetode om de record te zoeken die u wilt
wissen of bewerken.
10. Het telefoonboek overzetten:
Om het telefoonboek over te zetten, moeten beide deelnemende partijen
eerst als volgt naar de overzetmodus gaan:
a.
Klik OPTIE rechts opgevolgd door 5 of of scrollend
wanneer de handset in telefoonboek mode is.
b.
Druk op het verzendende toestel op 1 om naar de verzendmodus te
gaan.
i. Druk op TX ALLE (links) om het gehele telefoonboek naar het/de
andere toestel(len) over te brengen.
ii. Of druk op TX EEN (rechts) om één record naar h et/de andere
toestel(len) over te brengen.
iii. Kies het tweecijferige toestel-ID of groeps-ID en selecteer het
hele telefoonboek of een ingang om dit over te zetten.
Re: “00” betekent alle toestellen
iv. Tijdens het overzetten staat “Verzendt” op het scherm met een
tweecijferige teller om de nummers aan te geven die klaar staan
om over te zetten.
c.
Druk op het ontvangende toestel op 2 om naar de ontvangstmodus
te gaan.
i. Op het scherm verschijnt “Gereed”.
ii. Begin met het binnenhalen van het telefoonboek. Op het scherm
verschijnt "Telefoonboek ophalen bij nummer # : xx”.
iii. Bij de ontvangst van elk record klinkt een piep.
iv. Een tweecijferig getal op het scherm geeft aan welke nummers
op ontvangst wachten.
Re: Het telefoonboek wordt draadloos overgebracht, door interferentie
kunnen nummers gemist worden.
b. Druk op de sneltoets OPTIE links om de menuopties
te openen.
c. Druk op 2 om de geselecteerde ingang te
bewerken.
9. Bellen vanuit het scherm:
a.
Druk op
of
om het weergegeven telefoonnummer of
handtoestel te bellen.
~41~
Gesprek blokkeren
1. Blokkeer uitgaande interlokale of internationale oproepen. Blokkeer ook
inkomende gesprekken van een buitenlijn of van een ander geregistreerd
toestel.
U hebt het wachtwoord nodig om de instelling te wijzigen. Het
standaardwachtwoord is 0000.
~42~
Page 85

Druk op MENU-4-3 om 'gesprek blokkeren' te openen.
A
2.
Typ het wachtwoord van het toestel, gevolgd door de
sneltoets OK (links).
Uitgaande gespre kk en blokkeren
Druk op de sneltoets KIES (links) om “Uitgaand” te
1.
blokkeren en bevestig de keuze.
2.
Gebruik
of scrollend om te switchen
tussen On and Off. Druk op de sneltoets KIES om de
keuze te bevestigen.
Re:Gesprek blokkeren staat standaard uit.
3. De code voor Gesprek blokkeren toevoegen
a. Nadat u de optie Gesprek blokkeren hebt
ingeschakeld, kunt u de bijbehorende code
invoeren.
Druk op de sneltoets TOEVOEG (links) en begin
met het invoeren van de code. Druk na invoeren
van de code op OPSLAAN (links) om deze op te
slaan.
(1) De code mag maximaal 5 tekens bevatten. Als u
bijvoorbeeld alle uitgaande gesprekken naar
Rotterdam wilt blokkeren, voert u 010 in als code.
(2)
ls het basisstation is gekoppeld aan een centrale,
moet u ook het nummer daarvan toevoegen om de
PSTN-toon te verkrijgen.
b. Druk op de sneltoets OPTIE (rechts) om de codes
te wissen of bewerken.
c. U kunt maximaal vijf codes voor het blokkeren van
gesprekken invoeren.
d. Als u alle uitgaande gesprekken wilt blokkeren, typt
u “*****" (5 “ *”toetsen) gevolgd door
OPSLAAN (links) om dit op te slaan, waarna alle
uitgaande gesprekken geblokkeerd worden.
Binnenkomende gesprekken blokkeren
1. Druk op de sneltoets KIES om de keuze voor
“Binnenkomend” te bevestigen.
Druk op
of om het te blokkeren onderdeel
te selecteren.
a.
Druk op de sneltoets KIES om de keuze voor het
ontvangen of blokkeren te bevestigen.
Druk op de sneltoets WIJZIG links om de instelling
in of uit te schakelen.
Re: “Aan” betekent dat oproepen kunnen worden
ontvangen van andere toestellen of het
basisstation. “Uit” betekent dat de verzending van
andere handtoestellen of van het basisstation is
uitgeschakeld.
b.
Druk op de sneltoets KIES om de keuze voor het
ontvangen of blokkeren te bevestigen.
Druk op de sneltoets WIJZIG links om de instelling
in of uit te schakelen.
Re: “Aan” betekent dat het mogelijk is om
gesprekken te ontvangen van buitenlijnen; “Uit”
betekent dat gesprekken van buitenlijnen
geblokkeerd zijn.
c,
Druk op de sneltoets KIES om de keuze voor het
ontvangen of blokkeren van intercom-oproepen te
bevestigen.
Druk op de sneltoets WIJZIG links om de instelling
in of uit te schakelen.
Re: “Aan” betekent dat het mogelijk is om
intercomoproepen van andere toestellen of het
basisstation te ontvangen, “Uit” betekent dat de
ontvangst geblokkeerd is.
~43~
~44~
Page 86

Programmeerbare functieoproep
1. Als het basisstation EP802 achter een centrale is geïnstalleerd, is het
mogelijk om een aantal functieoproepen samen met de functiecode van
de centrale in het systeem te programmeren.
2. U kunt tot 10 van de meest gebruikte functiecodes programmeren.
De functiecodes een naam geven en invoeren:
3.
a.
Druk op de sneltoets MENU (rechts) ter w ijl he t
toestel in de stand-by modus staat.
b.
Druk tweemaal op “4” om het menu
“Functieoproep” te openen.
c.
Druk op de sneltoets TOEVOEGEN (links) om een
nieuwe functieoproep in te voeren.
d.
Toets een naam in voor de functieoproep,
bijvoorbeeld voor het bewerken van een ingang in
het telefoonboek.
Druk op de sneltoets OPSLAAN (links) ter
bevestiging.
e.
Voer de code voor de bijbehorende PBX-functie in
bijvoorbeeld F*70.
Druk op de sneltoets OPSLAAN (links) ter
bevestiging.
Re: “F” staat voor het flitssignaal.
f.
De eerste functieoproep en de bijbehorende code
verschijnen op het scherm.
g.
Druk op de sneltoets OPTIE (rechts) om de
geprogrammeerde functieoproep te wissen of
bewerken.
h.
Herhaal deze handelingen voor het programmeren
van volgende veelgebruikte functieoproepen.
4.
Een voorgeprogrammeerde functie-oproep tijdens een
gesprek gebruiken.
~45~
a.
Druk op de sneltoets MENU (rechts) ter w ijl he t
toestel in de spraakmodus staat.
b. Druk op het bijbehorende cijfer voor de
functieoproep die u wilt uitvoeren, bijvoorbeeld op
“0” voor de eerste oproep.
Opmerkingen:
1. Functieoproepen zijn handig als de EP800 met een centrale is
verbonden.
2. Als u geen functieoproep hebt geprogrammeerd, is alleen
“#.Telefoonboek” in het menu OPTIE aanwezig.
3. De programmeeroptie van de EP800 werkt mogelijk niet bij alle
centrales of toetstelefoonsystemen door de grote verschillen tussen
de verschillende systemen.
Nummerweergave
1. Neem contact op met uw telefoonmaatschappij om u op deze functie te
abonneren. Het telefoonsysteem ontvangt en toont de nummerweergave
die door de telefoonmaatschappij wordt doorgezonden. Deze informatie
kan het telefoonnummer van de beller, de naam, datum en tijd omvatten.
Dit apparaat kan informatie opslaan van maximaal 50 bellers.
2. Op het scherm verschijnen de datum en tijd van het gesprek op de eerste
regel, gevolgd door de naam op de tweede en het telefoonnummer op de
derde regel. Achter een ongelezen record staat NIEUW achter de eerste
regel.
3.
Tijdens het bekijken van deze gegevens kunt u het nummer kiezen, in het
telefoonboek opslaan of verwijderen.
De gesprekslog bekijken
1.
Druk op
Druk op
nummers en namen te bladeren.
om de gesprekslog te openen.
of om door de beschikbare
~46~
Page 87

2.
Druk op de sneltoets OPTIE (rechts), u kunt of
gebruiken voor opslaan, wissen, alles wissen.
a. Gesprekslog op sl aan:
(1)
(2)
(3)
b. Gesprekslog wissen:
(1) Druk op de sneltoets KEUZE rechts gevolgd
c. Alles wissen:
(1) Druk op de sneltoets KEUZE rechts gevolgd
Naar een weergegeven nummer bellen
1.
2.
Druk op de sneltoets KEUZE rechts, u kunt
of
bladeren, en druk op VERW om de naam te
bewerken.
Druk daarna op de sneltoets OPSLAAN links om
de naam op te slaan.
Druk op
bladeren en druk op VERW om het nummer te
bewerken.
Druk daarna op de sneltoets OPSLAAN links om
de naam op te slaan.
Daarna wordt de gesprekslog in het telefoonboek
opgeslagen.
door JA om het wissen te bevestigen.
door JA om het wissen van alle
nummeweergave-records te bevestigen.
gebruiken om door de namen te
of om door de nummers te
Druk op
te bladeren.
Druk voor een weergegeven nummer op
bellen.
gebruik of om door de gesprekslog
om dit nummer te
Instellingen voor meerdere basisstations
De instelling voor meerdere basisstations maakt een uitgebreider dekking of
lijncapaciteit mogelijk. Gebruik bij het toevoegen van het tweede, derde of
vierde basisstation een van de handtoestellen die op het eerste basisstation
is geregistreerd (het toestel met ID 11) en ga als volgt te werk:
Druk op de sneltoets MENU (rechts) gevolgd door “7”
1.
om de registratiemodus te openen.
Houd de OPROEP-knop op het basisstation drie
2.
seconden ingedrukt; het prompt-geluid klinkt en de
LED In gebruik knippert.
Druk op het handtoestel op “3” om naar de instellingen
3.
voor meerdere basisstations te gaan.
Selecteer BS #1
4.
Herhaal de bovenstaande stappen 1 – 4 om na elkaar
5.
het tweede, derde en vierde basis station toe te
voegen.
Re:Het ID voor het eerste basisstation is 10, voor het
tweede basisstation 20, vo or het de rd e
basisstation 30 en voor het vierde basisstation 40.
Opmerkingen:
1. Als u “Multi-basisstations” voor het eerst instelt, moet u eerst het BS
#1 kiesen, en daarna de bovenstaande stappen volgen voor de
volgende basisstations.
2. Voor synchronisatiedoeleinden moeten alle handtoestellen opnieuw
worden geregistreerd voordat u het multi-basisstation-scenario
toepast, ofwel het eerste ID voor een handtoestel met 1x moet u
registeren bij BS1, en de rest van de handsets bij de volgende
basisstations.
3. Na voltooiing van al deze processen is Multi-basisstation voltooid.
~47~
~48~
Page 88

A
Druk op “2” om BS Selecteren in te stellen.
A
Gesprekbeheerder
De optie “Gesprekbeheerder” ondersteunt twee opties:
1. De eerste is het instellen van het handtoestel op het ontvangen van
binnenkomende gesprekken of het voeren van uitgaande gesprekken
(tweewegs intercom, uitzenden en gesprek overzetten zijn toegestaan.) De
optie kan worden geselecteerd op de basisstations 1 tot 4.
Re: De optie “Gespreksbeheerder” is verborgen als de functie Multibasisstation is uitgeschakeld.
2. De andere optie is het instellen van het handtoestel op automatisch of
handmatig toegang verkrijgen tot de beschikbare basisstations.
Voor de eerste optie (Abonnement BS):
Druk op de sneltoets MENU (rechts) gevolgd door 4
1.
om de modus Gesprekinstellingen te openen.
Druk op “6” om Gespreksbeheerder te selecteren.
Re: “Gespreksbeheerder” is alleen beschikbaar als
2.
3.
4.
Voor de tweede optie (BS selecteren):
1.
de functie Multi-basisstations is ingeschakeld.
Druk op 1 om Abonneren op BS te selecteren.
Re:Bij het openen van het submenu van Abonneren
op BS worden de beschik b ar e ba s is stations
weergegeven die reeds geregistreerd zijn.
Druk op
(#1~4), druk op de sneltoets WIJZIG (links) om Abonneren op BS in- of
uit te schakelen.
ls Abonneren op BS is ingeschakeld, betekent dit dat het toestel de lijn
van het gewenste basisstation kan gebruiken en dus uitgaande
gesprekken kan voeren of binnenkomende gesprekken beantwoorden
via het gewenste basisstation.
Als Abonneren op BS echter is uitgeschakeld, betekent dit dat het
toestel de lijn van het gewenste basisstation niet kan gebruiken en dus
geen uitgaande gesprekken kan voeren of binnenkomende gesprekken
beantwoorden via het gewenste basisstation.
Druk op de sneltoets MENU (rechts) gevolgd door 4
om de modus Gesprekinstellingen te openen.
Druk op “6” om Gespreksbeheerder te selecteren.
of om het gewenste basisstation te selecteren
~49~
2.
Re:DDe standaardinstelling is Uit.
Druk op de sneltoets WIJZIG (links) om BS selecteren in of uit te
3.
schakelen.
ls BS Selecteren is ingeschakeld en u drukt op
Re:
verschijnen de beschikbare basisstations
(lijnen) op het scherm, dus 1, 2, 3, 4. Druk op
nummer “1” zodat u toegang krijgt tot basisstation 1
om de lijn te bereiken.
NB:bij een enkel basisstation ontbreekt Gespreksbeheerder in de
“Belinstellingen”.
Visuele indicator Bericht wacht (VMWI)
De optie VMWI ondersteunt het FSK-bericht dat vanaf de telefoonlijn
ontvangen wordt; dit activeert een berichtpictogram op het handtoestel en de
LED GESPROKEN BERICHT op het basisstation gaat knipperen.
Opmerkingen:
1. Vereist is een abonnement op de voicemail-dienst van de telefoonmaatschappij.
2. Als het toestel nog steeds het pictogram toont ook nadat u naar alle berichten
hebt geluisterd, kunt u dit uitschakelen door de toets “Nummerweergave” op het
toestel ingedrukt te houden.
Microfoonsterkte van handtoestel instellen
Als u het toestel in verschillende omgevingen wilt gebruiken, kunt u de
gesprekskwaliteit voor uw gesprekspartner verbeteren door de versterking
van de microfoon in het toestel aan de omgeving aan te passen.
Druk op de sneltoets MENU (rechts) terwijl het toestel in de stan d-
a.
by modus staat.
b. Druk op “5” (Telefooninstellingen), gevolgd door “1” om het menu
“Mic. Versterking” te openen.
c.
Druk op
“Gemiddeld” en “Laag” te bladeren.
Als u het toestel in een stille omgeving gebruikt, zoals een kantoor
d.
of vergaderkamer, wordt “Standaard” aanbevolen.
of om door de opties “Standaard”,
~50~
Page 89

Als u het toestel in een rumoerige omgeving gebruikt, zoals een
fabriek of buitenshuis, wordt “Gemiddeld” of “Laag” aanbevolen.
Beltoon van headset instellen
Bij het gebruik van een headset kunt u voorkomen dat u een gesprek mist
doordat de bel van de ontvanger in de headset klinkt, door te kiezen of u de
bel wilt laten klinken via de luidspreker van het handtoestel of via de
ontvanger van de headset.
Druk op de sneltoets MENU (rechts) terwijl het toestel in de stand-
a.
by modus staat.
b. Druk op “5” (Telefooninstellingen), gevolgd door “9” om het menu
“Bel Headset” te openen.
c. Selecteer “Aan” om de bel in de headset te laten overgaan; als u
“Uit” kiest, klinkt de bel uit de luidspreker van het handtoestel.
Babymonitor
U kunt een handtoestel instellen als “babytoestel” om de bewegingen van
een baby of een bejaarde te volgen.
Als u de babymonitor inschakelt, gaat het “babytoestel” automatisch naar de
controlemodus via tweeweg-intercom.
Als u bijvoorbeeld toestel A instelt als “babytoestel” en u doet een
intercomoproep vanaf toestel B, gaat toestel A automatisch in de
controlemodus zonder dat de bel overgaat; u kunt verder alle bewegingen
rond toestel A volgen vanaf toestel B.
a.
Druk op de sneltoets MENU (rechts) terwijl het toestel in de stand-
by modus staat.
b.
Druk op “4” (Belinstellingen) en vervolgens op “5” om het menu
“Babymonitor” te openen.
c. Druk op “WIJZIG” om de optie in of uit te schakelen (standaard is
Uit).
Re: Om storingen te vermijden, zal het toestel tijdens de controle geen
binnenkomend gesprek aannemen, alleen de intercom.
Menubewerkingen
~51~
~52~
Page 90

1. Druk op de sneltoets MENU (rechts) om het menu te openen terwijl het
t
S
toestel stand-by staat.
Re: U kunt op of drukken, gevolgd door de sneltoets KEUZE
(links) om het geselecteerde menu te bevestigen. Of druk direct op
een nummertoets om het geselecteerde menu te bevestigen. Druk
bijvoorbeeld op de sneltoets MENU (rechts) gevolgd door 4 en 1 om
2.
3.
4.
a. Druk op 1 voor het belvolume:
b. Druk op 2 om de Beltoon te selecteren:
c. Druk op 3 om het toetsvolume bij het indrukken van een toets te
d. Druk op 4 om de Toetstoon te selecteren:
het belvolume te selecteren.
Druk op 1 om Toetsvergrendeling te select eren (Zie Toetsvergrendeling
op pagina 34
Druk op 2 om records toe te voegen, bewerken en bekijken in het
telefoonboek (zie Telefoonboek op pagina 39
Druk op 3 voor de geluidsinstellingen:
Twee opties voor het belvolume: Lijn (voor inkomende gesprekken) en
Intercom (voor intercomgesprekken). Stel elke optie apart in.
Druk bij het instellen van elke optie op of om door 6 opties
e bladeren: “Uit”, “Laag”, “Gemiddeld”, “Hoog”, “Trillen” en “Trillen en
hoog”. Druk op de sneltoets KIES om de keuze op te slaan.
tandaard = Gemiddeld.
Twee opties voor de beltoon: Lijn (beltoon voor inkomende
gesprekken) en Intercom (beltoon voor intercomgesprekken). Stel
elke optie apart in.
Gebruik of om door 8 bellen te bladeren, druk op de
sneltoets KEUZE (links) om de keuze op te slaan. Standaard = 1.
selecteren:
Gebruik of om door 4 opties te bladeren: Uit, Laag,
Gemiddeld en Hoog. Druk op de sneltoets KIES om de keuze op te
slaan. Standaard = Gemiddeld.
Gebruik of om door 4 opties te bladeren: 1, 2, 3 and 4. Druk
op de sneltoets KEUZE (l inks ) om de s ele ctie op te sla an. Sta ndaa rd =
).
).
~53~
5. Druk op 4 voor de belinstellingen:
a. Druk op 1 voor het Voorkiesnummer:
(1)
(2) Als de functie is ingeschakeld, wordt op het toestel gevraagd om
(3) Gebruik de sneltoets Wissen (rechts) om het voorkiesnummer te
(4)
(5) Als deze optie is ingeschakeld, verschijnt op het scherm
(6) Deze optie is handig voor toegangscodes, belkaart en bellen via
b.
c.
d.
e.
f.
g. Druk op 7 voor het instellen van het Kengetal:
de functie Netnummer maakt het mogelijk om naar andere
(1) Netnummer instellen:
(2) Landnummer instellen:
1.
Druk op
schakelen. Standaard = Uit
het voorkiesnummer in te voeren, maximaal 14 tekens.
bewerken.
Druk op de sneltoets OPSLAAN om de keuze te bevestigen.
“Voorkiesnummer? Ja of Nee” bij elk uitgaand gesprek vanuit
gesprekslogs, het telefoonboek en het kiesdialoogvenster; ook
het huidige voorkiesnummer wordt weergegeven.
Re: Het voorkiesnummer wordt automatisch aan het gekozen
nummer toegevoegd als op JA word t gedrukt.
credit cards, enzovoort.
Druk op 2 voor Groep selecteren: zie Abonnement groep
handtoestellen op pagina 37
Druk op 3 om Gesprek blokkeren in te stellen: zie Gesprek blokkeren
op pagina 42
Druk op 4 om Functieoproep in te stellen: zie Functieoproep op
pagina 45
Druk op 5 om de Babymonitor in te stellen: zie Babymonitor op
pagina 51
Druk op 6 voor Belbeheerder: zie Belbeheerder op pagina 49.
netnummers te bellen zonder de prefix.
.
.
Druk op MENU-4-7-1. Voer het netnummer in en druk op
OPSLAAN om de selectie te bevestigen.
Druk op MENU-4-7-2. Voer de landcode in (3 cijfers) en druk op
OPSLAAN om de selectie te bevestigen.
of om de optie Voorkiesnummer in of uit te
.
.
~54~
Page 91

A
A
Druk op 5 voor de telefooninstellingen:
6.
a.
b.
c.
(1)
(2)
d.
(1)
e.
f.
(1)
(2)
g.
Druk op 1 om de microfoonversterking in te stellen: zie
Microfoonversterking op pagina 50
Druk op 2 om Gespr. Elke toets in te stellen:
Druk op de sneltoets WIJZIG (links) om Aan of Uit te selecteren.
De standaardinstelling is "Uit".
Re: Als de optie is ingeschakeld, kunt u op elke toets drukken
(behalve en STIL ) om een binnenkomend gesprek te
beantwoorden.
Druk op 3 om het LCD-contrast in te stellen:
Gebruik of om door 8 opties te blader en. De
standaardinstelling is 6.
Druk op de sneltoets OPSLAAN om de keuze te bevestigen.
Druk op 4 om de LCD-achtergrondverlichting in te stellen:
Druk op of om door de opties 1~3 te bladeren (1. 8
seconden 2.Aan 3.Uit). De standaardwaarde is “8 seconden”.
(2)
Druk op de sneltoets OPSLAAN om de keuze te bevestigen.
Druk op 5 om het Naamlabel in te stellen:
Druk op de sneltoets WIJZIG (links) om Aan of Uit te selecteren.
(1)
De standaardinstelling is "Uit".
(2)
Druk op de sneltoets OPSLAAN om de keuze te bevestigen.
Re: Als dit is ingeschakeld, vergelijkt het toestel het nummer van de
beller met de records in het telefoonboek; als een overeenkomst
is gevonden, verschijnt op het LCD-scherm de naam of de
bijnaam in plaats van de informatie voor nummerweergave
(hiervoor is de dienst Gesprek in wachtstand met
nummerweergave van de telefoonmaatschappij nodig)
Druk op 6 om de Taal in te stellen:
Gebruik of om door de opties 1~10 te bladeren
(1.Engels 2.Spaans 3.Frans 4.Italiaans 5.Duits 6.Nederlands
7.Pools 8.Tsjechisch 9.Hongaars 10.Roemeens).
De standaardinstelling is “Engels”.
Druk op de sneltoets OPSLAAN om de keuze te bevestigen.
Druk op 7 om de Aangepaste naam in te stellen:
.
~55~
(1)
(2)
(3)
Re:
h.
(1)
(2)
i.
Druk op 6 voor de instellingen van het basisstation:
7.
ls u dit menu opent, moet u eerst de PIN-code voor het basisstation
invoeren (4 cijfers).
Re: De PIN-code is voor de instellingen van het basisstation. De
standaardcode is 0000.
a.
(1)
b.
(1)
(2)
Re: De standaardwaarde (600 ms) werkt in de meeste gebieden.
c.
(1)
(2)
Gebruik de tekentabel en de methode die voor het Telefoonboek
is beschreven om tekens in te voeren.
Gebruik
verplaatsen om in te voegen (links van de aanwijzer) of wissen)
het teken boven de aanwijzer, of links van de aanwijzer als deze
rechts van het laatste teken staat).
Druk op de sneltoets OPSLAAN (links) ter bevestiging.
Nadat de aangepaste naam is ingevoerd, past de begroeting op
het scherm in stand-by modus zich daarop aan.
De standaardgroet is ËP802”.
Druk op 8 om het wachtwoord te wijzigen:
Voer het oorspronkelijke wachtwoord (4 cijfers) van het handtoestel
in en druk op de sneltoets OK (links) als u dit menu opent.
Voer het nieuwe wachtwoord in (4 cijfers) en druk op OPSLAAN
om het nieuwe wachtwoord te bevestigen.
Druk op 9 om Beltoon van headset in te stellen: Zie Beltoon van
headset instellen op pagina 51
Druk op 1 om de DTMF-duur in te stellen.
Voer de DTMF-duur in (90~200 ms), druk op de sneltoets OK
links om de instelling te bevestigen. De standaardduur is 100 ms.
Re: Neem contact op met uw handelaar voordat u dit wijzigt. Als de duur
niet overeenkomt met die van PSTN of PBX kan dit fouten veroorzaken.
Druk op 2 om de tijd voor de flitstoets in te stellen. De standaardduur
is 600 ms.
Gebruik of om door 9 opties te bladeren (100~900
ms). Of druk de betreffende nummertoets in (1 tot 9).
Druk op de sneltoets KIES om de keuze op te slaan.
Mogelijk werkt de Flash-toets niet als u deze waarde wijzigt.
Wijzig dit alleen als u zeker weet dat de nieuwe waarde werkt.
Druk op 3 om Volgende HS toewijzen in te stellen.
Voer het tweecijferige ID van het handtoestel in en druk op OK.
ls u een nieuw handtoestel registreert, wijst het basisstation het
vooraf toegewezen ID aan dit toestel toe.
of om de aanwijzer vooruit of terug te
.
~56~
Page 92

Druk op 4 voor HS wissen
g
g
d.
(1)
(2)
e.
(1)
Re: De standaard PIN-code is 0000.
Druk op 6 om automatisch ophangen in te stellen:
f.
(1)
Re: Als u de optie inschakelt, hangt de EP802 automatisch op als de
g.
(1)
Druk op 7 om het handtoestel te registreren, de registratie op te heffen
8.
en om Multi-Basisstation in te stellen: Zie Handtoestel registreren op
pagina 36
Druk op 8 om de menuweergave in te stellen:
9.
Om het onjuist instellen van belinstellingen (menu-4), telefooninstellingen
(menu-5) en instellingen voor het basisstation (menu-6) te voorkomen,
kunt u deze menu’s verbergen, zodat andere gebruikers van het toestel
geen kans krijgen om deze instellingen te wijzigen.
Re: Bij het openen van de menuweergave moet u eerst het wachtwoord
invoeren.
a.
b.
c.
d.
Re:
Voer het tweecijferige ID van het handtoestel in en druk op OK.
Het basisstation wist het ID van het handtoestel uit het systeem.
Druk op 5 om de PIN-code te wijzigen:
Voer de nieuwe PIN-code voor het basisstation in en druk op OK.
Druk op de sneltoets WIJZIG (links) om Aan of Uit te selecteren. .
beller ophangt. Maar deze optie is afhankelijk van het verzenden
van een beltoon of bezetsignaal door de PBX of PSTN nadat de
beller heeft opgehangen.
Druk op 7 om de tijd voor ondersteuning van DTMF nummerweergave:
Druk op de sneltoets OPSLAAN (links) om de ingestelde datum
en tijd te bevestigen (zie Tijd instellen op pagina 20
en Multi-basisstation instellen op pagina 48.
).
Druk op 1 om het menu Belinstellingen al dan niet te verbergen.
Druk op de sneltoets WIJZIG (links) om Aan of Uit te selecteren.
(1)
Druk op 2 om het menu Telefooninstellingen al dan niet te verbergen.
Druk op de sneltoets WIJZIG (links) om Aan of Uit te selecteren.
(1)
Druk op 3 om het menu Instellingen basisstation al dan niet te
verber
(1)
Druk op 4 om het menu Instellingen Multi-basisstation al dan niet te
verber
(1)
“Aan” selecteren betekent dat het menu op het scherm getoond wordt.
Selecteer “Uit” om het menu te verbergen.
en.
Druk op de sneltoets WIJZIG (links) om Aan of Uit te selecteren.
en.
Druk op de sneltoets WIJZIG (links) om Aan of Uit te selecteren.
~57~
Index
A
Abonneren op BS, 49
Actief gesprek, 13
Algemene veiligheidsinformatie, 4
B
Basisstation, 5, 6, 9, 10, 14, 15, 20, 22, 25, 26, 27, 28, 30, 36, 43
Batterij opladen en vervangen, 35
Batterij sparen, 10
Batterij, 5, 7, 10, 24, 26, 27, 35
Batterijvermogen, 13
Bediening basisstation, 27
Bel, 14, 15, 20, 31, 32, 34, 51, 53
Beltoon van headset instellen, 51
Belvolume, 14, 15
Binnenkomende gesprekken blokkeren, 43
BS selecteren, 49
Buitenantenne, 10, 22
C
Controlelijst onderdelen, 10
D
Dempen, 17, 33
DND, 15
DTMF-duur, 18, 56
DTMF-toon, 18
E
Een bericht uitzenden, 30
Een gesprek in de wachtstand plaatsen, 33
Een intercomgesprek ontvangen, 32
Een telefoongesprek ontvangen, 31
Een telefoongesprek voeren, 29
Electrische schok, 4, 5, 6
F
Flits, 14, 19, 36, 45, 48, 50, 56
Functieoproep, 17, 45, 54
Functies basisstation, 22
Functies handtoestel, 13, 15
Functies lader, 24
~58~
Page 93

G
Geheugen, 27
Gesprek blokkeren, 16, 18, 42, 43, 54
Gesprek doorschakelen, 33, 37
Gesprek in wachtstand, 17
Gesprek wacht met nummerweergave, 15, 55
Gesprek wacht, 14, 15
Gespreksbeheerder, 49, 50, 54
Gespreksinstellingen, 16, 18, 20, 37, 49, 50, 51, 54, 57
Gesprekslog bekijken, 46
Gesprekslog, 16, 17, 46, 47
Gespreksmodus, 14, 27, 46
Groepinstelling, 18, 37
Groepkeuzes, 37, 54
Groeps-ID, 15, 30, 38, 42
Groepslidmaatschap handtoestel, 37, 54
H
Handtoestel naar handtoestel gesprek, 30
Handtoestel registratie, 36, 57
Handtoestel-ID, 13, 15, 17, 19, 22, 27, 30, 31, 32, 36, 38, 39, 42, 48, 56
Het spraakvolume van het handtoes tel (oorstuk) inste llen, 33
Het stemvolume van de Telefoonluidspreker instellen, 33
Hoorapparaat, 4
I
ID basisstation, 48
IDLE-modus, 17, 27, 35
Illustratie basisstation, 21
Illustratie lader, 23
Installatie basisstation, 25
Installatie handtoestel en lader, 26
L
Laadsleuf voor handtoestel, 24
Lijn omkeren, 56
Lijnaansluiting, 22
Lithium-Ion (Li-Ion), 7, 10
M
Menu-modus, 27, 53
Menuweergave, 18, 57
Microfoonsterkte van handtoestel instellen, 50
Multi-basisstation instelling, 18, 48, 57
N
Naamlabel, 15, 55
Naar alle handtoestellen uitzenden, 30
Naar een groep handtoestellen uitzenden, 30
Naar een individueel handtoestel uitzenden, 31
Netnummer/landcode, 19, 54
Niet storen (Stil bellen), 15, 34
Noodoproep, 4
Nummerweergave, 15, 20, 31, 32, 46, 47, 50, 55, 56
O
Opnieuw kiezen, 16, 31
Oproepen, 14, 16, 18, 31, 44, 49
Oproeptimer, 17
P
Pacemaker, 4
PIN-code basisstation, 18, 19, 20
PIN-code wijzigen, 18, 19, 56
Programmeerbare flits, 19
Programmeerbare functieoproep, 17, 45, 46
R
REG, 22, 37, 48
Registratie meerder e handtoestellen, 15
Registratie opheffen, 36
Registratiemodus, 22, 27, 36, 48
Registratiesleutel, 22
REN
, 8
Resetknop, 22
RSSI, 13
S
Snelkiezen, 29
Spreken/Flitsen, 14
STIL, 15, 32, 34
Stroomuitval, 5, 9, 25, 26
T
Technische specificaties, 62
Telefoonboek, 14, 16, 17, 39, 45, 46, 47, 53, 55
Telefooninstellingen, 18, 20, 50, 51, 54, 57
Telefoonluidspreker, 14, 30, 31, 33, 48
Tijd instellen, 20
~59~
~60~
Page 94

Toetstoon, 17, 53
Toetsvergrendeling, 34, 53
Toetsvolume, 53
Transformator, 25, 26
Triller, 15
Tweecijferige adresindex, 13
Tweerichting/intercom-gesprek, 29
Tweeweg-intercom, 14, 29
Uitgaande gesprekken blokkeren, 43
V
Veiligheidsinformatie, 4
Veiligheidsinstructies batterij, 7
Veiligheidsinstructies, 5
Visuele indicator Bericht wacht (VMWI), 50
Waarschuwingsbericht, 24
Wettelijke kennisgevingen, 8
Technische specificaties
Elektrische specificaties Basisstation Draagbaar handtoestel
Frequentie 863-865 MHz 863-865 MHz
RF-uitgangsvermogen
Kanaalruimte 50 kHz 50 kHz
Aantal kanalen 38 38
Modulatie GMSK GMSK
TDD-framel engte 10 ms 10 ms
Aantal slots/frame 2 2
Gevoeligheid ontvangere
Antenneversterking 2 dBi
Antenne-aansluiting TNC Eigen
Telefoonaansluiting RJ11 x 2 N.V.T.
Kanaalversleuteling ½ rateConvolutional + CRC ½ rateConvolutional + CRC
Overdrachtsnelheid 42,667 kbps 42,667 kbps
Spraakversleuteling 8 kbps G.729A 8 kbps G.729A
Gegevenssnelheid
gebruiker
Duplex Time Division Duplex (TDD) Time Division Duplex (TDD)
Meervoudige toegang FDMA FDMA
Aantal systeem-IDs 65.536 65.536
Belsignaal 20-50 Hz, 12-90 Vrms N.V.T.
Flitsduur
Voedingsbron AC/DC 12 V/1 A adapter
Laadstroom
Laadtijd N.V.T. 3 uur
Regelgeving
Werktemperatuur 0 – 50 °C -10 – 60 °C
Opladen temperatuur N.V.T. 0 – 40 °C
Opmerkingen:
1. N.V.T = Niet van toepassing
2. De fabrikant behoudt zich het recht voor om de specificatie zonder
waarschuwing vooraf te wijzigen.
Top: 8 dBm Top: 7 dBm
Gemiddeld: 5 dBm Gemiddeld: 5 dBm
<-116dBm (@ BER 10
32 kbps duplex
100-900 ms
programmeerbaar
N.V.T.
EN 301 357-2 (RF) EN 301 357-2 (RF)
EN 301 489 (EMC) EN 301 489 (EMC)
EN 60950 (Veiligheid) EN 60950 (Veiligh e id)
EN 50371 (RF-veiligheid)
-2
) <-116dBm (@ BER 10
Lang: 2.5 dBi
Kort: 1.5 dBi
32 kbps duplex
N.V.T.
3,7 V/1100 mAh Li-Ion
batterij
550mA
(550/850 mA voor
bureaulader)
-2
)
~61~
~62~
Page 95

Manuel de l'utilisateur
(Français)
EP800
Téléphone sans fil numérique longue
portée
Service clientèle EnGenius
Singapour : 65-62271088, http://www.engeniustech.com.sg/
Table des matières
Instructions relatives à la sécurité ............................................ 4
Instructions de sécurité générale . .. .. .. .. .. ... .. .. .. .. .. ... .. .. .. .. .. ... . 4
Instructions de sécurité pour le produit ................................ 5
Instructions de sécurité pour la batterie ............................... 7
Information réglementaires ... .. .. .. .. ... .. .. .. .. .. ... .......................... . 8
Liste de contrôle des équipements .. .. .. .. .. .. ... ......................... 10
Illustration du combiné ........................................................... 11
Caractéristiques du combiné ................................................. 13
Caractéristiques de base du combiné .................... .. .. .. .. .. .. 13
Caractéristiques du combiné supplémentaire ..... ... .. .. .. .. ... . 15
Illustration de la base ............................................................. 22
Caractéristiques de la base ................................................... 23
Caractéristiques principales de la station de base ............. 23
Illustration du chargeur .......................................................... 24
Caractéristiques du chargeur ................................................. 25
Mise en route ............................ .. .. ... .. .. .. .. .. ... .. .. .. .. ... .. ............ 26
Installation de la station de base ..................... .. .. ... .. .. .. ...... 26
Installation du chargeur et du combiné .............................. 27
Fonctionnement de base ............ .. ... .. .. .. .. .. ... .. .. ..................... 28
Modes de fonctionnement .................................................. 28
A. Modes de fonctionnement de base ............................ 28
B. Modes de fonctionnement du combiné ...................... 28
Passer un appel téléphonique ............................................ 30
Faire un appel Double sens / Intercom .............................. 30
Effectuer une diffusion ........................................ ... .. .. ........ 31
A. Appels combiné vers combiné ................................... 31
Rappel ................................................................................ 32
Recevoir un appel téléphonique ......................................... 33
Recevoir un appel Intercom ............................................... 33
Mettre fin à un appel. ......................................................... 34
Réglage du volume de la voix dans le récepteur (écouteur) du
combiné ............................................................................. 34
Réglage du volume de la voix dans le haut-parleur du
combiné ............................................................................. 34
Mettre un appel en attente ................................................. 35
~2~
Page 96

Muet ................................................................................... 35
Ne pas déranger (Sonnerie silencieuse) ......... .. .. ... .. .. .. .. ... . 36
Garde-touches ................................................................... 36
Recharge et remplacement de la batterie .............. .. .. .. .. .. .. 36
Fonctionnement avancé ..................................... .. ... .............. 38
Enregistrement du combiné ............................................... 38
Enregistrement d'un combiné dans un groupe. .................. 39
Mise en attente d'appel ...................................................... 40
Fonctionnement de l'annuaire ............................................ 41
Blocage d’appels ......................................... .. .. .. .. ... .. .. .. .. .. .. 45
Fonction appel programmable........................... ... .. .. .. .. .. .. .. 48
ID appelant ......................................................................... 49
Paramétrage multi-base ......................... ... .. .. .. .. .. ... .. .. .. .. .. .. 51
Gestionnaire d'appels ......................................................... 52
Indicateur visuel de message en attente (VMWI) ............... 53
Ajuster le gain du microphone du combiné ............ .. .. .. .. ... . 53
Ajuster la sonnerie de l'écouteur ........................................ 54
Moniteur de bébé ............................................................... 54
Index ...................................................................................... 62
Spécifications techniques ...................................................... 65
Instructions relatives à la sécurité
Précaution : Votre téléphone sans fil vous donne la liberté et la flexibilité
de rester joignable quand vous vous déplacez. Toutefois, lorsque vous
utilisez votre appareil téléphonique, certaines instructions relat ives à la
sécurité sont à respecter pour éviter les risques d'incendie,
d'électrocution, de blessure corporelle ou de dégâts matériels.
Instructions de sécurité générale
1. Lorsque vous utilisez votre téléphone sans fil, assurez-vous de votre
sécurité et de celle des autres :
a. Regardez toujours où vous marchez et où vou s vous tenez .
b. Ne laissez pas un coup de téléphone vous distraire d'un travail en
toute sécurité.
2. En cas d'urgence :
a. Si une urgence survient, composez le numéro de téléphone
d'urgence. Rappel : Si vous êtes dans une zone où votre téléphone
ne dispose pas d'un signal clair de la base, il est fort probable que
l'appel ne passe pas. Repérez le téléphone fixe ou un autre appareil
de communication le plus proche pour appeler du secours.
b. Les appels d'urgence ne fournissent pas systématiquement aux
interlocuteurs vos nom, numéro de téléphone ou emplacement.
3. Avertissement aux personnes porteuses d'un appareil auditif : Ce
système téléphonique est compatible avec les aides auditives couplées
de façon inductive.
4. Avertissement aux personnes porteuses de stimulateur cardiaque : Bien
que des interférences puissant se produire avec un stimulateur
cardiaque implanté à très faible distance, les téléphones sans fil ne
semblent pas poser de problème significatif aux porteurs de st imul a teu r
cardiaque. Cependant, en l'état actuel des connaissances, nous
recommandons aux personnes porteuses de stimulateur cardiaque de
prendre des précautions lors de l'utilisation ou du transport d'un
téléphone sans fil, pour s'assurer qu'il y a assez de distance entre le
téléphone et le stimulateur. Ne portez pas le combiné dans une poche à
la poitrine. Si vous avez une raison de soupçonner que des
interférences ont lieu, éteignez immédiatement votre combiné.
~3~
~4~
Page 97

Instructions de sécurité pour le produit
1. Lisez et comprenez toutes les instructions.
2. Suivez tous les avertissements et toutes les instructions y compris ce qui
est indiqué sur le produit.
3. Les changements et les modifications apportés à ce produit et non
expressément approuvés par le fabricant annulent la garantieet
l'autorisation CE d'utiliser cet appareil. Utilisez uniquement les
accessoires fournis par le fabricant.
4. N'utilisez pas le téléphone près de l'eau. Ne renversez jamais des
liquides sur l'appareil.
5. Débranchez le produit de la prise téléphonique murale et de la prise
secteur avant nettoyage. N'utilisez pas de nettoyant liquide ou aérosol.
Utilisez un chiffon humide pour le nettoyage.
6. Ne placez pas ce produit sur un chariot, un support ou une table instable.
Le produit peut tomber et provoquer des blessures personnelles et des
dégâts au produit ou à d'autres biens.
7. Panne d'alimentation : En cas de panne d'alimentation, le chargeur de
votre combiné ne recharge plus la batterie du combiné, et la station base
ne vous permet plus de passer ni de recevoir d'appel. Le chargeur et la
station base nécessitent tous deux de l'électricité pour fonctionner. Vous
devez disposer d'un téléphone qui ne requiert pas d'électricité pour une
utilisation lors de panes de courant, ou avoir une alimentation électrique
de secours.
8. Les fentes et les ouvertures sur le boîtier du produit sont destinées à la
ventilation. Ces ouvertures ne doivent être ni obstruées ni couvertes. Le
fait de placer le produit sur un lit, un tapis ou une autre surface similaire
peut bloquer ces ouvertures, et il faut l'éviter. Ce produit ne doit jamais
être place près ou au-dessus d'un radiateur ou d'un convecteur, ou d'une
installation intégrée, à moins de fournir une ventilation adéquate.
9. N'enfoncez jamais d'objet d'aucune sorte dans ce produit à travers les
fentes/ouvertures du boîtier, car cela pourrait endommager le produit,
toucher des points exposés à des tensions dangereuses ou courtcircuiter des pièces et provoquer un incendie, une électrocution ou des
blessures.
10. Ce produit doit être utilisé qu'avec le type d'alimentation indiqué sur
l'étiquette. Si vous n'êtes pas sûr du type d'alimentation de votre
domicile, consultez votre revendeur ou votre compagnie d'électricité
locale.
11. Ne surchargez pas les prises de courant secteur ni les rallonges car cela
peut causer un incendie ou une électrocution.
12. Pour éviter une électrocution ou une brûlure, ne démontez pa s ce prod uit.
Envoyez ce produit à un centre de service autorisé lorsqu'un entretien ou
une réparation est nécessaire. Appelez le service clientèle pour
connaitre les emplacements près de chez vous. Le fait d'ouvrir ou
d'enlever les capots vous expose à des Le fait d'ouvrir ou d'enlever les
capots vous expose à des tensions et des courants électriques
dangereux ou à d'autres risques. Un remontage incorrect du produit
peut provoquer une électrocution lorsque le produit est ensuite utilisé.
13. Évitez d'utiliser le produit pendant un orage. Il peut y avoir un risque
d'électrocution par la foudre.
14. Ne placez pas le produit là où des personnes peuvent piétiner, passer ou
tomber sur lui.
15. Ne placez pas d'objets conducteurs au-dessus ou près de l'antenne.
16. N'utilisez pas le produit pour signaler une fuite de gaz au voisinage de la
fuite.
17. N'installez pas la station de base ni le chargeur du combiné près de
fours micro-ondes, de radios, de téléviseurs, de haut-parleurs ou autres
appareils électriques. Ces appareils peuvent provoquer des
interférences avec le produit ou recevoir des perturbations de la part du
produit.
18. Dans les situations suivantes, débranchez la station de base ou
l'adaptateur du chargeur de la prise de courant et référez-vous à un
centre de service autorisé :
a. Si du liquide a été renversé sur l’appareil
b. Lorsque le cordon d'alimentat i on ou sa fic he es t endo m mag é ou
effiloché.
c. Si le produit a été exposé à la pluie ou à l'eau.
d. Si le produit ne fonctionne pas normalement en suivant les
instructions d'utilisation.
e. Si le produit est tombé ou si le boîtier a été endommagé.
f. Si le produit affiche une nette diminution de ses performances.
~5~
~6~
Page 98

Instructions de sécurité pour la batterie
1. N'utilisez que des batteries Li-ion rechargeables et un chargeur
approuvés par le fabricant. N'utilisez pas d'autres types de piles
rechargeables ou des piles non rechargeables. Les batteries peut
provoquer un court-circuit, et l'enveloppe de la batterie peut être
endommagés entraînant une situation dangereuse.
2. Suivez les instructions de chargement de ce manuel et les étiquettes et
inscriptions d'instructions dans le combiné et les compartiments du
chargeur.
3. La batterie ne doit pas être rechargée sur place lorsque la température
est inférieure à 0°C ou supérieure à 40°C.
4. La batterie doit être recyclée ou éliminée de façon appropriée. Ne jetez
pas la batterie dans un feu. Les cellules peuvent exploser.
5. Ne jetez pas la batterie avec les déchets municipaux. Vérifiez les
réglementations locales pour vous en débarrasser.
6. Faites attention en manipulant les batteries afin de ne pas provoquer de
court-circuit avec les matériaux conducteurs comme les bagues, les
bracelets, les clés, les canifs ou les pièces de monnaie. La batterie ou le
matériau conducteur peut surchauffer et provoquer des brûlures ou un
incendie.
7. N'exposez pas les batteries à la pluie ou l'eau.
8. N'ouvrez pas et ne découpez pas la batterie . L'élec t r ol yt e libéré e s t
corrosif et peut causer des blessures aux yeux ou à la peau.
L'électrolyte peut être toxique s'il est ingéré.
9. Pendant la charge, la batterie se réchauffe. Ceci est normal et n'est pas
dangereux.
Information réglementaires
EP800
Cet appareil est conforme à la réglementation CE. Son utilisation est
soumise aux deux conditions suivantes :
1) cet appareil ne doit pas causer d'interférence nuisible, et
2) cet appareil doit accepter toute interférence reçue, y compris celles
qui peuvent causer un fonctionnement non souhaité.
1. Ce système téléphonique est conforme aux limites des directives EN 301 357-2
(RF), EN 301 489 (EMC), EN 60950 (Sécurité) et EN 50371 (Sécu rité RF).
2. Le REN est utile pour déterminer la quantité d'appareils que vous pouvez
connecter à votre ligne téléphonique et en maintenant la sonnerie de tous les
appareils lorsque votre numéro de téléphone est appelé. Dans la plupart des
zones, mais pas toutes, la somme des REN de tous les appareils connectés à
une ligne ne doit pas dépasser 5.0. Pour être sûr du nombre d'appareils que
vous pouvez connecter à votre ligne téléphonique, vous devez contacter votre
compagnie de téléphone locale pour connaître le REN maximum dans votre
région.
3. Si votre équipement téléphonique cause des problèmes au réseau téléphonique,
la compagnie de téléphone peut vous demander de débrancher votre système
téléphonique de la ligne jusqu'à ce que le problème ait été corrigé. Consultez
votre compagnie de téléphone locale pour connaître vos droits le cas échéant.
4. Votre compagnie de téléphone peut apporter des modifications à ses
installations, équipements, opérations ou procédures, qui peuvent affecter le bon
fonctionnement de votre système téléphonique. Consultez votre compagnie de
téléphone locale pour connaître vos droits le cas échéant.
5. Ce système téléphonique ne peut pas être affecté à un service à pièces de
monnaie fourni par la compagnie de téléphone. Le raccordement aux lignes est
soumis à tarification régionale.
6. Ce système téléphonique a été testé et trouvé conforme aux limites des
directives EN 301 357-2 (RF), EN 301 489 (EMC), EN 60950 (Sécurité) et EN
50371 (Sécurité RF). Ces limites sont conçues pour fournir une protection
raisonnable contre les interférences nuisibles dans une installation publique
générale. Le fonctionnement de ces appareils peut toutefois rencontrer des
interférences de / vers la télévision, les magnétoscopes, les radios, les
ordinateurs ou autres appareils électroniques alentours. Pour minimiser ou éviter
~7~
~8~
Page 99

ces interférences, le système téléphonique ne doit pas être placé ni fonctionner
près d'autres appareils électroniques.
7. Il n’y a toutefois aucune garantie qu’il ne se produira pas d’interférences dans
une installation particulière. Si ce système téléphonique provoque des
interférences avec d'autres appareils électroniques, ce qui peut être déterminé
en mettant allumant et en éteignant le système, l'utilisateur est encouragé à
essayer de corriger l'interférence par une ou plusieurs des mesures suivantes :
a. Nous recommandons au moins 20 pieds entre le système et d'autres
appareils électroniques.
b. Connectez la station de base sur une prise secteur d'un circuit séparé de
celui utilisé par l'appareil qui reçoit des interférences. Consultez un
revendeur ou un technicien expérimenté en électronique pour de l'aide.
Liste de contrôle des équipements
1. Dans l'emballage combiné + base, veuillez trouver les composants
suivants :
a. Station de la base x 1 (antenne installée)
b. Adaptateur CA/CC de la base x 1
c. Combiné x 1 (antenne installée)
d. Antenne de combiné x 1 (Long ×1)
e. Chargeur de bureau x 1
f. Adaptateur CA/CC du chargeur x 1
g. Pack batterie 1700mA Li-ion x 1
h. Cordon téléphonique x 1
i. CD (Manuel d'utilisation), Guide d'introduction
2. Accessoire en option
a. Kit d'antenne extérieure (y compris antenne et câble)
b. Kit de protection foudre
c. Antenne de combiné à haut élevé
d. Combiné
e. Répartiteur d'antenne
~9~
~10~
Page 100

Illustration du combiné
A
A
A
A
g
g
q
ntenne
ntenne
Haut/Bas
Touche
douce
Parler /
Flash
Microphone
Récepteur
Diffusion
ffichage
Touche
douce
Terminer /
Eteindre
Intercom
Touche de
composition
ttache
Couvercle de
la batterie
Contact de
char
ement
Contact de
char
ement
Prise
cas
ue
~11~
~12~
Prise CC
 Loading...