

Page 1

ENFORCER Wireless Video Door Phone
12 SECO-LARM U.S.A., Inc.
MiDP-236Q_150319.docx
PICKN1
U.S.A., Inc.
16842 Millikan Avenue, Irvine, CA 92606
Tel: 800-662-0800 / 949-261-2999 Fax: 949-261-7326
Website: www.seco
-
larm.com
E-mail: [email protected]
IMPORTANT:
Users and installers of this product are responsible for
ensuring this product complies with all national, state, and local laws
and statutes related to monitoring and recording audio and video signals. SECO-
LARM will not be held responsible for the use of this product
in violation of any current laws or statutes.
WARNING:
Stop using the camera if you see a malfunction such as smoke or unusual heat, as it could cause fire or electric shock. Do n
ot
open the case of this device, as there are no field-serviceable components inside.
FCC COMPLIANCE STATEMENT
:
THIS DEVICE COMPLIES WITH PART 15 OF THE FCC RULES. OPERATION IS SUBJE CT TO THE FOLLOWING TWO CONDITIONS:
(1) THIS DEVICE MAY NOT CAUSE HARMFUL INTERFERENCE AND (2) THIS DEVICE MUS T ACCEPT ANY INTERFERENCE
RECEIVED, INCLUDING INTERFERENCE THAT MAY CAUSE UNDESIRED OPERATION.
Notice: The changes or modifications not expressly approved by the party responsible f or compliance could void the user’s authority to
operate the equipment.
IMPORTANT NOTE: To comply with the FCC RF exposure compliance requirements, n o change to the antenna or the device is permitted.
Any change to the antenna or the device could result in the device exceeding the RF expos ure requirements and void user’s authority to
operate the device.
WARRANTY:
This SECO
-
LARM product is warranted against defects in material and workmanship while used in norm al service for a period
of one (1) year from the date of sale to the original customer. SECO-LARM’s obligation is lim ited to the
repair or replacement of any defective
part if the unit is returned, transportation prepaid, to SECO-LARM.
This Warranty is void if damage is caused by or attributed to acts of God, physical or electrical m isuse or abuse, neglect, repair or alteration,
improper or abnormal usage, or faulty installation, or if for any other reason SECO- LARM determines that such equipment is not operating
properly as a result of causes other than defects in material and workmanship.
The sole obligation of SECO-LARM, and the purchaser’s exclusive remedy, shall be lim ited to replacement or repair only, at SECO-LARM’s
option. In no event shall SECO-LARM be liable for any special, collateral, incidental, or conse quential personal or property damages of any
kind to the purchaser or anyone else.
NOTICE:
The information and specifications printed in this manual are current at the time of p ublication. However, the SECO
-
LARM policy is
one of continual development and improvement. For this reason, SECO-LARM reserves t he right to change specifications without notice.
SECO-LARM is also not responsible for misprints or typographical errors.
Copyright © 2015 SECO-LARM U.S.A., Inc. All rights reserved. This material may not be reproduced or copied, in whole or in part, without
the written permission of SECO-LARM.
The monitor’s screen is blank.
•
Make sure the “ON/OFF” button was pressed.
• Recharge the monitor’s battery.
• Plug the charger directly into the monitor.
The
monitor does not ring.
•
Check that the volume is turned up.
• Check that the monitor is in standby mode.
• Check that the monitor is placed in the mounting bracket.
The monitor’s screen turns on, but
does not display the camera’s
image.
• Check that the monitor has been paired with the camera.
• Check that the monitor is within range of the camera.
The monitor’s screen image quality is
poor.
•
Adjust the monitor’s display brightness (see Operating the
Wireless Video Door Phone on pg. 9~10).
• Clean the camera’s lens using a soft, clean cloth.
• Change the position of the camera.
•
Move the monitor away from microwaves, television, lamps,
and other potential sources of electromagnetic interference.
The monitor’s “ON/OFF” button does
not unlock the door’s optional locking
device.
•
Check the wiring between the camera and the optional
door locking device.
• Check that the unit is in two-way communication.
Troubleshooting:
DP-236-CQ FCC ID
:K4E236CQ
DP-
236-MQ FCC
ID
:K4E236MQ
1
3
DP-236Q
Wireless Video Door Phone
Manual
1
Second and third monitor
s sold separately.
2
Line-of-sight range. Actual range may vary depending on the installation and operati ng environment.
• Wireless operation – camera and monitor can
operate from up to 492ft (150m)2 away
• Remotely and securely talk to visitors and
unlock doors or gates via the monitor
• Lightweight monitor can be carried around the
premises while talking to the visitor
• Connect up to two additional monitors1
• Camera includes a built-in PIR sensor that
activates the camera and takes photos of the
visitor when he or she approaches
• Camera has built-in IR LEDs for nighttime
operation
• Monitor includes a kickstand and a charging
base
• Camera powered by 9~16 VAC/5~16 VDC
• Monitor front door at any time
• Egress input
• 120° wide field of view
• Adjustable camera pan and tilt angle—up to
20° from centerline in any direction—to allow
for mounting variations
Page 2

ENFORCER Wireless Video Door Phone
2
Also Available:
Parts List:
Introduction
................................
.......................
2
Parts List ........................................................... 2
Also Available ................................................... 2
Specifications .................................................... 3
Overview ........................................................... 3
Display Overview .............................................. 4
Installation Notes .............................................. 4
Camera Wiring Diagram ................................... 5
Sample Application ........................................... 5
Installation – Camera ........................................ 6
Installation
Programming
Operating the Wireless
Video Door Phone
Pairing Additional Monitors
Resetting the Camera
and Pairing a First Monitor
Tamper Alarm
Troubleshooting
War
ranty
The ENFORCER
Wireless Video Door Phone is the convenient and secure way to monitor and
control an entryway such as a door or gate from nearly 492 feet (150 meters) away.
When a guest or visitor presses the doorbell button on the camera unit, the homeowner can use
one of up to three lightweight wireless LCD monitors to see who is requesting entry, speak with the
caller, take a photo, and decide whether or not to grant entry
1x Monitor (DP
-
236-MQ)1
1x Camera (DP-236-CQ)1
1x Monitor charger stand
1x Monitor kick stand
1x AC Power adapter with USB port
(for monitor)
1x USB Cable (for monitor)
2x Rechargeable lithium ion batteries
(for monitor and camera)
1x AC Power adapter with DC plug
(for camera)
1x DC Jack with pigtail (for camera)
5x Mounting screws
5x Screw anchors
2x Camera screw
1x Screw cover
1x Monitor
1x Monitor charger stand
1x Monitor kick stand
1x AC Power adapter with USB port
(for monitor)
1x USB Cable
1x Rechargeable lithium ion battery
DP-236Q DP-236
Complete Kit
Additional Monitor Unit
DP-236
Replacement Monitor Charger Stand
DP-236
Replacement Battery
1
By default, the monitor in the
DP-236Q Complete Kit is paired
with the camera.
Introduction:
Table of Contents:
SECO-LARM U.S.A., Inc.
– Monitor
................................
...... 6-7
.................................................... 8
.................................... 9-10
............................. 10
.......................... 11
................................................. 11
.............................................. 12
......................................................... 12
.
2
-MQ
-SQ
-BQ
2
Additional monitors are not
automatically paired with the
camera. See pg. 10, Pairing
Additional Monitors.
ENFORCER Wireless Video Door Phone
SECO-LARM U.S.A., Inc. 11
To reset the camera and pair a first monitor:
1. Clear the camera’s existing pairings:
a. Remove the camera from the bracket.
b. The alarm will begin to sound.
c.
Remove the battery from the camera then replace the battery to deactivate the tamper
alarm.
d. Use a paper clip or other small object to press and hold the camera’s reset button for
three seconds. A beep confirms the pairings have been cleared.
2. Pair the monitor to the camera:
a. Turn on the monitor by holding the “ON/OFF” button for three seconds.
b. Quickly press the “ON/OFF” button three times. The screen will display “Pairing” for
about 15 seconds. The monitor will allow pairing only once per bootup, so you may
need to power it OFF and ON again if the attempt fails.
3. Pair the camera to the monitor:
a. While the monitor displays “Pairing”, press the camera’s reset button twice.
4. One beep confirms the pairing of the first monitor. Return the camera to the bracket:
a. Mount the camera in the bracket.
b. Press the doorbell button on the camera to test the connection.
The camera’s tamper alarm will sound when the camera is removed from its
bracket, warning the
homeowner of possible vandalism. Only the first programmed monitor will sound an alarm.
NOTE: If the camera is removed and replaced within 2 seconds, the camera will instead send a
warning call to the monitor. Answer the call as normal by pressing the “Talk” button, and
then again to hang up the call.
1. To disable the tamper alarm if no monitors are paired with the camera:
a. Return the camera to the bracket.
b. If the alarm persists, unplug the camera and remove the battery.
c. Return the camera’s battery and reconnect it to power.
2. To disable the tamper alarm if one or more monitors are paired with the camera:
a. Repeatedly press the “Talk” button on one of the paired monitors to disable the
tamper alarm.
b. If the alarm persists, unplug the camera and remove the battery.
c. Unplug each monitor and remove each monitor’s battery.
d. Return the camera’s battery and reconnect it to power.
e. Insert each monitor’s battery and reconnect each monitor to power.
Tamper Alarm:
Resetting the Camera and Pairing a First Monitor:
Page 3
ENFORCER Wireless Video Door Phone
10 SECO-LARM U.S.A., Inc.
Adjust the monitor’s color tint:
1. Press the “ON/OFF” button to turn the monitor’s
display ON.
2. Press the monitor’s “View” button to turn the
camera on.
3. While the camera’s image is displayed, press the up
and down arrows on the front of the monitor to turn
the brightness up and down.
4. Press the monitor’s “View” button to save the
brightness setting and turn the camera off.
Access the photo gallery:
1. The monitor can be used to view up to 100 photos that have been captured by the camera,
and to delete photos no longer needed.
2. Press the “ON/OFF” button to turn the monitor’s display ON.
3. Press and hold the down arrow on the front of the monitor 3 seconds until the letter “P” and the
number of stored photos show on the top of the screen.
4. Press the up and down arrows on the front of the monitor to view the captured photos.
5. To delete a photo:
a. Press the “Photo/Settings” button.
b. Press the up and down arrows on the front of the monitor to select “Y” (yes, delete),
“N” (no, do not delete), or “ALL” (delete all photos).
c. Press the “Talk” button to select. If “Y” is selected, the photo will be deleted.
NOTE: Monitor will automatically delete the oldest photo when full.
NOTE: It is not possible to export internal photos.
NOTE:
By default, the monitor in the
DP-236Q
Complete Kit is paired with the camera. These
instructions apply to pairing a second or third monitor.
To pair a monitor with the camera:
1. Disable the tamper alarm:
a. Remove the camera from the bracket.
b. The tamper alarm will now sound. Press the “Talk” button on the already-paired
monitor repeatedly to disable the tamper alarm.
2. Pair the new monitor to the camera:
a. Turn on the monitor to be paired by holding the “ON/OFF” button for three seconds.
b. Quickly press the “ON/OFF” button three times. The screen will display “Pairing” for
about 15 seconds. The monitor will allow pairing only once per bootup, so you may
need to power it OFF and ON again if the attempt fails.
3. Pair the camera to the new monitor:
a. While the monitor displays “Pairing”, use a paperclip or other small object to press the
camera’s reset button twice.
b. Two or three beeps confirm the pairing of the second or third monitor respectively.
4. Return the camera to the bracket:
a. Mount the camera in the bracket.
b. Press the doorbell button on the camera to test the connection.
Pairing Additional Monitors:
Operating the Wireless Video Door Phone
(continued)
:
Talk
View
Photo/Settings
Arrow
Buttons
ENFORCER Wireless Video Door Phone
SECO-LARM U.S.A., Inc. 3
Reset
Camera
Camera
Type Color Camera
Chip CMOS
Resolution
480 TV Lines
Lens 2mm
Field of view
120°
Camera angle adjustment
Up
to 20° any direction
Operating voltage
9~16 VAC/
5~16
VDC
Relock delay
1~6 s
Relay output
3A@250VAC/30VDC
Current
draw
Active [email protected]
Standby [email protected]
Battery
life
Active 4.4 Hours
Standby 366
Hours (15
days)
PIR Detection range
9’ (3m)
PIR Detection angle
138°
Dimensions
(with bracket)
511/16”x31/8”x23/8”
(144x80x60 mm)
Weight 4.3-oz (122g)
Operating temperature
14°~122° F (
-
10°~50° C)
Monitor
Display 33/8” (86mm)
TFT
Operating voltage
5VDC (adapter) or
3.7VDC (battery)
Current
draw
Active [email protected]
Standby 5
Battery
life
Active 4.4 Hours
Standby 220 Hours (9
days)
Operating frequency
2410.875~2471.625M
Hz
RF power
10mW
Wireless range
492
’ (
150m)*
Dimensions
5”x33/8”x7/8”
(127x85x22 mm)
Weight 3.9-oz (110g)
Operating temperature
32°~104° F (0°~40° C)
Monitor
33/8”
(86mm)
*Line-of-sight range. Actual range may vary depending on the
installation and operating environment.
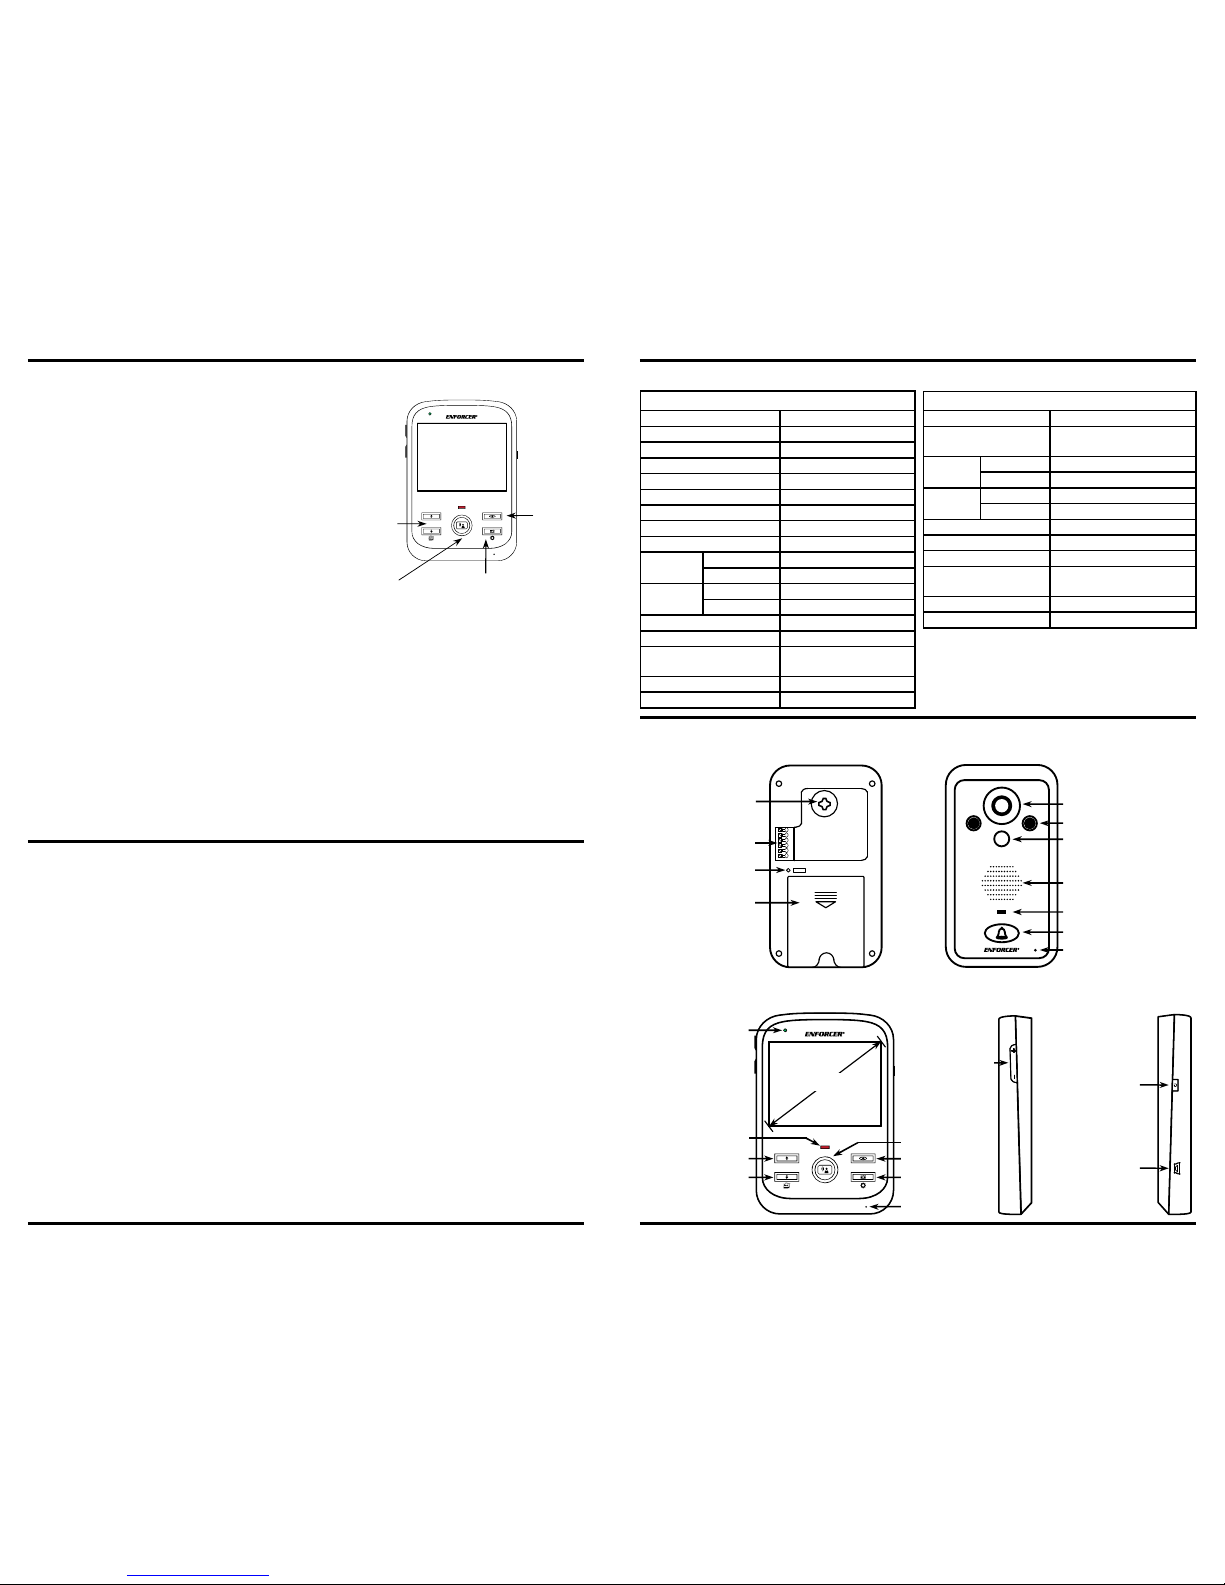
Overview:
Specifications:
Wiring connections
(see pg. 4)
Reset button
Battery cover
Camera
IR LEDs
PIR Sensor
Speaker
Status LED
Doorbell
Microphone
Volume buttons
ON/OFF Button:
- Turn monitor
ON/OFF
- Standby mode
- Unlock door
USB Connector
(Mini-B)
View
Photo/Settings
Microphone
Talk
Up
Down/Gallery
Charging
indicator
Status LED
Camera Angle
Adjustment Joystick
Page 4
ENFORCER Wireless Video Door Phone
4 SECO-LARM U.S.A., Inc.
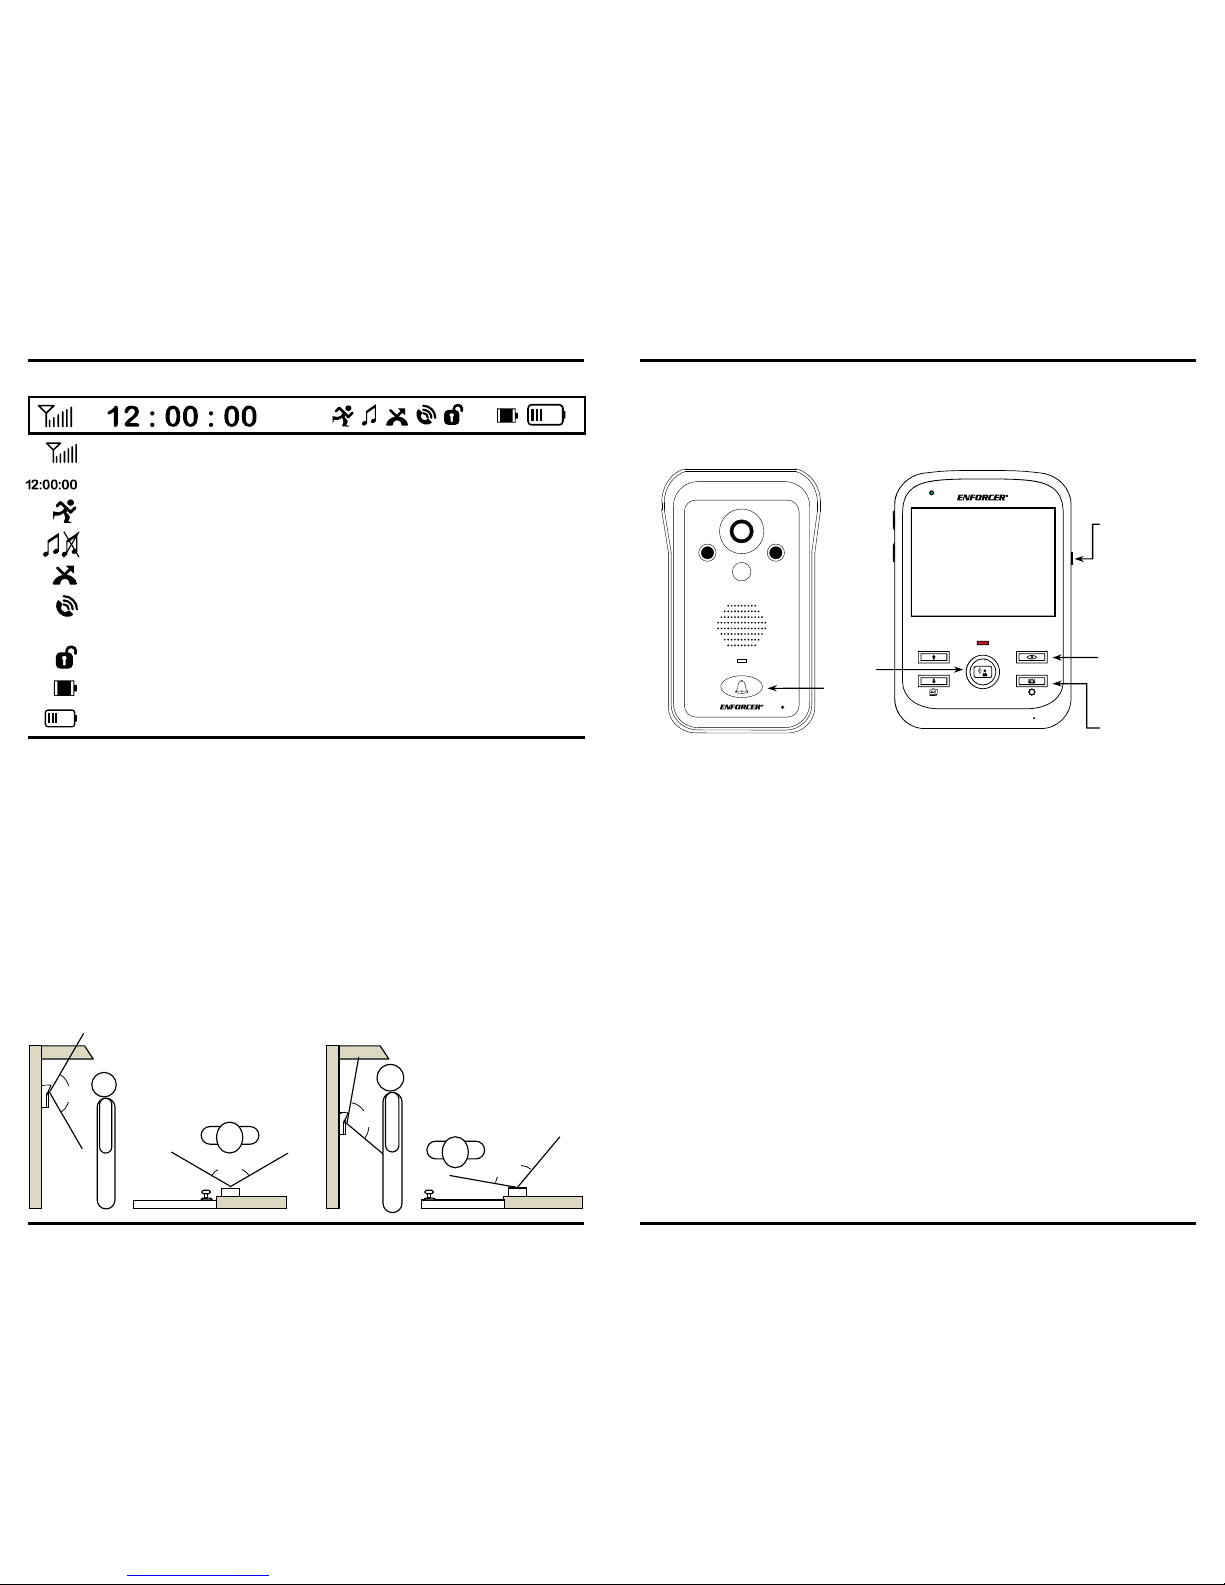
120
º
Camera with No Tilt
Camera
Tilted
120º
Up 20º
120º
Left 20º
120
º
1. Unpack the video door phone and note the included parts.
2. Read this manual thoroughly. A clear understanding of the manual will make installation and
operation much easier.
3. Find a good location to mount the monitor and camera. Approximately 5ft (1.5m) above the
ground is optimal, where the visitor would stand approximately 2.5~5ft (0.8~1.5m) from the
camera. Note that the camera tilt and pan angle can be adjusted up to 20° from centerline to
compensate for less than optimal situations (see below).
4. Avoid mounting the camera or monitor near sources of strong electromagnetic signals or other
electronic devices that may cause interference.
5. Avoid mounting the camera in direct sunlight or exposing the camera to strong vibrations,
direct
rain, or moisture, which could result in damage to the camera. Strong backlight or reflection
may degrade the resulting video image.
6. The monitor and camera contain no user-serviceable parts. Opening them may damage
sensitive components
and will void the warranty.
Installation Notes:
Display Overview:
:
Signal Strength
–
Displays the wireless signal strength
: Time – Displays the current time
: PIR – Displays when the PIR sensor is turned on
: Ringer – Displays if the ringer is audible or muted
: Missed Call – Displays when there is a missed call
: Two-Way Communication – Displays when the monitor and camera station can hear
each other
: Relay – Displays while the relay is active
: Camera Battery: Displays the current camera station battery level
: Monitor Battery: Displays the current monitor station battery level
ENFORCER Wireless Video Door Phone
SECO-LARM U.S.A., Inc. 9
Receive a visitor:
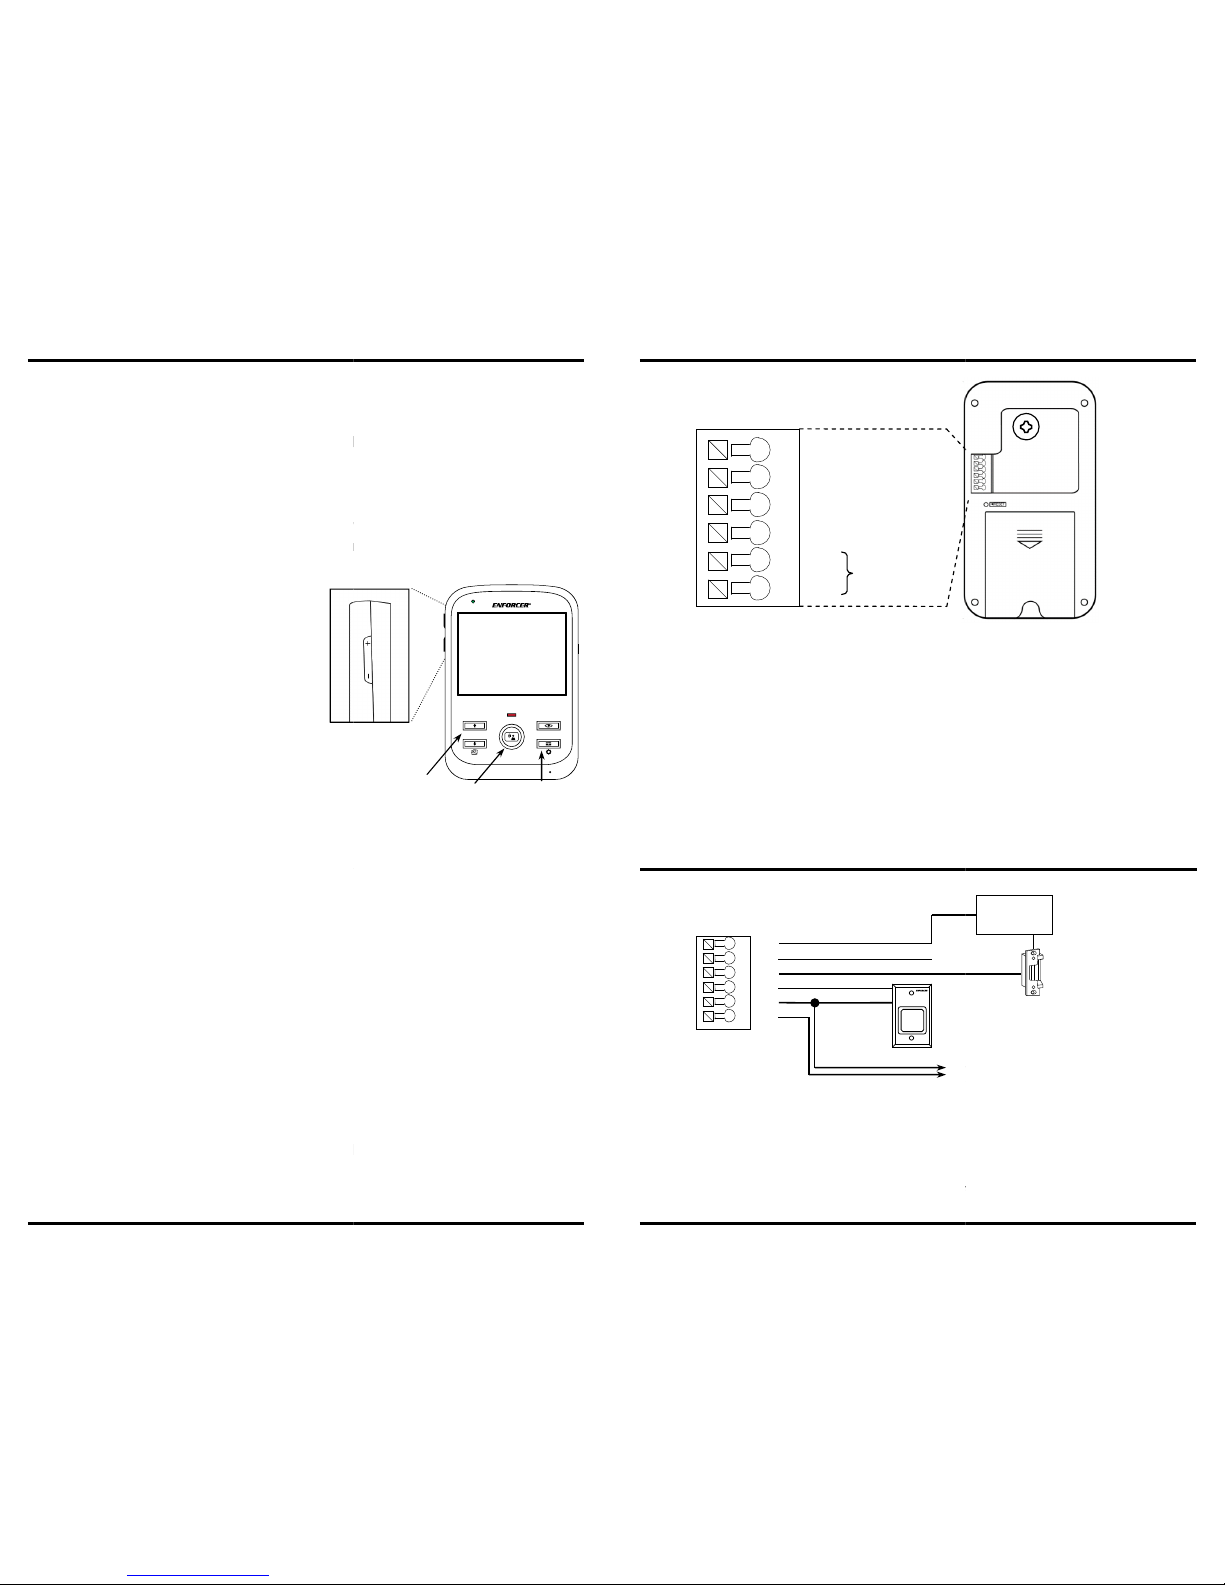
1. If a visitor presses the doorbell button on the camera, the monitor’s display turns ON and the
monitor sounds the chosen ring tone.
2. To talk with the visitor, press the “Talk” button.
3. To unlock the optional electronic door lock, press the “ON/OFF” button briefly while the
monitor is displaying the camera’s view.
4. Press the “Talk” button again to turn off the monitor.
View and/or talk to a visitor who has not pressed the doorbell button on the camera:
1. Press the “ON/OFF” button to turn the monitor’s display ON.
2. Press the monitor’s “View” button to turn the camera on. At this time, the monitor can hear
sound and view video from the camera.
3. Press the monitor’s “Talk” button to enable communication between the monitor and camera.
4. To unlock the optional electronic door lock, press the “ON/OFF” button momentarily while the
monitor is displaying the camera’s view.
NOTE: The “Talk” button must be pressed before pressing the “ON/OFF” button. Otherwise
pressing the “ON/OFF” button will turn off the monitor.
5. Press the monitor’s “View” button to mute the monitor
or “Talk” button to end monitoring of the
camera.
Manually take a photo:
1. While the monitor is displaying the camera’s view, press the “Photo/Settings” button to
manually take a photo.
2. If the user does not answer a call within 5 seconds, the camera will take a photo
automatically.
NOTE: If the monitor’s battery is low, the photo-taking function will not work.
Request
entry:
1. Press the doorbell button on the camera.
2. Wait for someone to press the “ON/OFF” button on the monitor to unlock the door.
Doorbell
Talk
View
Photo/
Settings
ON/OFF
:
• Turn monitor
ON/OFF
• Standby
mode
• Unlock door
Operating the Wireless Video Door Phone:
Page 5
ENFORCER Wireless Video Door Phone
8
1. While the monitor display is
on, hold the “Photo/Settings” button for 3 seconds to enter
programming mode.
2.
Press the “Photo/Settings” button to cycle through the programming options, including:
a. Time setup
b. Ringtone choice
c. Lock delay
d. PIR setup
3. To exit programming mode, press the
“Photo/Settings” button to cycle through the remaining
programming modes, or press the “Talk” button to return to the home screen.
NOTE:
If there is no activity, the monitor will exit programming mode and the disp
off in 35 seconds.
Programming the display time:
1. Hold the “Photo/Settings” button for 3 seconds
to enter programming mode.
2. Use the up and down arrow buttons on the
front of the monitor to highlight the area to be
changed.
3. Use the volume buttons (+/-) to adjust the time
or date.
4. Press the “Talk” button to set the display time
and exit programming mode.
Programming the ringtones:
1.
Hold the “Photo/Settings” button for 3 seconds to enter programming mode, then
momentarily press the “Photo/Settings” button one time to select the ringtone
2.
Use the up and down arrow buttons on the front of the monitor to choose one of 4 ringtones:
Telephone, Doorbell, “Für Elise”, or “Jingle Bells”. This is the tone the user will hear when a
visitor requests entry.
3. Use the volume buttons (+/-) to adj
ust the volume of the ringtone.
4.
Press the “Talk” button to set the ringtone and exit programming mode.
Programming the lock delay:
This determines how long the relay output is active after the door has been unlocked.
1. Hold the “Photo/Settings” button for 3
seconds to enter programming mode, then momentarily
press the “Photo/Settings” button two times to select the lock delay.
2.
Use the up and down arrow buttons on the front of the monitor to set the lock delay from 1 to 6
seconds. The default setting is 1 second.
3.
Press the “Talk” button to set the lock delay and exit programming mode.
Programming the PIR sensor ON/OFF:
The camera has a built-
in PIR (passive infrared) sensor to detect an approaching visitor and
automatically turns the camera on and captures a ph
oto. It can be programmed ON or OFF.
1.
Hold the “Photo/Settings” button for 3 seconds to enter programming mode, then briefly press
the “Photo/Settings” button three times to select the PIR mode.
2.
Use the up and down arrow buttons on the front of the monitor
or OFF.
3.
Press the “Talk” button to set the PIR sensor and exit programming mode.
Volume buttons
Arrow buttons
Programming:
SECO-LARM U.S.A., Inc.
lay will turn
display.
to turn the PIR sensor ON
Photo/
Settings
Talk
ENFORCER
SECO-LARM U.S.A., Inc.
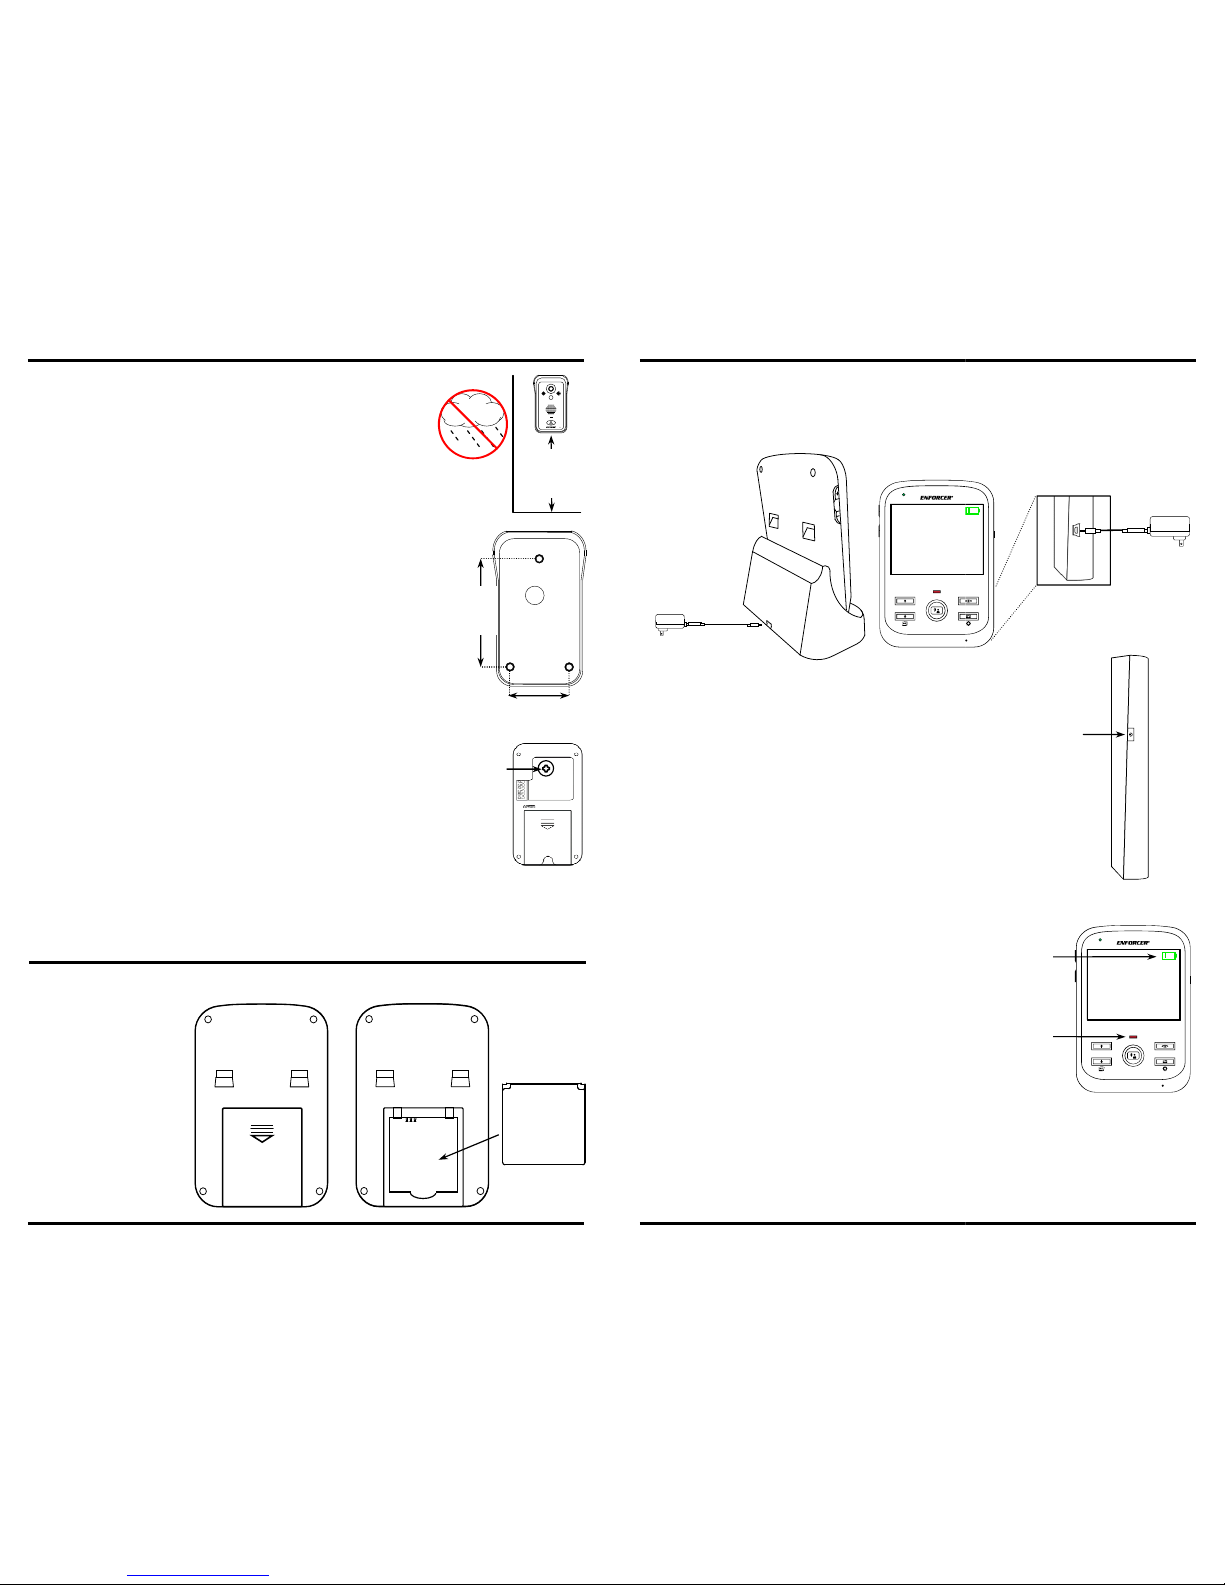
Sample Application:
Positive (+) (red wire)
Negative (-) (black wire)
1) Positive (+) power input. Connect to the red wire of the
wire of the doorbell’s power supply.
2) Negative (-
) power input. Connect to the black wire of the included AC adapter or to the
negative wire of the doorbell’s power supply.
3)
Egress (N.O.) negative input. Connect to an optional N.
will activate the relay for the same le
ngth as the lock delay. (See pg. 8, Programming the
lock delay).
4)
N.O. (Normally opened) output. Wire to the lock device for fail
5)
N.C. (Normally closed) output. Wire to the lock device for fail
6) Common output. Wire to the p
ower supply of the lock device.
NOTE:
For 16VAC doorbell installation, wire directly from the doorbell’s transformer.
COM
PUSH
TO
EXIT
1 2 3 4 5 6
N.C.
N.O.
Request
•
The camera is connected to its included AC adapter.
• The egress input is connected to a Request-to-
Exit Plate. The homeowner can exit the
premises by pressing this button.
•
The N.O. (normally open) output is wired to an electric lock. The camera and the Request
Exit Plate both activate the strike, allowing
entry or egress.
•
The electric lock’s power supply is wired to the COM (common) output.
Egress input (N.O., -)
N.O. Output
N.C. Output
COM
Egress input (N.O., -)
To the included AC adapter or
the doorbell’s
(–)
(+)
9~16 VAC/
5~16 VDC
Camera
Camera Wiring Diagram:
6
5
4
3
2
1
(–)
(+)
Wireless Video Door Phone
5
-secure operation.
-safe operation.
-to-exit plate
Fail-secure
electric strike
Electric strike
power supply
-to-
transformer
Page 6
ENFORCER Wireless Video Door Phone
6 SECO-LARM U.S.A., Inc.
BP-6M
5ft
(1.5m)
Install the monitor battery:
Remove the battery cover
on the back of the monitor
and insert the included
BP-6M lithium ion battery.
1. Position the camera so
the area to be monitored is easily visible,
optimally 5ft (1.5m) above the ground. Do not position the camera in
direct sunlight, or where it will be exposed directly to rain or snow.
NOTE:
For best results, the visitor should stand 2.5~5ft (0.8~1.5m)
away from camera.
2.
Cut a hole large enough to run the min. 21AWG 2-conductor wire to
the door unlock device through the wall, as well as to the included
power supply.
3.
Install the camera bracket to the wall with three screws. Use screw
anchors if the bracket is mounted on drywall or brick.
4.
Run the 2-conductor wire from the camera through the wire hole in
the bracket to the optional door unlock device.
5.
Install the rechargeable lithium ion battery into the camera. The
battery will act as a backup power source in case of a power
outage.
6.
Connect the AC adapter (see Camera Wiring Diagram on pg. 5).
7.
Install the monitor battery (see below) and turn on the camera and
monitor. If the camera is not in the bracket, the tamper alarm will
sound. Press the “Talk” button on the monitor repeatedly to disable
the tamper alarm.
8.
Experiment with the camera angle using the joystick on the camera
back to adjust the direction of the camera while viewing the image
on the monitor.
9.
Mount the camera into the bracket:
o Push the top of the camera into the top of the bracket.
o Push the bottom of the camera into the bottom of the bracket.
o Screw in the bottom of the camera to fix the camera into the
bracket and push the plastic screw cover into the bottom of the
bracket, over the screw.
NOTE: Do not block the PIR sensor on the camera.
22/16” (54mm)
33/4”
(96mm)
Camera
Angle
Adjustment
Joystick
Installation – Monitor:
Installation – Camera:
ENFORCER
SECO-LARM U.S.A., Inc.
1. Place the
monitor into
the monitor
charger stand
and plug the
charger into
the stand.
2.
Plug the charger directly into the monitor.
Turn monitor ON:
Hold the “ON/OFF” button for 3 seconds. The monitor will turn
ON with the ENFORCER screen.
Standby mode:
If the m
onitor is on, press the “ON/OFF” button momentarily to
go to standby mode (if the display is ON) or to leave
standby
mode (if the display is OFF).
The red indicator LED will flash once every three seconds in
standby mode.
Battery saver:
If the display is
ON and there is no user action for 35 seconds,
the display will turn OFF and the monitor will go into standby
mode.
Low battery:
When the battery is low (indicated by 1 or 0 bars on the
display’s battery icon), the red indicator LED will start to flash
once per second.
Turn monitor OFF:
While the monitor’s display is ON, hold the “ON/OFF” button
for 3 seconds and the monitor will turn OFF.
Installation – Monitor
(continued)
:
Recharge the monitor battery:
There are two ways to recharge the monitor battery.
Wireless Video Door Phone
7
ON/OFF
Battery
level
indicator
Standby/
Low
battery
indicator
 Loading...