

Page 1
User Guide
Page 2

Contents
1. Copyrights.........................................................................4
2. About this User Guide...........................................................5
3. Getting Enfocus PitStop Server up and running...........................6
4. Looking at Enfocus PitStop Server............................................8
5. Setting up a hot folder.........................................................9
Enfocus PitStop Server
3.1 Installing Enfocus PitStop Server ...........................................................6
To install PitStop Server from DVD.....................................................6
To install PitStop Server from the Enfocus Web site...............................6
3.2 Starting Enfocus Enfocus PitStop Server ..................................................6
3.3 Registering Enfocus PitStop Server ........................................................7
3.4 Setting up Enfocus PitStop Server ..........................................................7
5.1 Valid hot folders................................................................................9
5.2 Summary.......................................................................................10
6. Folder setup......................................................................11
6.1 To create a basic setup.......................................................................11
7. Adding Action Lists and/or a PDF Profile....................................12
7.1 To add one or more Action Lists to a hot folder:.......................................12
To add a PDF Profile to a hot folder:.................................................12
8. Certified PDF.....................................................................13
8.1 About Certified PDF...........................................................................13
8.2 Action on incoming documents before processing...................................13
Incoming non-Certified PDF documents:...........................................13
Incoming Certified PDF documents:..................................................13
8.3 Allow rollback to previous version........................................................13
9. Color Management.............................................................15
9.1 Hot folder specific color management...................................................15
9.2 General color management settings in the preferences.............................15
10. Fonts.............................................................................16
10.1 Hot folder specific Font folders...........................................................16
10.2 Font preferences.............................................................................16
11. E-mail notification.............................................................17
11.1 Setting up E-mail notification in a hot folder.........................................17
11.2 E-mail preferences...........................................................................17
Outgoing SMTP Server....................................................................17
Personal Info..............................................................................18
PitStop Server Administrator ..........................................................18
2
Page 3

Contents
E-mail test notification.................................................................18
12. Running jobs through Enfocus PitStop Server ...........................19
12.1 Dropping files or folders in the input folder...........................................19
How often is an input folder checked ?.............................................19
Creating subfolders in the input folder..............................................19
13. Monitoring active jobs.......................................................20
13.1 To sort the active jobs......................................................................20
13.2 To pause all active jobs....................................................................20
13.3 To resume all active jobs..................................................................20
13.4 To delete active jobs........................................................................20
14. Viewing finished jobs in the History tab .................................22
14.1 History Logging...............................................................................22
14.2 Managing the History List..................................................................22
14.3 Exporting History............................................................................22
14.4 Statistics.......................................................................................22
14.5 Special Events Log...........................................................................23
3
Page 4

Enfocus PitStop Server
1. Copyrights
©
2009 Enfocus NV all rights reserved.Enfocus is an EskoArtwork company.
Certified PDF is a registered trademark of Enfocus NV; patent pending.
Enfocus PitStop Pro, Enfocus PitStop Server, Enfocus Instant PDF, Enfocus StatusCheck, Enfocus
CertifiedPDF.net, Enfocus Instant Barcode, Enfocus PitStop Extreme, Enfocus PDF Workflow Suite,
Enfocus LightSwitch, Enfocus FullSwitch, Enfocus PowerSwitch, Enfocus SwitchClient and Enfocus
SwitchScripter are product names of Enfocus NV.
Acrobat, Distiller, InDesign, Illustrator, Photoshop, FrameMaker, PDFWriter, PageMaker, the Adobe
logo, the Acrobat logo and PostScript are trademarks of Adobe Systems Incorporated.
Macintosh, Mac, Mac OS and ColorSync are trademarks of Apple Computer, Inc., registered in the
U.S. and other countries.
Windows, Windows 2000, Windows XP and Windows Vista are registered trademarks of Microsoft
Corporation.
PANTONE®Colors displayed here may not match PANTONE-identified standards. Consult current
PANTONE Color Publications for accurate color.
PANTONE®and other Pantone, Inc. trademarks are the property of Pantone, Inc.©Pantone, Inc.,
2006.
OPI is a trademark of Aldus Corporation.
Quark, QuarkXPress, QuarkXTensions, XTensions and the XTensions logo among others, are
trademarks of Quark, Inc. and all applicable affiliated companies, Reg. U.S. Pat. & Tm. Off. and
in many other countries.
This product and use of this product is under license from Markzware under U.S.Patent No.
5,963,641.
Other brand and product names may be trademarks or registered trademarks of their respective
holders. All specifications, terms and descriptions of products and services are subject to change
without notice or recourse.
4
Page 5

2. About this User Guide
Take a few minutes to familiarize yourself with this User Guide. It is the best way to get off to a
speedy start with Enfocus PitStop Server.
These are the logical steps to take before starting to process jobs with PitStop Server:
• Install the software (see Installing Enfocus PitStop Server on page 6 and “Installing Enfocus
PitStop Server” in the PitStop Server Reference Guide)
• Register or run in trial mode (see Registering Enfocus PitStop Server on page 7 and
“Registering Enfocus PitStop Server” in the PitStop Server Reference Guide)
• Set up a hot folder (see Setting up a hot folder on page 9 and “Setting up hot folders” in
the PitStop Server Reference Guide)
• Check if preferences are set according to your needs (see “Enfocus PitStop Server Preferences”
in the PitStop Server Reference Guide)
You will then be able to drop files in the input folder and to monitor the job progress (see “Active
jobs in Enfocus PitStop Server” in the PitStop Server Reference Guide). The input files will be
processed; output files will end up in the appropriate output folders.
Enfocus PitStop Server
The History will give an overview of all completed jobs for which History logging was enabled
(see “Enfocus PitStop Server History” in the PitStop Server Reference Guide).
5
Page 6

Enfocus PitStop Server
3. Getting Enfocus PitStop Server up and running
3.1 Installing Enfocus PitStop Server
To install PitStop Server from DVD
1. Insert the Enfocus DVD into your DVD drive.
2. In Microsoft Windows, the flash movie will start automatically if the AutoPlay function is
enabled for that DVD drive. On Mac OS, you need to open the DVD, and double-click the “Start”
flash movie.
3. A flash movie will guide you to the installer.
4. Follow the installation instructions on your screen.
To install PitStop Server from the Enfocus Web site
1. Go to the Enfocus Web site (www.enfocus.com).
2. Download the Enfocus PitStop Server installer from the site.
3. Start the appropriate installer
4. Follow the installation instructions on your screen
3.2 Starting Enfocus Enfocus PitStop Server
The PitStop Server application can be used to define and edit hot folders, monitor active jobs,
and view the job history. PDF Profile and Action List control panels, as well as Help documents
can be accessed.
The actual processing is done by software components running in the background, managed by
the PitStop Server Watchdog.
On startup, Enfocus Enfocus PitStop Server will check if the Enfocus PitStop Server Watchdog is
running. If not, you will get the option to start the Enfocus PitStop Server Watchdog and thus
the processing of files.
When quitting Enfocus PitStop Server, you get the choice to keep processing files. This means
PitStop Server doesn't need to be running in order to process files.
6
Page 7

3.3 Registering Enfocus PitStop Server
When you start Enfocus PitStop Server for the first time after it has been installed, a dialog box
appears, which offers you the following options:
• You can use Enfocus PitStop Server for evaluation purposes during a 30-day trial period.
• You can use the fully licensed and registered version of Enfocus PitStop Server.
To register Enfocus PitStop Server, you need a Product Key. You receive this Product Key when
you purchase Enfocus PitStop Server. To qualify for product upgrades and free technical support,
you must register Enfocus PitStop Server.
3.4 Setting up Enfocus PitStop Server
Enfocus PitStop Server
When setting up Enfocus PitStop Server, it can be important to consider setting the Enfocus
WatchDog user and permissions, locking the user interface, etc. It is also possible to setup Enfocus
PitStop Server as a Service on Windows.
For more information, please read the “Introduction” and “Concept” chapter in the PitStop Server
Reference Guide.
7
Page 8

Enfocus PitStop Server
4. Looking at Enfocus PitStop Server
The work area of PitStop Server basically consists of a main dialog box with 3 tabs: the Hot Folders
tab, the Progress tab and the History tab. The Hot Folders tab in combination with the Hot Folder
Editor can be used to set up and manage your hot folders. The Progress tab provides you with
an overview of the active jobs and the History tab holds a summary of all finished jobs.
8
Page 9

5. Setting up a hot folder
All defined hot folders are shown in the Hot Folder tab in PitStop Server, with an indication of
their status, priority and number of files in queue.
When upgrading from a previous version of PitStop Server, existing hot folders will be converted
and displayed in the hot folders lists.
The most important actions on hot folders, can be run using the buttons above the hot folder
list:
•
You can create a hot folder by clicking the button. The Hot Folder Editor will open.
• You can edit an existing hot folder by selecting it in the list of hot folders and clicking the
button, or by double clicking an existing hot folder in the list. This will also open the
Hot Folder Editor.
•
Using the Duplicate button you can create a duplicate of an existing folder, to create a
new hot folder based on the original one.
Enfocus PitStop Server
It is also possible to delete, export and import hot folders. Export and import of hot folders allows
you to move or replicate hot folders on another machine.
By means of a control-click (right mouse click) in the hot folder list or on a specific hot folder,
you can access a contextual menu, offering a shortcut to the most relevant actions.
5.1 Valid hot folders
In order to process files through a hot folder, the hot folder should be valid and enabled. You
can see the status of your hot folder in the Hot Folders tab.
To set up a valid hot folder:
1. Set the hot folder’s name and description in the General category in the Hot Folder Editor.
2. Set all properties in the different categories
3. Use the Summary to get an overview of all settings and errors
4. Go back to the corresponding categories or to the Preferences pane to fix any errors
Repeat step 3 and 4 until all errors are fixed
5. Enable the hot folder in the General category with the Enable hot folder option, and set the
Priority
6. Specify the History logging setting of your choice. If not set up in the hot folder editor the
default option as defined in the global preferences will be used.
7. Click OK
9
Page 10

Enfocus PitStop Server
5.2 Summary
The Summary gives an overview of all settings, warnings and errors.
These warnings and errors can be configuration problems, that are fixable by adjusting the
settings in the corresponding category of the hot folder editor. It is also possible that they are
general problems, which need to be fixed in the preferences panel of PitStop Server.
10
Page 11

6. Folder setup
The first step in setting up a hot folder is to define the input folder and output folders. You can
define one or more of these folders manually, but the easiest way is to create them all inside a
selected base folder, by using the Create Basic Setup function.
6.1 To create a basic setup
1. In the Hot Folder Editor, go to the “Folders” category
2. Click the Create Basic Setup button.
3. Select “Create all subfolders” to define advanced folders, or “Create minimal set of subfolders”
to define only basic folders.
Enfocus PitStop Server
4. Do one of the following:
• navigate to the existing folder you want to use as a base folder
• navigate to the location you want to create a new folder, and click “Make New Folder”.
The new folder appears with a temporary name, which can be changed to a more descriptive
name for the folder, e.g. “hot_folder_01”
5. Select the new or existing folder, and click OK.
6. Depending on your choice, the Folders category will be set to Simple or to Advanced mode.
11
Page 12

Enfocus PitStop Server
7. Adding Action Lists and/or a PDF Profile
Action Lists and PDF Profiles are the “fuel” for the preflighting process.
7.1 To add one or more Action Lists to a hot folder:
1. In the Hot Folder Editor, go to the “Action Lists and PDF Profile” category
2. Click the + button below the Selected Action Lists to open the Select Action List dialog.
3. Select one or more Action Lists you want to add, either From Database or From File. You can
select multiple Action Lists in one go by holding the shift key or the ctrl (Windows) or apple
(Mac OS) key.
4. Click OK. The Action Lists of your choice are added to the bottom of the list of Selected Action
Lists. The name of the Action List, its description and location will be displayed. The Action
Lists appear in this list in the order in which they will be run on the PDF documents: the
Action List on top of the list will start first.
5. If necessary, change the order of the Action Lists: select an Action List and click the Move Up
( ) or Move Down ( ) button.
To add a PDF Profile to a hot folder:
1. In the Hot Folder Editor, go to the “Action Lists and PDF Profile” category
2. Click the + button below the Selected PDF Profile to open the Select PDF Profile dialog.
3. Select a PDF Profile you want to add, either From Database or From File
4. Click OK. The name of the PDF Profile, its description and its location will be shown.
12
Page 13

8. Certified PDF
8.1 About Certified PDF
Enfocus Certified PDF technology guarantees quality, eliminates ambiguity and communicates
precisely at every stage in the PDF workflow. Certified PDF ensures that a PDF documenthas been
preflighted with the appropriate Preflight Profile, storing both the Preflight report and the
Preflight Profile inside the PDF.
8.2 Action on incoming documents before processing
Enfocus PitStop Server
Incoming non-Certified PDF documents:
If the option “Keep document status unchanged” or "Make document uncertified” is chosen,
the non-Certified documents will remain uncertified.
If the option “Make document Certified using hot folder Preflight Profile” is chosen, the PDF
document will be certified using the Preflight Profile defined in the hot folder.
Incoming Certified PDF documents:
If the option “Make uncertified” is chosen, the PDF document will no longer be certified.
If the option “Keep document status unchanged” is chosen, the PDF document will remain
Certified. By default, the Preflight Profile defined in the hot folder will be used instead of the
embedded Preflight Profile.
If the option “Change Certified PDF Profile to hot folder Preflight Profile” is off, the Certified PDF
document will keep its embedded preflight Profile.
If the option “Make document Certified using hot folder Preflight Profile” is chosen, the PDF
document will be Certified using the Preflight Profile defined in the hot folder. However, if the
option “If incoming document is Certified: keep original Certified Preflight Profile” is on, the
Certified PDF will keep its embedded Preflight Profile.
8.3 Allow rollback to previous version
The Certified PDF workflow can offer you a robust roll-back mechanism. This allows you to revert
to any previous stage in the Certified PDF workflow and to compare different versions of your
PDF document, even though you maintain one physical PDF file. By disabling this option, you
will not be able to take advantage of the roll-back functionality; you will however reduce the
file size.
13
Page 14

Enfocus PitStop Server
This option is only applicable for Certified documents, thus will be hidden when using “Make
document uncertified”.
14
Page 15

9. Color Management
Color Management (CM) can be defined on different levels. First, Enfocus PitStop Server will search
CM in the Action Lists and/or PDF Profile. If no CM is defined there, the hot folder specific CM
settings will be used. If these are not set, the general CM settings from the preferences will be
used.
9.1 Hot folder specific color management
In the Hot Folder Editor, you can choose to override the preference settings for this specific hot
folder:
1. In the Hot Folder Editor, go to the “Color Management” category
Enfocus PitStop Server
2. Enable Override General Color Settings
3. Define if you want to use the same settings for all objects, or if you want to define other
settings for images than for other objects
4. Define either for all objects, or for images and other objects,
• whether or not you want to apply color management
• what profile to use for Gray, RGB, CMYK and Lab
• what Rendering intent to use
5. If you want to use other ICC profiles for target than for source, enable the option and define
what profiles to use.
9.2 General color management settings in the preferences
1. Open the Preferences
2. Select the Color Management category
3. Define if you want to use the same settings for all objects, or if you want to define other
settings for images than for other objects
4. Define either for all objects, or for images and other objects,
• whether or not you want to apply color management
• what profile to use for Gray, RGB, CMYK and Lab
• what Rendering intent to use
5. If you want to use other ICC profiles for target than for source, enable the option and define
what profiles to use.
15
Page 16

Enfocus PitStop Server
10. Fonts
By default PitStop Server will look for available fonts in the system font folders. In addition, font
folders can be defined in the PitStop Server preferences, allowing these fonts to be used for all
hot folders.
It is also possible to define font folders for a specific hot folder. This can be used e.g. to create
a hot folder for a specific customer, using specific font folders for the selected hot folder only.
The Modify button offers a shortcut to the font settings in the preferences.
10.1 Hot folder specific Font folders
1. In the Hot Folder Editor, go to the “Fonts” category
2. Click the “Add” button
3. Browse to the font folder, and click OK.
10.2 Font preferences
To define font folders to be used for all hot folders:
1. In the Preferences, go to the Fonts category
or
• In the Hot Folder Editor, go to the “Fonts” category and click the “Modify” button
2. Click the “Add” button
3. Browse to the font folder, and click OK.
16
Page 17

11. E-mail notification
You can configure PitStop Server in such a way that it sends you — or anyone who is interested
in the outcome of the processing — an e-mail message. You can request an e-mail message
every time a PDF document is processed or depending on the outcome of the processing.
11.1 Setting up E-mail notification in a hot folder
1. Open the Hot Folder Editor.
2. Display the E-mail Notification properties.
3. Select one or more cases in which an e-mail message has to be sent, based on the result of
processing (success, error, ...). For every job, only one e-mail will be sent.
Enfocus PitStop Server
4. Configure the message that will be sent. It is for example possible to add the preflight report
to the e-mail.
5. Fill in the e-mail addresses of the persons who have to be notified.
6. Click OK.
11.2 E-mail preferences
Outgoing SMTP Server
In order to send an e-mail notification, the e-mail preferences need to be set. You can access
the e-mail preferences either from the E-mail category in the Hot Folder Editor by clicking the
Edit E-mail preferences button, or from the Preferences in the E-mail category.
17
Page 18

Enfocus PitStop Server
The SMTP Server name and port are required. In case of a secured SMTP environment, also user
name and password are required.
Personal Info
The Personal Info also needs to be set to send e-mail notifications. Personal Info can be accessed
by clicking the Personal Info button on the E-mail category of the hot folder editor, or directly
by opening the preferences panel and going to the Personal Info category.
PitStop Server Administrator
In the E-mail preferences, you can define whom PitStop Server should send an e-mail notification
in case special events occur, and one or more files fail to be processed (e.g. because of corrupted
files, not enough disk space available, etc.).
E-mail test notification
After setting the E-mail preferences, you may want to do a test to see if the e-mail is working
properly.
1. Open the Hot Folder Editor.
2. Display the E-mail Notification properties.
3. Enter your e-mail address in the field
4. Click the “Send Test Notification” button. A test e-mail will be sent to the address you entered.
18
Page 19
12. Running jobs through Enfocus PitStop Server
12.1 Dropping files or folders in the input folder
By dropping a file in the input folder, this file is submitted to be processed by the hot folder.
How often is an input folder checked ?
An input folder is checked for incoming files, based on the Time Interval set in the Processing
category of the Preferences. By default, the input folder is checked every 10 seconds.
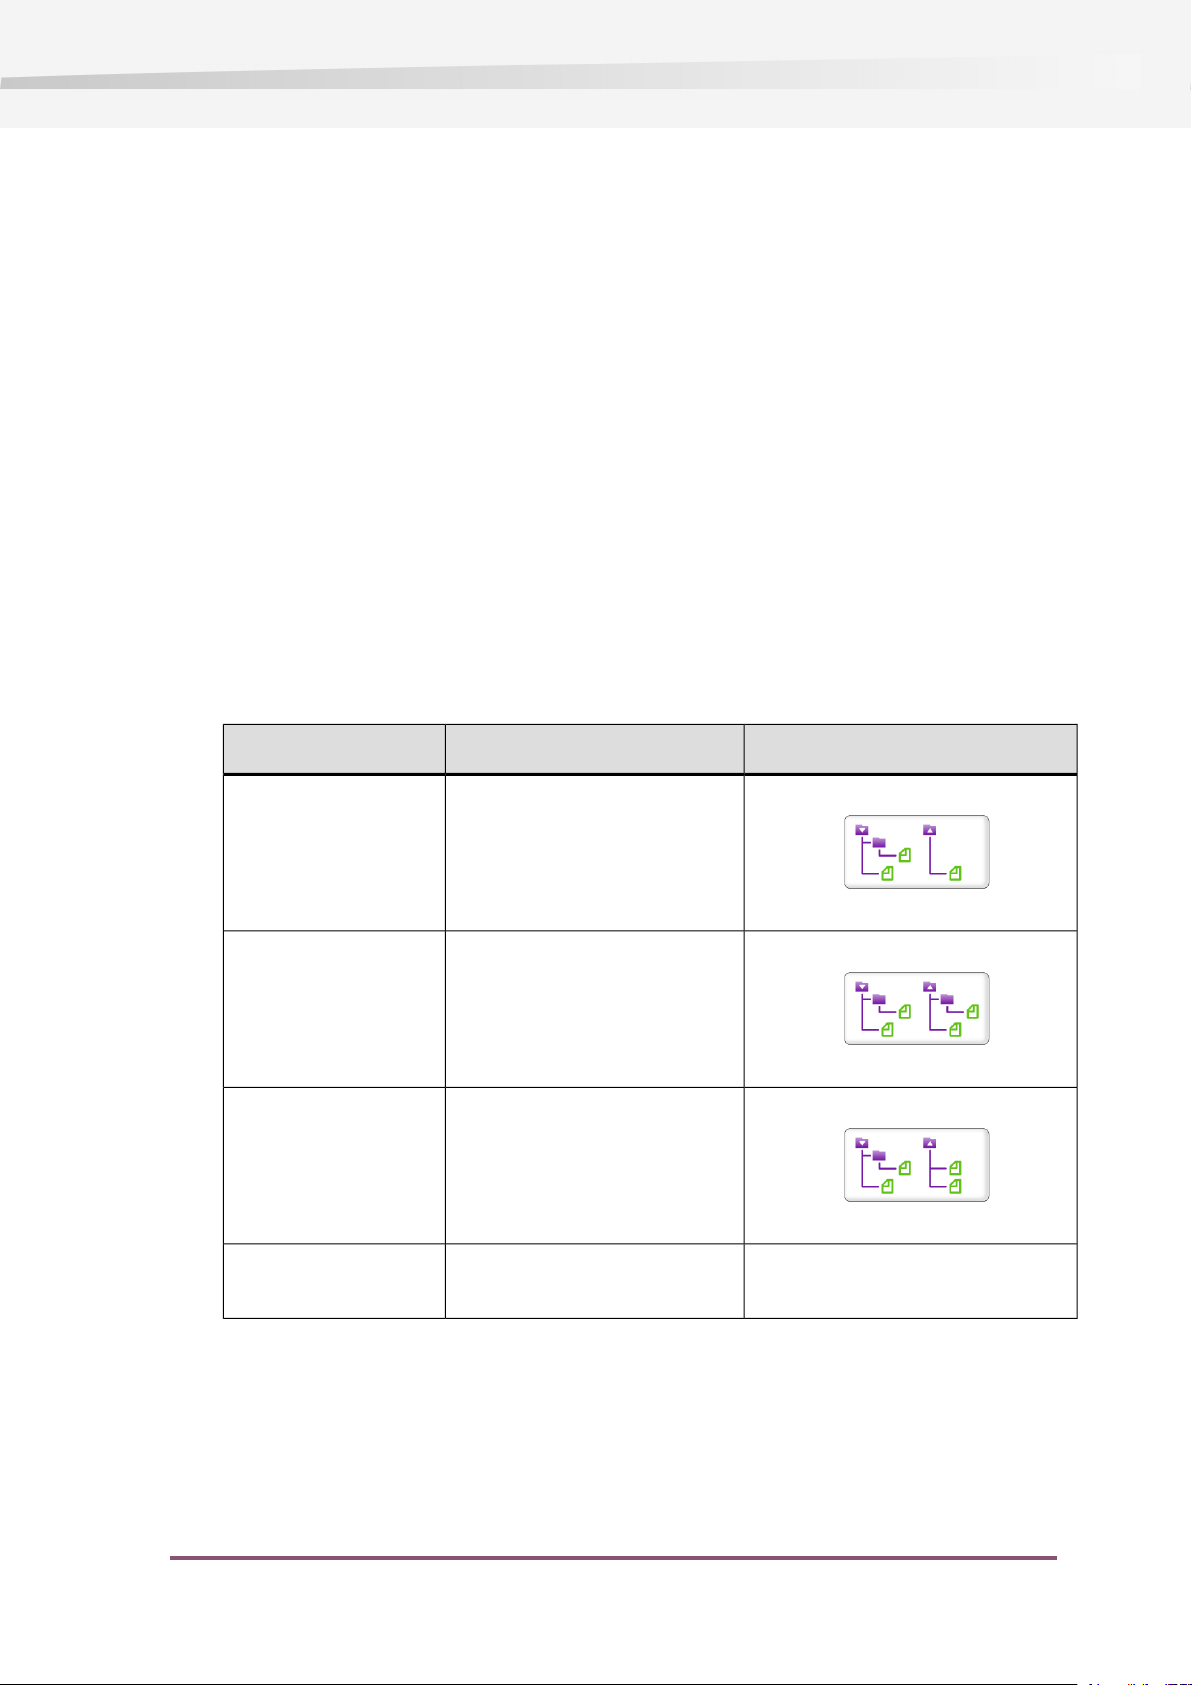
Creating subfolders in the input folder
Enfocus PitStop Server
If you create subfolders in the input folder, either by dropping folders in the input folder, or by
creating subfolders manually, the way these subfolders are processed depends on the “Processing”
category in the Hot Folder Editor.
Input and OutputResultOption
Don’t process subfolders
in input folder
Process subfolders,
keeping folder structure
Process subfolders,
flattening folder
structure placed in the “root” of the
Only files in “root” of input
folder will be processed. Files in
subfolders are ignored
Files from subfolders will be
processed. The output files will
be placed in a same subfolder
structure in the output folder(s).
Files from subfolders will be
processed. All output files will be
output folder(s).
Delete empty subfolders
in input folder
Subfolders that are empty after
processing, will be deleted.
19
Page 20

Enfocus PitStop Server
13. Monitoring active jobs
In the Hot Folder tab, you can see the number of jobs queued to a specific hot folder. However,
to monitor individual jobs, you can use the Progress tab.
In the Progress tab in PitStop Server, all active jobs can be monitored. For every job, you can see
• The name of the job. This will be the name of the input file.
• The hot folder processing the job
• The current step
• The progress on this step
• Additional info
13.1 To sort the active jobs
You can sort the active jobs in the list.
1. Go to the Progress tab in PitStop Server
2. Click in the header of the column you want to use as base to sort the active jobs
3. To change between sorting ascending and descending, click the same header again.
13.2 To pause all active jobs
1. Go to the Progress tab in PitStop Server
2. Click the button to pause all jobs.
13.3 To resume all active jobs
1. Go to the Progress tab in PitStop Server
2. Click the button to resume processing on all jobs.
13.4 To delete active jobs
1. Go to the Progress tab in PitStop Server
20
Page 21

2. Select one or more active jobs
3. Click the button to delete the selected jobs.
Enfocus PitStop Server
21
Page 22

Enfocus PitStop Server
14. Viewing finished jobs in the History tab
After finishing a job, and logging is enabled for the hot folder, the job will be shown in the
History tab. The History tab in PitStop Server gives an overview of all finished jobs, showing the
output job name, the hot folder name, the date, the Preflight status and any special events that
occured.
14.1 History Logging
History Logging enables or disables keeping a log of the processed file, which will then be shown
in the History tab.
History Logging can be set on or off in the General category in the Hot Folder Editor. If History
Logging is set to “Use Global Preferences”, the hot folder will use the setting of the “Log History”
checkbox in the Logging category of the PitStop Server preferences panel.
14.2 Managing the History List
Using the Filters on top of the list, you can define what jobs you want to see, based on different
criteria (date, file name, preflight status, ...). This allows to get an overview of all jobs for a
specific customer or hot folder, get an overview of all jobs with errors, etc.
By clicking the column headers, you can also sort the list based on the selected column.
14.3 Exporting History
The information in the history can be exported to a file for archiving, statistics, etc. using the
Export button . This file can either be tab separated text (TXT), with or without detail, or an
XML.
14.4 Statistics
The statistics allow to check the number of files processed per hot folder, processing times,
average pages per jobs, etc.
22
Statistics are opened by clicking the button
Page 23

14.5 Special Events Log
The Special Events Log, opened by clicking the button, shows all jobs that, for some reason,
failed to be processed. This could be e.g. because the incoming PDF file is corrupted. The Special
Events Log will also show errors that are not job-related, e.g. if there are missing components
of Server itself, if Enfocus PitStop Server has no access to a folder due to changed permissions,
etc.
Enfocus PitStop Server
23
Page 24

Index
Enfocus PitStop Server
A
Action Lists 12
Activation
Enfocus PitStop Server 7
Active jobs 20
C
Certified PDF 13
Color Management 15
D
Duplicate hot folder 9
E
E-mail notification 17
Enable
hot folder 9
Enfocus PitStop Server
Activation 7
F
Folders
checking input folders 19
folder structure 11
font folders 16
handling subfolders 19
Fonts 16
H
History
History tab 22
logging 22
Hot folder
action lists and PDF Profile 12
activation 9
color management 15
duplicate 9
Hot folder (continued)
e-mail notification 17
folder setup 11
font folders 16
handling subfolders 19
input folder checking 19
new 9
priority 9
valid hot folders 9
I
Input folder 11
J
Jobs
active jobs 20
N
New hot folder 9
O
Output folders 11
P
PDF Profile 12
PitStop Server Administrator 17
PitStop Server Monitor 8
Preferences
color management 15
e-mail settings 17
Font folders 16
Priority 9
Progress 20
S
Statistics 22
Summary 10
 Loading...