

Page 1
User Guide
Page 2

© 2006 AWSG Limited.
All rights reserved.
Enfocus is an Artwork Systems brand.
Certified PDF is a registered trademark of Artwork
Systems; patent pending. Enfocus PitStop Professional, Enfocus PitStop Server, Enfocus Instant PDF,
Enfocus StatusCheck, Enfocus CertifiedPDF.net,
Enfocus PitStop Automate, Enfocus Instant Barcode
and Enfocus PDF Workflow Suite are product names
of Artwork Systems.
Other brand and product names may be trademarks
or registered trademarks of their respective holders.
All specifications, terms and descriptions of products and services are subject to change without
notice or recourse.
Page 3

Enfocus PitStop Automate User Guide 3
Table of Contents
Table of Contents ................................................................................... 3
Chapter 1: Introduction ......................................................................................... 7
About PitStop Automate 8
Content of this User Guide 9
Chapter 2: Installation.......................................................................................... 13
Installation 14
General Terms 18
Chapter 3: The Canvas Working area........................................................................ 23
Navigating through the Canvas 25
Creating and Editing a workflow 26
Gateways Overview 28
Canvas List View 30
Chapter 4: Processing Jobs ................................................................................... 33
Bringing Jobs into a workflow 34
Job Settings 35
Naming Conventions 36
Chapter 5: Gateways .......................................................................................... 41
Receive 42
Expand 43
Route 44
Distill 46
PitStop 47
Copy Job 48
Rename 48
Copy File 49
Split Pages 50
Page 4

4
Generic Application 51
Schedule 52
Hold 53
Print 54
Compress 56
FTP 57
Send Mail 58
Archive 59
Delete File 60
End 60
Run AppleScript 61
Chapter 6: Preflighting and Checking PDF Documents .................................................. 65
What is preflighting? 66
Properties of PDF documents 69
Problem reporting 70
Creating a PDF Profile 71
Interpreting preflight reports 72
Chapter 7: Canvas Manager ................................................................................... 75
Preferences 76
File Menu 77
Edit Menu 79
View Menu 80
Folder 81
Contextual Menus 83
Toolbar / Shortcut overview 85
Page 5

Chapter 1
Page 6

Page 7

Enfocus PitStop Automate User Guide 7
C h a p t e r 1 : Introduction
About This Chapter
This chapter introduces you to the software and describes its functions and objectives.
It also guides you through this documentation.
Page 8

8
About PitStop Automate
PitStop Automate allows design studios, ad agencies, printers and publishers to
increase productivity and output consistency by introducing advanced automation at
an affordable price. Built to streamline graphic arts processes, PitStop Automate
extends the power of Enfocus’ automation-enabling technologies such as PDF preflight
& editing and the award-winning Certified PDF®. On top of all that power lays an
intuitive graphical user interface, making it straightforward to translate your complex
production requirements into a complete automation workflow design.
A natural upgrade from PitStop Server, PitStop Automate goes beyond PDF preflight and
editing. The application closely integrates with Acrobat® Distiller® and features file
sorting and conditional workflows based on file type, size and other file or document
properties.
PitStop Automate combines powerful internal capabilities while at the same time
controlling third party applications, forming the glue between the different steps in
your production process. Any hot-folder-based application can be integrated through
the “Generic Application” Gateway. PitStop Automate will hand the job over to the
applications and pick it up again after it has been processed. Another way of driving
external applications is through Apple Script integration. Finally, third-party developers can use the PitStop Automate SDK plug into their solution into PitStop Automate.
Page 9

Content of this User Guide
This User Guide has been subdivided into the following chapters :
Chapter 1 : Introduction
Contains a general overview of the software, its functions and objectives, and a general
overview on the different chapters of the User Guide.
Chapter 2 : Installation
Contains set-up requirements and describes the installation process for successful
Pitstop Automate operation. It also gives an overview of the installed items, and basic
terms used in the software and this User Guide.
See “Installation” on page 13
Chapter 3: The Canvas Working Area
Describes how to handle Canvases, the working area in Pitstop Automate. It explains
how to save and open Canvases, how to navigate through a Canvas, and how to set up
workflows based on the components. It also gives an overview of the Sample Canvases.
See “The Canvas Working area” on page 23
Enfocus PitStop Automate User Guide 9
Chapter 4: Running Jobs
Shows how to handle files in a Pitstop Automate system, either through hot folders or
on the Canvas itself. It also explains the use of file tags.
See “Processing Jobs” on page 33
Chapter 5: Gateways
Shows the settings of all individual workflow Components. These are split up in 3 kinds:
workflow Gateways, defining how a file is run through a workflow; Process Gateways,
which actually process the file, and File Gateways, which allow the handling of files
(Copy, Archive, FTP, ...)
See “Gateways” on page 41
Chapter 6: Preflighting and Checking PDF Documents
The core of PitStop Automate is the PitStop Gateway, allowing to run Action Lists and
certify a PDF document to a PDF Profile. These are explained in this chapter. The PDF
Profile Editor is also included here.
See “Preflighting and Checking PDF Documents” on page 65
Page 10

10
Chapter 7 : Canvas Manager
Gives a detailed overview of all functions in the Canvas Manager, the User Interface to
define and manage Canvases and their files.
See “Canvas Manager” on page 75
Page 11

Chapter 2
Page 12

Page 13

Enfocus PitStop Automate User Guide 13
C h a p t e r 2 :
Installation
About This Chapter
This chapter contains set-up requirements and describes the installation process for
successful Pitstop Automate operation. It also gives an overview of the installed items,
and basic terms used in the software and this User Guide.
In this Chapter :
• “Installation” on page 14
• “General Terms” on page 18
Page 14

14
Installation
Minimum Configuration
Installation
• The System Requirements are displayed in the Installer, and they can also be
found on the Enfocus Web site, at http://www.enfocus.com/systemreq
• In order to run the “Distill” Gateway, Acrobat® Distiller™ Server 6 or 7 is required
Installation of PitStop Automate is done using an installer application. It can be found
on the Enfocus DVD, or it can be downloaded from the Enfocus Web site
www.enfocus.com.
To install from DVD:
1 Insert the Enfocus PitStop Automate DVD into your DVD drive
2 Open the Enfocus PitStop Automate DVD
3 A Flash animation will lead you through the DVD. Choose Install PitStop Automate
4 Click Install
To download & install:
1 Download the Compressed file (.gz) to your computer.
2 If the compressed file is not expanded automatically, double-click it to expand.
The compressed file contains a disk image (.dmg).
3 If not mounted automatically, double-click the disk image (.dmg) to mount the
volume.
4 Open the mounted volume, and double-click the installer to start installation.
5 Follow the installation instructions on your screen.
Page 15

Activation
Enfocus PitStop Automate User Guide 15
After installing the software, it needs to be activated.
When started for the first time, a warning will be shown, stating that you are running
the software in trial mode. You have a number of days left to enter the Product Key.
You can enter the Activator application here, or you can enter the Activator application
using the Activate / Deactivate button in the About screen of the Canvas Manager.
Without a Product Key, you can use the trial version for a period of 30 days.The warning
will indicate how many days of this trial period is left. By clicking Continue, you can
continue using the Trial Version.
After entering a Product Key, you have 5 days to activate it. In that case the warning will
say the Product Key has not been activated yet.
First Time Activation
To activate PitStop Automate after installing it for the first time :
1 Start the Canvas Manager
2 Click Enter Product Key to open the Activator
3 Enter the Product Key, which is included with the DVD.
4 Choose Automatic Activation and click Activate Now
5 Wait until activation is done, and click Continue.
To move the software from one computer to another
If you want to move the software from one computer to another, you cannot simply
copy the software, as the Activation connects a Product Key to be used on a specific
computer. To move the software, follow these steps :
1 Open the Activator at the original computer
2 Click Deactivate to deactivate the software on that computer, and choose Auto-
matic deactivation.
3 Install the software on the target computer
4 Use the same sequence as for First Time Activation (see above)
To activate using a fi le
It is also possible to activate using a file, e.g. to activate the software on a computer
without Internet connection. In that case, use the following steps :
1 Open the Activator
2 Select Create Activation Request File to start manual activation. A Browse dialog
will allow to define name and location for the Activation Request file. Copy this
file to a computer with internet access.
3 Browse to http://activation.enfocus.com and upload the Activation Request file
into the Activation section. You will receive an Enfocus Activation file, to be copied
to the other computer.
4 Select Read Activation file and click Activate Now. Browse to the Enfocus Activa-
tion File.
Page 16

16
Installed Components
To deactivate using a file
It is also possible to deactivate using a file, e.g. to deactivate the software on a computer without internet connection. In that case, use the following steps :
1 Open the Activator
2 Click Deactivate. Select Create File for Manual DeActivation. A Browse dialog will
allow to define name and location for the DeActivation Request file. The software
will immediately be deactivated as well
3 Copy this file to a computer with internet access.
4 Browse to http://activation.enfocus.com and upload the DeActivation Request file
into the De-Activation section.
After installation, the following components can be found on your hard disk :
Administrator Software
The Administrator Software contains the Canvas Manager, the main application to set up
and define workflows and Canvases.
See also:
• “Canvas Manager” on page 75
• “The Canvas Working area” on page 23
Enfocus Data
Documentation
Contains all available documentation, both in PDF as in HTML version.
Server Software
The Server Software folder contains all Gateways and the Watchdog application.
see “Gateways” on page 41
The Enfocus Data folder is a folder that, if it doesn’t exist yet, will be created automatically next to the PitStop Automate applications folder, as soon as the Watchdog is
started. Two folders can be created in that folder automatically : the Server Software
folder, and the Canvases folder.
The Server Software Folder
The Server Software Folder contains a folder for every Gateway that has been run at
least once. It contains the Job Ticket file, maintaining the connection between the
Gateways and Process Folders on the Canvases, and the actual Gateway applications (in
the Server Software folder).
Page 17

Enfocus PitStop Automate User Guide 17
The Canvas Folder
This is the default location where Canvases will be saved and opened from. It is advisable to save all Canvases inside this folder.
Since the Enfocus Data folder is not inside the PitStop Automate applications folder, it
allows to keep Canvas, Workflow and Gateway settings even when updating to another
version of PitStop Automate, by installing the new version next to the original one.
Page 18

18
General Terms
Canvas Manager
Watchdog
Gateway
The Canvas Manager, the user interface for defining workflows by setting up Canvases,
changing settings and running jobs, can be found in the Administrator Software folder.
See also:
• “Canvas Manager” on page 75
• “The Canvas Working area” on page 23
The Watchdog is an application in the Server Software folder, that starts all Gateways
that are not running, and keeps checking if all necessary applications are up and
running. It can also be used to quit all Gateways at once, without having to quit them
individually. The Watchdog (and thus all individual Gateways) should be running in
order to process a Job.
A Gateway is a single application, found in the Server Software folder. It will execute a
single operation on a job, according to the settings made in the Canvas Manager. A
Gateway is shown in the upper part of the Canvas Manager. When dragging a Gateway
onto a Canvas, a Process Folder for the Gateway is created.
Canvas
See also:
• “Gateways” on page 41
• “Gateways Overview” on page 28
• “Creating and Editing a workflow” on page 26
A Canvas is a working space in the Canvas Manager. On disk, it’s a bundle, containing all
Process Folders and job folders.
See also:
• “Creating and Editing a workflow” on page 26
• “The Canvas Working area” on page 23
Canvases should always be saved in the Canvas Folder in the Enfocus Data folder!
If files need to be output on another location, use the File Copy Gateway.
Page 19

Process Folder
Enfocus PitStop Automate User Guide 19
A Process Folder is a folder on a Canvas, connected to a Gateway. If a job is dropped on
a Process Folder on the Canvas, the job will be processed by the Gateway application
provided that this Gateway application is up and running (see Watchdog). By selecting
a Gateway in the Gatewaybar, the link with the corresponding Process Folders on the
Canvas is visualized by a gray arrow, called “tube”.
See also:
• “Creating and Editing a workflow” on page 26
Page 20

20
Page 21

Chapter 3
Page 22

Page 23
Enfocus PitStop Automate User Guide 23
C h a p t e r 3 :
The Canvas Working area
About this chapter
The Canvas is the working area of the Canvas Manager. On the Canvas, workflows can be
defined or edited, files can be run, options and settings can be set, results can be seen
etc. This chapter gives an overview on the Canvas Working area, and how to create and
edit Canvases and workflows.
New Canvas
A new Canvas can be started in different ways :
To Create a new Canvas based on a Template:
Select New Canvas in the File menu of the Canvas Manager
Select one of the Enfocus templates. To create a completely new, empty Canvas,
select the Empty Canvas template.
Define the name for the new Canvas. By default, this will be “New [template
name]”. The Canvas will be saved in the “Canvases” folder in the Enfocus Data
Folder (see “Enfocus Data” on page 16)
If necessary, add or remove Process Folders or change their Parameters
You can also start a new Canvas based on a Canvas that already existed on the same or
on another computer, by restoring a .odcfg archive file:
Select New from Canvas Archive in the File menu of the Canvas Manager
Define the name for the new Canvas. The Canvas will be saved in the “Canvases”
folder in the Enfocus Data Folder (see “Enfocus Data” on page 16)
Redefine the location of all external files, if necessary
If necessary, add or remove Process Folders or change their Parameters
The Canvas Archive can be used to reuse existing Canvases, or to move Canvases from
one computer to another.
The Canvas Archive can be used to reuse existing Canvases, or to move Canvases
from one computer to another, by creating a .odcfg file, using the Save Canvas
Archive function, and restoring it on another computer.
Page 24
24
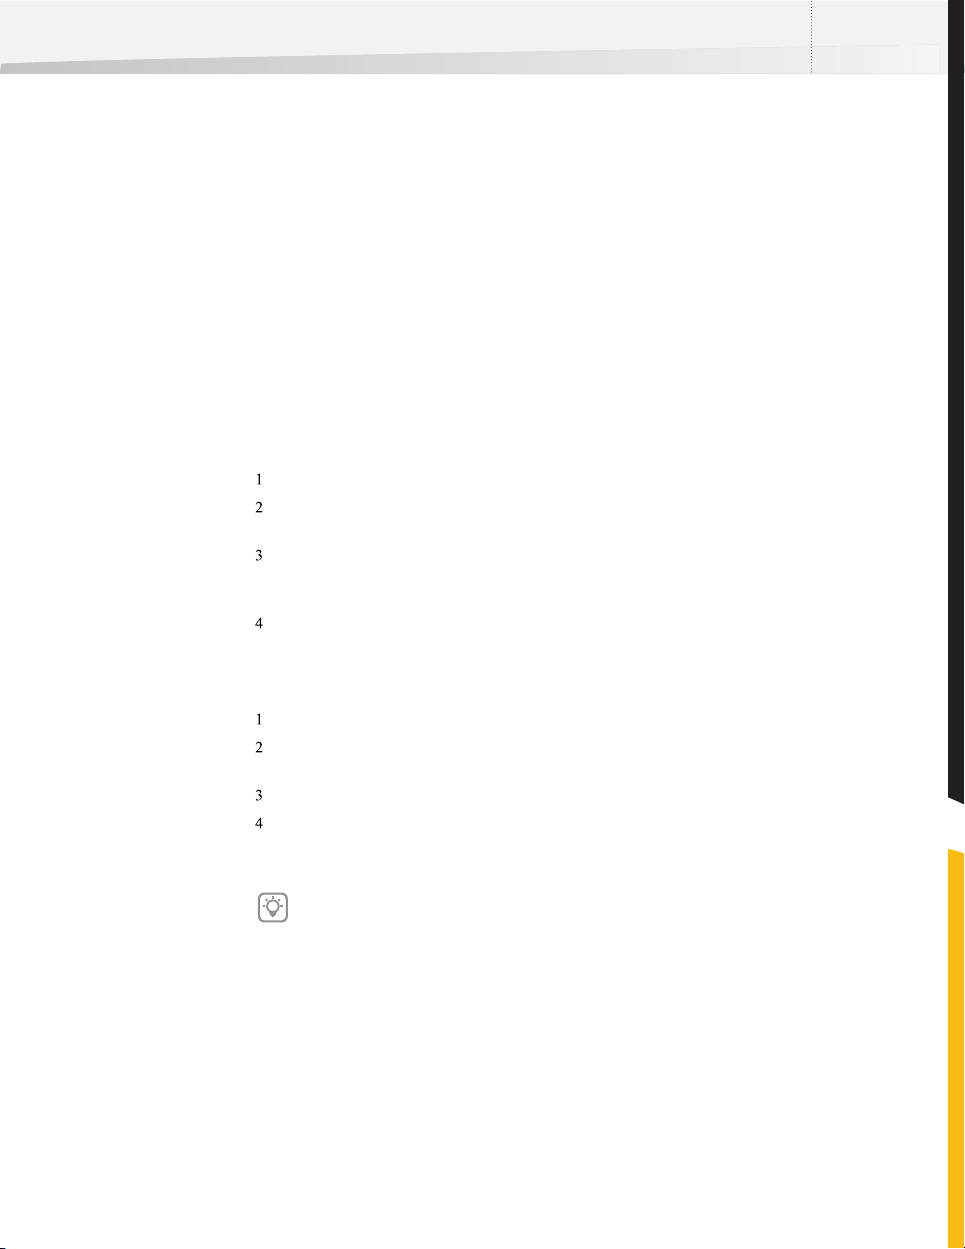
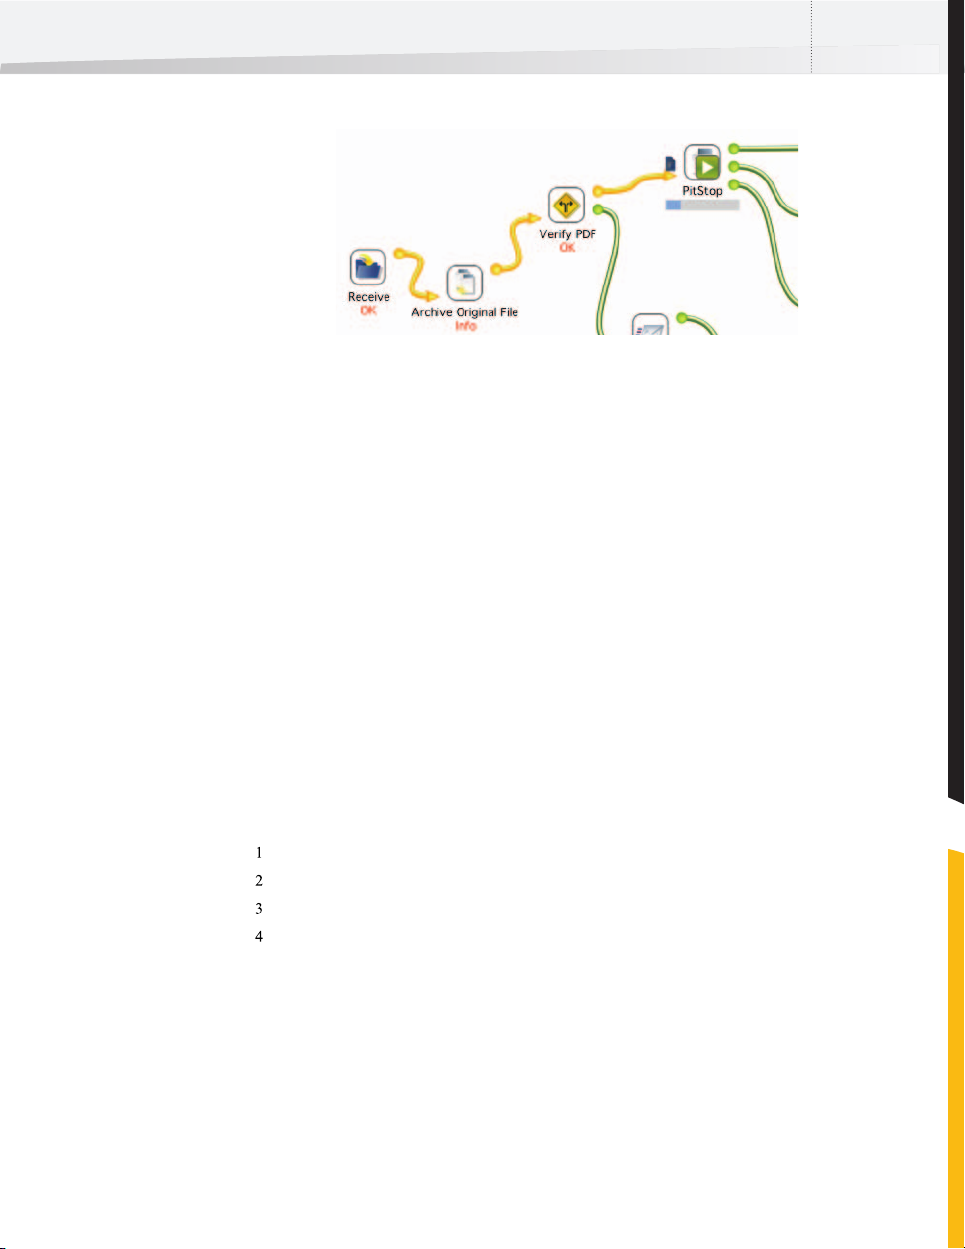
A Canvas example
A. Gateway B. Gateway Bar C. Process Folder D. Connection Tube E. Job in End Folder F. Job on Canvas G. Progress Bar H. Output Connection
Page 25

Navigating through the Canvas
Zoom
Zooming can be done by using the zoom in and zoom out function in the view menu,
using the zoom tools in the tool bar, or by dragging in the Canvas, holding the
Command key. Dragging up or to the right will zoom in, dragging down or to the left
zooms out.
The Reset Zoom (in the view menu) returns to the default zoom factor.
Panning
The Canvas can be moved inside the window, by holding down the Command and the
option key, and dragging. The same function can be used in the Gatewaybar
Open Settings
Command-Double clicking a Process Folder on the Canvas, will open the settings dialog.
This can also be done from the contextual menu (control-click - Edit Settings)
Open Log
Option-Double clicking a Process or File Folder on the Canvas will open the corresponding Log file
Enfocus PitStop Automate User Guide 25
Open in Finder
Contextual Menus
Double-clicking a Process or File Folder on the Canvas will open the corresponding
folder in the Finder.
By control-clicking any item on the Canvas, the contextual menu for that item opens.
The contextual menus give access to a number of settings for the selected process or file
folder : Settings, hiding or showing links, etc.
See also:
• “Canvas Manager” on page 75
Page 26
26
Creating and Editing a workflow
A workflow is built by connecting Process Folders in a logical order.
Creating a Process Folder
By dragging a Gateway from the Gatewaybar onto the Canvas area, a Process Folder is
created.
A Process Folder is a part of a workflow that can process files. Process Folders can be
renamed very easily, to represent exactly what it does.
When selecting a Gateway in the top part, all links to Process Folders are visualized by
gray arrows, called “tubes”.
In the Gatewaybar, the default settings for the Gateways can be set. These settings will
be applied when creating a new Process Folder.
See also:
• “Preferences” on page 76
• “Navigating through the Canvas” on page 25
Connecting Process Folders
The Canvas Area contains all defined Process Folders and jobs. Process Folders can
be linked into a workflow, represented by
green arrows called “tubes”.
Every Process Folder (except for End Folders) has one or more outputs, represented by green dots. The output from a
Process Folder can be connected to another Process Folder:
Click the output dot you wish to connect
Drag it away from the Process Folder. A green tube will show.
Drag it on top of the Process Folder you wish to connect. The Process Folder will
highlight.
Release the mouse button. The connection tube will now end in an arrow instead
of a dot, showing that the connection is made.
Page 27
End Folders
Enfocus PitStop Automate User Guide 27
If a job is in a Process Folder, selecting it will show the flow it followed in yellow
See also:
• “Gateway” on page 18
• “Process Folder” on page 19
End Folders can be renamed very easily on the Canvas. The corresponding End Folder in
the Canvas Folder will be renamed as well.
To get the output file outside the Canvas, a File Copy can be used to copy the file to an
external folder.
Failure Folder
Every Gateway has a Failure output, used in case the processing itself goes wrong (e.g.
invalid configuration). For example, the PitStop Gateway will have 4 outputs:
• success: preflighted, no warnings, no errors
• warning: preflighted, warnings, no errors
• error: preflighted, errors, possibly warnings,
• failure: not preflighted: the file could not be processed
To set up a Failure folder:
Create a new End folder, and rename it “Failure Folder”
Hide the Incoming Connections using the contextual menu on the Failure Folder.
Apply Set Failure Folder in the same contextual menu
Switch on automatically link new folders in the contextual menu of the Canvas
If a new Process Folder is created after these steps, its failure output will automatically
be connected to the Failure Folder
Page 28

28
Gateways Overview
The components that can be used to build a workflow, the Gateways, can be divided in
3 types :
Workflow Gateways
The Gateways that define the handling of a job without changing it
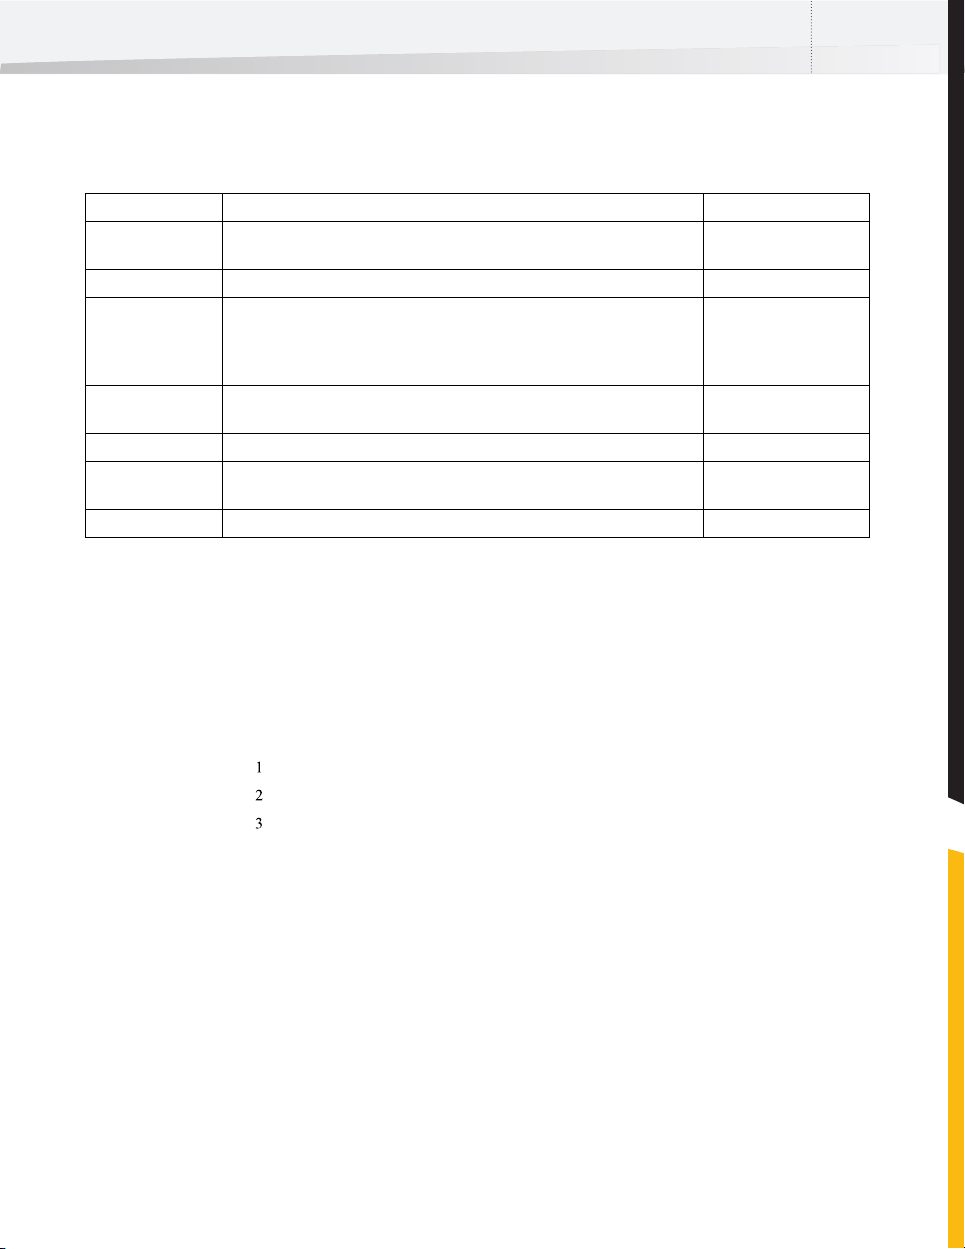
Gateway What it does outputs
Receive Takes in jobs, either from a Hot Folder (an external folder in which files to be
processed can be dumped) or from a Virtual Printer.
Hold Stalls jobs, until a user either accepts or rejects it. Accept, Reject, and
Schedule Hold or release incoming jobs until a specified time or interval. Success and Failure
Route Allows to define the path a job will follow, based on a defined criteria, such as
file type, file name, ...
Send Mail Sends an e-mail notification if a file passes this Gateway. Files (e.g. Pitstop
Reports) can be attached
Success and Failure
Fai lure .
One for every criteria, one
“No Match” and failure
Success and Failure
Process Gateways
The Gateways that actually change the job
Gateway What it does outputs
Distill Send files to the (external) Distiller application, which will convert PostScript files
into PDF files. This can be done using Watched Folders or using Apple Events
PitStop Checks a job to a PDF Profile or to apply an Action List Success, Warning, Error
Print Send the file to a printer or proofer on the network, or to save as PostScript. The
printers are to be defined in the Gateway itself.
Split Pages Splits a multipage PDF file into multiple single page documents Success (for the original
Generic Application Sends the job to be processed by any external hot folder based application, and
takes in the result from that application
Success and Failure
and Failure.
Success and Failure
PDF), Single Pages, Failure
Success and Failure
Page 29
Enfocus PitStop Automate User Guide 29
File Management Gateways
The Gateways that handle moving, copying, deleting and archiving files.
Gateway What it does outputs
Archive Allows to move finished files to a central location. You can archive the complete
job, or only their Job Tickets.
Compress Compress the job or files belonging to the job, either in Stuffit or Zip mode. Success and Failure
Copy File Copies files from one location to another, in one of 3 ways :
1. duplicate a file inside job folder
2. bring an external file into the job folder
3. copy a file (e.g. output) to an external location.
Copy Job Duplicates the entire job, allowing to send the job through 2 different workflow
branches at once.
Delete File Delete one or multiple files from the Job Folder Success and Failure
FTP Lets you transfer files from the Job Folder over FTP. This can be used to send files
to a proofer or to a file server.
Rename Allows to rename one of the files in the Job Success and Failure
Configuration
The settings for every Process Folder (and also for jobs, see later) can be found by
opening the Settings.
These can be opened by command-double-clicking the Process Folder, by selecting the
Process Folder, and click Edit Configuration in the Folders menu, or by control-clicking
the Process Folder, and choose Edit Configuration in the contextual menu.
It is user definable where settings are shown.
To make a setting visible on the Canvas :
Open the Configuration Dialog for the Process Folder
Control-click on the label of a Setting to open its contextual menu
Set it to On Canvas
Fai lure
Success and Failure
Original Job, Duplicate
Job, and Failure
Success and Failure
Page 30

30
Canvas List View
By clicking View - View as List, a list view of the selected Canvas is opened.
Job Determination
In the upper part of the list view, you can determine what jobs you would like to be
visible, based on job name, status (info, warning, error or failure), start time, modification time, process state or Job Owner. Multiple conditions can be combined by clicking
the + button. If multiple conditions are set, all conditions must be fulfilled for a job to
show.
List
The List itself contains all Process Folders and Job Folders on the Canvas. Job folders
inside a Process Folder can be shown by clicking the triangle next to the Process Folder.
In the List, the name of the Job/Process Folder is shown, its state (Ok, warning, ...), its
running state (Hold/running), its start time and modification time.
By control clicking an item in the list, a contextual menu is opened, containing settings
also found in the Icon view of a Canvas. Settings for connections (Hide Incoming Links,
Set Failure Folder, ...) are not available in List View.
Page 31

Chapter 4
Page 32

Page 33

Enfocus PitStop Automate User Guide 33
C h a p t e r 4 :
Processing Jobs
About this Chapter
This Chapter shows how to handle files in an Pitstop Automate system, either through
hot folders or on the Canvas itself. It also explains the naming conventions, i.e. the use
of file tags, wildcards and file name patterns.
In this Chapter
• “Bringing Jobs into a workflow” on page 34
• “Job Settings” on page 35
• “Naming Conventions” on page 36
Page 34

34
Bringing Jobs into a workflow
A job can be brought into a Canvas and run through a workflow in different ways:
• You can drag and drop one or more files from the Finder onto the Canvas : a job
folder and JDF are created, and the job is displayed on the Canvas, from where
you can drop it on any Process Folder.
• You can drag and drop one or more files from the Finder directly on a Process
Folder. A job folder and JDF are created, and the job is run through the workflow
it was dropped on.
• A file can be dropped in the defined hot folder of a Receive Gateway. The Receive
Gateway is the only Gateway that can have an external (i.e. not in the Canvas
folder) hot folder, to be defined in the configuration of the Receive Gateway.
When a file is dropped in the hot folder, a job folder and JDF will be created, and
the file will be run through the workflow.
Creating a hot folder for a workflow
To create a hot folder for a workflow :
Create the folder you want to use as hot folder. Make sure it is on a volume
mounted on the server.
In the Canvas Manager, create a Process Folder for the Receive Gateway by dragging it from the Gatewaybar onto the Canvas Area.
Open the Settings of the Receive Process Folder by double-clicking it.
Define the location of the earlier defined folder using the browse button next to
Hot folder.
If the hot folder should take folders as one job, set the input mode to Folder is
Job. If it should take in single files, set input mode to Individual Files.
If the hot folder should take in folders, define the name of the file to be used as
“Main File”. Wildcards can be used in this expression.
See also:
• “Receive” on page 42
• “Naming Conventions” on page 36
Page 35

Job Settings
Viewing the settings used for a job
When a job was run through some Gateways, opening the configuration of the job
(double-click it, or choose Edit Configuration in the contextual menu) will show all
settings of every Gateway the file went through.
Add Process Folder settings to a Job
It is possible to add the settings for a Process Folder to the settings of the job. In that
way, the settings for the job can be defined before it is run through the Process Folder,
and the job can use settings other than the default settings defined in the Process
Folder.
Make sure the job is on the Canvas (by dragging it from the Finder onto the Canvas).
Option-drag the Process Folder for which you want to make different settings onto
the job
Open the settings for the job (by double-clicking or using the Contextual Menu)
Make the appropriate changes
Run the job through the process folder or the workflow
Enfocus PitStop Automate User Guide 35
Copying settings from one Process Folder to another
By option-dragging a Process Folder on another Process Folder, you can copy the
settings from one Process Folder to another one. Of course, this can only be used on
Process Folders of the same type.
Page 36

36
Naming Conventions
File tag
A file tag is a tag attached to a file to indicate its function for the job. In a job folder,
the original file has by default a file tag Main. Output files from Gateways can have
different file tags, e.g. the report of a PitStop Gateway can be placed in the jobfolder as
well, and can be tagged “PitStop Report”.
All these tags can be defined in the Gateway they are generated in. Custom file tags can
be used (e.g. you can use “Base” instead of “Main” for the main file) and are specific
for each workflow.
Most Gateways process the main file, however some Gateways, such as e-mail,
compress, etc., can be executed on another file in the job folder, based on its file tag.
The default file tags are :
Main The main file and in most cases, the input file for the workflow
Report The Report generated by the PitStop Gateway, containing the
Archive The Archive created by the Compress Gateway
CopiedFile The file copied by the Copy File Gateway
OriginalPS The PostScript file run through the Distiller Gateway.
PostScriptPrintFile The PostScript file generated by the Print Gateway if Save As Post-
preflighting information
Script is selected.
Wildcards
See also:
• “Archive” on page 59
• “Compress” on page 56
• “Copy File” on page 49
• “Expand” on page 43
• “FTP” on page 57
• “Send Mail” on page 58
In file names, the “*” can be used as a wild cards, e.g. to select a file based on a part
of the filename. Regular Expressions can also be used. Regular Expression is a more
elaborate way of defining wildcards. More info can be found on the Internet
Page 37

File Name Patterns
Enfocus PitStop Automate User Guide 37
Whenever a File Name needs to be defined in the settings of a Gateway, the File Name
Template is used. The File Name Template uses building blocks, of which the resulting
File Name will be composed.
Fixed Text
When Fixed Text is chosen, a text input field becomes available. This text will be placed
unmodified in the file name.
Input (Full) File Name
The File Name of the processed file (mostly the Main File) can be used. You can choose
to use the Input File Name (without extensions), the Input Full File Name (including
extensions), or the Input File Extensions (only the extension).
Date & Time
You can enter the Current Time, or the Input File Modification Time : the date when the
last change was made to the input file. The Format will be Day Month Date
hours_minutes_seconds Year. E.g. : Mon Oct 4 14_39_27 2004.
New line
This enters a line break. This can not be used in File Names, but can be very usefull
when defining the body of an email notification.
Truncate
The Truncate function allows to take a number of characters out of a file name, or
whatever is in between the brackets.
The Truncate function itself contains an open bracket, “ Truncate( “ The Truncate function needs to be closed by an ending bracket, “)”. All other File Name Template options
can be used in between the brackets. The resulting file name will be truncated by the
Truncate function. The first field after the truncate defines where the truncating will be
done : left, center or right, means the file will be truncated at the left side, in the
center or at the right side. The second field defines how many characters need to be
kept. The Third field can contain any text. Pitstop Automate will then overwrite the
truncated part by these characters, starting at the defined direction (left, center or
right).
CharactersOf
The CharactersOf function works in a simular way as the Truncate function : it takes a
part of whatever is in between the brackets, and should be closed by a “)”.
In the CharactersOf function, both fields need to be entered. The first field defines the
starting character, the second defines the last character to be kept.
When entering a negative value, counting is done from right to left i.o. left to right.
E.g. -4 in “filename” will be the “n”.
Page 38

38
If the first value is not on the left side of the last value, an error will be generated. E.g.
values 6 and 2 are not allowed, in any case.
Values -2 and -6 are not allowed in any case.
Values 8 and -4 will give an error for filenames shorter than 12 characters.
EXAMPLES TRUNCATE / CHARACTERSOF
In the Examples below, the original filename is 123456789filename
File Name Template Result Note
Truncate( left 10
Input File Name
)
Truncate( right 5
Input File Name
)
Truncate( center 8
Input File Name
)
Truncate( left 10 abcd
Input File Name
)
Truncate( center 8 abcd
Input File Name
)
CharactersOf( 3 8
Input File Name
)
CharactersOf( 3 -5
Input File Name
)
89filename Truncating on the left side
Last 10 char. are kept
12345 Truncating on the right side
5 characters are kept
1234name Truncating in center
8 characters are kept
abcdlename same as ex. 1
first 4 characters overwritten
by abcd
12abcdme same as ex. 3
center 4 char. overwritten
by abcd
345678 from char 3 to char 8
3456789file from char 3 to char -5
(char -5, the “e”, is included)
Page 39

Chapter 5
Page 40

Page 41

Enfocus PitStop Automate User Guide 41
C h a p t e r 5 :
Gateways
About this Chapter
This Chapter shows the settings of all individual workflow Components. These are split
up in 3 kinds: workflow Gateways, defining how a file is run through a workflow;
Process Gateways, which actually process the file, and File Gateways, which allows the
handling of files (copy, archive, FTP,...)
In this Chapter
• “Receive” on page 42
• “Expand” on page 43
• “Route” on page 44
• “Distill” on page 46
• “PitStop” on page 47
• “Copy Job” on page 48
• “Rename” on page 48
• “Copy File” on page 49
• “Split Pages” on page 50
• “Generic Application” on page 51
• “Schedule” on page 52
• “Hold” on page 53
• “Print” on page 54
• “Compress” on page 56
• “FTP” on page 57
• “Send Mail” on page 58
• “Archive” on page 59
• “Delete File” on page 60
• “End” on page 60
• “Run AppleScript” on page 61
Page 42

42
Receive
Settings
The Receive Gateway defines the input to workflows, by defining Hot Folders. The
Receive Gateway can take single files from a Hot Folder, or complete Job folders.
The Procedures on how to create a Hot Folder for a workflow can be found in “Bringing
Jobs into a workflow” on page 34
Hot Folder
The location of the Hot Folder. The Arrow button opens a browse dialog, allowing to
select the Hot Folder. The cross button allows to remove a selected path.
Polling Interval
The Polling Interval defines how often (every x seconds) the Hot Folder is checked for
new entries.
Settling Time
The Settling Time is the time the Gateway waits after a file has been copied or moved
into the Hot Folder, before moving it. This is to avoid a file being moved before the
original save or copy is completely finished. The Settling Time will start once the file size
and modification time stop changing.
Remove Empty Folders (Individual Files only)
This setting allows to define if empty folders should be removed from the Hot Folder.
Set Job Owner Mode
This allows to define when the Job Owner should be changed : Never (Don’t Set), if no
Job Owner was defined (Set If Empty), or regardless of the situation before (Set Always)
New Job Owner
The New Job Owner to be set if Job Owner has to be changed according to the Set Job
Owner Mode (see above).
Job Priority
This allows to change the Priority of the job. The range is 1-9. Don’t Change means the
priority is unmodified.
Page 43

Expand
Enfocus PitStop Automate User Guide 43
The Expand Gateway expands a selected archive file.
The Archive file to be expanded, selected by its file tag.
See also:
“Naming Conventions” on page 36
Select File(s) to Extract
In order to extract specific file(s) from the archive, the name(s) can be entered. Wildcards such as * can be used. Default is set to *, meaning all files from the archive will be
used.
Select Main File
The Select Main File will define what file gets the Main tag, thus should be processed by
the following Gateways. The Gateway generates an error if the extracted files do not
contain exactly one file that matches with the Select Main File name.
Page 44

44
Route
Exact Match
The Route Gateway allows to define what path Jobs need to follow, based on a set
criteria. A file matching a criteria goes to the corresponding output. If it doesn’t match,
it goes to the No Match output
If Match Mode is set to Exact Match, multiple criteria can be entered, each having their
own output.
This can be used for selecting by File Name, File Type, Job Owner, Status, Certify and
Page Orientation
File Name
File Name allows to select based on the name of the file. The File Name Pattern allows
to modify (truncate, ...) the filename before comparing it to the Criteria. See “Naming
Conventions” on page 36
File Type
File Type allows to select based on the type of the file, defined using Mime type. More
information on Mime types can be found on the internet. The Mime type of a file can be
found using the File Information function, in General Information next to Kind.
Job Owner
Allows to select based on the Job Owner.
Status
Allows to select based on the Job Status (OK, Failure, ...)
Certified
Allows to select based on the profile the incoming file was certified with. For the
Criteria, profiles can be selected using the browse button. If a file is not certified, or
certified with another profile, it will go to the Error output.
Page Orientation
Allows to select based on the orientation of the pages. If Page orientation is selected,
the Criteria contains a dropdown menu allowing to set to Portrait or Landscape.
Page 45

No Exact Match
Enfocus PitStop Automate User Guide 45
Wildcarding
This allows to define if Wildcards and/ore multiple criteria leading to the same output,
are possible.
• None : one criteria leads to 1 output, no wildcards can be used.
• Comma Separated List : multiple criteria can be set in the same line.
• Simple Wildcard : the “*” can be used as a wildcard.
• RegularExpression : Regular Expressions can be used. Regular Expression is a
more elaborate way of defining wildcards. More info can be found on the Internet
Less than, Less or Equal, More than, More or Equal can only be used for numbers, i.e.
for Test Type set to No of Pages, No of Separations, Page Size or File Size. Only 1 criteria
is allowed : either the job matches and go through the output, or it doesn’t, and get
sent to the Error output.
Page 46

46
Distill
Using AppleEvents
The Distill Gateway allows to send files through the (external) Distiller. This can be done
in 2 ways : either by AppleEvents, or using Distiller's Watched Folders. The advantage of
using the AppleEvents way, is that Distiller gets started automatically. However, as using
AppleEvents can cause unexpected behavior, we recommend to use Watched Folders.
Please note that the Distill Gateway drives an external Distiller application. You
need a licensed Distiller application on your system.
We encourage users to use Distiller 6 (or later) though Adobe Distiller 5 is supported.
Minor issues can arise when using Distiller 5 :
- File names longer than 28 characters are not supported by Distiller 5, and will lead to
errors
- Non-Roman file names not supported by Distiller 5 with PitStop Automate.
- Starting Distiller 5 (in Classic OS9) sometimes fails due to OS latencies.
Using Watched Folders
General Settings
When using AppleEvents, by default, the Global Parameters will be used (see “Edit
Global Parameters” on page 82). An icon next to the parameter will indicate that these
Global Parameters are used, and the settings (Distiller Application, Time Out, ...) are
greyed out. From the contextual menu (control-click) on the icon or the parameter
itself, you can open the Global Parameters dialog. In the contextual menu of the
Distiller application parameter, you can switch Use Local Setting on. In that case you
can overwrite the Global Parameters by the settings in the Process Folder Parameters.
When using Watched Folders, the Watched Folders option should be on, and the location of the Watched Folders as set in Distiller needs to be defined. The settings to be
used are included in the Watched Folders.
If the Keep Original PS File option is checked, the original PS file will be kept in the Job
Folder. This is not influenced by the option PostScript File is Deleted or Moved to “Out”
folder in the Watched Folder settings in the Acrobat Distiller application. The Original PS
File can get a separate file tag, as the PDF file will be the Main file.
To avoid problems, the PDF File Name should be set to Input File Name and fixed
text:.PDF as this is the file Adobe Distiller creates, and the Distill Gateway looks
for.
Page 47

PitStop
Actions
PDF Profile
Enfocus PitStop Automate User Guide 47
This Gateway uses the Enfocus PitStop library to detect problems in PDF files, and/or
correct problems in the PDF files. This is defined using PDF Profiles and Action Lists. For
more info, see “Preflighting and Checking PDF Documents” on page 65
Location of the Enfocus Action List files (.eal) that have to be executed on the file. If this
field is left blank, no Actions will be performed.
Multiple Action Lists can be set using the + button. The Action Lists will be executed in
the order they are set in the list.
If one or more Action lists are used in combination with a PDF Profile, the Action lists
will be executed BEFORE checking the file to the PDF Profile
Location of the PDF Profile that has to be used to check the file. If this field is left blank,
no PDF Profile will be used.
This should be a .ppp file. These files can be exported from the Enfocus PDF Profile
Control Panel
Change Status to Success
Certified
If this setting is switched on, a “successful” Pitstop will change the status of the Job to
Success, even if it had a status Warning or Error from earlier Gateways. This is to avoid
that files with an Error State from previous Gateways would go to the Error output of the
PitStop Gateway, even though PitStop was successful.
Using the Certified Status dropdown, you can define the Certified Status of the file after
being processed. If set to Leave Unchanged, the Certified Status will not change : if it
was a Certified file, it will remain Certified, if it was not Certified, it will remain not
Certified.
When set to Make Certified, the file will be a Certified PDF, and the used profile will be
included in the file, along with its status. The Certified User, Email, Phone, Fax and
Comment info will also be included.
When set to Make UnCertified, the file will no longer be Certified.
Page 48

48
Copy Job
Rename
This Gateway duplicates the job, so that it can be sent through 2 different workflow
branches at the same time.
This Gateway allows to rename one of the files in the Job. The file to be renamed is
defined by the File Tag.
See also:
“Naming Conventions” on page 36
Page 49

Copy File
Copy and Rename
Insert into workflow
Copy to New Location
Enfocus PitStop Automate User Guide 49
The Copy File Gateway allows to copy a file, based on file tag, to an external folder, or
to copy an external file into the Job Folder. There are different modes for copying.
This will copy the files defined by the File To Copy tag and the Select Files option, into
the jobfolder itself, using the Copied File name.
This can be used to copy an external file into the Job Folder. The file to be copied is
defined by the External Folder and the External File Name. The file inserted into the
workflow will be renamed to the name defined in the Copied File Name. To preserve
the external file name, keep the Copied File Name at Fixed Text and leave the input
field empty
This will copy the selected file(s) in the defined External Folder. The name of the file is
defined by the Copied File Name field. By setting it to Input Full File Name, its original
name can be used.
Back To Original
Select Files
If a job was dropped directly on the Canvas, or if an alias is put in a Hot folder, Pitstop
Automate remembers the original location of the file. The Back To Original option
allows to copy back to this original location, e.g. to overwrite the original file after
modifying it.
If the Select Files is set to Job File, only the file defined by the File To Copy tag will be
copied. If it is set to All Job Files, all files in the Job Folder, created by a Gateway and
thus referenced in the ticket, will be copied. In most cases this will be all files in the
Job Folder except for the ticket and files added to the Job Folder manually. If it is set to
All Files, all files in the Job Folder will be copied, regardless of their origin. If set to
Additional Files Only, only the files defined in the Additional Files List will be copied
See also:
• “Naming Conventions” on page 36
Page 50

50
Split Pages
Split Mode For Lists
New Name Pattern
The Split Pages Gateway converts a multipage PDF file into single page PDF files, and a
RunList containing the references to all single page PDF files. If the input is a Runlist or
Joblist, this List will be split into individual pages or in its original components, each of
them as a separate job.
If the file to be split is a List, there are two Modes available. Split Pages means the List
will be split into separate individual pages. Split Lists means the List will be split into
its components.
The New Name Pattern allows to set the name for the split files. The File Name Pattern
contains two extra components: the Page Label, being the page name as included in
the PDF document, and the Wide Page Label, being the Page Label, but prefixed by a
number of zero’s, to have a number with a fixed length.
Connections
The first connection is the output of the RunList, the second is the output of the single
page PDF document’s. The third is the Failure Output.
Page 51

Generic Application
The Generic Application Gateway can be used to drive any 3rd party application that
uses Hot Folders for automation. Setup of this Gateway will depend of the setup of the
3rd party application.
Check If Output File Is Ready
If the checkbox is off, the Gateway will assume the Output file of the generic application is ready from the moment it’s available. This might cause errors if the file becomes
available before the generic application finishes creating it. If the checkbox is on, the
Gateway will repeat checking until the file is stable, i.e. if the file is no longer
write-protected, or if the Modification Time no longer changes.
Application Deletes Original Files
Defines if the original input file is deleted after being processed or not. This avoids
Pitstop Automate looking for a file that was deleted by running it through an external
application. It does NOT influence the behavior of the external application!
Enfocus PitStop Automate User Guide 51
Hot Folder / Output
Allows to define the location of the Hot Folder and the Output folder of the generic application.
Output File Name
Defines the name Pitstop Automate will look for as “Processed File”. It should match
the name as written by the External Application.
Success Folder / Success File Name / Error Folder / Error File Name
If the used generic application doesn’t move succeeded or errored files in a separate
folder, leave this section empty. If a different location and name is used for successfully
processed files or Error files, set up the correct location and file names here.
Page 52

52
Schedule
This Gateway will hold or release incoming jobs until a specified time or interval. During
that “active period” files will be released to the scheduled Gateway. If the following
Gateway is processing a file, the next files will be held until the Process Folder is idle.
Page 53

Hold
Hold is a folder in which files can be stored, waiting for approval. Files can be moved
manually through an Accept Path or a Reject Path.
Message / Accept / Reject Text
The Message is a line of information shown for the operator who has to accept or reject.
The Accept and Reject text will be displayed as the two options. If left blank, the Accept
text will be Accept and the Reject text will be Reject.
Set Status To
If the Accept path is chosen, the status will be set to the Set Status To value. If the
status is better than the Set Status To value, it will remain unchanged. If it is set to
Don’t Modify, the status remains unchanged.
Enfocus PitStop Automate User Guide 53
Page 54

54
Defining a Printer Queue
The Print Gateway allows to send a file, either as PDF or as PostScript, to a Printer
Queue. In the Print Gateway, multiple Printer Queues can be defined.
To print a file from PitStop Automate:
Go to the Print Gateway on the Server
Create a Printer Queue (Add Printer)
Set the Printer Setup and Page Setup to be used
Go to the Canvas Manager, add a Print Process Folder
Set the name of the Printer Queue in the configurations
A Printer Queue is defined in the Print Gateway on the server. It combines the selection
of the Printer, and Printer Setup and Page setup settings.
To add or edit a Printer Queue :
Go to the Printers menu in the Print Gateway on the Server
Select Add Printer or select the Printer Queue you want to change, and click Edit
Current Printer
Set or change the name for the Printer Queue.
Set or change Page Setup
Set or change Printer Setup
Select the available page sizes
click the Change button
Setting the Print Process Folder
The most important setting in the Print Process Folder, is the Printer Name. This should
be identical to the name of an earlier defined Printer Queue, and thus set the selection
of the Printer, the Page Setup and Printer Setup
Layout settings
• Print Layout : Defines the positioning of the file on the page size for the Printer
Queue.
• Bounding Box : the PageBox defining the area to be printed.
Page 55

Enfocus PitStop Automate User Guide 55
• Auto Select Paper Size: This makes the printer choose the minimum paper size
that holds the entire job, from the sizes defined in the Paper sizes available for
Auto Select in the Gateway settings. First a paper size for which no scaling is
necessary will be searched. If the option Rotate To Fit is on, also rotation is
considered.
• Use Page Size In Job: If the PDF document contains a defined Page Size, this paper
size will be used.
Save As PostScript
If the Save As PostScript option is on, the file will not be printed, but will be saved as a
PS file alongside the original file in the Job Folder, using the PostScript Filename and
PostScript Tag.
If set, the AWS Pacifier is used to create PS from a PDF file. This Pacifier only accepts PDF
1.3, so PDF 1.4 and 1.5 will be flattened first (by the Print Gateway).
Separations and Colors
•If the Separate option is on, composite files will be separated first. If the setting is
off, composite files are sent unmodified. Separated files will always be sent
unmodified.
• Page Sorting defines the sequence of pages when separating a multipage file. If
set to Separations First, the file will start with all separations of the first page,
then all separations of the second, etc. If set to Pages First, the file will start with
all pages in the first separation, then all pages in the second separation, etc.
• Include / Exclude Separations allows to define names of separations that have to
be included or excluded. If separations are set to be Included, all other separations will be excluded, regardless of the setting of the Exclude fields. Include
Separation and Exclude Separation can take the * sign as wildcard.
Page 56

56
Compress
Archive Name
Archive Tag Name
Delete Added Files
Compress allows to create a StuffIt or Zip archive of the selected files.
Allows to define the name of the Archive to be saved. The name is defined using the
File Name Template.
Defines the Tag for the newly created archive file. If the Delete Added File Tag is on, the
Tag for the Archive will be Main.
If the Delete Added Files checkbox is on, files added to the archive will be deleted from
the Job Folder after archiving. In case the Main file is added and deleted, the Archive
file will become the main file.
Select Files
If the Select Files is set to Job File, only the file defined by the File To Compress tag will
be compressed. If it is set to All Job Files, all files in the Job Folder, created by a
Gateway and thus referenced in the ticket, will be added to the archive. In most cases
this will be all files in the Job Folder except for the ticket and files added to the Job
Folder manually. If it is set to All Files, all files in the Job Folder will be archived,
regardless of their origin. If set to Additional Files Only, only the files defined in the
Additional Files List will be added to the archive.
See also:
• “Naming Conventions” on page 36
Page 57

FTP
The FTP Gateway allows to send files to a remote location using FTP protocol.
IP Address, UserName, Password, Destination Path
Settings for the FTP server to send to. The protocol (ftp://) doesn’t need to be added to
the IP address. The Destination Path is a relative path, starting at the User Folder, and
should end by a /.
UsePassiveMode
When using active mode, the connection between data ports (opening the data
connection) is done from the server side. For some firewalls, this is prohibited, thus the
Gateway will fail, and the file will be sent to the Failure output. In that case, passive
mode can be chosen, meaning both command and data connection is established from
the client side.
Enfocus PitStop Automate User Guide 57
Select Files
If set to Job File, only the file set in File To FTP tag will be sent. If set to All Job Files, all
files in the Job Folder, created by a Gateway and referenced in the ticket, will be sent. If
set to All Files, all files in the Job Folder will be sent. If set to Additional Files Only, only
the files defined in the Additional Files List will be sent.
See also:
• “Naming Conventions” on page 36
Page 58

58
Send Mail
An automatically generated e-mail message can be sent through a Mail server, with
attachment as defined, based on file tag. The Gateway determines its own IP address,
and uses SMTP port 25.
By default, the Global Parameters will be used for the Mail Server address, user name
and password (see “Edit Global Parameters” on page 82). An icon next to the parameter
will indicate that these Global Parameters are used, and the settings (Server, User
name, Password) are greyed out. From the contextual menu (control-click) on the icon
or the parameter itself, you can open the Global Parameters dialog.. In the contextual
menu of the Mail Server parameter, you can switch Use Local Setting on. In that case
you can overwrite the Global Parameters by the settings in the Process Folder Parameters.
Sending a PitStop Report by E-mail
By entering the file tag(s), the corresponding file(s) can be attached to the e-mail
message. This can be used to send a PitStop Report by E-mail
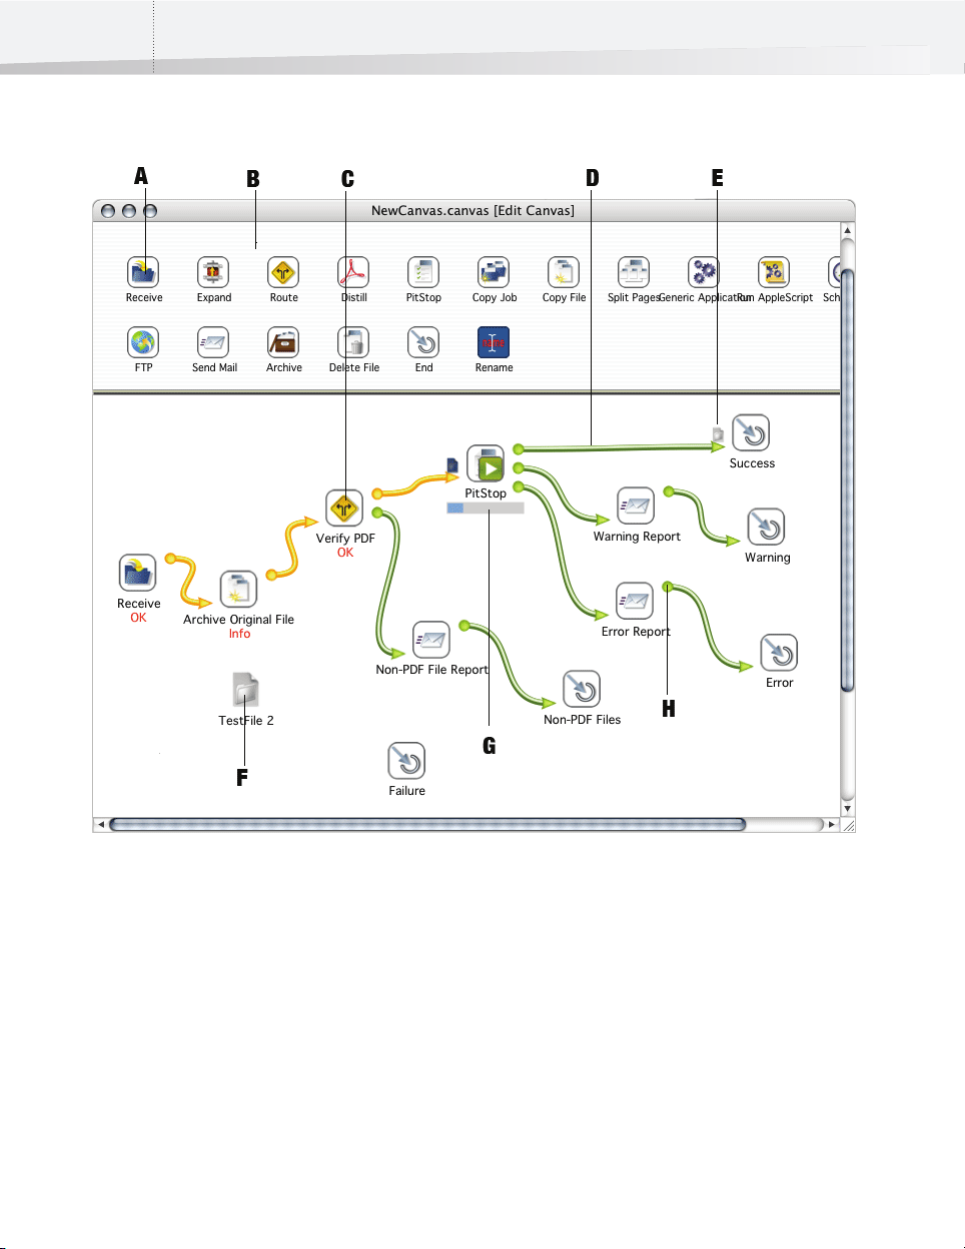
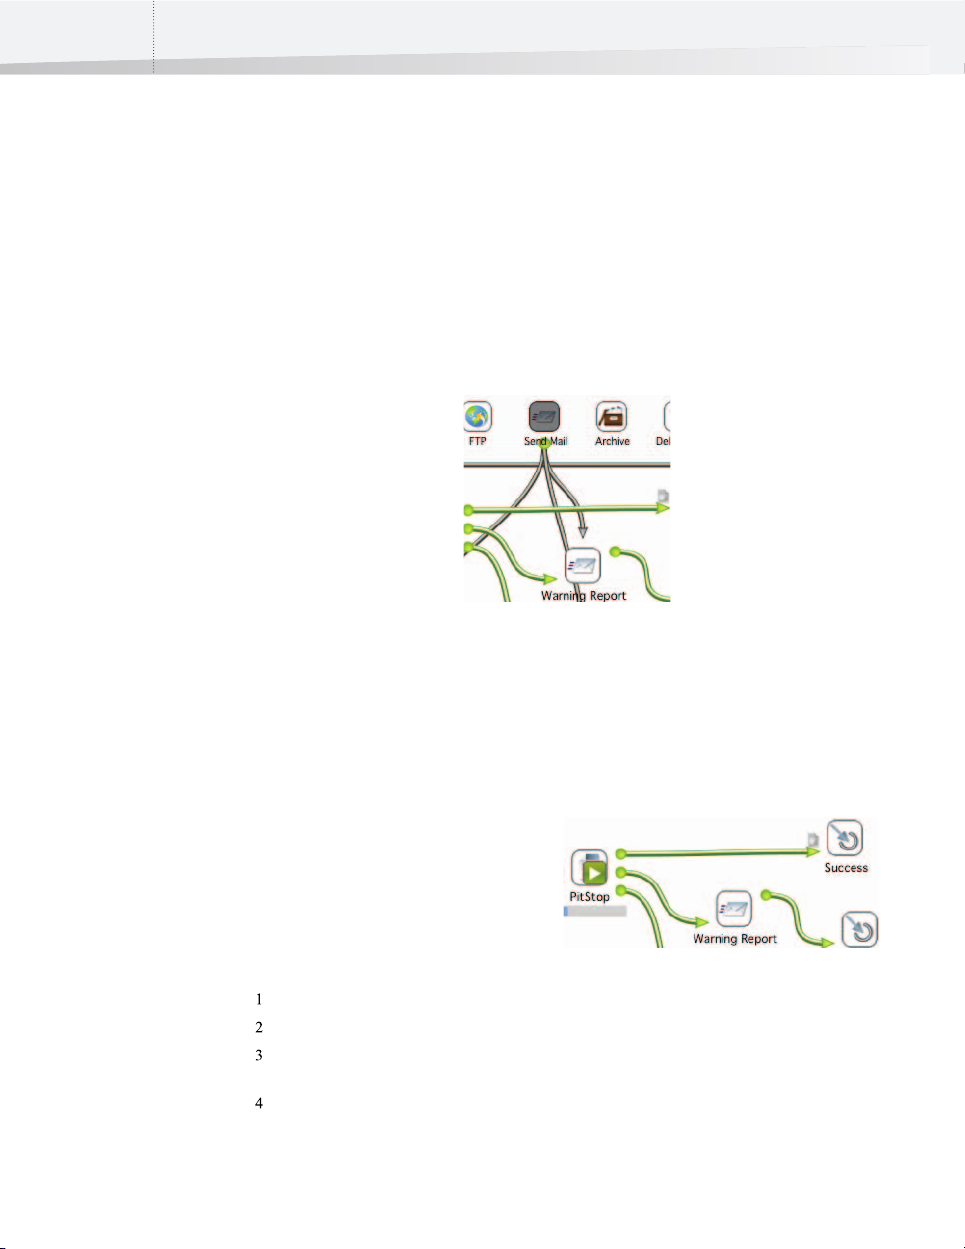
connect a Send Mail Gateway after the PitStop Gateway, either to all outputs, or
only to the Warning/Error outputs if you don’t want to send an e-mail if the job
was found to be ok
make all settings in the Send Mail Gateway: message, To address etc.
Set the PitStop Report file tag as file to be attached
See also:
• “Naming Conventions” on page 36
• “Interpreting preflight reports” on page 72
Page 59

Archive
Purge Mode
Archive Mode
Enfocus PitStop Automate User Guide 59
The Archive Gateway will allow you to purge jobs from a Canvas and/or Archive jobs on a
file server. As it occurs at the end of a workflow, the Archive Process Folder has only one
output, a Failure Output.
The Purge Mode defines how and when jobs are archived and purged. The options are
Immediately, Delayed (set in Purge Time Limit in hours and minutes) or on Volume
Percentage Limit (percentage full for a disk). This Volume Percentage Limit can be set in
the Gateway Preferences. Note that the Volume Percentage Limit option in the configuration can only be used for the volume the Server software is running on.
This will allow you to archive your jobs on a central file server. There are three options
here.
• None, which will not Archive anything, but will remove the job completely from
the Canvas.
• Save Job Centrally, which will allow you to archive the Job Folder with all files on
the central server. The path where these archives will be stored is specified in the
preferences (see below).
• Save Ticket Centrally, which will do exactly the same, but will only archive the
ticket of a job.
Archiving Settings
When Archiving a Job or a ticket, it will be stored in the Default Job Archive as defined
in the preferences of the Archive Gateway. A folder will be created for every job, using
the defined Folder Name.
The Divide Subfolders option allows you to create subfolders in your Archive folder. If
set to never, all archives will be directly in the Archive folder. It is possible to have a
new subfolder created every day, every week or every month. This can facilitate organizing and relocating archives based on date.
The Compress option defines if the archived job should be compressed or not. When
switched off, the files will be archived in a folder 'Unstuffed_Archive' within the Default
job Archive in a folder with the job name.
See also:
• “Naming Conventions” on page 36
Page 60

60
Delete File
End
This Gateway allows to delete one or more files from the Job. The file(s) to be deleted
can be defined using the File tag.
See also:
“File tag” on page 36
The End Gateway is actually an End folder : no further processing is done.
Page 61

Run AppleScript
The Run AppleScript Gateway allows to execute an applescript. This allows to perform
programmable Gateways, or to drive any 3rd party software that can be controlled using
apple events. Using Apple Script i.o. Hot Folders gives better feedback and controlability.
Output Name
The Output name (i.e. the name given to the Output File by the AppleScript) can be defined here.
Parameter
When running a script that uses a parameter, this parameter can be entered here, and
will simply be passed on to the AppleScript. If the AppleScript does not use a parameter,
this field should be left blank.
Rename Main Tag To Output Name
If this option is on, the Output file (with the Output Name) will get the Main tag i.o. the
original file.
Enfocus PitStop Automate User Guide 61
Original File Handling
This defines how the AppleScript treats the file, and allows to take the processed file
back into the workflow:
• If the AppleScript deletes the input file and saves a new file, set to Save As and
define the new name in Output Name.
• If the AppleScript overwrites the original input file, set to Overwrite.
• If the AppleScript keeps the original input file and creates a new file, set to Save A
Copy As and define the new file name in Output Name.
• If the AppleScript doesn’t change the input file nor create a new file, set to Do Not
Modify.
The Settings in the AppleScript Gateway should be set based on the AppleScript.
The settings do NOT change the AppleScript.
Page 62

62
Page 63

Chapter 6
Page 64

Page 65

Enfocus PitStop Automate User Guide 65
C h a p t e r 6 :
Preflighting and Checking PDF Documents
About this chapter
Enfocus PitStop Automate enables you to conveniently preflight your PDF documents
before you output them, either on screen or in printed form. You can easily create and
manage PDF Profiles and see whether the incoming properties of your PDF documents
match the properties as specified in the respective PDF Profile. The result of this
preflight is presented in a preflight report.
You can find the Enfocus PDF Profile control panel in the View Menu of the Canvas
Manager. At the same place, you can find the Enfocus Action List Control Panel, which
allows to make corrections to the PDF documents.
PDF Profiles and Action lists can be used in the PitStop Gateway.
In this Chapter
• “What is preflighting?” on page 66
• “Properties of PDF documents” on page 69
• “Problem reporting” on page 70
• “Creating a PDF Profile” on page 71
• “Interpreting preflight reports” on page 72
Page 66

66
What is preflighting?
Preflighting defined
Preflighting is a term derived from the airline industry. The pilot has the responsibility
to determine the airworthiness of the aircraft before take-off. This means that he or
she has to perform a number of checks prior to each flight.
Preflighting PDF documents basically means the same thing: the “pilot in command”,
i.e. the person who creates or processes a PDF document, has to make sure that the
document is “airworthy”, or rather, “
“Outputworthy” means that the PDF document is “fit for use”, for example:
• That a PDF document to be printed on a four-color printing press contains only
• That a PDF document intended for online viewing contains only RGB images
Moreover, properties of a PDF document which do not meet the requirements of the
preflight check can be reported as an “error” and fixed in the same process.
PDF Profiles
To preflight PDF documents, you use PDF Profiles. A PDF Profile is a collection of criteria
which a PDF document should meet to be outputworthy. For each criterion, you can
specify:
• If it should be checked or not
• How it should be listed in the preflight report, i.e. “Warning” or “Error” if a devi-
Moreover, some criteria allow you to specify how detected problems, if any, should be
fixed.
An example of a criterion is RGB colors. If you do not want RGB colors in your PDF documents, you can check this and have all RGB colors converted to CMYK.
outputworthy
CMYK images and that all the necessary fonts are included
ating property is detected in the PDF document
”, before sending it for output.
See also:
• “Creating a PDF Profile” on page 71
Page 67

Preflighting mechanism
Certified
Enfocus PitStop Automate User Guide 67
To preflight a PDF file, you need to have a PDF Profile, containing all criteria you want to
preflight your PDF documents with. If you don’t have a PDF Profile yet, you can create
one using the Enfocus PDF Profile Editor, and export it to a .ppp file. This .ppp file can
then be used in the PitStop Gateway (see “PitStop” on page 47)/
When PDF documents are processed by the PitStop Process Folder, the PDF documents
will be checked and possibly be corrected according to the specifications in the PDF
Profile. A Report stating the results of this preflight will be generated.
See also:
• “Creating a PDF Profile” on page 71
• “PitStop” on page 47
What is Certified ?
Certified PDF is a PDF workflow concept developed by Enfocus Software based on
customer requests and feedback from industry experts. The Certified PDF concept has
been designed to address three fundamental issues faced by the majority of users
implementing a PDF workflow :
• How to guarantee that a PDF document was successfully preflighted with a specific
PDF Profile
• How to maintain consistency between the source document(s) and the PDF document when changes can be applied to the PDF document throughout the workflow
• How to minimize risk and responsibility when changing a customer’s PDF document before final output.
Preflighting in a Certified PDF workflow
A Certified PDF workflow supports the preflight process by:
• Offering the PDF document provider a simple and streamlined way to preflight a
PDF document with a PDF Profile supplied by the PDF document recipient
• Including the PDF Profile and the corresponding preflight report in the PDF document. This way there can be no doubt about the preflight status of the PDF document.
• Offering a straightforward user interface that enables the recipient of the PDF
document to verify that the document has been successfully preflighted with a
PDF profile he or she provided
Page 68

68
PDF editing and responsibilities
The Certified PDF workflow settles responsibility issues by:
• Providing a detailed log file of all the changes made to a PDF document
• Keeping track of the PDF editing process, i.e. who applied which change and
when
• Implementing a robust roll-back mechanism, which, if you wish, allows to easily
return to a previously saved state of your PDF document
Certified Workflow in Pitstop Automate
The PitStop Gateway can change the Certified PDF status after preflighting. See “PitStop”
on page 47
It is also possible to use the Certified PDF status as a criteria in the Route Gateway : see
“Route” on page 44
Page 69

Properties of PDF documents
Groups of properties
The Enfocus PDF Profile Editor gives you access to, and control over, a large number of
properties in PDF documents. These properties have been subdivided into a number of
categories and are represented as such in the Enfocus PDF Profile Editor.
A preflight check verifies and fixes these properties of a PDF document. The categories
in the PDF Profile Editor relate to the following properties of a PDF document, which are
verified and possibly fixed through a preflight:
• The document’s digital format
•Security
•Pages
•Fonts
• Color
•Images
•OPI
•Text
•Line art
•Transparency
• Annotations
• Metadata
•PDF/X
Enfocus PitStop Automate User Guide 69
Page 70

70
Problem reporting
Problem severity levels defined
If any of the properties in a PDF document don’t comply with the settings as specified
in the PDF Profile, they will be logged in the preflight report. You can select how these
deviations should be reported:
•As “Information”
•As “Error”
These two labels indicate severity levels of the detected “problem”. If a property does
not comply, you can define how severe the detected problem is:
• You can label deviating properties as “Information” if it is not a real problem in
the strict sense of the word, but just something you would like to be informed
about.
• You can label deviating properties as “Error” if you really want them to be as
specified in the PDF Profile before you send them to output.
Problem severity levels: example
Suppose that some of the PDF documents you work with contain RGB colors. First, you
want to print them on a black and white output device, such as a laser printer, for
proofing purposes. In that case, RGB colors are not really a problem. However, you
would like to know which PDF documents contain objects in RGB color, because at a
later stage, you might want to print these documents on a color press. You could then
use two different PDF Profiles to preflight these PDF documents:
• A PDF Profile for the laser printer, which reports RGB colors as “Information”
• A PDF Profile for the color press, which reports RGB colors as “Error”
See also:
• “Creating a PDF Profile” on page 71
• “PitStop” on page 47
Page 71

Creating a PDF Profile
Enfocus PDF Profile Control Panel
The Enfocus PDF Profile Control Panel allows to manage PDF Profiles in the PDF Profile
Database. Every PDF Profile is shown by its Name, Author and Company.
It will contain a number of predefined PDF Profiles. Rather than creating PDF Profiles
from scratch, you can create your own PDF Profiles based on these predefined PDF
Profiles.
New PDF Profile
A new PDF Profile to be created is based on a template. Choose empty if you want to
start from scratch.
Edit
When Editing is selected, the Enfocus PDF Profile Editor window is opened, to edit the
selected PDF Profile.
Import a PDF Profile
Importing a .ppp file will make the PDF Profile available in the Enfocus PDF Profile
Control Panel for managing and editing.
Export a PDF Profile
Exporting a PDF Profile into a .ppp file is necessary in order to use the PDF Profile in the
PitStop Gateway. A browse dialog will open to define name and location
a PDF Profile needs to be exported to a .ppp file in order to be used in the
PitStop Gateway !
Enfocus PitStop Automate User Guide 71
Defining a PDF Profile in the Enfocus PDF Profile Editor
Creating a PDF Profile implies that you specify all the properties which have to be
checked, reported and, if necessary, fixed. To do this, you use the Enfocus PDF Profile
Editor.
To use the Enfocus PDF Profile Editor:
Click a problem category in the list.
Select the Enable category check box.
Select one or more properties or potential problems to check.
Specify how to fix the problem, if necessary.
Select how the detected problem should be listed in the preflight report: Information or Error.
Repeat steps 1 through 5 for each potential problem you wish to check and fix.
Click OK.
Page 72

72
Interpreting preflight reports
The report generated by PitStop Automate is a PDF document that consists of the
following chapters:
Chapter Contents
Errors & Warnings (potential) problems according to the
selected PDF Profile
General File Information
Font Information all fonts used in the PDF document,
Color Information all color spaces (RGB, CMYK, etc.) used in
Image Information all images in the PDF document, along
OPI Information OPI usage in the PDF document
The first chapter is by far the most important one, because it warns you if your PDF
document does not comply with the settings you specified in the PDF Profile (and,
consequently, may not output correctly).
See also:
• “Creating a PDF Profile” on page 71
• “PitStop” on page 47
• “Sending a PitStop Report by E-mail” on page 58
information about the current PDF document, such as title, author, PDF Profile
used, data format, etc.
along with their attributes (type of font,
embedded or subset, etc.)
the PDF document, with additional
information where required
with additional information (e.g. physical and effective resolution, page, angle,
custom color functions, etc.)
Page 73

Chapter 7
Page 74

Page 75

Enfocus PitStop Automate User Guide 75
C h a p t e r 7 :
Canvas Manager
About this chapter
This Chapter gives a detailed overview of all functions in the Canvas Manager, the User
Interface to define and manage Canvases and their files.
In this Chapter
• “Preferences” on page 76
• “File Menu” on page 77
• “Edit Menu” on page 79
• “View Menu” on page 80
• “Folder” on page 81
• “Contextual Menus” on page 83
• “Toolbar / Shortcut overview” on page 85
Page 76

76
Preferences
Distance Units
Resolution Units
User Name
Copy Gatewaybar
The Preferences can be opened in the Canvas Manager Menu, or by the shortcut
Command -, (comma).
The units to be used for traps, sizes, etc. This can be Millimeter, Point or Inches.
The units to be used for resolutions
This can be Pixels Per Millimeter or Pixels Per Inch.
The User Name can be entered here. This can be used in the List View, or in the Route
Gateway
The Gatewaybar, the part of the Canvas on top, containing the available Gateways, can
be remodelled: Gateways can be moved and ordered, or removed from the Gatewaybar.
When clicking the Copy Gatewaybar, the layout and contents of the Gatewaybar of the
active Canvas will be copied into the ticket of the Canvas Manager, and all new Canvases
will use the same Gatewaybar.
When holding down the option key while clicking the Copy Gatewaybar button, the
Gatewaybar as defined in the Canvas Manager is reset to its default state.
Page 77

File Menu
New Canvas (Command-N)
When selecting New Canvas, a dialog will open showing all available template
Canvases. Selecting one allows to create a new Canvas based on the selected template.
To start from a new, empty Canvas, the Empty Canvas template can be selected.
The name for the Canvas needs to be defined. By default, this will be “New” followed
by the name of the used template. The Canvas will be saved in the Canvases folder in
the Enfocus Data folder. A New Canvas can be created from the File menu, by its shortcut
Command - N, or by its Toolbar button.
Open Canvas (Command-O)
When selecting Open Canvas, a dialog will open showing all Canvases in the “Canvases”
folder in the Enfocus Data. A Canvas at another location can be opened using the
Other... button.
Delete Canvas
When selecting Delete Canvas, a dialog will open showing all Canvases in the
“Canvases” folder in the Enfocus Data, allowing to select the Canvas you want to delete.
A Canvas at another location can be deleted using the Other... button.
Enfocus PitStop Automate User Guide 77
Canvases should always be deleted using the Delete Canvas function. If the actual
file is removed from the folder (i.e. without the Delete Canvas function), the
Gateway applications will still contain links to the Process Folders in the deleted
Canvas.
Delete Current Canvas
Rename Canvas
File Information
This allows to delete the currently opened Canvas.
When selecting Rename Canvas, a dialog will open showing all Canvases in the
“Canvases” folder in the Enfocus Data. A Canvas at another location can be selected
using the Other... button.
By selecting a Canvas in the list, this Canvas can be renamed by entering the new name
and clicking the Rename button.
The File Information function opens a browse dialog, allowing to select a file. For the
selected file, all available information is shown : Preview, general information (date,
file name, size, ...), Page box information, Certified PDF state, used separations, used
fonts, and Properties.
Page 78

78
New View (Command-B)
New View opens a second window of the Canvas. Both windows will be synchronized,
so changes made to one of the windows, will also show in the other.
Close (Command-W)
Close will close the selected Canvas window.
Save as Canvas Archive / New from Canvas Archive
Saving a Canvas as a Canvas Archive will create an ODCFG file. These ODCFG files allow to
move a Canvas from one computer to another.
When creating a new Canvas from the Canvas Archive, a browse dialog will allow to
select the ODCFG file, and you will be asked to define the name and location for the
new Canvas
After that, you will be able to restore all links to external files, e.g. to the location of
the PitStop Profiles to be used.
Remove Stale Links
Remove Stale Links removes all links from Gateways to Process Folders that do not
longer exist in the Canvas folder. This is only useful when Canvasses were manually
deleted in the Finder.
Reset Gateway Bar
Reset Gateway Bar can be used to return the Gateway Bar to its default state, or to the
state as defined in the Preferences, using the Copy Gateway Bar function.
Page 79

Edit Menu
Manage Jobs
Edit Jobs
Edit Canvas
Enfocus PitStop Automate User Guide 79
The Edit menu allows to set the level of editing is allowed.
This means you can add jobs to the Canvas, move those jobs from the Canvas into
Process Folders, but nothing else.
This is the default when opening a Canvas.
This means you can do anything with jobs on the Canvas (also take them out of Process
Folders, delete them, etc.) You can not make any changes to the Process Folders.
This means you can edit everything.
This is the default when creating a new Canvas.
Page 80

80
View Menu
Refresh Canvas (Command - R)
This is a repaint on the Canvas. It refreshes the contents of the Canvas. In normal situations, this is not necessary, as changes to a Canvas should be updated automatically.
View as List (Command - L)
View as List switches the active window from Icon view to List view. See “Canvas List
View” on page 30.
View as Icons (Command - I)
View as Icons switches the active window from List view to Icon view. See “Canvas List
View” on page 30.
View all Parameters
By selecting View all Parameters, all settings are shown on the Canvas (in orange) if a
Process Folder or job is selected. It can be switched off by selecting View Canvas
Settings.
View Canvas Settings
By selecting View Canvas Settings, the View All Settings is turned off: which settings are
shown on the Canvas depends on the setting of the contextual menu of the configuration dialogs (see “Contextual Menu items for Configurations” on page 84).
Zoom in
By clicking Zoom in, you can zoom in on the active Canvas. The zoom can also be
changed by holding down the command key, and dragging up (zoom in) or down (zoom
out) on the Canvas. By holding down the Command and Option key, the view can be
moved around (pan).
Zoom out
By clicking Zoom out, you can zoom out on the active Canvas. The zoom can also be
changed by holding down the command key, and dragging up / right (zoom in) or down
/ left (zoom out) on the Canvas. By holding down the Command and Option key, the
view can be moved around (pan).
Reset Zoom (Command - F)
By clicking Reset Zoom, the zoom of the Canvas is restored to default.
Page 81

Folder
Hide Contents (Command - D)
Will hide the contents of a Process Folder. In that way, the Process Folder itself remains
visible, but the jobs inside it are hidden. This can be useful for folders containing lots
of files, or e.g. Failure folders.
Show Contents (Command - shift - D)
Makes the contents of the selected Process Folder visible again.
Hide Incoming links
Hides all incoming links from the selected Process Folder. Hidden links will be shown in
a dimmed color, if the Process Folder at one of the ends is selected.
Show Incoming Links
Makes all links to the selected Process Folder visible again.
Open in Finder
Will open the selected Process Folder or Job Folder in the finder. This can also be done
by double-clicking the folder in the Canvas.
Enfocus PitStop Automate User Guide 81
View Log
Opens the log file for the selected Process Folder. The log can be very helpful for diagnostics, timings, etc. The Log can also be opened by option - double clicking the Process
or Job folder.
Edit Parameters / All Parameters
Edit Parameters or Edit All Parameters opens a dialog containing the settings for the
selected Job or Process Folder. The Parameters can also be opened by
command-double-clicking the Process or Job Folder. See Job settings for more details.
Edit Defaults
The Edit Defaults function is only available on Gateways. It allows to define the default
settings of Gateways. When a Process Folder is created from a Gateway, the Default
settings are used, but can be altered in the Edit Parameters dialog. Changing the
defaults will not change the settings of earlier created Process Folders.
Page 82

82
Edit Global Parameters
Hold / Release
Most parameters can be set in the Gateway (as a default value) or in the Process Folder
itself. For the Distill Gateway and the Send Mail Gateway, some parameters can be set
on an overall level, applying to all Canvases as well, by setting the Global Parameters.
These will be used as a default value in all Distill and Send Mail Process Folders.
The Global Parameters can still be overwritten in the contextual menu of the Distill and
Send Mail Parameters. An example : In the Distill Parameters, control-click the Distill
Application, and enable Use Local Setting. The path for the Distill application entered
in the Parameters dialog will be used, while the path as defined in the Global Parameters will be ignored.
The first time a Canvas is started after installation, the Global Parameters dialog
be will open, so you can enter these settings immediately
When a Global Parameter applies, an icon will be visible next to that parameter
in the All Parameters dialog of the Process Folder.
See also:
• “Distill” on page 46
• “Send Mail” on page 58
A Process Folder, or a job folder can be put on hold, meaning that nothing will be
processed. A Job or Process Folder on hold is represented by a yellow file icon. It can be
released by selecting it and clicking Release.
Duplicate
A Process Folder can be duplicated, creating a Process Folder with the same settings.
Remove from Disk (backspace)
Removes the selected Process or Job Folder from the Canvas. The corresponding folder in
the Canvas folder will be deleted as well. A File or Process Folder can also be deleted by
selecting it and hitting the backspace button, by the contextual menu of the Process
Folder or file, or by the toolbar button.
Page 83

Contextual Menus
Contextual Menu items for the Canvas
The contextual menu items found when control-clicking anywhere on the Canvas, can
also be found in the View menu and the Folder menu
• New View (see “New View (Command-B)” on page 78)
• Close View (see “Close (Command-W)” on page 78)
• Refresh Canvas (see “Refresh Canvas (Command - R)” on page 80)
• View as List (see “View as List (Command - L)” on page 80)
• View All Parameters / View Canvas Parameters (see “View all Parameters” on
page 80)
• Zoom in / out - Reset View (see “Zoom in” on page 80 and following)
•Show All
• Automatically Link New Folder
If the Automatically Link New Folder option is on, a new Process Folder, dragged
on the Canvas, will automatically be connected with the first available output of
the last selected Process Folder.
See also:
• “Failure Folder” on page 27
• “Creating and Editing a workflow” on page 26
Enfocus PitStop Automate User Guide 83
Contextual Menu items for Gateways
The contextual menu items can also be found in the Folders menu, when a Gateway is
selected.
• Open in Finder (see “Open in Finder” on page 81)
• View log (see “View Log” on page 81)
• Edit Defaults (see “Edit Defaults” on page 81)
• Remove from Canvas (see “Remove from Disk (backspace)” on page 82)
Contextual Menu items for Process Folders
The contextual menu items can also be found in the Folders menu, when a Process
Folder is selected.
• Hide contents / show contents (see “Hide Contents (Command - D)” on page 81)
• Hide links / show links (see “Hide Incoming links” on page 81)
• Open in finder (see “Open in Finder” on page 81)
• View Log (see “View Log” on page 81)
• Parameters / All Parameters (see “Edit Parameters / All Parameters” on page 81)
Page 84

84
• Hold / Release (see “Hold / Release” on page 82)
• Remove from Disk (see “Remove from Disk (backspace)” on page 82)
• Duplicate (see “Duplicate” on page 82)
• Set Failure Folder
The Set Failure Folder will define the selected folder (only useful on End Folders)
as the default Failure Folder, and connects the Failure output of newly created
Process Folders to this Failure Folder. Please note that this should always be used
together with the 'Automatically Link New Folder' option that can be found in the
contextual menu of the Canvas.
See also:
• “Creating and Editing a workflow” on page 26
• “Failure Folder” on page 27
Contextual Menu items for Jobs
The contextual menu items can also be found in the Folders menu, when a Job Folder is
selected.
• Open in finder (see “Open in Finder” on page 81)
• View Log (see “View Log” on page 81)
• Parameters / All Parameters (see “Edit Parameters / All Parameters” on page 81)
• Hold / Release (see “Hold / Release” on page 82)
• Remove from Disk (see “Remove from Disk (backspace)” on page 82)
Contextual Menu items for Configurations
The contextual menu for settings in the Parameters allow to define at what level the
setting should be shown and accessible.
If set to All Parameters, the setting can only be seen when using All Parameters.
When set to In Parameters, the setting is present in Parameters and All Parameters
When set to on Canvas, the setting will be shown on the Canvas when selecting the
Gateway or a file that has been processed by the Gateway. The setting will also be
available in (All) Parameters.
Page 85

Toolbar / Shortcut overview
This table gives an overview of all shortcuts and toolbar buttons in the Canvas Manager
cmd - , (comma) Canvas Manager Preferences “Preferences” on page 76
cmd - Q Quit Canvas Manager
cmd - N New Canvas “New Canvas (Command-N)” on page 77
cmd - O Open Canvas “Open Canvas (Command-O)” on
cmd - R Refresh Canvas “Refresh Canvas (Command - R)” on
cmd - B New View “New View (Command-B)” on page 78
cmd - W Close “Close (Command-W)” on page 78
Enfocus PitStop Automate User Guide 85
“New Canvas” on page 23
page 77
page 80
cmd - L View as List “View as List (Command - L)” on
page 80
cmd - i View as Icons “View as Icons (Command - I)” on
page 80
cmd + drag up / right Zoom In “Zoom in” on page 80 and “Navigating
through the Canvas” on page 25
cmd + drag bottom / left Zoom Out “Zoom out” on page 80 and “Navi-
gating through the Canvas” on page 25
cmd - option - drag in Canvas or
Gateways bar
cmd - option - drag on line between
Gateways bar and Canvas
cmd - F Reset Zoom “Reset Zoom (Command - F)” on
Pan “Navigating through the Canvas” on
page 25
Resize Gateways bar “Navigating through the Canvas” on
page 25
page 80
Page 86

86
cmd - D Hide “Hide Contents (Command - D)” on
page 81
cmd - shift - D Show All “Show Contents (Command - shift - D)”
on page 81
cmd - double-click Process or Job
Folder
double-click Process or Job Folder Edit Parameters “Edit Parameters / All Parameters” on
double-click Gateway in Gateway bar Edit Defaults “Edit Defaults” on page 81
option - double-click Process or Job
Folder
Backspace Remove from disk “Remove from Disk (backspace)” on
Open in Finder “Open in Finder” on page 81
page 81
Edit All Parameters “Edit Parameters / All Parameters” on
page 81
View Log “View Log” on page 81
Hold “Hold / Release” on page 82
Release “Hold / Release” on page 82
page 82
Page 87

Enfocus PitStop Automate User Guide 87
A
Actions
PitStop Gateway 47
Administrator Software 16
AppleScript 61
Archive 59
C
Canvas 16, 18, 23
Bringing jobs into Workflows 34
Contextual Menu for Canvas 83
Create Workflows 26
Delete Canvas 77
Edit Canvas 79
Hide Contents 81
Hide Incoming Links 81
List View 30
Navigate 25
New Canvas 77
Open Canvas 77
Pan 25
Refresh 80
View as List 80
Zoom 25, 80
categories of problems 69
Certified 67
Compress
Archive 59
Compress Gateway 56
Configuration 29
Connect
Process Folder 26
Contents
Hide Contents 81
Contextual Menus 25
Copy
Copy File Gateway 49
Insert into Workflow 49
to New Location 49
Create
Process Folder 26
Workflow 26
creating a new PDF Queue 8
creating a PDF Profile 71
D
Delete
Delete Canvas 77
Purge when Archiving 59
Distill 46
E
Edit
Edit Canvas 79
Workflow 26
End Folder 27
Enfocus PDF Profile Editor
using 71
Page 88

88
Error
Error Folder 27
Hide Incoming Links 81
Send by Mail 58
error reporting 70
error severity levels
defined 70
example 70
External Application 51
External Applications
Run AppleScript 61
F
File tag
File to Compress 56
For FTP 57
File Type
Route 44
G
Gateways 16, 18, 41
Archive 59
Compress 56
Contextual Menu for Gateways 83
Distill 46
Error Folder 27
Generic Application 51
Hold Folder 53
Overview 28
PitStop Gateway 47
Receive 42
Route 44
Run Applescript 61
running Gateways 18
Schedule 52
Send Mail 58
Split Pages 50
Generic Application 51
Folder
End Folder 27
Error Folder 27
H
Hide
Hide Contents 81
Hold
Hold Folder 53
Hot folder 34
Hot folder Based Applications 51
Page 89

Enfocus PitStop Automate User Guide 89
I
Input
Jobs into Workflow 34
Receive Gateway 42
Insert
Insert File into Workflow 49
Inspector 18, 75
Working area 23
Installation 14
interpreting a preflight report 72
J
job
In Process Folder 27
Jobs
Bringing Jobs into Workflow 34
Canvas List View 30
Contextual menu for Jobs 84
Create hot folder 34
Input 34
Receive Gateway 42
Running Jobs 33
Schedule 52
List
Canvas List 30
View as List 80
Load Balancing
Schedule Gateway 52
Log
Open 25
M
Mail 58
managing
PDF Profiles 71
Minimum Configuration 14
Multipage
Split Pages 50
N
Navigating 25
New
New Canvas 77
L
Links
Hide Incoming Links 81
O
Open
Log 25
Open Canvas 77
Settings 25
Page 90

90
P
Pages
Split Pages 50
Panning 25
PDF
Distill Gateway 46
PitStop Gateway 47
PDF Profile
creating 71
definition 66
error level options 70
managing 71
PDF properties
groups 69
PDF Queue
creating a new ~ 8
creating a new ~ yourself 9
PitStop 47
PitStop Report
Send by Mail 58
PostScript
Distill Gateway 46
Save As PostScript 55
preflight report
interpreting 72
Preflighting
definition 66
preflighting
defined 66
mechanism 67
PitStop Gateway 47
Print
Define Printer Queue 54
Printer
Print Gateway 54
problem categories 69
Process Folder 19
Connect 26
Create 26
Hide Contents 81
Hide Incoming Links 81
Process Folders
Contextual Menu Process Folders 83
Profile
PitStop Gateway 47
Purge 59
Preferences
Canvas Manager 76
Preflight Profile
<Emphasis>See PDF Profile
Preflight Report
Send by Mail 58
R
Refresh Canvas 80
Report
PitStop Gateway 47
Send Mail 58
Page 91

Enfocus PitStop Automate User Guide 91
report
interpreting 72
Route
Route Gateway 44
Run Jobs 33
S
Send Mail 58
Server Software 16
Settings
Gateways 29
Open Settings 25
Single Page
Split Pages 50
Split Pages 50
Status
Change Status in Hold Gateway 53
Change Status in PitStop Gateway 47
U
Units
Canvas Manager Preferences 76
User Name 76
using Enfocus PDF Profile Editor 71
V
View
Refresh Canvas 80
View as List 80
W
Workflow
Create 26
Create hot folder 34
Edit 26
T
Task Manager 16, 18
Taskbar 26
Tasks
Settings 29
Z
Zoom 25, 80
Page 92

92
Page 93

Page 94

Enfocus - International
Bellevue 5 / 1101
9050 Gent
Belgium
T: +32 9 269 16 90
F: +32 9 269 16 91
info@enfocus.com
www.enfocus.com
Enfocus - North America
16000 Ventura Blvd. Ste. 910
Encino, CA 91436
United States
Sales: (888)-ENFOCUS
T: +1 818-501-2380
F: +1 818-501-2387
info@enfocus.com
www.enfocus.com
 Loading...