

Page 1

Quick Start Guide, AlphaGateway SMG-HP, Model AG100D-PoE+
The AlphaGateway SMG-HP AG100D-PoE+ provides 2 x 10/100/1000 BASE-T Ethernet ports with support for IEEE802.3af/at PoE/PoE+, with a
power output of 30W per port. The included DOCSIS 3.1 cable modem provides power system status monitoring and up to 1 Gigabit connectivity.
The unit connects to the HFC Coaxial Access network through a power-passing tap at any location within the HFC voltage range (44–90Vac Quasi
Wave), and transforms the HFC power to a voltage suitable for connected devices.
AlphaGateway SMG-HP Connections
1
2
TOP
3
3
1
Access port cover for System LEDs / Reset Button
GPS Antenna
2
3
IP67 Cable Gland for network cables
4
Ground Lug
5
AC Input via F-connector
(44-90Vac Quasi Square HFC Coax
5/8-24 SCTE-91 compliant)
6
Product label location
7
Pin to F-connector trim length guide
6
4
5
FRONT/LID
7
RIGHT
Fig. 1, Connections and Ports
14.8" (375 mm)
3.9" (98 mm)
8.4" (213 mm)
018-357-B1-001, Rev. A (08/2019)
BACK/BASE
LEFT
Fig. 2, Dimensioned Views
1
Page 2
NOTICE:
Each connected Ethernet device will register as a distinct CPE device; these may need xed IP addresses
depending upon the usage model.
Ensure that unused ports are covered with plugs. Remove only the plugs necessary for installation.
For other mounting options, refer to the SMG-HP Technical Manual (Alpha p/n 018-357-B0).
Pre-Installation
Tools Required (User-Supplied):
Torque Wrench with:
7/16" (11 mm) Socket
1/2" (13 mm) Socket
Open-ended 7/16" (11 mm) torque wrench
Flat blade screwdriver (to remove nylon screws during bracket installation)
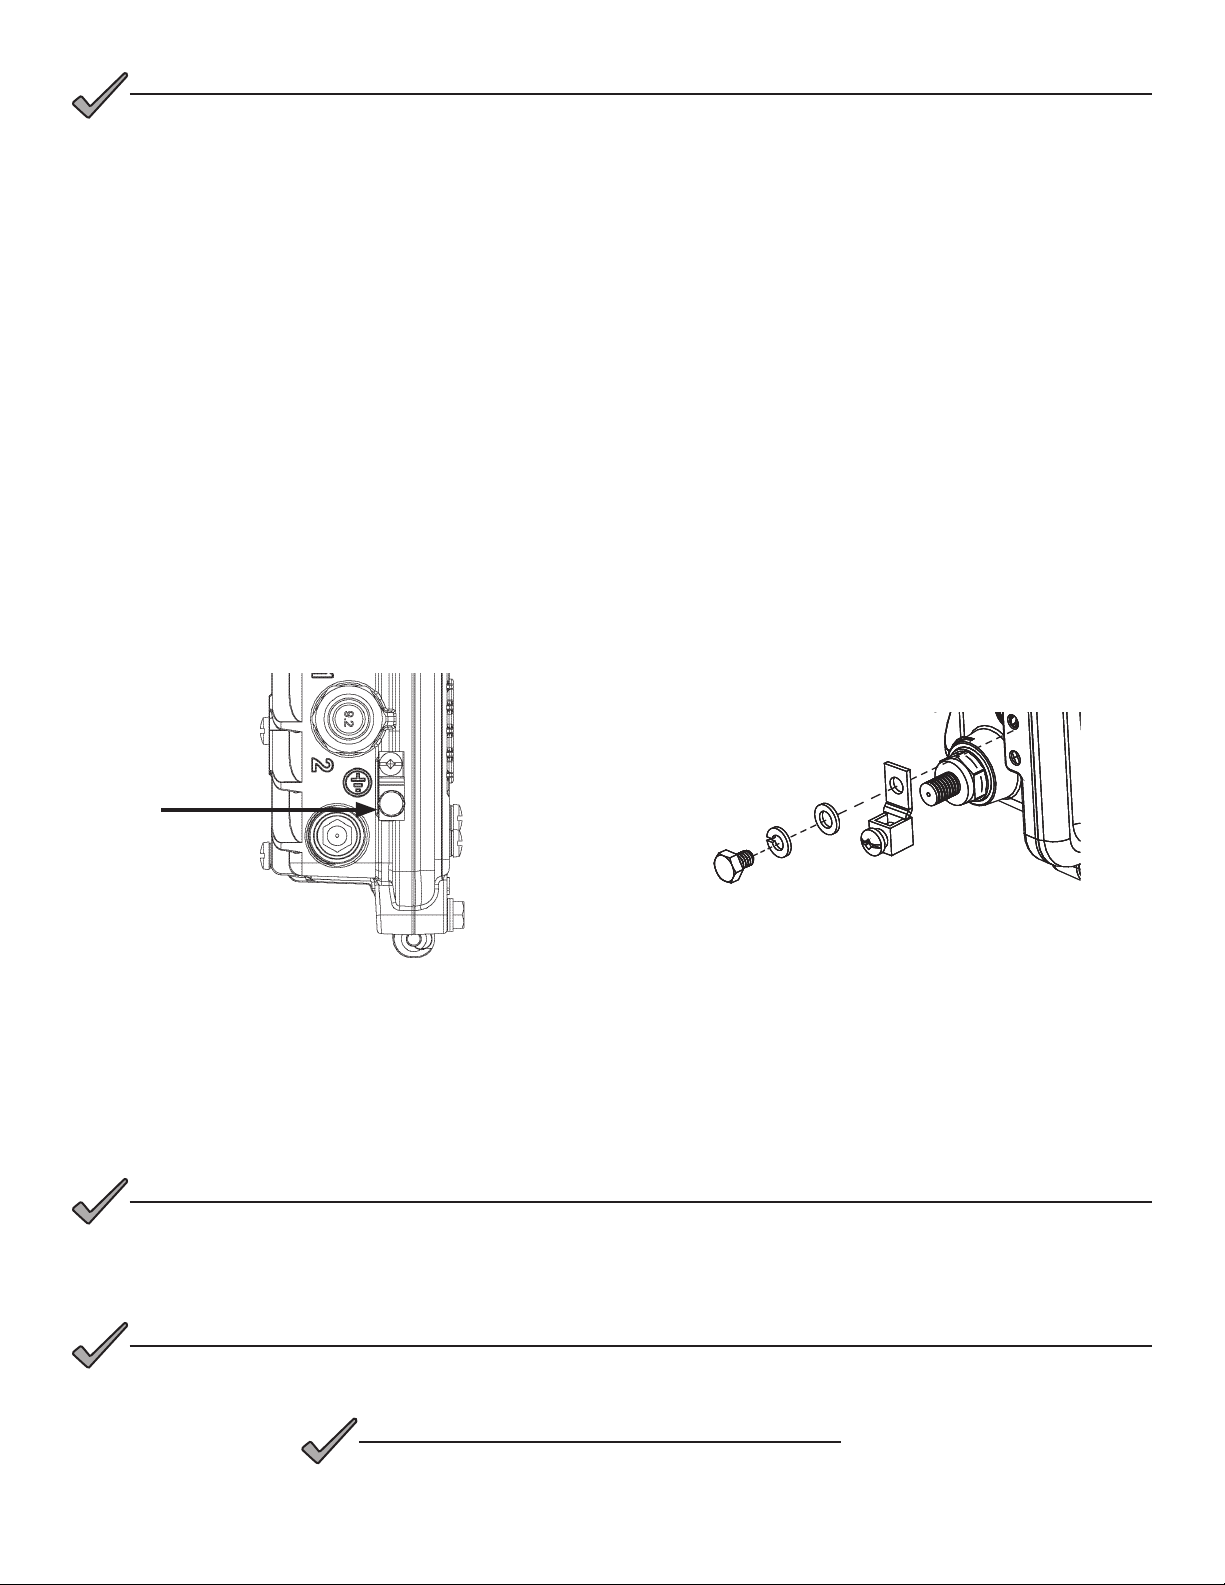
SMG-HP Grounding
1. Locate the ground lug mounting location [1] and install the ground lug hardware as shown in Fig. 4. Tighten the
hex head nut to 44 in-lbs (5 Nm).
[1]
HEX HEAD NUT
Fig. 3, Ground Lug Location
2. Properly ground the SMG-HP by connecting a #6 AWG wire from the grounding lug on the body of the unit to the
strand ground in accordance with local electrical codes. Apply anti-oxidant compound (e.g., Noalox® or equivalent)
to the ground connection. Bond the grounding system to other grounded electrical equipment located within 20 ft
using #6 AWG bonding conductor.
FLAT WASHER
LOCK WASHER
GROUND LUG
Fig. 4, Ground Lug Installation Reference
NOTICE:
Alpha Technologies Services, Inc. assumes no responsibility or liability for failure of the installer to comply with
the requirements of applicable local and national codes. Where allowed, exothermic welding may be used as an
alternative to compression grounding methodologies.
NOTICE:
Follow national, local and MSO/employer grounding standards.
NOTICE:
For 24/7 technical support, call:
1 800 863 3364
2 018-357-B1-001, Rev. A (08/2019)
Page 3
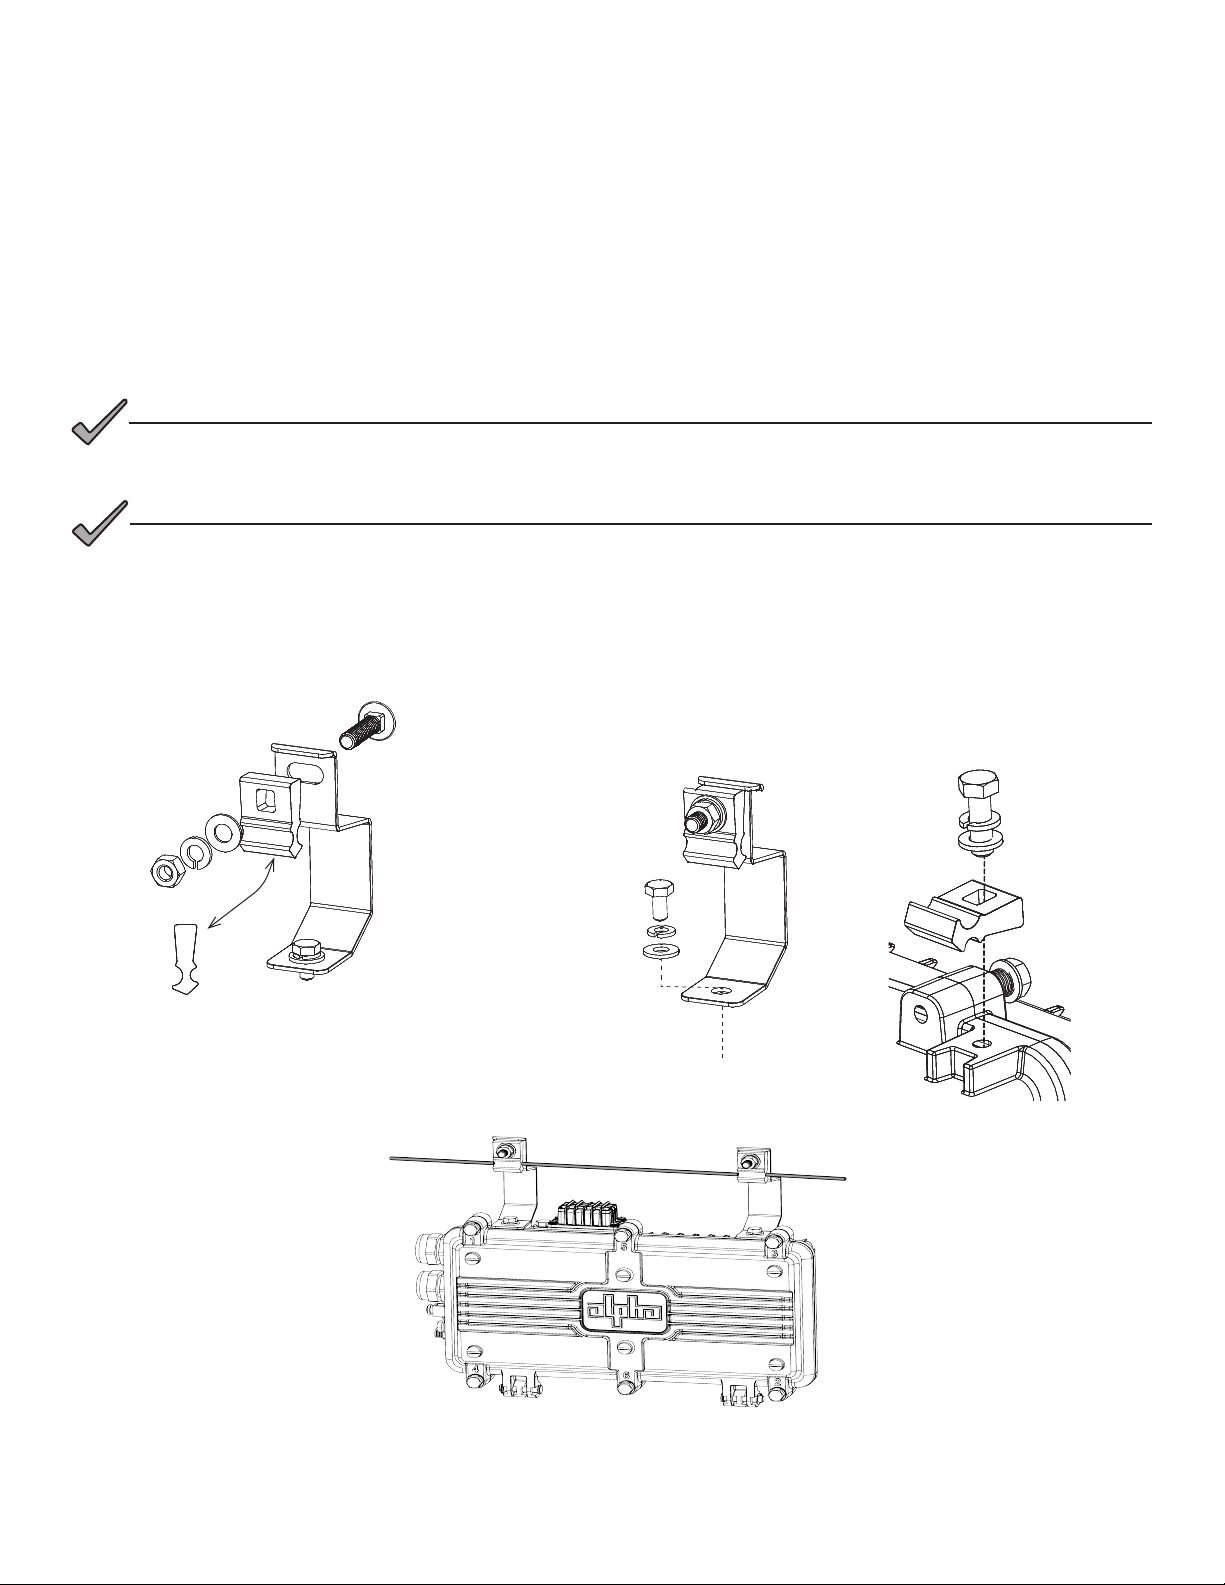
Strand Mount Installation Procedure
CARRIAGE BOLT
HEX HEAD NUT
LOCK WASHER
FLAT WASHER
CLAMP
FL
1. Remove the two nylon screws from the top (or back, e.g., if hanging the SMG-HP horizontally) of the enclosure.
2. Take the two strand mount brackets from the strand bracket installation kit (3" bracket kit, Alpha p/n 746-627-25,
2.5" bracket kit, Alpha p/n 746-627-27 or 2" bracket kit, Alpha p/n 746-627-22), and attach the strand mounting
clamp hardware as shown in the stack-up below [2]. The clamp may be reversed to accommodate either 1/4" or
3/8" diameter strand. Repeat for the second bracket.
3. Verify the proper orientation as shown below and fasten the bracket with the hex head bolts, lock washers, and
at washers as shown in [3], torquing both brackets to 46 in-lbs (5.25 Nm).
4. Verify the clamp is oriented to t the strand and hang the SMG-HP on the strand torquing to 84 in-lbs (9.5 Nm).
Repeat for the second bracket.
NOTICE:
For installations of units in conned spaces (e.g., vault installations) the unit may be fastened to the steel mounting
rod via the hardware stack-up shown in item [4].
NOTICE:
When hung vertically, the SMG-HP must hang from the strand with the hinges facing down.
5. Properly ground the SMG-HP by connecting a #6 AWG wire from the ground lug mount to the strand ground per
local code. Apply anti-oxidant compound (e.g., Noalox® or equivalent) to the ground connection.
6. Refer to "Connection and Start-Up" and follow the procedures to connect, start-up and verify operation of the
SMG-HP.
CARRIAGE BOLT
CARRIAGE BOLT
[2]
[3]
[4]
FLAT WASHER
FLAT WASHER
LOCK WASHER
LOCK WASHER
HEX HEAD NUT
HEX HEAD
NUT
3/8" DIA.
REVERSE CLAMP
TO ALLOW FOR USE
WITH EITHER 1/4"
OR 3/8" DIAMETER
CLAMP
CLAMP
1/4" DIA.
STRANDS
HEX HEAD BOLT
LOCK WASHER
X HEAD BOLT
CK WASHER
AT WASHER
FLAT WASHER
HEX HEAD BOLT
LOCK WASHER
FLAT WASHER
CLAMP
3 018-357-B1-001, Rev. A (08/2019)
Fig. 5, Completed Assembly and Installation, Vertical Conguration
Page 4

Horizontal Conguration
CARRIAGE BOLT
HEX HEAD NUT
LOCK WASHER
FLAT WASHER
CLAMP
This method is recommended for installations in areas with space limitations within the communications space between
poles, or when a connected application device (e.g., WiFi AP, camera) is mounted directly to the SMG-HP’s lid.
1. Remove the two nylon screws from the back of the enclosure.
2. Take the two strand mount brackets from the strand bracket installation kit (3" bracket kit, Alpha p/n 746-627-25,
2.5" bracket kit, Alpha p/n 746-627-27 or 2" bracket kit, Alpha p/n 746-627-22), and attach the strand mounting
clamp hardware as shown in the stack-up below [1]. The clamp may be reversed to accommodate either 1/4" or
3/8" diameter strand. Repeat for the second bracket.
3. Verify the proper orientation as shown below and fasten the bracket with the hex head bolts, lock washers, and
at washers as shown in [2], torquing both brackets to 46 in-lbs (5.25 Nm).
4. Verify the clamp is oriented to t the strand and hang the SMG-HP on the strand torquing to 84 in-lbs (9.5 Nm).
Repeat for the second bracket.
5. Properly ground the SMG-HP by connecting a #6 AWG wire from the ground lug mount to the strand ground per
local code. Apply anti-oxidant compound (e.g., Noalox® or equivalent) to the ground connection.
6. Refer to Section 2.4, "Connection and Start-Up" and follow the procedures to connect, start-up and verify
operation of the SMG-HP.
FLAT WASHER
FLAT WASHER
LOCK WASHER
LOCK WASHER
HEX HEAD NUT
HEX HEAD
NUT
REVERSE CLAMP
TO ALLOW FOR USE
WITH EITHER 1/4"
OR 3/8" DIAMETER
STRANDS
[1] [2]
CLAMP
CLAMP
1/4" DIA.3/8" DIA.
CARRIAGE BOLT
CARRIAGE BOLT
HEX HEAD BOLT
HEX HEAD BOLT
LOCK WASHER
LOCK WASHER
FLAT WASHER
FLAT WASHER
Fig. 6, Strand Mounting Bracket Installation, Horizontal Conguration
4 018-357-B1-001, Rev. A (08/2019)
Page 5

Connection and Start-Up
WARNING! ELECTRICAL HAZARD
Low impedance grounding is mandatory for personnel safety and critical for the proper operation of the cable
system.
WARNING! ELECTRICAL HAZARD
Prior to connection, the technician must verify the coax cable being connected to the SMG-HP is not energized.
2
1
3
5
4
1
HFC Hardline Coax (44-90Vac Quasi Square Wave + DOCSIS RF)
2
Power-passing Tap/Directional Coupler
3
Input RF/AC to SMG-HP via cable with F-connector
4
Strand-mounted unit
5
Power over Ethernet (PoE+) Network Connections (2)
Fig. 7, Connection Diagram
5 018-357-B1-001, Rev. A (08/2019)
Page 6

Connection Procedure
NOTICE:
To ensure no power issues are encountered, such
as shorting the center conductor, connect the
drop cable to the SMG-HP rst, then connect the
drop cable to the power passing tap.
1. Connect the coax to the Pin to F-connector, and with
an open-ended torque wrench, torque to 35 in-lbs
(4.0 Nm).
2. Connect the other end of the coax cable to the
Power-passing tap.
3. The unit will power up at this time.
NOTICE:
For 24/7 Technical Support, call:
1 800 863 3364
PoE+ Port 1
PoE+ Port 2
Ground
Connection
RF/AC Input (Pin
to F-Connector)
Fig. 8, Input/Output Ports
Start-Up
1. Use a torque wrench with 1/2" (13mm) socket to
remove the inspection port cover and observe the
system LEDs (See Fig. 9).
2. After applying power, the Power LED will light,
followed by the DS (Downstream) LED, followed
by the US (Upstream) LED and nally the OL
(Online) LED. The indicators (all Green, on solid)
should all be illuminated.
3. Once veried, replace the inspection port cover;
tighten to 44 in-lbs (5 Nm).
BACK/BASE
TOP
FRONT/LID
RESET BUTTON
OL (ONLINE)
US (UPSTREAM)
Fig. 9, Inspection Port Location and System LED detail
POWER
DS (DOWNSTREAM)
6 018-357-B1-001, Rev. A (08/2019)
Page 7

Ethernet Cable Connector Assembly
NOTICE:
Verify all pieces of the assembly are present and used in the correct sequence to prevent the ingress of water into
the SMG-HP.
1. Remove (and save) the sealing plug from the sealing nut. Remove the sealing nut, insert and cage from the port.
2. Route the cable through the sealing nut [5] and clamping cage [4] and connect to Ethernet connector.
3. Open the split sealing insert [3] and place it over the cable.
4. Slide the clamping cage [4] over the sealing insert.
5. Verify Ethernet connectivity LEDs are active, then slide the assembly into the xed cable port. Verify the sealing
insert has t ush into the xed cable port.
6. Tighten the sealing nut to 44 in-lbs (5 Nm) to fasten the assembly together.
7. Repeat for each port used.
8. Re-torque nuts of unused ports.
1
Unused Cable Gland Assembly
4
2
1
2
Sealing Plug
3
Sealing Insert
5
The cable gland base is
factory-installed and tightened
to 70 in-lbs (8 Nm).
Do not remove.
4
5
6
3
6
Fig. 10, Cable Gland Assembly, Input and Output cables
Clamping Cage
Sealing Nut
Input Power Cable
Tighten the cable gland
sealing nut to 44 in-lbs
(5 Nm).
is factory-installed and
tightened to 70 - 85 in-lbs
(8 - 9.6 Nm).
Fig. 11, Torque Values for Cable Glands and Pin to F-Connector
7 018-357-B1-001, Rev. A (08/2019)
The Pin to F-connector
Page 8

Verification of Ethernet Status
The PoE controller will disable power to the Ethernet connection ports until a valid PoE powered device is connected
to the port. When such a connection is made, the Link/Activity LED (green) will either be on solid (indicating Link), or
blinking to indicate activity and the PoE+ Status LED (orange) will be illuminated.
NOTICE:
The Ethernet activity green LED is independent of the orange PoE LED, and will function with standard Ethernet con-
nectivity, even if the orange LED is o.
POWER LED (ORANGE)
(Will illuminate when
connected to a valid PoE
powered device.)
ETHERNET CONNECTOR
LINK/ACTIVITY LED (GREEN)
(Will blink to indicate activity
when connected to a valid
PoE powered device.)
Fig. 12, Ethernet Connector LEDs (Applicable to both Ports)
8 018-357-B1-001, Rev. A (08/2019)
Page 9

Alternate Installation Methods
Surface Mount Installation
1/4-20x1/2"
hardware
Wall-mount
hardware
9.69" (246.2 mm)
10.64" (270.2 mm)
Wall-mount
hardware
1/4-20x1/2"
hardware
Fig. 13, Gateway Wall Mount Bracket
Tool for Installation:
• Torque Wrench with:
7/16" (11 mm) Socket
1/2" (13 mm) Socket
Open-ended 7/16" (11 mm) wrench
Slot head screwdriver (to remove nylon screws during bracket installation)
Hand Drill
1. Align the bracket (Alpha p/n 746-645-20) into the desired installation position on the wall. Mark the four holes where
the 5/16" (M8) hex head screws will be drilled into the wall.
2. Drill four pilot holes into the wall using the wall mount bracket as a template. If mounting to drywall, a stud should
be located and used to secure any two of the hex head screws.
3. Attach the SMG-HP to the surface mount bracket per the following procedure:
9 018-357-B1-001, Rev. A (08/2019)
Page 10

Alternate Installation Methods, continued
Surface Mount Installation, continued
NOTICE:
Note the orientation of the bracket. The SMG-HP must be installed on the bracket as shown.
1/4-20x1/2" mounting hardware
Fig. 14, Attaching the SMG-HP to the bracket
4. Use a standard screwdriver to remove the four nylon
protection screws from the back of the enclosure.
5. Using the four 1/4-20x1/2" bolts and at/lock washers,
mount the unit to the surface mount bracket.
6. Use the 7/16" (11 mm) socket to torque each to a
value between 44 and 53 in-lbs (5 to 6 Nm). The Pin
to F connector must be facing down with the hinges
on the enclosure facing right.
7. Mount the unit and bracket on the surface by partially
screwing in the top two 5/16" lag bolts without
washers and hang the unit by the bracket with the
key-holes. Install the other two lag bolts with washers
and tighten all four.
8. Properly ground the SMG-HP by connecting a #6
AWG wire from the ground lug mount to the strand
ground per local code. Apply anti-oxidant compound
(e.g., Noalox® or equivalent) to the ground connection.
9. Refer to "Connection and Start-Up" and follow the
procedures in the succeeding sections to connect,
power up and verify operation of the SMG-HP.
Fig. 15, SMG-HP and Bracket ready for surface mounting
10 018-357-B1-001, Rev. A (08/2019)
(4 places)
Page 11

Alternate Installation Methods, continued
Pole Mount Installation
Tools for Installation:
Torque Wrench with:
7/16" (11 mm) Socket
1/2" (13 mm) Socket
Open-ended 7/16" (11 mm) wrench
Slot head screwdriver (to remove nylon screws during
bracket installation)
Hand Drill
Customer-supplied stainless steel (or better) banding
equipment
1. Secure the pole mount bracket (Alpha p/n 746-861-20)
to the pole using the metal straps.
2. In the top two mounting bracket holes of the SMGHP, partially tighten two of the 1/4-20x1/2" bolts, split
washers, and at washers, leaving a few millimeters of
space between the at washer and the enclosure.
3. Line up the unit and place it so that the 1/4"-20 bolts
rest on the top slots of the bracket. Then secure it to
the bracket by tightening the four 1/4-20x1/2" bolts,
split washers, and at washers using the 7/16" (11 mm)
socket, torquing to a value between 44 – 53 in-lbs (5
– 6 Nm). The Pin to F-connector must be facing down
with the hinges on the enclosure facing right.
1/4-20x1/2"
mounting hardware
(4 places)
Slots for mounting
straps (3 per side)
Fig. 16, Pole-Mount Installation Conguration
Fig. 17, SMG-HP and Bracket Installed
11 018-357-B1-001, Rev. A (08/2019)
Page 12

Alternate Installation Methods, continued
Pole Mount Installation, continued
4. Attach SMG-HP and bracket to the pole with stainless steel (or better) banding.
5. Properly ground the SMG-HP by connecting a #6 AWG wire from the ground lug mount to the strand ground per
local code. Apply anti-oxidant compound (e.g., Noalox® or equivalent) to the ground connection.
6. Refer to "Connection and Start-Up" and follow the procedures to connect, power up and verify operation of the
SMG-HP.
Fig. 18, SMG-HP, Bracket and Pole
12 018-357-B1-001, Rev. A (08/2019)
Page 13

Environmental Specications and Agency Certications
SYSTEM MANAGEMENT
LEDs (Internal)
Management Protocols SNMPv1, 2c, 3, HTTPS, SSH
Remote Output Power Control On, O, Reset (per port)
Remote PoE Port Status Link up/down, link speed, power up/down, PoE device class, PoE power consumption
Remote PoE Device Status MAC address, IPv4/IPv6 address
System Management (SNMP)
Environmental Status Parameters (SNMP)
Alarming SCTE-HMS MIBs and alarming
Network Quality of Service RFC 2544, Y.1564, and Y.1731 for turn up, remote monitoring, and remote troubleshooting of key Ethernet metrics,
HTTPS HTTPS Web Interface (Diagnostics & Device Management)
CLI SSH for Diagnostics and Device Management
TR-069 TR-181 for Lan/Wan/Device Management
Advanced diagnostic features
AGENCY CERTIFICATIONS
Enclosure Protection UL50E / NEMA Type 6 / IEC 60529 IP67
IEC/EN 60950-1: ED2
Safety
EMC Emissions
EMC Immunity
Surge Immunity
RoHS RoHS Directive 2011/65/EU Compliant Restriction of Hazardous Substances Directive
IEC/EN 60950-22: ED 1
UL/CSA 60950-1
UL/CSA 60950-22: ED1
FCC Class B (FCC CFR 47 Part 15 Class B) EMC Emissions requirements (US)
ICCES-003 EMC Emissions requirements (Canada)
CISPR 32 (IEC/EN 55032) Electromagnetic compatibility of multimedia equipment - Emission requirements (EU/Global)
CISPR 24 (IEC/EN 55024)
CISPR 35 (ICE/EN 55035) Electromagnetic compatibility of multimedia equipment - Immunity requirements - (EU/Global)
IEC 61000-4-5 Surge Immunity: 4kV/2kA on COAX input port, 4kV on Ethernet port (1.2x50/8x20)
UL/CSA 60950-1 Line Cross: 277Vac on Ethernet ports
System Power / DOCSIS (Downstream, Upstream, Online) / CPE (Link, Activity)
Standard DOCSIS & Mib2 SNMP MIB support (e.g. sysDescription, sysObjectID, ifTable)
CM, other sub-components, GPS, ports and services (when applicable)
Input Voltage / Power, Output Voltage / Power, Current (Per Port)
e.g. latency, frame loss, jitter
Full spectrum capture (Cable Labs MIBs)
Safety CB report (global)
NRTL/C Cert (US/CAN), Safety - General Requirements
- Information technology equipment - Immunity characteristics
- Limits and methods of measurement
Notice of FCC Compliance
Per FCC CFR 47 PART 15:
This equipment has been tested and found to comply with the limits for a Class B digital device, pursuant to part 15 of the FCC Rules. These limits are designed to provide
reasonable protection against harmful interference in a residential installation. This equipment generates, uses and can radiate radio frequency energy and, if not installed and
used in accordance with the instructions, may cause harmful interference to radio communications. However, there is no guarantee that interference will not occur in a particular
installation. If this equipment does cause harmful interference to radio or television reception, which can be determined by turning the equipment o and on, the user is encouraged
to try to correct the interference by one or more of the following measures:
• Reorient or relocate the receiving antenna.
• Increase the separation between the equipment and receiver.
• Connect the equipment into an outlet on a circuit dierent from that to which the receiver is connected.
• Consult the dealer or an experienced radio/TV technician for help.
Worldwide Corporate Oces
North America
Tel: +1 360 6 47 2360
Fax: +1 360 671 4936
Alpha Technologies Services, Inc.
an EnerSys company
Europe
Tel: +49 9122 79889 0
Fax: +49 9122 79889 21
Alpha reserves the right to change specications without notice.
Alpha is a registered trademark of Alpha Technologies Services, Inc.
For more informa tion vi sit ww w.alpha .com
Latin America
Tel: +561 792.9651
Fax: +561 792.7157
Asia Pacic
Tel: +852 2736.8663
Fax: +852 2199.7988
© 2019 Alpha Technologies Services, Inc. All Rights Reserved.
018-357-B1-001, Rev. A (08/2019)
 Loading...