

Page 1

AlphaNetTM DM3X Series DOCSIS® Status Monitor for XM2
Technical Manual
Eective: June 2019
Page 2

Safety Notes
Alpha considers customer safety and satisfaction its most important priority. To reduce the risk of injury or death and to
ensure continual safe operation of this product, certain information is presented dierently in this manual. Alpha tries to
adhere to ANSI Z535 and encourages special attention and care to information presented in the following manner:
WARNING! GENERAL HAZARD
GENERAL HAZARD WARNING provides safety information to PREVENT INJURY OR DEATH to the technician or user.
WARNING! ELECTRICAL HAZARD
ELECTRICAL HAZARD WARNING provides electrical safety information to PREVENT INJURY OR DEATH
to the technician or user.
WARNING! FUMES HAZARD
FUMES HAZARD WARNING provides fumes safety information to PREVENT INJURY OR DEATH to the technician or user.
WARNING! FIRE HAZARD
FIRE HAZARD WARNING provides ammability safety information to PREVENT INJURY OR DEATH to the technician or user.
There may be multiple warnings associated with the call out. Example:
WARNING! ELECTRICAL & FIRE HAZARD
This WARNING provides safety information for both Electrical AND Fire Hazards
CAUTION!
CAUTION provides safety information intended to PREVENT DAMAGE to material or equipment.
NOTICE:
NOTICE provides additional information to help complete a specic task or procedure.
ATTENTION:
ATTENTION provides specic regulatory/code requirements that may aect the placement of equipment and /or
installation procedures.
The following sections contain important safety information that must be followed during the installation and maintenance
of the equipment and batteries. Read all of the instructions before installing or operating the equipment, and save this
manual for future reference.
Page 3

AlphaNetTM DM3X Series DOCSIS
®
Status Monitor for XM2
Technical Manual
704-939-B10-001 Rev. A5
Eective Date: June 2019
©
2019 by Alpha Technologies Services, Inc.
Disclaimer
Images contained in this manual are for illustrative purposes only. These images may not match your installation.
Operator is cautioned to review the drawings and illustrations contained in this manual before proceeding. If there are
questions regarding the safe operation of this powering system, please contact Alpha Technologies Services, Inc. or your
nearest Alpha representative.
Alpha shall not be held liable for any damage or injury involving its enclosures, power supplies, generators, batteries or
other hardware if used or operated in any manner or subject to any condition not consistent with its intended purpose or is
installed or operated in an unapproved manner or improperly maintained.
Contact Information
Sales information and customer service in USA
(7AM to 5PM, Pacic Time):
Complete technical support in USA
(7AM to 5PM, Pacic Time or 24/7 emergency support):
Sales information and technical support in Canada:
Website:
1 800 322 5742
1 800 863 3364
1 888 462 7487
www.alpha.com
Page 4

Table of Contents
1.0 Introduction. . . . . . . . . . . . . . . . . . . . . . . . . . . . . . . . . . . . . . . . . . . . . . . . . . 8
2.0 Overview . . . . . . . . . . . . . . . . . . . . . . . . . . . . . . . . . . . . . . . . . . . . . . . . . . 10
2.1 System Diagram . . . . . . . . . . . . . . . . . . . . . . . . . . . . . . . . . . . . . . . . . . . . 10
2.2 Network Connectivity. . . . . . . . . . . . . . . . . . . . . . . . . . . . . . . . . . . . . . . . . . 11
2.3 System Conguration and Installation . . . . . . . . . . . . . . . . . . . . . . . . . . . . . . . . . 11
2.4 DM3.0 Series Start Up and Reboot Routline. . . . . . . . . . . . . . . . . . . . . . . . . . . . . . 12
3.0 Network Conguration . . . . . . . . . . . . . . . . . . . . . . . . . . . . . . . . . . . . . . . . . . . 13
3.1 Provisioning the DHCP Server with the MAC Addresses . . . . . . . . . . . . . . . . . . . . . . . 13
3.2 Establishing IP Connectivity . . . . . . . . . . . . . . . . . . . . . . . . . . . . . . . . . . . . . . 14
3.3 The DOCSIS Conguration File . . . . . . . . . . . . . . . . . . . . . . . . . . . . . . . . . . . . 14
3.3.1 Setting Modem Community Strings - docsDevNmAccess Method (IPv4 Only) . . . . . . . . . 15
3.3.2 Setting Modem Community Strings - Coexistence Method . . . . . . . . . . . . . . . . . . . 16
3.3.3 Setting SNMP Trap Destination Addresses - docsDevNmAccess Method. . . . . . . . . . . . 17
3.3.4 Setting SNMP Trap Destination Addresses - Coexistence Method . . . . . . . . . . . . . . . 18
3.3.5 Sample DOCSIS Conguration File Entries - devDocNmAccess . . . . . . . . . . . . . . . . 19
3.3.6 Sample DOCSIS Conguration File Entries - Coexistence . . . . . . . . . . . . . . . . . . . 20
3.3.7 Proprietary Conguration File ‘atidoc33.cfg’ . . . . . . . . . . . . . . . . . . . . . . . . . . . 21
3.3.8 Changing Default atidoc33.cfg Download Settings. . . . . . . . . . . . . . . . . . . . . . . . 22
3.4 Setting Communication Options . . . . . . . . . . . . . . . . . . . . . . . . . . . . . . . . . . . . 23
4.0 Web Interface . . . . . . . . . . . . . . . . . . . . . . . . . . . . . . . . . . . . . . . . . . . . . . . 24
4.1 Local Web Server Access . . . . . . . . . . . . . . . . . . . . . . . . . . . . . . . . . . . . . . . 24
4.2 Remote Web Server Access . . . . . . . . . . . . . . . . . . . . . . . . . . . . . . . . . . . . . . 27
4.3 Navigating the Web Page . . . . . . . . . . . . . . . . . . . . . . . . . . . . . . . . . . . . . . . 28
4.3.1 Web Interface Security Levels . . . . . . . . . . . . . . . . . . . . . . . . . . . . . . . . . . 29
4.4 Verifying Communication Parameters . . . . . . . . . . . . . . . . . . . . . . . . . . . . . . . . . 30
4.5 Verifying Power Supply and Battery Parameters. . . . . . . . . . . . . . . . . . . . . . . . . . . . 31
4.6 Remote Self-Tests via the Web Page . . . . . . . . . . . . . . . . . . . . . . . . . . . . . . . . . 31
4.7 Viewing HMS Alarm Status via the Web Page . . . . . . . . . . . . . . . . . . . . . . . . . . . . . 32
4.8 Setting the I/O Controller via the Web Page . . . . . . . . . . . . . . . . . . . . . . . . . . . . . . 33
4.9 Viewing and Conguring Power Supply Settings via the Web Page . . . . . . . . . . . . . . . . . . 34
4.10 Viewing and Conguring Generator Settings Via the Web Page . . . . . . . . . . . . . . . . . . . 37
4.11 Tools Menu - Constellation and Microreections . . . . . . . . . . . . . . . . . . . . . . . . . . . 38
4.11.1 QAM Constellation Tool . . . . . . . . . . . . . . . . . . . . . . . . . . . . . . . . . . . . . 38
4.11.2 QAM Constellation Common Impairments . . . . . . . . . . . . . . . . . . . . . . . . . . . 39
4.11.3 Microreections Tool . . . . . . . . . . . . . . . . . . . . . . . . . . . . . . . . . . . . . . 44
4.12 Viewing the Modem Event Log via the Web Page . . . . . . . . . . . . . . . . . . . . . . . . . . 47
5.0 Upgrading Firmware . . . . . . . . . . . . . . . . . . . . . . . . . . . . . . . . . . . . . . . . . . . . 48
5.1 Upgrading DM3X Modem Firmware . . . . . . . . . . . . . . . . . . . . . . . . . . . . . . . . . . 48
5.1.1 Identifying the Modem and Obtaining Firmware Files . . . . . . . . . . . . . . . . . . . . . . 48
5.1.2 Modem Firmware Upgrade SNMP Parameters . . . . . . . . . . . . . . . . . . . . . . . . . 48
5.1.3 Upgrading Manually by Setting SNMP Parameters . . . . . . . . . . . . . . . . . . . . . . . 49
5.1.4 Upgrading via the DOCSIS Conguration File . . . . . . . . . . . . . . . . . . . . . . . . . . 49
6.0 Data Management . . . . . . . . . . . . . . . . . . . . . . . . . . . . . . . . . . . . . . . . . . . . . 50
6.1 SCTE-HMS MIBs. . . . . . . . . . . . . . . . . . . . . . . . . . . . . . . . . . . . . . . . . . . . 50
6.2 SCTE-HMS MIB Alarms . . . . . . . . . . . . . . . . . . . . . . . . . . . . . . . . . . . . . . . . 51
6.2.1 SCTE-HMS Congurable Alarms. . . . . . . . . . . . . . . . . . . . . . . . . . . . . . . . . 51
6.2.2 SNMP Traps . . . . . . . . . . . . . . . . . . . . . . . . . . . . . . . . . . . . . . . . . . . 58
6.2.3 General Power Supply Alarms . . . . . . . . . . . . . . . . . . . . . . . . . . . . . . . . . . 60
6.2.4 Battery Alarms . . . . . . . . . . . . . . . . . . . . . . . . . . . . . . . . . . . . . . . . . . 64
4 704-939-B10-001 Rev. A5 (06/2019)
Page 5

Table of Contents
7.0 Installation . . . . . . . . . . . . . . . . . . . . . . . . . . . . . . . . . . . . . . . . . . . . . . . . . 65
7.1 Verifying Power Supply Device Address . . . . . . . . . . . . . . . . . . . . . . . . . . . . . . . . 65
7.2 Installation / Replacement Procedure in XM2 Power Supplies . . . . . . . . . . . . . . . . . . . . 66
7.3 DM3X LEDs and Connections . . . . . . . . . . . . . . . . . . . . . . . . . . . . . . . . . . . . . 68
7.4 Connecting the RF Drop . . . . . . . . . . . . . . . . . . . . . . . . . . . . . . . . . . . . . . . . 69
7.5 Front Panel Connections . . . . . . . . . . . . . . . . . . . . . . . . . . . . . . . . . . . . . . . . 70
7.6 I/O Connections (TPR, ENV). . . . . . . . . . . . . . . . . . . . . . . . . . . . . . . . . . . . . . 71
7.6.1 Tamper (TPR) Switch Interface. . . . . . . . . . . . . . . . . . . . . . . . . . . . . . . . . . 71
7.6.2 I/O Port Interface . . . . . . . . . . . . . . . . . . . . . . . . . . . . . . . . . . . . . . . . . 72
7.6.3 Conguring I/O Port Connections . . . . . . . . . . . . . . . . . . . . . . . . . . . . . . . . 72
7.6.4 I/O Port: Generic Device . . . . . . . . . . . . . . . . . . . . . . . . . . . . . . . . . . . . . 73
7.6.5 Connecting a Generic I/O Device . . . . . . . . . . . . . . . . . . . . . . . . . . . . . . . . 74
7.6.6 Conguring and Monitoring a Generic I/O Device . . . . . . . . . . . . . . . . . . . . . . . . 74
7.6.7 I/O Port: Heater Mat Control . . . . . . . . . . . . . . . . . . . . . . . . . . . . . . . . . . . 75
7.6.8 Connecting the Battery Heater Mat Controller . . . . . . . . . . . . . . . . . . . . . . . . . . 76
7.6.9 Conguring the Battery Heater Mat Controller . . . . . . . . . . . . . . . . . . . . . . . . . . 77
7.6.10 I/O Port: Emergency DC Generator (GEN) . . . . . . . . . . . . . . . . . . . . . . . . . . . 77
7.6.11 Conguring and Monitoring the DC Emergency Generator . . . . . . . . . . . . . . . . . . . 78
8.0 Battery Sense Wire Kits . . . . . . . . . . . . . . . . . . . . . . . . . . . . . . . . . . . . . . . . . . 79
8.1 36V Single and Dual Strings . . . . . . . . . . . . . . . . . . . . . . . . . . . . . . . . . . . . . . 79
9.0 Start Up and Verication . . . . . . . . . . . . . . . . . . . . . . . . . . . . . . . . . . . . . . . . . . 81
9.1 Initial Start Up and Local Verication. . . . . . . . . . . . . . . . . . . . . . . . . . . . . . . . . . 81
9.2 Verifying Correct Hardware Interconnection . . . . . . . . . . . . . . . . . . . . . . . . . . . . . . 83
9.3 System Status Indicators and Reset Button . . . . . . . . . . . . . . . . . . . . . . . . . . . . . . 84
9.3.1 Detailed LED Descriptions . . . . . . . . . . . . . . . . . . . . . . . . . . . . . . . . . . . . 85
9.3.2 Resetting the Transponder . . . . . . . . . . . . . . . . . . . . . . . . . . . . . . . . . . . . 88
9.4 Verifying Communications via the Headend . . . . . . . . . . . . . . . . . . . . . . . . . . . . . . 88
9.5 Dual IP Mode. . . . . . . . . . . . . . . . . . . . . . . . . . . . . . . . . . . . . . . . . . . . . . 89
9.5.1 Overview . . . . . . . . . . . . . . . . . . . . . . . . . . . . . . . . . . . . . . . . . . . . . 89
9.5.2 Web Comparison, Single IP Mode/Dual IP Mode . . . . . . . . . . . . . . . . . . . . . . . . 90
9.5.3 Conguring Dual IP Mode . . . . . . . . . . . . . . . . . . . . . . . . . . . . . . . . . . . . 91
9.5.4 Dual IP SNMP Community Strings . . . . . . . . . . . . . . . . . . . . . . . . . . . . . . . . 94
9.5.5 Security in Dual IP Mode . . . . . . . . . . . . . . . . . . . . . . . . . . . . . . . . . . . . . 95
10.0 Specications . . . . . . . . . . . . . . . . . . . . . . . . . . . . . . . . . . . . . . . . . . . . . . . 97
11.0 Glossary. . . . . . . . . . . . . . . . . . . . . . . . . . . . . . . . . . . . . . . . . . . . . . . . . . 99
11.1 Acronym Denitions . . . . . . . . . . . . . . . . . . . . . . . . . . . . . . . . . . . . . . . . . . 99
5704-939-B10-001 Rev. A5 (06/2019)
Page 6

Figures
Fig. 1-1, AlphaNet DM3X. . . . . . . . . . . . . . . . . . . . . . . . . . . . . . . . . . . . . . . . . . . . . 8
Fig. 1-2, DM3X Transponder Components. . . . . . . . . . . . . . . . . . . . . . . . . . . . . . . . . . . . 9
Fig. 2-1, Representative System Arrangement. . . . . . . . . . . . . . . . . . . . . . . . . . . . . . . . . 10
Fig. 2-2, DM3X Transponder Start Up and Reboot Routline. . . . . . . . . . . . . . . . . . . . . . . . . . 12
Fig. 3-1, Locations of MAC Address Labels . . . . . . . . . . . . . . . . . . . . . . . . . . . . . . . . . . 13
Fig. 4-1, DM3X Web Page . . . . . . . . . . . . . . . . . . . . . . . . . . . . . . . . . . . . . . . . . . . 24
Fig. 4-2, Local Area Connection Properties Screen, Windows® 7 . . . . . . . . . . . . . . . . . . . . . . . 25
Fig. 4-6, Web Server Home Page . . . . . . . . . . . . . . . . . . . . . . . . . . . . . . . . . . . . . . . 27
Fig. 4-7, Navigation Bar Items . . . . . . . . . . . . . . . . . . . . . . . . . . . . . . . . . . . . . . . . . 28
Fig. 4-8, Communication Parameters . . . . . . . . . . . . . . . . . . . . . . . . . . . . . . . . . . . . . 30
Fig. 4-9, Advanced Communication Parameters. . . . . . . . . . . . . . . . . . . . . . . . . . . . . . . . 30
Fig. 4-10, Power Supply and Battery Parameters . . . . . . . . . . . . . . . . . . . . . . . . . . . . . . . 31
Fig. 4-11, HMS Alarm Conguration . . . . . . . . . . . . . . . . . . . . . . . . . . . . . . . . . . . . . . 32
Fig. 4-12, Advanced I/O Controller Status Screen . . . . . . . . . . . . . . . . . . . . . . . . . . . . . . . 33
Fig. 4-13, Advanced Power Supply Settings Screen. . . . . . . . . . . . . . . . . . . . . . . . . . . . . . 34
Fig. 4-14, Advanced Generator Status Screen. . . . . . . . . . . . . . . . . . . . . . . . . . . . . . . . . 37
Fig. 4-15, QAM Constellation Tool . . . . . . . . . . . . . . . . . . . . . . . . . . . . . . . . . . . . . . . 38
Fig. 4-16, Normal - (Good Quality) and Individual Cell Characteristics . . . . . . . . . . . . . . . . . . . . 39
Fig. 4-17, Fuzzy (Low CNR and/or Low MER) and Individual Cell Characteristics . . . . . . . . . . . . . . 40
Fig. 4-18, Doughnuts (Coherent Interference) and Individual Cell Characteristics . . . . . . . . . . . . . . 40
Fig. 4-19, Gaussian Noise and Individual Cell Characteristics. . . . . . . . . . . . . . . . . . . . . . . . . 41
Fig. 4-20, Rectangular vs. Square (I-Q Imbalance) and Entire Constellation Shape . . . . . . . . . . . . . 41
Fig. 4-21, Corners Squeezed to Center (Gain Compression) and Entire Constellation Shape . . . . . . . . 42
Fig. 4-22, Circular Smear (Phase Noise) and Entire Constellation Shape. . . . . . . . . . . . . . . . . . . 42
Fig. 4-23, Twisted or Skewed (Quadrature Distortion) and Entire Constellation Shape . . . . . . . . . . . . 43
Fig. 4-24, Microreections Tool. . . . . . . . . . . . . . . . . . . . . . . . . . . . . . . . . . . . . . . . . 44
Fig. 4-25, Spectrum Tool . . . . . . . . . . . . . . . . . . . . . . . . . . . . . . . . . . . . . . . . . . . . 45
Fig. 4-26, Spectrum Tables. . . . . . . . . . . . . . . . . . . . . . . . . . . . . . . . . . . . . . . . . . . 46
Fig. 4-27, Docsdev Event Log Screen . . . . . . . . . . . . . . . . . . . . . . . . . . . . . . . . . . . . . 47
Fig. 7-1, Captive Screw Locations . . . . . . . . . . . . . . . . . . . . . . . . . . . . . . . . . . . . . . . 66
Fig. 7-2, Jumper Location and the 18-Pin Connector . . . . . . . . . . . . . . . . . . . . . . . . . . . . . 67
Fig. 7-3, Connecting the Transponder to the Inverter Module . . . . . . . . . . . . . . . . . . . . . . . . . 67
Fig. 7-4, DM3X LEDs and Connectors . . . . . . . . . . . . . . . . . . . . . . . . . . . . . . . . . . . . . 68
Fig. 7-5, Connecting the RF Drop . . . . . . . . . . . . . . . . . . . . . . . . . . . . . . . . . . . . . . . 69
Fig. 7-6, System Interconnection Diagram . . . . . . . . . . . . . . . . . . . . . . . . . . . . . . . . . . . 70
Fig. 7-7, I/O (ENV) and Tamper Switch Interface (TPR) Connection Locations . . . . . . . . . . . . . . . . 71
Fig. 8-1, 36V System, Single String . . . . . . . . . . . . . . . . . . . . . . . . . . . . . . . . . . . . . . 79
Fig. 8-2, 36V System, Dual String . . . . . . . . . . . . . . . . . . . . . . . . . . . . . . . . . . . . . . . 79
Fig. 8-3, 48V System, Single String . . . . . . . . . . . . . . . . . . . . . . . . . . . . . . . . . . . . . . 80
Fig. 8-4, 48V System, Dual String . . . . . . . . . . . . . . . . . . . . . . . . . . . . . . . . . . . . . . . 80
Fig. 9-1, XM2 Smart Display Screens . . . . . . . . . . . . . . . . . . . . . . . . . . . . . . . . . . . . . 81
Fig. 9-2, Communications Section - General Page . . . . . . . . . . . . . . . . . . . . . . . . . . . . . . 82
Fig. 9-3, Power Supply Section - General Page . . . . . . . . . . . . . . . . . . . . . . . . . . . . . . . . 83
Fig. 9-4, LED Functionality and Indications . . . . . . . . . . . . . . . . . . . . . . . . . . . . . . . . . . 84
Fig. 9-5, Transponder Web Page, RF Power Level Indicators . . . . . . . . . . . . . . . . . . . . . . . . . 87
Fig. 9-6, Simplied Block Diagram Single IP Mode . . . . . . . . . . . . . . . . . . . . . . . . . . . . . . 89
Fig. 9-7, Simplied Block Diagram Dual IP Mode . . . . . . . . . . . . . . . . . . . . . . . . . . . . . . . 89
Fig. 9-8, Single IP DM3X Transponder Web Page . . . . . . . . . . . . . . . . . . . . . . . . . . . . . . . 90
Fig. 9-9, Dual IP DM3X Transponder Web Page. . . . . . . . . . . . . . . . . . . . . . . . . . . . . . . . 90
Fig. 9-10, Dual IP Conguration Settings for Web Server Communications Page. . . . . . . . . . . . . . . 92
Fig. 9-11, Dual IP Parameters for Web Server General Page . . . . . . . . . . . . . . . . . . . . . . . . . 92
6 704-939-B10-001 Rev. A5 (06/2019)
Page 7

Tables
Table 1-1, DM3X Transponder Model Specications. . . . . . . . . . . . . . . . . . . . . . . . . . . . . . . 8
Table 2-1, LEDs and Indications . . . . . . . . . . . . . . . . . . . . . . . . . . . . . . . . . . . . . . . . 12
Table 3-1, Modem Community String Parameters - docsDevNmAccess Method . . . . . . . . . . . . . . . 15
Table 3-2, Modem Community String Parameters - Coexistence Method . . . . . . . . . . . . . . . . . . . 16
Table 3-3, Trap Destination Addresses - docsDevNmAccess Method . . . . . . . . . . . . . . . . . . . . . 17
Table 3-4, Trap Destination Addresses - Coexistence Method. . . . . . . . . . . . . . . . . . . . . . . . . 18
Table 3-5, Default atidoc33.cfg Download Settings . . . . . . . . . . . . . . . . . . . . . . . . . . . . . . 22
Table 3-6, Communications Parameters . . . . . . . . . . . . . . . . . . . . . . . . . . . . . . . . . . . . 23
Table 4-1, DM3X Web Page Security . . . . . . . . . . . . . . . . . . . . . . . . . . . . . . . . . . . . . 29
Table 4-2, DM3X Security Levels . . . . . . . . . . . . . . . . . . . . . . . . . . . . . . . . . . . . . . . 29
Table 4-3, Spectrum Tool Buttons . . . . . . . . . . . . . . . . . . . . . . . . . . . . . . . . . . . . . . . 45
Table 4-4, Spectrum Table Details . . . . . . . . . . . . . . . . . . . . . . . . . . . . . . . . . . . . . . . 46
Table 5-1, Modem Firmware Upgrade SNMP Parameters . . . . . . . . . . . . . . . . . . . . . . . . . . . 48
Table 5-2, SNMP Parameters . . . . . . . . . . . . . . . . . . . . . . . . . . . . . . . . . . . . . . . . . 49
Table 5-3, DOCSIS Congurations File Values . . . . . . . . . . . . . . . . . . . . . . . . . . . . . . . . 49
Table 6-1, SCTE-HMS MIB Files . . . . . . . . . . . . . . . . . . . . . . . . . . . . . . . . . . . . . . . . 50
Table 6-2, Binary to Hex Conversions for Alarm Settings . . . . . . . . . . . . . . . . . . . . . . . . . . . 52
Table 6-3, Recommended Settings for DM3X Analog Alarms . . . . . . . . . . . . . . . . . . . . . . . . . 53
Table 6-4, Recommended Settings for Discrete Alarms . . . . . . . . . . . . . . . . . . . . . . . . . . . . 54
Table 6-5, DM3X Alarm Setting Parameters . . . . . . . . . . . . . . . . . . . . . . . . . . . . . . . . . . 57
Table 6-6, Status of Alarm Setting Download Parameters . . . . . . . . . . . . . . . . . . . . . . . . . . . 57
Table 6-7, SNMP Alarm Trap Varbinds and Explanations . . . . . . . . . . . . . . . . . . . . . . . . . . . 59
Table 6-8, Power Alarms: Classications, Causes and Corrections . . . . . . . . . . . . . . . . . . . . . . 61
Table 6-8, Power Alarms: Classications, Causes and Corrections, Continued . . . . . . . . . . . . . . . . 62
Table 6-8, Power Alarms: Classications, Causes and Corrections, Continued . . . . . . . . . . . . . . . . 63
Table 6-9, Battery Alarms: Classications, Causes and Corrections. . . . . . . . . . . . . . . . . . . . . . 64
Table 7-1, Tamper (TPR) Switch Specications . . . . . . . . . . . . . . . . . . . . . . . . . . . . . . . . 71
Table 7-2, ENV Connector and Pin Descriptions. . . . . . . . . . . . . . . . . . . . . . . . . . . . . . . . 72
Table 7-3, I/O Port Specications . . . . . . . . . . . . . . . . . . . . . . . . . . . . . . . . . . . . . . . 73
Table 7-4, I/O Port: Generic Device Specciations. . . . . . . . . . . . . . . . . . . . . . . . . . . . . . . 73
Table 7-5, I/O Port: Heater Mat Control Specications. . . . . . . . . . . . . . . . . . . . . . . . . . . . . 75
Table 7-6, Heater Mat OIDs and Functionality . . . . . . . . . . . . . . . . . . . . . . . . . . . . . . . . . 77
Table 7-7, Heater Mat MIB Reports . . . . . . . . . . . . . . . . . . . . . . . . . . . . . . . . . . . . . . 77
Table 7-8, Generator Monitoring Values . . . . . . . . . . . . . . . . . . . . . . . . . . . . . . . . . . . . 78
Table 9-1, SCTE-HMS Property Table . . . . . . . . . . . . . . . . . . . . . . . . . . . . . . . . . . . . . 86
Table 9-2, Rx/Tx Power LED Color Ranges . . . . . . . . . . . . . . . . . . . . . . . . . . . . . . . . . . 86
Table 9-3, Single IP Mode vs. Dual IP Mode. . . . . . . . . . . . . . . . . . . . . . . . . . . . . . . . . . 89
Table 9-4, Enabling Dual IP Mode . . . . . . . . . . . . . . . . . . . . . . . . . . . . . . . . . . . . . . . 91
Table 9-5, CPE Communications Module IP Settings . . . . . . . . . . . . . . . . . . . . . . . . . . . . . 91
Table 9-6, Available Download Options . . . . . . . . . . . . . . . . . . . . . . . . . . . . . . . . . . . . 93
Table 9-7, Community Strings . . . . . . . . . . . . . . . . . . . . . . . . . . . . . . . . . . . . . . . . . 94
Table 9-8, Data Access Key Parameters. . . . . . . . . . . . . . . . . . . . . . . . . . . . . . . . . . . . 95
Table 9-9, Secure Access Table Parameters. . . . . . . . . . . . . . . . . . . . . . . . . . . . . . . . . . 96
7704-939-B10-001 Rev. A5 (06/2019)
Page 8
1.0 Introduction
The AlphaNet DM3X Embedded DOCSIS and EuroDOCSIS Transponders allow monitoring of Alpha power supplies
through existing cable network infrastructure. Advanced networking services provide quick reporting and access to critical
powering information. This manual focuses on the DM3X Transponder complementing the XM2 CableUPS.
The DM3X Transponder utilizes Simple Network Management Protocol (SNMP) and Management Information Bases
(MIBs) to provide network status monitoring and diagnostics. A Web interface enables authorized personnel direct
access to advanced diagnostics using a common Web browser. No custom software is required. See Table 1-1 for model
specications.
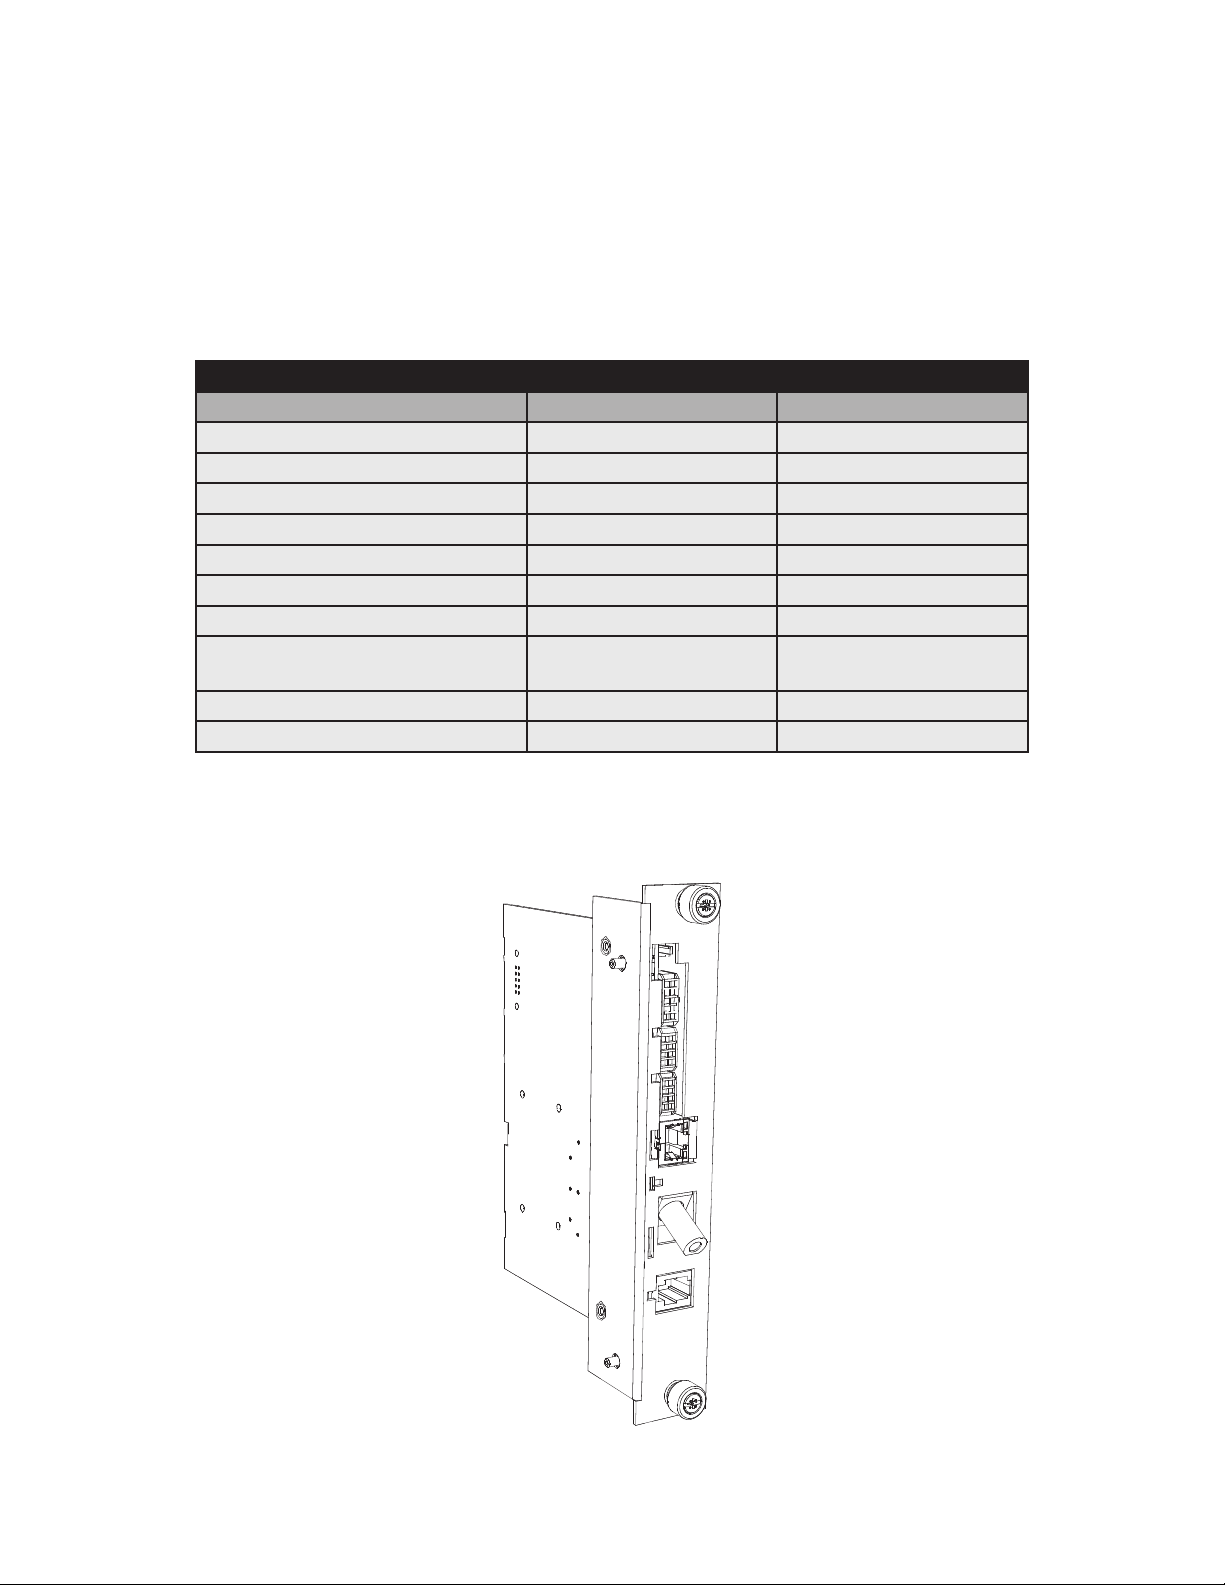
DM3X Transponder Model Specications
Features & Information DM3X DM3EX
Part Number 704-939-20 704-939-22
1 & 2 Battery Strings Yes Yes
3 & 4 Battery Strings Yes Yes
DOCSIS 3.0 Standard U.S. EURO
Gb-Ethernet, CPE and local access Yes Yes
Tamper Switch Interface Ye s Ye s
ENV I/O Monitoring and Control Yes Yes
COM Port (AlphaBus) (PSx5 &
AlphaGen)
Battery Monitoring
Quality of Service (QoS) Yes Ye s
24V / 36V x 4 STR / 6 x 6V 24V / 36V x 4 STR / 6 x 6V
Yes Yes
Table 1-1, DM3X Transponder Model Specications
Fig. 1-1, AlphaNet DM3X
8 704-939-B10-001 Rev. A5 (06/2019)
Page 9
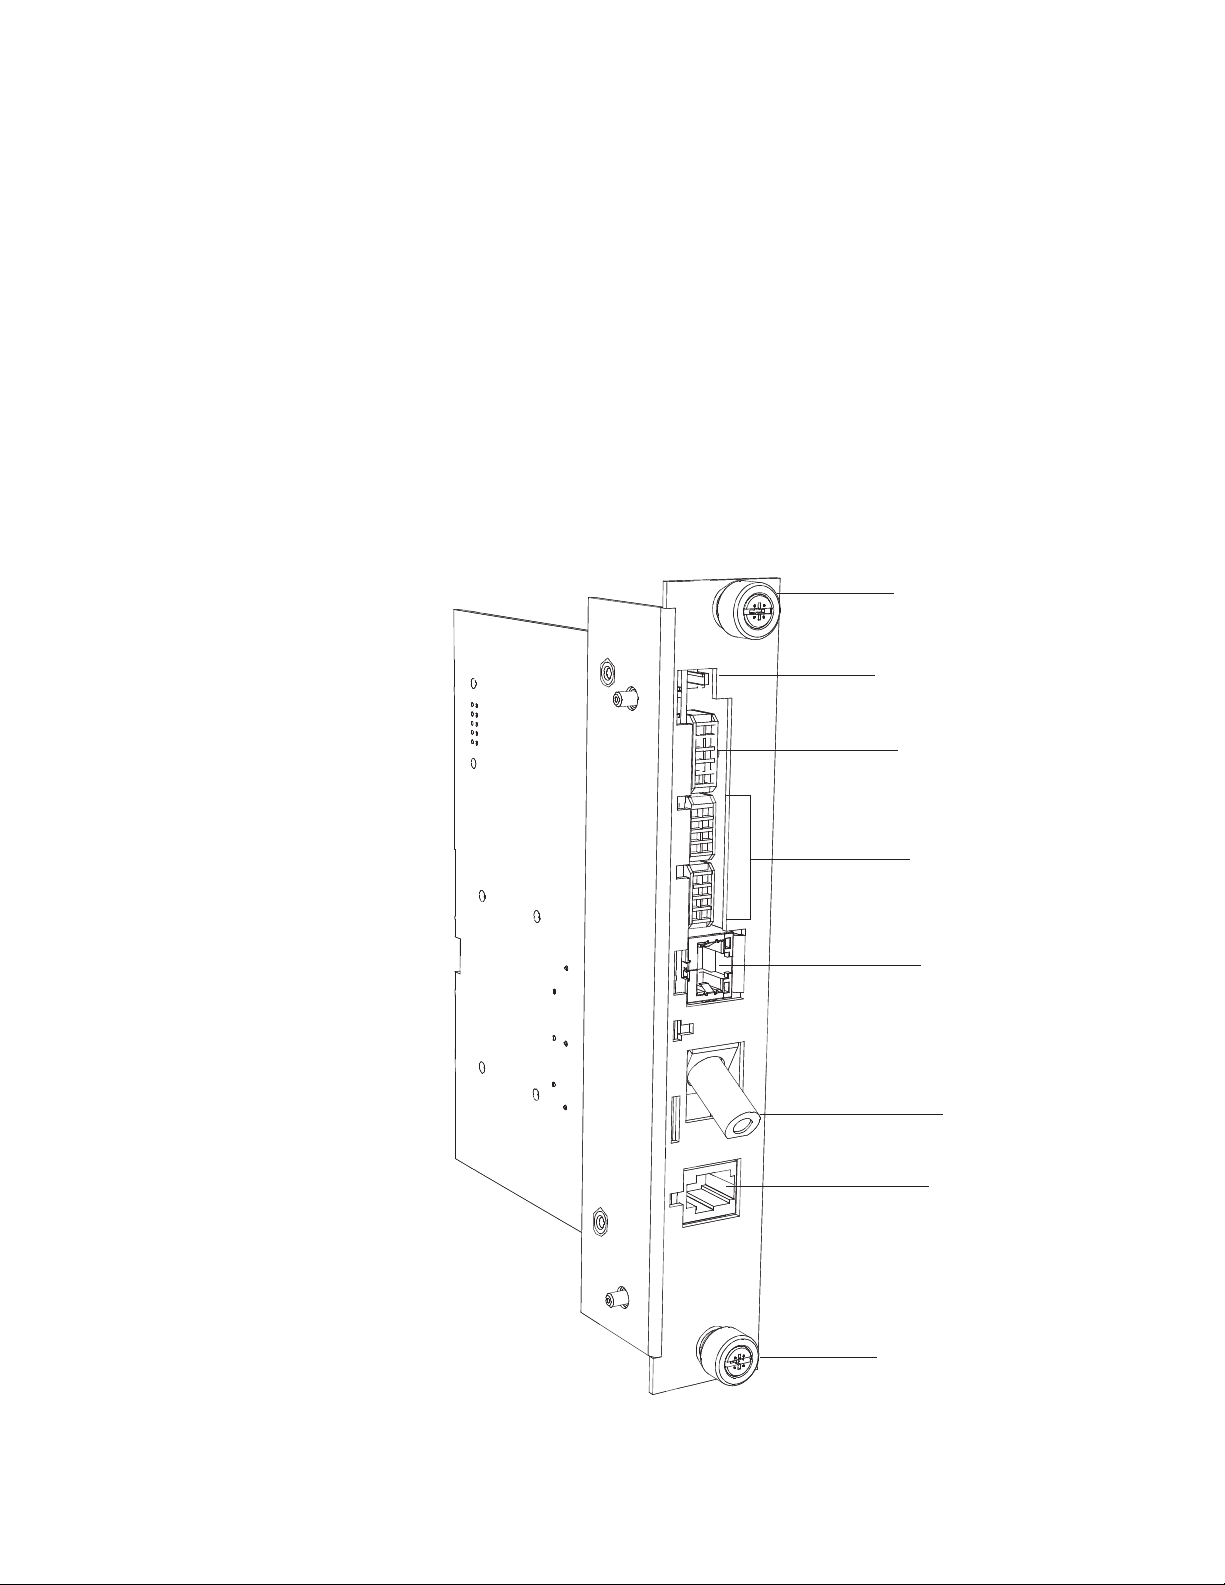
1.0 Introduction, continued
Primary Features
• DOCSIS 3.0 “Full Band Capture” Hardware
• 10/100/1000 Mbps auto-negotiating standard Ethernet interface
• Local Ethernet port provides technician on-site access to extensive power supply diagnostics*
• Embedded Web server for direct diagnostics
• Supports SNMPv1, v2c, v3
• Extensive power supply diagnostic MIBs
• Environmentally hardened DOCSIS cable modem and transponder
• Angled RF connector reduces cable bend radius
• Diagnostic LED indicators for RF communications, Battery connections and Ethernet status
• North American DOCSIS or EuroDOCSIS available
*Ethernet port also permits the connecting of external CPE devices.
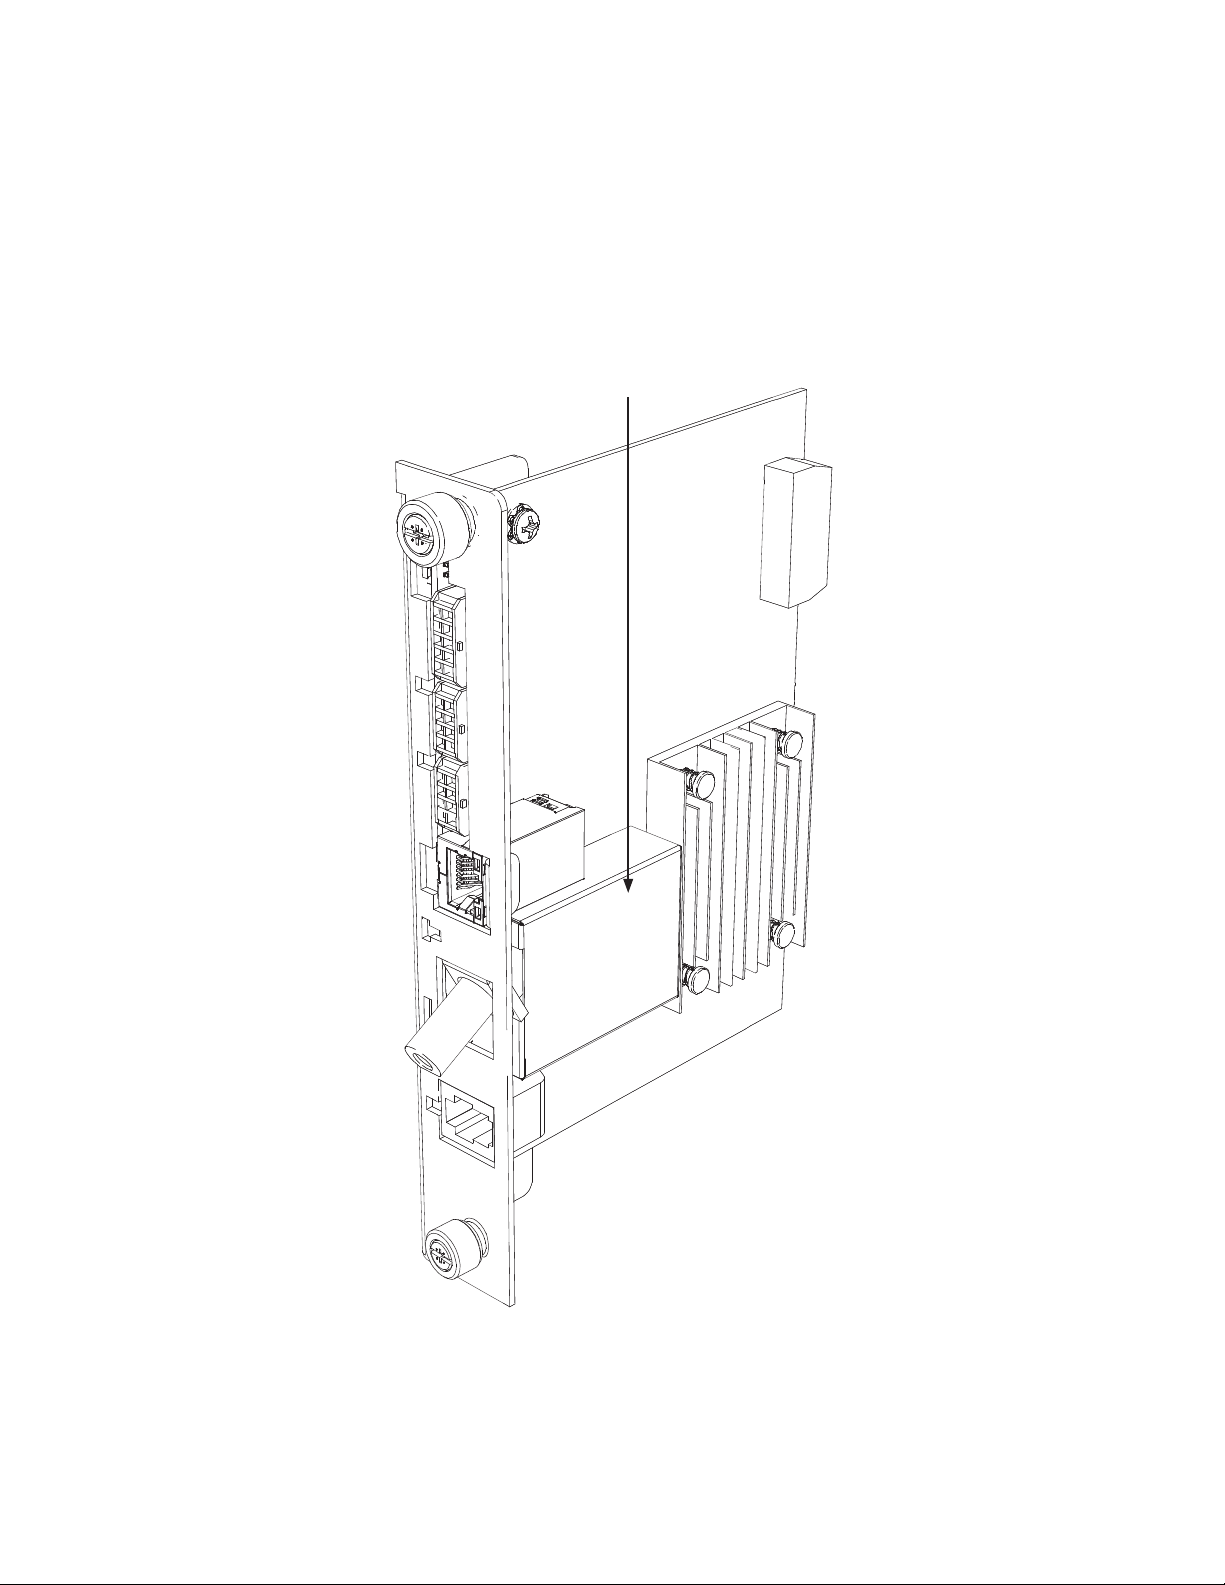
Captive Screw
Tamper Connector
Environmental IO
Connector
Battery Monitoring
Connections
DM3(E)X only
Ethernet Port for
Local Diagnostics
or External CPE
Device
RF Connector
COM Port
DM3(E)X
Fig. 1-2, DM3X Transponder Components
Captive Screw
9704-939-B10-001 Rev. A5 (06/2019)
Page 10
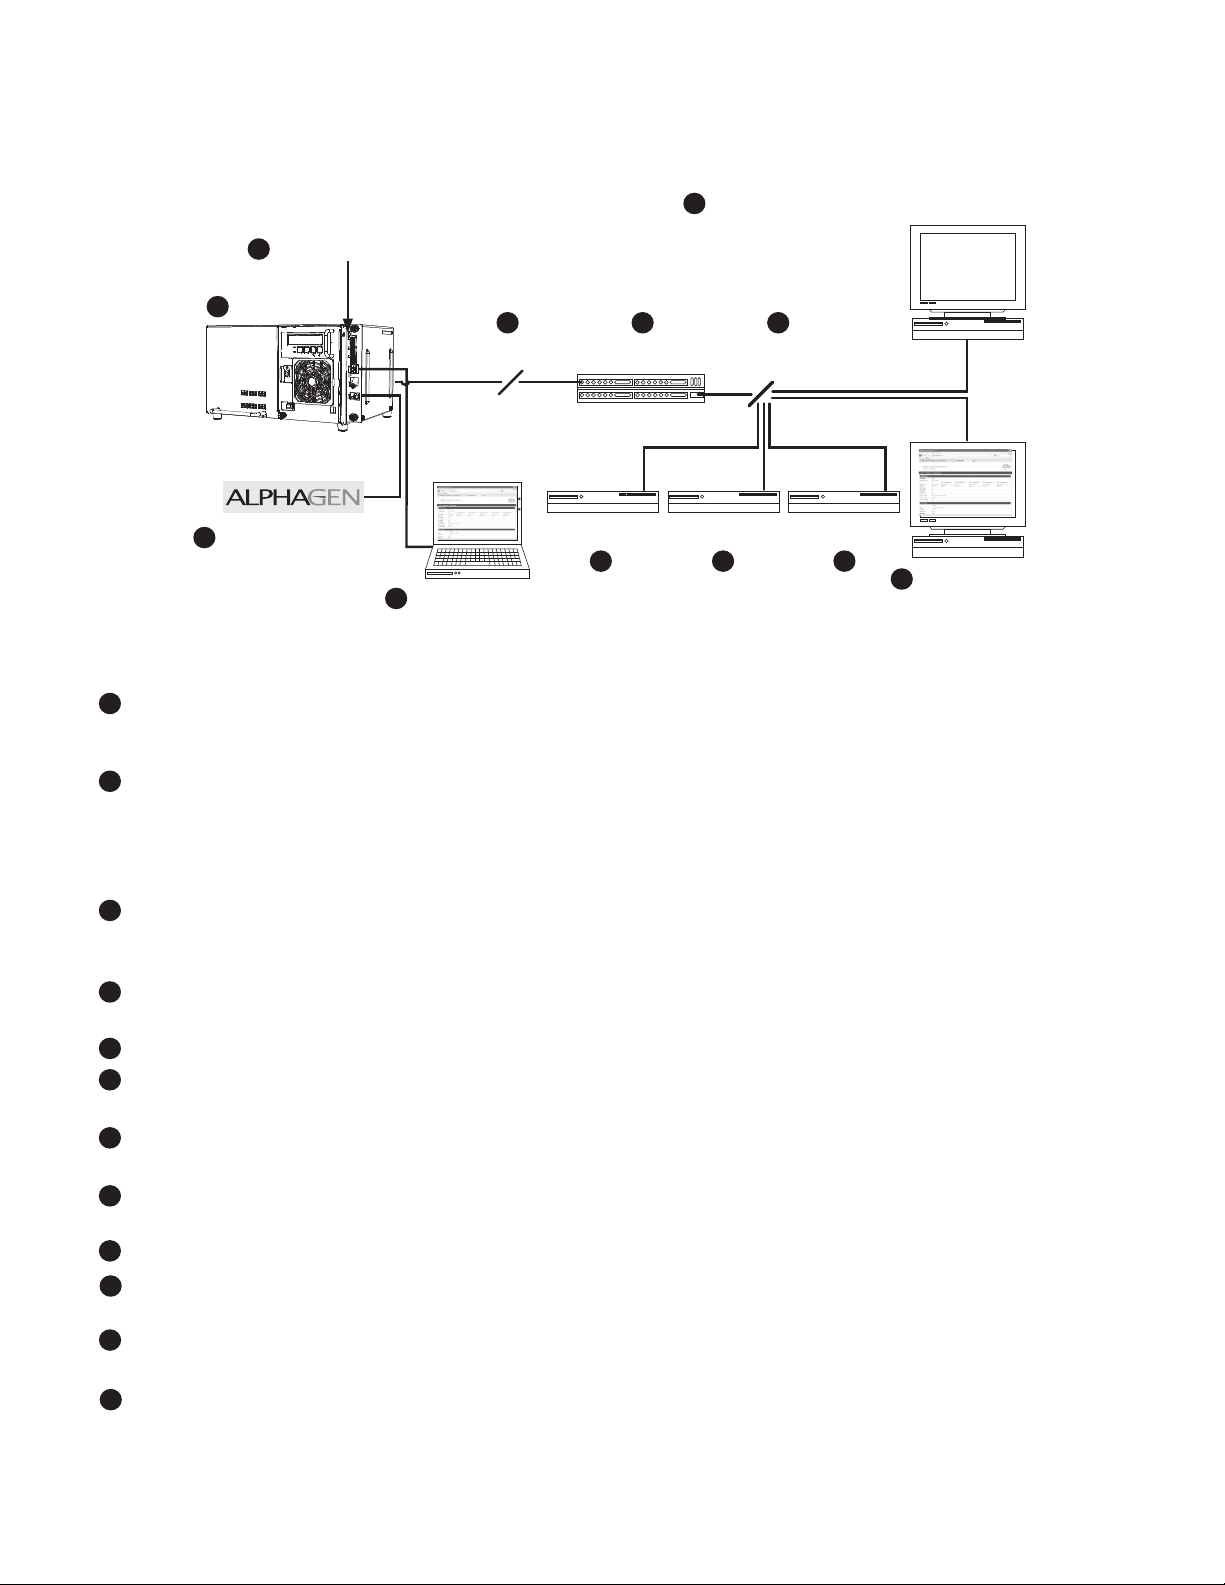
2.0 Overview
2.1 System Diagram
DM3X Transponder
2
1
Power Supply
5 6
Coax/HFC Network CMTS
10
SNMP-based Network Management System
12
TCP/IP Network
External Generator
3
Local Computer
4
DHCP Server
7 8 9
TFTP Server TOD Server
Web Browser
11
Fig. 2-1, Representative System Arrangement
• All power supply data is stored in the power supply Inverter Module’s class information base (CIB) tables in
1
the power supply. This data is accessible directly via the power supply’s LCD Display (see the power supply’s
technical manual for details). The CIB tables are the source of the transponder’s data.
2
• The DM3X Transponder contains both SCTE-HMS Management Information Base (MIBs) and the proprietary
Alpha MIB tables. The SCTE-HMS MIBs are industry standard MIB tables that store power supply, battery and
generator data from the CIB tables (See Section 6.0, Data Management). The Alpha MIB contains all the data of
the SCTE-HMS MIBs plus additional power supply settings and values as well as the transponder’s conguration
values.
3
• A xed or stationary external generator or additional power supplies may be connected through the COM
(AlphaBus) port permitting monitoring locally through the Ethernet connector or remotely via the Web page or
SNMP-based Network Management System.
4
• Power supply and transponder parameters can be monitored and set locally using a personal computer and a
standard Ethernet cable.
5
• The transponder transmits data via its cable modem directly over the Coax or Hybrid Fiber Coax network.
6
• The Cable Modem Termination System (CMTS) is the bridge between the cable network and the TCP/IP network.
The transponder’s cable modem communicates over the HFC network to the CMTS.
7
• The Dynamic Host Control Protocol (DHCP) server needs to be provisioned with the transponder’s cable modem
CM MAC address and the MAC address needs to be assigned a DOCSIS Conguration File.
8
• The DOCSIS Conguration File and rmware les should be available in the Root Directory of the Trivial File
Transfer Protocol (TFTP) Server.
9
• The Time of Day (TOD) Server provides the cable modem with the current date and time.
10
• A Network Management System (NMS) or MIB Browser allows remote monitoring, control, and conguration of
the transponder, power supply, and connected device parameters. Alarms and traps can be set and monitored.
11
• The power supply and generator data may be accessed remotely through the transponder’s Web page by placing
its IP address into a standard Web browser.
12
• The following ports of the Transmission Control Protocol/Internet Protocol network must be opened: 161=SNMP,
162=SNMP, Traps, 69=TFTP, 80=HTTP, 37=TOD.
10 704-939-B10-001 Rev. A5 (06/2019)
Page 11

2.0 Overview, continued
2.2 Network Connectivity
The transponder’s cable modem must be provisioned to be recognized by the CMTS as a valid device to be assigned an
IP address from the DHCP server, to locate the TFTP and TOD servers and to communicate with the SNMP management
server (trap receiver). The DM3X Transponder must be provisioned in the cable system to allow it to be recognized by the
CMTS, receive an IP address, TOD, TFTP les and communicate with the SNMP management system.
In single IP congured devices, data from both the cable modem and power supply are accessed and managed through
the modem’s IP address on the secure private modem network. The transponder is not accessible from the public
Customer Premises Equipment (CPE) network. Consequently, the Network Management System (NMS) that monitors the
power supplies must have access to the same private modem network.
CMTS and system vendors use dierent security methods to ensure network integrity, but common considerations are:
• Network MAC ltering may have to be modied to allow the cable modem OUI of 00:90:EA for North America, and
00:03:08 for European models.
• For SNMP access, UDP ports 161 and 162 must not be blocked.
• For TFTP access, port 69 must not be blocked.
• For HTTP access, port 80 must not be blocked.
• For TOD access, port 37 must not be blocked.
• Firewalls must allow TFTP, DHCP, SNMP and TOD communication to the cable modem.
• If the address of the TFTP or TOD server is dierent than the DHCP server, the response from the DHCP server
must contain the TFTP and TOD addresses.
2.3 System Conguration and Installation
NOTICE:
Before installation, read all of Section 2.0, Overview.
DM3X Transponder installation and setup is comprised of three basic steps:
1. Configuring the Network: Provisioning the DHCP Server with the transponder’s MAC address and assigning it a
DOCSIS Configuration File.
2. Setting Options: The DM3X Transponder is designed for out-of-the-box, “plug and play” operation, but non-default
settings such as SNMP trap destination addresses may be required for the Network Management System (NMS).
SNMP trap addresses can be set automatically via the DOCSIS Conguration File per RFC 4639 (IPv4), or
through SNMPv3 Notication settings (IPv6), while proprietary options may be set through type-11 TLV entries.
3. Field Installation of the DM3X Transponder into the power supply, connecting the battery string wire harnesses,
Tamper, Environmental Control (as applicable), RF drop cable and verifying operation.
These steps can be performed independently of one another. However, conguring the network prior to eld installation
will allow the installation to be veried while personnel are still on-site. Performing eld installation before network
conguration and before the installation can be veried, might result in additional eld service calls to correct mistakes.
Carefully read the following section in order to understand the dependencies within the system before performing system
conguration or hardware installation.
11704-939-B10-001 Rev. A5 (06/2019)
Page 12
2.0 Overview, continued
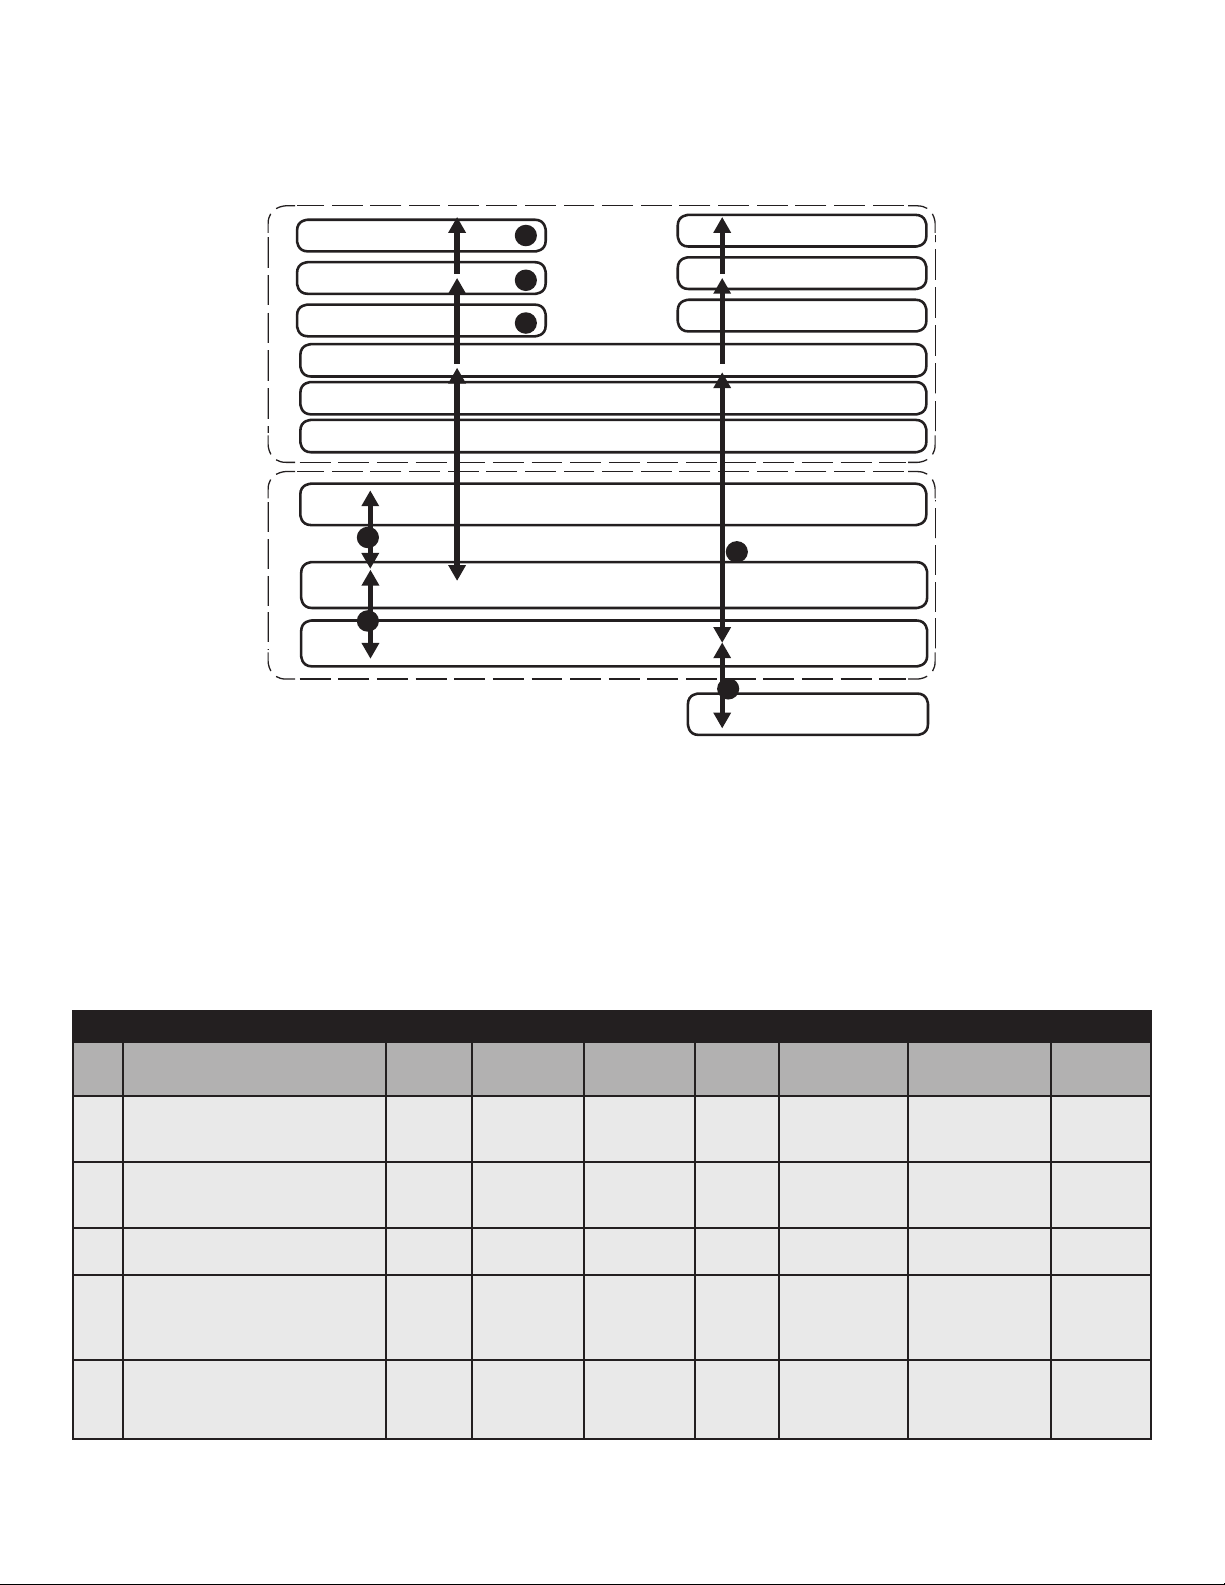
2.4 DM3.0 Series Start Up and Reboot Routline
TFTP Server
TOD Server
DHCP Server
TCP/IP NetworkHFC Network
5
4
3
Switches
Routers
Firewalls
CMTS
2
DM3X Transponder
1
Power Supply
Network Management System
6
7
Fig. 2-2, DM3X Transponder Start Up and Reboot Routline
MIB Browser
Web Browser
Local Laptop
The above diagram, read left to right, indicates the order of operations as the transponder comes online. There are certain
conditions that must exist for each step to occur, resulting in successful data monitoring and management. The numbers
below correspond to the numbered arrows above.
• Blue Rx/Tx Power LED indicates Rx/Tx Power at a warning level. Make the necessary RF level adjustments.
• Red Rx/Tx Power LED indicates Rx/Tx Power at an alert level. Make the necessary RF level adjustments.
LEDs and Indications
Ref
#
1
2
3 - 5 Online - registration complete
6
7 Laptop Connected (Local)
Communications State ALM/
Transponder Initializing /
Searching for Downstream
DOCSIS channel
Downstream channel acquired,
service group determination and
ranging initialization
DM3.0 Series Transponder fully
functional
RDY
Flashing
(Green)
Flashing
(Green)
Flashing
(Green)
Flashing
(Green)
Flashing
(Green)
Downstream
(ds)
Flashing OFF OFF OFF OFF OFF
ON Flashing OFF OFF OFF OFF
ON ON
ON ON
ON ON
Upstream
(US)
Rx / Tx
Power
ON
(Green)
ON
(Green)
ON
(Green)
ONLINE
(OL)
ON OFF and ON OFF
ON
Bursts when
CPE device
communicating
Communications
(COM)
Bursts when
communicating to
multiple power
supplies
Bursts ON
Link
(LNK)
OFF
Table 2-1, LEDs and Indications
12 704-939-B10-001 Rev. A5 (06/2019)
Page 13
3.0 Network Configuration
3.1 Provisioning the DHCP Server with the MAC Addresses
On the DHCP server, assign the cable modem’s CM MAC address with a DOCSIS Conguration File to set modem
communication options. (See Section 3.3, The DOCSIS Conguration File for instructions on how to create a DOCSIS
Conguration File).
The CM and CPE MAC addresses are located on the DM3X Transponder and on the packing slip, see below. The CM
MAC address may be labeled as the RF MAC address on some DM3X units.
Identier label
Fig. 3-1, Locations of MAC Address Labels
13704-939-B10-001 Rev. A5 (06/2019)
Page 14

3.0 Network Conguration, continued
3.2 Establishing IP Connectivity
The DM3X Transponder supports the CableLabs DOCSIS 3.0 IPv6 implementation. The main benet of IPv6 is its
expanded addressing capability, increasing the address space from 32 to 128 bits, providing virtually unlimited number
of networks and systems. The DM3X Transponder determines the IP provisioning mode via the CableLabs SNMP MIB
parameter docsIf3CmMdCfgIpProvMode (SNMP OID: 1.3.6.1.4.1.4491.2.1.20.1.31.1.1). The DM3X will support the
following congurable IP Provisioning Mode Override policies:
• Honor MDD: The cable modem of the DM3X unit will acquire an IPv6 or IPv4 address as directed by the MAC
Domain Descriptor (MDD) message for provisioning and operation.
• IPv4 only: The cable modem of the DM3X unit will acquire a single IPv4 address for the CM management stack,
overriding the TLVs in the MDD message.
• IPv6 only: The cable modem of the DM3X unit will acquire a single IPv6 address for the CM management stack,
overriding the TLVs in the MDD message.
3.3 The DOCSIS Conguration File
A cable modem’s DOCSIS Conguration File is a type-length-value (TLV) le that contains important operational
parameters as dened by the DOCSIS standards. It provides certain settings for the cable modem. In addition to standard
entries, settings in the DOCSIS Conguration File should include the modem’s community strings and if an upgrade is
necessary, rmware upgrade parameters. Place the Conguration File in the TFTP root directory.
The transponder’s cable modem interface can support both IPv4 and IPv6 addressing schemes. The required DOCSIS
Conguration File operational parameters will dier depending on company policies, cable modem rmware versions and
IP addressing schemes. The following DOCSIS Conguration File details listed in this manual are general guidelines.
Please consult the published DOCSIS Specication resources (CableLabs) for additional DOCSIS Conguration File
details and guidelines.
To build a DOCSIS Conguration File, use a DOCSIS TLV editor program.
See the example Conguration Files in Sections 3.3.5 and 3.3.6.
NOTICE:
The modem community strings should be set in the DOCSIS Conguration File. Failure to set community strings
will result in a less secure system. For automatically updating modem rmware with the DOCSIS Conguration File,
see Section 5.1, Upgrading DM3X Modem Firmware.
14 704-939-B10-001 Rev. A5 (06/2019)
Page 15

3.0 Network Conguration, continued
3.3.1 Setting Modem Community Strings - docsDevNmAccess Method (IPv4 Only)
Set the modem community strings with the DOCSIS Conguration File by including the following SNMP parameters.
Modem Community String Parameters docsDevNmAccess Method
MIB Parameter Object ID Description Value
docsDevNmAccessIp 1.3.6.1.2.1.69.1.2.1.2.x The IP address (or subnet) of
the NMS
docsDevNmAccessIpMask 1.3.6.1.2.1.69.1.2.1.3.x The IP subnet mask of the NMS e.g. 255.255.255.0
docsDevNmAccessCommunity 1.3.6.1.2.1.69.1.2.1.4.x The community string matched
to this IP address net mask entry
docsDevNmAccessControl 1.3.6.1.2.1.69.1.2.1.5.x The level of access granted 1-3
docsDevNmAccessInterfaces 1.3.6.1.2.1.69.1.2.1.6.x Species the set of interfaces
from which requests from this
NMS will be accepted
docsDevNmAccessStatus 1.3.6.1.2.1.69.1.2.1.7.x Controls and reects the status
of rows in this table
e.g. 10.20.30.0
alphanumeric string
None, Read Only, Read /
Write
0x40 : Cable interface
(typical)
0x80 : Ethernet interface
0xC0 or 0x00 : Both
interfaces
4
Note: X denotes the index of the SNMP entry
Table 3-1, Modem Community String Parameters - docsDevNmAccess Method
15704-939-B10-001 Rev. A5 (06/2019)
Page 16

3.0 Network Conguration, continued
3.3.2 Setting Modem Community Strings - Coexistence Method
Set the modem community strings with the DOCSIS Conguration File for an IPv6 network by including the following
SNMP parameters:
Modem Community String Parameters Coexistence Method
TLV
Type
53 SNMPv1v2c
53.1 SNMPv1v2c
53.2 SNMPv1v2c Transport
53.2.1 SNMPv1v2c Transport
53.2.2 SNMPv1v2c Transport
53.3 SNMPv1v2c Access
53.4 SNMPv1v2c Access
TLV Parameter Description Value
Coexistence
Conguration
Community Name
Address Access
Address
Address Mask
View Type
View Name
This object species the SNMPv1v2c Coexistence Access
Control conguration of the CM. This TLV creates entries in
SNMPv3 tables as specied in [DOCSIS OSSIv3.0]
This sub-TLV species the Community Name (community
string) used in SNMP requests to the CM.
This sub-TLV species the Transport Address and Transport
Address Mask pair used by the CM to grant access to the
SNMP entity querying the CM.
Species the Transport Address to use in conjunction with the
Transport Address Mask used by the CM to grant access to
the SNMP entity querying the CM. Length is 6 bytes for IPv4
and 18 bytes for IPv6. Two additional bytes are added to the
IP address length for the port number.
Species the Transport Address Mask to use in conjunction
with the Transport Address used by the CM to grant access to
the SNMP entity querying the CM. Length is 6 bytes for IPv4
and 18 bytes for IPv6. Two additional bytes are added to the
IP address length for the port number.
Species the type of access to grant to the community name
of this TLV. If not specied, default read-only is used.
Species the name of the view that provides the access
indicated in sub-TLV SNMPv1v2c Access View Type.
Composite
Text (e.g.
AlphaRead)
Variable
Transport Address
(e.g. 0.0.0.0/0 or
0:0:0:0:0:0:0:0/0)
Transport Address
(e.g. 0.0.0.0/0 or
0:0:0:0:0:0:0:0/0)
1 = Read Only
2 = Read / Write
String (e.g.
docsisManagerView)
Table 3-2, Modem Community String Parameters - Coexistence Method
16 704-939-B10-001 Rev. A5 (06/2019)
Page 17

3.0 Network Conguration, continued
3.3.3 Setting SNMP Trap Destination Addresses - docsDevNmAccess Method
Set the SNMP Trap Destination Addresses via the DOCSIS Conguration File by including the following SNMP
parameters.
Trap Destination Addresses docsDevNmAccess Method
MIB Parameter Object ID Description Value
docsDevNmAccessIP 1.3.6.1.2.1.69.1.2.1.2.x IP address of trap
destination, e.g. NMS server
docsDevNmAccessIpMask 1.3.6.1.2.1.69.1.2.1.3.x Must be set to
255.255.255.255 per RFC
4639
docsDevNmAccessCommunity 1.3.6.1.2.1.69.1.2.1.4.x Community string used by
NMS to query transponder
docsDevNmAccessControl 1.3.6.1.2.1.69.1.2.1.5.x Level of SNMP access to
DM3X Transponder from IP
address specied in
docsDevNmAccessIpMask
docsDevNmAccessInterfaces 1.3.6.1.2.1.69.1.2.1.6.x Species the set of
interfaces from which
requests from this NMS will
be accepted
docsDevNmAccessStatus 1.3.6.1.2.1.69.1.2.1.7.x Controls and reects the
status of rows in this table
e.g. 10.20.30.40
255.255.255.255
alphanumeric string
4=Read/Only plus Trap
5=Read/Write plus Trap
6=Trap only, no SNMP access
0x40 : Cable interface (typical)
0x80 : Ethernet interface
0xC0 or 0x00 : Both interfaces
4
Note: X denotes the index of the SNMP entry
Table 3-3, Trap Destination Addresses - docsDevNmAccess Method
17704-939-B10-001 Rev. A5 (06/2019)
Page 18

3.0 Network Conguration, continued
3.3.4 Setting SNMP Trap Destination Addresses - Coexistence Method
Set the SNMP Trap Destination Addresses via the DOCSIS Conguration File by including the following SNMP
parameters:
Trap Destination Addresses Coexistence Method
TLV
Type
38
38.1
38.2
38.3
38.4
38.5
38.6
TLV Parameter Description Value
This cong le element species an NMS
SNMPv3 Notication
Receiver
SNMPv3 Notication
Receiver IP Address
SNMPv3 Notication
Receiver UDP Port
Number
SNMPv3 Notication
Receiver Trap Type
SNMPv3 Notication
Receiver Timeout
SNMPv3 Notication
Receiver Retries
SNMPv3 Notication
Receiver Filtering
Parameters
that will receive notications from the
modem when it is in Coexistence mode. Up
to 10 of these elements may be included in
the conguration le.
This sub-TLV species the IP address of the
notication receiver.
This sub-TLV species the UDP port number
of the notication receiver. If this sub-TLV is
not present, the default value of 162 should
be used.
This sub-TLV species the type of trap to
send.
This sub-TLV species the timeout value to
use when sending an Inform message to the
notication receiver.
This sub-TLV species the number of times
to retry sending an Inform message if an
acknowledgement is not received.
Object Identier of the snmpTrapOID value
that identies the notications to be sent to
the notication receiver. This notication and
all below it will be sent.
Composite
0:0:0:0:0:0:0:0 (e.g.fc00:168:1:0:0:0:0:32)
0.0.0.0 (e.g. 10.11.0.1)
UDP port number (e.g. 162)
The trap type may take values:
1 = SNMP v1 trap in an SNMP v1 packet
2 = SNMP v2c trap in an SNMP v2c packet
3 = SNMP inform in an SNMP v2c packet
4 = SNMP v2c trap in an SNMP v3 packet
5 = SNMP inform in an SNMP v3 packet
Time in milliseconds (e.g. 15000)
Number of retries (e.g. 3)
Filter OID (e.g. 1.3.6)
Table 3-4, Trap Destination Addresses - Coexistence Method
NOTICE:
As an alternative to the docsDevNmAccessTable or SNMPv3 trap parameters, SNMP Trap Destination Addresses
may be set through the DM3X proprietary MIB atiMgmtSnmpTrapTable (OID: 1.3.6.1.4.1.926.1.3.1.1) using a
SNMP MIB Browser or as an entry in the Proprietary Conguration File ‘atidoc33.cfg’ in Section 3.3.6, Sample
DOCSIS Conguration File Entries — Coexistence Method.
18 704-939-B10-001 Rev. A5 (06/2019)
Page 19

3.0 Network Conguration, continued
3.3.5 Sample DOCSIS Conguration File Entries - devDocNmAccess
SNMP MIB Object (11) [Len=21]:docsDevNmAccessStatus.1/4
SNMP MIB Object (11) [Len=21]:docsDevNmAccesslp.1/10.56.21.0
SNMP MIB Object (11) [Len=21]:docsDevNmAccesslpMask.1/255.255.255.0
1
SNMP MIB Object (11) [Len=25]:docsDevNmAccessCommunity.1/”RW STRING”
SNMP MIB Object (11) [Len=25]:docsDevNmAccessInterfaces.1/”@”
SNMP MIB Object (11) [Len=21]:docsDevNmAccessControl.1/3
SNMP MIB Object (11) [Len=21]:docsDevNmAccessStatus.2/4
SNMP MIB Object (11) [Len=21]:docsDevNmAccesslp.2/10.20.30.40
SNMP MIB Object (11) [Len=21]:docsDevNmAccesslpMask.2/255.255.255.255
2
SNMP MIB Object (11) [Len=25]:docsDevNmAccessCommunity.2/”RW Trap string”
SNMP MIB Object (11) [Len=25]:docsDevNmAccessInterfaces.2/”@”
SNMP MIB Object (11) [Len=21]:docsDevNmAccessControl.2/5
Software Upgrade Filename(9) [Len=24]:”ModemFirmwareFile.bin”
3
SNMP MIB Object (11) [Len=20]:docsDevSwAdminStatus.0/2
4
Software Upgrade TFTP Server (21) [Len=4]:10.56.48.15
Manufacturer Code Verication Certicate (32) [Len=254]: 30 82 03 1A 30 82...
Manufacturer Code Verication Certicate (32) [Len=254]: 04 0A 13 11 41 4D...
5
Manufacturer Code Verication Certicate (32) [Len=254]: 04 0C 30 0A 06 01...
Manufacturer Code Verication Certicate (32) [Len=36]: 11 A3 41 A6 A7 D9....
Legend
1
Sets Read-Write community string. Set the IP address, netmask and community string to t your system.
2
Sets the IP address of where the SNMP traps will be sent. This is typically set to match the IP address of
the Network Managements System Server.
3
Sets rmware download parameters.
4
Species the IP address of the TFTP server used for upgrading rmware.
5
Sets Code Verication Certicate (CVC) for rmware upgrade security per the DOCSIS specication.
19704-939-B10-001 Rev. A5 (06/2019)
Page 20

3.0 Network Conguration, continued
3.3.6 Sample DOCSIS Conguration File Entries - Coexistence
SNMPv1v2c Coexistence Conguration
SNMPv1v2c Community Name:ReadWrite
SNMPv1v2c Transport Address Access
SNMPv1v2c Transport Address:0.0.0.0/0
SNMPv1v2c Transport Address Mask:0.0.0.0/0
1
SNMPv1v2c Transport Address Access
SNMPv1v2c Transport Address:0:0:0:0:0:0:0:0/0
SNMPv1v2c Transport Address Mask:0:0:0:0:0:0:0:0/0
SNMPv1v2c Access View Type:read-write
SNMPv1v2c Access View Name:docsisManagerView
Docsis V3 Notication Receiver
UDP Port number of trap receiver:162
Type of trap:SNMP v1 trap in an SNMP v1 packet
Timeout for sending inform:15000
Number of retries:3
Filtering Parameters:1.3.6
IPv6 Address of trap receiver:fc00:168:1:0:0:0:0:32
2
Docsis V3 Notication Receiver
IP Address of trap receiver:192.168.1.51
UDP Port number of trap receiver:162
Type of trap:SNMP v1 trap in an SNMP v1 packet
Timeout for sending inform:15000
Number of retries:3
Filtering Parameters:1.3.6
3
Software Upgrade Filename:ModemFirmwareFile.bin
4
Software Upgrade IPv6 TFTP Server:fc00:168:1:0:0:0:0:51
Manufacturer Code Verication Certicate:3082031B30820…
Manufacturer Code Verication Certicate:040A1312414C5…
5
Manufacturer Code Verication Certicate:FF040C300A060…
Manufacturer Code Verication Certicate:257939C848CE0…
Legend
1
Sets Read-Write community string. Set the IP address, netmask and community string to t your system.
2
Sets the IP address of where the SNMP traps will be sent. This is typically set to match the IP address of
the Network Managements System Server.
3
Sets rmware download parameters.
4
Species the IP address of the TFTP server used for upgrading rmware.
5
Sets Code Verication Certicate (CVC) for rmware upgrade security per the DOCSIS specication.
NOTICE:
DOCSIS conguration les vary from system to system. Take into consideration your company’s policies and test
the le on a local system prior to widescale deployment.
In previous versions of the DM product line, an additional conguration le (also known as a Setup File)
could be used for distributing custom Alpha MIB settings to all DMs on a network. This is still the case,
with the only dierence being the name of the le, which for the DM3.0 Series is atidoc33.cfg. It may be
used if preferred but is not required.
20 704-939-B10-001 Rev. A5 (06/2019)
Page 21

3.0 Network Conguration, continued
3.3.7 Proprietary Conguration File ‘atidoc33.cfg’
The DM3X Transponder will attempt to download a TLV-formatted le ‘atidoc33.cfg’ from the modem’s provisioning TFTP
server at start up and every 24 hours thereafter. The atidoc33.cfg proprietary conguration le is optional and provides an
alternative method to the modem’s DOCSIS conguration le for deploying Alpha proprietary SNMP MIB parameters to
eld-installed DM3.0 Series Communications Modules.
The atidoc33.cfg le should be used if the following conditions are true:
1. Non-default settings, such as SNMP Trap Destination Addresses need to be distributed to all DM3X
Transponders.
2. The operator does not desire to place Alpha-proprietary parameters into the modem’s DOCSIS conguration le.
NOTICE:
The recommended method for setting the SNMP trap address(es) is through the modem DOCSIS conguration le
(See Section 3.3, The DOCSIS Conguration File). Alpha-proprietary parameters may also be set through the
modem’s DOCSIS conguration le, eliminating the need for the atidoc33.cfg proprietary conguration le.
To build the atidoc33.cfg le, enter the desired SNMP OIDs and values from the Alpha MIB into a TLV le as TLV type-11
entries using a TLV editor (Refer to sample entries below). The DM3X proprietary conguration Setup le must be named
“atidoc33.cfg” and placed in the root directory of the TFTP server. DM3X settings are updated according to values dened
in this le at start up and after every 24 hours of operation.
Sample atidoc33.cfg Entries:
• Network Access Control (3) [Len - 1]: 1
• SNMP MIB Object (11) [Len = 24]: atiMgmtSnmpTrapAddress.1 / 10.20.30.40
• SNMP MIB Object (11) [Len = 24]: atiMgmtSnmpTrapAddress.2 / 10.20.30.50
• SNMP MIB Object (11) [Len = 23]: atiMgmtSysTamperPolarity.0 / 1
21704-939-B10-001 Rev. A5 (06/2019)
Page 22

3.0 Network Conguration, continued
3.3.8 Changing Default atidoc33.cfg Download Settings
By default, the DM3X Transponder will download the atidoc33.cfg le from the provisioning TFTP server every 24 hours.
However, these settings may be adjusted per the tables below by placing the respective SNMP varbinds into the modem’s
DOCSIS conguration le.
Default atidoc.cfg Download Settings
Parameter Type Description Value
atiMgmtSysDownloadCongName
1.3.6.1.4.1.926.1.3.2.1.9.0
atiMgmtSysDownloadReCfgTime
1.3.6.1.4.1.926.1.3.2.1.13.0
Search Order Parameter Type Description Value
Alphanumeric
String
Integer
Name of proprietary
conguration le
Download interval for
atidoc33.cfg (hours)
“atidoc33.cfg”
(Default)
24 (Default)
1
2
3
4 Software Upgrade Server IP Address
atiMgmtSysDownloadCongAddress
OID 1.3.6.1.4.1.926.1.3.2.1.10.0
docsDevServerCongTftpAddress
1.3.6.1.2.1.69.1.4.11.0
docsDevSwServerAddress
1.3.6.1.2.1.69.1.3.7.0
Table 3-5, Default atidoc33.cfg Download Settings
IP Address
IP Address
IP Address
Overrides default
location
Default location (no
change necessary)
Set via DOCSIS
conguration le
Set via DOCSIS
conguration le
0.0.0.0
(Default)
CM’s TFTP
Server
Address
Congurable
Congurable
22 704-939-B10-001 Rev. A5 (06/2019)
Page 23

3.0 Network Conguration, continued
3.4 Setting Communication Options
Communications Settings may be changed through the Alpha MIB remotely using an SNMP MIB browser or automatically
by placing the SNMP parameters into the DOCSIS Conguration File.
NOTICE:
Before setting options, verify UDP ports 37, 69, 161, 162 and TCP port 80 are not blocked.
Communications Parameters
SNMP Parameter Type Description Value
atiMgmtSnmpTrapOnNormal
OID: 1.3.6.1.4.1.926.1.3.1.5.1.0
atiMgmtSysDownloadReCfgTime
OID: 1.3.6.1.4.1.926.1.3.2.1.13.0
atiMgmtSysSnmpTimeout
OID: 1.3.6.1.4.1.926.1.3.1.5.3.0
atiMgmtSysHttpAccess
OID: 1.3.6.1.4.1.926.1.3.2.2.4.1.0
Integer
Integer
Integer
Integer HTTP Web Server
Send SNMP trap when alarmed condition
returns to normal state
Download interval for DM3X-specic items in
atidoc33.cfg cong le (hours)
Time DM3X will wait before reset if SNMP
trac is not detected (minutes)
1 = Disabled
2 = Enabled
(Default)
24 (Default)
240 (Default)
Note: If set
to zero,
watchdog will
be disabled.
1 = Disabled
2 = Enabled
(default)
Table 3-6, Communications Parameters
NOTICE:
The DM3X Transponder will inherit the cable modem community string settings provided by the DOCSIS
Conguration File.
23704-939-B10-001 Rev. A5 (06/2019)
Page 24

4.0 Web Interface
Overview
The DM3X provides an embedded Web server interface to allow operations personnel the ability to connect locally or
remotely via TCP/IP over Ethernet with a laptop/computer to verify the status of common data points and to congure
various operating parameters. Unless otherwise stated, data values shown in the gures throughout this section are
shown for illustration purposes only.
4.1 Local Web Server Access
The DM3X Ethernet port (comparable to the Craft port on some transponder models) will typically be used as a local
connection point allowing the user to connect directly to the DM3X Web server interface to verify/congure common
communication parameters and view power supply status and battery values. The Ethernet port on the DM3X is a fully
functional standard Ethernet port, capable of providing all the functionality of any standard Ethernet connection.
To access the DM3X Web server locally utilizing
a Web browser, use the following procedure:
NOTICE:
The following Web Browser settings
should be ‘enabled’ for proper
rendering/download of the web pages:
• Java Script
• Cookies
• ActiveX Controls
• Downloads
• Active Scripting
• Show Pictures
These settings are typically enabled in
the Web Browser by default.
1. Connect a standard Ethernet cable
(CAT5) between the DM3X Ethernet
port (ETH) and a laptop or computer’s
network interface port.
2. Launch a Web browser.
3. Enter the transponder’s default IP
address (192.168.100.1) or the DHCP
assigned IP address into the Web
browser’s address eld.
4. The transponder’s Web server home
page will appear (Fig. 4-1). Note: This
may take up to 45 seconds when the
transponder is initially powered up with
no RF connection. Click the Language
menu to select a desired language for
the text information on the Web page.
The language choices are English
(default), Spanish, Portuguese, French
& German.
Fig. 4-1, DM3X Web Page
24 704-939-B10-001 Rev. A5 (06/2019)
Page 25
4.0 Web Interface, continued
NOTICE:
If you are unable to view the home page of the DM3X Transponder using IP address 192.168.100.1, the network
conguration on the computer that is being used to connect to the DM3X Transponder may require a temporary
static IP address (192.168.100.2) to be congured.
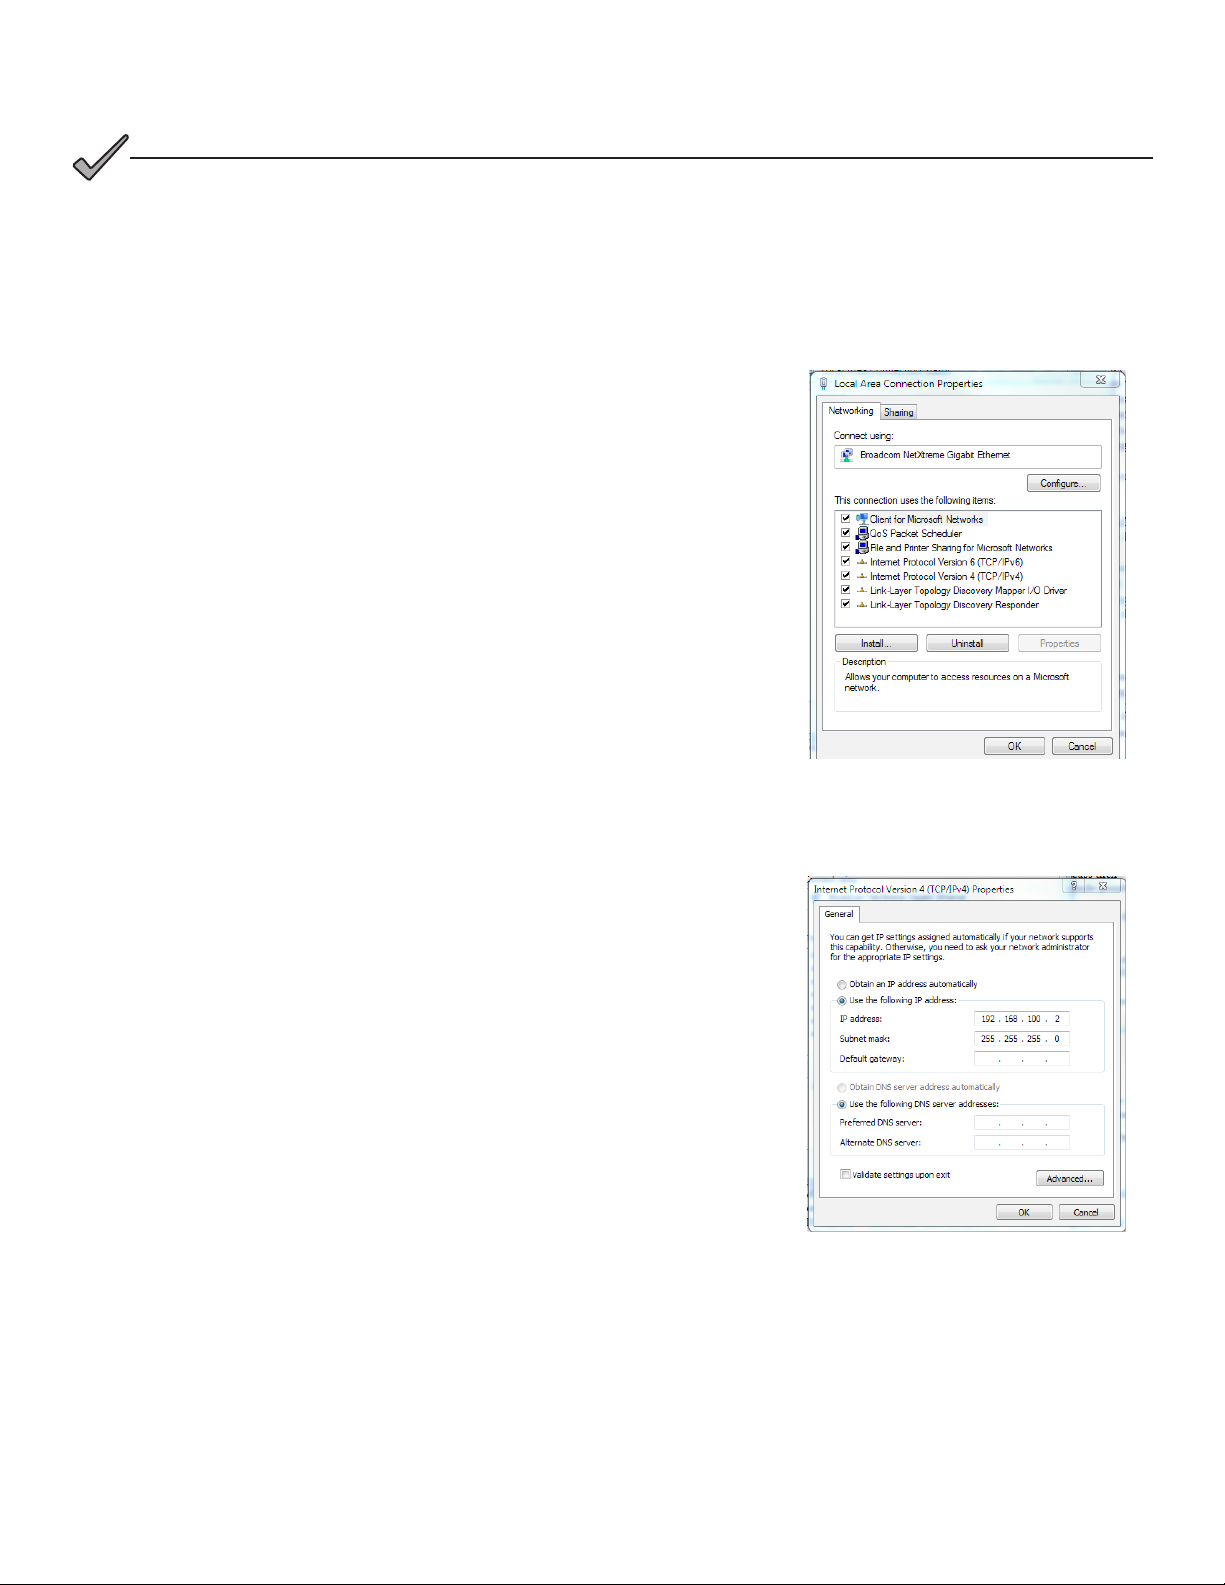
Use the following procedure to congure a static IP address on a laptop or computer with the Windows® 7 operating
system:
1. Click the Start button (lower left button on most Windows® computers).
2. When the window pops up, click Control Panel (usually about half the
way down the second column).
3. Click Network Connections.
4. Right-Click Local Area Connection link to open menu box.
5. Click the bottom option Properties.
6. You will see a dialog box much like Fig. 4-2; select Internet Protocol
(TCP/IP) and then click the Properties button.
1. The Internet Protocol (TCP/IP) Properties dialog box will open (Fig.
4-3). Select “Use the following IP address”. Enter the values as shown
(i.e. IP address 192.168.100.2, or DHCP assigned IP address, and
Subnet mask 255.255.255.0). Record the existing IP address and
Subnet mask in order to later return the computer to its original state.
2. Click the OK button and try to connect to the DM3X once again using
192.168.100.1 in the Web browser.
3. To restore network settings, repeat Steps 1 through 6 but in step 7 click
check box for “Obtain IP address automatically or, manually set back to
the original settings recorded in Step 7.
Fig. 4-2, Local Area Connection
Properties Screen, Windows® 7
1. Fig. 4-3, Internet Protocol (TCP/IP)
Properties Screen, Windows® 7
25704-939-B10-001 Rev. A5 (06/2019)
Page 26
4.0 Web Interface, continued
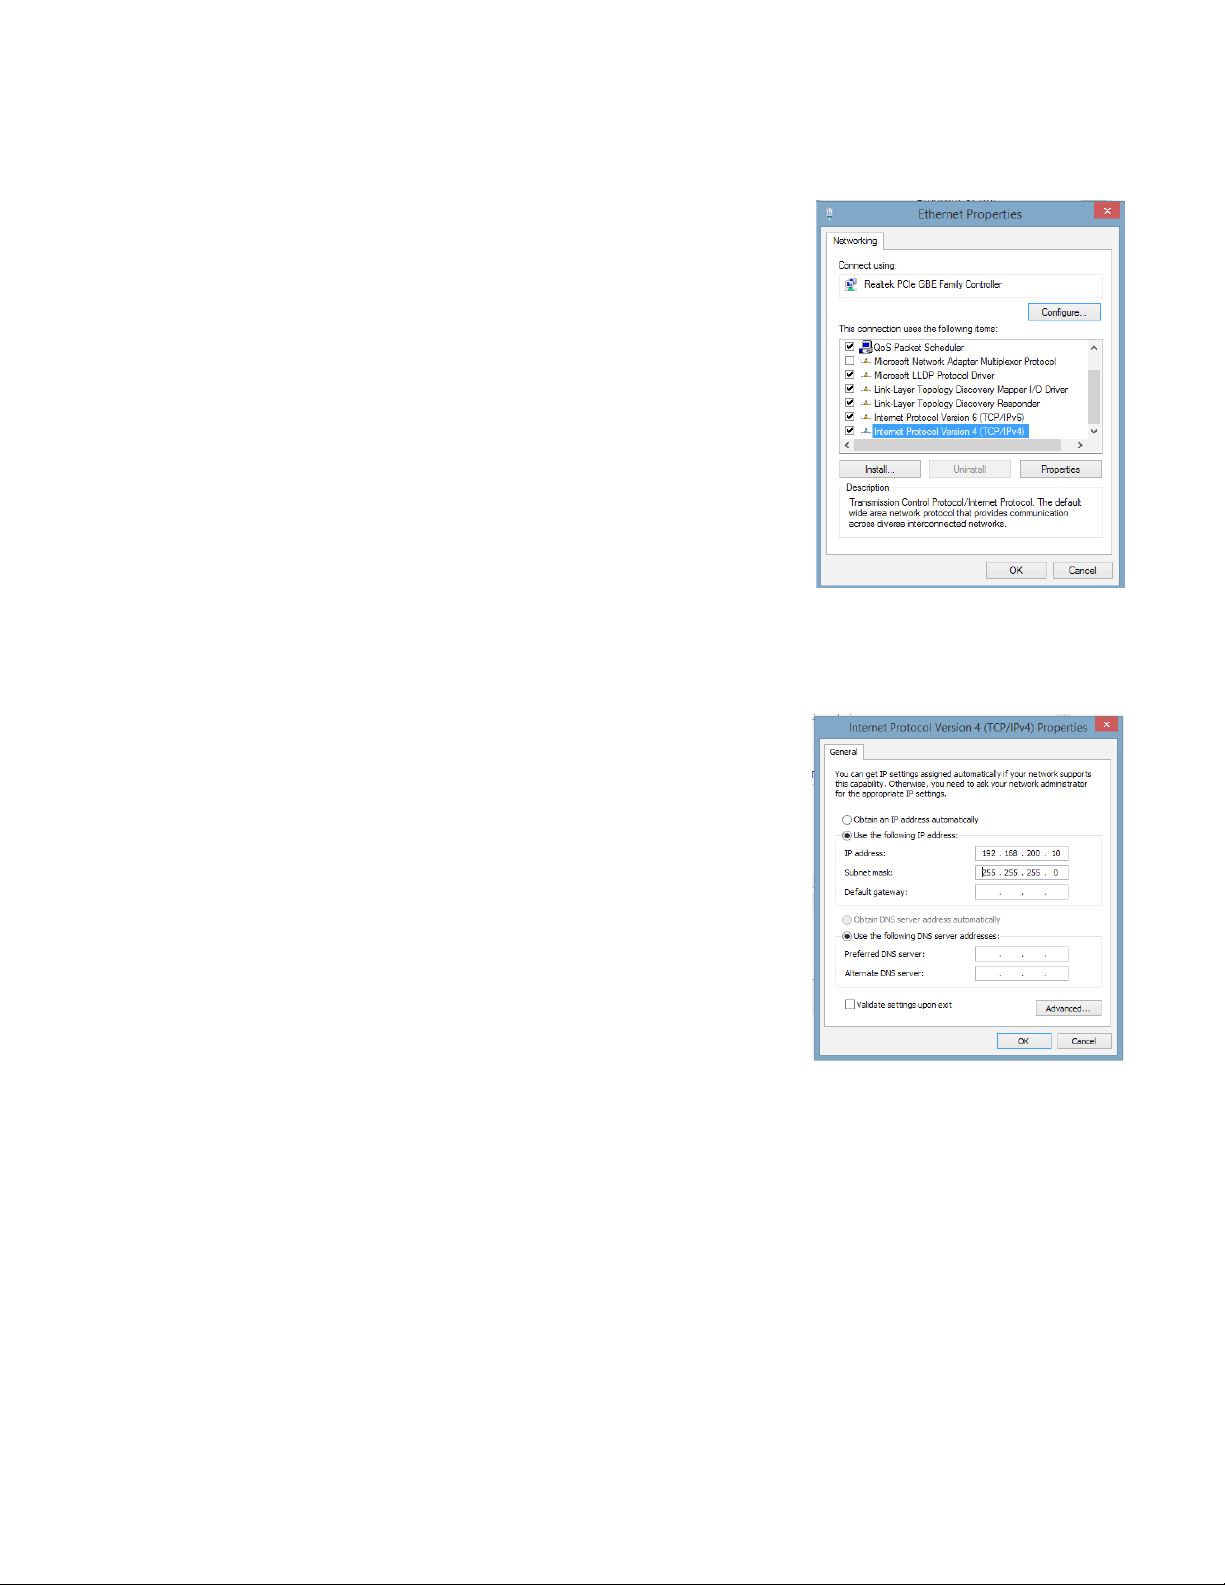
Use the following procedure to congure a static IP address on a laptop or computer with the Windows® 8 operating
system:
1. Click the Start button (lower left button on most Windows® computers).
2. When the window pops up, click Control Panel (usually about half the
way down the second column).
3. Click Network and Sharing Center.
4. Click Local Area Connection.
5. Click the Properties button.
6. You will see a dialog box much like Fig. 4-4; click Internet Protocol (TCP/
IPv4) and then click the Properties button.
1. Fig. 4-4, Local Area Connection
Properties Screen, Windows® 8
1. The Internet Protocol (TCP/IP) Properties dialog box will open (Fig. 4-5).
Select “Use the following IP address”. Enter the values as shown (i.e.
IP address 192.168.100.2 and Subnet mask 255.255.255.0). Record
the existing IP address and Subnet mask in order to later return the
computer to its original state.
2. Click the OK button and try to connect to the DM3X once again using
192.168.100.1 in the Web browser.
3. To restore network settings, repeat Steps 1 through 6 but in step 7 click
check box for “Obtain IP address automatically or, manually set back to
the original settings recorded in Step 7.
1. Fig. 4-5, Internet Protocol (TCP/IP)
Properties Screen, Windows® 8
26 704-939-B10-001 Rev. A5 (06/2019)
Page 27
4.0 Web Interface, continued
4.2 Remote Web Server Access
To remotely access the DM3X Web server utilizing a Web browser, use the following procedure:
NOTICE:
For Web server (HTTP) access, port 80 must not be blocked and the computer must have access to the private
cable modem network
1. Connect the laptop or computer’s network interface port to the company’s Ethernet network.
2. Open a Web browser.
3. Enter the DM3X DHCP designated IP address (e.g., 192.168.1.124) into the Web browser’s address eld. Use
square brackets when entering IPv6 IP addresses (e.g. [FC00:168:40::124]) into the Web browser’s address eld.
4. The DM3X Web server home page will appear (Fig. 4-6).
5. Click on the Language menu to select a desired language for the text information on the Web page. The language
choices are English (default), Spanish, Portuguese, French and German.
Fig. 4-6, Web Server Home Page
27704-939-B10-001 Rev. A5 (06/2019)
Page 28

4.0 Web Interface, continued
4.3 Navigating the Web Page
Once the Web page has been successfully accessed, the operator is able to select a link on the header bar and the page
specic to the topic will open enabling real-time data to be observed.
See Fig. 4-7 for the navigation bar items.
TM
AlphaNet
DOCSIS Status Monitor
General Tools Apps History Language Print
Commonly used
parameters for
quick diagnostics
of Power Supply,
Communications,
Batteries and
Generator.
Communications: Comprehensive
communications diagnostic parameters
Power Supply: Comprehensive Power
parameters
Generator: Comprehensive Generator
IO - Environment:
of Tamper polarity and external I/O devices
HMS Alarms: Status of SCTE-HMS active
alarms, alarm history and alarm threshold
settings.
Constellation: Provides a constellation view of the DOCSIS
channel for troubleshooting impairments.
Provides details about impairments on the
network and the approximate distance(s) of those impairment(s).
Requires the Adaptive equalization feature to be enabled on the
CMTS.
Spectrum: Displays and records the Full Band Capture data by
directly sampling and digitizing the entire 1GHz downstream
spectrum.
The Web page content
will be displayed in the
selected language
System Logs (requires AlphaApp card): Log
from each of the system logs.
Power Supply Events (requires AlphaApp card):
Records daily Power Supply system events.
AlphaApp card): Records power supply system
the initial installation.
Battery Events (requires AlphaApp card):
Records battery conductance measurements and
manufacturing dates.
Cable Modem Log: Web page representation of
the DOCSIS modem event log.
(Requires AlphaApp card)
Overview: Provides AlphaApp card
version and status, plus Utility power
health information.
Battery Management:
technician ID, battery conductance
measurements, battery model and
battery manufacturing dates for
runtime and battery life calculations.
Sends the contents
of the selected
Web page to the
computer’s default
printer.
Fig. 4-7, Navigation Bar Items
28 704-939-B10-001 Rev. A5 (06/2019)
Page 29

4.0 Web Interface, continued
4.3.1 Web Interface Security Levels
The DM3X has two levels of function-specic security. General operations are Level 1. Conguration-related functions are
Level 2. Refer to Table 4-1 for default User Name and Security Passwords.
DM3.0 Series Transponder Web Page Security
OID Function Value
1.3.6.1.4.1.4413.2.2.2.1.1.3.3.0 Level 1 User Name Alpha
1.3.6.1.4.1.4413.2.2.2.1.1.3.4.0 Level 1 Security Password AlphaGet
1.3.6.1.4.1.4413.2.2.2.1.1.3.1.0 Level 2 User Name Alpha
1.3.6.1.4.1.4413.2.2.2.1.1.3.2.0 Level 2 Security Password AlphaSet
Table 4-1, DM3X Web Page Security
DM3.0 Series Transponder Security Levels
Web Page Function Security Level
System Name, System Contact, System Location, Common Logical ID 1
General
Advanced Communications
Advanced Power Supply
Advanced Generator
Modem Log [Event Log] Reset Log 1
Advanced I/O
HMS Alarms Export Alarm Cloning File 2
Constellation Number of Samples 2
Power Supply Self-Test 1
Generator Self-Test 1
Reset Transponder 1
Provisioning Mode - Single IP or Dual IP 2
Congure Proprietary Trap Addresses 2
Power Supply Self-Test 1
Congure / Save 2
Reset Output 1 / 2 2
Generator Self-Test 1
Reset Latched Alarms 1
Tamper Switch Polarity 1
Enclosure Heater / Controller Installed 1
Table 4-2, DM3X Security Levels
29704-939-B10-001 Rev. A5 (06/2019)
Page 30
4.0 Web Interface, continued
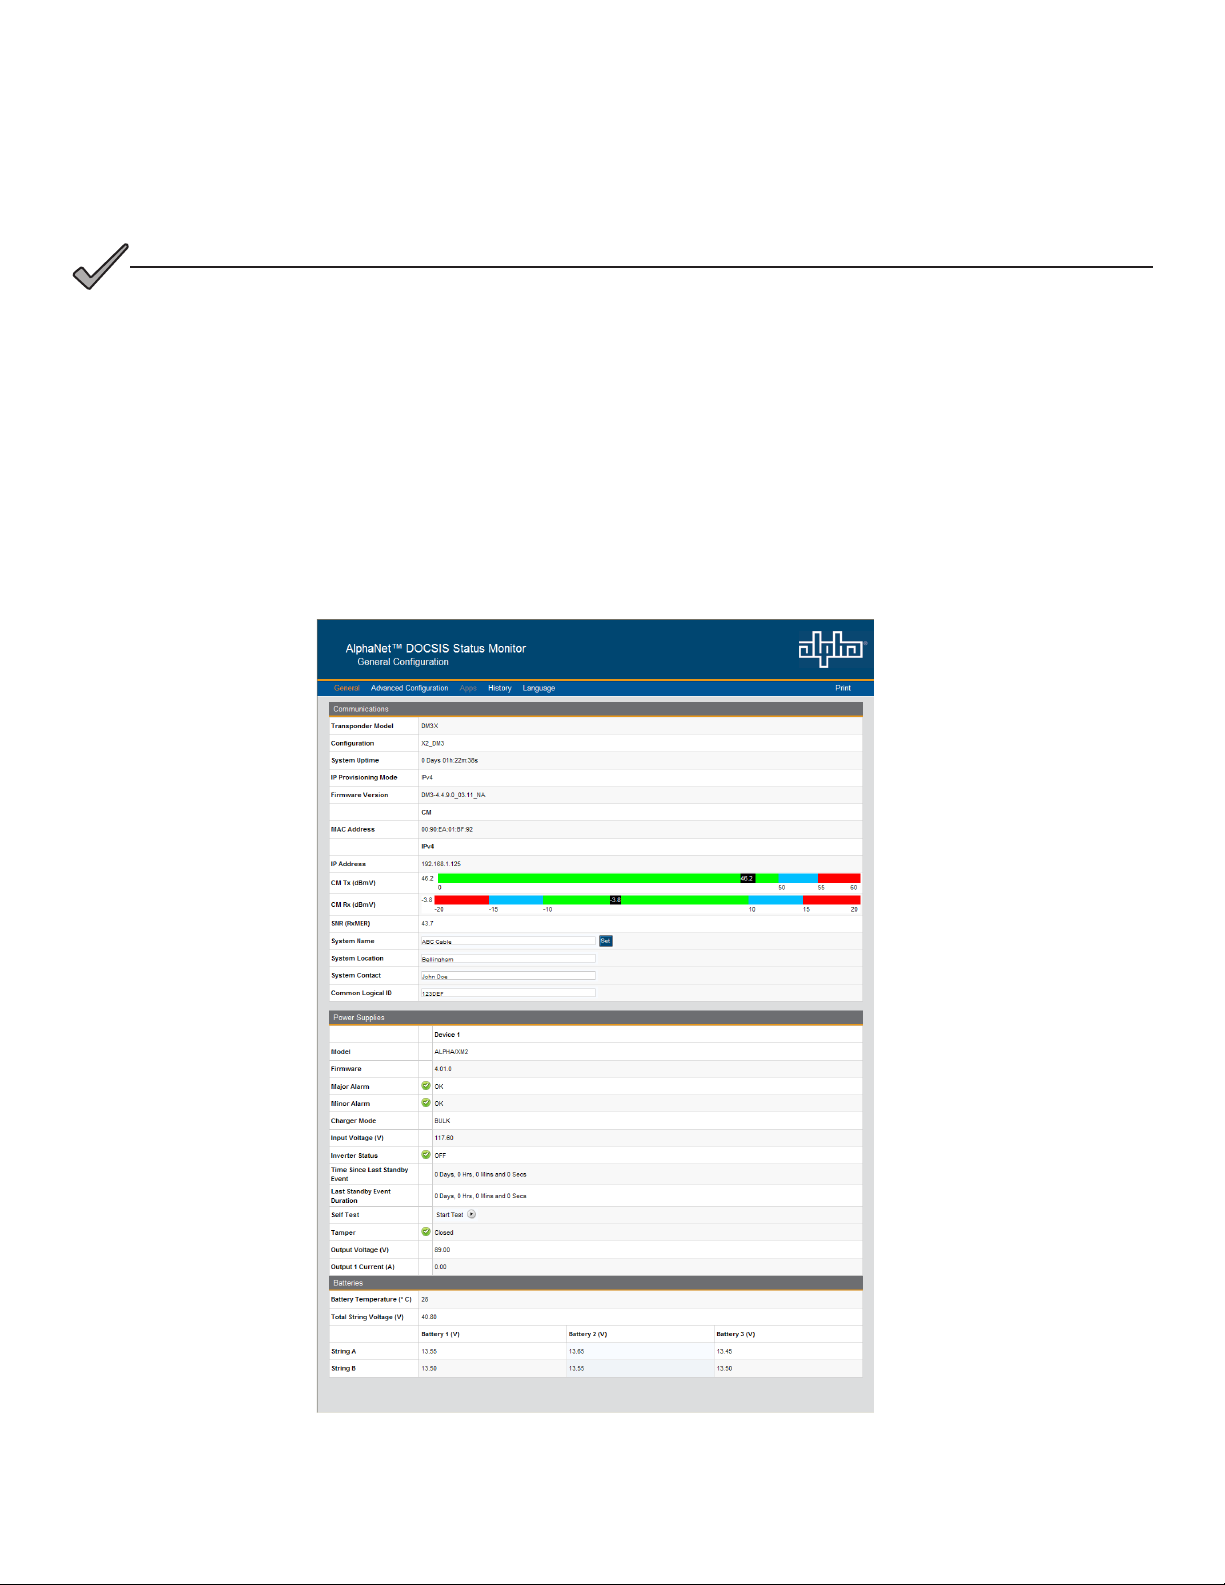
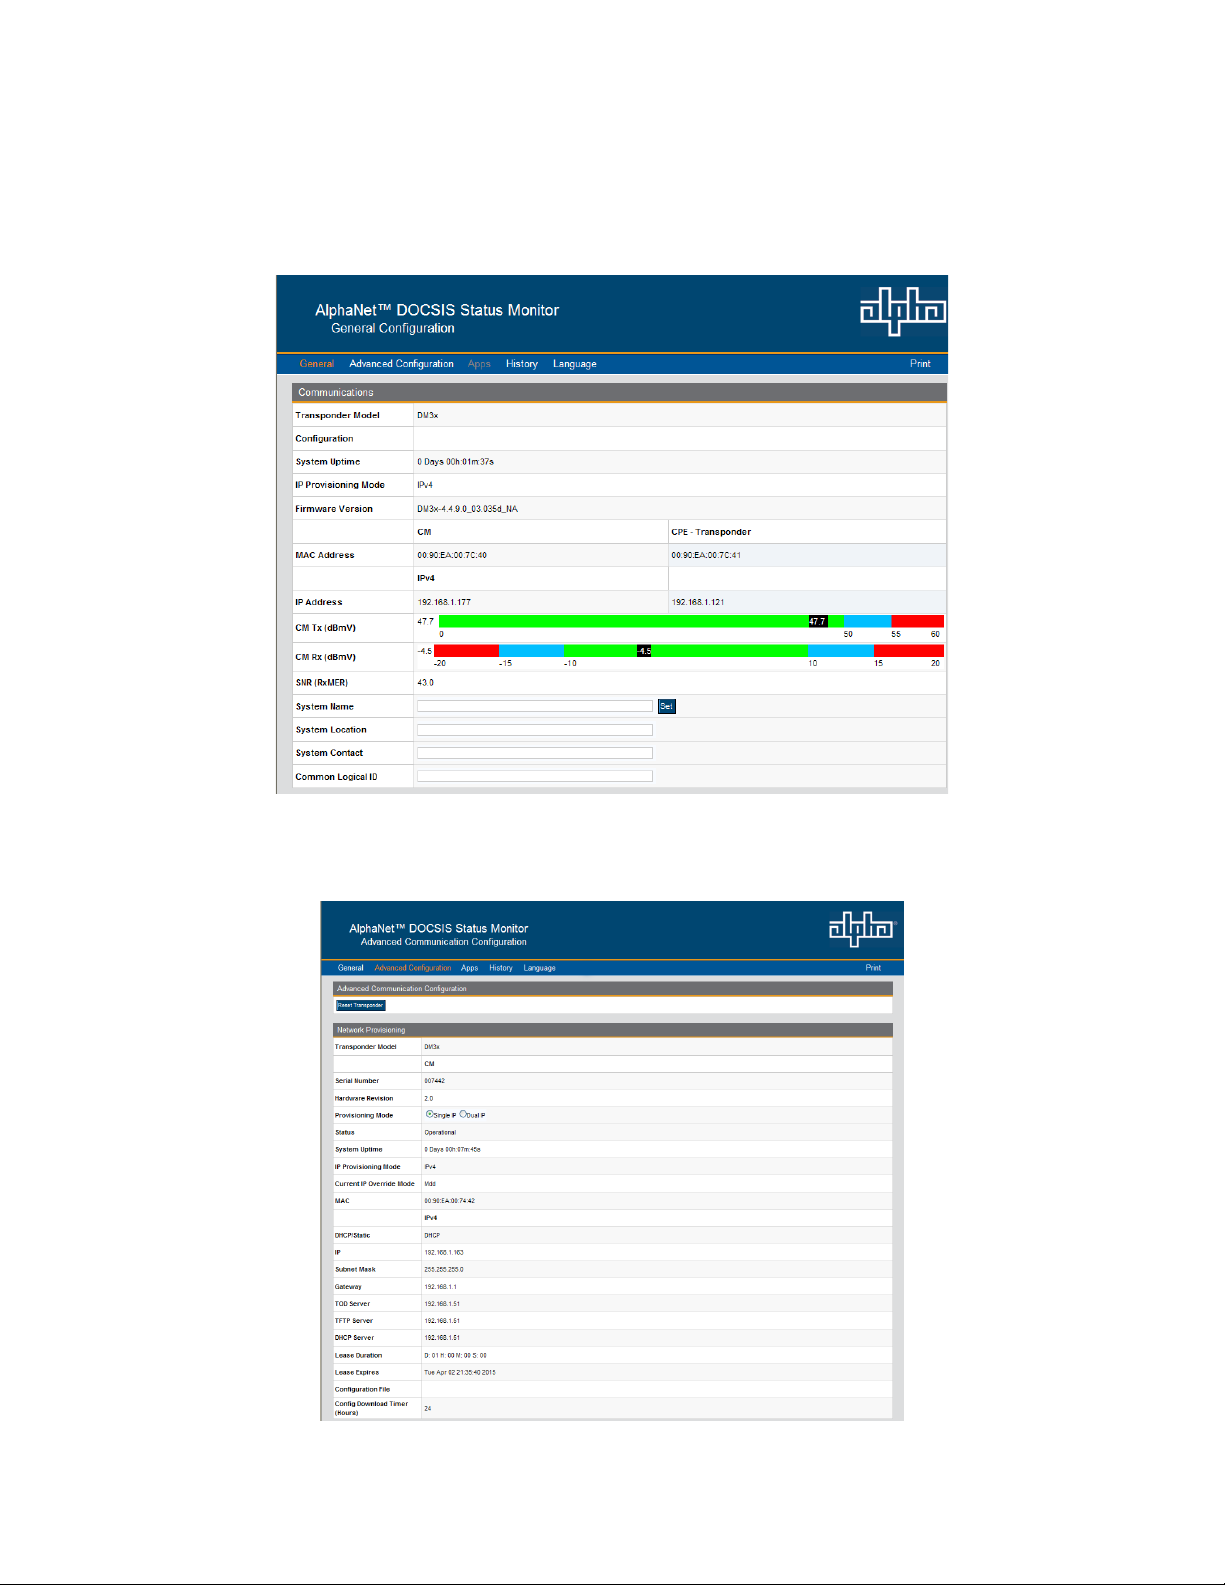
4.4 Verifying Communication Parameters
Click the General menu of the web page to display common communication settings and values. Click the Advanced
Communication menu to view additional communication parameters.
Fig. 4-8, Communication Parameters
Fig. 4-9, Advanced Communication Parameters
30 704-939-B10-001 Rev. A5 (06/2019)
Page 31

4.0 Web Interface, continued
4.5 Verifying Power Supply and Battery Parameters
Click the General menu to access Power Supply and individual battery voltage values. Important parameters such as
current alarm status, inverter status and tamper status can be quickly veried on this page. Additional power supply
parameters can be viewed and congured on the Power Supply page located in the Advanced Conguration menu.
Fig. 4-10, Power Supply and Battery Parameters
4.6 Remote Self-Tests via the Web Page
Remote Self-Tests on power supplies may be started and stopped via the transponder Web page. This requires a Level 1
login. Refer to Section 4.3.1, Web Interface Security Levels for User Name and Security Password.
To launch a remote Self-Test, click the Start Test button seen in Fig. 4-10.
To stop a remote Self-Test before the predened test duration, click the Stop Test button.
31704-939-B10-001 Rev. A5 (06/2019)
Page 32

4.0 Web Interface, continued
4.7 Viewing HMS Alarm Status via the Web Page
HMS alarms levels and current states may be viewed by clicking on the HMS Alarms link on the Advanced Conguration
menu (see Fig. 4-11). Parameter values cannot be edited on this Web page. An SNMP MIB browser or status monitoring
software may be used for such edits.
Alarms settings may be exported by selecting the Export button at the bottom of the page. Alarms settings may be
distributed to other DM3X units. For more details, refer to the DM3 Alarm Cloning and Distribution section under Section
6.2.1, SCTE-HMS Congurable Alarms.
Fig. 4-11, HMS Alarm Conguration
32 704-939-B10-001 Rev. A5 (06/2019)
Page 33

4.0 Web Interface, continued
4.8 Setting the I/O Controller via the Web Page
Access the I/O Environment page in the Advanced Conguration menu to adjust the settings for the Tamper Switch and
I/O Controller. The Tamper Switch polarity may be changed by clicking on the preferred tamper switch polarity button. The
I/O Controller section provides a user interface to select the type of device that will be connected and monitored via the
ENV connector of the transponder. An example of such a device would be the battery heater mat controller.
Fig. 4-12, Advanced I/O Controller Status Screen
33704-939-B10-001 Rev. A5 (06/2019)
Page 34

4.0 Web Interface, continued
4.9 Viewing and Conguring Power Supply Settings via the Web Page
Click the Advanced Conguration menu and select Power Supplies to view connected power supply parameters. The
power supply parameters with a formatted text box or a menu around the value can be congured. Click the Start Test
button to remotely initiate power supply tests. When prompted, refer to Section 4.3.1, Web Interface Security Levels for
the applicable User Name and Security Password.
Fig. 4-13, Advanced Power Supply Settings Screen
34 704-939-B10-001 Rev. A5 (06/2019)
Page 35

4.0 Web Interface, continued
Fig. 4-13, Advanced Power Supply Settings Screen, Continued
NOTICE:
When the Battery Model is set to “Other”, the battery charging parameters such as charger voltages, battery
capacity, and temperature compensation can be customized, otherwise default values are populated for Alpha
supported batteries. For systems with more than one power supply, the master unit will override the charger
parameter settings.
35704-939-B10-001 Rev. A5 (06/2019)
Page 36

4.0 Web Interface, continued
Fig. 4-13, Advanced Power Supply Settings Screen, Continued
36 704-939-B10-001 Rev. A5 (06/2019)
Page 37

4.0 Web Interface, continued
4.10 Viewing and Conguring Generator Settings Via the Web Page
When a permanent, xed generator is connected to a DM3X, the generator page listed in the Advanced Conguration
menu will populate a list of the various parameters and alarm statuses. Generator Self-Tests may be remotely started by
clicking on the Start Test button. When prompted, refer to Section 4.3.1, Web Interface Security Levels for User Name and
Security Password.
Fig. 4-14, Advanced Generator Status Screen
37704-939-B10-001 Rev. A5 (06/2019)
Page 38

4.0 Web Interface, continued
4.11 Tools Menu - Constellation and Microreections
The Web Page of the DM3X provides some basic tools for analyzing impairments on the DOCSIS network. The “Tools”
menu selection on the Web page provides access to the Constellation, Microreections, and Spectrum tools.
4.11.1 QAM Constellation Tool
The Constellation page provides a constellation view of the DOCSIS channel that may assist in identifying and
troubleshooting common network impairments.
Navigate the mouse pointer to the Tools menu item and select “Constellation” in the drop-down menu to open and start
the Constellation page. The page will automatically refresh until the Samples Remaining counter reaches 0. Clicking the
Restart button refreshes the constellation tool, and clicking the Stop button halts the analysis.
The number of samples can be changed from 100 (default) on the sampling control to either 150 or 50 for more or less
sample rates. For User Name and Password refer to Section 4.3.1, Web Interface Security Levels.
Fig. 4-15, QAM Constellation Tool
38 704-939-B10-001 Rev. A5 (06/2019)
Page 39

4.0 Web Interface, continued
The tables on the right-hand side of the screen provide a summary of common parameters associated with QAM
Constellation analysis. Here’s a breakdown of the parameters listed:
• Frequency - The tuned downstream frequency given in MHz.
• Power – Downstream power given in dBmV.
• Modulation – Modulation type associated with the downstream channel.
• Lock Status – Current cable modem connectivity state.
• Channel ID – CMTS identication of the downstream channel within this particular MAC interface.
• SNR / (RxMER) – Downstream signal quality. Modulation Error Ratio (SNR)
• EVM – Error Vector Magnitude (from hardware MER (Modulation Error Ratio) / software MER).
• Symbol Rate – Msym/sec
• CER Interval – Codeword Error Rate (CER) refresh rate.
• Pre FEC CER – Codeword Error rate (CER) BEFORE forward error correction is applied.
• Post FEC CER – Codeword Error rate (CER) AFTER forward error correction is applied.
4.11.2 QAM Constellation Common Impairments
Several common impairments tend to reveal themselves on the constellation display which can help determine the cause
of the reduced MER levels. Below are examples of several of these common impairments and their footprints.
Individual
cells and
entire QAM
constellation
Fig. 4-16, Normal - (Good Quality) and Individual Cell Characteristics
39704-939-B10-001 Rev. A5 (06/2019)
Page 40

4.0 Web Interface, continued
Individual
cells and
entire QAM
constellation
Fig. 4-17, Fuzzy (Low CNR and/or Low MER) and Individual Cell Characteristics
entire QAM
constellation
Individual
cells and
Fig. 4-18, Doughnuts (Coherent Interference) and Individual Cell Characteristics
40 704-939-B10-001 Rev. A5 (06/2019)
Page 41

4.0 Web Interface, continued
Individual
cells and
entire QAM
constellation
Fig. 4-19, Gaussian Noise and Individual Cell Characteristics
Entire QAM
constellation
Fig. 4-20, Rectangular vs. Square (I-Q Imbalance) and Entire Constellation Shape
41704-939-B10-001 Rev. A5 (06/2019)
Page 42

4.0 Web Interface, continued
Entire QAM
constellation
Fig. 4-21, Corners Squeezed to Center (Gain Compression) and Entire Constellation Shape
Entire QAM
constellation
Fig. 4-22, Circular Smear (Phase Noise) and Entire Constellation Shape
42 704-939-B10-001 Rev. A5 (06/2019)
Page 43

4.0 Web Interface, continued
Entire QAM
constellation
Fig. 4-23, Twisted or Skewed (Quadrature Distortion) and Entire Constellation Shape
43704-939-B10-001 Rev. A5 (06/2019)
Page 44

4.0 Web Interface, continued
4.11.3 Microreections Tool
The Microreections page provides details about impairments on the DOCSIS network and the approximate distance(s)
of the impairment(s). In order to provide the analysis and a display of possible impairments, this tool requires the Adaptive
Equalization function to be enabled on the CMTS.
Navigate the mouse pointer to the Tools menu item and select “Microreections” in the drop-down menu to open the
Microreections page.
Click on a particular bar in the graph to display the details of the impairment such as time, distance (feet & meters) and
amplitude in the table below. The selected bar will turn a slightly dierent shade of color compared to other bars in the
graph.
Fig. 4-24, Microreections Tool
44 704-939-B10-001 Rev. A5 (06/2019)
Page 45

4.0 Web Interface, continued
4.11.4 Spectrum Tool
Full-range display spanning 0 - 1005MHz, the Spectrum page provides a detailed, full-band capture analysis of the
DOCSIS Channels for the DM3X. This tool assists in identifying and troubleshooting common impairments throughout the
range of DOCSIS Channels. Navigate to the Tools menu item and select “Spectrum” in the drop-down menu to open the
Spectrum page.
Fig. 4-25, Spectrum Tool
Spectrum Tool Features
Feature Type Function
Live Button This provides a live view of the spectrum data.
Average Button This displays spectral data averaged from the last several background captures.
Last Button This displays the last capture.
Saved Button This displays the saved captures.
Aggregate
Minimum/Maximum
Range Dropdown Menu
Channel Data The channel number in the center of the display.
Frequency Data The frequency (in MHz) in the center of the display.
Restart Button This restarts the spectrum display.
Stop Button This stops the spectrum display from refreshing.
Max Hold Button This will mark the highest power seen. (Only applies to the “Live” view.)
Save 1 Button Saves the current trace (1) and display.
Save 2 Button Saves the current trace (2) and display.
Clear Button This clears the Max Hold, Save 1 and Save 2 traces.
Dropdown Menu
This drop-down menu allows the user to choose between displaying the
aggregate minimum and aggregate maximum of the RF samples.
This drop-down menu allows the user to select the window’s span of
measurement - Full, 3 Channel, or 1 Channel.
Table 4-3, Spectrum Tool Buttons
45704-939-B10-001 Rev. A5 (06/2019)
Page 46

4.0 Web Interface, continued
The tables on the right of the Spectrum page detail the X-Axis (Frequency), the Y-Axis (Amplitude), and the settings for
the Spectrum display.
Fig. 4-26, Spectrum Tables
Spectrum Tool Features
Feature Function
Frequency (X-Axis)
Center Frequency (MHz) The frequency in the center of the display.
Span (MHz) The range of frequencies in the display.
Start Frequency (MHz) The frequency at the left end of the display.
Stop Frequency (MHz) The frequency at the right end of the display.
Resolution Bandwidth (MHz) The frequency range represented by each point on the spectral display.
Amplitude (Y-Axis)
Maximum (dBmV) The highest power level shown on the display.
Minimum (dBmV) The lowest power level shown on the display.
Measurements
Peak (dBmV)
Peak Position (MHz) The approximate frequency with the highest power level on the display.
Marker 1 (MHz) Enter a frequency in MHz to see its respective power level.
Power (dBmV) The power level for the previously entered frequency.
Marker 2 (MHz) Enter a frequency in Mhz to see its respective power level.
Power (dBmV) The power level for the previously entered frequency.
▲Frequency (MHz) The dierence in frequency between the two markers.
▲Power (dBmV) The dierence in power between the two markers.
The highest power level shown on the display. The reported value is
dependent upon the Resolution Bandwidth.
Table 4-4, Spectrum Table Details
46 704-939-B10-001 Rev. A5 (06/2019)
Page 47

4.0 Web Interface, continued
4.12 Viewing the Modem Event Log via the Web Page
View the transponder’s event log by clicking the History drop down menu and select Modem Log. This will display the
Docsdev Event Log. The log may be reset by clicking on the Reset Log button or the logged data may be downloaded by
clicking on the Download CSV button.
Fig. 4-27, Docsdev Event Log Screen
47704-939-B10-001 Rev. A5 (06/2019)
Page 48

5.0 Upgrading Firmware
5.1 Upgrading DM3X Modem Firmware
The rmware is upgraded using standard DOCSIS methods as dened in RFC4639.
There are two ways to upgrade the modem’s rmware: By directly setting the appropriate MIB parameters in the
docsDevSoftware branch, or by including the appropriate SNMP parameters and values in the modem’s DOCSIS
Conguration File, stored in the TFTP root directory.
Both methods are explained below.
5.1.1 Identifying the Modem and Obtaining Firmware Files
The cable modem rmware in the DM3X requires its own rmware and manufacturer’s Code Verication Certicate (CVC
le).
Contact Alpha Technologies Services, Inc. to obtain the latest rmware and manufacturer’s CVC les.
5.1.2 Modem Firmware Upgrade SNMP Parameters
Modem Firmware Upgrade SNMP Parameters
Parameter Type Value
docsDevSoftware
OID: 1.3.6.1.2.1.69.1.3
docsDevSwServer
OID: 1.3.6.1.2.1.69.1.3.1.0
docDevSwFilename
OID: 1.3.6.1.2.1.69.1.3.2.0
docsDevSwAdminStatus
OID: 1.3.6.1.2.1.69.1.3.3.0
docsDevSwOperStatus
OID: 1.3.6.1.2.1.69.1.3.4.0
docsDevSwCurrentVers
OID: 1.3.6.1.2.1.69.1.3.5.0
docsDevSwServerAddressType
1.3.6.1.2.1.69.1.3.6.0
docsDevSwServerAddress
OID: 1.3.6.1.2.1.69.1.3.7.0
docsDevSwServerTransportProtocol
1.3.6.1.2.1.69.1.3.8.0
Object
Heading
IP Address
Octet String
Integer
Integer,
Read Only
Octet String,
Read Only
Integer,
Read Only
IP Address
Integer,
Read Only
None
The IP address of the TFTP server from which the rmware
will be downloaded. This OID has been deprecated, refer to
docsDevSwServerAddress (OID:1.3.6.1.2.1.69.1.3.7.0).
Set to the lename of the rmware le. Example:
[“rmwareImage.bin”]
1 = Initiate upgrade (manual method)
2 = Upgrade on next reboot (Cong File Method)
3 = Ignore update
1 = TFTP download is in progress
2 = Last upgrade was performed at reboot
3 = Last upgrade was initiated by setting
docsDevSwAdminStatus to “1”
4 = Firmware upgrade failed
5 = Other
The current version of rmware installed in the modem
The type of address (IPv4, IPv6) of server used for upgrades
The IP address of the server from which the rmware will be
downloaded. A set of this object to an IPv4 address will result
in also setting the value of docsDevSwServer to that address.
If this object is set to an IPv6 address, docsDevSwServer is set
to 0.0.0.0. If docsDevSwServer is set, this object is also set to
that value.
The Transport protocol to be used for software upgrades:
1 = TFTP
2 = HTTP
Table 5-1, Modem Firmware Upgrade SNMP Parameters
48 704-939-B10-001 Rev. A5 (06/2019)
Page 49

5.0 Upgrading Firmware, continued
5.1.3 Upgrading Manually by Setting SNMP Parameters
1. Acquire the rmware and CVC les for your DM3X from Alpha Technologies Services, Inc.
2. Import the CVC into the modem’s DOCSIS Conguration File (to create a Conguration File, see Section 3.3, The
DOCSIS Conguration File).
3. Set the following MIB parameters using an SNMP MIB browser. For additional information regarding the SNMP
MIB parameters, refer to the table in Section 5.1.2, Modem Firmware Upgrade SNMP Parameters.
SNMP Parameters
Parameter Value
docsDevSwServerAddress
OID:1.3.6.1.2.1.69.1.3.7.0
docsDevSwFilename
OID:1.3.6.1.2.1.69.1.3.2.0
docsDevSwAdminStatus
OID: 1.3.6.1.2.1.69.1.3.3.0
Table 5-2, SNMP Parameters
IP Address of theTFTP server (IPv4 or
IPv6)
Firmware lename
1 (Initiate Upgrade)
The rmware upgrade will begin immediately. Monitor the upgrade status with the docsDevSwOperStatus MIB parameter,
and verify the rmware version with the docsDevSwCurrentVers MIB parameter (refer to Table 5-1, Modem Firmware
Upgrade SNMP Parameters). Once the rmware has been upgraded, the modem will automatically run the new version.
5.1.4 Upgrading via the DOCSIS Conguration File
DM3X rmware can be automatically upgraded using the DOCSIS Conguration File by adding the following
docsDevSoftware SNMP parameters and the manufacturer’s Code Verication Certicate (CVC).
DOCSIS Congurations File Values
Parameter Value
docsDevSwServerAddress
OID:1.3.6.1.2.1.69.1.3.7.0
docsDevSwFilename
OID:1.3.6.1.2.1.69.1.3.2.0
docsDevSwAdminStatus
OID: 1.3.6.1.2.1.69.1.3.3.0
Manufacturer CVC TLV:32
IP Address of TFTP server
Firmware lename
2 (Upgrade on next reboot)
The CVC le for the DM3.0 Series
Transponder (embed in the
Conguration File).
Table 5-3, DOCSIS Congurations File Values
The rmware will be upgraded on the next reset. Monitor the upgrade status with the docsDevSwOperStatus MIB
parameter, and verify the rmware version with the docsDevSwCurrentVers MIB parameter (refer to Table 5-1, Modem
Firmware Upgrade SNMP Parameters). Once the rmware has been upgraded, the modem will automatically run the new
version.
49704-939-B10-001 Rev. A5 (06/2019)
Page 50

6.0 Data Management
6.1 SCTE-HMS MIBs
The DM3X remotely reports power supply data and alarms using the Simple Network Management Protocol (SNMP) over
the DOCSIS (Data Over Cable Service Interface Specication) communications standard. The DM3X typically reports into
a centralized Network Management System (NMS) through a standard collection of data access points referred to as the
SCTE-HMS Management Information Bases (MIBs). The NMS polls the DM3X for power supply data with the option of
having the transponder send SNMP traps in the event that an alarm condition occurs.
The following MIB (Management Information Base) les are required for the NMS or SNMP Manager to collect data from
the transponders. These les can be found on the Society of Cable Telecommunications Engineers (SCTE) Web site
www.scte.org. There are dependencies between MIB les so they should be compiled in the order listed below:
SCTE-HMS MIB FIles
Reference Number Description
ANSI/SCTE 36 2002R2007
(formerly HMS 028)
ANSI/SCTE 37 2010
(formerly HMS 072),
ANSI/SCTE 38-1 2009
(formerly HMS 026)
ANSI/SCTE 38-2 2005
(formerly HMS 023)
ANSI/SCTE 38-3 2008
(formerly HMS 024)
ANSI/SCTE 38-4 2006
(formerly HMS 027)
ANSI/SCTE 38-6 2006
(formerly HMS 033)
ANSI/SCTE 38-7 2008
(formerly HMS 050)
SCTE-ROOT Management Information Base (MIB) Denitions
Hybrid Fiber/Coax Outside Plant Status Monitoring
SCTE-HMS-ROOTS Management Information Base (MIB) Denition
Hybrid Fiber/Coax Outside Plant Status Monitoring
SCTE-HMS-PROPERTY-MIB Management Information Base (MIB) Denition
Hybrid Fiber/Coax Outside Plant Status Monitoring
SCTE-HMS-ALARMS-MIB Management Information Base (MIB) Denition
Hybrid Fiber/Coax Outside Plant Status Monitoring
SCTE-HMS-COMMON-MIB Management Information Base (MIB) Denition
Hybrid Fiber/Coax Outside Plant Status Monitoring
SCTE-HMS-PS-MIB Management Information Base (MIB) Denition
Hybrid Fiber/Coax Outside Plant Status Monitoring
SCTE-HMS-GEN-MIB Management Information Base (MIB) Denition
Hybrid Fiber/Coax Outside Plant Status Monitoring
SCTE-HMS-Transponder-Interface-Bus (TIB)-MIB Management Information Base (MIB)
Denition
Table 6-1, SCTE-HMS MIB Files
50 704-939-B10-001 Rev. A5 (06/2019)
Page 51

6.0 Data Management, continued
6.2 SCTE-HMS MIB Alarms
6.2.1 SCTE-HMS Congurable Alarms
The HMS discrete and analog alarms provide the capability to monitor and alarm various power supply and environmental
conditions and measurements. The alarms in the SCTE-HMS propertyTable and the discretePropertyTable can be dened
and set to provide a custom monitoring system.
The following section provides an example and detailed information on how to set values and enable or disable alarms in
the MIB tables. For ease of reference they are in this sequence:
• An example of how to set a temperature alarm
• A table to help convert the desired reported alarm states to hexadecimal for setting the MIB
• Commonly monitored parameters and recommended values
Example:
The alarms for psTemperature on the following page are set so that the normal temperature range is from 30°C to 45°C.
If the temperature rises above 45°C, a casHI alarm will be sent to the alarmTable. Anything over 50°C is considered a
critical condition and will generate a casHIHI alarm. If the temperature falls below the normal level of 30°C, casLO will be
generated and if it continues to drop below 0, a casLOLO will be generated. The temperature must rise above the LOLO
limit plus the deadband value of 3°C before the casLOLO alarm will change to a casLO. The alarmEnable eld is set to 0F
Hex to monitor and alarm for all conditions.
51704-939-B10-001 Rev. A5 (06/2019)
Page 52

6.0 Data Management, continued
Binary to Hex Conversions for Alarm Settings
Unused HiHi Hi Lo LoLo
Bit 7 Bit 6 Bit 5 Bit 4 Bit 3 Bit 2 Bit 1 Bit 0
0 0 0 0 0 0 0 0 00 No Alarms
0 0 0 0 0 0 0 1 01 LoLo
0 0 0 0 0 0 1 0 02 Lo
0 0 0 0 0 0 1 1 03 Lo, LoLo
0 0 0 0 0 1 0 0 04 Hi
0 0 0 0 0 1 0 1 05 Hi, LoLo
0 0 0 0 0 1 1 0 06 Hi, Lo
0 0 0 0 0 1 1 1 07 Hi, Lo, LoLo
0 0 0 0 1 0 0 0 08 HiHi
0 0 0 0 1 0 0 1 09 HiHi, LoLo
0 0 0 0 1 0 1 0 0A HiHi, Lo
0 0 0 0 1 0 1 1 0B HiHI, Lo, LoLo
0 0 0 0 1 1 0 0 0C HiHi, Hi
0 0 0 0 1 1 0 1 0D HiHi, Hi, LoLo
0 0 0 0 1 1 1 0 0E HiHi, Hi, Lo
0 0 0 0 1 1 1 1 0F HiHi, Hi, Lo, LoLo
Hex Enabled Alarms
Table 6-2, Binary to Hex Conversions for Alarm Settings
52 704-939-B10-001 Rev. A5 (06/2019)
Page 53

6.0 Data Management, continued
The following table displays the various analog alarms with common settings for the DM3X.
Analog Alarms and Common Settings
Analog Alarms Description
psTotalStringVoltage 36V
Individual Battery Voltage
120V
psInputVoltage
psRMSCurrentIn
psPowerIn
psFrequencyOut
psOutputVoltage
psPowerOut
psStringChargeCurrent
psStringDischargeCurrent
psStringFloat
psOutputCurrent
psTemperature -40 to +80 degrees C 0x0F Varies by Site
docsIfDownChannelPower
docsIfCmStatusTxPower
atiBBsysViewTimeInStandby
Alarms for Optional Generator
GenVBatIgnition
genEnclosureTemperature
220V
Scaled representation of the full
battery string in 1/100 Volts units
Battery Voltage of 12V Battery in
1/100 Volts units
Scaled representation of the input
line voltage in 1/100 Volts units
Scaled representation of the Power
Supply’s RMS current in 1/100 A
units
Representation of the Power
Supply’s input power in 1 W units
Representation of Power Supply’s
output frequency in 1/100 Hz units
Scaled representation of the Power
Supply output voltage in 1/100 Volts
units
Representation of Power Supply
output power in 1W units
Battery string charge current, scaled
in 1/100 Amp units
Scaled representation of battery
string discharge current. This is an
RMS value in 1/100 Amps
Battery string oat charge current,
scaled in 1/100 Amp units
15A Scaled representation of Power
Supply RMS current in 1/100 Amp
18A
units
The CM’s receive RF power scaled
in 1/10 dBmV units
The CM’s transmit RF power scaled
in 1/10 dBmV units
Time in seconds that the Power
Supply’s inverter is currently running
due to outage or self-test
Scaled representation of the
generator’s ignition battery in 1/100
Volts
Temperature inside generator’s
enclosure in degrees C
Alarm
Enable
0x0F 3300 3500 4520 4570 50
0x0F 1050 1150 1530 1550 20
0x0F
0x0F
0x00 Set as desired per site
0x00 Set as desired per site
0x00 Set as desired per site
0x0F 4300 4550 5050 5300 200
0x0F 5650 6000 6600 7000 200
0x0F 7800 8200 9150 9300 200
0x00
0x0C Disable Disable 1200 1250 20
0x00 Set as desired per site
0x0C Disable Disable 1200 1250 20
0x0C Disable Disable 1650 1720 20
0x0C Disable Disable 1980 2060 20
0x0F -150 -10 10 150 15
0x0C 0 0 500 550 15
0x0C 0 0
0x0F 1150 1200 1500 1550 20
0x09 -40 0 0 55 5
LOLO LO HI HIHI Deadband
Varies by site. The XM2 will switch to standby at
nominal +15% / -30%
It is recommended that psOutputCurrent be used for
output alarms.
Set as desired
for notication of
extended outage
10
Table 6-3, Recommended Settings for DM3X Analog Alarms
53704-939-B10-001 Rev. A5 (06/2019)
Page 54

6.0 Data Management, continued
Recommended Settings for Discrete Alarms
Discrete Alarms Description Setting
psInverterStatus (1) Inverter O Disable
psInverterStatus (2)
Inverter Running Due to Loss of AC
Line Voltage
discreteMinor
psInverterStatus (3) Self-Test Initiated Locally Disable
psInverterStatus (4) Self-Test Initiated Remotely Disable
psInverterStatus (5) Last Self-Test Failed Disable
psMajorAlarm (1) No Alarm Disable
psMajorAlarm (2) Alarm discreteMajor
psMinorAlarm (1) No Alarm Disable
psMinorAlarm (2) Alarm discreteMinor
psTamper (1) Closed Disable
psTamper (2) Open discreteMajor
psInputVoltagePresence (1) AC Line Voltage Lost Disable
psInputVoltagePresence (2) AC Line Voltage Present Disable
Battery Standby Time Remaining (1) Over 3 Hours Remaining Disable
Battery Standby Time Remaining (2) 2 to 3 Hours Remaining Disable
Battery Standby Time Remaining (3) 1 to 2 Hours Remaining discreteMinor
Battery Standby Time Remaining (4) Less than1 Hour Remaining discreteMajor
Battery Standby Time Remaining (5) Calculating Disable
Battery Standby Time Remaining (6) Not Available Disable
tibControlMode (2) Device is Under Local Control Disable
tibControlMode (3) Remote Device is Not Responding discreteMajor
Table 6-4, Recommended Settings for Discrete Alarms
54 704-939-B10-001 Rev. A5 (06/2019)
Page 55

6.0 Data Management, continued
Discrete Alarms for Optional Generator
Discrete Alarms Description Setting
genGeneratorStatus (1) Generator OFF Disable
genGeneratorStatus (2) Generator Running (Test) discreteMinor
genGeneratorStatus (3) Generator Running discreteMajor
genGeneratorStatus (4) Generator Fail discreteMajor
genGasHazard (1) No Alarm Disable
The concentration of hydrocarbon
fuel in the generator enclosure has
exceeded safe limits. Generator
operation is suspended. The alarm is
genGasHazard (2)
cleared when the sensor reports safe
discreteMajor
conditions, and the alarm is reset via
the resetLatchedAlarms(3) command
found in the genEquipmentControl
MIB point.
genWaterIntrusion (1) No Alarm Disable
Water level within the generator or fuel
enclosure has exceeded safe limits
genWaterIntrusion (2)
for generator operation. Generator
operation is suspended while this
discreteMajor
alarm is active. The alarm resets when
the water returns to a safe level.
genPadShear (1) No Alarm Disable
Indicates that the generator or
fuel enclosure has shifted from
genPadShear (2)
its mounting position. Generator
operation is suspended. The alarm
discreteMajor
resets when the unit is returned to its
original position.
genEnclosureDoor (1) No Alarm Disable
genEnclosureDoor (2)
Generator and/or auxiliary fuel
enclosure door is open
discreteMajor
genCharger (1) No Alarm Disable
genCharger (2)
Ignition battery charger is not
operating correctly
discreteMajor
genFuel (1) No Alarm Disable
Indicates the engine’s fuel supply is
genFuel (2)
insucient for extended operation.
discreteMajor
Alarm resets when fuel is replenished.
genOil (1) No Alarm Disable
Indicates the engine’s oil is inadequate
genOil (2)
for safe operation. Alarm resets when
discreteMajor
the condition returns to normal.
genMinorAlarm (1) No Alarm Disable
Table 6-4, Recommended Settings for Discrete Alarms, continued
55704-939-B10-001 Rev. A5 (06/2019)
Page 56

6.0 Data Management, continued
Discrete Alarms for Optional Generator, continued
Discrete Alarms Description Setting
The generator is indicating a minor
genMinorAlarm (2)
alarm. The generator requires
attention but does not require an
discreteMinor
immediate visit to the site.
genMajorAlarm (1) No Alarm Disable
The generator is indicating a major
genMajorAlarm (2)
alarm. The generator requires
discreteMajor
immediate attention.
atiMgmtSysIoPinCtrl (1) Contact Open Disable
atiMgmtSysIoPinCtrl (2) Contact Closed Disable
atiMgmtSysIoPinIn4 (1) Contact Open Disable
atiMgmtSysIoPinIn4 (2) Contact Closed Disable
atiMgmtSysIoPinIn5 (1) Contact Open Disable
atiMgmtSysIoPinIn5 (2) Contact Closed Disable
atiMgmtSysIoPinIn6 (1) Contact Open Disable
atiMgmtSysIoPinIn6 (2) Contact Closed Disable
Table 6-4, Recommended Settings for Discrete Alarms, continued
DM3XAlarm Cloning & Distribution
SCTE-HMS Alarm settings can be distributed automatically to all DM3X Transponders on the network. Use the following
procedure to congure and distribute the alarm settings.
1. Select the desired SCTE-HMS alarm settings on a master DM3XTransponder.
The SCTE-HMS-PROPERTY MIB denes a method for setting thresholds for analog and discrete values that can be
used for setting traps or alerting a Network Management System when those thresholds are compromised. There are two
SCTE-HMS SNMP MIB Tables where these values are congured:
propertyTable OID: 1.3.6.1.4.1.5591.1.1.1
This table is used for setting thresholds for analog properties such as input & output voltages, individual battery voltages,
currents and temperature.
discretePropertyTable OID: 1.3.6.1.4.1.5591.1.1.3
This table is used to set alarm parameters on discrete conditions such as tamper on/o, major/minor alarms and various
inverter status conditions.
Full explanations of these MIB tables and their settings can be found by reading the SCTE-HMS-PROPERTY MIB. The
MIB table alarm settings can be changed to desired values using a SNMP MIB browser or status monitoring software.
Once the tables are congured with the desired alarm settings, proceed to Step 2 on exporting the “AlarmSettings.acf” le.
56 704-939-B10-001 Rev. A5 (06/2019)
Page 57

6.0 Data Management, continued
2. Export the “AlarmSetting.acf” le of the master transponder’s alarm settings.
3. Connect to the Web page of the master transponder.
4. Navigate to the Advanced Conguration menu and select the HMS Alarms page.
5. Verify the alarm settings dened in Step 1 are displayed in the propertyTable and discrete PropertyTable. If further
changes to the alarm settings are required, refer to Step 1.
6. Click on the Export button at the bottom of the HMS Alarms page.
7. When prompted, refer to Section 4.3.1, Web Interface Security Levels for the applicable User Name and Security
Password.
8. Download the “AlarmSettings.acf” le to the TFTP root directory. If desired, the le may be renamed.
9. Distribute the “AlarmSettings.acf” le to other transponders.
10. The “AlarmSettings.acf” le is distributed to other transponders by setting the following Alpha MIB parameters
to the indicated values. This can be done to an individual transponder using a MIB browser, or to multiple
transponders by placing the SNMP OIDs into the modem’s DOCSIS conguration le or the proprietary atidoc33.
cfg conguration le.
DM3 Alarm Setting Parameters
Parameter Type Value
atiMgmtSysDownload
OID: 1.3.6.1.4.1.926.1.3.2.1
atiMgmtSysDownloadTftpAddress
OID: 1.3.6.1.4.1.926.1.3.2.1.1.0
atiMgmtSysDownloadFile1
OID: 1.3.6.1.4.1.926.1.3.2.1.4.0
atiMgmtSysDownloadCtrl
OID: 1.3.6.1.4.1.926.1.3.2.1.2.0
atiMgmtSysDownloadTftpServerAddressType
OID: 1.3.6.1.4.1.926.1.3.2.1.15.0
atiMgmtSysDownloadTftpServerAddress
1.3.6.1.4.1.926.1.3.2.1.16.0
Object
Identier
IP Address
Octet String
Integer
Integer
Octet String
The IP address of the TFTP server on which
AlarmSettings.acf is stored.
Set to “AlarmSettings.acf” or other specied
le name.
1 = Initiate download of “AlarmSettings.acf”
le.
Address mode of
atiMgmtSysDownloadTftpServerAddress.
IPv4(1),IPv6(2)
Address of download TFTP server.
0.0.0.0 (IPv4), 0:0:0:0:0:0:0:0 (IPv6)
Table 6-5, DM3X Alarm Setting Parameters
The status of the alarm settings download can be monitored with the following parameters (please note the AlarmSettings.
acf le downloads quickly):
Status of Alarm Setting Download Parameters
Parameter Type Value
atiMgmtSysDownloadProgress
OID: 1.3.6.1.4.1.926.1.3.2.1.6.0
Integer Byte count of the le download process.
1 = Idle
atiMgmtSysDownloadStatus
OID: 1.3.6.1.4.1.926.1.3.2.1.3.0
Read Only
Integer
5 = Transferring
6 = Testing
8 = Error
Table 6-6, Status of Alarm Setting Download Parameters
Verify the transponder’s SCTE-HMS property tables have been updated by viewing the HMS Alarms Web Page, status
monitoring system or SNMP MIB browser.
57704-939-B10-001 Rev. A5 (06/2019)
Page 58

6.0 Data Management, continued
6.2.2 SNMP Traps
Use of SNMP Traps allow the network manager to set conditions (alarms) under which the device (or devices)
autonomously reports to the headend the existence of the pre-congured event. The type of event determines the level of
action to be taken.
1. Verify the IP address of the trap destination server(s) has been configured.
• If the trap destination server requires conguration, refer to Section 3.3.3 Setting SNMP Trap Destination IPv4
Method, and 3.3.4 Setting SNMP Trap Destination Addresses—IPv6 Method, for instructions.
2. Alarms must be congured. SNMP alarm traps sent by the transponder are formatted according to the SCTEHMS-ALARM-MIB specication with the following information included:
• SNMP Trap community string:
• commonTrapCommunityString, OID 1.3.6.1.4.1.5591.1.3.1.11.0
• Default value is “public”
Example Alarm Trap:
The example below is a psTamper alarm trap indicating a discreteMinor alarm: Tamper is open. Data from the raw trap will
appear as shown below. Refer to Table 6-7, SNMP Alarm Trap Varbinds and Explanations, for denitions of the varbinds.
Frame 441 (230 bytes ib wire, 230 bytes captured)
Ethernet II, Src: 192.168.1.77 (00:90:EA:A0:01:4E), Dst: 3com_0d:1d:d4 (00:10:5a:0dL1d:d4)
Internet Protocol, Src Port: 62481 (62481), Dst Port: snmptrap (162)
Simple Network Management Protocol
Version: 1 (0)
Community: PUBLIC
PDU type: TRAP-V1 (4)
Enterprise: 1.3.6.1.4.1.5591.1 (SNMPv2-SMI::enterprises.5591.1)
Agent address: 0.0.0.0 (0.0.0.0)
Trap type: ENTERPRISE SPECIFIC (6)
Specic trap type: 1
Timestamp: 2358751
Object identier 1: 1.3.6.1.4.1.5591.1.3.2.7.0 (SNMPv2-SMI::enterprises.5591.1.3.2.7.0)
Value: Hex-STRING: 00 90 EA A0 0B 82
Object identier 2: 1.3.6.1.4.1.5591.1.3.1.1.0 (SNMPv2-SMI::enterprises.5591.1.3.2.1.0)
Value STRING: “123 Example Ave.”
Object identier 3: 1.3.6.1.4.1.5591.1.2.3.1.2.1 (SNMPv2-SMI::enterprises.5591.1.2.3.1.2.1)
Value: Hex-STRING: 00 00 00 76 07 10 06 0D 2B 06 01 04 01 AB 57 01 04 02 01 1B 01 02 01 02
Object identier 4: 1.3.6.1.4.1.5591.1.4.2.1.27.1 (SNMPv2-SMI::enterprises.5591.1.3.2.1.0)
Value: INTEGER: 2
Object identier 5: 1.3.6.1.4.1.5591.1.1.2.1.2 (SNMPv2-SMI::enterprises.5591.1..1.2.1.2)
Value: INTEGER: 7
58 704-939-B10-001 Rev. A5 (06/2019)
Page 59

6.0 Data Management, continued
When viewed through a third-party trap receiver, the translated varbinds and data values will be displayed in a format
similar to the sample below:
Bindings (5)
Binding #1: commonPhysAddress.0 *** (octets) 00:90.EA.A0.01.4E (hex)
Binding #2: commonLogicalID.0 *** (octets) (123 Example Ave.)
Binding #3: alarmLogInformation.1 *** (octets) 00.00.00.76.07.10.06.0D.2B.06.01.04.01.AB.57.01.04.02.01.
1B.01.02.01.02 (hex)
Binding #4: psTamper.1 *** (int32) open (2)
Binding #5: currentAlarmAlarmState *** (int32) caasDiscreteMinor(7)
SNMP Alarm Trap Varbinds and Explanations
Varbind Explanation
Binding #1
commonPhysAddress
MAC address of the Communications Module
OID: 1.3.6.1.4.1.5591.1.3.2.7.0
Binding #2
commonLogicalID
OID: 1.3.6.1.4.1.5591.1.3.1.1.0
Optional user-congurable parameter that is often used to provide a unique logical
name, or even the physical address of where the Communications Module is
installed.
This varbind was designed by the SCTE-HMS committee with the intention of being
used by sophisticated trap interpreters. The information is “coded” within the octet
strings:
Binding #3
alarmLogInformation
OID: 1.3.6.1.4.1.5591.1.2.3.1.2.1
Octet 1-4: POSIX Time of alarm occurrence (most signicant byte rst)
Octet 5: Alarm Type (See description below)
Octet 6: Contents of commonNeStatus immediately after alarm occurred
Octet 7-m: Alarm Object Identier (BER encoded)
Octet n-z: Alarm value (BER encoded)
Most trap interpreters cannot decode this message, which is why varbinds 4 and 5
were added that provide the same information in a more useable format.
This eld provides the varbind of the parameter that is alarming along with the value
Binding #4
Alarmed Parameter OID/Value
OID: 1.3.6.1.4.1.5591.1.4.2.1.27.1
of that parameter. This is the same information encoded in varbind #3 Octets 7
through Z.
In the example above the value would be:
OID: 1.3.6.1.4.1.5591.1.4.2.1.27.1.0 (psTamper)
Value: 2 (Open)
This is the information from varbind #3 Octet 5 above. The alarm location will
always be the SCTE-HMS currentAlarmAlarmState and the type will be determined
based on how the alarm was congured in the SCTE-HMS PropertyIdent MIB
tables.
OID 1.3.6.1.4.1.5591.1.1.2.1.2.0 (currentAlarmAlarmState)
Type: 1-7 based on SCTE denitions:
Binding #5
Alarm Location/Type
OID: 1.3.6.1.4.1.5591.1.1.2.1.2
1 NOMINAL
2 HIHI
3 HI
4 LO
5 LOLO
6 Discrete Major
7 Discrete Minor
The Type will be determined by how the alarm is congured in the SCTE-HMS
PropertyIdent MIB, whether it is a Discrete or Analog alarm and the level of alarm
dened for that state.
Table 6-7, SNMP Alarm Trap Varbinds and Explanations
59704-939-B10-001 Rev. A5 (06/2019)
Page 60

6.0 Data Management, continued
Trap on Normal
The DM3X has the capability of sending a “return to normal” trap once an alarmed condition returns to a normal state.
This feature is enabled by default but can be disabled by setting the TRAP ON NORMAL parameter in the MIB point
atiMgmtSnmpTrapOnNormal to a value of “2”. The contents of this trap message will be identical to the SNMP Alarm
traps, but the value of the Alarm Type dened in the 5th varbind will be “1” (NOMINAL).
SCTE-HMS Warm-Start Trap
In addition to the SNMP alarm traps, the DM3X will also send an SCTE-HMS warm-start trap when it is initialized. Some
SNMP monitoring software requires this trap for auto-identication of the transponder. The format of this trap will be
similar to the alarm trap, but the only information sent will be:
• commonTrapCommunityString, OID 1.3.6.1.4.1.5591.1.3.1.11.0
• commonPhyAddress, OID, 1.3.6.1.4.1.5591.1.3.2.7
• commonLogicalID, OID 1.3.6.1.4.1.5591.1.3.1.1.0
SCTE-HMS Cold-Start Trap
An SNMP-HMS cold-start trap will be generated by the DM3X anytime it initializes with a new rmware version. In
addition, a cold-start trap is sent whenever the conguration has changed. If any parameter in the HMS PROPERTY table
has changed since the last reset, a cold-start trap will be sent upon the next reset.
6.2.3 General Power Supply Alarms
The Intelligent CableUPS detects a wide array of alarms and displays the type of active alarm in the Smart Display screen
and the severity of alarm (e.g., Major/Minor) by means of the Inverter Module LEDs.
General power supply alarms are passed directly from the power supply to the transponder without specic denition
and are classied in the HMS MIB table as psMinorAlarm and psMajorAlarm. There are a number of problems that can
generate these alarms and the exact nature of the situation is not specied. Minor and Major alarms are dened by the
SCTE standards committee as follows:
psMajor
“Service has been dropped or a service interruption is imminent. Indicates that an immediate truck roll is appropriate.”
Several psMajor alarms are latching, meaning that the alarm won’t clear until the problem is xed and after a successful
completion of a Self-Test. A Self-Test is the preferred method of verifying the resolution of the alarm condition as cycling
the power has the potential of masking the problem and not indicating the actual state of the system.
psMinor
“A non-service aecting condition has occurred and should be monitored.”
60 704-939-B10-001 Rev. A5 (06/2019)
Page 61

6.0 Data Management, continued
The following table lists the psMajor and psMinor alarm denitions for the XM2 power supply.
Power Alarms: Classications, Causes and Corrections
Active Alarm
SELF-TEST FAIL
(see Note 1
below)
CONFIG ERROR Major
FUSE FAIL Major
Alarm
Type
Major
Probable Causes of Alarm Corrective Action
• 36 Volt battery string below 33.0 Vdc
• 48 Volt battery string
below 44.0 Vdc
• Alarm during a Self-Test
• Inverter failure has occurred
• Line Isolation Alarm
• Conguration Switch Settings Incorrect
• Power Distribution Board failure (see Note 2
below)
• Fuse failure on tap switch option board.
• Open ATS fuse (see Note 3 below)
• ATS damage
• Power Distribution Board damage (see Note 2
below)
1. Check/correct other alarms.
2. Check that correct AC Input Voltage is
present
3. Check Battery Circuit Breaker
4. Check Battery Fuse, if installed
5. Check Battery condition and voltage
6. In the event that a Self-Test Alarm condition
was already present, re-run the Self-Test to
clear the alarm.
7. Change Inverter Module
8. Replace Power Supply
1. Check the conguration switch & jumper
settings on the Power Distribution Board
match those required for the power supply
2. Verify the conguration settings on display
(press UP and Enter simultaneously) match
the application and conguration switch
settings on the Power Distribution Board
3. Check transformer Output Tap setting to
verify the Inverter Module voltage matches
the Transformer Module voltage and voltage
shown on the label of the Inverter Module
matches the voltage of Transformer Module.
4. Check for corrosion on the Power
Distribution Board.
5. Verify Power Distribution Board to Inverter
Module. Check ribbon cable for damage
and connection.
6. Turn all power o, wait 10 seconds, turn all
power back on.
7. Change Inverter Module
8. Replace power supply.
1. Check/replace fuse on ATS
2. Check for damaged contacts on the ATS
board relay.
3. Check the conguration switch settings on
the Power Distribution Board match those
required for the power supply.
4. Check that conguration settings on display
(press UP and Enter simultaneously) match
the conguration switch settings on the
Power Distribution Board.
5. Turn all power o, wait 10 seconds, turn all
power back on.
6. Replace power supply
Table 6-8, Power Alarms: Classications, Causes and Corrections
NOTICE:
Note 1: To clear a Latched Self-Test Fail Alarm, initiate and complete a successful self-test.
Note 2: Remove and replace power supply. Do not try to clear alarm or replace relay while in service.
Note 3: The Automatic Tap Switch (ATS) option is not available in units sold in North America or Europe.
61704-939-B10-001 Rev. A5 (06/2019)
Page 62

6.0 Data Management, continued
Power Alarms: Classications, Causes and Corrections
Active Alarm
OUTPUT
FAILURE
(NON-LATCHING)
OUTPUT 1
TRIPPED
OUTPUT 2
TRIPPED
Alarm
Type
Major
Major
Major
The AC output has failed due to an open or short
detected by the power supply.
Output 1 hardware protection mode engaged or
overloaded. (Only active with optional PIM installed.)
Output 2 hardware protection mode is engaged or
overloaded. (Only active with optional PIM installed.)
Probable Cause of Alarm Corrective Action
1. Check for AC Input Voltage present
2. Check Output current on the display. If
Output Current is > 100% of rating, correct
overload conditions.
3. Measure the output voltage and compare to
the display output voltage
4. Check Output Taps from Transformer.
5. Check the conguration switch settings on
the Power Distribution Board match those
required for the power supply.
6. Check that conguration settings on display
(press UP and Enter simultaneously) match
the conguration switch settings on the
Power Distribution Board.
7. Open the Battery Circuit Breaker and
8. Pull out and re-seat Inverter Module
9. Turn the Battery Circuit Breaker back on.
10. Replace power supply
1. Check Current
2. Check Settings
1. Check Current
2. Check Settings
GENERAL
FAILURE
(LATCHING)
TEST FAIL
(LATCHING)
LINE ISOLATION Major Line isolation has failed.
OUTPUT
OVERLOAD
(NON-LATCHING)
CHARGER
FAILURE
(NON-LATCHING)
Major
Major
Major
Major
A latched failure of an automated, local or remote
inverter test, or some other major malfunction within
the power supply.
Battery voltage drops below 1.85V/cell or inverter fail
during self-test.
Indicates the power supply is overloaded. Power
supply will shut down and attempt to restart
periodically.
Charger has failed or was shut down due to a
problem such as battery over-temp.
1. Check Batteries
2. Check Inverter
3. Check Settings
1. Check Batteries
2. Check Inverter
1. Open the Battery Circuit Breaker
2. Pull out and re-seat Inverter Module
3. Turn the Battery Circuit Breaker back on
4. Run Self-Test (press Down and Enter
simultaneously)
5. If alarm, replace power supply
1. Check output voltage and compare to
display reading:
2. Check the conguration switch settings on
the Power Distribution Board match those
required for the power supply.
3. Check that conguration settings on display
(press UP and Enter simultaneously) match
the conguration switch settings on the
Power Distribution Board.
4. Check Output Taps from Transformer.
5. Change inverter module
6. Replace power supply
1. Re-seat Inverter
2. Perform Self-Test
Table 6-8, Power Alarms: Classications, Causes and Corrections, Continued
62 704-939-B10-001 Rev. A5 (06/2019)
Page 63

6.0 Data Management, continued
Power Alarms: Classications, Causes and Corrections
Active Alarm
OVERTEMP Major Inverter heat sink over temperature.
Alarm
Type
Probable Cause of Alarm Corrective Action
1. Check Inverter
2. Check PDB
3. Check Enclosure Ventilation
N+1 ACTIVE Major
LINE LOSS
FROM INVERTER
STATUS
BATTERY
TEMPERATURE
PROBE
N+1 ERROR Minor
INPUT FAILURE Minor Utility AC input has failed.
INVERTER FAIL
(LATCHING)
INVERTER
DISCONNECTED
INVERTER
TEMPERATURE
CONFIGURATION
FAILURE
Active Alarm or
Abnormal Condition
Minor Loss of AC line as determined by power supply.
Minor Temperature probe has failed or is not connected.
Major
Major The Inverter Module is not properly connected.
Major
Major
A power supply has failed and the N+1 system has
been activated to provide backup power.
N+1 circuit is not congured properly. Possibly
detecting input voltage on a redundant system or
other issue.
The power supply has detected a failure in inverter
operation.
The inverter heatsink has exceeded set temperature.
(Standby operations suspended until temperature
drops to safe level.)
The power supply has detected it is improperly
congured.
Alarm States Corrective Action
1. Check Output Fuse
2. Check Output Connections
1. Utility Failure
2. Check Input Breaker
3. Input Connections
1. Check Connection
2. Replace Temperature Probe
1. Verify wiring
2. Check N+1 output
1. Utility Failure
2. Check Circuit Breaker Input
3. Input Connections
4. Check 120/240 Jumpers
1. Re-seat Inverter
2. Replace Inverter
1. Re-seat Inverter
2. Check Ribbon Cable
1. Check Fan
2. Check Filter (legacy models)
1. Over Current
2. Check Settings
OUTPUT OVERLOAD
(XM2)
OUTPUT OVERLOAD
(XM2-918 HP, XM2-924
HP)
Table 6-8, Power Alarms: Classications, Causes and Corrections, Continued
Overload Indication
Alarm, no shutdown 110 to 115%
Alarm, shutdown in 30m 115 to 125%
Alarm, shutdown in 10m 125 to 150%
Alarm, shutdown in 30s >150%
Alarm, shutdown in <15s Short circuit
Alarm, no shutdown 105 to 107.5%
Alarm, shutdown in 30m 107.5 to 112.5%
Alarm, shutdown in 10m 112.5 to 125%
Alarm, shutdown in 30s >125%
Alarm, shutdown in <15 Short circuit
Current Range
(approx. %)
1. Check Output current on the display. If
Output Current is > 100% of rating, correct
overload conditions.
2. Check the conguration switch settings on
the Power Distribution Board match those
required for the power supply.
3. Turn all power o, wait 10 seconds, turn all
power back on.
4. Check that conguration settings on display
(press UP and Enter simultaneously) match
the conguration switch settings on the
Power Distribution Board.
5. If PIM option installed, check PIM limits on
display
6. Replace Inverter Module
7. Replace power supply
63704-939-B10-001 Rev. A5 (06/2019)
Page 64

6.0 Data Management, continued
6.2.4 Battery Alarms
The Intelligent CableUPS detects a wide array of battery alarms and displays the type of active alarm in the Smart Display
screen and the severity of alarm (e.g., Major/Minor) by means of the Inverter Module LEDs.
Battery Alarms: Classications, Causes and Corrections
Active Alarm
NO BATTERIES Major
LOW BATT
VOLTS
HIGH BATT
VOLTS
BATTERY EOD Major
BATTERY FAIL
(NON-LATCHING)
BATT TEMP
PROBE
REFRESH /
BATT REFRESH
ALARM
X BAL STAGE Minor
Alarm
Type
Detected the absence of batteries (alarm inactive
when battery capacity or number of battery strings is
set to 0)
Major Battery voltages below 1.833V/cell
Major
Major
Minor
Minor Battery Temperature Exceeded 60°C
36 Volt battery string above 45.0Vdc or, 48V
battery string above 60.0Vdc
Output batteries dropped below the low voltage
shutdown level (low battery disconnect)
Battery voltage drops below 1.75V/cell while
in standby mode, battery exceeds 2.5V/cell, or
batteries not detected.
Remote Temperature Sensor failure or Inverter
Board failure
Stage 0 and 1 are normal. Stage 2 shows that
the batteries are not of similar capacity. Stage 3-5
trigger check battery alarm to show that there is a
major capacity imbalance
Probable Cause of Alarm Corrective Action
1. Check Batt Breaker
2. Check Connections
3. Check Bat,tery Fuse
1. Check Battery Voltage and compare to
Displayed Battery Voltage
2. Check for correct battery capacity on Set-up
Menu.
3. Check for AC Input Voltage present
4. Open the Battery Circuit Breaker and
5. Pull out the Inverter Module
6. Verify Inverter Module securely connected.
7. Re-seat the Inverter Module
8. Turn the Battery Circuit Breaker back on.
9. Replace Inverter Module
1. Check Batteries
2. Check Charger settings
3. Replace Inverter
1. Restore AC Input
2. Connect Generator
1. Check Batteries
2. Replace Batteries
1. Inspect RTS sensor, wire and connector to
see if there is an intermittent connection
2. Replace with known good sensor
3. Check Battery Temperature Display Reading
4. Check for Alarm
5. Replace Inverter Module
1. Check Charger Settings
2. Check Batteries
3. Check Battery Temperature
1. Check Batteries
2. Replace Batteries
Table 6-9, Battery Alarms: Classications, Causes and Corrections
NOTICE:
The cause of a psMajor or psMinor alarm can be determined by checking the Discretes table in the Alpha MIB or by
viewing the Web page. The cause will have the value of ALARM.
64 704-939-B10-001 Rev. A5 (06/2019)
Page 65

7.0 Installation
7.1 Verifying Power Supply Device Address
Before installing the hardware, provision the DHCP server with the cable modem’s CM MAC address. This allows the
installation to be veried while the technician is on-site, eliminating the need for a second visit if there are problems with
the installation.
WARNING! ELECTRICAL HAZARD
To reduce the risk of electric shock, completely remove the Inverter Module from the power
supply prior to installation. For eld installation, use a service power supply to avoid losing
power to the load.
CAUTION!
The DM3X Transponder is static sensitive. An ESD wrist strap should be worn when installing the
transponder.
Before removing the Inverter Module, verify the power supply device address and rmware version is correct.
The power supply device address must not be set to zero and no two power supplies monitored by a single DM3X
Transponder can have the same address. The power supply must have a unique address to communicate with a system
controller. The system controller uses the address as an identier to query the power supply for information. Each power
supply on the same communications bus must be identied with a value between 1 and 5. To verify the power supply’s
address do the following:
OUTPUT
ALARM
1. Press the enter button twice to access the Set Up Menu on the LCD display.
2. Press the Down or Up key until DEVICE ADDRESS is displayed.
3. If the address is correct (in the range of 1 to 5), skip to Step 8.
4. To change the address, press the Enter key to enter the Edit mode.
5. Press the Up or Down keys until the desired address (1 to 5) is displayed. Remember, each power supply
monitored by a single transponder must have a unique address; this may require accessing the menu systems of
the additional power supplies and adjusting as applicable.
6. Press the Enter key to load the new address.
7. Press ESC two times to return to the OPERATION NORMAL screen.
ESC
TEST
XM2 LCD Display
OUTPUT
ALARM
TEST
65704-939-B10-001 Rev. A5 (06/2019)
Page 66

7.0 Installation, continued
7.2 Installation / Replacement Procedure in XM2 Power Supplies
NOTICE:
The DM3X is powered via the Battery A/B Sense/Power Harness. The sense harness must be connected to the
batteries before being plugged into the DM3X A/B connector to power the transponder.
If the XM2 CableUPS has been shipped without a DM3X Transponder, or the existing module requires removal and
replacement, do so via the following procedure:
1. Switch OFF the Inverter Module battery breaker.
NOTICE:
With the battery breaker in the OFF position, the power supply will not go into inverter mode.
2. Disconnect the battery input and temperature sensor cables from the Inverter Module, followed by the tamper, RF
and battery sense cables if a transponder is currently installed.
3. Loosen the Inverter Module thumbscrew and (if applicable) the two transponder thumbscrews.
4. Slide the Inverter Module out of the power supply.
5. Disconnect the ribbon cable attached at the back of the Inverter Module.
6. If the Inverter Module is equipped with a transponder, remove it by loosening the two Phillips captive screws.
Captive Screws
Fig. 7-1, Captive Screw Locations
66 704-939-B10-001 Rev. A5 (06/2019)
Page 67

7.0 Installation, continued
1
2
3
Place the
jumper on
positions 2 and
3 for an XM2
installation
Fig. 7-2, Jumper Location and the 18-Pin Connector
1. Verify the Jumpers (J10 and J11) on the transponder are in the correct position for an XM2 installation (See Fig.
7-2).
2. Line up the 18-pin mating connectors on the DM3X Transponder and the XM2 Inverter Module. Gently push the
transponder into the Inverter Module until the 18-pin mating connector is properly seated.
Fig. 7-3, Connecting the Transponder to the Inverter Module
3. Fasten the DM3X Transponder to the Inverter Module by tightening the two captive screws. It is recommended
that the screws be tightened alternately, a few turns at a time so the transponder aligns in parallel to the Inverter
Module.
4. Reinstall the Inverter Module and tighten the three thumbscrews. Make front panel connections (tamper,
temperature sensor, battery sense, RF etc.).
5. Connect the Battery Sense/Power Wire Kit to the A/B port. Refer to the battery diagrams provided with the sense
wire kit or reference the section “Battery Sense Wire Kit”. Connecting the Battery Sense Wire Kit will power the
DM3X transponder.
6. Record the cable modem MAC address from the front of the unit and report it to the network manager for network
provisioning.
67704-939-B10-001 Rev. A5 (06/2019)
Page 68

7.0 Installation, continued
7.3 DM3X LEDs and Connections
10
1
2
RST
3
A
/
4
5
B
C
/
6
7
8
9
D
LNK
OL
US
DS
TPR
ALM/
RDY
ENV
GRN = OK
BLU = WARN
RED = OUT
Rx/Tx PWR
COM
11
12
E
T
13
H
14
15
16
DM3X LEDs and Connectors
Item
1 TPR: Tamper Switch Connector
2 RST: Reset Button
3 BAT A / B GRN ON / OFF
4 BAT A / B Connector
5 BAT C / D GRN ON / OFF
6 BAT C / D Connector
7
8
9
10
11
12 ENV: Environmental Control Connector
13 ETH: Ethernet Connection
14
15 RF Connection
16 COM: AlphaBus Communications Connector
LED or
Connector
LNK: CPE Link
Status
OL: CPE Activity
Status (or Online
Status)
US: Upstream
ranging and
registration lock
DS: Downstream
RF Carrier
detection and
lock
ALM / RDY:
Alarm and Ready
RF Rx / Tx
Power Level
Indicator
Status Behavior Indication
GRN
GRN
GRN
GRN
N/A OFF
GRN
RED
TRI
OFF No Ethernet Link
ON Link on Ethernet Craft Port
OFF No Ethernet Communications Activity
OFF / ON
ON Online and Operational
OFF
OFF / ON
ON CMTS registration completed
OFF No Power / Downstream Carrier
OFF / ON
ON Downstream carrier lock
ON
Steady Blinking Normal Operation
Blinking more OFF
than ON
Blinking more ON
than OFF
OFF No RF Detected
BLUE
GREEN
RED
ON (steady) if Battery String(s)
Connected Correctly
ON (steady) if Battery String(s)
Connected Correctly
Momentary ashes during CPE
communications via the Ethernet Craft
Port when connected to a CPE device
OR ashes while performing early
authentication, IP connectivity, BPI
initialization.
No power, upstream frequency
undetermined
Power on, downstream locked,
upstream frequency ranging, DHCP
request in progress
Power on, downstream carrier
frequency searching
No power or malfunctioning
Communications Module
Reset of the DM3.0 Series in in
process
Minor Alarm
Major Alarm
Rx / Tx Power at a Warning Level as
Set Within the SCTE-HMS Property
Table
Rx / Tx RF Power Level Within
Tolerance
Rx / Tx Power at an Alert Level as Set
Within the SCTE-HMS Property Table
Fig. 7-4, DM3X LEDs and Connectors
68 704-939-B10-001 Rev. A5 (06/2019)
Page 69

7.0 Installation, continued
7.4 Connecting the RF Drop
CAUTION!
Install a grounded surge suppressor (Alpha P/N 162-028-10 or equivalent). Failure to install an
appropriate surge suppressor may void the warranty
NOTICE:
Alpha Technologies Services, Inc. recommends tightening the RF cable connector and the cables attached to the
Grounded Surge Protector to a torque setting of 10in-lb ± 1in-lb.
Connect the RF drop according to the diagram below. The RF drop must have a properly installed ground block in the
power supply enclosure. Recommended downstream RF level is 0 dBmV. Connect any other front panel connections at
this time (e.g. battery strings, tamper switch).
Grounded Surge
Protector
(See Caution Above)
Fig. 7-5, Connecting the RF Drop
RF Cable to
Headend
69704-939-B10-001 Rev. A5 (06/2019)
Page 70

7.0 Installation, continued
7.5 Front Panel Connections
NOTICE:
Alpha Technologies Services, Inc. recommends tightening the RF cable connector and the cables attached to the
Grounded Surge Protector to a torque setting of 10in-lb ± 1in-lb.
Communications Port Alpha Bus Cable
Generator (ECM)
(Alpha p/n 744-726-XX)
XM2 SI
(Serial Interface)
Card
S
Y
S
C
O
M
System Port
XM2 SI
(Serial Interface)
Card
S
Y
S
C
O
M
Communications
Port
“Master” XM2
ECM Interface
(Alpha p/n 704-709-20)
Tamper Switch Connector
A/B
C/D
To Battery Sense
Wire Harnesses
RF Cable
to Headend
CAUTION!
A Ground Surge Protector is Required. (Alpha
p/n 162-028-10 or equivalent)
Legend
Connections
Connections with more than one power supply
Fig. 7-6, System Interconnection Diagram
70 704-939-B10-001 Rev. A5 (06/2019)
Page 71

7.0 Installation, continued
7.6 I/O Connections (TPR, ENV)
The Alpha DM3X Transponders are all populated with a Tamper interface to report the status of the power supply
enclosure door when equipped with the optional tamper switch. The Alpha DM3X Transponders are populated with
the Environmental and I/O Controller interface (referred to in this section as I/O Port) which can be used to monitor
and control an array of contact relay devices such as battery heater mats, enclosure moisture sensors and emergency
generators.
TPR
ALM/
RDY
RST
ENV
Tamper Switch Interface (TPR)
I/O Control Interface (ENV)
Fig. 7-7, I/O (ENV) and Tamper Switch Interface (TPR) Connection Locations
7.6.1 Tamper (TPR) Switch Interface
The tamper switch interface is designed to report and alarm the status of the power supply enclosure door. The circuit
created by the tamper switch is a contact relay, so other contact relay devices can be designed to be monitored through
this interface. For example, the Alpha Utility Line Sensor (Alpha P/N 746-399-2X) uses the tamper interface to monitor the
Utility outlet to report the presence of line voltage.
NOTICE:
In the OID column of the following table, ‘X’ denotes power supply device address (Default = 1)
Tamper (TPR) Switch Specications
Function Parameter OID Values Description
Tamper
Utility Sense
Alarm / Trap
Alarm / Trap
psTamper
psTamper 1.3.6.1.4.1.5591.1.4.2.1.27.X
tamperPolarity 1.3.6.1.4.1.926.1.3.2.6.1.0
psTamper
(Closed)
psTamper
(Open)
1.3.6.1.4.1.5591.1.4.2.1.27.X
See Note 1
1.3.6.1.4.1.5591.1.1.3.1.3.13.1.3.6.1.4
.1.5591.1.4.2.1.27.X.1
1.3.6.1.4.1.5591.1.1.3.1.3.13.1.3.6.1.4
.1.5591.1.4.2.1.27.X.2
1 = Closed
2 = Open
1 = No Voltage
2 = Voltage Present
1 = Report “Open”
When Contact Open
2 = Report “Open”
When Contact Closed
1 = Disable
2 = enableMajor
3 = enableMinor
1 = Disable
2 = enableMajor
3 = enableMinor
Status of Enclosure
Door
Status of Utility
Voltage
Controls Polarity of
“psTamper” Reporting
Alarm Enable for
psTamper = Closed
Alarm Enable for
psTamper = “Open”
Table 7-1, Tamper (TPR) Switch Specications
71704-939-B10-001 Rev. A5 (06/2019)
Page 72

7.0 Installation, continued
7.6.2 I/O Port Interface
ENV Connector and Pin Descriptions
ENV Connector Pin Description
1 Logic Gnd
2 5V +/- 0.5V voltage Shotky Protection – 15mA max. – Relay current drive
10
5
4
9
3
8
2
7
6
1
Back of ENV
Connector
Steps to congure DM3X Transponder to monitor I/O device.
3 Open/Close Control – 0V/15mA sink = Close, 3.3V/0mA = Open
4 Open/Close Sense – Pin 4 relay contact short to pin 1 = Close, Pin 4 open = Open
5 Open/Close Sense – Pin 5 relay contact short to pin 1 = Close, Pin 5 open = Open
6 Open/Close Sense – Pin 6 relay contact short to pin 1 = Close, Pin 6 open = Open
7 Open/Close Control – 0V/15mA sink = Close, 3.3V/0mA = Open
8 Open/Close Sense – Pin 8 relay contact short to pin 1 = Close, Pin 8 open = Open
9 Not Connected
10 Not Connected
Table 7-2, ENV Connector and Pin Descriptions
1. Set atiMgmtSysIoSelect appropriately (SNMP or Web) for device to monitor.
OID 1.3.6.1.4.1.926.1.3.2.8.1.0
1 = Generic
2 = LAP Only
3 = Heater/Cool Control Only (Heater Mat)
4 = DC Emergency Generator Only
5 = Heater/Cooler + LAP
6 = DC Generator + LAP
The device can be selected through the Web page by navigating to ‘Advanced Conguration’,
‘I/O – Environment’ and selecting from the pull-down list
2. Congure alarms (Generic Only – See below section for details)
3. Monitor appropriate SNMP parameters (See each section below for details)
7.6.3 Conguring I/O Port Connections
Alpha has created logic for control and reporting of specic devices or combination of devices. The Alpha proprietary
SNMP MIB atiMgmtSysIoSelect, 1.3.6.1.4.1.926.1.3.2.8.1.0 must be set appropriately before the device status will
be correctly reported. The monitored device can also be set through the transponder’s “Advanced Conguration I/O” Web page pull-down. The status of the generic I/O Pins can still be monitored and alarmed via the SCTE-HMS
discretePropertyTable even when specic devices have been selected.
72 704-939-B10-001 Rev. A5 (06/2019)
Page 73

7.0 Installation, continued
I/O Port Specications
atiMgmtSysIoSelect (1.3.6.1.4.1.926.1.3.2.8.1.0)
MIB Value Device Reported Parameter of MIB Branch
1 No Device (Generic) I/O Pins Only
2 LAP Only atiMgmtSysIoLAPState 1.3.6.1.4.1.926.1.3.2.8.2.0
3 Heater Control Only atiMgmtSysTempMgr * 1.3.6.1.4.1.926.1.3.2.4
4 DC Generator Only atiMgmtSysIoGenState 1.3.6.1.4.1.926.1.3.2.8.3.0
5
Heater Control and
LAP
atiMgmtSysIoLAPState atiMgmtSysTempMgr *
6 Generator and LAP atiMgmtSysIoLAPState atiMgmtSysIoGenState
*MIBs within atiMgmtSysTempMgr branch will report and control will be allowed
regardless of the value reported by atiMgmtSysloSelect
Table 7-3, I/O Port Specications
7.6.4 I/O Port: Generic Device
The I/O connector on the transponder allow the headend to remotely monitor and control external contact relay devices.
Each input pin can be congured through the SCTE-HMS discretePropertyTable for alarm and SNMP trap generation.
I/O Port: Generic Device Specications
Function Parameter OID Values Description
Input atiMgmtSysIOPinIn4 1.3.6.1.4.1.926.1.3.2.8.21.0 1 = Contact Open
Input atiMgmtSysIOPinIn5 1.3.6.1.4.1.926.1.3.2.8.22.0
Input atiMgmtSysIOPinIn6 1.3.6.1.4.1.926.1.3.2.8.23.0
Control atiMgmtSysIOPinCtrl 1.3.6.1.4.1.926.1.3.2.8.20.0
Alarm / Trap IOPinIn4(Open)
Alarm / Trap IOPinIn4 (Closed)
Alarm / Trap IOPinIn5 (Open)
Alarm / Trap IOPinIn5 (Closed)
Alarm / Trap IOPinIn6 (Open)
Alarm / Trap IOPinIn6 (Closed)
Alarm / Trap IOPinCtrl (Open)
Alarm / Trap IOPinCtrl (Closed)
1.3.6.1.4.1.5591.1.1.3.1.3.13.1.3.6.1.4.1.9
26.1.3.2.8.21.0.1
1.3.6.1.4.1.5591.1.1.3.1.3.13.1.3.6.1.4.1.9
26.1.3.2.8.21.0.2
1.3.6.1.4.1.5591.1.1.3.1.3.13.1.3.6.1.4.1.9
26.1.3.2.8.22.0.1
1.3.6.1.4.1.5591.1.1.3.1.3.13.1.3.6.1.4.1.9
26.1.3.2.8.22.0.2
1.3.6.1.4.1.5591.1.1.3.1.3.13.1.3.6.1.4.1.9
26.1.3.2.8.23.0.1
1.3.6.1.4.1.5591.1.1.3.1.3.13.1.3.6.1.4.1.9
26.1.3.2.8.23.0.2
1.3.6.1.4.1.5591.1.1.3.1.3.13.1.3.6.1.4.1.9
26.1.3.2.8.20.0.1
1.3.6.1.4.1.5591.1.1.3.1.3.13.1.3.6.1.4.1.9
26.1.3.2.8.20.0.2
1 = Contact Open
2 = Contact Closed
1 = Contact Open
2 = Contact Closed
1 = Contact Open
2 = Contact Closed
1 = disable
2 = enableMajor
3 = enableMinor
1 = disable
2 = enableMajor
3 = enableMinor
1 = disable
2 = enableMajor
3 = enableMinor
1 = disable
2 = enableMajor
3 = enableMinor
1 = disable
2 = enableMajor
3 = enableMinor
1 = disable
2 = enableMajor
3 = enableMinor
1 = disable
2 = enableMajor
3 = enableMinor
1 = disable
2 = enableMajor
3 = enableMinor
Used to monitor moisture
sensor
Open/Close a contact
Alarm enable when Pin4
contact is Open
Alarm enable when Pin4
contact is Closed
Alarm enable when Pin5
contact is Open
Alarm enable when Pin5
contact is Closed
Alarm enable when Pin6
contact is Open
Alarm enable when Pin6
contact is Closed
Alarm enable when control
contact is Open
Alarm enable when control
contact is Closed
Table 7-4, I/O Port: Generic Device Specications
73704-939-B10-001 Rev. A5 (06/2019)
Page 74

7.0 Installation, continued
7.6.5 Connecting a Generic I/O Device
For generic device congurations consult your Alpha representative.
7.6.6 Conguring and Monitoring a Generic I/O Device
Set the parameter atiMgmtSysIoSelect 1.3.6.1.4.1.926.1.3.2.8.1.0 to a value of “1” (Generic). Alternatively, navigate to
‘Advanced Conguration’, ‘I/O – Environment’ and select “Generic Device” from the pull-down list.
The status of the control and input pins can be monitored through the following OIDs.
Pin 3 (Control)
1.3.6.1.4.1.926.1.3.2.8.20
Pin 4 (Input)
1.3.6.1.4.1.926.1.3.2.8.21
Input Pin 5 (Input)
1.3.6.1.4.1.926.1.3.2.8.22 t
Pin 6 (Input)
1.3.6.1.4.1.926.1.3.2.8.23
Voltage to drive Pin 3 is managed through the following SNMP OID.
atiMgmtSystempCtrl
1.3.6.1.4.1.926.1.3.2.4.1
The SCTE-HMS discretePropertyTable can be congured to generate SNMP traps based upon the desired contact state
of any of the I/O input or control pins (see Table 7-3).
1 = Contact Open
2 = Contact Closed
1 = Contact Open
2 = Contact Closed
1 = Contact Open
2 = Contact Closed
1 = Contact Open
2 = Contact Closed
1 = O
5 = On
74 704-939-B10-001 Rev. A5 (06/2019)
Page 75

7.0 Installation, continued
7.6.7 I/O Port: Heater Mat Control
NOTICE:
The Heater Control MIBs will continue to report regardless of atiMgmtSysIoSelect value, but the Web page will only
display Heater Control status if atiMgmtSysIoSelect is set to “3” or “5.”
atiMgmtSysIoSelect = 3,5
A battery heater mat controller may be managed though the following set of parameters within the ‘atiMgmtSysTempMgr’
MIB branch.
I/O Port: Heater Mat Control Specications
Parameter Access Values Description
atiMgmtSysTempCtrl
1.3.6.1.4.1.926.1.3.2.4.1.0
atiMgmtSysTempStatus
1.3.6.1.4.1.926.1.3.2.4.2.0
atiMgmtSysTempTimer
1.3.6.1.4.1.926.1.3.2.4.7.0
atiMgmtSysTempCountdown
1.3.6.1.4.1.926.1.3.2.4.8.0
atiMgmtSysTempStatusInvert
1.3.6.1.4.1.926.1.3.2.4.9.0
RW
R
RW 0..1440 (Default = 30)
R 0..1440 Number of minutes remaining on timer
RW
1 = O
2 = Switch on Timer
1 = Contact Open
2 = Contact Closed
1 = No invert (default)
2 = Invert
Starts or stops the heater mat activation timer
The heater mat is activated when this parameter
reports “2”
The number of minutes the heater mat will stay
on when timer is started
The manufacturer of the mat control block
created some models where the polarity is
reversed (Open vs closed). If these devices are
deployed then this parameter will need to be set
to “2”
Table 7-5, I/O Port: Heater Mat Control Specications
75704-939-B10-001 Rev. A5 (06/2019)
Page 76

7.0 Installation, continued
7.6.8 Connecting the Battery Heater Mat Controller
Power to the heater mat is provided via a customer-supplied controller plugged into the power outlet inside the enclosure.
A cable (Alpha p/n 875-627-22) connects the controller to the ENV (Environmental) connector on the transponder. The
connection procedure is shown below.
TPR
ALM/
RST
RDY
ENV
Connect the 4-pin
connector from the
controller cable
Plug the controller
into the power outlet.
Plug the Heater Mat into the controller.
Plug the 10-pin
connector into the
ENV connector.
into the base of the
Heater Mat Controller.
Once the connection has been made, Environmental Control Management can be congured using an SNMP MIB
browser as indicated in the following tables. The Environmental Control MIB section begins at atiMgmtSysTempMgr
(1.3.6.1.4.1.926.1.3.2.4). Status of the Environmental Control is also available via the Communications Module’s Web
page by navigating to ‘Advanced Conguration’, ‘I/O – Environment’. Ensure the ‘Heater/Cooler Only’ is selected from the
drop-down list.
76 704-939-B10-001 Rev. A5 (06/2019)
Page 77

7.0 Installation, continued
7.6.9 Conguring the Battery Heater Mat Controller
In this example, values are written to their respective OIDs to set temperatures, control mode and status reporting.
Heater Mat OIDs and Functionality
Set these OIDs to the Specied Value Functionality
atiMgmtSysTempTemperature
(1.3.6.1.4.1.926.1.3.2.4.5) to 5
atiMgmtSysTempHysteresis
(1.3.6.1.4.1.926.1.3.2.4.6) to 3
atiMgmtSysTempCtrl
(1.3.6.1.4.1.926.1.3.2.4.1) to 3
atiMgmtSysTempMode
(1.3.6.1.4.1.926.1.3.2.4.3) to 1
atiMgmtSysTempActiveState
(1.3.6.1.4.1.926.1.3.2.4.4) to 1
atiMgmtSysTempStatusInvert
(1.3.6.1.4.1.926.1.3.2.4.9) to 1
Heater turns on at 5°C
3°C of permitted controller overshoot (in this case, would turn o at 8°C)
Battery temperature sensor used to control heater setpoint
Places controller in heater mode
Drive pin to the temperature device will go low when heater is on
Sets the polarity of the feedback signal from the temperature device
Table 7-6, Heater Mat OIDs and Functionality
During operating, the following MIB points will report the current temperature and whether the heater is on or o.
Heater Mat MIB Reports
SNMP MIB Point Data
atiMgmtSysTempStatus
(1.3.6.1.4.1.926.1.3.2.4.2)
atiBBSysViewBatteryTemperature
(1.3.6.1.4.1.926.1.4.1.1.3.5)
Table 7-7, Heater Mat MIB Reports
Temperature device ON or OFF
Battery temperature (in degrees C)
7.6.10 I/O Port: Emergency DC Generator (GEN)
atiMgmtSysIoSelect = 4, 6
The DM3X Transponders have the capability to report the status of the Alpha DCX Series Emergency DC Generator
through the I/O or“ENV” port on the front of the transponder.
See the DCX3000/DCX2000 Remote Status Monitoring (RSM) Assembly Kit Field Installation Guide, p/n 746-379-C0.
77704-939-B10-001 Rev. A5 (06/2019)
Page 78

7.0 Installation, continued
7.6.11 Conguring and Monitoring the DC Emergency Generator
Set the parameter atiMgmtSysIoSelect 1.3.6.1.4.1.926.1.3.2.8.1.0 to a value of “4” (Generator). Alternatively, navigate to
‘Advanced Conguration’, ‘I/O – Environment’ and select “Generator Only” from the pull-down list.
The status of the Generator can be monitored through I/O – Environment web page or via the SNMP MIB
atiMgmtSysIoGenState 1.3.6.1.4.1.926.1.3.2.8.3.0.
I/O Port: Heater Mat Control Specications
Value List Description
atiMgmtSysIoGenState (1.3.6.1.4.1.926.1.3.2.8.3.0)
notInstalled(1) This indicates that atiMgmtSysIoSelect has not been set to a value of 4 (Generator).
genO(2) The generator has been detected but it is not powering the load.
genRunning(3) The generator is present, and it is powering the load.
genNotDetected(4) atiMgmtSysIoSelect has not been set to “4” (Generator) but the Generator is not detected.
atiMgmtSysIoGenTimePowering (1.3.6.1.4.1.926.1.3.2.8.3.0)
Time (Minutes)
Both of the above parameters can be alarmed through the SCTE-HMS propertyIdent MIB
Increments when atiMgmtSysIoGenState = 3; resets to “0” when atiMgmtSysIoGenState changes
to any other value
Table 7-8, Generator Monitoring Values
78 704-939-B10-001 Rev. A5 (06/2019)
Page 79

8.0 Battery Sense Wire Kits
Vbatt 3A [C] 36V
Vbatt 2A [C] 24V
Vbatt 1A [C] 12V
8.1 36V Single and Dual Strings
Battery Sense Wire Kits are required to power the transponder, as well as for individual battery voltage monitoring. The
Battery Sense Wire Kits are connected to the transponder battery connections A/B for battery strings 1 and 2 and the C/D
connector for battery strings 3 and 4.
R E D (+)
B L A C K (-)
NEG
NEG
3A
2A
NEG
1A
Sense Wire Kits:
Alpha P/N: 874-842-21 (6')
Alpha P/N: 874-842-27 (9')
POS
4
8
3
7
2
6
1
5
Pin 1
A/B [C/D] NEG
Pin 4
POS
Pin 3
POS
Pin 2
Fig. 8-1, 36V System, Single String
R E D (+)
B L A C K (-)
NEG
POS
NEG
3A
2A
POS
NEG
POS
1A
Sense Wire Kits:
Alpha P/N: 874-842-20 (6')
Alpha P/N: 874-842-28 (9')
4
8
3
7
2
6
1
5
Pin 1
A/B [C/D] NEG
Pin 4
Vbatt 3A [C] 36V
Pin 7
Vbatt 3B [D] 36V
Vbatt 2B [D] 24V
NEG
3B 2B 1B
POS
Pin 6
Pin 3
Vbatt 2A [C] 24V
Vbatt 1B [D] 12V
NEG
POS
Pin 2
Vbatt 1A [C] 12V
Pin 5
NEG
POS
Fig. 8-2, 36V System, Dual String
79704-939-B10-001 Rev. A5 (06/2019)
Page 80

8.0 Battery Sense Wire Kits, continued
Vbatt 4A [C/D] 48V
Vbatt 3A [C] 36V
Vbatt 2A [C] 24V
Vbatt 1A [C] 12V
A/B [C/D] ENG
To Power Supply
Red Black
Neg -
Vbatt 4A [C/D] 48V
Pin 8
Vbatt 3A [C] 36V
Pin 4
Vbatt 2A [C] 24V
Pin 3
Vbatt 1A [C] 12V
Pin 2
A/B [C/D] ENG
Pin 1
4A 3A 2A 1A
Pos +
Neg -
Pos +
Neg -
Pos +
Neg -
Pos +
R E D (+)
B L A C K (-)
1
2
3
4
5
6
7
8
To Power Supply
R E D (+)
B L A C K (-)
Red Black
Neg -
4A 3A 2A 1A
Pos +
Neg -
Pos +
Pin 8
To Power Supply
Red Black
Neg -
Neg -
Pin 4
R E D (+)
Neg -
Pos +
B L A C K (-)
Neg -
Sense Wire Kits:
Alpha P/N: 874-841-21 (6')
Alpha P/N: 874-841-25 (9')
Pin 3
Pos +
Pin 2
Pin 1
Fig. 8-3, 48V System, Single String
Neg -
Neg -
4
8
3
7
2
6
1
5
4A 3A 2A 1A
Pos +
Pin 1
A/B [C/D] ENG
Pin 8
Neg -
Vbatt 4A [C/D] 48V
4B 3B 2B 1B
Pos +
Pos +
Pin 4
Vbatt 3A [C] 36V
Pin 7
Vbatt 3B [D] 36V
Neg -
Pos +
Vbatt 2B [D] 24V
Pin 6
Sense Wire Kits:
Pos +
Pos +
Alpha P/N: 874-841-20 (6')
Alpha P/N: 874-841-24 (9')
Pin 3
Vbatt 2A [C] 24V
Vbatt 1B [D] 12V
Neg -
Pos +
Pin 2
Vbatt 1A [C] 12V
Pin 5
Neg -
Pos +
Fig. 8-4, 48V System, Dual String
4
8
3
7
2
6
1
5
80 704-939-B10-001 Rev. A5 (06/2019)
Page 81

9.0 Start Up and Verification
9.1 Initial Start Up and Local Verication
To conrm successful hardware installation before leaving the installation site, verify network connectivity and correct
hardware interconnection.
To Verify Network Connectivity:
The DS and REG LEDs on the front of the DM3X Transponder should be ON solid green. This indicates successful
registration with the headend. In addition, the RF LED should also be ON solid green indicating proper RF power levels
and the ALM/RDY LED should be blinking green for normal operation.
With the DM3X Transponder used in conjunction with the XM2 power supply, network connectivity can be veried via
the COMM menu on the XM2 LCD Display. Pressing ENTER while in the Operation Normal screen will open the Comms
Information display (only displayed when paired with suitable communications module, otherwise display will read “NO
DATA”). When accessing the information display, information displays in Auto Scroll mode. Press UP or DOWN to access
information one step at a time. Press ENTER to access the Setup Menu. Press ESCAPE to reactivate Auto Scroll mode.
Press ESCAPE a second time to reactivate Operation Normal mode (up one level)
The following provides a list of parameters available on the XM2 LCD Display COMMS Menu populated with sample
values.
OUTPUT
ALARM
COMMS INFO
CM
CM
CM Rx PWR
CM Tx PWR
DN FREQ
UP FREQ
MODEL
SW
BATT
BATT
BATT
TEST
00:90:EA:00:30:54
192.168.1.151
-6.7dBMv
41.0dBMv
369.000Mhz
15.000Mhz
DM3X
4.5.9.0_00.77CO-N
A1 = 13.1 A2 = 14.0
A3 = 13.5 B1 = 13.1
B2 = 14.0 B3 = 13.5
Fig. 9-1, XM2 Smart Display Screens
81704-939-B10-001 Rev. A5 (06/2019)
Page 82

9.0 Start Up and Verication, continued
Connect a computer’s network port to the transponder’s Ethernet port using a standard network cable. Launch an Internet
browser and enter 192.168.100.1 into the address. The transponder will return the Web page shown below. Click on
General to display the key communications parameters including system uptime, IP provisioning mode (IPv4, IPv6 &
MDD), upstream and downstream power levels and the cable modem’s IP address, which conrms connectivity.
Fig. 9-2, Communications Section - General Page
82 704-939-B10-001 Rev. A5 (06/2019)
Page 83

9.0 Start Up and Verication, continued
9.2 Verifying Correct Hardware Interconnection
NOTICE:
The DM3X model provides both BAT A/B and BAT C/D LED indicators and battery harness connectors (supports a
maximum 4 battery strings).
The BAT A/B and BAT C/D LED indicators on the front panel of the DM3X unit should illuminate solid green once the
battery wiring harnesses are correctly installed. A system with multiple strings must use String A as the rst string, B as
the second, C as the third and D as the fourth.
From the Power Supplies and Batteries section of General tab of the DM3X Web page, the following screen will be
visible and the parameters shown will be available for viewing and verication. To test hardware interconnection using the
Ethernet port, verify valid values for Output Voltage, Output Current and individual battery voltages.
Fig. 9-3, Power Supply Section - General Page
83704-939-B10-001 Rev. A5 (06/2019)
Page 84

9.0 Start Up and Verication, continued
9.3 System Status Indicators and Reset Button
As viewed from the front of the unit, the DM3X Transponder utilizes LEDs to indicate system status. During system
start up, the LEDs will rst blink momentarily then indicate the current status of a variety of parameters on the DM3X
Transponder. The LEDs indicate alarms, RF power level status, battery string connectivity and communications activity
with the network. A description of each LED follows.
LED Functionality and Indications
Item
TPR
ALM/
RDY
RST
1
1
ENV
2
A
/
2 BATT A / B GRN ON / OFF
B
3
3 BATT C / D GRN ON / OFF
C
/
4
D
4
LNK
E
T
5
6
OL
GRN = OK
BLU = WARN
RED = OUT
H
5
Rx/Tx PWR
7
8
US
6
DS
COM
9
7
8
9
LED or
Connector
ALM / RDY:
Alarm and Ready
LNK: CPE Link
Status
OL: CPE Activity
Status
RF Rx / Tx
Power Level
Indicator
US: Upstream
ranging and
registration lock
DS: Downstream
RF Carrier
detection and
lock
COM: AlphaBus
Communications
Status Behavior Indication
N/A OFF
GRN
RED
GRN
GRN
TRI
GRN
GRN
GRN
ON
Steady Blinking Normal Operation
Blinking more OFF
than ON
Blinking more ON
than OFF
OFF No Ethernet Link
ON/OFF Link on Ethernet Craft Port
OFF No Ethernet Communications Activity
OFF / ON
ON Online and Operational
OFF No RF Detected
BLUE
GREEN
RED
OFF
OFF / ON
ON CMTS registration completed
OFF No Power / Downstream Carrier
OFF / ON
ON Downstream carrier lock
OFF No AlphaBus Communications
OFF / ON
No power or malfunctioning
Communications Module
Reset of the DM3.0 Series in in
process
Minor Alarm
Major Alarm
ON (steady) if Battery String(s)
Connected Correctly
ON (steady) if battery string(s)
connected correctly
Momentary ashes during CPE
communications via the Ethernet Craft
Port when connected to a CPE device
OR ashes while performing early
authentication, IP connectivity, BPI
intialization.
Rx / Tx Power at a Warning Level as
Set Within the SCTE-HMS Property
Table
Rx / Tx RF Power Level Within
Tolerance
Rx / Tx Power at an Alert Level as Set
Within the SCTE-HMS Property Table
No power, upstream frequency
undetermined
Power on, downstream locked,
upstream frequency ranging, DHCP
request in progress
Power on, downstream carrier
frequency searching
Momentary Flashes - AlphaBus Port
Communications Active
Fig. 9-4, LED Functionality and Indications
84 704-939-B10-001 Rev. A5 (06/2019)
Page 85

9.0 Start Up and Verication, continued
9.3.1 Detailed LED Descriptions
After power is applied or a reset occurs, all LEDs will ash in certain patterns indicating the cable modem chipset is
starting or restarting. Once it is ready, it will begin the DOCSIS requirement of searching for the downstream frequency
lock and the LEDs will follow the detailed descriptions below.
ALM/RDY - Alarm/Ready
During normal operation, this LED blinks GREEN, indicating a heartbeat pulse from the processor. The frequency of
ashing by this LED provides a visual alert for power supply discrete major and minor alarms, if congured in the property
and discrete property tables of the SCTE-HMS MIB. The ALM LED (RED) is factory defaulted OFF. Refer to Section
6.2.3, General Power Supply Alarms for information on conguring the DM3X Transponder for active monitoring and
alarming. If an event triggers an HMS alarm, the ALM/RDY LED blinks RED according to the alarm type until the alarm
has been resolved. For a minor alarm, the frequency of ashing (RED) will be more OFF than ON and for a major alarm
the frequency of ashing will be (RED) more ON than OFF. If there are multiple active alarms, including one or more major
alarms with one or more minor alarms, the major alarm will take precedence in terms of the indication.
DS - Downstream Communication
This LED indicates the state of the CM’s attempt to gain a downstream signal. This process may take several seconds,
depending on how long it takes the CM to locate a carrier signal and lock onto a channel. The LED ashes while
searching for the downstream DOCSIS channel and is on solid when the downstream channel is locked.
US - CM Registration
Once a downstream channel has been negotiated between the CM and CMTS, the modem attempts to register with the
DHCP server and obtain the Conguration File. This LED ashes while the process takes place. Once a ranging status of
‘success’ has been received, the LED will remain on solid. This is the best indication that the DM3.0 Series Transponder is
communicating with the CMTS in the headend.
OL - Network Communication Status
The Ethernet link LED remains ON when there is an active connection on the Ethernet port (e.g., a computer is connected
for local diagnostics). Momentary ashes during CPE communications via the Ethernet Craft Port when connected to a
CPE device OR ashes while performing early authentication, IP connectivity, BPI initialization.
LNK - CPE Activity
The CPE activity LED ashes to indicate that data is being transmitted or received between the DM3.0 Series
Transponder and a network device.
85704-939-B10-001 Rev. A5 (06/2019)
Page 86

9.0 Start Up and Verication, continued
Rx/Tx Power
The Rx/Tx PWR LED utilizes a tricolor LED to provide the installer a quick verication of the modem transmit (Tx) and
receive (Rx) RF power levels. The Rx/Tx PWR LED will illuminate green when both the cable modem Tx and cable
modem Rx RF power levels are within the range as specied in the SCTE-HMS PropertyTable. The LED indicator
illuminates blue when Rx and/or Tx levels are within the warning range as specied by the SCTE-HMS PropertyTable.
The LED indicator illuminates red when Rx and/or Tx levels are outside the range as specied by the SCTE-HMS
PropertyTable.
Refer to the following table for default ranges in the SCTE-HMS PropertyTable:
SCTE-HMS Property Table
Parameter
docsIfDownChannelPower
Rx
(OID:1.3.6.1.2.1.10.127.1.1.1.1.6)00(0F*)
docsIfCmStatusTxPower
Tx
(OID:1.3.6.1.2.1.10.127.1.2.2.1.3)00(0C*)
alarm
Enable
HiHi Hi Lo LoLo Deadband
150 100 -100 -150 15
550 500 00 00 15
Table 9-1, SCTE-HMS Property Table
By default, alarmEnable is set to 00 (disabled) to prevent unwanted SNMP traps but the LED behavior will function as if
the alarmEnable were set to the values in the above table. If the alarmEnable bits are set to anything other than 00, the
LEDs will then follow the behavior of the desired enable bit setting.
The above default values translate into the following Rx/Tx Power LED color ranges:
Rx / Tx Power LED Color Ranges
LED Color Rx Range (dBmV) Tx Range (dBmV)
Green +10 to -10 0 to +50
Blue +15 to +10 and -10 to -15 +50 to +55
Red >+15 and <-15 >+55
Table 9-2, Rx/Tx Power LED Color Ranges
In addition to the above SCTE-HMS PropertyTable entries, the Tx and Rx levels displayed on the transponder Web page
will each provide colored indicator bars that correlate to the RF LED and SCTE-HMS PropertyTable thresholds.
86 704-939-B10-001 Rev. A5 (06/2019)
Page 87

9.0 Start Up and Verication, continued
Rx/Tx Power
The current RF level status for both the Rx and Tx will be displayed on the colored scale highlighted in black, providing
verication of modem RF power levels. Refer to the gure below for an example of the RF power level indicator bars on
the Web page.
Fig. 9-5, Transponder Web Page, RF Power Level Indicators
Conguring the Rx/Tx Power LED - Custom Settings
If desired, the RF Power Level ranges for the Rx/Tx PWR LED may be customized via SNMP by adjusting the HiHi,
Hi, Lo, LoLo values for the docsIfDownChannelPower and docsIfCmStatusTxPower in the SCTE-HMS Property Table
(OID:1.3.6.1.4.1.5591.1.1.1). Be careful not to exceed the RF Input Power and Output Power range specications of the
DM3X Transponder.
COM - AlphaBus Communications
The COM LED indicates any data trac being received by the DM3X through the COM (AlphaBus) port. This LED will
also blink one to three times approximately every 10 seconds, which indicates communication exists between the
DM3X and other connected devices, such as a generator or additional XM2.
BAT A/B - Battery Strings A & B
The LED indicator remains ON solid when the battery string wiring harness is correctly connected to the batteries and the
Bat A/B connector on the DM3X.
BAT C/D - Battery Strings C & D
The LED indicator remains ON solid when the battery string wiring harness is correctly connected to the batteries and the
Bat C/D connector on the DM3X.
87704-939-B10-001 Rev. A5 (06/2019)
Page 88

9.0 Start Up and Verication, continued
9.3.2 Resetting the Transponder
Should the need arise to reset the transponder locally, such as in the case of adding additional power supplies, a
generator, or carrying out maintenance activities, do the following:
Press and hold the reset button (RST) for approximately three (3) seconds until the ALM/RDY LED stops blinking and
turns solid (green). Release the button. The transponder will perform its power up sequence.
9.4 Verifying Communications via the Headend
Using SNMP, check connectivity by verifying power supply data by doing the following:
• With a MIB browser, check power supply data in the psIdent MIB branch (1.3.6.1.4.1.5591.1) of the SCTE-HMS
tree.
• With network management software, verify the DM3X Transponder has been identied and is reporting data
correctly.
88 704-939-B10-001 Rev. A5 (06/2019)
Page 89

9.0 Start Up and Verication, continued
(CPE) network.
9.5 Dual IP Mode
9.5.1 Overview
The DM3X Transponder can operate in either Single (default) or Dual IP mode. In Single IP mode, data from both the
cable modem and power supply are accessed and managed through the modem’s IP address on the secure private
modem network. In Dual IP mode, the Communications Module acts like a CPE device to the cable modem and registers
a second IP address on the public CPE network.
The following table lists some of the common characteristics of the DM3X Single IP and Dual IP congurations:
Single IP Mode vs. Dual IP Mode
Single IP Dual IP
Network
Data Access
Security
IP Addresses
Data Management
All data from both the cable modem and
power supply are accessed and managed
through the modem’s IP address on the
secure private modem network.
The Network Management System requires
access to the same private modem network.
Communication with the Communications
Module is limited to the private LAN network
and is very secure.
Where the IP address pool is limited, there is
no need to issue the Communications Module
a CPE IP address. Only one (1) IP Address is
required for the cable modem of the DM3.
Access to the Communications Module is
limited to the private LAN network making
data management less versatile, especially for
eld personnel.
The Communications Module acts like a CPE
device to the cable modem and registers a
second IP address on the public CPE network.
Dual IP mode allows the power supply data
to be accessed and managed from anywhere
within the public (CPE) network.
Since the Communications Module is a CPE
on the public network, access may be less
secure.
The CPE requires its own IP address, which
may be in short supply. A total of two (2) IP
addresses are required, one for the cable
modem and one for the Communications
Module.
The Communications Module is accessible
on the public (CPE) network. This makes data
management more versatile for eld personnel.
Table 9-3, Single IP Mode vs. Dual IP Mode
One CM IP address, CM and Communications Module
data; accessible on the private (LAN) network.
One CM IP address only accessible on the private (LAN)
network with access to both CM and Communications
Module data.
DM
Cable Modem Communications Module
MIB Tables
Cable Modem
One CPE IP address, Communications
Module data only; accessible on the public
DM
Communications Module (CPE)
MIB Tables
Fig. 9-6, Simplied Block Diagram Single IP Mode Fig. 9-7, Simplied Block Diagram Dual IP Mode
89704-939-B10-001 Rev. A5 (06/2019)
Page 90

9.0 Start Up and Verication, continued
9.5.2 Web Comparison, Single IP Mode/Dual IP Mode
To easily determine the conguration of the Communications Module when viewing it on its web page, check the
Conguration line as well as the entries for the CM and CPE addresses. A single IP Communications Module will display a
CM MAC address only, while a Dual IP Communications Module will also indicate a CPE address.
Displays CM MAC address only
Fig. 9-8, Single IP DM3X Transponder Web Page
Displays CM and CPE MAC addresses
Fig. 9-9, Dual IP DM3X Transponder Web Page
90 704-939-B10-001 Rev. A5 (06/2019)
Page 91

9.0 Start Up and Verication, continued
9.5.3 Conguring Dual IP Mode
To switch the DM3X Transponder from Single to Dual IP mode the atiMgmtSnmpSnmpCPEAccess parameter of the Alpha
MIB will need to be enabled. The Dual IP enable setting can be set through the DOCSIS Conguration File, the DM3.0
Setup File (atidoc33.cfg), the Provisioning Mode via the Communications Web page or remotely using SNMP by setting
the following Alpha MIB:
Enabling Dual IP Mode
MIB Parameter Object ID Description Value
atiMgmtSnmpSnmpCPEAccess 1.3.6.1.4.1.926.1.3.1.3.6.0
Table 9-4, Enabling Dual IP Mode
The CPE Communications Module IP can be assigned its IP, Subnet Mask and Gateway Addresses either via DHCP
(default) or manually, either through the web page or via the below SNMP settings:
NOTICE:
After conguring the Static settings, the Communications Module must be reset in order for the settings to take
eect.
Enables/Disables the
CPE Interface
1=Disabled (Single IP)
2=Enabled (Dual IP)
CPE Communications Module IP Settings
MIB Parameter Object ID Description Value
atiMgmtSysMonitoringCpeStaticMode 1.3.6.1.4.1.926.1.3.2.2.5.2.1.0
atiMgmtSysMonitoringCpeStaticAddress 1.3.6.1.4.1.926.1.3.2.2.5.2.2.0
atiMgmtSysMonitoringCpeStaticMask 1.3.6.1.4.1.926.1.3.2.2.5.2.3.0
atiMgmtSysMonitoringCpeStaticGateway 1.3.6.1.4.1.926.1.3.2.2.5.2.4.0
Table 9-5, CPE Communications Module IP Settings
Method by which the
CPE acquires its IP
address.
When the IP address
is static, this is the IP
address to which the
CPE will respond.
When the CPE IP
address is static, this is
the subnet mask.
When the IP address
is static, this is the IP
address of the gateway.
1=DHCP
2=Static
0.0.0.0 (default)
0.0.0.0 (default)
0.0.0.0 (default)
91704-939-B10-001 Rev. A5 (06/2019)
Page 92

9.0 Start Up and Verication, continued
To change the CPE IP address allocation option from DHCP to Static via the Web Server, refer to the following:
1. Connect to DM3X Transponder via Web browser per the procedure in Section 4.0, Web Interface.
2. In the Advanced Conguration menu of the Web page, click the Communications button.
3. Click the Static button in the CPE Communications Module column of the page. Refer to Figure 9-10. When
prompted for User Name and Password, refer to Section 4.3.1, Web Interface Security Levels for User Name and
Security Password
4. Enter the desired IP Address, Subnet Mask and Gateway in the provided data elds.
5. Click the Set button to update the Communications Module with the new values.
6. Conrm the new Static IP Address is listed under the CPE Communications Module column of the General page.
Refer to Figure 9-11.
Fig. 9-10, Dual IP Conguration Settings for Web Server Communications Page
Fig. 9-11, Dual IP Parameters for Web Server General Page
92 704-939-B10-001 Rev. A5 (06/2019)
Page 93

9.0 Start Up and Verication, continued
atidoc33.cfg in Dual IP Mode
NOTICE:
Refer to Section 3.3.5 for details on using the atidoc33.cfg le to propagate custom settings to eld deployed
DM3X Series Transponders.
In Dual IP mode, the DM3X Transponder will rst attempt to download the proprietary conguration le atidoc33.cfg
through the CPE’s interface from a TFTP server on the CPE network. In many networks, the TFTP server is blocked or
disabled, so the DM3X Transponder also has provisions to download this le through the Cable Modem interface from the
modem’s provisioning server if necessary. The lename and TFTP server location may also be specied through special
tags in the DHCP Oer, refer to Section 9.5.3, Specifying atidoc33.cfg Name and Location via DHCP Tags for details.
Similar to Single IP mode, any DM3X Transponder proprietary SNMP MIB setting may be placed in the modem’s DOCSIS
conguration le which would eliminate the need for atidoc33.cfg.
Changing Default atidoc33.cfg Download Settings in Dual IP Mode
The following table explains the download options available for the atidoc33.cfg le in Dual IP mode. The ‘Download
Interface’ indicates the network from which the DM3X Transponder will attempt to download atidoc33.cfg, either the CPE
network or the more secure cable modem management network.
Available Download Options
Parameter Comments Value
atiMgmtSysDownloadCongAddress
OID 1.3.6.1.4.1.926.1.3.2.1.10.0
DHCP Server IP
DHCP Option 54 Server IP
Overrides Default Location
Server or Relay Agent Address from DHCP
lease (No Change Necessary)
Server or Relay Agent Address from DHCP
lease
Search
Order
0.0.0.0
(Default)
1 CPE
As Set 2 CPE
As Set 3 CPE
Download
Interface
DHCP Tags See Section 9.5.3, Dual IP Mode As Set 4 CPE
CM’s
docsDevServerCongTftpAddress
1.3.6.1.2.1.69.1.4.11.0
Automatically set in modem
TFTP
Server
5 CM
Address
docsDevSwServerAddress
1.3.6.1.2.1.69.1.3.7.0
Set via DOCSIS conguration le As Set 6 CM
Software Upgrade Server Set via DOCSIS conguration le As Set 7 CM
Table 9-6, Available Download Options
93704-939-B10-001 Rev. A5 (06/2019)
Page 94

9.0 Start Up and Verication, continued
Specifying atidoc33.cfg name and location via DHCP Tags
In the User-dened area of the DHCP Tags, above option 192, the Communications Module will look for the following
value:
Tag: [Insert Unique Tag Name, e.g. ‘ati-tag’]
Value: aticong
In the Tag value immediately following will be the value for the TFTP server to use:
Tag: [Insert Unique Tag Name, e.g. ‘ati-ip’]
Value: IP address of TFTP server (i.e. 192.168.1.51)
Immediately following will be the value for the cong lename:
Tag: [Insert Unique Tag Name, e.g. ‘ati-name’]
Value: =atidoc33.cfg (an equal sign needs to be in front of the lename for the DHCP server to recognize this as a valid
entry)
9.5.4 Dual IP SNMP Community Strings
The Communications Module community strings used for the CPE Communications Module in Dual IP mode can be
congured by the operator. The default Communications Module read-only community string is AlphaGet. The default
read-write community string is AlphaSet. These settings can be congured with the DOCSIS Conguration File, the DM3.0
Setup File (aitdoc33.cfg) or remotely using SNMP by including the parameters below:
NOTICE:
These community strings are only applicable for CPE access in Dual IP mode. CM access in both Single
IP and Dual IP modes use standard DOCSIS community strings set through the modem conguration le’s
docsDevNmAccessTable. See Sections 3.3.1 and 3.3.2.
Community Strings
MIB Parameter Object ID Description Value
atiMgmtSnmpCommGet 1.3.6.1.4.1.926.1.3.1.4.1.0 Read Community String AlphaGet (default)[desired value]
atiMgmtSnmpCommSet 1.3.6.1.4.1.926.1.3.1.4.2.0 Read-Write Community String AlphaSet (default)[desired value]
Table 9-7, Community Strings
94 704-939-B10-001 Rev. A5 (06/2019)
Page 95

9.0 Start Up and Verication, continued
9.5.5 Security in Dual IP Mode
In Dual IP mode, additional SNMP security to the DM3X Transponder proprietary MIBs is required since the
Communications Module and power supply data is exposed on the CPE network, which may be more vulnerable to packet
sning and community string deciphering than on the secure cable modem network.
There are two methods of providing SNMP Security in Dual IP mode: the Data Access Key (default), and the Secure
Access List.
Method 1: Dual IP Security Using the Data Access Key
In Dual IP mode atiMgmtSnmpAlphaSetAccess is the only SNMP parameter within the Alpha proprietary MIB
with SNMP write access on the CPE network by default. When this parameter is set to the value of the parameter
atiMgmtSnmpAlphaSetKey, the data access key, SNMP read/write access is granted to all parameters in the Alpha MIB
tree with read/write attributes. When this access is granted, the value of atiMgmtSnmpCPESetEnabled is automatically
changed to “2” (enabled). After the operator is nished setting the SNMP variables, SNMP write access can be disabled
by setting the atiMgmtSnmpCPESetEnabled to “1” or by setting atiMgmtSnmpAlphaSetAccess to any value other than the
data access key or by performing a reset to the DM3X Transponder.
The data access key parameters can be changed from the default values through the DOCSIS Conguration File, the
DM3.0 Setup File (atidoc33.cfg) or remotely using SNMP by including the following Alpha MIB parameters:
Data Access Key Parameters
MIB Parameter Object ID Description Value
atiMgmtSnmpAlphaSetAccess 1.3.6.1.4.1.926.1.3.1.3.3.0 Set to Access Key
atiMgmtSnmpAlphaSetKey 1.3.6.1.4.1.926.1.3.1.3.4.0 Data Access Key (Dual IP) CIBSET (default)
Corresponds to whether
or not the action taken on
atiMgmtSnmpAlphaSetKey
atiMgmtSnmpCPESetEnabled 1.3.6.1.4.1.926.1.3.1.3.5.0
Table 9-8, Data Access Key Parameters
was successful. Once
enabled, writing 1 to this
variable will disable CPE
sets.
Set to match the value of
atiMgmtSnmpAlphaSetKey
1 = Disabled (False)
2 = Enabled (True)
95704-939-B10-001 Rev. A5 (06/2019)
Page 96

9.0 Start Up and Verication, continued
Method 2: Dual IP Security Using the Secure Access List
The DM3X Transponder provides an alternative method of providing additional SNMP security in Dual IP by limiting
access to the Communications Module’s CPE address. The Secure Access List method limits remote SNMP access to
four IP addresses. Only the IP addresses listed in the SNMP Access Table are able to read or write to the Alpha MIB
parameters from the public (CPE) network. This method overrides the default Data Access Key method.
The IP address entries in the SNMP Access Table can be set through the DOCSIS Conguration File, the DM3.0 Setup
File (atidoc33.cfg) or remotely using SNMP by including the following Alpha MIB parameters:
Data Access Key Parameters
MIB Parameter Object ID Description Value
atiMgmtSnmpAccessTable 1.3.6.1.4.1.926.1.3.1.2 Table of SNMP Access Addresses Object identier
atiMgmtSnmpAccessAddress.1 1.3.6.1.4.1.926.1.3.1.2.1.2.1 SNMP access IP Address #1 0.0.0.0 (Default)
atiMgmtSnmpAccessAddress.2 1.3.6.1.4.1.926.1.3.1.2.1.2.2 SNMP access IP Address #2 0.0.0.0 (Default)
atiMgmtSnmpAccessAddress.3 1.3.6.1.4.1.926.1.3.1.2.1.2.3 SNMP access IP Address #3 0.0.0.0 (Default)
atiMgmtSnmpAccessAddress.4 1.3.6.1.4.1.926.1.3.1.2.1.2.4 SNMP access IP Address #4 0.0.0.0 (Default)
Table 9-9, Secure Access Table Parameters
96 704-939-B10-001 Rev. A5 (06/2019)
Page 97

10.0 Specifications
DM3X Specications
Battery Monitoring (DM3X Only): Up to four strings of 36V/48V batteries
Power System Management:
Management Protocol:
Advanced Diagnostics
Intelligent Power Supply Interface:
Battery State of Health (Requires
AlphaAPPs option) (DM3X Only):
Network Tools
Utility Status & Events
Power Inverter State of Health:
Hardware
RF Cable Interface: F-connector, female, 75 Ohm, connector angle better accommodates coax bend radius when installed in some enclosures
Local Interface: RJ-45, Ethernet, multi-mode operation
LED Indicators:
I/O Control: 10-pin Molex: Digital input, Digital output, 5V, Common
AlphaBus: RJ-11 oset tab: Multiple-power supply and AlphaGen communications
Battery Monitoring (DM3X Only): 8-pin Molex battery string A/B and 8-pin Molex battery string C/D.
Tamper: NO or NC, software congurable, reads enclosure door magnetic switch
Environment
Operating Temperature: -40 to 65°C / -40 to 149°F
Storage Temperature: -40 to 85°C / -40 to 185°F
Humidity: 10 to 90% non-condensing
Regulatory Compliance:
Up to ve power supplies and an AlphaGen generator are managed from a single DM3X including coordinated battery charging,
system test and aggregated alarms
Standard ANSI/SCTE-HMS MIBs support basic power supply monitoring. Advanced diagnostics with battery and power module
analytics available via secure SNMP
Power supply user interface displays advanced diagnostics including: DOCSIS modem upstream and downstream RF levels, IP
address assigned by network DHCP server, MAC address and rmware versions, individual battery voltages to verify correct wire
harness installation
Power supply internal analytic diagnostics report when batteries should be serviced.
Battery String Runtime Remaining
Battery Life Remaining
QAM Constellation Diagram: Identify types of interference and distortion in downstream RF signal.
Microreections Meter: Locate microreections detected in Coax caused by physical impairments.
AC Line Status
Utility Performance Status (outages, sags, surges, frequency)
Utility Events (24-hour and lifetime number of events)
Power supply internal diagnostics report if the power inverter requires service.
Reported Values: Inverter OK, Replace Inverter
Ready/Alarm, Upstream registration, Downstream lock, AlphaBus activity, RF level, Link, CPE trac, Battery Sense harness
correctly connected
FCC Part 15 Class A
EN 50083-2:2006 EMC requirements for CATV equipment
EN 62040-2:2006 Uninterruptable power supply EMC requirements, Category C2
Surge: IEEE 587, Category B3
RoHS: Directive 2002/95/EC
* Advanced diagnostics are available through Alpha Certied network monitoring systems.
Network Communications
DOCSIS (RF) Port Protocols: IP (docDevNmAccess IPv4, Coexistence IPv6), UDP, TCP, DHCP, TFTP, SNMPv1,SNMPv2c, SNMPv3, HTTP, SNTP
Ethernet Port: HTTP Web interface for local on-site diagnosis.
MIBs:
Power supply (ANSI/SCTE 38-4)
Other SCTE-HMS MIBs as dened by the SCTE for power supply and generator status monitoring
Alpha proprietary advanced UPS diagnostics
97704-939-B10-001 Rev. A5 (06/2019)
Page 98

10.0 Specications, continued
DM3X Specications
Power Supply Monitored Parameters
Major Alarm:
Minor Alarm: Aggregate alarm consisting of: Temperature probe error, AC line loss, N+1 error
Input Voltage: Reported from power supply V(in) measurement
Output Voltage: Reported from power supply V(out) measurement
Output Current:
Output Power: Calculated; reported in AC Watts
Input Current: Reported in Amps
Input Power: Reported in Amps
UPS Status: AC Line, Standby, Test in progress, Test alarm
Charger Current: Reported in Amps
Battery Discharge Current: Reported in Amps
Enclosure Door: Open or Closed
Battery Voltage:
Battery Temperature: Reported from power supply battery Remote Temperature Sensor (RTS)
Remote Test Control: Start/Stop power supply test cycle
Generator Monitored Parameters (DM3X Only)
Status: Generator O, Running, Alarm
Generator Alarm:
Gas Hazard: OK, Alarm
Water Intrusion: OK, Alarm
Pad Shear: OK, Alarm
Enclosure Door: OK, Alarm
Ignition Battery Voltage: Reported in DC volts, ±100mV
Enclosure Temperature: Reported in Celsius, ±2°C
Low Fuel: OK, Alarm
Remote Test Control: Start / Stop generator test cycle
Cable Modem
Compliance: DOCSIS 3.0
Transmit Frequency Range: 5 to 42 MHz
Receive Center Frequency Range: 91 to 857 MHz
Output Power Range: Meets transmit power requirements with Multiple Transmit Channel Mode Enabled or Disabled
Input Signal Range: -15 to 15 dBmV
Channel Bandwidth: 6 MHz
Additional Equipment
874-842-21: Wire Kit, Battery Sense, 1x36V, 6’
874-842-20: Wire Kit, Battery Sense, 2x36V, 6’
874-841-21: Wire Kit, Battery Sense, 1x48V, 6’
874-841-20: Wire Kit, Battery Sense, 2x48V, 6’
Surge Arrestor
(Alpha p/n 162-028-10):
Aggregate alarm consisting of: Test fail, battery fail, line isolation alarm, output overload, inverter, over-temperature, N+1 active,
fuse fail
0 to 25A standard on port 1
Port 2 requires power supply DOC option
Individual battery voltage, up to four strings of 3 batteries (maximum 12 batteries),
±100mV per battery.
Aggregate alarm consisting of: Low oil pressure, engine over-temp, engine over-speed, crank limit, over voltage, low fuel, water
intrusion, pad shear, gas hazard, test fail
Female/Female connector conguration, “F” type connector with integral ground block. Required for all installations
98 704-939-B10-001 Rev. A5 (06/2019)
Page 99

11.0 Glossary
11.1 Acronym Denitions
• ANSI: American National Standards Institute
• BER: Basic Encoding Rules [Bit error Rate]
• CM: Cable Modem
• CMTS: Cable Modem Termination System
• CPE: Customer Premises Equipment
• DHCP: Dynamic Host Conguration Protocol
• DOCSIS: Data Over Cable Service Interface Specication
• EMS: Element Management System
• EVM: Error Vector Magnitude
• HMS: Hybrid Management Sublayer
• IT: Information Technology
• MAC: Media Access Control
• MER: Modulation Error Ratio
• MIB: Management Information Base
• NMS: Network Management System
• QoS: Quality of Service
• RTS: Remote Temperature Sensor
• SCTE: Society of Cable Telecommunications Engineers
• SI: Serial Interface
• SNMP: Simple Network Management Protocol
• SNTP: Simple Network Time Protocol
• TFTP: Trivial File Transfer Protocol
• TOD: Time of Day
• UDP: User Datagram Protocol
• VoIP: Voice over Internet Protocol
99704-939-B10-001 Rev. A5 (06/2019)
Page 100

Worldwide Corporate Oces
North America
Tel: +1 360 647 2360
Fax: +1 360 671 4936
Europe
Tel: +49 9122 79889 0
Fax: +49 9122 79889 21
Latin America
Tel: +561 792.9651
Fax: +561 792.7157
Asia Pacic
Tel: +852 2736.8663
Fax: +852 2199.7988
Alpha Technologies Services, Inc.
an EnerSys company
Alpha reserves the right to change specications without notice.
Alpha is a registered trademark of Alpha Technologies.
For more informati on visit w ww.alpha .com
© 2019 Alpha Technologies Services, Inc. All Rights Reserved.
704-939-B10-001, Rev. A5 (06/2019)
 Loading...