

Enersol Solar Pool Heating, Solar panel Installation Manual And Owner's Manual
SOLAR PANEL
INSTALLATION GUIDE
AND OWNERS MANUAL
www.enersol.com
May, 2015
© 2015 Enerworks

Enersol Pool Panel Installation Guide – EnerWorks Inc. ©, May 2015
2 | P a g e
Enersol Pool Panel Installation Guide – EnerWorks Inc. ©, May 2015
PANEL BOX
1 section with pre attached headers
2 clips
3 lag bolts
2 O-rings
1 long strap (48”)
1 short strap (12”)
TOOLS REQUIRED
Ladder, Safety gear (safety glasses, fall arrest, and
boots), Variable speed drill, 5/16” and 3/8” socket
drivers, Level, Hacksaw, Chalk line, Utility knife,
Caulking gun, Various tools (pliers, etc.)
INSTALLATION KIT (Purchased separately – 1
per install)
1 warranty card
1 installation guide/owner’s manual
1 orange installation tool
1 tube lag bolt roof sealant
1 tube O-ring lubricant
2 end caps assembly
2 O-rings
1 Lag bolt and short strap (12”)
ADDITIONAL PARTS REQUIRED
PVC heavy bodied cement
1 ½” - 2” elbows
1 ½” - 2” tees
1 ½” – 2” pipe
pipe hold downs (1 ½” and/or 2”)
1 ½” – 2” couplers
Extra lag bolts
3-way manual valve or
Automatic controller with 3-way valve
One way check valve
1 ½” – 2” ball valve
Teflon tape
SOLAR PANEL INSTALLATION
INFORMATION
If for any reason whatsoever, the installer of this
product does not feel comfortable and/or safe do
not proceed with the installation. The installation of
this product involves walking on the roof as well as
climbing ladders. Do not attempt unless you
understand all safety procedures involved with
power tools, climbing ladders and working on roofs.
To obtain ladder safety, roof safety and power tool
safety procedures, contact your local Hardware or
Building Supply Company and State or Provincial
Worker’s Safety Board.
The installation of Enersol Solar Panels may be
performed on a low pitched (less than 12:12 or 45
degrees angle) shingle and some types of metal
roofs. If an installation varies from these types,
Enersol should be advised and asked for special
installation instructions, visit our website or contact
your roof manufacturer. For example, on a flat roof
installation, we do not advise cutting into the
roof or drilling lag bolts into the roof.
EnerWorks Inc., its agents, distributors
and sales representatives of the Enersol
solar products are in no way responsible if
safety procedures, installation instructions and
common sense are not followed, or if EnerWorks
is not consulted should an unusual problem
arise. EnerWorks assumes no liability for
installation, parts or labor. If for any reason, you
question the installation instructions, safety
procedures and/or installation locations, do not
proceed, and contact EnerWorks immediately at:
1-877-268-6502.
Remember… SAFETY FIRST!
3 | P a g e
Enersol Pool Panel Installation Guide – EnerWorks Inc. ©, May 2015
In Ground Pool
Pool
Surface
Area
1 x 8
1 x 10
1 x 12
12 x 24
288
18 - 27
14-22
12-18
14 x 28
392
25 - 37
20-29
16-25
15 x 30
450
28 - 42
23-34
19-28
16 x 32
512
32 - 48
26-38
21-32
18 x 36
648
41 - 61
32-49
27-41
20 x 40
800
50 - 75
40-60
33-50
Above Ground Pool
15' Round
177
12 - 17
12-13
12
18' Round
254
16 - 24
13-19
12-16
21' Round
346
22 - 32
17-26
14-22
24' Round
452
28 - 42
23-34
19-28
27' Round
572
36 - 54
29-43
24-36
12' x 24' Oval
257
16 - 24
13-19
11-16
14' x 28' Oval
350
22 - 33
17-26
15-22
15' x 30' Oval
402
25 - 38
20-30
17-25
16' x 32' Oval
457
28 - 43
23-34
19-28
18' x 33' Oval
524
33 - 50
26-40
22-33
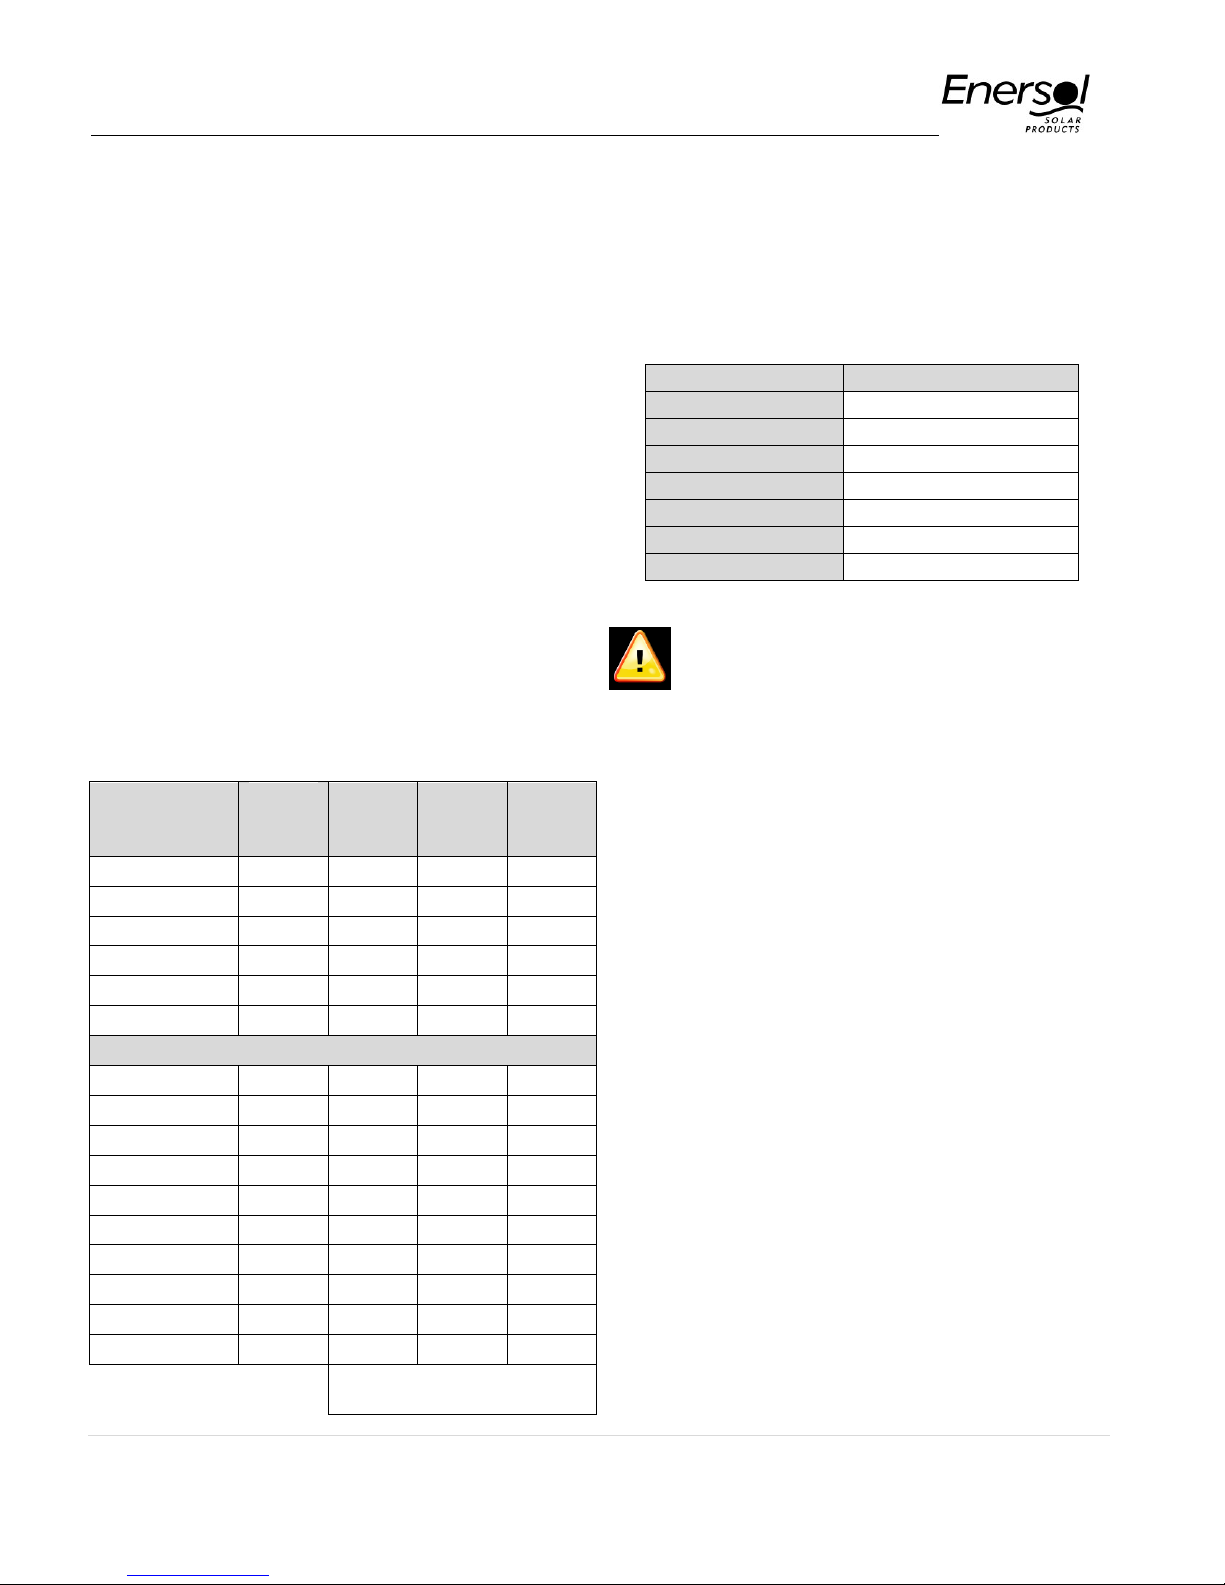
Recommended number of
boxes
Panel Size
Number of Boxes / Array
4’ x 8’ (AAA074-8)
7 - 9
1’ x 8’ (AAA086-8)
28 - 36
4’ x 10’ (AAA074-10)
6 - 8
1’ x 10’ (AAA086-10)
24 - 32
4’ x 12’ (AAA074-12)
5 - 7
1’ x 12’ (AAA086-12)
20 - 28
Custom size
Consult with EnerWorks
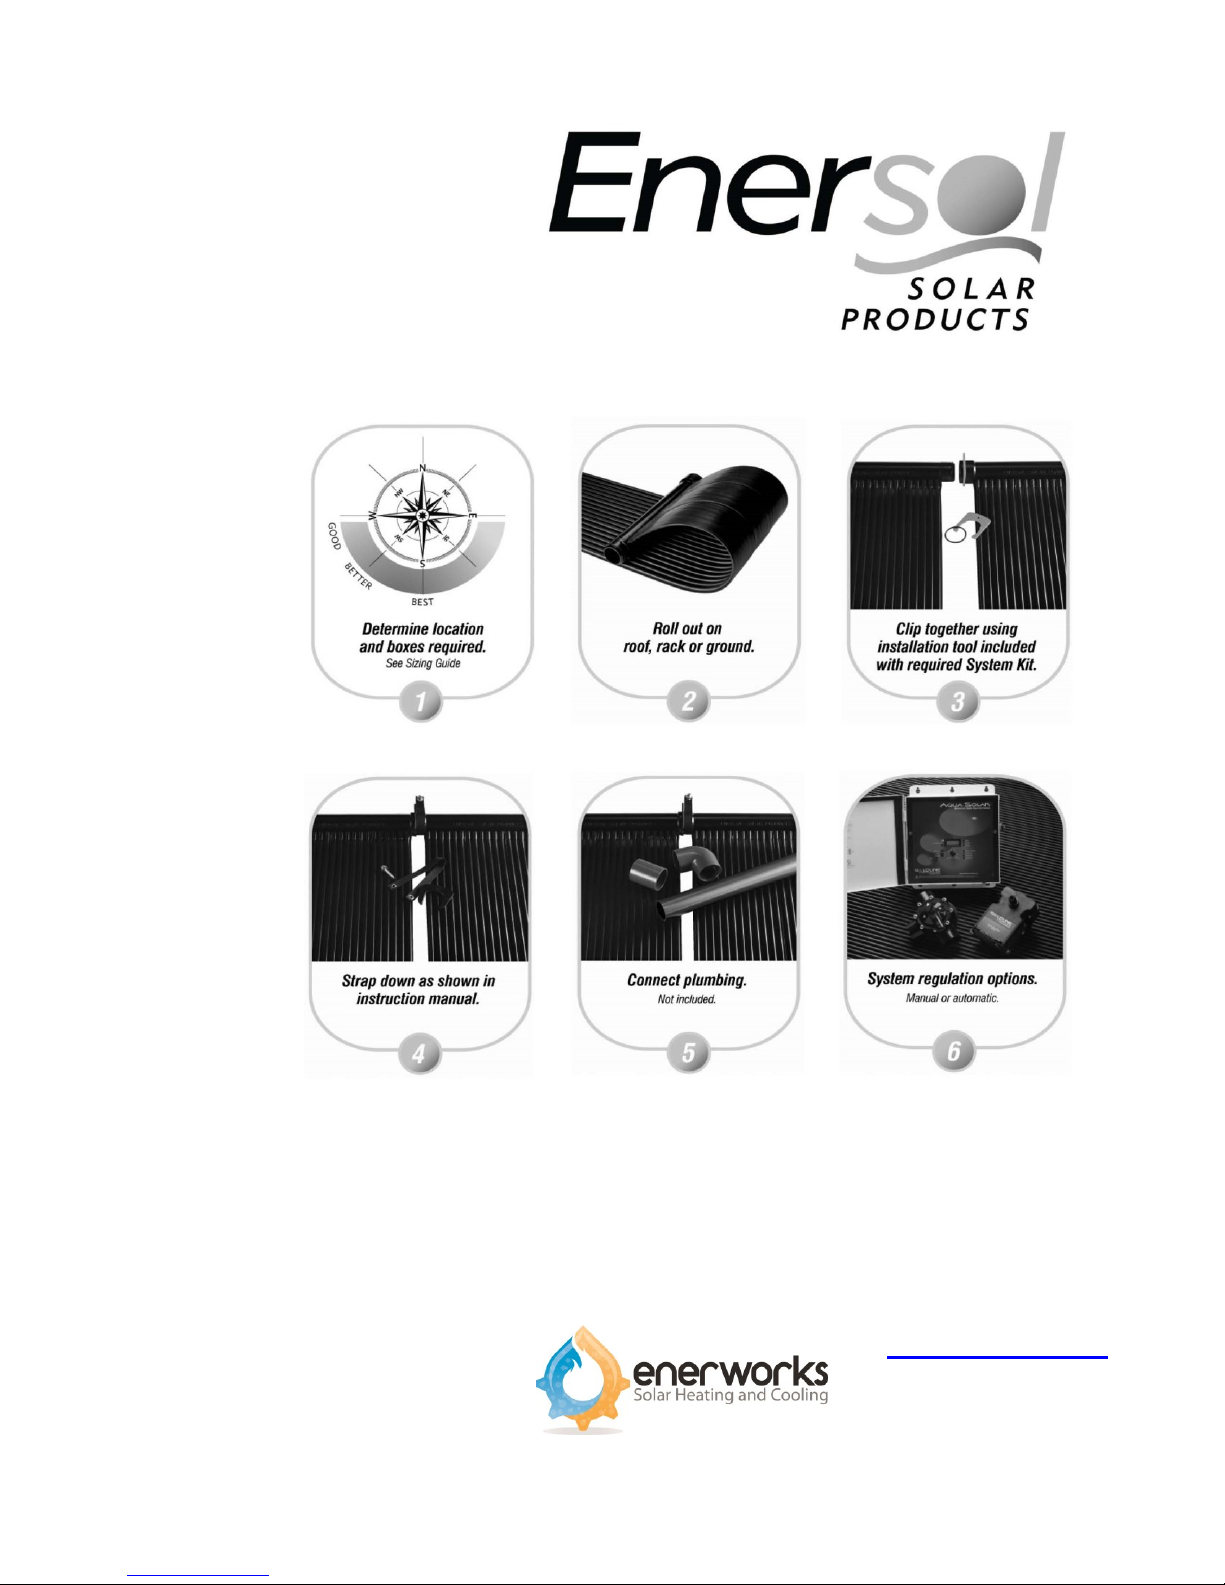
ASSEMBLY INSTRUCTIONS
OVERVIEW
1 - Plan your system:
a) Determine the location; south is best
followed by west or east. North is not
recommended. Panels should be tilted at an
angle of 45° or less.
b) Determine the optimum number of boxes
needed. The following quick sizing guide will
help you establish the number of boxes of
solar panels required for your pool. The
lower number is for a south facing roof with
full sun. If the roof is west facing or has more
shade, you will need the larger number. The
solar rule of thumb is 50% to 75% of the pool
surface should be represented in solar panel
area. Indoor pools require 100% coverage.
If panel area exceed number of sections that can be
installed in one array (see table) panels must be split
to equally sized arrays. See typical split-array
reverse return.
For additional information in sizing the
system please see System Design
considerations or call EnerWorks for
assistance at: 1-877-268-6502.
c) Measure roof area available to be sure the
panels will fit: Panels must be positioned
vertically from eave to peak with at least 6”
space around the panels for plumbing and
workspace. Four sections of connected
headers measure 51” and rubber panel strip
width measures 48”.
d) There are several different types of roofs.
Most will accommodate the entire panel
system in a continuous row. However, some
systems may need to be split over two or
more arrays or two or more roofs. When
splitting a system, you must balance equal
sections in each array. Remember to be
conscious of the best sun exposures, and
avoid roofs with shade.
e) Check that your existing pool pump is in
good working order. Verify that pool pump is
sized accordingly and that it will not exceed
the maximum panel flow. For information on
pump size see System Design
Considerations or consult with EnerWorks
at 1-877-268-6502.
4 | P a g e
Enersol Pool Panel Installation Guide – EnerWorks Inc. ©, May 2015
Pipe Size
Velocity
6 fps
8 fps
1-1/2"
35 gpm
50 gpm
2"
62 gpm
85 gpm
2-1/2"
90 gpm
120 gpm
3"
140 gpm
187 gpm
f) Plan for the plumbing and fittings required.
Ensure no to exceed maximum velocities
allowed on pipes when selecting pipes
diameters as per table below. See System
Design Considerations (page 13) for more
information on how to size the line set, or
consult with us at: 1-877-268-6502.
EnerWorks recommends between 6 – 8 fps
when sizing pipes for pool systems.
g) Gather all components and tools required for
the job.
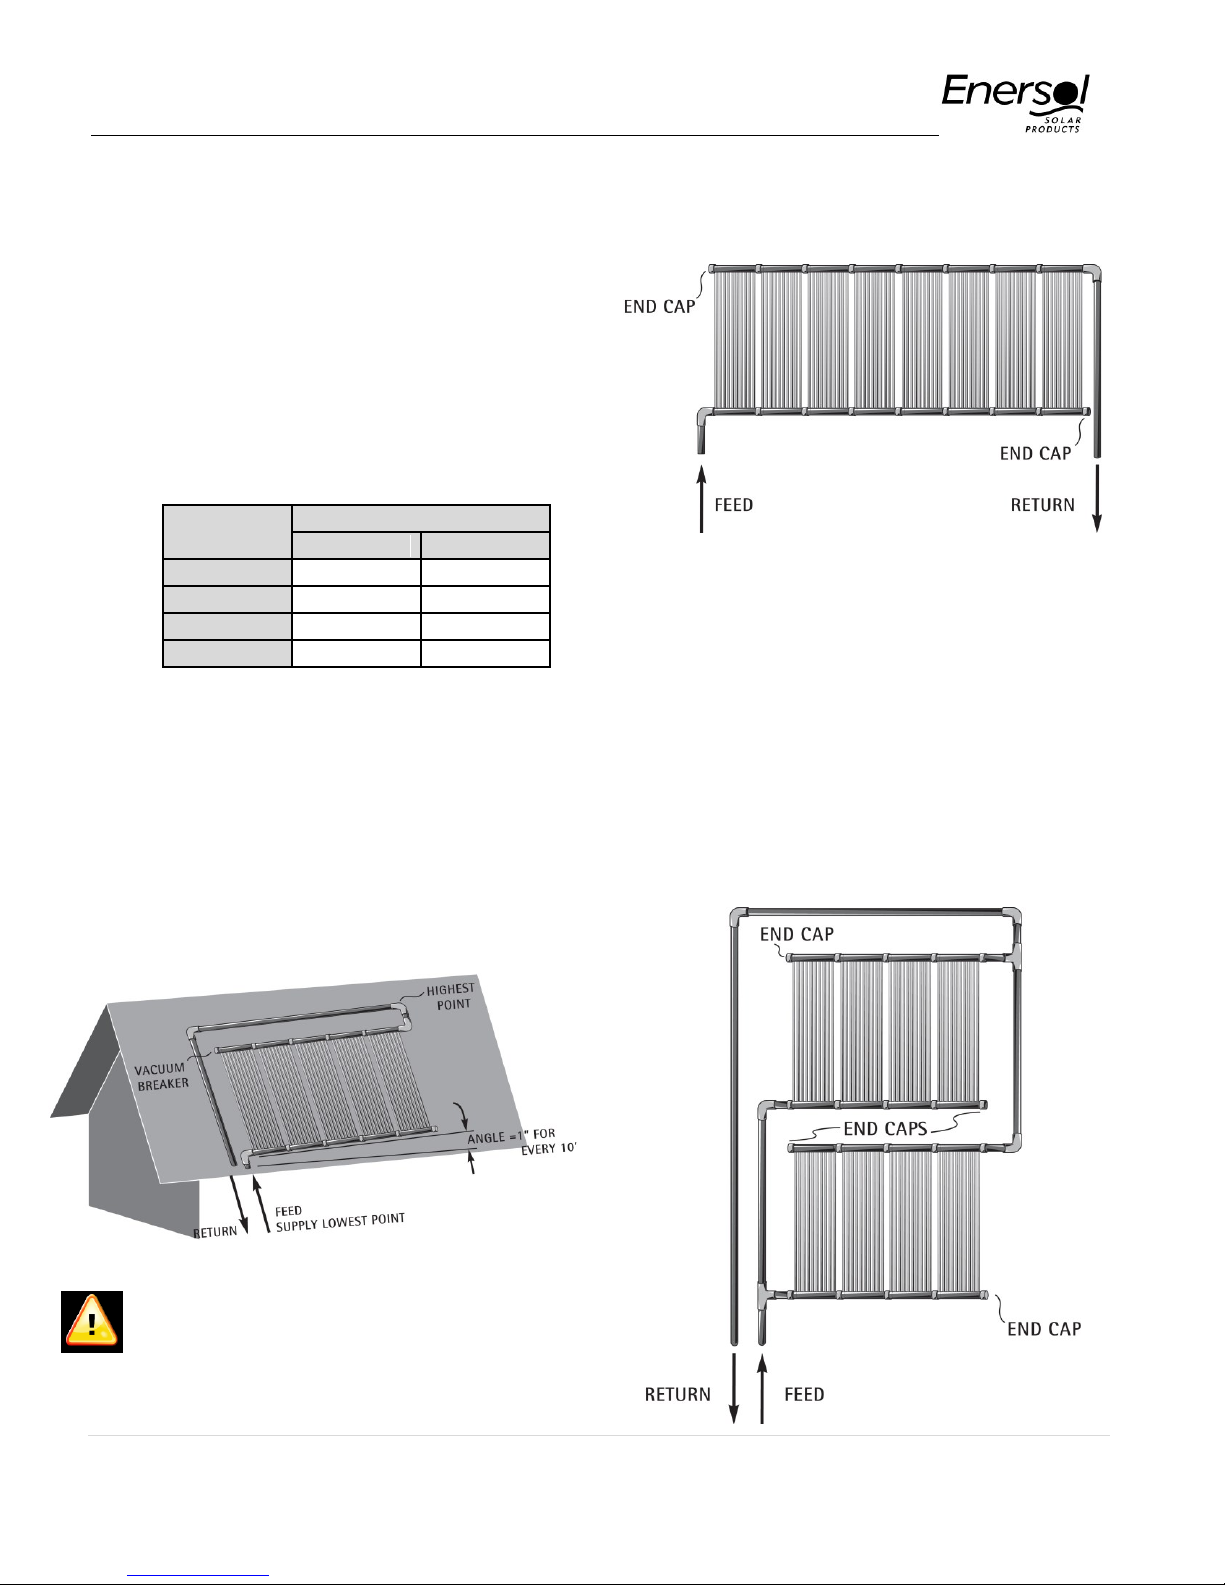
TYPICAL PITCHED ROOF MOUNT
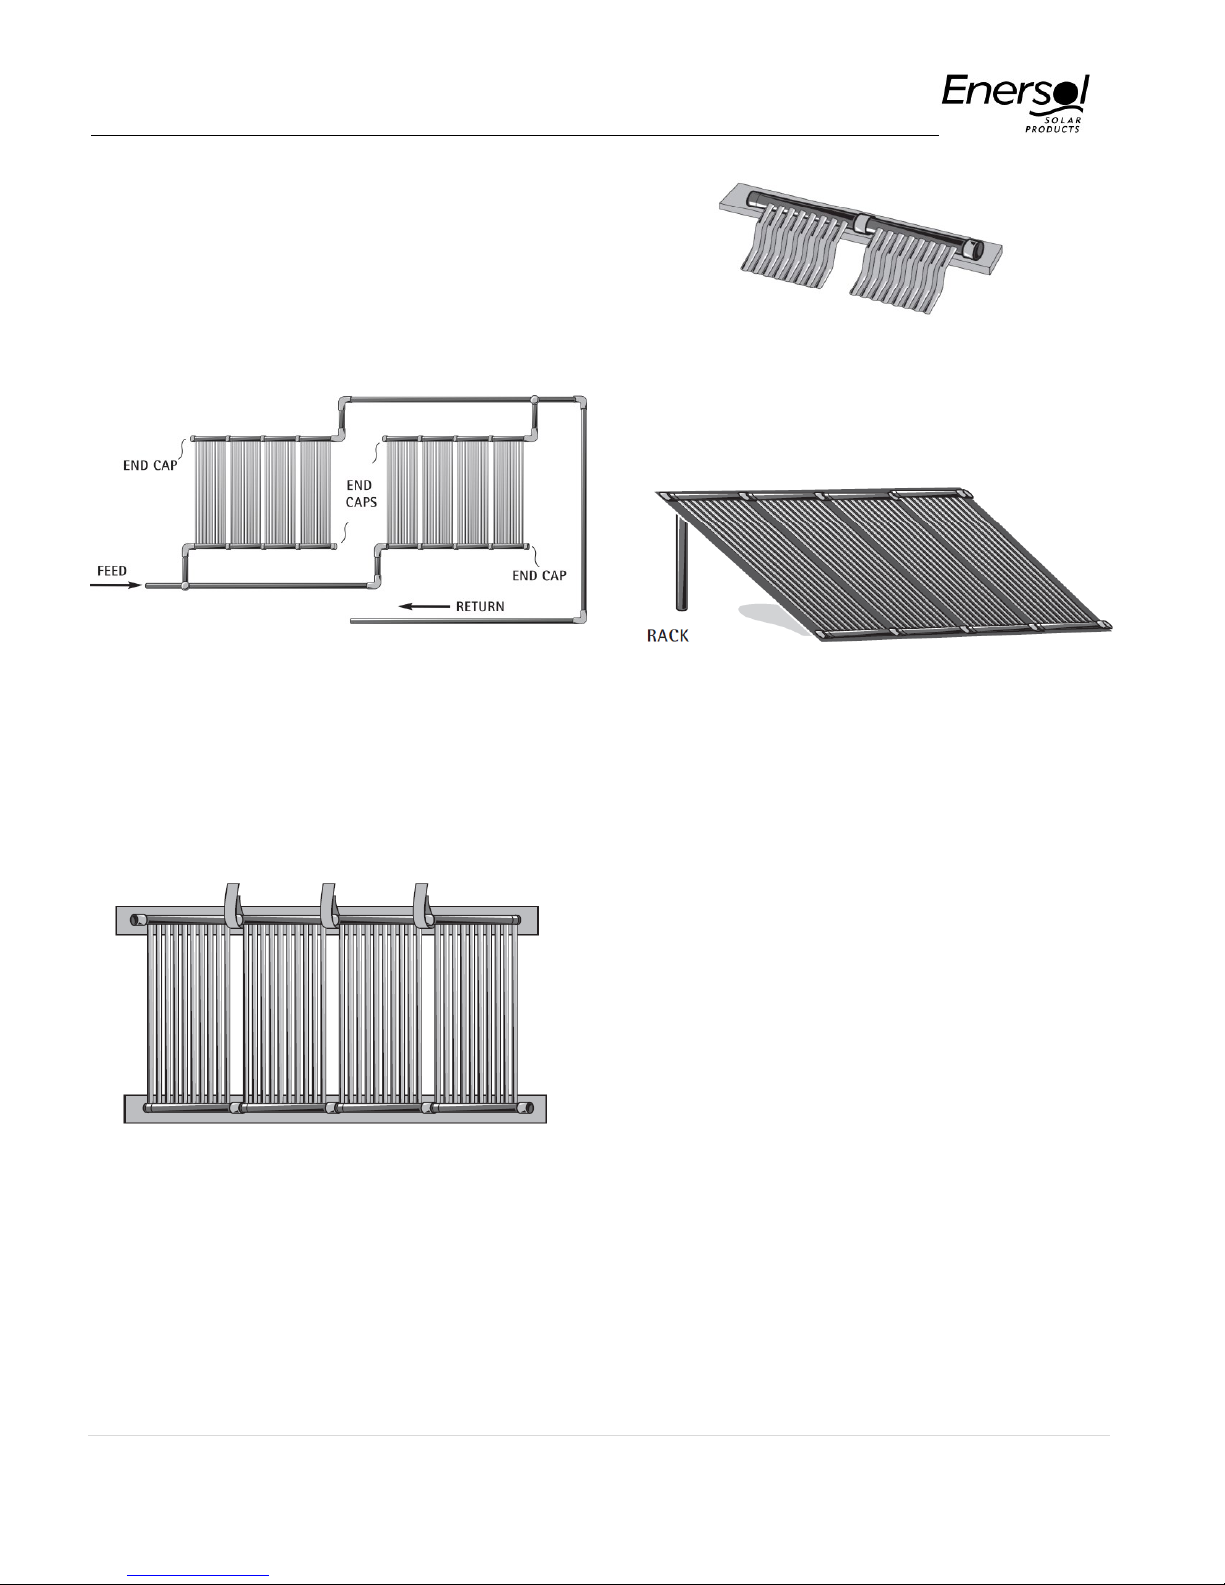
TYPICAL PARALLEL ROOF
TYPICAL SPLIT-ARRAY REVERSE
RETURN
When installing more than the recommended
maximum number of collectors or when there is
some space limitation on the roof (i.e. a series of
small roof), the array has to be split into two or more
banks following the reverse return configuration to
ensure proper distribution of flow through the
collectors.
Important: Angle panel headers inch for
every 10 feet to drain water back to feed/supply
inlet.
5 | P a g e
Enersol Pool Panel Installation Guide – EnerWorks Inc. ©, May 2015
ASSEMBLY INSTRUCTIONS
(CONTINUED)
TYPICAL SPLIT-ARRAY REVERSE
RETURN (Horizontal array)
TYPICAL RACK MOUNT
For safety reasons do not mount panels against a
pool. Rack plywood should be mounted 45° or less.
TYPICAL FLAT ROOF MOUNT
Attach headers to 2x6” lumber on each end. 2x6”
lumber may then be attached to roof using liquid
adhesive. Ensure that the rubber is not blocking any
roof drainage.
TYPICAL METAL OR TILE STYLE ROOF
MOUNT
Attach top header to 2x6 lumber with straps
supplied, and provide a rest for the bottom headers
on 2x6 lumber (w/o strapping to allow expansion and
contraction of the rubber), lumber may then be
attached to roofing material using appropriate
method. Always consult with the roof manufacturer
for best practices.
2 - Roll out panels on roof, rack or
ground:
TYPICAL GROUND MOUNT
Support headers with 2x6” lumber. Panels may be
set on any material that will insulate them from the
earth: plywood, metal, plastic or gravel. Note: Flat
roof or ground mount panels will not gain heat if
sitting in puddles of water, always ensure proper
drainage.
a) Carry the boxes to the installation area.
b) If installing on a roof – snap a chalk line as a
guide to where the top of the panels will be
aligned. It is important to place the panels on
a slight angle on the roof. This helps purge
the air from the system when filling, and
provides drainage when draining for the
winter. Angle the panel headers 4” for every
40 feet with the slope down toward the end
that has the feed line
6 | P a g e
 Loading...