

Page 1

ENERPLEX WARRANTY
Product Warranty Period
All new EnerPlex pro ducts carry a one (1) -year Limited War ranty from date of purchase against defects
in material and workmanship. The sales receipt from the rst consumer purchase, or other reasonable
documentation showing proof of purchase, is required to e stablish the start date of the warranty peri od.
Acknowledgment
By purchasing at EnerPlex you acknowledge that you have had an opportunity to review and accept
EnerPlex’s Warranty Terms and Conditions, including limitations, exclusions and disclaimers in these terms.
Exclusions and Limitations
EnerPlex will replace, at Ener Plex’s option and expense, any EnerPlex product that fails to operate during
the applicable warranty period due to a defec t in workmanship or material. Cert ain state laws do not all ow
limitat ions on implied war ranties or the exclusion or limitation of certain damages. If these laws apply to
you, some or all of the disclaimers, exclusions or limitatio ns may not apply to you, and you might have
additional rights.
If you retur n your product within the rst thirty (30) days of purchase, you will rec eive a new replacement
unit. Replacement units that are sent for products that are returned to us after t he rst thirty (30) days of
purchase may be refurbished units of similar cosmetic wear. Replacement produc ts provided pursuant to
this Limited Warranty shall be subject to the Ener Plex Limited Warrant y only for the balance of the or iginal
warranty period on the product being replaced.
This Warr anty is limited to the original consumer purchaser of the EnerPlex product(s) and is not
transferable to any subsequent owner.
EnerPlex’s Limited War ranty does not apply to (i) any product that is misused, abused, modied,
damaged by accident, or used for anything other than normal co nsumer use as authorized by EnerPlex’s
User Manuals and ot her product literature, OR (ii) any product purc hased through a third par ty vendor (ie:
eBay or unauthorized Amazon sellers or physical stores without an agreement with EnerPlex). For a list
of Authorized Enerplex resellers, please refer to the W here to Buy section on the www.goenerplex.com
web site.
Money Back Guarantee
EnerPlex’s prior ity is your 100% satisfaction with your purchase. If you are unsatised, for whatever
reason, with your purchase, you can return it to the original place of purchase within 30 days of receipt
of item(s). Claims for damaged or missing items must be rec eived within two business days of receipt
of merchandise.
What Isn’t Covered
EnerPlex’s Limited War ranty will not cover product failure because the owner of the product broke it, any
incidental damages, or any product that has been opened that isn’t intended to be op ened – Please do not
try to correct any failure issues that the product may be experiencing.
In additi on, this Warranty does not apply to products that are not Ener Plex branded even if pac kaged or
sold with EnerPlex products. Please contact the other manufacturer dire ctly for technic al support and
customer service.
How to Sub mit Your Claim
To submit your claim under the aforementioned Limited Warranty, please (i) ll out the form l ocated o n our
website, www.goenerplex.com, located under the “Suppor t” tab, then under “Retur ns and Exchanges,” OR
(ii) by emailing [email protected] and providing as much detail and infor mation as possible, OR
(iii) by calling the EnerPlex support line at 1-(720) 872-5100.
Your Inquiry will be responded to within 24 to 48 hours. O nce the inquiry is received, should you need a
replacement pro duct or to send your product bac k to obtain a refund, you w ill be provided with a prepaid
return label and a unique RMA (Returned Merchandise Authorization) number, as long as proof of
purchase is provided. You must properly package the product, and must inc lude the prepaid return label
and if possible a physical copy of the proof of purchase.
Upon rec eption of the said defective product , we will inspect the unit and determine if a f ree replacement
or full refund is to be given. If your product is no longer being manufactured or is out of stock, we may
replace your product with a similar or better product at our discretion.
Generatr Y1200
11
Version 4 (3/3/16)
Page 2
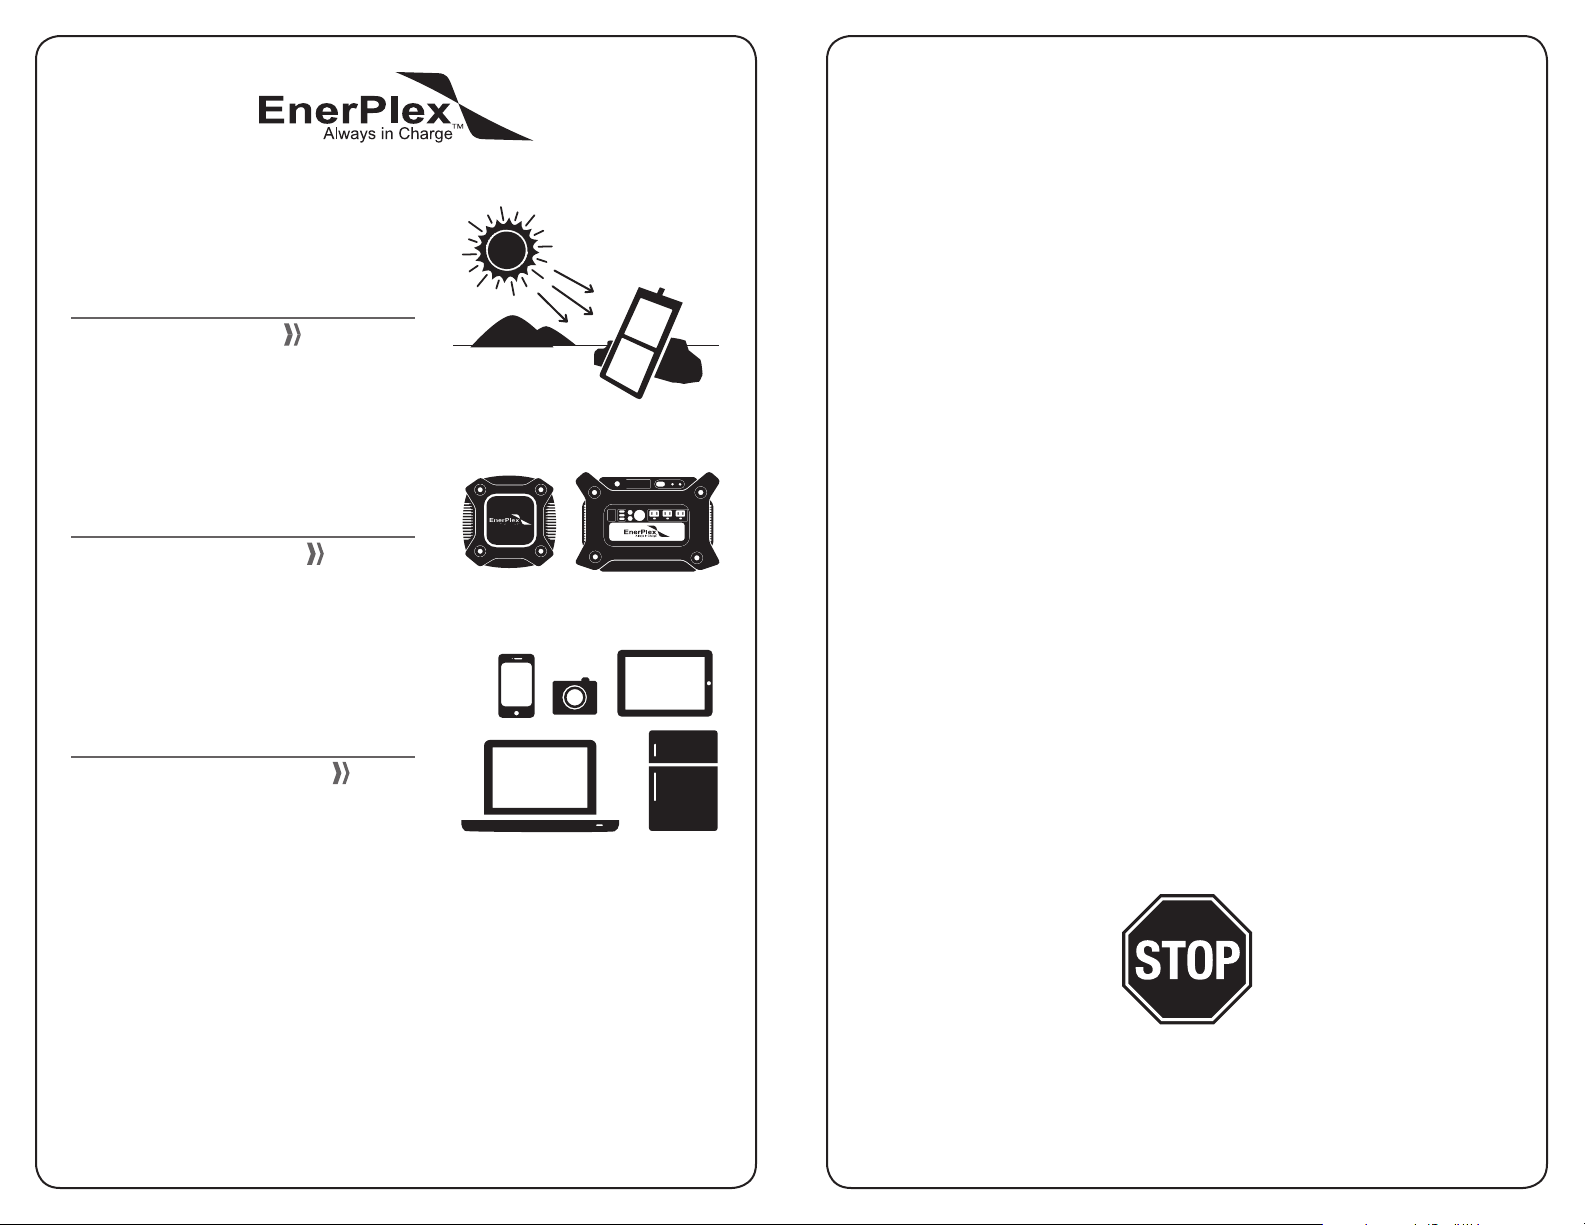
Solar
BATTERIES
collect it
STORE it
TABLE OF CONTENTS
Setup Instructions ................................................................................................2
Operating Instructions ..........................................................................................3
LCD Screen ..........................................................................................................5
Your New Generatr Y1200 ...................................................................................6
Package Contents ................................................................................................7
Frequently Asked Questions ................................................................................8
Technical Specications ......................................................................................9
Troubleshooting ..................................................................................................10
Warranty and Contact Info ................................................................................. 11
The EnerPlex Generatr™ Y1200 is a lightweight and portable 1231Whr large
format battery that is ideal for emergencies, camping, and any time you need
power for long periods of time. This unit weighs only 42 pounds, yet holds
enough power to keep your phones, tablets, laptops, and even refrigerators
powered up for days.
www.goenerplex.com
ACCESSORIES
USE it
Power your
adventure.
After unpacking your Generatr Y1200, follow the
setup instructions on Page 2
.
Warning: Risk of electric shock, DO NOT OPEN.
Do not expose to or immerse in water.
Page 3
SETUP INSTRUCTIONS OPERATING INSTRUCTIONS
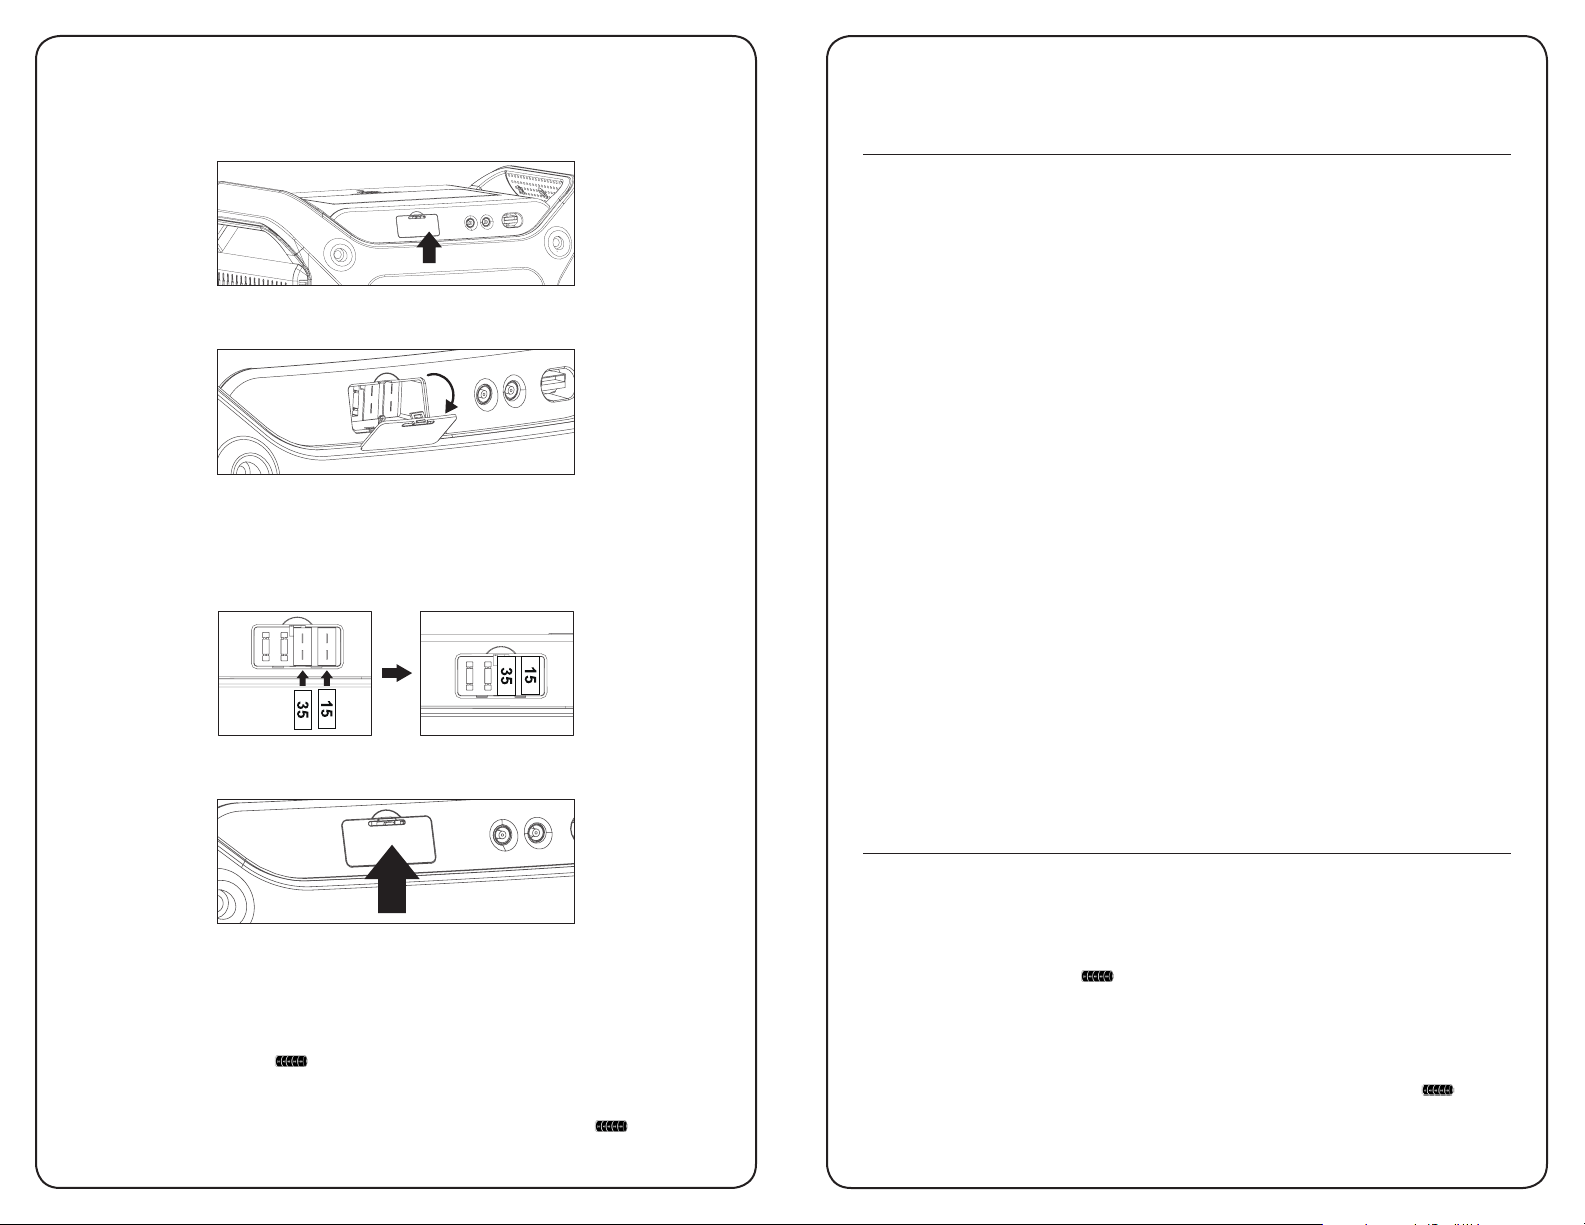
1) Locate fuse compartment on the back of the Generatr.
2) Open the compartment lid as shown.
3) Locate the fuses included and insert them as shown below. Note –
there will be a small spark when inserting the fuses, this is normal as the
electrical circuit is now complete. Be sure that the fuses are in the indicated
locations, incorrect installation may cause damage to the Generatr.
4) Close the compartment lid.
DISCHARGE
AC Discharge
Press Master Power Button, display will turn on.
• Switch AC On/Off switch to the On position.
• Plug in your AC devices, then turn them on.
DC Discharge
USB Ports
Press Master Power Button, display will turn on.
• USB Ports are active whenever the Y1200 has sufcient charge,
indicated by a solid USB icon.
•
Though not required, using the top USB port for Apple devices, or the
bottom USB port for Samsung devices, will allow for quickest charging times.
• Other USB devices may still be plugged in to the optimized USB ports.
12V Anderson, 6.3 x 3.0 mm Barrel & Cigarette Lighter Adapter
Press Master Power Button, display will turn on.
• Switch DC On/Off switch to the On position
- Plug in your 12V devices, then turn them on.
19V 7.4mm Jack
Press Master Power Button, display will turn on.
• Switch DC On/Off switch to the On position.
- Plug in the included laptop accessory cable or other compatible
19V device.
5) With no devices plugged in to the outputs, allow your Generatr to fully
charge from a suitable power source.
• Plug the 7.4mm plug into one of the 4 inputs (2 on front, 2 on back).
• The Input Indicator will start rotating.
• The Battery Indicator may show it is fully discharged, this is normal.
• Output Indicator icon will ash, signaling outputs are disabled until the
battery has sufcient charge.
• The Generatr will be fully charged when the Battery Indicator show 5
solid segments.
2
RECHARGING
Charging the unit via the included wall adapter
• Plug the 7.4mm plug into one of the 4 inputs (2 on front, 2 on back).
• The Input Indicator will start rotating.
• The Battery Indicator
• If the Generatr is fully discharged, the output indicator icon will ash,
indicating outputs are disabled. Outputs will be re-enabled when the
battery has sufcient charge.
• The Generatr will be fully charged when the Battery Indicator
5 solid segments.
• Estimated charge time via 110V wall outlet is between 10-16 hours.
will show the current charge level.
shows
3
Page 4
OPERATING INSTRUCTIONS
LCD Screen
RECHARGING (Continued)
Charging the unit via solar
• Plug the solar panel(s) into one or more of the four 7.4mm input jacks,
front or back.
• The Input Indicator will start rotating.
• The Battery Indicator
will show the current charge level.
• If the Generatr is fully discharged, the output indicator icon will ash,
indicating outputs are disabled. Outputs will be re-enabled when the
battery has sufcient charge.
• The Generatr will be fully charged when the Battery Indicator
shows
5 solid segments.
• Note: Maximum charging efciency will be reached by plugging solar
panels directly into the Generatr, bypassing any optionally included
regulator boxes. Only when there are more solar panels than input ports
available should a regulator box be used.
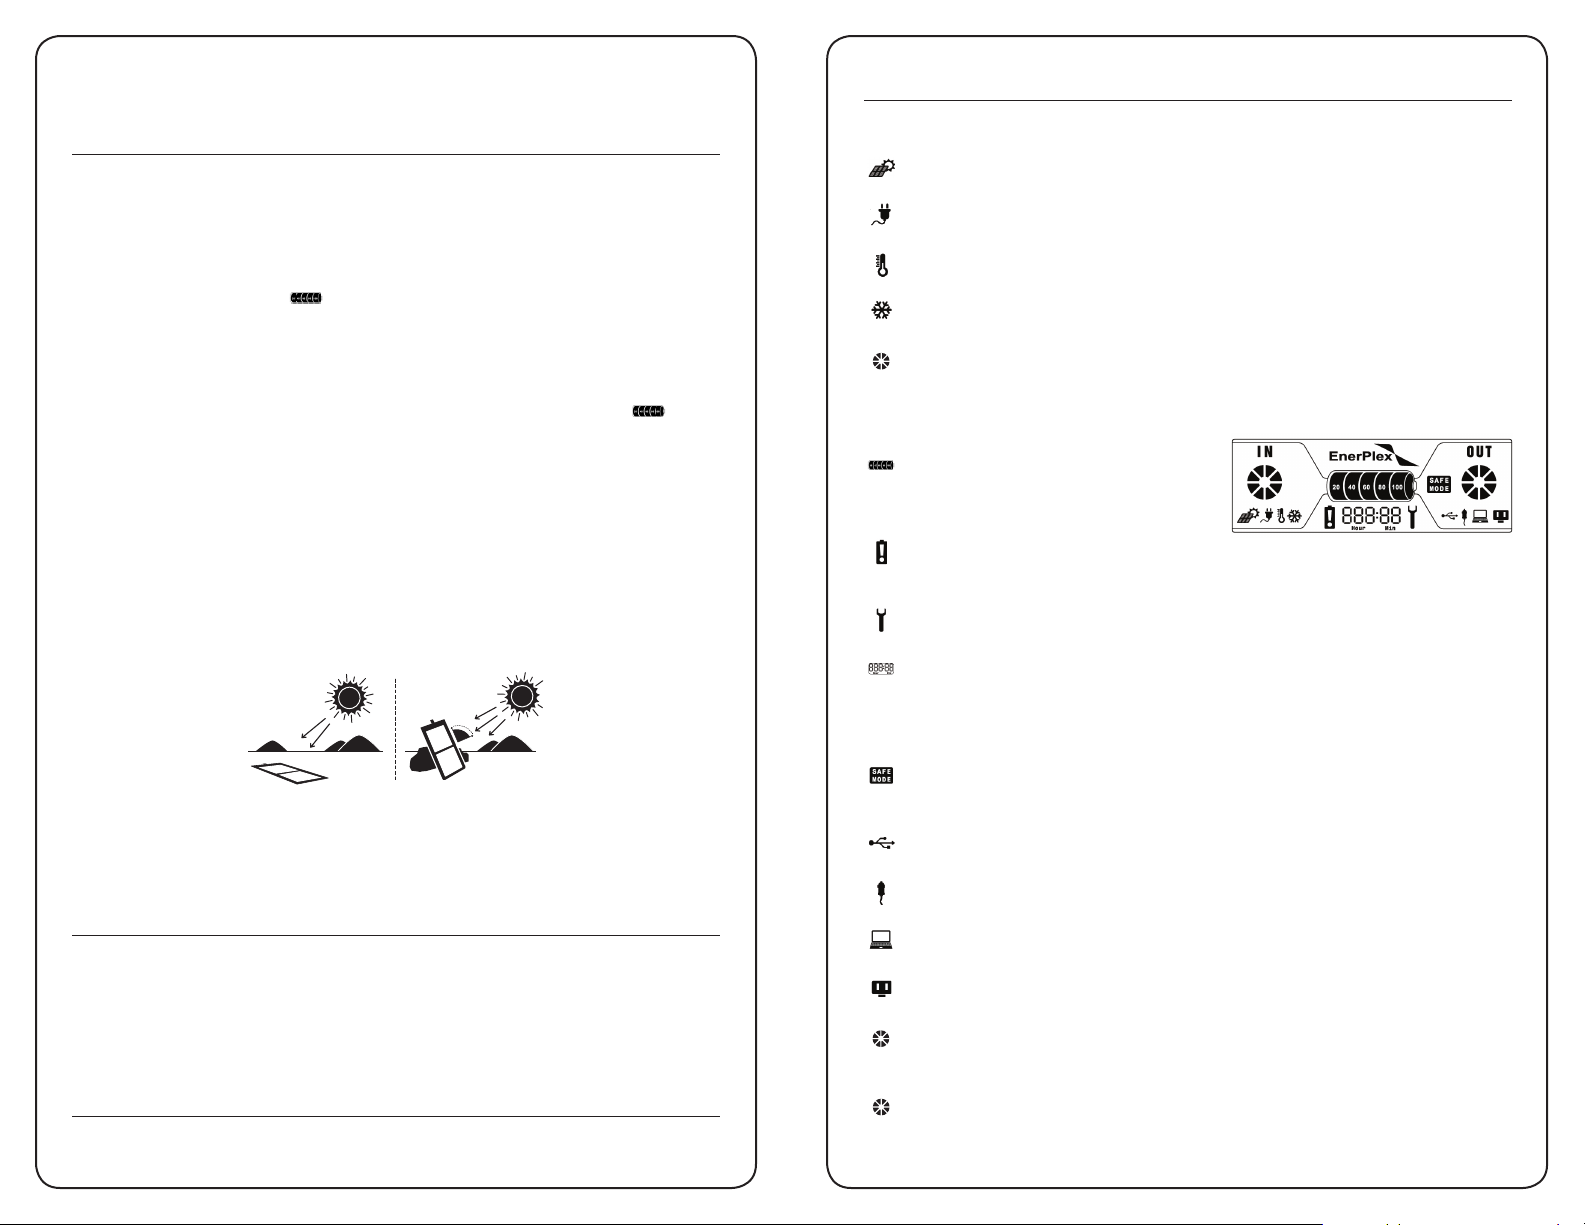
Charge Times Under Best Performance
• 40W Input = 30-40 hours
• 60W Input = 21-27 hours
• 80W Input = 16-20 hours
Average Performance Best Performance
*Solar charging times are estimates based on ideal sunlight conditions. To maximize
charging capabilities, we recommend angling your solar panels toward the sun to
receive the most direct sunlight.
• 100W Input = 12-18 hours
• 120W Input = 10-16 hours
90°
SHUTDOWN
• Turn off and disconnect all your devices from the Generatr.
• Turn off the DC and AC On/Off switches.
• Press and hold the Master Power Button until the display goes off.
STORAGE
Fully recharge the unit once every 3 months to ensure optimum battery health.
4
Inputs
Solar Panel Input
Icon will illuminate when the Generatr is charging from a solar panel.
Wall Outlet Input
Icon will illuminate when the Generatr is charging from a wall outlet.
High Temp Alarm
The internal temperature is too warm, move the Generatr to a cool location.
Low Temp Alarm
The internal temperature is too cool, move the Generatr to a warm location.
IN
Input Activated (when spinning)
When the Input Indicator is spinning, the Generatr is charging from one of its
inputs.
Battery
Battery Level Indicator
• All segments lit = Battery full
• No segments lit = Battery empty
• Flashing segments = charging level
Battery Alarm
The Generatr is malfunctioning, disconnect all loads and reset the unit by
powering it off.
Repair Indicator
The Generatr requires repair, contact EnerPlex for assistance.
Numeric Display
The numeric display shows the approximate hours and minutes left at the
current discharge rate.
Outputs
Half Power Output
The unit has entered Safe Mode, disconnect all loads and reset the Generatr by
powering it off.
USB Output
Icon will illuminate when the Generatr is powered on.
12V Output
Icon will illuminate when the Generatr is powered on and DC switch is ON.
19V / Laptop Output
Icon will illuminate when the Generatr is powered on and DC switch is ON.
110V Output
Icon will illuminate when the Generatr is powered on and AC switch is ON.
OUT
Output Activated (when spinning)
When the Output Indicator is spinning, the Generatr is discharging from one of
its outputs.
OUT
Output Disabled (when blinking)
When the Output Indicator is blinking, the Generatr has disabled all outputs.
Refer to Troubleshooting for guidance.
5
Page 5
YOUR NEW GENERATR Y1200
110V-AC OUTLETS
12V Output 12V OutputsUSB Outputs19V Outputs
Inputs
12VSolar / Adapter
M20 Tip for HP
M9 Tip for Dell
M11 for Thinkpad
M9 Tip for Dell
M9 Tip for Dell
PACKAGE CONTENTS
F
6
POWER Inputs
A
B
12V Output 12V OutputsUSB Outputs19V Outputs
G
H
J
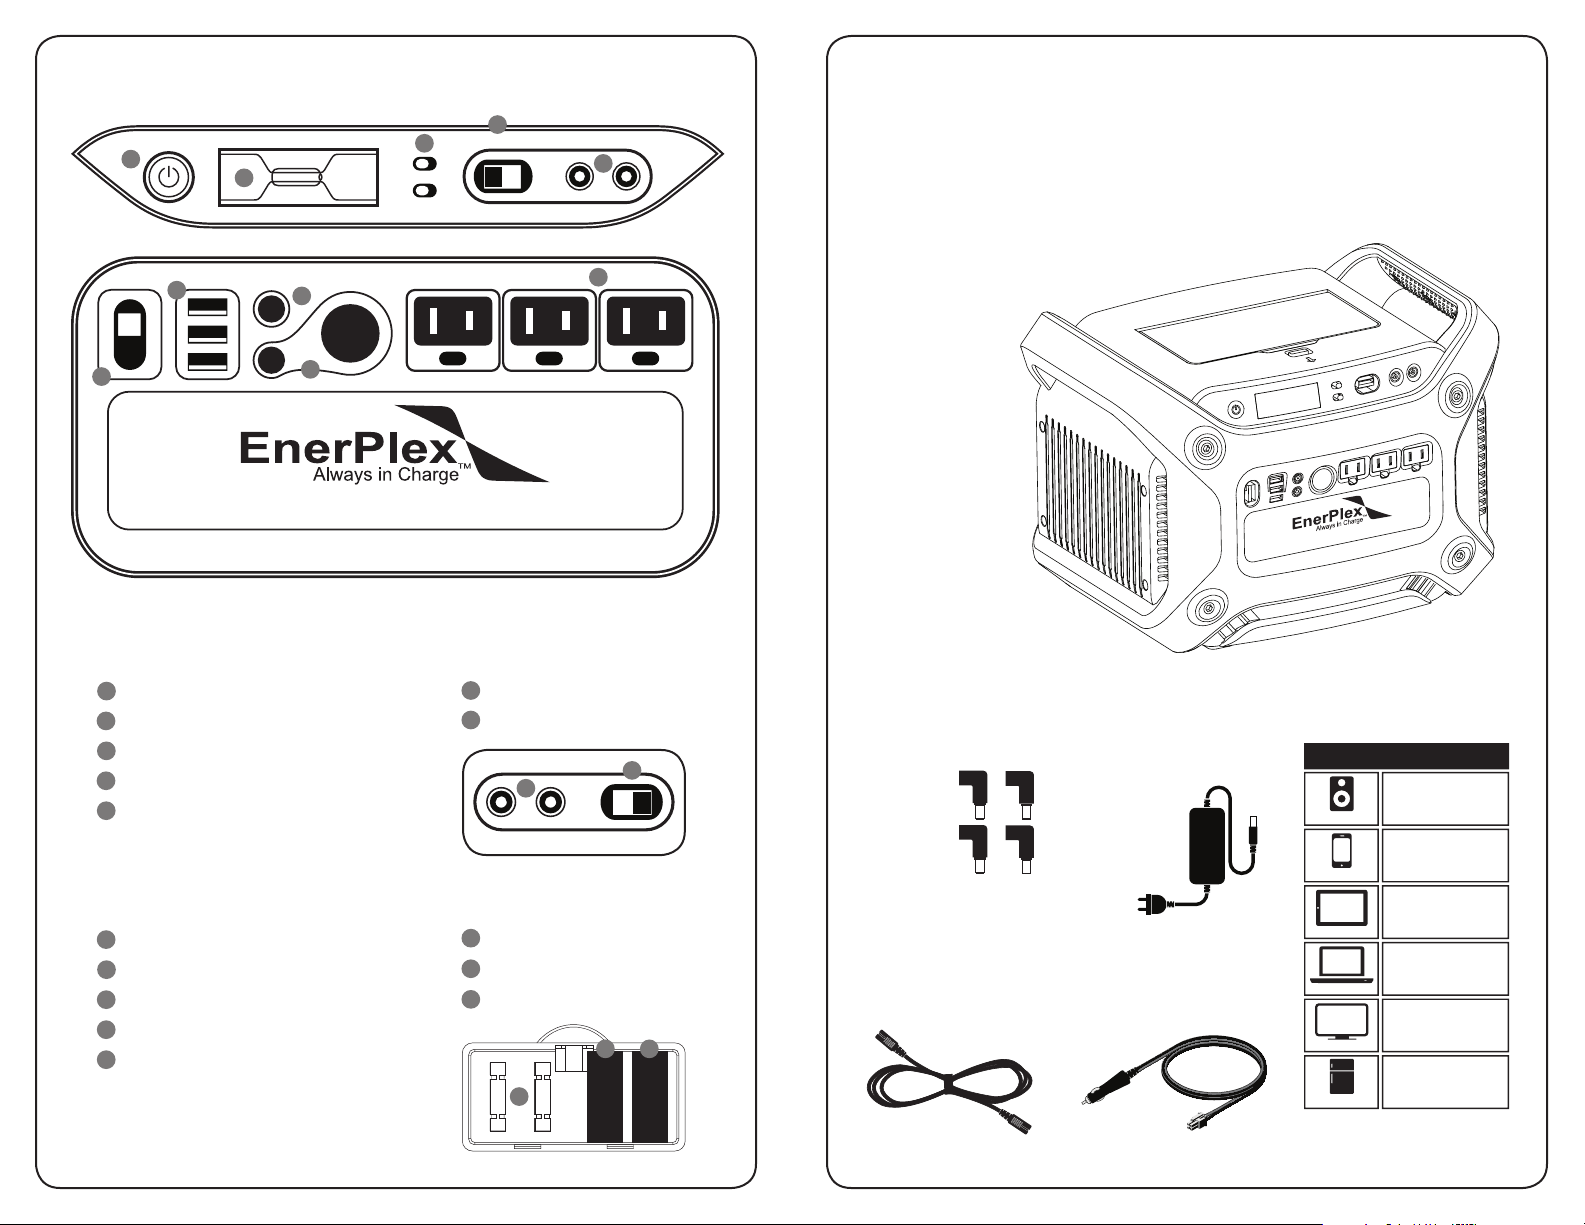
GENERATR Y1200
FRONT INPUT
A
Master Power Button
B
Display
C
AC/DC ON/OFF Switches
D
Anderson-Type Input
E
Two Solar/DC Inputs
FRONT OUTPUT
F
Anderson-Type Output
G
Three USB Outputs
H
19V DC Output
I
Three AC Outlets
J
12V Outputs
C
OFFON/DC
OFF ON/AC
D
E
12VSolar / Adapter
110V-AC OUTLETS
I
BACK INPUT
K
Two Solar/DC Inputs
L
Anderson-Type Input
K
FUSE COMPARTMENT
M
35 Amp ATO Fuse
N
15 Amp ATO Fuse
Spare Fuse Holder
O
M N
35
O
• 19V/120W Wall Adapter
• 12V to Anderson Adapter
• Output Power Cord
• Dell Tip x2 (M9)
• HP Tip (M20)
• IBM Tip (M11)
• User Manual
GENERATR Y1200
INCLUDED ACCESSORIES
L
M9 Tip
for Dell
M9 Tip
for Generatr
M20 Tip
for HP
M11 Tip
for Thinkpad
110V Wall Adapter
Use the corresponding tips with the laptop tip cable
to charge your laptop from the 19V output on the
front of the Generatr
15
Laptop Tip Cable 12V to Anderson Cable
Generatr Y1200
400+ CHARGES
MP3
TV
150+ CHARGES
50+ CHARGES
20+ CHARGES
12+ HOURS
16+ HOURS
Phone
Tablet
Laptop
Refrigerator
*Actual number of charges/
hours may vary.
7
Page 6
FREQUENTLY ASKED QUESTIONS
TECHNICAL SPECIFICATIONS
How often will I need to recharge my Generatr?
All lithium-ion batteries will naturally lose charge over time. To ensure a healthy
battery, recharge at least once every 3 months.
Can I replace the battery in my Generatr Y1200?
No, there are no replaceable parts in the Generatr Y1200. Do not open the
Generatr Y1200 under any circumstances, electric shock could result. If you
have difculties with your Generatr Y1200, please contact EnerPlex immediately.
How do I know if my Generatr Y1200 is charged?
To check the charge level of your Generatr Y1200, refer to the LCD Battery
Display. When lit up, you’ll see a battery outline with ve segments, indicating
the current charge level. You can turn on the Battery Display by pushing the
Master POWER button. It is OK to use your Generatr Y1200 even when it’s not
fully charged.
Can I charge my Generatr while it is being used?
Yes, the Generatr can power devices while it is being charged. However, if the
power you’re drawing from the Generatr is more than the power going in to it, the
battery will slowly deplete. When the battery is empty, outputs will be disabled.
The Generatr will automatically turn the outputs back on when the battery level
reaches 20% and then continue to discharge until empty.
Can I charge it from my car battery?
Yes, use the Anderson inputs on the front and back of the Generatr Y1200 for
this purpose. Note: The 12V and 19V inputs cannot be used simultaneously.
Is it possible to charge the Generatr Y1200 from other brand solar panels?
Yes, the unit is compatible with other brands of solar panels. The voltage range
needs to be between 16-34V.
Can I use the 12V and 19V inputs at the same time?
No, use either the 19V or 12V inputs.
Can I use the USB outputs for different devices than what is indicated?
Yes, the USB outputs are optimized to charge the indicated devices but can also
charge other USB-enabled devices as well.
How long will my Generatr last on a full charge?
The Generatr has a 1231Whr battery; however, actual watt-hour performance
will vary depending on load.
Please visit goenerplex.com for additional FAQs.
Charge Times
Charging With: Approximate Charge Times
AC Wall Charger (120W) 10-16 hours
Commandr Solar Panels (120W) 10-16 hours
Inputs
7.4mm wall adapter/solar input jacks
(2 front, 2 back)
Anderson Jacks (2) 12V
Internal
Battery Type Li-ion battery(NMC)
Battery Capacity 1231Wh (14.8V, 83.2AH) regulated
Battery voltage range 11V-1 6 V
Life Span >300 Charges
Fuses 1x15A, 1x35A
Inverter 1000W pure-sine wave inverter
General
Battery maintenance Charge every 3-4 months
Weight 42 LBS(19KG)
Dimensions 16.1” X 12” X 11.4”
Tested and Certied FCC, CE, RoHS
Operating usage temperature 20° - 131°F (-6° - 55°C)
Optimal storage temperature 70ºF, 21ºC
Outputs
110V AC outlets x 3 (1000W max total continuous, 1100W peak)
110V AC, 60Hz pure-sine wave
19V 7.4mm jack (120W max)
19V DC, 6.3A, regulated
12V (120W max total)
Anderson Jack
12V DC, 10A, regulated
Car charger outlet
12V DC, 10A, regulated
6.5 x 3mm Jack
12V DC, 10A, regulated
5V USB ports x 3
2.4A each, regulated
16- 34V
(409 X 305 X 290MM)
8
9
Page 7

TROUBLESHOOTING
If your devices are not recharging from your Generatr Y1200, follow these
steps:
1. Make sure the Master Power button is turned on.
2. Ensure the Output Port has been turned on.
3. Check the Battery Display. If it is at 20% or below, charge your
Generatr Y1200.
4. Verify your device is suitable for use with the Generatr Y1200:
a. All of the Generatr Y1200 output ports have their own max power
capacity. Check the Generatr Y1200’s Tech Specs to ensure your
device is compatible.
5. Check the LCD Display for warning icons:
a. Need Repair: Battery needs to be repaired, contact EnerPlex
b. Low Battery: Plug into a power source
c. Temperature Warning: The Generatr is either too hot or too cold.
Unplug devices, power down the Generatr, and move the unit to an
environment within the operating usage temperature range
If your output indicator icon is ashing:
All outputs have been disabled. To re-enable outputs:
1. Ensure that no maximum load has been exceeded. If it has, disconnect
this load and reset the Generatr by turning it off and on using the
appropriate AC or DC switch and Master Power Button.
2. If no load has exceeded its output port’s maximum, ensure that the battery
has more than 20% charge. If it does not, allow it to charge to at least 20%
before outputs re-enable.
If you are still experiencing trouble with your Generatr Y1200, please
call us at 1-720-872-5100 or by email at [email protected]
10
Page 8

 Loading...