

Enerlites HET01-3R, HET01-R Installation Instructions Manual

WARRANTY INFORMATION
3 MANUAL OFF MODE: In the MANUAL OFF mode
the wired lights are off.You can push MAN
button to ON mode and turn the wired lights ON.
4 MANUL ON MODE: In the MANUAL ON mode
the wired lights are on. You can push MAN
button to OFF mode and turn the wired lights OFF.
MAN MODES
1 AUTO ON MODE:In AUTO ON mode the wired lights are on. The wired lights
will be off until the next programming OFF time.
You can push MAN button while in AUTO mode
to manually override the program and turn the wired
lights on or off. The programmed switching
2 AUTO OFF MODE:In the AUTO OFF mode the wired lights are off. The wired
lights will be on until the next programming on
time.You can push MAN button while in AUTO
mode to manually override the program and turn
times remain.
the wired lights on or off. The programmed
switching times remain
04
05
06
INSTALLATION INSTRUCTIONS
repair, opened, taken apart or otherwise modified; (c) unit not used in
accordance with instruction; (d) damages exceeding the cost of the product;
(e) finish on any portion of the product, such as surface and weathering,
as this is considered normal wear and tear; (g) transit damage, initial
installation costs, removal costs, or rein-installation costs.
This warranty service is available by returning the product with proof
dealer from whom the unit was purchased.
of purchase, purchase date and a description of the problem to the
If within three(3) years from the date of purchase, this product fails due
to a defect in material or workmanship, we will repair or exchange it, at
its sole option free of charge. This warranty does not apply to: (a) damage
to units caused by accident, dropping or abuse in handling, acts of God
or any negligent use; (b) units which have been subject to un-authorized
FUNCTION FOR" DST" "RND" " RCL"
1 DST----Press and hold the HOUR button for 5 seconds, entering into the Daylight
Saving Time(DST) mode and time on clock will advance one hour; Press and hold for
another 5 seconds to cancel the DST function and time on clock will fall back one hour.
2 RND---Press and hold the MIN button for 5 seconds, entering into the Random
of the programmed settings.
Press and hold the MIN button for another 5 seconds to cancel the function.
Vacation option for extra security by varying the ON/OFF times within 30 minutes
3 RCL---It allows you to disable or enable the programmed ON/OFF settings.
a. push and release the RCL, the display will replace the setting with dashes.
b. repush and release the RCL, the display will show the previous programmed settings.
Nov.2010
3way( HET01-3R)
HET01-R / HET01-3R
2 It can be set as a clock.
Motor …….....…..……................……..........................……….……….... . 1/2Hp
DESCRIPTION
-01-
-02- -03-
SPECIFICATIONS
Voltage ……………………………………...........……….................. 120VAC,60Hz
Resistive……….........…...…….…………...................……………15Amps,1800W
Tungsten….......…....................…........….........…………………..15Amps,1200W
The timer can be programmed to control the regular light switch for energysaving and security.And it can be set to show the time as a clock.It can control
incandescent lights, fluorescent lights, flood lights, stereos, or heavy-duty loads
such as air conditioner and motors.
The timer has the following features:
2 For the first time use of the timer, push the R button with a ball point to clear
all programming and the clock, then push any button to enter into the main
program.
3 Push and release PROG button ,entering into the clock mode. Push and
release DAY button to set the day of the week .Push and release HOUR and MIN
button to set the current time.Finally,push the MAN button to preserve the
clock setting.
5 Push and release DAY button to set the day of the week .To set the day
selection(MO, TU, WE, TH, FR, SA, SU, MO to SUN, MO to FR, SA to SU) by
1 Automatic or manual operation. Push the MAN button to switch ON or OFF
at any time
3 Program up to18 ON/18 OFF settings .
4 With random feature(RND) ,the timer can add additional security by varying
the ON/OFF times within 30 minutes of the programmed settings.
5 Large, easy-to-read digital display,To-the-minute accuracy.
6 With Daylight Saving Time feature(DST).
OPERATION
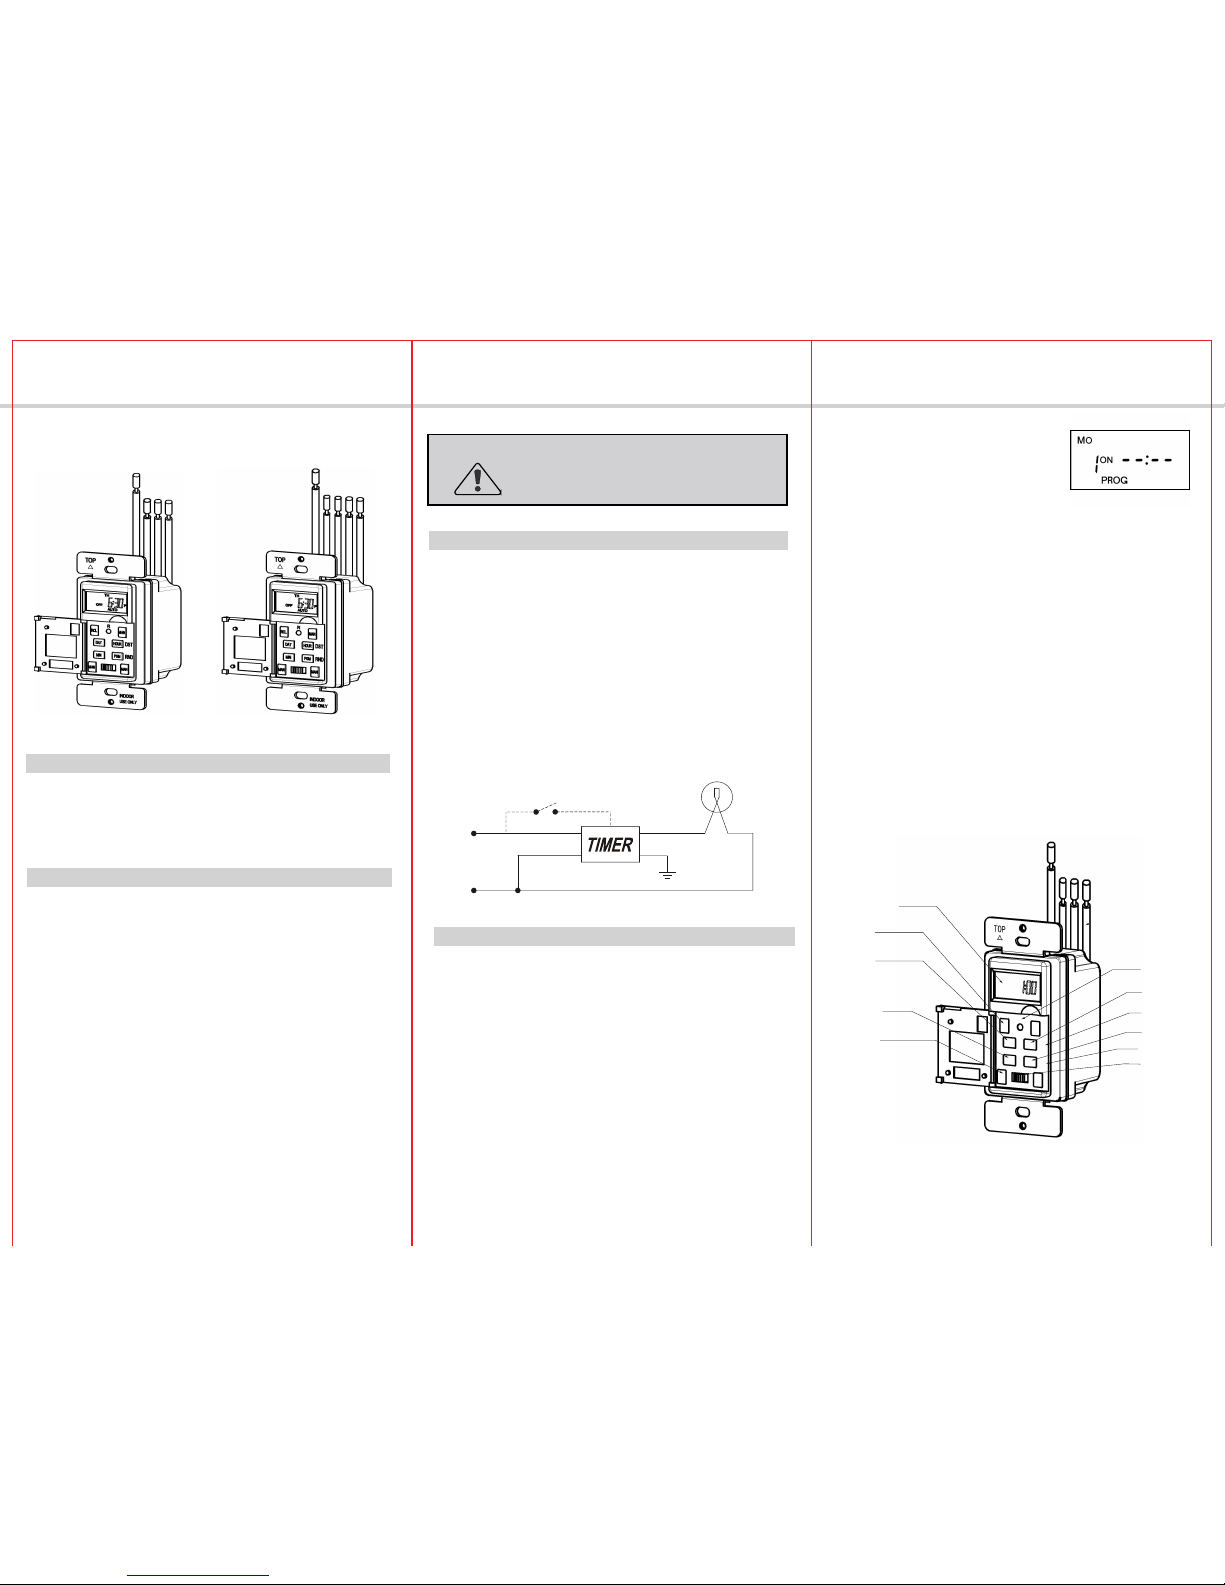
4 Push and release PROG button twice,
entering into program settings as the
right figure.
7-DAY DIGITAL IN-WALL TIMER
pressing the DAY button. After completing the ON setting, push and release
HET01-R
HET01-3R
1 Remove the existing wall switch.
2 Connect the hot wire of the building wires to the black wire from the timer,
using the wire nuts provided.Connect the neutral wire of the building wire to
the white wire from the timer.Connect the light wire to the red wire from the timer.
Be sure that all the wire nuts are secure.
3 Tuck the wires into the wall box and leave room for the timer.
4 Mount the timer to the wall box with the screws provided,and then install the
wall plate.
5 Slide the power button to ON,your timer is now ready to set.
6 For HET01-3R ,the load will be in the opposite state,when pushing the button
of the threeway switch.
Wiring diagram:
Note:
a. During the setting progress, the length of time that you stop operating should
not exceed 5 seconds ,otherwise the setting will fail and screen will return to the
b After finishing the clock and all program setting,eventhough the switch is slided
to OFF, the settings are still keep effective when you reslide the switch to ON.
original state;
6 The timer can program up to 18 ON/18 OFF setting pairs, so after completing
the first pair of ON/OFF setting,you can push and release PROG directly,
entering into the second pair of settings. Other settings are same.
1 Slide the switch to ON
11.RND
MIN
6.HOUR
3.MAN
4.PROG
1.DISPLAY
8.RCL
5.DAY
MAN
RCL
HOUR
PROG
MAN
MAN
DST
RND
OFF
ON
INDOOR
MO
OFF
AUTO
P
R
2.RESET
7.MIN
POWER
DAY
10.DST
the PROG button for OFF setting, the way is the same as ON setting, then
push and release the MAN button to preserve this pair of settings.
HOT(BLACK)
NEUTRAL(WHITE)
LOAD(RED)
GROUND
INSTALLATION INSTRUCTIONS
INSTALLATION
Turn off the circuit breaker before installation;
WARNING:
In door use only;
 Loading...