

Energy Star Xi3 NUC Lear Instruction Manual
Xi3 NUC Lear
Install Everywhere. Manage Anywhere.

Table of Contents
Chapter 1 - Getting Started ................................................. 3
Introduction
What’s Inside?
Getting Started
Your Operating System
Move Data onto yo ur Xi3 N U C
Chapter 2 – Get to Know your NUC
Processor
System Mem ory
Memory Configurations .......................................................... 6
Graphics ................................................................................. 6
Video Memory Allocation ....................................................... 6
High-bandwidth Digital Content Protection (HDCP) .............. 6
High Definition Multimedia Interface (HDMI) ......................... 6
USB ........................................................................................ 6
LAN Subsystem ..................................................................... 7
Hardware Management Subsystem....................................... 7
Power Management ............................................................... 7
Energy Saving Settings .......................................................... 8
Intel Security and Ma na g eab ility Te chn ol ogi es
Intel® vPRO™ Technology ................................................ 8
Intel® Active Management Technology ............................. 8
Intel® Virtualization Technology (Intel® VT), is a hardwareassisted technology that, when combined with softwarebased virtualization solutions, provides maximum system
utilization by consolidating multiple environments into a
single server or client. ........................................................ 8
Intel® Virtualization Technology for Directed I/O ............... 8
Intel® Trusted Execution Technology ................................ 9
Intel® Identity Protection Technology ................................ 9
Intel® Anti-Theft Technology .............................................. 9
Trusted Platform Module (TPM). ........................................ 9
The Dangers of Static Electricity
Removing & Replacing Components ..................................... 9
Turn Off Your Xi3 NUC .......................................................... 9
Restarting Your Xi3 NUC
Chapter 3 – BIOS Settings ................................................. 10
System Management BIOS (SMBIOS) ................................ 10
Legacy USB Support ........................................................... 10
BIOS Updates ...................................................................... 10
BIOS Recovery .................................................................... 11
Boot Options ........................................................................ 11
Power Button Menu ............................................................. 11
BIOS Security Features ....................................................... 12
........................................................................... 3
....................................................................... 3
...................................................................... 3
........................................................ 4
............................................ 4
.................................. 5
.............................................................................. 5
.................................................................... 5
.......................................... 9
...................................................... 9
.................. 8
Chapter 4 – Troubleshooting ............................................ 13
Front-panel Power LED Blink Codes ................................... 13
BIOS Error Messages .......................................................... 13
Chapter 5 – Legal Stuff ...................................................... 14
Important Safety Information
Important Handling Information
............................................. 14
......................................... 15
Environmental ...................................................................... 15
Regulatory Information......................................................... 15
Glossary ............................................................................... 16
Corporate Information .......................................................... 16
Xi3 Corporation’s mission is to provide efficient and
low-maintenance technological solutions that improve lives with
minimal environmental impact. We’ve designed the
meet the latest ENERGY STAR® guidelines for energy
efficiency. ENERGY STAR is a U.S. En
Agency voluntary program to reduce
pollution. Xi3 computers are ener
default ENERGY STAR settings
energy savings. For specifics, see
page 8 of this manual.
Xi3 NUC to
vironmental Protection
energy consumption and
gy efficient and come with
recommended for optimal
“Energy Saving Settings” on

Triple Display Configuration Resolutions
Active Display
Active Display
Active Display
DisplayPort
1920 x 1200 @ 60 Hz
DisplayPort
1920 x 1200 at 60 Hz
HDMI
1080P at 60 Hz
Chapter 1 - Getting Started
Introduction
Aside from the stunningly small form factor, the Xi3® NUC Lear features the Intel® Core™ i5 vPro™ processor offering robust
computing capabilities and complete remote management capabilities; allowing for remote management and the ability to
manage/repair systems anytime from anywhere.
What’s Inside?
When you open the box containing your Xi3 NUC, you should find:
One fully integrated Intel® NUC DC53427HYE including RAM, SSD,
•
OS, and WiFi (if applicable)
One Power Cord
•
One Power Adaptor
•
One Vesa Mount
•
Getting Started
Step One - Connect Your Display
To get started, connect your monitor cable to your display and then connect to either the HDMI or one of the two
DisplayPorts found on your NUC.
The HDMI port supports standard, enhanced, or high definition video, plus multi-channel
digital audio on a single cable. The port is compatible with all ATSCV and DVB HDTV standards and supports eight full
range channels at 24-bit/96 KHz audio of lossless audio formats such as Dolby* TrueHD or DTS* HD Master Audio. The
DisplayPort is designed to support connections between PCs and monitors, projectors, and TV displays. It is suitable for
display connections between consumer electronics devices such as high definition optical disc players, set top boxes, and
TV displays.
Multiple DisplayPort and HDMI configurations feature the following:
• Two independent displays
• Single HDMI 1.4a with 1080P support
• Single DisplayPort 1.2 with 4K support
• Collage Display
Step Two - Connect Your Mouse and Keyboard
Connect your keyboard cable to any USB port on your Xi3 NUC. Next, connect your Computer Mouse cable
your
keyboard and mouse share a combo USB cable, connect this to any USB port. Additionally, you can also use a wireless keyboard and/or
mouse; if you choose to do so, insert the wireless USB keyboard and/or mouse module(s) into any USB port(s).}
Step Three - Connect Your External Hard Drive
If you will not be using an external hard drive, skip this step. If, however, you will be using an external hard drive, connect this device into
appropriate port on your Xi3 NUC
the
drives. This is especially
is possible to launch
will seriously degrades
noteworthy as a USB thumb drive cannot be used to launch a Windows Operating System. Additionally, although it
openSUSE and other Linux Operating Systems with a USB thumb drive, we strongly recommend against doing so as this
the performance of the Operating System.}
. {NOTE: When we refer to external hard drives in this step, we are NOT referring to USB sticks or thumb
Step Four - Connect to the Network
If you intend to surf the World Wide Web or use email, you will need a network connection. For many Xi3 NUC owners, this will involve
plugging an Ethernet cable into the Ethernet Port on the back of your computer.
will need a wireless
your computer.
connection, such as a wireless network adaptor, which can be plugged into one of the unused USB Ports on the back of
to a different USB port.
{NOTE: If
If, however, you want to connect to a network wirelessly, you
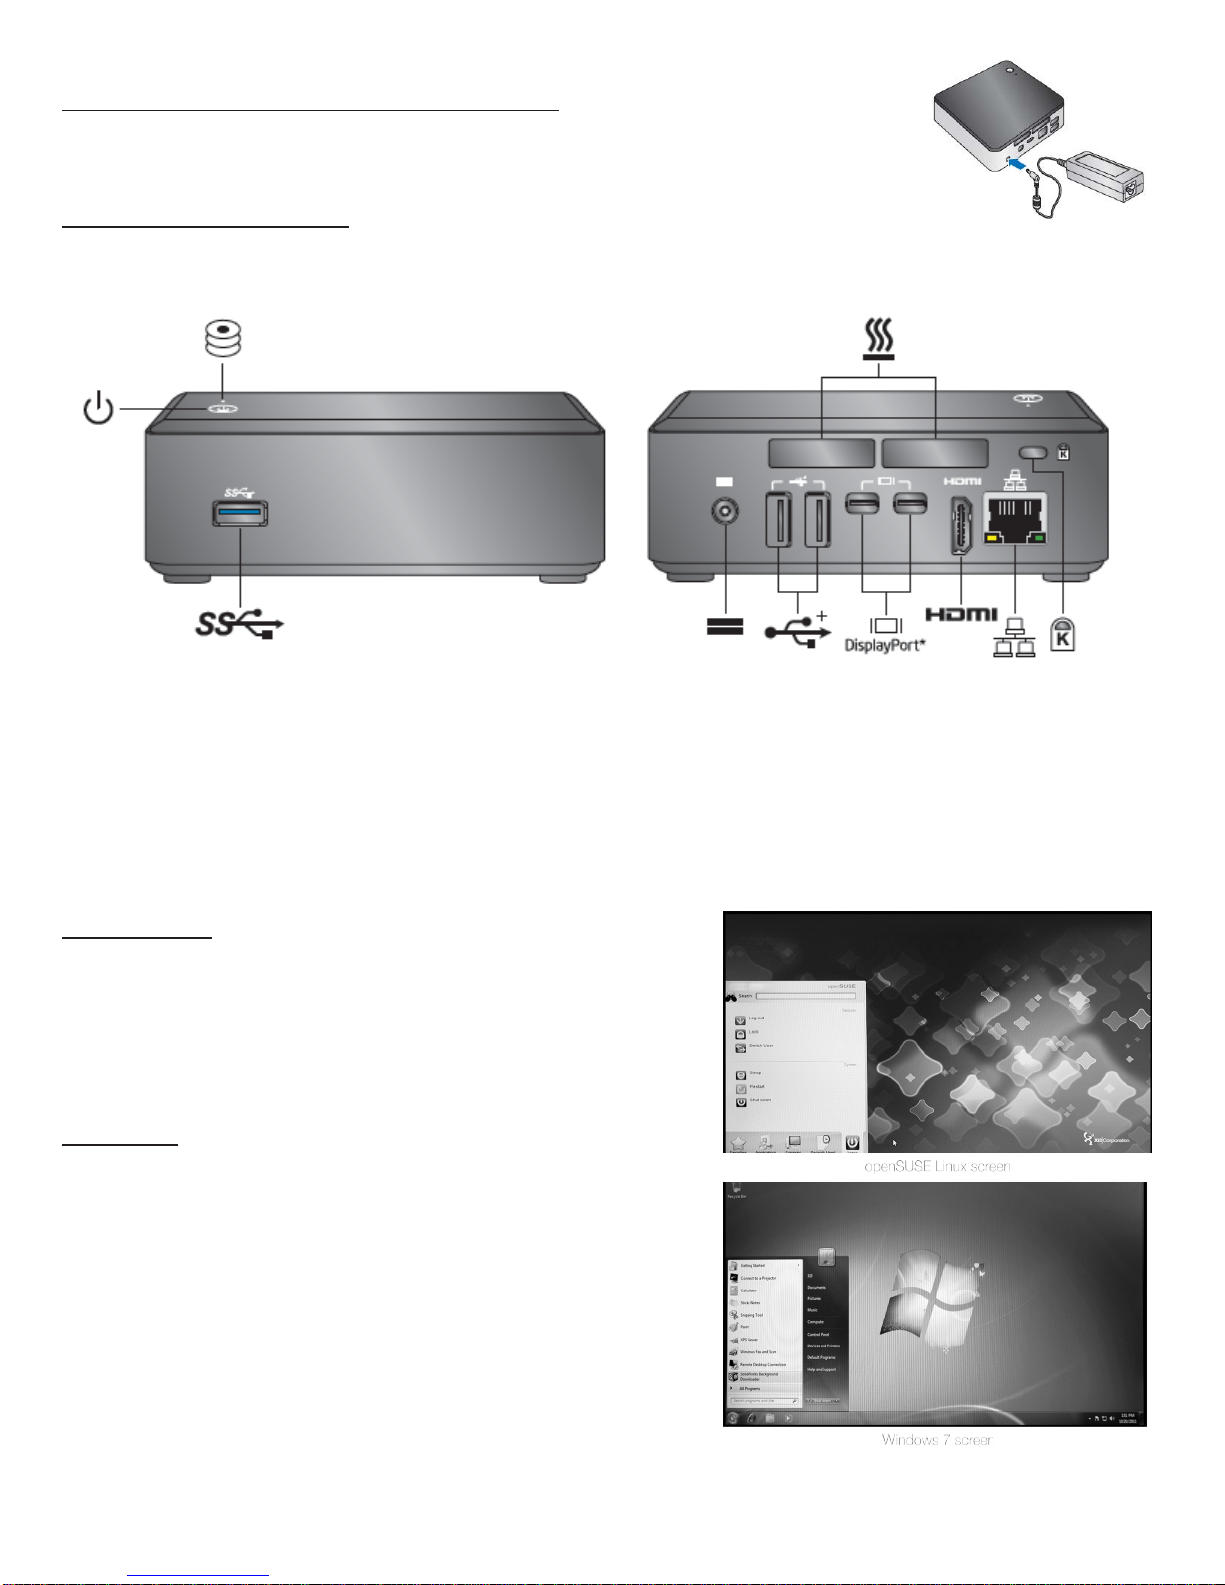
Step Five - Connect the Power Cord and Power Adaptor
First join the Power Cord to the Power Adaptor. Next connect the small round end of the Power Cord to the
Power Cord port found on back of the Xi3 NUC. Then insert the three-prong AC plug directly into an electrical
wall outlet (or a surge protector/power strip).
Step Six - Turn Your Xi3 NUC On
The Power Button is found on the top of the Xi3 NUC. Briefly depress this Power Button to turn on your Xi3 NUC. {NOTE: You
should also turn on your computer monitor/display at this time.}
Your Operating System
The standard Operating System for the NUC is openSUSE Linux. However, based upon your preferences, you may have purchased your
®
.
computer with a different Operating System pre-installed, such as Windows
System designed for x86-based computers, such as variants of UNIX®, AIX®, other Linux Operating Systems, and even Web- or Cloudbased Operating Systems.}
{NOTE: The Xi3 NUC will work with any 64-bit Operating
Listed below are instructions for getting started with the two most common operating systems.
openSUSE Linux
After completing Steps One through Six above (including turning on your Xi3 NUC
and your computer monitor/display), the
operating system should appear
are ready to begin using
the initial Root Password on an Xi3 NUC pre-loaded with
factory,
your Xi3 NUC. {NOTE: When shipped from the
main screen of the openSUSE Linux
on your computer monitor, signifying that you
openSUSE Linux is xi3password – all in lowercase. Please reset your Root
Password after initial use.}
Windows 7/8
After completing Steps One through Six on the previous pages (including turning
on your Xi3 NUC and your computer
Windows operating system
that you are ready
to begin using your Xi3 NUC.
should appear on your computer monitor, signifying
monitor/display), the main screen of your
Move Data onto your Xi3 NU C
If you purchased your Xi3 NUC with certain Software Applications pre-installed on
your machine, you should be able to see
turned on your computer.
Loading additional Software Applications onto your Xi3 NUC can be accomplished
either by downloading/installing these programs via the Internet or by
transferring/installing
Xi3 NUC.
the programs from a DVD/CD disc or USB drive onto your
and use these programs once you have

Downloading/Installing Programs from the Internet
Chapter 2 – Get to Know your NUC
To download and install Software Applications from the Internet onto your Xi3 NUC, take the following steps.
Make sure you are connected to the Internet.
1.
Go to the appropriate page on the web.
2.
Follow the instructions for downloading the application.
3.
Download and install the application.
4.
Installing Programs from a USB Thumb drive
To install Software Applications from a USB thumb drive onto your Xi3 NUC, take the following steps.
Insert the USB thumb drive into an open USB port on the back of your Xi3 NUC.
1.
Within the Operating System, highlight the Software Applications you wish to install onto your Xi3 NUC.
2.
Follow the Operating System instructions and install the Software Applications to your Xi3 NUC hard drive.
3.
Installing Programs from a DVD/CD
To install Software Applications from a DVD or CD onto your Xi3 NUC, take the following steps.
Connect an external DVD/CD drive to your Xi3 NUC (typically through an available USB port).
1.
Insert the DVD or CD into your DVD/CD drive.
2.
Within the Operating System, highlight the Software Applications you wish to install onto your Xi3 NUC.
3.
Follow the Operating System instructions and install the Software Applications to your Xi3 NUC hard drive.
4.
Copying Existing Files to the Xi3 NUC from an Older PC
If you have files, photos, videos or other forms of data on your existing computer that you would like to move onto your Xi3 NUC
several ways to accomplish this. If you have a lot of files to copy and you have access to a DVD
or CD burner, you can copy these files onto
, there are
a DVD or CD and then follow the steps outlined above in the Installing Programs from a DVD or CD or Installing Programs from a USB
thumb drive sections above. You will be installing files instead of “programs.”
free, or for a nominal fee, that can be installed onto your Xi3 NUC and will walk you through the file transfer process step by step.
There are also numerous software applications that are
If you have only a few files to copy, however, you may choose to email the files to yourself as this is often the easiest way to move files
from one computer to another. Simply send an email to yourself from your old computer and attach the files you want to that email.
.
Then open the email on your Xi3 NUC and save the files onto your new Xi3 NUC
Once you have successfully booted-up/turned-on your Xi3 NUC and have installed and/or transferred all of the Software Applications and
files/data onto your new machine, you’re ready to start using your new Xi3 NUC.
All Xi3 NUCs com e pre-built to include the RAM, Intel® SSD, a prof e ssion al ly imag e d O perat ing Sy s tem an d W iFi
(varies by model).
Processor
Intel® Core™ i5-3427 Processor (1.8GHz with turbo capability to achieve 2.8GHz, Dual-Core proc ess or with 3 M B
smart cache), sup port s Hy per T hrea din g Te ch nol ogy an d Su p por ts Intel® 64 architecture.
The Intel® N U C Bo ar d ha s a solder e d-down Intel® Core i5-3427 processor with Integrated Grap hic s Technology and
integrated mem ory contr oller .
System Memory
Dual-Channel DDR3 with two connectors for 1600/1333/1066 MHz memory support (16GB max). Integrated memory
configurations available through Xi3 include 4GB (1x4GB), 8GB (2x4GB), 8GB (1x8GB) and 16GB (2x8GB).
The board has two 204-pin SO-DIMM sockets and support the following memory features:
• 1.5V DDR3 SDRAM SO-DIMMs with gold plated contacts
• Support for 1.35 V Low Voltage DDR3 (new JEDEC specification)
• Two independent mem or y channels with interleaved mode support
• Unbuffered, single-sided or double-sided SO-DIMMs
• 16GB maximum total system memory (with 4Gb memory technology)
• Minimum recommended total system memory: 1024MB
• Non-ECC SO-DIMMs
• Serial Presence Detect
• DDR3 1600 MHz and DDR3 1333 MHz SDRAM SO-DIMMs

Memory Configurations
The processor supports the following types of memory configurations:
• Dual Channel (Interleaved) mode. This mode offers the highest throughput for real world applications. Dual
channel mode is enabled when the installed memory capacities of both SO-DIMM channels are equal. Technology
and device width can vary from one channel to the other but the installed memory capacity for each channel must be
equal. If different speed SO-DIMMs are used between channels, the slowest memory timing will be used.
• Single channel (Asymmetric) mode. This mode is equivalent to single channel bandwidth operation for real world
applications. This mode is used when only a single SO-DIMM is installed or the memory capacities are unequal.
Technology and device width can vary from one channel to the other. If different speed SO-DIMMs are used
between channels, the slowest memory timing will be used.
Graphics
All Xi3 NUCs support graphics through Intel® HD Graphics. The Intel® HD graphics controller features the following:
• 3D Features
− DirectX* 10.1 and OpenGL* 3.0 compliant
− DirectX* 11.0 CS4.0 only
− Shader Model 4.0
• Video
− High-Definition content at up to 1080p resolution
− Hardware accelerated MPE G -2, VC-1/WMV and H.264/AVC Hi-Definition video formats
− Intel® HD Technology and Advanc e d Hard ware Vi deo Transcoding
− Blu-ray S3D via HDMI 1.4a
− Dynamic Video Memory Technology (DVMT) 5.0 support
− Support of up to 1.7GB Video Memory with 4GB and above system memory configuration
Video Memory Allocation
Intel® Dynamic Memory Technology (DVMT) is a method for dynamically allocating system memory for use as graphics
memory to balance 2D/3D graphics and system performance. If your computer is configured to use DVMT, graphics
memory is allocated based on system requirements and application demands (up to the configured maximum amount).
When memory is no longer needed by an applica tio n, the d ynamically allocated portion of mem or y is returned to the
operating system for other uses.
High-bandwidth Digital Content Protectio n (HDCP)
HDCP is the technology for protecting high definition content against unauthorized copy or interception between a source
(computer, digital set top boxes, etc.) and the sink (panels, monitor, and TVs). The PCH supports HDCP 1.4a for content
protection over wired displays (Mini HDMI and Mini DisplayPort).
High Definition Multimedia Interface (HDMI)
The HDMI port supports standard, enhanced, or high definition video, plus multi-channel digital audio on a single cable.
Each port is compatible with all ATSC and DVB HDTV standards and supports eight full range channels at 24-bit/96 kHz
audio of lossless audio formats such as Dolby* TrueHD or DTS* HD Master Audio. The maximum supported resolution is
1920 x 1200 (WUXGA). The HDMI port is compliant with the HDMI 1.4a specification.
Integrated Audio provided by the HDMI interface includes:
− AC-3 – Dolby* Digital
− Dolby Digital Plus
− DTS-HD*
− Dolby TrueHD, DTS-HD Master Audio*, (Lossless Blu-ray Disc* Audio Format)
− LPCM, 192 kHz/24-bit, 8 channel
USB
The Xi3 NUC supports USB 2.0/3.0 ports. All USBG 2.0/3.0 ports are high-speed, full-speed, and low-speed capable. The
port arrangement is as follows:
• USB 2.0 ports:
− Two front panel ports are implemented through one dual-port internal header
− Two ports are implemented with vertical back panel connectors
− One port is reserved for the PCI Express Half-Mini Card
− One port is reserved for the PCI Express Full-Mini Card
• One front panel USB 3.0 port is implemented through an external connector.
 Loading...