

Energy Star GCRH410FWW User Manual
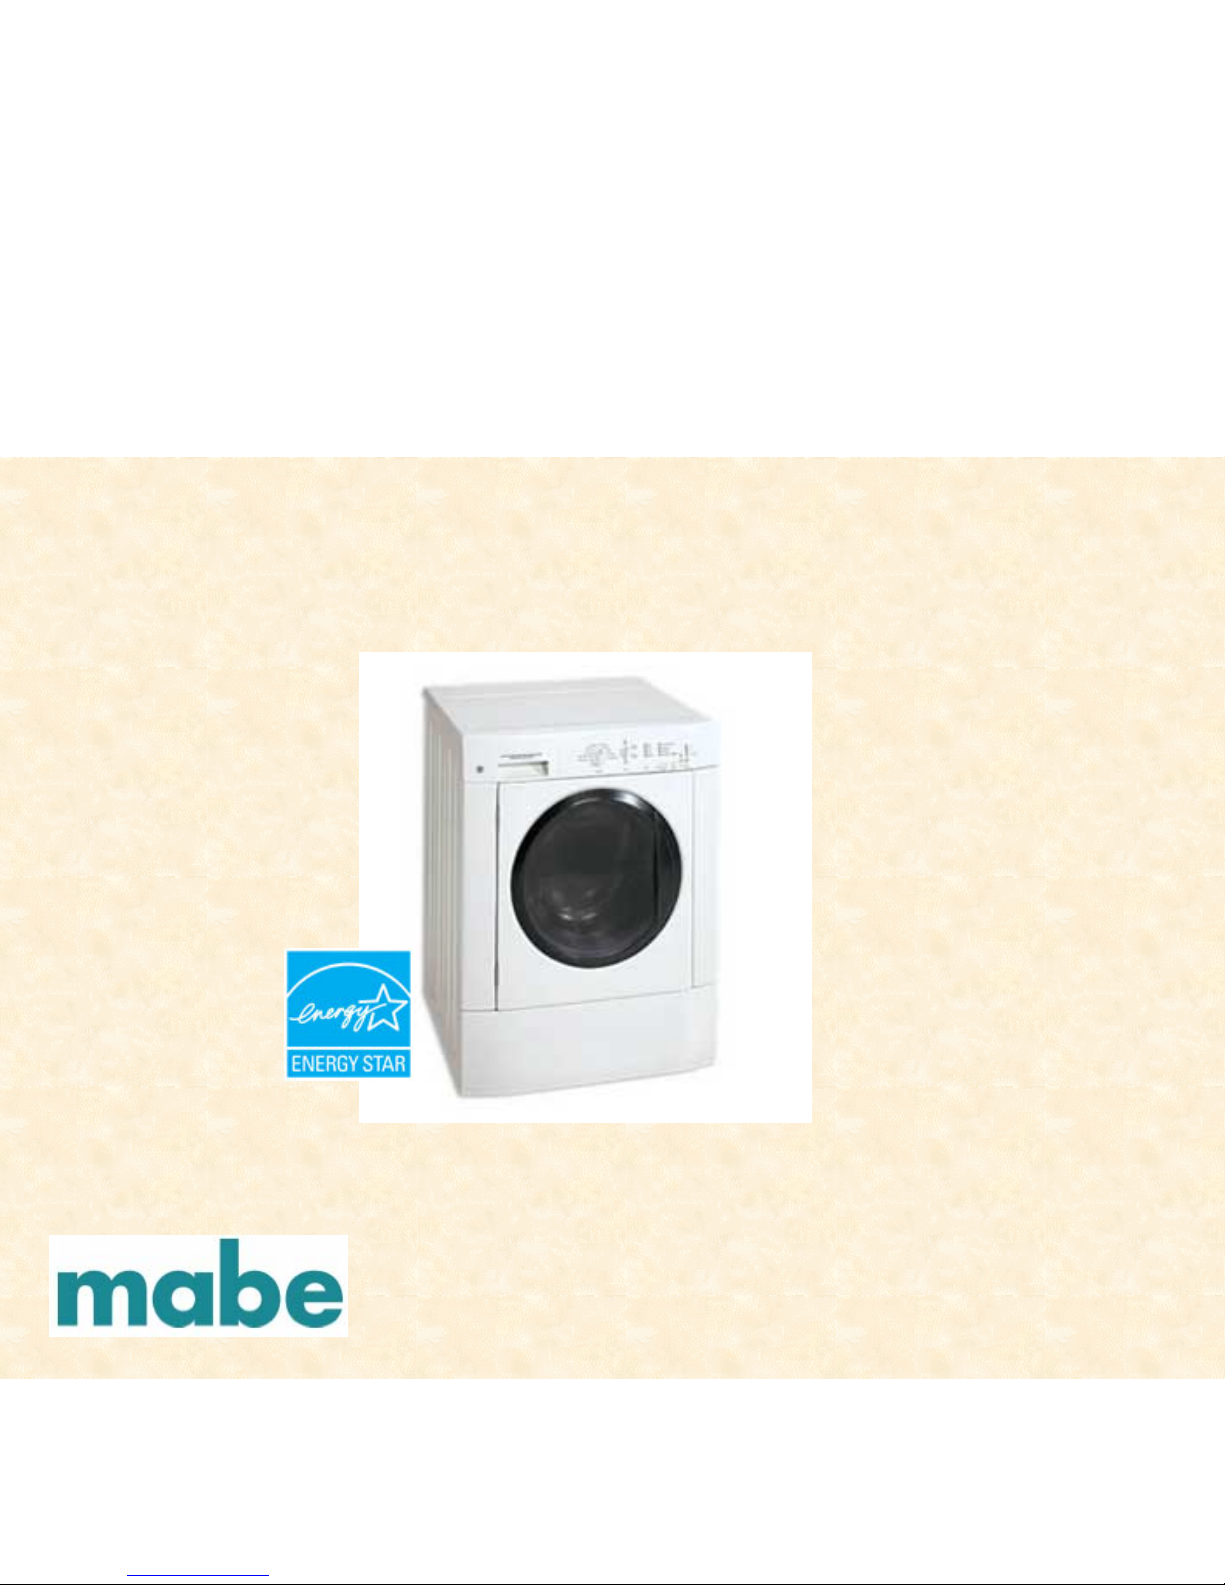
GCRH410FWW
GE 3.5 Cu. Ft. (I.E.C.)
O7-PPT/AW-03
2
Warning: This information is intended for use by individuals possessing
adequate backgrounds of electrical, electronic and mechanical experience.
Any attempt to repair a major appliance may result in personal injury and
property damage. The manufacturer or seller cannot be responsible for the
interpretation of this information, nor can it assume any liability in connection
with its use.
CAUTION
To avoid personal injury while servicing this unit, disconnect power before
servicing. If grounding wires, screws, straps, clips, nuts, or washers used to
complete a path to ground are removed for service, they must be returned to
their original position and properly fastened.
mabe CONFIDENTIAL AND PROPRIETARY INFORMATION-NOT FOR PUBLIC DISCLOSURE. July 2006
IMPORTANT SAFETY NOTICE

3
ACCESSORIES AVAILABLE FOR:
GCRH410FWW
134467300
•For use with portable or stationary washers and dryers.
•Rack allows dryer to be stacked above washer.
NLPWD15
•15" pedestal with drawer for use with GE Front Load
laundry (models GCRH410F and PSXH47EF only).
mabe CONFIDENTIAL AND PROPRIETARY INFORMATION-NOT FOR PUBLIC DISCLOSURE. July 2006
4
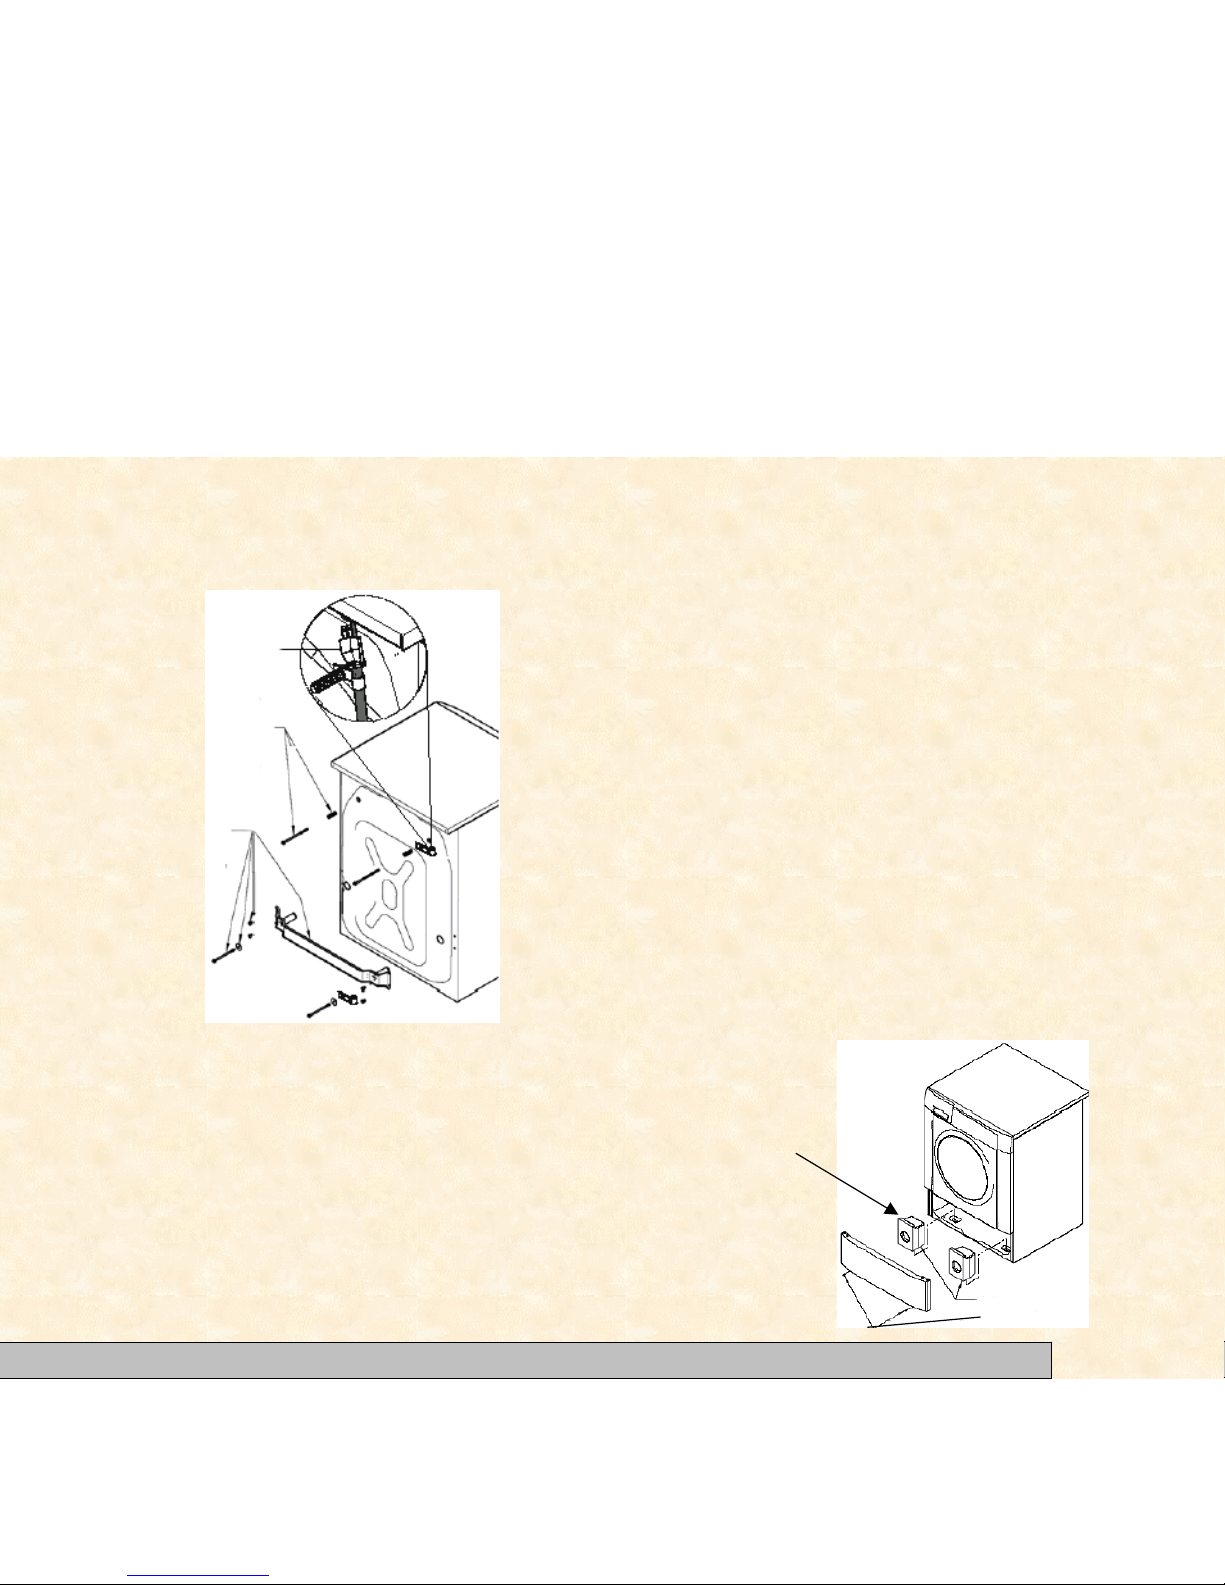
INSTALLATION
POWER CORD
REMOVE TWO
UPPER BOLTS,
‘P’ CLAMPS,
AND SPRINGS.
REMOVE LOWER
BOLTS AND
WASHERS (2),
SCREWS (4),
AND BRACE.
1. Remove the following from the back panel of the washer:
4 packaging bolts,
2 packaging springs,
2 washers,
2 metal “P” clamps,
4 screws,
1 packaging brace.
2. Remove the 4 transport plugs from the literature pack and install
them in the corresponding holes in the back panel of the washer.
3. Remove the 4 small hole plugs from the literature pack and install
them in the side panel holes vacated by the packaging brace.
4. Using the shipping posts, prop up the front of the washer
approximately 2 inches to gain access to the service panel.
5. Remove the 2 screws and remove the service panel.
6. Remove the two (2) Styrofoam blocks located under the
drum (a yellow ribbon surrounds the items to be removed).
Lift up on the drum, tilt the base of the foam blocks inwards
toward the rear of the washer until free, then pull them out.
7. Remove and discard the yellow ribbon from the front of the
washer.
8. Replace the service panel and screws. TWO SCREWS
UNDER PANEL
REMOVE LEFT
AND RIGHT
FOAM BLOCKS.
mabe CONFIDENTIAL AND PROPRIETARY INFORMATION-NOT FOR PUBLIC DISCLOSURE. July 2006

5
TECH SHEET LOCATION
On the lefthand bodyside behind the front access panel.
mabe CONFIDENTIAL AND PROPRIETARY INFORMATION-NOT FOR PUBLIC DISCLOSURE. July 2006

6
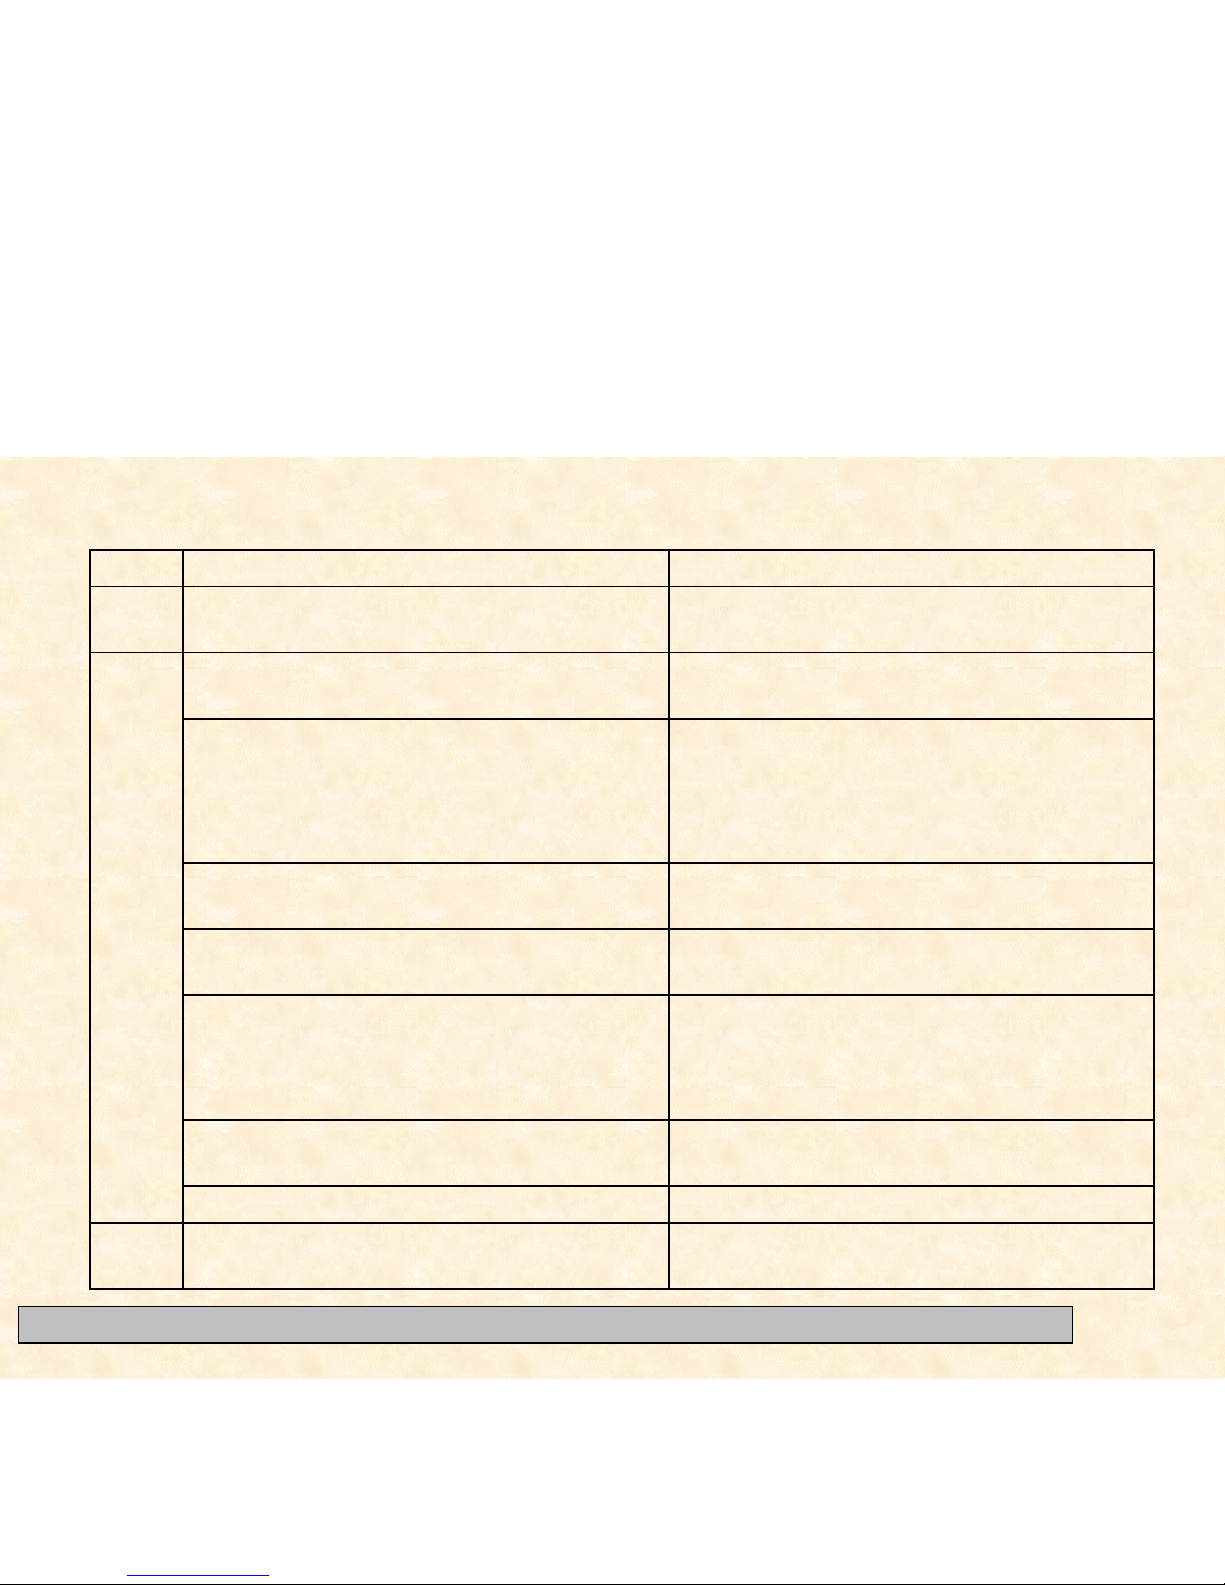
QUICK REFERENCE SHEET
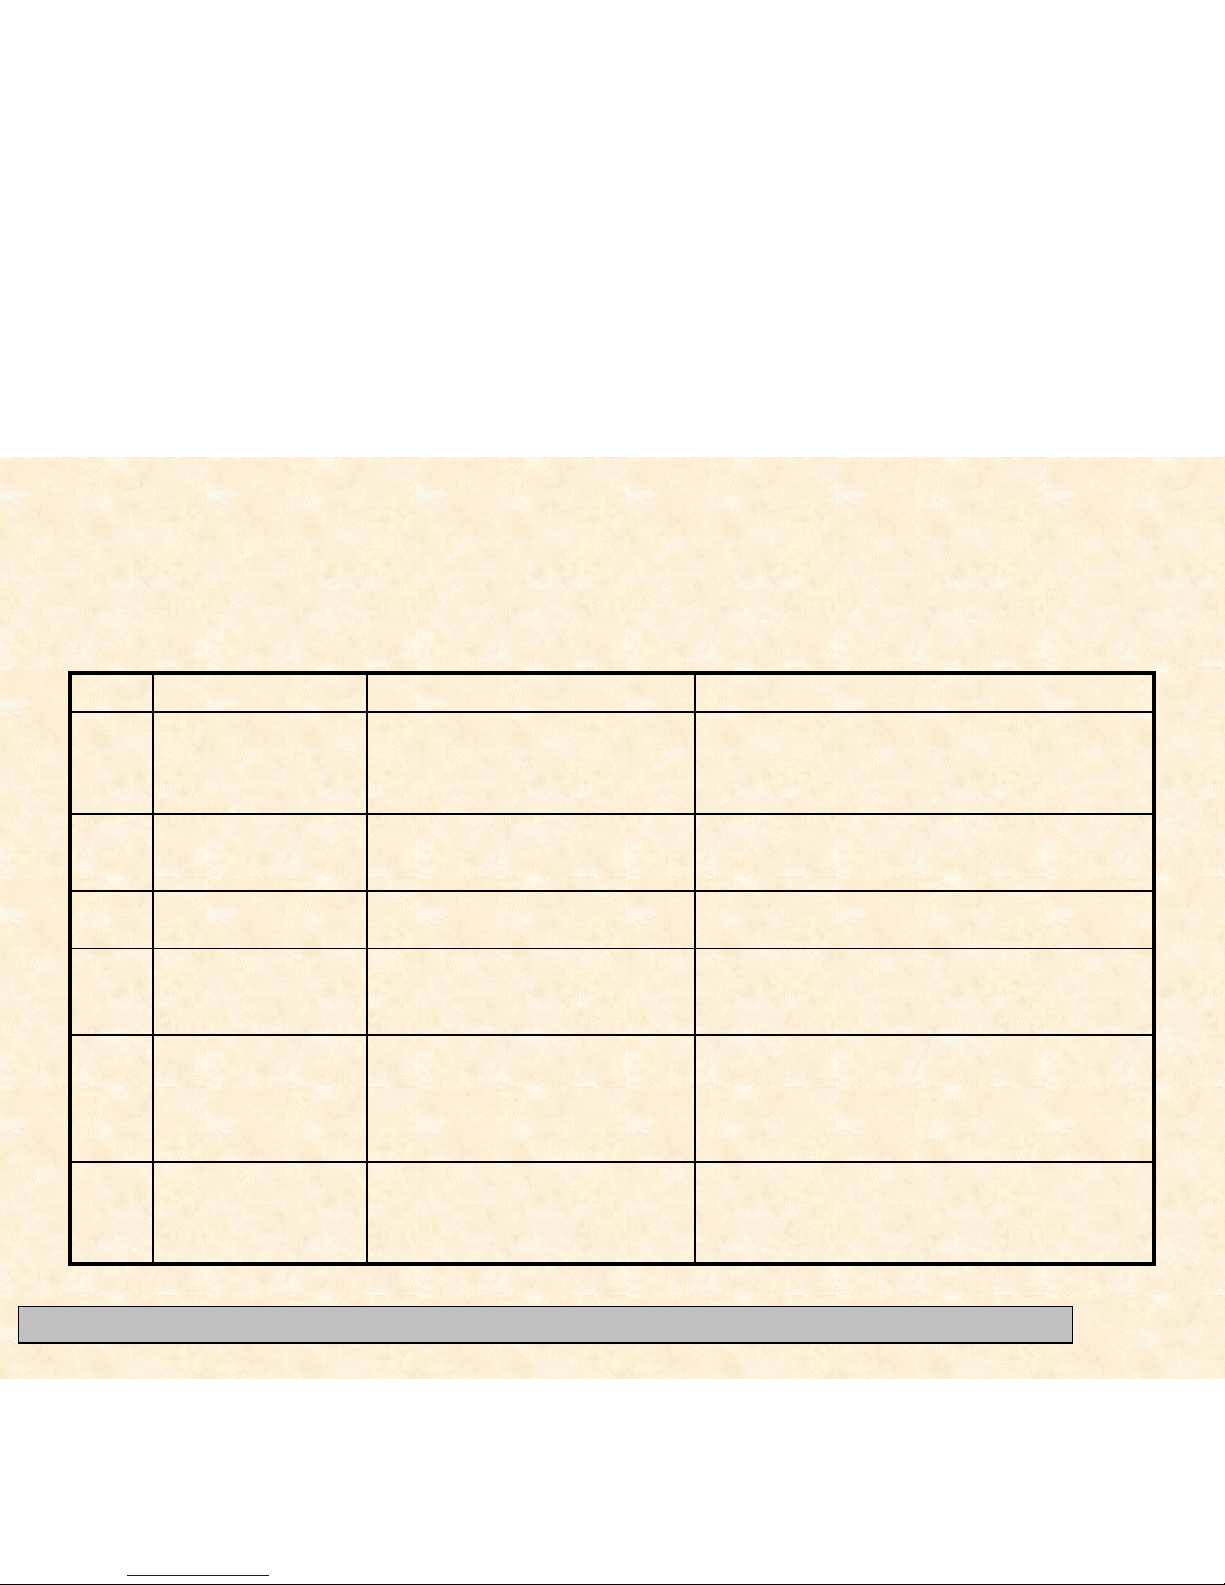
Component resistance chart
Resistance Ω @ 77° F (25° C)
Electrical component
1325 ± 10%
Pump motor
Motor
M1 TO M2
M2 TO M3
M1 TO M3
M4 TO M5
800 ± 7%
Dispenser valve solenoids
Door lock solenoid
12 ± 7%
NTC Thermistor
50K ± 2%
5.3 ± 7%
5.3 ± 7%
5.3 ± 7%
118 ± 7%
mabe CONFIDENTIAL AND PROPRIETARY INFORMATION-NOT FOR PUBLIC DISCLOSURE. July 2006

7
CYCLE SELECTION
Heavy
This cycle provides 16 minutes of reversing tumble wash action for heavily soiled regular items,
followed by 3 rinses plus an automatic extra rinse and a final spin. Hot water
is recommended to remove heavy soil and most stains. Heavy Soil/Stain and Extra Spin are available
options.
Normal
The Normal cycle provides 13 minutes of reversing tumble wash action for normally soiled loads
followed by 3 rinses and a final spin. Heavy Soil/Stain, Extra Rinse and Extra Spin are available
options.
Perm Press
The Perm Press cycle provides 10 minutes of reversing tumble wash action for cottons and blends with
a no-iron finish followed by a Cool Down rinse, 2 additional rinses and a final spin. To minimize
wrinkling, the Warm Rinse and Extra Spin are not available with this cycle. Heavy Soil/Stain and Extra
Rinse options can be selected.
Quick
The Quick cycle provides 5 minutes of reversing tumble wash action for lightly soiled items that
must be laundered quickly, followed by 2 rinses and a final spin. To save time, Heavy Soil/Stain,
Extra Rinse and Extra Spin options are not available in this cycle.
mabe CONFIDENTIAL AND PROPRIETARY INFORMATION-NOT FOR PUBLIC DISCLOSURE. July 2006

8
CYCLE SELECTION (cont.)
Sport
This cycle is designed for small loads of lightweight, synthetic apparel worn for working out,
running, swimming, cycling, tennis and similar activities when removal of light soil and perspiration
are important. Items will tumble occasionally as they soak for 10 minutes. Reversing tumble wash
action will continue for 6 minutes followed by 3 rinses and a final spin. For best results, select a
detergent that contains enzymes and the hottest wash water safe for the load. Add a detergent
booster, color safe bleach or odor eliminator with the detergent if needed. Chlorine bleach should
not be used on items containing Lycra™. Fabric softeners reduce wicking and are not
recommended for garments made to pull moisture away from the body.
Delicate
This cycle provides 10 minutes of gentle reversing tumble wash action for knits and delicates,
followed by 3 rinses and a final spin. To protect your delicate items, a hot water wash is not
available. Extra Rinse is an available option.
Handwash
Select the Handwash Cycle for items labeled “Hand Washable”. Ten minutes of occasional
tumbling are followed by 3 rinses and a slow final spin. To protect your hand washables, a hot
water wash, Heavy Soil/Stain and Extra Spin are not available options. Extra Rinse is an available
option.
mabe CONFIDENTIAL AND PROPRIETARY INFORMATION-NOT FOR PUBLIC DISCLOSURE. July 2006

9
CYCLE SELECTION (cont.)
Soak
Use this cycle to soak heavily soiled and stained items before washing. Only cold water is
available with this cycle because warmer water may set some stains. Add half the detergent dose
and a detergent booster, if desired, to the detergent compartment. Six minutes of regular reversing
tumble wash action are followed by 30 minutes of occasional tumbling as the load soaks. The
water will drain out and the load will spin slowly for several minutes. Follow Soak with a complete
wash cycle suitable for the load and a full detergent dose.
Drain/Spin
Use the Drain/Spin cycle as a follow-up to a no spin selection or anytime you want to drain water
from the washer and spin out the load. Select the spin speed appropriate to the load.
Rinse/Spin
Select Rinse/Spin for loads that need a cold water rinse or to add fabric softener that may have
been omitted in a regular cycle. Add the fabric softener to the dispenser chamber if desired. Select
the spin speed appropriate for the load.
mabe CONFIDENTIAL AND PROPRIETARY INFORMATION-NOT FOR PUBLIC DISCLOSURE. July 2006
10
ERROR CODE CHART
If the washer stops, an error code flashes and the signal beeps periodically, press Pause Cancel.
Consult the error code chart below or the “Avoid Service Checklist” in the owner guide for the
possible cause and solution. Make correction, then select a cycle and press START.
Straighten hose.
Unclog household drain.
Drain hose is kinked.
Household drain is clogged.
Water doesn’t drain
3
Close dispenser drawer.Washer will not operate if the
dispenser drawer is open.
Dispenser drawer is
open
2
Tighten inlet hose connections at faucets and washer.
Unclog household drain.
Use high efficiency detergent in amount recommended on
label.
Hose connections are loose.
Household drain is clogged.
Oversudsing.
Water leaks
1
Check to see if the water flows adequately from the other
faucets in the home; wait for service to be restored.
Avoid running water in other areas of the home when
doing laundry.
Fully open supply faucets to washer.
Straighten hoses.
Water supply to home is interrupted.
Water pressure is too low.
Water may not be turned on or faucets
may not be fully opened.
Hoses are kinked.
Water doesn’t enter
1
SolutionsPossible causesErrorBeeps
mabe CONFIDENTIAL AND PROPRIETARY INFORMATION-NOT FOR PUBLIC DISCLOSURE. July 2006
11
ERROR CODE CHART (cont.)
Be sure the cold water faucet is fully opened.Cold water hose is connected to the
wrong faucet.
Cold water faucet is turned off.
Cold water doesn’t enter
washer
15
Use only high efficiency detergent.
Follow manufacturer’s recommendation for dosage.
Amount may need to be adjusted for water temperature,
water hardness, load size and soil level.
A high efficiency detergent was not
used.
Too much detergent was added.
Oversudsing
15
Connect the hose to the hot water faucet and the hot inlet
on the washer.
Be sure the hot water faucet is fully opened.
Hot water hose is connected to the
wrong faucet.
Hot water faucet is turned off.
Hot water doesn’t enter
Wait 30 minutes for the motor to cool down.Washer motor stops if overheated.Motor is overheated
7
Close washer door.Washer will not operate if the door is
open.
Door open
5
Do not open door. Select Drain/Spin to
remove the water. Re start cycle.
Inlet valve, pressure switch or control
board failure.
Drum overfilled
4
SolutionsPossible causesErrorBeeps
mabe CONFIDENTIAL AND PROPRIETARY INFORMATION-NOT FOR PUBLIC DISCLOSURE. July 2006

12
PROBLEMS / SOLUTIONS
Washer won’t spin.
• Dispenser drawer is not completely closed. Close dispenser drawer.
Wash load too wet after spin.
• Load is too small. Add 1 or 2 similar items to help balance the load.
• Load is out of balance. Rearrange load to allow proper spinning.
• Drain hose is kinked. Straighten drain hose.
WATER
Water collects in bleach and
fabric softener compartments.
• This is a result of the siphoning action and is part of the normal operation
of the washer. Water may be removed by removing the dispenser drawer
and draining water into the empty drum or sink.
mabe CONFIDENTIAL AND PROPRIETARY INFORMATION-NOT FOR PUBLIC DISCLOSURE. July 2006

13
DIAGNOSTIC TEST:
The diagnostic test is performed by using the Program Knob.
To START THE TEST:
Turn the Program Knob to START position, Drain/Spin.
Press Pause/Cancel to turn off LED's.
Within 5 seconds, press and hold the Option and Pause Cancel buttons until LED's start
sequentially chasing, then release buttons.
1. All the LED's will sequentially light. Pressing a button below a light cluster will light all
the LED's in that cluster at one time to confirm f unctionality.
2. Turn the program knob (1) click clockwise from the START position. The hot water
solenoid will activate and hot water should enter through the detergent compartment.
3. Turn the program knob (2) clicks from the START position. The bleach water solenoid
will activate and cold water should enter through the bleach c ompartment.
4. Turn the program knob (3) clicks from the START position. The bleach and the wash
water solenoids will activate and cold water should enter through the softener
compartment.
mabe CONFIDENTIAL AND PROPRIETARY INFORMATION-NOT FOR PUBLIC DISCLOSURE. July 2006

14
DIAGNOSTIC TEST (cont.)
5. Turn the program knob (4) clicks from the START position. The door lock
solenoid will activate.
6. Turn the program knob (5) clicks from the START position. The door lock
solenoid will deactivate and the loading door can be opened.
7. Turn the program knob (6) clicks from the START position. The washer will fill
and tumble.
8. Turn the program knob (7) clicks from the START position. The washer will fill
and spin (leakage test).
9. Turn the program knob (8) clicks from the START position. The drain pump and
door lock solenoid will activate and the washer will operate in high spin.
SAFETY WARNING: If power is removed during this test, the door can be
opened. To prevent injury, DO NOT put your hands inside when the tub is
rotating.
mabe CONFIDENTIAL AND PROPRIETARY INFORMATION-NOT FOR PUBLIC DISCLOSURE. July 2006

15
DIAGNOSTIC TEST (cont.)
10. Turn the program knob (9) clicks from the START position. The control will
signal the last error code.
See Troubleshooting Section, for details on properly identifying the error code on
non-digital display models.
Exiting Diagnostic Mode
There are two options for exiting the diagnostic test mode and returning the washer to
normal operation:
a) Unplug the power cord, wait 5-8 seconds, then reconnect the power cord OR
b) Turn the program knob clockwise 2 or 3 clicks after the START Position. Press
Options and Pause Cancel buttons together for a few seconds until wash cycle LED's
appear.
mabe CONFIDENTIAL AND PROPRIETARY INFORMATION-NOT FOR PUBLIC DISCLOSURE. July 2006

16
DIAGNOSTIC TEST (cont.)
If a situation arises where you cannot exit the diagnostic mode as described
above and the bank of 5 LED’s on the right end remain ON regardless of Program
Knob position, a combination of pushed buttons caused the control to enter a
special factory test mode. Disconnect power to reset the control to return washer
to normal operation is this occurs.
To clear latest stored error code: Place the control into diagnostic test mode.
•Turn the program knob clockwise 9 clicks from the START position. The control will
signal
the last error code.
•Press and hold the Options and Pause Cancel buttons for 3 seconds. The code will be
cleared.
•Exit diagnostic mode to return the washer to normal operation.
mabe CONFIDENTIAL AND PROPRIETARY INFORMATION-NOT FOR PUBLIC DISCLOSURE. July 2006

17
TROUBLESHOOTING
The electronic controls of the 3.0 Cu. Ft. horizontal axis washers have self
diagnostics codes built in that cover most products failures.
The control signals the failure code by flashing the five indicator lights of Door Lock,
Wash, Rinse, Final Spin and Control for the first number or letter after the E and
the START indicator light for the second number or letter after the E. When a failure
occurs, the washer stops or pauses and the control beeps and flashes the five
indicator lights to tell the customer that a failure has occurred.
To stop the flashing and beeping, the customer may touch the Pause/Cancel
button. The error code remains stored in the control and once the problem is
corrected, it does not affect the operation of the washer. If the failure is something
that the customer can correct (such as the water faucets being turned off), the
washer will operate normally the next time it is started.
mabe CONFIDENTIAL AND PROPRIETARY INFORMATION-NOT FOR PUBLIC DISCLOSURE. July 2006

18
TROUBLESHOOTING (cont.)
To recall an error code:
• wake the machine by pressing any button,
• wait 5 seconds,
• Press and hold the START and Pause Cancel buttons simultaneously.
• All LED's will go blank and after a few seconds the control will signal the stored
code using audible beeps and blinking LED's. The control will repeatedly signal
the code, as long as the START and Pause Cancel buttons are pressed.
mabe CONFIDENTIAL AND PROPRIETARY INFORMATION-NOT FOR PUBLIC DISCLOSURE. July 2006

19
TROUBLESHOOTING (cont.)
A two-second pause between repeats affords you the ability to make accurate counts
to identify the correct error codes.
The five indicator lights of Door Lock, Wash, Rinse, Final Spin and Control will
flash the number of times for the first digit of the code and the START indicator light
will flash the number of times for the second digit. Take separate counts of each
indicator light, then repeat to confirm in order to be accurate in identifying the proper
error code. The code is obtained by counting the number of times the lights flash.
Example E24: The five indicator lights would flash twice indicating the 2 and the
START indicator light will flash four times indicating the 4. The five indicator lights and
the START indicator light start flashing at the same time. The control will pause for 2
seconds, then repeat the code as long as the two buttons are pressed and held.
Note: A letter appearing in the code stands for a number higher than nine.
A = 10 B = 11 C = 12
D = 13 E = 14 F = 15
Example Code EF1: the first digit would be 15 and the second digit would be 1. If this
code would appear on a washer in the Good model line, the five indicator lights would
blink fifteen times and the START indicator light would blink once.
mabe CONFIDENTIAL AND PROPRIETARY INFORMATION-NOT FOR PUBLIC DISCLOSURE. July 2006
20
TROUBLESHOOTING (cont.)
Examples: Identifying Error Codes
The following LED Flashes and Beeps signal E41 (Error code 41 ) Door Open
COUNT>>>>>>
5 Vertical LED Flashes
START LED Flashes
X
XXXX
FEDCBA987654321
1st Code Digit
2nd Code Digit
The following LED Flashes and Beeps signal EF1 (Error code F1 ) Clogged Pump
XSTART LED Flashes2nd Code Digit
XXXXXXXXXXXXXXX
5 Vertical LED Flashes
1st Code Digit
FEDCBA987654321
COUNT>>>>>>
mabe CONFIDENTIAL AND PROPRIETARY INFORMATION-NOT FOR PUBLIC DISCLOSURE. July 2006
21
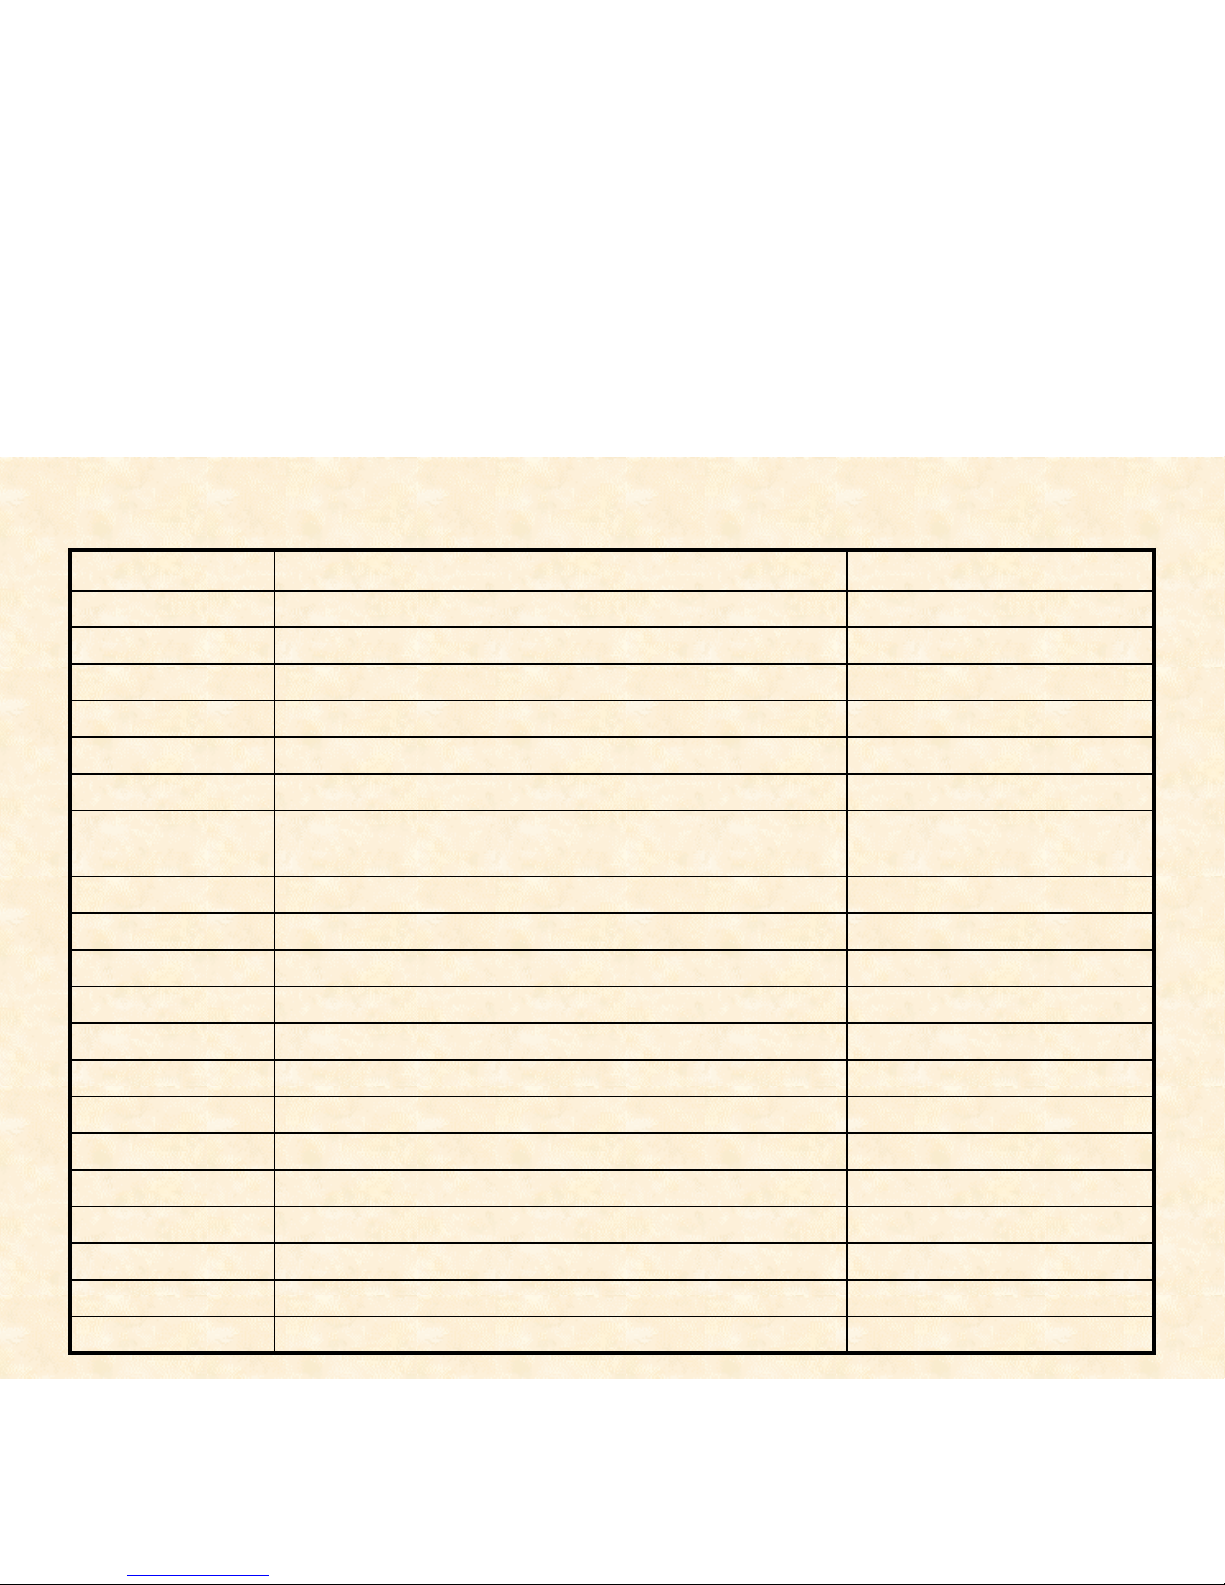
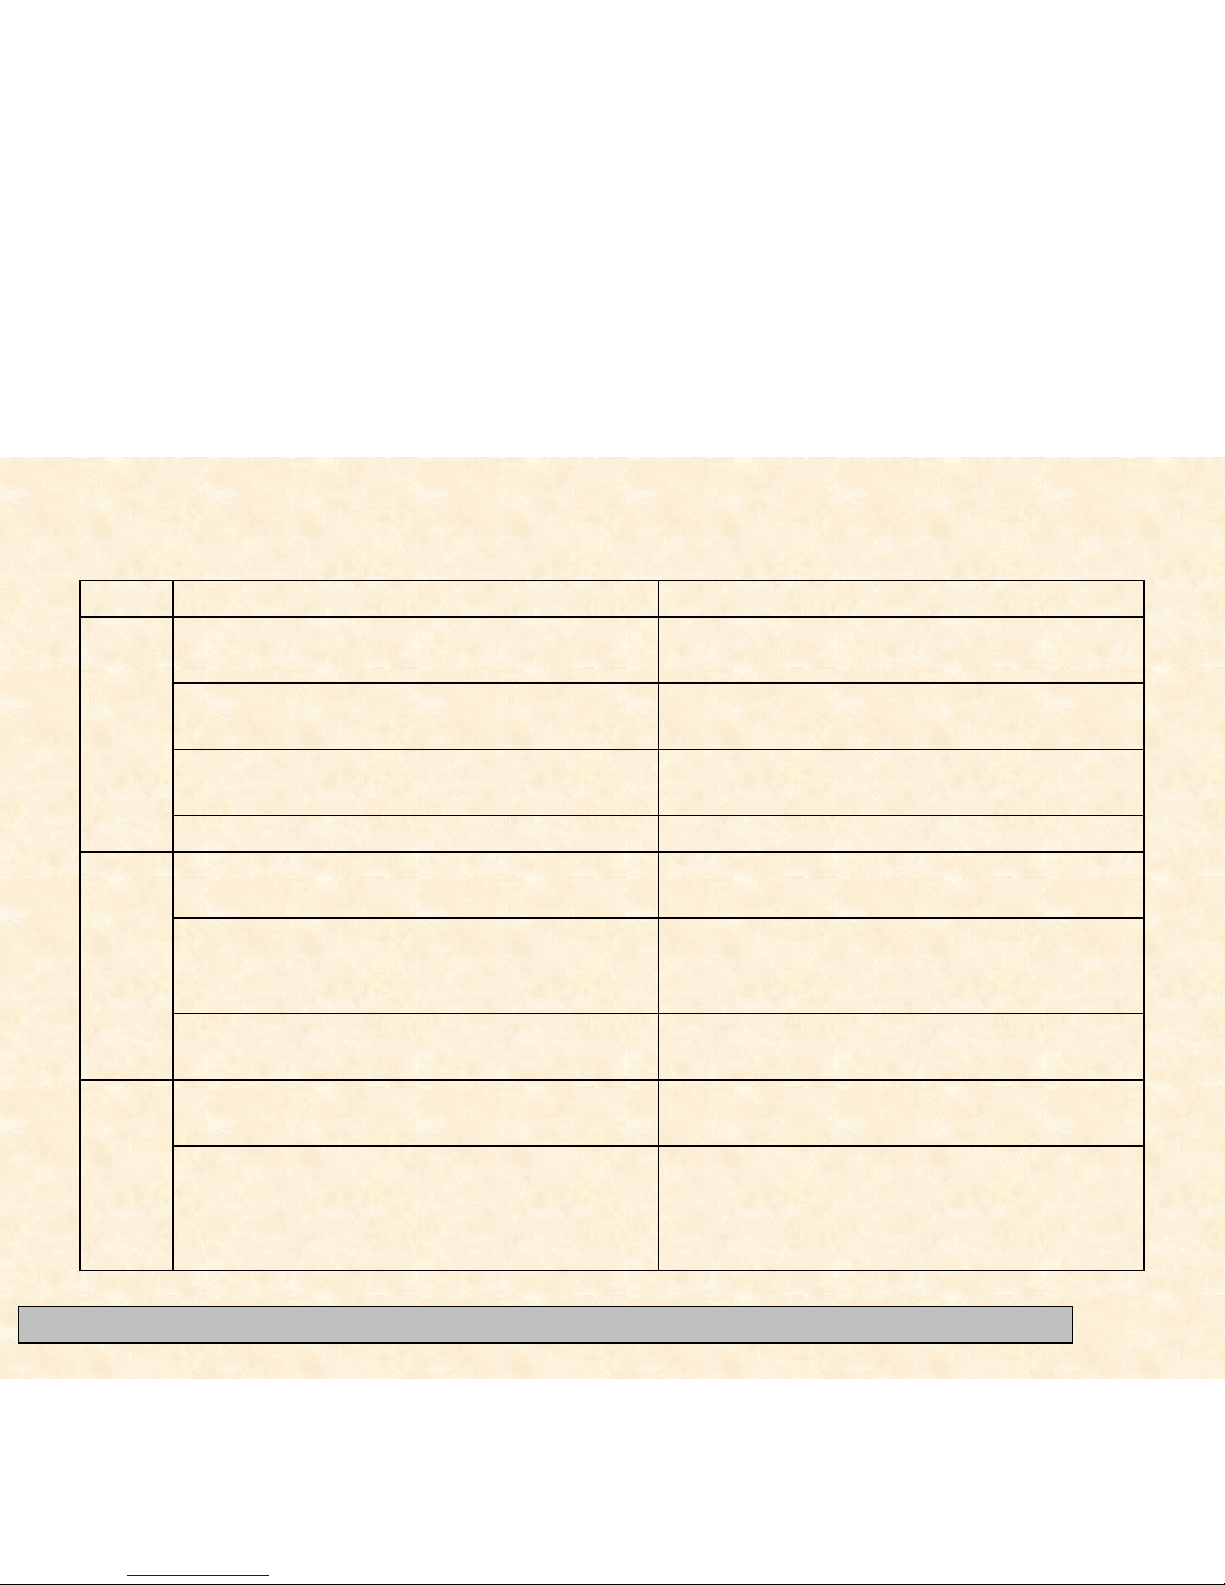
FAILURE CODE CHART
Refer to test (11).Motor overheating.
E55
Refer to test (11).High motor current.
E56
Refer to test (11).High current on inverter.
E57
Refer to test (10).Bad signal from tacho generator.
E52
Refer to test (9).Board thinks the door PTC circuit is closed.
E48
Refer to test (9).Board thinks the door PTC circuit is open in spin.
E47
Replace the control board.Control board problem.
E46
Replace the control board.Control board problem.
E45
Replace the control board.Control board problem.
E44
Replace the control board.Control board problem.
E43
Refer to test (8).
Door remains locked after cycle is completed.
E42
Refer to test (7).Control board thinks the door switch is open.
E41
Refer to test (6).Better models. Pressure sensor indicates water overfill.
E35
Refer to test (5).Better models. Pressure sensor not communicating
with control board.
E31
Replace control board.Drain pump relay on control board failed.
E24
Replace control board.Drain pump relay on control board failed.
E23
Refer to test (4).Water not pumping out fast enough.
E21
Refer to test (3).Reed switch.
E14
Refer to test (2).Water leak in tub or air leak in air bell.
E13
Refer to test (1).Fill time too long.
E11
CheckFault conditionFailure code
22
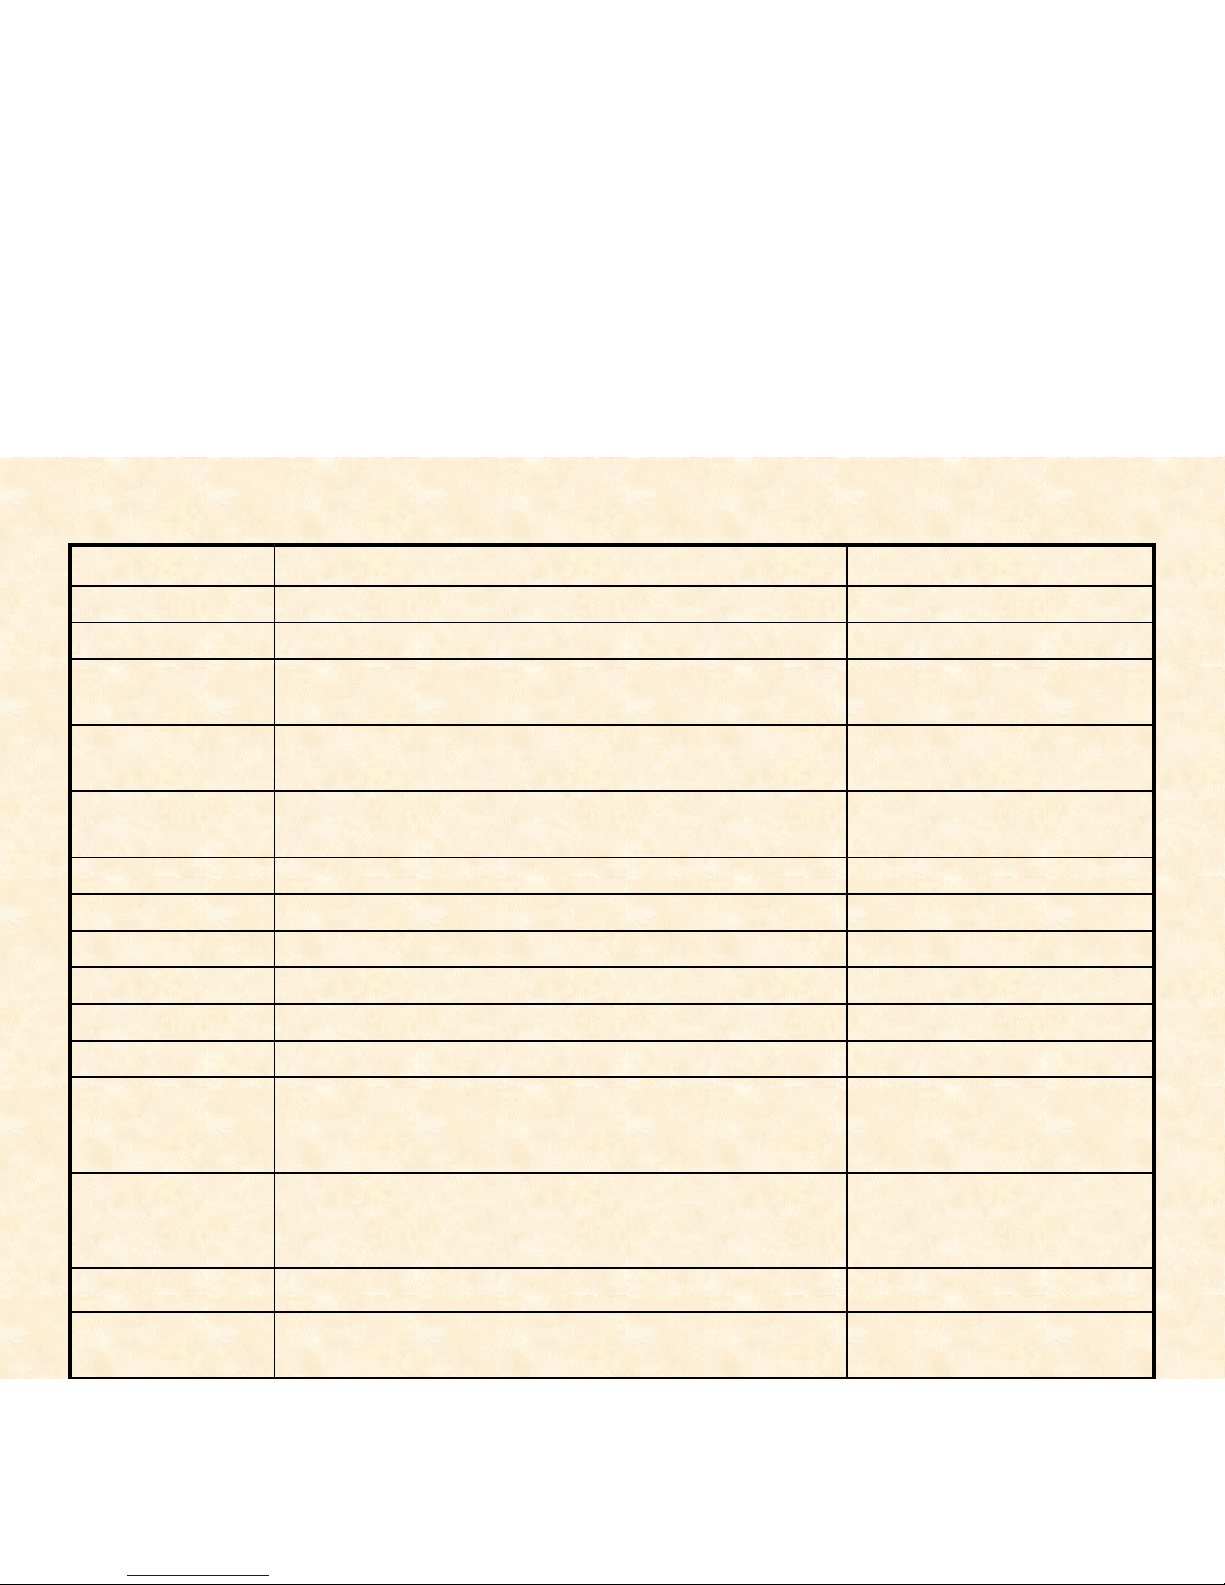
FAILURE CODE CHART (cont.)
Refer to test (11)High current on motor phase.
E58
Refer to test (12)No tacho signal for 3 seconds.
E59
Replace the speed control
board.
High temperature on heat sink.
E5A
Replace the speed control
board.
High temperature on heat sink.
E5B
Replace the speed control
board.
High temperature on heat sink.
E5C
Refer to test (13)
Communication problem.
E5D
Refer to test (13)Communication problem.
E5E
Refer to test (13)Communication problem.
E5F
Replace the control board.Input voltage on microprocessor incorrect.
E67
Replace the control board.Communication error.
E95
Refer to test (15)Incoming power frequency out of limits.
EB1
Check voltage at the outlet. If
below 130 VAC, replace the
control board.
Incoming line voltage above 130 VAC.
EB2
Advise customer to reduce the
amount of soap they are using.
To much soap.
EF2
Unclog the drain pump.
Clogged drain pump.
EF1
Check voltage at the outlet. If
above 90 VAC, replace the
control board.
Incoming line voltage below 90 VAC.
EB3
CheckFault conditionFailure code
23
TEST
Yes. Correct water leak.
No. Go to step (2).
1. Is the washer leaking water?Test 2:
8. Replace the control board.
If this did not correct the problem, go to
step 8.
7. Better models, replace the pressure sensor.
Pressure switch checks good.
Go to step (8).
Pressure switch checks bad. Replace
pressure switch.
6. Check the pressure switch.
Yes. Go to step (6).
No. Replace the inlet valve assembly.
5. Remove power from the washer. Did the water
fill stop?
Yes. Go to step (5).
No. Go to step (6).
4. Does the fill water continue enter the washer?
No. Have customer correct pressure problem.
Yes. Check for kinked or blocked incoming water
hoses, clean the incoming water screens. If
problem still remains, replace the water inlet valve
assembly.
3. Is the incoming water pressure above (30) psi.
No. Turn water faucets on.
Yes. Go to step (3).
2. Are the incoming water faucets turned on?
Yes. Go to step (4).
No. Go to step (2).
1. Is the incoming water flow normal?Test 1:
CorrectionCheckTest
mabe CONFIDENTIAL AND PROPRIETARY INFORMATION-NOT FOR PUBLIC DISCLOSURE. July 2006
24
Zero. Replace the control board.
120 VAC. Remove the pump and check
for blockage. If blocked, remove the
restriction, if not, replace the pump.
2. Start the washer and check for 120 VAC at the
drain pump.
Restriction. Correct problem.
No restriction. Go to step (2).
1. Check the drain hose for restrictions.Test 4:
Defective. Replace the reed switch.
Good. Replace the control board.
3. Open the console and check the reed switch.
Magnet missing or defective. Replace
the magnet.
Magnet good. Go to step (3).
2. Remove the drawer and check the magnet.
No. Close the drawer.
Yes. Go to step (2).
1. Is the dispenser drawer closed?Test 3:
5. Replace the control board.
If this did not correct the problem, go to
step 5.
4. Better models, replace the pressure sensor.
Defective. Replace the pressure switch.
Good. Go to step (5).
3. Good models, check the pressure switch.
Yes. Correct the air leak problem.
No. Go to step (3-4).
2. Is there an air leak in the air bell system?Test 2:
CorrectionCheckTest
TEST (cont.)
mabe CONFIDENTIAL AND PROPRIETARY INFORMATION-NOT FOR PUBLIC DISCLOSURE. July 2006
 Loading...