

ENERGY SISTEM LED TV3010 User Manual

35
ESPAÑOL
User manual
37
ENGLISH
1. INTRODUCTION
Thank you for purchasing this Portable Multimedia Energy ™ LED TV3010. First of
all, welcome to the Energy portable multimedia TVs world. The following sections
provide an overview of your new device and its basics features. Please read
everything carefully before start using the product.
2. IMPORTANT SAFETY INSTRUCTIONS
To ensure your safety and the safety of others, please ensure that you read all the
safety information before operating this product.
Keep this information in a safe place for future reference.
This symbol indicates that this product incorporates double insulation
between hazardous mains voltage and user accessible parts.
WARNING: To reduce the risk of fire or electric shock, do not expose your TV3010
to rain or moisture.
Safety Considerations
≥ Do not use the device in humid or damp conditions.
≥ Do not allow the device to get wet.
≥ Do not expose the device to dripping or splashing.
≥ Do not place water filled objects on top of the device.
≥ Do not place naked flame sources, such as candles, on the top of the device.

38
Ventilation
The slots and openings on the device are for ventilation. Do not cover or block them
as it may cause overheating.
NEVER let children push anything into the holes or slots on the case.
Battery Disposal
Please ensure batteries are disposed of safely.
Never dispose of batteries in a fire or with other household waste.
Check with your local authority for disposal regulations.
Cleaning
ALWAYS unplug the product before you clean it.
Do not use liquid or aerosol cleaners.
Clean the device with a soft, damp (not wet) cloth.
39
ENGLISH
3. CONTROLS AND CONNECTIONS
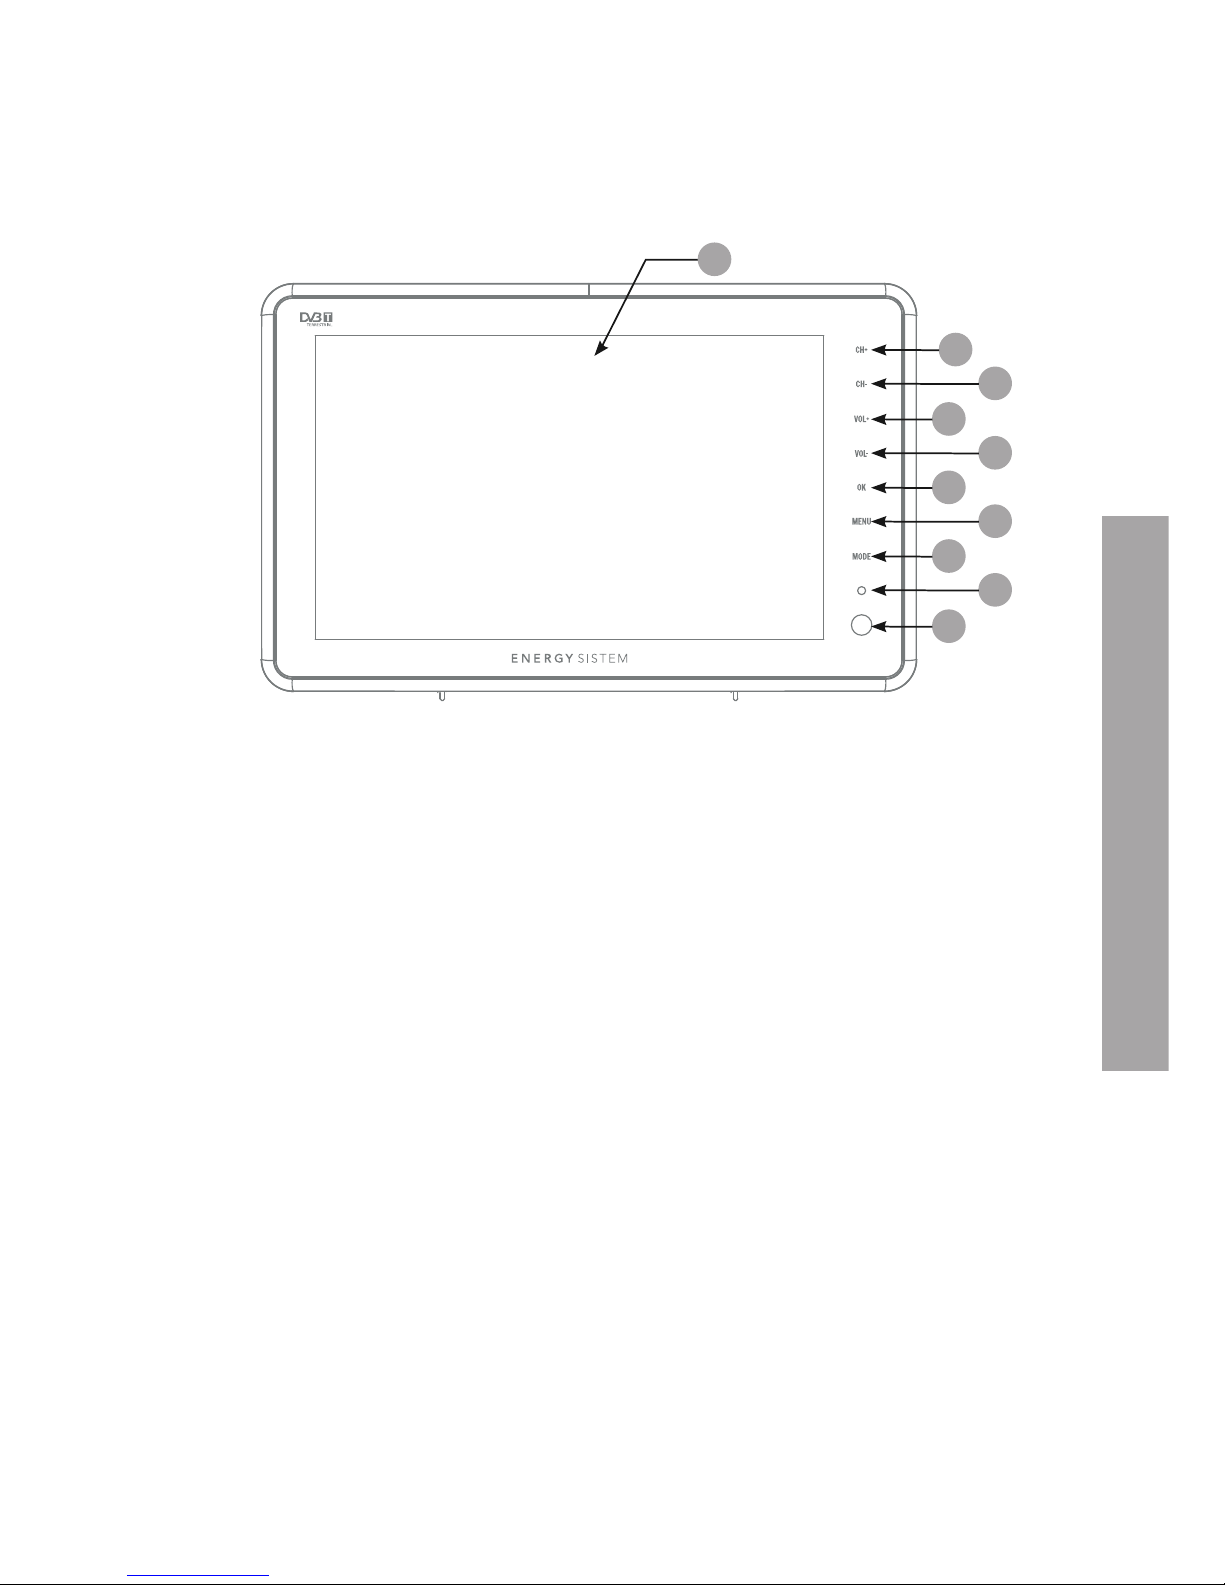
3.1. Front view
1. 10’’LED Screen.
2. CH+: Move up in the menus and change to the next channel in viewing mode.
3. CH-: Move down in the menus and change to the previous channel in viewing
mode.
4. VOL+: Move right/change settings in menus. Increase the volume level in
viewing mode.
5. VOL-: Move left/change settings in menus. Decrease the volume level in viewing
mode.
6. OK: To confirm a selection.
7. MENU: Press to open the menus /exit to go back to the topper menus.
8. Mode: Press this button to switch display mode:4:3LB, 4:3PS, 16:9.
9. LED indicator (*).
10. IR receiver.
(*) The LED states are shown as:
Blue – The battery has finished charging and is full.
Red – Device on and battery charging / Device off and battery charging
Null – Device on / Device off
Flashing -The device is in STANDBY mode.
2
3
4
5
6
7
8
10
9
1
40
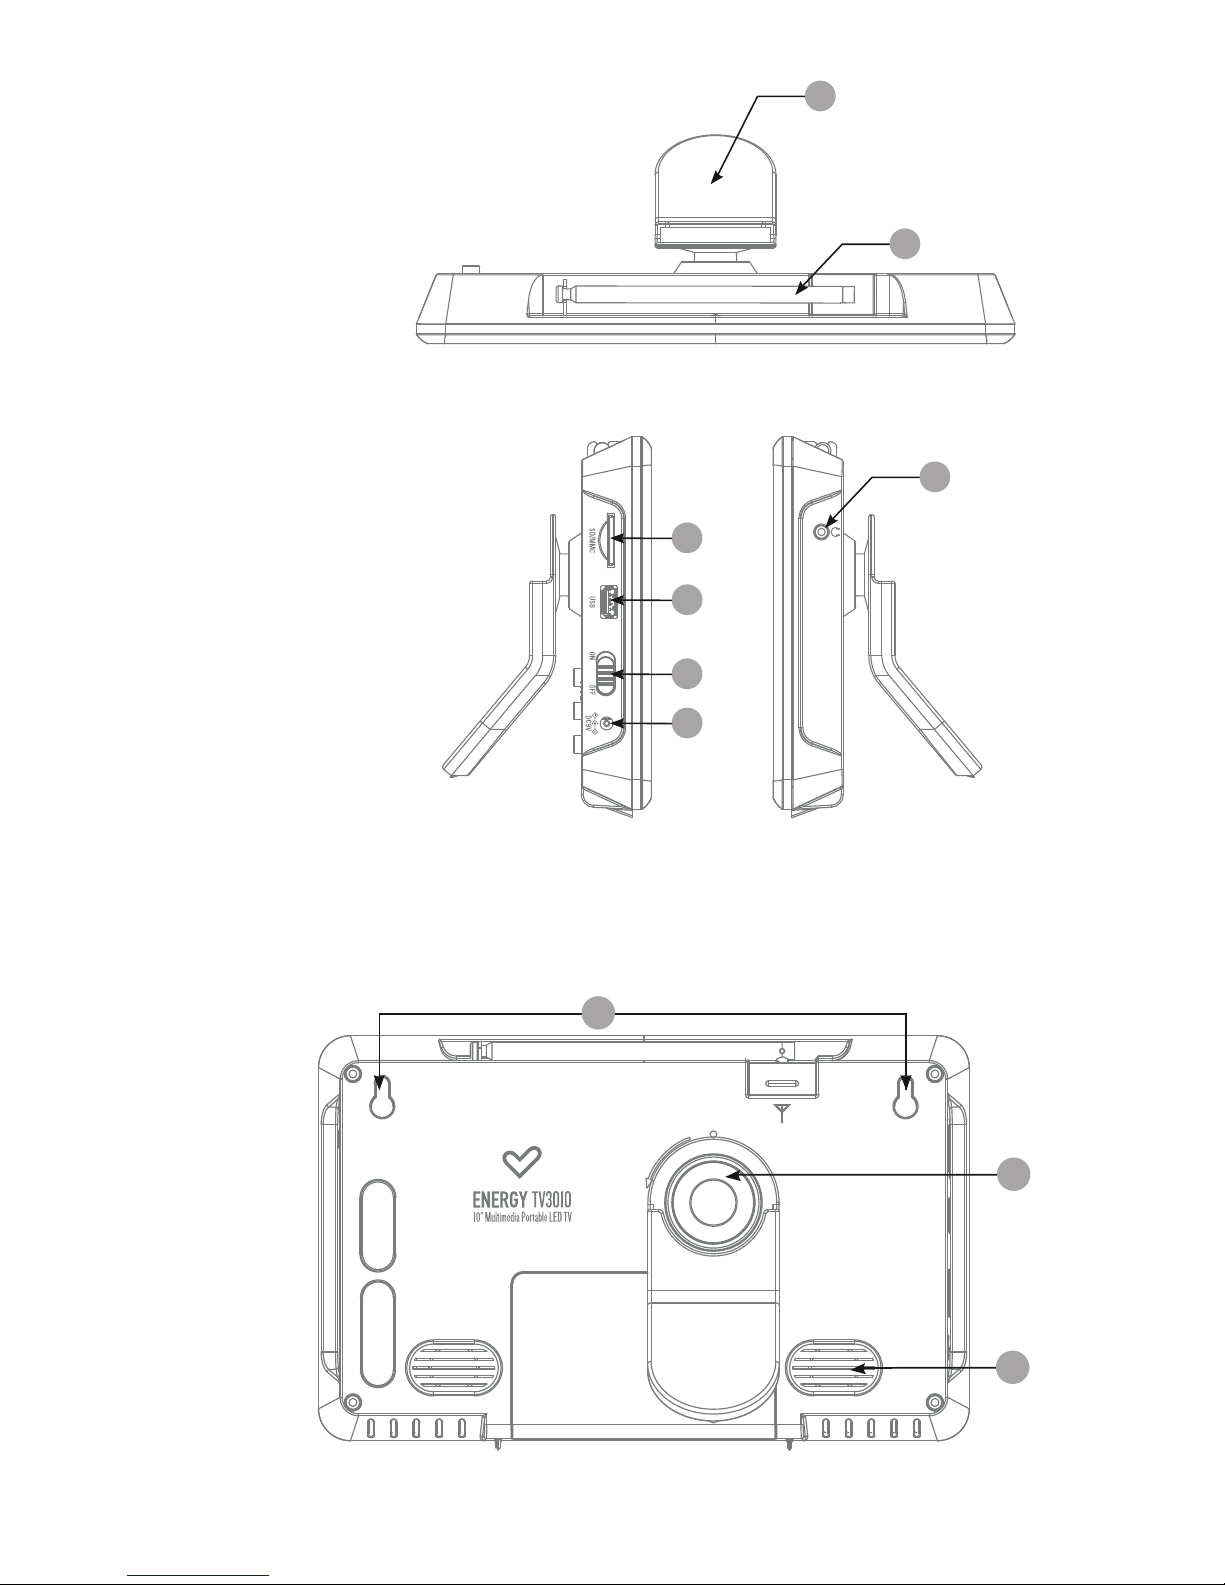
3.2. Top view
1. Stand.
2. Antenna.
3.3. Side view
1. SD/SDHC/MMC Card Reader.
2. USB jack.
3. ON/OFF.
4. DC 9V Jack.
5. 3.5 mm Earphone Jack.
3.4. Rear view
1. Hanging bracket to the wall.
2. Remote control jack.
3. Speakers
2
1
2
5
1
1
2
3
4
REMOTE CONTROL
OPEN
2
3
1
41
ENGLISH
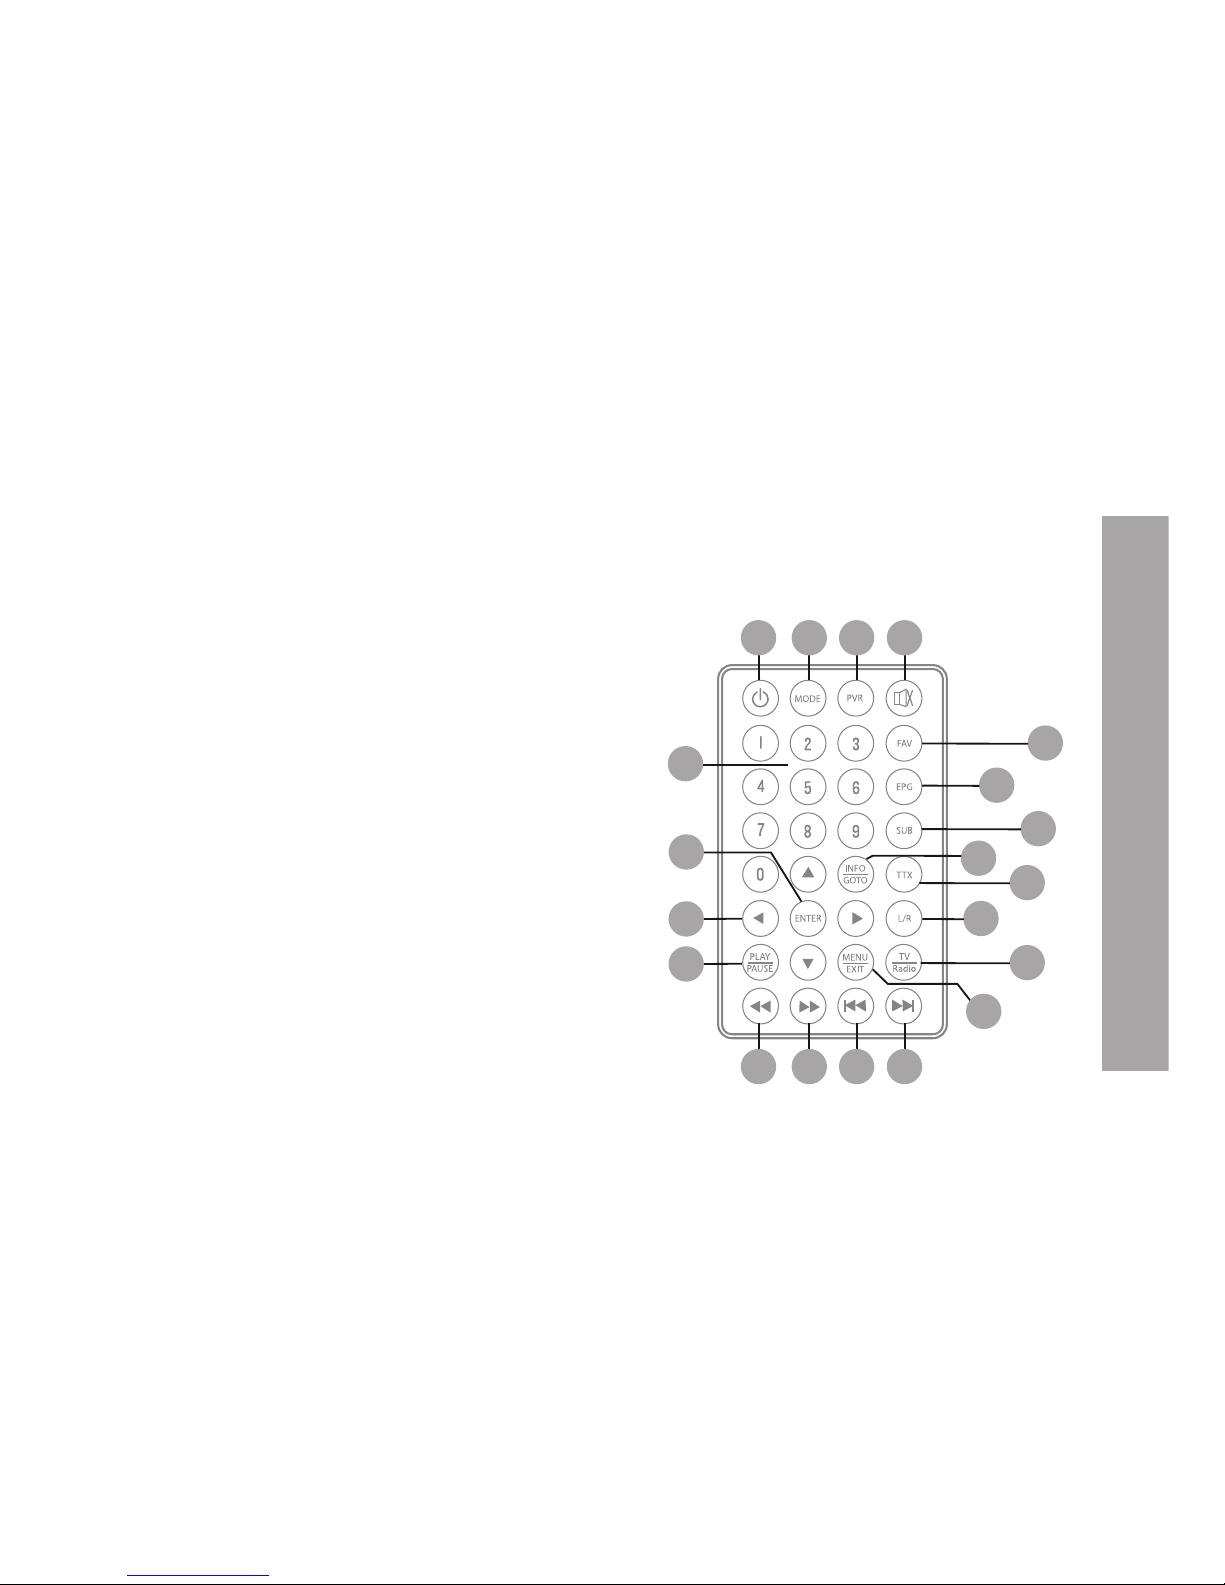
4. REMOTE CONTROL
4.1. Button Description
1. 0-9:
To change the channel and to select individual menu options.
2. ON/STANDBY:
Press to turn on the device or to change to Standby mode.
3. MODE:
Press this button to switch display mode: 4:3LB, 4:3PS,16:9.
4. PVR:
Record programs of TV or Radio.
5. MUTE:
Press once to turn the sound off/on (mute control).
6. FAV:
To operate the favourite channels.
7. EPG:
Press this button to display Electronic Program Guide.
8. SUB:
Subtitle.
9. INFO/GOTO:
Press to display the information of the current programs, or to go to a
specific instant of the video playback.
10. TTX:
Press to enter Teletext (if available).
11. L/R:
Press to change the sound of channel.
12. TV/Radio:
TV/Radio switch.
13. Menu/Exit:
Press to open the menus and
press again to exit.
14. ►►
|: Play next file/chapter.
15.
|◄◄: Play previous file/chapter.
16.
►►: Fast forward the video playing.
17.
◄◄: Fast rewind the video playing.
18.
PLAY/PAUSE: Starts or pauses the current
playback.
19.
▲: Move up in the menus and change to the
next channel in viewing mode.
▼: Move down in the menus and change to the previous channel in viewing mode.
►: Move right/change settings in menus. Increase the volume level in viewing mode.
◄: Move left/change settings in menus. Decrease the volume level in viewing mode.
20. ENTER:
To confirm a selection. Or to open the channel list Menu.
Note:
SUB/TTX/EPG may not be available for all channels.
◄◄/►►/|◄◄/►►| will act as RED/GREEN/YELLOW/BLUE key depending on
context.
6
7
8
9
10
11
12
20
1
19
18
17 16 15 14
2 3 4 5
13
42
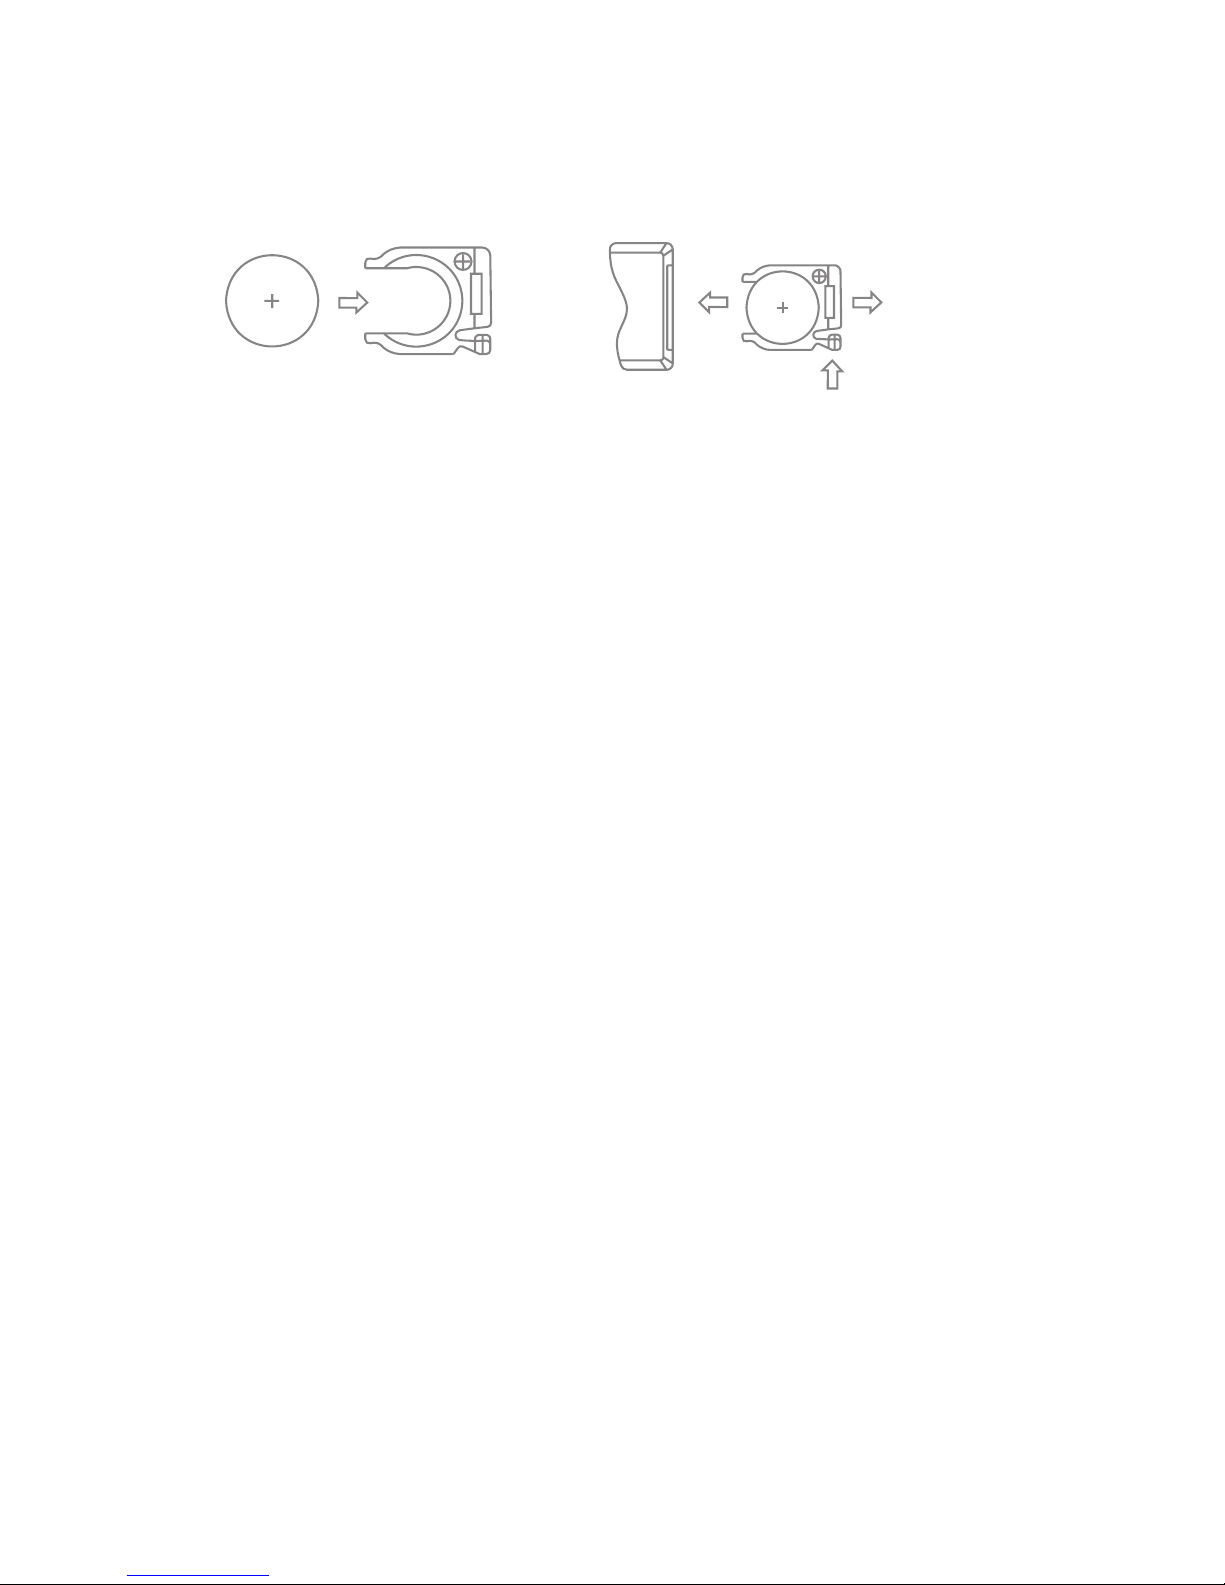
4.2. Installig the batteries
Pull the battery loader out and insert a CR2025 battery.
≥ Make sure to place the battery in the correct direction.
≥ When not using the remote control for a long period of time remove the battery.
≥ When operating range reduces replace the battery.
≥ Do not recharge, disassemble, or heat the battery. Misuse of the battery may
result in leakage that will damage the remote control.
4.3. Using the remote control
To use the remote control, point it towards to the IR receiver.
The remote control range is 4 metres or less within a
±30° angle from the remote
sensor. If the remote’s battery is low, the remote may not function properly, so
replacing the battery immediately is recommended.
The remote control will not work if the way to the receiver is blocked.
Sunlight or other very strong light will decrease the sensitivity of the remote control.
5. BUILT-IN RECHARGEABLE BATTERY
This portable TV comes with a built-in rechargeable Lithium-Ion battery.
≥ Charge the battery fully before initial use for at least 8 hours. Charging time is
normally about 4hours. A fully charged battery delivers about 2.5 hours of use.
≥ When the battery is weak, an indication symbol will appear on the screen and the
unit will power off automatically after a few minutes.
6. INSTALLATION AND CONNECTIONS
Caution: Make sure to check the voltage specification of the wall outlet is the same
rating with the receiver. To prevent the risk of electric shock, do not open the cover
or the back of the TV.
43
ENGLISH
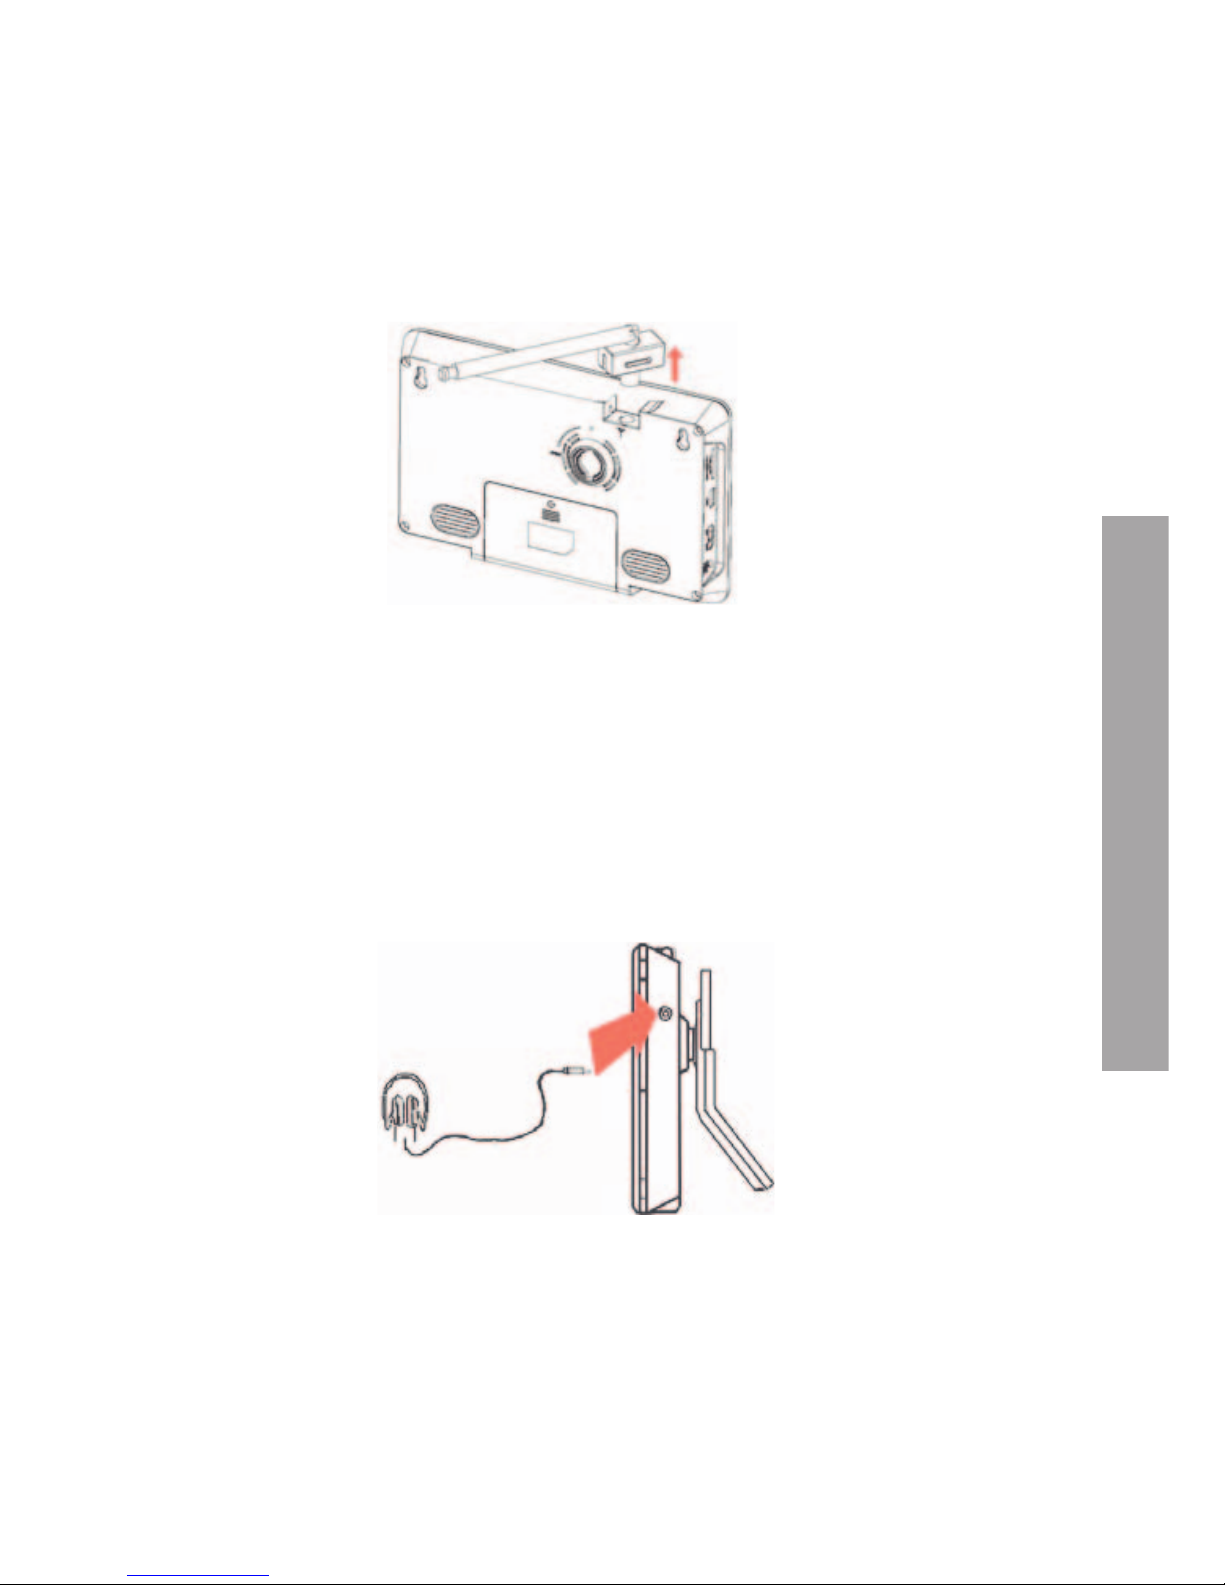
6.1. Antenna
The TV unit is supplied with a telescoping antenna that will provide good reception
in most situations. Be sure to keep the TV stationary when trying to receive a
signal. Any movement of the TV can result in loss of the digital signal.
Please pull the Antenna just like the figure shows.
We recommend to use an external antenna instead of the portable antenna included when the signal isn’t good enough.
6.2. Connecting the earphones
You can connect stereo earphones to the headphone jack for private listening.
When earphones are connected, the speakers will automatically turn off.
Caution: Loud volume can damage your hearing.
Decrease the volume before connecting earphones, and then raise the volume back to a
comfortable level.
44
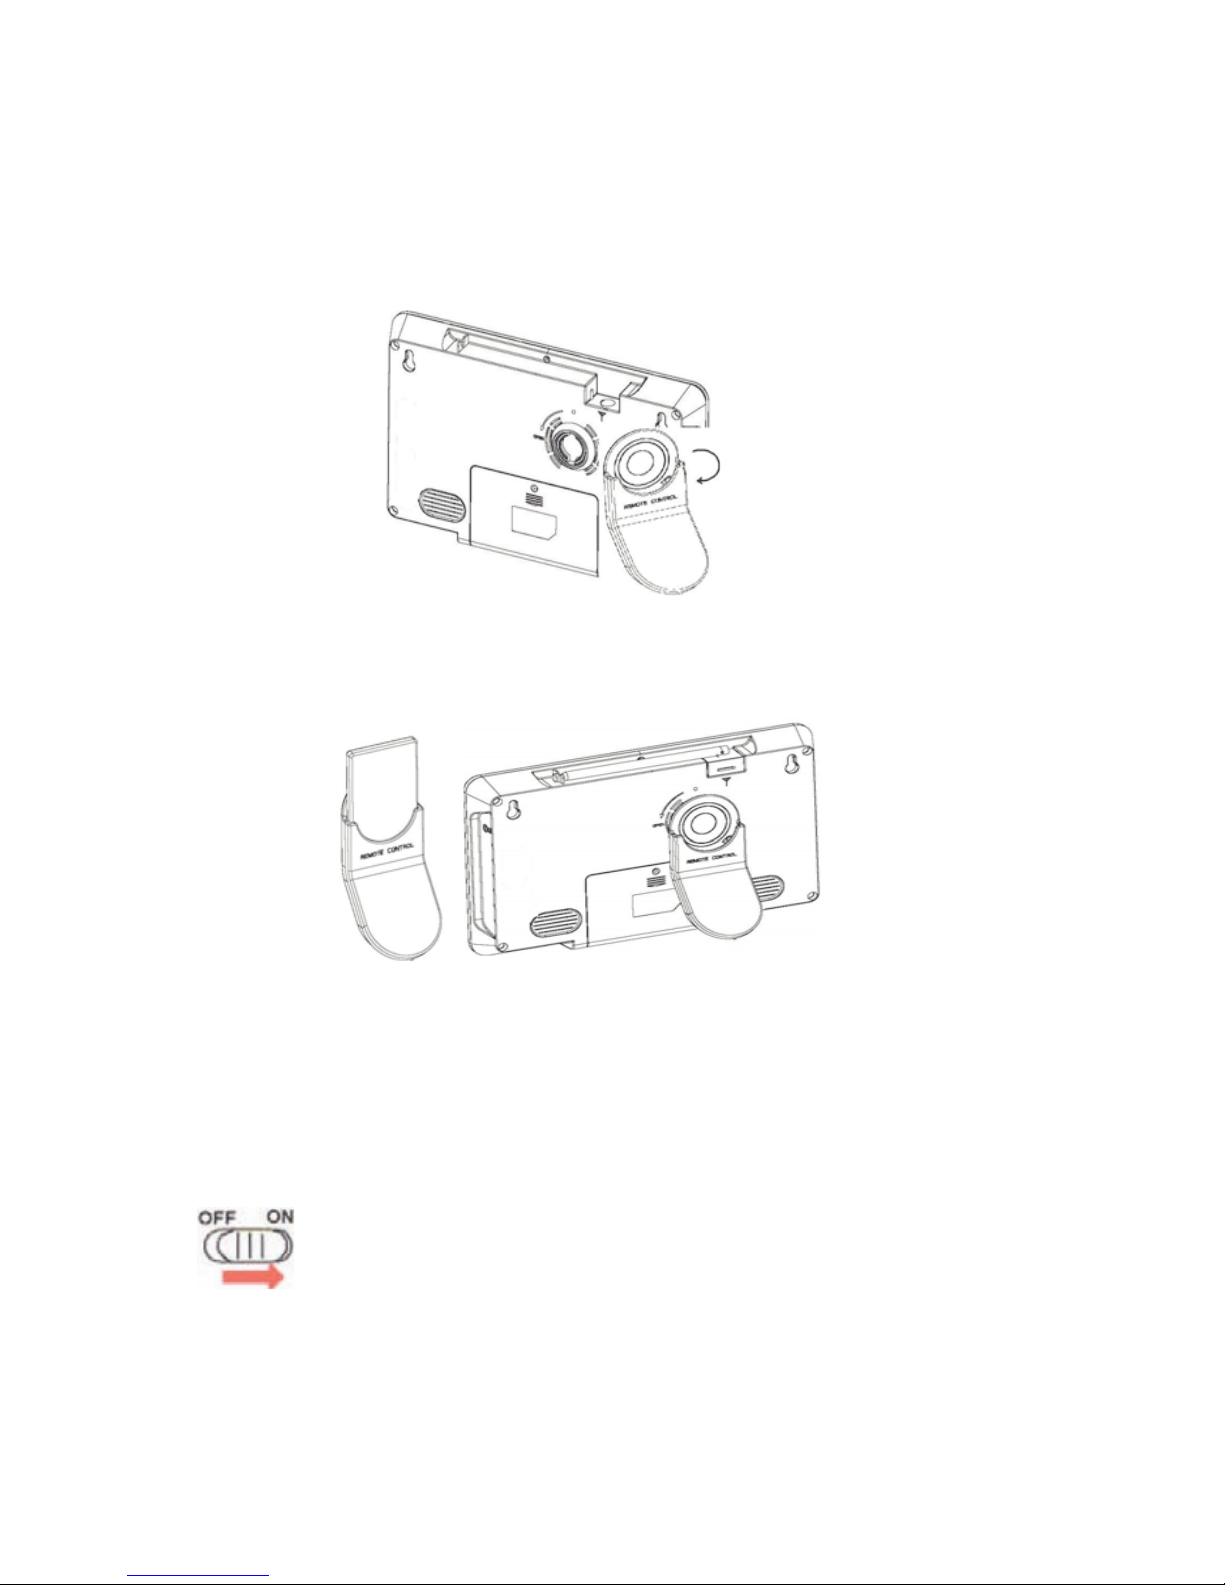
6.3. Installing stand
Insert the front end of the support to the slot on the back cover, and then rotate the
base as illustrated in bottom, until the support is locked properly.
In order to store the remote control, insert it to the slot on the back stand.
7. USER INTEFACE
7.1. Powering ON the system
1. Power On: Switch ON/OFF button from OFF to ON.
The system will enter DVB mode as soon as the system is powered on.
 Loading...