

Page 1
Twin Light Center
Thank You!
™
We hope you enjoy your new Energizer® Light on Demand
Twin Light Center. It has been designed to provide you with light
wherever you need it, in everyday use and during emergencies.
The following instructions will tell you all you need to know to
Package Contents:
•
1 Twin light center
•
1 Portable area light stick
•
1 Portable dual-light stick
gain the most satisfaction from your new light.
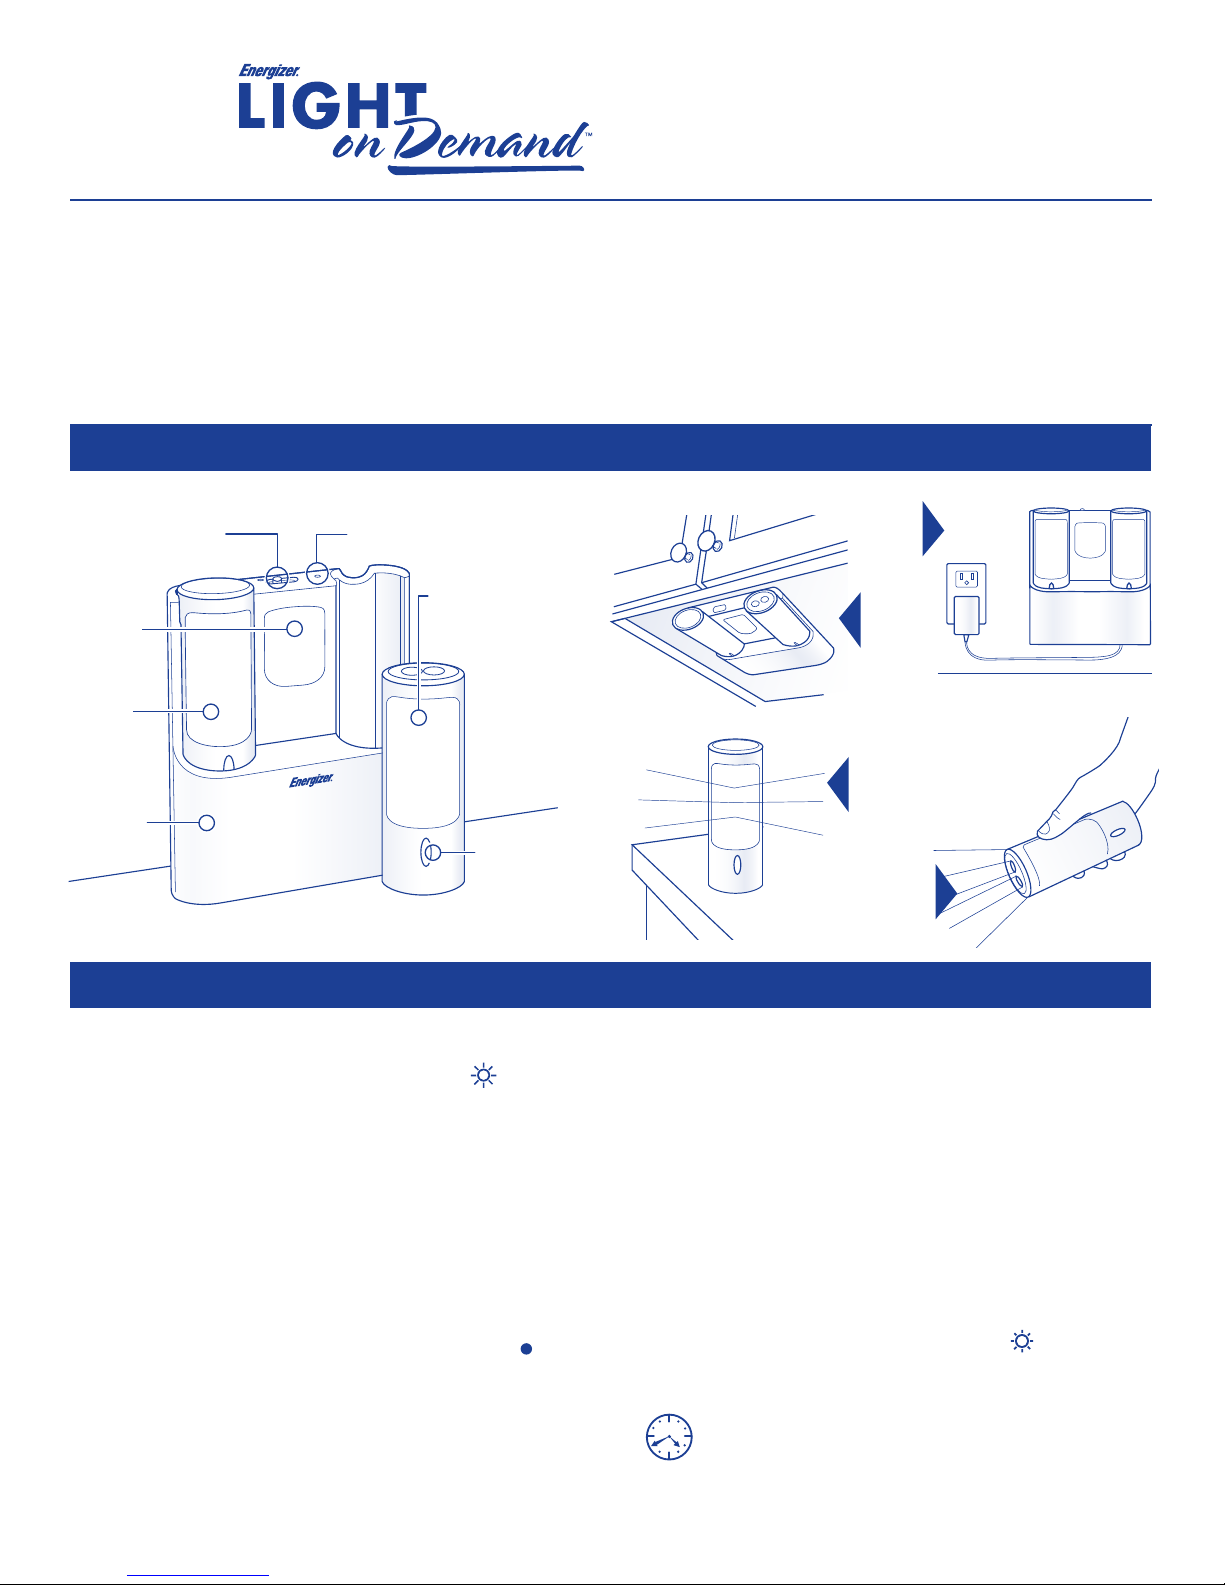
Twin Light Center Multiple Uses
Mode switch
Soft glow
nightlight
Portable
area light
stick
Light dock
LED power indicator
Portable
dual-light stick
(flashlight or area light)
Push button
switch
(flashlight,
area light, off )
•
2 Rechargeable battery packs
(in lights)
•
1 AC adaptor
•
Mounting hardware and template
Mount
to wall
OR
Mount
under
cabinet
( template
included)
USE AS:
Portable
area light
stick
OR
Dual-light
stick
flashlight
Basic Operation
Daily Use
For light, set the mode switch on the light dock to ON . The light
sticks and the nightlight in the main unit will come on using power
from your home. The glowing green LED indicates that the unit is
drawing power from your home and that the docked light sticks
are charging.
Power Emergency
To ensure instant light during a power outage, be sure the mode
switch is on AUTO. For your safety and peace of mind, when power
goes out, the light stick in the left-hand dock turns on and remains lit
until power returns (or batteries run down). If light is not required
during a power outage, you can set the mode switch to
conserve battery life. When mode switch is set to AUTO and the power
is on, the unit’s AUTO LED glows indicating light sticks are charging.
OFF to
Portable Area Light Stick
To use the area light stick as an area light, remove from the dock
and press the push button switch 1 time. Return to dock after use
to recharge.
Portable Dual-Light Stick (Flashlight/Area Light)
To use the dual-light stick as a flashlight, remove from the dock
and press the push button switch 1 time. To use as an area light,
remove from the dock and press the push button switch 2 times.
Return to dock after use to recharge.
Nightlight
To use the nightlight, set the mode switch to LOW ; the nightlight
LEDs in the main unit will light. Light sticks in the dock continue to
charge during this time. (Nightlight will not operate without power.)
Energizer® Light on Demand™ sticks
require an initial 16 hour charge time.
Page 2
Extended Use
To keep light sticks fully charged, return them to the dock after
portable use. While they are in the dock, they will recharge
whether the mode switch is set to
(as long as power is present).
AUTO, OFF , LOW , or ON
Using Alkaline Batteries
In the event of a prolonged power outage,
you can use regular AAA Energizer®
Max® alkaline batteries in your
Energizer® Light on Demand
However, when power returns, REMOVE THE ALKALINE
BATTERIES and replace the rechargeable battery pack in
order to recharge. The dock will NOT recharge regular
alkaline batteries. (See warning on page 3.)
™
sticks.
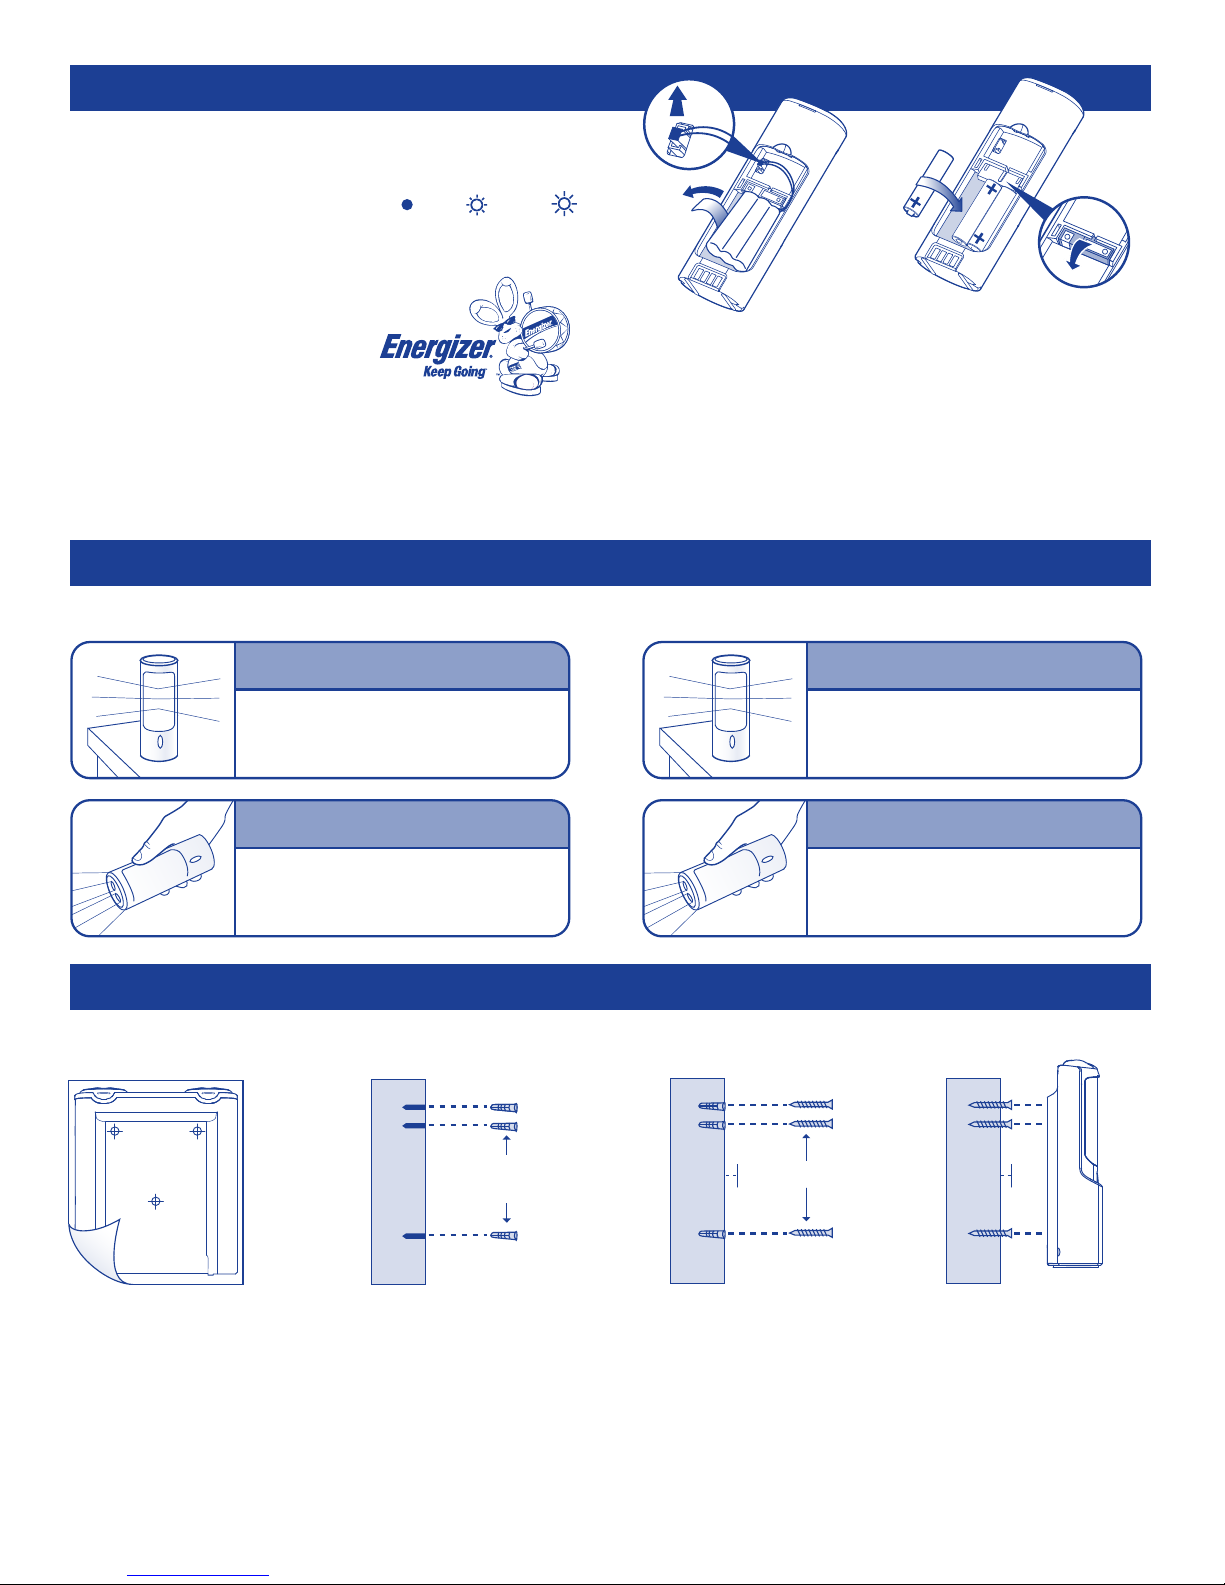
Run Time
PULL
To Insert Alkaline Batteries:
1. Remove the back of the light
stick to access the rechargeable
battery pack.
2. Pull the white ribbon to remove
the rechargeable battery pack
and pull up on the wire connection
to disconnect from the light stick.
FLIP
3. Flip the contact holder so
the metal contacts face down.
4. Insert 3 AAA size alkaline
batteries as indicated.
5. Replace the back of light
stick. Do not throw away
the rechargeable battery
pack; re-insert when the
power returns.
Using Rechargeable Battery Pack
Area Light (4 LEDs
5 Continuous Hours
Per Light Stick
Flashlight (2 LEDs
)
10 Continuous Hours
Per Light Stick
)
Using 3 AAA Alkaline Batteries
Area Light (4 LEDs
18 Continuous Hours
Per Light Stick
Flashlight (2 LEDs
25 Continuous Hours
Per Light Stick
Mounting To Wall
You will need: mounting template (included), 3 wall anchors (included), 3 self tapping screws (included), hand drill, 3/16" size drill bit, screwdriver
Wall
Anchors
1/8" 1/8"
Screws
WALL
)
)
1. Use the enclosed
template to mark the
screw hole locations.
2. Pre-drill holes in the
mounting surface with a
3/16" size drill bit.
3. Insert the 3 plastic wall
anchors and tap them in
until they are snug.
4. Turn the screws into the
anchors, stopping about 1/8"
before the screw is flush with
the wall.
5. Center the unit over the
screws and slide down to
secure. If the unit is not
snug to the wall, lift it off
and tighten the screws
slightly until you have the
ideal fit.
Page 3

Mounting Under Cabinet
You will need: mounting template (included), spacers (included), 2 machine screws (included), hand drill, 7/32" size drill bit, screwdriver
FLUSH
(Cabinet doors are flush with shelf base.)
Washers
INSIDE
CABINET FRONT
MOUNTING
SURFACE
1. Position the template under
the cabinet and drill holes.
2. Insert the screws with
washers into the holes from
the inside of the cabinet.
Energizer® Light on Demand
The light sticks included with this device are interchangeable with Light on
Demand All-in-One Light Center ( LODLC4BY), Twin Light Center (LODLC2BY),
Tabletop Nightlight ( LODNLTT ), and Wallplate Nightlight ( LODNLWP ).
3. Align the unit with the
screws and tighten until the
unit is held firmly. Do not
overtighten the screws.
™
A Family of Innovative Lighting Solutions
( Cabinet frame hangs below shelf base.)
LIP
Washers
INSIDE
MOUNTING
SURFACE
SPACERS
1. Position the template under
the cabinet and drill holes.
2. Determine screw length and
number of spacers needed
based on cabinet overhang.
Note: Spacers can be used together
to provide various heights.
CABINET FRONT
3. Insert the screws with
washers into the holes from
the inside of the cabinet.
4. Align the unit with the
screws and tighten until the
unit is held firmly. Do not
overtighten the screws.
Wall
Sconce
Desk Light
Motion Light
Warranty
ONE YEAR LIMITED WARRANTY: Warranty covers any defect in material or workmanship for up to one year. It
excludes damage caused by normal wear and tear, misuse, modification. Warranty applies only to the original U.S.
or Canadian purchaser of the Light on Demand Product. Warranty terminates if you sell or transfer Product(s).
Energizer will repair or replace Product(s) at its option. Call 1-800-383-7323 for warranty service. Warranty is limited
to consumer use. EXCLUDES ALL INCIDENTAL AND CONSEQUENTIAL DAMAGES, SOME JURISDICTIONS DO NOT
ALLOW THE EXCLUSION OR LIMITATION OF INCIDENTAL OR CONSEQUENTIAL DAMAGES, SO THE ABOVE
LIMITATION OR EXCLUSION MAY NOT APPLY TO YOU. WARRANTY GIVES YOU SPECIFIC LEGAL RIGHTS, AND
YOU MAY HAVE OTHER RIGHTS WHICH VARY BY JURSIDICTION. Energizer Holdings, Inc., St. Louis, MO 63141.
Energizer Canada, Inc., Walkerton, Ontario N0G 2V0.
BATTERY WARNING: (1) Keep away from children. If swallowed, promptly see doctor; have doctor phone
(202) 625-3333 collect. (2) Do not install backwards, charge, put in fire or mix with other battery types. May explode
or leak causing injury. Replace all batteries at the same time.
ENERGY STAR® is a Federal initiative created by the U.S. Environmental Protection Agency and the
U.S. Department of Energy to help consumers identify and purchase quality products that meet strict
energy-saving guidelines. These products help protect the environment by conserving energy and help
consumers save money on energy bills. Energizer is proud to be a voluntary ENERGY STAR partner
and proud to introduce this ENERGY STAR product.
Tabletop
Nightlight
All-in-One
Light Center
Powered by an
ENERGY STAR®
qualified adapter
for a better
environment
Twin
Light Center
Wallplate
Nightlight
Mfd. for: Energizer Holdings, Inc.
St. Louis, MO 63141
Energizer, Energizer Light on Demand,
Energizer Bunny design, and other
marks are trademarks of Energizer.
Made in China
Patents pending
©2007 Energizer
UPN-122948
www.energizer.com
1-800-383-7323
 Loading...