

Page 1
QUICK
START GUIDE
EOB1-1001-WHT
v1.2
TM
Page 2

Thank you for choosing the Energizer
Baמּery Camera. This quick start guide will help
Smart
®
you with setup and installation.
Package Includes:
1
– Smart Baמּery Camera
1
– 13ﬞ Weatherproof
Micro USB Cable
Note:
Energizer
2.4GHz WiFi network. Please note that many home WiFi
networks are set to 5GHz by default. (Ex: AT&T, Verizon)
Please contact your Internet Service Provider for
assistance with 2.4GHz network setup.
For video tutorials,
check out our
YouTube channel
1 – Magnetic Mount
1 – Mounting Equipment
1 – Quick Start Guide
Connect devices only work on a
®
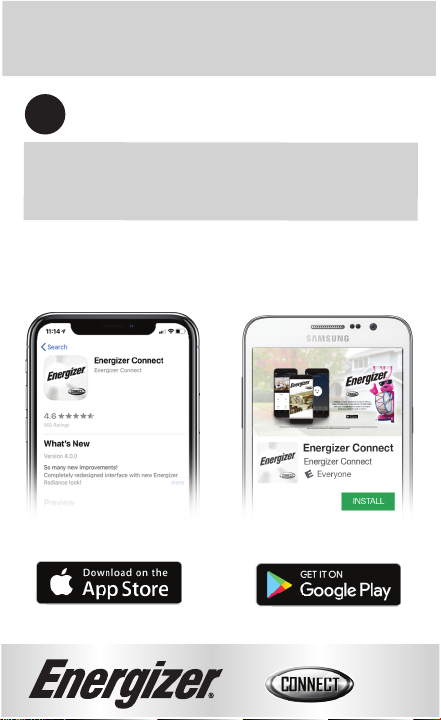
Search: Energizer Connect
or Scan the QR code
Page 3
Pair the Smart Baמּery Camera.
1
Download the Energizer
App Store (for iPhones) or Google Play Store (for
Android phones).
Before opening the app to the 2.4GHz WiFi network,
make sure your phone is connected to the WiFi network
that your Smart Baמּery Camera will be placed on.
Connect app from the
®
1
Page 4
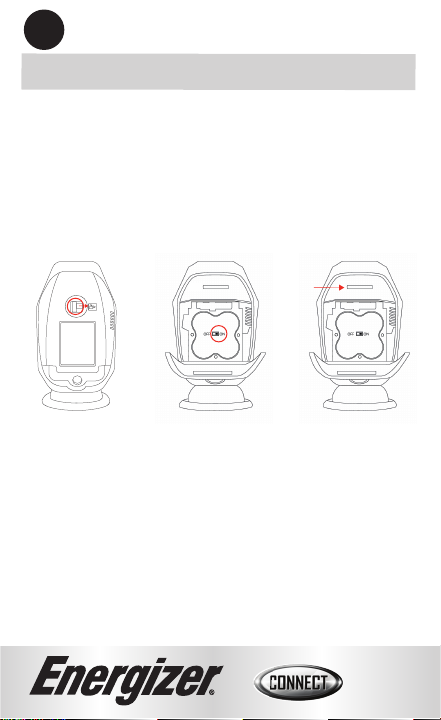
2
Set Up Camera:
1. Slide the latch of the baמּery compartment to the right.
2. Optional: Insert microSD card (not included) into
microSD card slot, supports max to 128GB.
3. Turn the baמּery power switch to the ON position.
microSD
Card Slot
Step 1
4. Close the baמּery door. The camera will now finish
booting up, and the indicator light will begin to blink
red (page 4). If the indicator light is not blinking red,
please reset. (see page 14 for troubleshooting)
Step 2 Step 3
2
Page 5
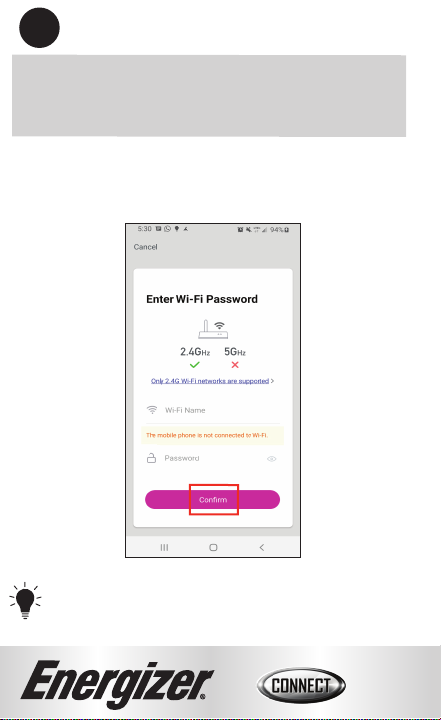
7
Confirm that the WiFi displayed network is your
2.4GHz WiFi network, enter your WiFi password
and click “Confirm”.
Hint: If you need information about 2.4gHz
networks, use our Connection FAQs on our website.
7
Page 6
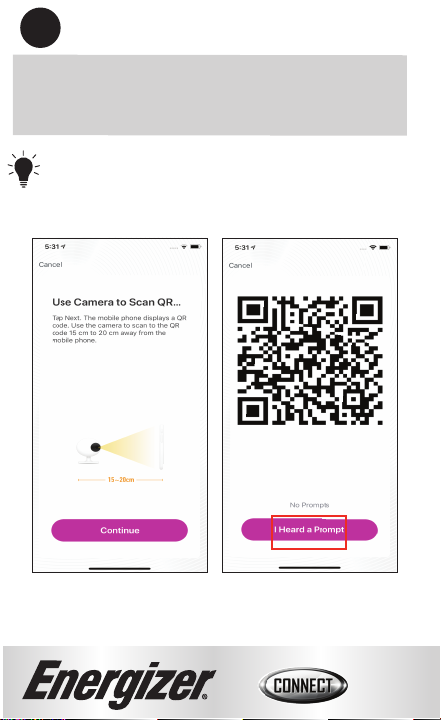
8
Place the lens of the camera directly against the QR
code that shows up on your screen and slowly
move the camera back.
Tip: You are trying to get the camera to scan
the QR code on your phone.
Once you hear an audible prompt from the
camera, press the “I Heard a Prompt” buמּon.
8
Page 7

9
Your Smart Baמּery Camera will now be connected
to the network.
TIP: You can put your camera directly in a
room by selecting one of the available rooms.
Click buמּon to change the name of the
product.
Your Energizer® Smart Baמּery Camera is now ready to use. You
can now view the camera remotely and receive mobile alerts. We
hope you enjoy using your Energizer® Smart Baמּery Camera.
For frequently asked questions and instruction videos, please
visit our website at www.energizerconnect.com.
9
Page 8

10
Mounting Installation:
Option 1:
For mounting without the
magnetic mount, simply place
the camera on any flat surface.
Option 2:
Install the magnetic mount to a
wall using the included screws
and place the camera on the
mount. You can adjust the
position of the camera around
the ball mount to fit your needs.
Option 3:
Use any standard tripod mount
(not included) with the tripod
screw on the boמּom of the
camera.
10
Page 9

11
Advanced Features:
In order to use Advanced Features such as Cloud Recording or 3rd
party streaming services, you will need to have your baמּery
camera constantly plugged into a power source.
These features take up a lot of power and will deplete your
baמּery unless you keep it plugged in.
If you plan to keep your camera outdoors, while using advanced
features, you will need to use our included waterproof power
cable.
Note: When connecting the waterproof power cable,
make sure the silicone cover is off to the side (Fig. A),
and the waterproof plug is fully inserted (Fig. B).
Back of Camera
Fig. A Fig. B
Open Silicone
Cover on Back
Silicone
Cover
Fully Insert Cable
Waterproof
Power Cable
11
Page 10

To enable voice access for your Smart Baמּery Camera, you will
need to link the Energizer
voice assistant.
Connect skill with your choice of
®
Voice Activation for Alexa
Make sure your Alexa device is installed and set up first.
1
Open your Alexa app.
Open the menu to search for “Skills”.
2
Authorize your account with the Alexa skill using the username
4
and password from your
Using the name you assigned your camera, you can ask Alexa to
5
turn on/off your camera.
Ex: “Alexa, show me the backyard camera”.
Energizer
Search for & choose
3
Energizer
Connect app.
®
Connect.
®
12
Page 11

Voice Activation for the Google Assistant
Make sure your Google Assistant device is installed and set up first.
1
Open your Google Home app.
3
Click the “+” to add a new device.
2
Click “Set up device”.
Click “Have something already set up?”
4
Search for & choose
5
Energizer
Authorize your account with the Google Assistant skill using the
6
username and password from your
Using the name you assigned your camera, you can ask the
7
Google Assistant to turn on/off your camera.
Ex: “Ok Google, show me the backyard camera”.
Energizer
Connect app.
®
Connect.
®
13
Page 12

Live view
controls:
1
6
7
8
2
3
9
4
Photo
5
Storage
1
Camera Timestamp
Quality Switch: Toggle
2
between High
Definition (HD)
and Standard Definition (SD)
Audio Switch: Enable camera
3
audio so you can hear through
the camera
4
Take a Photo: Save a snapshot
of the current live video to
your smart device
Help
5
Tap to Speak
6
Device Seמּings
WiFi Signal Stregth
7
Recording Stamp
8
Full Screen Landscape View
9
Recording Playback Controls
10
(see next page for details)
Microphone Switch: Enable
11
the microphone so you can
speak through the camera
12
PIR: Set Motion Sensitivity
and Notification
13
Cloud Storage Options
(scroll down to view)
10
11
12
13
(Scroll down
14
to view)
14
Page 13

Local playback
controls:
1
2
5
6
7
3
4
Camera Timestamp
1
2
Pause Playback
List of Motion Detections: Click
3
on a time to see the recorded
event
Take a Photo: Save a snapshot
4
of the current live video to your
smart device
Take a Photo
5
Device Seמּings
6
Full Screen
7
Playback Timeline
8
Date Selection
Duration of event recorded
9
Begin recording the
10
playback video as it plays
Note: Local playback is only available when
microSD card is installed.
8
9
10
15
Page 14

Troubleshooting
1. Please visit www.energizerconnect.com for video tutorials on
your device.
2. If you are having trouble with your device and need to reset it,
open the micro USB cover and use the included reset pin to
push and hold the pin-hole buמּon for 5 seconds. You will hear
an audible prompt leמּing you know the device has been reset.
3. For maximum baמּery performance the camera will enter into
baמּery saving sleep mode. It may need to be woken up on the
device screen when trying to access live view.
To enable SD card recording based off motion, you must have a
micrioSD card installed in the camera AND the PIR sensor
turned on. As long as the microSD card is installed and the PIR
sensor is on, it will record based off motion.
If you are looking to stop recording, and still get motion
notifications, you must remove the microSD.
A) Pairing Issues
If your device fails to add or times-out, you may need to reset the
camera. Open up the silicon cover on the back and then use the
included reset pin to press the reset pin-hole buמּon for 5-7
seconds. You will hear a audible prompt leמּing you know the
reset was accepted. Your camera will reboot into pairing mode
and the red light in the indicator light zone will start blinking.
B) Connection Issues
If your device is showing as “Offline”, check to make sure it is
charged by opening up the baמּery cover and turning it OFF and
back ON. If the indicator light does not turn on at all, try charging
your camera.
If the baמּery is charged, but the camera continues to show as
“Offline”, you may have a weak connection at the spot where
you have placed your camera.
16
Page 15

Try moving it to a spot closer to your router with few walls
between the router and your camera.
You can purchase a WiFi extender to increase your wifi range.
You can create a separate 2.4GHz network just for your smart
devices. This will provide dedicated bandwidth and cache
memory for your smart devices, separate from all the other
devices you use in your home. You can create a new 2.4GHz
network manually in your router seמּings or by contacting your
Internet Service Provider and asking them to turn on a 2.4GHz
guest network.
C) Controlling your camera
To turn on Motion Detected recording, insert a microSD card
(not included, max 128gb) and turn on the PIR sensor.
If the PIR Sensor is not on, the camera will not be able to
detect motion and the camera will not record.
Due to the low-power state the camera uses to conserve
baמּery, there is no full time recording available.
Motion Detection screenshots can be found in the Main Menu
Notification Center. From the Home page, click the three lines
in the top leﬞ, and then click Notifications.
Two Way Audio.
By default, the camera will only use the microphone OR the
speaker. When you click the microphone on the live view, you
will be able to speak through the camera, and when you click
the microphone again to turn it off, the speaker will
automatically turn on so you can hear whats being said at the
camera.
17
Page 16

Legal & Warranty
To see Warranty information and Certification Legal wanrings,
please see our website.
www.energizerconnect.com
©2020 Energizer. Energizer, Energizer Bunny design and certain
graphic designs are trademarks of Energizer Brands, LLC and
related subsidiaries and are used under license by Jem
Connected IOT, Inc. All other brand names are trademarks of
their respective owners. Neither Jem Connected IOT, Inc. nor
Energizer Brands, LLC is affiliated with the respective owners of
their trademarks.
Apple and the Apple logo are trademarks of Apple Inc.,
registered in the U.S. and other countries.
App store is a service mark of Apple Inc.
Google and Google Play are trademarks of Google LLC. All rights
reserved.
Amazon, Alexa and all related logos are trademarks of
Amazon.com, Inc. or its affiliates.
18
Page 17

3
Open the app and create an account by following
the on-screen instructions.
TM
3
Page 18

4
It is recommended to first pair the camera indoors,
close to your router.
Note: The indicator light on the camera should start
blinking red for pairing mode.
Blinking Red
Blinking Green
Solid Green
Indicator Light
Pairing Mode
Waking Up/Detecting
Motion
Awake
Reset
Pinhole
(Behind Silicone
Cover)
*You may need to remove the protective plastic to see the
indicator flashing.
Note: We recommend inserting the microSD card (not
included) before mounting the camera.
Indicator
Light*
4
Page 19

5
Aﬞer logging in, click “+” on the top right of the
screen and select "Add Device".
5
Page 20

6
Select the “Camera” category and confirm you can still
see the red indicator light blinking through the front
of the camera.
rapidly blinking, then click “Next Step”.
Tip: This is for switching between
pairing modes.
Refer to troubleshoot on page 14 for reset
instructions if device is not in pairing mode.
Confirm that the indicator light is
Next Step
6
 Loading...