

Page 1
Made in China for:
Bright Manufacturing LLC.
Fort Lauderdale, FL 33309
© 2017 Energizer. Energizer and certain graphic designs are
trademarks of Energizer Brands, LLC and related subsidiaries
and are used under license by Bright Manufacturing, LLC. All
other brand names are trademarks of their respective owners.
Neither Bright Manufacturing, LLC. nor Energizer Brands, LLC
is affiliated with the respective owners of their trademarks.
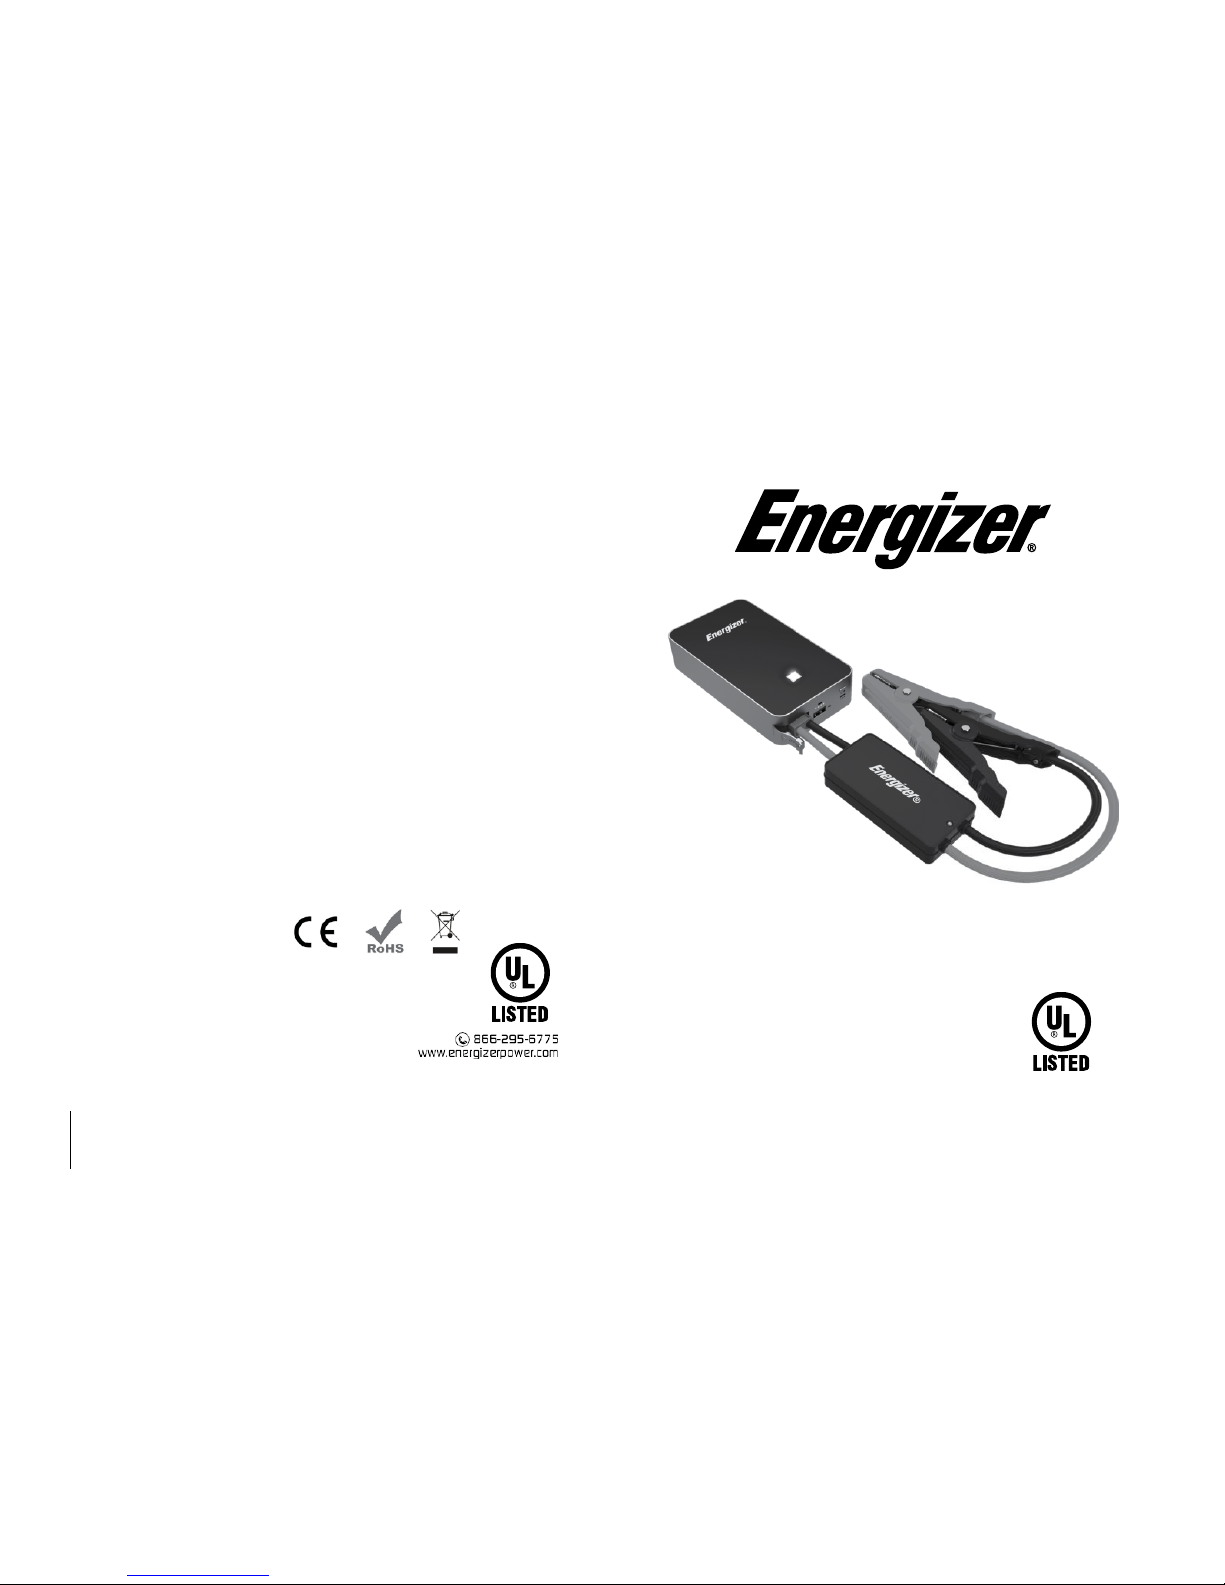
ENX12K
44,400mWh LITHIUM-POLYMER
CAR JUMP STARTER
USER’S MANUAL
PLEASE READ THIS MANUAL CAREFULLY BEFORE OPERATION
Lithium Battery Disposal:
This product contains a lithium battery. A lithium battery should not be thrown
away in the trash. Please dispose of the battery at an authorized disposal or
recycle center. Check your local requirements for battery disposal/recycling in
your state.
Page 2

INTRODUCTION
Please read this manual thoroughly before installing
and operating your new Energizer® Lithium-Polymer Car Jump
Starter. This manual contains information you need to obtain
relating to the performance required for your application. Keep
this manual for future reference.
IMPORTANT SAFETY INFORMATION
Misusing or incorrectly connecting the Jump Starter may
damage the equipment or create hazardous conditions for
users. Read the following safety instructions and pay special
attention to all Caution and Warning statements in the guide.
Warnings identify a condition. Cautions identify practices both
resulting in damage to existing equipment or the Jump Starter.
Page 3
SPECIFICATIONS (Specifications are subject to change without notice.)
Battery Capacity: 44,400mWh
Starting Current: 200A
Peak Current: 600A
DC Charge Input: 5V 1A/2.1A
Rated USB Output: 5V/max, 2.4A (iPad)
Temp (Environment): -25°C to 40°C / -13°F to 104°F
Physical Specifications:
Dimensions (L x W x H): 5.5in x 3.2in x 1.2in / 140mm x 83mm x 30mm
Weight: 0.86 lbs / 0.39 Kg
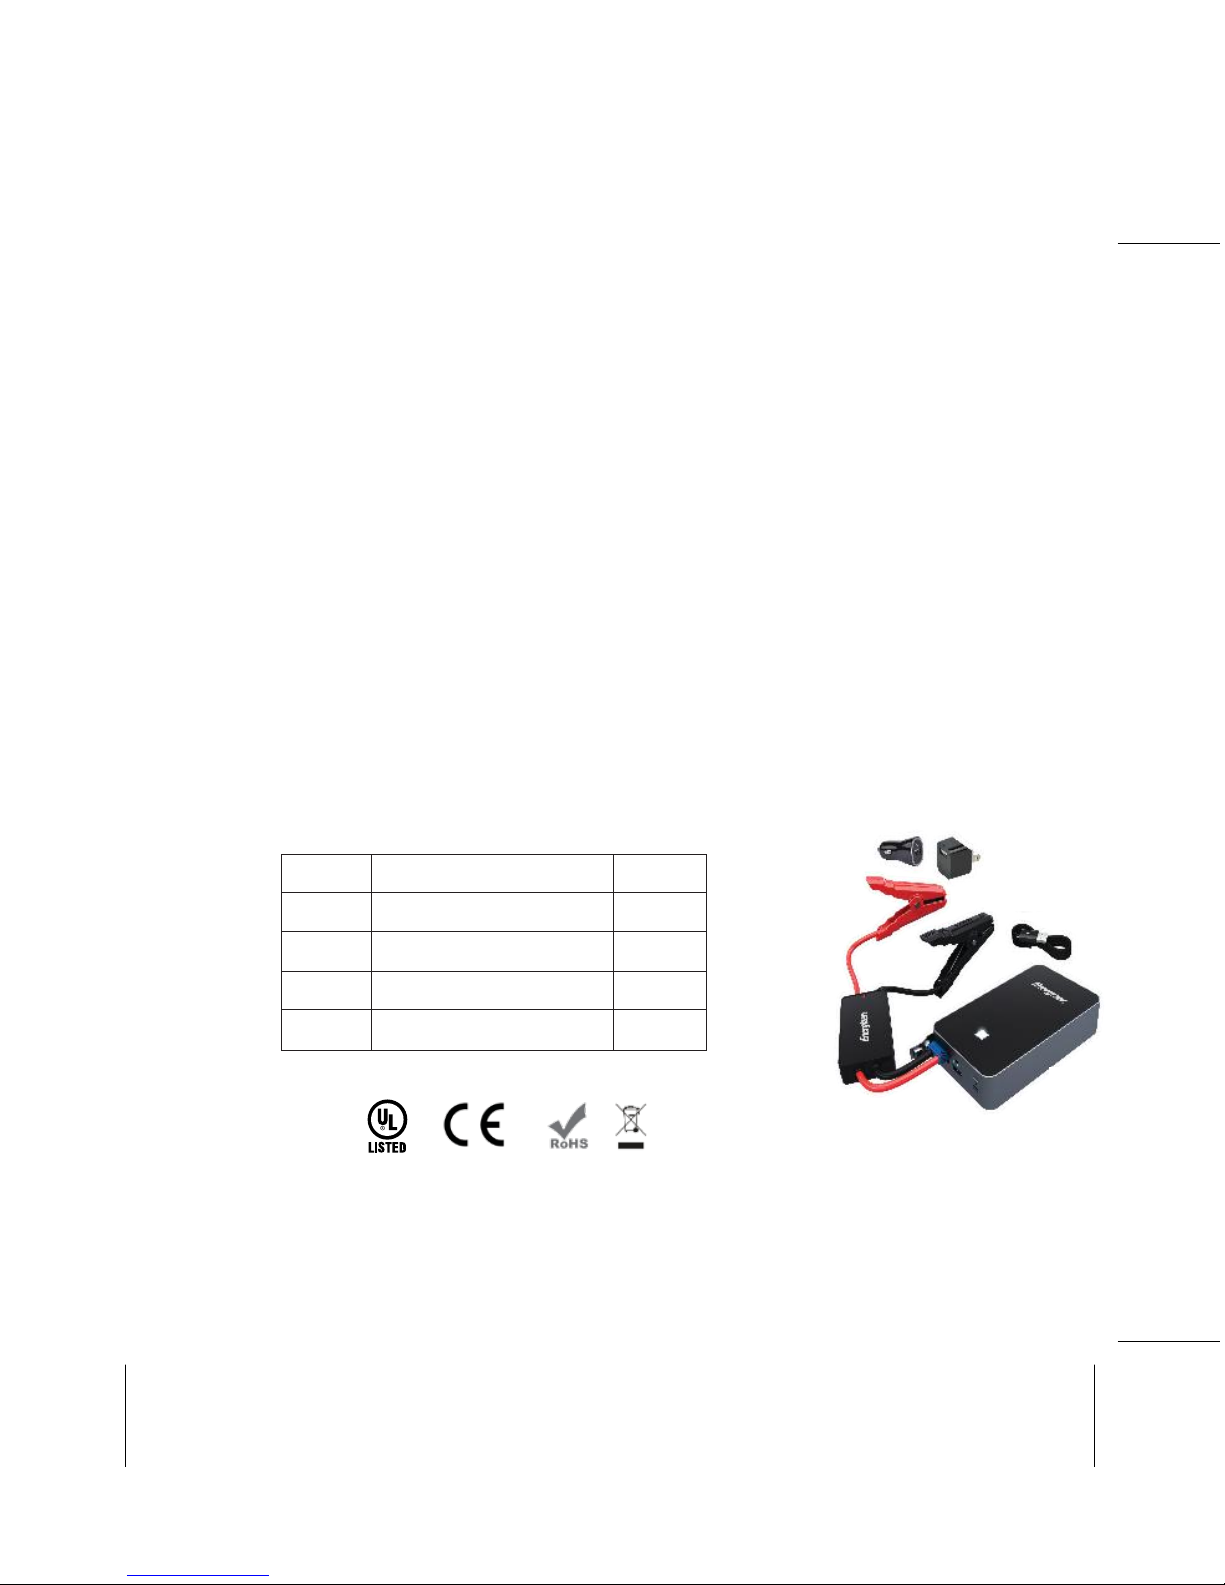
PACKAGE CONTENTS
Part
Description
QTY
A Jump starter
1
B Jump starter
1
C Charging Cable
1
D AC Charger
1
Note:
The Jump starter/charger recommended recharging every 3 months.
A
C
D
B
Page 4

SAFETY INFORMATION
Please read this entire manual before attempting to use this product.
WARNING
Avoid dangerous environments. Do not charge this item in rain, snow, damp or
wet environments. Do not use this item or charger in the presence of explosive
atmospheres (gaseous fumes, dust or flammable materials) since sparks may
be generated when inserting or removing this item, possibly causing fire.
Charge in a well-ventilated area. Do not allow smoking or open flames near a
charging battery. Vented gases may explode. Do not burn or incinerate this
item. This item may explode, causing personal injury or damage. Toxic fumes
and materials are created when batteries are burned. Do not crush, drop or
damage this item. Do not use this item or a battery charger that has received a
sharp blow, been dropped, run over or damaged in any way (e.g. pierced with a
nail, hit with a hammer or stepped on). Do not disassemble. Disassembly may
result in the risk of electric shock, fire or exposure to battery chemicals. Battery
chemicals cause serious burns. Never allow contact with skin, eyes or mouth. If
this item leaks battery chemicals, use rubber or neoprene gloves to dispose of
it. If skin is exposed to battery fluids, wash with soap and water and rinse with
vinegar. If eyes are exposed to battery chemicals, immediately flush with water
for 20 minutes and seek medical attention. Remove and dispose of
contaminated clothing. Do not short circuit. This item will short circuit if a metal
object makes connection to the power cable port. Do not place this item near
anything that may cause a short circuit, such as coins, keys or nails. A shortcircuited battery may cause fire and personal injury. Never charge or jump start a
frozen battery. Store this item and charger in a cool dry place. Do not store this
unit for more than 10 days where temperatures may exceed 120 Degrees F (50
Degrees C) such as direct sunlight, a vehicle, or metal building during the
summer as it may cause damage to the unit. This product is intended for
private use only and should not be used in any commercial applications. Use of
this product to start multiple vehicles over a short period of time may damage
the jump starter/charger. When jump starting your vehicle do not place Jump
Starter on the ground or at a height less than 18 inches.
PROPOSITION 65 WARNING:
This Product contains chemicals known to the
State of California to cause cancer and birth defects or other reproductive harm
(California law requires this warning to be given to customers in the State of
California). Wash hands after handling.
Page 5

OPERATING INSTRUCTIONS
Make sure power level is above 50% before use:
Indicator
0 1 2 3 4
Battery charger
0% 25%
50%
75%
100%
1. Plug the blue connector into the 12V Jump Starter port (A); LED (B)
illuminates red.
2. Connect the red damp to positive '+' on the vehicle's battery. Connect the
black clamp to negative '-' on the vehicles battery. lf connected correctly LED (B)
illuminates green. lf LED flashes red it's more than likely the clamps have been
incorrectly connected, remove clamps & connect correctly, the LED should now
be green. Even if with the clamps connected correctly the LED flashes red,
remove the red clamp & re-connect to reset.
3. If Green, proceed to start vehicle.
4. Once the vehicle has started and the LED flashes green, disconnect the
clamps from the vehicle's battery and then remove the jumper cables from the jump
starter.
Recharging the Jump starter
To charge the jump starter, connect D and A with C then plug the charger (D)
into a 110V outlet. The four Indicator lights will flash. When the four Indicator
lights are solid illuminated, the jump starter battery is completely charged.
Page 6

TROUBLE SHOOTING
Problem
Possible Cause
Solution
Jump starter does not
jump start vehicle.
Red blinking
1. Battery may not
have sufficient
charge.
2. Jumper cable clamps
maybe improperly
connected to the
vehicle’s battery.
3. Over temperature
1. Charge the jump starter
to sufficient charge.
2. Reconnect the clamps
to the proper battery
terminals, and ensure
the jumper cable’s LED
is illuminated green
3. Make sure the Jump
starter cooled to
usage temperature
Jump starter does not
jump start vehicle.
Green blinking
1. Not properly
connected
2. Jump starter/charger
voltage level lower
than vehicle battery
voltage
1. Reconnect the
clamps to the vehicle
battery
2. Vehicle battery has
enough charge to
start car
Page 7

1. Disconnect the Jump starter within 30 seconds after starting your car.
2. Do not connect the red clamp and black clamp directly.
3. Do not disassemble the machine.
IMPORTANT SAFETY INSTRUCTIONS WARNING –
When using this product, basic precautions should always be followed,
including the following:
a) Read all the instructions prior to using the product.
b) To reduce the risk of injury, close supervision is necessary when the
product is used near children.
c) Do not put fingers or hands into the product.
d) Use of an attachment not recommended or sold by jump starter
manufacturer may result in a risk of fire, electric shock, or injury to
persons.
e) To reduce risk of damage to the electric plug and cord, pull the plug
rather than the cord when disconnecting the jump starter.
f) Do not use a battery pack or appliance that is damaged or modified.
Damaged or modified batteries may exhibit unpredictable behavior
resulting in fire, explosion or risk of injury.
h) Do not operate the jump starter with a damaged cord or plug, or a
damaged output cable.
i) Do not disassemble the jump starter, take it to a qualified service
person when service or repair is required. Incorrect reassembly may
result in a risk of fire or electric shock.
j) To reduce the risk of electric shock, unplug the jump starter form the
outlet before attempting any instructed servicing.
k) WARNING - RISK OF EXPLOSIVE GASES.
1) Working in vicinity of a lead acid battery is dangerous. Batteries
generate explosive gases during normal battery operation. For this
reason, it is of the utmost importance that you follow the instructions
each time you use the jump starter.
2) To reduce risk of battery explosion, follow these instructions and
Page 8

those published by battery manufacturer and manufacturer of any
equipment you intend to use in vicinity of the battery. Review cautionary
marking on these products and on engine.
l) PERSONAL PRECAUTIONS
1) Consider having someone close enough by to come to your aid
when you work near a lead-acid battery.
2) Have plenty of fresh water and soap nearby in case battery acid
contacts skin, clothing, or eyes.
3) Wear complete eye protection and clothing protection. Avoid
touching eyes while working near battery.
4) If battery acid contacts skin or clothing, wash immediately with
soap and water. If acid enters eye, immediately flood eye with running
cold water for at least 10 minutes and get medical attention immediately.
5) Never smoke or allow a spark or flame in vicinity of battery or
engine.
6) Be extra cautious to reduce risk of dropping a metal tool onto
battery. It might spark or short-circuit battery or other electrical part that
may cause explosion.
7) Remove personal metal items such as rings, bracelets,
necklaces, and watches when working with a lead-acid battery. A leadacid battery can produce a short-circuit current high enough to weld a
ring or the like to metal, causing a severe burn.
m) When charging the internal battery, work in a well ventilated area and
do not restrict ventilation in any way.
n) Under abusive conditions, liquid may be ejected from the battery;
avoid contact. If contact accidentally occurs, flush with water. If liquid
contacts eyes, additionally seek medical help. Liquid ejected from the
battery may cause irritation or burns.
o) Do not expose a jump starter. Do not expose a jump starter to fire or
excessive temperature. Exposure to fire or temperature above
130°C/265°F may cause explosion.
p) Have servicing performed by a qualified repair person using only
identical replacement parts. This will ensure that the safety of the
product is maintained.
q) Attach output cables to a battery and chassis as indicated below.
Never allow the output clamps to touch one another.
1) Instructions shall include step by step directions for the proper
use of the booster function detailing the correct steps to connect and
disconnect the booster cables to the battery.
Page 9

A- Spring-loaded fully insulated colored coded clamps
B- 12V jump starter connector & port
C- Cross polarity safety function. Fully protected against short circuiting
D- USB 2.4A output suitable for most USB devices including smart phones,
tablets, iPhone, iPad, and iPod
E- On/off button _ Led Light button
F- DC charge input
G- Battery level indicator lights
Your Energizer Jump Starter can be charged with any USB charging device.
Page 10

WARRANTY AND RETURNS
What does the warranty cover? This Limited Warranty is provided by Bright
Manufacturing and covers defects in workmanship and materials in your model ENX12K
Jump Starter. This warranty period lasts 12 months from date of purchase at the point of
sale to you, the original end user customer. Proof of purchase is required to make warranty
claims.
What will Bright Manufacturing do?
Bright Manufacturing will, at its option, repair or replace the defective product free of
charge, provided that you notify Bright Manufacturing of the product defect within the
Warranty Period and provided that Bright Manufacturing through inspection, establishes the
existence of such a defect and that it is covered by this Limited Warranty. Bright
Manufacturing will, at its option, use new and / or reconditioned parts in performing
warranty repair and building replacement products. Bright Manufacturing reserves the right
to use parts or products of original or improved design in the repair or replacement. If Bright
Manufacturing repairs or replaces a product, its warranty continues for the remaining
portion of the original Warranty Period or 90 days from the date of the return shipment to
the customer, whichever is greater. All replaced products and all parts removed from
repaired products become property of Bright Manufacturing. Bright Manufacturing will cover
both parts and all the labor necessary to repair the product, and return shipment to the
customer via our Help-Line center for all US resident customers. Please return with proof of
purchase to EDX Repair Center, 2016 Corporate Dr., Wilmington NC 28405. An RMA
number MUST be obtained prior to shipping to us. This does not affect your statutory
rights.
How do I get service? If your product requires troubleshooting or warranty service, call the
Help-Line number:
Toll Free: 1-866-295-6775
What does this warranty not cover? This Limited Warranty does not cover normal wear and
tear of the product or costs related to the removal, installation, or troubleshooting of the
customer’s electrical systems. This warranty does not apply to and Bright Manufacturing will
not be responsible for any defect or damage to:
1. The product if it has been misused, neglected, improperly installed, physically damaged
or altered, either internally or externally, or damaged from improper use or use in an
unsuitable environment;
Page 11

2. The product if it has been subjected to fire, water, generalized corrosion, biological
infestations, or input voltage that creates operating conditions beyond the maximum or
minimum limits listed in the Bright Manufacturing product specifications including high
input voltage from generators or lighting strikes;
3. The product if repairs have been done to it other than by the Energizer Warranty
Department.
4. The product if it is used as a component part of a product expressly warranted by
another manufacturer;
5. The product if its original identification (trade-mark, serial number) markings have
been defaced, altered or removed.
6. This warranty does not cover any damages to any equipment or any environment
damaged in conjunction with use or defect of this product.
Exclusions
This Limited Warranty gives you specific legal rights. This does not affect your statutory
rights.
Warning: Limited on Use
Please refer to your product manual for limitations on uses of the product.
Return Procedure
1. Package the unit safely, preferably using original box and packing materials. Please
ensure that your product is shipped fully insured in the original packaging or equivalent.
This warranty will not apply where the product is damaged due to improper packaging.
2. Include the following:
A return address where the unit can be shipped.
Post Office Boxes are not acceptable.
A contact telephone number where you can be reached during work
hours.
Information about the installation and use of the unit.
Information about the failure and / or reason for the return.
A copy of your dated proof of purchase.
3. Ship the unit prepaid to our Energizer Warranty Dept.
 Loading...