

Page 1
© 2017 Energizer. Energizer and certain graphic designs are
trademarks of Energizer Brands, LLC and related subsidiaries and are
used under license by Custom Accessories Europe Ltd. All other brand
names are trademarks of their respective owners. Neither Custom
Accessories Europe Ltd nor Energizer Brands, LLC is affiliated with the
respective owners of their trademarks.
iPhone and iPod touch are trademarks of Apple Inc.,
registered in the U.S. and other countries.
iPad Air and iPad mini are trademarks of Apple Inc.
For more info,
scan QR code
50810
PLEASE READ THIS USER GUIDE CAREFULLY BEFORE OPERATION
Made in China for:
Custom Accessories Europe Ltd,
The Granary, Standen Manor, Hungerford, Berkshire, RG17 0RB
12000mAh
LITHIUM-ION POLYMER
CAR JUMP STARTER
SUITABLE FOR ENGINES UP TO
5.0 LITRE (5000CC) PETROL & 4.0 LITRE (4000CC) DIESEL
USER GUIDE
Energizeraut omotiveaccessorie s.eu
0800-5420825
This Lithium-ion Polymer Car Jump
Starter has been tested & approved
to the following standards:
EN60950
EN61000
EJS6317
Page 2

INTRODUCTION
Thank you for purchasing your new Energizer
®
Lithium-ion Polymer car jump starter. Before installing
and operating please read this user guide thoroughly.
This user guide contains important information relating
to various power requirements that your products may
have. Please keep this user guide for future reference.
IMPORTANT SAFETY INFORMATION
Misusing or incorrectly connecting the jump starter may
damage the equipment or create hazardous conditions
for users. Please pay particular attention to all the
safety precautions and warning statements in this
guide.
2
Page 3

Do not crush, puncture, incinerate or short circuit
the jump starter, as this may lead to electric shock
or an explosion.
Do not expose to moisture.
Keep the jump starter out of reach of children.
Only charge the jump starter when the temperature
is between 0°C and 40°C.
If there is any evidence of leakage wash your hands
immediately and avoid contact with eyes.
Do not use the jump starter if the case is hot or
discoloured.
Do not look directly at the LED light.
Your Energizer
®
jump starter should only be
charged using the supplied 240V AC mains lead or
the 12V in-car lead.
3
SAFETY PRECAUTIONS
Page 4
4
A
Red ‘+’
Black ‘-’
E
F
F1
K
J
J
I
L
M
N
D
C
B
G
H
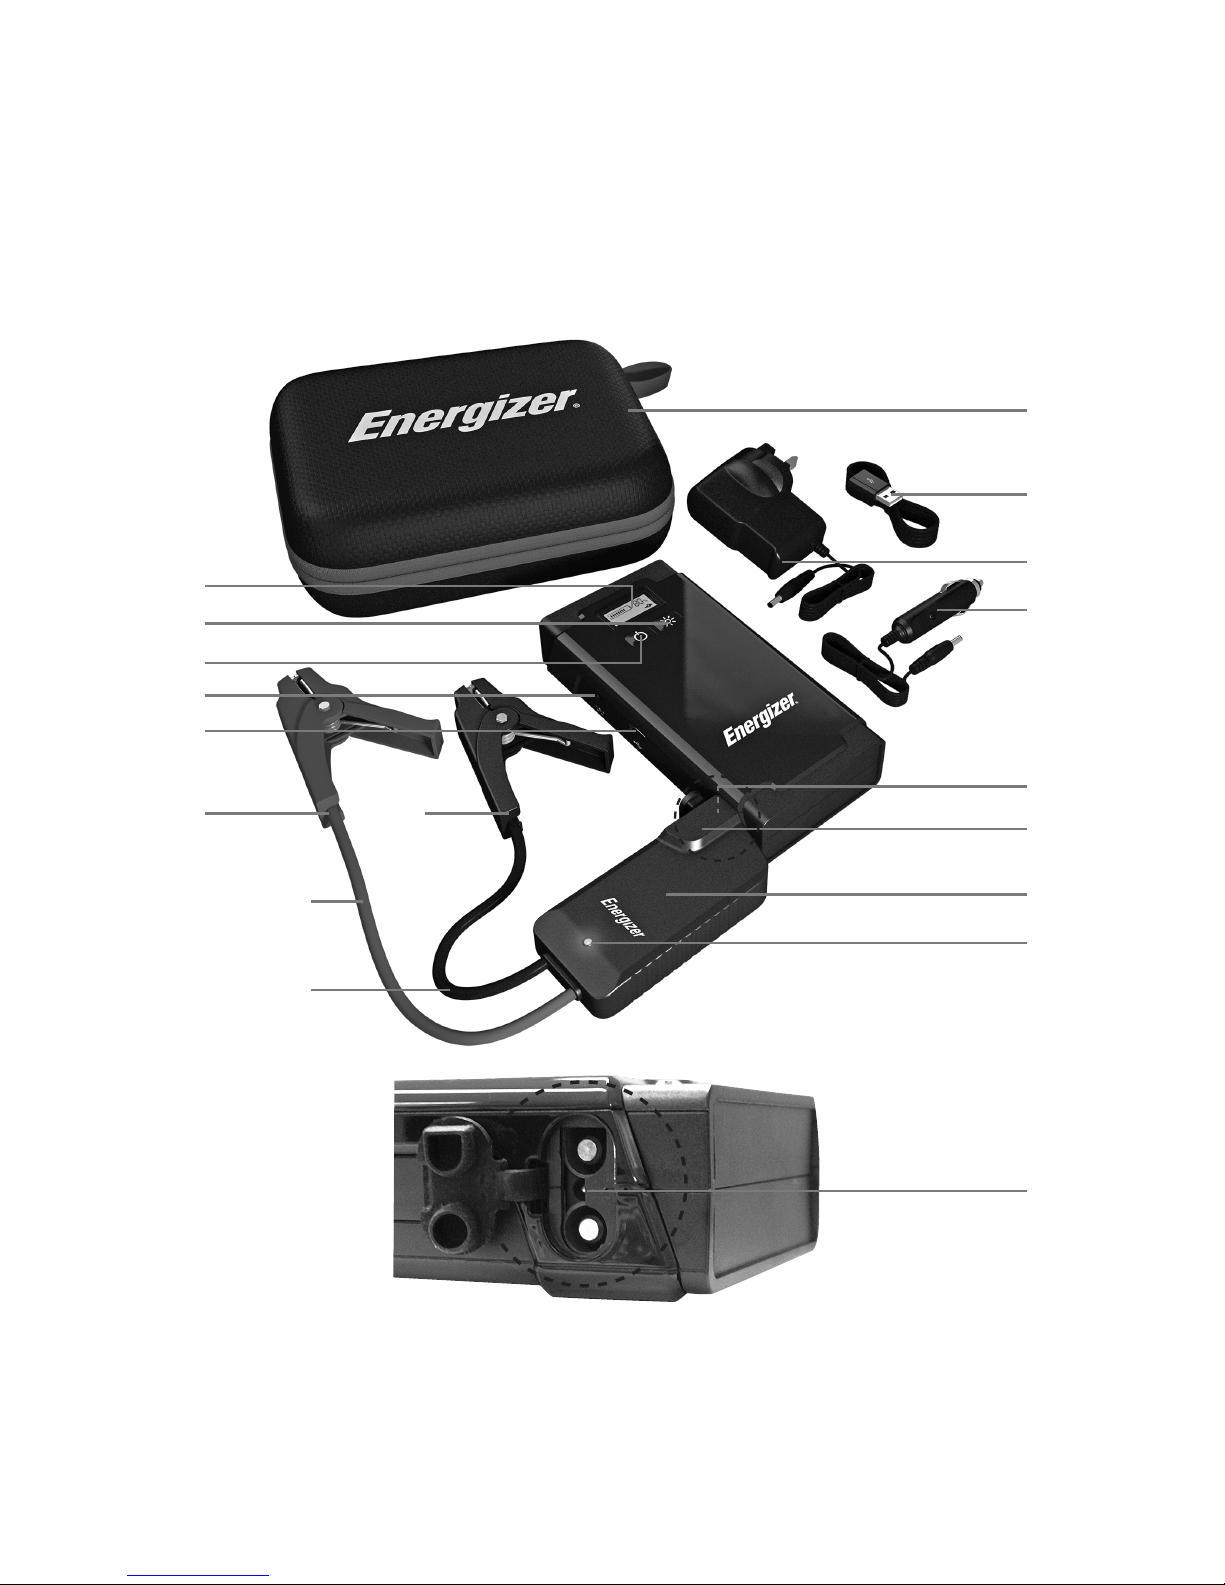
FEATURES
Page 5

A Large LCD display
B High-power LED light switch
C Power switch
D AC/DC charge input 15 V/1A port
E USB 2.4A output suitable for most USB devices
including smart phones, tablets, iPhone, iPad and
iPod
F Spring-loaded fully insulated colour coded clamps
G LED Indicator
H Mosfet unit with cross polarity safety function. Fully
protected against short circuiting
I Blue connectors
J Mosfet unit blue connector port
K 12V DC in-car charger
L 240V AC charger
M Phone/tablet charge cable (USB to micro USB)
N Storage case
5
Page 6

HOW TO CHARGE YOUR ENERGIZER
®
JUMP STARTER
Your Energizer® jump starter can be charged using
either the supplied 12V in-car charger lead (K) or the
240V AC mains charger (L). Plug the relevant lead into
either a 240V mains or 12V in-car power outlet and the
other end into the AC/DC charge input port (D) on the
side of the jump starter. To maintain battery charge it is
recommended you charge the jump starter battery
every 3 months.
6
Battery power
percentage
Battery
level
indicator
Sufficient charge to
jump start vehicle
indicator
USB port in-use indicator LED Light indicator
Charging
battery
indicator
Page 7

1. The 'Charging Battery' indicator illuminates when the
battery is charging. When all the lights on the
‘Battery Level’ indicator are lit and the ‘Battery
Power’ percentage reaches 100% the battery is fully
charged. Depending on the existing charge this
could take up to 4 hours.
2. Pressing the power switch (C) will show the charge
status. Holding the power button (C) or waiting 20
seconds will turn the charger off.
3. LED light indicator
To activate the LED light first switch the power
button (C) on. Do not look directly into the LED light.
Repeatedly pressing the LED button (B) scrolls
through the different light modes:
1 = Constant
2 = Flashing
3 = SOS
4 = Off
7
Page 8

8
4. USB output port: This is useful for charging your
phone or tablet. Plug in your device and press the
power button (C) to start charging, this will be
indicated by the USB symbol on the LCD screen.
Once charged disconnect the USB lead. Holding the
power button (C) or waiting 20 seconds will turn the
charger off.
5. Whilst charging a device via the USB port the
‘Battery Power’ percentage will warn you when you
need to charge the jump starter:
• Less than 50%: Alarm sounds 5 times and again
10 minutes later. The jump starter must be
charged above 50% in order to jump start a
vehicle.
• Below 10%: ‘Battery Power’ percentage flashes
and the alarm sound.
6. Double pressing the power button (C) cancels the
alarm.
Page 9

9
EXAMPLES
Page 10

HOW TO JUMP START YOUR VEHICLE
Please note that to jump start a vehicle the ‘Battery
Power’ percentage needs to be above 50%.
1. Plug the blue connector into the 12V jump starter
port (J), the LED (G) will flash green.
2. Connect the red clamp (F) to the positive '+', of the
vehicle's battery and the black clamp (F1) to the
negative '-'. If connected correctly the LED (G) will
show steady green. If the LED shows red then the
clamps have been connected incorrectly. Remove
and start again. If you are sure that the clamps are
connected correctly but still the LED shows red,
remove the red clamp and re-connect to reset.
3. Only when the LED (G) shows steady green should
you start the vehicle.
4. Dependent on your vehicle’s battery status you may
need to turn the ignition 2-3 times for the jump
starter to operate. This isn’t a fault, it is just the jump
starter analysing the vehicle’s battery condition for it
to work effectively.
10
Page 11

5. Once the vehicle has started and the LED (G) flashes
green, disconnect the black and the red clamps first
from the vehicle’s battery, then remove the blue
connector from the jump starter.
6. Replace the protective cover over the ‘Engine Start’
port (J).
WARNINGS
1. Disconnect the jump starter within 30 seconds of
starting your vehicle.
2. Always connect the red clamp first, never both red and
black clamps at the same time.
3. Do not dismantle the jump starter.
11
Page 12

SPECIFICATIONS
Specifications are subject to change without notice.
Battery capacity 12000mAh (44.4Wh)
Starting current 300A
Peak current 500A
Operation temperature -20˚ to +60˚C
AC/DC Charge input 15V / 1A
Rated USB output 5V/max. 2.4A (iPad)
Physical Specifications
Dimensions (L x W x H) 16.2cm x 7.8cm x 3.3cm
Weight 0.5kgs / 491g / 1.08lbs
12
Page 13

13
WARRANTY
The warranty covers defects in workmanship and
materials in your jump starter. The warranty lasts for 12
months from the original date of purchase and proof of
purchase is required to make a warranty claim.
Provided that we are made aware of a defective product
within the warranty period, the jump starter will, at the
discretion of the company, be repaired or replaced free
of charge. We reserve the right to use new and/or
reconditioned parts to effect a warranty repair. We also
reserve the right to use parts or products of original or
improved design in the repair or replacement. Once the
jump starter has been repaired or replaced its warranty
continues for the remaining portion of the original
warranty period or 90 days from the date of return to the
customer, whichever is greater. All replaced products
and all parts removed from repaired products become
the property of the company.
What is not covered by the warranty?
This warranty does not cover normal wear and tear of
the product or costs related to the removal, installation,
or troubleshooting of the customer's electrical systems.
The warranty does not cover any defects in, or damage
to, the jump starter if:
Page 14

14
1. It has been misused, neglected, improperly
installed, physically damaged or altered, either
internally or externally, or damaged by improper use
or use in an unsuitable environment.
2. It has been subjected to fire, water, generalised
corrosion, biological infestations, or input voltage
that creates operating conditions beyond the
maximum or minimum limits listed in the product
specifications including high input voltage from
generators and lightning strikes.
3. Repairs have been done to it other than by the
Energizer
®
Warranty Department.
4. It is used as a component part of a product
expressly warranted by another manufacturer.
5. Its original identification markings (trade-mark,
serial number etc) have been defaced, altered, or
removed.
Please be aware that this warranty gives you specific
legal rights and does not affect your statutory rights.
Page 15

15
RETURNS
1. Package the unit safely, preferably using the
original box and packing materials. Please ensure
that your product is shipped fully insured in the
original packaging or equivalent. This warranty will
not apply where the product is damaged due to
improper packaging.
2. Include the following:
• A return address where the unit can be shipped. PO
Box addresses are not acceptable.
• A contact telephone number where you can be
reached during work hours.
• Information about the installation and use of the unit.
• Information about the failure and / or reason for the
return.
• A copy of your dated proof of purchase.
Please return your faulty jump starter, with the above
enclosures, to:
Cobalt Innovations Ltd
Energizer Warranty Dept.,
Unit 30-31
Lagrange,
Lichfield Road Industrial Estate,
Tamworth, B79 7XD.
 Loading...