

Endurance T8HRC User Manual

Endurance T 8HRC Treadmill
®
User Manual
T8HRC


Warning
When using an electrical appliance, basic precautions should always be taken,
including the following:
• Read all instructions before using your treadmill. These instructions
are written to ensure your safety and to protect the unit.
• Before beginning any fitness program, you should obtain a complete
physical examination by your physician.
Danger
To reduce the risk of electrical shock always unplug the treadmill from the electrical
outlet immediately after using and before cleaning.
Warning
To reduce the risk of burns, fire, electric shock, or injury to persons, take the following
precautions:
• When it is plugged in, do not leave the treadmill unattended. Unplug the
treadmill from the power source when it is not in use, and before
adjusting, putting on or taking off parts.
• Do not allow children, invalids, or disabled persons on or near the treadmill
` without adult supervision. Close supervision is necessary.
• Use the treadmill only for its intended use as described in this manual.
• Do not use accessory attachments that are not recommended by the
manufacturer—such attachments might cause injuries.
• Never operate the unit if it has a damaged cord or plug, if it is not working
properly, if it has been dropped or damaged, or dropped in water. Return
the treadmill to a service center for examination and repair.
• Keep the power cord and plug away from heated surfaces.
• Never block the air openings on the hood while operating the Treadmill.
Keep the air openings clean and free of lint, hair, or anything that might
impede the free flow of air.
• Never drop or insert objects into any opening. Keep hands away from
moving parts.
• Do not use outdoors.
• Do not operate where aerosol (spray) products are being used or where
oxygen is being administered.
• To disconnect, turn the power switch to the OFF (O) position, then remove
the power plug from the wall outlet.
Warning
Connect the treadmill to a properly grounded outlet only. See Grounding Instructions.
1

IMPORTANT SAFETY INSTRUCTIONS
SAVE THESE INSTRUCTIONS
Personal Safety
• Assemble and operate the treadmill on a solid, level surface. Locate the
treadmill at least 4 feet from walls or furniture. Keep the area behind the
treadmill clear.
• Check the treadmill before each use.
• Completely assemble the treadmill before using it.
• Turn OFF and unplug the treadmill when adjusting or working near the rear
roller. Do not adjust the running belt when someone is standing on the unit.
• Keep all electrical components, such as the motor, power cord, and
ON/OFF (I/O) switch, away from water or other liquids to prevent shock.
Do not set anything on the handrail, electronic console, or hood. Never
place liquids on any part of the unit except the water bottle holder and only
capped spill-proof water bottles are recommended.
• Always attach the safety clip to your clothing at waist level prior to
beginning your workout. The safety clip is connected by a cord to the
magnetic safety key in the electronic console. If you encounter difficulties,
you can stop the running belt by pulling on the cord to disengage the
magnetic safety key from inside the console. To resume operation, the
magnetic safety key must be replaced.
• When the treadmill is not being used, remove the magnetic safety key and
store it in a safe place to prevent unauthorized use.
• Wear proper exercise clothing and shoes for your workout—no loose
clothing. Do not wear shoes with heels or leather soles. Check the soles of
your shoes and remove any dirt and embedded stones. Tie long hair back.
• Keep all loose clothing and towels away from the running surface. The
running belt will not stop immediately if an object becomes caught in the
belt or rollers.
• Before the running belt begins moving (prior to your workout), and after it
stops (at the end of your workout), straddle the belt by placing your feet
firmly on the right and left side platforms.
• Use care when getting on or off the treadmill. Use the handrails whenever
possible. Step onto the running belt when the speed is at or below 1 mile
per hour (1.6 kilometers per hour). Never step off the treadmill while the
running belt is moving.
• Never turn ON the treadmill when someone is standing on the machine.
• Keep your body and head facing forward. Never attempt to turn around
on the treadmill when the running belt is moving.
2

• Do not rock the unit. Do not stand on the handrails, electronic console,
or hood.
• Do not attempt to service the treadmill yourself other than the assembly
and maintenance instructions found in this manual.
• Do not overexert yourself or work to exhaustion.
• Stop your workout immediately if you feel any pain or abnormal
symptoms, and consult your physician
Grounding Instructions
Your Endurance Treadmill must be grounded. If it should malfunction or break down,
grounding provides a path of least resistance for electric current which reduces the
risk of electrical shock. The treadmill is equipped with a power cord having an
equipment-grounding conductor and a grounding plug. The plug must be inserted
into an appropriate outlet that is properly installed and grounded in accordance
with all local codes and ordinances.
Danger
Improper connection of the equipment-grounding conductor can result in a risk of
electric shock. Check with a qualified electrician or service person if you are in doubt
as to whether the treadmill is properly grounded. Do not modify the plug provided
with the treadmill—if it doesnʼt fit the outlet; get a proper outlet installed by a
qualified technician.
The treadmill is for use on a nominal 120-volt circuit and has a grounding plug that
looks like the plug illustrated in the “Grounding Instructions” section of this book.
Warning
This product is rated for use on a circuit having a nominal rating of 120 volts, 15
amps and is factory-equipped with a specific electric cord and plug to permit
connection to a proper electric circuit. Make sure that the product is connected to
an outlet having the same configuration as the plug. No adapter should be used
with this product. If the treadmill must be reconnected for use on a different type
of electric circuit, the reconnection should be made by qualified service personnel.
3

FCC WARNING - POSSIBLE RADIO/TELEVISION INTERFERENCE
NOTE: This equipment has been tested and found to comply with Part 15 of the
FCC rules. These limits are designed to provide reasonable protection against
harmful interference in a residential installation. Any changes or modifications not
expressly approved by the party responsible for the compliance could void the user's
authority to operate the equipment. This equipment generates, uses and can radiate
radio frequency energy and, if not installed and used in accordance with the
instructions, may cause harmful interference to radio communications. However,
there is no guarantee that the interference will not occur in a particular installation.
If this equipment does cause harmful radio interference to radio or television
reception, which can be determined by turning the equipment off and on, you are
encouraged to try to correct the interference by one or more of the following measures:
Class R (Residential): Private or non-commercial use
• Reorient or relocate the receiving antenna
• Increase space between the equipment
• Plug the equipment into two electrical outlet located on separate circuits
• Consult an exercise equipment dealer or an experienced radio/TV
technician for help
4
-
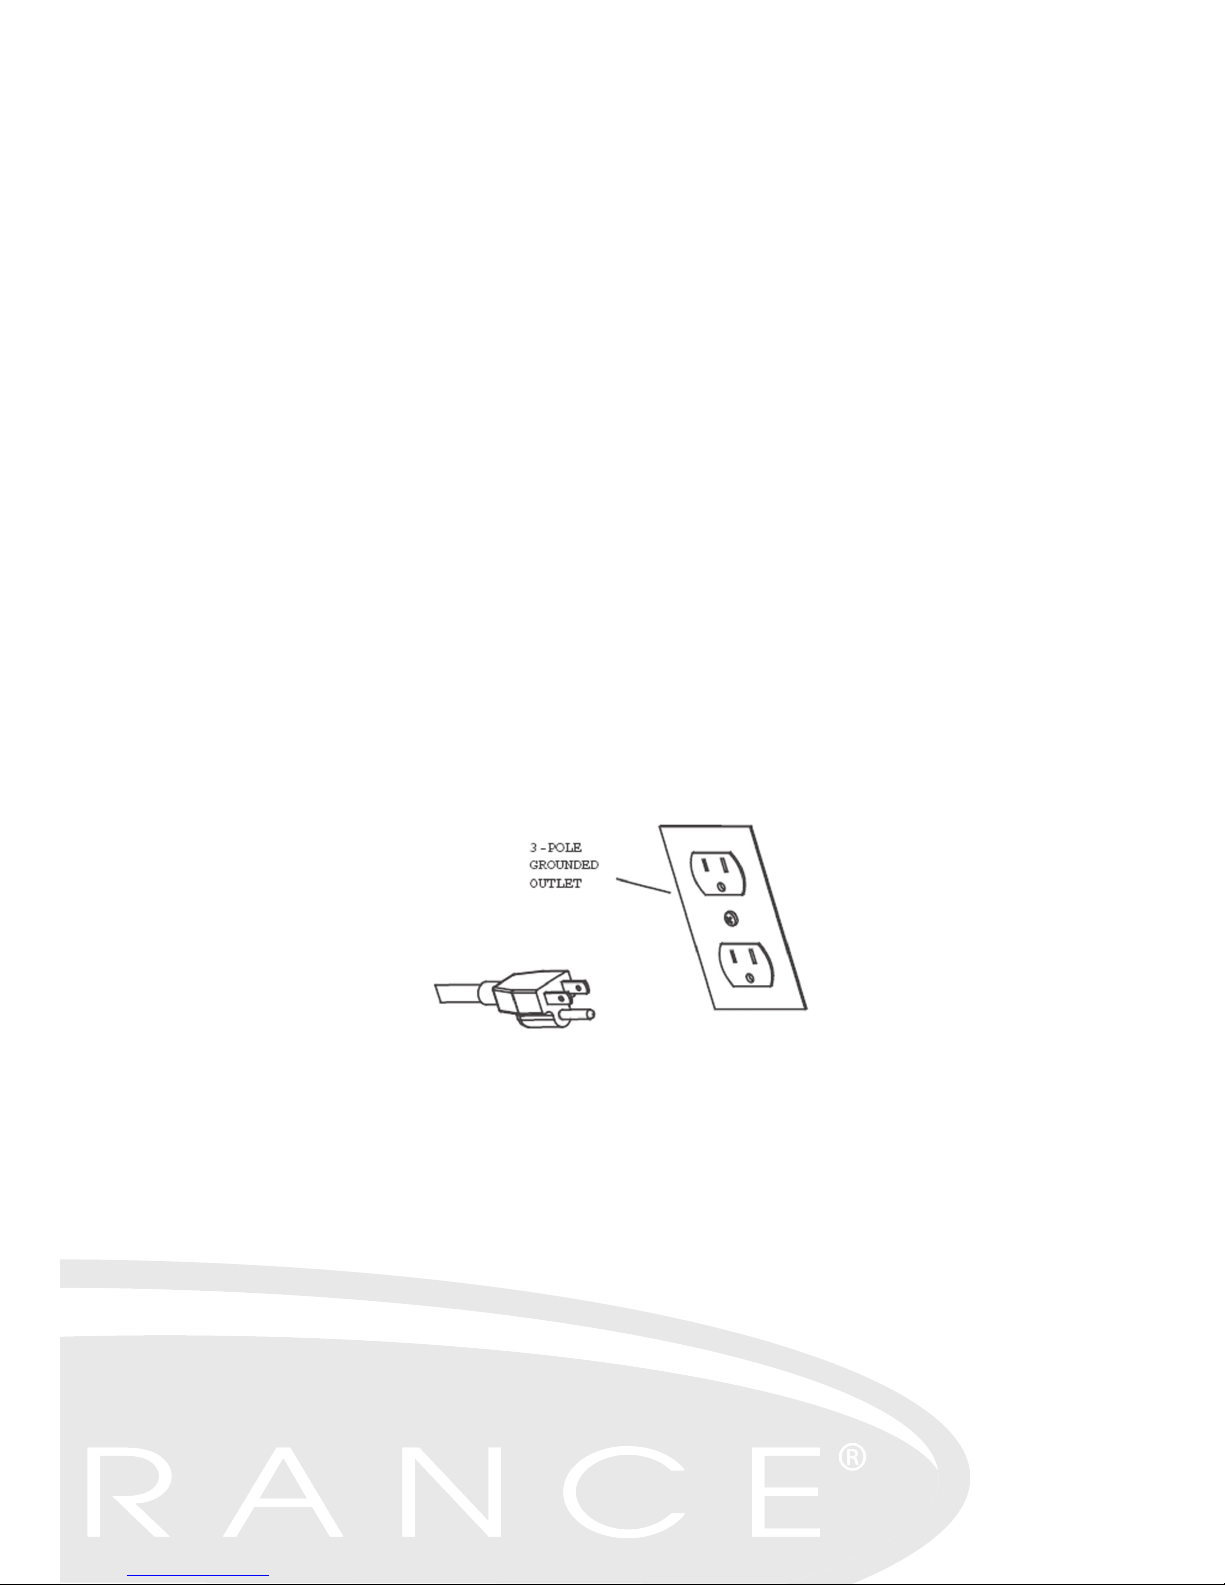
The Proper Outlet
This product must be grounded. A temporary adapter such as the one illustrated
below may be used to connect this plug to a 2-pole receptacle as shown, if a
properly grounded outlet is not available. If it should malfunction or breakdown,
grounding provides a path of least resistance for electric current to reduce the
risk of electric shock. This product is equipped with a cord having an
equipment-grounding conductor and grounding plug. The plug must be plugged
into an appropriate outlet that is properly installed and grounded in accordance
with all local codes and ordinances.
DANGER- Improper connection of the equipment-grounding conductor can result
in a risk of electric shock. Check with qualified electrician or serviceman if you are in
doubt as to whether the product is properly grounded. Do not modify the plug
provided with the product - if it will not fit the outlet, have a proper outlet installed
by a qualified electrician. This product is for use on a nominal 120-volt circuit and
has a grounding plug that looks like the plug illustrated in the figure. Make sure that
the product is connected to an outlet having the same configuration as the plug. No
adapter should be used with this product. It is recommended to use a 15 amp
dedicated circuit.
• The appliance must be positioned so that the plug is accessible
• If the power cord is damaged, it must be replaced by the manufacture or
its service agent or a similarly qualified person in order to avoid a hazard.
5

Table of Contents
Safety Guidelines…………………………………………………………………1-5
Introduction…………………………………………………………………………7
Hardware and Components Chart……………………………………………….8-9
T8HRC Assembly Diagram………………………………………………….......10
Assembly Steps……………………………………………………………………11
Belt Tension………………………………………………………………………...12-14
Adjustments………………………………………………………………………...15
The Console and Controls………………………………………………………..16-18
Working Out………………………………………………………….....................18-25
Stretching and Flexibility………………………………………….......................26-28
Maintenance And Lubrication…………………………………….......................29-30
Warranty……………………………………………………………......................31
Endurance Customer Service Information……………………….....................32
6

Introduction
Congratulations on purchasing an Endurance treadmill. Your journey to a better
body and a healthier lifestyle is about to begin. We hope this treadmill will be an
integral part of your home fitness program.
Be sure to read and understand this ownerʼs manual prior to assembly and use of
your treadmill. Understanding the correct assembly, adjustments, maintenance and
operation of this machine will enhance your ability to achieve your fitness goals
safely and successfully.
The image below details the various components of your new Endurance treadmill:
7
Control Panel
Handrail
Upright
Water Bottle Holder /
CD Holder
Treadbelt
Leveler Foot
Side Rail
Motor
Shroud
Front
Transport
Wheel
End Cap
Console

L (1PC)
I (1PC)
Assembly Components
8
F (2PC)
D (1PC)
C (1PC)
J (1PC)
H (1PC)
A (1PC)
E (1PC)
Flat Washer 10mm
Part #

Hardware Diagram
9
Included
Tools
Hex Head Bolt 10mm x 20mm Part # A3-1 QTY. 2
Round Cross Screw 4mm x 15mm Part # A4 QTY. 2
Round Inner Hex Screw 10mm x 15mm Part # A3 QTY. 10
Round Inner Hex Screw 10mm x 110mm Part # A2 QTY. 2
Round Inner Hex Screw 10mm x 70mm Part # A1 QTY. 4
Flat Washer 10mm
C1 QTY. 14
Flat Washer 4mm
Part #
C2 QTY. 2
Spring Washer 10mm
Part #
C3 QTY. 6
mm
Inches
 Loading...