

Endurance E5 Owner's Manual

E5 OWNERʼS MANUAL

ELLIPTICAL CROSS TRAINING
Proper ergonomics transform workouts
When it comes to elliptical cross trainers, the newest and
fastest growing category of fitness equipment, all definitely
are not created equal. Anyone can step onto several
different machines and quickly realize that each has its own
very distinct motion and feel, unlike other fitness equipment
such as treadmills and stationary bikes.
An elliptical cross trainer is a unique combination of a stair
climber and a cross-country ski machine, requiring the feet
to follow an elliptical motion that typically goes forward or
reverse. Some units also include arms that engage the upper
body as well. The advantage of these total-body machines
is that they require on upright, weight bearing position in
a natural, closed kinetic chain while training all the bodyʼs
major muscle groups - including the gluteals, hamstrings,
quadriceps, calves, lats, chest, deltoids, biceps, and triceps
- which, worked together, result in maximum calorie burn and
distinguishes ellipticals from virtually all other cardiovascular
equipment.
Quality elliptical machines foster a smooth, natural, lowimpact cardiovascular workout that challenges everyone
from beginners to elite athletes. Studies have shown that
compared to other exercises, total body elliptical cross
trainers require significant oxygen consumption and result in
high caloric expenditure for efficient, effective workouts.
Also, total body machines that disperse the exercise
throughout enable exercisers to work at higher intensities
without actually perceiving greater exertion.
Critical ergonomic factors
While biomechanics are integral in developing elliptical cross
trainers, ergonomics is really where the rubber hits the road.
Ergonomics is the science of adapting external conditions to
suit individuals, or in this case, using biomechanical analysis
to build the best feeling elliptical cross trainers to satisfy
exercisers and deliver results.
The essential ergonomic factors for elliptical cross trainers
all contribute to its motion or feel, and exercisers should
evaluate the following when choosing equipment:
Stride length - Either extreme, long or short, can cause
hyperextension in the hip joint in the for ward motion as
well as unnatural, forced hip flexion when going in reverse,
and both can cause discomfort. The optimal stride length
of 18.5”, should comfortably accommodate the majorit y of
individuals in both forward and reverse motion.
Stride angle / height - This refers to the shape of the actual
ellipse, whether it is more circular or oblong. It should not
feel too vertical like a stair climber of cycle or too flat like a
cross-country skier. The result is a natural, comfortable ride
that optimally engages all major lower body muscles.
Stride width / pedal spacing - The wider the space
between the pedals, the greater the hips shift laterally during
the movement, which can create lower back pain. In addition,
a wide stance feels distinctly unnatural, since people walk
and run with their feet and legs close together.
It is easy to see why these machines are tremendously
popular, but before investing in an elliptical cross trainer, it is
critical to evaluate its overall feel.
The importance of biomechanics
Biomechanics, which is the study of human movement, is an
important consideration for any piece of fitness equipment,
but even more so with the elliptical cross trainer due to the
complexit y and variance of its movement. For the optimum
workout, the machine must fit the exerciser; individuals
should never be required to adapt their posture, position of
movement pattern to fit a piece of equipment. Elliptical
cross trainers ideally should simulate how the body naturally
moves for people of various shapes and sizes.
The motion on an elliptical cross trainer should replicate
movements like walking or running, which involve similar
biomechanics. Engineers therefore must consider
numerous factors to make the exercise biomechanically
correct while eliminating unnatural alignment of excessive,
repetitive stress or torque.
On most elliptical cross trainers, the biomechanical analysis
is as follows: the body moves in a linear direction through
flexion and extension at numerous joints in the sagittal
plane, including the shoulder, elbow, hip, knee, and ankle.
Machines with arms may also include a minimal amount of
radial and ulnar deviation in the frontal plane at the wrist
joint. Also, in total body units, the erector spinae may engage in a bit of rotation in the transverse plane throughout
the range of motion.
Pedal acceleration - Anyone who has tried several brands
of ellipticals immediately notices the difference in how
quickly and smoothly the pedals move. Some are faster
on the downstroke and drag on the upswing, others have
a “kick” on the upswing that unnaturally propels the pedals
and can throw exercisers off balance. Without steady pedal
acceleration, the result is an uncomfortable and potentially
unsafe movement.
Inertia - Iner tia deals with the amount of effor t it requires to
get the pedals moving. With too much inertia, it is difficult to
get the machine going, but once started, momentum kicks in
and relieves exercisers of significant effort, which takes away
from the workout.
Pedal articulation - In most elliptical machines, the ankle
joint engages in dorsi flexion on the downstroke and plantar
flexion on the upstroke. Excessive plantar flexion leads to
transient paresthesia, a “numb toe” condition due to
compression of ner ves in the foot, and extreme dorsi flexion
can limit knee and hip extension, which are essential for a
complete range of motion.
Upper body pivot point and range of motion - Unlike
treadmills, stationary cycles and stair climbers, many
elliptical cross trainers engage the upper body in movements
that should be synchronized with leg motion. Arm handles
should simulate natural shoulder and arm flexion and
extension as seen in walking or running, and that excessive
radial or ulnar deviation may cause wrist discomfort.
2

HEART RATE TRAINING
Heart Rate Training Maximizes
Performance
During exercise, the heart beat, or pulse rate, is a valuable
gauge of intensit y level - the more vigorous the workout, the
faster the heart must pump to deliver oxygen rich blood to
hard working muscles. Research shows that exercising in
target heart rate zones is the best way to improve
cardiovascular health while preventing under-training which
minimizes results, as well as over-training and risking injury
or burnout. Essentially, it amounts to smarter, more ef fective
workouts.
Cardiovascular exercise should be performed at 55% to 90%
of oneʼs maximum heart rate (MHR), one way to determine
your MHR is by using the following equation: 220-age=MHR.
Or by using a chart:
Advances in fitness equipment
Premium cardiovascular machines feature technology that
facilitates accurate heart rate monitoring using telemetry or
hand sensors. With telemetry, exercisers wear a chest strap,
and the machine wirelessly picks up the heartʼs signal and
displays the heart rate on the console. Some manufacturers
also of fer hand sensors that exercisers grip to get a hear t
rate reading. Because muscle contraction interference can
cause erratic readings with hand sensors, telemetry is
generally more accurate.
Some fitness equipment also offers pre-designed programs
that take the guesswork out of heart rate training by keeping
exercisers at predetermined hear t rate zones. For example,
in a workout that requires 80% MHR, the machine picks up
the heart rate from the exerciserʼs chest strap and
automatically varies resistance levels so the user maintains
the proper intensity.
The advantage is that exercisers donʼt have to continually
monitor and readjust to ensure that they are at the
appropriate level because the machine does it for them.
These programs also provide valuable variety, enhance
motivation and help improve performance.
Technology boost heart rate monitoring
Heart rate can be measured by palpating an ar tey and
counting the beats. But even simpler is using a heart monitor,
which consists of a strap worn around the chest that picks
up the heartʼs electric signal and a wristband receiver that
displays the number of beats. Qualit y monitors are nearly as
accurate as clinical EKGʼs.
The first heart rate monitor was developed in 1977 as a
training tool for the Finnish National Cross Country Ski
Team. During the 1980s, heart rate monitoring became more
popular with athletes, as they saw its effectiveness in
enhancing their performance. Endurance athletes like elite
runners, competitive cyclists, and even Olympic athletes
have attested to better overall results due to heart rate
training.
3

IMPORTANT SAFETY INSTRUCTIONS
Save these instructions
Failure to follow any of the following safety instructions may
result in injury or serious health problem:
•Use this exercise product only as intended and
described in this Ownerʼs Manual.
Do not use attachments not recommended by the
manufacturer.
•Never drop or insert any object into any opening, or
on the Pedal Arm Guide Rails.
•Do not place fingers, feet or any other object into or
near the moving par ts.
•Never turn foot pedals, pedal arms or crank by
hand.
•To avoid entanglement and possible injur y, do not
expose hands or arms to the drive mechanism.
•Do not dismount the E5 until the pedals are at a
complete stop.
•Warn bystanders to keep a safe distance away. Do
not allow anyone (other than the user) to touch the
machine while it is in operation.
•Do not remove the side covers. Only on authorized
retailer should perform maintenance or repair
services.
•Do not use outdoors.
Children
•Keep children off and away from your E5 at all
times.
Assembly
If you have elected to assemble this product yourself,
please read and follow each of the steps in the enclosed
assembly instructions. It is recommended that assembly
be performed by an authorized retailer. If you have any
questions regarding any part or function of your E5, contact
your retailer.
Moving your E5
Your E5 has a pair of transport wheels built into the front
foot. It is easy to move your E5 by picking up the back end
and rolling it on the front wheels.
Placement in your home
It is important that you place your E5 in a comfortable and
inviting room. Your E5 is designed to use minimal floor
space. Many people will place their E5 facing the TV or a
picture window. To make exercise a desirable daily activity
for you the E5 should be in attractive setting.
Leveling your E5
If your E5 wobbles when you have placed it where you
intend to use it, raise or lower the four adjustable levelers.
Two are located on either side of the rear stabilizing frame,
and two are on each side under the housing.
Foot position
Your E5 has a large foot pedal, of fering you a variety of foot
positions. When using your E5 you may notice that your
heel rises off the footpad. This is normal heel-toe-plant
walking or running motion and you should not try to prevent
this.
•When the E5 is in use, young children and pets
should be kept at least 10 feet away.
Other safety tips for your E5
•CAUTION! If you experience chest pains, nausea,
dizziness or shortness of breath, stop exercising
immediately and consult your physician before
continuing.
•Donʼt wear loose clothing that might catch on any
par t of the E5.
•Read this Ownerʼs Manual in itʼs entirety before
operating the E5.
Cleaning
•Use a damp cloth to wipe your E5 and console free
of sweat and dust. Always avoid getting extra
moisture on the console. By keeping the console
face free of sweat, you can extend the consoleʼs life.
•Important Reminder: NEVER use petroleum - based
solvents when cleaning. Doing so will damage the
finish on your E5.
How to use the E5
To start using the E5 simply stand on the foot pedals with
the toes of your shoes close to the front edge of the foot
platform.
Place your hands in a comfortable position on the
handlebars. Simply move your highest foot forward and
follow the natural path of the machine.
E5 motion handles
Working in unison with the adjustable resistance of the
elliptical stride, the motion handles are designed to work
your upper body in rhythm with your lower body. The
ergonomic design encourages good posture and proper
technique. When working with the motion handles for the
first time, start out at slow pace to get accustomed to the
total body motion.
The stationary handles are there for additional support. On
the stationary handles are the metallic contact heart rate
pads, to be used if you are not wearing a Heart Rate
Monitor Transmitter.
4

CONSOLE
Converting from metric to standard
First locate the switch on the reverse side of the panel.
Flipping the switch to the upper position means your
readouts are in the STANDARD format. Flipping the switch
down converts the readouts to METRIC. Remember that
1 mile equals 1.6 kilometers.
Turning the screen display on
You can turn your console on by either pressing the START
button at the bottom of the console or by simply getting on
your elliptical and beginning your stride.
Clearing previously stored information
Your elliptical will retain information from your previous
workout such as calories and distance for a few minutes.
You can clear this information by holding down the CLEAR
RESET button.
Console feedback
Your E5 provides you with the information you need for an
effective workout every time.
Time
There are two modes of time display. You can choose
either Count Up Mode or Count Down Mode for a
programed time limit.
Speed
This readout will display your speed in miles per hour.
Calories
The calories display will show the approximate number
of calories you burn during your workout. Your can also
program your elliptical to notify you when you have burned
a specific number of calories.
Top program a calorie countdown:
Turn on the console by pressing the RESET button. Press
the SHIFT button to cycle through the feedback windows
until CALORIES is displayed. Next, press the “+” button
until the desired number of calories are displayed. Then,
start pedaling. The CALORIES display will show your
specified calories counting backwards to zero. When you
have reached your goal, the console will beep until you
press the RESET button again.
HEART RATE
The HEART RATE display will show your heart rate in beats
per minute. During your workout, press the SHIFT button
until HEART RATE is displayed. Nex t, grasp the inner
upright handles with your palms on the heart rate sensors.
After 10 seconds your heart rate will be displayed and will
change as your heart rate changes. NOTE: Always consult
a physician before starting an exercise program. This will
be helpful in determining your target heart zone.
To operate in Count-Up Mode:
Simply get on the elliptical and start striding. The console
will automatically turn on and the time display will advance
from zero and keep time until you finish your workout.
To operate in Count-Down Mode:
Turn on the console by pressing the RESET button. Press
the SHIFT button to cycle through the feedback windows
until TIME is displayed. Next, press the “+” but ton until the
desired number of minutes of your workout is displayed.
Then, start pedaling. The TIME display will show your
specified time counting down to zero. When you have
reached your goal, the console will beep until you press the
RESET button again.
Distance
The DISTANCE display will show this amount of mileage
you have “traveled” in your workout. Keeping a record of
your progress is a great motivational tool. You can also
program the amount of distance you desire for your
workout:
To operate a specific distance:
Turn on the console by pressing the RESET button. Press
the SHIFT button to cycle through the feedback windows
until DISTANCE is displayed. Next, press the “+” button
until the desired distance for the workout is displayed.
Then, start pedaling. The DISTANCE display will show your
specified mileage counting backwards to zero. When you
have reached your goal, the console will beep until you
press the RESET button again.
Setting the main display window
The automatic display mode on your elliptical is set to
SCAN. In this mode, information from each of the feed back
windows is cycled. If you desire to keep one feed back
function on for quick reference, press the SHIFT button
until the feed back function you desire is displayed. When it
does, you will see your selected feedback information.
Turn the screen display off.
The elliptical console automatically shuts off after a few
minutes of inactivity.
5

1.) Program Function
Lights
CONSOLE
LED Readout
2.)
Main
3.) Readout
Display
4.) Readout
Function Lights
5.) Select
Button
6.) Scan
Button
7.) Enter
Button
8.) Start /
Stop
Button
9.) Increase / Decrease
Button
1.)Light will indicate
which progra has
been displayed.
2.) Main Readout:
displays where
you are in the
program.
3.) Displays the
value of each
function.
6
4.) Light indicates
which function
is selected.
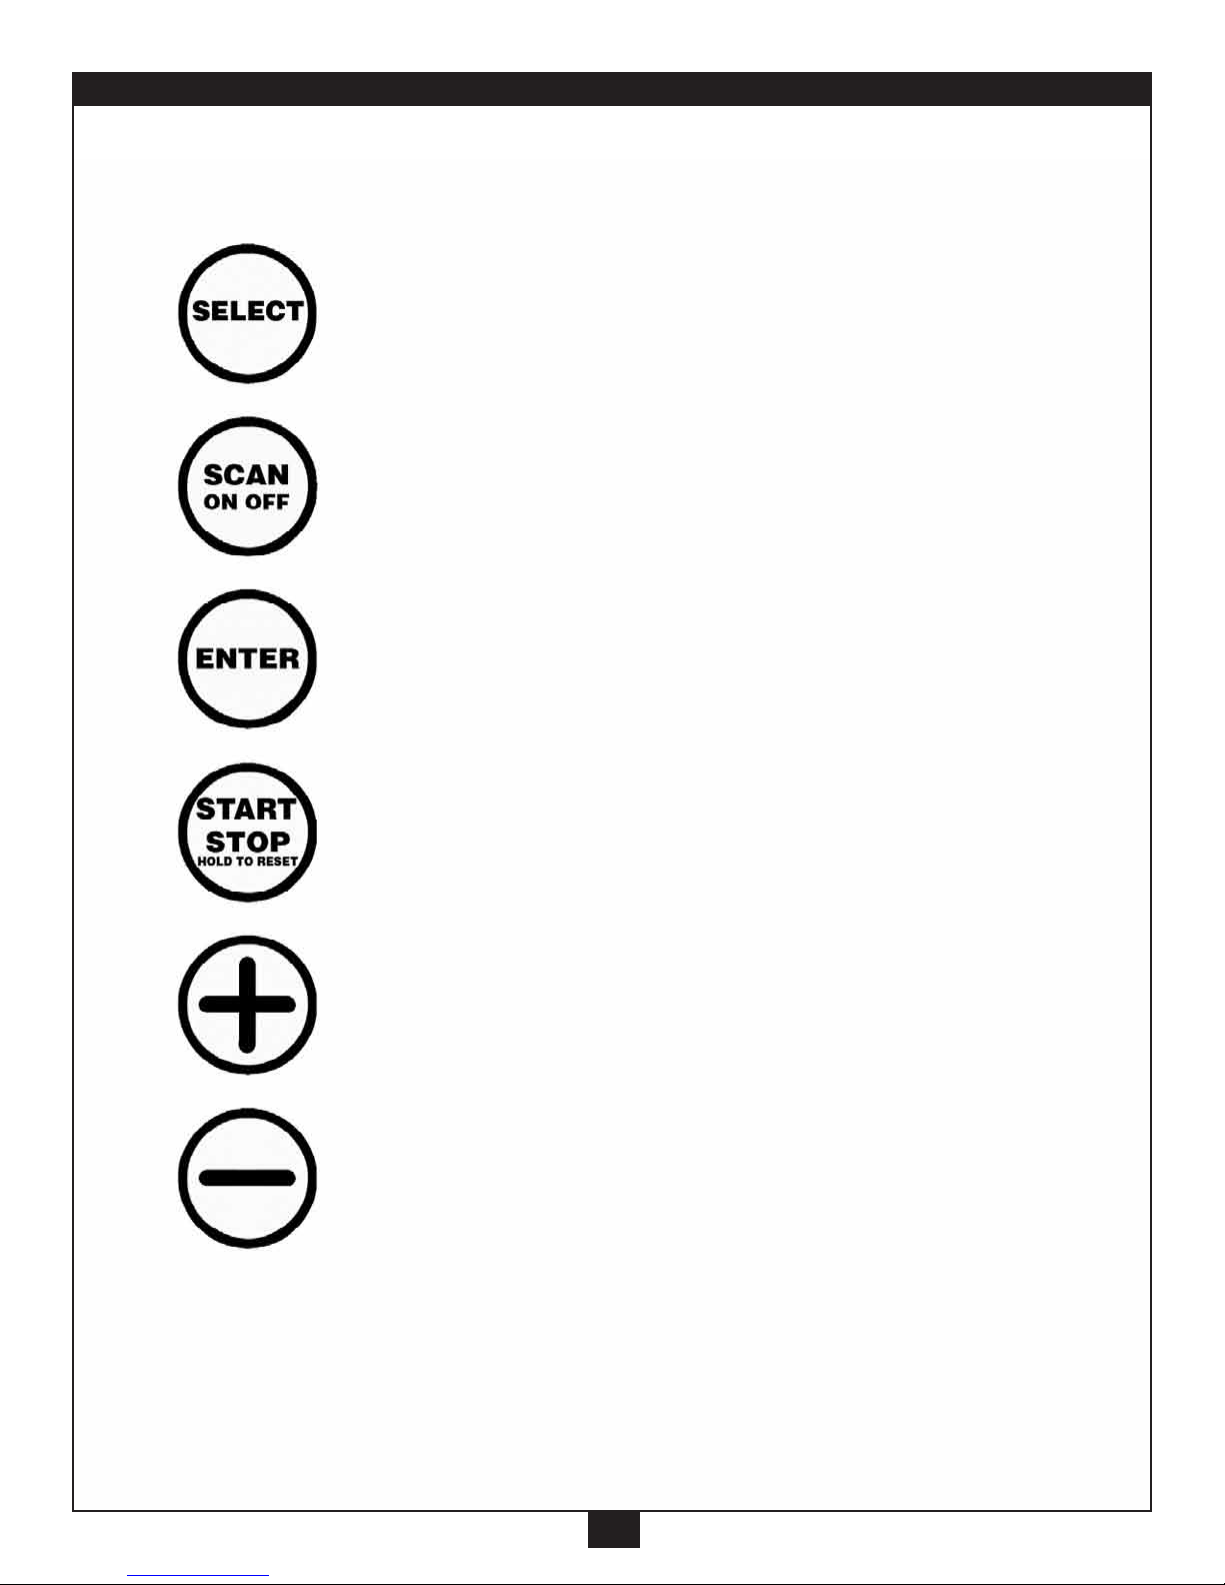
BUTTONS
5.) Select Button:
display.
Allows you to select which information you would like to input and
6.) Scan on / off Button:
Will turn on or off the scan feature (see page 13).
7.) Enter Button:
Will enter the information that you have given, so you can move
onto the next catagory.
8.) Start / Stop Button:
Will start and stop your program. If you hold this button down for
more than 2 seconds, it will allow you to reset all information.
9). Increase Button:
Will increase the value of resistance in the program, and select the
program.
9). Decrease Button:
Will decrease the value of resistance in the program, and select the
program.
7
 Loading...