

Endress+Hauser Liquiline To Go CYM290 Operating Instructions Manual
Products ServicesSolutions
Operating Instructions
Liquiline To Go CYM290


Basics
Warranty
Defects occurring within 3 years from delivery date shall be remedied free of charge
at our plant (carriage and insurance paid by sender).
Subject to change.
Return of Products Under Warranty
Please contact our Service Team before returning a defective device.
Ship the cleaned device to the address you have been given.
If the device has been in contact with process uids, it must be decontaminated/
disinfected before shipment. In that case, please attach a corresponding certicate,
for the health and safety of our service personnel.
Disposal
Please observe the applicable local or national regulations concerning
the disposal of “waste electrical and electronic equipment”.
3
Registered Trademarks
The following names are registered trademarks. For practical reasons they are shown
without trademark symbol in this manual.
• Memosens®
• Liquiline®
• Sensocheck®
• Sensoface®

4
Basics ..............................................................................................................................3
Table of Contents .......................................................................................................4
Package Contents ............................................................................... 6
Documentation ................................................................................... 7
Overview ............................................................................................. 8
Value-Added Features ..............................................................................................9
Protective Cover ....................................................................................................... 10
Hook ............................................................................................................................10
Display and Keypad ................................................................................................ 11
Start-Up ............................................................................................. 12
Inserting the Batteries ........................................................................................... 12
Connecting a Sensor .............................................................................................. 13
Switching On the Meter ........................................................................................ 14
Icons ............................................................................................................................ 14
Information ....................................................................................... 15
Calibration Record ..................................................................................................15
Sensor Information (Digital Sensors only) ......................................................15
Sensor Network Diagram (pH and Oxy only) ................................................ 16
Sensor Monitor .........................................................................................................17
Messages .................................................................................................................... 17
MemoLog (Memosens only) ...............................................................................17
Device Info ................................................................................................................. 18
Device Test ................................................................................................................. 18
Table of Contents
Conguration ................................................................................... 19
Calibration ................................................................................................................26
Manual Calibration .................................................................................................27
Data Entry Calibration ...........................................................................................27
Auto Calibration ....................................................................................................... 28
”Entry of Solution” Calibration ........................................................................... 29
Cell Constant Calibration ...................................................................................... 29
Calibration in Air ...................................................................................................... 30

Table of Contents
Zero Calibration .......................................................................................................31
Data Entry Calibration ...........................................................................................31
Measuring .........................................................................................32
Toggling the Measured Value Display .............................................................32
Adjusting the Temperature .................................................................................. 32
Data Logger ......................................................................................33
Operating Modes of the Data Logger (Logger Type) .................................34
Conguring the Data Logger .............................................................................. 36
Increasing the Battery Life ................................................................................... 36
Starting/Stopping the Data Logger ..................................................................38
Viewing the Logger Data ...................................................................................... 38
Deleting the Logger Data .....................................................................................38
Error and Status Messages ...............................................................41
Info and Help Texts ................................................................................................. 42
Error Messages ......................................................................................................... 43
5
pH Product Line ................................................................................ 44
pH Sensors ................................................................................................................. 44
Endress+Hauser Buer Solutions (pH) ...........................................................45
Ready-to-use quality pH buer solutions.......................................................45
Accessories for pH ................................................................................................... 45
Conductivity Product Line ............................................................... 46
Conductivity Sensors ............................................................................................. 46
Conductivity Calibration Solutions CLY11......................................................47
Accessories for Conductivity ............................................................................... 47
Oxygen Product Line ........................................................................ 48
Oxygen Sensor ......................................................................................................... 48
Accessories for Oxygen ......................................................................................... 48
Specications .................................................................................... 49
Index .................................................................................................. 55

6
Check the shipment for transport damage and completeness.
The package of the Liquiline To Go CYM290 includes:
Meter incl. 4 batteries (AA)
and premounted quiver
Carrying strap
Data carrier with detailed user manuals
USB cable, 1.5 m
Safety instructions
Quickstart instructions in various languages
Package Contents
Liquiline To Go CYM290
P
P
P
P
P
P
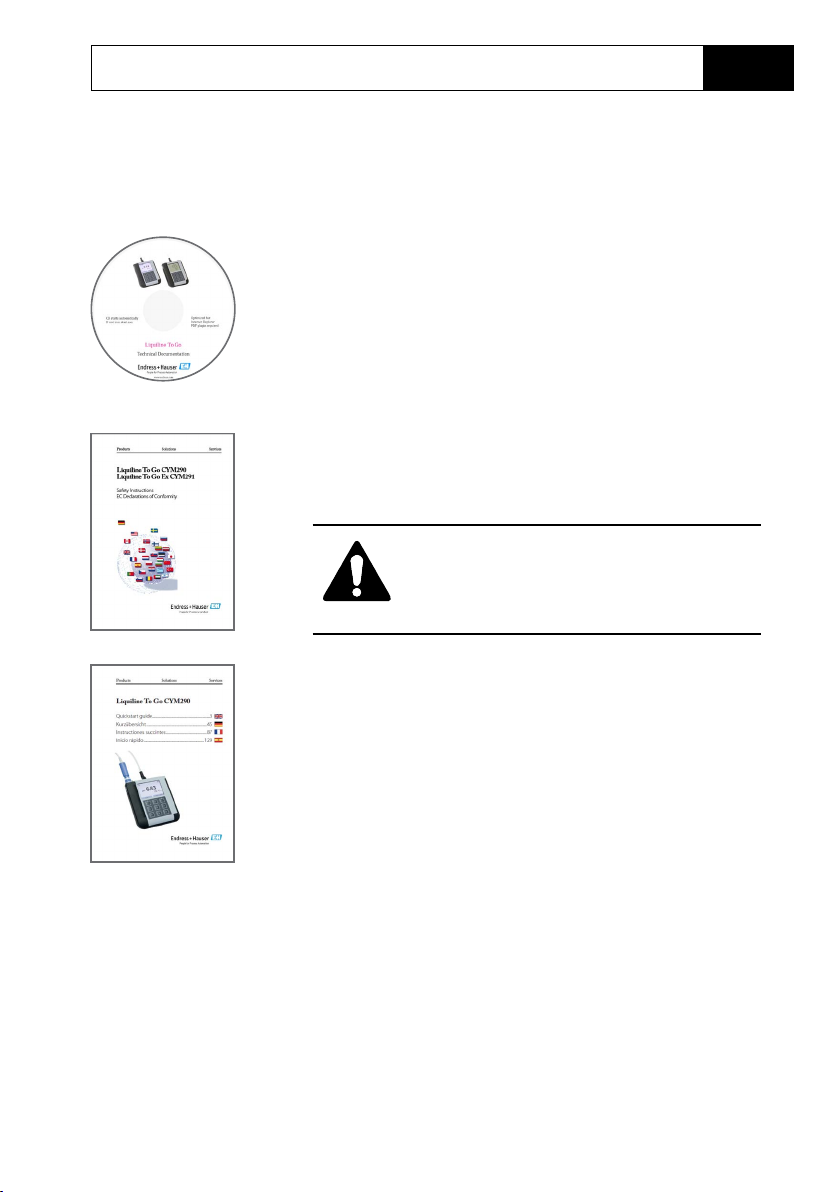
Documentation
Specic Test Report
CD-ROM
Complete documentation:
• User manuals in dierent languages
• Safety instructions
• Certicates
• Quickstart guides
Safety Instructions
In ocial EU languages and others.
• EU Declarations of Conformity
7
CAUTION!
These safety instructions are part of the
product documentation and must be
observed.
Quickstart Guides
Installation and rst steps:
• Operation
• Menu structure
• Calibration
• Error messages and recommended actions
Various languages on CD-ROM:
• German
• English
• French
• Italian
• Spanish
• Portuguese (Brazil)
8
The Liquiline To Go CYM290 is a portable
multiparameter meter for use with analog
or digital sensors. The meter automatically
recognizes a connected Memosens sensor
and accordingly selects the corresponding process variable. By simply replacing
the Memosens sensor, the meter can be
used for measuring conductivity, pH or
oxygen.
Operation is simple and intuitive, supported by detailed information and help texts.
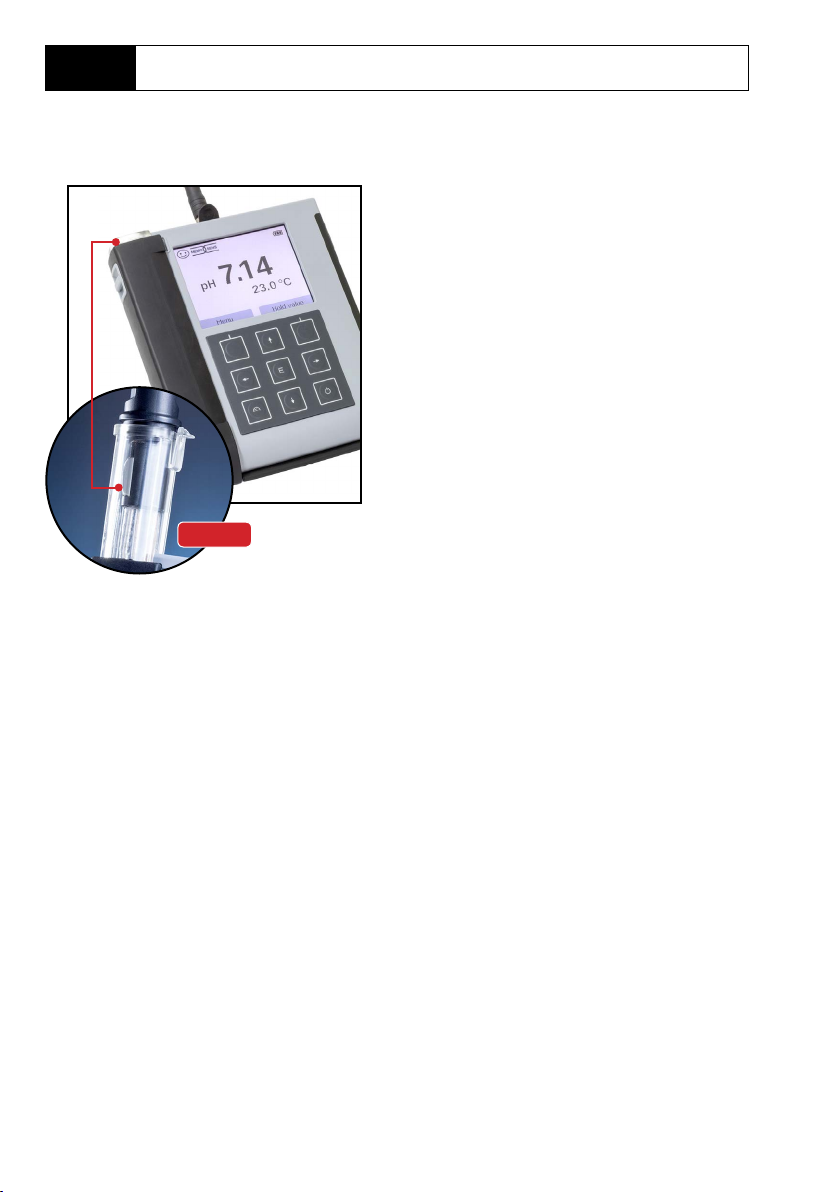
Quiver
The meter stands out by the following features:
• Use of digital Memosens sensors
• A detachable quiver protects the sensor and prevents it from drying out.
Furthermore, it can be used for calibration.
• The rugged housing is made of a high-performance polymer. It provides high
impact resistance and dimensional stability even when exposed to extreme
moisture.
• Scratch-proof clear glass display, perfectly readable even after years
• Long operating time with one set of batteries (4 x AA) or use of a Li-ion battery for
reliable operation even at high or very low operating temperatures
• Data logger with 10,000 values
• Micro USB port
• Sensoface icons provide single-glance information on the sensor condition
• Real-time clock and indication of battery charging level
• Automatic compensation of ambient pressure for oxygen measurement
• At measuring temperatures from -20 to +100 °C the temperature detector can be
automatically identied.
Overview

Overview
Value-Added Features
Memosens
The Liquiline To Go CYM290 can communicate
with Memosens sensors. These digital sensors are
automatically identied and the meter switches to
the appropriate measurement method.
When a Memosens sensor is connected to the
meter, it is indicated by the logo shown on the
right. Furthermore, Memosens allows the storage
of calibration data, which will be available and
can still be used when the sensor is connected to
another Memosens-capable device.
Sensoface
Sensoface provides quick information on the
sensor condition. The three “smiley” faces as shown
on the right represent the sensor condition during
measurement and after a calibration. When the
condition deteriorates, a status message gives a
hint to the cause.
9
Programmed buers
“Programmed buers” is a very convenient method
for pH calibration with automatic buer recognition. You only have to select the buer set with the
buers used. The buers can then be used in any
order.

10
Overview
Protective Cover
The front of the meter is protected
by a cover, which can be completely
ipped over and secured to the back for
operation.
Hook
A fold-out hook on the back allows
suspending the meter. This leaves your
hands free for the actual measurement.
The rating plate is located beneath the
hook.
Protective Cover and Hook
Combined
Cover and hook can be joined together
to form a benchtop stand allowing comfortable and fatigue-free working at a lab
bench or desk.
Overview
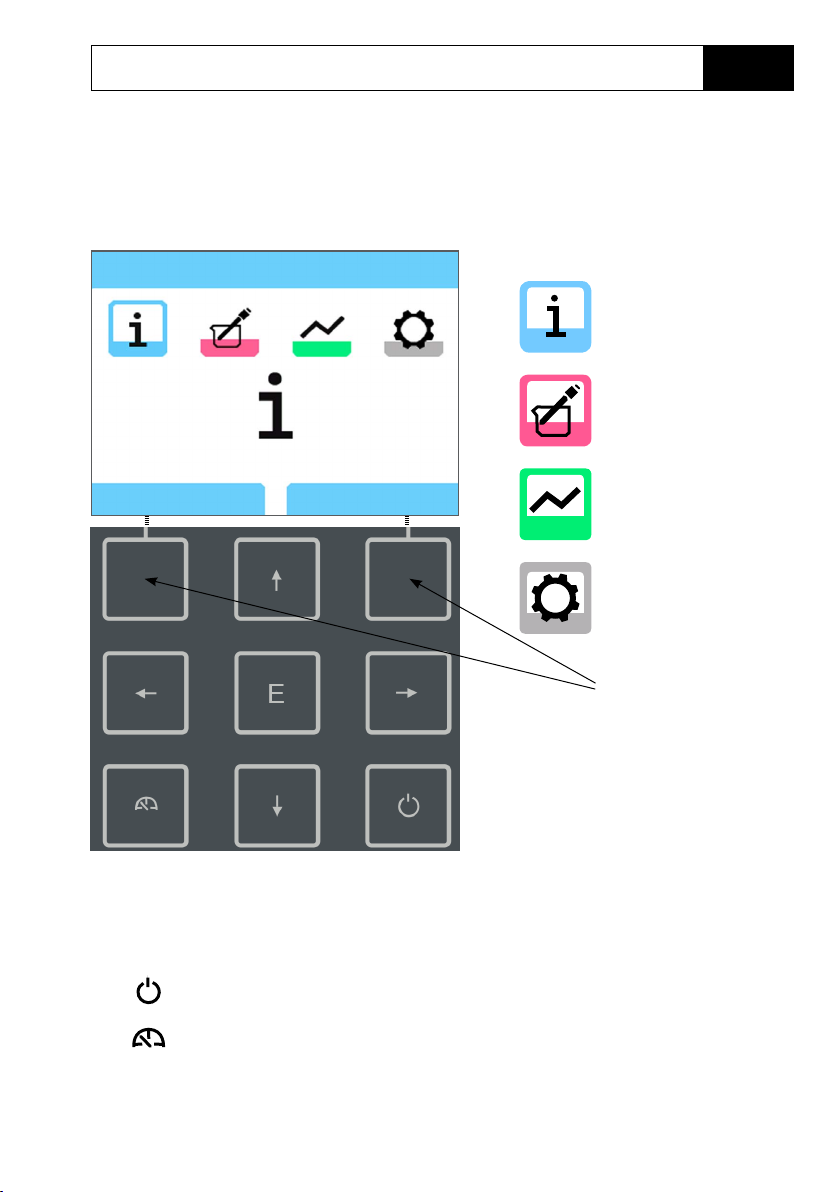
Display and Keypad
Display and keypad correspond directly via softkeys.
11
Menu selection
Information
Return
Start logger
Menu icons
Information
Calibration
Data logger
Conguration
Softkeys
Softkeys Function is shown in the display above the key
Arrow keys Selecting / Adjusting entries
E Conrming an adjustment
Switching on / o
Switching on / Immediate access of meas. mode /
Toggling the display / Displaying time and date
12
Check the shipment for transport damage and completeness (see Package
Contents).
NOTICE!
Do not operate the device when one of the following conditions
applies:
• the device shows visible damage
• the device fails to perform the intended function
• prolonged storage at temperatures above 70 °C
• severe transport stresses
In this case, a professional routine test must be performed.
This test should be carried out at our factory.
Start-Up
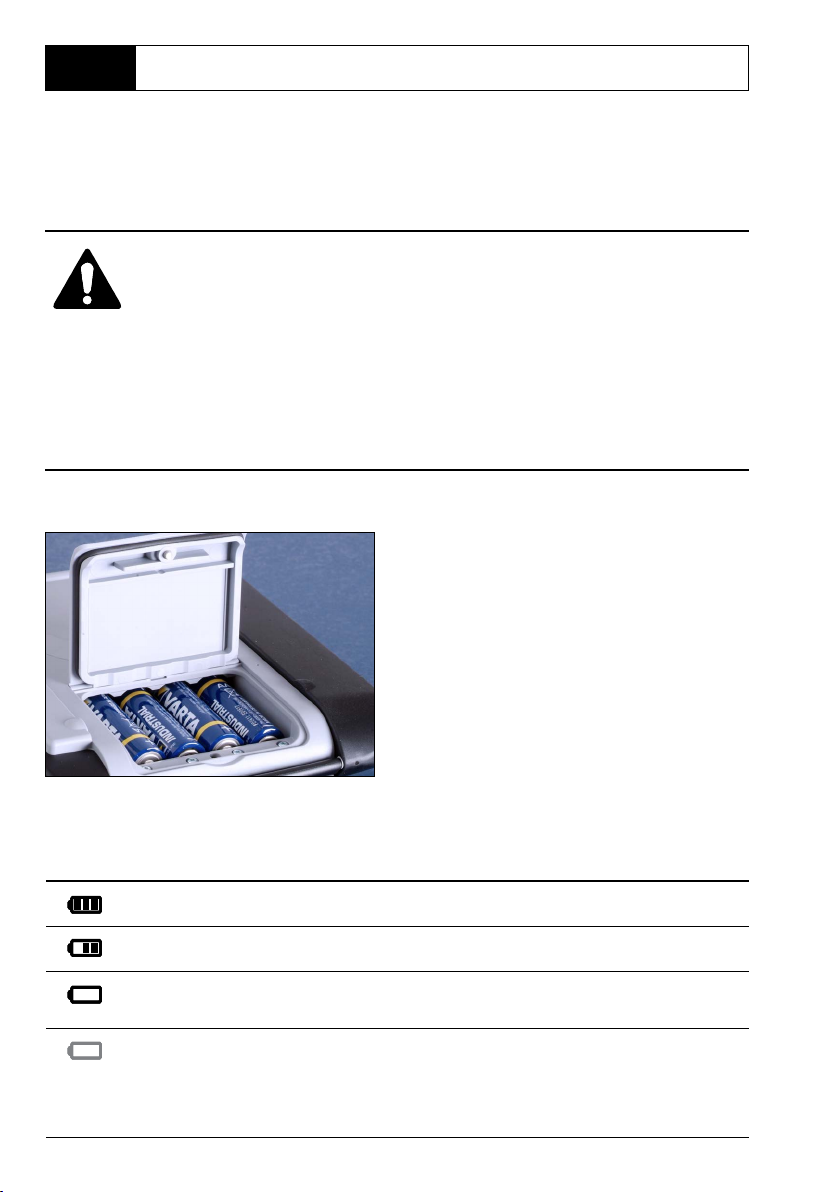
Inserting the Batteries
With four AA batteries, the CYM290 has an
operating time of up to 500 h when operated in logger mode (see page 36).
Open the battery compartment on the
rear of the device. Be sure to observe the
correct polarity when inserting the batteries (see markings in the battery chamber).
Close the battery compartment cover and
screw it handtight.
A special lithium-ion battery suited to the battery compartment is available for the
Liquiline To Go CYM290. The battery is recharged through the USB port.
A battery icon in the display indicates the battery power level:
Icon fully lled Batteries at full capacity
Icon partially lled Battery capacity is sucient
Icon empty Battery capacity not sucient;
calibration is possible, no logging
Icon blinks Only a few operating hours remaining,
measurement is still possible.
NOTICE! It is absolutely necessary to replace the
batteries.
Start-Up
13
Connecting a Sensor
The Liquiline To Go CYM290 provides a pH socket acc. to DIN 19262 for analog pH
sensors. Alternatively, you can connect a Memosens sensor for pH, conductivity or
oxygen measurement. The meter automatically recognizes a connected Memosens
sensor and accordingly selects the corresponding process variable.
Memosens is signaled in the display.
Note that only one sensor may be connected to the meter at a time.
Separate temperature probe
After power-on, a separate temperature probe is automatically recognized.
When you want to replace the temperature probe, you must switch o the meter
and then switch it on again.
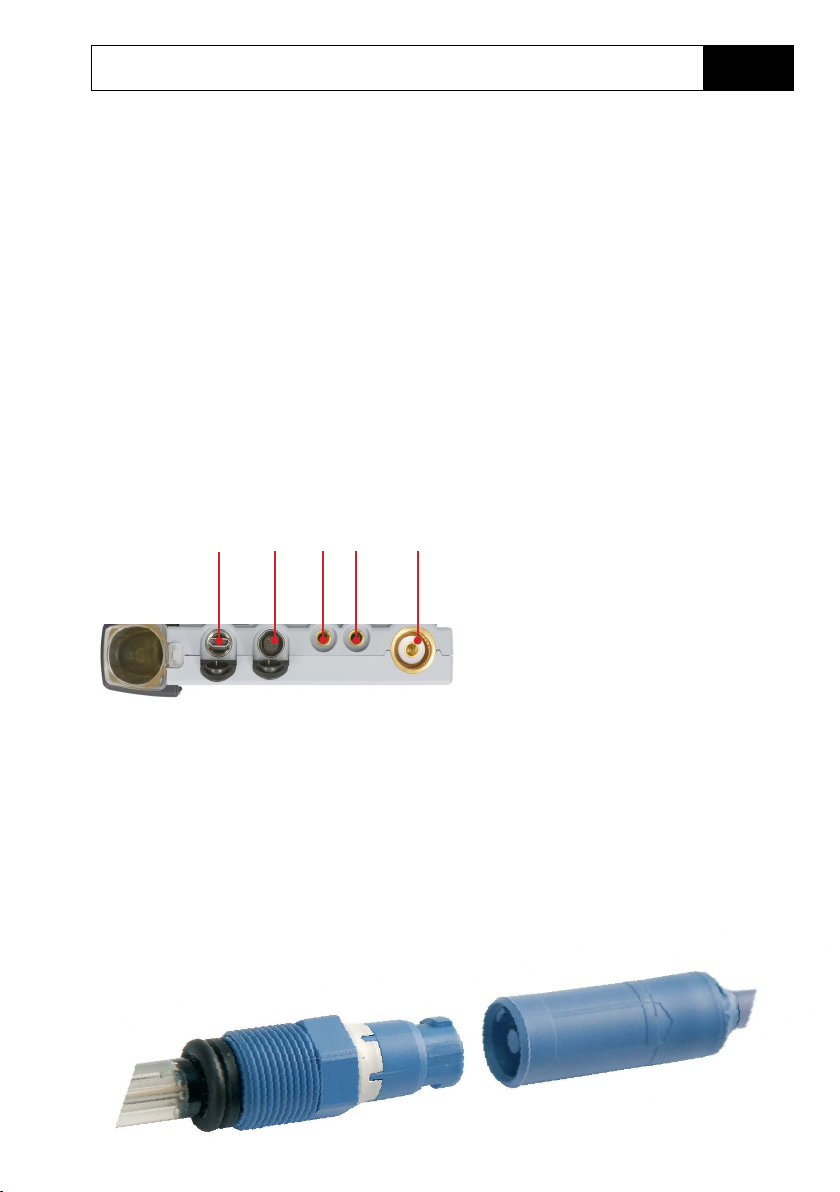
a b c d e
Memosens sensors have a cable coupling, which allows convenient replacement
of sensors while the cable remains connected to the meter. The connecting cable is
connected to socket b (Memosens lab cable) or e.
Connections
a - Micro USB port
b - M8, 4 pins, for Memosens lab cable
c - Temperature probe GND
d - Temperature probe
e - pH socket acc. to DIN 19262 for analog
sensors
14
Switching On the Meter
You can use or to switch the meter on:
• With , the meter immediately switches to measuring mode.
• With , rst a self test is performed and then the calibration data
and settings are displayed before the meter switches to measuring mode.
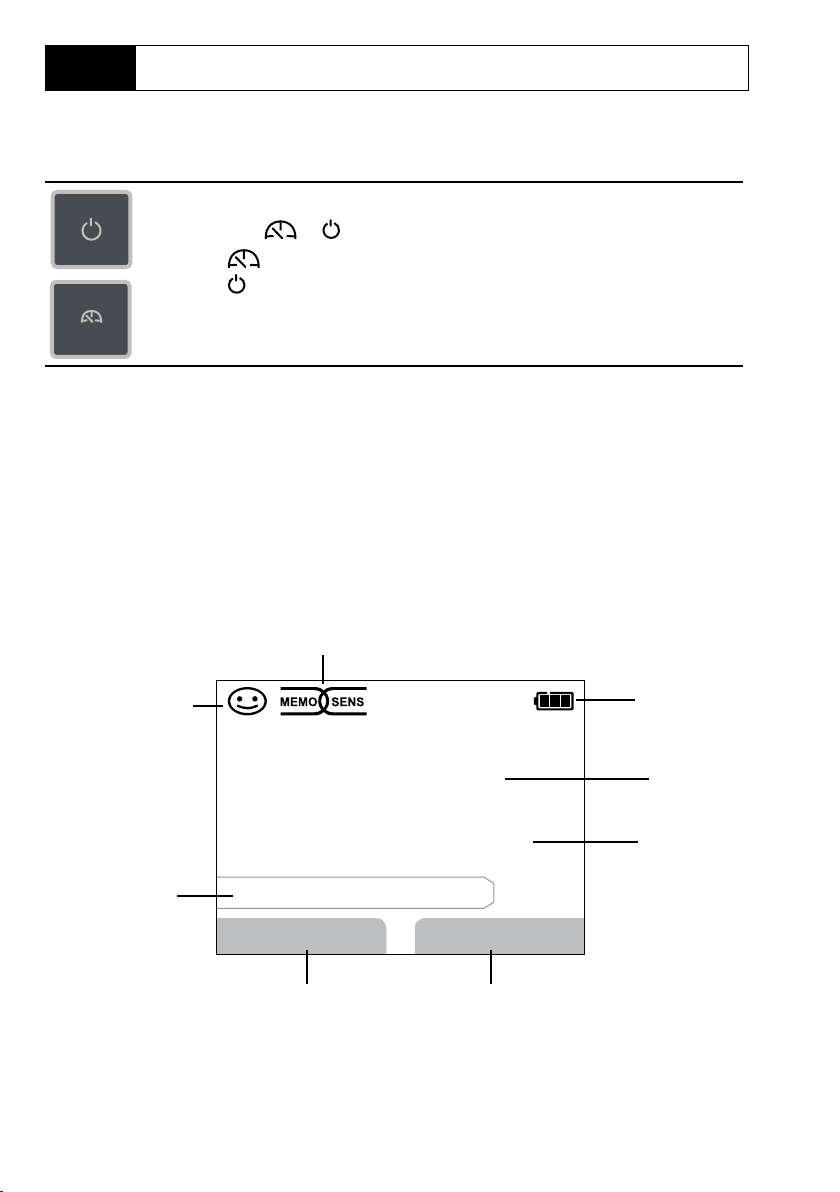
Icons
Important information about the state of the device:
Memosens sensor
Start-Up
Sensor condition
Error message
pH
No sensor connected
Menu
Left softkey
6.75
24.1 °C
Hold value
Right softkey
Battery
charging level
Measured
variable
Temperature

Information
15
pH Oxy Cond
1) In measuring mode, press the Menu softkey.
2) Select “Information” and conrm by pressing E.
3) Select the desired submenu and conrm by pressing E.
The dierent submenus are described below.
Calibration Record
Shows the data of the last calibration performed on the currently connected sensor.
Sensor Information (Digital Sensors only)
Shows the data of the currently connected digital sensor. You can save sensor data
(MemoLog) in the device by pressing the “Save” softkey. The following table shows
the sensor information depending on the respective sensor type:
pH Cond Oxy ISFET ORP
Manufacturer
Order No.
Sensor serial no.
Cap serial no.
SW version
HW version
Calibration*
Zero point
Slope
Sensor operating time
Wear
SIP
CIP
Cell constant
Operating point
ORP correction
P P P P P
P P P P P
P P P P P
P P P P P
P P P P P
P P P P P
P P
P P P
P P P P P
P P P
P P P P P
P
P
P
P
* Last calibration
16
Information
pH Oxy
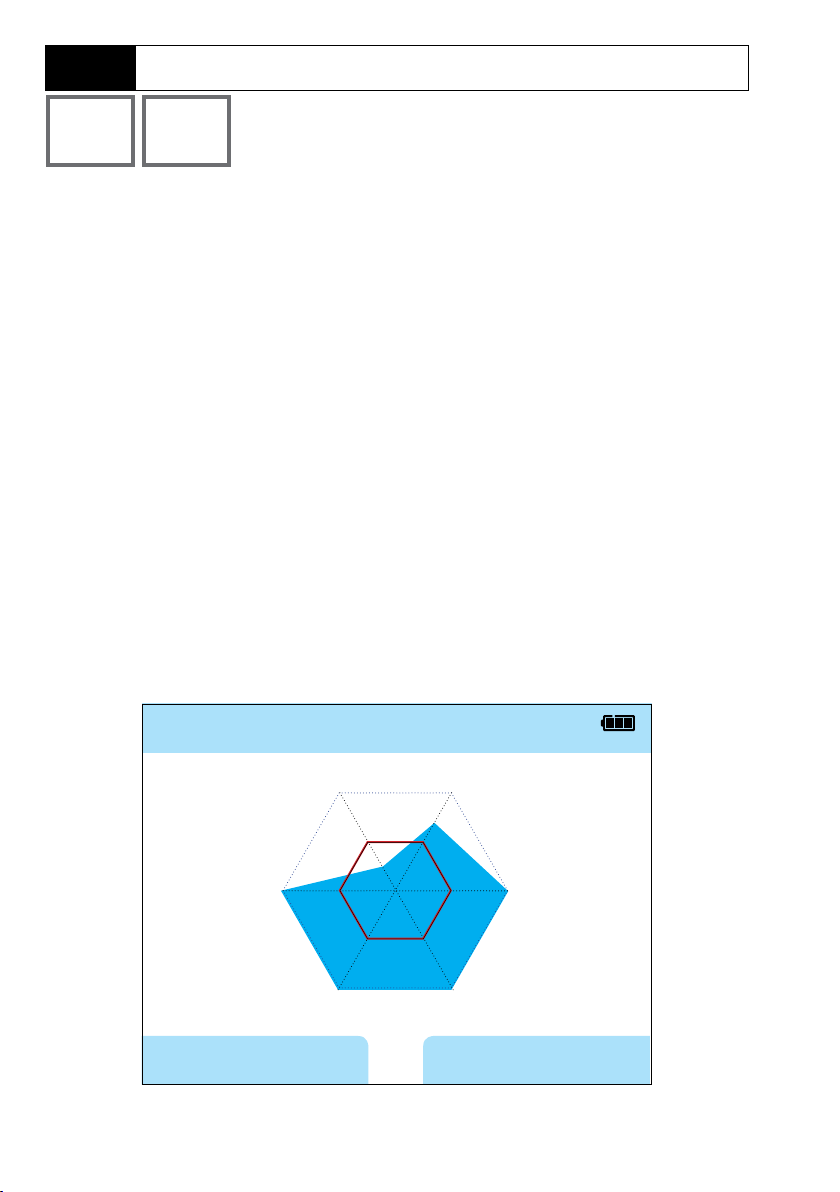
Sensor Network Diagram (pH and Oxy only)
Provide single-glance information on the following parameters of the connected
sensor:
• Slope
• Zero point (operating point for Memosens ISFET)
• Sensocheck (pH) or leakage current (ISFET and Oxy)
• Response time
• Calibration timer
• Wear (Memosens)
Parameters which cannot be checked are shown as inactive (gray) and are set to
100% (e.g., Sensocheck for analog sensors).
The parameter values should lie between the outer (100%) and inner (50%) hexagon. When a value enters the inner hexagon (<50%), the corresponding caption text
ashes red (see example).
Example: Network diagram of a digital pH sensor (Memosens)
Network Diagram
pH
Wear
Calibration timer
Return
Slope
Zero point
Sensocheck
Response time
Help

Information
17
pH Oxy Cond
Sensor Monitor
Shows the raw values available fom the connected sensor:
pH, analog
pH, digital, glass mV, temperature, glass impedance
pH, digital, ISFET mV, leakage current, temperature
pH, ORP mV, temperature
Cond, digital Resistance, conductance, temperature
Oxy, digital
Messages
Shows all active error and status messages as well as supplementary help texts.
mV, temperature, temperature detector, temperature
resistance
Sensor current, leakage current, polarization voltage,
partial pressure, air pressure, temperature
MemoLog (Memosens only)
Displays the individual calibration records. You have the possibility to delete
individual entries or all entries. The following parameters are displayed:
• Sensor type
• Manufacturer
• Calibration date
• Serial no.
• Zero point
• Slope
• Load conditions
• Tag number (TAG)
Background: The device provides a calibration data logger, which must be activated
in the conguration menu. With “MemoLog” activated, up to 100 calibration records
can be directly saved to the device. Then, the complete Memosens index structure
will be recorded after every calibration.

18
Information
pH Oxy Cond
Device Info
Shows the following device information:
• Device name
• Serial number
• Software version
• Hardware version
• Air pressure
• Battery
Device Test
A device self-test is automatically run in the background at regular intervals.
It checks the memory modules listed below.
A green checkmark shows that the test was successful.
• FLASH program memory
• FLASH data memory
• FLASH parameter memory
• RAM (working memory)
Display test
1) Select “Display test” and press E.
2) The display lights up red, green, blue and then white.
3) Press any key to stop the test.
Keypad test
1) Select “Keypad test” and press E.
2) Press all nine keys one after the other.
A green checkmark shows that a key functions properly.
3) Press any key to stop the test.
Conguration
pH Conguration
1) In measuring mode, press the Menu softkey.
2) Select “Conguration” and conrm by pressing E.
3) Make the desired adjustments.
The following table gives you an overview.
Factory settings are shown in bold print.
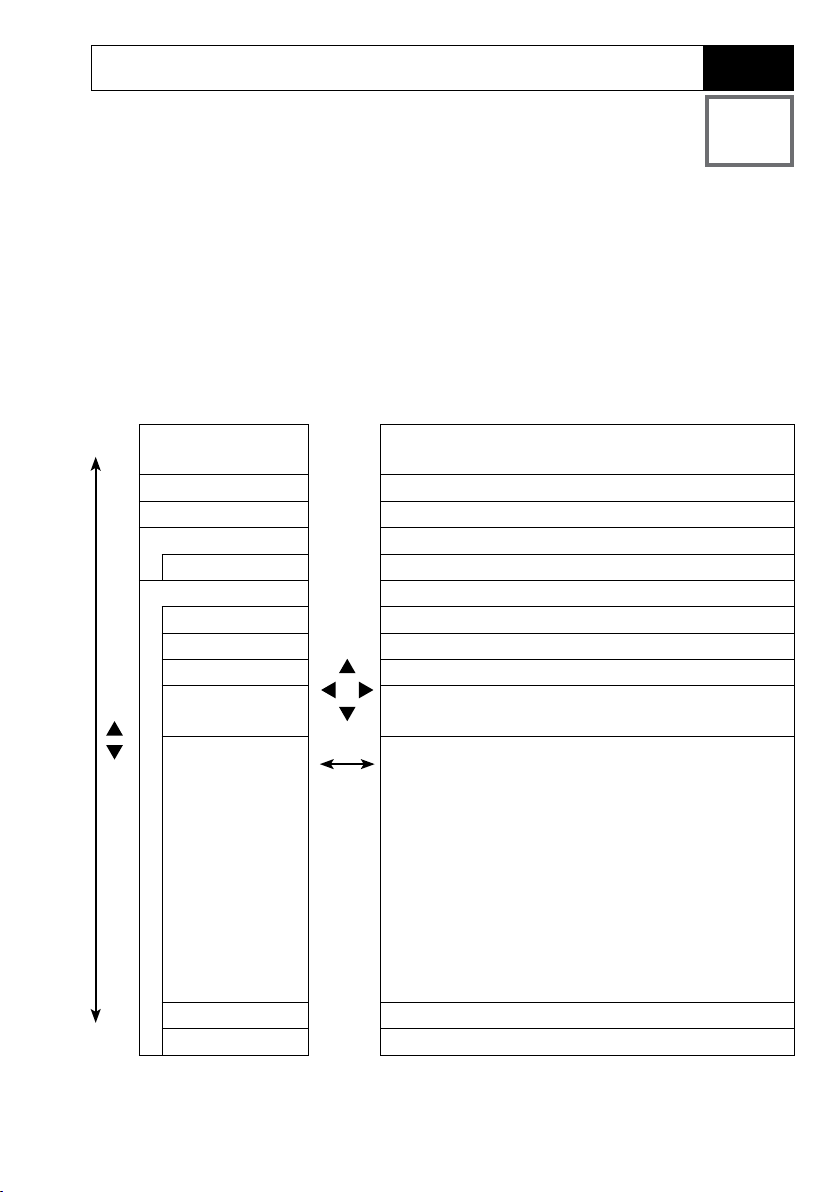
“Conguration” menu selection – part 1
Language
Auto-o O | 5 min | 10 min | 30 min | 60 min
Temperature °C | °F
+ pH sensor*
Wear On | O
+ Calibration*
Cal timer O | On
Interval On: 00 … 99 days
Cal mode Programmed buer | Manual | Data entry
Calibration
points
Buer set Endress+Hauser
MemoLog O | On
TAG O | On
Deutsch | English | Español | Italiano | Français |
Português
Auto | 1-point | 2-point | 3-point
E
Mettler-Toledo
Knick CaliMat
Ciba
NIST technical
NIST standard
Hach
WTW
Hamilton
Reagecon
DIN 19267
2.00/4.01/6.98/9.95/11.87
2.00/4.01/7.00/9.21
2.00/4.00/7.00/9.00/12.00
2.06/4.00/7.00/10.00
1.68/4.00/7.00/10.01/12.46
1.679/4.006/6.865/9.180
4.01/7.00/10.01/12.00
2.00/4.01/7.00/10.00
2.00/4.01/7.00/10.01/12.00
2.00/4.00/7.00/9.00/12.00
1.09/4.65/6.79/9.23/12.75
19
pH
* “+” indicates that submenus can be opened by pressing E.
20
pH
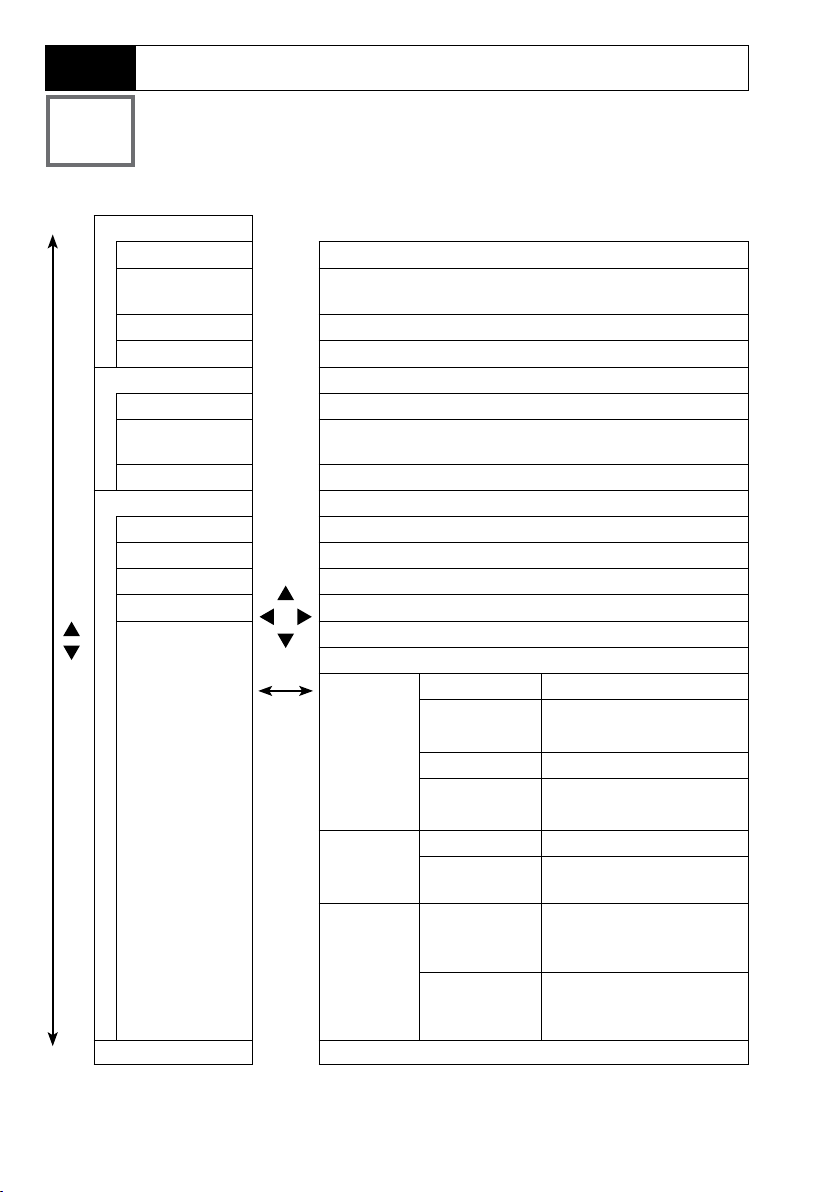
“Conguration” menu selection – part 2
+ Time/Date*
Time format 24 h | 12 h
Date format dd.mm.yyyy | yyyy-mm-dd | dd/mm/yyyy |
mm/dd/yyyy
Time hh:mm:ss
Date Date format as congured
+ Display*
Appearance Modern | b/w
Lighting Permanent | 60 min | 30 min | 10 min |
5 min | 1 min | 30 sec
Brightness Bright | Standard | Dim
+ Data logger*
Meas.point Without
Note Without
Right softkey
Recording Non-circular | Circular
Logger type Shot
Factory setting Yes | No
Logger Start/Stop | Hold value
Interval 00.00.01…12:59:59 | 00:02:00
E
Dierence 1st dierence On | O
Intv+Di Interval as logger type: interval
Limit value Interval Basis/Event
Conguration
Delta pH pH 0.0…16.0 | pH 1.0
Delta mV 0 … 2000 mV | 1 mV
2nd di. On | O
Delta °C 0…99.9 °C | 1.0 °C
Delta °F 0…450 °F | 1.0 °F
Dierence as logger type:
dierence
00.00.01…12:59:59
00:01:00/00:00:01
Limit values Min/Max corresponding
to permissible range
(see Specications)
* “+” indicates that submenus can be opened by pressing E .
 Loading...