

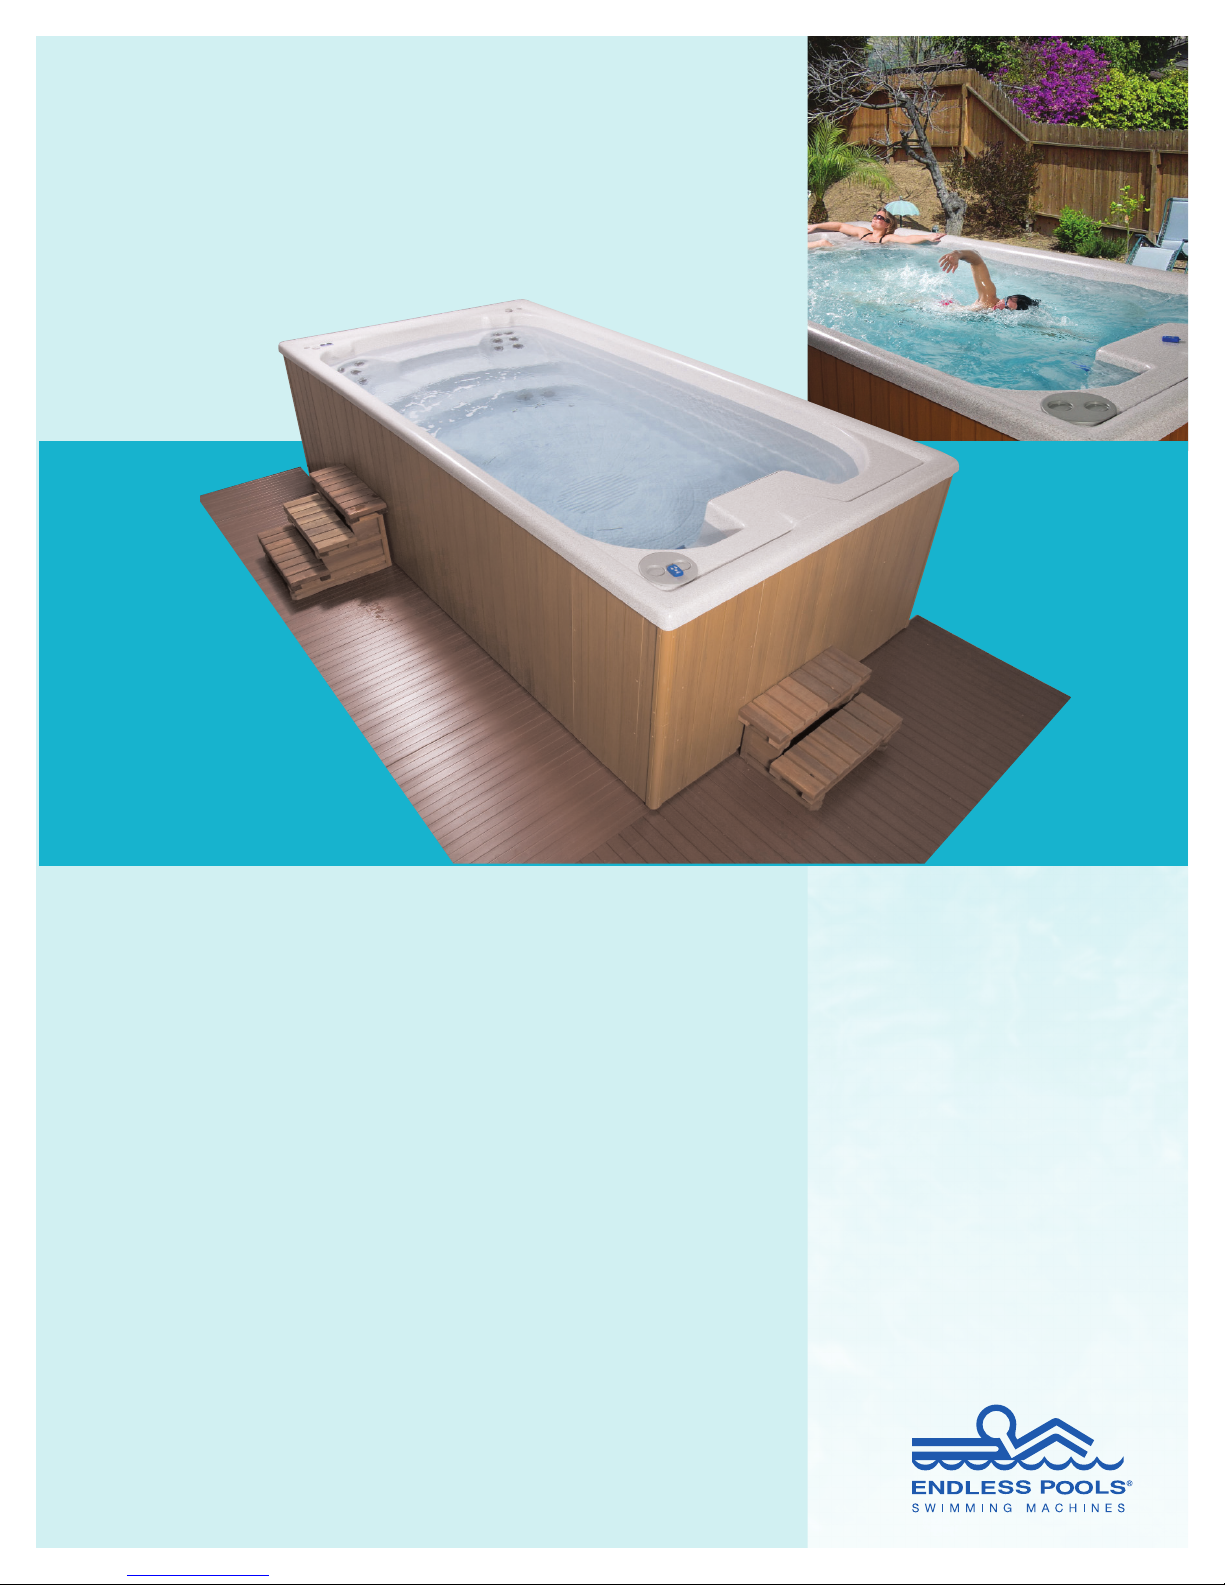
OPERATIONS AND MAINTENANCE
Endless Pool Swim Spa
PRE-SITE PREPARATION
Shut
Off
60 amp
220 volt
GFCI
Power
Please read all instructions in this manual prior to having the
swim spa installed in its chosen location. IMPROPER INSTALLATION MAY RESULT IN EQUIPMENT DAMAGE AND
VOID THE ENDLESS POOL SWIM SPA WARRANTY.
GETTING THE SPA TO YOUR SITE
Your Endless Pool Swim Spa is delivered by truck and trailer. An
empty Swim Spa weighs 2,800 lbs and will typically need to be
lifted into position with a crane. The cost of crane rental will
depend on a variety of factors including timing, location, required
reach, obstructions and possible permits. Your Swim Spa can usually be unloaded from the delivery trailer without a crane. For
installations indoors where the Swim Spa needs to be slid only a
few feet from where the driver unloads, a garage for example, the
Swim Spa can be slid or rolled into position using short sections
of pipe and a lifting bar (see the video on our website)
Our shipping coordinators work closely with you planning the
delivery. You may speak with them at any time by calling us toll
free at 800 732 8660. They will work with you once you have
made your color choices to insure a smooth delivery. The shipping
quotation you receive is mileage based. We try to group shipments
together to minimize trucking cost.
• If the spa is to be set in-ground, not skirted, even support of
bottom, sides and lip are absolutely necessary to insure proper structural support and to keep the warranties valid. A
properly constructed vault is recommended for in-ground
installations. In-ground installations also require proper
drainage of water and may require a sump pump to remove
spa and rain water from this vault.
• It is not recommended to backfill against the swim spa cabinet. This will damage the swim spa.
• If your spa is located near water sprinklers, adjust or cap
them so water will not hit the wood siding of the spa.
• During colder months, have a fill hose and water supply
thawed and ready for filling your spa upon delivery.
ELECTRICAL REQUIREMENTS
The Endless Pool Swim Spa requires one (1) 220-Volt, 60-Amp
GFCI protected circuit (circuit to contain 3 wires plus ground).
The circuit must use a minimum #6 gauge copper wire. Allow
plenty of extra wire from the Circuit Box to the Spa Equipment
Disconnect inside the cabinet.
SPA PAD REQUIREMENTS
Your Endless Pool Swim Spa MUST BE PLACED ON A UNIFORMLY FIRM AND LEVEL SURFACE. A concrete pad foundation 4 inches thick is recommended. As an alternative, a peagravel foundation pad could be used, but this pad must be contained in a secure wood or concrete restraining border to prevent
loose gravel from shifting once the swim spa is placed. If a concrete pad is poured, this is the logical time to “plumb-in” your
electrical conduit (refer to the diagram on page 7). Be sure the
concrete has cured for at least one (1) week before setting the
swim spa in place. AN UNEVEN OR CRACKED CONCRETE
PAD, OR THE USE OF SHIMS OF ANY KIND MAY CAUSE
THE SWIM SPA TO BUCKLE, DISTORT AND/OR CRACK,
CAUSING THE WARRANTY ON YOUR SPA TO BE VOIDED.
ADDITIONAL REQUIREMENTS
• All installations require the equipment system to be shielded
from the weather. If the equipment system is placed away
from the spa, then an enclosure for the equipment will be
required. The customer is responsible for providing such an
enclosure.
• Balconies and decks must be constructed to current state and
local codes to safely support the maximum load of your
water-filled swim spa and the number of people using the
swim spa. Check with your construction contractor for these
specifications.
• It is the responsibility of the owner to provide appropriate
access at the rear and front right corner of the swim spa
once it is set in place for ease of repair and maintenance.
Otherwise, additional costs to service and repair the swim
spa may be incurred.
THE SENSIBLE WAY TO ENJOY YOUR
ENDLESS POOL SWIM SPA
Swim spas are fun, but along with the fun comes serious
responsibility. Be sure good times are safe times. Establish
rules and enforce them. It is your responsibility to be sure that
you, your family and guests use your Endless Pool Swim Spa
sensibly and safely.
Children are not waterproof! Drowning is one of the largest
causes of accidental death for infants and children under the
age of five.
• There is no substitute for adequate supervision.
• Never leave a child alone or out of eye contact in/near
the swim spa – not even for a second.
• Always completely remove the cover before using your
swim spa to avoid the possibility of someone being trapped
under the swim spa cover.
• Insist there be no running, pushing or rough housing near the
swim spa.
• Never consider young children “water-safe” despite their
swimming skills, previous instructions or experience.
1

Common sense should prevail.
• Never use the swim spa when you are alone.
• One (1) individual must assume the responsibility for supervising the swim spa.
• Never use the swim spa while or after using narcotics or
other drugs that may cause sleepiness, drowsiness or
raise/lower blood pressure.
• Never use the swim spa while or after using alcohol.
• Be sure you check the water temperature before and while
you are in the swim spa.
• Persons with heart disease, diabetes, high or low blood pressure or any serious illness, and pregnant women – indeed
persons with any doubt – should not enter the swim spa
without prior consultation with their doctor.
• To maintain clean spa water, it is a good idea to shower with
soap and water before using your swim spa to wash off skin
oils, lotions and deodorants.
• Plan ahead to prevent accidents and injuries and make your
entertaining or workout truly enjoyable. Use only unbreakable items around your swim spa.
• At least one (1) responsible person should be trained in
artificial respiration and/or cardiopulmonary resuscitation
(CPR).
Spa Preparation.
• Have a licensed electrician wire the spa equipment through a
GFCI (Ground Fault Circuit Interrupter).
• Where possible, use battery-operated appliances around the
swim spa. Electrocution from appliances in contact with the
water is a real danger.
• Carefully read, understand and follow operating and maintenance instructions supplied by EPI. It is a good general rule
to visually inspect your swim spa and equipment regularly.
If you detect something unusual, contact our Customer
Service Department at 1-800-910-2714.
• Never perform work on your swim spa or filter equipment
without turning the entire system off at the breaker(s).
• Carefully follow the instructions for maintaining, servicing
or repairing your swim spa. If you are at all unsure of how
to proceed, call our Customer Service Department at 1-800910-2714.
• For health reasons, make sure the spa water is properly
cleaned and disinfected.
USING CHEMICALS IN YOUR ENDLESS
POOL SWIM SPA
The chemicals needed for your Endless Pool Swim Spa help make
it clean, disinfected and more attractive to use. Remember, these
chemicals are potentially dangerous and may be hazardous if not
used properly. Follow the manufacturer’s instructions carefully
for proper use and storage of chemicals.
Outlined are some general tips for proper chemical use
and storage:
• Before using chemicals, read the labels and directions fully
and carefully.
• Follow label use on instructions.
• Keep all chemicals out of reach of children.
Storage:
• Chemicals for test kits should be replaced every year.
• Keep the original lids on all chemical containers and make
sure the lids are closed tightly when not in use.
• Do not stack different chemicals on top of one another.
• Store your swim spa chemicals in a clean, cool, dry, wellventilated area preferably off the floor to prevent contamination from other materials. Keep them away from the chemicals and equipment used for garden and/or lawn maintenance.
• Keep liquid chemicals away from dry chemicals. Keep apart
chemicals that are different forms of oxidizing compounds.
Physically separate all different forms of chemicals.
• Do not store your swim spa chemicals where other flammable items may mix with them. For example, a mixture of
these chemicals and fertilizer can cause a fire or an explosion.
Usage:
• Always add chemicals directly to the swim spa water, either
in a suitable feeder, distributed across the surface of the
water or diluted and poured into the water. Follow label use
instructions.
• When preparing water solutions for feeder applications, pour
the chemical slowly into the appropriate amount of water,
stirring constantly to provide mixing and dilutions.
• Always add chemicals to water. NEVER ADD WATER TO
CHEMICALS.
• Carefully clean up any spilled chemicals with large amounts
of water to dilute and wash away the chemicals.
Disinfectants and pH adjustment chemicals can usually be
sent to the sewer with large quantities of water since they are
intended for use at low levels.
• Wash out empty disinfectant containers before disposing to
eliminate danger of fire, explosion or poisoning.
• Test the water in your swim spa with a reliable test kit. Add
the necessary chemicals according to the test results and the
manufacturer’s instructions. The hotter the water, the faster
disinfectants may break up and spread out requiring more
frequent water testing. In addition, the more people who use
the swim spa, the more frequently you should test the water.
• Do not inhale dust or fumes from any chemicals. If necessary, use proper protective devices for breathing, handling
and eye protection. Promptly wash off any residues that
come in contact with your skin.
• Never reuse old chemical containers unless specified by the
manufacturer.
2

INITIAL START UP
1. Fill the Endless Pool Swim Spa with water from a garden hose
or water truck.
(any brand is fine as long as it does not have an added scent to it) to
an indoor swim spa. If you have an outdoor swim spa, add the
appropriate amount of granules out of the bag of “stabilized” chlorine. Test for chlorine in a day or two and add more if necessary.
2. Once filled with water, turn power ON at Disconnect Box.
3. Check that the Circulating Pump is operating (water flowing
into the skimmer). NOTE: If water is not flowing into your
skimmer, there may be an air lock in your plumbing line. Turn
off the power at the breaker immediately. Use the hose bib in
the equipment cabinet to, “bleed off” some water. You should
notice air and then water coming through the hose bib. Once a
steady stream of water is draining, close the hose bid and turn
the power back on.
4. Run jets for two to three minutes. Check the equipment cabinet
to ensure no water is leaking from the union joints. Tighten any
joints as necessary.
5. Use your remote control to turn the swim current on and run for
two to three minutes. Check the equipment cabinet to ensure no
hydraulic fluid is leaking from the hydraulic connections.
Tighten any fittings as necessary.
6. Check Alkalinity and pH with test strips or test kit – adjust
accordingly.
7. Visit www.myendlesspool.com or contact our Customer
Service Department at 1-800-910-2714 to answer any questions
that you may have.
Special Note:
It is extremely important that you check and re-tighten your
pump couplers several times during the initial weeks of ownership of your new swim spa. We have done this during the delivery process, but they will need to be re-tightened after the initial
fill and warm up of the water. Additionally, you will need to
check them once a month to insure they stay tight. If you have
any questions, please call our Customer Service Department at
1-800-910-2714.
BALANCING THE WATER CHEMISTRY
Included with your Endless Pool Swim Spa are products to help
with start-up and on-going maintenance. These include:
(1) Container calcium hardness increaser
(1) Container water clarifier
(1) Container pH decreaser
(1) Container pH increaser
(1) Container total alkalinity increaser
(1) Container stabilized chlorine (outdoor pools)
(1) Test Kit
The following steps need to be followed when the swim spa is
first filled, as well as anytime the swim spa is partially drained
and refilled. They will walk you through testing and adjusting
the factors affecting the “balance” of the water i.e., the water’s
total alkalinity, pH and calcium hardness levels.*
The level of chlorine inside the swim spa, as long as it is not above
5ppm, will not significantly affect the following tests and procedures used to balance the pool water. Therefore, if there is no chlorine in the pool at this time, add some. Add 1-2 cups of liquid bleach
1) Balance Total Alkalinity (TA)
Ideal reading: 100ppm
Acceptable range: 80-120ppm
Raise with: Sodium Bicarbonate (TA increaser)
Lower with: Sodium Bisulfate (pH decreaser)
Method of chemical application:
• Adjusting the level of TA in the swim spa requires that the
chemical be “slugged” i.e. pour chemical in four different
spots around the swim spa with the water calm. Let the
water remain calm until the next filtration cycle.
• Retest TA and adjust again if necessary.
• Add less chemical than you think is necessary to effect the
desired change. Keep track of how much chemical it took to
make that change.
Notes:
Many regions of the country and world will have water with a TA
higher than our recommended range. In a lot of cases, it will be
desirable to leave the TA alone as any adjustment to it will also
tend to affect the pH. The TA is mainly serving as a buffer for the
pH. If it is above 120ppm, but lower than 200-250ppm, leave the
level alone. It will simply over-stabilize the pH, which is not a
problem, especially if the pH is within range or close to being
within range.
If the TA is lower than our recommended range, though, we would
recommend increasing it to at least 80ppm. Once again, the TA
serves mainly as a buffer for the pH and if the TA is too low, the
pH level in the pool can change very rapidly causing bather discomfort and damage to the pool and pool equipment.
Once the TA is within a tolerable range, move on to adjusting the
pH in the swim spa. You should find that the TA will be pretty
slow to change—for this reason, test for it once a week as detailed
in the “Maintenance and Use of your Endless Pool” instructions
found later in this guide.
2) Balance pH
Ideal reading: 7.5
Acceptable range: 7.4-7.8
Raise with: Sodium Carbonate (pH increaser)
Lower with: Sodium Bisulfate (pH decreaser)
Method of chemical application:
• Measure out and pour your dosage of chemical directly into the
swim current. Afterwards, make sure you wash some water on
the propulsion housing to ensure that no granules are resting on
the benches. Test and apply more chemical as necessary.
Notes:
It is very important to keep the pH within range. If the level is too
low, severe damage can occur to the submerged hydraulic motor
and the pool equipment. If the level is too high, the water can be
prone to “scaling,” when minerals and metals dissolved in the
water will be dropped out of solution and on to the swim spa surfaces. Having the pH too high or too low may cause bather discomfort in the form of eye or skin irritation.
* It is important to maintain properly balanced water. Under balanced water can be corrosive or cause scaling, which can damage
the spa components and void any warranties
3

The pH will change slowly over the course of a week or two. The
number of bathers and the type of chlorine used are just two factors that will cause the pH to change. For this reason, pH should
be tested three times a week and adjusted as needed. See the
“Maintenance and Use of your Endless Pool Swim Spa” instructions found later in this guide for further details.
Once the pH is within range, move on to adjusting the calcium
hardness.
3) Balance Calcium Hardness (CH)
Ideal reading: 180ppm
Acceptable range: 175-250ppm
Raise with: Calcium Chloride (calcium hardness increaser)
Lower with: water containing less calcium (softened water)
Method of chemical application:
• Fill a clean, five gallon bucket with water and dissolve the
dosage of calcium into this water. Do not mix this solution
with your hands. Pour the solution in to the swim current,
and let the current circulate the water in the pool for a few
minutes. Wait a few hours, test again, and add more calcium
if necessary. Once again, always add less chemical than you
think will be necessary to effect the desired change.
Notes:
As with TA, many regions will have higher CH than what is specified by our recommended range. If it is available, partially filling
the pool with softened water will dilute the calcium content and
essentially lower the CH level inside the swim spa. If softened water
is unavailable, perhaps water tanked-in from an outside source
would be the best option for you. If this not possible either, we
would strongly suggest adding a “sequestering agent” which can be
purchased at any local swimming pool retail center. This chemical
helps the water hold all of its dissolved materials in solution, including metals and calcium content. The main concern with having CH
levels too high is that the calcium may deposit out of solution—a
sequestering agent will help prevent this.
Calcium hardness will tend to slowly increase over time as water
evaporates from the swim spa and leaves its calcium behind.
Periodic testing of CH is detailed in the “Maintenance and Use of
your Endless Pool Swim Spa” instructions below.
RECOMMENDED MAINTENANCE SCHEDULE
Daily:
• Test for free chlorine (FC) after you swim, or at least a few
times a week. Add chlorine to maintain FC levels between
0.5 - 1.5 ppm. As you become familiar with the chlorine
demand for your pool, you will find that you may not have to
test for chlorine as frequently in order to maintain a minimum level of 0.5ppm.
Twice a week:
• Check and adjust water level. Water should completely
cover the honeycomb grill where the current is produced.
Water 1/2” lower than this can create a choppy current and
may cause your skimmer to draw air into the plumbing lines.
Having the water level 1” or more higher that honey comb
grill will cause more water to get splashed out of the swim
spa, and may cause the air relief port on the top of the skimmer body to leak water.
• Test for pH at least twice a week. Broadcast (i.e. pour chemical into current) pH increaser or pH decreaser to maintain
levels between 7.4-7.8.
Weekly:
• Test for total alkalinity (TA) once a week. Slug (i.e. pour
chemical in 4 spots around pool with water calm) TA
increaser or pH decreaser to maintain levels between 80-120.
If TA is too high, it is usually not necessary to decrease as it
merely serves as a buffer for the pH and will not cause damage in the pool.
• Test for total chlorine (TC) once a week. If the test for TC
yields a result that is significantly higher than level of FC
(i.e. the solution gets noticeably more pink) then you have a
significant amount of combined chlorine (CC) in the pool
water. Combined chlorine generates a heavy chlorine odor,
and can cause bather discomfort in the form of eye and skin
irritation. If you have significantly more total chlorine than
you do free chlorine, then it is time to shock the pool (i.e.
add enough chlorine to get the FC between 3-5ppm, but
don’t swim until FC falls below 3ppm). Shocking the pool
should burn off the combined chlorine.
MAINTENANCE AND USE OF YOUR
ENDLESS POOL SWIM SPA
We recommend getting into a routine that involves adding a measured amount of chlorine either after you swim or at the very least
every other day. This measured amount depends on pool use. One
person swimming every day for 30 minutes might add 1/2 cup of
Clorox after each swim. This small amount should maintain the
required 0.5 to 1.5 ppm chlorine residual. Heavier use and use by
children generally requires more chlorine. Adding 1 cup of Clorox
bleach raises the chlorine level by about 1 ppm. It is safe to swim
in any pool where the chlorine level is between 0.5 to 3.0 ppm
free chlorine.
If you intend to keep your swim spa at a temperature above 95ºF,
then the use of bromine should be considered. Bromine is a more
effective sanitizer at higher temperatures. The acceptable range of
bromine for your swim spa if 2.0 to 5.0 ppm. The easiest way to
introduce Bromine into your Swim Spa is by a floating feeder. A
floating feeder allows Bromine to dissolve at a slow and constant
rate. Remember to remove the floating feeder when the swim spa
is in use. Too high a bromine level can cause corrosion to the
swim spa.
Every two weeks:
• Test for calcium hardness (CH) once every two weeks.
Predissolve calcium hardness increaser (i.e. fill a 5-gallon
bucket with pool water and dissolve calcium in bucket) then
pour the solution into the current to keep levels between 175250 ppm. If CH is too high, it can only be decreased by
adding water with less calcium (i.e. softened water).
• If you have an outdoor pool, or if you use stabilized chlorine
(i.e. sodium dichlor or sodium trichlor), test the cyanuric acid
(CYA) level every two weeks. Maintain levels between 2050 ppm. If CYA is above 80 ppm, the pool should be partially drained and refilled, or un-stabilized chlorine should be
temporarily used in place of the stabilized. If CYA is above
100ppm, the pool should be partially drained and refilled. If
you use bromine, then this step is unnecessary.
Every two months:
• Remove and clean the filter cartridge. After several uses, the
cartridge will need to be replaced, and new filter cartridge
can be purchased on our Customer Service website, myendlesspool.com.
4

Remove Your Filter with the Power OFF
7
4
1
2
5
3
Cartridge filter exploded view
• Bleed air from the filter housing, turn knob (1) counterclockwise.
• Pull on the gray tab (2) and rotate filter ring (3) counterclockwise and remove.
• Pull on filter lid handle (4) and remove filter (5) to clean
or replace.
• Check o-ring (6) for damage.
Replace Your Filter with the Power OFF
• Replace ring (7) and reverse steps above turning filter ring
(3) clockwise until hand tight.
• Turn power ON.
• When water comes out of bleed knob (1), close, turn clockwise and hand tighten.
Annually:
After 1 year (9000hrs) the bulb of your UV Sanitizer must be
replaced. Start by turning off the circulation pump. Hold the
P1 button on your keypad for 5 seconds. Then unplug the UV
Sanitizer from the Heater Controller.
Unthread the electrical connector assembly (1) from the electrical tee assembly (2). Note that there is an O-Ring (3)
between the electrical connector and the plastic body. Set the
o-ring aside for re-installation later.
Once the electrical connector has been unthreaded from the tee
assembly, carefully remove the UV bulb (4) from the UV
body. Note: pulling on the bulb too quickly could cause the
bulb to separate from the electrical connector. If this happens,
then the entire UV body will have to be removed and the bulb
will have to be carefully dropped out of the UV body. If this
occurs, it is very important to prevent the bulb from breaking.
When the bulb has been removed from the UV body separate
the bulb from the electrical connector.
Do not touch the new UV bulb with your bare hands. Skin
oils can remain on the bulb creating hotspots, which will
shorten the life of the bulb. Make sure that the bulb cushion
(5) and the 2 bulb o-rings (6) are in place. Connect the new
bulb to the electrical connector, making sure that the pins in
the bulb are aligned with the pin connectors.
Carefully insert the bulb into the UV body and thread the electrical connector back into the electrical tee assembly. It is
important that the electrical connector o-ring is in place prior
6
to this step.
Press the P1 button on your keypad once to turn the circulation pump on. Now that water is running through the system,
the UV can be plugged back into the heater controller.
Every five years:
• After five years of operation, we will send you a letter detailing our recommendation that the submerged hydraulic motor
be changed. This procedure does require the swim spa to be
drained to 6” in the standard-depth section of the pool. This
may also be a convenient time to replace the propeller or
front grill in the pool; a list of recommended and optional
replacement parts is supplied with the tune-up letter.
As Needed:
• Clean the water line around the perimeter of the swim spa
and the underside of the cover as needed. Body oils and
mold may build up slowly in these areas and should be
cleaned off periodically.
• If you happen to get cloudy water, or if the surface feels slippery, it likely means that you have algae in the pool. A pool
brush and pole may be purchased in order to wipe down all
the surfaces in the pool. Increasing free chlorine level temporarily to 5 ppm will help, as will maintaining the free chlorine level in the swim spa at 3 ppm until the water is clear.
Test the chlorine level frequently during this time.
5

DRAINING YOUR ENDLESS POOL SWIM SPA
1) Disconnect electrical power to all pool equipment.
2) Begin to drain down pool water by placing a suitable sump
pump in the pool, or by setting up a siphon using a garden hose.
If using a siphon, two or more hoses may be used simultaneously in order to expedite the process.
3) When you are ready, refill the pool using a garden hose with a
“bobby filter” on the end to screen out debris and fine sediment.
If you do not have one of these filters, contact Endless Pools
Customer Service. If you have high calcium content and/or
high metal content in you area, you should also add some
“sequestering agent” to the pool water to help prevent scaling/
staining. Once again, if you do not have a bottle of this product, contact us and we will send one out to you. You may also
be able to find both of these items at a local pool store.
4) The swim spa is full when the water completely covers the grill
at the front of the pool. Reestablish electrical power to the pool
equipment, and start balancing the pool water. Shock the pool
to 3.0 ppm free chlorine. Turn on your WQS in order to get
your new body of water filtered, circulated, and heated.
WARNINGS:
Before installing or connecting the unit, please read the following.
• FOR UNITS FOR USE IN OTHER THAN SINGLE-FAMILY DWELLINGS,A CLEARLY LABELED EMERGENCY
SWITCH SHALL BE PROVIDED AS PART OF THE
INSTALLATION. THE SWITCH SHALL BE READILY
ACCESSIBLE TO THE OCCUPANTS AND SHALL BE
INSTALLED AT LEAST 5 FEET (1.52 M) AWAY,ADJACENT TO, AND WITHIN SIGHT OF THE UNIT.
• ANY DAMAGED CABLE MUST BE IMMEDIATELY
REPLACED.
• TURN POWER OFF BEFORE SERVICING OR MODIFYING ANY CABLE CONNECTIONS IN THIS UNIT.
• TO PREVENT ELECTRIC SHOCK HAZARD AND/OR
WATER DAMAGE TO THIS CONTROL,ALL UNUSED
RECEPTACLES MUST HAVE A DUMMY PLUG.
• THIS CONTROLLER MUST NOT BE INSTALLED IN
PROXIMITY OF HIGHLY FLAMMABLE MATERIALS.
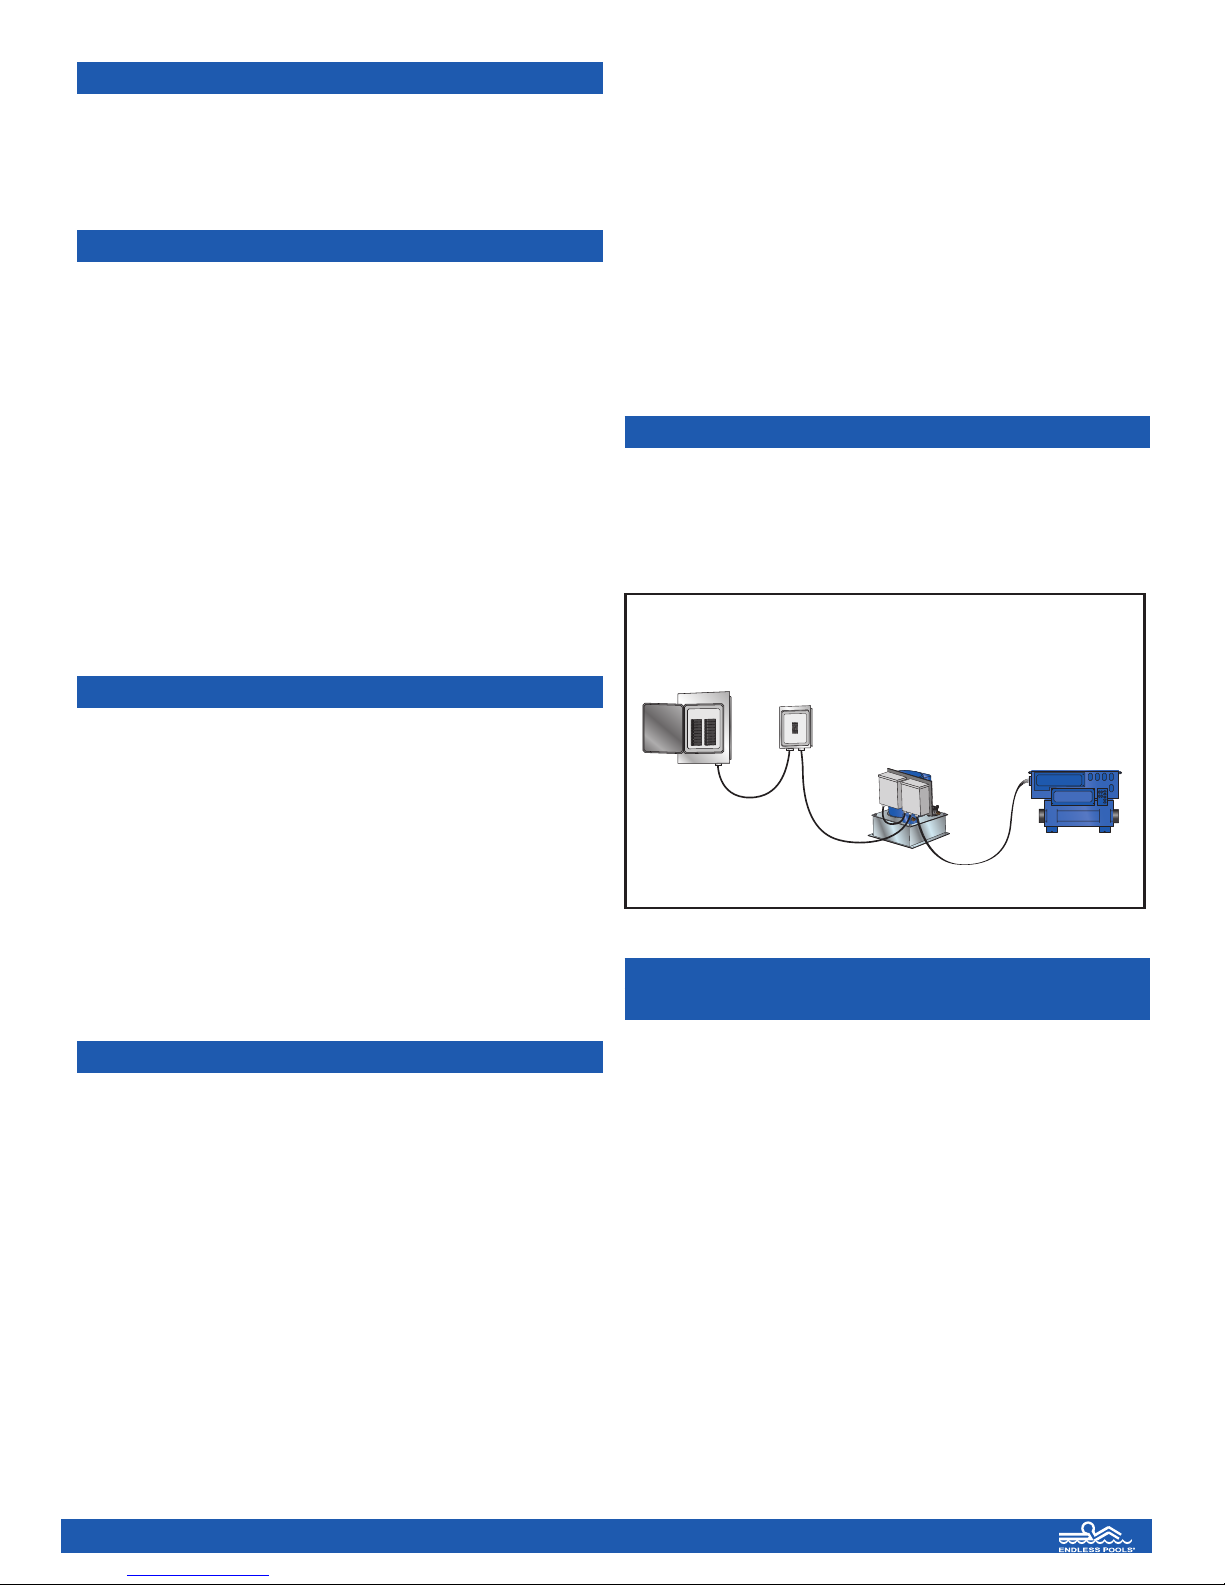
ELECTRICAL WIRING
WINTERIZING YOUR ENDLESS
POOL SWIM SPA
An Endless Pool Swim Spa may be used year round, even in colder climates. If you will not be using the swim spa during the winter in an area where freezing is a problem, special consideration
must be taken to protect the pool and ancillary equipment if either
is located outside. If you have any questions regarding precautions
to take against freezing, please call our Customer Service
Department at (800) 910-2714.
SWIM SPA HEATER/CONTROLLER
The in.xe is a heater controller used by Endless Pools to control
the following water quality features:
• Water temperature can be set between 59ºF and 104ºF.
Default set point at 84ºF. The set point is changed with the
up and down keys.
• The Circulating Pump, CP, is always on. The heater can only
turn on when CP is on.
• Pressing the light key will turn lights on/off with an on time
of 120 minutes.
• Optional Pump #1 is for a single speed Jet pump. Pressing
the first key turns pump 1 on/off, with a run time of 30-minutes. The heating element is turned off when Pump #1 is
activated. To aid in filtration there are 4-purges per day.
For 240 VAC (4 wires)
Correct wiring of the electrical service box, GFCI, and pack terminal block is essential.
Call an electrician if necessary.
Warning!
This product must always be connected to a circuit protected by
a ground fault interrupter.
Proper wiring of the electrical service box, GFCI and in.xe terminal block is essential!
Check your electrical code for local regulations. Only copper wire
should be used, never aluminum.
To install the wiring for the in.xe heater controller, you'll need a
Phillips screwdriver and a flat screwdriver.
Loosen the 2 screws of the spa pack door and open it. Remove 5
1/2" of cable insulation. Strip away 1" of each wire insulation. Pull
the cable through the cutout of the box and secure it with a strain
relief (1" NTP strain relief; hole diameter: 1.335"). Make sure that
only the uncut sheathing is clamped at this opening. Push the colorcoded wires into the terminals as indicated on the sticker and use
the flat screwdriver to tighten the screws on the terminals.
After making sure wire connections are secure, push them back into
the box and close the door. Tighten the 2 screws of the sp pack door.
Connect the bonding conductor to the bonding lug on the front of
the in.xe spa pack. Use a minimum 8 AWG solid copper wire.
• Optional UV always on except when Pump #1 is on and
remains off for 30-minutes after pump #1 is turned on.
• Holding first key for 5-seconds will turn off all devices for
30 minutes to allow for servicing. Pressing again will return
to normal operation.
6

15'
7'-10"
8''
24"
24"
access
SWIM SPA COMPONENTS
Skimmer:
through the filtration system. The water is pulled into the
skimmer and passed through a basket, which needs to be
cleaned periodically. If your swim spa is outdoors, this basket
may need to be cleaned more frequently.
Circulating Pump: This compact and efficient pump circulates water through the filter, heater and UV Sanitizer 24 hours
a day. Keeping the water circulating is one of the best ways to
help you keep your swim spa clean while requiring very little
attention from you.
Heater Controller: The heater controller warms the water
before it goes through the filter and re-enters your swim spa. It
also controls the operation of the UV sanitizer, lights, and jets.
As in the case of the motor, the heater does not need much
maintenance.
UV Sanitizer:
Although Bromine and Chlorine are the most commonly used
sanitizers, we also use a UV sanitizer. Water is pumped through
a chamber that contains a bulb that produces ultra-violet light.
Algae, bacteria, and other microorganisms pass through the
chamber and are eradicated by the UV light. A UV system drastically reduces the need for a chemical sanitizer (chlorine or
bromine). Since the high-efficiency circulating pump is running
continuously, your swim spa is being filtered, heated, and sanitized 24 hours a day reducing the likelihood of bacterial growth.
Cartridge Filter:
through the filter. The filter is a 25 square foot cartridge-type
filter located at the front of the pool. The filter needs to be
cleaned or replaced periodically to ensure that your swim spa
stays sparkling clear. Please refer to the “Recommended
Maintenance Schedule” portion of this manual for more information on your filter.
The skimmer is where the water begins its travel
The water then passes through the UV Sanitizer.
The circulating pump then moves the water
Jet Pump:
the two-jetted seats. The jet pump pulls from two ports under
the seats and then pushes the water through 6 jets in each of
the two seats. Pushing the pump 1 button twice turns the jets
on. Pressing the pump 1 button once turns the jets off.
Electrical Disconnect Box:
which is attached to the hydraulic power unit is where your
incoming 220volt 60amp GFCI service is attached. If you are
going to bury your electrical conduit, please refer to the above
drawing for ideal placement of the conduit inside of the spa
skirting. Please refer to the “Electrical Requirements” for
more information.
Hydraulic Power Unit:
your swim current system. It pumps high-grade vegetable
based hydraulic fluid to the underwater hydraulic motor to
create the swim current.
Keypad:
ture of the swim spa as well as controlling the lights and jets.
Please refer to the, “Spa Functions” section in this manual for
more information.
Electrical Supply Conduit:
spa through underground conduit it should penetrate the floor
at the swim spa 8" from the back and side of the swim spa
(220V, 60Amp GFCI).
Your swim spa has a larger jet pump, which feeds
The electrical disconnect box,
The hydraulic power is the heart of
The keypad is how you change the desired tempera-
If bringing power to the swim
7

HEATER CONTROLLER
C
98
Connections simply snap into appropriate color coded receptacles.
TYPICAL SETTINGS
Set Point : 59°F to 104°F / Factory set at 84°F
Filter Cycle Duration: 0 to 24 hrs / Factory set at 24 hrs
Jet Pump Run Time: 1 to 255 min. / Factory set at 30 min.
Light Timeout: 1 to 255 min. / Factory set at 120 min.
Max Set Point: 59°F to 104°F / Factory set at 104°F
Purge Cycle Frequency: 1 to 4 times a day / Factory set at 4
Input wiring shown above
KEYPAD DOESN’T SEEM TO WORK
If a keypad doesn’t seem to work:
• Verify keypad connections.
• Replace keypad if problem is corrected.
• Replace in.xe if problem is not corrected.
in.xe UL/CSA electrical specifications:
Input rating: 120/240 VAC
(2-phase required, with neutral) 48 A maximum, 60Hz.
Software limited to 24A. Install on a 30A GFCI circuit.
Output ratings:
Output Voltage Current Typical Device
Out 1 120/240V 17FLA Pump 1
Out 3 120/240V 0.8 A Circulation
Pump/Blower
Out 4 120/240V 1 A Ozone Generator
Out 5 120/240V 5 A Audio/Video device
Keypad connection
L1 Light, 12VAC, 0.1 A
CO Communications port *
C1 Top side controller *
*CO: Comm.connector (in.stik).
8

heat.wav ratings:
Voltage: 120/240VAC
Current: 17A resistive (4 kW heater at 240V)
Frequency: 50 / 60 Hz
in.k200 full-function keypad
The Quick Reference Card provides a quick overview of your
spa’s main functions and the operations accessible with your
digital control pad.
heat.wav heater flow rate:
Minimum of 18 GPM is required
Important:
• All low voltage accessories use + 5Vdc and/or + 12 Vdc.
• All low voltage accessories combined:
150 mA max, on + 12 Vdc.
GENERAL SPECIFICATIONS:
Environmental:
Operating temperature: -20°C (-4°F) to 60°C (140°F)
Storage temperature: -25°C (-13°F) to 85°C (185°F)
Humidity: up to 85% RH, non condensing
IPx5 level of waterproofing is conditional on 3 items:
• Both front covers (heater and input wiring) are closed and
screwed shut.
• A waterproof strain-relief/bushing is used for the cable entry
into the pack.
• Any unused in.link connections (HC, LC, or low voltage) is
plugged with the appropriate blank plug.
Spa Functions
Key 1
98
The “Pump 1” indicator lights up when
Pump 1 is on.
Light Key
98
The “Light” indicator lights up when light is on.
Up/Down Keys
Press Key 1 key twice to turn
the jet pump on. Press a third
time to turn jets off.
A built-in timer automatically
turns pump off after 30 minutes,
unless pump has been manually
deactivated first.
Press Light key to turn light on.
Press a second time to turn light
off. A built-in timer automatically turns light off after 2
hours, unless it has been
manually deactivated first.
Mechanical:
Weight: 4.76 kg (10.5 lbs)
Dimensions (W x H x D):
Chassis: 441.5mm x 298.5mm x 129mm
(17.38" x 11.75" x 5.1")
UL/CSA Standards:
UL 1563 Fifth Ed.
File: E182156
CSA No. 22.2 - 218.1-M89.
TUV Standards:
EN/IEC 60335 - 2 - 60
EN55014-1
EN55014-2
EN61000-3-2
EN61000-3-3
The in.xe is lab tested to IPx5 enclosure protection levels.
Use Up or Down key to set
desired water temperature.
The temperature setting
98
The “Set Point” icon indicates that the display
shows the desired temperature, NOT the current
water temperature!
Off Mode
While the Off mode is engaged, the display will toggle between
OFF and the water temperature.
will be displayed for 5 seconds
to confirm your new selection.
This mode allows you to stop all
outputs for 30 minutes to perform a quick spa maintenance.
Press and hold Key 1 key for 5
secs to activate the Off mode.
Quick press Key 1 key to reactivate the system before the expiration of the 30-minute delay.
9

TROUBLESHOOTING
SMART WINTER MODE
Hr
An internal hardware error has been detected in
in.xe. Contact Customer Service.
HL
The system has shut the heater down because
HL
AOH
FLO
OH
UPL
WATER TEMPERATURE
In a heating cycle, the system first generates water flow through
the heater housing and the plumbing, in order to ensure accurate
water temperature readings as well as avoiding heater activation in
dry conditions.
After verifying pump activation and taking a water temperature
reading if required, the system automatically turns the heater on to
reach and maintain water temperature at Set Point.
The “Heater” indicator lights up when the heater is on. It
flashes when there is a request for more heat but the
heater has not yet started.
the temperature at the heater has reached 119°F
(48°C). Do not enter the water! Remove the
spa cover and allow the water to cool down,
then shut power off and power your spa up
again to reset the system.
AOH
Temperature inside the spa skirt is too high,
causing the internal temperature in the in.xe to
increase above normal limits. Open skirt and
wait until error clears.
FLO
The system does not detect any water flow
while the primary pump is running. Check
and open water valves. Check for water level.
Clean filter. If the problem persists, call
Customer Service.
Prr
A problem is detected with the temperature
probe.Call Customer Service.
OH
The water temperature in the spa has reached
108°F (42°C). Do not enter the water! Remove
the spa cover and allow the water to cool down
to a lower temperature. Call Customer Service if
problem persists.
UPL
No low level configuration software has been
installed into the system. Call Customer Service.
Our Smart Winter Mode protects your system from the cold by
turning pumps on several times a day to prevent water from freezing in pipes.
The “Smart Winter Mode” indicator lights up when
the Smart Winter Mode is on.
PURGE CYCLES
The system is programmed to automatically turn on the optional
jet pump 4 times daily, for 60 seconds, in order to purge the
plumbing lines and keep plumbing lines filtered clean.
REMOTE CONTROL TRANSMITTER
The remote control transmitter has three buttons. Press and hold the
On/Off button to turn the swim current on. Press and hold the Up or
Down button to adjust the current to the desired speed. Press and
hold the On/Off button while the current is on to turn off.
This device complies with Part 15 of the FCC Rules. Operation is
subject to the following two conditions:
(1) This device may not cause harmful interference, and
(2) This device must accept any interference received, including
interference that may cause undesired operation. WARNING:
Changes or modifications not expressly approved by the party
responsible for compliance could void the user's authority to
operate the equipment.
MODEL: EP-1g - 230 VAC, 24 AMPS, 60 Hz.
IP25 RATED RAINPROOF (TYPE 3R) ENCLOSURE SUITABLE FOR INDOOR OR OUTDOOR USE
THIS UNIT REQUIRES 60 AMP 230 VOLT AC, SINGLE
PHASE WITH NEUTRAL, 60 Hz. (THREE COPPER WIRES
PLUS GROUND)
Hydraulic Power Unit
5 HP 21 FLA Amps 230 VAC 60 Hz
6 HP 23 FLA Amps 230 VAC 60 Hz
HEATER CONTROLLER (optional)
24 Amps 230 VAC 60 Hz
Controller
IMPORTANT SAFETY INSTRUCTIONS: Read and follow all
instructions. To reduce the risk of injury, do not permit children to
use this product unless supervised at all times. This control panel
must be installed according to local electric code requirements. A
GFCI (Ground Fault Circuit Interrupter) or RCD (Residual
Current Device) circuit breaker must be used in the service panel
and tested before each use in accordance with the manufacturer's
instructions. The line in wire whip should be connected to a safety disconnect in sight of all equipment, but at least 5 feet away
from the pool. This controller must be installed at least 5 feet away
from the pool and all conductors must not share boxes, conduits or
enclosures with non GFCI or RCD protected wiring. All wires
must be copper. Box must be mounted with conduit down.
10

CABINET & COVER CARE OF YOUR
ENDLESS POOL SWIM SPA
HOW TO SWIM IN AN
ENDLESS POOL SWIM SPA
Cabinet Care: The natural cedar wood cabinet on your Endless
Pool Swim Spa is made of the finest quality outdoor wood available. This wood needs to “breathe” therefore a traditional sealer
should not be used on its exterior. It is best to use a wood preservative, such as “boiled linseed oil”, or a semi transparent stain, like
“Cuprinol” that is available at Sherwin Williams stores.
Cover Care: The optional 4”-thick bi fold coordinating cover was
custom made for your Endless Pool Swim Spa with top of the line
materials. Aluminum channel bars form the structure of the cover
for superior strength. Inside, the high-density polystyrene foam
core provides excellent insulation preventing heat loss. Hard
working, 4-mil extruded plastic covers the foam core. The outside
is made off Marine grade vinyl, safe from “cold-cracking” down
to 10 degrees below zero. In addition, it is treated with UV stabilized pigments so the color will not fade.
The swim current is turned on through the use of a remote control,
which also adjusts the speed of the current faster or slower. When
changing speed, you must press and hold the buttons on the remote,
then wait a few seconds for the current to adjust. Our standard
pool's top speed is roughly equivalent to a 1:08 100 yard pace -- a
speed for expert swimmers only. Set the water speed at a comfortable level for your needs. Remember, since you don't have to turn
in an Endless Pool, your workout is continuous and you will tire
faster than when swimming laps in a traditional pool.
To stop swimming, simply press the on/off button on the remote.
If left running, the power unit will turn off automatically after thirty minutes and can be restarted by pressing the on/off button
again. Once you have found an optimal speed for yourself, you
may leave the system at that setting. The controller for the swim
machine is designed with a “ramp-up” feature which forces the
swim machine to start slowly, but will increase to the last setting
at which someone swam.
TROUBLESHOOTING WATER QUALITY
Symptom Possible Cause Solution
Algae Growth Low sanitizer levels. Shock the water, brush spa walls, and add
an algaecide.
Cloudy Water High calcium hardness levels. High Test all chemical levels and make the
total alkalinity levels. High pH levels. appropriate adjustments.
High TDS levels. Algae growth, low
sanitizer levels, rain, high bather load, and pets.
Colored Water For green or blue: High pH levels. For green or blue green: Test the pH level
For brown to red: Overall water imbalance. and make the appropriate adjustments.
For brown to red: Test pH, total alkalinity and
calcium hardness levels. If necessary, drain all
or part of water and refill with fresh water.
Corrosion Low pH levels. Low total alkalinity levels. Test chemical levels, make the appropriate
An excessively high Bromine/Chlorine level. adjustments and consult our Customer Service
Department at 1-800-910-2714.
Foaming A buildup of organic dirt, soaps, Drain and clean the swim spa and filter
shampoos and oils. Limit clarifier use
Low calcium hardness. Raise calcium hardness levels.
pH Bounce Low total alkalinity levels. Test total alkalinity levels and make the appro-
priate adjustments.
pH Resistance High total alkalinity levels. Test total alkalinity levels and make the appro-
priate adjustments.
Poor Sanitizer Efficiency High pH levels. High total alkalinity levels. Test pH and total alkalinity levels and make
appropriate adjustments.
Scale Formation High pH levels. High total alkalinity levels. Test pH and total alkalinity levels
High TDS levels. High calcium hardness levels. make the appropriate adjustments.
If necessary, drain the swim spa, scrub down
the walls and refill with fresh water.
Skin and Eye Irritation Low or high pH levels. Low or high total Test pH and total alkalinity levels and
alkalinity levels. Low sanitizer levels. make the appropriate adjustments. Test
sanitizer levels and, if extremely low,
shock the swim spa water.
Stains Low pH levels. Low total alkalinity levels. Test ph and total alkalinity levels and
High TDS levels make the appropriate adjustments. If
11
necessary, drain the swim spa, scrub
down the walls and refill with fresh water.

TROUBLESHOOTING
None of the Equipment Main breaker is set at OFF Set main breaker to ON.
is Operating Sub-panel breakers are set to OFF Set sub-panel breakers to ON. .
Equipment GFCI set at OFF. Reset GFCI.
Power switch set at OFF (if available). Set power switch to ON.
Components not plugged in. Plug in components.
Power cord not plugged in. Plug in power cord.
Leaking couplers allowing water in Check and tighten any loose couplers.
the equipment area.
No Water Flow, Air lock in plumbing system. “Bleed” system issue - refer to
Low Water Flow, Restricting flow. initial start-up procedure.
or Surging Flow Clogged or Dirty Skimmer Basket. Ensure the water Shut-Off Valves are open.
(Keypad is reading, “FLO”) Dirty filter. Low water level. Ensure suction fittings are not blocked
by debris and clean skimmer basket.
Clean or replace filter
Increase water level to recommended level.
Therapy Jets Not Operating Component not plugged into heater controller. Plug component into P1 on Heater/Controller.
Therapy Jets Not Operating Shut-off valves closed. Open valves.
Jets not properly adjusted. Adjust jets properly.
Diverter valve not properly adjusted. Adjust diverter valve properly.
UV Sanitizer Not Working UV bulb has gone bad. Replace bulb.
Component not plugged into heater controller. Plug in component.
Lighting Not Operating Light bulb defective. Replace bulb.
Not plugged in. Plug in cord.
Light cord not connected. Connect cord.
Water Leaks Swim Spa over filled or too many people in spa. Adjust swim spa water level.
Couplings or unions loose. Tighten couplers.
Incorrect water chemistry. Correct chemistry.
Pump seal leaking. Fix leak, contact local Spa Technician.
Loose Plumbing connections. Check connections and tighten.
Water dripping from topside control buttons. Seal topside control panel.
Water in air blower plumbing. “Bleed” system issue - refer to
initial start-up procedure.
No Heat Thermostat not set correctly. Adjust thermostat setting.
Overheat protection switch tripped. Reset Hi-Limit Switch.
No power to heater. Reset breaker at service panel.
Low water flow. Clean or replace filter.
Improper water flow. Refer to “No Water Flow, Low
Water Flow, or Surging Flow” section.
High Heat Temperature sensor not in drywell. Place sensor in drywell.
Jets left running continually. Turn OFF jets pump.
Thermostat set too high/maximum. Adjust thermostat setting.
High air temperature. Remove Swim Spa Cover.
GFCI Tripped Occasionally Lightning/Electrical storm. Reset GFCI.
Power Surge. Reset GFCI.
Extremely humid conditions. Reset GFCI.
Radio frequency interference. Reset GFCI.
Water spraying on electrical components. Reset GFCI.
NOTE: Ensure that the equipment is properly grounded and bonded.
GFCI Trips Repeatedly Water spraying on electrical components. Make sure all couplers are tight.
Defective component.
Should you need further assistance, please call our Customer Service Department at 1-800-910-2714.
12

WIRING DIAGRAM: EP-1 CONTROLLER WITH SWIM SPA
Line in on 60 amp Ground Fault Circuit Breaker
13

ENDLESS POOL SWIM SPA™ LIMITED WARRANTY
ENDLESS POOLS, INC. WARRANTS TO THE ORIGINAL PURCHASER OF THE ENDLESS POOL SWIM SPA MANUFACTURED BY US TO BE FREE FROM DEFECTS IN MATERIALS AND WORKMANSHIP UNDER NORMAL USE FOR TWO
YEARS FROM PURCHASE.
Our obligation under the warranty shall be limited to the repair or exchange (at our option) of any part or parts which may thus prove
defective under normal use within two years from date of purchase by the original purchaser, and which our examination shall disclose
to our satisfaction to be thus defective. All labor costs for removal and re-installation of the defective part and all freight charges shall
be paid by the purchaser and will not be reimbursed by Endless Pools, Inc. This warranty is expressly in lieu of all other warranties
expressed or implied including the warranties of merchantability and fitness for use and of all other obligations or liabilities for all damages direct or consequential to person, property or business whether or not occasioned by our negligence, and we neither assume for
us any other liability in connection with the sale of this Endless Pool Swim Spa.
IN ADDITION, ENDLESS POOLS, INC. OFFERS A TEN-YEAR STRUCTURAL WARRANTY ON THE ACRYLIC SHELL
STRUCTURE. If the acrylic shell should deteriorate beyond structural use in this ten-year period, we will repair or replace the component at our option after inspection of the defective shell. The structural warranty is voided when suitable drainage is not provided.
THE ACRYLIC SURFACE OF THE SWIM SPA SHELL IS WARRANTED NOT TO SPLIT, BREAK, CRACK, BLISTER OR
MILDEW FOR A PERIOD OF FIVE YEARS. This warranty does not include cosmetic damage or minor surface imperfections.
THIS WARRANTY SHALL NOT APPLY TO THIS ENDLESS POOL SWIM SPA OR ANY PART THEREOF, WHICH HAS BEEN
SUBJECT TO SALT CHLORINE GENERATORS, ACCIDENT, NEGLIGENCE, FREEZING, IMPROPER INSTALLATION OR
OPERATION, ALTERATION, ABUSE OR MISUSE. THIS INCLUDES, BUT IS NOT LIMITED TO, FLOW RESTRICTIONS OR
OBSTRUCTIONS ON ALL WATER AND HYDRAULIC SYSTEMS AND NOT MAINTAINING PROPER WATER CHEMISTRY
(pH level must be maintained between 7.4 and 7.8 and total alkalinity between 80 and 120 ppm. Total dissolved solids (TDS) must be
no greater than 3,000 ppm).
We make no warranty whatsoever in respect to accessories or parts not supplied by Endless Pools, Inc. directly. The term “original
purchaser”, as used in this warranty, shall be deemed to mean the person for whom the Endless Pool Swim Spa was originally installed.
We DO NOT warrant this machine to meet requirements of any safety code of any state, municipality, or other jurisdiction. Purchaser
assumes all risk and liability whatsoever resulting from the use thereof.
In order to claim this warrant, original purchaser must promptly notify our Customer Service Department in writing of the existence
of the claim and then follow our written instructions regarding the procedures for remedying the defect. Endless Pools, Inc. shall not
be responsible for cartage, transportation, removal and/or reinstallation labor or any other such costs relating to performance of the warranty. In the event any portion of this warranty shall be deemed unenforceable by a court of law, the remainder of this warranty shall
remain in full force and effect as if the voided portion were never included.
Prepaid returns of all Endless Pool products are accepted less a 10% restocking fee, up to 30 days from the date of purchase if undamaged and in its original shipping containers. Accessories, options and equipment that have been used are non-refundable. Before
returning any product, you must call our Customer Service Department to receive proper return authorization.
Endless Pools, Inc., 1601 Dutton Mill Rd., Aston, PA 19014
14

Endless Pools, Inc. • 1601 Dutton Mill Rd • Aston, PA 19014-2931
800-910-2714 • 610-497-8693 fax • www.myendlesspool.com
B31 5-09
 Loading...