

Endeavour Tools ET8636 Instruction Manual
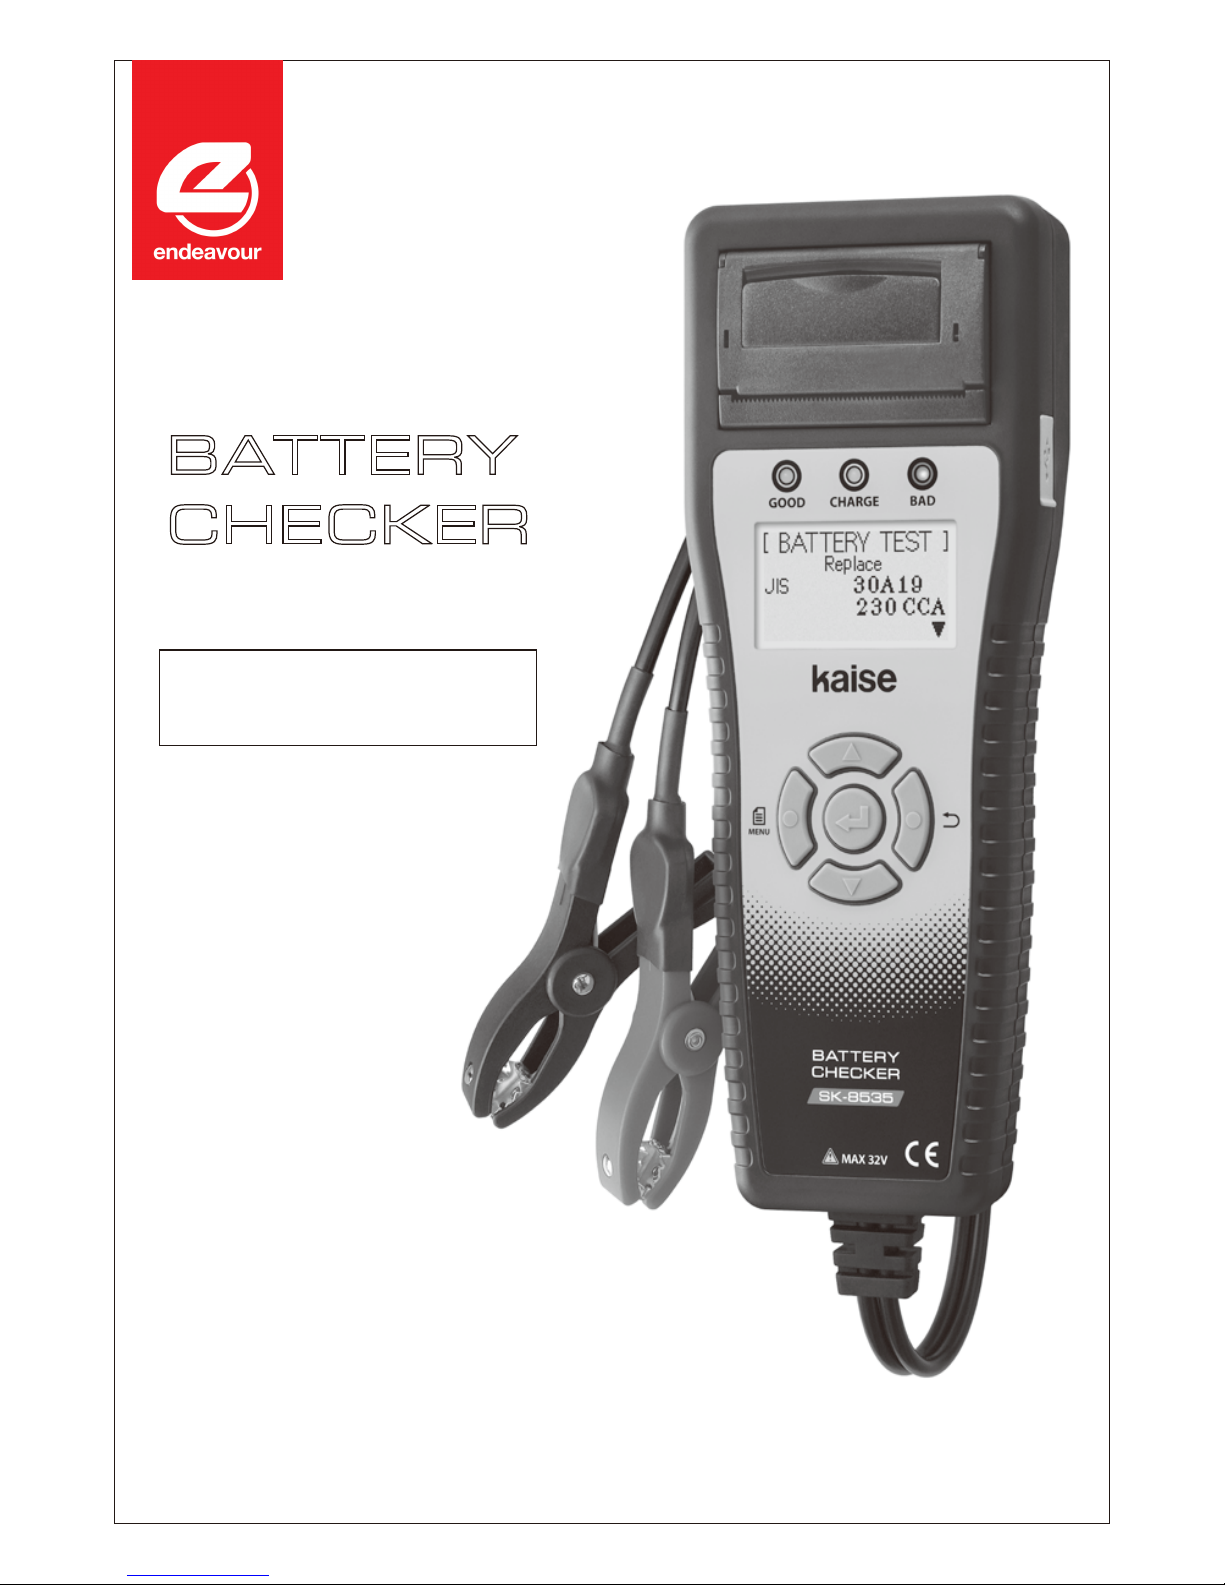
BATTERY
CHECKER
Instruction Manual
ET8636

CONTENTS
Thank you for purchasing "BATTERY CHECKER ET8636". To obtain the maximum
performance of this instrument, read this Instruction Manual carefully, and take safe
measurement.
INTRODUCTION
1 - 3
4
5
6
7 - 8
9
9
10 - 11
11
11
12 - 19
20 - 22
23 - 25
26 - 27
28
29
30 - 31
32
33
33
34
35 - 36
37 - 38
39 - 40
40
40
40
41
SAFETY PRECAUTIONS
・・・・・・・・・・・・・・・・・・・・・・・・・・・・・・・・・・・・・・・・・・・・・・・・・・・・・・・・・・・・・・・・・・・・・・
OPERATING PRECAUTIONS
・・・・・・・・・・・・・・・・・・・・・・・・・・・・・・・・・・・・・・・・・・・・・・・・・・・・・・・・・・・・・・・・・・・
FEATURES
・・・・・・・・・・・・・・・・・・・・・・・・・・・・・・・・・・・・・・・・・・・・・・・・・・・・・・・・・・・・・・・・・・・・・・・・・・・・・・・・・・・・・・・・・・・・・・・・
UNPACKING AND INSPECTION
・・・・・・・・・・・・・・・・・・・・・・・・・・・・・・・・・・・・・・・・・・・・・・・・・・・・・・・・・・・・・
NAME ILLUSTRATION
・・・・・・・・・・・・・・・・・・・・・・・・・・・・・・・・・・・・・・・・・・・・・・・・・・・・・・・・・・・・・・・・・・・・・・・・
SPECIFICATIONS
1. General Specifications
・・・・・・・・・・・・・・・・・・・・・・・・・・・・・・・・・・・・・・・・・・・・・・・・・・・・・・・・・・・・・・・・・・・・・・・・・・・・・
2. Measurement Specifications
・・・・・・・・・・・・・・・・・・・・・・・・・・・・・・・・・・・・・・・・・・・・・・・・・・・・・・・・・・・・・・・・・・・・・
BEFORE USE
1. Technical Words
・・・・・・・・・・・・・・・・・・・・・・・・・・・・・・・・・・・・・・・・・・・・・・・・・・・・・・・・・・・・・・・・・・・・・・・・・・・・・
2. Language / Date & Time Settings
・・・・・・・・・・・・・・・・・・・・・・・・・・・・・・・・・・・・・・・・・・・・・・・・・・・・・・・・・・・・・
3. Others
・・・・・・・・・・・・・・・・・・・・・・・・・・・・・・・・・・・・・・・・・・・・・・・・・・・・・・・・・・・・・・・・・・・・・・・・・・・・・・・・・・・・・・・・・・・・・・・・・
MEASUREMENT PROCEDURES
1. Battery Test
・・・・・・・・・・・・・・・・・・・・・・・・・・・・・・・・・・・・・・・・・・・・・・・・・・・・・・・・・・・・・・・・・・・・・・・・・・・・・・・・・・
2. Battery System Test
・・・・・・・・・・・・・・・・・・・・・・・・・・・・・・・・・・・・・・・・・・・・・・・・・・・・・・・・・・・・・・・・・・・・・・・
3. Print out
・・・・・・・・・・・・・・・・・・・・・・・・・・・・・・・・・・・・・・・・・・・・・・・・・・・・・・・・・・・・・・・・・・・・・・・・・・・・・・・・・・・・・・・
4. Test Result Saving
・・・・・・・・・・・・・・・・・・・・・・・・・・・・・・・・・・・・・・・・・・・・・・・・・・・・・・・・・・・・・・・・・・・・・・・・・
5. View the Saved Data
・・・・・・・・・・・・・・・・・・・・・・・・・・・・・・・・・・・・・・・・・・・・・・・・・・・・・・・・・・・・・・・・・・・・・・・・・・・・・・
6. Delete the Saved Data
・・・・・・・・・・・・・・・・・・・・・・・・・・・・・・・・・・・・・・・・・・・・・・・・・・・・・・・・・・・・・・・・・・・・・・・・・・・・
7. Connecting to PC
・・・・・・・・・・・・・・・・・・・・・・・・・・・・・・・・・・・・・・・・・・・・・・・・・・・・・・・・・・・・・・・・・・・・・・・・・・・
8. Setting of Date and Time
・・・・・・・・・・・・・・・・・・・・・・・・・・・・・・・・・・・・・・・・・・・・・・・・・・・・・・・・・・・・・・・・・・・・・・・・
9. Setting of Language
・・・・・・・・・・・・・・・・・・・・・・・・・・・・・・・・・・・・・・・・・・・・・・・・・・・・・・・・・・・・・・・・・・・・・・・・・・・・・・
10. Contrast Adjustment
・・・・・・・・・・・・・・・・・・・・・・・・・・・・・・・・・・・・・・・・・・・・・・・・・・・・・・・・・・・・・・・・・・・・・・・・・・・・
11. Temperature Setting
・・・・・・・・・・・・・・・・・・・・・・・・・・・・・・・・・・・・・・・・・・・・・・・・・・・・・・・・・・・・・・・・・・・・・・・・・・・・
12. CCA Value List for Battery Manufacturers and Their Models
・・・・・・・・・・・・・・・・
MAINTENANCE
1. Printing Paper Setup
・・・・・・・・・・・・・・・・・・・・・・・・・・・・・・・・・・・・・・・・・・・・・・・・・・・・・・・・・・・・・・・・・・・・・・
2. Formatting of Removable Disk
・・・・・・・・・・・・・・・・・・・・・・・・・・・・・・・・・・・・・・・・・・・・・・・・・・・・・・・・・
3. Periodical Check and Calibration
・・・・・・・・・・・・・・・・・・・・・・・・・・・・・・・・・・・・・・・・・・・・・・・・・・・・・・・・・・・・・
4. Software Version Update
・・・・・・・・・・・・・・・・・・・・・・・・・・・・・・・・・・・・・・・・・・・・・・・・・・・・・・・・・・・・・・・・・・・・・・・
5. Others
・・・・・・・・・・・・・・・・・・・・・・・・・・・・・・・・・・・・・・・・・・・・・・・・・・・・・・・・・・・・・・・・・・・・・・・・・・・・・・・・・・・・・・・・・・・・・・・・
TROUBLE SHOOTING & REPAIR
・・・・・・・・・・・・・・・・・・・・・・・・・・・・・・・・・・・・・・・・・・・・・・・・・・・・・・・・・・
1
SAFETY PRECAUTIONS
(strict observance is required)
This instruction manual contains the important contents to prevent harm to
user or others and damage of property, and to use the instrument safely and
correctly.
Read this manual carefully and obey the contents after having understand the
following terms and symbols.
■The points where the following symbols are attached in this manual
describe the degree of harm and damage that would be caused by
incorrect usage due to neglect of this description.
WARNING
CAUTION
■The points where the following symbols are attached in this manual
describe the matters which must obey in accordance with the each
meanings. (following symbols are some examples.)
This symbol in this manual advises the user of
an electrical shock hazard that could result in
serious injury or even death.
This symbol in this manual advises the user of
an electrical shock hazard that could cause
injury or material damages.
This symbol shows the warnings and cautions.
This symbol shows the prohibited matters.
This symbol shows the matters that is forced to do.
2
SAFETY PRECAUTIONS
(strict observance is required)
Do not place this instrument in any place where it will be subjected to
direct sunlight, high temperatures or the inside of the sun-heated cars.
Fire, electric shock or damage to the instrument may occur.
Make sure that the shift lever is set to "Parking" position (set to "Neutral" for
stick shift car).
The car runs accidentally and could cause unexpected accident, electric shock,
fire or damage to the instrument or the car.
Make sure that the parking brake is applied.
The car runs accidentally and could cause unexpected accident, electric shock,
fire or damage to the instrument or the car.
Keep the instrument away from babies or children.
Important to prevent any accident, injury, or electric shock hazard.
Take the measurement under well-ventilated environment.
The hydrogen gas which stayed around battery catches fire from the spark that
occurred when connecting the Battery Clips and might explode.
Do not drive the car keeping the instrument connected.
Accident, electric shock, fire, or damage to the instrument or the car may occur.
Do not use this instrument with the hands or Battery Clips wetting.
Accident, electric shock, fire, or damage to the instrument or the car may occur.
Do not take the measurement for the battery which does not have enough battery fluid.
It causes combustion and the explosion of the battery.
Do not take the measurement around inflammables such as gasoline or oil.
Fire or explosion may occur.
Do not work in the dark place.
Accident, electric shock, fire, or damage to the instrument or the car may occur.
Do not get the instrument wet.
Fire or electric shock may occur.
Do not use the faulty instrument that can recognize such as display trouble,
switch failure.
Stop using the instrument immediately and consult with your local dealer.
Using the faulty instrument may cause the unexpected accident, fire, or
electric shock.
Do not touch the USB port with finger or insert the foreign objects in the USB port.
Unexpected accident, electric shock, fire, or damage to the instrument may occur.
Do not touch the heated part of the engine such as exhausting parts.
Important to prevent burn injury.
WARNING
3
SAFETY PRECAUTIONS
(strict observance is required)
WARNING
Do not use the instrument if it is in the abnormal condition.
Stop using the instrument immediately and consult with your local dealer
when recognizing smoke, strange smell, or abnormal noise.
Using the faulty instrument may cause the unexpected accident, fire, or electric shock.
Do not attempt to disassemble or modify the instrument.
Fire, electric shock, or damage to the instrument may occur.
Do not use the cables with which coating were damaged.
Fire or electric shock may occur.
Be careful about the instrument or the cables not to touch the heated part
of the engine such as exhausting parts.
Important to prevent any accident, or damage to the instrument or the car.
Be careful about the instrument or the cables not to be caught in the engine belt or cooling fan.
Short circuit or wire breaking may occur that could cause unexpected accident,
electric shock, or damage to the instrument or the car.
CAUTION
Be careful not to get the battery fluid into eyes or not to attach it to skin and clothes.
Loss of eyesight or injury may occur. If it gets into eyes, rinse immediately and
submit to medical treatment.
When testing the battery on vehicle, take the measurement after stopping
the engine and turning off the power supply of all in-vehicle apparatuses.
It causes injury or damage to the instrument.
Connect the Battery Clips to the battery with the correct polarity.
Reverse connection causes damage to the instrument.
Disconnect this instrument from battery soon after finishing the test.
It causes consumption of the battery and the ignition.
Do not use the other USB cable except the supplied one.
Damage to the instrument or PC may occur.
Do not hit, thrust and make scratch on the LCD display part.
It causes trouble or damage to the LCD.
Be careful not to jam the fingers in the Battery Clip.
It causes injury.
Be careful about your hands, gloves and clothes not to be caught in
the engine belt or cooling fan.
Important to prevent injury.

4
OPERATING PRECAUTIONS
●Do not apply the engine oil to the metal part of the Battery Clips or USB Plug to
prevent contact failure.
●Do not apply engine oil, gasoline, antifreeze or battery fluid to the instrument to
prevent any damage on its surface.
●Do not polish the case with the fluid that contains alcohol to prevent the cracking.
●Use this instrument under the environment of -10℃ to 50℃, 80%RH or less to obtain
the accurate measurement. (Printer is operating at 0℃ to 50℃)
●Cables which coating are heat damaged might cause the short circuit. Do not use them
and replace into the new ones.
●Disconnect this instrument from battery soon after finishing the test to prevent trouble
of this instrument and running out of battery power.
●Do not touch the inside of the printer with finger to prevent trouble of this instrument.
●Do not put serious pressure on Printer Lever or Printer Cover to prevent trouble or
damage to this instrument.
●If Date and Time are not able to set, built-in battery for backup is exhausted. Ask
KAISE AUTHORIZED SERVICE AGENCY through your local dealer for repair service.
●Keep this instrument in supplied Carrying Case to avoid malfunction of the printer
trouble by dust penetration.
Cautions for Handling
●Do not apply mechanical shock.
The shock such as dropping or beating might damage the instrument and may cause the
trouble.
●Do not pull cables forcibly.
Pulling the cables forcibly, such as when removing the Battery Clips from the battery or
USB Plugs from USB Port, may cause trouble such as the breaking of wire.
Cautions for Safekeeping
●Keep away the instrument from the following place.
・Dusty area
・The place where has the water splash
・The place where applies the hard shock
・-20℃ or less, 60℃ or more, 70%RH or more
・The place where has the condensation
・The place where is exposed to direct sunlight

5
FEATURES
■Portable instrument that can operate
with one hand.
■The software is upgradeable by
connecting supplied USB cable with
PC.(※)
■Capable of saving the test results up
to 99 data. Moreover, the test data
can edit on PC as text data by using
the supplied USB cable.
■Batteries for the vehicle equipped
with charge control system or idle
reduction system are testable.
■Test result can be printed on site by
built-in printer. Printing language is
selectable from Japanese, English
and Simplified Chinese.
■E
T8636 can test State of Charge
(SOC), State of Health (SOH), Start
Performance and Charging System
of the car battery.
※PC with Internet access is necessary.
Battery Test Report
Date and Time
2013/5/1 515:00
Test Result : Good
Test Result : Good
SOC
(State of Charge)
: 100%
SOH
(State of Health)
: 100%
Store Name
Person in Charge
BATTERY TEST
START PERFORMANCE TEST
Battery Type
Battery Size
Rated CCA
Measured CCA
Battery Voltage
Battery Temperature
Testing Mode
JIS
Q-85
530CCA
615CCA
12.780V
24℃
Charge controller / Idle Reduction
File EditViewFavoriteToolHelp
1351501.TXT
TextDocument
1KB
1351502.TXT
TextDocument
1KB
1351503.TXT
TextDocument
1KB
1351504.TXT
TextDocument
1KB
1351505.TXT
TextDocument
1KB
1351601.TXT
TextDocument
1KB
1351602.TXT
TextDocument
1KB
1351603.TXT
TextDocument
1KB
1351701.TXT
TextDocument
1KB
1351702.TXT
TextDocument
1KB
1351703.TXT
TextDocument
1KB
1351704.TXT
TextDocument
1KB
1351705.TXT
TextDocument
1KB
BAD
GOOD
CHARGE
MENU
[ バッテリーテスト ]
交換(バッテリー劣化)
JIS規格 95D31
565 CCA
MAX 32V
B
A
T
TERY
CHECKER
S
K
-8
530
[ BATTERY TEST ]
Replace
JIS
95D31
565 CCA
BADGOOD CHARGE
MENU
MAX 32V
B
A
T
TERY
CHECKER
S
K
-
8530
[ BATTERY TEST ]
Repla
ce
JIS
95D31
565 CCA
■Auxiliary battery for hybrid car is
testable.
1351503.TXT‑Notepad
Battery Test Report
Date and Time
2013/05/15 15:00:00
-----------------------------Battery Test
(Aging test mode)
Test Result: Good
Battery Type: JIS
Battery Size: Q-85
Rated CCA: 530CCA
Measured CCA: 615CCA
Battery Voltage: 12.780V
Battery Temperature: 24℃
Testing Mode
: Charge Controller / Idle Reduction
FileEditFormatViewHelp
B
AT
TERY
CHECKER
SK-8535
CHARGE
BADGOOD
MAX 32V
MENU
CHARGE
BAD
GOOD
MENU
12V?24V?
12.462V
12VBattery
24VBattery
B
A
T
TERY
CHECKER
SK-8535
CHARGE
BAD
GOOD
MAX 32V
MENU
(Aging Test Mode)
6
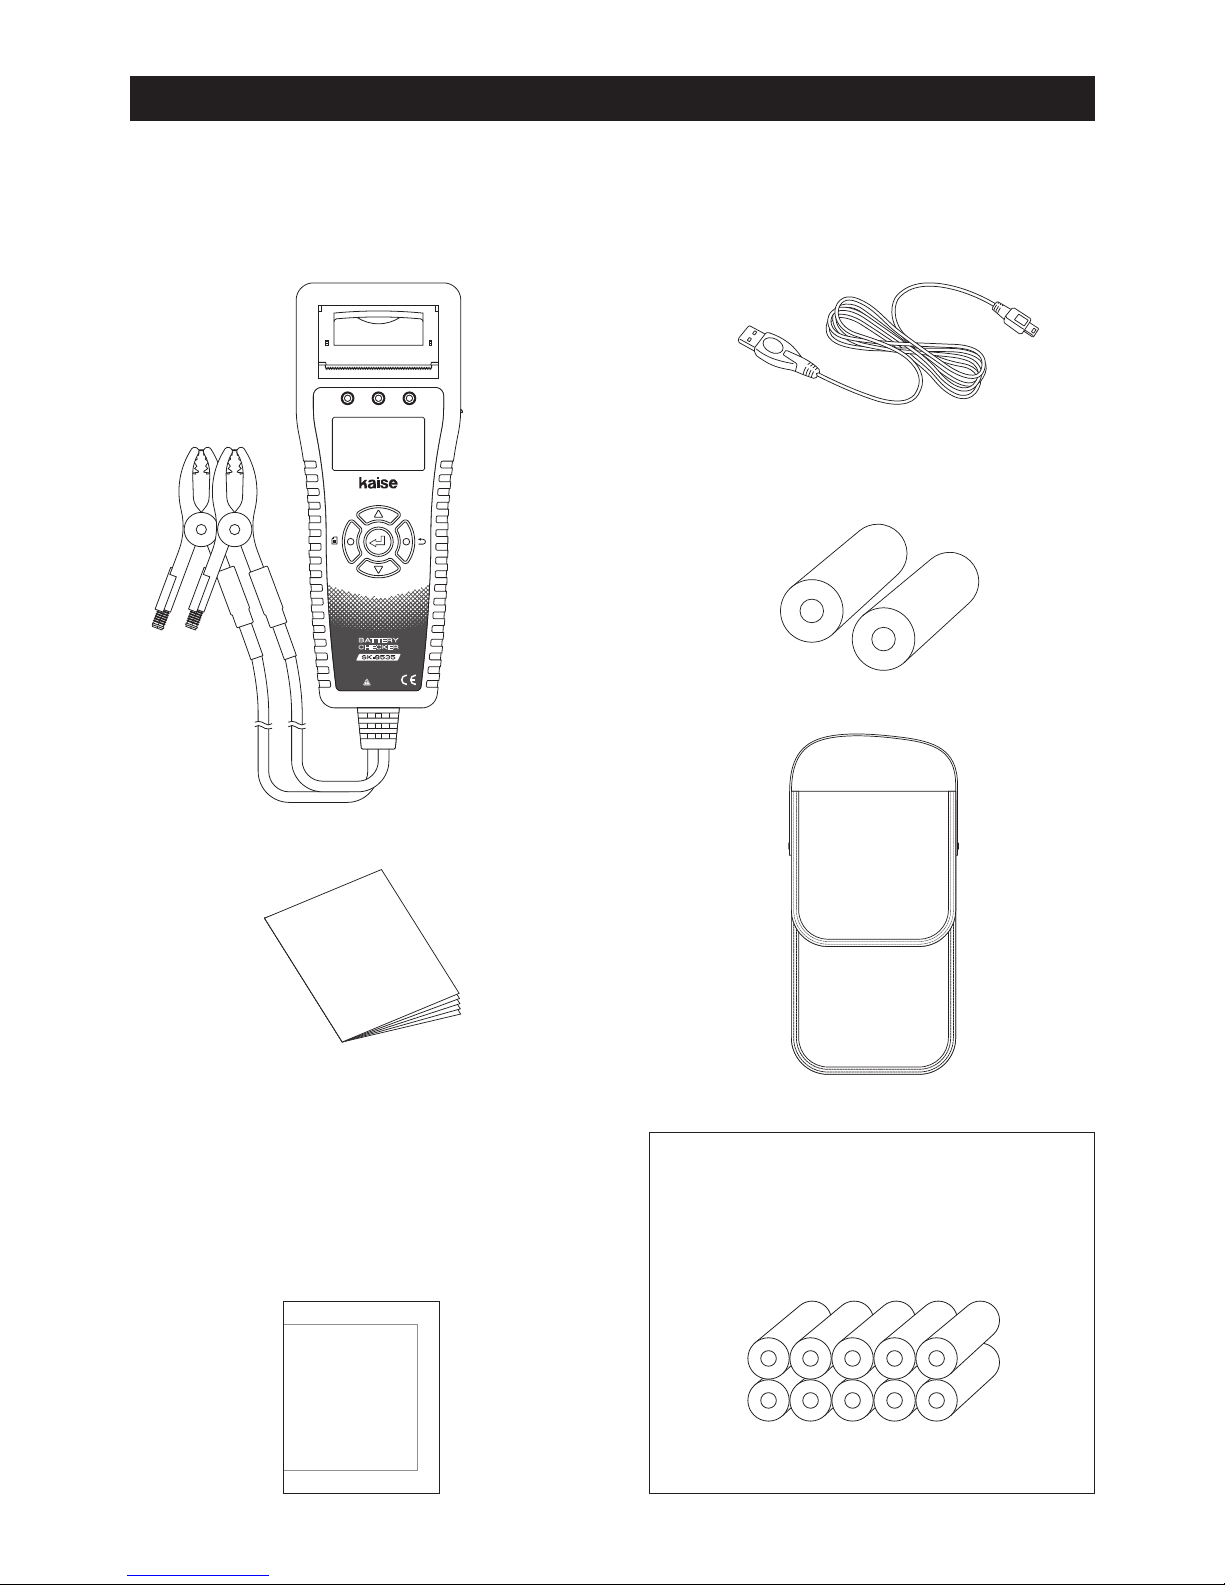
UNPACKING AND INSPECTION
(Check before use)
Confirm if the following items are contained in the package in good condition.
If there are any damages or missing items, ask your local dealer for replacement.
①Battery Checker…1 pce.
③Printer Paper…2 rolls
(installed, and spare)
Available Printer Paper (10pcs per set)
Parts number:851
(Paper width:approx. 57mm,
length:approx. 5.8m)
②USB Cable (937)…1 pce.
⑤Instruction Manual…1 pce.
・Use above parts number when ordering.
SILICA
THROW AWAY
"DO NOT EAT"
THROW AWAY
"DO NOT EAT"
DESICCANT
GEL
※The following desiccant is enclosed
in the package for maintenance of
quality. Throw it away after opening
the package.
MENU
BATTERY
CHECKER
SK-8535
CHARGE BADGOOD
MAX 32V
④Carrying Case…1 pce.
MENU
BAT TERY
CHECKER
SK-8535
CHARGE BADGOOD
MAX 32V
MENU
7
NAME ILLUSTRATION
●
LED Indicators
①GOOD (Green LED):
L
ights up when battery test result is
"Good".
②CHARGE (Yellow LED):
Lights up when the battery is weak
and needs re-charging.
③BAD (Red LED):
lights up when battery test result is
"Replace" or needs replacement.
Flashes when battery test result is
"Attention" or "Weak Start Power".
●
USB Port
Plug the USB Cable into this port
when connecting to PC.
Connect to the battery.
Red to ○+, black to ○−.
● Battery Clips (Red・Black)
●
Printer
●
LCD
●
△ (UP SCROLL) Key
Scrolls up the display / use for
numerical settings.
Press this key to return to the
previous screen.
●
(BACK) Key
●
(ENTER) Key
Press this key to fix the settings.
●
(MENU) Key
Display the Menu screen.
MENU
●
▽ (DOWN SCROLL) Key
Scrolls down the display / use for
numerical settings.
Front Side
CHARGE BADGOOD
8
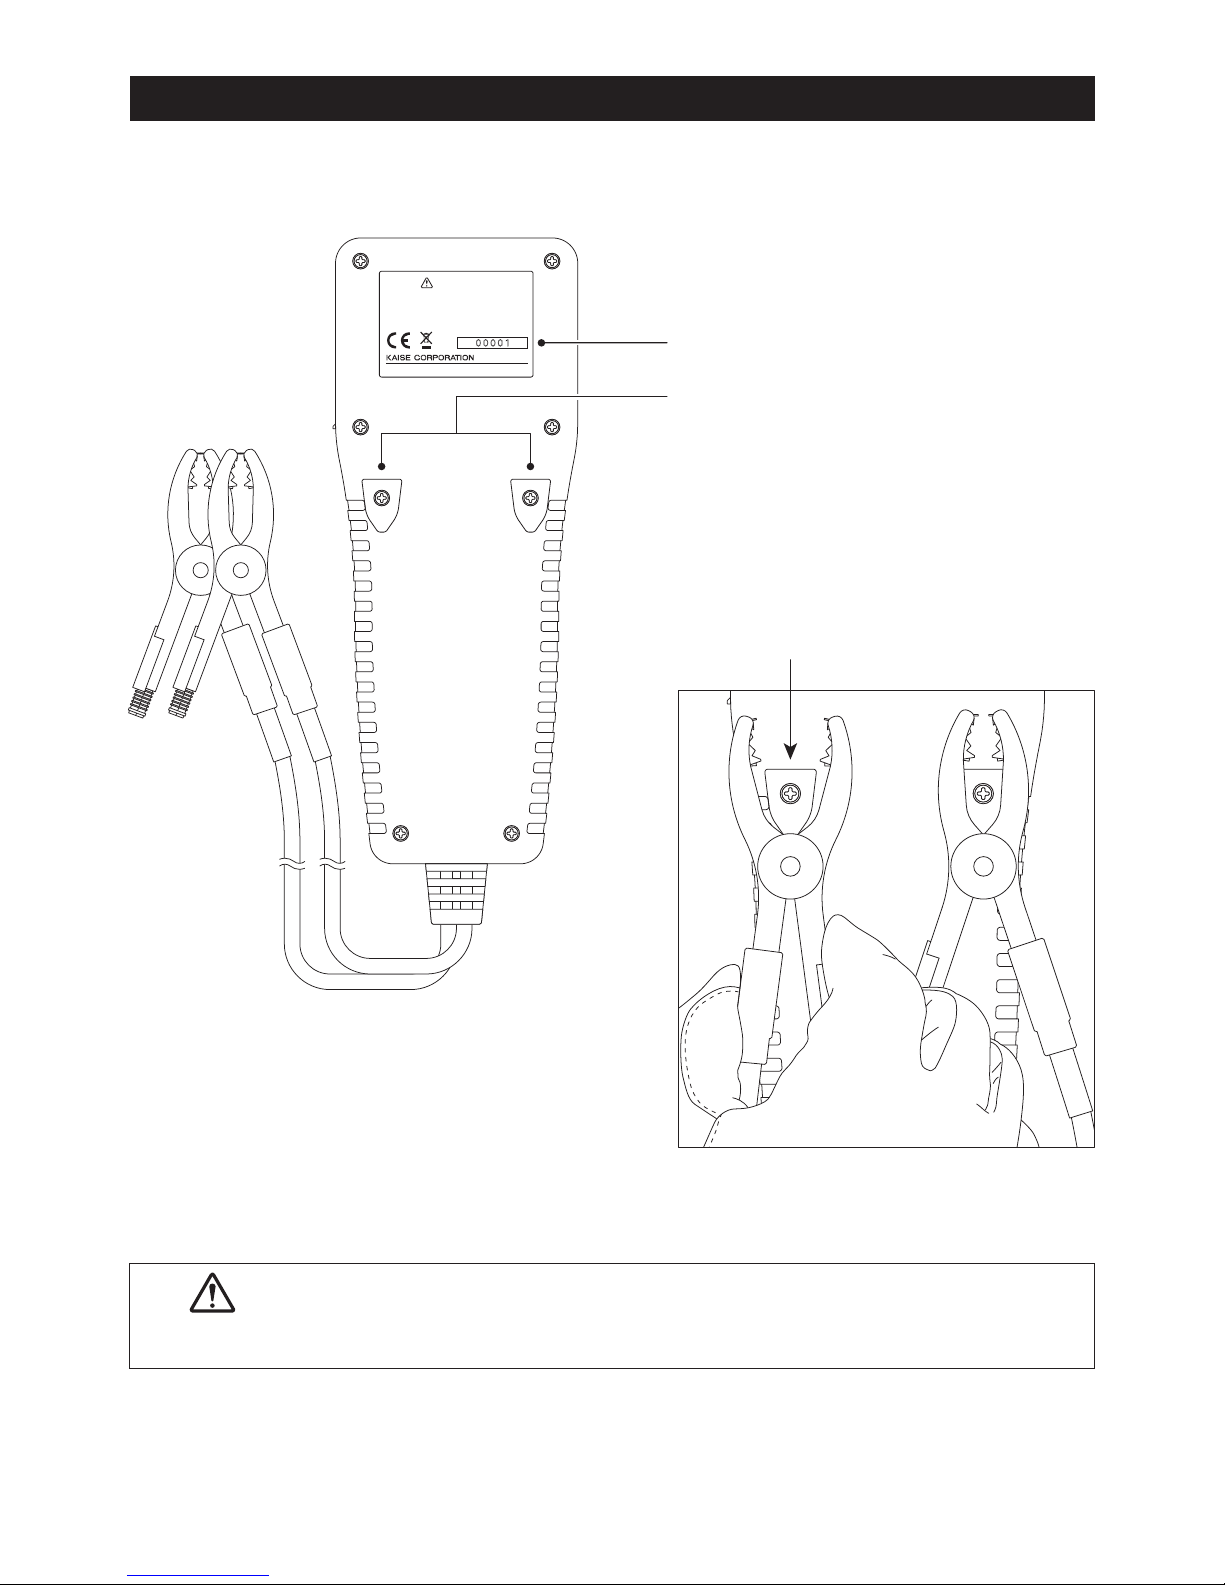
NAME ILLUSTRATION
Rear Side
●
Serial Number
How to clip :
Open the battery clip widely and clip
it to the holder in the plastic part of
the clip. (Do not clip in the metal
part)
Clip Battery Clips here when not in
use.
●
Battery Clip Holder
●Do not clip in the metal part of the Battery clip. To prevent any
damages of the Battery Clip and Clip Holder.
CAUTION
00001
KAISE JAPAN4301-8530-1 1106
TO AVOID ELECTRICAL SHOCK, DO NOT CONNECT
BATTERY WITH WET HAND OR WET BATTERY CLIP.
感電事故防止のため、手やバッテリークリップ等がぬれた
状態で、バッテリーに接続しないでください。
SERIAL No.
WARNING
www.kaise.com
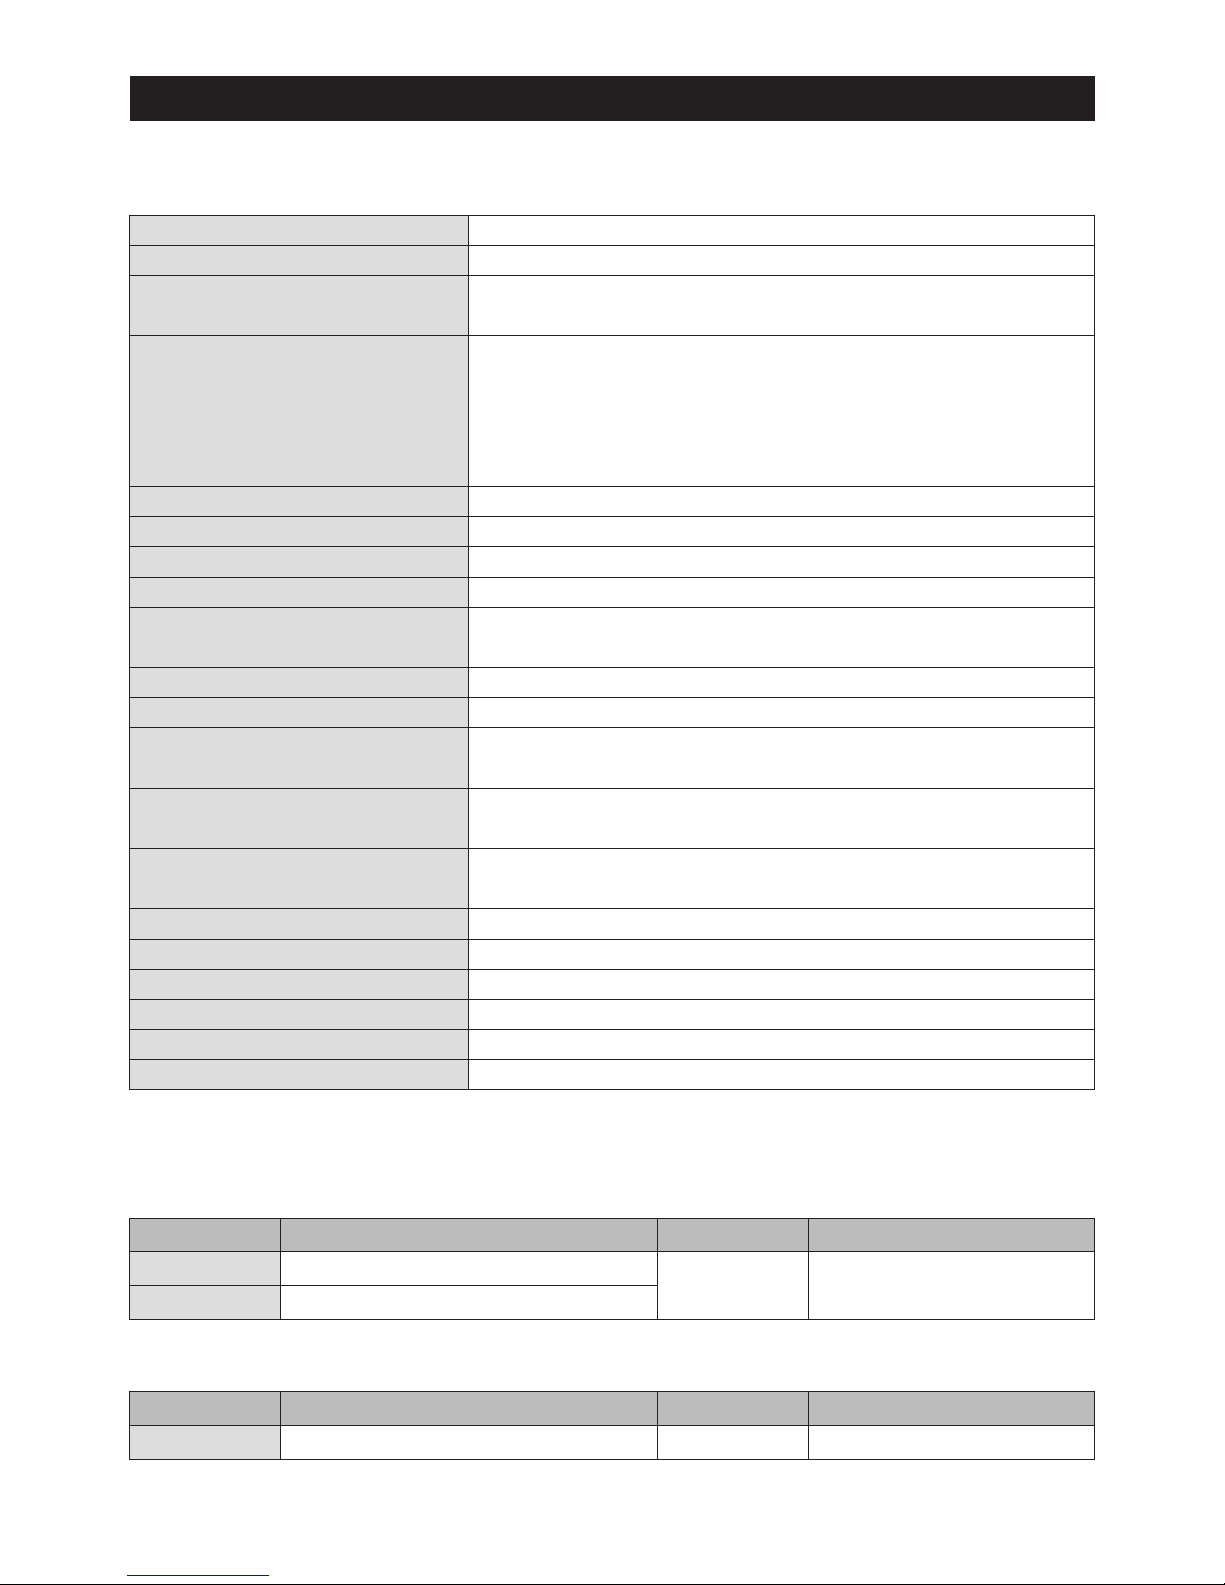
SPECIFICATIONS
Dot presentation, 128×64dots
Japanese, English, Chinese (Default: English)
1 time/second
Green:Lights up when battery test result is "Good"
Yellow:Lights up when battery is weak and needs re-charging
Red:Lights up when battery test result is "Replace"
Flashes when battery test result is "Attention" or
"Weak Start Power"
Built-in
Approx.70cm (Clip and Bush are not included)
Testing battery or USB connection
DC8V to 32V (Testing battery), DC5V (USB Connection)
12V lead batteries ※For 24V battery, only Start-up
Performance Test or Charging System Test are possible.
JIS, DIN, EN, SAE, BCI, CCA and Industrial Rating
CCA:100 to 1400, Industrial Rating:1.0mΩ to 50.0mΩ
12V battery : Battery Test / Start Performance Test and Charging System Test
24V battery : Start Performance Test and Charging System Test
Accuracy at 23°C±5°C×0.01/°C
Test results can be saved to the internal memory up to 99 data.
※The data can be sent to PC via USB connection
From web site via USB connection
0°C to 50°C, less than 80%RH (in non-condensing)
-20°
C
to 60°C, less than 70%RH (in non-condensing)
CE marking approved EN61326-1
248
mm
(H)×96
mm
(W)×50
mm
(D) ※
Cable and Bush are not included
Approx. 550g ※Printer paper is not included
1. General Specifications
2. Measurement Specifications
(23°C±5°C, <80%RH in non-condensing)
LCD
LANGUAGE
DISPLAY RATE OF
VOLTAGE MEASUREMENT
LED INDICATION
PRINTER
BATTERY CABLE LENGTH
POWER SUPPLY
TESTING VOLTAGE
TESTABLE BATTERIES
TESTABLE BATTERY STANDARDS
TESTABLE BATTERY PERFORMANCE
MEASURABLE TESTS
TEMPERATURE COEFFICIENT
FOR VOLTAGE MEASUREMENT
DATA SAVING
SOFTWARE UPDATE
OPERATING TEMPERATURE & HUMIDITY
STORAGE TEMPERATURE & HUMIDITY
SAFETY LEVEL
DIMENSION
WEIGHT
1.
2.
3.
4.
5.
6.
7.
8.
9.
10.
11.
12.
13.
14.
15.
16.
17.
18.
19.
20.
※Specification and appearance are subject to change without notice.
Range
16.000V
32.000V
Resolution
1mV
Maximum Input
Lower than 32V
Accuracy
(8V to 16V):±0.15%±3dgt
(16V〜32V):±0.15%±3dgt
Battery Voltage
※Overload indication:"Over voltage" is displayed.
Range
-20°C to 60°C
Resolution
1°C
Maximum Input
-20°C to 60°C
Accuracy
±3°C
Temperature
※
Accuracy is applied when measuring after leaving under constant temperature more than an hour.
9
10
BEFORE USE
●What is CCA?
CCA stands for Cold Cranking Amperes. It is defined as the current a battery at 0°F
(-18°C) can discharge for 30 seconds and maintain at least 7.2V (for JIS, SAE and
BCI). And it is defined as the current a battery at 0°F (-18°C) can discharge for 10
seconds and maintain at least 7.5V (for EN and DIN). The battery which has the
bigger CCA, the higher ability to start an engine, CCA is one of the criterion for
selection of the battery.
●What is SOH (State of Health)?
SOH is the health condition of the battery, the state is expressed in percentage (%).
1. Technical Words
The current discharge at 0°F (-18°C) for 30 seconds
and maintain at least 7.2V.
The current discharge at 0°F (-18°C) for 10 seconds
and maintain at least 7.5V.
CCA definition of various standards
Standards CountriesCCA Definition
JIS
SAE
BCI
EN
DIN
Japan
USA
USA
EU
Germany
●What is SOC (StateofCharge)?
SOC is the charging condition of the battery, the state is expressed in percentage (%).
Definition of SOH in this product:
ET8636
defines SOH 23% as the threshold of the battery replacement recommendation. Test
result shows "Replacement is necessary" when measured SOH is 23% or less and test
result of SOC is not "Charge/Retest".
※SOH(%) is calculated as the ratio of CCA standard value to CCA measured value.
※SOH(%) fluctuates due to the rate of deterioration and charging condition.
Definition of SOC in this product:
ET8636 defines as SOC
100% when the battery voltage is higher than 12.756V. (Higher than
13.056V for the battery for industry)
※
ET8636 does not show the exact measurement voltage when testing the battery just after
an engine shutdown or just after charging. Test the battery after reducing the stimulated
condition according to the procedure mentioned in Page 12.

11
BEFORE USE
2. Language / Date & Time Settings
●Set date and time before using this instrument. (Refer to "8. Setting of Date and
Time" on Page 32).
●Language changeable from English (default setting) to Japanese or simplified
Chinese. (Refer to "9. Setting of Language" on Page 33).
●What is Ripple Voltage?
Ripple Voltage is the feeble change of charging voltage which occurs when rectifying
the generated voltage by diode. If diode is damaged, the ripple voltage fluctuated
sharply and adversely affects battery and in-vehicle apparatus.
3. Others
●Protection film is put on the front plate of
the unit before shipment. Tear off the
protection film before using this
instrument.
Tear off the protection film.
MENU
BAT TERY
CHECKER
SK-8535
CHARGE BADGOOD
MAX 32V
●Initial display shows the factory default
settings.

12
MEASUREMENT PROCEDURES
1. Battery Test
●This instrument forced to be restarted if the testing battery is extremely
exhausted and cannot afford to supply the workable current.
●
Test the battery in the state of the engine shutdown to obtain the accurate
measurement.
●When testing 24V battery, test each 12V battery which is connected in series.
●When testing the battery on vehicle, test the parked car after turning off the power
supply of all in-vehicle apparatuses which are using the electricity from battery
and locking the car door to obtain the accurate measurement.
●Test result may change when testing the same battery repeatedly. Also, test result
may change when testing the weak battery after using the printer.
●Test result may change, even when testing the same battery, depending on the
battery condition or change the storage environment.
●Test results may be higher than usual just after driving. When testing the battery
test of such a car, test it after doing the following procedure.
・Turn on the headlights for approx. 20 seconds.
・Turn off the headlights and test it more than 3 minutes after turning off the
headlights.
In case of the test result is "Charge/Retest" by turning on the headlights, shorten
the time of turning on the headlights after re-charging the battery, and lengthen
the time of intervals before testing.
When you do not perform the procedure mentioned above or testing battery unit
just after charging, test after an interval more than 2 hours.
●This instrument judges the battery condition with testing the basic use of the lead
battery such as charge-discharge characteristics. Test result is not for judging
whether the special control function can use for the vehicle or not.
●This instrument judges the battery condition with testing the basic use of the lead
battery such as charge-discharge characteristics. Test result is not for judging
whether the special control function can use for the vehicle or not.
Special purpose battery such as idling stop battery may not work idling stop
function due to decreasing charge acceptance occurring with long-term use. In
this case ask your car dealer for check and maintenance of the battery.
●
The maximum CCA displayed with this unit is up to 1400CCA.
CAUTION
 Loading...