

Page 1

Z8ENCORE000ZCO
Z8 Encore!® Flash Microcontroller Development Kit
User Manual
UM014605-0208
Copyright ©2008 by Zilog®, Inc. All rights reserved.
www.zilog.com
Page 2

Z8 Encore!® Flash Microcontroller Development Kit
Revision History
Each instance in Revision History reflects a change to this document from
its previous revision. For more details, refer to the corresponding pages
and appropriate links in the table below.
Revision
Date
February
2008
July 2003 04 Updates. All
July 2003 03 Corrected Schematics. 30
March
2003
March
2003
Level Description Page No
05 Updated Zilog logo, changed
02 Corrected Timer 3 errors. All
01 Original Issue. All
User Manual
ii
All
ZiLOG to Zilog, implemented
style guide and template.
Deleted ’Figure 7-Figure to be
added at a later revision’ in
Smart Cable section.
UM014605-0208 Revision History
Page 3

Z8 Encore!® Flash Microcontroller Development Kit
Table of Contents
Introduction . . . . . . . . . . . . . . . . . . . . . . . . . . . . . . . . . . . . . . . . . . . . 1
Kit Contents . . . . . . . . . . . . . . . . . . . . . . . . . . . . . . . . . . . . . . . . . 1
Hardware . . . . . . . . . . . . . . . . . . . . . . . . . . . . . . . . . . . . . . . . 1
Software (on CD-ROM) . . . . . . . . . . . . . . . . . . . . . . . . . . . . . 2
Documentation . . . . . . . . . . . . . . . . . . . . . . . . . . . . . . . . . . . . 3
System/Software Requirements . . . . . . . . . . . . . . . . . . . . . . . . . . 4
Supported Host System Configuration . . . . . . . . . . . . . . . . . . 4
Installation . . . . . . . . . . . . . . . . . . . . . . . . . . . . . . . . . . . . . . . . . . . . . 5
Setting up the Evaluation Board . . . . . . . . . . . . . . . . . . . . . . . . . . 5
Changing the Universal 9 V DC Power Supply Plug
Configurations . . . . . . . . . . . . . . . . . . . . . . . . . . . . . . . . . 6
Installing the ZDS II—Z8 Encore!® Software . . . . . . . . . . . . . . . . 8
Getting Started . . . . . . . . . . . . . . . . . . . . . . . . . . . . . . . . . . . . . . . 9
Using ZDS II . . . . . . . . . . . . . . . . . . . . . . . . . . . . . . . . . . . . . . 9
Z8 Encore!
Introduction . . . . . . . . . . . . . . . . . . . . . . . . . . . . . . . . . . . . . . . . . 10
Features . . . . . . . . . . . . . . . . . . . . . . . . . . . . . . . . . . . . . . . . . . . 10
Block Diagram . . . . . . . . . . . . . . . . . . . . . . . . . . . . . . . . . . . . . . 11
MCU . . . . . . . . . . . . . . . . . . . . . . . . . . . . . . . . . . . . . . . . . . . . . . 13
LED Array . . . . . . . . . . . . . . . . . . . . . . . . . . . . . . . . . . . . . . . . . . 14
Serial Communications Devices . . . . . . . . . . . . . . . . . . . . . . . . . 15
IrDA Transceiver . . . . . . . . . . . . . . . . . . . . . . . . . . . . . . . . . . . . 16
Power and Communication Interfaces . . . . . . . . . . . . . . . . . . . . 17
Smart Cable . . . . . . . . . . . . . . . . . . . . . . . . . . . . . . . . . . . . . . . . 17
Expansion Module Interface . . . . . . . . . . . . . . . . . . . . . . . . . . . . 17
Embedded Modem . . . . . . . . . . . . . . . . . . . . . . . . . . . . . . . . . . . 28
®
Evaluation Board. . . . . . . . . . . . . . . . . . . . . . . . . . . . 10
I2C Interface . . . . . . . . . . . . . . . . . . . . . . . . . . . . . . . . . . . . . 15
SPI Interface . . . . . . . . . . . . . . . . . . . . . . . . . . . . . . . . . . . . . 16
Configuration Headers/Jumpers . . . . . . . . . . . . . . . . . . . . . . 23
User Manual
iii
UM014605-0208 Table of Contents
Page 4

Z8 Encore!® Flash Microcontroller Development Kit
User Manual
Pushbuttons . . . . . . . . . . . . . . . . . . . . . . . . . . . . . . . . . . . . . . . . 29
Schematics . . . . . . . . . . . . . . . . . . . . . . . . . . . . . . . . . . . . . . . . . . . 30
Index. . . . . . . . . . . . . . . . . . . . . . . . . . . . . . . . . . . . . . . . . . . . . . . . . 35
Customer Support. . . . . . . . . . . . . . . . . . . . . . . . . . . . . . . . . . . . . . 38
iv
UM014605-0208 Table of Contents
Page 5

Z8 Encore!® Flash Microcontroller Development Kit
Introduction
Zilog’s Z8 Encore!® Flash Microcontroller (MCU) is the first in the new
line of Zilog microcontroller products. This board supports the Z8
Encore! and introduces Flash to the Z8
The Z8 Encore! Development Kit (Z8ENCORE000ZCO) allows you to
become familiar with the hardware and software tools available with this
product. This kit consists of the 64 KB version of the Z8 Encore!
Evaluation board that supports and presents the features of the Z8
Encore!. The software development tool kit allows you to begin writing
application software and contains all supporting documents.
This manual acquaints you with the Z8 Encore! Development Kit, and
gives instructions on setting up and using the tools to start building
designs and applications.
User Manual
®
line of microcontrollers.
1
Kit Contents
The Z8 Encore! Flash MCU development kit contains the following:
Hardware
The hardware component of the Z8 Encore! Flash MCU development kit
include:
•
Z8 Encore! Evaluation board
•
Smart cable for PC to Z8 Encore! evaluation board (DB9 to six-pin
male)
•
9 V DC universal power supply (for details, see Figure 3 on page 6)
UM014605-0208 Introduction
Page 6
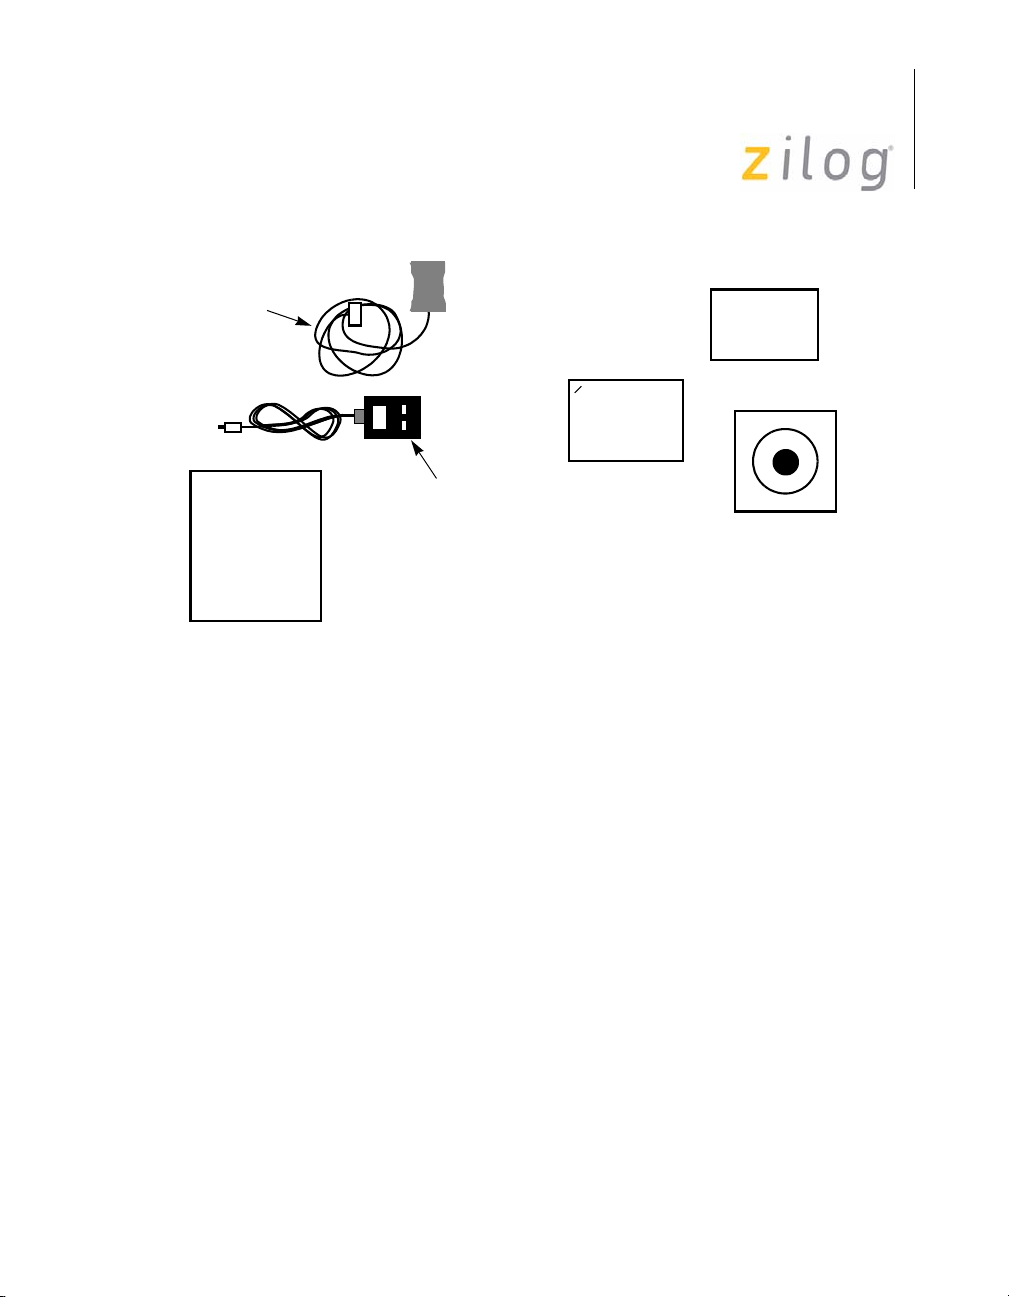
Smart Cable
Evaluation
Board
Z8 Encore!® Flash Microcontroller Development Kit
User Manual
Z
Registration
Card
Quick
Start Guide
9 V DC Universal
Power Supply
Software
Documentation
CD
2
Figure 1. Z8 Encore!® Development Kit Contents
Software (on CD-ROM)
The software components of Z8 Encore! development kit include:
•
Zilog Development Studio II (ZDS II)—Z8 Encore!® Integrated
Development Environment (IDE) with ANSI C-Compiler
•
Sample code
•
Device driver software
•
Document browser
•
Acrobat Reader
UM014605-0208 Introduction
Page 7

Z8 Encore!® Flash Microcontroller Development Kit
Documentation
The following documentation are included in the Z8 Encore!
development kit:
•
Programmer’s Reference Sheet
•
Registration card
•
Z8 Encore!® technical documentation (on CD-ROM)
– ZDS II—IDE User Manual
– eZ8 CPU User Manual
– Product Specification
– Product briefs
– Application notes
– Programmer’s Reference Sheet
–Flyers
– Product Line Card
User Manual
3
The sample code is installed with ZDS II and is located in the
lation directory>\sample
The device driver software is installed with ZDS II and resides in the
<installation directory>\applications\Z8Encore!_F640X_DriversDemo
The documentation can be installed with the DemoShield interface or can
be viewed on the CD-ROM using the DemoShield menus and a PDF
reader. A copy of the Acrobat installer is provided on the CD-ROM and
can be installed from the DemoShield install screen. After installing the
documentation on your system, Windows Explorer can be used to select
any document to be viewed with PDF file viewer.
UM014605-0208 Introduction
in the disk drive.
in the disk drive.
<instal-
Page 8

Z8 Encore!® Flash Microcontroller Development Kit
System/Software Requirements
IBM PC (or compatible computer) with the following recommended
configurations:
Supported Host System Configuration
The following system configurations are required on the host PC:
•
Microsoft Windows XP SP1/Windows 2000 SP3/Windows NT 4.0
SP6/Windows 98 SE
•
Pentium II/233 MHz processor or higher up to Pentium IV, 2.8 GHz
•
96 MB RAM or more
•
25 MB hard disk space or more
•
Super VGA video adapter
User Manual
4
•
CD-ROM
•
One or more RS-232 communication ports
UM014605-0208 Introduction
Page 9

Z8 Encore!® Flash Microcontroller Development Kit
Installation
This chapter describes the installation of hardware and software tools for
the Z8 Encore! Evaluation Kit. Also describes setting up the evaluation
board, substituting plug configurations of the universal 9 V DC power
supply, and installing the ZDS II—IDE Z8 Encore! software.
Setting up the Evaluation Board
The PC communicates with the Z8 Encore! Flash MCU Evaluation board
using the serial port of the PC. A Z8 Encore! Smart Cable converts the
RS-232 signals into the 3.3 V bidirectional open-drain signal needed to
communicate with the on-chip debugger of the eZ8. This Z8 Encore!
Smart Cable is a small circuit board with an attached cable and a six-pin
right angle female connector that attaches to the evaluation board.
User Manual
5
Caution:
UM014605-0208 Installation
Always use a grounding strap to prevent damage resulting from electrostatic discharge (ESD).
Follow the steps below to setup the Z8 Encore! evaluation board:
1. Connect the serial port of the PC to the Z8 Encore! Smart Cable
female DB9 connector.
2. Connect the Z8 Encore! Smart Cable to the Z8 Encore! Flash MCU
evaluation board pin header P4.
3. Connect the 9 V DC universal power supply to the evaluation board,
then to an electrical outlet.
For the Z8 Encore! development kit external connections, see Figure 2 on
page 6.
Page 10
Z8 Encore!® Flash Microcontroller Development Kit
User Manual
6
Serial Port
9 V Universal
Power Supply
Smart Cable
PC
Evaluation Board
Figure 2. Evaluation Board External Connections
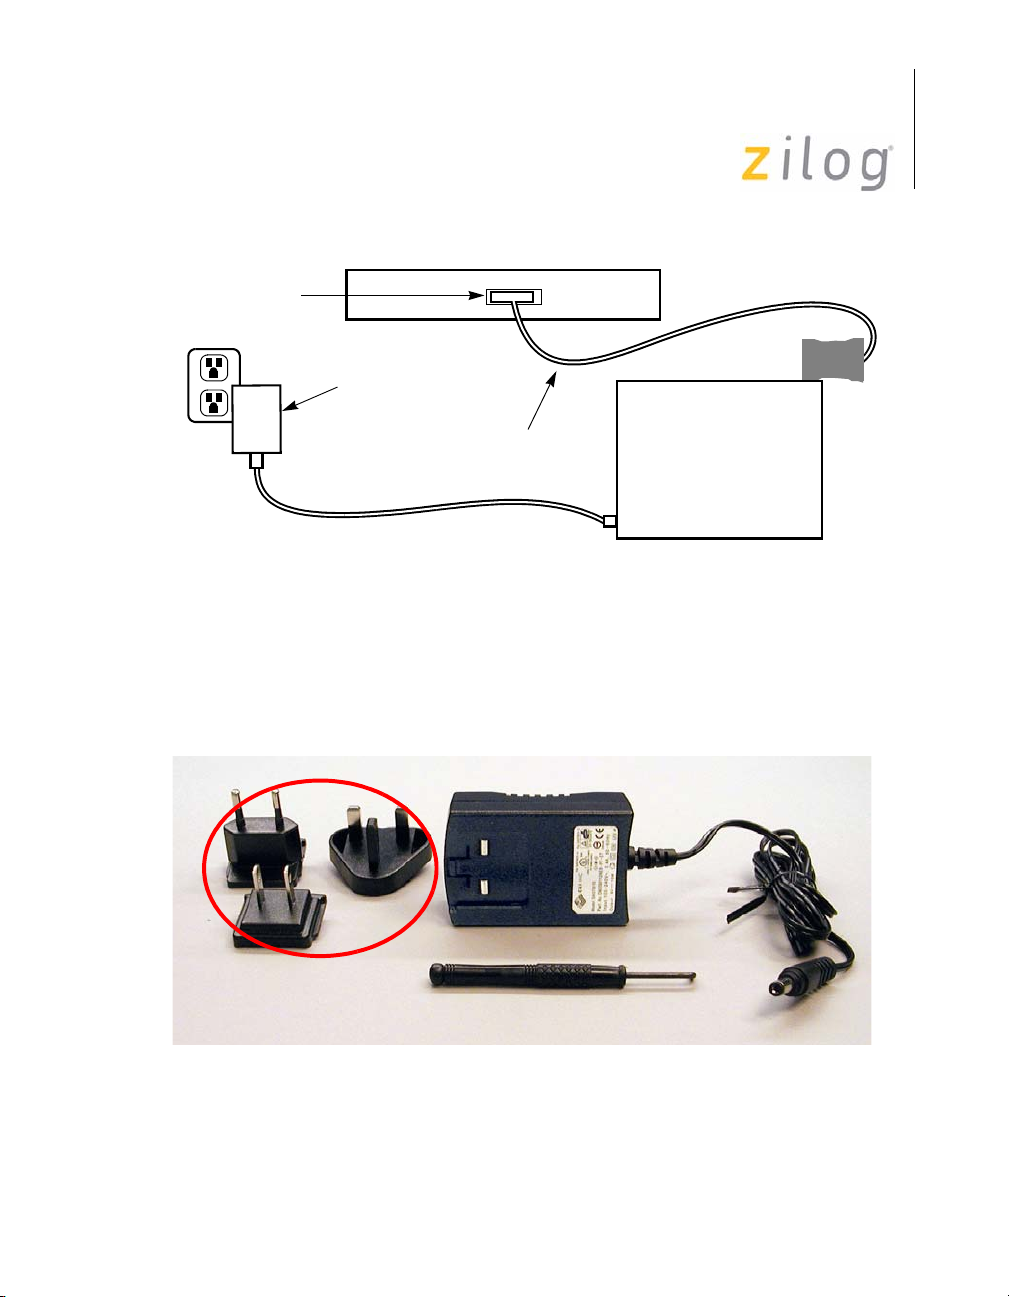
Changing the Universal 9 V DC Power Supply Plug Configurations
Figure 3 displays the contents of the Universal Power Supply kit.
9 V DC Universal
Power Supply
Z
Plug
Configurations
Removal Tool
Figure 3. 9 V DC Universal Power Supply Components
UM014605-0208 Installation
Page 11

Z8 Encore!® Flash Microcontroller Development Kit
User Manual
The 9 V DC universal power supply features three different plug configurations, the power supply and a tool that aids in removing one plug configuration to insert another.
Follow the steps below to substitute one plug configuration for another:
1. Using the removal tool, place the power supply in the round hole at
the top of the current plug configuration.
2. Press down to disengage the keeper tab and push the plug configura-
tion out of its slot.
3. Select the plug configuration of choice for your location, and insert it
into the slot left by the previous plug configuration.
4. Push the new plug configuration down until it snaps into place (see
Figure 4).
7
Figure 4. Inserting a New Plug Configuration
UM014605-0208 Installation
Page 12

Z8 Encore!® Flash Microcontroller Development Kit
Installing the ZDS II—Z8 Encore!
Follow the steps below to install the software tools:
1. Load the ZDS II—Z8 Encore!
drive of the host PC. The CD launches DemoShield automatically
and provides a menu to install the product and documentation. Select
INSTALL PRODUCTS followed by INSTALL ZDS II to display
the Installation Wizard.
User Manual
®
Software
Flash MCU CD into the CD-ROM
8
Note:
Software versions used in the following illustrations are for reference
only. You may have an updated version.
2. Click Next to continue with the installation. The License Agreement
appears.
3. Select Yes to accept the agreement and proceed with the installation.
4. After selecting Yes, the Choose Destination Location screen
appears. Follow the directions on the screen and choose whether to
install ZDS II in the default location or in some other folder. Click
Next
.
5. The Select Program Folder screen appears. Follow the on-screen
instructions and click Next
.
6. After selecting Next, the Installation Wizard completes the
installation.
7. When the installation is complete, another screen appears asking you
to register the product online at www.zilog.com
. To register at a later
time the registration link to the internet site is provided in the ZDS II
Help menu.
8. The following directory is installed on the host PC, assuming all
installation settings remain at their defaults:
C:/Program Files/ZiLOG/ZDSII_Z8Encore!_F640X_<Version>.
UM014605-0208 Installation
Page 13

Getting Started
Using ZDS II
Follow the steps below to open an existing project:
1. Connect the Evaluation board to the host PC’s serial communications
port using the Smart Cable.
2. Apply 9 V DC power to the Evaluation board.
Z8 Encore!® Flash Microcontroller Development Kit
User Manual
9
3. Run the ZDS II Software (
Encore!
F640x_<Version>
F640x_<Version>ZDS II-28 Encore!
Start > Programs > ZDS II-Z8
).
4. Select Open Project from the File menu. The Open Project dialog
box appears.
5. Select samples. The samples folder appears.
6. Select the
access the
7. Select the
Z8F640x_ledBlink folder and then the src folder to
ledBlink.pro project file.
ledblink.pro file. The initial ZDS II program screen
opens.
8. Click Rebuild All
and then the Reset icon to
connect and download the code to the Evaluation board.
9. Click Go icon to start the program.
For more information, refer to Zilog Developer Studio II—Z8 Encore®
User Manual (UM0130), supplied with the documentation on the CDROM or available for download at www.zilog.com
.
UM014605-0208 Installation
Page 14

Z8 Encore!® Flash Microcontroller Development Kit
User Manual
Z8 Encore!® Evaluation Board
Introduction
10
Features
Z8 Encore! evaluation board (64 KB version) is an evaluation and prototyping board for the Z8 Encore!
you with a tool to evaluate features of Z8 Encore! family, and to develop
an application before building the hardware.
The features of the Z8 Encore! evaluation board include:
•
Z8 Encore! MCU
•
LED array with four 7 x 5 LED matrices
•
Serial Communications Devices
2
–I
C configuration IC for Expansion Module
– SPI Interface with temperature sensor
•
Infrared Data Association (IrDA) transceiver
•
Power and communication interfaces
– 9 V DC power supply
– Two RS-232 connectors
– One RS-485 connector with two ports
•
Expansion Module interface
®
family of MCUs. The board provides
•
Embedded modem socket with U.S. phone line interface (modem is
not included in the kit)
•
Three pushbuttons
UM014605-0208 Z8 Encore!® Evaluation Board
Page 15

Block Diagram
The board consists of the following major blocks:
•
Z8 Encore!
•
Serial communication devices (SPI and I2C)
•
Power and communication interfaces
•
LED array
•
Expansion Module interfaces
•
IrDA transceiver
•
Zilog Debug Interface (DBG)
Z8 Encore!® Flash Microcontroller Development Kit
User Manual
®
MCU
11
3
4
5
1
2
®
Figure 5. Major Z8 Encore!
UM014605-0208 Z8 Encore!® Evaluation Board
Evaluation Board Blocks
7
6
5
Page 16

Z8 Encore!® Flash Microcontroller Development Kit
User Manual
Figure 6 displays the Z8 Encore!® evaluation board block diagram.
Temp.
Sensor
12
Port A[0:7]
Port B[0:7]
Port C[0:7]
Port D[0:7]
Port E[0:7]
Port F[0:7]
Port G[0:7]
Port H[0:3]
Z8 Encore!
MCU
IrDA IrDA
RS-232 Console
RS-485 RS485_1
RS-232 Modem
Phone Line
®
Embedded
Modem
Port A
Port C
ID SEL
Port D
LED ARRAY
Port F
Port B
Port E
Port G
Port H
RS-485
RS485_2
Expansion Module Interface
®
Figure 6. Z8 Encore!
Evaluation Board Block Diagram
UM014605-0208 Z8 Encore!® Evaluation Board
Page 17

MCU
Z8 Encore!® Flash Microcontroller Development Kit
User Manual
The Z8 Encore! MCU family of products are the first in a line of Zilog
MCU products based upon the new 8-bit eZ8 core CPU. The Flash
in-circuit programming capability allows for faster development time and
program changes in the field. The new eZ8 core CPU is upward compatible with existing Z8
Encore! makes it suitable for a variety of applications including motor
control, security systems, home appliances, personal electronic devices,
and sensors.
®
instructions. The rich peripheral set of the Z8
13
The Evaluation Board contains circuitry to support and presents all the
features of Z8 Encore!. The key features of Z8 Encore!
•
eZ8 core CPU
•
64 KB Flash memory with in-circuit programming capability
•
4 KB register RAM
•
12-channel, 10-bit analog-to-digital converter (ADC)
•
Two full-duplex UARTs
•
I2C interface (Master Mode only)
•
Serial Peripheral Interface (SPI)
•
Two Infrared Data Association (IrDA)-compliant infrared encoder/
decoders
•
Three to four 16-bit timers with capture, compare, and PWM capability. 40-pin and 44-pin packages feature only 3 timers. The fourth
timer is available only on the 64-, 68- and 80-pin packages.
•
Watchdog Timer (WDT) with internal RC oscillator
•
3-channel DMA
•
Up to 60 Input/Output (I/O) pins
include:
•
24 interrupts with configurable priority
UM014605-0208 Z8 Encore!® Evaluation Board
Page 18

Z8 Encore!® Flash Microcontroller Development Kit
•
On-Chip Debugger
•
Voltage Brownout (VBO) Protection
•
Power-On Reset (POR)
•
3.0 V–3.6 V operating voltage with 5 V-tolerant inputs
•
0 °C–70 °C operating temperature
User Manual
14
For further information on the Z8 Encore! family of devices, refer to
Z8 Encore! XP
(PS0199).
®
64K Series Flash Microcontrollers Product Specification
LED Array
The LED array display user information. There are four 7 x 5 LED
matrixes. To light up an LED dot the appropriate Anode bit must be 1, and
the correlated Cathode must be 0. All Anodes are addressed by Port G,
and Cathodes are addressed by Port E. Every LED Matrix is addressed by
separate pair of registers. Each register pairs is addressed by a bit of Port
E or Port G. Table 1 through Table 4 describe how to address each Anode
and Cathode of D1 through D4.
Table 1. LED Anode Assignments
Function/Port G Bit No 6543210
Anode Row 0 X
Anode Row 1 X
Anode Row 2 X
Anode Row 3 X
Anode Row 4 X
Anode Row 5 X
Anode Row 6 X
Note: Row 0 = Topmost Row
UM014605-0208 Z8 Encore!® Evaluation Board
Page 19

Z8 Encore!® Flash Microcontroller Development Kit
User Manual
Table 2. LED Cathode/Modem/Trigger
Function/Port E Bit No 43210
Cathode Column 0 X
Cathode Column 1 X
Cathode Column 2 X
Cathode Column 3 X
Cathode Column 4 X
Note: Column 0 = Leftmost Column
Table 3. LED Addressing
Function/Port, Bit No PE[5] PE[6] PE[7] PG[7]
D3 X
D4 X
D1 X
D2 X
15
Serial Communications Devices
I2C Interface
The Z8 Encore! is compatible with I2C protocol (in this case the
PCA8550). The I
serial data (SDA) line and a serial clock (SCL) line.
2
The I
C Controller operates in Master mode to transmit and receive data.
Having a PCA8550 on board enables configuration of the Expansion
Module. The PCA8550 is a 4-bit multiplexer that selects four bits of data
either from a non-volatile register or from the input pins. In this case four
input pins are left unconnected and only a non-volatile register is selected
as a source of data. Only three bits are used. Currently this chip is not
used by the software provided with the board, so you can use it to your
UM014605-0208 Z8 Encore!® Evaluation Board
2
C controller consists of two bidirectional bus lines, a
Page 20

Z8 Encore!® Flash Microcontroller Development Kit
User Manual
advantage. The configuration register (Table 4) is available at the address
0x9C for Write operation and 0x9D for Read operation on the PCA8550
device. For more details on programming this device, refer to PCA8550
Product Specification (www.semiconductors.philips.com
Table 4. I
Device/Bit No76543210
Value 1001110R/W
2
C Address for Configuration Register on the PCA8550 (U2)
).
SPI Interface
The SPI allows the Z8 Encore! to exchange data between other peripheral
devices such as EEPROMs, ADC, and ISDN devices. The SPI is a fullduplex, synchronous, character-oriented channel that supports a four-wire
interface.
16
To work with SPI interface for temperature/sensor types of applications,
DS1722 Digital Thermometer was incorporated into the board. The serial
mode is SPI. For more details on programming the device, refer to
DS1722 Product Specification.
IrDA Transceiver
The Z8 Encore! contains two fully-functional, high-performance UARTs
with Infrared Encoder/Decoders (Endec). The Infrared Endec is integrated with an on-chip UART to allow easy communication between the
Z8 Encore! and IrDA transceivers. Infrared communication provides
secure, reliable, low-cost, point-to-point communication between PCs,
PDAs, cell phones, printers and other infrared enabled devices.
UM014605-0208 Z8 Encore!® Evaluation Board
Page 21

Z8 Encore!® Flash Microcontroller Development Kit
Power and Communication Interfaces
The following are the power and communication interfaces:
•
9 V DC power supply powers the board
•
Two RS-232 DB9 connectors and an RS-485 connector with two
ports
•
Zilog IrDA transceiver is integrated onto the Z8 Encore!® evaluation
board
Smart Cable
The Z8 Encore! Smart Cable enables communication with the Host
computer. The Z8 Encore! Smart Cable converts a one-wire interface into
a two-wire (TxD and RxD RS-232-like interface with RS-232 levels).
User Manual
17
Expansion Module Interface
The Expansion Module Interface allows addition of any plug-in modules.
The Expansion Module Interface brings out the signals from the Z8
Encore! device for debug and testing.
Two 60-pin male headers, J6 and J8, implement the Expansion Module
Interface. Tables 5 and Tab le 6 list the signals and their direction, where
applicable.
UM014605-0208 Z8 Encore!® Evaluation Board
Page 22

Z8 Encore!® Flash Microcontroller Development Kit
Table 5. Header J6
Pin No Signal Name Function Direction Comments
1VCC
2VCC
39 V DC
49 V DC
5SCL I
6 ID2 Evaluation Board IDOUT
2
C Clock OUT
User Manual
18
7SDA I
2
C Data IN/OUT
8 ID1 Evaluation Board IDOUT
9GND
10 ID0 Evaluation Board IDOUT
11 -MOD_DIS Modem Disable OUT If a shunt is installed the Modem
Function on the evaluation
board is disabled
12 -CON_DIS Console Disable OUT If a shunt is installed the
Console Function on the
evaluation board is disabled
13 -MWAIT IN Reserved (see note)
14 GND
15 PE0 Port E, bit 0 IN/OUT
16
17 -CS3 Reserved (see note)
18
19 GND
20 GND
Note: Do not use pins marked Reserved when designing Expansion Modules.
All the signals are driven directly by the MCU.
UM014605-0208 Z8 Encore!® Evaluation Board
Page 23

Z8 Encore!® Flash Microcontroller Development Kit
Table 5. Header J6 (Continued)
Pin No Signal Name Function Direction Comments
21 PE7 Port E, bit 7 IN/OUT
22 PA0 Port A, bit 0 IN/OUT T0IN
23 PE6 Port E, bit 6 IN/OUT
24 PA1 Port A, bit1 IN/OUT T0OUT
25 PE5 Port E, bit 5 IN/OUT
26 PA2 Port A, bit 2 IN/OUT
27 PE4 Port E, bit 4 IN/OUT
28 PA3 Port A, bit 3 IN/OUT CTS0
29 PE3 Port E, bit 3 IN/OUT
30 PA4 Port A, bit 4 IN/OUT RXD0
31 PE2 Port E, bit 2 IN/OUT
32 PA5 Port A, bit 5 IN/OUT TXD0
33 PE1 Port E, bit 1 IN/OUT
34 PA7 Port A, bit 7 IN/OUT SDA
35 RESERVED
36 PA6 Port A, bit 6 IN/OUT SCL
37 GND
38 GND
39 PD7 Port D, bit 7 IN/OUT RCOUT
40 PC4 Port C, bit 4 IN/OUT MOSI
41 PD6 Port D, bit 6 IN/OUT CTS1
42 PC3 Port C, bit 3 IN/OUT MISO
43 PD5 Port D, bit 5 IN/OUT TXD1
44 PC7 Port C, bit 7 IN/OUT T2OUT
45 PD4 Port D, bit 4 IN/OUT RXD1
46 PC6 Port C, bit 6 IN/OUT T2IN
Note: Do not use pins marked Reserved when designing Expansion Modules.
All the signals are driven directly by the MCU.
User Manual
19
UM014605-0208 Z8 Encore!® Evaluation Board
Page 24

Z8 Encore!® Flash Microcontroller Development Kit
Table 5. Header J6 (Continued)
Pin No Signal Name Function Direction Comments
47 PD3 Port D, bit 3 IN/OUT
48 PC3 Port C, bit 3 IN/OUT SCK
49 PD2 Port D, bit 2 IN/OUT
50 PC2 Port C, bit 2 IN/OUT SS
51 PD1 Port D, bit 1 IN/OUT T3OUT
52 PC0 Port C, bit 0 IN/OUT T1IN
53 PD0 Port D, bit 0 IN/OUT T3IN
54 PC1 Port C, bit 1 IN/OUT T1OUT
55 GND
56 GND
57 GND
58 GND
59 GND
60 GND
Note: Do not use pins marked Reserved when designing Expansion Modules.
All the signals are driven directly by the MCU.
User Manual
20
Table 6. Header J8
Pin No Signal Name Function Direction Comments
1VDD
2GND
3 PB0 Port B, bit 0 IN ALG0 Analog input
4 PB1 Port B, bit 1 IN ALG1 Analog input
5 PB2 Port B, bit 2 IN ALG2 Analog input
6 PB3 Port B, bit 3 IN ALG3 Analog input
Note: Do not use pins marked Reserved when designing Expansion Modules.
All the signals are driven directly by the MCU.
UM014605-0208 Z8 Encore!® Evaluation Board
Page 25

Z8 Encore!® Flash Microcontroller Development Kit
User Manual
Table 6. Header J8 (Continued)
Pin No Signal Name Function Direction Comments
7 PB4 Port B, bit 4 IN ALG4 Analog input
8 PB5 Port B, bit 5 IN ALG5 Analog input
9 PB6 Port B, bit 6 IN ALG6 Analog input
10 PB7 Port B, bit 7 IN ALG7 Analog input
11 GND
12 GND
13 PH0 Port H, bit 0 IN ALG8 Analog input
14 PH1 Port H, bit 1 IN ALG9 Analog input
15 PH2 Port H, bit 2 IN ALG10 Analog input
16 PH3 Port H, bit 3 IN ALG11 Analog input
17 Reserved (see note)
18 Reserved (see note)
19 Reserved (see note)
20 Reserved (see note)
21 GND
22 GND
23 PF0 Port F, bit 0 IN/OUT DTR1
24 PF1 Port F, bit 1 IN/OUT RTS1
25 PF2 Port F, bit 2 IN/OUT DSR1
26 PF3 Port F, bit 3 IN/OUT DCD1
27 PF4 Port F, bit 4 IN/OUT RI1
28 PF5 Port F, bit 5 IN/OUT
29 PF6 Port F, bit 6 IN/OUT
30 PF7 Port F, bit 7 IN/OUT
31 VDD
32 VDD
Note: Do not use pins marked Reserved when designing Expansion Modules.
All the signals are driven directly by the MCU.
21
UM014605-0208 Z8 Encore!® Evaluation Board
Page 26

Z8 Encore!® Flash Microcontroller Development Kit
User Manual
Table 6. Header J8 (Continued)
Pin No Signal Name Function Direction Comments
33 -RD Read Reserved (see note)
34 -WR Write Reserved (see note)
35 -RESET Pushbutton reset OUT
36 INSTRD Reserved (see note)
37 -BUSACK Reserved (see note)
38 -BUSREQ Reserved (see note)
39 -NMI Reserved (see note)
40 PHI Reserved (see note)
41 GND
42 GND
43 PG0 Port G, bit 0 IN/OUT
44 PG1 Port G, bit 1 IN/OUT
45 PG2 Port G, bit 2 IN/OUT
46 PG3 Port G, bit 3 IN/OUT
47 PG4 Port G, bit 4 IN/OUT
48 PG5 Port G, bit 5 IN/OUT
49 PG6 Port G, bit 6 IN/OUT
50 PG7 Port G, bit 7 IN/OUT
51 GND
52 GND
53 -CS0 Reserved (see note)
54 -CS1 Reserved (see note)
55 -CS2 Reserved (see note)
56 -CSx Reserved (see note)
Note: Do not use pins marked Reserved when designing Expansion Modules.
All the signals are driven directly by the MCU.
22
UM014605-0208 Z8 Encore!® Evaluation Board
Page 27

Z8 Encore!® Flash Microcontroller Development Kit
User Manual
Table 6. Header J8 (Continued)
Pin No Signal Name Function Direction Comments
57 -MEMRQ Reserved (see note)
58 -IORQ Reserved (see note)
59 VDD
60 GND
Note: Do not use pins marked Reserved when designing Expansion Modules.
All the signals are driven directly by the MCU.
Configuration Headers/Jumpers
Configuration headers/jumpers help to configure the board. Tab le 7
lists the function of each header, and related headers, registers, or devices.
23
Note:
The default settings for all jumpers is OUT.
Table 7. Configuration Headers and Jumpers
Related Headers,
Header Function
J1 RJ11
J2 Modem connector Header 32
J3 Modem connector Header 9
J4 Modem connector Header 2
J6.12 (-CON_DIS), J6.14 (GND) Console Enable/Disable J2
J6.11 (-MOD_DIS), J6.9 (GND) Modem Enable/Disable
J7 External Vref Internal Vref Control
J8 Expansion Module
Header
J9 Vref test point R5
J10 IrDA Enable/Disable J6.12 (-CON_DIS), J6.14,
UM014605-0208 Z8 Encore!® Evaluation Board
Registers or Devices
(GND)
Page 28

Z8 Encore!® Flash Microcontroller Development Kit
Table 7. Configuration Headers and Jumpers (Continued)
Related Headers,
Header Function
J11 SocketModem Power
(3 V DC/5 V DC)
J12 RS-485_1_EN
J13 RS-485_2_EN
J14 RT_1
J15 RT_2
Registers or Devices
Tabl e 8 through Table 13 list jumper information concerning the shunt
status, functions, and devices affected of selected jumpers.
Table 8. J6.9–J6.11-Modem Enable/Disable
User Manual
24
Shunt Status Function Device Affected
IN Modem connector (P2) is
disabled
OUT Modem connector (P2) is
enabled
UART1 cannot communicate through P2.
Ports D and F can be assigned to functions
other than UART1.
If the embedded SocketModem is not in the
socket, UART1 communicates through P2.
Table 9. J6.12–J6.14-Console Enable/Disable
Shunt
Status Function Device Affected
IN Console connector (P1) is disabled If J6.12–14 is IN and J10 is IN, Port A
(3-5) is assigned to IrDA; if J10 is
OUT Port A (3-5) is assigned to
UART0.
OUT Console connector (P1) is enabled None
UM014605-0208 Z8 Encore!® Evaluation Board
Page 29

Z8 Encore!® Flash Microcontroller Development Kit
User Manual
Table 10. J7 External Vref
Shunt Status Function Device or Register Affected
IN External Vref is used for ADC Internal Vref is disabled.
OUT Internal Vref is used for ADC Internal Vref is enabled.
Table 11. J9 Vref
Function Device or Register Affected
J9-1 Test point to external Vref Vref
J9-2 GND None
Table 12. J10 IrDA Enable/Disable
25
Shunt Status Function Device Affected
IN IrDA enabled Only the IrDA interface is operational.
OUT IrDA disabled UART0 communicates through RS-232.
If J6 12-14 is IN Port A (3-5) can be
assigned to other functions (console
connector P1 is disabled).
If J6 12-14 is OUT console connector P1
is enabled (Port A (3-5) is assigned to
UART0).
Note:
UM014605-0208 Z8 Encore!® Evaluation Board
If the IrDA board is installed the Console port is disabled.
Page 30

Z8 Encore!® Flash Microcontroller Development Kit
User Manual
Table 13. J11 SocketModem Power (3 V DC/5 V DC)
Shunt Position Function Device Affected
IN (pins 1-2) 5.0 V DC is provided to power
SocketModem
OUT (pins 2-3) 3.3 V DC is provided to power
SocketModem
SocketModem
SocketModem
Table 14. J12–RS-485_1_Enable First Interface
Shunt Position Function Device Affected
IN RS-485 disabled none
OUT Enables RS-485 first interface Console and IrDA
26
Table 15. J13–RS-485_1_Enable Second Interface
Shunt Position Function Device Affected
IN RS-485 disabled none
OUT Enables RS-485 second interface SocketModem
Table 16. J14–RT_1, Termination Resistors Enable, RS-485 First Interface
Shunt Position Function Device Affected
IN First RS-485 interface termination resistors
disabled
OUT Enables first RS-485 interface termination
resistors
UM014605-0208 Z8 Encore!® Evaluation Board
none
none
Page 31

Z8 Encore!® Flash Microcontroller Development Kit
User Manual
Table 17. J15–RT_2, Termination Resistors Enable, RS-485 Second Interface
Shunt Position Function Device Affected
IN Second RS-485 interface termination
resistors disabled
OUT Enables second RS-485 interface
termination resistors
none
none
27
UM014605-0208 Z8 Encore!® Evaluation Board
Page 32

Z8 Encore!® Flash Microcontroller Development Kit
Embedded Modem
Figure 7 displays the embedded modem location.
User Manual
28
Figure 7. Embedded Modem Placement
The evaluation board provides for an embedded modem, the SF56D/SP
SocketModem. The SocketModem is not part of the kit. Tab le 18 on page
29 lists ordering information for the modem. The interface communicates
with the modem serially. LEDs D7-D10 provide information about the
status of the modem’s interface lines. The phone line connection is for the
U.S. only. To connect to a modem outside of the U.S., modifications must
be made to the board. The necessary data is found in the SocketModem
Data Sheet available for download at w
UM014605-0208 Z8 Encore!® Evaluation Board
ww.zilog.com.
Page 33

Z8 Encore!® Flash Microcontroller Development Kit
User Manual
Table 18. SocketModem Ordering Information
Sales Order
Number Part Number Configuration
SC56H1 SC43-E310-001 V.90/56 kbps, serial interface, +5 V operation
SC56H1_L SC43-E320-001 V.90/56 kbps, serial interface, +3.3 V operation
SC336H1 SC34-E310-001 V.34/33.6 kbps, serial interface, +5 V operation
SC336H1_L SC34-E310-001 V.34/33.6 kbps, serial interface, +5 V operation
SC144H1 SC14-E310-001 V.32/14.4 kbps, serial interface, +5 V operation
SC144H1_L SC14-E310-001 V.32/14.4 kbps, serial interface, +5 V operation
Pushbuttons
The Z8 Encore!® evaluation board contains three user-configurable pushbuttons (see Figure 8).
29
Figure 8. User-Configurable Pushbuttons
UM014605-0208 Z8 Encore!® Evaluation Board
Page 34

Z8 Encore!
®
Flash Microcontroller Development Kit
User Manual
Schematics
Figure 9 through Figure 13 display schematics for the Z8 Encore! Target Module and the Z8 Encore! Evaluation Board.
Z8F64 & CO NNECTORS
DO NOT USE J6_17 AND J6_35
9VDC
-MOD_DIS
-MWAIT
PE0
PE7
PE6
PE5
PE4
PE3
PE2
PE1
PD7_RCOUT
PD6_CTS1
PD5_TXD1
PD4_RXD1
PD3
PD2
PD1_T3OUT
PD0_T3IN
PF2_DSR1
PF4_RI1
PF6
-BUSACK
VCC
VDD
GND
GND
VDD
9V_DC
SCL
SDA
PF0_DTR1
-RD
-NMI
PG0
PG2
PG4
PG6
-MEMRQ
VCC
-CS3
GND
GND
VDD
PB0_ALG0
PB2_ALG2
PB4_ALG4
PB6_ALG6
GND
PH0_ALG8
PH2_ALG10
GND
GND
-CS0
-CS2
VCC
VDD
GND
P4
12
34
56
Header 3x2
GND
GND
PF0
PF2
PF4
PF6
VDD
-RESET
GND
PG0
PG2
PG4
PG6
VDD
DBG
INTERFACE
J6
12
34
56
78
910
11 12
13 14
15 16
17 18
19 20
21 22
23 24
25 26
27 28
29 30
31 32
33 34
35 36
37 38
39 40
41 42
43 44
45 46
47 48
49 50
51 52
53 54
55 56
57 58
59 60
Header 30x2
J8
12
34
56
78
910
11 12
13 14
15 16
17 18
19 20
21 22
23 24
25 26
27 28
29 30
31 32
33 34
35 36
37 38
39 40
41 42
43 44
45 46
47 48
49 50
51 52
53 54
55 56
57 58
59 60
Header 30x2
DBG
ID_2
ID_1
ID_0
-CON_DIS
GND
GND
PA0_T0IN
PA1_T0OUT
PA2
PA3_CTS0
PA4_RXD0
PA5_TXD0
PA7_SDA
PA6_SCL
GND
PC4_MOSI
PC5_MISO
PC7_T2OUT
PC6_T2IN
PC3_SCK
PC2_SS
PC2_SS
PC0_T1IN
PC0_T1IN
PC1_T1OUT
PC1_T1OUT
GND
PB1_ALG1
PB3_ALG3
PB5_ALG5
PB7_ALG7
GND
PH1_ALG9
PH3_ALG11
GND
PF1
PF1_RTS1
PF3
PF3_DCD1
PF5
PF5
PF7
PF7
VDD
-WR
INSTRD
-BUSREQ
PHI
PHI
GND
PG1
PG1
PG3
PG3
PG5
PG5
PG7
PG7
GND
-CS1
-CSx
PB0_ALG0 PB1_ALG1 PB2_ALG2 P B3_ALG3 PB4_ALG4 PB5_ALG5
-IORQ
GND
PB6_ALG6
VDD
PC2_SS
PC3_SCK PC4_MOSI
U4
1
VDD
2
CE
SERMOD
3
SCLK
4 5
GND SDO
DS1722
U1
PA0_T0IN
PD2
PC2_SS
PF6
-RESET
PF5
PF4
PF3
PE4
PE3
PE2
PE1
PE0
PF2
PF1
Y1
18.432MHz
1M
PC5_MISO
PF0
PD1_T3OUT
PD0_T3IN
C2
18pF
C31
0.001uF
C38
0.001uF
XTAL
SOC KET
EXTAL
R3
C1
18pF
C36
0.001uF
C37
0.001uF
PB7_ALG7 PH0_ALG8 PH1_ALG9 PH2_ALG10 PH3_ALG11
8
VDA
7
6
SDI
VDD
GND
GND
VDD
C32
0.001uF
C39
0.001uF
C47
0.1uF
1
2
3
4
5
6
7
8
9
10
11
12
13
14
15
16
17
18
19
20
21
22
23
24
C43
0.001uF
PA0/T0IN
PD2
PC2/SS
PF6
RESET
VDD
PF5
PF4
PF3
PE4
PE3
GND
PE2
PE1
PE0
GND
PF2
PF1
PF0
VDD
PD1/T3OUT
PD0/T3IN
EXTAL
XTAL
C33
0.001uF
C40
0.001uF
PA2
PF7
PD3
PA1_T0OUT
PA3_CTS0
PC5_MISO
PD4_RXD1
PD5_TXD1
VDD
GND
80
75
787977
76
PF7
PA2
PD3
VDD
GND
PC5/MISO
PA3/CTS0
PH1/ALG9
PB0/ALG0
PB1/ALG1
PH1_ALG9
PB1_ALG1
PB0_ALG0
C34
0.001uF
C41
0.001uF
PB4/ALG4
PB5/ALG5
PB4_ALG4
PB5_ALG5
PD4/RXD1
PB6/ALG6
PB7/ALG7
PB7_ALG7
PB3_ALG3
PB6_ALG6
C35
0.001uF
GND
C42
0.001uF
PA1/T0OUT
GND
AVDD
PH0/ALG8
25
26272829303132333435363738
VDD
GND
PH0_ALG8
PC4_MOSI
VDD
7071727374
69
VDD
PC4/MOSI
PD5/TXD1
PB3/ALG3
PB2/ALG2
PH2/ALG10
PH2_ALG10
PB2_ALG2
PA6_SCL
PA4_RXD0
PA5_TXD0
GND
65
66
67
68
GND
PA5/TXD0
PA4/RXD0
PA7/SDA
PD6/CTS1
PC3/SCK
PD7/RCOUT
PC7/T2OUT
PC6/T2IN
PC1/T1OUT
PC0/T1IN
AGND
PH3/ALG11
VREF
40
39
GND
VREF
PH3_ALG11
+
PA6/SCL
PG0
GND
PG1
PG2
PE5
PE6
PE7
VDD
PG3
PG4
PG5
PG6
VDD
PG7
DBG
GND
C51
22uF
Z8F
PA7_SDA
64
PD6_CTS1
63
PC3_SCK
62
PD7_RCOUT
61
60
GND
59
58
57
56
55
54
VDD
53
52
51
50
49
VDD
48
47
PC7_T2OUT
46
PC6_T2IN
45
44
PC1_T1OUT
43
PC0_T1IN
42
GND
41
1
2
J7
EXTERNAL VREF
PG0
PG1
PG2
PE5
PE6
PE7
PG3
PG4
PG5
PG6
PG7
DBG
VDD
R1
4.7K
U3
1
OUT
NC
NC
GND ADJ
MAX6160
IN
NC
NC
2
3
4 5
30
R2
4.7K
PA6_SCL
PA7_SDA
GND
C45
C46
0.1uF
0.1uF
VDD
C3
0.1uF
8
7
6
U2
1
SCL
2
SDA
3
OVERR
4
5
6
7
8 9
R4
100K
R5
200K
R6
100K
N_MUX_O
M_IN_A
MUX_SEL
M_IN_B
M_OUT_A
M_IN_C
M_OUT_B
M_IN_D
M_OUT_C
GND M_OUT_D
PCA8550
VDD
C49
0.1uF
C50
0.1uF
GND
1
2
VREF
VDD
WP
J9
GND
15
14
GND
13
12
11
10
VDD
16
Z8F64 & CONNECTORS
ID_2
ID_1
ID_0
C48
0.1uF
Figure 9. Z8 Encore!® Evaluation Board (96C0868-001 Rev.C)
UM014605-0208 Schematics
Page 35

Z8 Encore!
®
Flash Microcontroller Development Kit
User Manual
31
U5
3
4
7
8
13
14
17
18
11
1
U7
D0
D1
D2
D3
D4
D5
D6
D7
CLK
OE
74HCT374
13
14
17
18
11
13
14
17
18
11
3
4
7
8
1
3
4
7
8
1
VCC
GND
Q0
Q1
Q2
Q3
Q4
Q5
Q6
Q7
GND
D0
D1
D2
D3
D4
D5
D6
D7
CLK
OE
74HCT374
U6
D0
D1
D2
D3
D4
D5
D6
D7
CLK
OE
74HCT374
PE0
PE1
PE2
PE3
PE4
PE5
PG0
PG1
PG2
PG3
PG4
PG5
PG6
PG0
PG1
PG2
PG3
PG4
PG5
PG6
PE6 PE7 PG7
2
Q0
5
Q1
6
Q2
9
Q3
12
Q4
15
Q5
16
Q6
19
Q7
20
VCC
10
GND
GND
2
Q0
5
Q1
6
Q2
9
Q3
12
Q4
15
Q5
16
Q6
19
Q7
20
VCC
10
GND
GND
AN2_0
2
AN2_1
5
AN2_2
6
AN2_3
9
AN2_4
12
AN2_5
15
AN2_6
16
19
VDD
20
C6
10
0.1uF
0.1uF
VDD
0.1uF
VDD
C4
C5
PG0
PG1
PG2
PG3
PG4
PG5
PG6
CT1_0
CT1_1
CT1_2
CT1_3
CT1_4
AN1_0
AN1_1
AN1_5
AN1_6
AN1_2
AN1_3
AN1_4
3
4
7
8
13
14
17
18
11
1
12
11
2
9
4
5
6
U8
D0
D1
D2
D3
D4
D5
D6
D7
CLK
OE
74HCT374
1 3 10 7 8
LTP -757
2
Q0
5
Q1
6
Q2
9
Q3
12
Q4
15
Q5
16
Q6
19
Q7
20
VCC
10
GND
GND
AN3_0
AN3_1
AN3_2
AN3_3
AN3_4
AN3_5
AN3_6
VDD
C7
0.1uF
D3
PG0
PG1
PG2
PG3
PG4
PG5
PG6
13
14
17
18
11
CT2_0
CT2_1
CT2_2
CT2_3
CT2_4
AN2_0
AN2_1
AN2_2
AN2_3
AN2_4
AN2_5
AN2_6
3
4
7
8
1
U9
D0
D1
D2
D3
D4
D5
D6
D7
CLK
OE
74HCT374
VCC
GND
12
11
Q0
Q1
Q2
Q3
Q4
Q5
Q6
Q7
GND
2
9
4
5
6
1 3 10 7 8
LTP -757
AN4_0
2
AN4_1
5
AN4_2
6
AN4_3
9
AN4_4
12
AN4_5
15
AN4_6
16
19
VDD
20
C8
10
0.1uF
CT3_0
CT3_1
CT3_2
CT3_3
CT3_4
VCC
GND
12
11
Q0
Q1
Q2
Q3
Q4
Q5
Q6
Q7
GND
2
9
4
5
6
1 3 10 7 8
LTP -757
2
CT2_1
5
CT2_2
6
CT2_3
9
CT2_4
12
15
16
19
VDD
20
C9
10
0.1uF
PE0
PE1
PE2
PE3
PE4
D4
AN3_0
AN3_1
AN3_2
AN3_3
AN3_4
AN3_5
AN3_6
PE0 CT2_0
PE1
PE2
PE3
PE4
U10
3
D0
4
D1
7
D2
8
D3
13
D4
14
D5
17
D6
18
11
1
D7
CLK
OE
74HCT374
PE6 PE7 PG7
CT4_0
CT4_1
CT4_2
CT4_3
CT4_4
D1
AN4_0
AN4_1
AN4_2
AN4_3
AN4_4
AN4_5
AN4_6
U11
3
Q0
D0
4
Q1
D1
7
Q2
D2
8
Q3
D3
13
Q4
D4
14
Q5
D5
17
Q6
D6
18
Q7
D7
11
CLK
VCC
1
OE
GND
74HCT374
GND
1 3 10 7 8
12
11
2
9
4
5
6
LTP -757
CT3_0 CT4_0
2
CT3_1
5
CT3_2
6
CT3_3
9
CT3_4
12
15
16
19
VDD
20
C10
10
0.1uF
PE0
PE1
PE2
PE3
PE4
D2
3
4
7
8
13
14
17
18
11
1
U12
D0
D1
D2
D3
D4
D5
D6
D7
CLK
OE
74HCT374
VCC
GND
Q0
Q1
Q2
Q3
Q4
Q5
Q6
Q7
GND
2
CT4_1
5
CT4_2
6
CT4_3
9
CT4_4
12
15
16
19
VDD
20
C11
10
0.1uF
SW1
SW PUSHBUTTON
SW2
SW PUSHBUTTON
SW3
SW PUSHBUTTON
VDD
R7
10K
R8
10K
R9
10K
R10
R11
R12
M_TIP
12
33
33
33
PD3
PF6
PF7
VDD
GND
VDD
GND
M_RING
SIDACTOR P3100SB
U13
C12
0.001uF
GND
Ferrite Core
C13
0.001uF
J1
1
L1
2
3
4
5
6
RJ11
1
2
3
4
5
6
Figure 10. Z8 Encore!® Evaluation Board (96C0868-001 Rev.C)
UM014605-0208 Schematics
Page 36

VDD
C14
1918
U15
2
C16
C18
0.1
0.1
PA5_TXD0
VDD
U20A
147
-0_CON_DIS
-1_CON_DIS -1_CON_DIS
VDD
1
2
74LVC00/SO
C27
PD5 _TXD1
PF0_DTR1
PF1_RTS1
-MOD_DIS
10K
PF4_RI1
PF2_DSR1
PD6_CTS1
PD4_RXD1
PF3_DCD1
GND
C26
0.1
0.1
PA3_CTS0
PA4_RXD0
3
VDD
U17B
3 4
GND
28
24
1
2
14
13
12
22
23
20
19
18
17
16
15
GND
147
74LVC04/SO
VDD
U18
C1+
C1-
C2+
C2-
T1IN
T2IN
T3IN
FORCEOFF
FORCEON
R2OUTB
R1OUT
R2OUT
R3OUT
R4OUT
R5OUT
4
5
6
13
12
15
10
1
20
26
VCC
INVALID
GND
25
C+
C1-
C2+
C2-
T1IN
T2IN
R1OUT
R2OUT
EN
SHDN
MAX3222
C25
0.1
V+
V-
T1OUT
T2OUT
T3OUT
R1IN
R2IN
R3IN
R4IN
R5IN
MAX3245CAI
V+
VCCGND
V-
T1OUT
T2OUT
R1IN
R2IN
NC
NC
27
3
TXD1
9
DTR1
10
RTS1
11
21
DSR1
4
RI1
5
CTS1
6
RXD1
7
DCD1
8
0.1uF
3
7
17
8
16
9
14
11
J10
C19
0.1uF
TXD0
CTS0 VDD
RXD0
VDD
1
2
EN_IRDA
C28
C29
0.1
0.1
DCD1
DSR1
RXD1
RTS1
TXD1
CTS1
DTR1
RI1
MODEM
R15
10K
P2
1
6
2
7
3
8
4
9
5
DB9 Male
C20
0.1uF
U17A
1 2
-DIS_IrDA
147
VDD
U19
1
GND
DS1233A-15
TXD0
CTS0
RXD0
74LVC04/SO
VCC
RESET
RESET
CONSOLE
P1
1
6
2
7
3
8
4
9
5
DB9 Female
4
5
R16
10K
3
2
C30
SW4R18
0.01
147
VDD
P3
PWR JACK
U20B
6
74LVC00/SO
R17
100K
12345
TP1
12345
TP2
-RESET
GND
Z8 Encore!
®
Flash Microcontroller Development Kit
User Manual
32
9VDC
9VDC
F1
RXE160
GND
VDD
VDD
D5
S2G
R24
68
R25
2R7
PA5_TXD0
IRDA_SD
PA4_RXD0
RX
TX
J11
1
2
3
con 3
D8
D10
C21
0.1
C52
330nF
U21
5
VCC
1
LEDA
2
TXD
4
SD
3
RXD
6
GND
MOD_VCC
PF5
D7
21
D9
21
2
3
1
U14
LM7805C/TO220/0.5A
1 3
IN OUT
+
C22
47uF
T
ZHX1810
0
M_RING
VCC
VDD
C44
0.1uF
GND
R19
10K
R20
DCD
21
R21
R22
DTR
21
R23
M_TIP
0
0
0
0
VCC
5V
GND
2
C17
0.1
100/10
U16
3 2
VIN VOUT
1
GND
LT1086-3.3/TO220
VCC
+
C15
C24
0.1
3.3V
+
C23
100/6.3
VDD
R14
680
21
D6
GREEN
3.3 OK
GND
M_TIP
M_RING
GND
1
2
1
2
3
4
5
6
7
8
9
J4
HEADER 2
J3
HEADER 9
MODEM CONNECTORS
J2
1
2
3
4
5
6
7
8
9
10
11
12
13
14
15
16
17
18
19
20
21
22
23
24
25
26
27
28
29
30
31
32
HEADER 32
MODEM's
AGND
MOD_VCC
PF0_DTR1
PF3_DCD1
PD6_CTS1
PF2_DSR1
PF4_RI1
PD5 _TXD1
PD4_RXD1
PF1_RTS1
-MOD_DIS
GND-MRESET
Figure 11. Z8 Encore!® Evaluation Board (96C0868-001 Rev.C)
UM014605-0208 Schematics
Page 37

Z8 Encore!
5
D D
J12
1
2
RS485_1_EN
U22
1
RO
PA4 _RXD0
PA2
PA5_TXD0
C C
PD4_RXD1
PF1 _RTS1
PD5_TXD1
B B
VCC
2
RE
B
3
DE
A
4 5
DI GND
DS1487
U23
1
RO
VCC
2
RE
B
3
DE
A
4 5
DI GND
DS1487
J13
1
2
RS485_2_EN
4
R26
10K
R29
10K
VCC
VCC
GND
C53
0.1uF
C54
0.1uF
J14
RT_1
J15
RT_2
1
2
1
2
8
7
6
8
7
6
R27
R28
3
9 8
GND
5 6
120
P5
1
2
3
GND
4
5
6
7
8
con8
120
VDD
14
13
GND
12 11
U24D
7
TC74LVT125
GND
14
10
U24C
7
TC74LVT125
4
14
7
U24B
TC74LVT125
2
-MOD_DIS
-0_CON_DIS
R30
10K
VDD
-DIS_IRDA
®
Flash Microcontroller Development Kit
1
User Manual
33
VDD
VCC
A A
5
GND
VDD
VCC
GND
Title
Schematic, Z8F Encore Evaluation Board
Size Document Number Rev
B
4
3
2
Date: Sheet
96C0868-001 B
1
of
44Thursday, May 30, 2002
Figure 12. Z8 Encore!® Evaluation Board (96C0868-001 Rev.C)
UM014605-0208 Schematics
Page 38

Z8 Encore!
®
Flash Microcontroller Development Kit
User Manual
34
Figure 13. Z8 Encore!® Smart Cable
UM014605-0208 Schematics
Page 39

Z8 Encore!® Flash Microcontroller Development Kit
User Manual
35
Index
A
addressing, LED 14
anode and cathode 14
anode assignments 14
array, LED 14
B
block diagram 12
blocks, evaluation board 11
C
C address for configuration register 16
cathode/modem assignments 15
communication devices, serial 15
configuration 4
headers 23
register, I2C 16
connectors, RS-232 and RS-485 17
console enable/disable 25
D
debug and testing 17
digital thermometer 16
documentation 3
E
embedded modem 28
ENDEC 16
evaluation board
block diagram 12
configuration headers 23
DIS_IrDA 26
embedded modem 28
expansion module interface 17
external Vref 25
features 10
I2C
interface 15
J11 VDC values 26
J6 signals, pins and functions 18
J8 signals, pins and functions 20
major blocks 11
power and communication 17
SocketModem ordering information 29
SPI interface 16
Vref 25
expansion module interface 17
external Vref 25
F
features, evaluation board 10, 12
features, Z8 Encore! 13
file menu 9
fixed voltage 25
G
getting started 9
UM014605-0208 Index
Page 40

Z8 Encore!® Flash Microcontroller Development Kit
User Manual
36
H
hardware 1
host system configuration 4
I
I2C
configuration register 16
I2C interface 15
infrared communication 16
installation 5
the ZDC II Z8 Encore! software 8
wizard screen shot 8
interface
four-wire 16
I2C 15
SPI 16
IrDA
enable/disable 26
transceiver 16
J
J11 VDC values 26
J6 signals, pins and functions 18
J8 signals, pins and functions 20
L
LED
addresses 14
modem status 28
LED anode and cathode information 14
M
MCU 13
modem enable/disable 24
P
PCA8550 16
phone line connections 28
plug-in modules 17
power and communication 17
power supply 17
pushbuttons 29
R
register pairs 14
requirements 4
RS-232 connector 17
RS-485 connector 17
K
kit contents 1
UM014605-0208 Index
S
SCL (serial clock line) 15
SDA (serial data line) 15
serial communications devices 15
setting up the evaluation board 5
Page 41

Z8 Encore!® Flash Microcontroller Development Kit
shunt status 24
signals
J6 17
J8 20
SocketModem 28
power 26
SocketModem ordering information 29
software 2
SPI interface 16
suggested host system configuration 4
system/software requirements 4
U
user-configurable pushbuttons 29
using ZDS 9
User Manual
37
V
Vref 25
Z
Z8 Encore!
features 13
Z8 Encore! MCU 13
UM014605-0208 Index
Page 42

Z8 Encore!® Flash Microcontroller Development Kit
Customer Support
For answers to technical questions about the product, documentation, or
any other issues with Zilog’s offerings, please visit Zilog’s Knowledge
Base at http://www.zilog.com/kb
For any comments, detail technical questions, or reporting problems,
please visit Zilog’s Technical Support at http://support.zilog.com
User Manual
38
.
.
UM014605-0208 Customer Support
Page 43

Z8 Encore!® Flash Microcontroller Development Kit
User Manual
39
Warning:
DO NOT USE IN LIFE SUPPORT
LIFE SUPPORT POLICY
ZILOG'S PRODUCTS ARE NOT AUTHORIZED FOR USE AS CRITICAL
COMPONENTS IN LIFE SUPPORT DEVICES OR SYSTEMS WITHOUT THE
EXPRESS PRIOR WRITTEN APPROVAL OF THE PRESIDENT AND GENERAL
COUNSEL OF ZILOG CORPORATION.
As used herein
Life support devices or systems are devices which (a) are intended for surgical implant
into the body, or (b) support or sustain life and whose failure to perform when properly
used in accordance with instructions for use provided in the labeling can be reasonably
expected to result in a significant injury to the user. A critical component is any
component in a life support device or system whose failure to perform can be reasonably
expected to cause the failure of the life support device or system or to affect its safety or
effectiveness.
Document Disclaimer
©2008 by Zilog, Inc. All rights reserved. Information in this publication concerning the
devices, applications, or technology described is intended to suggest possible uses and
may be superseded. ZILOG, INC. DOES NOT ASSUME LIABILITY FOR OR
PROVIDE A REPRESENTATION OF ACCURACY OF THE INFORMATION,
DEVICES, OR TECHNOLOGY DESCRIBED IN THIS DOCUMENT. ZILOG ALSO
DOES NOT ASSUME LIABILITY FOR INTELLECTUAL PROPERTY
INFRINGEMENT RELATED IN ANY MANNER TO USE OF INFORMATION,
DEVICES, OR TECHNOLOGY DESCRIBED HEREIN OR OTHERWISE. The
information contained within this document has been verified according to the general
principles of electrical and mechanical engineering.
Z8, Z8 Encore!, Z8 Encore! XP, Z8 Encore! MC, Crimzon, eZ80, and ZNEO are
trademarks or registered trademarks of Zilog, Inc. All other product or service names are
the property of their respective owners.
UM014605-0208
 Loading...