

Page 1

ENLTV-DVB-S
DVB-S PCI TV Tuner
(PCI Satellite TV Receiver Card / Recorder)
ENLTV-DVB-S Series
User’s Guide
Page 2

ENLTV-DVB-S User’s Guide -
User’s Notice
This manual is provided “as is” without warranty of any kind, either express or implied,
including but not limited to the implied warranties or conditions of merchantability or fitness
for a particular purpose. In no event shall we, its directors, officers, employees or agents
be liable for any indirect, special, incidental, or consequential damages (including
damages for loss of profits, loss of business, loss of use or data, interruption of business),
even if we have been advised of the possibility of such damages arising from any defect or
error in this manual or product.
Specifications and information contained in this manual are furnished for information
use only, and are subject to change at any time without notice, and should not be
construed as a commitment by us. We assume no responsibility or liability for any errors or
inaccuracies that may appear in this manual, including the products and software
described in it.
No part of this manual, including the products and software described in it, may be
reproduced, transmitted, transcribed, stored in a retrieval system, or translated into any
language in any form or by any means, except documentation kept by the purchaser for
backup purposes, without the express written permission of us.
Product warranty or service will not be extended if: (1) the product is repaired,
modified or altered, unless such repair, modification of alteration is authorized in writing by
us; or (2) the serial number of the product is defaced or missing.
Products and corporate names appearing in this manual may or may not be
registered trademarks or copyrights of their respective companies, and are used only for
identification or explanation and to the owners’ benefit, without intent to infringe.
Windows, MS-DOS, and DirectX are registered trademarks of Microsoft Corporation.
Adobe and Acrobat are registered trademarks of Adobe Systems Incorporated.
The product name and revision number are both printed on the product itself. Manual
revisions are released for each product design represented by the digit before and after
the period of the manual revision number. Manual updates are represented by the third
digit in the manual revision number.
Copyright © 2008 ENCORE ELECTRONICS, INC. All Rights Reserved.
2
Page 3

ENLTV-DVB-S User’s Guide -
Contents:
Chapter 1: Introduction..................................................................................................................4
1.1 Package Contents .............................................................................................................4
1.2 System Requirements.......................................................................................................4
Chapter 2: Getting Started..............................................................................................................5
2.1 Connect ENLTV-DVB-S ..................................................................................................5
2.2 Device Driver Installation.................................................................................................6
2.2.1 Device driver installation for Windows XP ................................................................6
2.2.2 Device driver installation for Windows Vista ...........................................................10
2.3 Install the ENLTV-DVB-S utility software......................................................................12
Chapter 3: Launch the Software...................................................................................................14
3.1 Running the ENLTV-DVB-S for the first time. ...............................................................14
3.2 Record Video..................................................................................................................16
Chapter 4: Using the Remote Control...........................................................................................17
4.1 Installing Batteries..........................................................................................................17
4.2 Remote controller functions............................................................................................17
Chapter 5: Supporting Center:......................................................................................................18
3
Page 4

ENLTV-DVB-S User’s Guide -
Chapter 1: Introduction
1.1 Package Contents
Upon receiving your ENLTV-DVB-S, please make sure the following items are included in
the ENLTV-DVB-S package.
CD of Installation Software
ENLTV-DVB-S Card
Audio Cable
4 in 1 Audio / Video cable
Remote sensor cable
Remote Controller
User’s Guide or Quick Installation Guide
1.2 System Requirements
IBM PC or compatible
PCI 2.1 or 2.2 compliant interface
Intel Pentium IV 2.0GHz CPU or higher (Recommended)
Minimum 256 MB memory
Minimum 1GB hard disk space available
VGA card supports DirectX 9.0c or above
SoundBlaster compatible sound card
One free PCI slot
Microsoft Windows XP Home or Professional with Service Pack 2, Windows Vista
CD-ROM drive for driver and software installation
4
Page 5
ENLTV-DVB-S User’s Guide -
Chapter 2: Getting Started
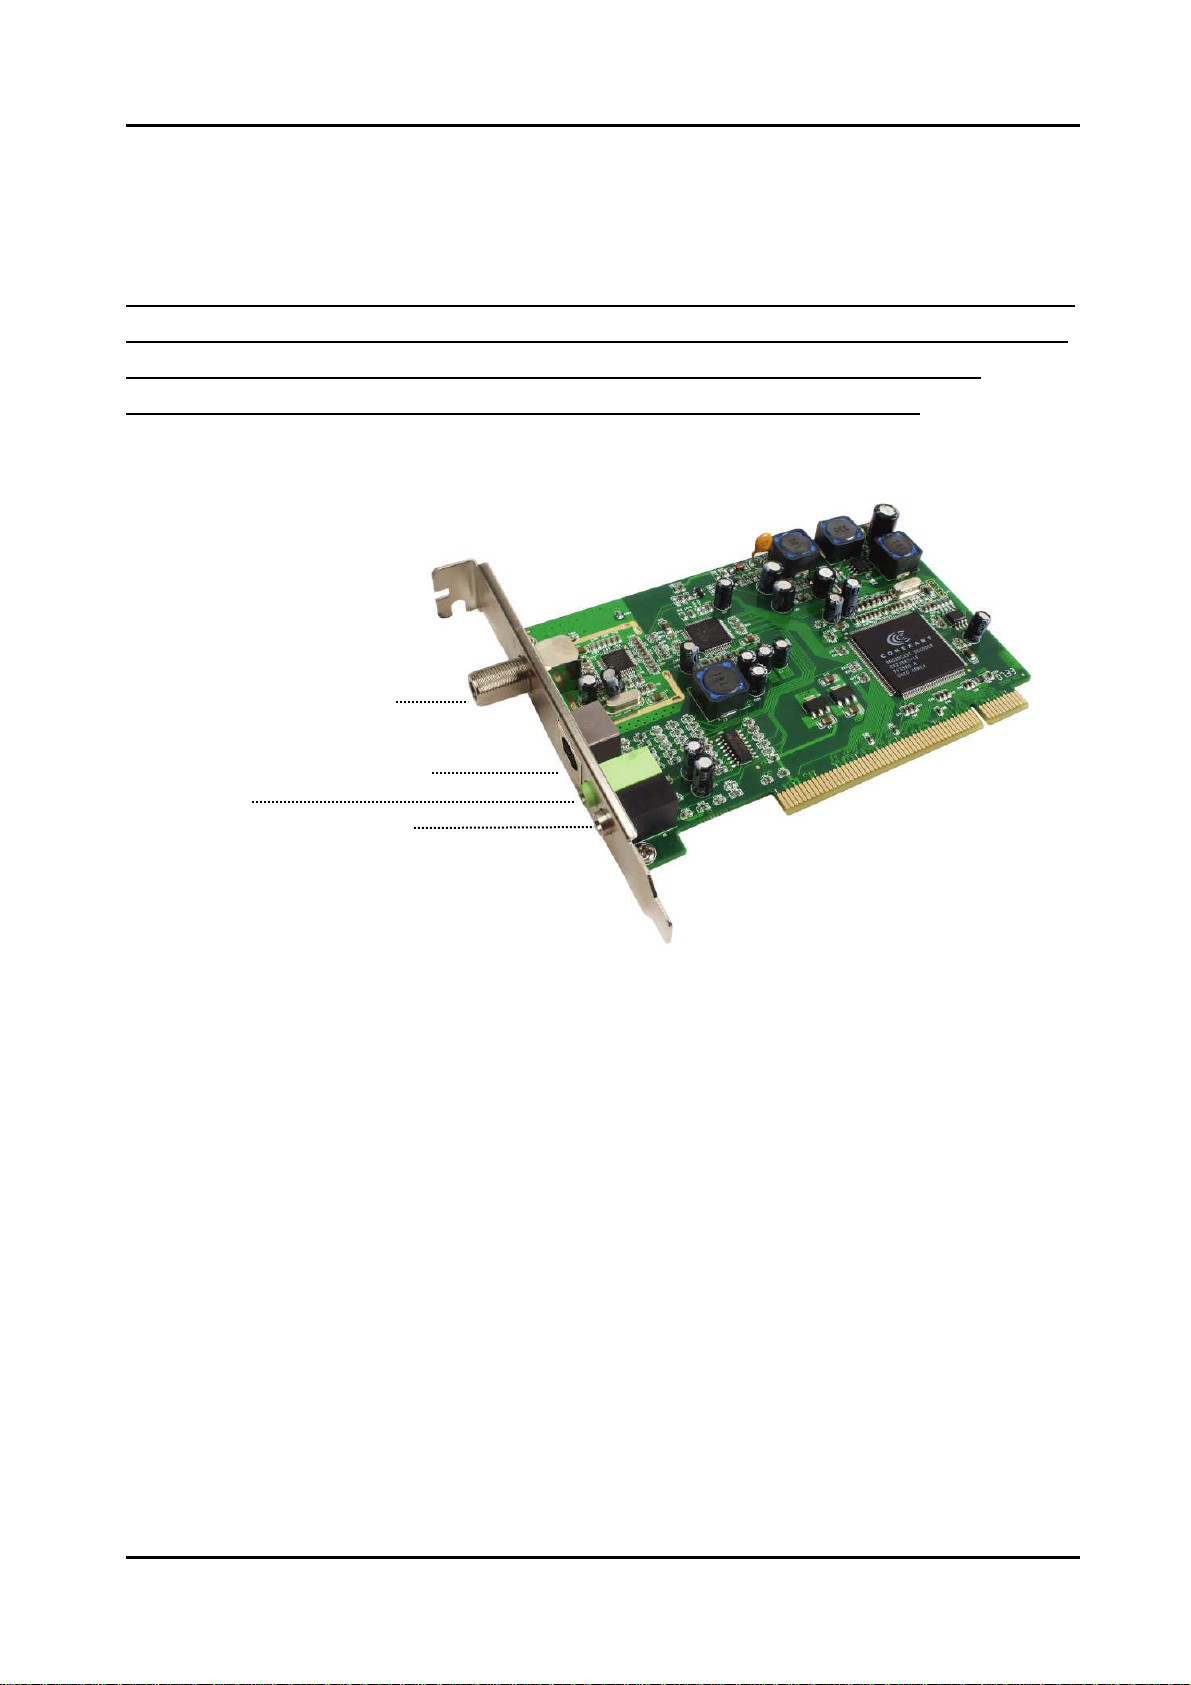
2.1 Connect ENLTV-DVB-S
Notes: Satellite cable has 12V power. At the first time installation, please make sure
the PC system’s power cord has not been connected to the power jack even when
the PC’s power is in shutdown state. Turn on the PC power ONLY after the
ENLTV-DVB-S has been firmly and securely plugged into the PCI slot.
Refer to below wire connection diagram for correct connection:
Satellite Dish cable input
4 to 1 Audio / Video cable in
Audio out
Remote sensor cable input
Caution: Please take special care on the Remote sensor cable, don’t plug in or plug off
the sensor cable while the PC system is in Power on state. Otherwise, it may cause
ENLTV-DVB-S hardware failure.
5
Page 6

ENLTV-DVB-S User’s Guide -
2.2 Device Driver Installation
Place the CD-ROM that came with the ENLTV-DVB-S in the CD-ROM drive. (Assuming
that the ENLTV-DVB-S PCI TV Tuner card is properly installed to the computer’s PCI slot),
then follow the on-screen installation guide below.
2.2.1 Device driver installation for Windows XP
1. When the computer is powered on for the
very first time during the setup, a
message “Found New Hardware Wizard”
dialogue box will appear on the screen.
Please click “Cancel” button or directly go
to next step.
2. Click “Setup Driver” button.
3. Click “Next” button to begin installation.
6
Page 7

ENLTV-DVB-S User’s Guide -
4. Click “Install” button.
5. Click “Continue Anyway” to continue the
installation.
6. Click “Continue Anyway” to continue the
installation.
7
Page 8

ENLTV-DVB-S User’s Guide -
7. Click “Continue Anyway” to continue the
installation.
8. Click “Continue Anyway” to continue the
installation.
9. Click “Continue Anyway” to continue the
installation.
8
Page 9

ENLTV-DVB-S User’s Guide -
10. Click “Continue Anyway” to continue the
installation.
11. Click “Continue Anyway” to continue the
installation.
12. Click “Continue Anyway” to continue the
installation.
9
Page 10

ENLTV-DVB-S User’s Guide -
13. Click “Finish” button to complete the
DVB-S card Hardware Installation Wizard.
2.2.2 Device driver installation for Windows Vista
1. When the computer is powered on for the
very first time during the setup, a
message “Found New Hardware Wizard”
dialogue box will appear on the screen.
Please click “Cancel” button or directly go
to next step.
2. Click “Setup Driver” button.
10
Page 11

ENLTV-DVB-S User’s Guide -
3. Click “Next” button
4. Click “Install” button
5. Click “Install this driver software anyway”
button 4 times.
6. Click “Finish” button to complete the
DVB-S card Hardware Installation Wizard.
11
Page 12

ENLTV-DVB-S User’s Guide -
2.3 Install the ENLTV-DVB-S utility software.
1. Insert the installation CD-ROM into the
CD-ROM drive. The setup will
automatically appear.
2. Click “Setup Utility”.
3. Select the language and click “Next”
button.
4. Click “Next” button
12
Page 13

ENLTV-DVB-S User’s Guide -
5. Click “Next” button or choose different
folder for installation.
6. Click “Install” button to start installing.
7. Click “Finish” to complete installation.
13
Page 14

ENLTV-DVB-S User’s Guide -
) and select your converter type (in
Chapter 3: Launch the Software
3.1 Running the ENLTV-DVB-S for the first time.
Click “Start” on Windows Taskbar, and then select “All Programs” \ Encore \ ProgDVB
At the first time running, please follow the setup steps as below.
1. Select the type of your card and click
“Next” button.
2. You must add the switch and/or positioner
into the DiSEqC tree (Main Menu -> Setting
-> DiSEqC
LNB properties). In the same place, you also
need to assign to each converter the satellite
(or several satellites) that will be received.
14
Page 15

ENLTV-DVB-S User’s Guide -
Usually, the free channels will be marked with
3. Then all satellites must be scanned in Main
Menu -> Channel list -> Search channels
-> …
4. That’s all. After that, you’ll see the
channels list and be able to watch then.
green color, and those encrypted channels
will be marked with the red color.
15
Page 16

ENLTV-DVB-S User’s Guide -
3.2 Record Video
Click “Start” on Windows Taskbar, and then select “All Programs” \ Encore \ ProgDVB
1. Double click to full screen display.
2. Video Record: to start record video
3. Source Switch: click it to select Video In or S-Video In.
4. Volume Control: Adjust volume
5. Playback video: to start playback recorded video file
1. Double click to full
5. Playback Video
6. Snapshot
7. Setting
6. Snapshot: Snapshot still image
7. Setting: Setup the video format
8. Window control: Adjust the window size.
16
Page 17

ENLTV-DVB-S User’s Guide -
Chapter 4: Using the Remote Control
The Remote controller allows you to operate the ENLTV-DVB-S remotely, such as turning
your TV on/off, viewing the TV, and changing the channels and volume. Aim the front of
the Remote Controller at the Remote Control Receiver and press the control buttons as
you would on the infrared receiver.
4.1 Installing Batteries
Open the back cover of remote controller and put in two pieces AAA batteries (alkaline
battery recommended).
4.2 Remote controller functions
1. Power: Close/Open TV Program.
2. Mute: Mute the audio
3. Number keys: Input TV channel number
4. Single or Double digits channel.
5. Recall: Return to the previous channel
6. Channel Up
7. Channel Down
8. Volume High
9. Volume Low
10. REC: Record video
11. Full screen: Full screen display
12. TV window: Hide the TV channel and control
13. Snap: Snapshot the still image
14. Channel list: Display the channel list
15. OK: Enter
16. Timeshift: Time shift the TV movie
17
Page 18

ENLTV-DVB-S User’s Guide -
Chapter 5: Supporting Center:
For Technical Support, Installation Hotline or Contacts, please visit our web site at
http://www.encore-usa.com .
18
Page 19

ENLTV-DVB-S User’s Guide -
NOTES:
_______________________________________________________________________
_______________________________________________________________________
_______________________________________________________________________
_______________________________________________________________________
_______________________________________________________________________
_______________________________________________________________________
_______________________________________________________________________
_______________________________________________________________________
_______________________________________________________________________
_______________________________________________________________________
_______________________________________________________________________
_______________________________________________________________________
_______________________________________________________________________
_______________________________________________________________________
_______________________________________________________________________
_______________________________________________________________________
_______________________________________________________________________
_______________________________________________________________________
19
Page 20

2008/06/30
Version: 1.01
 Loading...