

Page 1

ENDSL-A2+WIG2
ADSL2+ Modem
With Four Port Ethernet and
802.11g Wireless Router
User’s Manual
August 2007
Page 2

FCC Warning
ENDSL-A2+WIG2 has been tested and found to comply with the limits for a Class B digital
device, pursuant to part 15 of the FCC Rules. These limits are designed to provide reasonable
protection against harmful interference in a residential installation. This equipment generates,
uses, and can radiate radio frequency energy and, if not installed and used in accordance with
the instructions, may cause harmful interference to radio communication. However, there is no
guarantee that interference will not occur in a particular installation. If this equipment does ca use
harmful interference to radio or television reception, which can be determined by turning the
equipment off and on, the user is encouraged to try to correct the interference by one or more of
the following measures:
- Reorient or relocate the receiving antenna.
- Increase the separation between the equipment and receiver.
- Connect the equipment into an outlet on a circuit different from that to which
- Consult the dealer or an experienced radio/TV technician for help. the receiver is
connected.
FCC Caution: Any changes or modifications not expressly approved by the party responsible for
compliance could void the user’s authority to operate this equipment.
This device complies with Part 15 of the FCC Rules. Operation is subject to the following two
conditions: (1) This device may not cause harmful interference, and (2) this device must accept
any interference received, including interference that may cause undesired operation.
IMPORTANT NOTE:
FCC Radiation Exposure Statement:
ENDSL-A2+WIG2 comply with FCC radiation exposure limits set forth for an uncontrolled
environment. This equipment should be installed and operated with a minimum distance of about
eight inches (20cm) between the radiator and your body.
This transmitter must not be co-located or operated in conjunction with any other antenna or
transmitter.
Notice
Changes or modifications to the equipment, which are not approved by the party responsible for
compliance could affect the user's authority to operate the equipment. Company has an on-going
policy of upgrading its products and it m ay be possible that informa t ion in this document is not
up-to-date. Please check with your local distributors for the latest information.
1
Page 3

Copyright
2007 All Rights Reserved.
No part of this document can be copied or reproduced in any form without written consent from
Encore Electronics Inc.
Trademarks:
All trade names and trademarks are the properties of their respective companies.
Revision History
Revision History
V1.1 Second release
2
Page 4

Contents
1. Introduction................................................................................. 6
1.1 Introduction ......................................................................................... 6
1.2 Product Features................................................................................. 6
2. Hardware Installation................................................................10
2.1 System Requirements....................................................................... 10
2.2 Package Contents............................................................................. 10
2.3 Front Panel Indicators and Description .......................................... 10
2.4 Back Panel......................................................................................... 11
2.5 Connect Related Devices ................................................................. 11
3. Connecting Wireless ENDLS-A2+WIG2 via Ethernet ............ 12
3.1 Setup Wireless ADSL2+ router via Ethernet Cable ........................ 12
3.2 Configure TCP/IP ............................................................................... 12
4. Configure Wireless ENDLS-A2+WIG2 Router via HTML .......26
4.1 Login .................................................................................................. 26
4.2 Navigating the Web Configurator .................................................... 27
5. Quick Start Wizard....................................................................28
5.1 Setting a New Password................................................................... 30
5.2 Choose your Time Zone ................................................................... 30
5.3 Set your Internet Connection........................................................... 31
5.3.1 Configuring Dynamic IP Address .......................................... 31
5.3.2 Configuring Static IP Address................................................ 32
5.3.3 Configuring PPPoE................................................................. 33
5.3.4 Configuring PPPoA................................................................. 33
5.3.5 Configuring Bridge Mode....................................................... 34
5.3.6 Multiplexing............................................................................. 35
5.3.7 VPI and VCI.............................................................................. 35
5.4 Finishing the Wizard......................................................................... 36
6. Interface Setup.......................................................................... 37
6.1 Internet............................................................................................... 37
6.1.1 ATM VC & QoS......................................................................... 38
6.1.2 Encapsulation.......................................................................... 39
6.2 LAN..................................................................................................... 43
6.2.1 Router Local IP........................................................................ 43
6.2.2 Explaining RIP Setup.............................................................. 44
6.2.3 DHCP Server............................................................................ 44
3
Page 5

6.2.4 DHCP Relay ............................................................................. 45
6.2.5 DNS Relay................................................................................ 46
6.3 Wireless ............................................................................................. 47
6.3.1 Access Point Settings.............................................................47
6.3.2 Multiple SSIDs Settings.......................................................... 48
6.3.3 MAC Address Filter................................................................. 48
7 Advanced Setup......................................................................... 49
7.1 Firewall............................................................................................... 49
7.2 Routing............................................................................................... 49
7.3 NAT.....................................................................................................51
7.3.1 What NAT Does ....................................................................... 52
7.3.2 How NAT Works.......................................................................52
7.3.3 NAT Application.......................................................................53
7.3.4 NAT Mapping Types................................................................ 54
7.3.5 DMZ .......................................................................................... 55
7.3.6 Virtual Server........................................................................... 55
7.3.7 IP Address Mapping................................................................ 57
7.4 QoS..................................................................................................... 58
7.5 VLAN .................................................................................................. 59
7.6 ADSL .................................................................................................. 61
8. Access Management ................................................................ 61
8.1 ACL..................................................................................................... 61
8.2 IP Filter...............................................................................................63
8.3 SNMP.................................................................................................. 67
8.4 UPnP................................................................................................... 67
8.5 DDNS..................................................................................................68
8.6 CWMP................................................................................................. 69
9. Maintenance.............................................................................. 71
9.1 Administration................................................................................... 71
9.2 Time Zone .......................................................................................... 71
9.3 Firmware............................................................................................ 73
9.4 System Restart.................................................................................. 73
9.5 Diagnostic.......................................................................................... 74
10. Status....................................................................................... 75
10.1 Device Info....................................................................................... 75
10.2 System Log...................................................................................... 77
10.3 Statistics .......................................................................................... 78
4
Page 6

11. Troubleshooting...................................................................... 80
11.1 Using LEDs to Diagnose Problems................................................ 80
11.1.1 Power LED ............................................................................. 80
11.1.2 LAN LED................................................................................. 80
11.1.3 ADSL LED............................................................................... 80
11.2 Problems with the Web Interface................................................... 81
11.3 Problems with the Login Username and Password ..................... 81
11.4 Problems with LAN Interface.......................................................... 82
11.5 Problems with WAN Interface......................................................... 82
11.6 Problems with the Internet Access................................................ 83
5
Page 7
1. Introduction
1.1 Introduction
This full rate ENDLS-A2+WIG2 is an all-in-one gateway for Home and SOHO applications.
This gateway are with full-featured ADSL router that provides high-speed Internet access, 4-port
Ethernet switch direct connections to individual PCs or local area network with 10/100 Base-T
Ethernet and a 54Mbps IEEE802.11g wireless connectivity. ENDLS-A2+WIG2 uses
advanced ADSL chipset solution with complete set of industry standard features for high-speed
Internet access. Also built-in 54Mbps IEEE802.11g wireless service can provide you easy and
convenient way to connect the PCs and Internet. User can enjoy higher quality multimedia and
real-time applications such as online gaming, Video-on-Demand, VoIP and other bandwidth
consuming services. Also the feature-rich routing functions are seamlessly integrated to ADSL
service for existing corporate or home users. This product is made in ISO9001 approved factory
and complies with FCC part15 regulations and CE approval.
1.2 Product Features
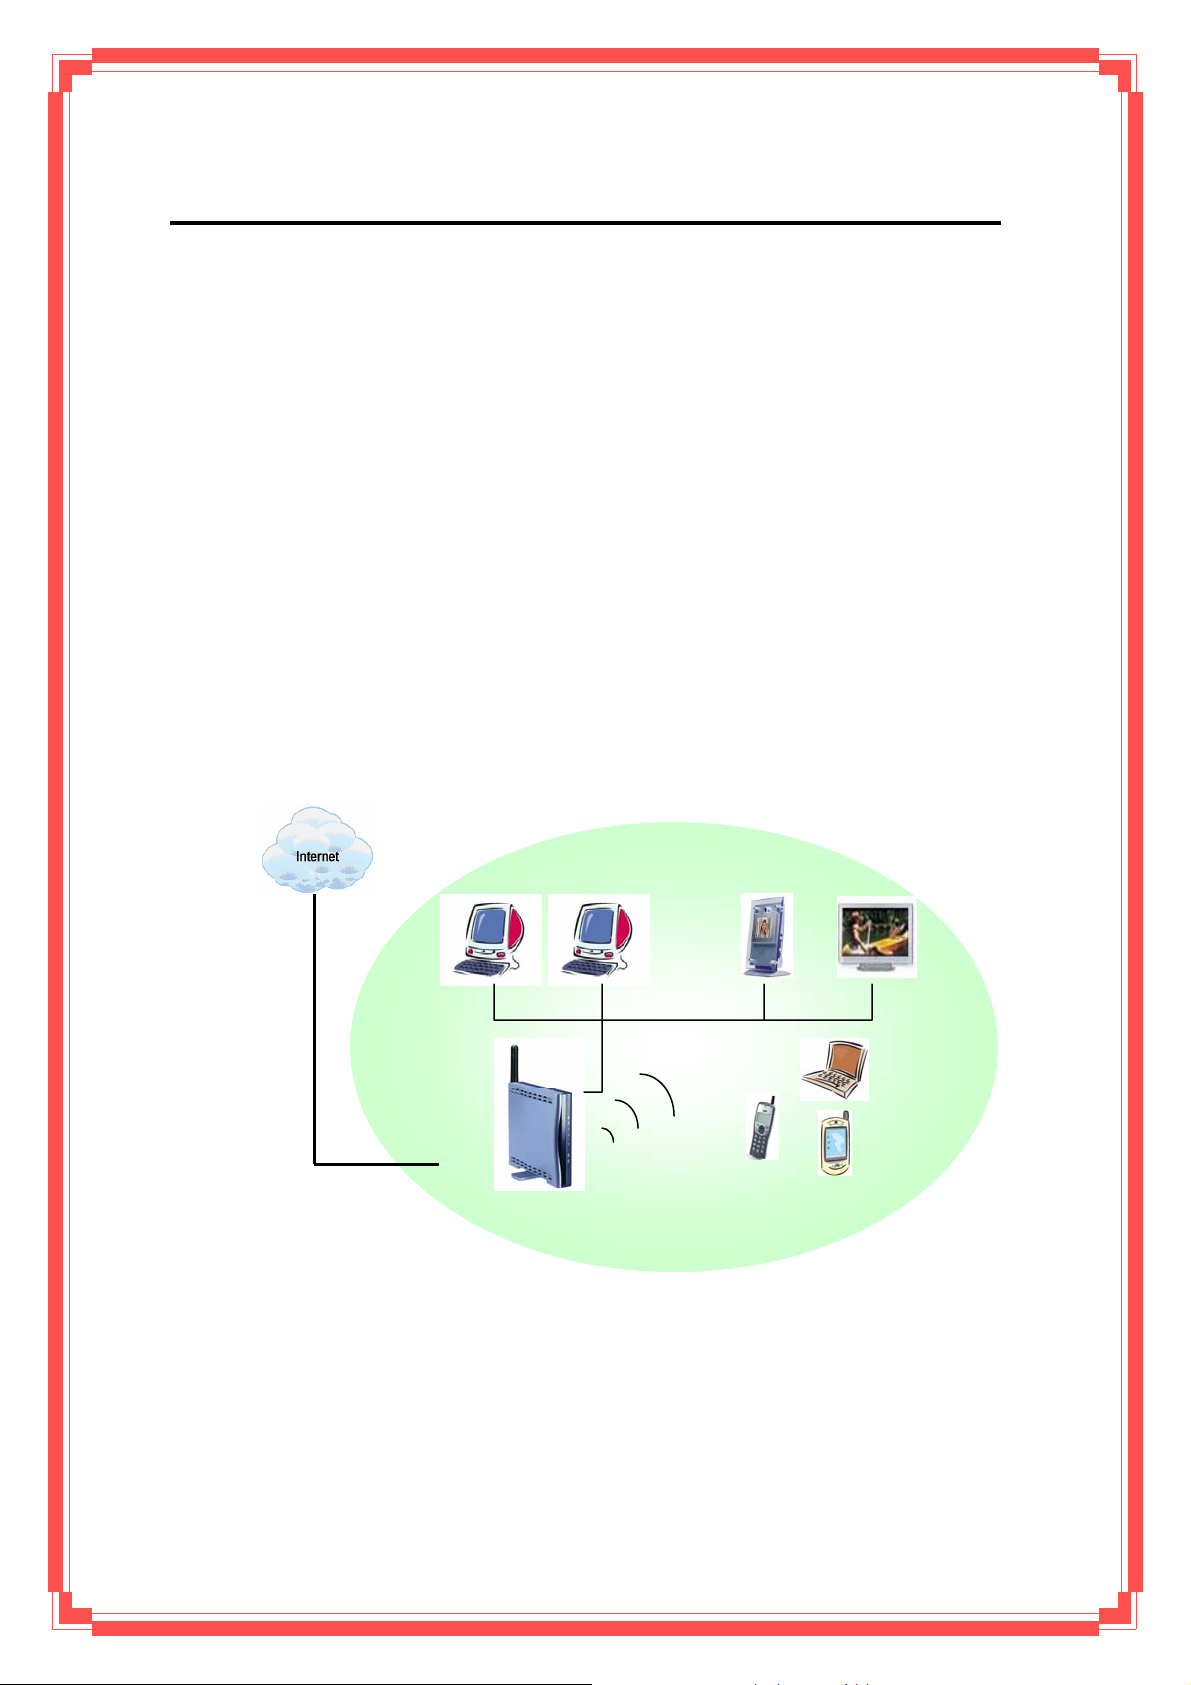
Application Diagram
Wireless Router
IP Phone / PDA / NB
IP Phone / Video Phone
High Speed Internet Access
This ENDLS-A2+WIG2 complies with ADSL / ADSL2 / ADSL2+ standards. It can support
downstream rates of up to 24Mbps and upstream rates of up to 1Mbps. The E NDLS-A2+WIG r is
compliant with the following standards.
6
Page 8

z ANSI T1.413 issue 2
z ITU-T G.992.1 (G.dmt)
z ITU-T G.992.2 (G.lite)
z G.994.1 (G.hs, Multimode)
z ITU-T G.992.3 (ADSL2 G.dmt.bis)
z ITU-T G.992.4 (ADSL2 G.lite.bis)
z ITU-T G.992.5 (ADSL2+; Annex A, B, I, J, L & M)
z Reach Extended ADSL (RE ADSL)
Quick Setup Wizard
Support Quick Setup Wizard Web GUI to configure the ENDLS-A2+WIG2 easily and
quickly.
Multi-connection protocol support
z Multi Protocol over AAL5 (RFC1483 / 2684)
z Classical IP over ATM (RFC 1577)
z VC and LLC Multiplexing
z PPP over Ethernet (RFC 2516)
z PPP over ATM (RFC 2364)
z Supports OAM F4/F5 loop-back, AIS and RDI OAM cells.
z ATM Forum UNI 3.1/4.0 PVC
z Support up to 8PVCs.
z Traffic Shaping (ATM QoS) UBR, CBR, VBR-rt, VBR-nrt
Network Address Translation (NAT)
Network Address Translation (NAT) allows the translation of an Internet protocol address
used within one network (for example a private IP address used in a local network) to a different
IP address known within another network (for example a public IP address used on the Internet).
Universal Plug and Play (UPnP)
Universal Plug and Play is a standard that uses Internet and Web protocols to enable
devices such as PCs, peripherals, intelligent appli ance s, and wi rele ss device s to be plug ged into
a network and automatically know about each other.
robust connectivity among stand-alone devices and P Cs.
This protocol is used to enable simple and
Dynamic DNS Support
With Dynamic DNS support, you can have a static hostname alias for a dynamic IP
7
Page 9

address, allowing the host to be more easily accessible from various locations on the Internet.
You must register for this service with a Dynamic DNS client.
DHCP Support
DHCP (Dynamic Host Configuration Protocol) allows individual clients to obtain TCP/IP
configuration at start-up from a centralized DHCP server. The ADSL router has built-in DHCP
server capability enabled by default. It can assign IP addresses, an IP default gateway and DNS
servers to DHCP clients. It can also act as a surrogate DHCP server (DHCP Relay) where it
relays IP address assignment from the actual real DHCP server to the clients.
Device Management
z Web-based GUI Configuration / Management
z Command-line Interpreter (CLI)
z SNMP support (V.1 and V.2C)
z Telnet Remote Management
z Firmware upgrade via FTP / TFTP (Web-based GUI)
z Built-in Diagnostic tool and IP Ping
z TR-069 support (CPE WAN Management Protocol) (Optional)
10/100M Auto-negotiation Fast Ethernet switch
This auto-negotiation feature allows the router to detect the speed of incoming
transmissions and adjust appropriately without manual intervention. It allows data transfer of
either 10 Mbps or 100 Mbps in either hal f-duplex or full-dupl ex mode depending on your Ethernet
network.
Bridging / Routing support
z Ethernet to ADSL self-learning Transparent Bridging (IEEE 802.1D)
z IP routing-RIPv2 (backward compatible with RIPv1)
z Static IP routing
z Routing (TCP/IP/UDP/ARP/ICMP)
z IP Multicast IGMP v1/v2
Wireless
z IEEE802.11g compliance, backward compatible with 802.11b (at 11Mbps)
z 64/128-bit WEP, WPA, WPA2 security
z Dynamic date rate scaling at 54, 48, 36, 24, 18, 12, 9 and 6Mbps for IEEE802.11g
z Dynamic date rate scaling at 11, 5.5, 2 and 1Mbps for IEEE802.11b
8
Page 10

z Supports Quality of Service (QoS), 802.11e, WMM
z MAC Address Filtering
Security
z PPP over PAP (Password Authentication Protocol; RFC1334)
z PPP over CHAP (Challenge Authentication Protocol; RFC1994)
z DoS Protection
z Stateful Packet Inspection (SPI)
z VPN (IPsec, PPTP, L2TP) pass through
z Built-in NAT Firewall
z IP-based Packet filtering
z Password Protected System Management
9
Page 11

2. Hardware Installation
2.1 System Requirements
z Pentium III 266 MHz processor or higher
z 128 MB RAM minimum
z 20 MB of free disk space minimum
z RJ45 Ethernet Port
2.2 Package Contents
z ENDLS-A2+WIG2 modem
z RJ-45 Ethernet cable
z RJ-11 Phone cable
z Power Adapter
z Quick Installation Guide
z One External Antenna (for detachable model)
2.3 Front Panel Indicators and Description
Front panel of the ENDLS-A2+WIG2 router has LED indicators to display router’s
operating status.
Descriptions of LED status
PWR When an active power adapter is connected with this router, this LED will light up.
When WLAN card installed properly, this LED will be flashing. When transferring data,
WLAN
the LED will be steadily.
LAN4 When port 4 connection with PC or Switch / Hub is established, this LED will light up.
LAN3 When port 3 connection with PC or Switch / Hub is established, this LED will light up.
LAN2 When port 2 connection with PC or Switch / Hub is established, this LED will light up.
LAN1 When port 1 connection with PC or Switch / Hub is established, this LED will light up.
When connection with Internet (ADSL Connected) is established, this LED will light up.
ADSL
When this LED is flashing: NO ADSL physical connection
10
Page 12

2.4 Back Panel
PWR Connect with power adapter
ON/OFF Power switch button
LINE Connect with phone cable
4 Connect with Ethernet Cable to Switch Hub or PC
3 Connect with Ethernet Cable to Switch Hub or PC
2 Connect with Ethernet Cable to Switch Hub or PC
1 Connect with Ethernet Cable to Switch Hub or PC
DEFAULT Reset button
2.5 Connect Related Devices
1) Connect Router to LINE
Plug the provided RJ-11 phone cable into LINE port on the back panel of the router
and insert the other end into splitter or wall phone jack.
2) Connect Router to LAN
Plug RJ-45 Ethernet Cable into LAN port on the back panel of the router and insert
the other end of the Ethernet cable on your PC’s Ethernet port or switch / hub.
3) Connect Router to Power Adapter
Plug Power Adapter to PWR port on the back panel of the router and the other end to
a power outlet.
4) Press ON/OFF button to start the router
Warning! Only use the power adapter provided in the package, otherwise it may cause
hardware damage.
11
Page 13
3. Connecting ENDLS-A2+WIG2 via Ethernet
Your router can be managed from anywhere with the embedded Web configuration using a
Web browser, such as Microsoft Internet Explorer or Netscape Navigator. Internet Explorer 6.0
and later or Netscape Navigator 7.0 and later versions with JavaScript enabled should be used.
3.1 Setup ENDLS-A2+WIG2 via Ethernet Cable
If there is an available LAN card present on your PC, you just simply connect ADSL router
and PC through the Ethernet cable. Once you establish Internet connection, you could browse
the Web through the Ethernet cable.
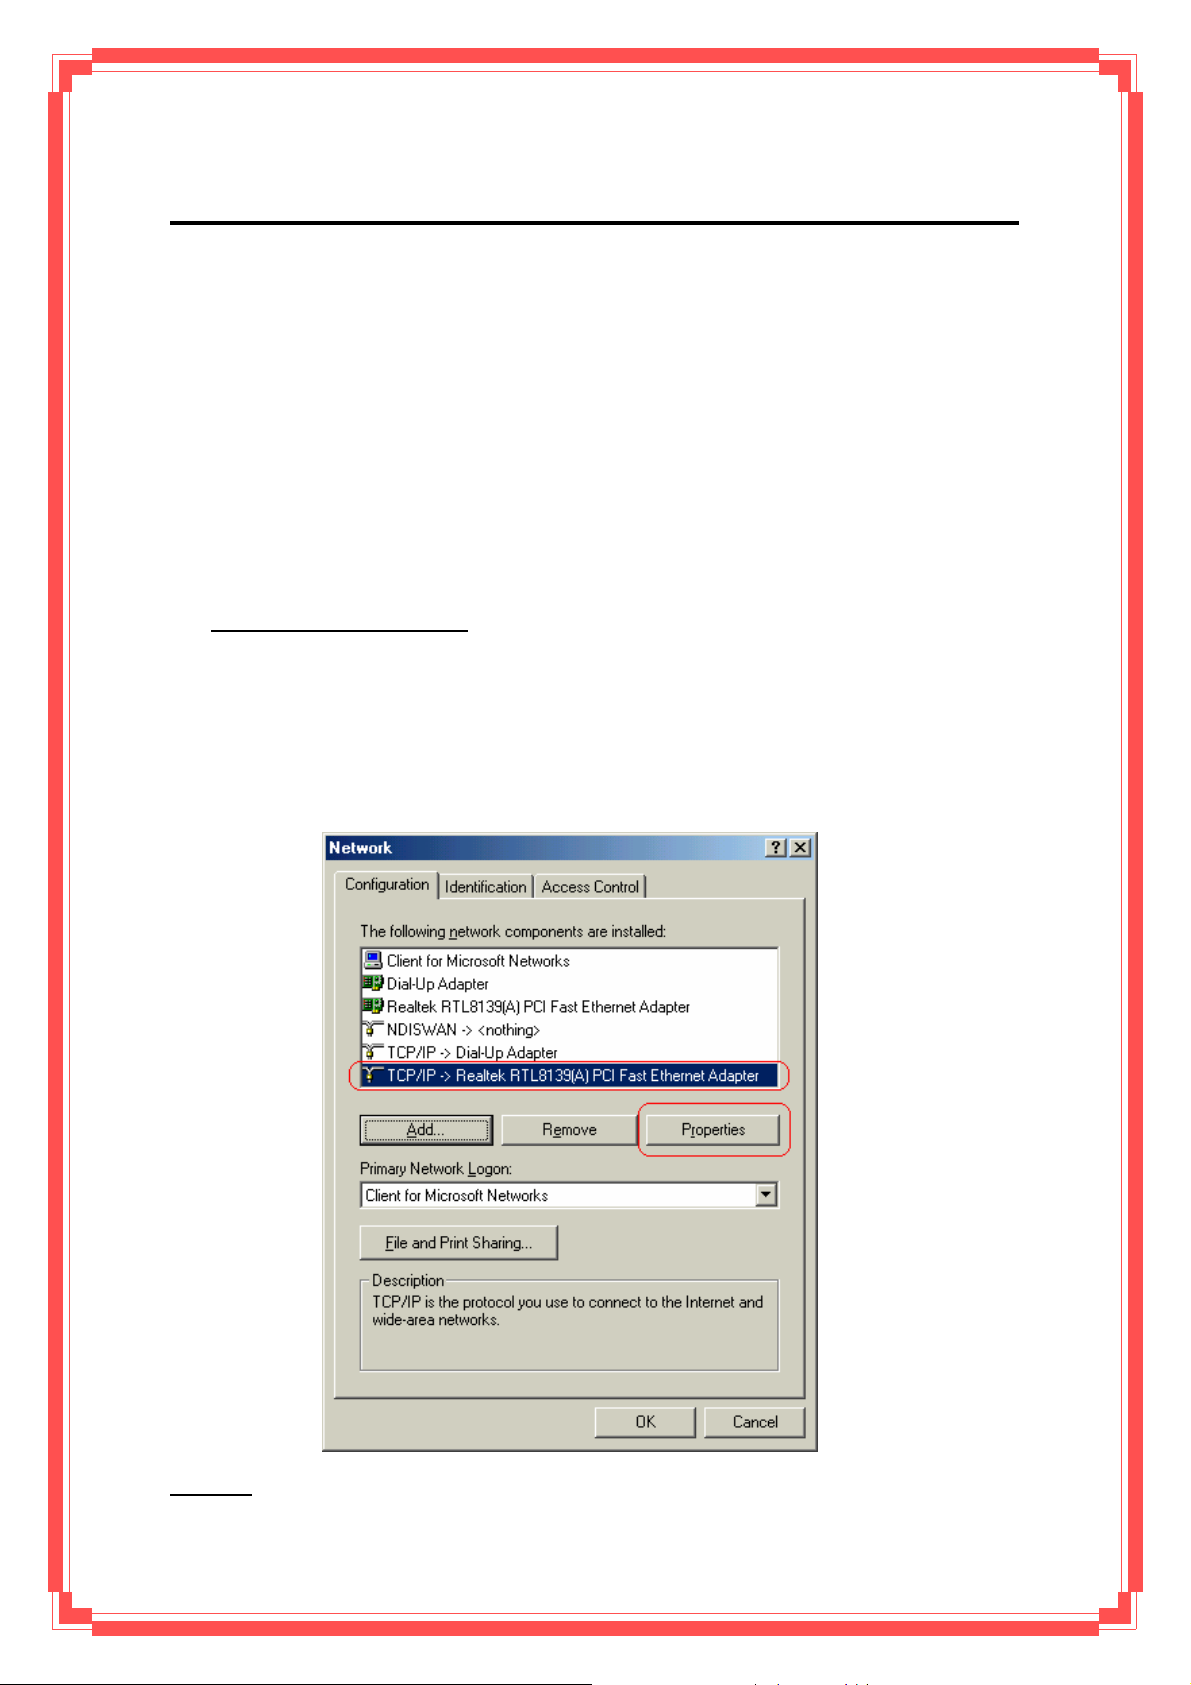
3.2 Configure TCP/IP
For Windows 98SE and ME
Step 1: Click Start then Settings and choose Control Panel
Step 2: Double click Network icon.
Step 3: Select Configuration tab, then choose TCP/IP from the list of installed network
Components and click Properties button.
Step 4: You can setup the following configurations in two methods:
Option1: Get an IP from Router Automatically
12
Page 14
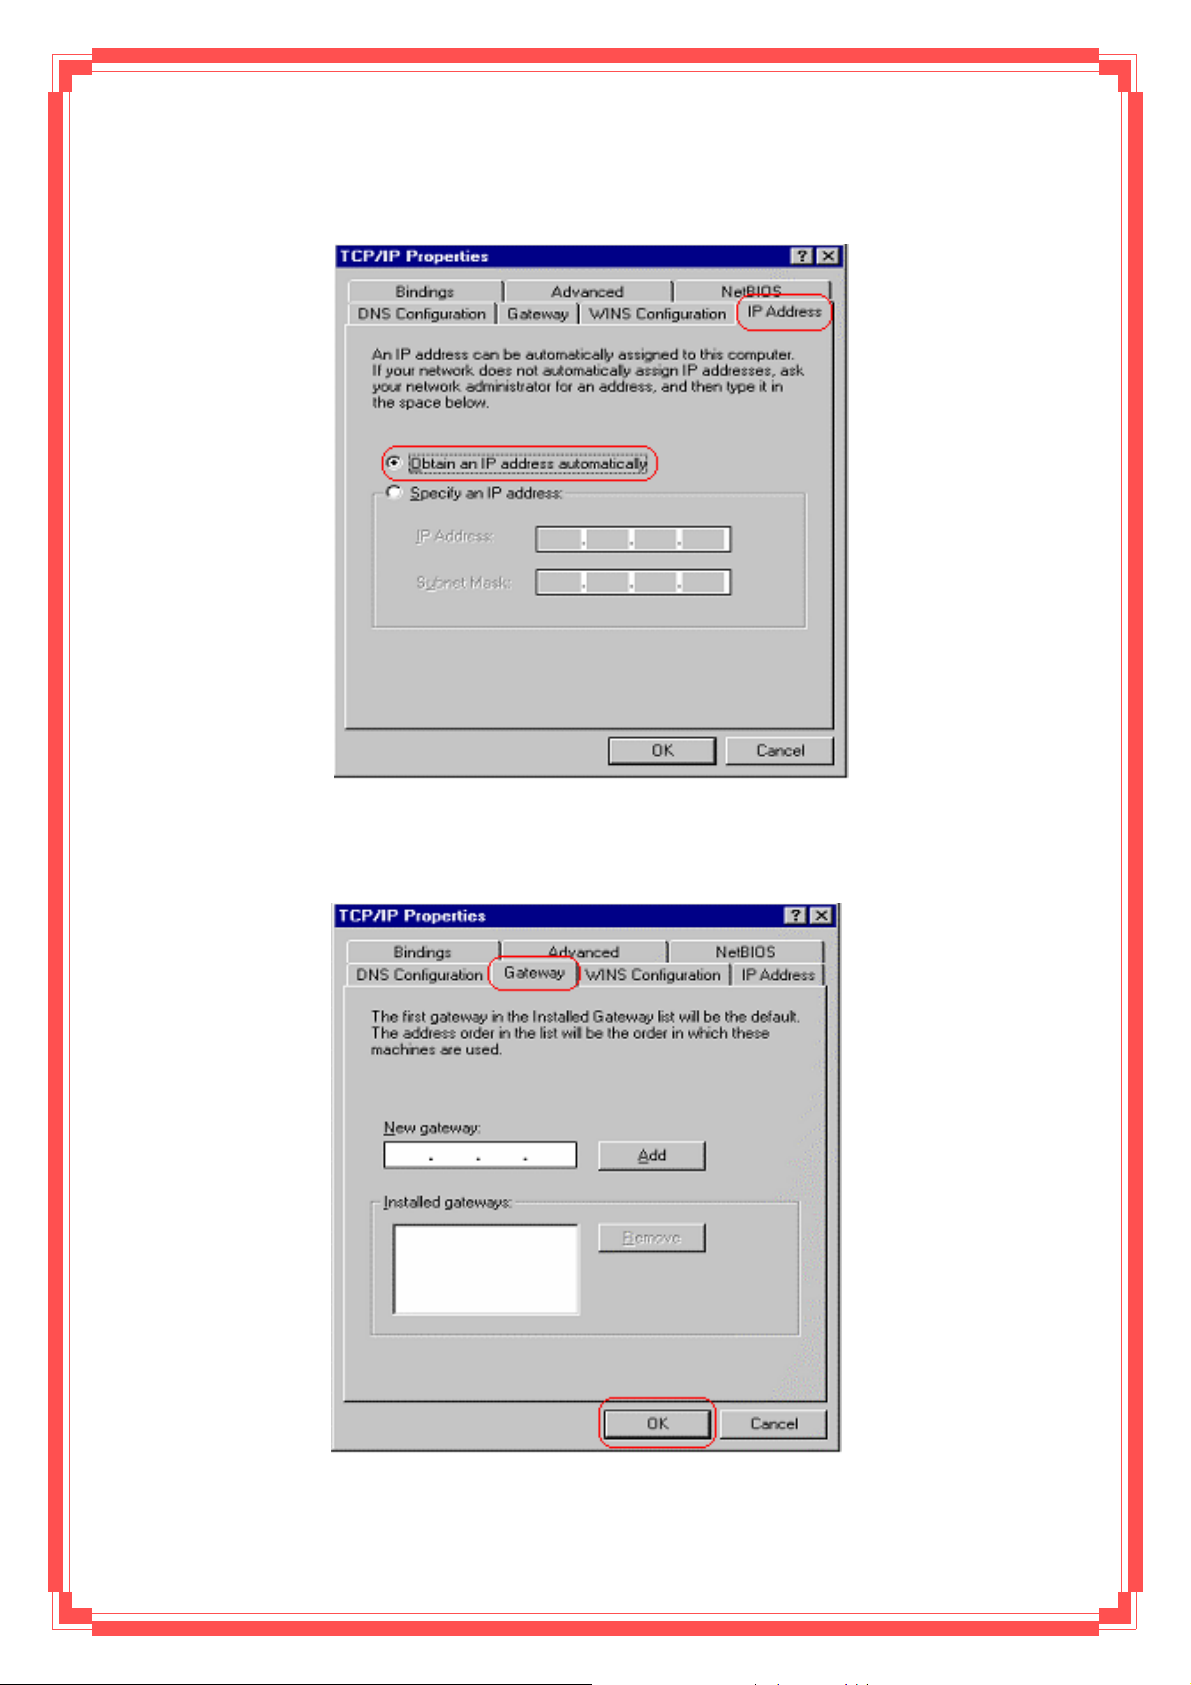
Select the IP Address tab.
In this page, click Obtain an IP address automatically radio button.
1) Select Gateway tab and click OK
2) Then, select DNS Configuration tab and select Disable DNS then click OK to
13
Page 15

finish the configuration.
Option2: Configure IP Manually
1) At IP Address tab, select Specify an IP address, set default IP address for the
Router is 192.168.1.1, so use 192.168.1.X (X is a number between 2 to 254) for
IP Address field and 255.255.255.0 for Subnet Mask field.
2) Select Gateway tab and add default Router IP Address “192.168.1.1” in the New
14
Page 16
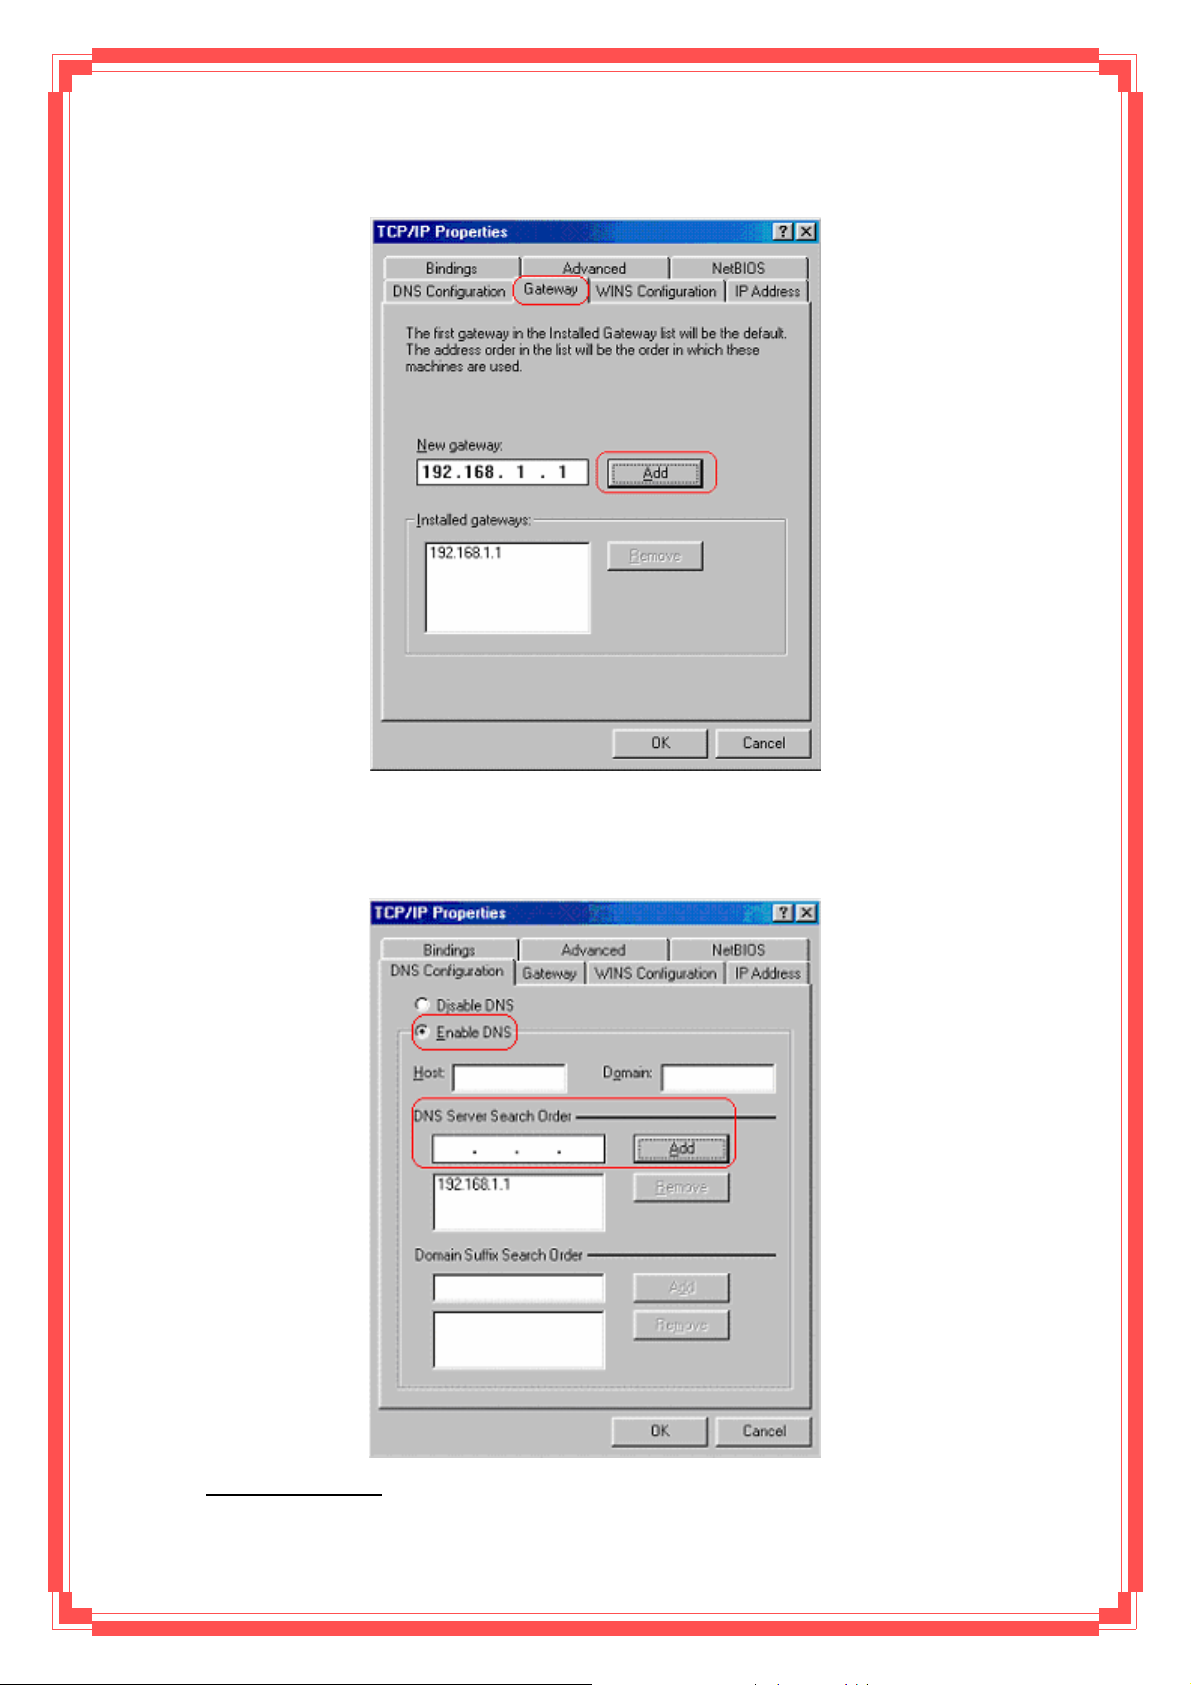
gateway field and click Add.
Under DNS Configuration tab, select Enable DNS and add DNS values
(192.168.1.1) in DNS Server Search Order field then click Add.
For Windows 2000
15
Page 17
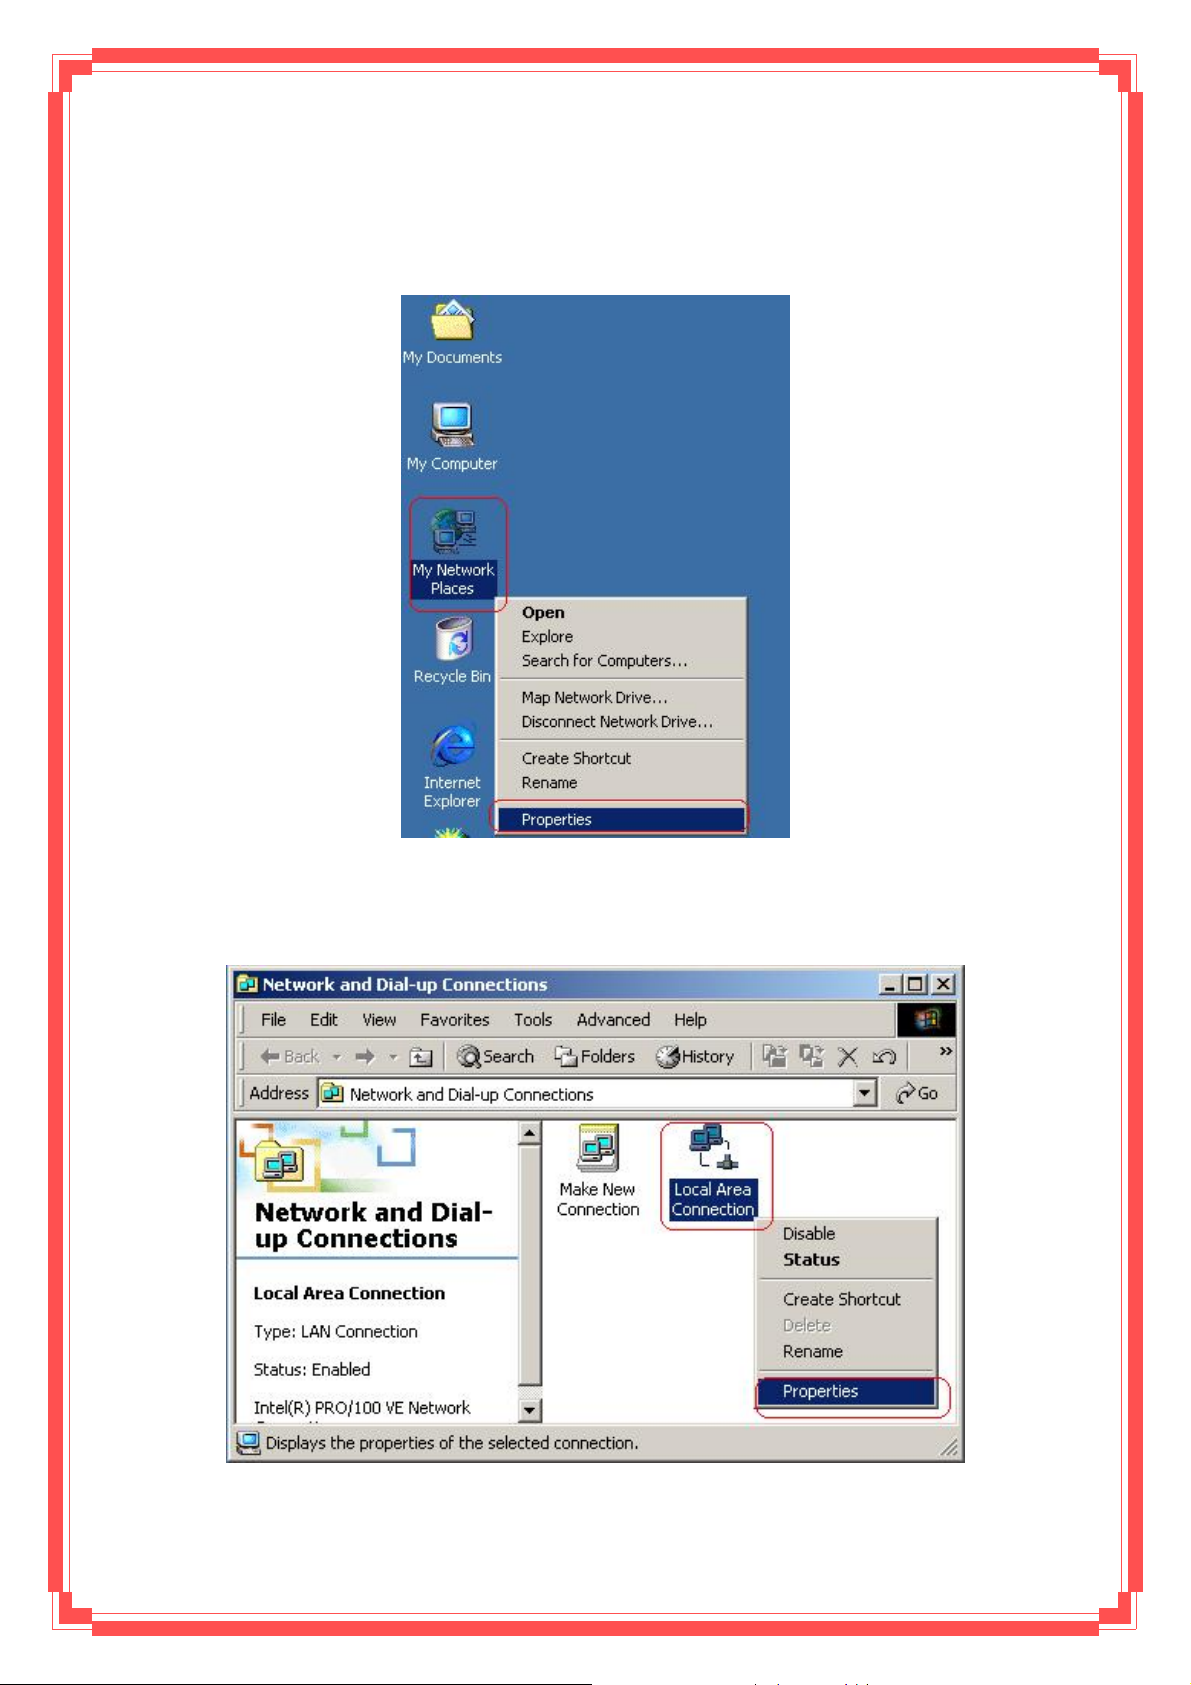
Step 1: (a) Right-click My Network Places and sele ct Properties in the main window screen
(b) Or, go to Start / Settings / Control Panel. In the Control Panel, double-click
on Network and Dial-up Connections.
Step 2: Right click Local Area Connection (your local network hooked up with ADSL
router) and select Properties:
Step 3: Select Internet Protocol (TCP/IP) then click Properties:
16
Page 18

Configure IP Automatically:
Step 4: Select Obtain an IP address automatically and Obtain DNS server address
automatically then click OK to complete IP configuring process.
Configure IP Manually:
17
Page 19
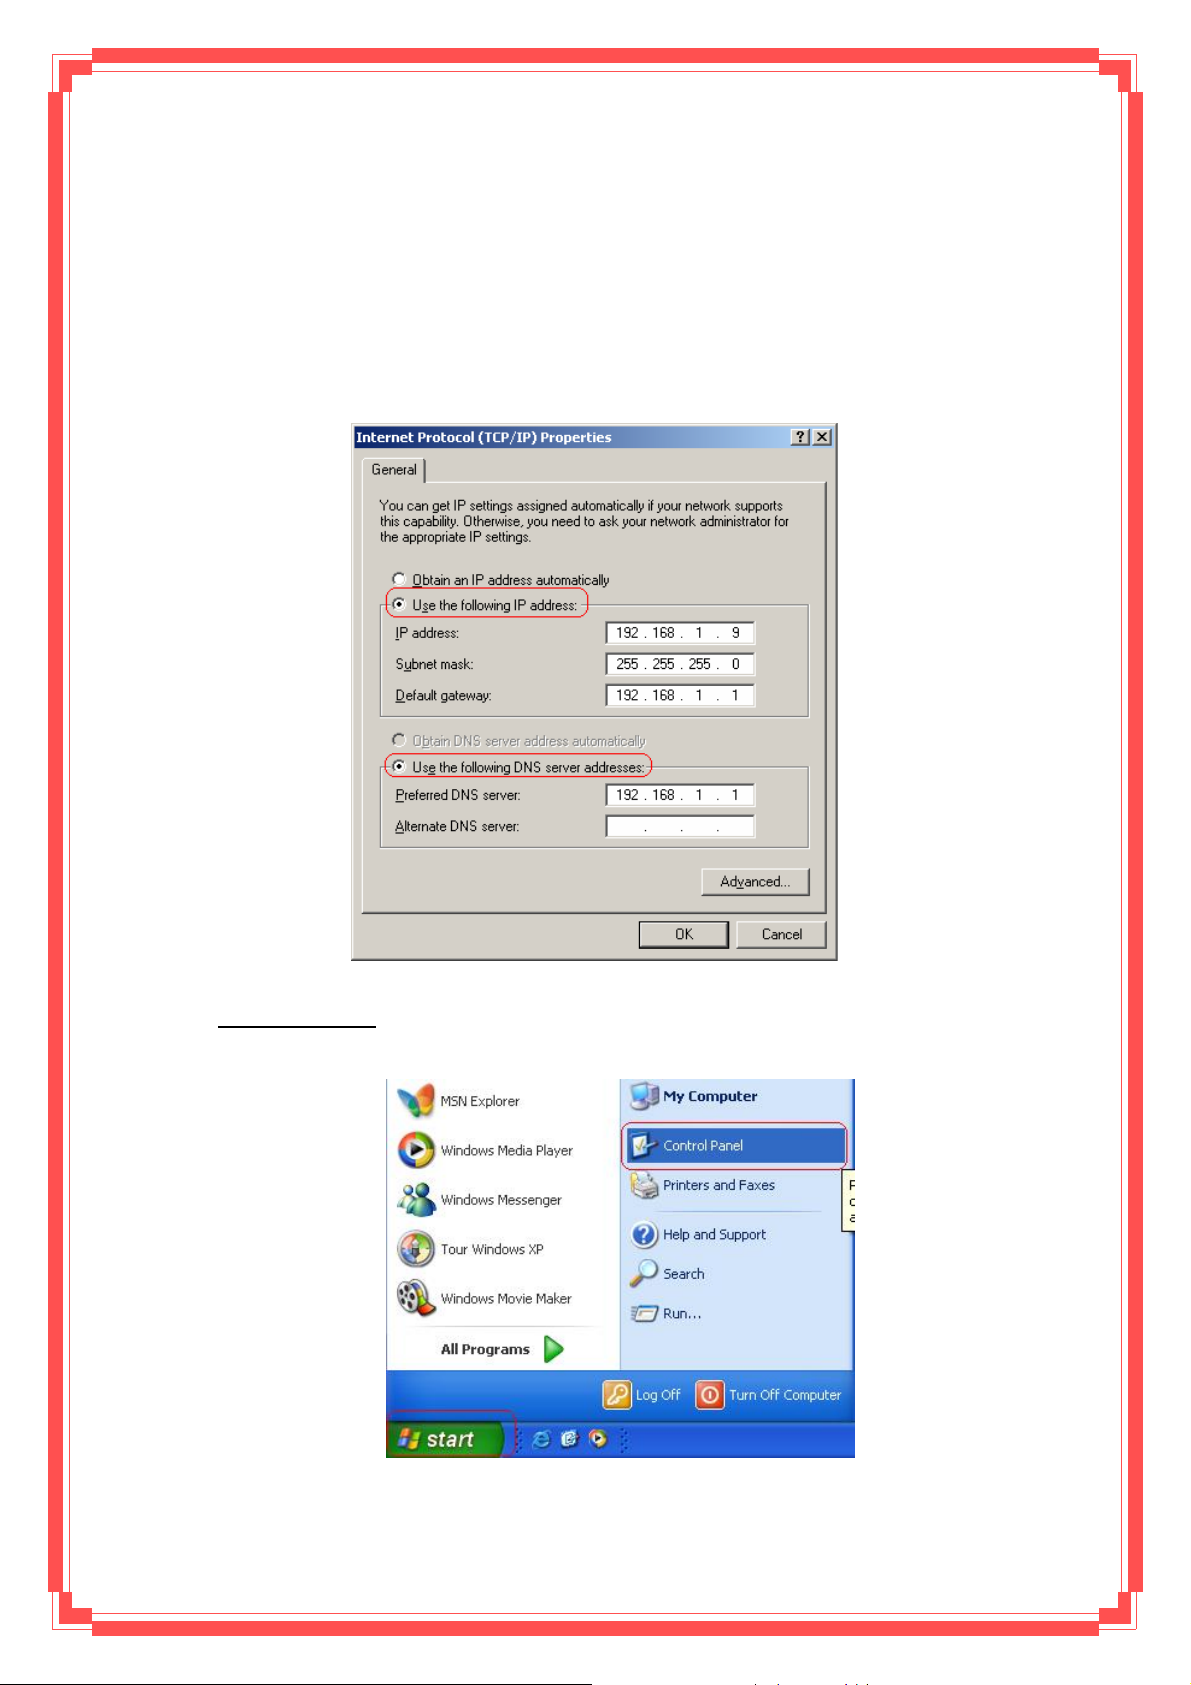
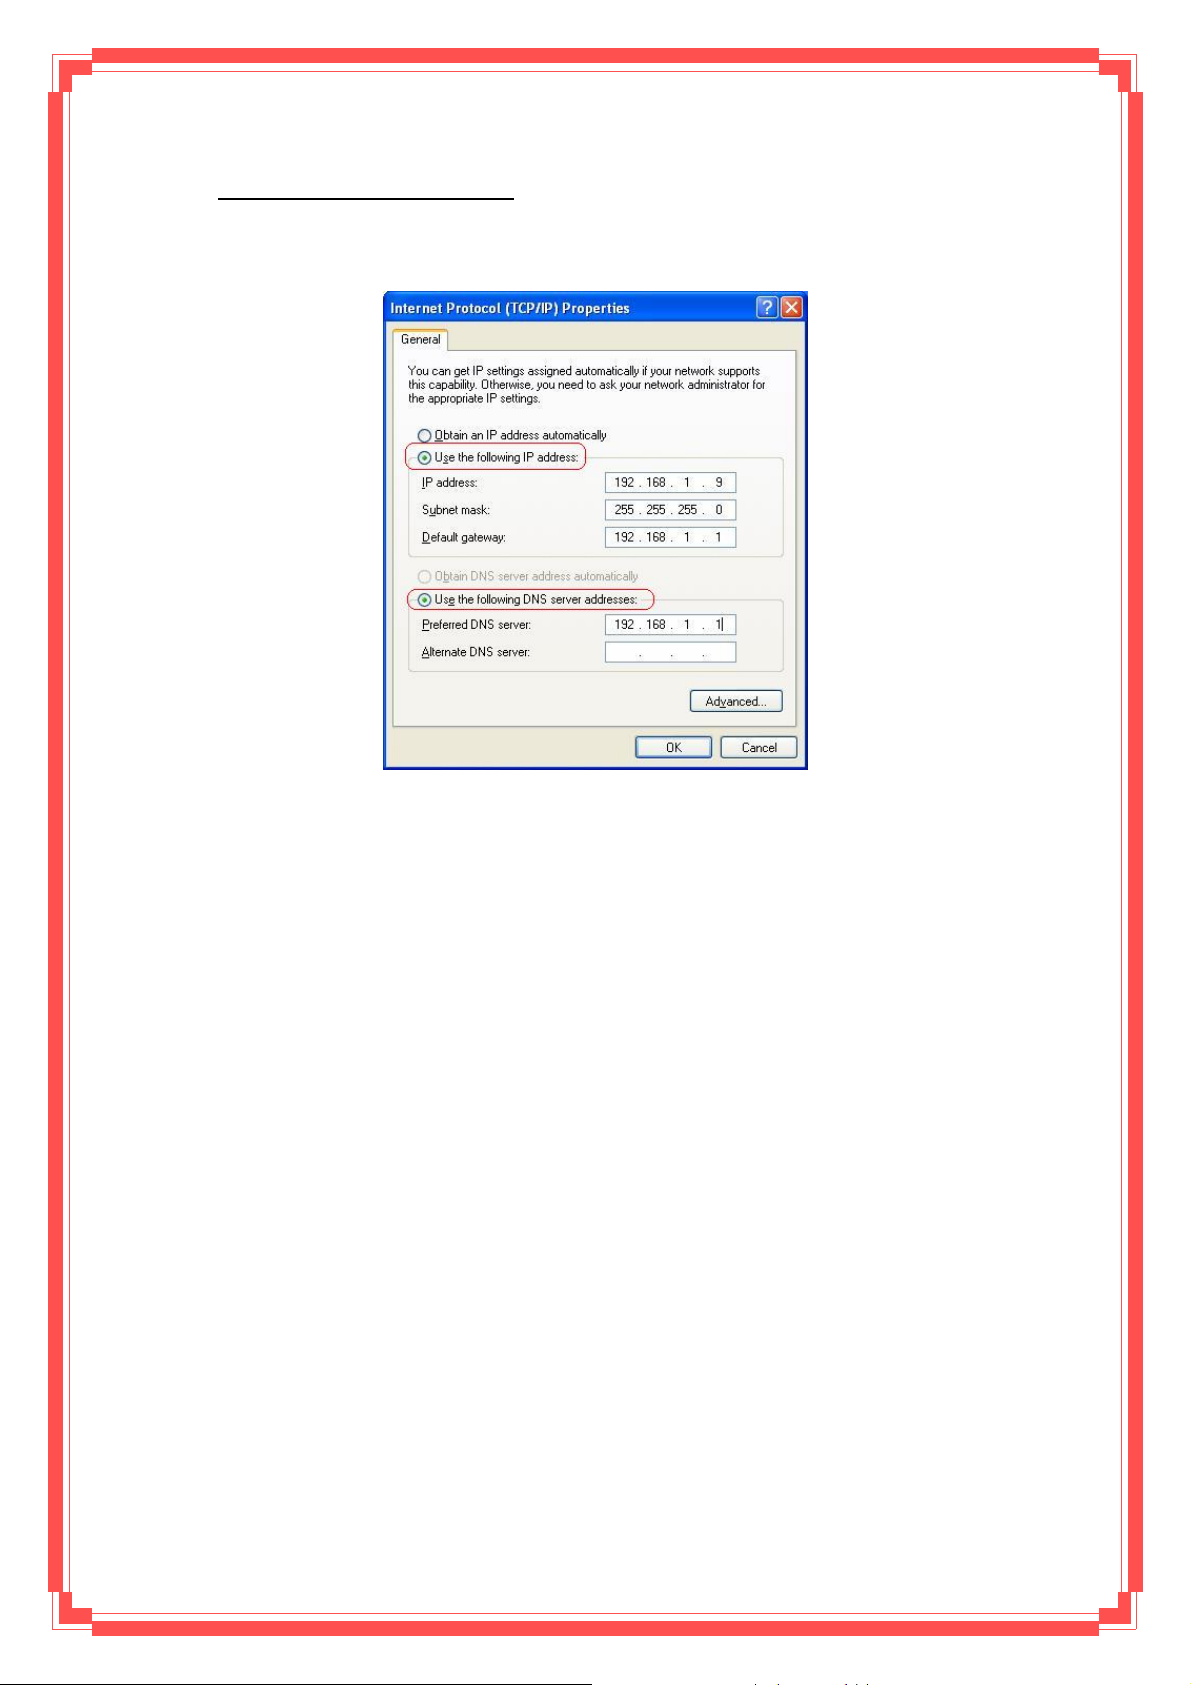
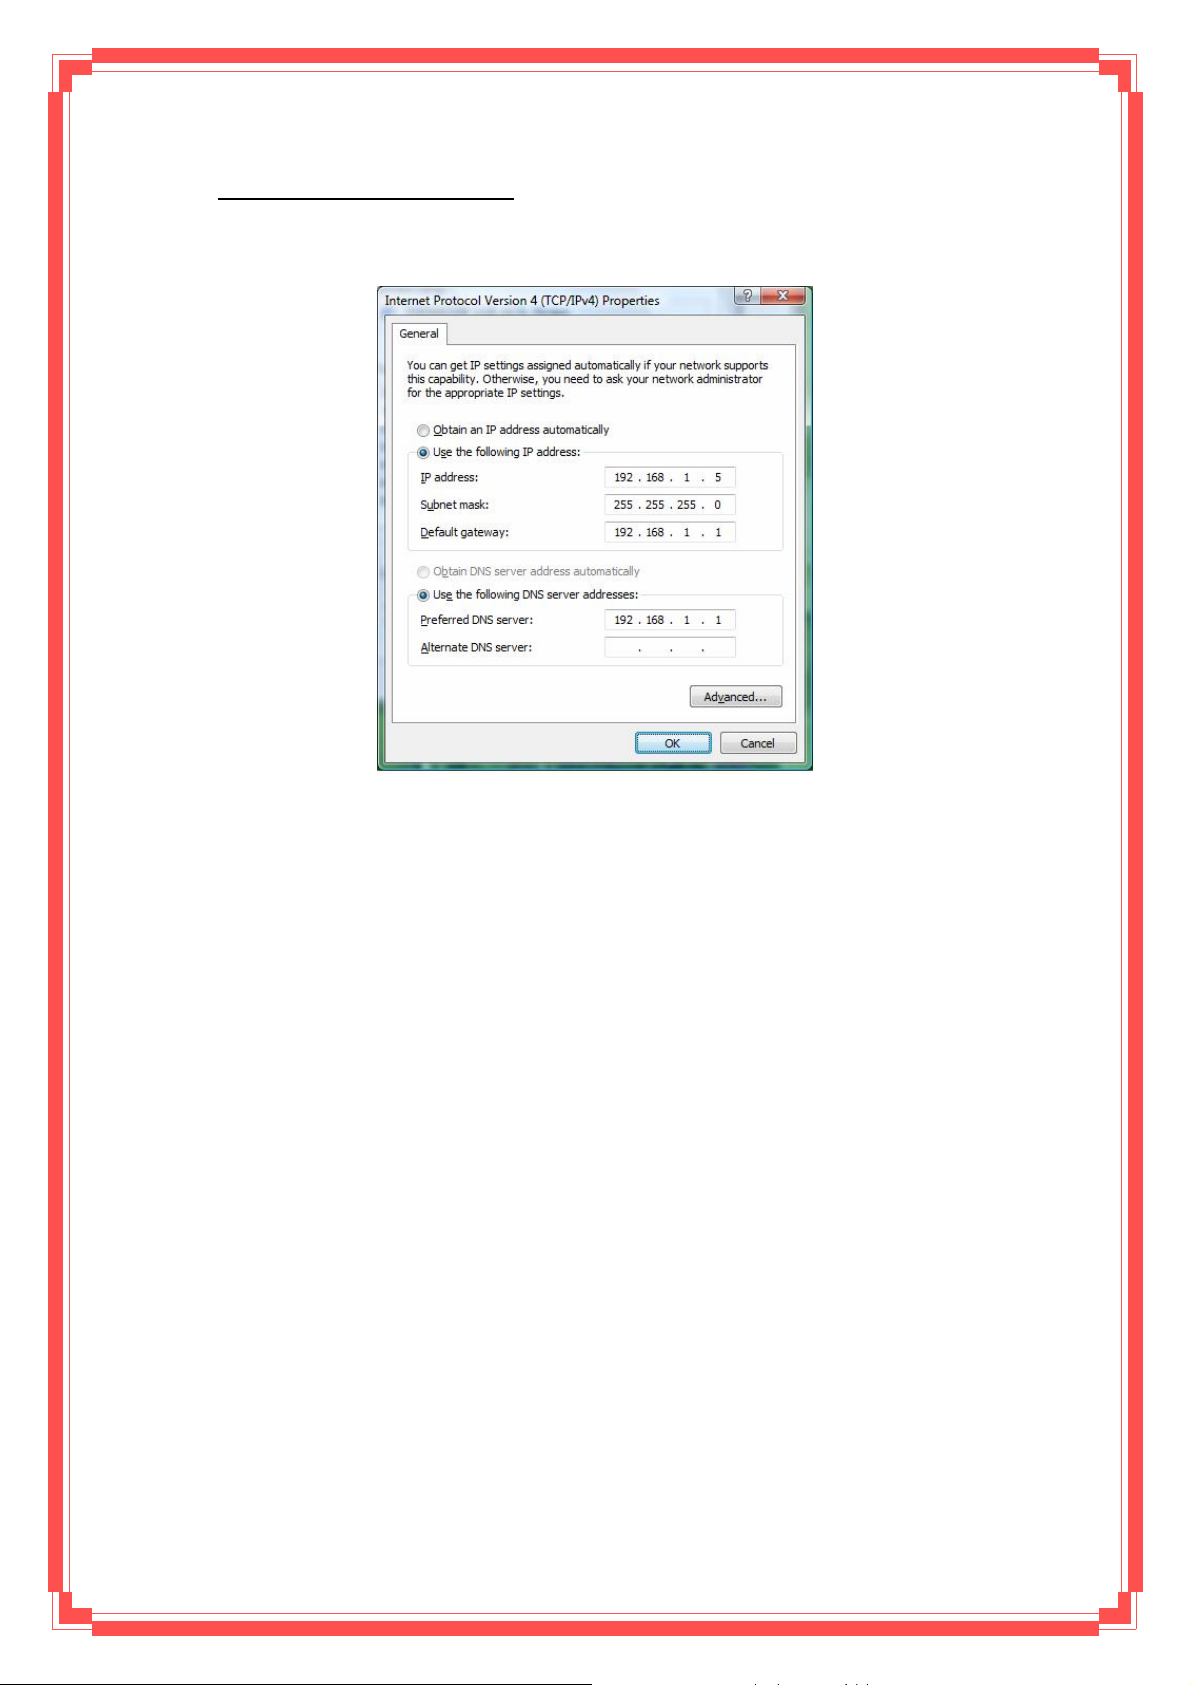
Step 4: Select Use the following IP address and Use the following DNS server
addresses.
IP address: Fill in IP address 192.168.1.x (x is a number between 2 to 254).
Subnet mask: Default value is 255.255.255.0.
Default gateway: Default value is 192.168.1.1.
Preferred DNS server: Fill in preferred DNS server IP address.
Alternate DNS server: Fill in alternate DNS server IP address.
For Windows XP
Step 1: Click Start then select Control Panel.
18
Page 20
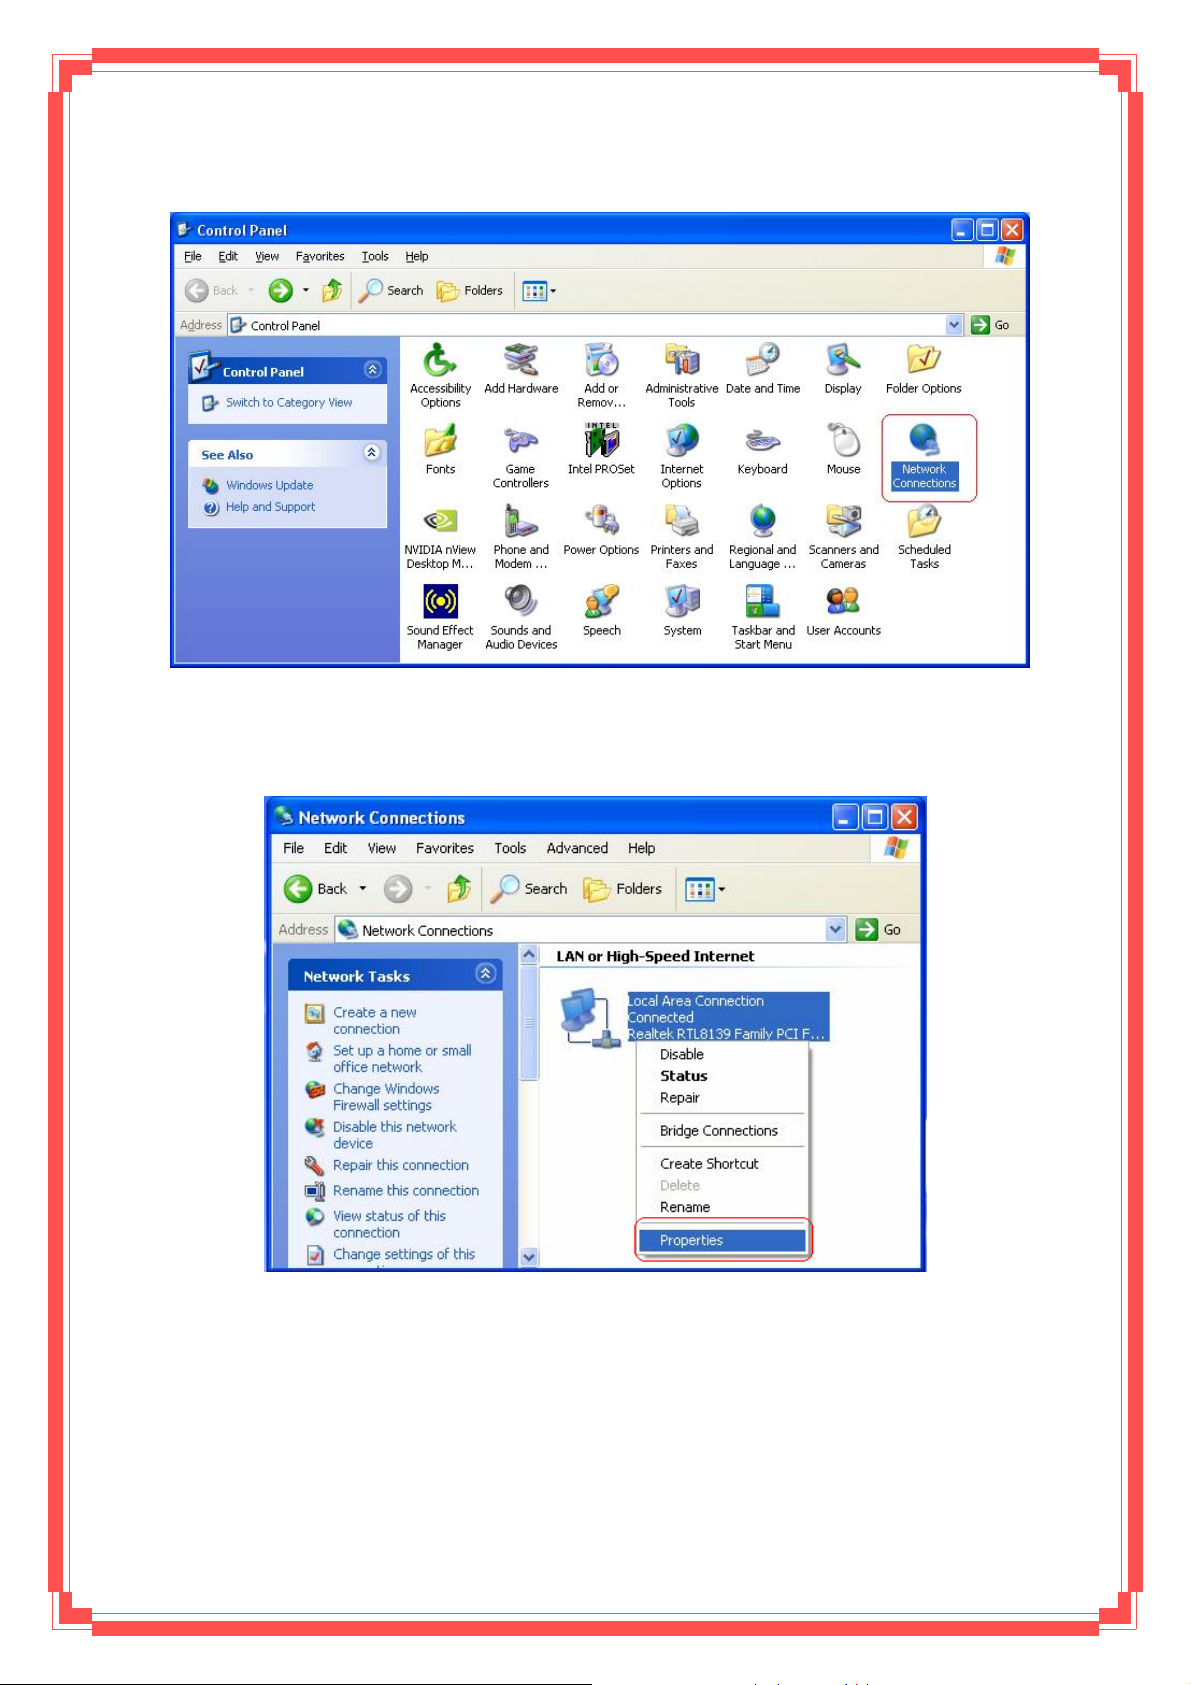
Step 2: Double-click Network Connections icon.
Step 3: Right-click Local Area Connection (local network your ADSL hooked up with ) a nd
select Properties:
19
Page 21
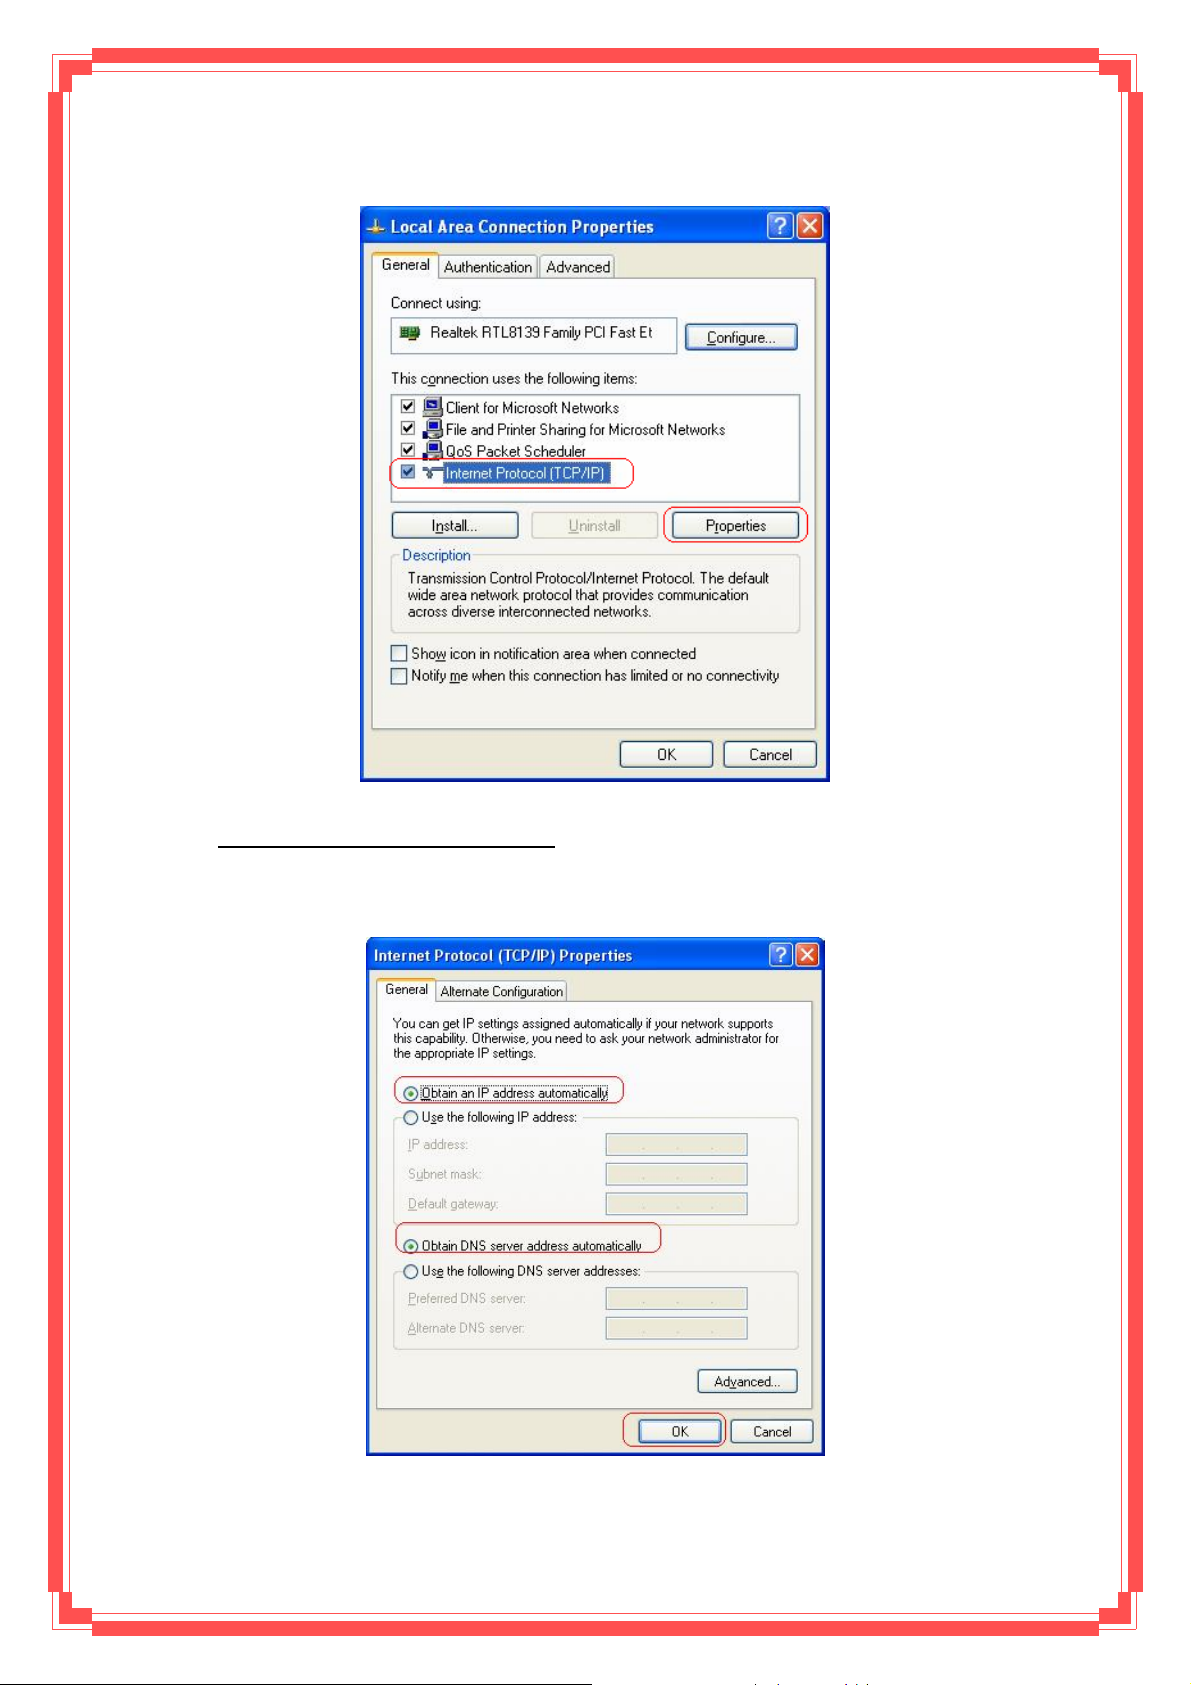
Step 4: Select Internet Protocol (TCP/IP) then click Properties:
Configure IP address Automatically:
Step 5: Select Obtain an IP address automatically and Obtain DNS server address
automatically. Click OK to finish the configuration.
20
Page 22
Configure IP Address Manually:
Step 5: Select Use the following IP address and Use the following DNS server
addresses.
IP address: Fill in IP address 192.168.1.x (x is a number between 2 to 254).
Subnet mask: Default value is 255.255.255.0.
Default gateway: Default value is 192.168.1.1.
Preferred DNS server: Fill in preferred DNS server IP address.
Alternate DNS server: Fill in alternate DNS server IP address.
You can use ping command under DOS prompt to check if you have setup TCP/IP
protocol correctly and if your computer has successfully connected to this router.
1) Type ping 192.168.1.1 under DOS prompt and the following messages will appear:
Pinging 192.168.1.1 with 32 bytes of data:
Reply from 192.168.1.1: bytes=32 times<2ms TTL=64
Reply from 192.168.1.1: bytes=32 times<1ms TTL=64
Reply from 192.168.1.1: bytes=32 times<10ms TTL=64
2) If the communication link between your computer and router is not setup correctly,
after you type ping 192.168.1.1 under DOS prompt following messages will appear:
Pinging 192.168.1.1 with 32 bytes of data:
Request timed out.
Request timed out.
Request timed out.
Cable issue or something wrong might cause this failure in configuration procedure.
21
Page 23
For Windows Vista™
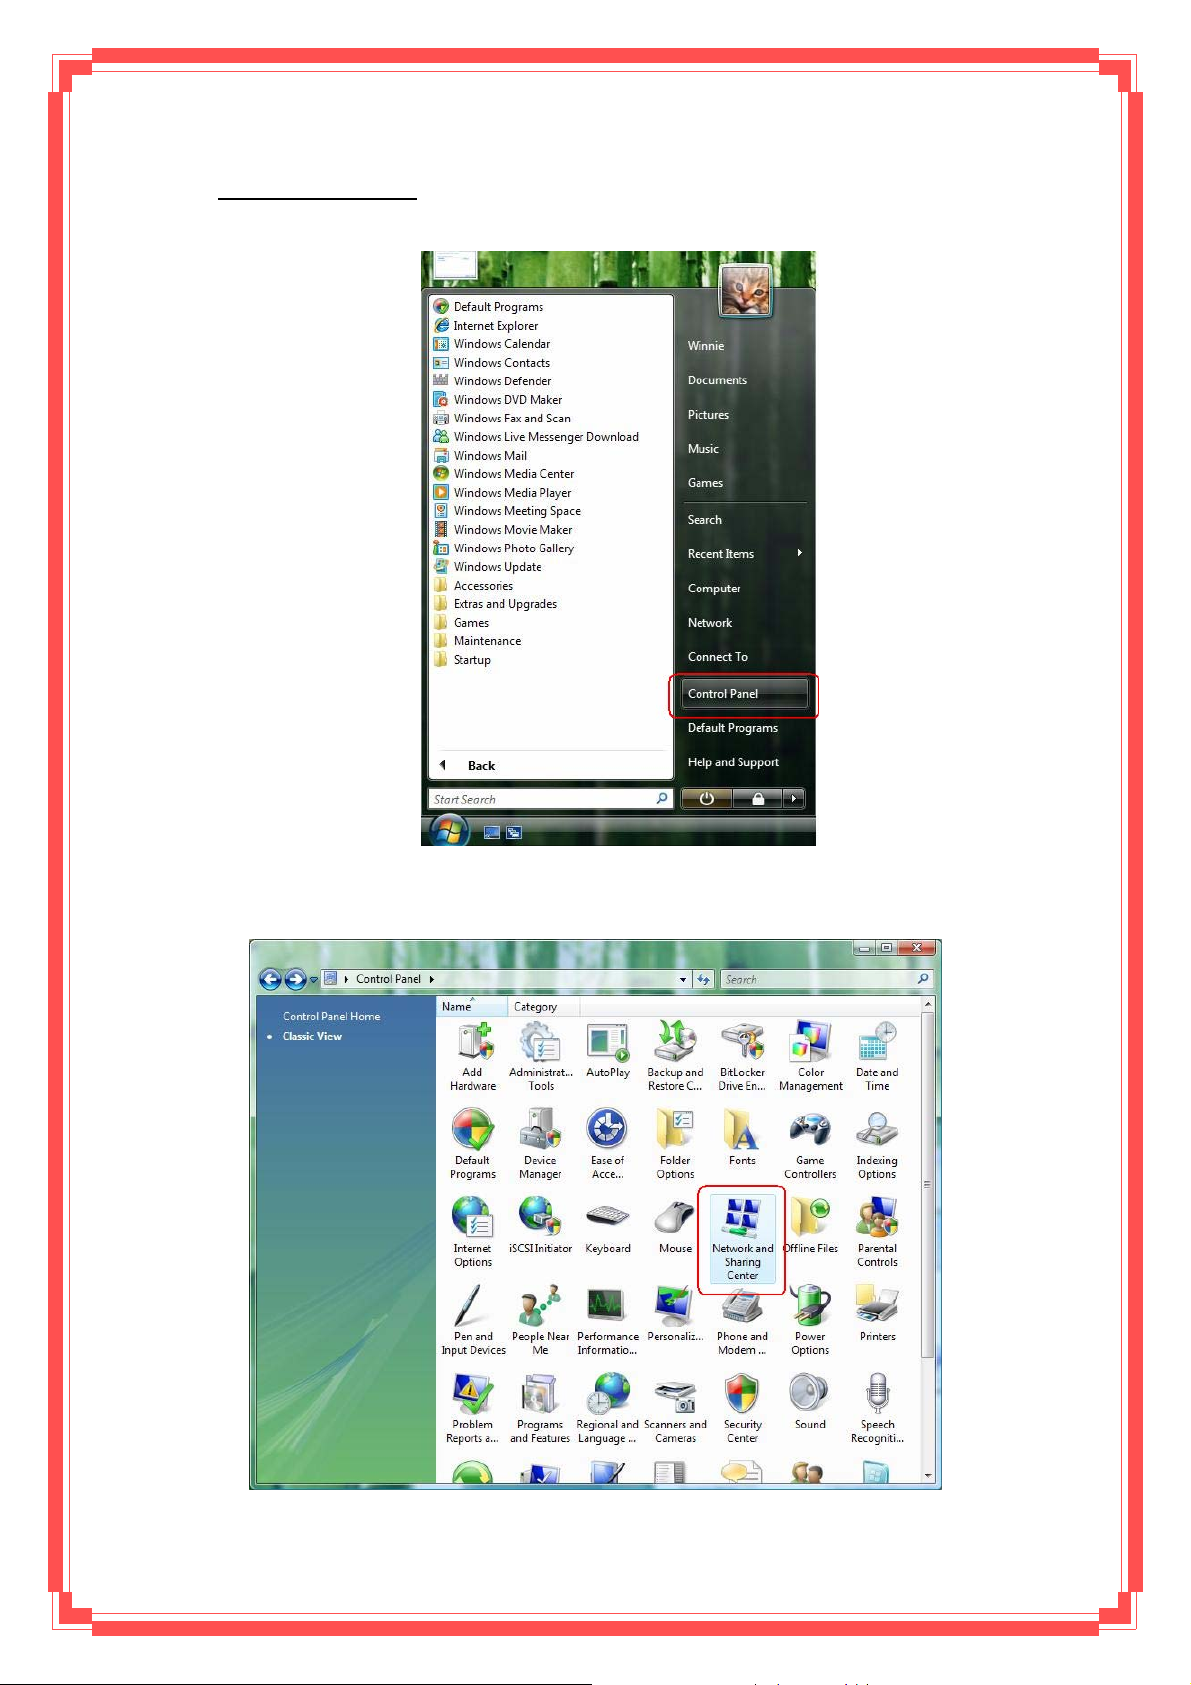
Step 1: Click Start then select Control Panel (in the Classic View).
Step 2: Double-click Network and Sharing Center icon.
22
Page 24
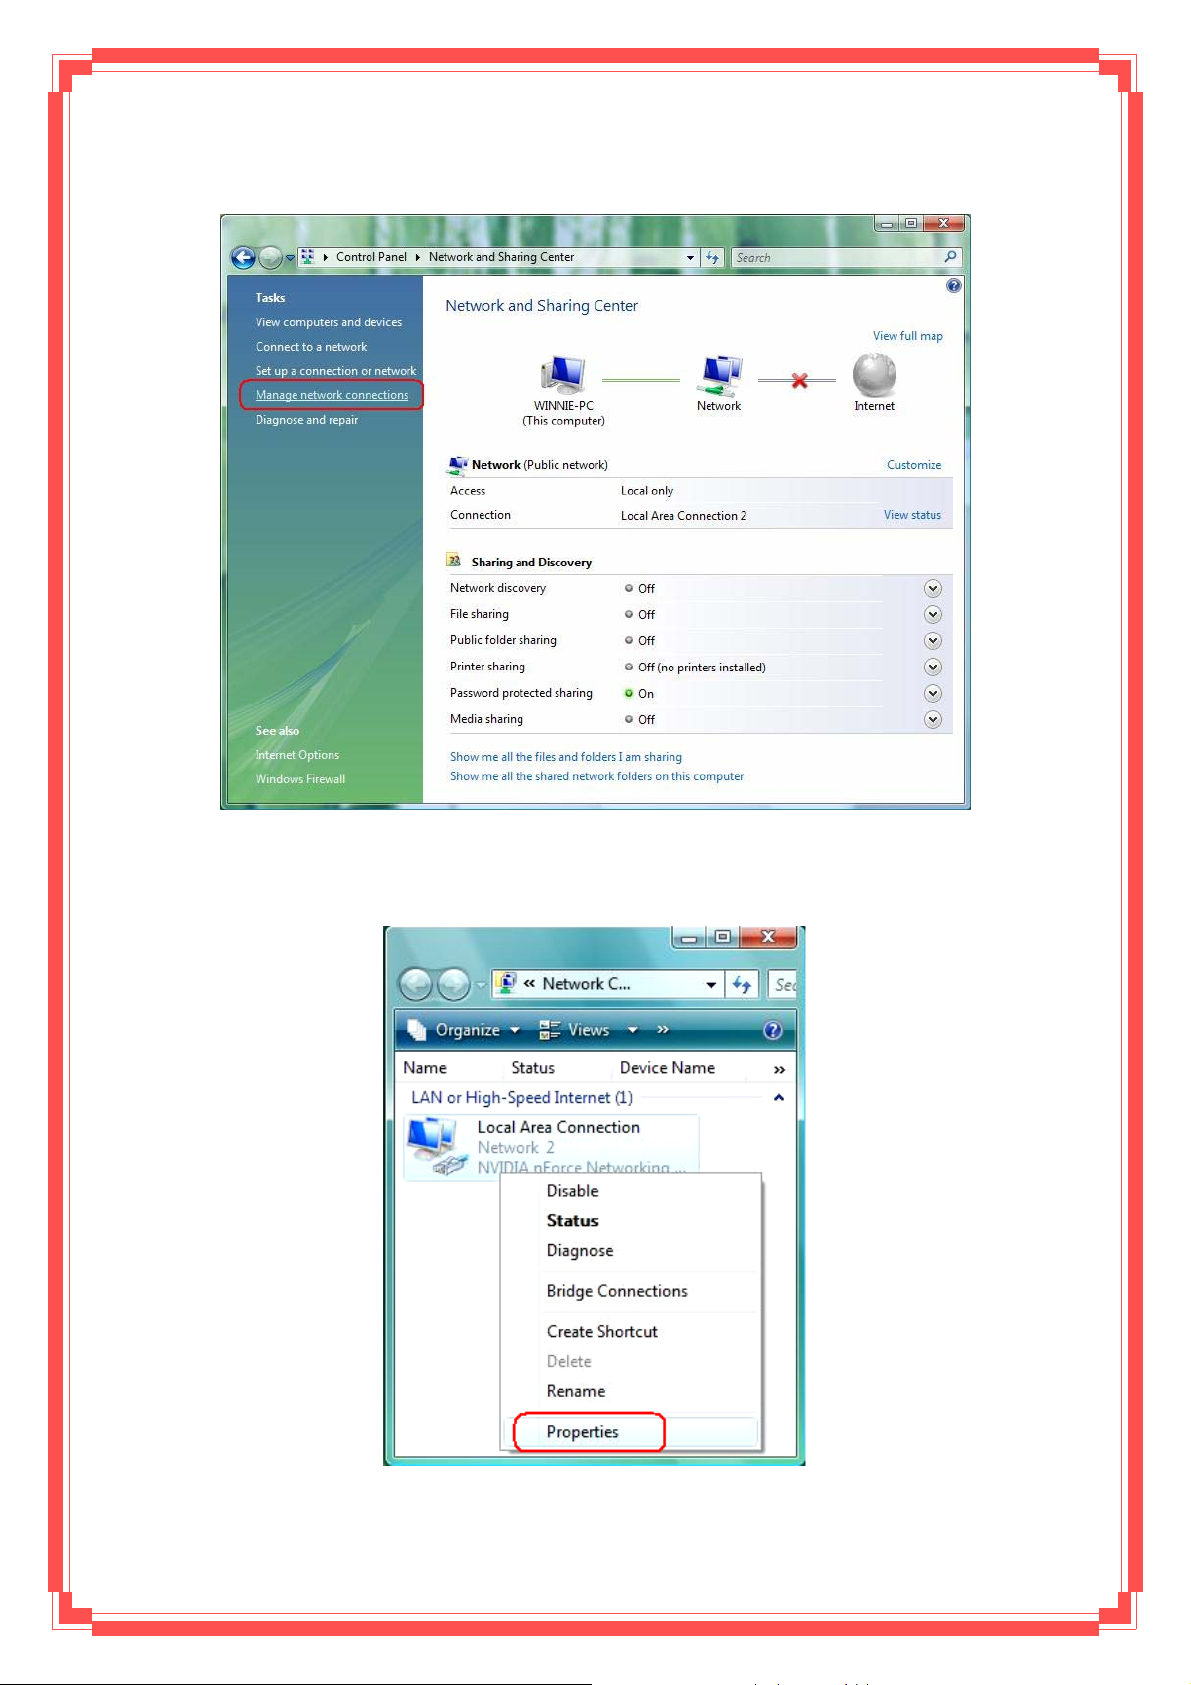
Step 3: Select “Manage Network connections”.
Step 4: Right-click Local Area Connection (local network your ADSL hooked up with ) a nd
select Properties:
23
Page 25
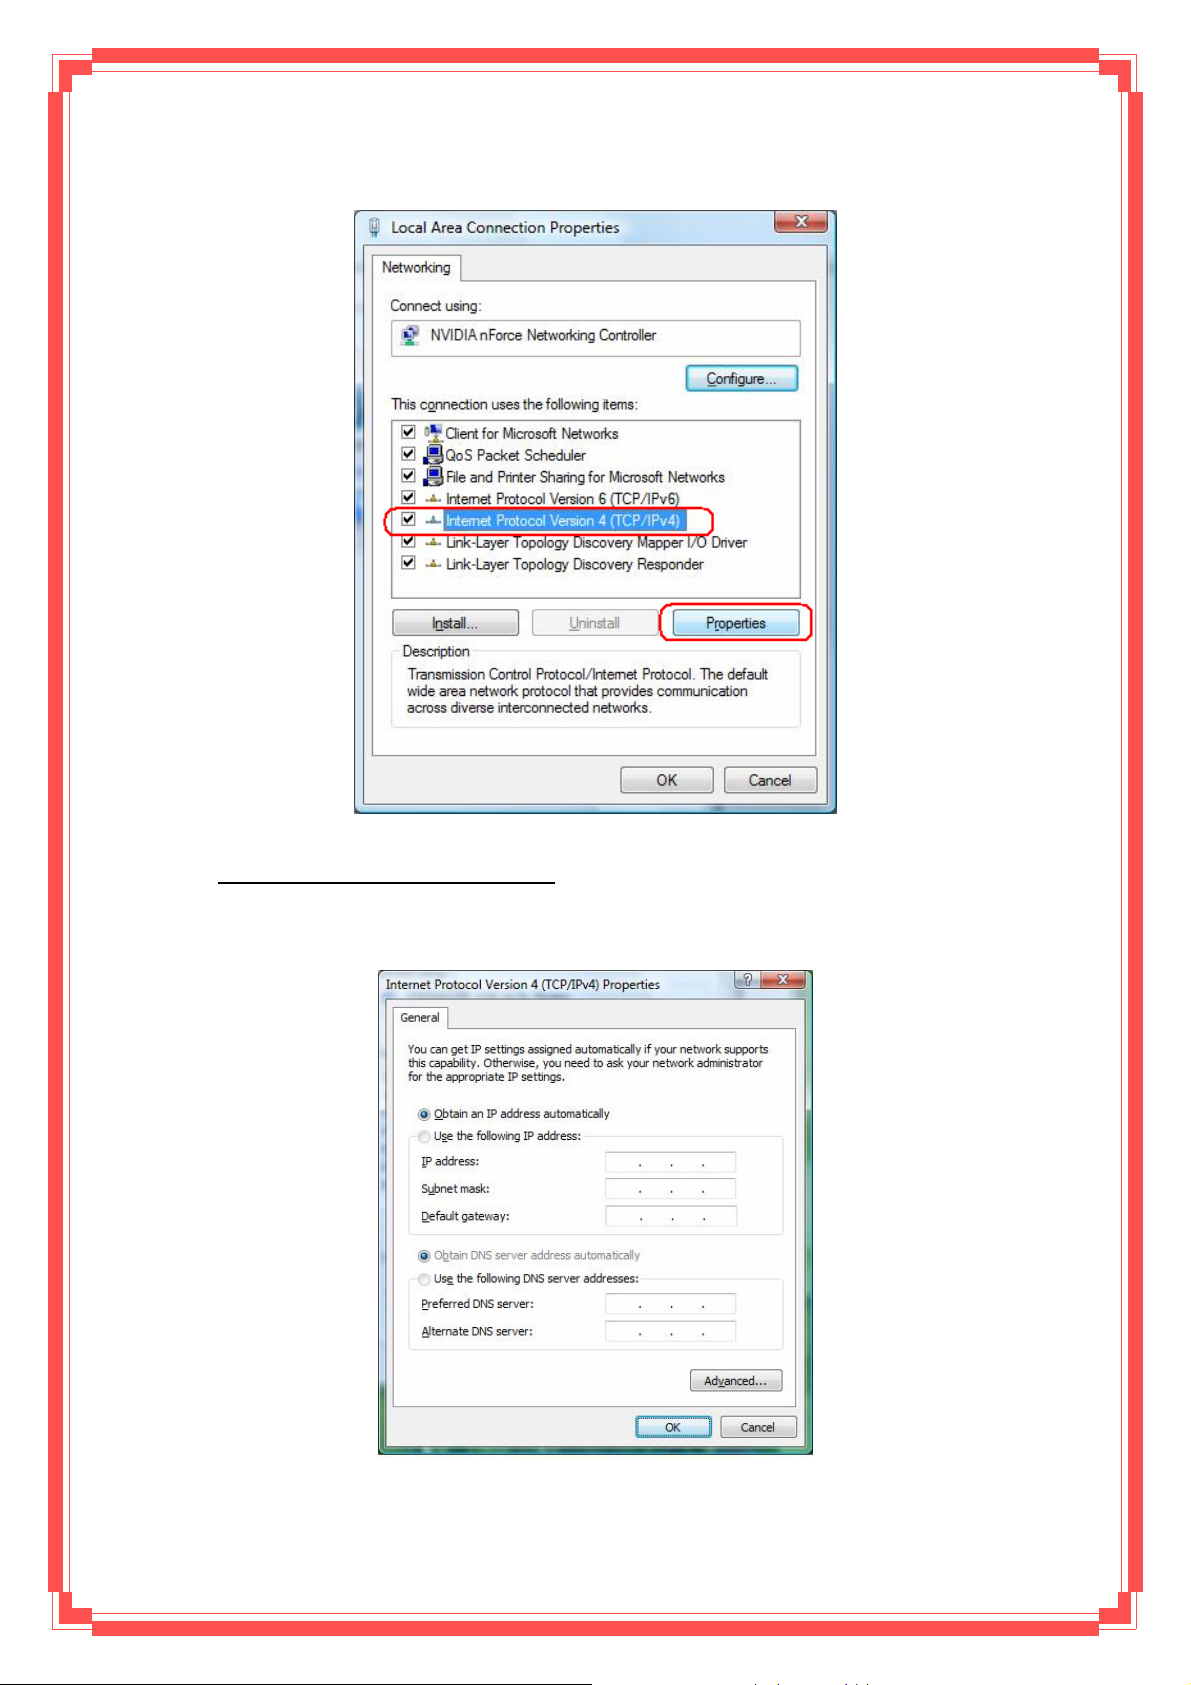
Step 5: Select Internet Protocol (TCP/IP) then click Properties:
Configure IP address Automatically:
Step 6: Select Obtain an IP address automatically and Obtain DNS server address
automatically. Click OK to finish the configuration.
24
Page 26
Configure IP Address Manually:
Step 7: Select Use the following IP address and Use the following DNS server
addresses.
IP address: Fill in IP address 192.168.1.x (x is a number between 2 to 254).
Subnet mask: Default value is 255.255.255.0.
Default gateway: Default value is 192.168.1.1.
Preferred DNS server: Fill in preferred DNS server IP address.
Alternate DNS server: Fill in alternate DNS server IP address.
You can use ping command under DOS prompt to check if you have setup TCP/IP
protocol correctly and if your computer has successfully connected to this router.
2) Type ping 192.168.1.1 under DOS prompt and the following messages will appear:
Pinging 192.168.1.1 with 32 bytes of data:
Reply from 192.168.1.1: bytes=32 times<2ms TTL=64
Reply from 192.168.1.1: bytes=32 times<1ms TTL=64
Reply from 192.168.1.1: bytes=32 times<10ms TTL=64
If the communication link between your computer and router is not setup correctly, after
you type ping 192.168.1.1 under DOS prompt following messages will appear:
Pinging 192.168.1.1 with 32 bytes of data:
Request timed out.
Request timed out.
Request timed out.
This failure might be caused by cable issue or something wrong in configuration procedure.
25
Page 27

4. Configure ENDLS-A2+WIG via HTML
This device supports a Web-based (HTML) GUI to allow users to configure Router setting
via Web browser.
4.1 Login
1) Launch the Web browser.
2) Enter the default IP address
3) Entry of the username and password will be displayed. Enter the default login
User Name and Password:
z The default login User Name of the administrator is admin, and the default
login password is trendchip.
http://192.168.1.1
26
Page 28

4.2 Navigating the Web Configuration
Steps to navigate the Web configuration from the Site Map are summarized as below.
Steps to navigate the Web configuration from the Site Map are summarized below.
¾ Click on Quick Start to begin a wizard that helps to configure your router.
¾ Click on Interface Setup to configure Internet and LAN functions.
¾ Click on Advanced Setup to configure advanced features.
¾ Click on Access Management to manage Internet access options.
¾ Click on Maintenance to set a new password, to set the time zone, to upgrade or reload
firmware and to run diagnostic tests on the router
¾ Click on Status to see router device information, system logs and performance statistics.
¾ Click on Help to see available help topics.
27
Page 29

5. Quick Start Wizard
Click Quick Start to guide you to configure the device to connect your ISP and have
Internet access within minutes. This Quick Start will guide you step by step to configure the
password, time zone, and W AN settings of you device . This Wizard is a helpful g uide for first time
uses to the device.
NOTE: It is a strong recommendation that using Quick Start to configure your ADSL settings.
Click on the RUN WIZARD button to start the Quick Start wizard. The Quick Start wizard
will open a new browser window with the following screen.
28
Page 30

.
The Quick Start Setup Wizard includes four quick steps: 1) Set your new password. 2)
Choose your time zone. 3) Set your Internet connection. 4) Re-start your ADSL router.
Please follow the quick start step by step to configure the device.
Note: If your ISP doesn’t provide DNS, after you complete Quick Start configuration, please go to
Interface Setup Æ Internet to configure your DNS settings.
Click on NEXT to continue, or on EXIT to exit the wizard without saving.
29
Page 31

5.1 Setting a New Password
This screen helps you set a new password, replacing the default password.
The following table describes the labels in this screen.
LABEL DESCRIPTION
New Password Enter the password you wish to use here
Confirmed Password Enter the password again to confirm
Click on BACK to return to the previous screen, on NEXT to continue, or on EXIT to exit
the wizard without saving.
5.2 Choose your Time Zone
This screen helps you set the time zone for your ENDLS-A2+WIG.
Select the appropriate time zone for your location from the dropdown list. Click on BACK
to return to the previous screen, on NEXT to continue, or on EXIT to exit the wizard without
saving.
30
Page 32

5.3 Set your Internet Connection
This screen helps you select, then configure, your ISP connection type.
Select the Internet connection type you use to connect to your ISP. Click on BACK to return
to the previous screen, on NEXT to continue, or on EXIT to exit the wizard. The following screen
will vary depending on which connection type you chose.
Each screen is explained below:
5.3.1 Configuring Dynamic IP Address
A dynamic IP address connection requests a new IP address from your ISP each time you
connect to it.
31
Page 33

The following table describes the labels in this screen.
LABEL DESCRIPTION
VPI Enter the VPI here. VPI can range from 0 to 255.
VCI Enter the VCI here. VCI can range from 1 to 65535.
Connection Type Select your connection type from the dropdown list.
Your ISP should provide the above information. Click on BACK to return to the
previous screen, on NEXT to continue, or on EXIT to exit the wizard without saving.
5.3.2 Configuring Static IP Address
A static IP address connection uses the same IP each time you connect to your ISP.
The following table describes the labels in this screen.
LABEL DESCRIPTION
VPI Enter the VPI here. VPI can range from 0 to 255.
VCI Enter the VCI here. VCI can range from 1 to 65535.
IP Address Enter the IP address here.
Subnet Mask Enter the Subnet Mask here.
ISP Gateway Enter the ISP Gateway here.
Connection Type Select your connection type from the dropdown list.
Your ISP should provide this information. Click on BACK to return to the previous
screen, on NEXT to continue, or on EXIT to exit the wizard without saving.
32
Page 34

5.3.3 Configuring PPPoE
PPPoE provides access control and billing functionality in a manner similar to dial-up
services using PPP. The router bridges a PPP session over Ethernet (PPP over Ethernet, RFC
2516) from your computer to an ATM Permanent Virtual Circuit (PVC) that connects to the ADSL
Access Concentrator, where the PPP session terminates. Single PVC can support any number
of PPP sessions from your LAN.
The following table describes the labels in this screen.
LABEL DESCRIPTION
Username Enter your username here.
Password Enter your password here.
VPI Enter the VPI here. VPI can range from 0 to 255.
VCI Enter the VCI here. VCI can range from 1 to 65535.
Connection Type Select your connection type from the dropdown list.
Your ISP should provide the above information. Note that you must enter the user
name exactly as your ISP assigned it. If the assigned name is in the form of user@domain where
domain identifies a service name, enter it exactly as given. Click on BACK to return to the
previous screen, on NEXT to continue, or on EXIT to exit the wizard without saving.
5.3.4 Configuring PPPoA
Point-to-Point Protocol over ATM Adaptation Layer 5 (AAL5) (PPPoA) provides access
control and billing functionality in a manner similar to dial-up services using PPP. The router
encapsulates the PPP session based on RFC1483 and sends it through ATM PVC to the ISP’s
DSLAM.
33
Page 35

The following table describes the labels in this screen.
LABEL DESCRIPTION
Username Enter your username here.
Password Enter your password here.
VPI Enter the VPI here. VPI can range from 0 to 255.
VCI Enter the VCI here. VCI can range from 1 to 65535.
Connection Type Select your connection type from the dropdown list.
Your ISP should provide the above information. Note that you must enter the user
name exactly as your ISP assigned it. If the assigned name is in the form of user@domain where
domain identifies a service name, enter it exactly as given. Click on BACK to return to the
previous screen, on NEXT to continue, or on EXIT to exit the wizard without saving.
5.3.5 Configuring Bridge Mode
RFC 1483 explains two methods for Multi-protocol Encapsulation over AAL5. The first
method allows multiplexing of multiple protocols over just one ATM virtual circuit (LLC-based
multiplexing). The second method assumes that each individual protocol is carried over a
separate ATM virtual circuit (VC-based multiplexing). Please refer to RFC 1483 for more
information.
34
Page 36

The following table describes the labels in this screen.
LABEL DESCRIPTION
VPI Enter the VPI here. VPI can range from 0 to 255.
VCI Enter the VCI here. VCI can range from 32 to 65535.
Connection Type Select your connection type from the dropdown list.
Your ISP should provide the above information. Click on BACK to return to the
previous screen, on NEXT to continue, or on EXIT to exit the wizard without saving.
5.3.6 Multiplexing
Two conventions identify what protocols a virtual circuit (VC) is carrying. Be sure to use the
multiplexing method your ISP requires.
(1) VC-Based Multiplexing
In VC-based multiplexing, by prior mutual agreement, each protocol is assigned to a
specific virtual circuit. For example, VC1 carries IP, etc. VC-based multiplexing may be dominant
in environments where dynamic creation of large numbers of ATM VCs is fast and economical.
(2) LLC-Based Multiplexing
In LLC-based multiplexing, one VC carries multiple protocols with protocol-identifying
information contained in each packet header. While this method requires extra bandwidth and
processing overhead, this method may be advantageous if it is not practical to have a separate
VC for each carried protocol; for example, if charging heavily depends on the number of
simultaneous VCs.
5.3.7 VPI and VCI
Be sure to use the Virtual Path Identifier (VPI) and Virtual Channel Identifier (VCI) numbers
assigned to you. The valid range for the VPI is 0 to 255. The valid range for the VCI is 32 to
65535. 0 to 31 is reserved for local management of ATM traffic.
35
Page 37

5.4 Finishing the Wizard
The Quick Start wizard now has all the information it needs. Click on BACK to make
changes or correct mistakes. Click on NEXT to save the current settings. Click on EXIT to exit
the wizard without saving.
Your changes have been saved. Click CLOSE. The Quick Start wizard window will close.
36
Page 38

6. Interface Setup
The physical connections determine whether the router ports are local area network (LAN)
ports or wide area network (WAN) ports. There are two kinds of IP networks. The local, private
kind is the LAN network; the global, public kind is the WAN network. The following illustration
shows the relationship between the router and the two different networks.
A LAN is a shared communication system to which many computers are attached. A LAN is
generally limited to the immediate area, usually the same building or floor of a building.
A WAN is an outside connection to another network or to the Internet.
Click an Interface Setup link to set ATM VC values, ISP Encapsulation, configure multiconnection settings, and LAN configuration.
6.1 Internet
The Internet screen allows you to set up how your router connects to the Internet. If you
already ran the Quick Start wizard, the information you provided to the wizard should be entered
into the fields already. After you finish the changes, click on the SAVE button to save your
changes.
37
Page 39

6.1.1 ATM VC & QoS
ATM settings are used to connect to your ISP. Your ISP provides VPI, VCI, settings to you.
In this Device, you can totally setup 8 PVCs on different encapsulations if you apply 8 different
virtual circuits from your ISP. You need to activate the VC to take effect. For PVCs management,
you can use ATM QOS to setup each PVC traffic line’s priority.
Virtual Circuit: Select the VC number you want to setup.
VPI: Virtual Path Identifier. The valid range for the VPI is 0 to 255.
VCI: Virtual Channel Identifier. The valid range for the VCI is 1 to 65635 (0 to 31 is reserved for
local management of ATM traffic).
ATM QoS: Select the Quality of Service types for this Virtual Circuit. The ATM QoS types include
CBR(Constant Bit Rate), VBR(Variable Bit Rate) and UBR (Unspecified Bit Rate). These QoS
types are all controlled by the parameters specified below, including PCR, SCR, and MBS.
PCR: Peak Cell Rate (PCR) is the maximum rate at which the sender can send cells. This
parameter may be lower (but not higher) than the maximum line speed. 1 ATM cell is 53 bytes
(424 bits), so a maximum speed of 832 Kbps gives a maximum PCR of 1962 cells/sec. This rate
is not guaranteed because it is dependent on the line speed.
SCR: Sustained Cell Rate (SCR) is the mean cell rate of a bursty, on-off traffic source that can
be sent at the peak rate, and a parameter for burst-type traffic. SCR may not be greater than the
PCR; the system default is 0 cells/sec.
MBS: Maximum Burst Size (MBS) is the maximum number of cells that can be sent at the PCR.
After MBS is reached, cell rates fall below SCR until cell rate averages to the SCR again. At this
38
Page 40

time, more cells (up to the MBS) can be sent at the PCR again.
CBR is for connections that support constant rates of data transfer. The only parameter you
need to worry about in CBR is PCR.
UBR is for connections that have variable traffic. The only parameter you need to worry about in
UBR is PCR.
rtVBR is for connections that, while having variable traffic, require precise timing between traffic
source and destination. PCR, SCR and MBS must all be set for rtVBR.
nrtVBR is for connections that have variable traffic, do not require precise timing, but still require
a set bandwidth availability. PCR, SCR and MBS must all be set for nrtVBR.
6.1.2 Encapsulation
Select the encapsulation protocol your ISP uses. The following section will vary depending
on which encapsulation protocol you select.
(1) Dynamic IP Address
Select this option if your ISP provides you an IP address automatically. Please enter the
Dynamic IP information accordingly.
The following table describes the labels in this screen.
LABEL DESCRIPTION
Encapsulation Select your encapsulation type from the dropdown list.
NAT Select whether NAT is Enabled or Disabled.
Default Route Select whether this PVC will be the default route for Internet data.
TCP MTU Option Enter TCP MTU Value here
Dynamic Route Select the RIP type and direction from the dropdown lists.
Multicast Select the multicast protocol you wish to use from the dropdown list.
39
Page 41

(2) Static IP Address
Select this option to set static IP information. You will need to enter in the encapsulation
type (1483 Bridged IP LLC, 1483 Bridged IP VC-Mux, 1483 Routed IP LLC (IPoA), 1483 Routed
IP VC-Mux), IP address, subnet mask, and ga teway address provided to you by your ISP. Each
IP address entered in the fields must be in the appropriate IP form, which is 4 IP octet s sepa rated
by a dot (x.x.x.x). The Router will not accept the IP address if it is not in this format.
The following table describes the labels in this screen.
LABEL DESCRIPTION
Encapsulation Select your encapsulation type from the dropdown list.
Static IP Address Enter the static IP Address here.
IP Subnet Mask Enter the IP Subnet Mask here.
Gateway Enter the Gateway address here.
NAT Select whether NAT is Enabled or Disabled.
Default Route Select whether this PVC will be the default route for Internet data.
Dynamic Route Select the RIP type and direction from the dropdown lists.
Multicast Select the multicast protocol you wish to use from the dropdown list.
(3) PPPoA / PPPoE
Select this option if your ISP requires you to use a PPPoE connection. This option is
typically used for DSL service. Select Dynamic PPPoE to obtain an IP address automatically for
your PPPoE connection. Selection Static PPPoE to use static IP address for your PPPoE
connection. Please enter the information accordingly.
40
Page 42

LABEL DESCRIPTION
Username Enter your username for your PPPoE/PPPoA connection.
Password Enter your password for your PPPoE/PPPoA connection.
Encapsulation Select your encapsulation type from the dropdown list.
Bridge Interface Select whether the Interface will be Activated or Deactivated.
Connection Select whether your connection is always on or if it connects on demand. If on
demand, specify how many minutes the connection may be idle before it
disconnects.
TCP MSS Option Enter the TCP MSS you wish to use here.
Get IP Address Choose whether the ROUTER obtains the IP address statically or dynamically.
Static IP Address Enter the static IP address here. Only if you chose Static ab ove.
IP Subnet Mask Enter the IP subnet mask here. Only if you chose Static above.
Gateway Enter the gateway here. Only if you chose Static above.
NAT Select whether NAT is Enabled or Disabled.
Default Route Select whether this PVC will be the default route for Internet data.
TCP MTU Option Enter TCP MTU Value here.
Dynamic Route Select the RIP type and direction from the dropdown lists.
Multicast Select the multicast protocol you wish to use from the dropdown list.
41
Page 43

Connection Setting: For PPPoE/PPPoA connection, you can select Always on or Connect
on-demand. Connect on demand is dependent on the traffic. If there is no traffic (or Idle) for a
pre-specified period of time, the connection will tear down automatically. And once there is traffic
send or receive, the connection will be automatically on.
IP Address: For PPPoE/PPPoA connection, you need to specify the public IP address for this
ADSL Router. The IP address can be either dynamically (via DHCP) or given IP address provide
by your ISP. For Static IP, you need to specify the IP address, Subnet Mask and Gateway IP
address.
NAT: Select this option to Activate/Deactivated the NAT (Network Address Translation) function
for this VC. The NAT function can be activated or deactivated per PVC basis.
[Dynamic Route]
RIP (Routing Information Protocol): Select this option to specify the RIP version, including
RIP1, RIP2-B and RIP2-M. RIP2-B & RIP2-M are both sent in RIP-2 format, the differen ce is that
RIP2-M using Multicast and RIP2-B using Broadcast format.
RIP Direction: Select this option to specify the RIP direction. None is for disabling the RIP
function. Both means the ADSL Router will periodically send routing information and accept
routing information then incorporate into routing table. IN only means the ADSL router will only
accept but will not send RIP packet. OUT only means the ADSL router will only sent but will not
accept RIP packet.
[Multicast]
IGMP (Internet Group Multicast Protocol): It is a session-layer protocol used to establish
membership in a multicast group. The ADSL supports both IGMP version IGMP-v1 & IGMP-v2.
Select None to disable it.
Your ISP should provide the above information. Note that you must enter the user name
exactly as your ISP assigned it. If the assigned name is in the form of user@domain where
domain identifies a service name, enter it exactly as given.
(4) Bridge Mode
The modem can be configured to act as a bridging device between your LAN and your ISP.
Bridges are devices that enable 2 or more networks to communicate as if they are 2 segme nt s of
the same physical LAN. Please set the Connection type.
42
Page 44

The following table describes the labels in this screen.
LABEL DESCRIPTION
Encapsulation Select your encapsulation type from the dropdown list.
6.2 LAN
There are the IP settings of the LAN Interface for the device. These settings may be
referred to as Private settings. You may change the LAN IP address if needed. The LAN IP
address is provided to your internal network and cannot be seen on the Internet.
6.2.1 Router Local IP
IP Address: Enter the IP address of your ADSL router in dotted decimal notation, for
example, 192.168.1.1 (default setting).
IP Subnet Mask: Your ADSL router will automatically calculate the subnet mask based on
the IP address that you assign. Unless you are implementing sub netting, use the subnet
mask computed by the ADSL router.
43
Page 45

Dynamic Route: Select the Dynamic Route from RIP1, RIP2-B, and RIP2-M. Please refer to
InternetÆ Dynamic Route. The only differen ce is the interface.
IGMP Snoop: You can disabled and enabled IGMP Snoop function.
6.2.2 Explaining RIP Setup
Routing Information Protocol (RIP) allows a router to exchange routing information with
other routers. The RIP Direction field controls how RIP packets are allowed to enter and
leave the router. Selecting Both means the router will broadcast its routing table and
incorporate the RIP information that it receives. Selecting In Only means the router will
only accept RIP packets received, not send RIP packets. Selecting Out Only means the
router will only send RIP packets, not accept any RIP packets received. Selecting
None means the router will not send any RIP packets nor will it accept any RIP packets
received.
The Dynamic Route field controls the format and the broadcasting method of RIP
packets that the router sends. It recognizes both formats when receiving packets.
RIP-1 is universally supported, but RIP-2 carries more information. RIP-1 is adequate for
most networks. Only consider RIP-2 if your network has unusual topology.
Both RIP-2B and RIP-2M sends the routing data in RIP-2 format. RIP-2B uses subnet
broadcasting while RIP-2M uses multicasting.
Direction: Select the RIP direction from None, Both, In Only and Out Only.
Multicast: IGMP (Internet Group Multicast Protocol) is a session-layer protocol used to
establish membership in a multicast group. The ADSL router supports both IGMP-v1 and
IGMP-v2. Select None to disable it. Please refer to InternetÆ Multicast. The only difference
is the interface.
6.2.3 DHCP Server
The DHCP Server gives out IP addresses when a device is booting up and request an IP to
be logged on to the network. It must be set as a DHCP client to obtain the IP address
automatically . By default, the DHCP Se rver is enabled. The DHCP address pool contains the
range of the IP address that will automatically be assigned to the client on the network.
44
Page 46

LABEL DESCRIPTION
Starting IP Address Enter the starting IP address you wish to use as the DHCP server's IP
assignment.
IP Pool Count Enter the maximum user pool size you wish to allow.
Lease Time Enter the amount of time you wish to lease out a given IP address.
DNS Relay Select the DNS relay option you wish to use from the dropdown list.
Primary DNS Server Enter the primary DNS server IP address you wish to use. For user
discovered DNS only.
Secondary DNS Server Enter the secondary DNS server IP address you wish to use. For user
discovered DNS only.
6.2.4 DHCP Relay
A DHCP relay is a computer that forwards DHCP data between computers that request IP
addresses and the DHCP server that assigns the addresses. Each of the device’s interfaces
can be configured as a DHCP relay. If it is enable, the DHCP requests from local PCs will
forward to the DHCP server runs on WAN side. To have this function working properly,
please run on router mode only, disable the DHCP server on the LAN port, and make sure
the routing table has the correct routing entry.
DHCP Server IP for relay agent: The DHCP server IP Address runs on WAN side.
45
Page 47

6.2.5 DNS Relay
The DNS Configuration allows the user to set the configuration of DNS.
DNS Rely Selection: If user wants to disable this feature, he just needs to set both Primary
& Secondary DNS to 0.0.0.0. Using DNS relay, users can setup DNS server IP to
192.168.1.1 on their computer. If not, device will perform as NO DNS relay.
If you don’t want to use the DNS Relay option, set the DNS relay to “Use User
Discovered DNS Server Only” and set both Primary and Secondary DNS Servers to
“0.0.0.0”.
46
Page 48

6.3 Wireless
6.3.1 Access Point Settings
Beacon Interval: The Beacon Interval value indicates the frequency interval of the beacon.
Enter a value between 20 and 1000. A beacon is a packet broadcast by the Router to
synchronize the wireless network.
RTS/CTS Threshold: The RTS (Request To Send) threshold (number of bytes) for enabling
RTS/CTS handshake. Data with its frame size larger than this value will perform the RTS/CTS
handshake. Set this attribute to be larger than the maximum MSDU (MAC Service Data Unit)
size TURNS OFF the RTS/CTS handshake. Set this attribute to ZERO TURNS ON the RTS/CTS
47
Page 49

handshake. Enter a value between 0 and 2432.
Fragment Threshold: The threshold (number of bytes) for the fragmentation boundary for
directed messages. It is the maximum data fragment size that can be sent. Enter a value
between 256 and 2432.
DTIM: This value is between 1 and 255, indicates the interval of the Delivery Traffic Indication
Message (DTIM).
6.3.2 Multiple SSIDs Settings
SSID: The SSID is a unique name to identify the ADSL Router in the Wireless LAN. Wireless
Clients associating to the ADSL Router must have the same SSID. The define SSID name is
Default_WLAN.
Broadcast SSID: Select No to hide the SSID such that a station can not obtain the SSID through
passive scanning. Select Yes to make the SSID visible so a station can obtain in the SSID
through Passive scanning.
Channel ID: The range of radio frequencies used by IEEE 802.11 b/g wireless devices us called
a channel.
[Authentication Type ]
WEP (Wired Equivalent Privacy) encrypts data frames before transmitting over the wireless
network. Select Disable to allow all wireless computers to communicate with the access points
without any data encryption. Select 64-bit WEP or 128-bit WEP to use data encryption.
Key#1~Key#4 The WEP keys are used to encrypt data. Both the ADSL Router and the wireless
clients must use the same WEP key for data transmission. If you chose 64-bit WEP, then enter
any 10 hexadecimal digits (“0-9”, “A-F”) precede d by 0x for each key (1-4). If you cho ose 1280bit
WEP, then enter 26 hexadecimal digits (“0-9”, “A-F”) preceded by 0x for each key (1-4). The
values must be set up exactly the same on the Access Points as they are on the wireless client
stations. The same value must be assigned to Key 1 on both access point (your ADSL Router)
and the client adapters, the same value must be assigned to Key 2 on both access point and the
client stations and so on, for all four WEP keys.
WPA-PSK Wi-Fi Protected Access, pre-shared key. Encrypts data frames before transmitting
over the wireless network.
Pre-shared Key is used to encrypt data. Both the AD SL Router and the wireless clients must
use the same WPA-PSK Key for data transmission.
6.3.3 MAC Address Filter
You can allow or deny a lust of MAC addresses associated with the wireless stations access to
the ADSL Router.
Status: Use the drop down list box to enable or disable MAC address filtering.
48
Page 50

Action: Select Deny Association to block access to the router , M AC addresses not listed wi ll be
allowed to access the router. Select Allow Association to permit access to the router, MAC
addresses not lusted will be denied access to the router.
7 Advanced Setup
7.1 Firewall
User can enable or disable firewall feature of the ADSL router in the page.
Firewall: Select this option can automatically detect and block Denial of Service (DoS) attacts,
such as Ping of Death, SYN Flood, Port Scan and Land Attack.
SPI: Select this option to Enabled or Disabled the SPI feature. (
traffics initiate from WAN would be blocked, including DMZ, Virtual Server, and ACL WAN side)
NOTE: If you enable SPI, all
7.2 Routing
This table lists IP address of Internet destinations commonly accessed by your network.
When a computer requests to send data to a listed destination, the device uses the Gateway IP
to identify the first Internet router it should contact to route the data most efficiently. Select this
option will list the routing table information. You can press ADD ROUTE to edit the static route.
(As below screen)
49
Page 51

[Static Route]
Select this option to set Static Routing information.
Destination IP Address: This parameter specifies the IP network address of the final
destination of packets routed by this rule.
IP Subnet Mask: Enter the subnet mask for this destination.
Gateway IP Address: Enter the IP address of the gateway. A gateway does the actual
forwarding of the packets. Enter the gateway’s IP address in the field or select which PVC you
wish to act as a gateway.
The gateway is an immediate neighbor of your ADSL Router that will forward the packet to the
destination. On the LAN, the gateway must be a router on the same segment as your Router;
over Internet (WAN), the gateway must be the IP address of one of the remote nodes.
Metric: Metric represents the “cost” of transmission for routing purposes. IP Routing uses hop
count as the measurement of cost, with a minimum of 1 for directly connected networks. Enter a
number that approximates the cost for this link. The number need not to be prec ise, but it must
between 1 and 15. In practice, 2 or 3 is usually a good number.
50
Page 52

Announced in RIP: This parameter determines if the ADSL router includes the router to this
remote node in its RIP broadcasts. If you choose Yes, the router in this remote node will be
propagated to other hosts through RIP broadcasts. If you choose No, this route is kept private
and is not included in the RIP broadcasts.
When you are done making changes, click on SAVE to save your changes, DELETE to
delete the rule with the parameters you set, BACK to return to the previous screen or CANCEL
to exit without saving.
7.3 NAT
Network Address Translation (NAT) is a method for disguising the private IP addresses you
use on your LAN as the public IP address you use on the Internet. You define NAT rules that
specify exactly how and when to translate between public and private IP addresses. Simply
select this option to setup the NAT function for your ADSL router.
Virtual Circuit (VC): The Virtual Circuit (VC) properties of the ATM VC interface identify a unique
path that your ADSL/Ethernet router uses to communicate via the ATM-based network with the
telephone company central office equipment.
NA T Status: This filed shows the current status of the NAT function for the current VC.
Number of IPs: This field is to specify how many IPs are provided by your ISP for current VC . It
can be single IP or multiple IPs.
51
Page 53

Note: For VCs with single IP, they share the same DMZ & Virtual servers; for VCs with multiple
IPs, each VC cab set DMZ and Virtual servers. Furthe rmore, for VCs with multiple IPs, they can
define the Address Map ping rule s; for V Cs with singl e IP, since they have only one IP, there is no
need to individually define the Address Mapping rule.
7.3.1 What NAT Does
NAT changes the source IP address in a packet received from a subscriber (the inside
local address) to another (the inside global address) before forwarding the packet to the WAN
side. When the response comes back, NAT translates the destination address (the inside global
address) back to the inside local address before forwarding it to the original inside host. Note that
the IP address (either local or global) of an outside host is never changed.
The global IP addresses for the inside hosts can be either static or dynamically assigned by the
ISP. You may also designate servers, such as a Web server and a telnet server, on your local
network and make them accessible to the outside world. With no servers defin ed, your ROUTER
filters out all incoming inquiries, thus preventing intruders from probing your network. For more
information on IP address translation, refer to RFC 1631, The IP Network Address Translator
(NAT).
Inside/outside indicates where a host is located relative to the ROUTER. The computers
hosts of your LAN are inside, while the Web servers on the Internet are outside.
Global/local indicates the IP address of a host in a packet as the packet traverses a router. The
local address refers to the IP address of a host when the packet is in the local network, while the
global address refers to the IP address of the host when the same packet is traveling in the WAN
side.
Note that inside/outside refers to the location of a host, while global/local refers to the IP
address of a host used in a packet. Thus, an inside local address (ILA) is the IP address of an
inside host of a packet when the packet is still in the local network, while an insid e global address
(IGA) is the IP address of the same inside host when the packet is on the WAN side.
The following table summarizes this information.
ITEM DESCRIPTION
Inside This refers to the host on the LAN.
Outside This refers to the host on the WAN.
Local This refers to the packet address (source or destination) as the packet
travels on the LAN.
Global This refers to the packet address (source or destination) as the packet
travels on the WAN.
7.3.2 How NAT Works
52
Page 54

Each packet has two addresses – a source address and a destination address. For
outgoing packets, the ILA is the source address on the LAN, and the IGA is the source address
on the WAN. For incoming packets, the ILA is the destination address o n the LAN, and the IGA is
the destination address on the WAN. NAT maps private (local) IP addresses to globally unique
ones required for communication with hosts on other networks. It replaces the original IP source
address (and TCP or UDP source port numbers for Many-to-One and Many-to-Many Overload
NAT mapping) in each packet and then forwards it to the Internet. The ROUTER keeps track of
the original addresses and port numbers so incoming reply packets can have their original
values restored.
The following figure illustrates this.
7.3.3 NAT Application
The following figure illustrates a possible NAT application, where three inside LANs
(logical LANs using IP Alias) behind the router can communicate with three distinct WAN
networks. More examples follow at the end of this chapter.
53
Page 55

7.3.4 NA T Mapping Ty pes
NAT supports five types of IP/port mapping. They are:
a. One-to-One: In One-to-One mode, the TC3162 EVM maps one local IP ad dress to one gl o bal
IP address.
b. Many-to-One: In Many-to-One mode, the TC3162 EVM maps multiple local IP addresses to
one global IP address.
c. Many-to-Many Overload: In Many-to-Many Overload mode, the TC3162 EVM maps multiple
local IP addresses to shared global IP addresses.
d. Man y-to-Many No Overload: In Many-to-Many No Overload mode, the TC3162 EVM maps
each local IP address to a unique global IP address.
e. Server: This type allows you to specify inside servers of different services behind the NAT to
be accessible to the outside world.
The following table summarizes these types.
TYPE IP MAPPING
One-to-One ILA1 IGA1
Many-to-One (SUA/PAT) ILA1 IGA1
ILA2 IGA1
…
Many-to-Many Overload ILA1 IGA1
ILA2 IGA2
ILA3 IGA1
54
Page 56

ILA4 IGA2
…
Many-to-Many No Overload ILA1 IGA1
ILA2 IGA2
ILA3 IGA3
…
Server Server 1 IP IGA1
Server 2 IP IGA1
Server 3 IP IGA1
7.3.5 DMZ
A DMZ (de-militarized zone) is a host between a private local network and the outside
public network. It prevents outside users from getting direct access to s server that has company
data. Users of the public network outside the company can access only the DMZ host.
DMZ: Toggle the DMZ function Enabled or Disabled.
DMZ Host IP Address: Enter the specified IP Address for DMZ host on the LAN side
When you are done making changes, click on SAVE to save your changes or on BACK to return
to the previous screen.
7.3.6 Virtual Server
The Virtual Server is the server or server(s) behind NAT (on the LAN), for example, Web server
or FTP server, that you can make visible to the outside world even though NAT makes your
whole inside network appear as a single machine to the outside world.
55
Page 57

Rule Index: The Virtual server rule index for this VC. Y ou can specify up to 10 rules. All the VCs
with single IP will use the same Virtual Server rules.
Start & End port number: Enter the specific St art and End Port number you want to forward . If
it is one port only, you can enter the End port number the same as Start port number. For
example, set the FTP Virtual server, you can set the start and end port number to 21.
Local IP Address : Enter the IP Address for the Virtual Server in LAN side.
Virtual Server Listing: This is a listing of all virtual servers your have set.
When you are done making changes, click on SAVE to save your changes, DELETE to delete
the rule with the parameters you set, BACK to return to the previous screen or CANCEL to exit
without saving.
56
Page 58

7.3.7 IP Address Mapping
The IP Address Mapping is for those VCs that with multiple IPs. The IP Address Mapping
rule is per-VC based. (only for Multiple IPs’ VCs).
Rule Index: The Virtual server rule index for this VC. You can specify up to 10 rules. All the
VCs with single IP will use the same Virtual Server rules.
Rule Type: There are 4 types of One-to-One, Many-to-One, Many-to-Many Overload, and
Many-to Many No-Overload.
Local Start & End IP: Enter the local IP address you plan to map to. Local Start IP is the starting
local IP address & Local End IP is the ending local IP address. If the rule is for all local IPs, then
the Start IP is 0.0.0.0 and the End IP is 255.255.255.255.
Public Start & End IP: Enter the Public IP Address you want to do NAT. Public Start IP is the
starting Public IP Address and Public End IP is the ending Public IP Address. If you have a
Dynamic IP, enter 0.0.0.0 as the Public Start IP.
When you are done making changes, click on SAVE to save your changes, DELETE to delete
the rule with the parameters you set, BACK to return to the previous screen or CANCEL to exit
without saving.
57
Page 59

7.4 QoS
QoS (Quality of Service). This option will provide better service of selected network traffic
over various technologies. Deploying QoS management to guarantee that all application receive
the service levels required and sufficient bandwidth to meet performance expectations is indeed
one important aspect of modem enterprise network.
58
Page 60

7.5 VLAN
Virtual LAN (VLAN) is a group of devices on one or more LANs that are configured so that they
can communicate as if they were attached to the same wire, when in fact they are located on a
number of different LAN segments. Because VLANs are based on logical instead of physical
connections, it is very flexible for user/host management, bandwidth allocation and resource
59
Page 61

optimization.
(1) Port-Based VLAN: each physical switch port is configured with an access list specifying
membership in a set of VLANs.
(2) ATM VLAN-using LAN Emulation(LANE) protocol to map Ethernet packets into ATM cells
and deliver then to their destination by converting an Ethernet MAC address into an ATM
address.
The key for the IEEE 802.1Q to perform the above functions is in its tags. 802.1Q-compliant
switch ports can be configure to transmit tagged or unt agged frames. A tag field containing VLAN
(and/or 802.1p priority) information can be inserted into an Ethernet frame. If a port has an
802.1Q-compliant device attached (such as another switch), these tagged frames can carry
VLAN membership information between switches, thus letting a VLAN span multiple switches.
However, it is important to ensure ports with non-802.1Q-compliant devices attached are
configured to transmit untagged frames. Many NICs for PCs and printers are not
802.1Q-compliant. If they received a tagged frame, they will not understand the VLAN tab and
will drop the frame. Also, the maximum legal Ethernet frame size for tagged frames was
increased in 802.1Q (and its companion, 802.3ac) from 1518 to 1522 bytes. This could cause
network interface cards and older switches to drop tagged frames a s “ove rsized”
Î Assign VLAN PVID for each interface: You can assign ATM VC, Ethernet (LAN) port, and
Wireless LAN port’s PVID in this section.
Î Define VLAN Group: Based on each VLAN group, you can configure each group’s VLAN
setting. You can configure up to 8 VLAN settings.
60
Page 62

7.6 ADSL
Select this option to set ADSL Mode and ADSL Type information.
ADSL Mode: Select which mode your ADSL connection uses from the dropdown list.
The option has Auto Sync-up, ADSL2+, ADSL2, G.DMT, T1.413, G.LITE
ADSL Type: Select the ADSL type you use from the dropdown list.
ANNEX A, ANNEX I, ANNEX A/L, ANNEX M, ANNEX A/I/J/L/M
When you are done making changes, click on SAVE to save your changes.
8. Access Management
8.1 ACL
Go to Access Management Æ ACL to enable remote management. Access Control
Listing (ACL) is a management tool that acts as a filter for incoming or outgoing packets, based
61
Page 63

on application. You may use telnet or Web to remotely manage the ADSL Router. User just
needs to enable Telnet or Web and give it an IP address that wants to access the ADSL Router.
The default IP 0.0.0.0 allows any client to use this service to remotely manage the ADSL Router.
ACL: There has Activated & Deactivated option. The default setting is Deactivated which
means all IP can access via router. If you choose Activated, you only can access via router by
listed IP addresses.
ACL Rule Index: Index number from 1 and up to 16.
Active: Once you choose Yes then you can access the IP via router.
Application: Each of these labels denotes a service that you may use to remotely manage the
Router. Choices are Web, FTP, Telnet, SNMP, Ping, ALL.
Interface: Select the access interface. Choices are WAN, LAN and Both.
For Example:
How to set your ACL?
1. You must choose Activated to enable your ACL function.
2. Select the ACL Rule Index number (up to 16 number)
3. You can set the specific Secure IP address or set 0.0.0.0 for all IPs.
62
Page 64

4. Choose the Application which you want to access for this ACL Rule index.
5. Select the Interface you want to access from.
6. After all settings are ready, click SAVE and continue next ACL Rule Index setting.
[Note]
1. You must set one ACL index to access your router via LAN interface. If you don’t, your
router cannot access other listed IP Address. (Refer to Index 1).
2. Remember! Once you active your ACL function, you only can access via router by listed
Secure IP Address.
8.2 IP Filter
The Router provides extensive firewall protection by restricting connection parameters to
limit the risk of intrusion and defending against a wide array of common hacker attackers. Go to
Access Management Æ IP Filtering to set different IP filter rules of a given protocol (TCP, UDP,
or ICMP) and a specific direction (incoming, outgoing, or both) to filter the packets.
IP Filter is a more complex filtering tool, based more on IP and custom rules. Each of the indices
can hold six rules, and each interface can have four associated indices, allowing 24 rules per
interface. If all six rules in an index are Next rules, the data will be sent to the next index for
filtering.
63
Page 65

IP Filter Set Index: The IP Filter Set Index from 1 to 12 and each index can set up to 6 IP Filter.
Interface: Choices from PVC0 to PVC7 and LAN.
Direction: Choices are Both, Incoming and Outgoing. Select which direction of data flow you
wish to apply the filters to. Note that Incoming and Outgoing are from the point of view of your
router, relative to the interface you select. For WAN, data coming from outside your system is
considered Incoming and data leaving your system is Outgoing. For LAN, data leaving your
system is considered Incoming and data entering your system is Outgoing.
IP Filter Rule Editing: Select the IP Filter Rule Index you wish to modify.
64
Page 66

Active: Toggle this rule index on or off with Yes or No, respectively.
Source IP Address: Enter the source IP address you wish to deny access to your system.
Subnet Mask: Enter the subnet mask of the source IP address.
Port Number: Enter the port number of the source IP address. Note that 0 means all that ports
are allowed.
Destination IP Address: Enter the destination IP address that you wish to deny access to your
system.
Subnet Mask: Enter the subnet mask of the destination IP address
Port Number: Enter the port number of the destination IP address. Note that 0 means that all
ports are allowed
Protocol: Select the protocol to filter. Choices are TCP, UDP, and ICMP.
Rule Unmatched: Choices are Forward and Next. Select what happens to the data in question
if the rule you are currently editing is unmatched. Next means that the data is then compared to
the next IP filter rule. Forward means that the data will be allowed into your system. Note that a
Forward rule should be the last rule, as no data will be compared to rules after a Forward rule.
IP Filter Set Index: Select the IP filter set you wish to view.
For Example
Please follow below steps to set your IP Filter:
1. IP Filter Set Editing: Choose your IP Filter Set Index, Interface and Direction options.
Remember, Interface and Direction functions are affected with
st
1
index set of IP filter set PVC0 as Interface and Outgoing as Direction, so the list of 1st IP
IP Filter Set Index. EX: if your
Filter will be PVC0 and Outgoing as their settings.
2. IP Filter Rule Editing: Sel ec t th e IP Filter Rule Index (up to 6 numbers for each set index)
and choose Active option. As below example, Source IP Address is 192.168.1.4, Subnet
Mask is 255.255.255.255, Destination IP Address & Subnet Mask is 0.0.0.0, Port
Number is 80. And, Protocol sets TCP. From this setting, it filters 192.168.1.14, so it cannot
access the web. Notice, each IP Filter Set Index can has up to 6 filters IP. At “Rule
Unmatched” option, you must choose NEXT until the last filter IP choose Forward.
3. After every setting is done, click SAVE to continue next IP Filter Editing.
65
Page 67

66
Page 68

8.3 SNMP
The Simple Network Management Protocol (SNMP) is used for exchanging information
between network devices. It enables a host computer to access configuration, performance, and
other system data that resides in a database on the modem. The host computer is called a
management station and the modem is called an SNMP agent. The data that can be accessed
via SNMP is stored in a Management Information Database (MIB) on the modem.
Get Community: Select to set the password for incoming Get- and GetNext request from
management station.
Set Community: Select to set the password for incoming Set request from management st ation.
The default password is ‘public’. When you are done making changes, click on SAVE to save
your changes.
8.4 UPnP
UPnP (Universal Plug and Play) is a distributed, open networking standard that uses TCP/IP
for simple peer-to-peer network connectivity between devices. An UPnP device can dynamically
join a network, obtain an IP address, convey its capabilities and learn about other devi ces on the
network. In turn, a device can leave a network smoothly an automatically when it is no longer in
use. UPnP broadcasts are only allowed on the LAN.
How do I know if I'm using UPnP?
UPnP hardware is identified as an icon in the Network Connections folder (in Windows XP &
Windows ME). Each UPnP-compatible device that is installed on your network will appear as a
separate icon.
67
Page 69

UPnP (Universal Plug and Play): You can choose “Activated” or “Deactivated” option from
this session.
Auto-Configured (by UPnP Application): UPnP network devices can automatically configure
network addressing, announce their presence in the network to other UPnP devices and enable
exchange of simple product and service descriptions. Choose “Activated” option to allow
UPnP-enabled applications to automatically configure the ADSL Router so that they can
communicate through the ADSL Router, for example by using NAT traversal, UPnP applications
automatically reserve a NAT forwarding port in order to communicate with another UPnP
enabled device; this eliminates the need to manually configure port forwarding for the UPP
enabled application. If you don’t want to make configuration changes through UPnP, just
choose “Deactivated”.
SAVE: Click SAVE to save the setting to the ADSL Router.
8.5 DDNS
The Dynamic Domain Name System allows you to update your current dynamic IP
address with one or many dynamic DNS services so that anyone can contact you (in NetMeeting,
CU-SeeMe, etc.). You can also access your FTP server or Web site on your own computer using
a DNS-like address (for instance myhost.dhs.org, where my host is a name of your choice) that
will never change instead of using an IP address that changes each time you reconnect. Your
friends or relatives will always be able to call you even if they don't know yo ur IP addre ss. First of
all, you need to have registered a dynamic DNS account with www.dyndns.org. This is for people
with a dynamic IP from their ISP or DHCP server that would still like to have a DNS name. The
Dynamic DNS service provider will give you a password or key.
68
Page 70

Dynamic DNS: Choose the option for Activated or Deactivated DDNS.
Service Provider: The default Dynamic DNS service provider is
My Host Name: Type the domain name assigned to your ADSL by your Dynamic DNS provider.
E-mail Address: Type your e-mail address.
Username: Type your user name.
Password: Type the password assigned to you.
Wildcard support: Select Yes or No to turn on DYNDNS Wildcard.
DYNDNS Wildcard --> Enabling the wildcard feature for your host causes *.yourhost.dyndns.org
to be aliased to the same IP address as yourhost.dyndns.o rg. This feature is usef ul if you want to
be able to use, for example, www. yourhost.dyndns.org and still reach your hostname.
SAVE: Click SAVE to save your changes.
Note that you must enter the user name exactly as your ISP assigned it. If the assigned name is
in the form of user@domain where domain identifies a service name, enter it exactly as given.
When you are done making changes, click on SAVE to save your changes.
www.dyndns.org.
8.6 CWMP
TR-069 is a CPE WAN Management Protocol (CWMP). As a bidirectional SOAP/HTTP
based protocol it provides the communication between
(ACS). It includes both a safe auto configuration and the control of other CPE management
functions within an integrated framework. In the course of the boom of the broadband ma rket, the
CPE and Auto Configuration Servers
69
Page 71

number of different Internet access possibilities grew as well (e.g.
Set-top box, paddles, VoIP-phones). At the same time the configuration of this equipment
became more complicated -- too complicated for the end-users. For this reason the TR-069
standard was developed. It provides the possibility of auto configuration of these access types.
modems, routers, gateways,
The technical specifications are managed and published by the
terminals can get in contact with the Auto Configuration Servers (ACS) and establish the
configuration automatically. Accordingly other service functions can be provided. TR-069 is the
current standard for activation of terminals in the range of DSL broadband market.
DSL Forum. Using TR-069 the
70
Page 72

9. Maintenance
9.1 Administration
There is only one account that can access Web-Management interface-Administration.
Admin has read/write access privilege. In this web page, you can set new password for admin .
New Password: Type the new password in this field.
Confirm Password: Type the new password again in this field.
Note: If you ever forget the password to log in, you may press the RESET button up to 6
second to restore the factory default settings. The Factory Default Settings for User Name
& Password are admin & trendchip.
9.2 Time Zone
The system time is the time used by the device for scheduling services. You can manually
set the time or connect to a NTP (Network Time Protocol) server. If an NTP server is set, you will
only need to set the time zone. If you manually set the time, you may also set Daylight Saving
dates and the system time will automatically adjust on those dates.
71
Page 73

Current Date/Time: This field displays an updated Date and Time when you reenter this menu.
[Time Synchronization]
Synchronize time with: You can choose “NTP Server automatically”, “PC’s Clock”, or
“Manually” to coordinate the time.
Time Zone: Choose the Time Zone of your location. This will set the time diff erence between
your time zone and Greenwich Mean Time (GMT).
Daylight Saving: Choose “Enabled” or “Disabled” to use daylight savings time.
NTP Server Address: Ty pe the IP address or domain name of your timeserver. Check with your
ISP/network administrator if you are unsure of this information.
A Network Time Protocol (NTP) server can automatically set the router time for you. If you use
an NTP server, you will only need to select your time zone. If you manually set the time, you can
enable Daylight Saving. The router will automatically adjust when Daylight Saving goes into
effect.
When you are done making changes, click on SAVE to save your changes or on CANCEL to exit
without saving.
72
Page 74

9.3 Firmware
You can upgrade the firmware of the router in this page. Make sure the firmware you want
to use is on the local hard drive of the computer. Click on Browse to browse the local had drive
and locate the firmware to be used for the update. Then press UPGRADE to upload new
Firmware. It might take several minutes, don’t power off it during upgrading. Device w ill
restart af ter the upgrade!!
After a success upload, the system automatically restarts. Please wait for the device to finish
restarting. This should take about 2 minutes or more. You need to log in again if you want to
access the device.
Current Firmware Ver.: This filed displays the current firmware version.
New Firmware Location: Type in the location of the file you want to upload in this field or click
Browse… to find it.
UPGRADE: Click UPGRADE to begin the upload process.
9.4 System Restart
The SysRestart screen allows you to restart your router with either its current settings still
in place or the factory default settings.
If you wish to restart the router using the factory default settings (for example, after a firmware
upgrade or if you have saved an incorrect configuration), select Factory Default Settings to
reset to factory default settings. Otherwise, you can select Current Settings. You may also reset
your router to factory settings by holding the DEFAULT button on the back panel of your router in
for 10-12 second while the router is turned on.
73
Page 75

9.5 Diagnostic
The Diagnostic Test page shows the test results for the connectivity of the physical layer
and protocol layer for LAN & WAN sides.
Select which PVC you wish to test from the dropdown list. The router will automatically run
diagnostic tests on that circuit. A green PASS means that the given test was passed, a red FAIL
means that the test was failed and a green SKIPPED means that the test was skipped.
Note: 1) User ONLY can view PVC0’s Diagnostic Test connection.
2) “Testing ADSL Synchronization” might take 30 sec to execut e the Diagnostic Test.
74
Page 76

10. Status
10.1 Device Info
The Device Info screen is a tool that you use to monitor your ADSL Router. It shows the
Firmware Version, WAN, LAN, and MAC address information. Note that these fields are
read-only and are not meant for diagnostic purposes. Except the Virtual Circuit, click the
drop-down list and select the name of the Virtual Circuit on which the system status is to be
shown.
[Device Information]
Firmware Version: This filed displays current firmware version.
MAC Address: The MAC (Media Access Control) or Ethernet address unique to your modem.
75
Page 77

[LAN]
IP Address: The LAN port IP address
Subnet Mask: The LAN port IP subnet mask.
DHCP Server: The status of DHCP Server (Enabled or Disabled)
[WAN]
Virtual Circuit: Click the drop-down list and select the name of the Virtual Circuit on which the
system status is to be shown.
Status: Connected or Not Connected
Connection Type: The WAN Connection Type.
IP Address: The WAN port IP address
Subnet Address: The WAN port IP subnet mask.
Default Gateway: The IP address of the default gateway, if applicable.
DNS Server: The IP address of the DNS Server
[ADSL]
ADSL Firmware Version: This field displays current ADSL firmware version.
Line States: This field displays the ADSL connection process and status.
Modulation: This field displays the ADSL modulation status for G.dmt or T1.413.
Annex Mode: This field displays the ADSL annex modes for Annex A or Annex B. Downstream
and Upstream: Status of SNR Margin, Line Attenuation and Data Rate
SNR Margin: Amount of increased noise that can be tolerated while maintaining the designed
BER (bit error rate). The SNR Margin is set by Central Office DSLAM. If the SNR Margin is
increased, bit error rate performance will improve, but the data rate will decrease. Conversely, if
the SNR Margin is decreased, bit error rate performance will decrease, but the data rate will
increase.
Line Attenuation: Attenuation is the decrease in magnitude of the ADSL line signal between the
transmitter (Central Office DSLAM) and the receiver (Client ADSL Modem), measured in dB. It is
measured by calculating the difference in dB between the signal power level received at the
Client ADSL Router and the reference signal power level transmitted from the Central Office
DSLAM.
Data Rate: This field displays the ADSL data rate.
76
Page 78

10.2 System Log
The System Log displays data generated or acquired by routine system communication
with other devices, such as the results of negotiations with the ISP's computers for DNS and
gateway IP addresses. The device keeps a running log of events and activities occurring on the
Router. You can click Save Log to display a Windows File Download dialog box that enables
opening or saving the contents of the log to your PC. To remove all entries from the list, click
Clear Log. New entries will begin accumulating. If the device is rebooted, the logs are
automatically cleared.
77
Page 79

10.3 Statistics
The ADSL Router keeps statistic of traffic that passes through it. You are able to view the
amount of packets that passes through the Router on both the WAN port & the LAN port. The
traffic counter will reset if the device is rebooted. You can select Ethernet/ADSL/WLAN to view
the statistics report of LAN/WAN.
[Ethernet]
The Ethernet screen gives you information on how much data your router has transmitted and
received across the Ethernet connection. Click on REFRESH to update the screen.
78
Page 80

[ADSL]
The ADSL screen gives you information about how much data your router has transmitted or
received across the ADSL connection. Click on REFRESH to update the screen.
[WLAN]
The WLAN screen gives you information about how much data your router has transmitted or
received across the ADSL connection. Click on REFRESH to update the screen.
79
Page 81

11. Troubleshooting
If the router is not function properly, first check this session for simple troubleshooting
before contacting your Internet service provider (ISP) for support.
11.1 Using LEDs to Diagnose Problems
The LEDs are useful aides for finding possible problem causes.
11.1.1 Power LED
The PWR LED on the front panel does not light up.
STEPS CORRECTIVE ACTION
1 Make sure that the power adaptor is connected to the router and plugged in to an
appropriate power source. Use only the supplied power adaptor.
2 Check that the router and the power source are both turned on and the router is
receiving sufficient power.
3 Turn the router off and on.
4 If the error persists, you may have a hardware problem. In this case, you should contact
your vendor.
11.1.2 LAN LED
The LAN LED on the front panel does not light up.
STEPS CORRECTIVE ACTION
1 Check the Ethernet cable connections between your router and the computer or hub.
2 Check for faulty Ethernet cables.
3 Make sure your computer’s Ethernet card is working properly.
4 If these steps fail to correct the problem, contact your local distributor for assistance.
11.1.3 ADSL LED
The ADSL LED on the front panel does not light up.
STEPS CORRECTIVE ACTION
1 Check the telephone wire and connections between the router ADSL port and the wall
jack.
2 Make sure that the telephone company has checked your phone line and set it up for
ADSL service.
3 Reset your ADSL line to reinitialize your link to the DSLAM.
4 If these steps fail to correct the problem, contact your local distributor for assistance.
80
Page 82

11.2 Problems with the Web Interface
I cannot access the web Interface.
STEPS CORRECTIVE ACTION
1 Make sure you are using the correct IP address of the router. Check the IP address of
the router.
2 Make sure that there is not a console session running.
3 Check that you have enabled web service access. If you have configured a secured
client IP address, your computer’s IP address must match it. Refer to the chapter on
remote management for details.
4 For WAN access, you must configure remote management to allow server access from
the WAN (or all).
5 Your computer’s and the router’s IP addresses must be on the same subnet for LAN
access.
6 If you changed the router’s LAN IP address, then enter the new one as the URL.
7 Remove any filters in LAN or WAN that block web service.
The web Interface does not display properly.
STEPS CORRECTIVE ACTION
1 Make sure you are using Internet Explorer 5.0 and later versions.
2 Delete the temporary web files and log in again.
In Internet Explorer, click Tools, Internet Options and then click the Delete Files ...
button.
When a Delete Files window displays, select Delete all offline content and click OK.
(Steps may vary depending on the version of your Internet browser.)
11.3 Problems with the Login Username and Password
I forgot my login username and/or password.
STEPS CORRECTIVE ACTION
1 If you have changed the password and have now forgotten it, you will need to upload
the default configuration file. This will erase all custom configurations and restore al l of
the factory defaults including the password.
2
Press the DEFAULT button for five seconds, and then release it. When the ADSL LED
begins to blink, the defaults have been restored and the router restarts.
3
The default username is “admin”. The default password is “trendchip”. The Password
and Username fields are case-sensitive. Make sure that you enter the correct password
and username using the proper casing.
81
Page 83

4 It is highly recommended to change the default username and password. Make sure
you store the username and password in a save place.
11.4 Problems with LAN Interface
I cannot access the router from the LAN or ping any computer on the LAN.
STEPS CORRECTIVE ACTION
1 Check the Ethernet LEDs on the front panel. A LAN LED should be on for a port that has
a PC connected. If it is off, check the cables between your router and the PC. Make sure
you have uninstalled any software firewall for troubleshooting.
2 Make sure that the IP address and the subnet mask is consistent between the router
and the workstation.
11.5 Problems with WAN Interface
Initialization of the ADSL connection failed.
STEPS CORRECTIVE ACTION
1 Check the cable connections between the ADSL port and the wall jack. The ADSL LED
on the front panel of the router should be on.
2 Check that your VPI, VCI, type of encapsulation and type of multiplexing settings are the
same as what you collected from your telephone company and ISP.
3 Restart the router. If you still have problems, you may need to verify your VPI, VCI, type
of encapsulation and type of multiplexing settings with the telephone company a nd ISP.
I cannot get a WAN IP address from the ISP.
STEPS CORRECTIVE ACTION
1 Ensure that all other devices connected to the same telephone line as your router (e.g.
telephones, fax machines, analogue modems) have a line filter connected between
them and the wall socket (unless your are using a Central Splitter or Central Filter
installed by the qualified and licensed electrician), and ensure that all line filters are
correctly installed and right way around.
2 Missing line filters or line filters installed the wrong way around can cause problems with
your ADSL connection, including causing frequent disconnects.
Frequent loss of ADSL line sync (disconnections).
STEPS CORRECTIVE ACTION
1 The ISP provides the WAN IP address after authenticating you. Authentication may be
through the user name and password, the MAC address or the host name.
82
Page 84

2 The username and password apply to PPPoE and PPoA encapsulation only. Make sure
that you have entered the correct Service Type, User Name and Password (be sure to
use the correct casing).
11.6 Problems with the Internet Access
I cannot access the Internet.
STEPS CORRECTIVE ACTION
1 Make sure the router is turned on and connected to the network.
2
3 Verify your WAN settings.
4 Make sure you entered the correct user name and password.
5 For wireless stations, check that both the router and wireless station(s) are using the
If the ADSL LED is off, refer to Section 11.1.3 (Page 71).
same ESSID, channel and WEP keys (if WEP encryption is activated).
Internet connection disconnects.
STEPS CORRECTIVE ACTION
1 Check the schedule rules.
2 If you use PPPoA or PPPoE encapsulation, check the idle time-out setting.
3 Contact your ISP.
If you have any troubles to configure or setup this ENDLS-A2+WIG2, please feel free to
contact us. Encore Electronics Inc. Support hotline information can be found on our web site at
www.encore-usa.com
Before contacting us, make sure collect following information. Submit complete detailed
information of your problem will help us to provide you accurate answers.
Model Name: ENDLS-A2+WIG2
Serial Number:
PC Settings:
Other:
83
 Loading...