

Encore N300 Series, N150 Series, ENXWI-2AN4 Series, ENXWI-1AN4 Series Quick Installation Manual
Page 1

© 2011 Encore Electronics, Inc.
Product specifications, size, and shape ar e subject to c hange wi thout notice, and actual product a ppearanc e may dif fer from that depic ted herein.
All trademarks and brand names are the properties of their respective holders.
Page 2

1
www.encore-usa.com
TABLE OF CONTENTS
Chapter 1: ..................................................................... 2 Introduction
1.1
............................................................ 3 Package Contents
1.2
...................................................... 3 System Requirements
1.3
....................................................................... 4 Front Panel
1.4
............................................. 5 Back Panel and Connectors
Chapter 2:
............................................... 6 Connecting the Extender
2.1
................................................... 6 Setting Up the Extender
2.2
............................................... 7 Connecting Wired Devices
2.3
............................................... 7 Checking the Connections
Chapter 3:
.............................................. 8 Configuring the Extender
3.1
........................................... 8 Configure the Host Computer
3.2
............... 8 Accessing the Web-based Configuration Utility
3.2.1
................................................................................. 9 Login
3.2.2
..................................................... 10 Encore Setup Wizard
3.3
................................................................. 13 Basic Settings
3.3.1
......................................................................... 14 AP Mode
3.3.2
............................................................... 16 Repeater Mode
3.3.3
..................................................................... 18 WDS Mode
3.3.4
............................................................ 20 AP + WDS Mode
Chapter 4:
........................................................ 24 Technical Support
Product specifications, size, and shape are subject to change without notice.
The actual product appearance may differ from that depicted herein.
All trademarks and brand names are the properties of their respective holders.
© 2011 Encore Electronics, Inc. All rights reserved.
Page 3

www.encore-usa.com
2
Chapter 1: Introduction
The Wireless N300 / N150 Extender connects wired or wireless devices to an existing
network. It expands the boundaries of a wired or wireless local area netw ork (LAN) literally
by repeating or extending access point signals thereby eliminating dead spot problems
and expanding network range.
The Extender has four operation modes:
AP Mode
─ In AP mode, the Extender is used as an access point of wireless
clients with its own wireless network or network name (SSID) that clients connect
to. The Extender performs tasks that routers do, such as network sharing and
broadcasting its SSID.
Repeater Mode
─ In Repeater mode, the extender works like a bridge between a
wireless router and a wireless client outside the router’s range. The Extender
adapts the network name (SSID) of the wireless router that it is connected to.
WDS Mode
─ In WDS (Wireless Distribution System) mode, the Extender enables
interconnection of two or more access points (APs). To use WDS, the access
points must support WDS function and must be configured with the same SSID
and WEP key.
AP + WDS Mode
─ In AP + WDS mode, the Extender acts as the access point to
two access points. An SSID is configured for the Extender. A wireless client
connects to the network using the Extender SSID.
Page 4

3
www.encore-usa.com
1.1 Package Contents
Wireless N300 / N150 Extender x1
External Antenna x 2 (for N300 Series)
x 1 (for N150 Series)
Power Adapter x 1
RJ-45 Ethernet Cable x 1
Setup CD (User Manual in the CD) x 1
Quick Installation Guide x 1
1.2 System Requirements
Active wired or wireless network
10/100 Ethernet cables with RJ-45 connector
Ethernet or wireless enabled computers
TCP/IP protocol must be installed on the connecting computers
Web browser: Internet Explorer 7 or later, or Mozilla Firefox 3 or later
Page 5
www.encore-usa.com
4
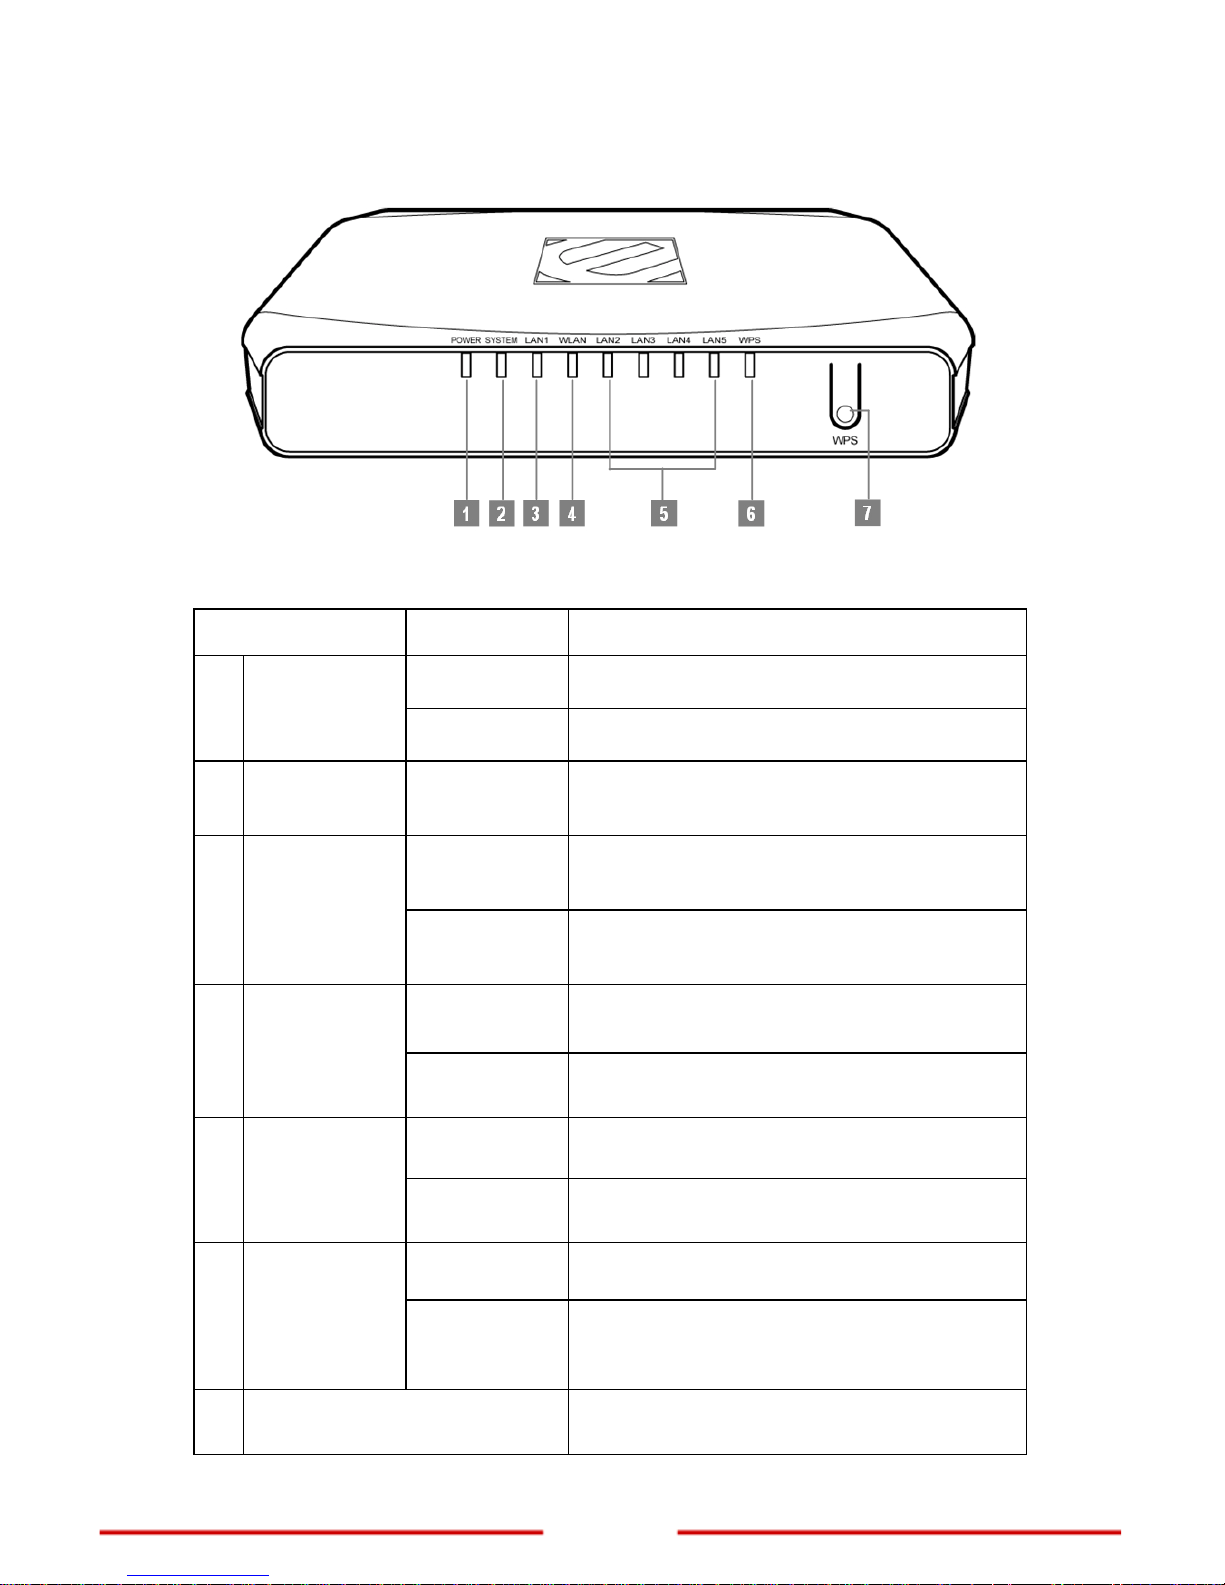
1.3 Front Panel
Note: When the Extender is turned on, the POWER LED lights up and the SYSTEM and WPS
LEDs stay on for 8 seconds to indicate that the system is starting up.
Item Status Description
On
The Extender power is on.
1 POWER LED
Off
The Extender power is off.
2 SYSTEM LED Slow Blinking
The Extender is ready to work.
On
LAN port is successfully connected.
3 LAN LED (1)
Blinking
The Extender is sending or receiving data
over the wired network.
Slow Blinking
Wireless network is ready.
4 WLAN LED
Blinking
The Extender is sending or receiving data
over the wireless network.
On
LAN port is successfully connected.
5
LAN LED
(2/3/4/5)
Blinking
The Extender is sending or receiving data
over the wired network.
Off
The WPS PBC/PIN function is not running.
6 WPS LED
Slow Blinking
The WPS PBC function is enabled. Turns off
after 2 minutes when no connection is
established.
7 WPS Button
Press and hold for 3 seconds to enable the
WPS (Wi-Fi Protected Setup) function.
Page 6
5
www.encore-usa.com
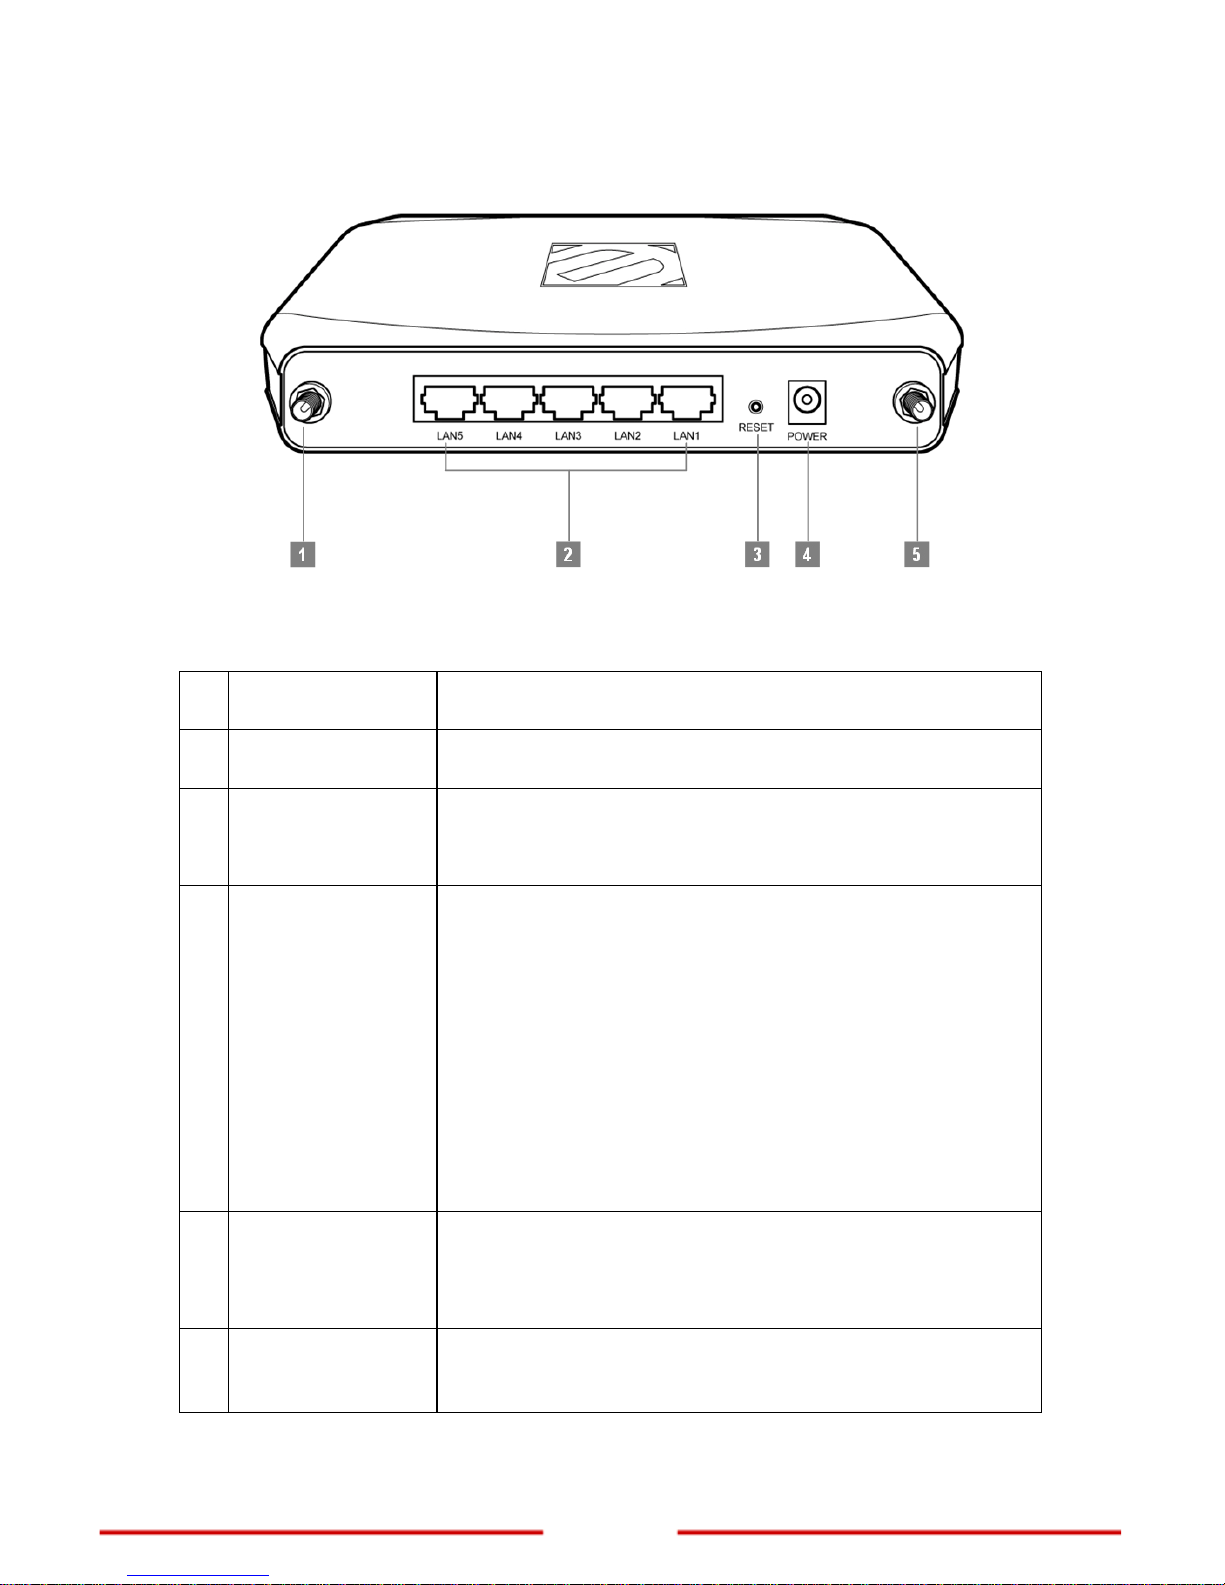
1.4 Back Panel and Connectors
Note: The number of antenna connectors differs per model. The N300 Series has two antenna
connectors (items 1 and 5), while the N150 Series only has one (item 1).
Port / Button Description
1 R-SMA Connector
Attach the external antenna.
2
LAN (1/2/3/4/5)
Ports
Connect wired network and devices, such as a computer,
NAS, IP camera, print server, switch, and access point,
using RJ-45 Ethernet cables.
3 Reset Button
Press and hold the Reset button for 6 seconds to restore the
Extender to its default settings.
Note:
Use a pointed object such as a pen or a paper clip to
press the button.
Using the reset function overrides all user-defined
settings. If you are experiencing problems with the
Extender, perform other troubleshooting methods first
or reset using the web-based configuration utility.
Resetting the Extender should be the last resort.
4 POWER Jack
Connect the supplied power adapter.
Note: Use only the supplied power adapter. Using power
adapters not recommended by the manufacturer may
damage the Ex
tender or the connected devices.
5 R-SMA Connector
Attach the second external antenna.
Note: This port is available only in N300 Series.
Page 7
www.encore-usa.com
6
Chapter 2: Connecting the Extender
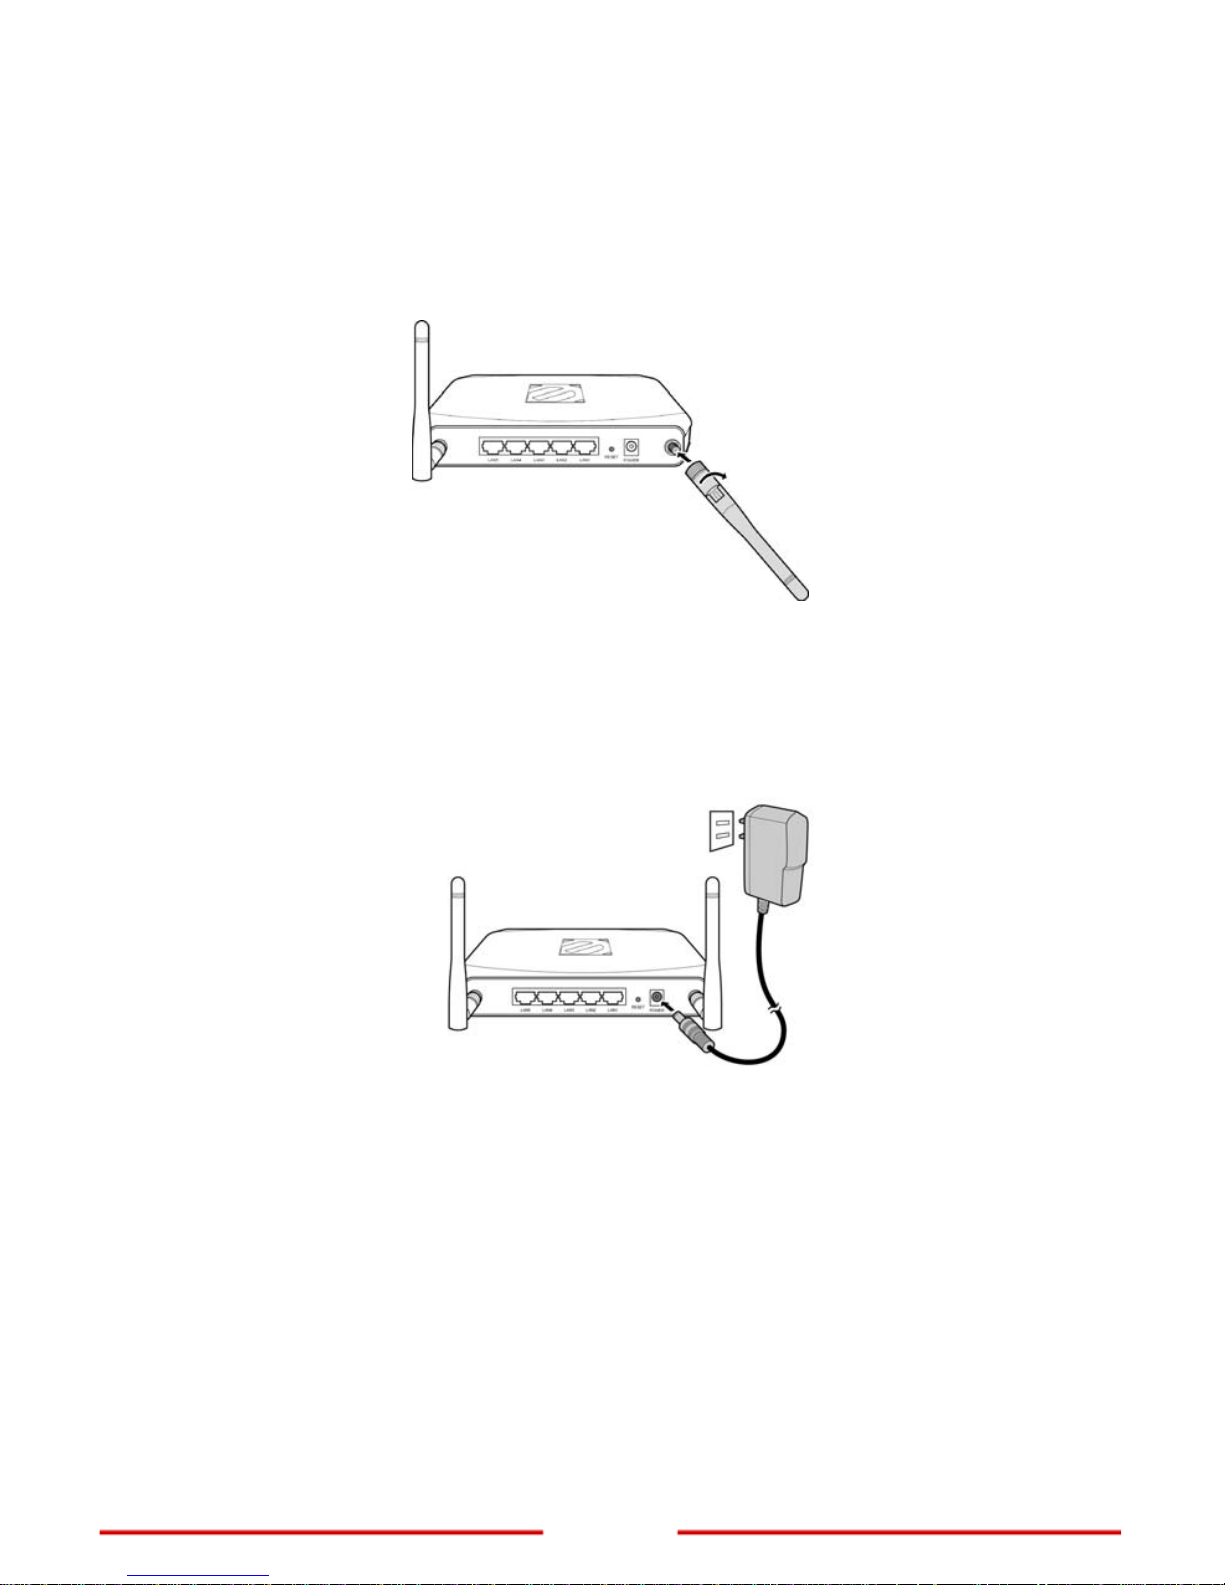
2.1 Setting Up the Extender
1. Attach the antenna(s) to the R-SMA connector(s) at the back of the Extender.
Note: The number of antennas varies depending on model.
2. Position the antenna(s) for proper placement.
3. Connect the power adapter to the power jack of the Extender and then plug the
power adapter to a pow
er outlet.
4. Connect a host computer to access the web-based configuration utility.
Note: For initial configuration, it is recommended to connect the host computer to the
LAN port with an Ethernet cable, see “Connecting Wired Devices” on page 7.
Or
, to connect a
computer wirelessly, search and connect to the Extender
default network:
Network name (SSID): default
Security: disabled
5. After connecting the host computer, configure the computer to be able to
access the web-based configuration utility, see “Accessing the Web-based
Conf
i
guration Utility” on page 8.
Page 8

7
www.encore-usa.com
2.2 Connecting Wired Devices
Use the LAN ports to connect wired devices such as computers, printers, and
Ethernet-enabled game consoles to the Extender.
Connect one end of an Ethernet cable to the LAN port of your device and the other end to
one of the LAN ports of the Extender.
2.3 Checking the Connections
To ensure the Extender and all other connected devices are working properly, check the
LED indicators. For basic connection, the following LED must be lit:
Power LED
System LED (blinking)
LAN L ED (for every device connected via Ethernet)
Page 9

www.encore-usa.com
8
Chapter 3: Configuring the Extender
To configure the Extender, you must configure the host computer first and then access the
web-based configuration utility.
3.1 Configure the Host Computer
Before you begin, the Internet Protocol (TCP/IP) settings of the host computer must be
configured properly to access the Web-based Configuration Utility. Configurations are as
follows:
IP Address : 192.168.10.xxx
(where xxx is a number between 100 ~ 199)
Subnet Mask : 255.255.255.0
Note: See “Chapter 3: Configure the Host Computer” of the User Manual for detailed
configuration information per operating system.
3.2 Accessing the Web-based Configuration Utility
Take note of the following default settings.
SSID : default
Channel : 6
Security : Disable
Page 10

9
www.encore-usa.com
3.2.1 Login
You need a web browser to access the web-based configuratio n utility.
1. Open a web browser.
2. Type the following URL on the address bar:
http://192.168.10.1
Sample Screenshot from Internet Explorer
3. The login screen prompts you for a User Name and Password.
Enter the default access information as follows:
User Name : admin
Password : admin
Note: The login screen varies depending on your web browser and the host computer
operating system.
Page 11

www.encore-usa.com
10
3.2.2 Encore Setu p Wizard
Encore Setup Wizard helps you to configure the Extender quickly. Follow the step-by-step
instructions to run the wizard.
1.
To access the Setup Wizard, click Wizard
at the bottom of the menu.
2.
The Setup Wizard overview page is
displayed.
Click Next to continue.
Page 12

11
www.encore-usa.com
3.
On Password and Verify Password, enter
desired password for the Extender
web-based configuration utility.
Click Next to continue.
4.
Leave the LAN IP Address and LAN
Subnet Mask to their default settings.
By default, DHCP Server is “Disabled”. In
most cases, the wired router assigns an IP
address to the Extender when it connects
to the network, so it is recommended to
leave the DHCP Server “Disabled”.
Otherwise, select DHCP Server
“Enabled”, then enter the IP range in
Range Start and Range End.
Click “Next” to continue.
5.
Enter a name for your wireless network on
SSID and select a radio channel in
Channel. These w ill be used by
networking devices to connect to the
Extender.
Click Next to continue.
Page 13

12
www.encore-usa.com
6.
The Setup Wizard is now completed. The
new settings will take effect after the
Extender reboots.
Click Restart to reboot the Extender. If you
do not want to make any changes, click
Exit.
7.
When this window appears, click CLOSE
to close the wizard.
Page 14

13
www.encore-usa.com
3.3 Basic Settings
After you log in to the web-based configuration utility, the System > Device Information
screen is displayed.
On the menu panel, click Wireless > Basic to open the Basic screen and select the
Extender operation mode.
The required parameters on this screen vary depending on the selected operation mode.
Operation Mode — Select an operation mode:
AP (Access Point): The Extender works as an access point for clients in the
wireless network. See ”AP Mode” on page 14.
Rep
eater:
The Extender repeats the signal from a wireless router for clients
outside the router range. See “Repeater Mode” on page 16.
WDS
(Wireless Distribution Sy
stem): The Extender connects two or more
access points. See “WDS Mode” on page 18.
AP +
W
DS: The Extender acts as the access point to two or more access
points that are connected in a WDS. See “AP + WDS Mode” on p age 20.
Page 15

www.encore-usa.com
14
3.3.1 AP Mode
In AP (Access Point) mode, the Extender acts as an access point with its own SSID and
allows wireless clients to view and connect to the Extender.
SSID — Enter a network name that you want to assign to the Extender. This is the name
that a wireless client searches for to connect to the wireless network via the Extender.
SSID Broadcast — Select Enable to allow wireless clients to view the SSID of the
Extender. Select Disable to hide the SSID.
Channel — Select a transmission channel for wireless communications. The channel of
any wireless client must match the channel selected here to access the network via the
Extender.
Security — When enabled, users are prompted to enter a security key to be allowed
access to the wireless network.
Authentication Type — Select the type of security to use: WEP, WPA, WPA2,
WPA2-Auto.
A. WEP
With WEP (Wired Equivalent Privacy), wireless client s must enter the same key to connect
to the wireless network.
Select one of the following:
Open System: Allows public access to the Extender via wireless connection
but requires users to enter the same WEP key to send and receive data from
the AP.
Share Key: Requires users to enter the same WEP key.
Auto: Select “Auto” if you are unsure which authentication is suitable for your
Page 16

15
www.encore-usa.com
wireless device.
WEP Key Format — Select a security key format:
HEX: To enter a security key using the characters 0~9, A~F, a~f.
ASCII: To enter a security key in alphanumeric format.
WEP Key Length — Select an encryption length:
64-bit: To enter a 10-character security key.
128-bit: To enter a 26-character security key.
WEP Key — Enter desired security key.
B. WPA / WPA2 / WPA2-Auto with PSK
WPA / WPA2 / WPA2-Auto provides a more secured encryption. If PSK is selected, the
screen below appears:
Encryption Type — Select TKIP, AES, or Auto encryption.
Note: TKIP is available for B or G WLAN band only. The WLAN Band setting is under
Wireless > Advanced menu.
Passphrase and Confirmed Passphrase — Enter a passphrase with at least 8
characters.
C. WPA / WPA2 / WPA2-Auto with EAP
Select EAP (Extensible Authentication Protocol) if a Radius server is connected in the
wireless network.
Encryption Type — Select TKIP, AES, or Auto encryption.
Note: TKIP is available for B or G WLAN band only. The WLAN Band setting is under
Wireless > Advanced menu.
Radius Server 1 — Enter the following information:
IP Address: The IP address of the authentication server.
Port: The port number used to connect to the authentication server.
Shared Secret: The secret pas sphrase to connect to the authentication server.
Page 17

www.encore-usa.com
16
3.3.2 Repeater Mode
In Repeater mode, the Extender repeats an access point signal and sends it to wireless
clients outside the access po int range. The Extender uses the SSID of the access point.
1. Click the Search button to search for an access point. A window appears with a
list of available access points.
2. Click Connect of the corresponding access point.
The current access point settings and information are displayed on the screen.
The information varies depending on its settings. Do not change the values of
the following:
SSID
Channel
Security
Authentication Type
Page 18

17
www.encore-usa.com
Encryption Type
PSK / EAP
3. Enter the security key of the selected access point. The screen varies
depending on the access point authentication type.
If the access point security setting is WEP, enter the WEP Key.
If the access point security is WPA / WPA2, enter the passphrase in
Passphrase and Confirmed Passphrase.
4. Click Apply to save and apply the configuration.
Page 19

www.encore-usa.com
18
3.3.3 WDS Mode
In WDS (Wireless Distribution System) mode, the Extender connects one or more access
points by their MAC address. When a wireless client belong ing to one access point moves
out of its access point range, the wireless client automatically connects to the other access
point within the WDS. Its wireless network signal continues without interruption.
Channel — Select a transmision channel for wireless communications. The channel of
any wireless client must match the channel selected here to access the network via the
Extender.
WDS Security — Select Enable to prompt users to enter a security key before allowing
access to the wireless network.
WDS Auth T ype — Select the type of security to use: WEP or WPA2.
Page 20

19
www.encore-usa.com
A. WEP
With WEP (Wired Equivalent Privacy), wireless client s must enter the same key to connect
to the wireless network.
WEP Key Format — Select a security key format:
HEX: To enter a security key using the characters 0~9, A~F, a~f.
ASCII: To enter a security key in alphanumeric format.
WEP Key Length — Select an encryption length:
64-bit: To enter a 10-character security key.
128-bit: To enter a 26-character security key.
WEP Key — Enter desired security key.
B. WPA2
WPA2 provides a more secured encryption.
Passphrase and Confirmed Passphrase — Enter a passphrase with at least 8
characters.
To add access points in the WDS, do the following:
1. Click the Search button to search for access points. A window appears with a
list of available access points.
2. Click Connect of the corresponding access point. The MAC address is shown
on MAC.
3. Click the Add button to add the access point to the WDS. The Extender reboots
for settings to take effect.
4. Repeat the above steps to add more access points.
Page 21

www.encore-usa.com
20
3.3.4 AP + WDS Mode
In AP + WDS mode, the Extender acts as the access point of the WDS with its own SSID.
Wireless clients can view and connect to the WDS via the Extender.
SSID — Enter a network name that wireless clients can view and connect to.
SSID Broadcast — Select Enable to allow wireless clients to view the SSID of the
Extender. Select Disable to hide the SSID.
Channel — Select a transmission channel for wireless communications.
Page 22

21
www.encore-usa.com
Security — When enabled, users are prompted to enter a security key to be allowed
access to the wireless network.
Authentication Type — Select the type of security to use: WEP, WPA, WPA2,
WPA2-Auto.
A. WEP
With WEP (Wired Equivalent Privacy), wireless client s must enter the same key to connect
to the wireless network.
Select one of the following:
Open System: Allows public access to the Extender via wireless connection
but requires users to enter the same WEP key to send and receive data from
the AP.
Share Key: Requires users to enter the same WEP key.
Auto: Select Auto if you are unsure which authentication is suitable for your
wireless device.
WEP Key Format — Select a security key format:
HEX: To enter a security key using the characters 0~9, A~F, a~f.
ASCII: To enter a security key in alphanumeric format.
WEP Key Length — Select an encryption length:
64-bit: To enter a 10-character security key.
128-bit: To enter a 26-character security key.
WEP Key — Enter desired security key.
B. WPA / WPA2 / WPA2-Auto with PSK
WPA / WPA2 / WPA2-Auto provides a more secured encryption. If PSK is selected, the
screen below appears:
Encryption Type — Select TKIP, AES, or Auto encryption.
Note: TKIP is available for B or G WLAN band only. The WLAN Band setting is under
Wireless > Advanced menu.
Passphrase and Confirmed Passphrase — Enter a passphrase with at least 8
characters.
Page 23

www.encore-usa.com
22
C. WPA / WPA2 / WPA2-Auto with EAP
Select EAP (Extensible Authentication Protocol) if a Radius server is connected in the
wireless network.
Encryption Type — Select TKIP, AES, or Auto encryption.
Note: TKIP is available for B or G WLAN band only. The WLAN Band setting is under
Wireless > Advanced menu.
Radius Server 1 — Enter the following information:
IP Address: The IP address of the authentication server.
Port: The port number used to connect to the authentication server.
Shared Secret: The secret pas sphrase to connect to the authentication server.
WDS Security — Select Enable to prompt users to enter a security key before allowing
access to the wireless network.
WDS Auth T ype — Select the type of security to use: WEP or WPA2.
D. WEP
With WEP (Wired Equivalent Privacy), wireless client s must enter the same key to connect
to the wireless network.
WEP Key Format — Select a security key format:
HEX: To enter a security key using the characters 0~9, A~F, a~f.
ASCII: To enter a security key in alphanumeric format.
WEP Key Length — Select an encryption length:
64-bit: To enter a 10-character security key.
128-bit: To enter a 26-character security key.
WEP Key — Enter desired security key.
E. WPA2
WPA2 provides a more secured encryption.
Passphrase and Confirmed Passphrase — Enter a passphrase with at least 8
characters.
Page 24

23
www.encore-usa.com
To add access points in the WDS, do the following:
1. Click the Search button to search for access points. A window appears with a
list of available access points.
2. Click Connect of the corresponding access point. The MAC address is shown
on MAC.
3. Click the Add button to add the access point to the WDS. The Extender reboots
4. Repeat the above steps to add more access points.
for settings to take effect.
Page 25

24
www.encore-usa.com
Chapter 4: Technical Support
For detailed product information or configuration, check the User Manual in the CD-ROM
that came with the Extender.
For software updates, product registration, or to download the latest documentation, check
our website http://www.encore-usa.com
.
For technical related issues or inquiries, call the local technical support number in your
area. Or, visit our w ebsite for more details.
 Loading...