

Page 1

ENXDVR-4C
Digital Surveillance in a Box
4 Channel Digital Video Recorder and
4 CCD Security Cameras with Night Vision
Quick Installation Guide
PPAACCKKAAGGEE CCOONNTTEENNTTSS
Check all the components and parts below. If any of the parts listed below is missing, please
contact the store where you bought it from. Keep the box in case of return or exchange.
● 1x Digital Video Recorder (DVR) Main unit
● 1x Power Adapter and Power Cord
● 1x Infra Red Remote Control (AAA batteries optional)
● 1 x Mouse
● 4 x Baluns
● 4x All Weather CCD Cameras
● 1x Quick Installation Guide
● 1x Internal SATA Hard Disk Drive (Optional, may or may not included / Capacity Varies)
● 1x Setup Disc (including of Quick Guide, Manual, PC Player / Active-X Software)
1
Page 2
HHAARRDDWWAARREE IINNSSTTAALLLLAATTIIOONN
NOTE: MAKE SURE POWER CABLE IS UNPLUGGED BEFORE STARTING
If the Encore DVR you purchase is a “No Hard Drive included” version, start installing a
hard disk drive first before proceeding.
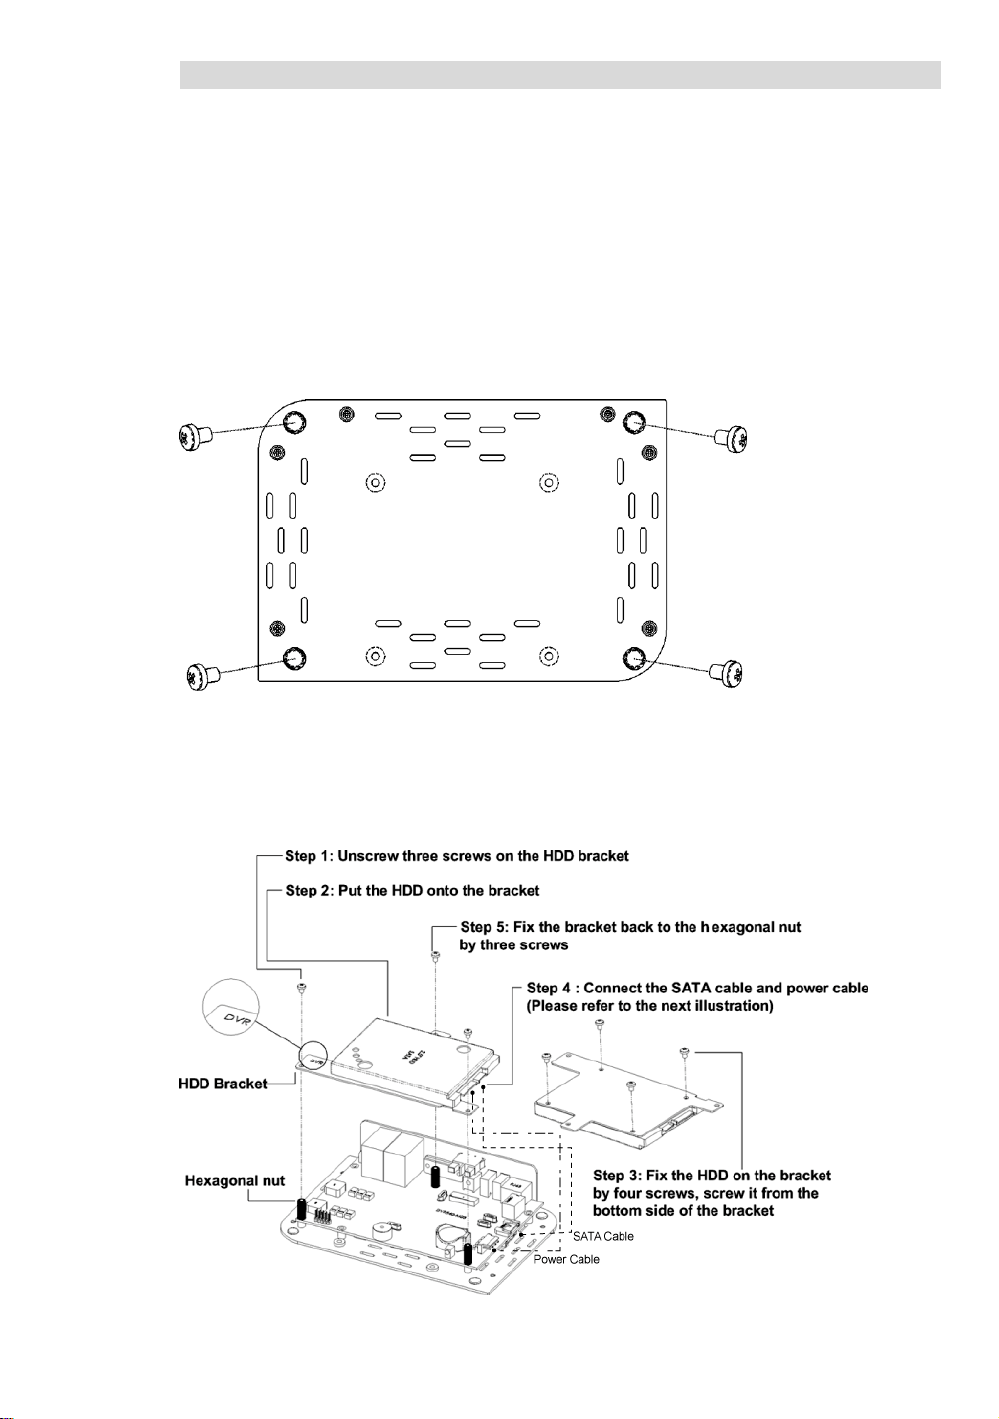
Internal Hard Disk Drive Installation Guide
Step 1 Remove the top housing. Unscrew four screws on the bottom
side of DVR to remove the chassis’s top housing
Step 2 Fix the HDD and Cables
2
Page 3
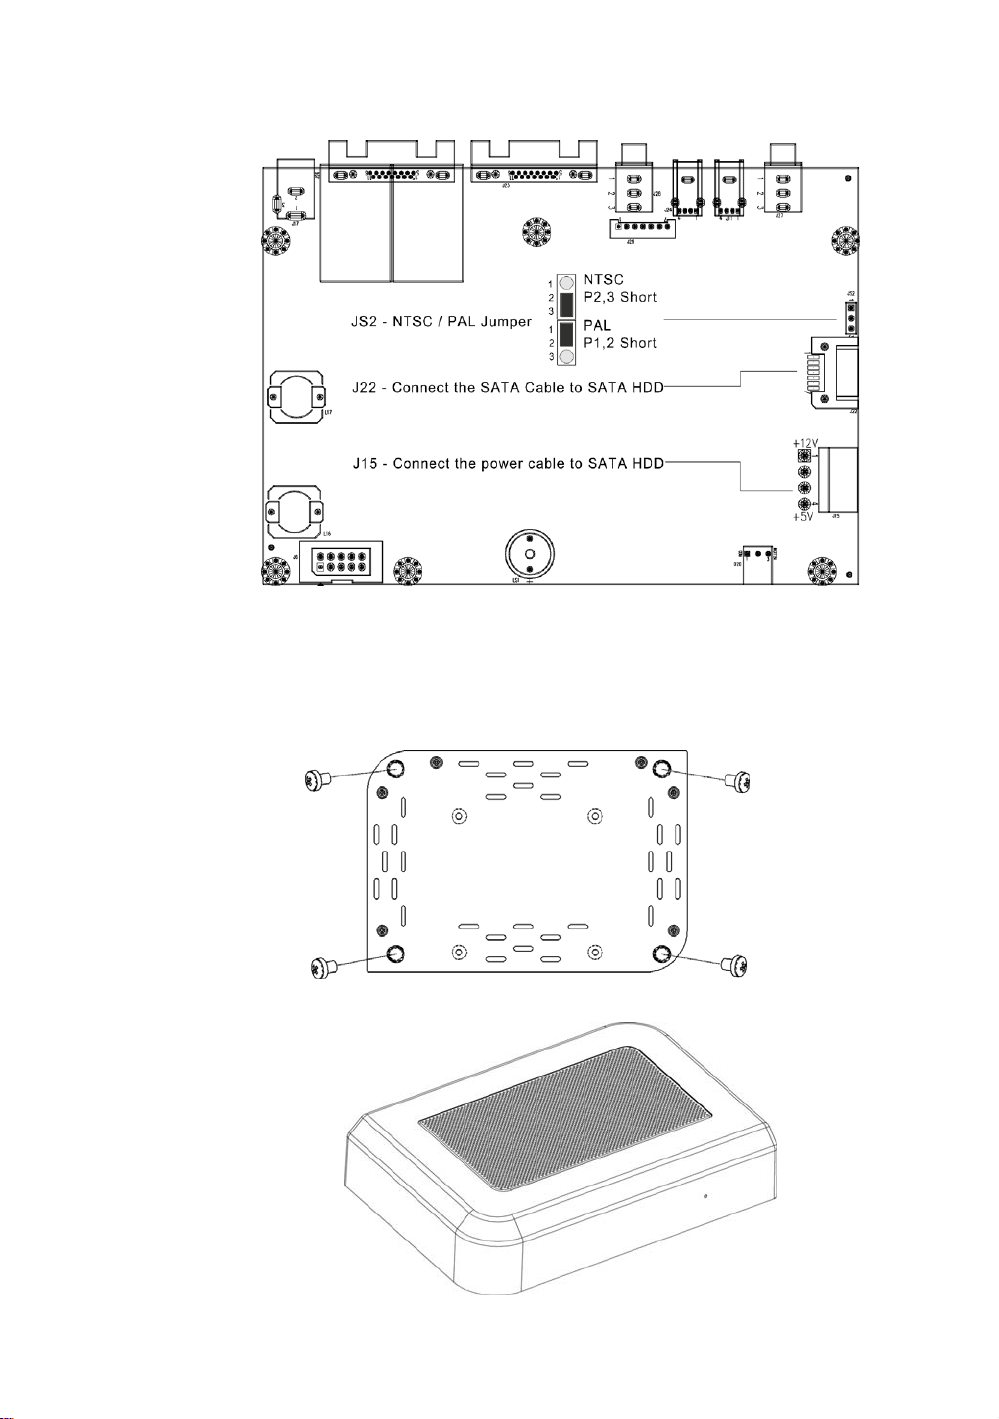
Step 3 Connect the SATA cable and power cable to the main board.
Step 4 Screw the top housing back to the bottom side of DVR by four
screws.
3
Page 4
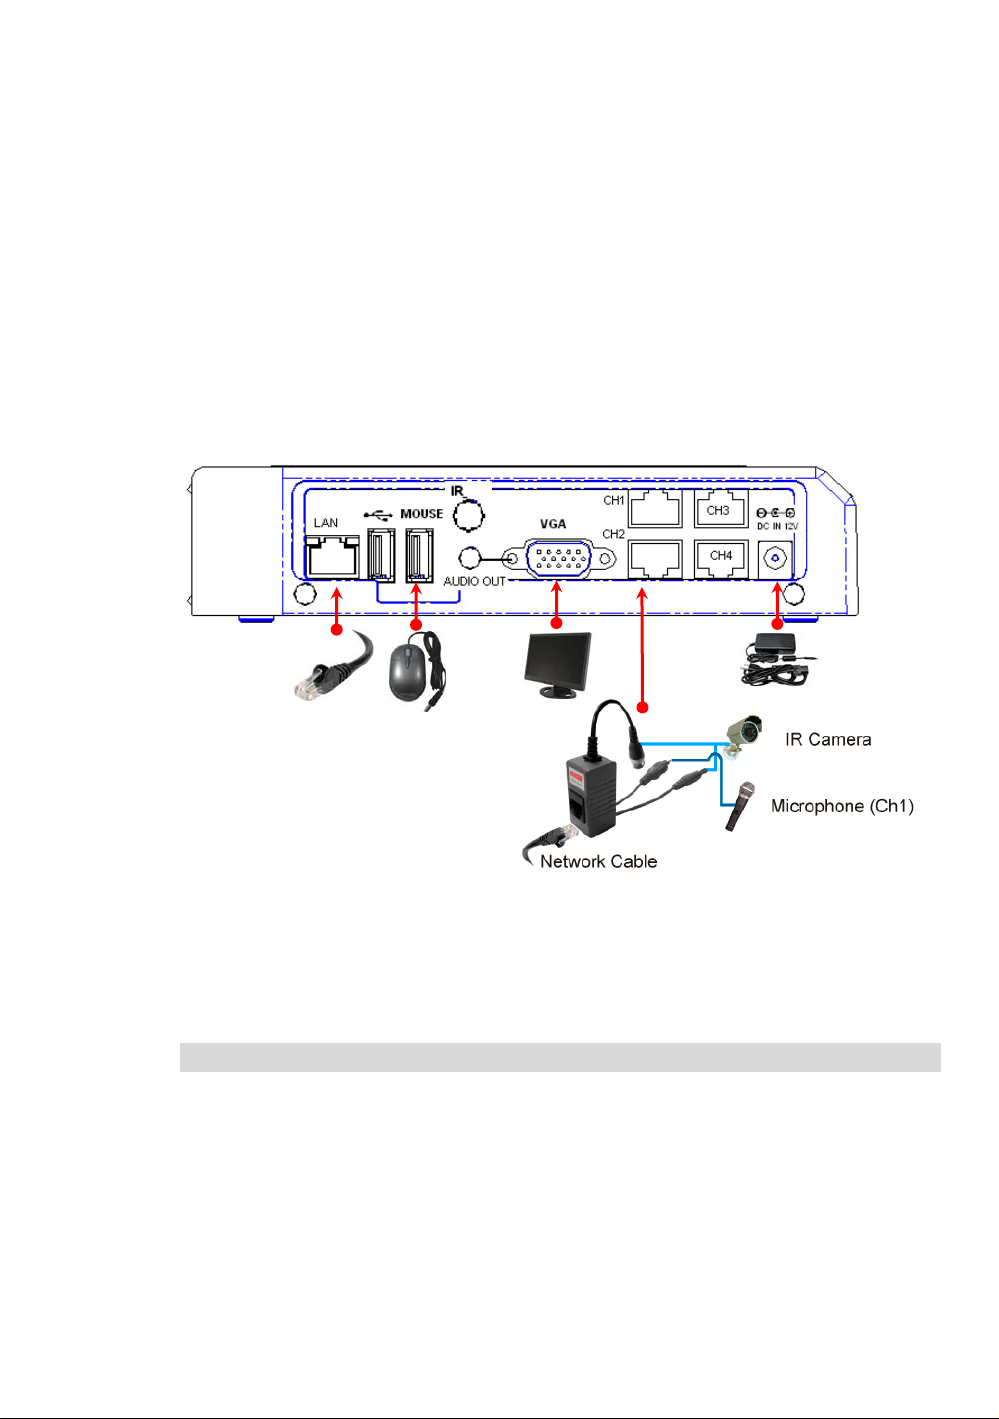
Connecting Cameras and Other External Devices
Connect all the security cameras to the RJ45 Channel ports using the included Baluns.
Use an RJ45 Ethernet cable to connect Channel port to BALUNs, then connect
camera to the BNC side of the BALUN.
Connect a computer monitor to the VGA port. Connect camera to the BALUN and
1.1.
connect the BALUN to the specific Channel port using an RJ45 cable.
Connect the USB mouse to the mouse port
2
2..
Connect the power adapter, the DVR unit will turn-on as soon as the power
3.3.
adapter is plugged-in, there is no power on/off button anywhere in the unit.
NOTE:
)3(
Microphone is not included in this package. Mic works on Channel 1 only.
Before buying a microphone make sure it fits on the Balun’s microphone
RCA connector jack.
STARTING UP THE ENXDVR-4C DVR SYSTEM
After the DVR unit is properly installed, it is now ready for actions such as to
record and play. After the DVR unit is powered on, the unit will check for the
Hard disk drive and do some initializations that will take place for several
seconds, and then the unit will enter into real-time display mode shown as the
following screen:
4
Page 5

SSEETTTTIINNGG UUPP TTHHEE EENNXXDDVVRR--44CC DDVVRR SSYYSSTTEEMM
STEP 1:
Main Menu:
Pop-up the main menu. Move your mouse arrow in the lower part of the screen to bring
up the menu selection bar, as seen below.
4 Split View Play menu (Playback)
9 Split View (8CH) Event search
5
Page 6

Auto channel rotation
Record Information
(1~4CH)
Start recording Hard drive Information
Stop recording Network Information
Enter Main menu
STEP 2:
Status Bar:
The “Status Bar” is located on the top portion of the screen as seen below
Camera on line
Camera signal loss
Recoding XX%
HDD Status
Hard drive will be overwritten when the
capacity is fully used.
Recording Capacity of Hard drive
(show by %)
2007/
Stop Recording
12/25
Date
6
Page 7

Network User Login
18:25
:31
Time
Network acting
Network no
connection
Channel Rotation
USB disk
STEP 3
Main Menu Screen and Selections:
Press to enter the “main menu”, it will show the password input inquiry, please
enter the password. The default password is “123456”.
¾ Channel Setup: To specify or select all channel for displaying and recording setup.
¾ Record Setup: To setup the recording status and schedule for all channels.
¾ Detector Setup: To specify or select all channel for detection status setting.
¾ System Setup: To setup the DVR system configuration including of date/time, button
beep, input device speed ....etc
¾ Hardware Setup: To setup the authentication and I/O device configuration such as
hard drive, network, screen, audio and the firmware update.
¾ Language Selection: To select the language for OSD menu.
¾ Exit Main Menu: To exit the main menu.
7
Page 8

AAUUTTHHEENNTTIICCAATTIIOONN SSEETTUUP
P
To enter the “Authentication Setup” Menu, from the Main Menu click on “Hardware
Setup” then click on ”Authentication Setup”. Authentication Setup is for setting up the
existing or creating new users and management of users for specific access rights to
specific assignments.
__ (W),
``(X)
Account ID
Passwd
NOTE:
To create a new account.
To delete an account.
Set an account within certain limits by giving a “9” mark to
give permission or and “X” mark as no permission
The account is active
The account is disable
Enter characters as account ID
By entering six characters or numbers as password.
The password will replace by “******” when any user login
from network.
When logged-in as “admin” or equivalent, all accounts can
be disabled including its own. When all accounts are
disabled no one will be able to change the settings. If one
function is disabled for all users, password is not required
to access it and to set that function.
8
Page 9

BBAACCKKIINNGG UUPP VVIIDDEEOOSS TTOO TTHHEE UUSSBB FFLLAASSHH DDRRIIVVEE
1. To enter the backup menu, from the Main Menu screen click on the Play Menu “ ”
then enter your password if any. Click to select any previously recorded video then
click on the “Backup” button located below the screen.
2. Adjust the recording time as necessary (Start Time and/or End Time).
3. Insert the USB disk in the USB slot indicated.
4. Press the “Backup Start” button to start backing up selected video(s) to the
USB Flash Drive.
9
Page 10

PPLLAAYYBBAACCKK
From the Main Menu selection, press the Play icon to enter “Play menu”, enter
your password if any, select previously recorded video then click the “Play” button
located at the bottom of the screen. Users can also playback all channel videos after
selecting the event or the by the selected time period. Click “Stop” to go back to the
play back menu.
【Step 1】Time Search
Click the green “Play” button on the Main Menu to enter “Play Search” menu.
Click on the “Play Begin Time” time selection section and use the arrow up or down to select the
desired span of recorded video. Click on “Play” Button when finished the time selections.
10
Page 11

【Step 2】Event Search
Enter the “Play Menu”
Option: By clicking the Option button will switch to the following screen:
Please select event to play back. Then click on the Play button:
When the video is finished playing a check mark “9” will show up indicating that the
video has been played back already.
11
 Loading...