

Page 1
© 2010 Encore Electronics, Inc. All rights reserved.COVER
© 2011 Encore Electronics, Inc.
Product specifications, size, and shape ar e subject to c hange wi thout notice, and actual product a ppearanc e may dif fer from that depic ted herein.
All trademarks and brand names are the properties of their respective holders.
Page 2

1
www.encore-usa.com
TABLE OF CONTENTS
CHAPTER 1: INTRODUCTION........................................................................................... 2
1.1
FEATURES..................................................................................................................3
1.2
SYSTEM REQUIREMENTS ............................................................................................ 3
1.3
SPECIFICATIONS.........................................................................................................4
1.4
PACKAGE CONTENTS..................................................................................................4
CHAPTER 2: GETTING STARTED....................................................................................5
2.1
DEVICE DRIVER INSTALLATION....................................................................................5
2.2
INST ALL THE BLAZEDTV SOFTWARE............................................................................ 9
CHAPTER 3: LAUNCH THE BLAZEDTV........................................................................12
3.1
SETTING THE BLAZEDTV SOFTWARE ........................................................................12
3.2
MAIN FUNCTION........................................................................................................13
CHAPTER 4: REMOTE CONTROL.................................................................................. 16
4.1
INSTALLING BATTERIES.............................................................................................16
4.2
REMOTE CONTROLLER FUNCTIONS ...........................................................................16
CHAPTER 5: FREQUENTLY ASKED QUESTIONS........................................................ 17
5.1
FAQ.........................................................................................................................17
5.2
TROUBLESHOOTING..................................................................................................17
CHAPTER 6: TECHNICAL SUPPORT............................................................................. 18
APPENDIX A: USER’S NOTICE....................................................................................... 18
Product specifications, size, and shape are subject to change without notice,
and actual product appearance may differ from that depicte d herein.
All trademarks and brand names
are the properties of their respective holders.
© 2010 Encore Electronics, Inc. All rights reserved.
Page 3

www.encore-usa.com
2
Chapter 1: Introduction
With seamless viewing technology, ENUTV-DIT2 provides an excellent combination of
speed and stability. This advanced seamless viewing technology can always keep smooth
video streaming even though in unstable transmission conditions.
ENUTV-DIT2 brings high quality video and audio directly to your computer.
This compact tuner stick features built-in ISDB-T/SBTVD receiver, high-performance
external antenna, and high speed USB 2.0 interface. Now, you can enjoy your favorite TV
shows even on a road trip!
The design of ENUTV -DIT2 matches your style. It is fully compatible with your desktop or
laptop PC. Its compact design with high speed USB2.0 interfac e let s y ou enjoy high quality
digital TV programs anywhere using the digital antenna. It comes with a friendly software
application complete with recording features. Never miss your favorite shows with
scheduled recording. With ENUTV-DIT2 build-in application, you can record digital TV
perfectly to files.
Page 4

3
www.encore-usa.com
1.1 Features
2-in-1 Product: Digital TV Tuner / Digital Video Recorder
Watch free-to air ISDB-T/SBTVD TV programs in Windows on your PC or Notebook
ISDB-T 1/3-segment TV standard support
Real-time MPEG4 recording
Scheduled recording and time-shift live TV: watch and record your favorite TV
shows
Free BlazeVideo TV play er
H.264 High Quality Video Compression: crystal clear picture quality
Time-shifting playback, simultaneously watch and record the TV program with
immediate replay and pause
Support subtitle or closed captioning
Still image snapshots
Support EPG (Electronic Program Guide) and schedule recording (EPG feature
depends on television broadcast used in different regions)
Support Windows
®
7 / XP , Windows Vista®
Full function infrared remote control
1.2 System Requirements
Available USB 2.0 port
CPU: Intel
®
Pentium®4 2.0GHz or equivalent AMD Athlon™ CPU
System Memory: 256MB of RAM or more is recommended
Hard Disk Space: 100MB free hard disk space for installation, additional space
required for video capture and T ime- Shifting
OS: Microsoft Windows
®
7 / XP; Windows Vista® 32bit/64bit
Graphic Card : 1024x768, DirectX
®
9.0c or above compatible graphic card
Sound Card: AC97 compatible PCI sound card
CD or DVD ROM Drive: For installing driver and application
Page 5
www.encore-usa.com
4
1.3 Specifications
Device Interface USB 2.0
VHF III (170-240 MHz)
Channel Frequencies
UHF 470 ~ 862 MHz
Support Standard ISDB-T 1-Seg and 3-Seg
Dimension 95 x 30 x 15 mm(L x H x W)
Certification FCC, RoHS
1.4 Package Contents
ENUTV-DIT2
Remote control
Batteries (optional)
Installation CD
User manual
USB cable
TV Antenna
Antenna adapter
Page 6
5
www.encore-usa.com
Chapter 2: Getting Started
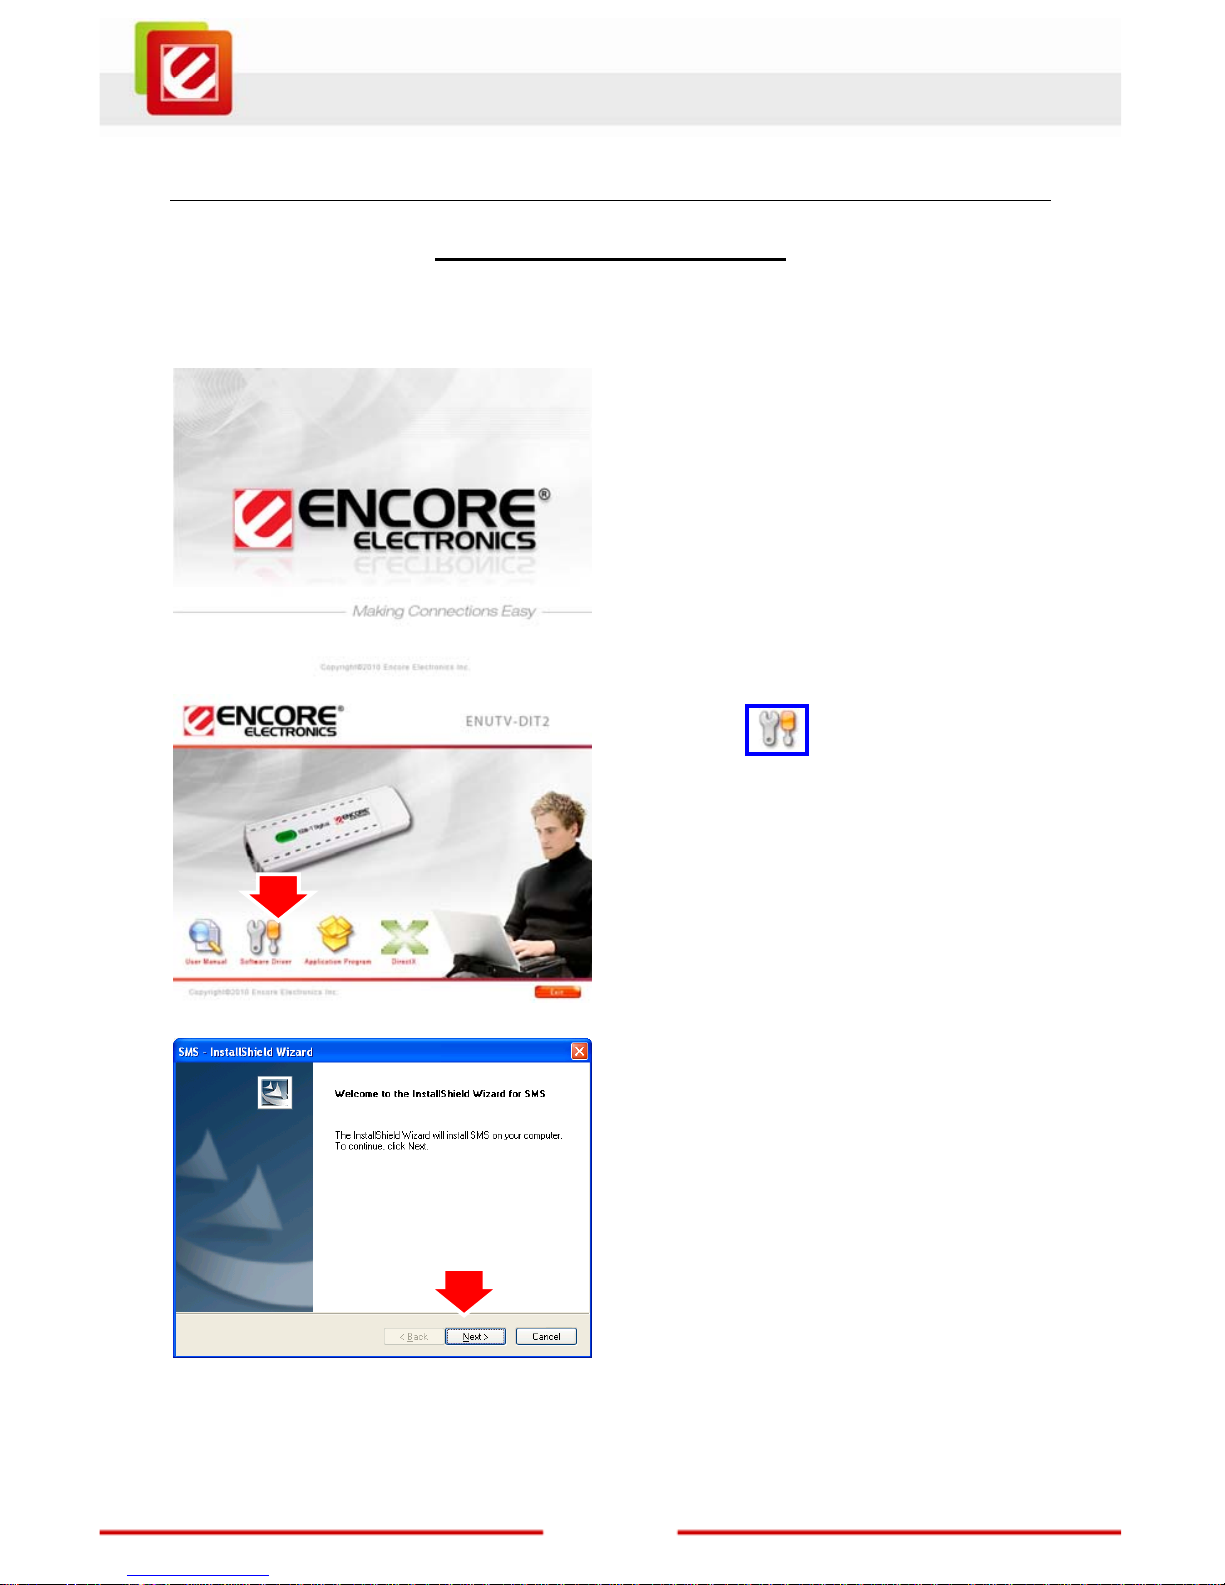
2.1 Device Driver Installation
Insert the provided CD into the CD-ROM drive, and then follow the on-screen instructions
below.
1. Insert the provided CD into the CD-ROM
drive. The setup screen should
automatically appear.
2. . Click the” Software Driver”
icon.
3. Click “Next” to start installation
Page 7

www.encore-usa.com
6
4. Click “Next” button to continue.
5. Click ”Continue Anyway” button
6. Click “Finish” button
Page 8

7
www.encore-usa.com
7. Connect the ENUTV-DIT2 to PC USB
Hub.
8. Click “Next” to continue.
9. Click ”Continue Anyway” button
Page 9

www.encore-usa.com
8
10. Click “Finish” button to close the
wizard
11. To examine if the driver is properly
installed, you can go to “Device
Manager” in Windows
®
.
12. Open “Sound, video and game
controllers” and you should see”SMS
Digital Video” now.
Page 10

9
www.encore-usa.com
2.2 Install the BlazeDTV software
1. Click the”
Application
Program” icon.
2. Choose the Language which you use.
And then click “OK” to continue.
3. Click “Next” button to start the
Installation.
Page 11

www.encore-usa.com
10
4. Please read the License Agreement
and select “I accept the agreement”.
5. Click “Next” button to continue.
6. Click “Next” button to accept the
default location or choose a different
folder.
7. Click “Next” button.
Page 12

11
www.encore-usa.com
8. Click “Install” button.
9. Click “Finish” button.
10. Then restart your computer.
Page 13

www.encore-usa.com
12
Chapter 3: Launch the BlazeDTV
3.1 Setting the BlazeDTV soft ware
The first time you launch BlazeDTV, it will ask you to scan for channels by popping up a
channel-scan window.
Please check TV antenna cable connecting to ENUTV-DIT2 first, and then check
ENUTV-DIT2 connecting to PC USB port.
Notes:
We highly recommend you use the outdoor antenna for better signal reception.
Follow the on-screen instructions and the guidance below.
1. Choose the Country and then click “OK” to
continue.
2. Click “Yes” to scanning all TV programs.
3. System will auto scan all channels.
Page 14

13
www.encore-usa.com
3.2 Main Function
Button/Icon Name Description
EPG Open TV EPG window
Play Play TV or Media
Time Shift/Paus e Time Shift (for TV) or pause playback
Stop Stop playback
Record Record TV or DVD
Page 15

www.encore-usa.com
14
Previous
Skip to play previous TV channel / DVD
chapter
Browse Browse channel
Next
Skip to play next TV channel / DVD
chapter
Open Select playback type
Subtitles Select Subtitles
Audio Select Audio
Capture Capture video as .bmp still image
Volume Control Drag slider bar to adjust volume
Mute Turn on/off audio
Media Type Display playback type
Playback status Display playback status
Signal Quality Display TV signal quality
Signal Strength Display TV signal strength
Channel/chapter
Display current TV channel / DVD
chapter
Time Display current time of TV / DVD
Fast backward
Fast backward, switch between 1X, 2X,
4X, 8X, 16X at each press
Slider bar
Drag the slider to new position for
playback.
Fast Forward
Fast forward, switch between 1X, 2X, 4X,
8X, 16X at each press
Open Floating
Panel
Show Floating Panel
Page 16

15
www.encore-usa.com
Show Advanced
Panel
Show/Hide Advanced Panel
Notes:
ENUTV- DIT2 is comp atible with 1-seg / 3-seg SDTV programming only. BlazeDTV will
not play and receive HDTV signal.
Page 17

www.encore-usa.com
16
Chapter 4: Remote Control
The Remote Control allows you to operate the device remotely. Aim the front of the
Remote Control at the Remote Control Receiver window and press the control buttons as
you would.
4.1 Installing Batteries
Please draw out the plastic from remote control. And then put in battery.
4.2 Remote controller functions
For default button assignments, please refer to the list below:
1. ON/OFF: Open/Close the program.
2. REC: Start to record TV programs
3. Full Screen: Full screen display
4. Snap: Capture a still image
5. 0-9 key: Number keys.
6. Vol+/Vol-: Click to increase/decr ease volume.
7. Ch+/Ch-: Click to switch previous/next channel.
8. Recall: Return to the last TV channel
9. Stop: Stop the recording
10. EPG: Click to show the Electronic Program
Guide
11. Timesift: click to start Timeshift feature play
Recorded show
Page 18

17
www.encore-usa.com
Chapter 5: Frequently Asked Questions
5.1 FAQ
Q: Why does ENUTV- DIT2 fail to create Overlay surface on the video card? How to solve
the problem?
A: Such alarm will be prompted by HDTV Player if your VGA card cannot provide enough
memory space or doesn't have Overlay mode to display video images.
In this case, it is suggested to reduce the resolution, refreshing rate or color pallet to leave
enough memory space for video images. Another reason is due to the fact that drivers for
the VGA card is quite old or don't support Overlay mode which lead to failure of Overlay
initiation. Please contact your VGA supplier for most updated drivers or do as we
recommend above.
5.2 Troubleshooting
Problem Possible Solution
Fail to scan digital TV
channel
1. Make sure you have selected the right location.
2. Expand frequency range.
3. Adjust off-center frequency.
4. Change parameter in Advanced Setting box.
5. Check for update, update application to the latest
version.
No EPG, No Teletext,
No digital radio
May not be available, local DTV service dependent,
please contact service supplier for the availability.
Blank screen for some
channels
Current channel has no data stream, please rescan.
Tip: Please check the clock in Main Control Panel: if
clock changes with time, there is data stream;
otherwise, there will be no data st r eam .
Can not record some
channel’s program
The channel adopts AC-3 audio encoding mode.
Page 19

www.encore-usa.com
18
Chapter 6: Technical Support
Please visit www.encore-usa.com for the latest product information and downloads.
International tech support hotlines are listed on the back cover
Appendix A: User’s Notice
This manual is provided “as is” without warranty of any kind, either express or implied,
including but not limited to the implied warranties or conditions of merchantability or fitness
for a particular purpose. In no event shall we, its directors, officers, employees or agents
be liable for any indirect, special, incidental, or consequential da mages (including
damages for loss of profits, loss of business, loss of use or data, interruption of business),
even if we have been advised of the possibility of such damages arising from any defect or
error in this manual or product.
Specifications and information contained in this manual are furnished for information use
only, and are subject to change at any time without notice, and should not be construed as
a commitment by us. We assume no responsibility or liability for any errors or inaccuracies
that may appear in this manual, including the products and software described in it.
No part of this manual, including the products and soft ware described in it, may be
reproduced, transmitted, transcribed, stored in a retrieval system, or translated into any
language in any form or by any means, except documentation kept by the purchaser for
backup purposes, without the express written permission of us.
Product warranty or service will not be extended if: (1) the product is repaired, modified or
altered, unless such repair, modification of alteration is authorized in writing by us; or (2)
the serial number of the product is defaced or missing.
Products and corporate names appearing in this manual may or may not be registered
trademarks or copyrights of their respective companies, and are used only for identification
or explanation and to the owners’ benefit, without intent to infringe.
Windows, MS-DOS, and DirectX are registered trademarks of Microsoft
Corporation.
Adobe and Acrobat are registered trademarks of Adobe Systems Incorporated.
The product name and revision number are both printed on the product itself. Manual
revisions are released for each product design represented by the digit before and after
the period of the manual revision number. Manual upd ates are represented by the third
digit in the manual revision number.
Page 20

19
www.encore-usa.com
Product specifications, size, and shape ar e subject to c hange wi thout notice, and actual product a ppearanc e may di ffer from that depic ted herein.
* Local tech-support numbers are provided in selectively countries. Service may change without prior notice.
Please visit www .encore- usa.co m for mor e de t ai ls .
 Loading...