

Page 1

ENTC-1000
Encore Thin Client
User Manual v1.04
Page 2

(This page is intentionally blank)
Page 2 of 51
Copyright © 2007 Encore Electronics, Inc.
Page 3

ENTC-1000 Encore Thin Client
User Manual v1.0
FCC warning
This device complies with Part 15 of FCC rules. Operation is
subject to the following two conditions:
1) This device may not cause harmful interference, and
2) this device must accept any interference received, including
interference that may cause undesired operation
CE Mark warning
This is a Class B product. In a domestic environment, this product
may cause radio interference, in which case the user may be
required to take adequate preventative measures.
Note
The manufacturer is not responsible for any radio or TV
interference caused by unauthorized modifications to this
equipment such modifications could void user’s authority to operate
this equipment.
Caution
To comply with the FCC RF exposure compliance requirements, a
separation distance of at least 20cm must be maintained between
the device and user
Unauthorized modification of product will void warrantee and violate
FCC regulations
Page 3 of 51
Copyright © 2007 Encore Electronics, Inc.
Page 4

(This page is intentionally blank)
Page 4 of 51
Copyright © 2007 Encore Electronics, Inc.
Page 5

ENTC-1000 Encore Thin Client
User Manual v1.0
Legal Statement
Trademarks
The E logo, ENCORE ELECTRONICS, and other Encore
trademarks are registered in United States and other countries.
Microsoft, Windows, and Microsoft logo are trademarks or
registered trademarks of Microsoft Corporation in the United States
and/or other countries.
All other product names, logos, designs, or titles mentioned
within this manual may be trademarks of their respective owners.
Disclaimer
Encore Electronics, Inc. makes no warranties, either express
or implied, regarding this manual and the information contained
herein.
Encore Electronics, Inc. hereby expressly disclaim any implied
warranties of merchantability or fitness for any particular purpose
and under no circumstances shall Encore Electronics, Inc. be liable
for any incidental, consequential, or special damages, whether
based on tort, contact, or otherwise arising out of or in connection
with this manual, information contained herein or the use thereof.
Copyright © 2007 Encore Electronics, Inc. All rights reserved. This
manual may not be copied, photocopied, reproduced, translated, or
converted to any electronic format in whole or in part without prior
written consent of Encore Electronics, Inc.
Encore Electronics, Inc. reserves the right to make any
modification to this manual or the information contained herein at
Page 5 of 51
Copyright © 2007 Encore Electronics, Inc.
Page 6

any time without prior notice. Encore Electronics, Inc. assumes no
responsibility for errors or omissions in this manual. For the latest
modifications and more information, visit website at
http://www.encore-usa.com
Page 6 of 51
Copyright © 2007 Encore Electronics, Inc.
Page 7

ENTC-1000 Encore Thin Client
User Manual v1.0
Safety Instructions
The following instructions pertain to risk of fire,
electric shock or bodily injury. Please read all of
these instructions carefully.
1. Save these instructions for later use.
2. Follow all of the instructions and warnings marked on this product
or included in this manual.
3. Do no use this system on an unstable cart, stand or table. The
product may fall, causing serious damage to the product.
4. Slots and openings in the cabinet and the back have been
provided for ventilation. To ensure reliable operation of this
product, and to protect it from overheating, do not block or cover
these openings. Don’t use this product on a bed, sofa, rug or
other similar surface. This product should never be placed near
or over a radiator or heat register. This product should not be
placed in a built-in installation unless proper ventilation is
provided.
5. Never push objects of any kind into the system through the
cabinet openings. Objects may touch dangerous voltage points
or short out parts that could result in a fire or electrical shock.
Never spill liquid of any kind on this product.
6. This product should only be connected to the power adapter
included with package. Manufacture assumes no responsibility
on consequences if the product is connected with other power
adapter.
7. Do not allow anything to rest on the power cord. Do not place
this product where people can walk or trip on the cord.
Page 7 of 51
Copyright © 2007 Encore Electronics, Inc.
Page 8

8. Unplug this product from main electrical power outlet before
cleaning. Do not use liquid cleaners or aerosol cleaners. Use a
damp cloth for cleaning.
9. Do not use this product near water.
10. To avoid generating an electric shock, be sure to plug power
cord into the system before plugging into wall socket.
11. For protection of this product and other devices during a
lightning storm, or when it is left unattended and unused for long
periods of time, unplug the computer and other devices from the
wall outlet and disconnect the cable from system. This will
prevent damage to the system and other devices due to lighting
and power line surges.
12. If this product does not operate normally, immediately seek
authorized technical support. Do not attempt to repair or modify
any part of this product. Any un-authorized repair and/or
modification will potentially result in extensive damage.
13. Unplug this product from main power outlet and call for service
under any of the following conditions:
a. If the power cord or plug is damage or frayed.
b. If the product has been exposed to rain, or water, or other
liquids
c. If the product has been dropped or the case has been
damaged.
d. If the product exhibits a distinct change in performance
indicating a need for service.
Page 8 of 51
Copyright © 2007 Encore Electronics, Inc.
Page 9

ENTC-1000 Encore Thin Client
User Manual v1.0
Table of Content
INTRODUCTION............................................................................10
PACKAGE CONTENTS ................................................................11
SYSTEM REQUIREMENT.............................................................13
INSTALLATION.............................................................................14
Network Installation............................................. 14
Windows 2003 .................................................. 14
Linux ................................................................. 25
Hardware Installation .......................................... 33
Software Installation............................................ 38
HOW TO USE ENTC-1000..ERROR! BOOKMARK NOT DEFINED.
STATUS AND MAINTENANCE ....................................................45
F.A.Q / TECHNICAL SUPPORT ...................................................49
Page 9 of 51
Copyright © 2007 Encore Electronics, Inc.
Page 10

Introduction
Thank you for purchasing ENTC-1000, Encore Thin Client, a
device that allows you to utilize computer resources on a terminal
server and is easy to setup, use, and maintain.
This user manual will cover topic such as installation,
configuration, maintenance, and trouble shooting.
We hope you enjoy your ENTC-1000.
Page 10 of 51
Copyright © 2007 Encore Electronics, Inc.
Page 11
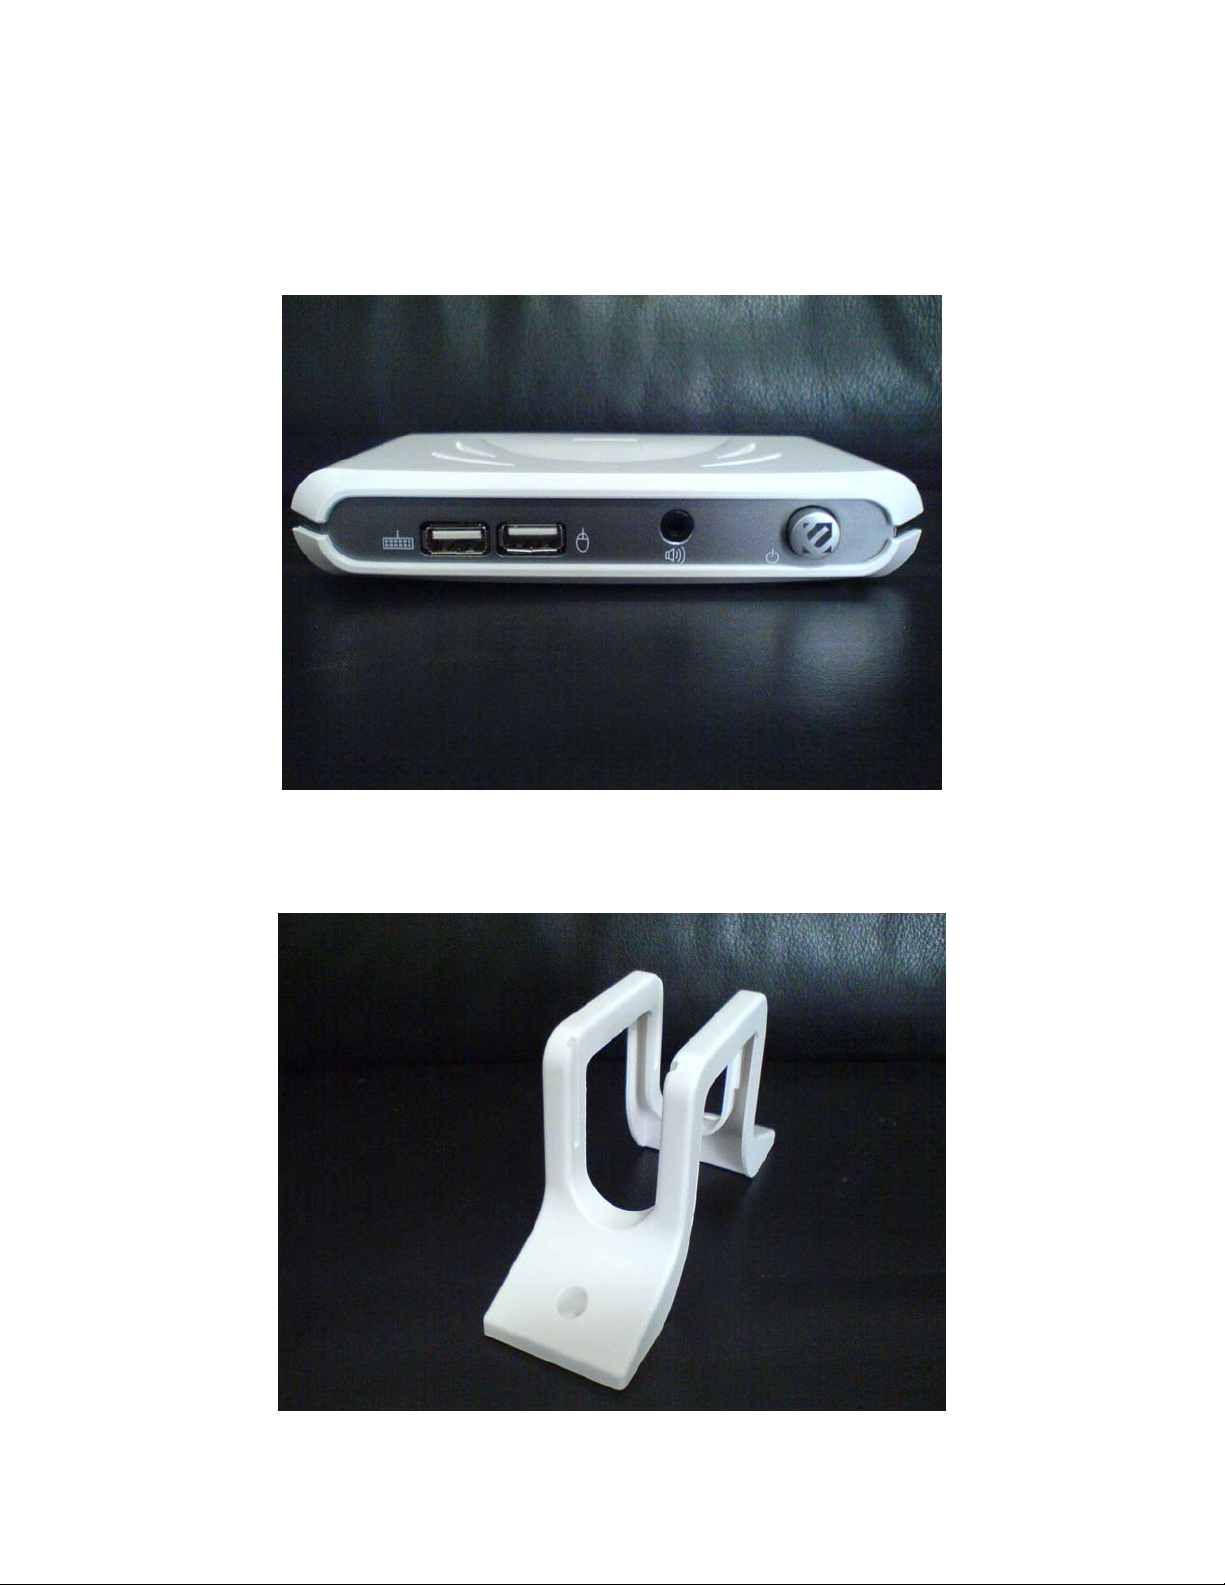
ENTC-1000
ENTC-1000 Encore Thin Client
User Manual v1.0
Package Contents
Vertical Device Stand
(color may vary)
(color may vary)
Page 11 of 51
Copyright © 2007 Encore Electronics, Inc.
Page 12
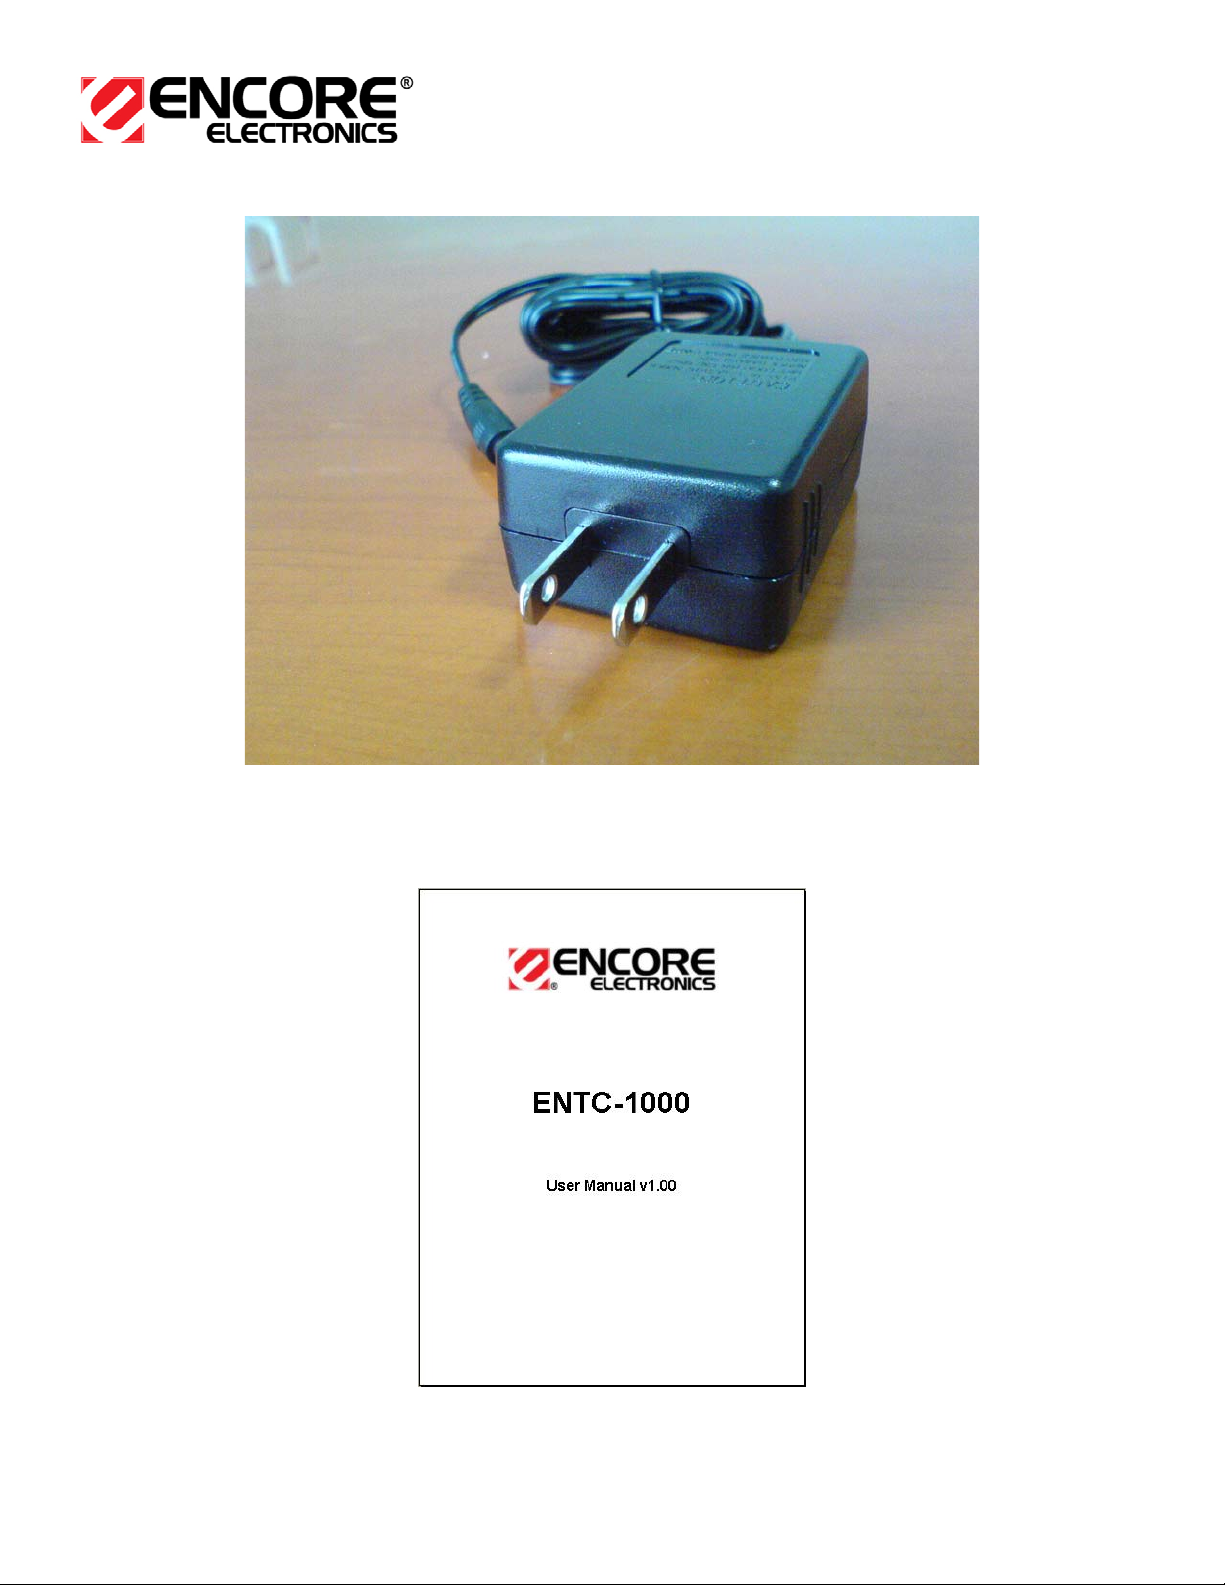
Power adapter
User manual
(Size and shape may vary)
Page 12 of 51
Copyright © 2007 Encore Electronics, Inc.
Page 13

ENTC-1000 Encore Thin Client
User Manual v1.0
System Requirement
This product is not a stand-alone computer. It requires a
terminal server in order to function properly. Please consult your
network administrator and ask one to configure server setting
correctly (see section “Network Installation”). An incorrect setting
will prevent proper functionality of this device. The following is a
checklist to help you determine if you have adequate network
resources to use this device.
__ a local area network
__ DHCP server
or
__ IP address of the gateway
__ subnet mask
__ IP address of the DNS server
__ one available IP address for the device
__ a Terminal Access Server
__ a valid user account registered on the terminal server
Page 13 of 51
Copyright © 2007 Encore Electronics, Inc.
Page 14

Installation
Network Installation
Before booting the device, you must make sure your terminal
server is properly configured. Depending on the O.S. (Operating
System) installed on the server, configuration steps can vary.
Please refer to the following section accordingly to ensure proper
configuration.
Windows 2003
(Warning: You must purchase genuine Windows user license
to login to server)
Prerequisite:
Windows 2003 Server
TCP/IP Protocol
Windows Terminal Server License
Windows 2003 Server CD
Connecting the
ENTC-1000 to the Windows 2003 Server network
requires an add-on server called Terminal Server for Windows
2003. Please verify with Microsoft if your Windows 2003 is capable
of running Terminal Server. Other Windows Servers such as
Windows 2003 Web Server Edition is not bundled with Terminal
Server Role.
Windows 2003 Terminal Server licensing has two types; these are
“Per User” and “Per Device”. Verify with your local Microsoft
Technical Support which licensing type is right for you. Other
Page 14 of 51
Copyright © 2007 Encore Electronics, Inc.
Page 15

ENTC-1000 Encore Thin Client
User Manual v1.0
licensing details can be acquired through Microsoft as well. Before
you install the Terminal Server Licensing, please install the
Terminal Server Role to your Windows 2003 Server first.
Installation of Windows 2003 Terminal Server Role:
Note:
1. Terminal Server installation requires an automatic reboot
after the installation. Make sure that there are no users
logged in and no other operations running on the server prior
to the installation
2. Windows 2003 Server CD should be ready before
installation of the Terminal Server starts
- Login to the Windows 2003 Server as Administrator or
equivalent.
- Click “START”, go to “Administrative Tools”, and then click on
“Manage Your Server”. A new Wizard window will appear on
the screen.
Page 15 of 51
Copyright © 2007 Encore Electronics, Inc.
Page 16
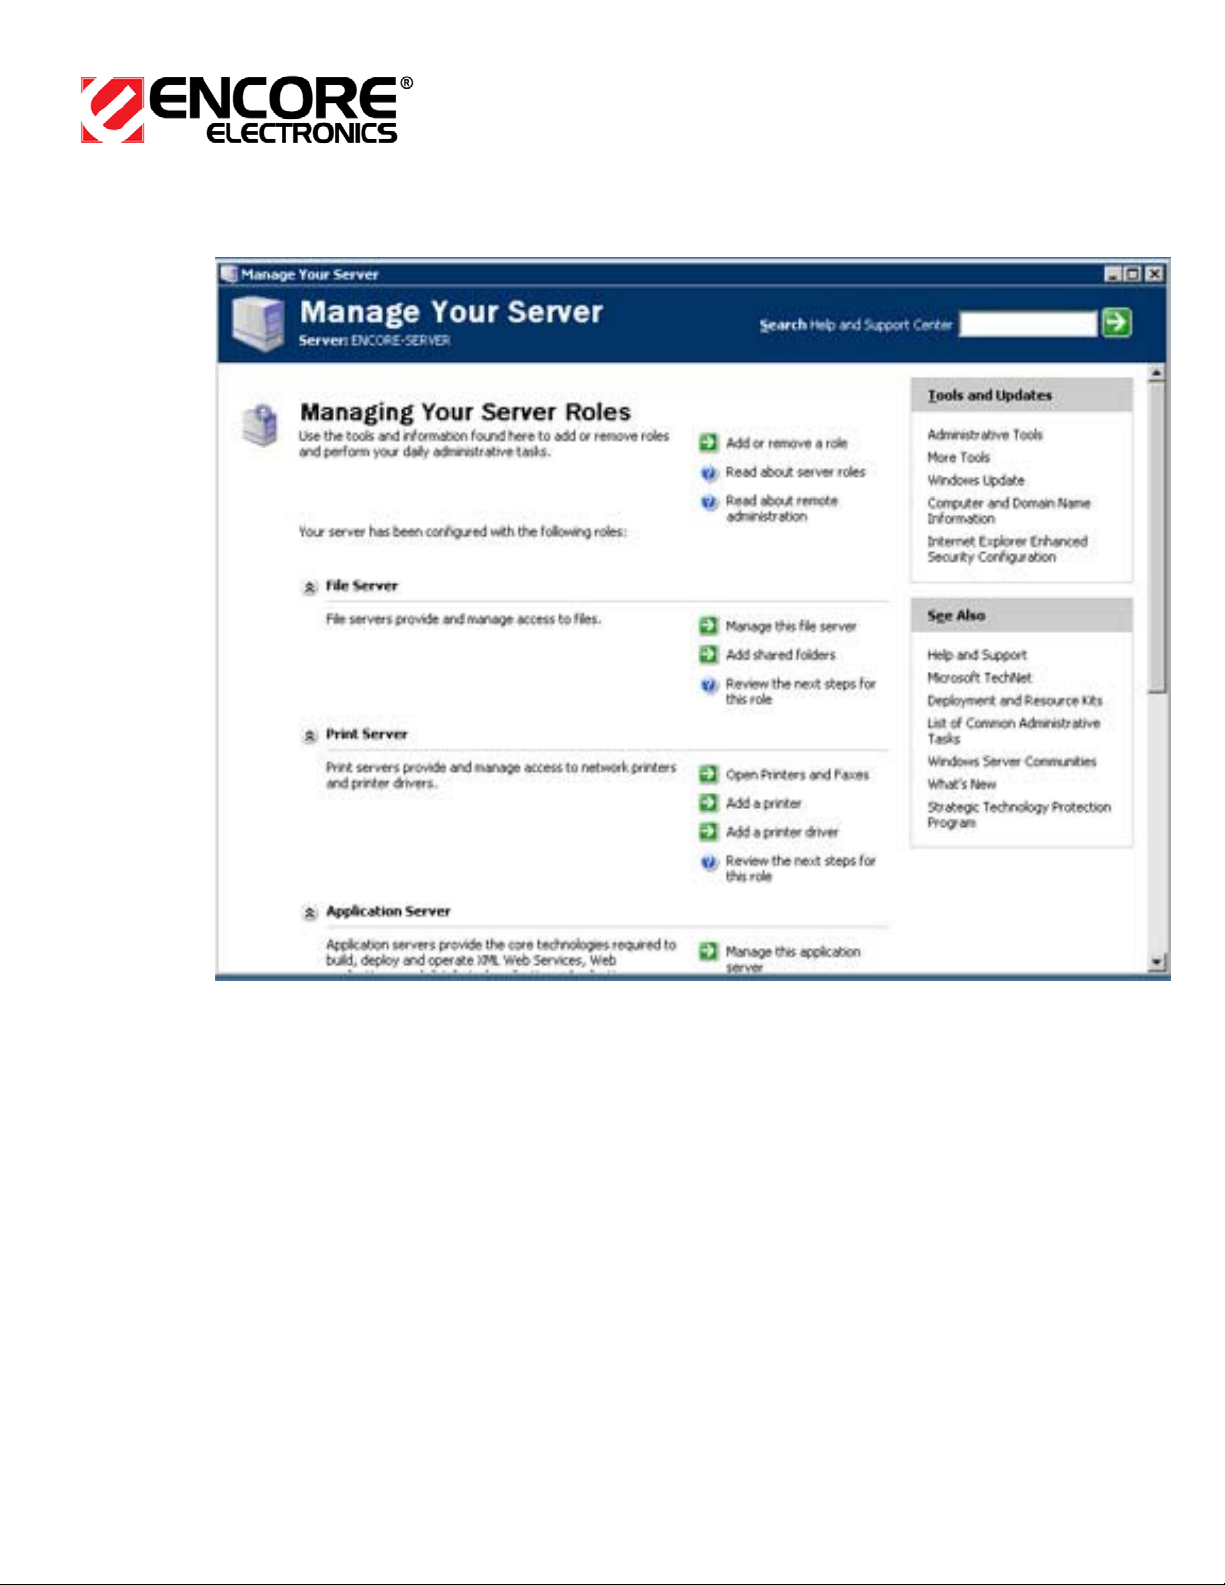
- Click “Add or remove a role”
Page 16 of 51
Copyright © 2007 Encore Electronics, Inc.
Page 17

ENTC-1000 Encore Thin Client
User Manual v1.0
- A new window similar to the picture above will appear, Click
the “Next” button
Page 17 of 51
Copyright © 2007 Encore Electronics, Inc.
Page 18

- Click to select “Terminal Server”. Click “Next”
Page 18 of 51
Copyright © 2007 Encore Electronics, Inc.
Page 19

ENTC-1000 Encore Thin Client
User Manual v1.0
- At the next window (above), click “Next” to confirm installation
of the Terminal Server.
Page 19 of 51
Copyright © 2007 Encore Electronics, Inc.
Page 20

- The next window box warns you that your computer will restart.
Click “OK” to accept and continue.
Page 20 of 51
Copyright © 2007 Encore Electronics, Inc.
Page 21

ENTC-1000 Encore Thin Client
User Manual v1.0
- The next window shows installation status
Page 21 of 51
Copyright © 2007 Encore Electronics, Inc.
Page 22

- If you have not done so, please insert Windows 2003 Server
CD into the CD-ROM drive then click “OK” to continue. When
this process is done, the server will restart automatically.
- Remove the Windows 2003 CD while the server is re-starting
to avoid booting from the CD
- After the installation is successful, you may now activate and
add the Terminal Server license. Refer to your Windows 2003
Terminal Server license installation instruction.
Page 22 of 51
Copyright © 2007 Encore Electronics, Inc.
Page 23

ENTC-1000 Encore Thin Client
User Manual v1.0
Configuration of user’s access rights
By default, the built-in “Remote Desktop Users” group and its
members have full access to the Terminal Server remotely. Initially,
this group has no members; you have to add member manually.
You may also want to create a new group instead of using the builtin group, add users to the group and manually assign access rights
to the Terminal Server to this group.
To add users to the “Remote Desktop Users” group in Windows
2003 Server running Active Directory:
- Click “Start”, go to “Administrative Tools”, and click “Active
Directory Users and Computers”
- Located at the left pane, click to select “Built-in”
- Located at the right hand pane, double click on “Remote
Desktop Users”
- A Remote User Desktop Properties dialogue box will appear.
Click on the “Members” tab then click “Add”
- At the “Select This Object Type” field, make sure it is on “Users,
Group…etc”
- The “From Location” should have your domain name
- Place your cursor to the “Enter your object names to select”
field and type the username of the target accounts for users of
the Terminal Server. You can use the “Check Names” button to
verify the user account you entered in the field.
- Once you have finished selecting and entering users, click OK
twice.
To add a new group for Terminal Server users group:
- Click “Start”, go to “Administrative Tools”, and select “Active
Directory Users and Computers”
Page 23 of 51
Copyright © 2007 Encore Electronics, Inc.
Page 24

- From the left pane, click to select “Users”.
- From the Menu bar, click on “Action” select “New” then click
“Group”
- Enter your new group name, then click “OK”
- Double click on the newly created group, click the “Member”
tab, and click “Add”
- At the “Enter the subject name to select” field, enter account’s
username. Click “OK” twice when done.
- To grant access to the Terminal Server to this group, do the
following:
o Click “Start”, go to “Administrative Tools”, and click on
“Terminal Services Configuration”
o Double click on “RDP-tcp” and then click on the
“Permissions” tab
o Click “Add”, then type the group’s name in the field and
click “OK” twice
To add a local user account manually:
- Click “Start”, go to “Administrative Tools”, and click on
“Terminal Services Configuration”
- Double click on “RDP-tcp” and click on the “Permissions” tab
- Click “Add”. Type the username to the Add field, then click
“OK” twice
Page 24 of 51
Copyright © 2007 Encore Electronics, Inc.
Page 25

ENTC-1000 Encore Thin Client
User Manual v1.0
Linux
(Warning: You must purchase genuine Linux user license to
login to server)
ENTC-1000 uses XDMCP (X Display Manager Control
Protocol) to access Linux servers. This section details how to
enable XDMCP services on your Linux system.
Prerequisites
Before starting, make sure your network interface and X11 service
(graphical user interface) are working properly on your Linux
server. Refer to your Linux user manual on setting up network
interface and X11 on your system.
Since Linux systems can vary depending on the distribution
installed, the procedures listed below only serve as examples. You
should refer to the user manual from your Linux distribution for
detailed instructions. For general information on setting up XDMCP
service, go to
http://tldp.org and search for “XDMCP”.
Most of the following steps require “root” privileges. Contact your
system administrator if you cannot log in as the “root” user.
CentOS 4.4 / Red Hat Enterprise Linux compatible systems
(with Gnome Display Manager)
1) Configure your firewall to allow UDP port 177. For testing
purposes, you can also disable the firewall entirely to avoid
configuration mistakes.
Page 25 of 51
Copyright © 2007 Encore Electronics, Inc.
Page 26

Start the Security Level Configuration Tool by selecting Main
Menu Button
system-config-securitylevel from a command terminal. Add the following text to the “Other Ports”
field (entries are separated by commas),
(on the Panel) ( System Settings ( Security Level, or enter the command
177:udp
2) Open and edit the GDM configuration file with a text editor.
Normally, this file is located at
/etc/X11/gdm/gdm.conf. Search
for the following section,
Page 26 of 51
Copyright © 2007 Encore Electronics, Inc.
Page 27

ENTC-1000 Encore Thin Client
User Manual v1.0
[xdmcp]
Enable = false
and change it to
[xdmcp]
Enable = true
Also, add the following line in the [xdmcp] section, or uncomment
it if it has been commented out,
port = 177
Remember to save your changes.
3) Make sure your Linux server starts in graphical mode. If your
system starts in text mode, you need to change the default
“runlevel” to 5.
Open and edit
/etc/inittab file with a text editor. Look for a line
similar to the following text,
id:5:initdefault:
This line specifies the runlevel 5 as the default runlevel. If the line
specifies a different runlevel on your system, modify it to runlevel
5 and save your changes.
4) Restart the GDM service. Please note that if you are using the
graphical user interface on your Linux system to make the above
configurations, restarting GDM will interrupt your session! Log out
your session and return to the GDM log-in screen, then restart
GDM by pressing Ctrl-Alt-Backspace keys at the same time.
Page 27 of 51
Copyright © 2007 Encore Electronics, Inc.
Page 28

If you are logged in through a text terminal, you can restart GDM
by entering the following command,
killall -1 gdm-binary
Page 28 of 51
Copyright © 2007 Encore Electronics, Inc.
Page 29

ENTC-1000 Encore Thin Client
User Manual v1.0
OpenSuSE 10.1 (with KDE Display Manager)
1) Configure your firewall to allow UDP port 177. For testing
purposes, you can also disable the firewall entirely to avoid any
configuration mistakes.
Start YaST Firewall Configuration by selecting Main Menu Button
(on the panel) → System → Yast (Control Center). Then go to
Security and Users section and select Firewall.
Page 29 of 51
Copyright © 2007 Encore Electronics, Inc.
Page 30

To allow connections from a particular interface, select
“Interfaces” from the left panel and click on the network interface
of your choice. Assign the appropriate network interface to
“Internal Zone”, which leaves all ports open on this interface. If
you must assign this network interface to “External Zone”, you
need to modify the rules for “External Zone” to open UDP port
177. Please refer to your SuSE manual for details.
Page 30 of 51
Copyright © 2007 Encore Electronics, Inc.
Page 31

ENTC-1000 Encore Thin Client
User Manual v1.0
2) Open and edit /etc/sysconfig/displaymanager file with a text
editor. Look for lines similar to the following text,
# Allow remote access to your display manager (kdm
only for now)
#
DISPLAYMANAGER_REMOTE_ACCESS=”yes”
The last line specifies whether KDM should allow remote
connections. If this line says “no” on your system, modify it to
“yes” and save your changes.
3) Open and edit
/etc/opt/kde3/share/config/kdm/kdmrc file
with a text editor. Look for lines similar to the following text,
[Xdmcp]
# Whether KDM should listen to XDMCP requests.
Default is true.
Enable=true
# The UDP port KDM should listen on for XDMCP
requests. Don't change the 177.
Port=177
These lines specify that KDM should enable XDMCP service. If
the lines say otherwise on your system, modify them and save
your changes.
4) Make sure your Linux server starts in graphical mode. If your
system starts in text mode, you need to change the default
“runlevel” to 5.
Open and edit
/etc/inittab file with a text editor. Look for a line
similar to the following text,
Page 31 of 51
Copyright © 2007 Encore Electronics, Inc.
Page 32

id:5:initdefault:
This line specifies the runlevel 5 as the default runlevel. If the line
specifies a different runlevel on your system, modify it to runlevel
5 and save your changes.
5) Restart the KDM service. Please note that if you are using the
graphical user interface on your Linux system to make the above
configurations, restarting KDM will interrupt your session! Log out
your session and return to the KDM log-in screen, then restart
KDM by pressing the Ctrl-Alt-Backspace keys at the same time.
If you are logged in through a text terminal, you can restart KDM
by entering the following command,
service xdm restart
Page 32 of 51
Copyright © 2007 Encore Electronics, Inc.
Page 33

ENTC-1000 Encore Thin Client
User Manual v1.0
Hardware Installation
Before any attempt of hardware installation, please check the
content of the box (see “
Package Contents”)
1. Take the ENTC-1000, and power adapter out of the box.
(color may vary)
Copyright © 2007 Encore Electronics, Inc.
Page 33 of 51
Page 34

2. Connect the following cables appropriately
a. Connect one RJ-45 cable and from the local area network
to the ENTC-1000 (or use one that is already in place)
(color may vary)
Copyright © 2007 Encore Electronics, Inc.
Page 34 of 51
Page 35

ENTC-1000 Encore Thin Client
User Manual v1.0
b. Connect VGA cable from the CRT/LCD display to the
ENTC-1000 (Make sure that the power and signal-cables
to the CRT/LCD display are properly connected)
(color may vary)
Copyright © 2007 Encore Electronics, Inc.
Page 35 of 51
Page 36

c. Connect USB keyboard and mouse to ENTC-1000 USB
ports.
(NOTE: this device will only recognize a USB keyboard
and a USB mouse. It will not recognize any other USB
device.)
(color may vary)
Copyright © 2007 Encore Electronics, Inc.
Page 36 of 51
Page 37

ENTC-1000 Encore Thin Client
User Manual v1.0
d. Connect a power adapter from any power outlet to the
ENTC-1000.
(color may vary)
Copyright © 2007 Encore Electronics, Inc.
Page 37 of 51
Page 38

e. (Optional) Connect audio cable from any speaker or
headphone to the
ENTC-1000
(color may vary)
f. You have now finished hardware installation
Software Installation
Currently there is no software installation required for the
ENTC-1000. However, from time-to-time, a firmware update may
be required. Please see “
proper firmware update procedure.
Copyright © 2007 Encore Electronics, Inc.
Status and Maintenance” section for
Page 38 of 51
Page 39

ENTC-1000 Encore Thin Client
User Manual v1.0
How to use the ENTC-1000
Once the network / terminal sever is properly configured and
the device is properly installed, the device is ready for use. Please
verify that all installation (see “Installation” section) is complete prior
to first-time use. Please follow below mentioned procedures.
1. Turn on display monitor and the ENTC-1000. Power button is
located on the front panel of the ENTC-1000.
(color may vary)
Copyright © 2007 Encore Electronics, Inc.
Page 39 of 51
Page 40

2. Wait for several second until device boots to logo screen (see
below).
Page 40 of 51
Copyright © 2007 Encore Electronics, Inc.
Page 41

ENTC-1000 Encore Thin Client
User Manual v1.0
3. Device will now enter initial dialog. There are 3 tabs on the
dialog. Each serves a different purpose.
First tab is the “connection” dialog. The dialog will display a
different input parameter depending on which protocol you
want to use.
The above dialog is displayed when the Windows server,
which uses “RDP”, Remote Desktop Protocol, is chosen. User
can specify the following parameters.
Server Address, the IP address or name of the server.
Color Depth, the lower the color depth, the better the
response time; the higher the color depth, the shaper the
display.
Audio Playback audio playback can be turned off, controlled
Page 41 of 51
Copyright © 2007 Encore Electronics, Inc.
Page 42

locally, or left to remote server setting.
If user chooses Unix/Linux server, which supports X-window
protocol, the above dialog will display. User must specify the
following parameter:
Server Address the IP address or the name of the server
Page 42 of 51
Copyright © 2007 Encore Electronics, Inc.
Page 43

ENTC-1000 Encore Thin Client
User Manual v1.0
4. The second tab is the “Network” tab. Use this tab to configure
basic IP setting of
ENTC-1000.
Initially, the dialog displays the current network settings. Click
the “Make Changes” button to modify these settings. When you
are done, click “Apply Changes” to make your changes
effective, or “Discard Changes” to cancel.
The user can specify whether DHCP should be used to
automatically acquire an IP address. If DHCP is not used, user
must manually enter IP address, subnet mask, default gateway,
and DNS server address. Please consult network
administrator in case manual entering is required.
Page 43 of 51
Copyright © 2007 Encore Electronics, Inc.
Page 44

5. The third tab is the “About” tab. It should display manufacturer,
copyright, model ID, and firmware information.
6. Go back to the “Connection” dialog. Enter server address in
“Server Address” field. When successful, user will be
connected to server. Normally, the user will be prompted for
login and password. After logging into the server, user can
operate the
ENTC-1000 as though he or she is directly in front
of server.
Page 44 of 51
Copyright © 2007 Encore Electronics, Inc.
Page 45

ENTC-1000 Encore Thin Client
User Manual v1.0
Status and Maintenance
This product can be administered either remotely or locally via
a web management interface. To administer, simply bring up a
web browser and type in the IP address of the device.
A webpage (see below) should display if the IP address of the
device is entered correctly. Use this page to check the status.
Operation status shows protocol used to connect to server and the
name of the server.
Network status shows the basic network setting of the device.
These settings include IP address, Subnet mask, Default gateway,
DNS server, MAC address, etc.
System status shows memory usage as well as up time.
Page 45 of 51
Copyright © 2007 Encore Electronics, Inc.
Page 46

Click on “Administration” to get to administration page. Before
accessing administration page, one must enter administrative
password. Default username is set to “admin” and default
password is set to “admin”.
Page 46 of 51
Copyright © 2007 Encore Electronics, Inc.
Page 47

ENTC-1000 Encore Thin Client
User Manual v1.0
After username and password are correctly entered, one will see
the administrative page. On this page, the following administrative
tasks can be performed.
• Administrator can reset username and password when current
password is correctly entered.
• Firmware can be uploaded/updated using HTTP or TFTP; to
use HTTP upload, hit “choose file” button to select the correct
binary file and then use “upgrade now” button to execute
upgrade. To use TFTP upload, enter correct TFTP server
address and file name and then hit “upgrade via TFTP” button
to execute upgrade.
Page 47 of 51
Copyright © 2007 Encore Electronics, Inc.
Page 48

• Auto-connect feature can be enabled/disabled at this page. If
auto-connect is enabled, device will attempt to connect to prespecified server once. Parameter for server configuration is
similar to that after the bootup screen.
Page 48 of 51
Copyright © 2007 Encore Electronics, Inc.
Page 49

ENTC-1000 Encore Thin Client
User Manual v1.0
F.A.Q / Technical Support
For further information, please use information from Encore’s
website (www.encore-usa.com) to contact technical support.
Page 49 of 51
Copyright © 2007 Encore Electronics, Inc.
Page 50

(This page is intentionally blank)
Page 50 of 51
Copyright © 2007 Encore Electronics, Inc.
Page 51

ENTC-1000 Encore Thin Client
User Manual v1.0
(This page is intentionally blank)
Page 51 of 51
Copyright © 2007 Encore Electronics, Inc.
 Loading...