

Page 1
1
Product specifications, size, and shape are subject to change without notice, and actual product appearance may differ from that depicted herein.
All trademarks and brand names are the properties of their respective holders.
© 2013 Encore Electronics, Inc.
Page 2

2
Contents
1. Product Introduction ....................................................................................................................4
2. Package list ..................................................................................................................................4
3. Operating Instructions .................................................................................................................5
3-1. Hardware Connection ......................................................................................................5
3-2. Operation Interface ..........................................................................................................6
3-3. ACB Setting .......................................................................................................................6
3-4. Status Bar ..........................................................................................................................7
4. Wireless networks setti ng ...........................................................................................................8
5. Screen Setting ..............................................................................................................................9
6. Android Application Software ...................................................................................................10
6-1. Google Play™ Store ......................................................................................................10
6-2. AP K I nstall with ES File Explorer .................................................................................10
6-3. Uninstall Application Software ......................................................................................13
7. Using Applications .....................................................................................................................14
7-1. Video ................................................................................................................................14
7-2. Photo ................................................................................................................................15
7-3. Music ................................................................................................................................15
7-4. Internet Browser .............................................................................................................16
7-5. File Manager ...................................................................................................................17
8. Language and Input ..................................................................................................................18
8-1. System Language ..........................................................................................................18
8-2. Configure input meth ods scr een ..................................................................................18
9. Speci ficat ion ...............................................................................................................................20
10. Wireless Air Mouse Controller ...............................................................................................21
10-1. Connection ....................................................................................................................21
10-2. Sleep Mode ...................................................................................................................21
10-3. Function .........................................................................................................................22
10-4. Battery Charging ..........................................................................................................22
1 1. Technical Support ....................................................................................................................22
Product specifications, size, and shape are subject to change without notice, and actual product
appearance may differ from that depicted herein.
All trademarks and brand names are the properties of their respective holders.
© 2013 Encore Electronics, Inc. All rights reserved.
Page 3

3
USER’S NOTICE:
This manual is provided “as is” without warranty of any kind, either express or implied,
including but not limited to t he impl ied w ar r anties or conditions of merch antability or fitness
for a particular purpose. In no ev ent shall we, it s direct ors, of ficers, e mployees or agents b e
liable for any indirect, special, incidental, or consequential damages (including damages
for loss of profits, loss of business, loss of use or data, interruption of business), even if we
have been advised of the possibility of such damages arising from any defect or error in
this manual or product.
Specifications and information contained in this manual are furnished for information use
only, and are subject to change at any time without not ice, and should not be construed as
a commitment by us. We assume no responsibility or liability for any errors or inaccuraci es
that may appear in this manua l, inc luding the products and software described in it.
No part of this manual, including the products and software described in it, may be
reproduced, transmitted, transcribed, stored in a retrieval system, or translated into any
language in any form or by any means, except documentation kept by the purchaser for
backup purposes, without t he ex pr ess written permission of us.
Product warranty or service will not be extended if: (1) the product is repaired, modified or
altered, unless such repair, modification of alteration is authorized in writing by us; or (2)
the serial number of the product is defaced or missing.
Products and corporate names appearing in this manual may or may not be registered
trademarks or copyright s of their res pect ive co mp an ies, and are used only for identification
or explanation and to the owners’ benefit, without intent to infringe.
Windows, MS-DOS, and DirectX are registered trademarks of M icr osoft Corporation.
Adobe and Acrobat are r egistered trademarks of Adobe Systems Incorporated.
The product name and revision number are both printed on the product itself. Manual
revisions are released for each pro duct design repr esent ed by the digit be fore and af ter the
period of the manual revision number. Manual updates are represented by the third digit in
the manual revision number.
Warning:
Do not use this product in damp places or places w ith high temperature or dusty.
Avoid drop or strong collision of the pro duc t
Do not disassemble the product, clean with alcohol, dilution or benzene produ cts.
Page 4
4
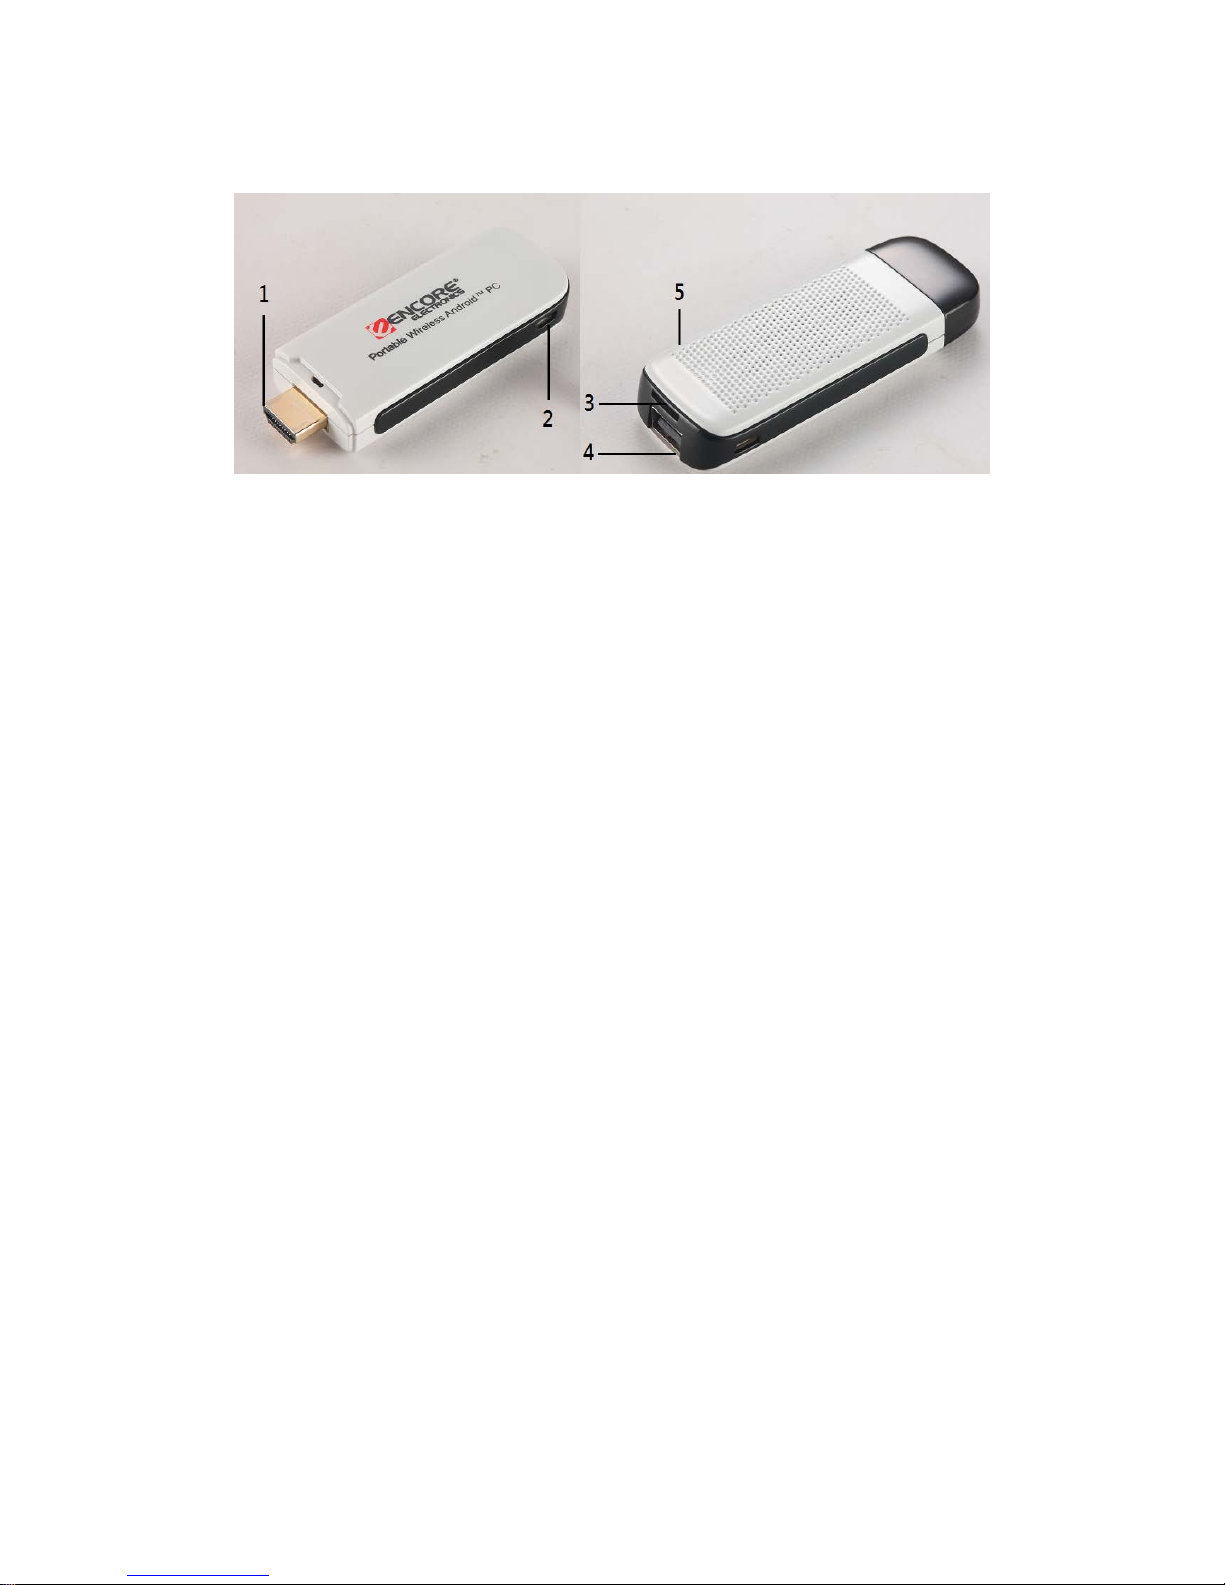
1. Product Introduction
1. HDMI output interface: Connect the ENMMP-U41 to your display device.
2. Micro B USB connector: Connect the provided USB cable to power adapter.
3. Memory card slot: Use compatible Micro-SD / T-FLASH memory card to expand
memory capacity.
4. USB host connector: Used for USB devices such as USB HUB, USB flash drive,
Mouse or Keyboard etc.
5. Power LED: Power On/Off Indicator.
2. Package list
One ENMMP-U41 device
One USB Cable
One USB Power Adapter
One HDMI Extension Cable
One User Manual
One Wireless Air Mouse Controll er ( opt ional )
Page 5
5
3. Operating Instructions
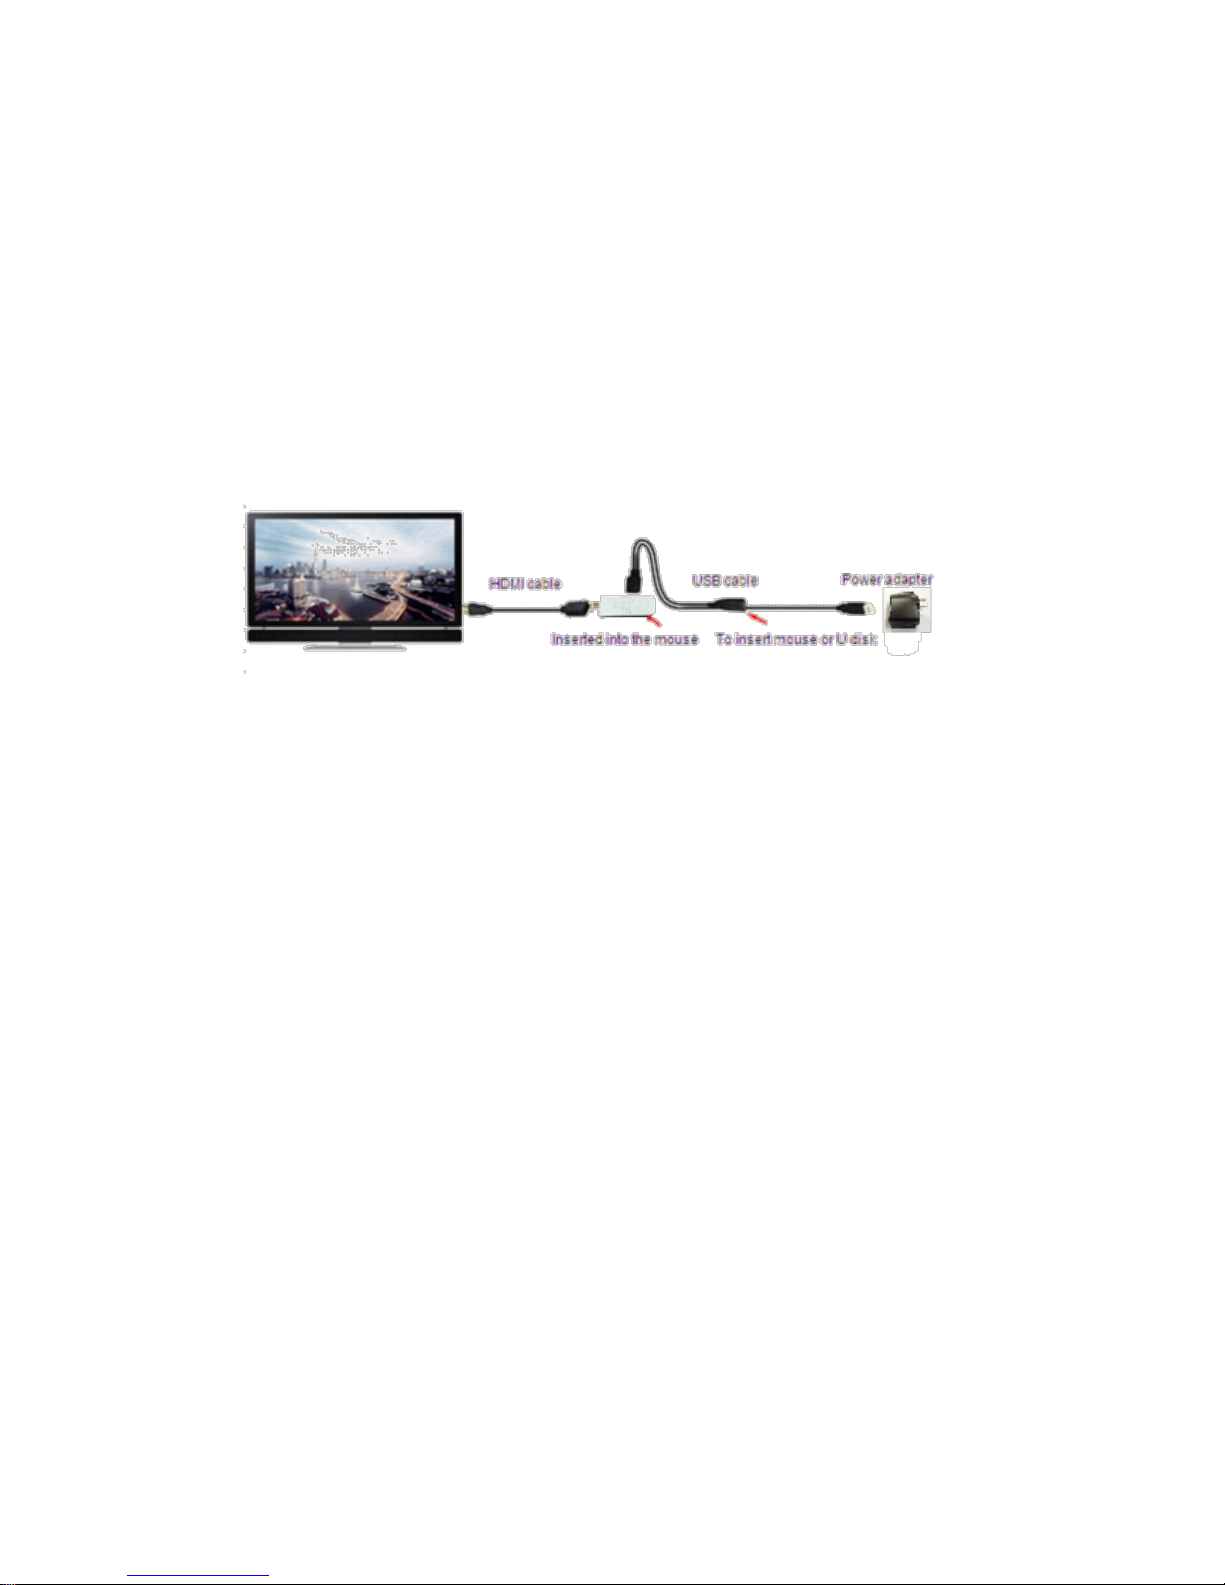
3-1. Hardware Connection
Please refer following con nection diagram:
1. Connect the HDMI cable to the HDMI output interface of ENMMP-U41, and your TV or
other display device.
2. Connect the USB cable t o t he Micro B USB connector of ENMMP-U41, and USB Power
Adapter.
3. Connect the receiver adapter of Wireless air mouse controller* or USB Mouse to the
USB Host connecter of ENMMP-U41.
4. You can also insert your Micro-SD memory card to ENMMP-U41 Memory card slot
5. Connect the USB Power Adapter to the wall.
* ENMMP-U41 has two kinds of packages; with wireless air mouse controller or without.
Tip:
Click the left button of mouse to "CONFIRM / OK", and right button of mouse for "BACK" to
previously screen. Roll the mo use scroll ball for "next page”.
Page 6
6
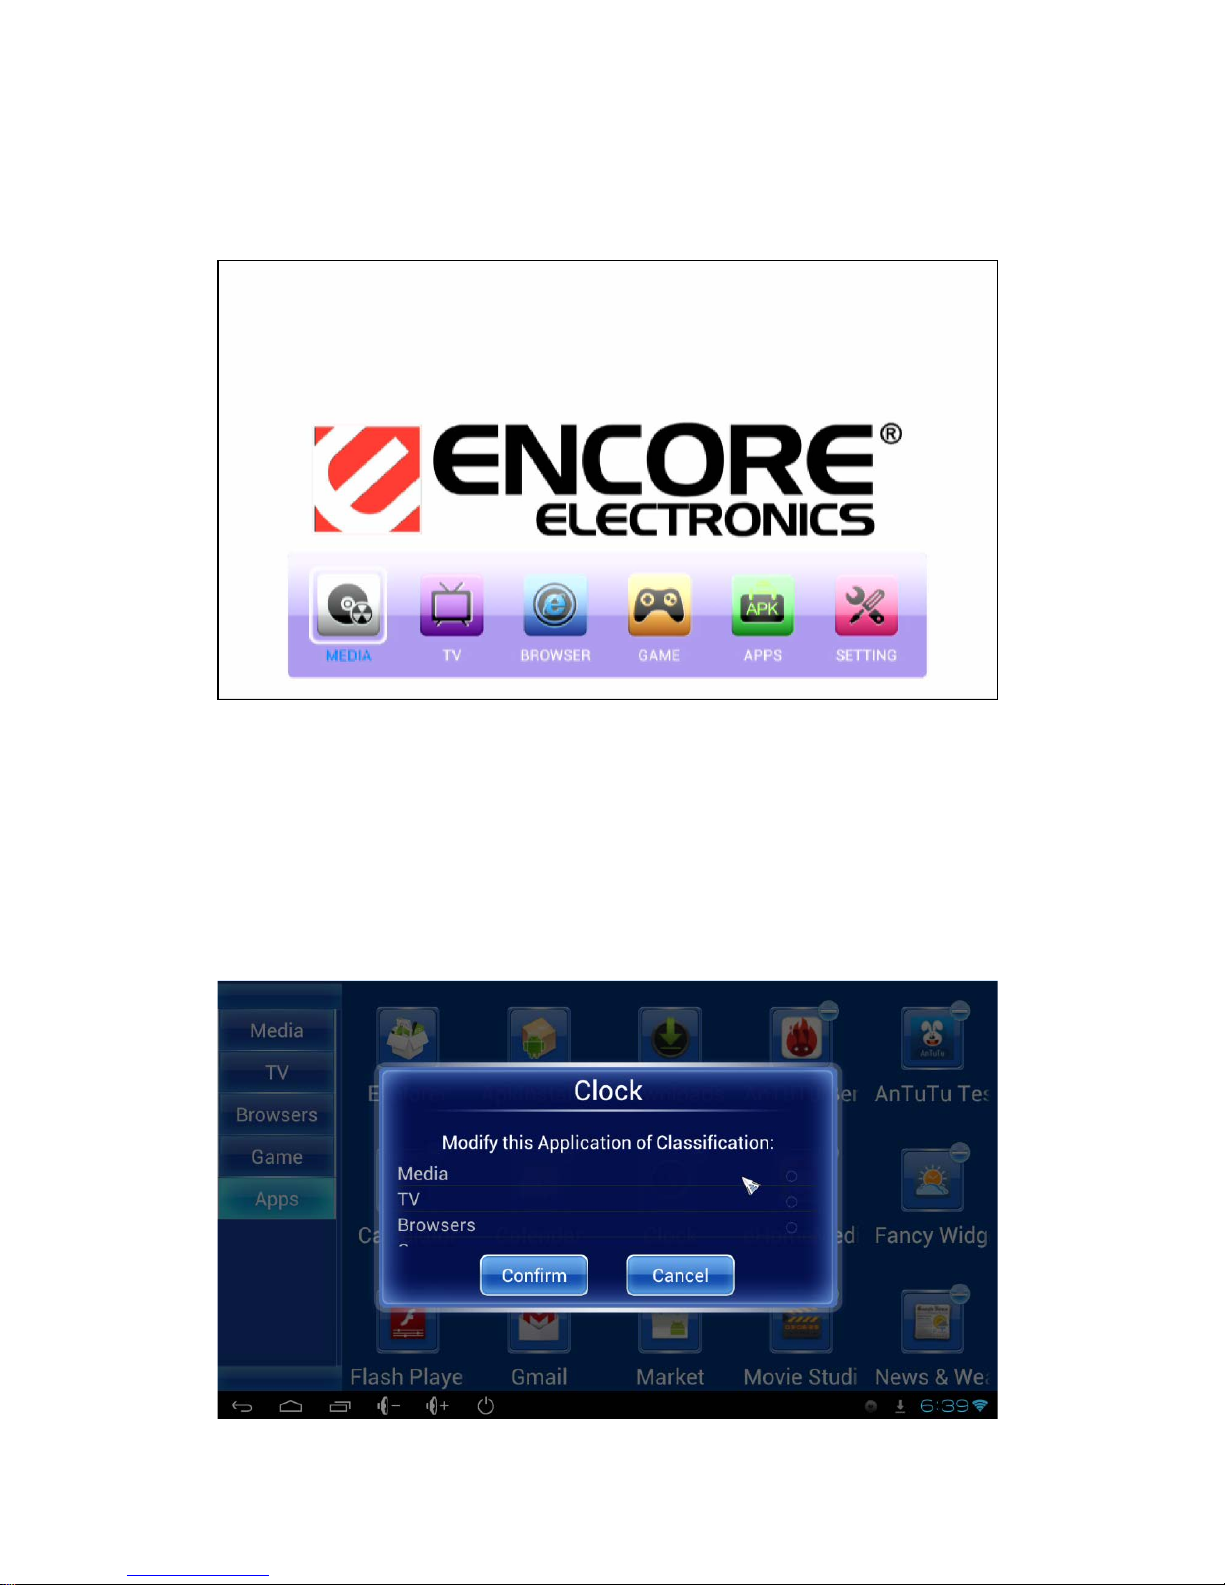
3-2. Operation Interface
After the ENMMP-U41 hardware connected, you will see the HOME screen with the
ACB (Applicat ion Classification Button) appear on your display device.
3-3. ACB Setting
Click any ACB on the HOME screen and enter to t he Appli cation Class ificat ion Main Menu.
You can manually enter the application category by using mouse and long press the
application icon, the following dialog will appear, and then click to choose the directory that
you like to relocate, and then clic k the “Confirm” button.
Page 7
7
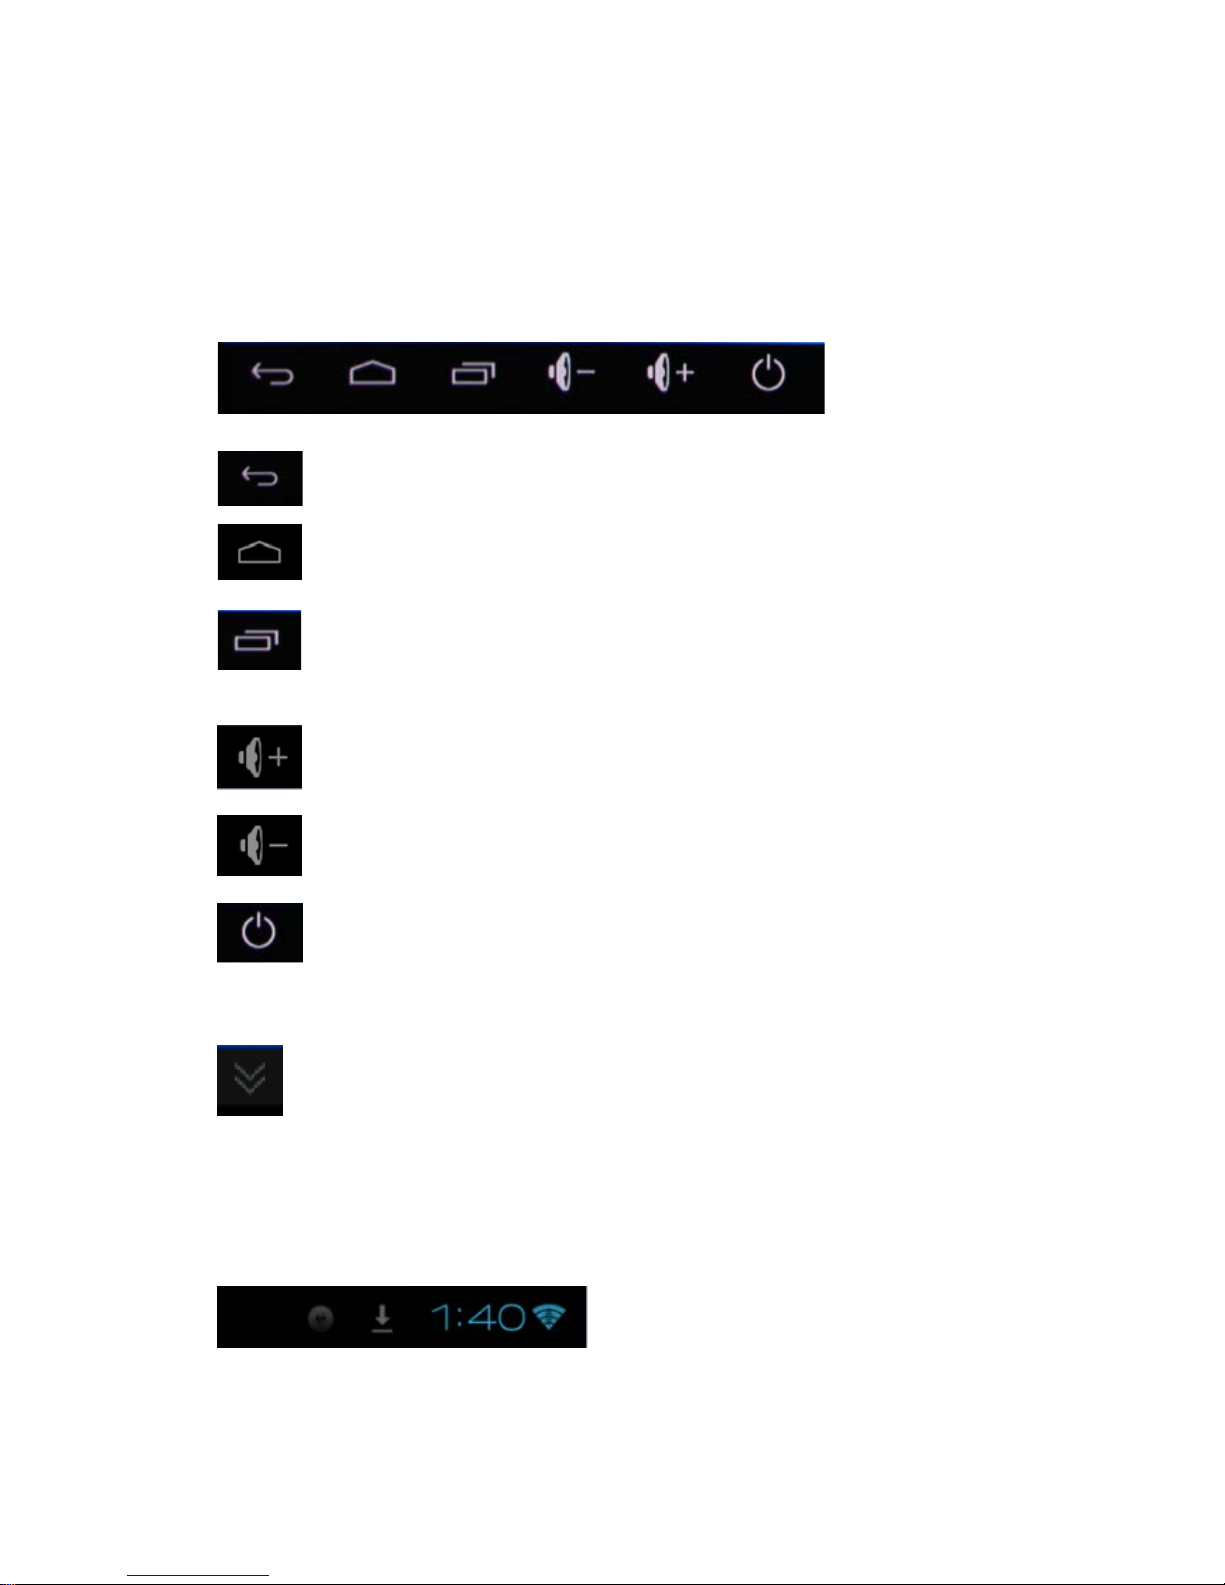
3-4. Status Bar
A status bar at the bottom of the screen displays ENMMP-U41 status information and
notifications.
The left side shows main menu key, such as the "Back", "Home" "Running program”,
"Volume -", "Vol ume +" and "Standby”.
Back: Click and back to the previous directory
Home: Click to the home screen
Running program: Click this button then it will pop -up the running programs
that are in active state
Volume +: Click to increase volume
Volume -: Click to reduce volume
Standby: Click to the standby state. Click the left or right of mouse button to
awaken.
Show/Hidden status bar: Click for hidden. Use your mouse to press and hold the
bottom line of the screen and move upw ard to show the status b ar. (Y ou will s ee this butt on
next to the “Standby” button, and under some applications.)
The right side shows the information such as “Application running status”, “Application
downloading status”, “Current time”, and the “Wi-Fi connectio n status ”, and so on.
Page 8

8
4. Wireless networks setting
Use Wi-Fi to access t he i nternet wirelessly with EN MMP-U41. To access the internet using
a Wi-Fi connection, you need to search and connect to an available Wi-F i network. The
signal strength of the Wi-Fi network may be different depending on your location. Moving
closer to the Wi-Fi access point may increase the signal strength.
1. Click the “SETTING” but t on on t he HO ME screen:
2. Switch the “Wi-Fi” function ON, and c l ick your available network router:
Page 9

9
3. Click the on screen keyboard to enter your router connection pa ssword, and then click
“Connect”.
5. Screen Setting
You can adjust your screen size to fit your display devices. Click a nd enter the “SETTING”
application, then click the “Screen”, and then click the “Screen Sc ale” to adjust.
Page 10

10
6. Android Application Software
6-1. Google Play™ Store
Once you sign in with your Google Account, with the Google Play ™ Store, you enter into a
world of applications and games. You can browse the applications and games through
categories and top downloads. You can also rate an application or game and send
feedback on it.
6-2. APK Install with ES File Explorer
Android application package file (APK) is the file for mat used to distribute and install
application software and middleware onto Google's Andro id op er at ing system.
1. Download the APK from Internet, save it to your Micro-SD card, and then insert your
Micro-SD card to the ENMMP-U41.
Page 11

11
2. Click the “APPS” button on t he HO ME screen:
2. Click the "
" icon into the ES File Ex plorer, and then click the apps that you want to
install.
Page 12

12
3. When you install the third party applications, if it’s fro m un known source, it will appear
like following warning message.
4. Just simply go to the "Settings", and then click the “Security”. Un-check the "Unknown
sources" box, and then go back to the “ES File Explorer” to continue ins talling of the app.
Page 13

13
6-3. Uninstall Application Software
1. Click the “SETTING” button on the HOME screen:
2. Click “Apps” on the lef t list, and then choose the application that which you want to
remove.
Page 14

14
7. Using Applications
7-1. Video
You can watch online videos from YouTube™ application or Internet Browser application.
To watch videos stored on your device, please follow below steps.
1. Click the “MEDIA” butto n on the HOME screen:
2. Click appl ication, it will show all video files from your ENMMP-U41 device and
its memory card. Click to open the video which you want to watch.
Page 15

15
7-2. Photo
Click into the “Media” on ACB, and then click to view your photos.
7-3. Music
Click into the “Media” on ACB, and then click application, it will show all music
files from your ENMMP-U41 device and its memory card. Click to open the music which
you want to listen.
If you leave the music track “playing screen”, music will remain playing in the backgroun d.
This allows you to using other applications, view pictures or sur f I nt er net while continue
listening music. To stop the playing track, go back to the Music application, and then click
the pause button.
Page 16

16
7-4. Internet Browser
1. Click into the “BROWSER” on ACB, and then click any browser application, such as
Google Chrome™ browser.
2. Input the website address t o the address bar of browser:
Click
to Increase new webpage
Click
to close webpage.
Page 17

17
7-5. File Manager
Click into the “APPS” on ACB, and then click any file management application, such as ES
File Explorer.
ES File Explorer is a full-feat ur ed file and application manager. It provides access to
pictures, music, video, documents, and other files.
Page 18

18
8. Language and Input
8-1. System Language
In the “Setting” application, c lick “Language & Input” , and then select the language you
want to work with on your ENMMP-U41.
8-2. Configure input methods screen
This screen lists settings for the input methods you have installed. Initially, it lists
settings only for the Android onscreen keyboard.
• Physical keyboard settings: If your ENMMP-U41 is connected to a physical keyboard,
you can set your preferences when using a physical keyboard for the same settings as the
onscreen keyboard.
• Android keyboard checkbox: For the ENMMP-U41 with or connected to physical
keyboards, uncheck to disable the onscreen keyboard
• Active input methods: Click to open a screen where you can check the languages you
want available for typing when using the onscreen keyboard. If you check specific
languages, the Input Method button appears in the System bar when the onscreen keyboard
is open.
Page 19

19
9. Frequently Asked Questions
Q1. What to do when there’s no image output to my monitor?
Answer:
Check if the pow er indicator light of the ENMMP-U41 is on. If not, please check if the
power is properly connect ed.
Check if ther e i s signal output on your monitor. If not, please check the HDMI
connection line interface i s cor r ect.
Remov e t he Micro-SD Ca rd or USB flash drive, and then plug in again after system
restarted.
Third par t y software might cause sy s t em become unstable; uninstall previously
installed software.
Q2. What to do when I can’t down load APK fr om Google Play™ St ore?
Answer:
Check and make sure your internet connection is working properly, such as your
router connection.
Make sure y ou have signed in your Google Account with the ENMMP-U41 system.
Q3. What to do when My Wireless Air Mouse Controller unresponsive on the monitor
screen?
Answer:
It maybe t he battery is lack of power, please charge the Wireless Air Mouse Controller
Battery.
Please remove and insert again the USB receiver to the USB port of ENMMP-U41, it
should automatically connect to the Wireless Air Mouse Controller.
For more information, please check our website: http://www.encore-usa.com
Page 20

20
9. Specification
Operating System Android 4.1
CPU Dual Core 1.6GHz CPU +
1080p media processor + 3D GPU
Memory 1GB DDR3
NAND Flash 4GB
Network Connection Wireless IEEE 802.11b/g/n
Power USB Power supply with 100~220V AC Input,
5V 1A DC Output Adapter
Requirement
• HDMI Input Monitor / TV
•
USB Mouse or Wireless Mouse (NOT included)
Dimensions 9.5 x 3.5 x 1.2cm (L x W x H)
Input
USB 1 x USB 2.0 USB OTG Port
Memory Card Reader 1 x Micro-SD card slot
Output
Video & Audio 1 x HDMI output
Format Support
Video RM/RMVB, MPEG,
MKV, AVI, MP4, MOV, FLV, H.263, H.264,
VC-1, DivX, Xvid, TS, RealVideo, VP6,
VP8 up to 1080p support
Audio AAC-LC/HEAAC/HE-AAC v2, AC3, AMR-
NB, DTS, MP3, OGG,
RA_COOK, WMA, WMA, LPCM/PCM/ADPCM, FLA
Picture BMP, JPEG, PNG
Adobe Flash Adobe Flash 10.1 support or above
Page 21

21
10. Wireless Air Mouse Controller
The ENMMP-U41 has two kinds of p ackages; with Wireless Air M ouse Co ntroll er or witho ut.
Customers who purchased the package with Wireless Air Mouse Controller please refer
this chapter for more detail information.
The Wireless Air Mouse Controller has built-in 3-a xis accelero meter sen sor and 3-axis gyro
to measure mouse moves around the air up and down, left and right. And use
self-developed 3-axis gyro and 3-axis accelerometer sensor algorithm to its precise
converted to the displaceme nt of the mouse on the monitor screen.
10-1. Connection
Insert the USB receiver to the USB port of the ENMMP-U41; it should automatically
connect to the Wireless Air M ouse Controller.
Press [V+] and [V-] keys for about 3 seconds. The operation indicating LED starts flashing.
This indicates the remote enters code matching mode. Release both keys, and plug the
USB receiver to the USB socket of TV or Computer within 20 seconds. The remote and
device starts auto code matching. If LED turns off, it means the code is successfully
matched.
10-2. Sleep Mode
If no button is pressed for over 20 seconds, the remote will enter sleep mode. Press any
button to wake up the remote contr ol.
Page 22

22
10-3. Function
Press this button for standby state. Click it again to
awaken.
Press this button for entering to the applicatio n
classification main menu.
Using the Wireless Air Mouse Controller and point to any
icon/button that you want to enter for and then press
“OK” button.
Press this button to the HOME screen of the
ENMMP-U41.
Press this button to the previous directory.
Mute volume.
Increase volume.
Reduce volume.
10-4. Battery Charging
When battery is lack of power, please recharge it as soon as possible.
The Wireless Air Mouse Controller uses rechargeable Lithium battery. When battery is in
low voltage, you can recharge the battery by use compute r via the USB cable, or recharge
by USB power supply with 5V DC output adapter. While charging, the red indicate light
turns on, after fully charged, the indicate light well be green.
11. Technical Support
For more information, please check our website: http://www.encore-usa.com
 Loading...