

Page 1
CLINCHING
TOOLS
AUTOMATED
M
A
CHINES
CLIPPING
SYSTEMS
FASTENERS
& CLIPS
RING TOOLS &
STAPLERS
www.encorehartco.com
info@encorefasteners.com
Northbrook, Illinois 60062 U.S.A.
Phone: 224-723-5524
Fax: 224-723-5526
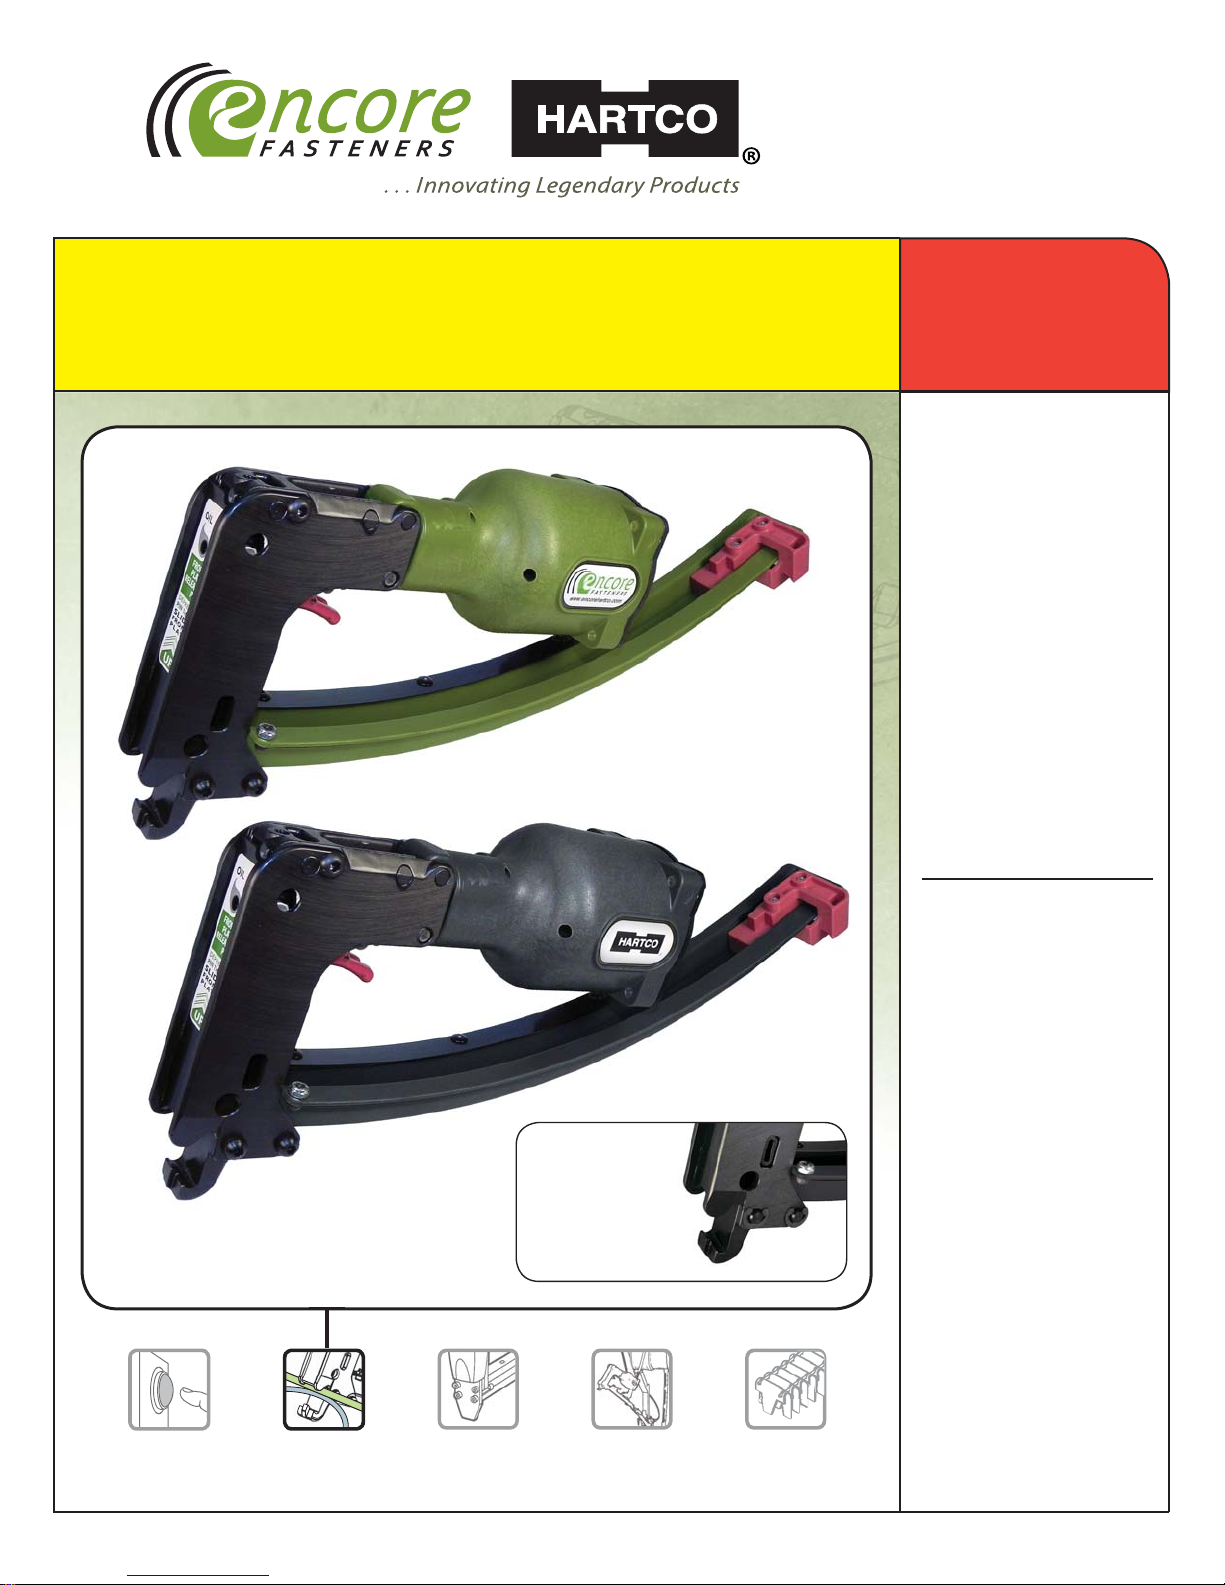
Encore Eclipser/Hartco “E” Clincher
2000 Series
OPERATING
MANUAL
ENCORE (EA)
ECLIPSER
2000 SERIES
Pneumatic Clipping Tool
Green Housing
Green Clip Magazine
HARTCO (HR)
“E” CLINCHER
2000 SERIES
Pneumatic Clipping Tool
Black Housing
Black Clip Magazine
CLINCHING
TOOLS
Thin (“T”)
Models for
Trap and Cage
Assembly
EXCLUSIVE Quick
Release Front Plate—no
tools needed for driver
blade replacement
Light, well balanced,
durable design ensures
e ortless handling
Fastest, simplest and
most trouble-free main
valve in the industry
Small contoured handle
reduces fatigue, improves
comfort and productivity
Compatible with
industry standard clips
v. 08-11-16
Page 2
Encore Eclipser / Hartco “E” Clincher – 2000 Series
SAFETY INFORMATION
1. SAFETY GLASSES should always be
worn while operating, maintaining
or repairing a tool.
2. KEEP HANDS AND FINGERS AWAY
from the blade and anvil area
when operating the tool or when
connecting the air supply to the tool.
3. DISCONNECT THE AIR SUPPLY
when mechanically clearing a jam,
performing maintenance or repairs,
and whenever the tool is not in use.
4. INJURY PREVENTION—Never point
the tool toward yourself or anyone
else.
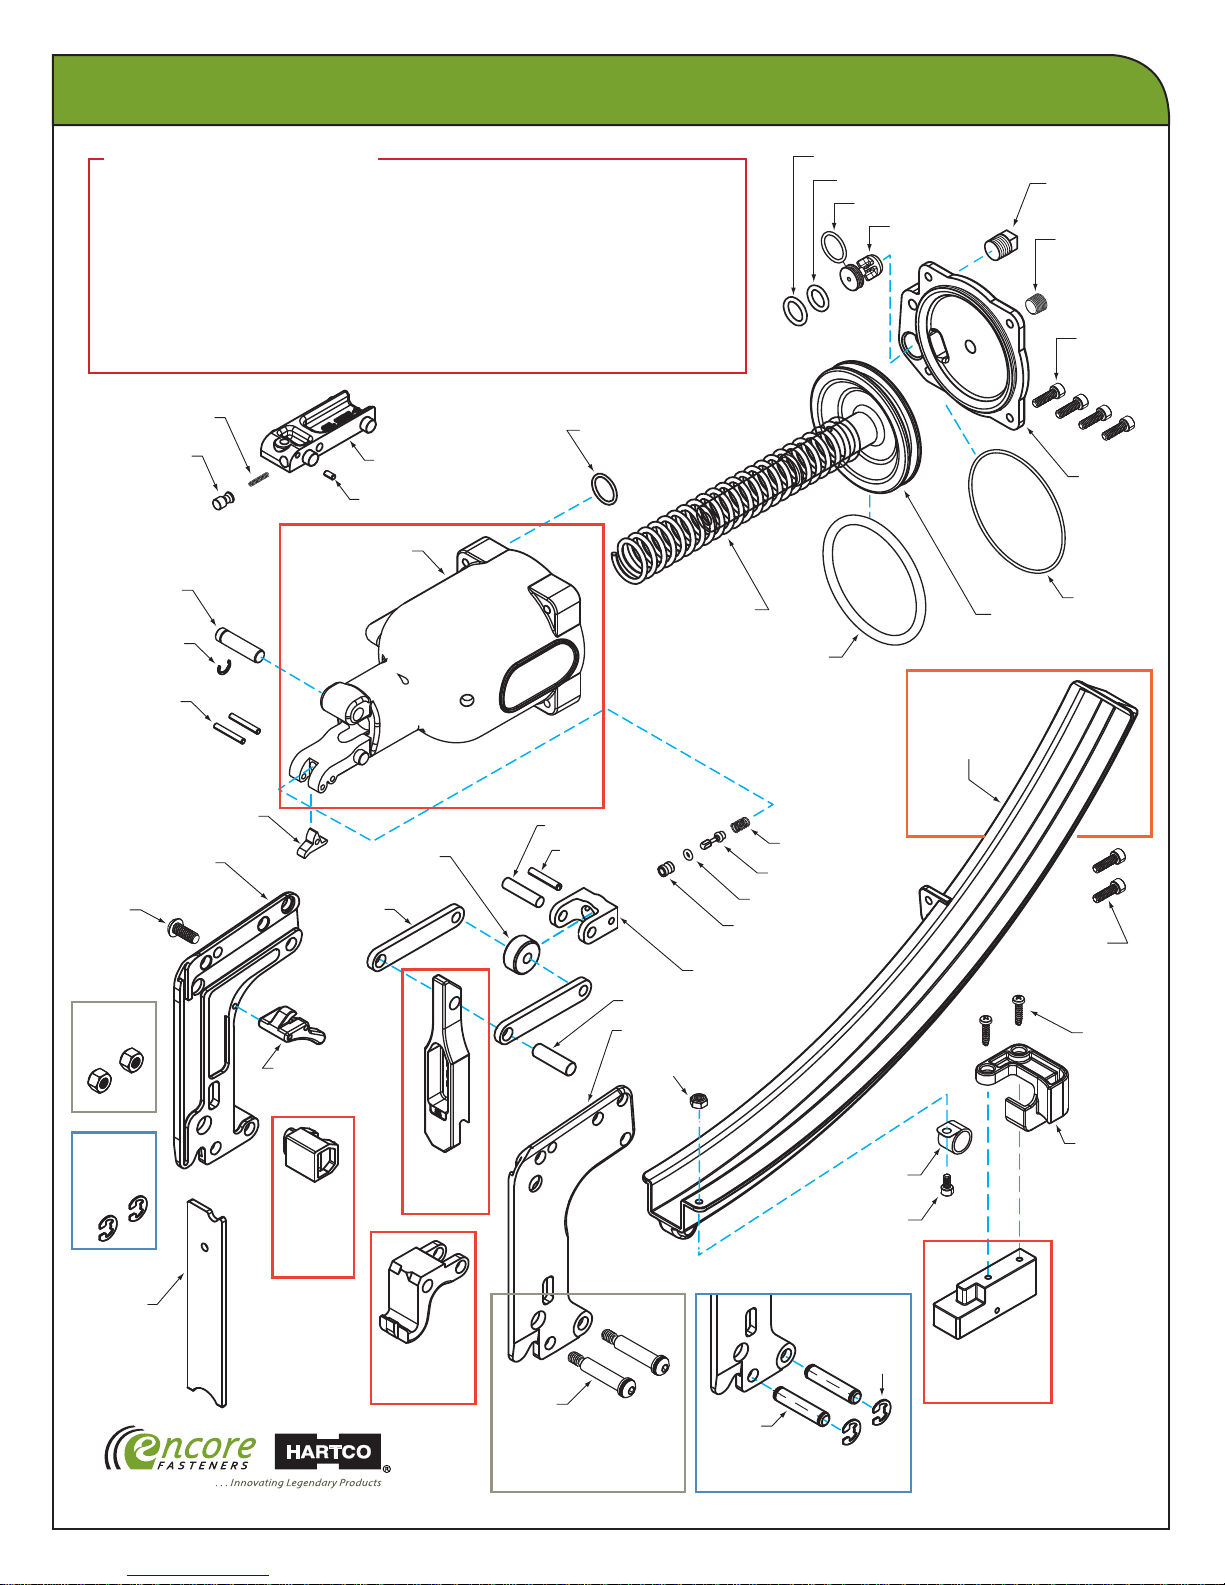
20001
O-RING
20000
20003
O-RING
O-RING
30000
VALVE
20035
PLUG (RED)
20019
PLUG
20011
SCREW
30016 SPRING
30015 PIN
30006
GROOVED PIN
20036
C-CLIP
20010
PIN
SIDE PLATE R. H.
20008
BHCS
Standard
20012
NUT
30010
30012
LEVER
30002
(GREEN)
38002
(BLACK)
30011
TRIGGER
30014 TOP PLATE
20009 PIN
HOUSING
HOUSING
30018
ROLLER
30019
LINK
HOUSING
30020
20018
20004
O-RING
PIN, ROLLER
PIN
30021
30013
20021
30005
SPRING
20006
O-RING
30008
20007
30009
30017
YOKE
PIN, BLADE
SIDE PLATE L. H.
NUT
30007
O-RING
SLEEVE
SPRING
VALVE
MAGAZINE
300___
380___
(GREEN)
(BLACK)
30004
PISTON
30001
CAP
20005
O-RING
20011
SCREW
20034
SCREW
Thin “T ”
20037
E-CLIP
BLADE
GUIDE
302___
30022
FRONT
PLATE
302___
www.encorehartco.com
BLADE
302___
ANVIL
30023
SHOULDER SCREW
Standard Models
30041
PIN
Thin “T” Models
20038
30040
SPRING
SHCS
20037
E-CLIP
30051
PUSHER
300___
30029
PUSHER
PULL
PUSHER “A”
v. 08-11-16
Page 3
TROUBLE SHOOTING
XXXX
X
SAFETY CAUSE SOLUTION
Blade does not Sticky main valve Lubricate main valve and check
return that main valve piston moves
Loose screw in housing cap Tighten all 4 screws in cap
Sluggish tool Dry main valve Lubricate main valve
Clips not feeding Obstruction in magazine Remove obstruction
Broken pusher spring Replace pusher spring
Loose clips Low air pressure Increase pressure to 80 psi
Worn blade or anvil Replace blade or anvil
Clip jamming Clips are loaded backward Reorient strip so that single ear into
the magazine on clip is loaded forward
Tool not cycling Clogged trigger valve Clean trigger valve assembly
v. 08-11-16
www.encorehartco.com
Phone: 224-723-5524
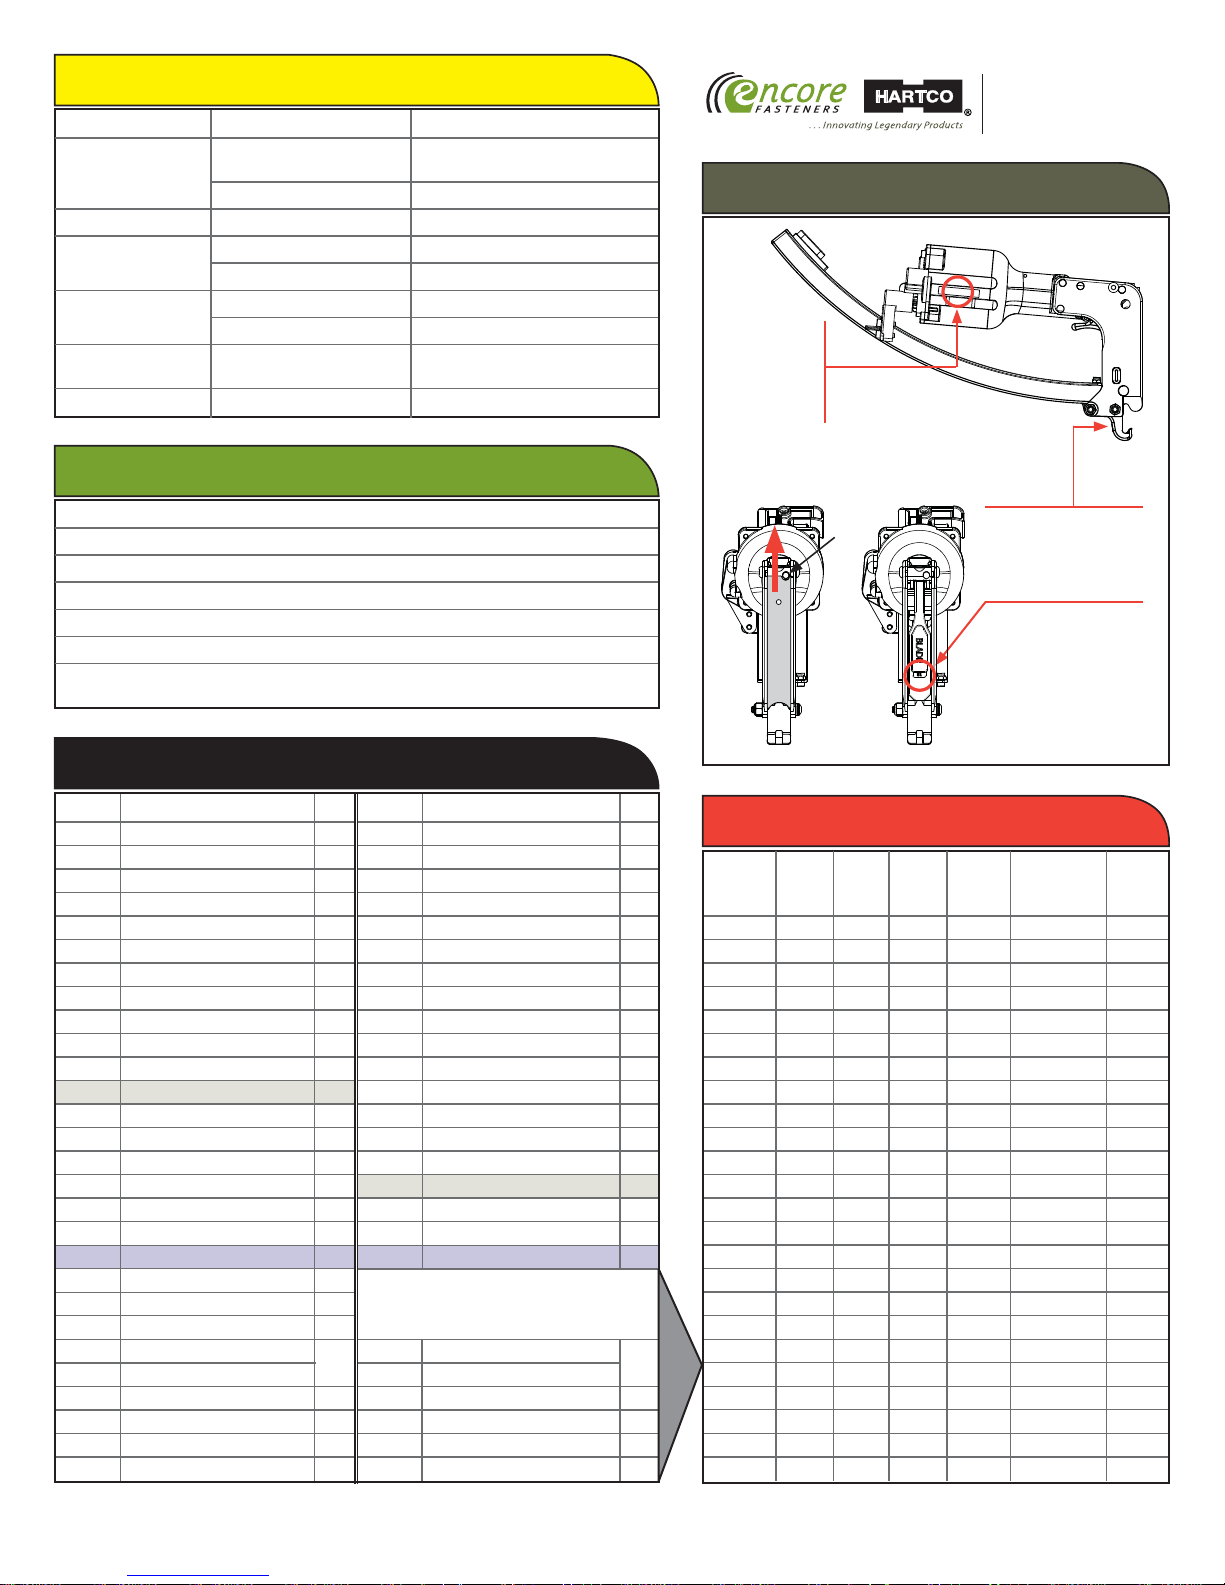
TOOL IDENTIFICATION
5DIGIT
SERIAL
NUMBER
XXXXX
SPECIFICATIONS
WEIGHT: 4.4 lbs (2.0 kg)
DIMENSIONS: 16.5” x 7” x 4” (419.1 x 177.8 x 101.6mm)
COMPONENT MATERIALS: Composite plastic housing and clip magazine
CLIP FEEDING METHOD: Constant force spring
PRIMARY POWER UNIT: Main cylinder - Bore 3.06” (78mm) spring return
AIR SUPPLY: 80-90 psi (5.5-6.2 bars) of dry, lubricated air
AIR CONSUMPTION (SCFM): 3.56, assuming 90 psi and 1 cycle per second
3.22, assuming 80 psi and 1 cycle per second
2000 Series UNIVERSAL PARTS
Item # Description Qty Item # Description Qty
20000 O-Ring 1
20001 O-Ring 1
20003 O-Ring 1
20004 O-Ring 1
20005 O-Ring 1
20006 O-Ring 1
20007 O-Ring 1
20008 Button Head Cap Screw 1
20009 Dowel Pin 1
20010 Dowel Pin 2
20011 Socket Head Cap Screw 6
20012 Nut* 2
20018 Dowel Pin 1
20019 Plug 1
20021 Nut 1
20034 Screw 2
20036 C-Clip 1
20035 Plug (Red) 1
20037 E-Clip* 4
20038 SHCS 1
30000 Valve 1
30001 Cap 1
30002 Housing, GREEN Encore
38002 Housing, BLACK Hartco
30004 Piston Assy. 1
30005 Compression Spring 1
30006 Grooved Pin 1
30007 Spring 1
* Tools with a “T” have a narrow clipping head. On those tools, Part #20037 (E-Clip)
replaces Part #20012 (Nut) and Part #30041 (Pin) replaces Part #30023 (Shoulder Screw).
30008 Trigger Valve 1
30009 Valve Sleeve 1
30010 Trigger Lever 1
30011 Trigger Assy. 1
30012 Side Plate, Right Hand 1
30013 Side Plate, Left Hand 1
30014 Top Plate 1
30015 Pin 1
30016 Spring, Top Plate Pin 1
30017 Yoke 1
30018 Roller 1
30019 Link 2
30020 Pin, Roller 1
30021 Pin, Blade 1
30022 Front Plate 1
30023 Shoulder Screw* 2
30029 Pusher Pull 1
30040 Spring (Equiv. to HR55040) 1
30041 Pin* 2
The following parts are MODEL
SPECIFIC. See chart at right for those
part numbers.
300__ Magazine, GREEN Encore
1
380__ Magazine, BLACK Hartco
300__ Pusher -w- Latch 1
302__ Blade Guide #__ 1
302__ Anvil #__ 1
302__ Blade #__ 1
MODEL NUMBER = 2000-AABB
PIN
ANVIL NUMBER AA
LOCATED ON BACK
OF ANVIL
BLADE NUMBER BB
LOCATED UNDER
FRONT COVER.
TO FIND, PRESS IN
PIN AND SLIDE THE
COVER UP.
MODEL-SPECIFIC PARTS
Blade Magazine Pusher
Model Anvil Blade Guide Fits Clip 300__ (Green) w/L atch
2000-___ 302__ 302__ 302__ Width 380__ (Black) 300__
1020 10 20 02 A 50 51
1020S 10 20 03 A 50 51
1022 10 22 01 A 50 51
1024 10 24 08 A 50 51
1121 11 21 01 A 50 51
1234 12 34 54 A 50 51
1533 15 33 55 A 50 51
1929 19 29 03 A 50 51
3236 32 36 07 E 24 31
4139 41 39 09 E 24 31
4151T* 41 51 05 F 24 30
4157T* 41 57 04 F 24 30
6075 60 75 00-0 F, H 24 29
6080 60 80 00-0 F, H 24 29
6082 60 82 00-0 F, H 24 25
6181 61 81 00-0 F, H 24 25
6181T* 61 81 00-0 F, H 24 25
6183 61 83 00-1 F, H 24 25
1
6183T* 61 83 00-1 F, H 24 25
6185 61 85 00-0 F, H 24 25
6187T* 61 87 00-1 F, H 24 25
6189 61 89 00-1 F, H 24 25
6788 67 88 06 F, H 60 25
6791T* 67 91 06 F, H 60 25
* Tools with a “T” designation have a narrow clipping head, ideal for
shing/lobster pots, traps and cage assembly.
Page 4
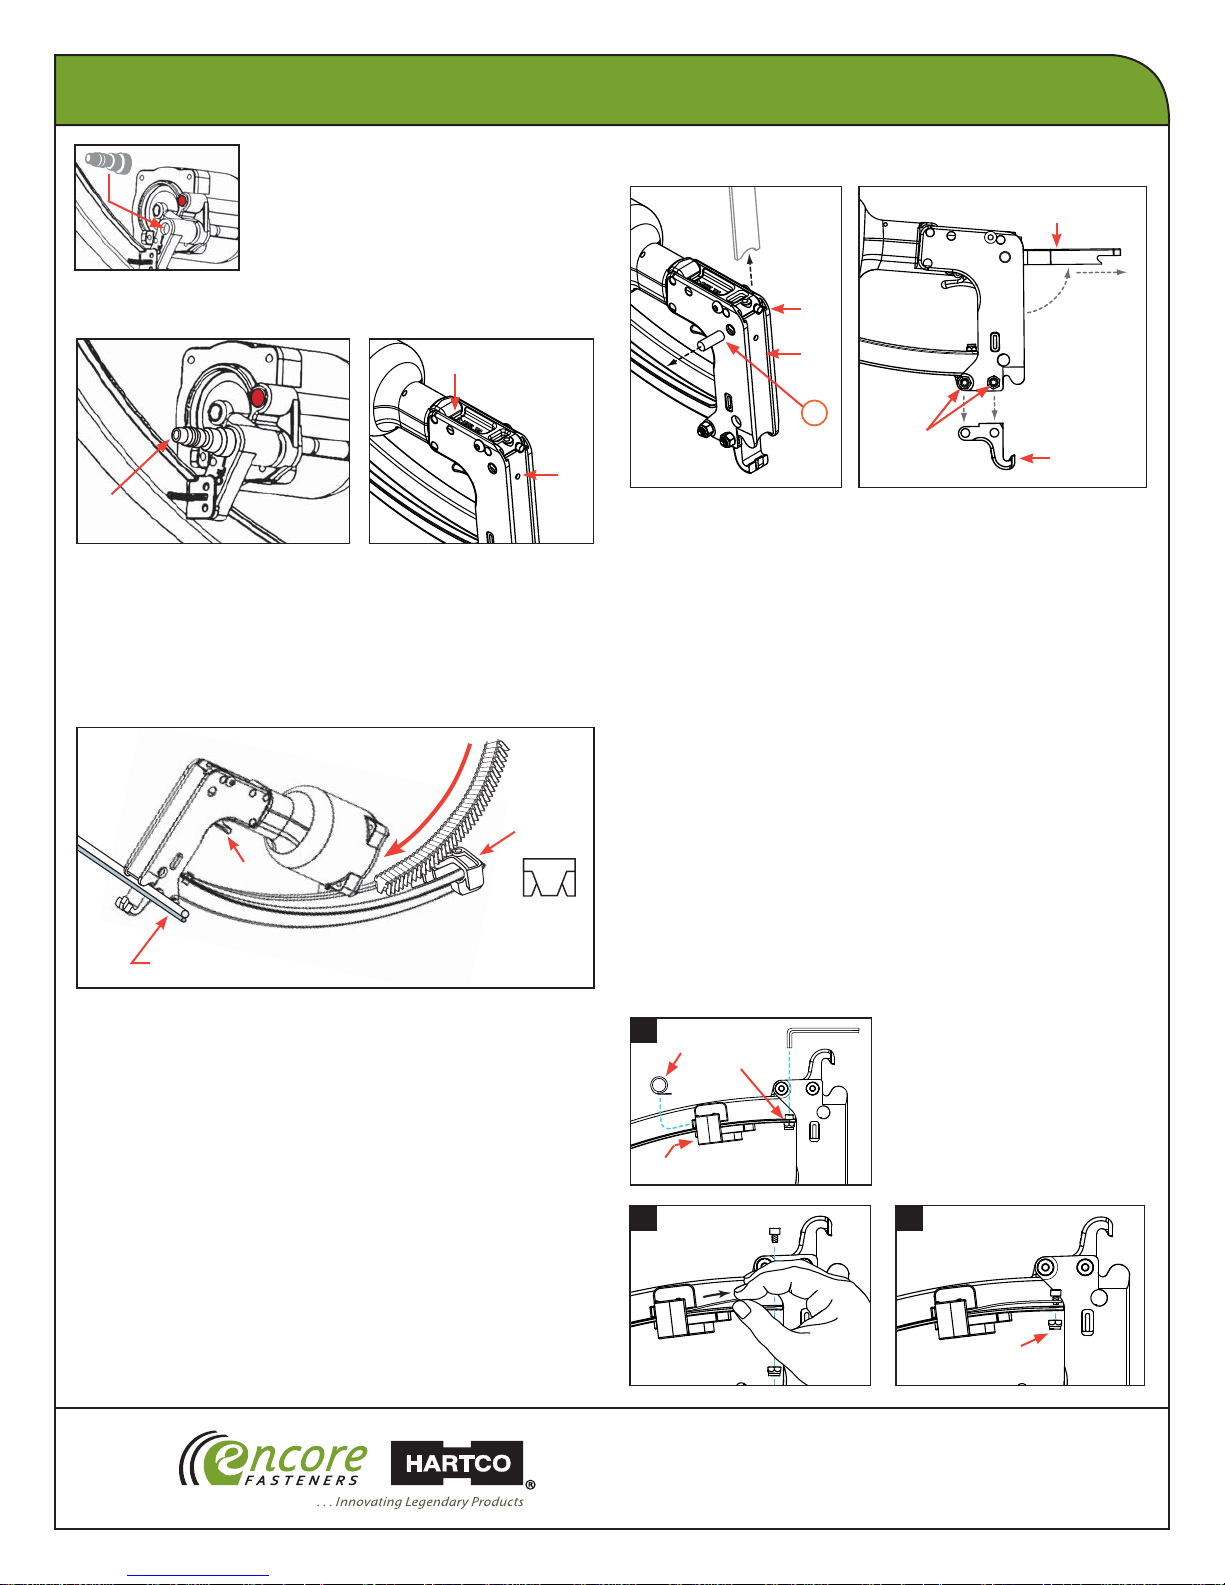
OPERATING INSTRUCTIONS
TO GET STARTED
Install a ¼” NPT tting (not included) into air
inlet opening in the back of the housing, using
suitable thread sealant. DO NOT REMOVE
RED PLUG LOCATED ABOVE THIS OPENING.
RECOMMENDED DAILY MAINTENANCE
B
C
A
Add 2-3 drops of air tool oil (10-weight recommended) to air inlet hose
tting
(A); and openings between the side plates at these two locations:
• in the gap at the back of the top plate and the housing
• the opening on the front plate (C), as shown on a xed label
TOOL OPERATION
(B)
PARTS REPLACEMENT
BLADE
H
F
G
I
J
BLADE: Disconnect air. Remove clips from tool.
1. Depress pin
2. Swing blade
plates. Remove pin through holes and take out old blade.
3. Lubricate new blade.
4. With new blade at 90° angle, align blade hole with links and side plate
holes on either side. Insert link pin through aligned holes to secure
blade. Firmly strike blade face to swing back into original position.
5. Re-lubricate front plate. Depress pin
until pin
(F) at top of front plate (G); slide plate up and remove.
(H) from tool and align link pin (I) with holes in side
(F) and slide front plate down
is released, securing plate in place.
DIRECTION
SHOWN TO
REMOVE
PART(S).
REVERSE TO
PUT IN NEW
PAR T
ANVIL
K
E
D
SINGLE
EAR FACES
FRONT OF
SMALLER WIRE ON BOTTOM
1. Connect air supply to hose tting, keeping ngers and hands away
from blade and anvil area. Recommended air supply is 80-90 psi
(5.5–6.2 bars) of dry, lubricated air.
Eclipser air consumption (SCFM), assuming 90psi and 1 cycle per
second, is 3.56. Assuming 80psi and 1 cycle per second, SCFM is 3.22.
2. Load clips into magazine.
3. Set wires to be fastened into side plate notches. For best results,
smaller wire should be on the bottom. Squeeze trigger
install clip.
LOADING CLIPS:
1. Pull pusher
2. Remove strip of clips from box. Load entire strip into magazine with
the single “ear” facing towards the front of the tool.
3. Secure clips in place by depressing pusher latch on underside
of magazine.
(E) back until it latches at the end of magazine.
TOOL
(D) to
ANVIL: Disconnect air. Remove clips from tool.
1. Remove lower shoulder screws
a “T” model.
2. Remove old anvil
(K) and replace.
(J) or pins/e-clips if tool is
PUSHER SPRING: Disconnect air. Remove clips from tool.
For better access, turn tool upside down.
1. Loosen screw
damaged pusher spring from magazine. Insert new spring
back of pusher
1
M
P
2
(L) with a 9/64" hex key (allen wrench) and remove
(P).
2. Pull spring out from pusher with
ngers or by using the screw.
L
Align the spring hole with the
magazine screw hole. Insert
screw and secure with nut
Be careful not to deform spring.
3. Pull pusher back and latch at
end of magazine.
3
N
(M) into
(N).
www.encorehartco.com • info@encorefasteners.com
Northbrook, Illinois 60062 U.S.A.
Phone: 224-723-5524 • Fax: 224-723-5526
v. 08-11-16
Page 5

Page 1 of 3 Rev. 3/24/16
E-Clips & Tool Guide BY CLIPS
Updated 12/10/15
ENCORE E-Clip # HARTCO Clip #
#/STRIP CLIPS/CTN LBS/CTN KGS/CTN HEIGHT WIDTH DEPTH HEIGHT WIDTH DEPTH
CLASSIC
A SERIES
B SERIES
C SERIES
(OBSOLETE)
E SERIES
STRIP
52A14SG – 58 15,834 25 11.4 0.32 0.40 0.20 8.2 10 5.1 EA2000-1234 0 0 0 0 HR2000-1234
64A18SG CLP-15G 47 10,857 24 10.9 0.41 0.43 0.26 10.4 11 6.6 EA2000-1020 0 HR-45i 0 0 HR2000-1020
64A18SG CLP-15G 47 10,857 24 10.9 0.41 0.43 0.26 10.4 11 6.6 EA2000-1929 0 HR-45TN 0 0 HR2000-1929
68H18S CLP-22 47 4,700 22 10.0 0.47 0.86 0.26 11 .9 22 6.6 EA2000-6075 0 0 0 0 HR2000-6075
71A16SAL CLP-13AL 47 9,400 22 10.0 0.45 0.43 0.26 11. 4 11 6.6 EA2000-1929 0 HR-45TN 0 0 HR2000-1929
71A18S CLP-13 47 9,400 22 10.0 0.45 0.43 0.26 11 .4 11 6.6 EA2000-1020 0 HR-45i 0 0 HR2000-1020
71A18S CLP-13 47 9,400 22 10.0 0.45 0.43 0.26 11 .4 11 6.6 EA2000-1929 0 HR-45TN 0 0 HR2000-1929
71A18SG CLP-13G 47 9,400 22 10.0 0.45 0.43 0.26 11 .4 11 6.6 EA2000-1020 0 HR-45i 0 0 HR2000-1020
71A18SG CLP-13G 47 9,400 22 10.0 0.45 0.43 0.26 11 .4 11 6.6 EA2000-1929 0 HR-45TN 0 0 HR2000-1929
72E18S CLP-20 47 6,110 24 10.9 0.47 0.67 0.26 11. 9 17 6.6 EA2000-3236 0 HR-68 HR-68B HR-68C-100 HR2000-3236
74F18S CLP-2312 47 5,076 22 10.0 0.49 0.73 0.26 12.4 19 6.6 EA2000-6080 0 HR-65AT HR-65BAT HR-65C-130 HR2000-6080
74H18S CLP-23 47 4,230 22 10.0 0.49 0.86 0.26 12.4 22 6.6 EA2000-6080 0 HR-65AT HR-65BAT HR-65C-130 HR2000-6080
74H18SC CLP-23C 47 4,230 23 10.5 0.49 0.86 0.26 12.4 22 6.6 EA2000-6080 0 HR-65AT HR-65BAT HR-65C-130 HR2000-6080
74H18SG CLP-23G 47 4,230 22 10.0 0.49 0.86 0.26 12.4 22 6.6 EA2000-6080 0 HR-65AT HR-65BAT HR-65C-130 HR2000-6080
78E18S CLP-20L 47 5,499 23 10.5 0.50 0.67 0.26 12.7 17 6.6 EA2000-3236 0 HR-68 HR-68B HR-68C-100 HR2000-3236
80F23S CLP-312 40 4,320 22 10.0 0.51 0.73 0.31 13.0 19 7.9 EA2000-6181 0 HR-66 HR-66B 0 HR2000-6181
80H18S CLP-25 0 4,230 22 10.0 0.52 0.86 0.26 13.2 22 6.6 EA2000-6080 0 HR-65AT HR-65BAT HR-65C-130 HR2000-6080
80H23S CLP-3 40 3,600 22 10.0 0.51 0.86 0.31 13.0 22 7.9 EA2000-6181 0 HR-66 HR-66B HR-66C-110 HR2000-6181
85A22S CLP-33 42 6,720 24 10.9 0.54 0.43 0.29 13.7 11 7.4 EA2000-1022 0 0 0 0 HR2000-1022
88A22S CLP-32 42 6,720 25 11 .4 0.55 0.43 0.29 14.0 11 7.4 EA2000-1022 0 0 0 0 HR2000-1022
88F23S CLP-412 40 3,840 23 10.5 0.57 0.73 0.31 14.5 19 7.9 EA2000-6181 0 HR-66 HR-66B HR-66C-110 HR2000-6181
88F23S CLP-412 40 3,840 23 10.5 0.57 0.73 0.31 14.5 19 7.9 EA2000-6185 HR-66 HR-66B HR-66C-110 HR2000-6185
88F23S CLP-72 40 3,840 23 10.5 0.57 0.73 0.31 14.5 19 7.9 EA2000-6185 0 0 0 0 HR2000-6185
88F23SAL CLP-4NAL 0 1,920 8 3.6 0.57 0.73 0.31 14.5 19 7.9 EA2000-4151T 0 0 0 0 HR2000-4151T
88F23SAL CLP-4NAL 0 1,920 8 3.6 0.57 0.73 0.31 14.5 19 7.9 EA2000-6181T 0 0 0 0 HR2000-6181T
88H23S CLP-4 36 3,200 23 10.5 0.57 0.86 0.31 14.5 22 7.9 EA2000-6181 0 HR-66 HR-66B HR-66C-110 HR2000-6181
88H23SAL CLP-4AL 36 3,200 8 3.6 0.57 0.86 0.31 14.5 22 7.9 EA2000-6181T 0 0 0 0 HR2000-6181T
ECLIPSER MODELS
Encore and Hartco tool equivalents, pack/ship configurations, and
clips to use with each
HARTCO MODELS
INCHES
MILLIMETERS
3485 Commercial Avenue Voice: (224) 723-5524
Northbrook, IL 60062 USA Fax: (224) 723-5526
info@encorefasteners.com
www.encorehartco.com
W D
H
A-H
ZZ
XX
S–STRIPS
R–ROLLS
B–BULK
CLP–STRIPS
CCP–ROLLS
(BLANK) = COLD ROLLED STEEL 1006-1010
A = ALUMINUM
C = CUSHIONED (PAPER LINING INSIDE)
G = GALVANIZED
L = 4 MIL PVC VINYL COATING (INSIDE)
S = STAINLESS STEEL (430)
XX = LENGTH in 100
ths
/inch
A-H = CLIP WIDTH
ZZ
= OPENING in 100
ths
/inch
TYPE OF PACKAGING
74H18
S G
A
=
7
/
16"
(11.0 mm)
E
=
11
/
16"
(17.5 mm)
F
=
3
/
4"
(19.0 mm)
H
=
7
/
8"
(22.0 mm)
(BLANK) or P = POLYCORD
T = TAPED COLLATION D = DETENT
MATERIAL
DESIGNATIONS
Page 6

Page 2 of 3 Rev. 3/24/16
E-Clips & Tool Guide BY CLIPS
Updated 12/10/15
ENCORE E-Clip # HARTCO Clip #
#/STRIP CLIPS/CTN LBS/CTN KGS/CTN HEIGHT WIDTH DEPTH HEIGHT WIDTH DEPTH
CLASSIC
A SERIES
B SERIES
C SERIES
(OBSOLETE)
E SERIES
ECLIPSER MODELS
Encore and Hartco tool equivalents, pack/ship configurations, and
clips to use with each
HARTCO MODELS
INCHES
MILLIMETERS
3485 Commercial Avenue Voice: (224) 723-5524
Northbrook, IL 60062 USA Fax: (224) 723-5526
info@encorefasteners.com
www.encorehartco.com
W D
H
A-H
ZZ
XX
S–STRIPS
R–ROLLS
B–BULK
CLP–STRIPS
CCP–ROLLS
(BLANK) = COLD ROLLED STEEL 1006-1010
A = ALUMINUM
C = CUSHIONED (PAPER LINING INSIDE)
G = GALVANIZED
L = 4 MIL PVC VINYL COATING (INSIDE)
S = STAINLESS STEEL (430)
XX = LENGTH in 100
ths
/inch
A-H = CLIP WIDTH
ZZ
= OPENING in 100
ths
/inch
TYPE OF PACKAGING
74H18
S G
A
=
7
/
16"
(11.0 mm)
E
=
11
/
16"
(17.5 mm)
F
=
3
/
4"
(19.0 mm)
H
=
7
/
8"
(22.0 mm)
(BLANK) or P = POLYCORD
T = TAPED COLLATION D = DETENT
MATERIAL
DESIGNATIONS
88H23SC CLP-4C 36 3,200 24 10.9 0.57 0.86 0.31 14.5 22 7.9 EA2000-6181 0 HR-66 HR-66B HR-66C-110 HR2000-6181
90A29SG – 0 5,220 24 10.9 0.50 0.43 0.41 12.7 11 10.4 EA2000-1533* 0 0 0 0 HR2000-1533*
90F18S CLP-24N 47 3,948 24 10.9 0.62 0.73 0.26 15.7 19 6.6 EA2000-6082 0 0 0 0 HR2000-6082
90F18SG CLP-2412G 47 3,948 24 10.9 0.62 0.73 0.26 15.7 19 6.6 EA2000-6082 0 0 0 0 HR2000-6082
90H18S CLP-24 47 3,290 24 10.9 0.62 0.86 0.26 15.7 22 6.6 EA2000-6082 0 0 0 0 HR2000-6082
90H18SG CLP-24G 47 3,290 24 10.9 0.62 0.86 0.26 15.7 22 6.6 EA2000-6082 0 0 0 0 HR2000-6082
91A23S CLP-14 40 5,600 23 10.5 0.56 0.43 0.31 14.2 11 7.9 EA2000-1121 0 HR-46 0 0 HR2000-1121
96A23S CLP-9 0 5,600 24 10.9 0.59 0.43 0.31 15.0 11 7.9 EA2000-1121 0 HR-46 0 0 HR2000-1121
n/a WA-39 0 0 0 0.0 0.00 0.00 0.00 0.0 0 0.0 EA2000-6791T 0 0 0 0 HR2000-6791T
101F23SAL CLP-34NAL 40 3,360 9 4.1 0.68 0.73 0.31 17.3 19 7.9 EA2000-4157T 0 HR-85SLN HR-85SBLN 0 HR2000-4157T
101F23SAL CLP-34NAL 40 3,360 9 4.1 0.68 0.73 0.31 17.3 19 7.9 EA2000-4151T 0 0 0 0 HR2000-4151T
101F23SS4 CLP-34NS430 40 3,360 22 10.0 0.68 0.73 0.31 17.3 19 7.9 EA2000-4157T 0 HR-85SLN HR-85SBLN 0 HR2000-4157T
101H23S CLP-34 40 2,800 24 10.9 0.68 0.86 0.31 17.3 22 7.9 EA2000-6183 0 HR-85 HR-85B HR-85C-100 HR2000-6183
101H23SAL CLP-34AL 40 2,800 9 4.1 0.68 0.86 0.31 17.3 22 7.9 EA2000-6183T 0 0 0 0 HR2000-6183T
101H23SAL CLP-34AL 40 2,800 9 4.1 0.68 0.86 0.31 17.3 22 7.9 EA2000-6187T 0 HR-85SL HR-85SBL 0 HR2000-6187T
101H23SC CLP-34C 40 2,800 25 11 .4 0.68 0.86 0.31 17.3 22 7.9 EA2000-6183 0 HR-85 HR-85B HR-85C-100 HR2000-6183
110A 18S – 47 6,580 18 8.2 0.68 0.43 0.26 17.3 11 6.6 EA2000-1024 0 0 0 0 HR2000-1024
110E25SS4 CLP-35430 37 2,886 18 8.2 0.75 0.67 0.33 19.1 17 8.4 EA2000-6189 0 HR-85S HR-85SB 0 HR2000-6189
110E25SS430 CLP-35S434 0 2,886 23 10.5 0.75 0.67 0.33 19.1 17 8.4 EA2000-4139 0 HR-85SN HR-85BSN 0 HR2000-4139
110E25SS430 (half) CLP-35S434 0 1,443 13 5.7 0.75 0.67 0.33 19.1 17 8.4 EA2000-4139 0 HR-85SN HR-85BSN 0 HR2000-4139
110F25SAL CLP-36NAL 0 2,664 8 3.6 0.72 0.73 0.33 18.3 19 8.4 EA2000-4157T 0 HR-85SLN HR-85SBLN 0 HR2000-4157T
110H 25S CLP-36 36 2,220 18 8.2 0.72 0.86 0.33 18.3 22 8.4 EA2000-6189 0 HR-85S HR-85SB 0 HR2000-6189
110H25SAL CLP-36AL 36 2,220 8 3.6 0.72 0.86 0.33 18.3 22 8.4 EA2000-6187T 0 HR-85SL HR-85SBL 0 HR2000-6187T
110H25SC CLP-36C 36 2,220 19 8.6 0.72 0.86 0.33 18.3 22 8.4 EA2000-6189 0 HR-85S HR-85SB 0 HR2000-6189
125A38SS CLP-61 25 3,000 26 11 .8 0.69 0.43 0.50 17.5 11 12.7 EA2000-4528* 0 0 0 0 HR2000-4528*
132A38SS CLP-64 0 3,000 28 12.7 0.72 0.43 0.50 18.3 11 12.7 EA2000-4528* 0 0 0 0 HR2000-4528*
132F27SAL WA-40 0 1,920 8 3.6 0.86 0.73 0.38 21.8 19 9.5 EA2000-6791T 0 0 0 0 HR2000-6791T
135H31S CLP-38 31 1,550 16 7.3 0.86 0.86 0.38 21.8 22 9.5 EA2000-6788 0 HR-88 HR-88B 0 HR2000-6788
Page 7

Page 3 of 3 Rev. 3/24/16
E-Clips & Tool Guide BY CLIPS
Updated 12/10/15
ENCORE E-Clip # HARTCO Clip #
#/STRIP CLIPS/CTN LBS/CTN KGS/CTN HEIGHT WIDTH DEPTH HEIGHT WIDTH DEPTH
CLASSIC
A SERIES
B SERIES
C SERIES
(OBSOLETE)
E SERIES
ECLIPSER MODELS
Encore and Hartco tool equivalents, pack/ship configurations, and
clips to use with each
HARTCO MODELS
INCHES
MILLIMETERS
3485 Commercial Avenue Voice: (224) 723-5524
Northbrook, IL 60062 USA Fax: (224) 723-5526
info@encorefasteners.com
www.encorehartco.com
W D
H
A-H
ZZ
XX
S–STRIPS
R–ROLLS
B–BULK
CLP–STRIPS
CCP–ROLLS
(BLANK) = COLD ROLLED STEEL 1006-1010
A = ALUMINUM
C = CUSHIONED (PAPER LINING INSIDE)
G = GALVANIZED
L = 4 MIL PVC VINYL COATING (INSIDE)
S = STAINLESS STEEL (430)
XX = LENGTH in 100
ths
/inch
A-H = CLIP WIDTH
ZZ
= OPENING in 100
ths
/inch
TYPE OF PACKAGING
74H18
S G
A
=
7
/
16"
(11.0 mm)
E
=
11
/
16"
(17.5 mm)
F
=
3
/
4"
(19.0 mm)
H
=
7
/
8"
(22.0 mm)
(BLANK) or P = POLYCORD
T = TAPED COLLATION D = DETENT
MATERIAL
DESIGNATIONS
135H31SAL CLP-38AL 31 1,550 0 0.0 0.86 0.86 0.38 21.8 22 9.5 EA2000-6791T 0 0 0 0 HR2000-6791T
n/a WA-39 0 0 0 0.0 0.00 0.00 0.00 0.0 0 0.0 EA2000-6791T 0 0 0 0 HR2000-6791T
[Hartco]: CLP=Clip Strip; CCP=Clip Coil
* In development
[Encore]: T = Thin/Low Profile Pin [Hartco]: L = Lobster w Low Profile Pin; N = Narrow
ENCORE E-Clip # HARTCO Clip #
– CLIPS/ROLL LBS/ROLL KGS/ROLL HEIGHT WIDTH DEPTH HEIGHT WIDTH DEPTH
CLASSIC
A SERIES
B SERIES
C SERIES
(OBSOLETE)
E SERIES
ROLL (COIL)
STANDARD
w/out BJR
64A18R CCP-15 0 15,000 34 15.5 0.41 0.43 0.26 10.4 11 6.6 EA2800-1020 EA2500-1020 HR-49CC 0 0 HR2800-1020
71A18R CCP-13 0 15,000 36 16.4 0.45 0.43 0.26 11.4 11 6.6 EA2800-1020 EA2500-1020 HR-49CC 0 0 HR2800-1020
73A18R CCP-19 0 14,000 34 15.5 0.48 0.43 0.26 12.2 11 6.6 EA2800-1020 EA2500-1020 HR-49CC 0 0 HR2800-1020
74F18R CCP-74 0 5,076 22 10.0 0.49 0.73 0.26 12.4 19 6.6 EA2800-6082 EA2500-6082 0 0 0 HR2800-6082
76A18R CCP-26 0 14,500 39 17.7 0.50 0.43 0.26 12.7 11 6.6 EA2800-1020 EA2500-1020 HR-49CC 0 0 HR2800-1020
76A22R – 0 12,300 34 15.5 0.50 0.43 0.29 12.7 11 7.4 EA2800-1022 EA2500-1022 HR-48CC 0 0 HR2800-1022
80A22R – 0 13,700 38 17.3 0.52 0.43 0.29 13.2 11 7.4 EA2800-1022 EA2500-1022 HR-48CC 0 0 HR2800-1022
80F23R CCP-71 0 6,667 33 15.0 0.51 0.73 0.31 13.0 19 7.9 EA2800-6181 0 0 0 0 HR2800-6181
85A18R CCP-30 0 13,500 40 18.2 0.55 0.43 0.26 14.0 11 6.6 EA2800-1020 EA2500-1020 HR-49CC 0 0 HR2800-1020
85A22R CCP-33 0 12,300 38 17.3 0.54 0.43 0.29 13.7 11 7.4 EA2800-1022 EA2500-1022 HR-48CC 0 0 HR2800-1022
88A22R CCP-32 0 12,300 39 17.7 0.55 0.43 0.29 14.0 11 7.4 EA2800-1022 EA2500-1022 HR-48CC 0 0 HR2800-1022
88A23R CCP-14S 0 9,375 37 16.8 0.56 0.43 0.31 14.2 11 7.9 EA2800-1121 EA2500-1121 HR-46CC 0 0 HR2800-1121
88F23R CCP-72 0 5,521 30 13.6 0.57 0.73 0.31 14.5 19 7.9 EA2800-6185 0 0 0 0 HR2800-6185
90F18R CCP-73 0 3,948 24 10.9 0.62 0.73 0.26 15.7 19 6.6 EA2800-6082 EA2500-6082 0 0 0 HR2800-6082
91A23R CCP-14 0 9,375 37 16.8 0.56 0.43 0.31 14.2 11 7.9 EA2800-1121 EA2500-1121 HR-46CC 0 0 HR2800-1121
96A23R CCP-9 0 10,000 37 16.8 0.59 0.43 0.31 15.0 11 7.9 EA2800-1121 EA25 00-1121 HR-46CC 0 0 HR2800-1121
110A18R (10mm
Flat BW)
– 0 9,300 37 16.8 0.68 0.43 0.26 17.3 11 6.6 EA2800-1024 0 0 0 0 HR2800-1024
HARTCO MODELS
INCHES
MILLIMETERS
ECLIPSER MODELS
Page 8

Page 1 of 2 Rev. 3-24-16
E-Clips & Tool Guide BY TOOL
STRIP
CLASSIC
A SERIES
B SERIES
C SERIES
(OBSOLETE)
E SERIES
ENCORE E-Clip # HARTCO Clip #
#/STRIP CLIPS/CTN LBS/CTN KGS/CTN
EA2000-1020 0 HR-45i 0 0 HR2000-1020 64A18SG CLP-15G 47 10,857 24 10.9
EA2000-1020 0 HR-45i 0 0 HR2000-1020 71A18S CLP-13 47 9,400 22 10.0
EA2000-1020 0 HR-45i 0 0 HR2000-1020 71A18SG CLP-13G 47 9,400 22 10.0
EA2000-1022 0 0 0 0 HR2000-1022 85A22S CLP-33 42 6,720 24 10.9
EA2000-1022 0 0 0 0 HR2000-1022 88A22S CLP-32 42 6,720 25 11.4
EA2000-1024 0 0 0 0 HR2000-1024 110A1 8S – 47 6,580 18 8.2
EA2000-1234 0 HR2000-1234 52A14SG – 58 15,834 25 11.4
EA2000-1121 0 HR-46 0 0 HR2000-1121 91A23S CLP-14 40 5,600 23 10.5
EA2000-1121 0 HR-46 0 0 HR2000-1121 96A23S CLP-9 0 5,600 24 10.9
EA2000-1533* 0 0 0 0 HR2000-1533* 90A29SG – 0 5,220 24 0.5
EA2000-1929 0 HR-45TN 0 0 HR2000-1929 64A18SG CLP-15G 47 10,857 24 10.9
EA2000-1929 0 HR-45TN 0 0 HR2000-1929 71A16SAL CLP-13AL 47 9,400 22 10.0
EA2000-1929 0 HR-45TN 0 0 HR2000-1929 71A18S CLP-13 47 9,400 22 10.0
EA2000-1929 0 HR-45TN 0 0 HR2000-1929 71A18SG CLP-13G 47 9,400 22 10.0
EA2000-3236 0 HR-68 HR-68B HR-68C-100 HR2000-3236 72E18S CLP-20 47 6,110 24 10.9
EA2000-3236 0 HR-68 HR-68B HR-68C-100 HR2000-3236 78E18S CLP-20L 47 5,499 23 10.5
EA2000-4139 0 HR-85SN HR-85BSN 0 HR2000-4139 110E25SS430 CLP-35S434 0 2,886 23 10.5
EA2000-4139 0 HR-85SN HR-85BSN 0 HR2000-4139 110E25SS430 (half) CLP-35S434 0 1,443 13 5.7
EA2000-4151T 0 0 0 0 HR2000-4151T 88F23SAL CLP-4NAL 0 1,920 8 3.6
EA2000-4151T 0 0 0 0 HR2000-4151T 101F23SAL CLP-34NAL 40 3,360 9 4.1
EA2000-4157T 0 HR-85SLN HR-85SBLN 0 HR2000-4157T 101F23SAL CLP-34NAL 40 3,360 9 4.1
EA2000-4157T 0 HR-85SLN HR-85SBLN 0 HR2000-4157T 101F23SS4 CLP-34NS430 40 3,360 22 10.0
EA2000-4157T 0 HR-85SLN HR-85SBLN 0 HR2000-4157T 110F25SAL CLP-36NAL 0 2,664 8 3.6
EA2000-6075 0 0 0 0 HR2000-6075 68H18S CLP-22 47 4,700 22 10.0
EA2000-6080 0 HR-65AT HR-65BAT HR-65C-130 HR2000-6080 74F18S CLP-2312 47 5,076 22 10.0
EA2000-6080 0 HR-65AT HR-65BAT HR-65C-130 HR2000-6080 74H18S CLP-23 47 4,230 22 10.0
EA2000-6080 0 HR-65AT HR-65BAT HR-65C-130 HR2000-6080 74H18SC CLP-23C 47 4,230 23 10.5
EA2000-6080 0 HR-65AT HR-65BAT HR-65C-130 HR2000-6080 74H18SG CLP-23G 47 4,230 22 10.0
EA2000-6080 0 HR-65AT HR-65BAT HR-65C-130 HR2000-6080 80H18S CLP-25 0 4,230 22 10.0
EA2000-6082 0 0 0 0 HR2000-6082 90F18S CLP-24N 47 3,948 24 10.9
EA2000-6082 0 0 0 0 HR2000-6082 90F18SG CLP-2412G 47 3,948 24 10.9
EA2000-6082 0 0 0 0 HR2000-6082 90H18S CLP-24 47 3,290 24 10.9
EA2000-6082 0 0 0 0 HR2000-6082 90H18SG CLP-24G 47 3,290 24 10.9
EA2000-6181 0 HR-66 HR-66B 0 HR2000-6181 80F23S CLP-312 40 4,320 22 10.0
EA2000-6181 0 HR-66 HR-66B HR-66C-110 HR2000-6181 80H23S CLP-3 40 3,600 22 10.0
EA2000-6181 0 HR-66 HR-66B HR-66C-110 HR2000-6181 88F23S CLP-412 40 3,840 23 10.5
EA2000-6181 0 HR-66 HR-66B HR-66C-110 HR2000-6181 88H23S CLP-4 36 3,200 23 10.5
EA2000-6181 0 HR-66 HR-66B HR-66C-110 HR2000-6181 88H23SC CLP-4C 36 3,200 24 10.9
EA2000-6181T 0 0 0 0 HR2000-6181T 88F23SAL CLP-4NAL 0 1,920 8 3.6
EA2000-6181T 0 0 0 0 HR2000-6181T 88H23SAL CLP-4AL 36 3,200 8 3.6
EA2000-6183 0 HR-85 HR-85B HR-85C-100 HR2000-6183 101H23S CLP-34 40 2,800 24 10.9
Encore and Hartco tool equivalents, pack/ship configurations, and
clips to use with each
ECLIPSER MODELS
HARTCO MODELS
3485 Commercial Avenue Voice: (224) 723-5524
Northbrook, IL 60062 USA Fax: (224) 723-5526
info@encorefasteners.com
www.encorehartco.com
A-H
ZZ
XX
S–STRIPS
R–ROLLS
B–BULK
CLP–STRIPS
CCP–ROLLS
(BLANK) = COLD ROLLED STEEL 1006-1010
A = ALUMINUM
C = CUSHIONED (PAPER LINING INSIDE)
G = GALVANIZED
L = 4 MIL PVC VINYL COATING (INSIDE)
S = STAINLESS STEEL (430)
XX = LENGTH in 100
ths
/inch
A-H = CLIP WIDTH
ZZ
= OPENING in 100
ths
/inch
TYPE OF PACKAGING
74H18
S G
A
=
7
/
16"
(11.0 mm)
E
=
11
/
16"
(17.5 mm)
F
=
3
/
4"
(19.0 mm)
H
=
7
/
8"
(22.0 mm)
(BLANK) or P = POLYCORD
T = TAPED COLLATION D = DETENT
MATERIAL
DESIGNATIONS
Page 9

Page 2 of 2 Rev. 3-24-16
E-Clips & Tool Guide BY TOOL
STRIP
CLASSIC
A SERIES
B SERIES
C SERIES
(OBSOLETE)
E SERIES
ENCORE E-Clip # HARTCO Clip #
#/STRIP CLIPS/CTN LBS/CTN KGS/CTN
Encore and Hartco tool equivalents, pack/ship configurations, and
clips to use with each
ECLIPSER MODELS
HARTCO MODELS
3485 Commercial Avenue Voice: (224) 723-5524
Northbrook, IL 60062 USA Fax: (224) 723-5526
info@encorefasteners.com
www.encorehartco.com
A-H
ZZ
XX
S–STRIPS
R–ROLLS
B–BULK
CLP–STRIPS
CCP–ROLLS
(BLANK) = COLD ROLLED STEEL 1006-1010
A = ALUMINUM
C = CUSHIONED (PAPER LINING INSIDE)
G = GALVANIZED
L = 4 MIL PVC VINYL COATING (INSIDE)
S = STAINLESS STEEL (430)
XX = LENGTH in 100
ths
/inch
A-H = CLIP WIDTH
ZZ
= OPENING in 100
ths
/inch
TYPE OF PACKAGING
74H18
S G
A
=
7
/
16"
(11.0 mm)
E
=
11
/
16"
(17.5 mm)
F
=
3
/
4"
(19.0 mm)
H
=
7
/
8"
(22.0 mm)
(BLANK) or P = POLYCORD
T = TAPED COLLATION D = DETENT
MATERIAL
DESIGNATIONS
EA2000-6183 0 HR-85 HR-85B HR-85C-100 HR2000-6183 101H23SC CLP-34C 40 2,800 25 11. 4
EA2000-6183T 0 0 0 0 HR2000-6183T 101H23SAL CLP-34AL 40 2,800 9 4.1
EA2000-6185 HR-66 HR-66B HR-66C-110 HR2000-6185 88F23S CLP-412 40 3,840 23 10.5
EA2000-6185 0 0 0 0 HR2000-6185 88F23S CLP-72 40 3,840 23 10.5
EA2000-6187T 0 HR-85SL HR-85SBL 0 HR2000-6187T 101H23SAL CLP-34AL 40 2,800 9 4.1
EA2000-6187T 0 HR-85SL HR-85SBL 0 HR2000-6187T 110H25SAL CLP-36AL 36 2,220 8 3.6
EA2000-6189 0 HR-85S HR-85SB 0 HR2000-6189 110E25SS4 CLP-35430 37 2,886 18 8.2
EA2000-6189 0 HR-85S HR-85SB 0 HR2000-6189 110H 25S CLP-36 36 2,220 18 8.2
EA2000-6189 0 HR-85S HR-85SB 0 HR2000-6189 110H25SC CLP-36C 36 2,220 19 8.6
EA2000-6788 0 HR-88 HR-88B 0 HR2000-6788 135H31S CLP-38 31 1,550 16 7.3
EA2000-6791T 0 0 0 0 HR2000-6791T 132F27SAL WA-40 0 1,920 8 3.6
EA2000-6791T 0 0 0 0 HR2000-6791T 135H31SAL CLP-38AL 31 1,550 0 0.0
EA2000-6791T 0 0 0 0 HR2000-6791T n/a WA-39 0 0 0 0.0
* In development
[Encore]: T = Thin/Low Profile Pin [Hartco]: L = Lobster w Low Profile Pin; N = Narrow [Hartco]: CLP=Clip Strip; CCP=Clip Coil
ROLL (COIL)
STANDARD
w/out BLADE
JAM RELEASE
CLASSIC
A SERIES
B SERIES
C SERIES
(OBSOLETE)
E SERIES
ENCORE E-Clip # HARTCO Clip #
– CLIPS/ROLL LBS/ROLL KGS/ROLL
EA2800-1020 EA2500-1020 HR-49CC 0 0 HR2800-1020 64A18R CCP-15 0 15,000 34 15.5
EA2800-1020 EA2500-1020 HR-49CC 0 0 HR2800-1020 71A18R CCP-13 0 15,000 36 16.4
EA2800-1020 EA2500-1020 HR-49CC 0 0 HR2800-1020 73A18R CCP-19 0 14,000 34 15.5
EA2800-1020 EA2500-1020 HR-49CC 0 0 HR2800-1020 76A18R CCP-26 0 14,500 39 17.7
EA2800-1020 EA2500-1020 HR-49CC 0 0 HR2800-1020 85A18R CCP-30 0 13,500 40 18.2
EA2800-1022 EA2500-1022 HR-48CC 0 0 HR2800-1022 76A22R – 0 12,300 34 15.5
EA2800-1022 EA2500-1022 HR-48CC 0 0 HR2800-1022 80A22R – 0 13,700 38 17.3
EA2800-1022 EA2500-1022 HR-48CC 0 0 HR2800-1022 85A22R CCP-33 0 12,300 38 17.3
EA2800-1022 EA2500-1022 HR-48CC 0 0 HR2800-1022 88A22R CCP-32 0 12,300 39 17.7
EA2800-1024 0 0 0 0 HR2800-1024
110A18R (10mm
Flat BW)
– 0 9,300 37 16.8
EA2800-1121 EA2500-1121 HR-46CC 0 0 HR2800-1121 88A23R CCP-14S 0 9,375 37 16.8
EA2800-1121 EA2500-1121 HR-46CC 0 0 HR2800-1121 91A23R CCP-14 0 9,375 37 16.8
EA2800-1121 EA2500-1121 HR-46CC 0 0 HR2800-1121 96A23R CCP-9 0 10,000 37 16.8
EA2800-6082 EA2500-6082 0 0 0 HR2800-6082 74F18R CCP-74 0 5,076 22 10.0
EA2800-6082 EA2500-6082 0 0 0 HR2800-6082 90F18R CCP-73 0 3,948 24 10.9
EA2800-6181 0 0 0 0 HR2800-6181 80F23R CCP-71 0 6,667 33 15.0
EA2800-6185 0 0 0 0 HR2800-6185 88F23R CCP-72 0 5,521 30 13.6
ECLIPSER MODELS
HARTCO MODELS
Page 10

Page 1 of 2
Parts Support Only
ENCORE ECLIPSER
HARTCO® CLINCHER
"E" SERIES
HARTCO® CLASSIC
CLINCHER "A" SERIES
HARTCO® CLASSIC
CLINCHER "B" SERIES
HARTCO® CLASSIC
CLINCHER "C" SERIES
COMPOSITE PLASTIC BODY
(HOUSING) & CLIP MAGAZINE,
GREEN
COMPOSITE PLASTIC BODY
(HOUSING) & CLIP MAGAZINE,
BLACK
CAST ALUMINUM BODY
(HOUSING) & STEEL CLIP
MAGAZINE
CAST ALUMINUM BODY
(HOUSING) & BLACK COMPOSITE
PLASTIC MAGAZINE
MAGNESIUM BODY (HOUSING)
in YELLOW & BLACK
COMPOSITE PLASTIC
MAGAZINE
ENCORE E-CLIP
SIZE NUMBERS
HARTCO CLIP
SIZE NUMBERS
ECLIPSER 2000-1020 HR2000-1020 HR-45i
64A18SG, 71A18S,
71A18SG
CLP-15G, CLP-13, CLP13G
Housing Construction
Panels, Cages, Traps
ECLIPSER 2000-1022 HR2000-1022
85A22S, 88A22S CLP-33, CLP-32
Bedding
ECLIPSER 2000-1024 HR2000-1024
110A18S –
Bedding, 10mm Flat
Border Frames
ECLIPSER 2000-1121 HR2000-1121 HR-46
91A23S, 96A23S CLP-14, CLP-9 Bedding, 5mm BW
ECLIPSER 2000-1929 HR2000-1929 HR-45TN
64A18SG, 71A16SAL,
71A18S, 71A18SG
CLP-15, CLP-13AL,
CLP-13, CLP-13G
Thin & Narrow, for Cages
& Traps with tight access
ECLIPSER 2000-3236 HR2000-3236 HR-68 HR-68B HR-68C-100
72E18S, 78E18S CLP-20, CLP-20L Bedding
ECLIPSER 2000-4139 HR2000-4139 HR-85SN HR-85SBN
110E25SS430 CLP-35S434 Fencing Gabions
ECLIPSER 2000-4151T HR2000-4151 T
88F23SAL, 101F23SAL CLP-4NAL, CLP-34NAL Crab Pots, Lobster Traps
ECLIPSER 2000-4157T HR2000-4157 T HR-85SLN HR-85SBLN
101F23SAL, 101F23SS4,
110F25SAL
CLP-34NAL, CLP-34NS430,
CL-36NAL
Crab Pots, Lobster Traps
ECLIPSER 2000-6075 HR2000-6075
68H18S CLP-22 Bedding, Furniture
ECLIPSER 2000-6080 HR2000-6080 HR-65AT HR-65BAT HR-65C-130
74F18S, 74H18S, 74H18SC,
74H18SG, 80H18S
CLP-2312, CLP-23, CLP23C, CLP-23G, CLP-25
Bedding, Furniture
ECLIPSER 2000-6082 HR2000-6082
90F18S, 90F18SG,
90H18S, 90H18SG
CLP-24N, CLP-2412G,
CLP-24, CLP-24G
Bedding, Furniture
ECLIPSER 2000-6181 HR2000-6181 HR-66 HR-66B HR-66C-110
80F23S, 80H23S, 88F23S,
88H23S, 88H23SC
CLP-312, CLP-3, CLP-412,
CLP-4, CLP-4C
Bedding, Furniture
ECLIPSER 2000-6181T HR2000-6181 T
88F23SAL, 88H23SAL CLP-4NAL, CLP-4AL Crab Pots, Lobster Traps
ECLIPSER 2000-6183 HR2000-6183 HR-85
HR-85B (SQUARE
DRIVER)
HR-85C-100 (SQ.
DRIVER)
101H23S, 101H23SC CLP-34, CLP-34C Bedding
ECLIPSER 2000-6183T HR2000-6183 T (HR-85SLT) 101H23SAL CLP-34AL Crab Pots, Lobster Traps
ECLIPSER 2000-6185 HR2000-6185
88F23S CLP-412, CLP-72 Bedding
ECLIPSER 2000-6187T HR2000-6187 T HR-85SL HR-85SBL
101H23SAL, 110H25SAL CLP-34AL, CLP-36AL Crab Pots, Lobster Traps
ECLIPSER 2000-6189 HR2000-6189 HR-85S HR-85SB
110E25SS4, 110H 25S,
110H25SC
CLP-35430, CLP-36,
CLP-36C
Bedding
ECLIPSER 2000-6788 HR2000-6788 HR-88 HR-88B
135H31S CLP-38 Cages, Concrete Forms
ECLIPSER 2000-6791T HR2000-6791 T
132F27SAL, 135H31SAL
WA-40, CLP-38AL,
WA-39
Crab Pots, Lobster Traps
Encore ECLIPSER & Hartco® CLASSIC CLINCHERS
xxxSide-By-Side Comparison Guide
USES CLIPS COLLATED IN STRIPS
COMMON
APPLICATIONS
3485 Commercial Avenue Voice: (224) 723-5524
Northbrook, IL 60062 USA Fax: (224) 723-5526
info@encorefasteners.com
www.encorehartco.com
Page 11

Page 2 of 2
Encore ECLIPSER & Hartco® CLASSIC CLINCHERS
xxxSide-By-Side Comparison Guide
3485 Commercial Avenue Voice: (224) 723-5524
Northbrook, IL 60062 USA Fax: (224) 723-5526
info@encorefasteners.com
www.encorehartco.com
ENCORE ECLIPSER
HARTCO® CLINCHER
"E" SERIES
ENCORE ECLIPSER
HARTCO® CLINCHER
"E" SERIES
HARTCO® CLASSIC
CLINCHER "A" SERIES
GREEN COMPOSITE PLASTIC BODY
(HOUSING) & STEEL CLIP
STRAIGHT MAGAZINE
BLACK COMPOSITE PLASTIC
BODY (HOUSING) & STEEL CLIP
MAGAZINE
GREEN COMPOSITE PLASTIC
BODY (HOUSING), STEEL
STRAIGHT CLIP MAGAZINE &
BLADE JAM RELEASE VALVE
BLACK COMPOSITE PLASTIC BODY
(HOUSING), STEEL STRAIGHT CLIP
MAGAZINE & BLADE JAM
RELEASE VALVE
CAST ALUMINUM BODY
(HOUSING) & STEEL STRAIGHT
CLIP MAGAZINE
ENCORE E-CLIP
SIZE NUMBERS
HARTCO CLIP
SIZE NUMBERS
ECLIPSER 2500-1020 HR-2500-1020 ECLIPSER 2800-1020 HR-2800-1020 HR-49CC
64A18R, 71A18R,
73A18R, 76A18R,
85A18R
CCP-15, CCP-13, CCP19, CCP-26, CCP-30
Housing Construction
Panels, Cages, Traps
ECLIPSER 2500-1022 HR-2500-1022 ECLIPSER 2800-1022 HR-2800-1022 HR-48CC
85A22R, 88A22R,
76A22R, 80A22R
CCP-33, CCP-32 Bedding
ECLIPSER 2500-1024 HR-2500-1024 ECLIPSER 2800-1024 HR-2800-1024
110A18R CLIP - (10mm
Flat BW)
–
Bedding, 10mm Flat
Border Frames
ECLIPSER 2500-1121 HR-2500-1121 HR-46CC
88A23R, 91A23R,
96A23R
CCP-14S, CCP-14,
CCP-9
Bedding, 5mm BW
ECLIPSER 2500-6082 HR-2500-6082
74F18R, 90F18R CCP-74, CCP-73 Bedding, Furniture
ECLIPSER 2500-6181 HR-2500-6181 ECLIPSER 2800-6181 HR-2800-6181
80F23R (9ga. or 4mm
Border Frame)
CCP-71 (9ga. or 4mm
Border Frame)
Bedding, Furniture
ECLIPSER 2500-6185 HR-2500-6185 ECLIPSER 2800-6185 HR-2800-6185
88F23R (6ga. or 5mm
Border Frame)
CCP-72 (6ga. or 5mm
Border Frame)
Bedding
CONTINUOUS COIL
CLIPPING SYSTEM
QUICK BLADE JAM
RELEASE
HANGER ASSEMBLY
Includes ADJUSTABLE HEIGHT FEATURE
Standard on Encore Eclipser
and Hartco "E" Series
2800 Series Tools
Standard on 2500 and 2800
Series Tools. Optional for
2000 Series Tools.
Rev. 160324
For 2500/2800 Series Tools
Includes STAND, BALANCER,
REGULATOR, HOSES &
TRACK
USES CLIPS ON A CONTINUOUS COIL
KING SIZE ROTATING TABLE
Tool Systems and Add-Ons
COMMON
APPLICATIONS
 Loading...