

Page 1
Décor Basket Rack
DR17A
If you need assistance, please call 1-877-ENCLUME
Enclume Design Products
24 Colwell Street, Port Hadlock, WA 98339
Enclosed you will find everything needed for the assembly of your pot rack. Two people make assembly and installation easier. The
parts and hardware included are:
Components included:
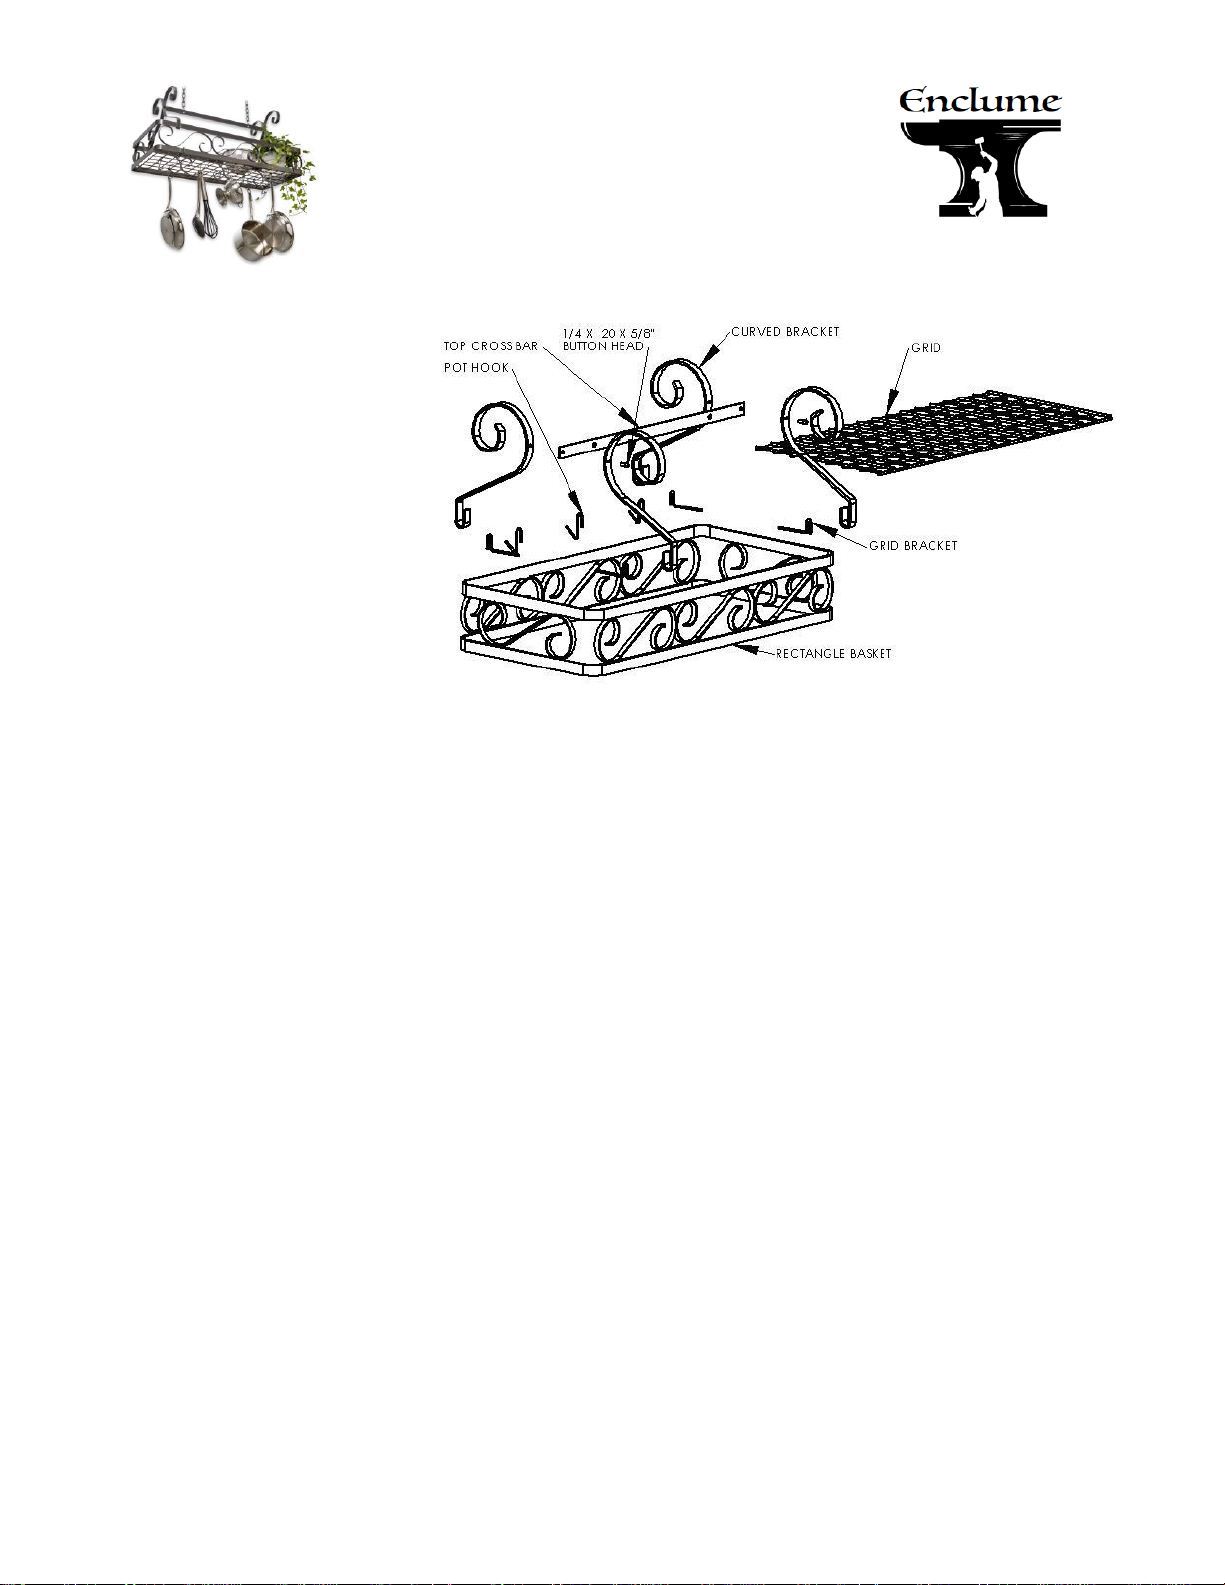
1 - Hammered Steel Rectangle Basket
1 – Top Cross Bar
4 - Curved Brackets
1 - Grid
Hardware included:
2 - Ceiling Screw Hooks (Large)
2 – 6” Chains
2 - 'S' Hooks 2"
12 - Pot Hooks (DRPHS)
6 - Grid Brackets - DRGB
1 – 5/32" Hex Key
2 – 1/4 x 5/8" Button Head Screws
Toggle Kit
ASSEMBLY AND INSTALLATION INSTRUCTIONS
Rack Assembly
1) Lay rack body (rectangle) on firm surface. Protect surface with corrugated box if necessary.
2) The curved brackets are pre-assembled as a set, each set will have one curved bracket with a "tapped" (threaded hole) and one
with a drilled hole (no threads). Remove the ¼” x 5/8" button head from one set. Slipping each curved bracket (the end with the
tight "U" shape bend) onto the rack body one on each side of the rack. Then place the Top Cross Bar between the two tops of the
Curved Brackets; using the ¼” x 5/8” button head screw, attach the two curved brackets and the cross bar together. (Please use
the hole closest to the end of the cross bar as the larger of the two holes must be used to hang fixture).
3) Repeat process for other set of curved brackets. Securely tighten all screws at this time.
4) Make sure that your Curved Brackets are evenly spaced from each end of your rack. The DR17a has hanging centers of 16” and
the DR 17b has hanging centers of 14”.
5) We recommend that you anchor your rack into the solid wood of ceiling joists or beams. Carefully measure the area where the
rack is to be hung and install the ceiling screw hooks directly into the wood joists. If it is not convenient to hang your rack
directly into wood joists you may use the included DRYWALL anchors enclosed with your rack. See Toggler® brand manufacturer
recommendations for weight limits included in the instructions in the Toggler kit.
Grid Assembly
6) Place four grid brackets over the sides of the rack on the inside of each of the four curved brackets with the straight end of the
brackets facing towards the inside of the rack. Place one grid bracket on each end of the rectangle. Next place the grid on top of
the grid brackets.
7) Insert the "S" hooks into each of the remaining holes in the cross bar and the other end through one end of the chain. Carefully
lift your rack into place and attach the other end of the chain onto the ceiling screw hooks.
8) Hang your heavier items on the straight portion of the rack body or the center of the grid area.
WARNING: It is important that your rack is assembled correctly. If the unit is assembled or used incorrectly, it could become unstable and collapse,
possibly causing injury.
LIMITED WARRANTY: This product is warranted to be free of material defects, other than that from normal use, for a period of five years from the
date of purchase. Customer's exclusive remedy shall be the repair or replacement of the defective product and shall be subject to the following
conditions: (1) notice of any defect is received by Enclume within the warranty period and (2) customer returns the defective product to Enclume
Design Products, 24 Colwell St., Port Hadlock, WA 98339, postage prepaid within 20 days following a return authorization number (which may be
obtained by telephoning the number at the top of this instructions) being provided to the customer by Enclume. There are no other warranties,
expressed or implied. THERE ARE NO WARRANTIES OF MERCHANTABILITY OR FITNESS FOR A PARTICULAR PURPOSE. ENCLUME SPECIFICALLY
DISCLAIMS ANY AND ALL INCIDENTAL OR CONSEQUENTIAL DAMAGES ARISING OUT OF THE PURCHASE OR USE OF ENCLUME'S PRODUCTS.
 Loading...