

Page 1
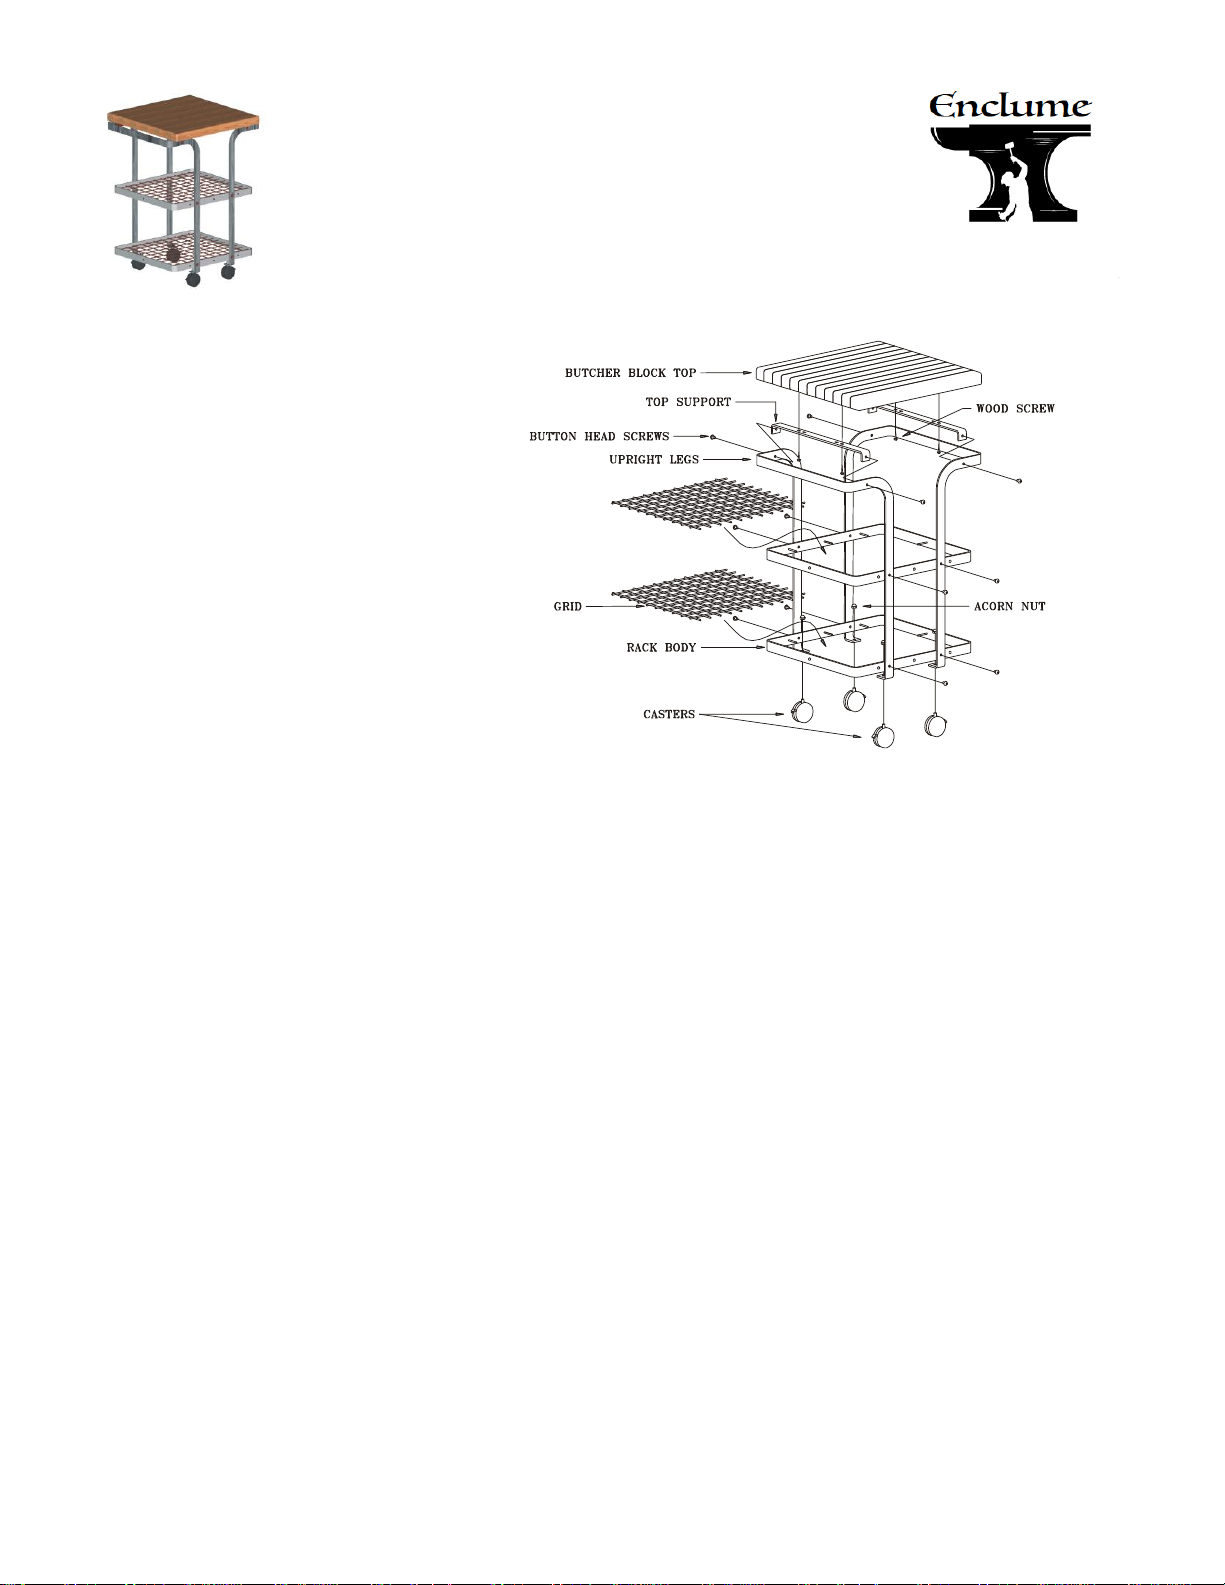
Bakers Cart
BC2A
If you need assistance, please call 1-877-ENCLUME
Enclume Design Products
24 Colwell Street, Port Hadlock, WA 98339
Enclosed you will find everything needed for the assembly and use of your Baker's cart. Two people make assembly and installation easier. The parts
and hardware included are:
Hardware included:
8 - 3/8' x ½" Button Head Screws
4 - 3/8" x ¾"
4 - 3/8"Hex Nuts
4 - 1/4" x 7/8" Button Head Screws
4 - Acorn Nuts
2 - Hex Keys - 7/32" and 5/32"
12- Roundhead Rivets
12- Pushnuts
Components included:
1 - Butcher Block Top
2 - Upright Legs
2 - Rack Body
2 - Top Supports
2 - 2" Grids
4 - Casters
ASSEMBLY INSTRUCTIONS
Cart Assembly
1) Insert Roundhead Rivets into the small holes on the outside of the rack body so they protrude into the rack body. Slide a pushnut onto each
rivet and push toward the rack body so the rivets are held tightly.
2) Lay upright legs on the floor in the horizontal position with handles pointing away from each other. Set the rack body inside the upright leg and
align the mounting holes. Attach the rack body using the eight 3/8" x ½” Buttonhead screws. The buttonhead screws should be inserted
through the upright leg into the threaded hole of the rack body. Repeat for the second rack body. Buttonhead screws should only be hand
tightened at this point.
3) Lift the unit into the upright position and install the Top Support Brackets by setting them into position with the tab facing downward and
securing with the four 3/8" x ½” buttonhead screws and hex nuts.
4) Square up entire unit and Tighten down all buttonhead screws and hex nuts.
5) Gently tilt unit backwards until it is laying flat on the floor again. Attach the four caster wheels to the bottom of the
threaded upright leg tabs by screwing them in until they are tight. Next screw the acorn nuts onto the caster stem and tighten. Lock the caster
wheels by flipping the tab on each wheel into the down position.
6) Carefully place the unit back into the upright position.
7) Place the butcher block work surface on top of the assembled unit with the rough surface facing down. Line up the mounting
holes in the butcher block with the slots in the support brackets, (if holes do not line up you may need to loosen the four top supports (fasteners
and nuts to re-align). Proceed to secure the butcher block in place once the holes in the top support line up with the holes in the board with the
four 5/32” buttonhead screws
using the smaller allen wrench by inserting the screws through the support bracket and into the insert on the bottom of the board.
8) Now place the grid pieces into the rack body so they rest on the rivets. Your Baker's cart in now fully assembled. Release the
locks on the wheels to move.
9) The butcher block surfaces have been penetrated with natural mineral oil. To maintain the finish we recommend a periodic
application of mineral oil rubbed into all of the wooden surfaces.
WARNING: It is important that your Baker’s cart is assembled correctly. If the unit is assembled or used incorrectly, it could become unstable and collapse, possibly
causing injury.
LIMITED WARRANTY: This product is warranted to be free of material defects, other than that from normal use, for a period of five years from the date of purchase.
Customer's exclusive remedy shall be the repair or replacement of the defective product and shall be subject to the following conditions: (1) notice of any defect is
received by Enclume within the warranty period and (2) customer returns the defective product to Enclume Design Products, 24 Colwell St., Port Hadlock, WA 98339,
postage prepaid within 20 days following a return authorization number (which may be obtained by telephoning the number at the top of this instructions) being
provided to the customer by Enclume. There are no other warranties, expressed or implied. THERE ARE NO WARRANTIES OF MERCHANTABILITY OR FITNESS FOR A
PARTICULAR PURPOSE. ENCLUME SPECIFICALLY DISCLAIMS ANY AND ALL INCIDENTAL OR CONSEQUENTIAL DAMAGES ARISING OUT OF THE PURCHASE OR USE OF
ENCLUME'S PRODUCTS.
 Loading...