

ENCAD 212528-05, NovaJet 500, NovaJet 630, NovaJet 700, NovaJet 505 Quick Start Manual
...
ENGLISH
NovaJet
500/630/700 Series
Printer Quick Start Guide
P/N 212528-05 Rev. AA
(Text P/N 212529-1 Rev. H
Copyright © ENCAD, Inc. 1999-2001
®
ENCAD
(VX), Graphic Extended™ (GX), Graphic Standard Plus™ (GS Plus) and
Graphic Outdoor Matched System™ (GO) are trademarks of ENCAD,
Inc.
Other trademarks and registered trademarks are the property of their
respective owners.
No part of this manual may be copied or distributed, transmitted,
transcribed, stored in a retrieval system, or translated in any human or
computing language, in any form or by any means, electronic,
mechanical, magnetic or otherwise, or disclosed to a third party without
the express written permission of: ENCAD, Inc., 6059 Cornerstone Court
West, San Diego, CA 92121, U.S.A.
®
, NovaJet®, CADJET®, NovaXsell™, Posterizer™, Vivid Extend™
Revision History
Rev. A April 1999
Rev. B May 1999
Rev. C June 1999
Rev. D August 1999
Rev. E March 2001
Rev. F March 2001
Rev. G June 2001
Rev. H July 2001

NovaJet 500/630/700 Series Printer Quick Start Guide
Other reference materials
In addition to this guide, the following additional documentation is included with your
printer:
NovaJet System CD-ROM - the system CD-ROM contains:
• Printer Reference Guide, which provides complete reference information regarding
the printer's options;
• Quality Primer, a guide to help you get high-quality output from your NovaJet
printer;
• HP-GL/2 Guide, provides reference information regarding the HP-GL/2 features of
your printer.
• Maintenance Guide, instructions for maintaining your NovaJet printer;
• Sample print files;
• Windows 95/98/ME/NT/2000 drivers*; and
• other software.
* Note that the NovaJet 500 and 700 Windows drivers on the System CD are series
drivers. The NovaJet 500 driver also supports the NovaJet 505. The NovaJet 700
driver also supports the NovaJet 750.
2

NovaJet 500/630/700 Series Printer Quick Start Guide
Contents
NovaJet Printer Models ............................................................................. 5
Unpacking your printer ............................................................................. 5
Assembling the printer stand .................................................................... 6
Assembling the dryer on the NovaJet 500, 505, 630 and 700 .................... 8
Assembling the dryer on the NovaJet 750 ............................................... 10
Removing protective shipping material .................................................... 12
Connecting power and your computer ..................................................... 12
Using the control panel ........................................................................... 12
Choosing menu functions ....................................................................... 13
Setting the language .............................................................................. 13
Loading media ........................................................................................ 14
Using the second feed roll ...................................................................... 16
Using the optional takeup roll ................................................................. 17
Moving the carriage ................................................................................ 19
Installing the cutter ................................................................................. 19
Filling the ink reservoirs .......................................................................... 20
Inspecting the ink cartridges ................................................................... 21
Installing the 500 series ink cartridges .................................................... 21
Priming the 500 series ink delivery lines ................................................. 23
Installing the 630/700 series ink cartridges ............................................. 26
Installing needle assemblies and priming the 630/700 ink delivery lines .. 27
Installing needle assemblies and priming the NovaJet 736 or 750 ink
delivery lines .................................................................................... 31
Printing the color test ............................................................................ 35
Printing the prime pattern ....................................................................... 36
Clogged jets ........................................................................................... 37
Aligning the ink cartridges ...................................................................... 38
Paper axis calibration ............................................................................. 41
Cartridge recognition .............................................................................. 41
Pausing the printer ................................................................................. 42
Canceling a print .................................................................................... 42
Registering your printer .......................................................................... 42
ENGLISH
3

NovaJet 500/630/700 Series Printer Quick Start Guide
This page is intentionally blank.
4
NovaJet 500/630/700 Series Printer Quick Start Guide
Quick Start
Congratulations on your purchase of a NovaJet wide format color printer. This
guide gives you details on the following:
• unpacking and assembling the printer
• loading media
• filling ink reservoirs
• installing ink cartridges
• installing the media cutter
• testing ink cartridges
NovaJet Printer Models
This manual provides instructions for the NovaJet 500, 630 and 700 series
printers. There may be more than one printer model in each series. When the
manual refers to the 500, 630 or 700 printer, it refers to all printer models within
that series. Any features or functionality unique to one printer model will be
noted. The NovaJet 700 Windows driver on the System CD is a 700 Series
driver that also supports the NovaJet 750. The following table lists the printer
models that are currently available.
ENGLISH
500 Series 630 Series 700 Series
NovaJet 500 NovaJet 630 NovaJet 700
NovaJet 505 NovaJet 736
Unpacking your printer
The printer is quite large and heavy. Two people (or a forklift) are recommended
to move the box. Before assembly, you may want to measure halls and elevators
to determine whether the unit should be assembled in the area where it will be
used.
NovaJet Printer Models
NovaJet 750
5

NovaJet 500/630/700 Series Printer Quick Start Guide
Assembling the printer stand
1 Locate the box containing the printer head and turn it upside down.
Open and remove the Accessory box which contains the screws and
screwdriver to use for the next steps.
2 Open the box containing the stand and remove the stand and feet
from the box.
3 Note that each foot has two casters, only one of which locks. Attach
the feet to the stand legs using the screwdriver and screws provided
in the setup box. Locate the casters so that they are diagonally
opposite each other. Lock the casters to prevent the stand from
rolling during subsequent assembly.
4 One of the stand legs has a connector on it. Pull the connector from
the access hole in the leg and remove the tiewrap holding the
connector in place. Attach the connector to the receptacle on the
bottom of the print head. Note: The NovaJet 736 does not include
the leg connector. Orient the stand legs so that the roll holder
brackets are facing the center of the printer head and align with the
holes in the bottom of the printer head. Attach both stand legs to the
printer head using the screwdriver and eight screws contained in the
Accessory box. Note: To help ensure that the legs seat properly,
attach screws snugly in opposite corners first. Then, when all
screws are in place, tighten them securely.
CAUTION: Be careful not to pinch the cable when attaching the leg.
Note: The NovaJet 736 and 750 printers will look slightly diffeent
from the printer in the following illustration. Also, the legs for your
printer may look slightly different.
6
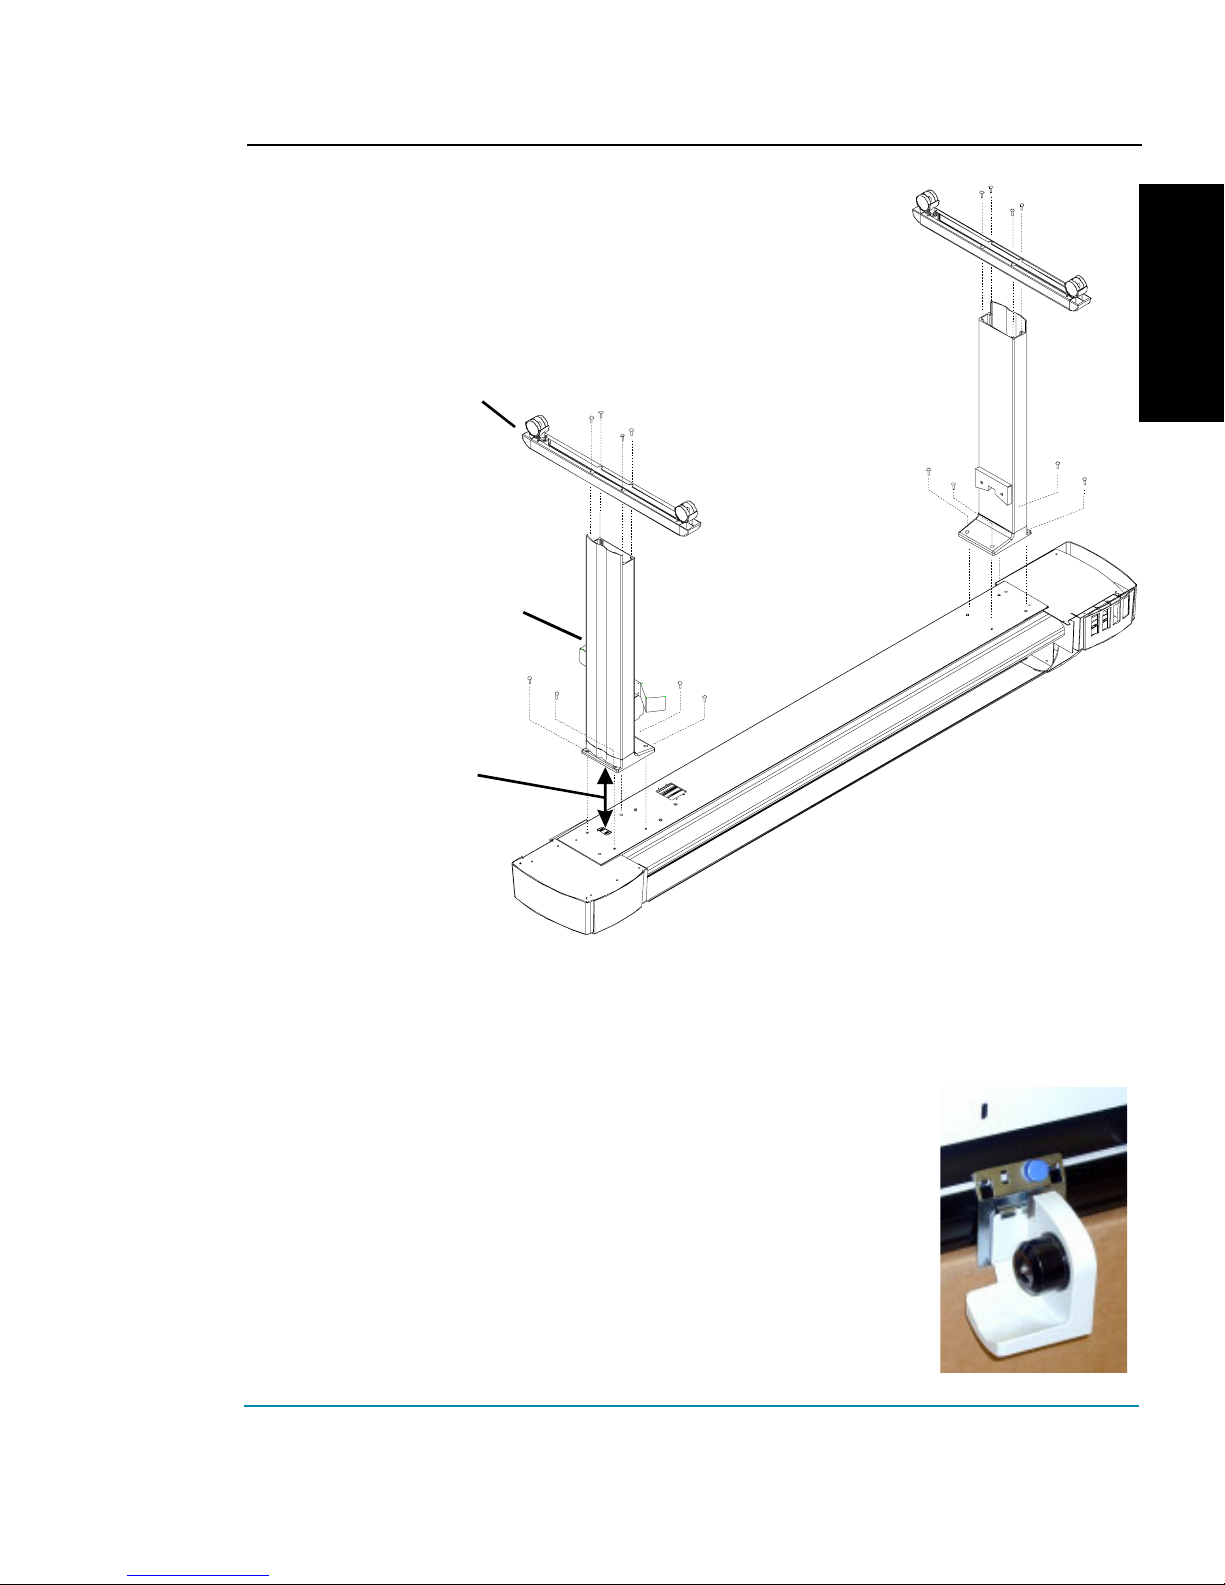
Foot
Stand Leg
NovaJet 500/630/700 Series Printer Quick Start Guide
ENGLISH
Attach Connectors
Stand Leg to Printer Head
(Not Required on NovaJet 736)
5 Two persons are required to lift the printer. Remove the assembled
printer and stand from the box. Save the boxes and packing
materials in case you need to ship the printer.
6 Check to be sure that the media sensor is plugged in to the
connector on the right stand leg.
7 On the NovaJet 736, attache the left and right roll
guides to the back of the printer as shown. Turn
th thumbscrew (blue knob) to secure them in
position.
The NovaJet 505 and 736 does not include a takeup and
dryer system. Proceed to the section on Removing protec-
tive shipping material. For all other printers, continue with
the following sections to install the dryer system.
7
NovaJet 500/630/700 Series Printer Quick Start Guide
Adj
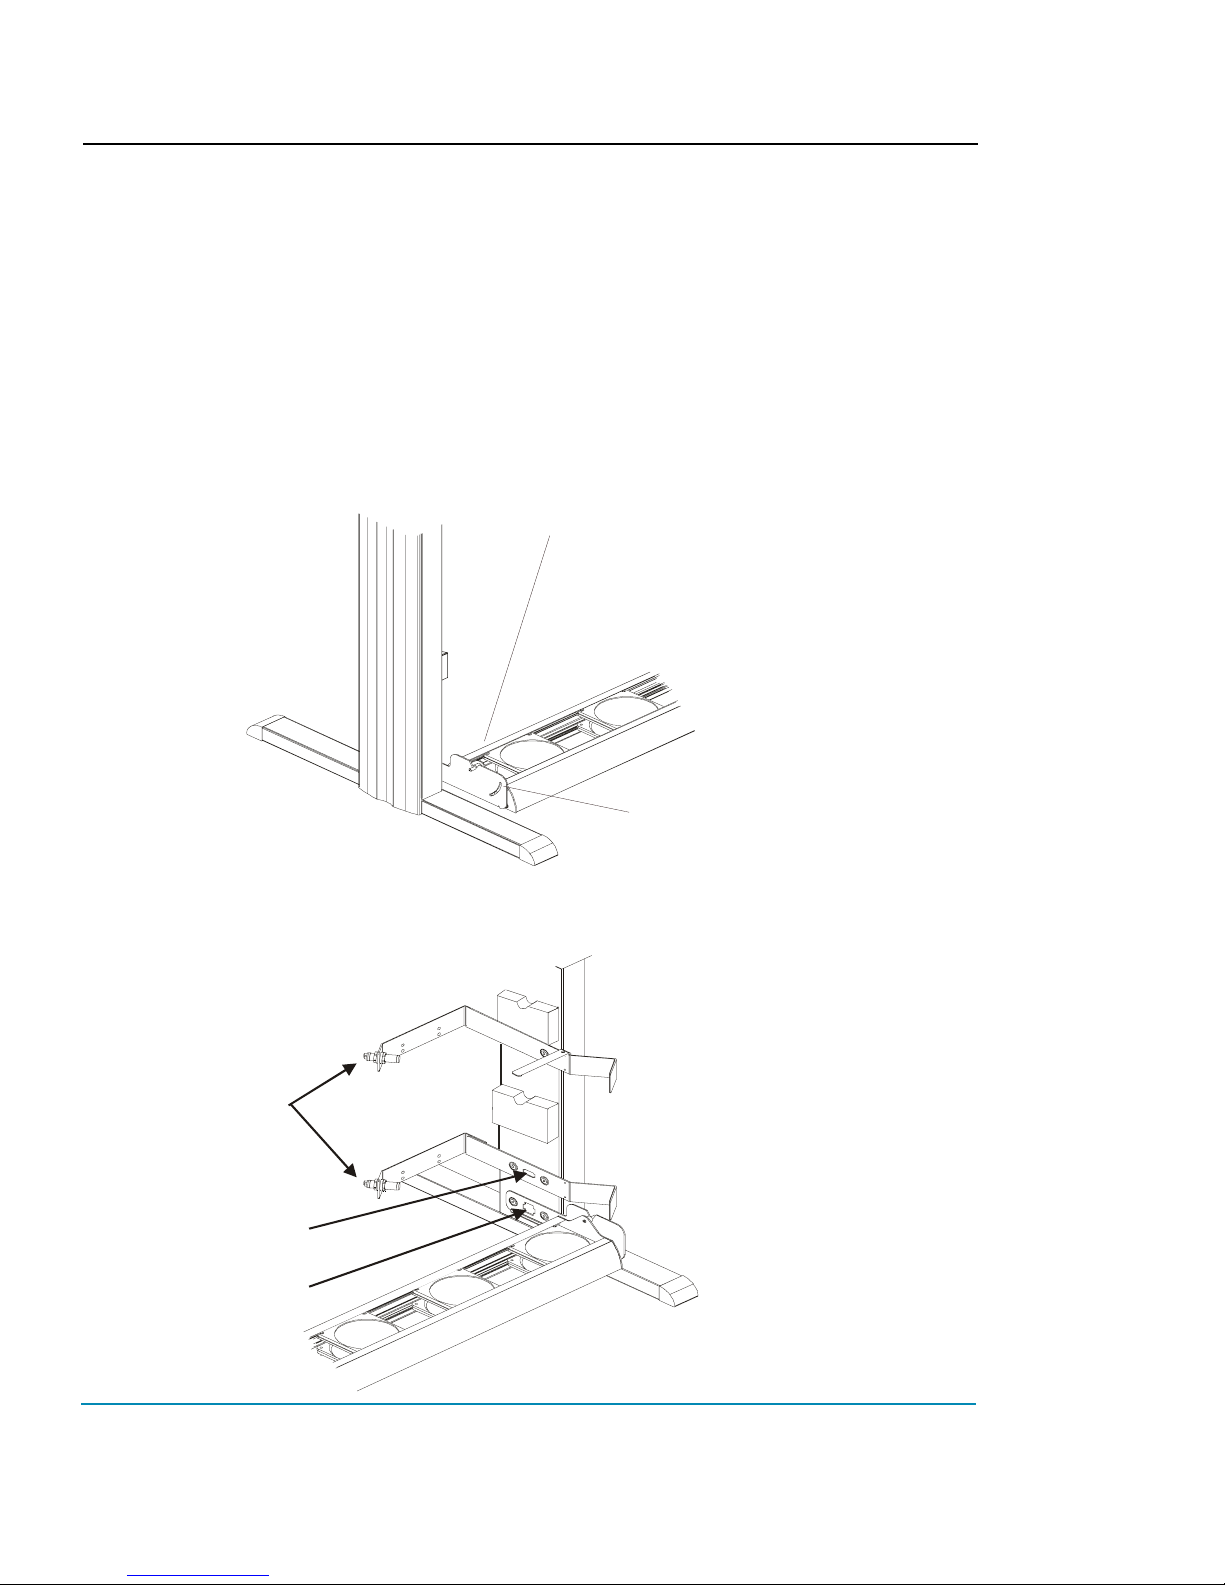
Assembling the dryer on the NovaJet 500, 505, 630 and 700
Use this section, if you ordered a takeup and dryer for the NovaJet 500, 505, 630
or 700. The following section will describe the installation of a takeup and dryer
system on the NovaJet 750.
1 Remove the wing nut and mount the dryer assembly in the slots
provided at the base of the stand. Be sure fans will blow upward and
toward the printer. Position the dryer assembly to the desired angle.
Replace and tighten the wing nut on the left side.
Set dryer assembly into
the slot on the bracket
2 Plug the dryer connector into the receptacle on the right stand leg.
Media
sensors
connector
connector
ust to desired position
and tighten wing nut
Sensor
Dryer
8
NovaJet 500/630/700 Series Printer Quick Start Guide
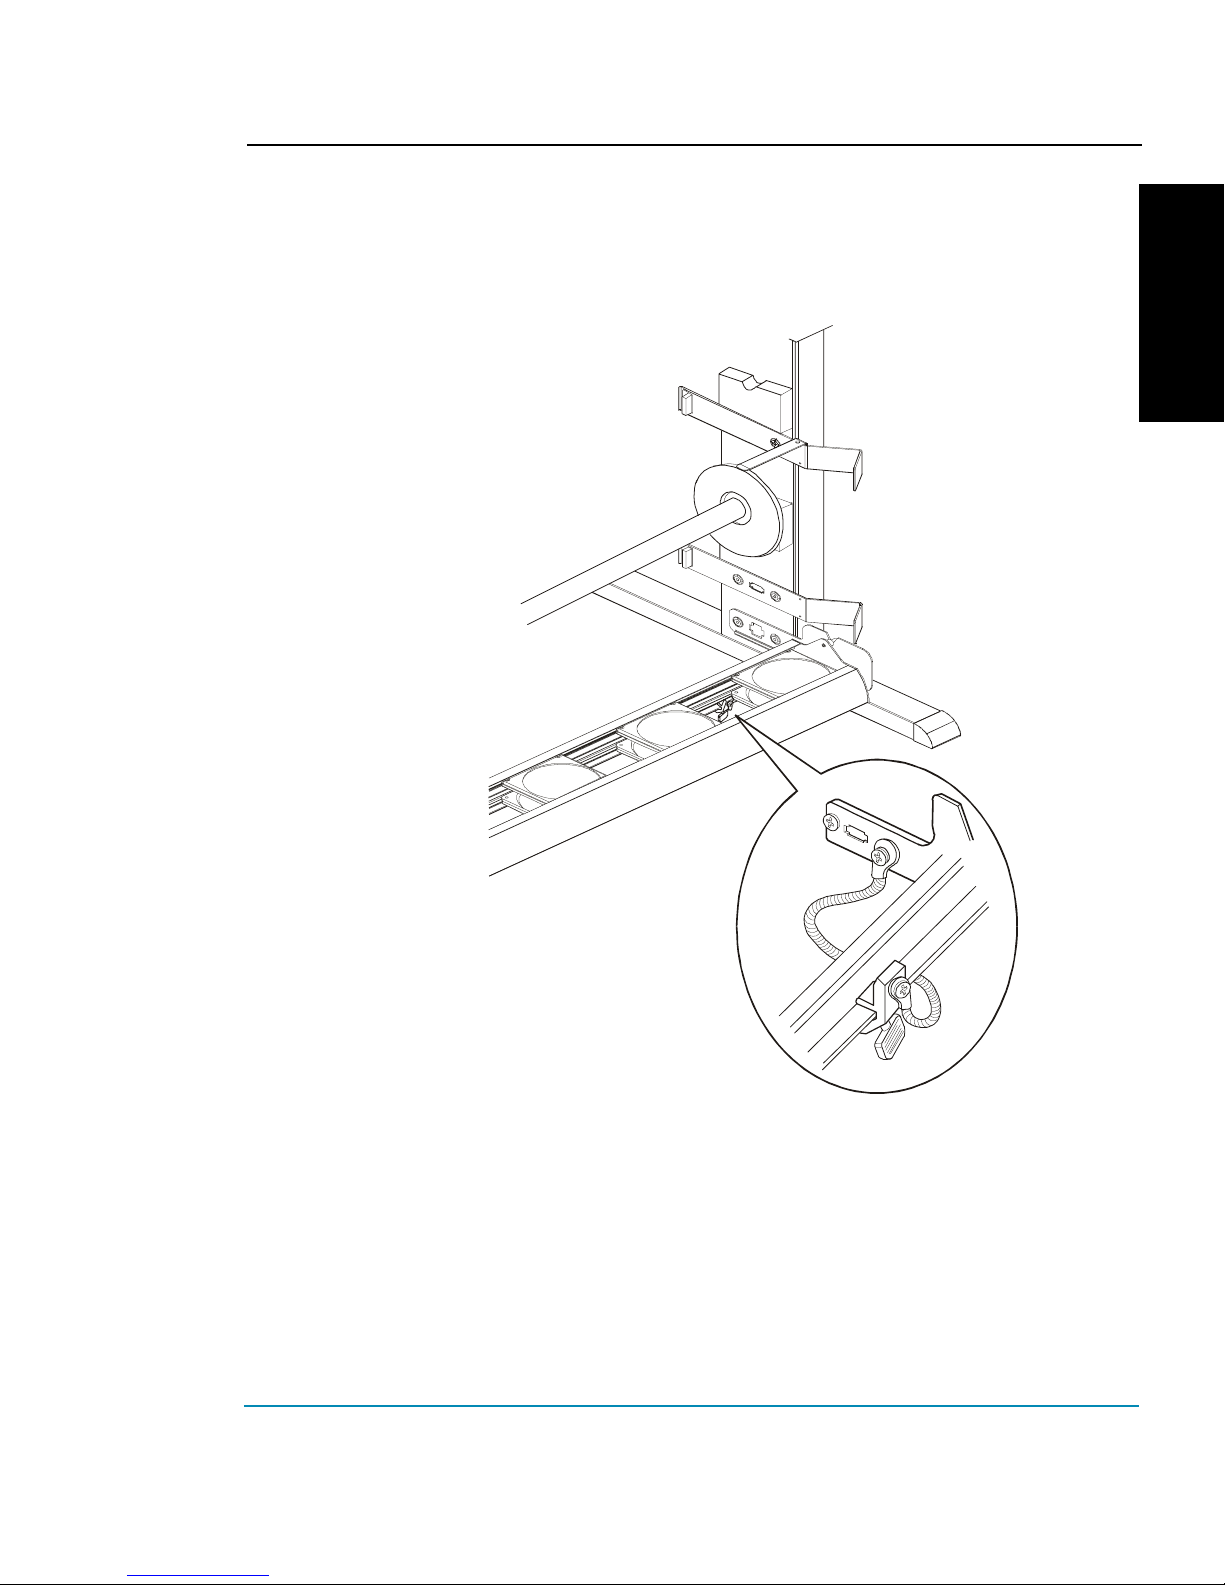
3 Attach the clamp for the grounding strap to the right lower rear edge
of the dryer assembly bracket and tighten the thumbscrew securely
so that the paint is penetrated, ensuring a good ground.
ENGLISH
Affix clamp to bottom
edge of bracket
and tighten thumbscrew
4 Check to be sure that the media sensor is plugged into the
connector on the right stand leg.
9

NovaJet 500/630/700 Series Printer Quick Start Guide
Assembling the dryer on the NovaJet 750
1 Attach the brackets for the dryer to the stand legs using four size 8-
32 screws. Orient the brackets as shown below. Note: The legs
are shown below without the printer head. Attach the dryer brackets
after the printer head as been attached and the assembled printer
removed from the packing box.
2 Place the dryer on top of the dryer brackets while aligning the guide
pins on the bottom of the dryer with the holes on the dryer brackets.
Secure using four size 8-32 screws.
10

NovaJet 500/630/700 Series Printer Quick Start Guide
3 Plug the data cable into both the dryer and right stand leg as shown.
CAUTION: Never open the dryer. There are no user serviceable
parts inside. Refer servicing to qualified service personnel only.
ENGLISH
CAUTION: This assembly emits heat by radiation.
CAUTION: Once the dryer is plugged in, there is continuous power
to the dryer,
even when the printer is turned off.
DISCONNECT POWER CORD BEFORE SERVICING!
4 Plug the power cable from the dryer into the power receptacle on the
back of the printer.
11
NovaJet 500/630/700 Series Printer Quick Start Guide
CAUTION: Never open the dryer. There are no user serviceable
parts inside. Refer servicing to qualified service personnel only.
Heating Chamber Power Connection/Plug
CAUTION: Once the dryer is plugged in, there is con-
tinuous power to the dryer,
turned off.
Removing protective shipping material
CAUTION: Before turning on the printer, make sure to remove the protective
material that secures the carriage. Remove the protective film from the control
panel and remove the tape from the ink reservoir cover. Do not remove black
tape affixed to left and right sides of the carriage assembly.
Connecting power and your computer
even when the printer is
An IEEE 1284 parallel cable is required to connect the printer to your PC
computer. If you are using an optional print server, refer to the information
accompanying the print server for installation instructions. If you are using an
optional hardware RIP, refer to the information accompanying the RIP for
installation instructions.
1 Plug the power cord into the power inlet at the rear of the printer.
2 Plug the printer cable into the connector at the rear of the printer. For
connecting to a PC, use an IEEE 1284 parallel cable.
3 To turn on the printer, turn the power switch on at the rear of the
printer. The control panel will display the printer's model name, the
firmware version, status and progress of the power on self-test, and
status.
Using the control panel
The control panel at the right side of the printer includes eight buttons and a
display which indicates modes and settings. An overview is provided here so that
you can load media and ink cartridges. Details on menu options are included in
the Reference Guide on the system CD-ROM. The menu tree in Appendix C of
the Reference Guide also gives you a summary of all the printer modes and their
functions.
12

Load Media Feed Media Menu
l
Cut Setup Menu
l
Pause Utility Menu
l
Reset
l
Two types of menus are displayed: action menus provide a list of additional
menus or immediate tasks to perform, such as Cut, Load Media, etc. Selection
menus let you view and modify values.
Choosing menu functions
To select a function, press the button adjacent the function displayed.
The display will list options available for the selected function. Press the button
for the option you want and press OK to accept the selection.
NovaJet 500/630/700 Series Printer Quick Start Guide
l
l
l
l
ENGLISH
Depending on the type of menu, you can return to the previous menu level by
pressing the OK or Exit button. There is no way to immediately return to the
top level menu.
Press the Cancel button to restore the previous setting and exit the menu.
Refer to the Reference Guide on the System CD for a description of all the
menu features.
Setting the language
With the appropriate firmware version, your printer can display menu items and
messages in English, German, French, Italian, Portuguese, Spanish, Japanese,
Simplified Chinese, Traditional Chinese or Korean.
➪➪
➪ To change the language
➪➪
1 Press Setup Menu/User Setup/Language, and select the
language you want.
2 Press OK.
13
 Loading...