

ENCAD NovaJet 1000i Reference Manual

C
i
ENCAD 1000I REFERENCE GUIDE
INTRODUCTION PRINTER OPTIONS MENU TREE TECHNICAL INFO ERROR MESSAGES TROUBLESHOOTING
Encad 1000i
Printer Reference Guide
Copyright © Eastman Kodak Company, 2004
KODAK and ENCAD are trademarks of Eastman Kodak Company.
Other trademarks are the property of their respective owners.
Except as provided below, no p art of this manual may be copied or distributed,
transmitted, transcribed, stored in a retrieval system, or translated in any human
or computing language, in any form or by any means, electronic, mechanical,
magnetic or otherwise, or disclosed to a third party without the express written
permission of Encad, Inc., 6059 Cornerstone Court West, San Diego, CA 92121,
U.S.A.
Certain manuals are distributed by Eastman Kodak Company in an electronic
format on CD-ROM or over the internet. The registered user of a Encad product
whose manuals are distributed in this fashion may print one copy for their
personal use only .
Revision History
Rev . A December 2003
Rev . B April 2004
Rev . C June 2004

ii
ENCAD 1000I REFERENCE GUIDE
Introduction Printer Options Menu Tree Technical Info Error Messages Troubleshooting
W arranty
Encad, Inc. warrants its printers (“PRODUCT”) to be free from defects in workmanship and materials for a period of one
year from the date of purchase. In order to submit a Warranty claim, please contact Encad at (858) 452-4350 or internationally , contact your dealer/distributor.
Encad reserves the right to make changes or improvements to Products, without incurring any obligation to similarly alter
Products previously purchased.
Buyer’s sole and exclusive rights pursuant to this Warranty shall be for the repair or replacement of defective Product.
Encad specifically disclaims any and all other warranties, expressed or implied, including but not limited to, implied warranties of merchantability and fitness for a particular purpose. In no event shall Encad be liable for any loss of profit or other
commercial damages, special, incidental or consequential damages, or any other damages or claims, whatsoever.
This Warranty gives Buyer specific legal rights, and Buyer may also have other rights that vary from state to state.
This Warranty applies only to printers purchased from Encad, or authorized Encad distributors or dealers. The intent of this
Warranty is to repair or replace defective Products subjected to normal wear and tear, when operated according to Encad
instructions.
This warranty does not cover damage to the Product resulting from the following:
· Accident or negligence.
· Unauthorized modification of the Product.
· Adverse environmental conditions.
· Service of the Product by other than an Encad authorized service provider.
· Unauthorized or improper use, including but not limited to:
- Use in applications for which the Product was not designed.
- Using cartridges or ink other than those supplied by Encad.
- Lubricating any part of the printer.
Extended Warranty: An extended warranty is available for your Encad printer. Contact your dealer/distributor or Encad for
further details.
W arranty

iii
ENCAD 1000I REFERENCE GUIDE
Introduction Printer Options Menu Tree Technical Info Error Messages Troubleshooting
The United States Federal Communications Commission has specified that the following notice be brought to the attention of users of
Encad printers.
FEDERAL COMMUNICA TIONS COMMISSION RADIO AND TELEVISION INTERFERENCE FOR CLASS A DEVICE
Statement
This equipment has been tested and found to comply with the limits for a Class A digital device, pursuant to Part 15 of the FCC Rules.
These limits are designed to provide reasonable protection against harmful interference in a residential installation. This equipment
generates, uses, and can radiate radio frequency energy, and if not installed and used in accordance with the instructions, may cause
harmful interference to radio communications.
User Instructions:
If the equipment does cause harmful interference to radio or television reception, which can be determined by turning the equipment on
and off, the user is encouraged to try to correct the interference by one of the following measures:
• Reorient or relocate the receiving antenna.
• Increase the separation between the equipment and receiver.
• Connect the equipment into an outlet on a circuit different from that to which the receiver is connected.
• Consult the dealer or an experienced radio/TV technician for help.
Changes or modifications not expressly approved by
Encad could void the user’s authority to operate the equipment.
Note: This product was FCC certified under test conditions that included the use of shielded I/O cables and connectors between
system components. To be in compliance with FCC regulations, the user must use shielded cables and connectors and install them
properly.
FCC S t atement (U.S.A.)
FCC S t atement (U.S.A.)
iv
ENCAD 1000I REFERENCE GUIDE
Introduction Printer Options Menu Tree Technical Info Error Messages Troubleshooting
VDE statement
Hiermit wird bescheinigt, daß der Drucker in Übereinstimmung mit den Bestimmungen der BMPT -AmstbIVfg
234/1991 funkentstört ist. Der vorschriftsmäßige Betrieb mancher Geräte (z.B. Meßsender) kann allerdings
gewissen Einschränkungen unterliegen. Beachten Sie deshalb die Hinweise in der Bedienungsanleitung.
Dem Zentralamt für Zulassungen im Fernmeldewesen würde den Inverkehrbringen dieses Gerätes angezeigt und
die Berechtigung zur Überprüfung der Serie auf die Einhaltung der Bestimmungen eingeräumt.
Die arbeitsplatzbezogene Geräuschemission des Gerätes beträgt 70 dB(A).
Industry Canada
This Class A digital apparatus meets all requirements of the Canadian Interference-Causing Equipment Regulations.
Cet apparell numérique de la classe A respecte toutes les exigences du Réglement sur le matériel brouilleur du
Canada.
v
ENCAD 1000I REFERENCE GUIDE
Introduction Printer Options Menu Tree Technical Info Error Messages Troubleshooting
Safety
Material safety data sheet
T o obtain information on the proper use, handling, and disposal of any Kodak ink, consult the material safety data
sheet included in the ink kit or obtain a copy from Encad at:
6059 Cornerstone Court West
San Diego, California 92121-3734
(858) 452-4350
International users should contact their local dealer or distributors.
General operating safety
The use of a <HAR> cord set (rated 10A, 250VAC) with the proper plug configuration for the country where the
device will be used, is required for continued safety compliance.
Ein harmonisiertes (<HAR>) Netzkabel (min. 10A, 250V~) mit dem vorgeschriebenen Netzstecker für das
entsprechende Land in dem das Gerät installiert wird, ist unbedingt notwendig für die elektrische Sicherheit.
El uso de cable poder <marcado HAR> (capacidad de 10A, 250V~), con el enchufe apropiado para el país
donde se use el producto, es requerido para acatamiento de seguridad eléctrica.
L' emploi d' un cordon surmoulé <HAR> (estimé 10A, 250V CA) avec la configuration de la fiche convenable
pour le pays où l' appareil sera utilisé, est exigé pour la conformité à la sécurité continuée.
For your safety
Always unplug the printer before servicing it.
Safety
vi
ENCAD 1000I REFERENCE GUIDE
Introduction Printer Options Menu Tree Technical Info Error Messages Troubleshooting
Manual conventions
Indicates a procedure for you to follow in order to perform a specific function.
Read the accompan
ying explanatory text before following the step-by-step procedure.
! Indicates a warning. Ignoring the warning can damage the printer or result in an unsatisfactorily printed
image.
Other reference materials
In addition to this guide, the following additional documentation is included with your printer:
Quick Start Guide - Tells you how to attach the printer stand, load media, install cartridges, and connect the
printer to your computer.
CD-ROM - contains the following:
Documents
Quick Start Guide
Reference Manual
Maintenance Guide
Applications
NovaJet 1000i Software Suite
EFPU
Windows 98/NT/2000/ME/XP Drivers
ICC color profiles
Sample Files
Conventions and References
Conventions and References
Introduction 1-1
Encad 1000i Reference Guide
Introduction
Introduction
Introduction Printer Options Menu Tree Technical Info Error Messages Troubleshooting
1
1
This Reference Guide describes the ENCAD 1000i printer and its menu functions. In this chapter you will find an overview of the printer and steps for calibrating the printer after it is installed. Refer to the Quick Start Guide for setup
instructions and the Maintenance Guide for maintenance information.
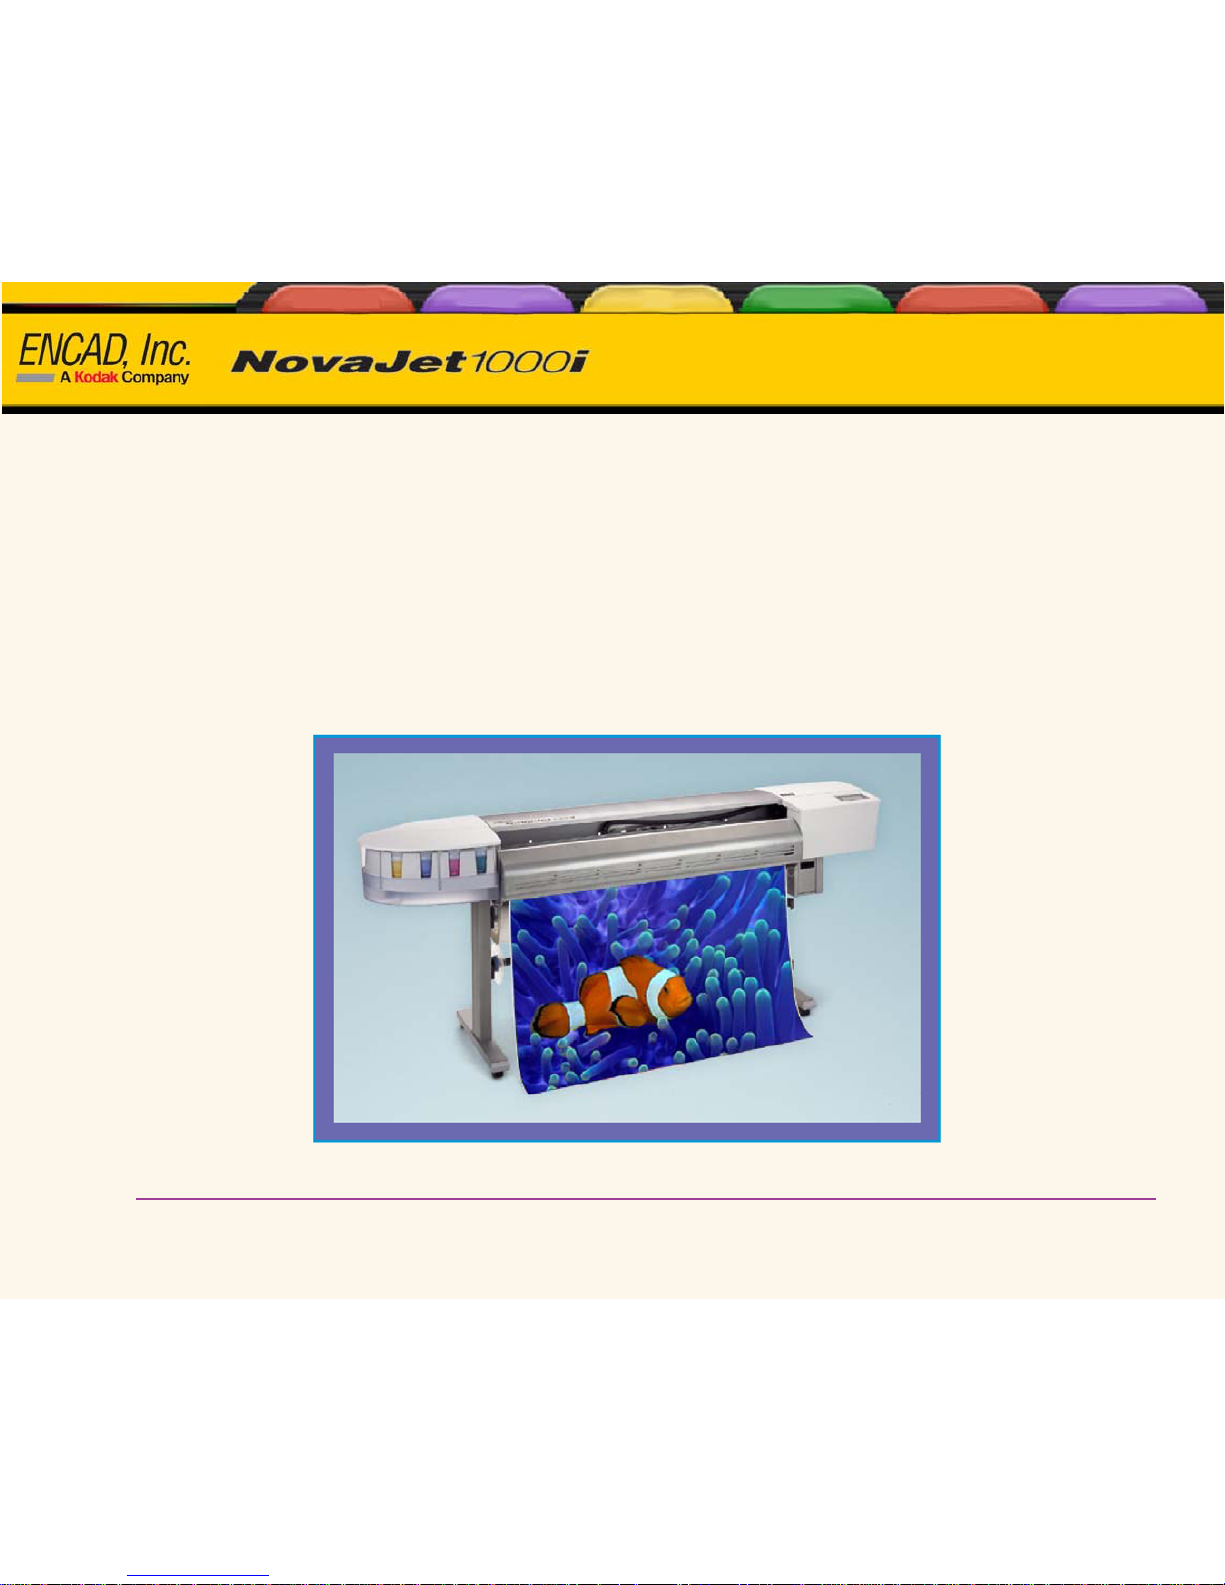
The printer is a wide-format color inkjet printer that gives you professional-quality output on a wide variety of media
using either dye or pigment-based Encad inks. Designed specifically for the needs of graphics professionals who need
high productivity, this printer offers six print heads, improved drying technology, and automated ink line fill and cartridge
cleaning for "clean hands" operation. The printer is network-ready so that it can be shared by an entire office. Job tracking
and cost accounting software provide instantaneous statistics for billing, media and ink status, and project management.
Introduction 1-2
Encad 1000i Reference Guide
Introduction
Introduction
Introduction Printer Options Menu Tree Technical Info Error Messages Troubleshooting
1
1
Printing
The printer accepts raster-oriented data in the format of HP RTL. In this mode, printing begins immediately after
the first complete line of HP RTL data is received.
There are many Raster Image Processors (RIPs) which convert Postscript or CGM to HP RTL. When choosing a
RIP or a file format converter for output to the printer, make sure it has the features you need. (Contact your
Encad distributor or dealer for an up-to-date listing.) If your applications do not support HP RTL, there are several
software utilities available to convert various raster file formats (TIFF, GIF, BMP, etc.) into HP RTL.
Obtaining quality results
You have probably seen a demonstration of your printer's capabilities or sample output.
If so, you are aware of the superb color graphics which can be obtained. Note, however, that to obtain high-quality results, you must consider several factors. Follow the
simple guidelines in the sections that follow to obtain excellent results.
Use the right inks and media
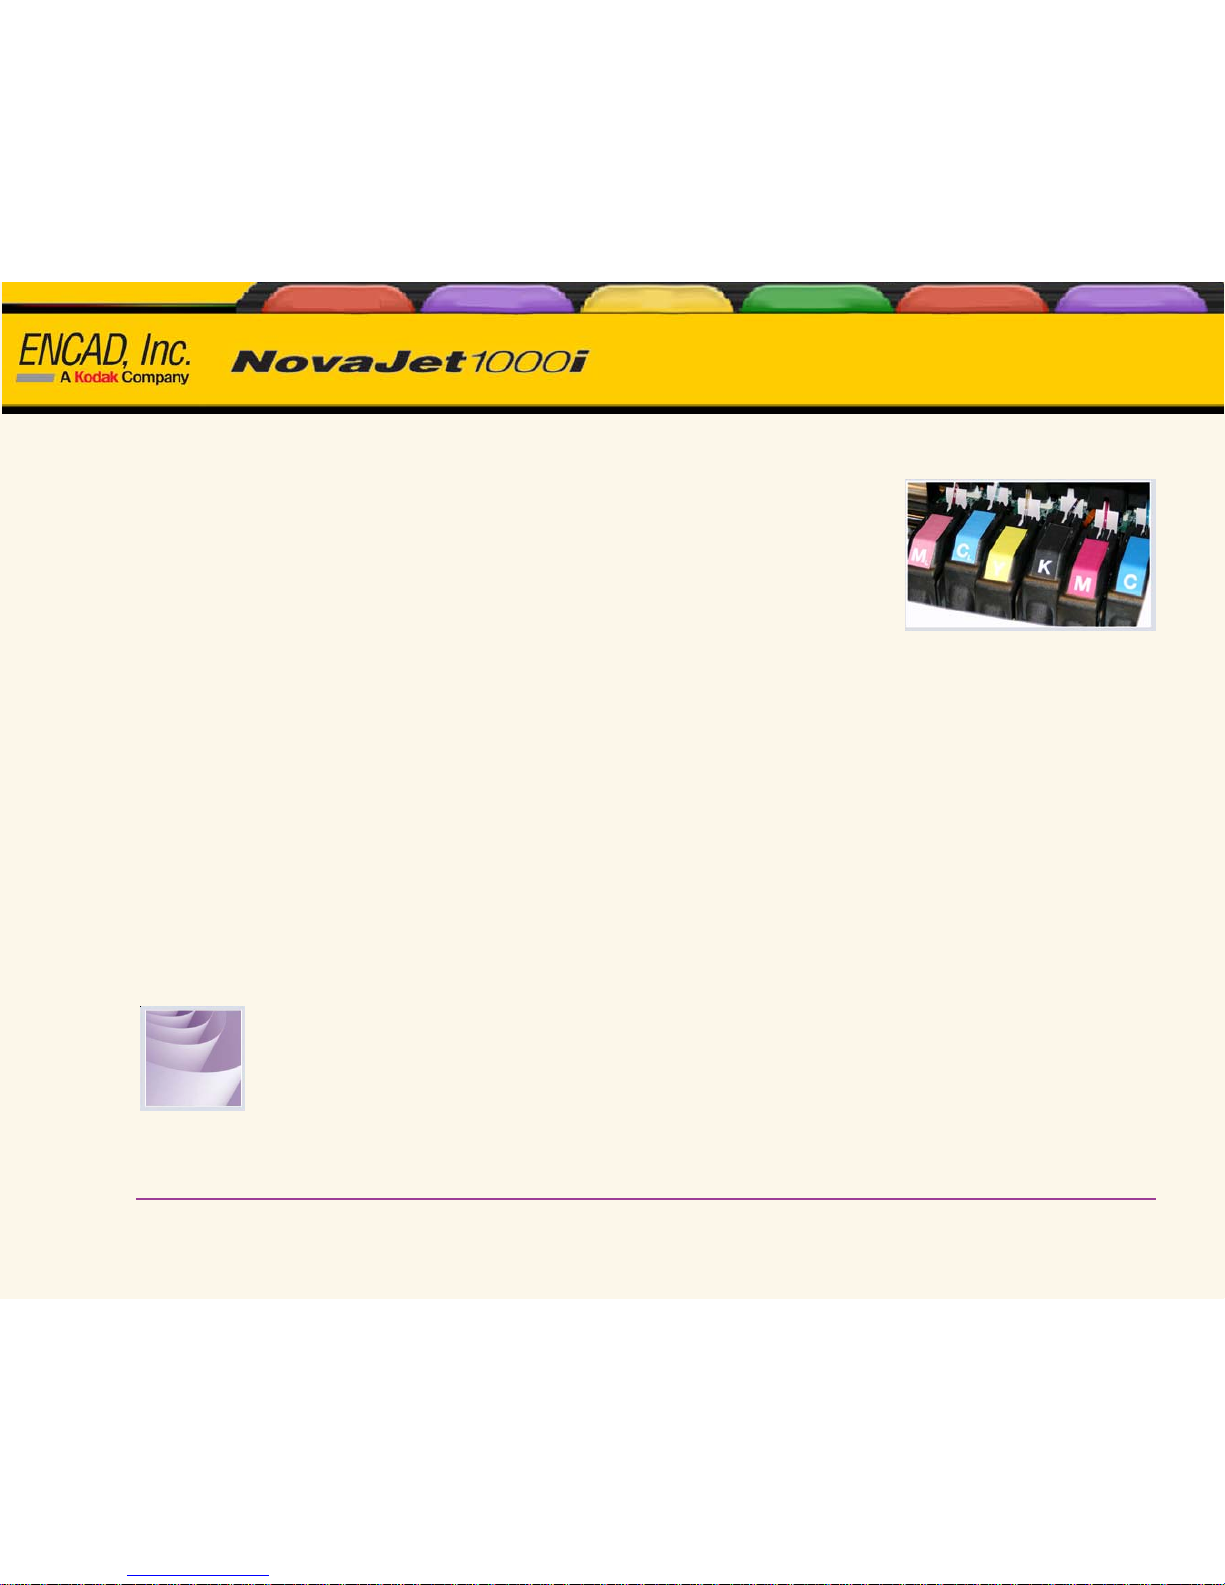
Your printer features six thermal ink cartridges with 640 jets each. Reservoirs
hold up to 700 ml of ink. You can print with six colors of ink (CMYK, M
L
and
C
L
) which create a combination of color gamut and smooth tonal gradations for
your most challenging applications. Note: in the calibration patterns, the M
L
and CL cartridges are referred to as M1 and C1.
Ink sets for the 1000i include dye and pigment offerings. Encad ink sets offer
optimized, matched and quality ink solutions. Every ink formula is scientifically designed to obtain the best performance possible in the printer for
which it is created. Extensive testing under a variety of extreme environmental and production conditions ensures the ink performs consistently.
When Encad inks are used with KODAK Wide-Format Inkjet Media, you receive
industry-leading performance guarantees that ensure customer satisfaction.
Introduction 1-3
Encad 1000i Reference Guide
Introduction
Introduction
Introduction Printer Options Menu Tree Technical Info Error Messages Troubleshooting
1
1
Caring for your ink and cartridges
• Handle cartridges only on the plastic areas. Touching the copper electrical
interconnect or the inkjets can damage the cartridge.
• Use only dye or pigment ink intended for this printer. Do not mix inks.
• Do not shake ink refill containers.
• Store ink and cartridges in the same environment as the printer whenever
possible.
• If you remove a cartridge from the printer, do not leave it exposed to the air for an extended period because the
jets may clog. Replace the original tape on the jet plate. Place the cartridge in a cartridge garage or sealed plastic
bag and store it in a closed area at room temperature. Keep it out of direct sunlight.
• Open new cartridges only when you are ready to install them.
• Use only Encad-brand ink refills and cartridges.
•
When you receive a "Low Ink" warning, there is approximately 15-20 minutes of printing time remaining
before the intermediate reservoir runs out of ink.
Note: When an ink bottle is removed, you have 30 seconds to put in another bottle before the printer senses the
bottle's absence and places the printer in Pause mode.
Choose the right media
This printer is designed to print on a wide variety of media including photo gloss, backlit film, matte, selfadhesive vinyl, canvas, banner tyvek, and more. Refer to the list of compatible media included with your
printer.

Introduction 1-4
Encad 1000i Reference Guide
Introduction
Introduction
Introduction Printer Options Menu Tree Technical Info Error Messages Troubleshooting
1
1
Caring for your media
Store media in its original packaging in a cool, dry area until you are ready to use it. The
environment should be stable; i.e., no extremes of heat and cold, and non-condensing
humidity. If conditions are outside the operating ranges recommended for the printer,
allow the media to acclimate in the operating environment for at least 48 hours before
using it.
If you remove a roll of media from the printer, be sure to store it in a manner which
keeps it clean and dust-free. Ideally, you should return it to its original packaging for
storage.
Print on the correct side! Roll media is wound with the printable side out.
Handle with care! Handle your media carefully to avoid creases, scrapes, and
tears. Avoid crushing or damaging roll media edges.
Caution! Some medias use an adhesive to adhere the end of the media to the
core. This adhesive can transfer onto rollers in the media feed path. A buildup
of this adhesive can cause banding and other imperfections in your printed
output. To avoid this, it is recommended that you always cut the media before
the end of the roll.
Introduction 1-5
Encad 1000i Reference Guide
Introduction
Introduction
Introduction Printer Options Menu Tree Technical Info Error Messages Troubleshooting
1
1
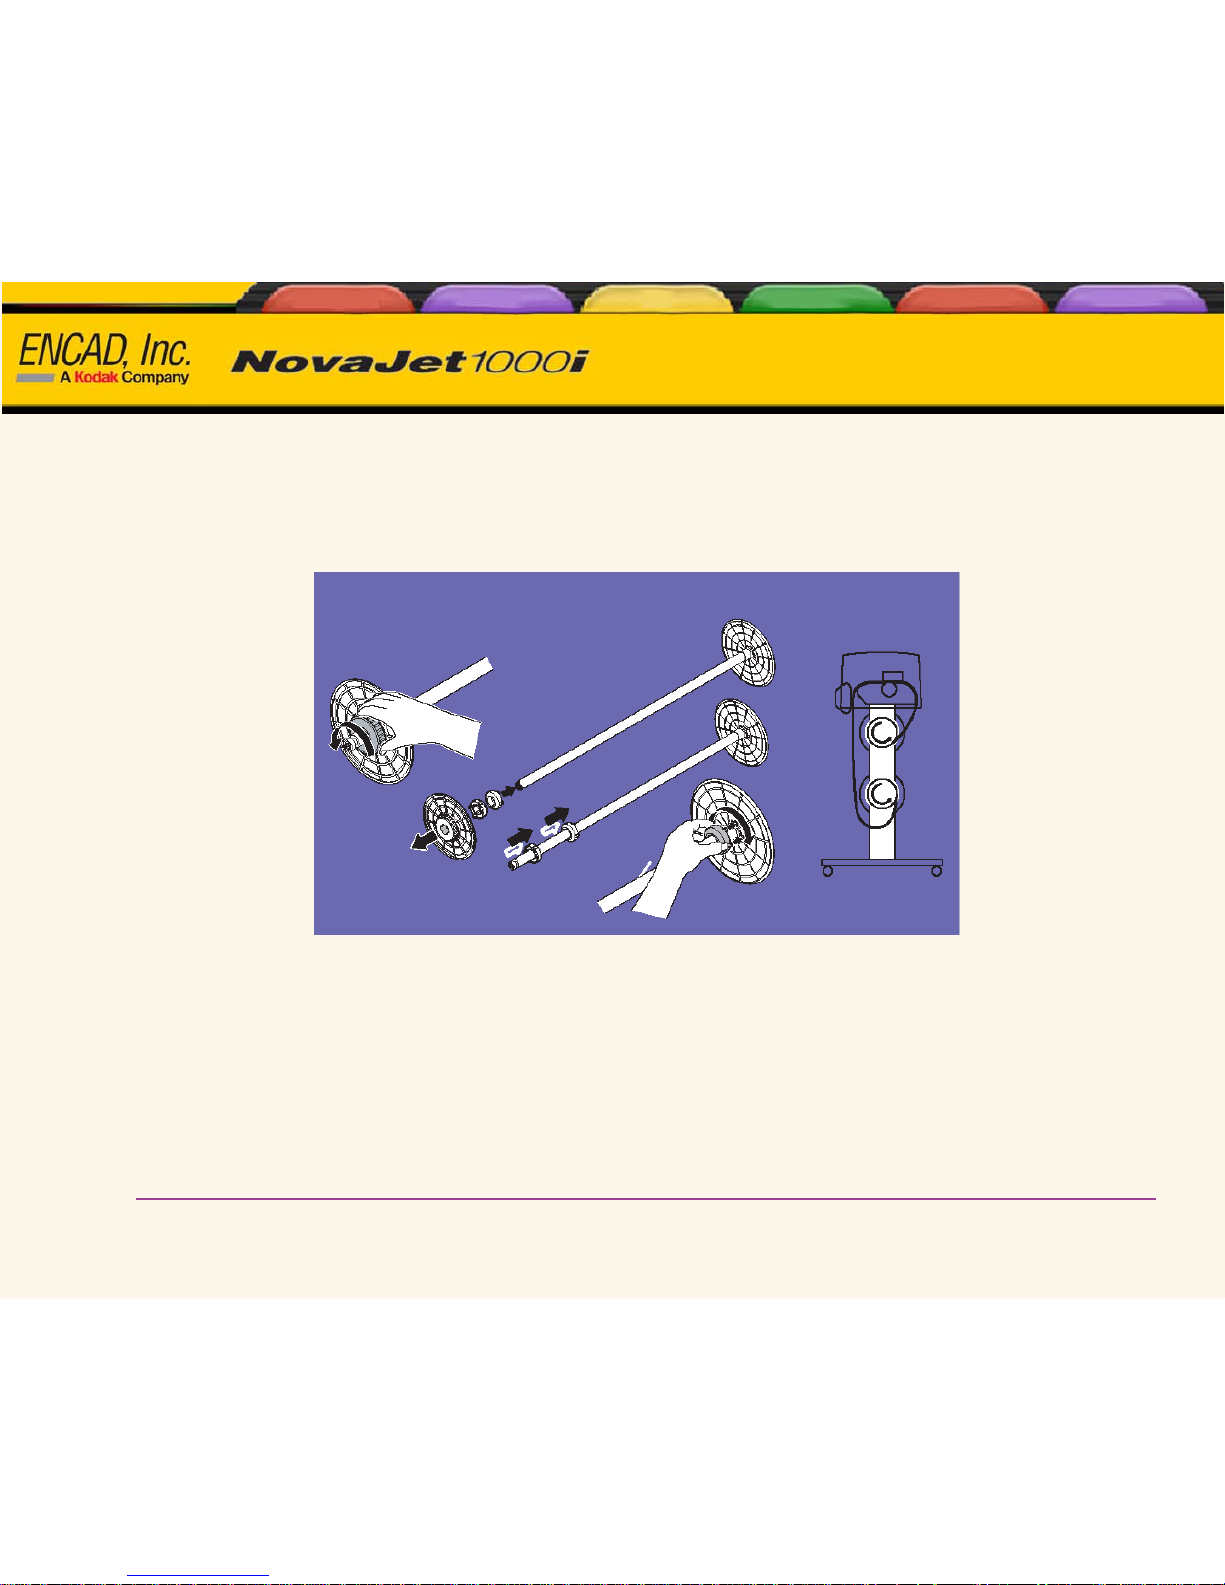
Loading media
The procedure for loading media is shown in the Quick Start Guide. If you are using paper rolls with a core
diameter of 3", it will be necessary to install a core adapter on the roller before installing the roll of media as
shown below. Be sure to orient the media as shown below.
Introduction 1-6
Encad 1000i Reference Guide
Introduction
Introduction
Introduction Printer Options Menu Tree Technical Info Error Messages Troubleshooting
1
1
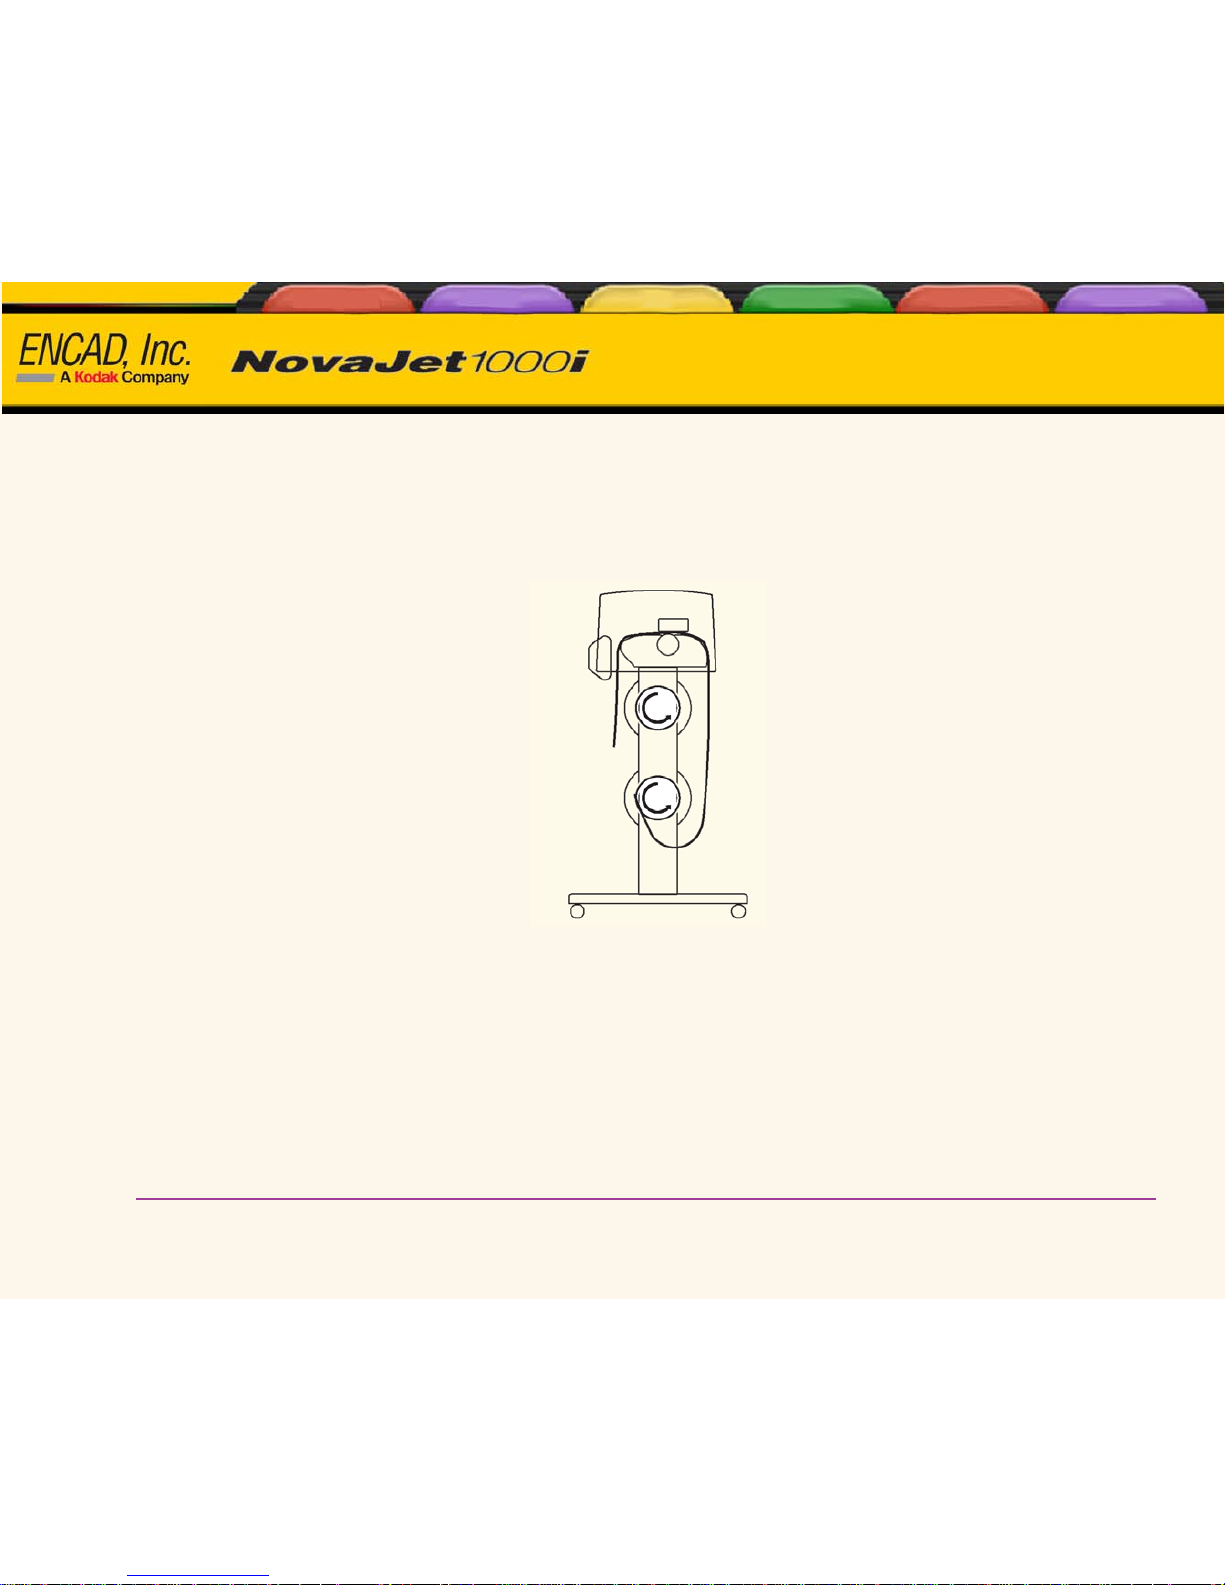
Using the second feed roll
The takeup roll can also be used as a feed roll. If you use the takeup roll as a feed roll, you cannot use the takeup
system. If you want to use the takeup roll as a feed roll, set the printer to ROLL2 by pressing Setup Menu/Paper
Options Menu/Supply Type/Roll2.
Loading Roll Media Using Roll2
Caution: When using the ROLL2 option, the media may have a tendency to curl inward under the bottom roller.
This could block the media sensor and prevent the feed roller from feeding media. Make sure you keep the
media turned outward, away from the media sensor.

Introduction 1-7
Encad 1000i Reference Guide
Introduction
Introduction
Introduction Printer Options Menu Tree Technical Info Error Messages Troubleshooting
1
1
Using the takeup roll
The takeup roll allows unattended printing by automatically winding printed media onto a core. In this mode, the
automatic cutter is disabled. When using this option, be sure that the media sensor on the printer's right leg is not
blocked.
Depending on the ambient humidity, temperature, and amount of ink coverage, you may want to turn on the
heater and/or set a dry time as described in Chapter 2.
Replacing the cutter
A cutter located in the ink cartridge carriage cuts roll media. The printer is shipped with the cutter installed. Use
the following procedure to replace the cutter, when necessary.
! Be careful when handling the cutter to avoid injury.
! Cutting media with a worn cutter can cause the media to jam and create a ragged cut line. Replace the cutter
to avoid this condition.
Do not cut media on the printer with an external knife, as you could seriously damage
the platen and void the warranty.
Introduction 1-8
Encad 1000i Reference Guide
Introduction
Introduction
Introduction Printer Options Menu Tree Technical Info Error Messages Troubleshooting
1
1
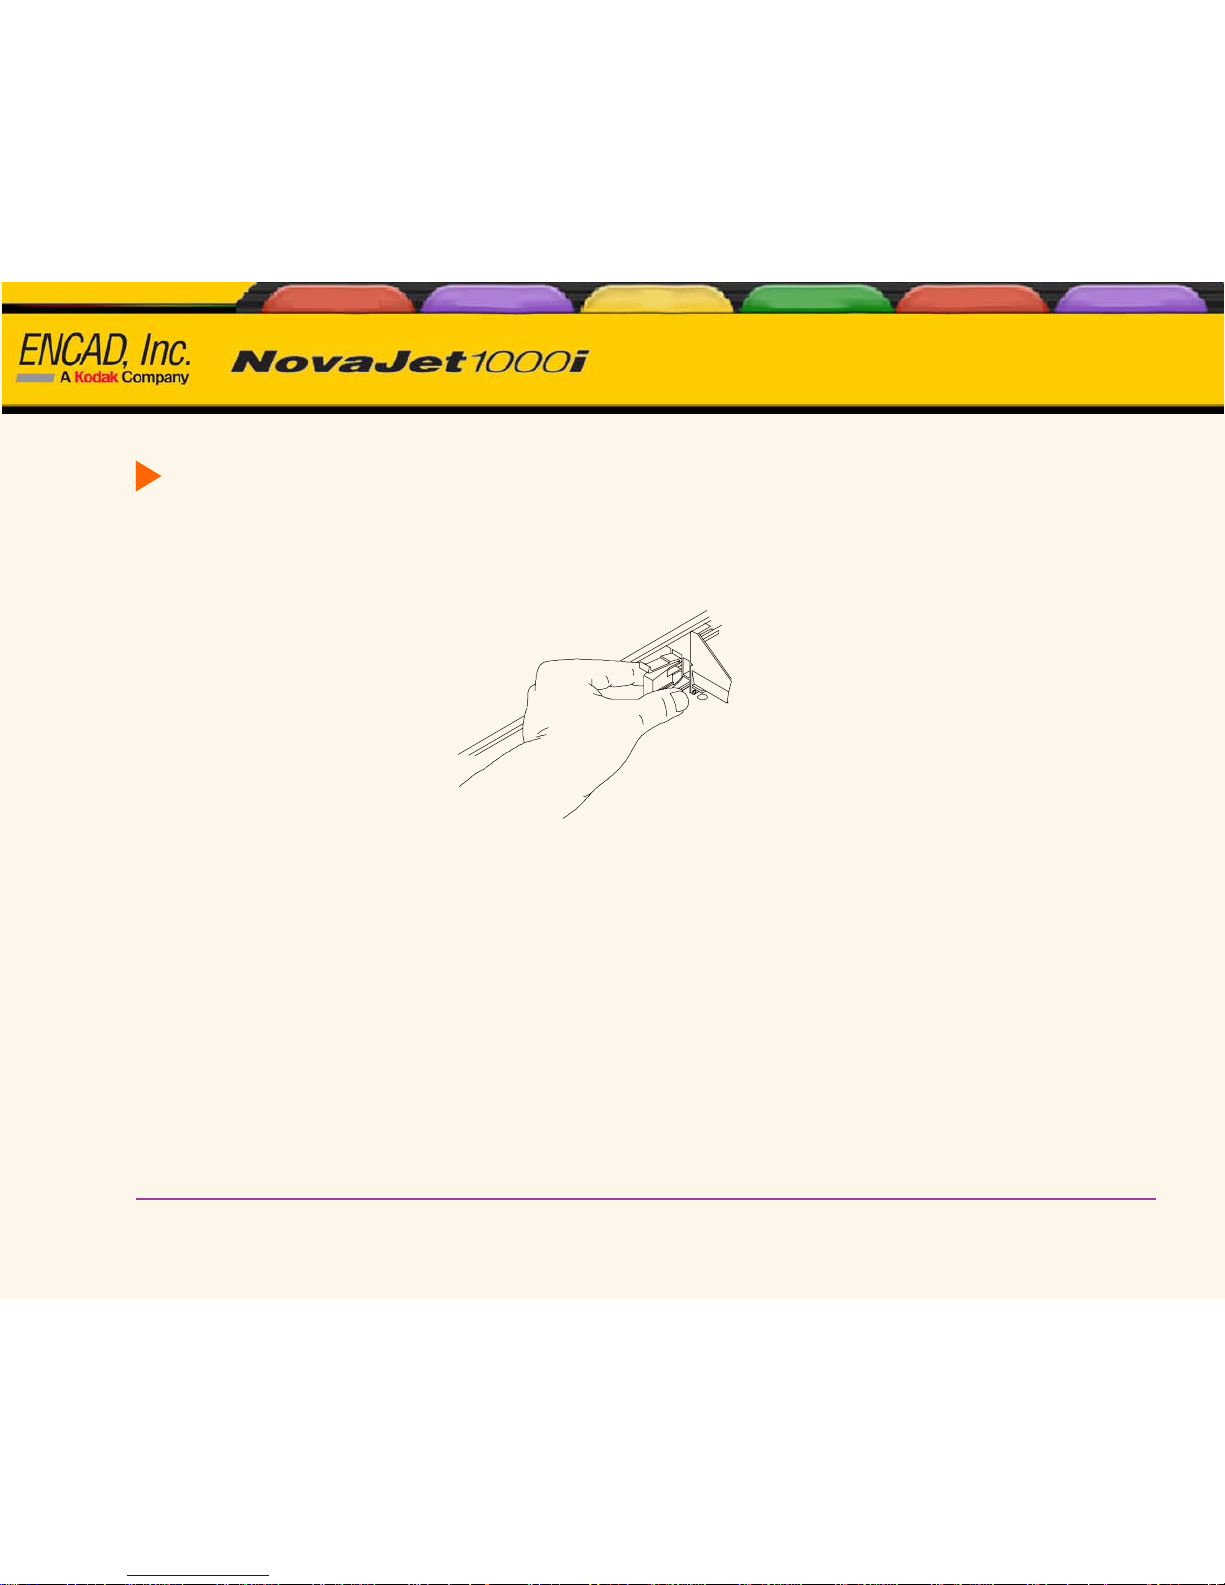
To install the cutter
1 Press Utility Menu/Access Cartridge to move the carriage out from the service station.
2 The cutter fits into the left side of the carriage. To remove a used cutter, push the cutter lever down and
pull it out. Install the new cutter by pushing it into the slot until it clicks into place.
3 Press Utility Menu/Access Cartridge to move the carriage back into the service station. This ensures that
the cutter blade is in the home position.
Choose the correct printing mode
By choosing from a variety of color, quality, and resolution modes, you can make choices between drawing
quality, colors, and speed. When printing images with large areas of color, always choose one of the enhanced
printing modes (High Speed, Productivity, Fine, Enhanced, or Ultrafine).
Use the right software
The quality of the software driver or the RIP can be very important, especially when printing continuous tone
images. Error diffusion or stochastic screening algorithms can yield photo-like images, even when these images
are scaled to full size. Software without advanced imaging features may produce images which are grainy when
enlarged.
Introduction 1-9
Encad 1000i Reference Guide
Introduction
Introduction
Introduction Printer Options Menu Tree Technical Info Error Messages Troubleshooting
1
1
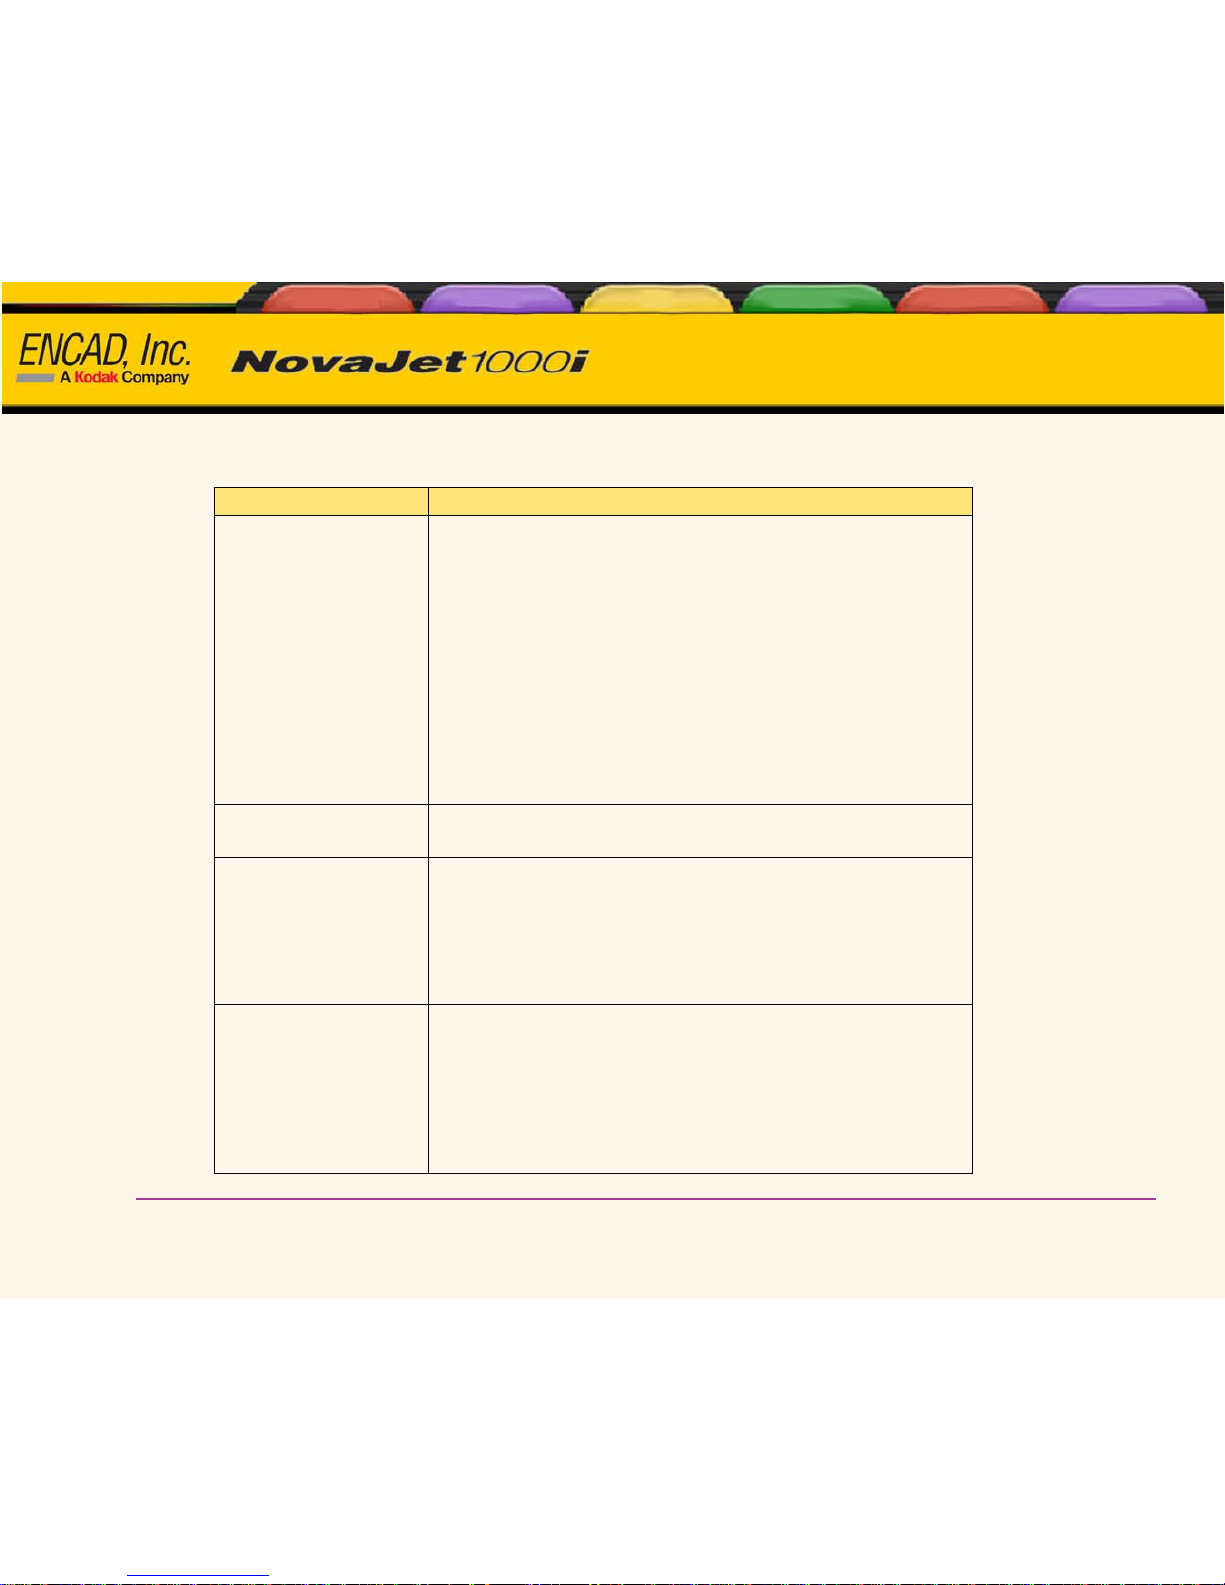
Daily operation
Task Description
Daily operation
Print the prime pattern. If it doesn’t look good, run the Clean
function (Utility Menu/Prime Menu/Clean). Repeat the prime.
Manually bypass any clogged jets.
Run a color test. (Service Menu/Diagnostics Menu/Color Test
Menu.)
Check colors. If colors are fine, start printing.
If there is a problem with the colors, run a color test. Verify
that the bands print a solid pattern.
If there are gaps in the lines, there may be clogged jets.
Manually bypass any clogged jets.
Changing Paper Rolls
Run the Line Length Test or Paper Calib Test. (Utility
Menu/Calibration Menu/Paper Calib Men u.)
Changing Cartridges
Run the color test and a prime test pattern.
Run the color deadband compensation test (Utility
Menu/Calibration Menu/Color Db Menu).
Run the vertical and horizontal calibrations. (Utility
Menu/Calibration Menu/Color Calibration Menu).
Periodic Cleaning
Clean the service station every 40 plot hours.
Clean the encoder strip every 20 plot hours.
Clean the slide shaft every 40 plot hours.
Clean the platen and flex driver cables every 75 plot hours.
Refer to the Maintenance Guide for instru ction s.

Introduction 1-10
Encad 1000i Reference Guide
Introduction
Introduction
Introduction Printer Options Menu Tree Technical Info Error Messages Troubleshooting
1
1
Procedures for all the tests and calibrations are in the following sections.
Printing the color test
Printing the color test verifies that pressure is set properly. You will print one color test pattern for each cartridge.
To print the color test
1 Be sure media is loaded in the printer.
2 Select Utility Menu/Service Menu/Diagnostics Menu/Color Test Menu/Stall Select.
3 Select the stall (K, C, M, Y, C1, M1) (or choose All Color Test to print the color test for all cartridges) for
the cartridge you want to print and press OK.
4 Next, select Utility Menu/Service Menu/Diagnostics Menu/Color Test Menu/Density Select.
5 Change the color test density to 100% and press OK.
6 Finally, select Utility Menu/Service Menu/Diagnostics Menu/Color Test Menu/Color Test Print.
The test pattern prints.
7 Verify that the selected band prints a solid pattern. This indicates that the cartridge has the correct ink
pressure for printing. If it doesn't print a solid pattern, run the color test again.
8 Repeat steps 1-7 for all cartridges.

Introduction 1-11
Encad 1000i Reference Guide
Introduction
Introduction
Introduction Printer Options Menu Tree Technical Info Error Messages Troubleshooting
1
1
Printing the prime pattern
The printer includes a feature called Open Jet Detection and Compensation. This feature helps maintain optimal
print quality and gives you the confidence to print long, unattended jobs. During multi-pass printing, the printer
will automatically compensate for jets found to be electrically damaged. The only intervention needed is to
verify that there are no clogged jets and then choose which print mode is most appropriate for your needs. This is
done by printing the Prime test pattern and then setting the print mode accordingly.
To print the prime pattern
1 With media loaded, press Utility Menu/Prime Menu/Prime All.
A test pattern prints. It should be smooth with no obvious banding.
2 If the printed results are unsatisfactory, run the test several more times to unclog the inkjet nozzles.
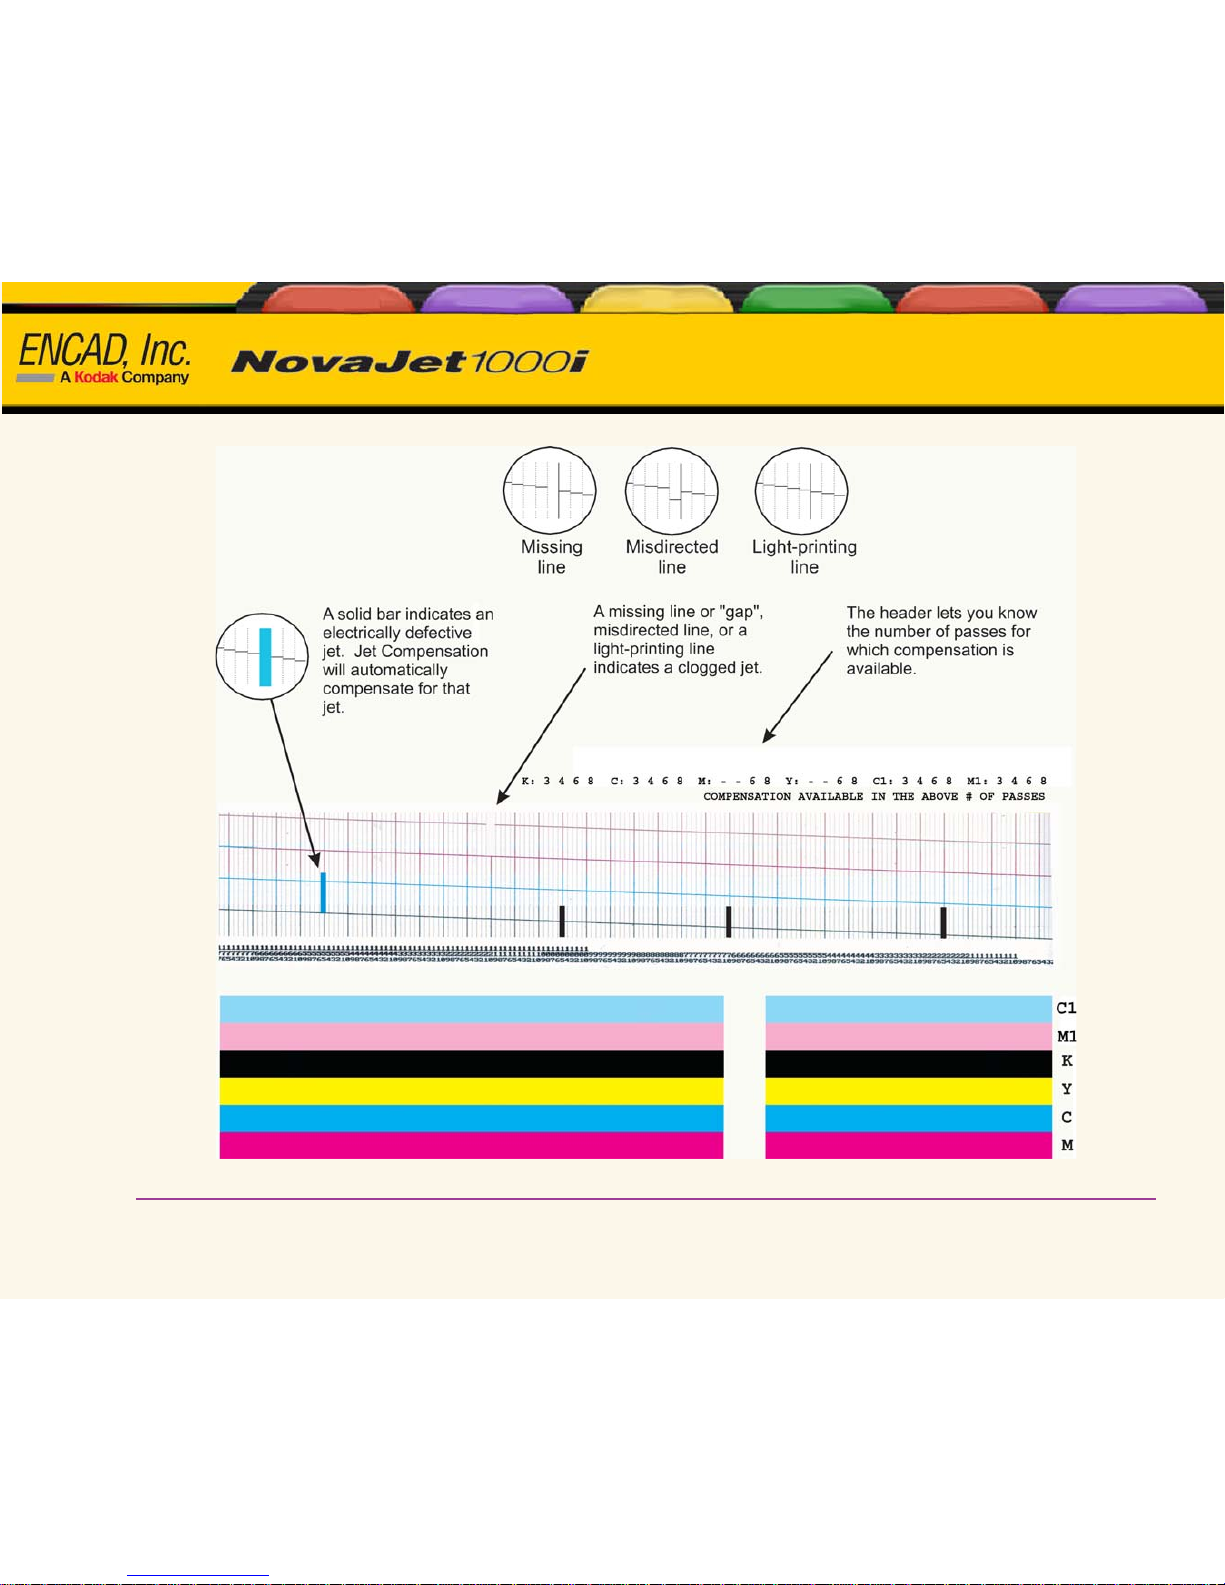
To interpret the prime test pattern
The test pattern consists of bands of color for each cartridge and a sloping line. Within the prime test pattern,
each jet is represented with a short horizontal line. Together, these short horizontal lines form a “stair step”
pattern. Clogged jets appear as missing or misdirected lines in the “stair step” pattern. Electrically defective jets
appear as solid bars. Electrically defective jets can be automatically compensated in certain modes. The print
modes for which compensation is available are shown clearly above the prime pattern.
Introduction 1-12
Encad 1000i Reference Guide
Introduction
Introduction
Introduction Printer Options Menu Tree Technical Info Error Messages Troubleshooting
1
1

Introduction 1-13
Encad 1000i Reference Guide
Introduction
Introduction
Introduction Printer Options Menu Tree Technical Info Error Messages Troubleshooting
1
1
Clogged jets
Clogged jets cannot be automatically detected and therefore must be cleared manually. If a jet is clogged, it will
appear in the prime pattern as a gap in the sloping line for each cartridge.
If you are unable to clear the jets you should compensate for them manually. Start by printing the manual jet
compensation list.
To print the manual jet compensation list
1 From the main menu, select Utility Menu/Calibration Menu/Open Jet Menu/Print Jet List.
The jet status list prints as illustrated below, showing current jet compensation list by number for each
cartridge.

Introduction 1-14
Encad 1000i Reference Guide
Introduction
Introduction
Introduction Printer Options Menu Tree Technical Info Error Messages Troubleshooting
1
1
Manual Jet Compensation List
C1: None
M1: 10,21,30,128
Y : None
M : 1,3,10
C : None
K : 10,21,30,128
2 To add a jet to the compensation list, select Utility Menu/Calibration Menu/Open Jet Menu/Edit List
Menu and press the button that designates the cartridge where the jet resides.
3 To compensate for a specific jet, press the button until the number of the jet is displayed. Then press the
Toggle button to toggle the jet’s status. Repeat for any other jets for which you need to compensate.
4 Press OK to accept the settings.
If you have manually compensated for jets in any cartridge, be sure to clear the compensation when a
new cartridge is installed by pressing Clear List Menu. Manual compensation settings are retained even
when the printer is turned off.

Introduction 1-15
Encad 1000i Reference Guide
Introduction
Introduction
Introduction Printer Options Menu Tree Technical Info Error Messages Troubleshooting
1
1
Aligning the ink cartridges
Three tests are provided to help you align the cartridges: Color Deadband Compensation, Vertical Color Calibration and Horizontal Color Calibration.
Color Deadband Compensation provides a method for adjusting dot placement. In bidirectional printing mode,
the velocity of the carriage causes dots to miss the target area on the media. The color deadband test pattern lets
you check the velocity deadband values and adjust them for the best printing results. A loupe is provided in the
accessory box to help you check the prints.
Color calibration aligns the inkjets of the cartridges vertically and horizontally to each other. Misalignment can
result from small tolerance variations in cartridges during manufacturing and from cartridge alignment in the
printer. Color test patterns let you check the horizontal and vertical alignment values and adjust them for the best
printing results.
You should perform Color Deadband Compensation before performing Vertical and Horizontal Color Calibration. Perform Color Deadband Calibration and Color Calibration each time a cartridge is replaced with a different cartridge. If you remove and reinstall the same cartridge, only Color Calibration needs to be performed.

Introduction 1-16
Encad 1000i Reference Guide
Introduction
Introduction
Introduction Printer Options Menu Tree Technical Info Error Messages Troubleshooting
1
1
To perform color deadband compensation
1 With paper loaded, press Utility Menu/Calibration Menu/Color Db Menu/Color Db Test.
The test pattern prints as shown below.
2 For each color, examine the vertical lines and select the straightest lines. Note the compensation num-
ber at the bottom of the lines you selected.
3 Existing compensation values are printed in the lower right corner of the test pattern. If any of these differ
from the values you selected, enter new compensation values by pressing Utility Menu/Calibration
Menu/Color Db Menu. Then, select the stall for the color you want to change. Use the Next and Previous
option buttons to scroll to the desired compensation.
Introduction 1-17
Encad 1000i Reference Guide
Introduction
Introduction
Introduction Printer Options Menu Tree Technical Info Error Messages Troubleshooting
1
1
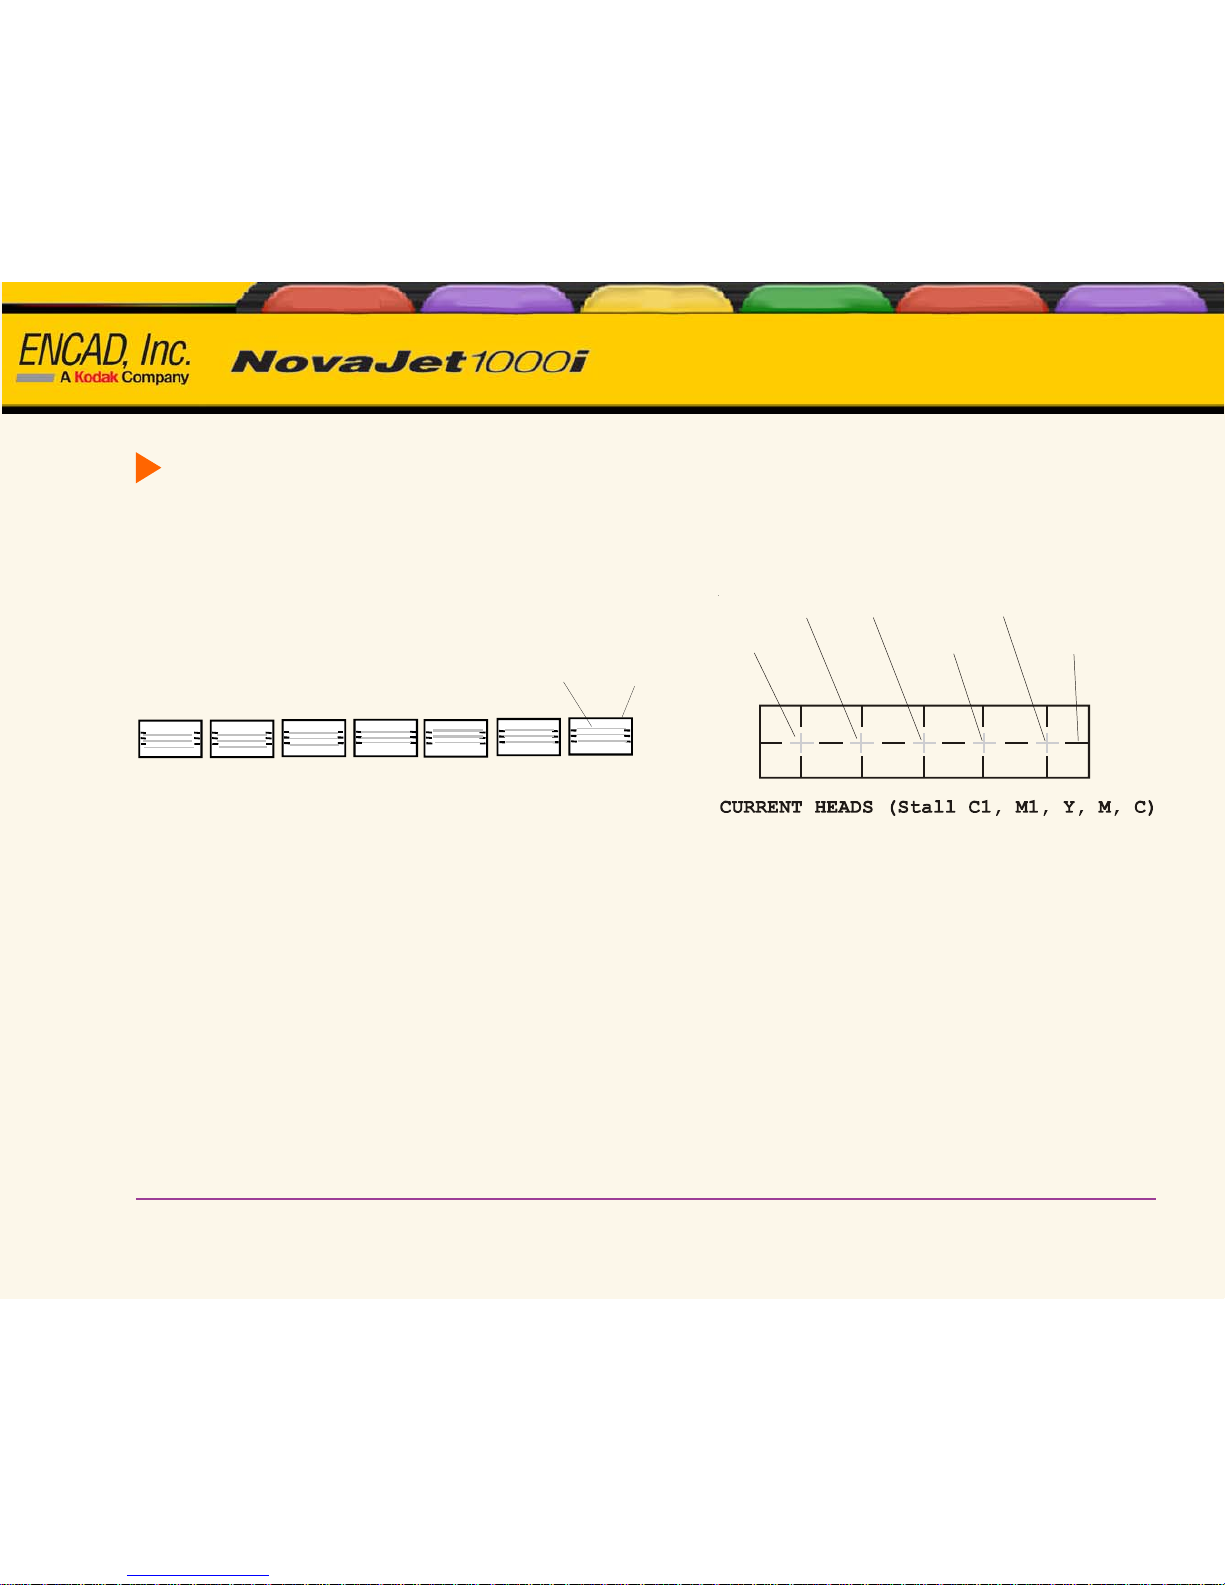
To perform vertical color calibration
1 With paper loaded, press Utility Menu/Color Calib Menu/Vert Calib Test.
The test patterns print as shown below.
-3
-2
-1
01
2
3
Color
Black
C1
M1
Yello w
Magenta
Cyan
Black
Vertical head-to-head test pattern
Examine the registration + in the Current Heads test pattern. If they are in register, your calibration is
correct. If not, perform the following steps to align the printer heads.
2 Examine the Vertical Head-to-Head test pattern and select the number that represents the best color
alignment for each color.
3 Press Utility Menu/Color Calib Menu/Vertical.
4 Select the stall (C, M, Y, C1, M1) for the color you wish to adjust.
5 Enter the number that represents the best vertical color alignment.
6 Repeat for each color.

Introduction 1-18
Encad 1000i Reference Guide
Introduction
Introduction
Introduction Printer Options Menu Tree Technical Info Error Messages Troubleshooting
1
1
To perform horizontal color calibration
1 With paper loaded, press Utility Menu/Color Calib Menu/Horiz. Calib Test.
The test patterns print as shown below.
-3
-2
-1
0
1
2
3
C1
M1
Yello w
Magenta
Cyan
Black
Horizontal head-to-head test pattern
Examine the registration + in the Current Heads Test Pattern. If they are in register, your calibration is
correct. If not, perform the following steps to align the printer heads.
2 Examine the Horizontal Head-to-Head test pattern and select the number that represents the best color
alignment for each color.
3 Press Utility Menu/Color Calib Menu/Horizontal.
4 Select the stall (C, M, Y, C1, M1) for the color you wish to adjust.
5 Enter the number that represents the best horizontal color alignment.
6 Repeat for each color.
Introduction 1-19
Encad 1000i Reference Guide
Introduction
Introduction
Introduction Printer Options Menu Tree Technical Info Error Messages Troubleshooting
1
1
Paper calibration
There are two paper calibration methods available, Paper Calib Test and Line Length Test. The Paper Calib Test
is the preferred method and can be used on most medias. On certain medias, such as scrim vinyl, banner and
matte paper, the Paper Calib Test cannot be used because the media absorbs too much ink to provide an
acceptable Paper Calib Test. For those medias, the Line Length Test should be used.
Note: It is important to perform the paper calibration whenever starting a new type of media. The paper
calibration can vary depending on the type of media being used. Heavier media, such as Kodak Scrim Vinyl
and Kodak Matte Canvas, will have higher paper feed calibration values.
To print the Paper Calib test pattern
1 Press Utility Menu/Calibration Menu/Paper Calib Menu/Paper Calib Test.
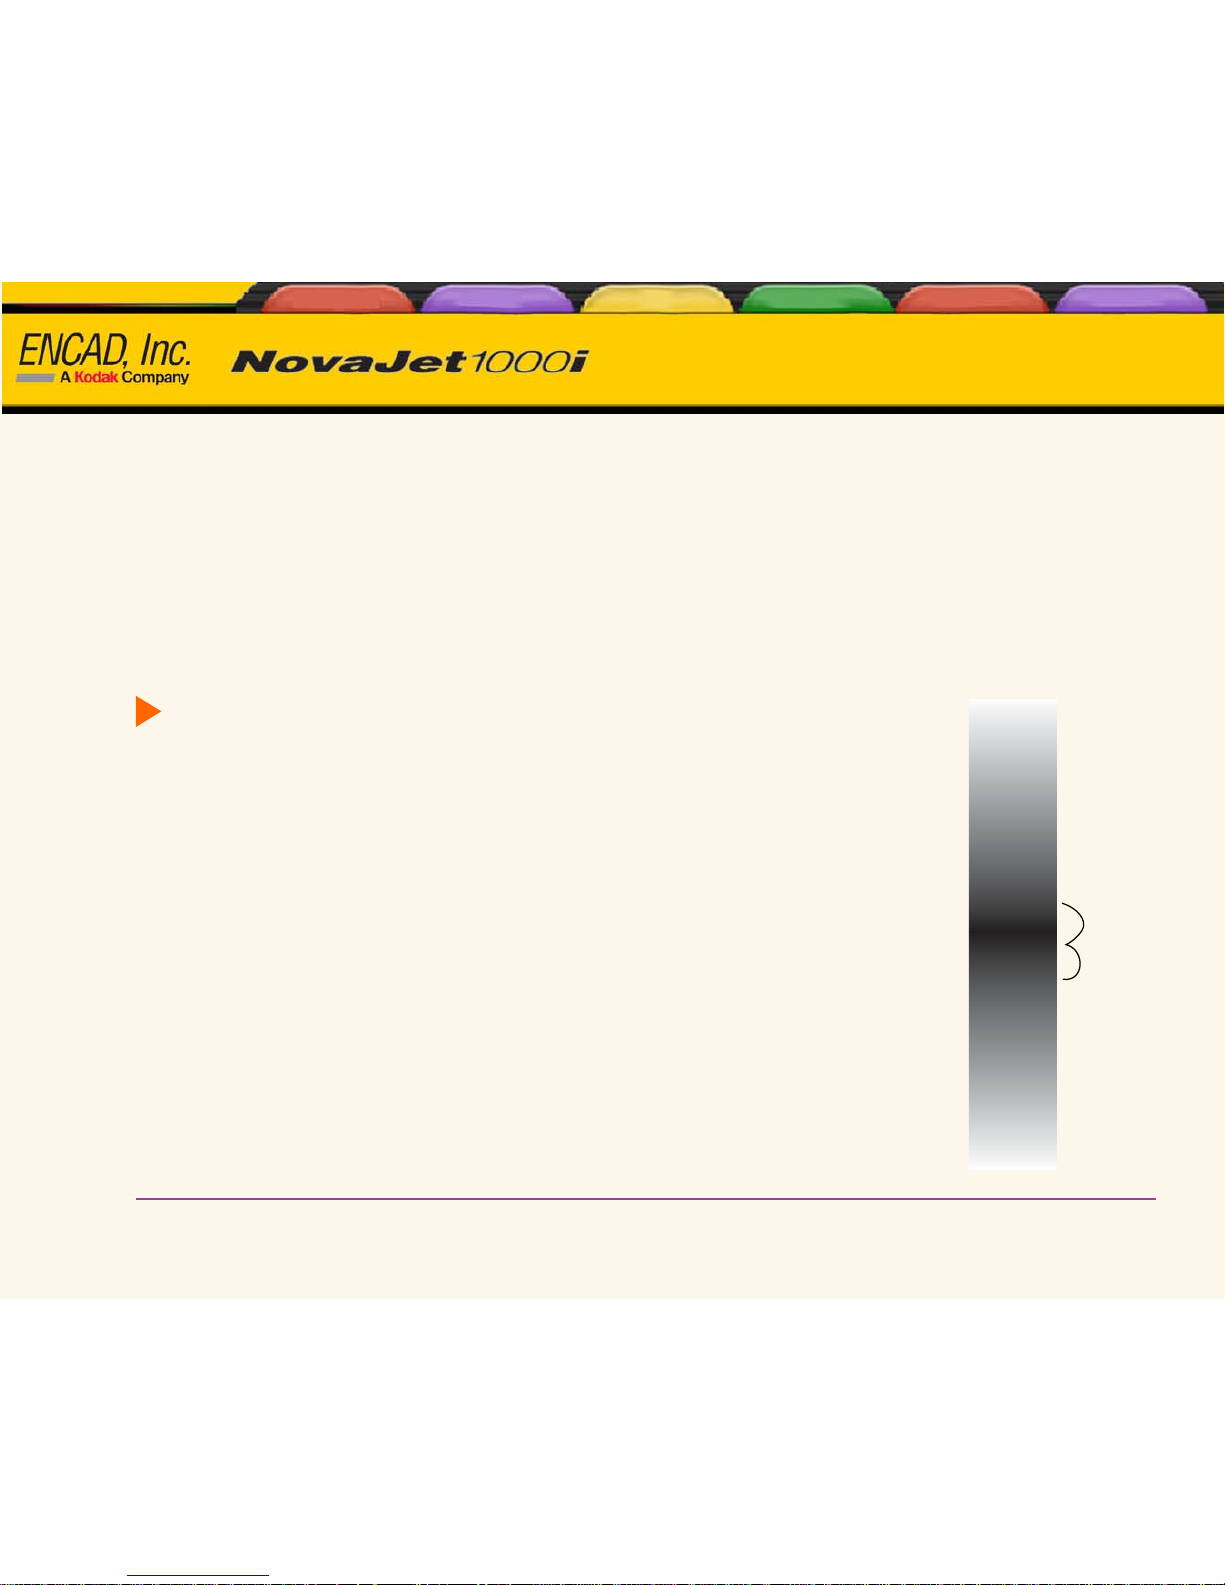
2 Evaluate the test pattern. The test pattern is a long black density target with
a column of numbers on the side ranging from 4725 to 4875 in increments
of three. The column of numbers represents the paper feed values. The
ends of the target where the paper feed values are extremely high or low
are lighter in density than the center of the target. You should see a dense
plateau or “sweet spot” near the middle of the print where the patterns
converge and are the densest.
Note: If you cannot detect a dense plateau or “sweet spot” near the
middle of the printed test pattern, then you should use the Line Length Test
for this media.
The middle of this plateau is where you want to set your paper calibration.
Using the column of numbers on the side, you could simply estimate what
the middle value should be. You can also do a calculation taking the value
at the bottom of the plateau and adding it to the value at the top of the
plateau. The resulting value is divided by two. This will give you the number
at the center of the plateau.
4725
4728
4731
4734
4737
4740
4743
4746
4749
4752
4755
4758
4761
4764
4767
4770
4773
4776
4779
4782
4785
4788
4791
4794
4797
4800
4803
4806
4809
4812
4815
4818
4821
4824
4827
4830
4833
4836
4839
4842
4845
4848
4851
4854
4857
4860
4863
4866
4869
4872
4875
Plateau
or
Sweet Spot
4791 + 4812 = 9603
9603 / 2 = 4801.5
Round up to 4802
Introduction 1-20
Encad 1000i Reference Guide
Introduction
Introduction
Introduction Printer Options Menu Tree Technical Info Error Messages Troubleshooting
1
1
3 Set the paper calibration value. Main Menu/Utility Menu/Calibration Menu/Paper Calib Menu/Paper
Calib Value
The paper calibration value can be adjusted in increments of one. Using the NEXT and PREV keys. Adjust
the paper calibration value until it matches the value on the target. Press OK.
To print the line length calibration test pattern
1 Load the printer with media that is at least 36 (91 cm) inches long (or the
media that you are going to run; you cannot load a 36" sheet and then run
the calibration from a roll feed because the line lengths will not match).
2 Press Utility Menu/Calibration Menu/Paper Calib Menu/Line Length Test.
The printer prints two marks.
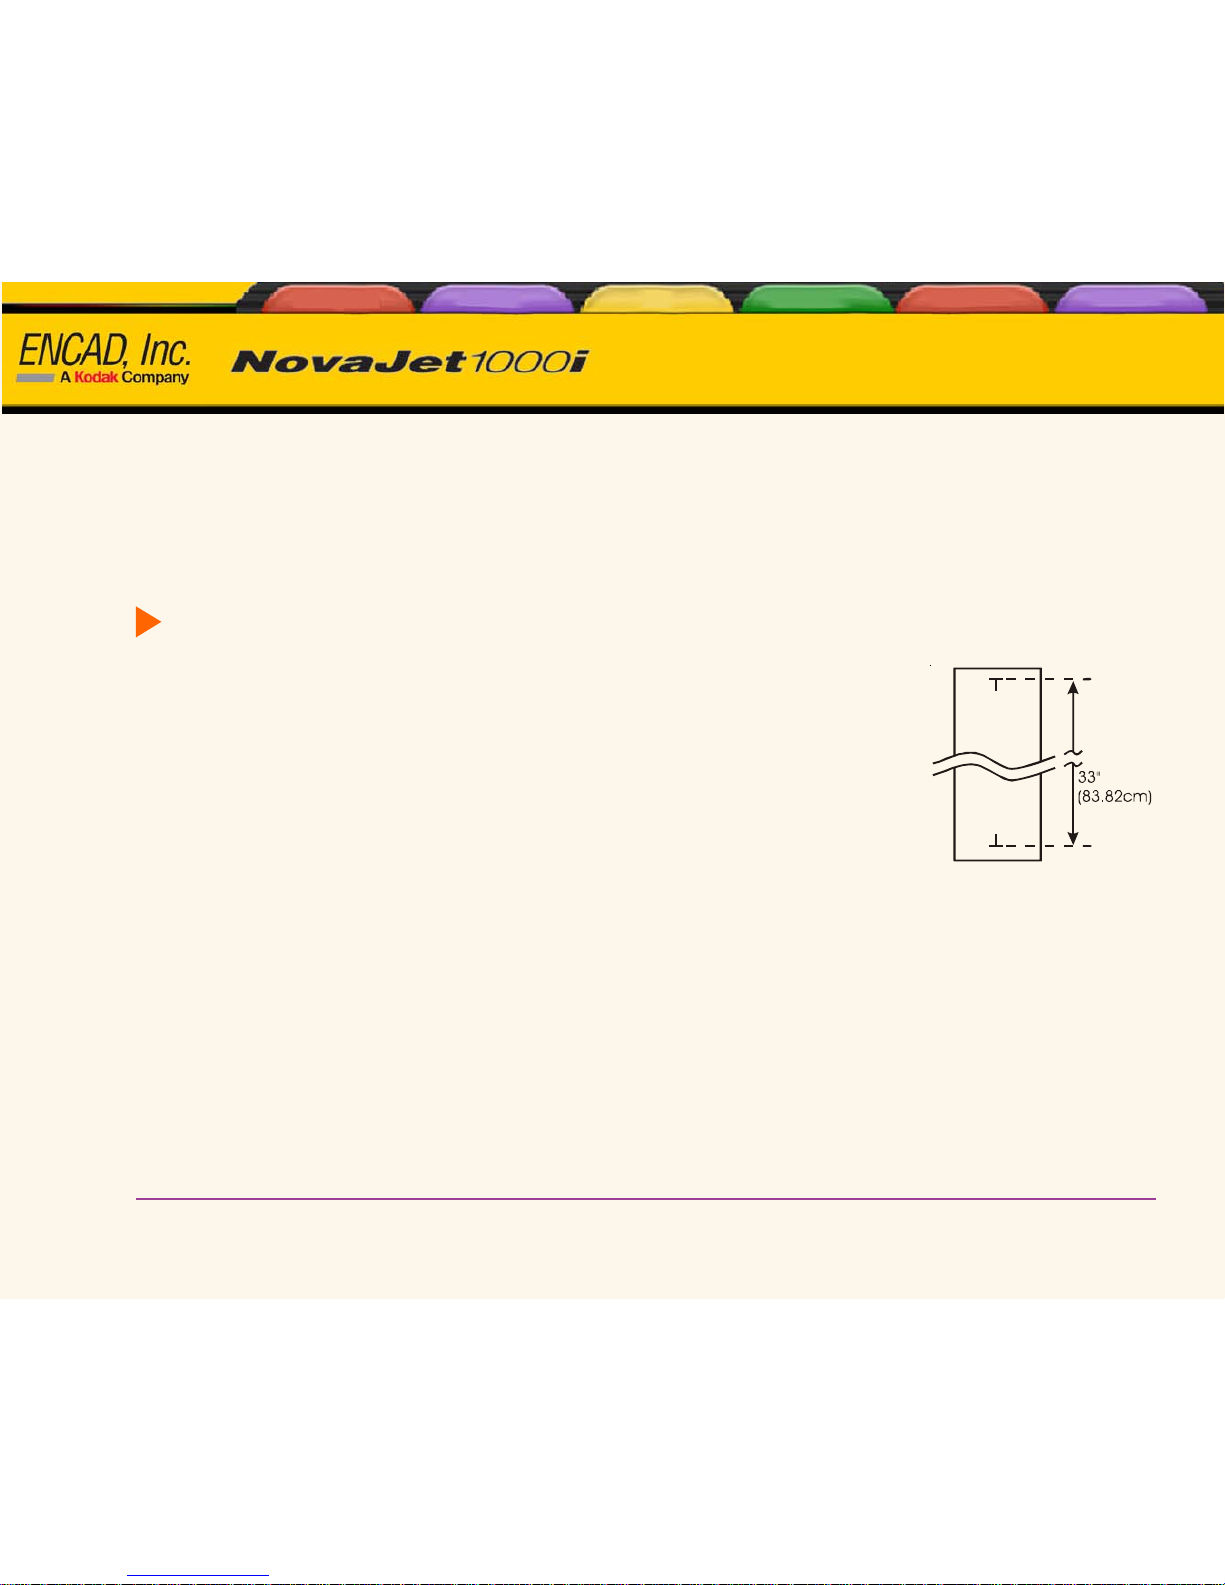
3 Remove the media from the printer and measure the distance between the
marks. To measure the marks laid down by the printer, you will need a ruler
or scale at least 33 inches (838.2 mm) long. (The System CD contains a ruler
file than can be printed on your printer.) The vertical marks should be exactly 33.00 inches (838.2 mm)
apart.
4 If the measurement is not exactly 33.00 inches, select "Line Length Value" and adjust the value to the
measurement read on the scale.

Introduction 1-21
Encad 1000i Reference Guide
Introduction
Introduction
Introduction Printer Options Menu Tree Technical Info Error Messages Troubleshooting
1
1
Cartridge recognition
The printer is designed to use only cartridges specific to your printer model. To eliminate potential damage to the
printer, a Cartridge Recognition feature checks to ensure that the proper cartridges are installed, and that they are
installed correctly. Cartridge recognition is performed when a print request is received (i.e., image data, prime,
etc.).
In addition to cartridge recognition, the printer automatically performs tests on the cartridges and uses the
information to improve image quality, monitor cartridge life, and update the user with system status. Some tests
are performed between prints and require no user input, while others require user input.
Cartridge-related error messages are listed in Appendix B. Cartridge-related troubleshooting is covered in
Appendix C.
To clear a cartridge-related error, press Utility Menu/Access Cartridge to move the carriage to the position
which allows replacement of the ink cartridges. Check to make sure you have the correct cartridges installed in
each position, that they contain the same type of ink and that all cartridges are installed properly. Install new
cartridges if necessary.
To clear cartridge recognition error
1 Press Utility Menu/Access Cartridge to move the carriage to the position which allows replacement of the
ink cartridges.
2 Verify that six valid cartridges are installed. Replace any invalid cartridges.
3 Press Exit. If the problem has been corrected, the printer will proceed with the print request. If the prob-
lem has not been corrected, the printer will beep.
Introduction 1-22
Encad 1000i Reference Guide
Introduction
Introduction
Introduction Printer Options Menu Tree Technical Info Error Messages Troubleshooting
1
1
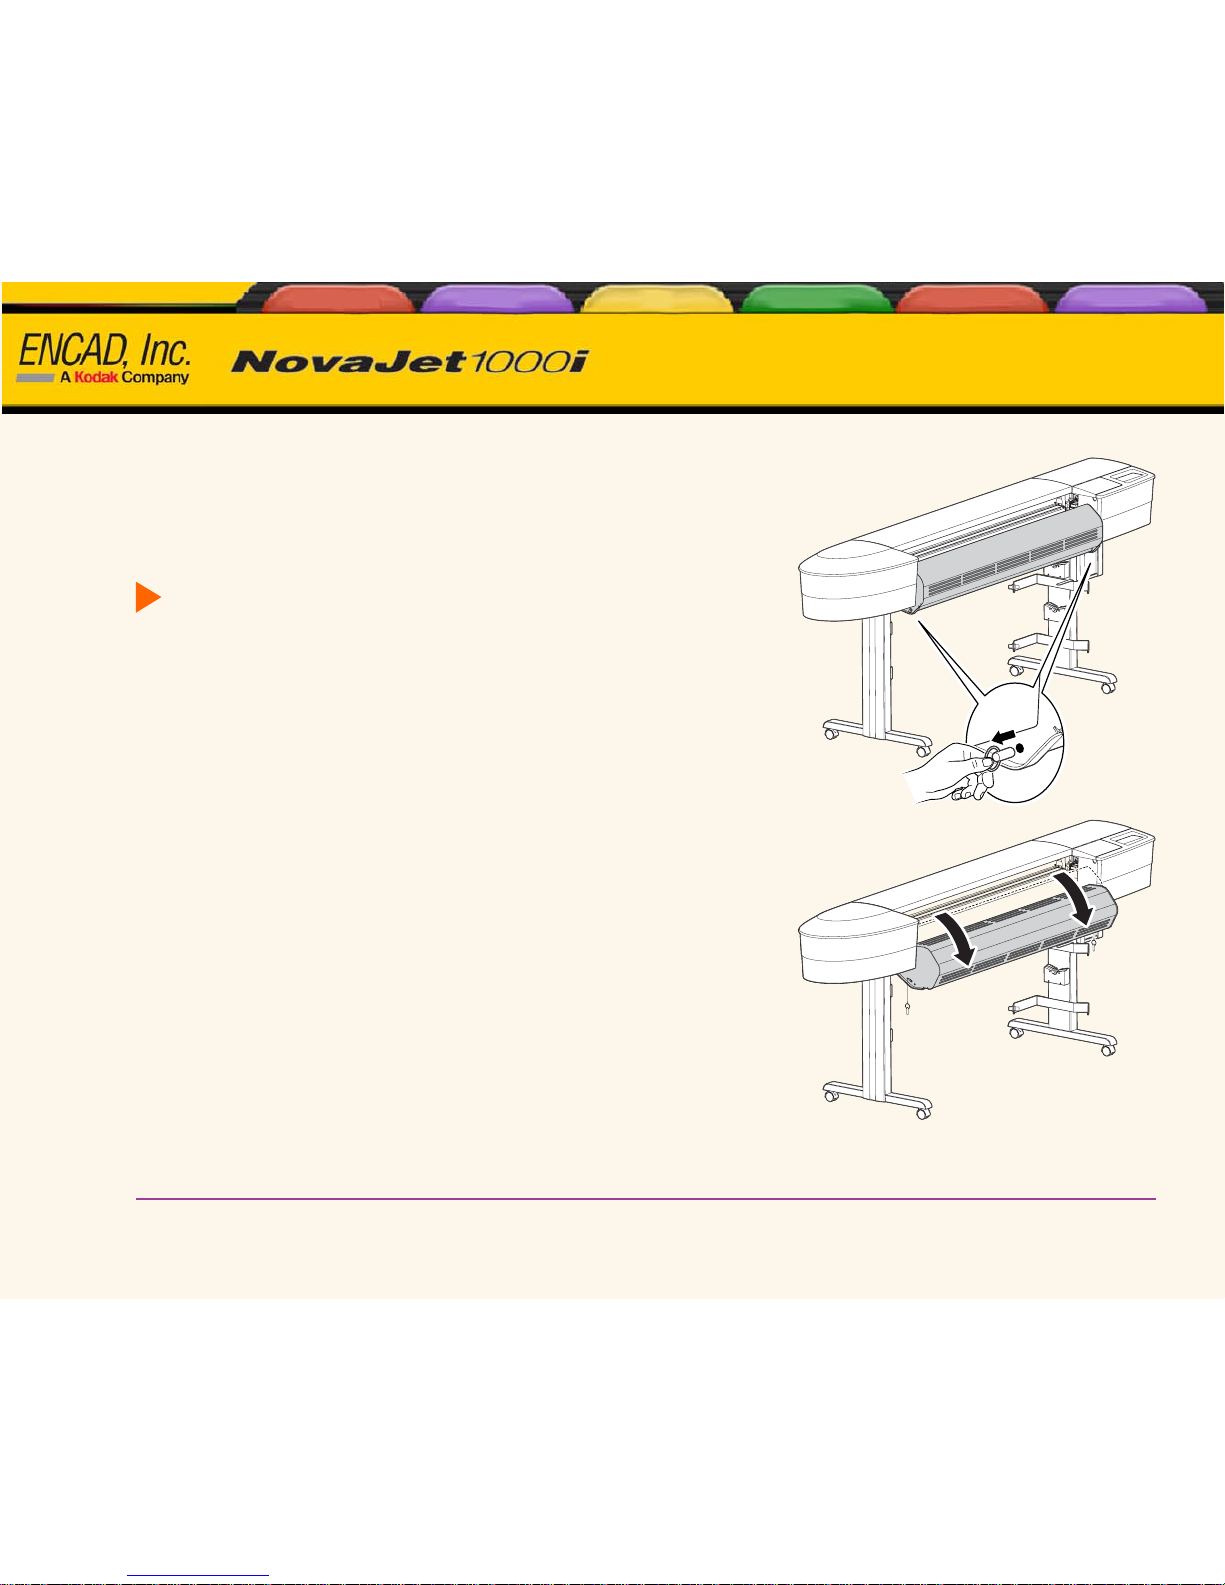
Lowering the air plenum
Sometimes during printing or servicing, you may want to lower the
air plenum.
To lower the air plenum
1 Pull out the retaining pin on the lower left and right sides.
2 Gently lower the air plenum.
Printer Options 2-1
Encad 1000i Reference Guide
Printer options
Printer options
2
2
Introduction Printer Options Menu Tree Technical Info Error Messages Troubleshooting
Y ou can define printer options through your application software or by choosing settings from the printer's control panel.
The following printer options are described in this chapter:
• Feed Media Options • User Setup Options • Changing Ink Types
• Print Mode Options • Paper
Options • Network Options
Choosing feed media options
Feed media options let you:
• advance the media
• display , enter and reset media counter values
• determine the printer action when the end of media is reached.
Feed media
Feed media options let you move the media forward or backward.
T o feed media
1 Press Feed Media/Forward (or Backward).
Media feeds in the selected direction while the button is pressed.
Media counter
The Media Counter function gives you a means of estimating the amount of media left on a roll. When a new
roll of media, or a used roll where the remaining length is known, is installed on the printer, you can enter the
length of the roll into the printer's front panel display. As images are printed, this amount is decremented. You can
view the estimated amount of media remaining on the printer's front panel display. When you are ready to remove
the roll, you can display and print the estimated amount of media remaining on the roll. When you reload this
media, you can enter this figure on the printer's front panel display.
 Loading...