

Page 1

Getting Started
for Macintosh iMac and G4 computers
P/N 210247-00
Page 2
Croma24 Getting Started for Macintosh
1. Introduction1. Introduction
Setting up your Croma24 printer takes only a few minutes.
This guide explains how to:
• connect cables;
• install the roll guides;
• install FastPort print server;
• load the driver software;
• install ink cartridges;
• load roll media
• prime and align cartridges.
2. Unpacking2. Unpacking
Unpack your Croma24 carefully. Save the packaging
in case you ship your printer later.
1. Remove the left and right roll guides, foam packing
material, and accessories package from the box.
2. With an assistant, lift the printer straight up, out of
the box.
3. Remove and discard the plastic bag and dessicant
package.
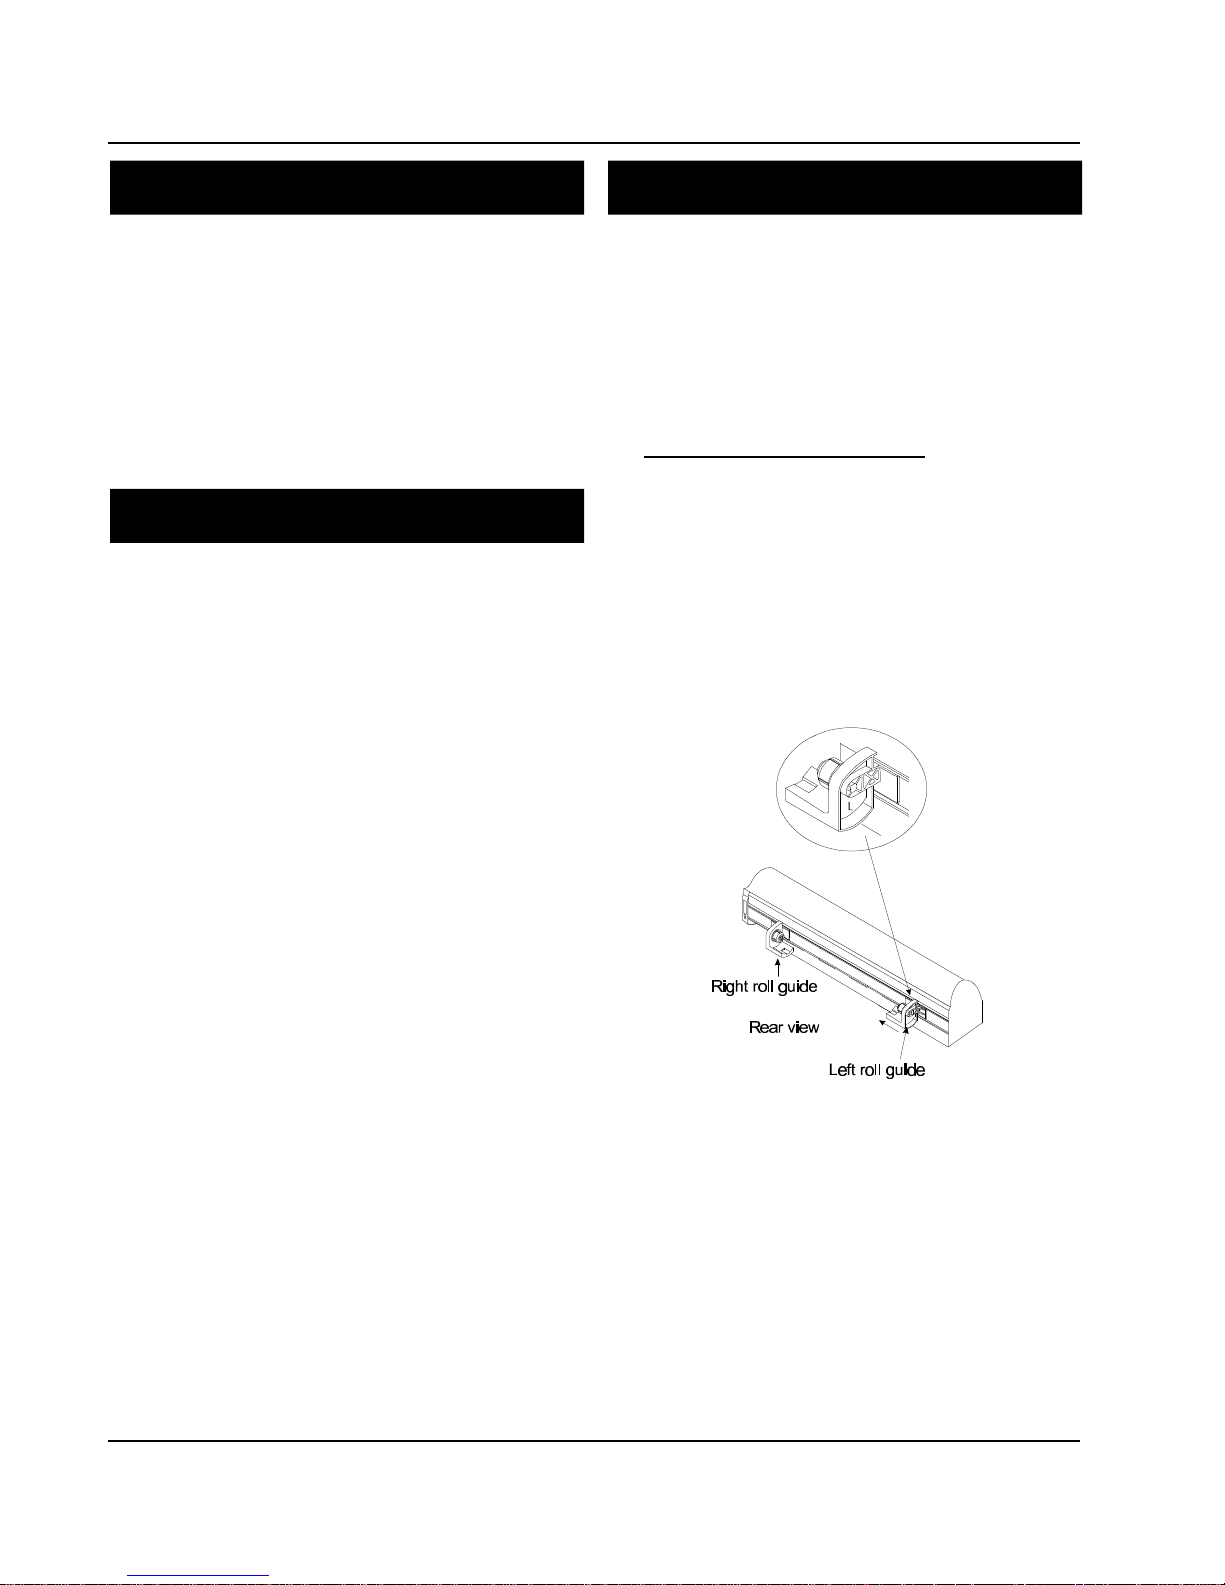
3. Installing roll guides3. Installing roll guides
Roll guides support roll media. If you plan to use only
sheet media, you will not need them.
Note: if you are planning to install the optional printer
stand, install the roll guides after the stand is installed.
Two roll guides attach to the back of the printer with
the black insets facing towards each other. They are
labelled "L" and "R" on the inside.
1. Facing the front of the printer, position the roll
guide marked "L" into the slide opening on the
back, right side of the printer. Pull it up slightly
and slide it to the left as far as it will go.
2. Position the roll guide marked "R" into the slide
opening on the back, right side of the printer. Pull
it up slightly and slide it all the way to the right.
3. Adjust the roll guide marked "L" to the approximate width of your media roll. Wait and load the
media later.
4. Open the printer's cover. Remove and discard the
cable tie and foam which hold the ink carrier in place
during shipment.
5. Save the foam packing material and box.
Your printer was shipped with the following items.
Check that they are all present before continuing the
installation:
• printer;
• left and right roll guides;
• Getting Started for Macintosh (this guide);
• power cord;
• ink cartridges;
• sample media;
• User Guide and driver software on CD-ROM;
• FastPort print server and power supply;
• RJ45 crossover cable; and
• Digi LAN Products CD-ROM.
Note: The Digi LAN Products CD-ROM is not
required for this installation. It contains documentation and support information for the FastPort print
server.
The optional printer stand is shipped in a separate box
which includes it’s own assembly instructions.
2
Page 3
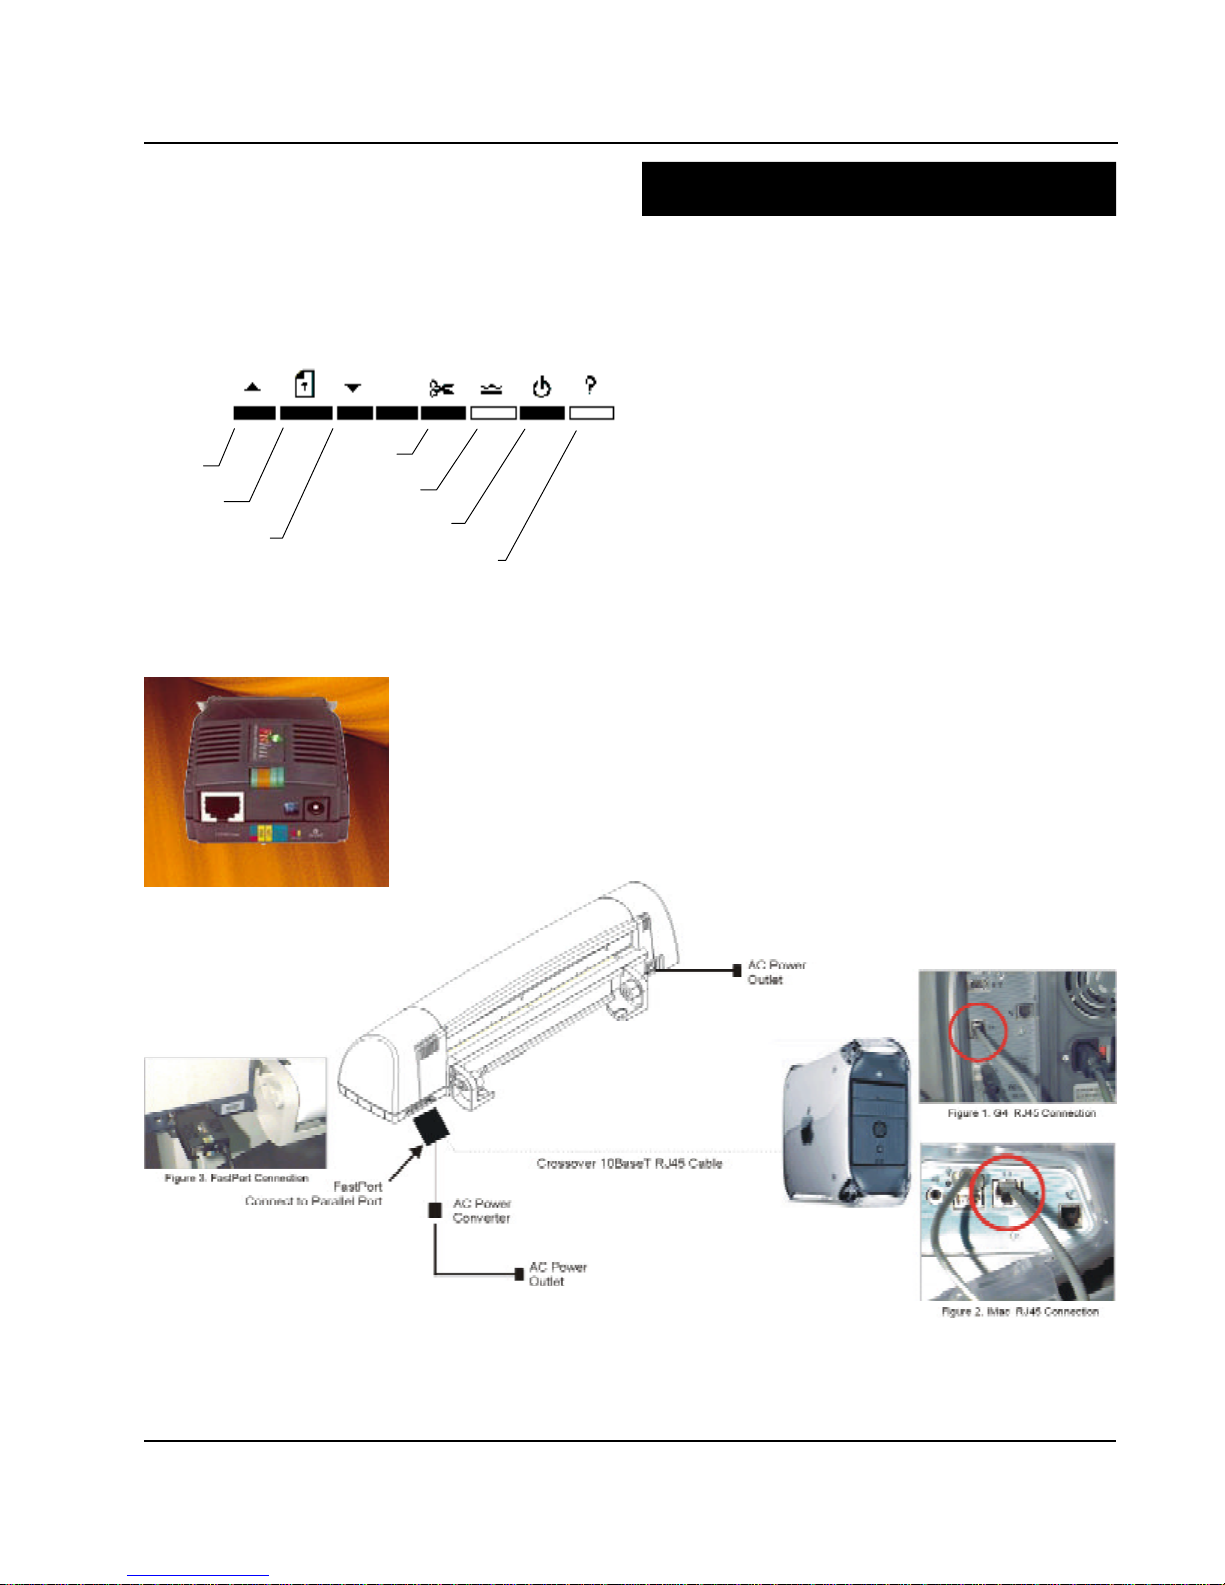
Cut
Ready to Print
indicator
Move media
backward
Load media
Move media
Croma24 Buttons and Indicators
indicator
Power On
forward
User Intervention
Croma24 Getting Started for Macintosh
4. Connecting Cables4. Connecting Cables
1. Turn off power to the computer. (Printer should be
unplugged.)
2. Plug the FastPort into the parallel port on the back of
the printer. (Figure 3)
3. Plug one end of the crossover (network) cable into
the RJ45 jack on the back of the Macintosh. (Figure 1
for G4 connection or Figure 2 for iMac)
4. Plug the other end of the crossover cable into the
FastPort RJ45 jack. (Figure 3)
5. Plug the DC power cord from the power converter
into the DC receptacle on the FastPort.
6. Plug the power converter into an AC power source
(wall outlet).
7. Plug the AC power cord into the receptacle on the
back of the printer. Plug the other end into a
grounded electrical outlet. The printer will automatically come on.
FastPort
Print Server
3
Page 4

Croma24 Getting Started for Macintosh
5. Loading roll media5. Loading roll media
Handle your media carefully to avoid wrinkles or
creases. Because the media can absorb skin oils, it's
a good idea to wear light cotton gloves when handling the media to prevent unwanted fingerprints in
the printed piece.
1. If the green light is not on, press the Power
button to turn the printer on.
2. Position the roll so the media feeds over the top
of the roll.
3. Facing the front of the printer, position the roll
media onto the roll guide marked "R" and slide
the other roll guide until it fits into the roll media
core.
4. Insert the media through the slot at the back of
the printer, aligning it with the guide line on the
back of the printer. Be sure the edge of the
media touches pinch rollers evenly.
5. Press the Load Media button .
4
Page 5

Croma24 Getting Started for Macintosh
6. Installing printer driver6. Installing printer driver
software software
The drivers included with your printer support iMac
and G4 Macintosh computers.
Installing the Chooser level driver
1. Insert the Croma24 System CD-ROM into your
Mac.
2. Double-click the driver installer.
2. The program prompts you with further instruc-
tions.
3. After installation, the program will prompt you to
restart the computer.
4. Following restart, go into the Chooser under the
Apple menu and click on Croma24 driver icon.
Make sure the “FPO48C88-par” selection is
highlighted in the Select a printer panel.
FPO48C88-par
7. Installing ink cartridges7. Installing ink cartridges
Your printer comes with four ink cartridges: yellow (Y),
magenta (M), cyan (C), and black (K).
Note: Keep cartridges sealed until ready to use. Don't
remove the protective tape from the inkjets until you
are ready to install the cartridges.
1. If the green light is not on, press the Power
button to turn the printer on.
2. From the File menu on your Mac, select Page
Setup. Then click the Access Cartridges button
to move the cartridge carrier to the left.
DO NOT MANUALLY MOVE THE CARRIER!
3. Raise the printer's top cover.
4. Remove protective tape from the bottom of the
cartridge.
Be careful not to touch the copper contacts or
the inkjets.
5. Close the Chooser.
5. Match the cartridge to the letter on the front of
the carrier (Y-M-C-K).
6. Install each cartridge by inserting it into the
carrier with the copper side to the back and
inkjets facing down. Push on the front of the
cartridge until it clicks into place.
7. Close the top cover.
5
Page 6

Croma24 Getting Started for Macintosh
8. Priming8. Priming
Next, you will want to prime the cartridges. Priming
cartridges clears the inkjets and helps to make sure
all jets are firing properly. Make sure there is paper
loaded in the printer.
1. Select Page Setup from the File menu, click on
the Calibration button.
2. Then select the Cartridge tab and click the Prime
Cartridges button.
9. Aligning cartridges9. Aligning cartridges
Cartridge alignment is necessary for best quality
output. Align the cartridges each time you install a
new cartridge.
1. Select Page Setup from the File menu and click
the Calibration button.
2. Click the Cartridge tab, then click the Run Test
button.
3. A test pattern prints with bands of black, cyan,
magenta, and yellow. The color bands should be
smooth, without dark streaks or white lines. The
sloping lines should not look fuzzy or contain
gaps. If this is not achieved, prime the cartridges
again by clicking the Prime Cartridges button.
4
3
2
1
4. To cut, click the Cut button on the front of the
printer.
6
Three test patterns will print. The first two test
patterns are for horizontal calibration and vertical
calibration. Color Horizontal Head-To-Head
Calibration horizontally aligns the cartridges.
Color Vertical Head-To-Head Calibration vertically aligns the cartridges.
The last test pattern shows how the cartridges
are currently aligned. Current Heads (Y, M, C)
shows yellow, magenta, and cyan "+"s which
represent the horizontal and vertical alignment
between the cartridges.
Page 7

Croma24 Getting Started for Macintosh
Black
Color
Yellow
Magenta
Vertical Values
10. Paper axis calibration10. Paper axis calibration
Color Vertical Head-to-Head Calibration
Color Horizontal Head-to-Head Calibration
Cyan
Current Heads (Y, M, C)
Black
1. First, examine the Current Heads pattern. When
the colored "+"s line up horizontally and vertically
with the black alignment marks, no adjustment is
required. If they are not aligned correctly, continue with Step 2.
2. Examine the horizontal calibration test pattern.
Find the set of lines that represents the best
alignment for each combination of colors (yellow/
magenta, magenta/cyan, and cyan/black). Set
the value in the appropriate box on the calibration
screen.
Executing the Paper Axis Calibration test will have the
printer draw a set of vertical marks to calibrate the
paper axis. To measure the marks laid down by the
printer, you will need a ruler or scale at least 33
inches (838.2 mm) long. The vertical marks should
be exactly 33.00 inches (838.2 mm) apart. If the
distance between the marks is different from that
shown on the display, you may adjust the printer by
setting its values to match the length or width you
measured.
Note: The Paper Axis Test should be performed
every time new media is loaded.
1. Select Page Setup from the File menu and click
on the Calibration button .
2. Click on the Line Length tab.
Horizontal Values
3. Examine the vertical calibration test pattern. Find
the set of lines that represents the best alignment
for each combination of colors (yellow/magenta,
magenta/cyan, and cyan/black). Set the value in
the appropriate box on the calibration screen.
4. Click the Set Calibration button .
5. Click the Run Test button again to print the test
pattern and verify that your settings are correct.
Repeat steps 1 - 4, if necessary.
3. Click on the Run Test button.
4. Measure the distance between the two vertical
marks.
5. Enter the measured length, if different from 33
inches.
6. You may want to repeat this procedure to verify
accuracy.
7
Page 8

Croma24 Getting Started for Macintosh
11. Printing with the driver11. Printing with the driver
The driver must be installed before you can print to
the Croma24 from within your application software.
Defaults have been pre-selected to streamline
printing and produce optimum quality from the
Croma24. Refer to the User Guide on the Croma24
System CD-ROM for descriptions of all the selections
available in the Croma24 driver.
1. Select Page Setup from the File menu.
2. In Page Size, select the closest page size that
matches your image. If not shown, select
Custom.
Note: Add one inch to the length of your page.
The maximum width is 23.25 inches.
3. Select the Media you are using.
4. Click OK.
5. Select Print from the File menu and click on the
Print button.
5. When the image finishes printing, click the
scissors icon on the driver or click the scissors
button on the front of the printer to cut the print.
12. Getting help12. Getting help
If you have problems during the setup procedures,
refer to "Quick Fixes" in the Users Guide on the
System CD-ROM. Also refer to your Users Guide for
details on:
• software driver selections
• media handling
• optimizing print quality
• maintenance
You may also want to check ENCAD's web site to see
the latest technical bulletins and download test files
and drivers.
http://www.encad.com
You can also call ENCAD Technical Support:
(877) 362-2387 (Monday - Friday, 6 a.m. to 5 p.m.,
Pacific time).
Copyright © ENCAD, Inc. 2000, All Rights Reserved.
ENCAD® and Croma24™ are trademarks of ENCAD, Inc. FastPort is a trademark of DIGI
International. Macintosh, iMac, Mac and G4 are trademarks of Apple Computer.
8
 Loading...