

ENCAD 215360-01, 215387-1, NovaJet 850, NovaJet 880 Quick Start Manual

NovaJet
800 Series
NovaJet 850
NovaJet 880
Printer Quick Start Guide
P/N 215360-01 Rev. AA
(Text P/N 215387-1 Rev. D)
Copyright ENCAD, Inc. 2000-2001
ENCAD®, NovaJet®, CADJET®, Extreme Color Printing™, and Graphic
Outdoor Matched System™ (GO) are trademarks of ENCAD, Inc.
®
ENGLISH
Other trademarks and registered trademarks are the property of their
respective owners.
No part of this manual may be copied or distributed, transmitted,
transcribed, stored in a retrieval system, or translated in any human or
computing language, in any form or by any means, electronic,
mechanical, magnetic or otherwise, or disclosed to a third party without
the express written permission of:
ENCAD, Inc., 6059 Cornerstone Court West, San Diego, CA 92121,
U.S.A.
Revision History
Rev. A August 2000
Rev. B September 2000
Rev. C October 2001
Rev. D October 2001

NovaJet 800 Series Printer Quick Start Guide
2
Other reference materials
In addition to this guide, the following additional documentation is included with your
printer:
System CD-ROM - contains:
• Printer Reference Guide, which provides complete reference information regarding
the printer's options;
• Maintenance Guide, instructions for maintaining your printer;
• Graphic Troubleshooting Guide;
• Print Quality Guide;
• Windows Drivers;
• Print Server Software; and
• utility software.

ENGLISH
NovaJet 800 Series Printer Quick Start Guide
3
Contents
Unpacking your printer...............................................................................5
Assembling the printer...............................................................................6
Removing protective shipping material .....................................................13
Connecting power ....................................................................................14
Using the control panel ............................................................................ 14
Choosing menu functions ........................................................................15
Setting the language................................................................................15
Loading media ......................................................................................... 15
Loading media on the NovaJet 880 .......................................................... 18
Printing rigid media .................................................................................. 20
Using the second feed roll ....................................................................... 23
Using the takeup roll................................................................................23
Moving the carriage..................................................................................25
Installing the cutter ..................................................................................25
Cartridge sets ..........................................................................................26
Filling the ink reservoirs ...........................................................................27
Inspecting the ink cartridges....................................................................28
Installing ink cartridges ............................................................................29
Priming the ink delivery lines ................................................................... 31
Printing the color test .............................................................................. 35
Printing the prime pattern ........................................................................ 36
Clogged jets.............................................................................................38
Aligning the ink cartridges ....................................................................... 39
Paper axis calibration ..............................................................................42
Cartridge recognition................................................................................43
Connecting the printer to your computer .................................................. 44
Pausing the printer ..................................................................................45
Canceling a print...................................................................................... 45

NovaJet 800 Series Printer Quick Start Guide
4
This page is intentionally blank.

NovaJet 800 Series Printer Quick Start Guide
NovaJet Quick Start
Congratulations on your purchase of a NovaJet wide format color printer. This
guide gives you details on the following:
• unpacking and assembling the printer
• loading media
• filling ink reservoirs
• installing ink cartridges
• installing the media cutter
• priming ink system
• cartridge alignment
If your printer is a NovaJet 880, it has an adjustable platen which provides the
capability of printing on almost any coated rigid media up to .5 inches thick.
The key to printing rigid media is the ability to get it flat enough for high-quality
inkjet printing. The kit includes special flattening rollers that attach to the back of
the printer. These rollers give you an insertion point for the rigid media and also
help to flatten the rigid media to provide a good surface for inkjet printing.
ENGLISH
When printing rigid media in the standard NovaJet 880 configuration, the media
exits the printer over the top of the dyer. To give rigid media the drying capabilities of the 800 series dryer, special hardware is included. This hardware allows
the dryer to be rotated upward to point down on the rigid media as it exits the
printer. This feature provides excellent dry time to lamination for rigid media.
Make sure you review this entire guide before starting the installation process.
Unpacking your printer
Your printer is shipped in three separate boxes. If your printer is a NovaJet 880,
you may have fourth box containing the Rigid Media Kit. The Rigid Media Kit
can be shipped as a separate box four or included in the same box as the printer
head. The printer and stand boxes are quite large and heavy. We recommend
you have two people (or a forklift) move these boxes. Before assembly, you may
want to measure halls and elevators to determine whether the unit should be
assembled in the area where it will be used.
5

NovaJet 800 Series Printer Quick Start Guide
6
Assembling the printer
1 Open the box containing the stand/takeup. Remove the entire
contents of this box and place nearby for easy access. In the same
box, locate the screws for use in subsequent steps. There are two
types of screws: 1) Sixteen size 10-24 screws to attach the feet to
the stand legs and the stand legs to the printer; and 2) Eight size 832 screws to attach the dryer brackets to the stand legs and the
dryer to the dryer brackets. (The 10-24 screws are a larger diameter
than the 8-32 screws.)
2 Attach the feet to the stand legs using eight of the size 10-24
screws. Note that each foot has two casters, only one of which
locks. Lock the casters to prevent the stand from rolling during
subsequent assembly.
3 Locate the box containing the printer head. It should already be open
with the underside of the printer facing up.
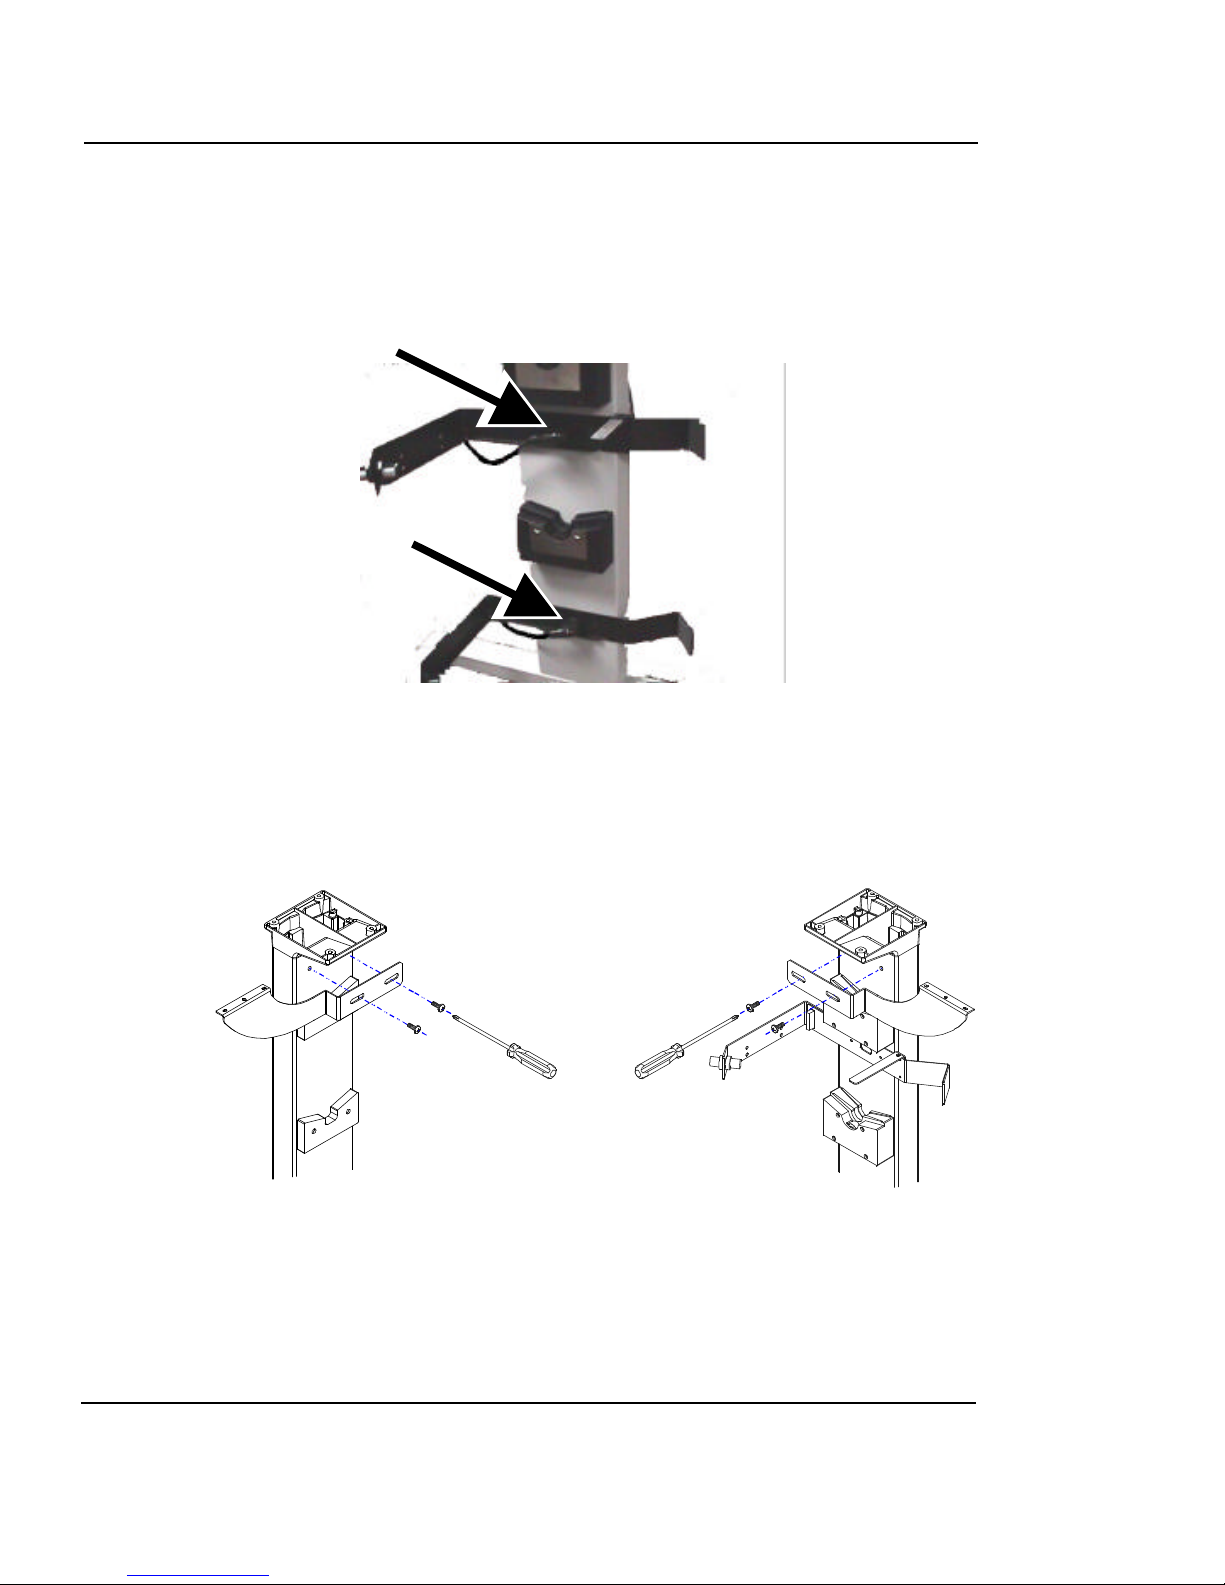
4 One of the stand legs has a connector in the center of the leg. (See
the following illustration.) Pull the connector from the access hole in
the leg and remove the tiewrap holding the connector in place.
Attach the connector to the receptacle on the bottom of the printer
head. Orient the stand legs so that the roll holder brackets are
facing the center of the printer head and align with the holes in the
bottom of the printer head. Attach both stand legs to the printer head
using eight of the size 10-24 screws. Note: To help ensure that the
legs seat properly on the printer head, attach screws snugly in
opposite corners first. Then, when all screws are in place, tighten
them securely.

ENGLISH
NovaJet 800 Series Printer Quick Start Guide
7
CAUTION: Be careful not to pinch the cable when attaching the
leg.
Attach connector from
stand leg to printer head
Stand leg
Foot
5 We recommend two people lift the printer. Remove the assembled
printer and stand from the box. Save the boxes and packing
materials in case you need to ship the printer.
NovaJet 800 Series Printer Quick Start Guide
8
6 Check to make sure the media sensors are plugged into their
respective connectors on the right stand leg. If your printer is a
NovaJet 850, continue with step 7. If your printer is a NovaJet 880,
go to step 9.
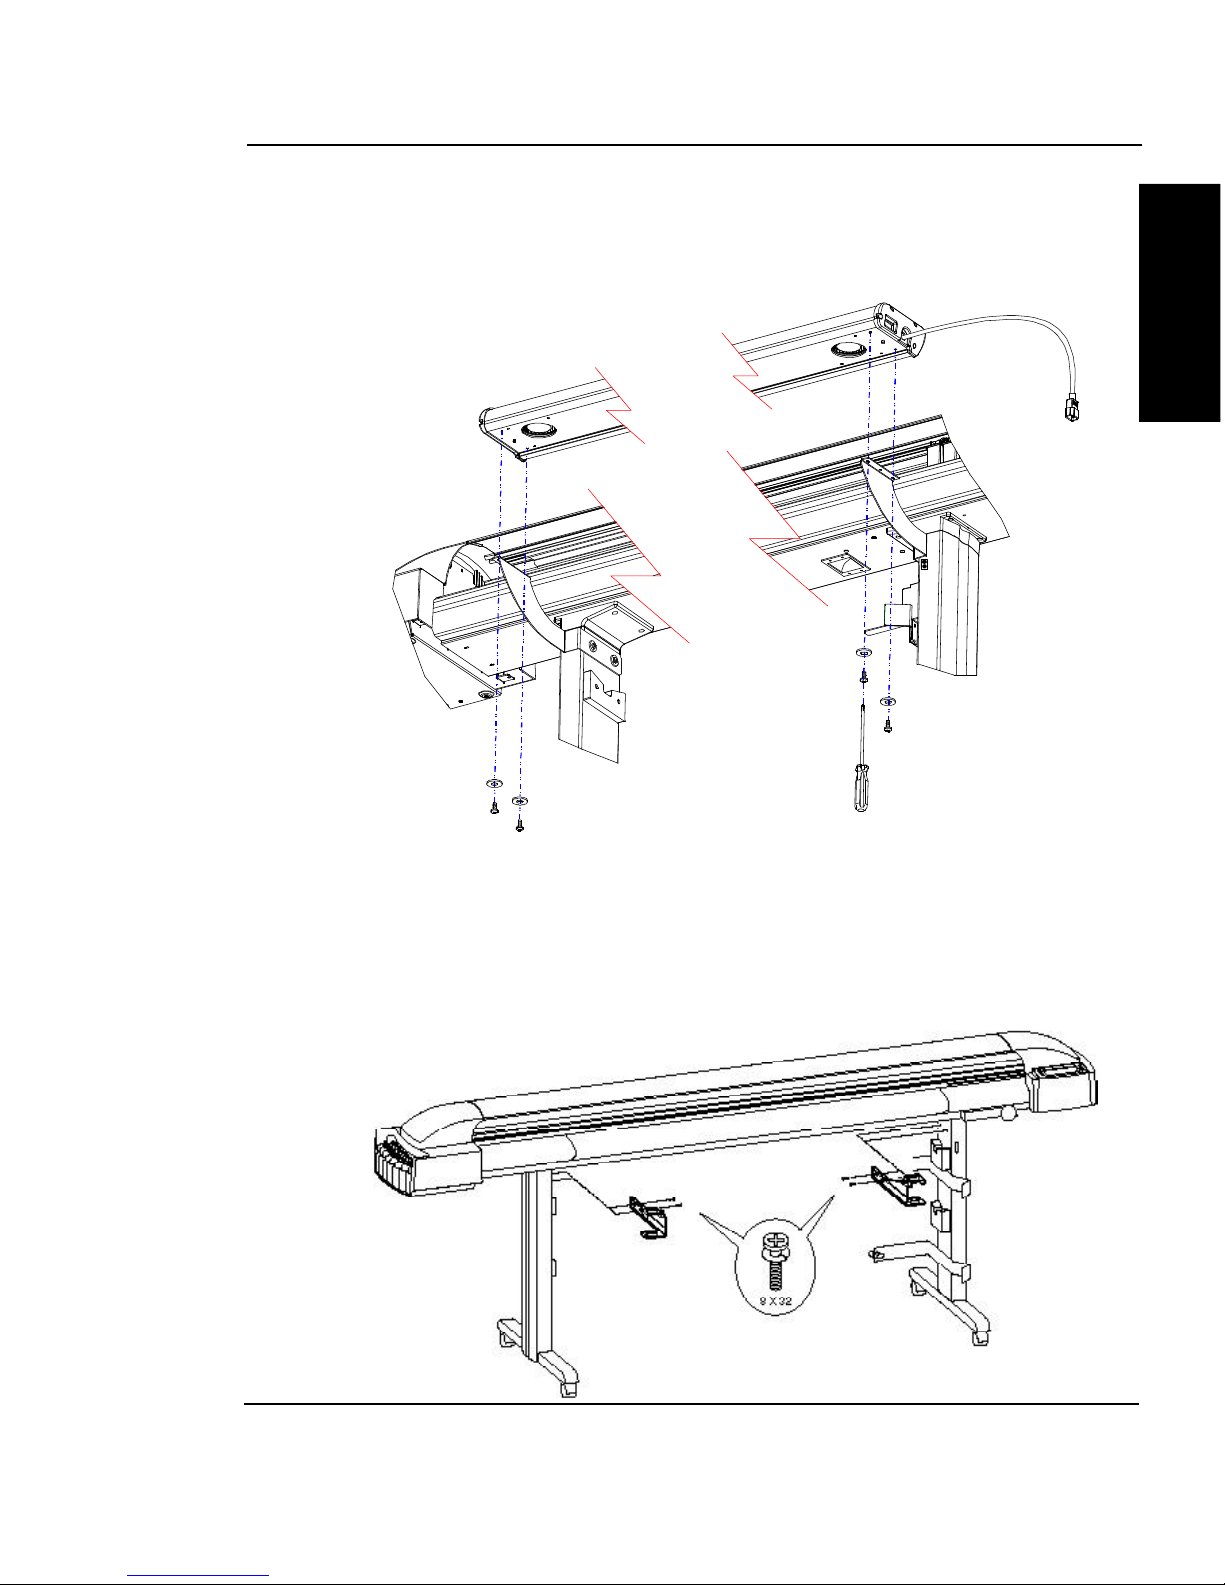
7 Attach the brackets for the dryer to the stand legs using four of the
size 8-32 screws. Orient the brackets as shown below. Note: The
legs are shown below without the printer head. Attach the dryer
brackets after the printer head as been attached and the assembled
printer removed from the packing box.
ENGLISH
NovaJet 800 Series Printer Quick Start Guide
9
8 Place the dryer on top of the dryer brackets while aligning the
guide pins on the bottom of the dryer with the holes on the dryer
brackets. Secure using four of the size 8-32 screws.
9 Locate the box containing the Rigid Media Kit. Remove the entire
contents and place nearby for easy access.
10 Attach the left and right dryer brackets to the stand legs,using four of
the size 8-32 screws. Orient the brackets as shown below with pull
pins at the top of the brackets facing towards the inside of the printer.

NovaJet 800 Series Printer Quick Start Guide
10
Note: The dryer brackets have slots for the screw holes. Use these
slots to position the dryer further away from the printer when using
thick roll media.
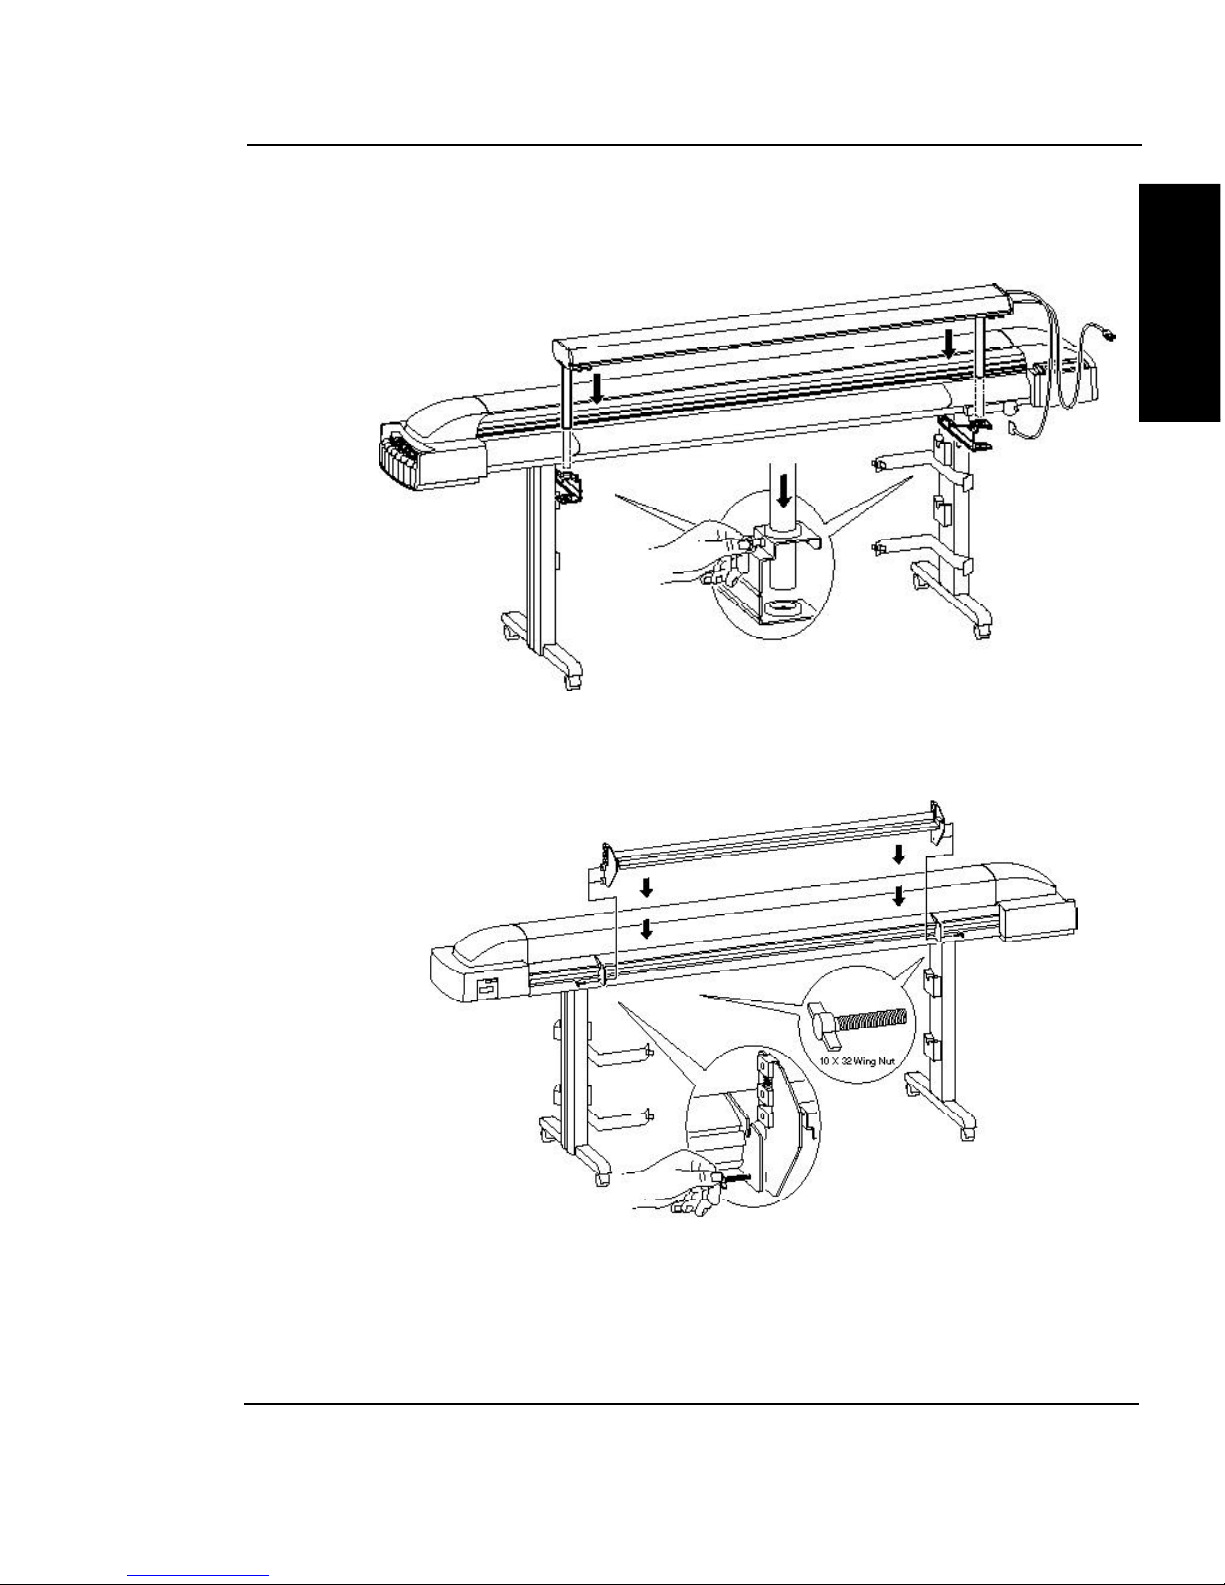
11 Locate the pivot brackets with attached risers. Remove the self-
locking pins securing the risers to the brackets. Place the selflocking pins and risers nearby for installation in the next step.
12 Attach the two pivot brackets to the dryer using four of the size 8-32
screws. The small end of the sloping bracket should point away
from the printer.
13 Next, slide a riser into each of the pivot brackets. Align the two holes
on the riser with the two holes in the bracket. Secure with the two
self-locking pins on each bracket from the inside of the printer to the
outside.
ENGLISH
NovaJet 800 Series Printer Quick Start Guide
11
14 Take the assembled dryer and slide the risers into the dryer
brackets on the legs. You will need to pull out on the pull pins for
the dryer to slide all the way down into place.
15 Next, install the flattening rollers on the back of the printer. Lower
the flattening rollers into the support brackets. Secure with two
wing thumb screws in the bottom hole of the bracket.
NovaJet 800 Series Printer Quick Start Guide
12
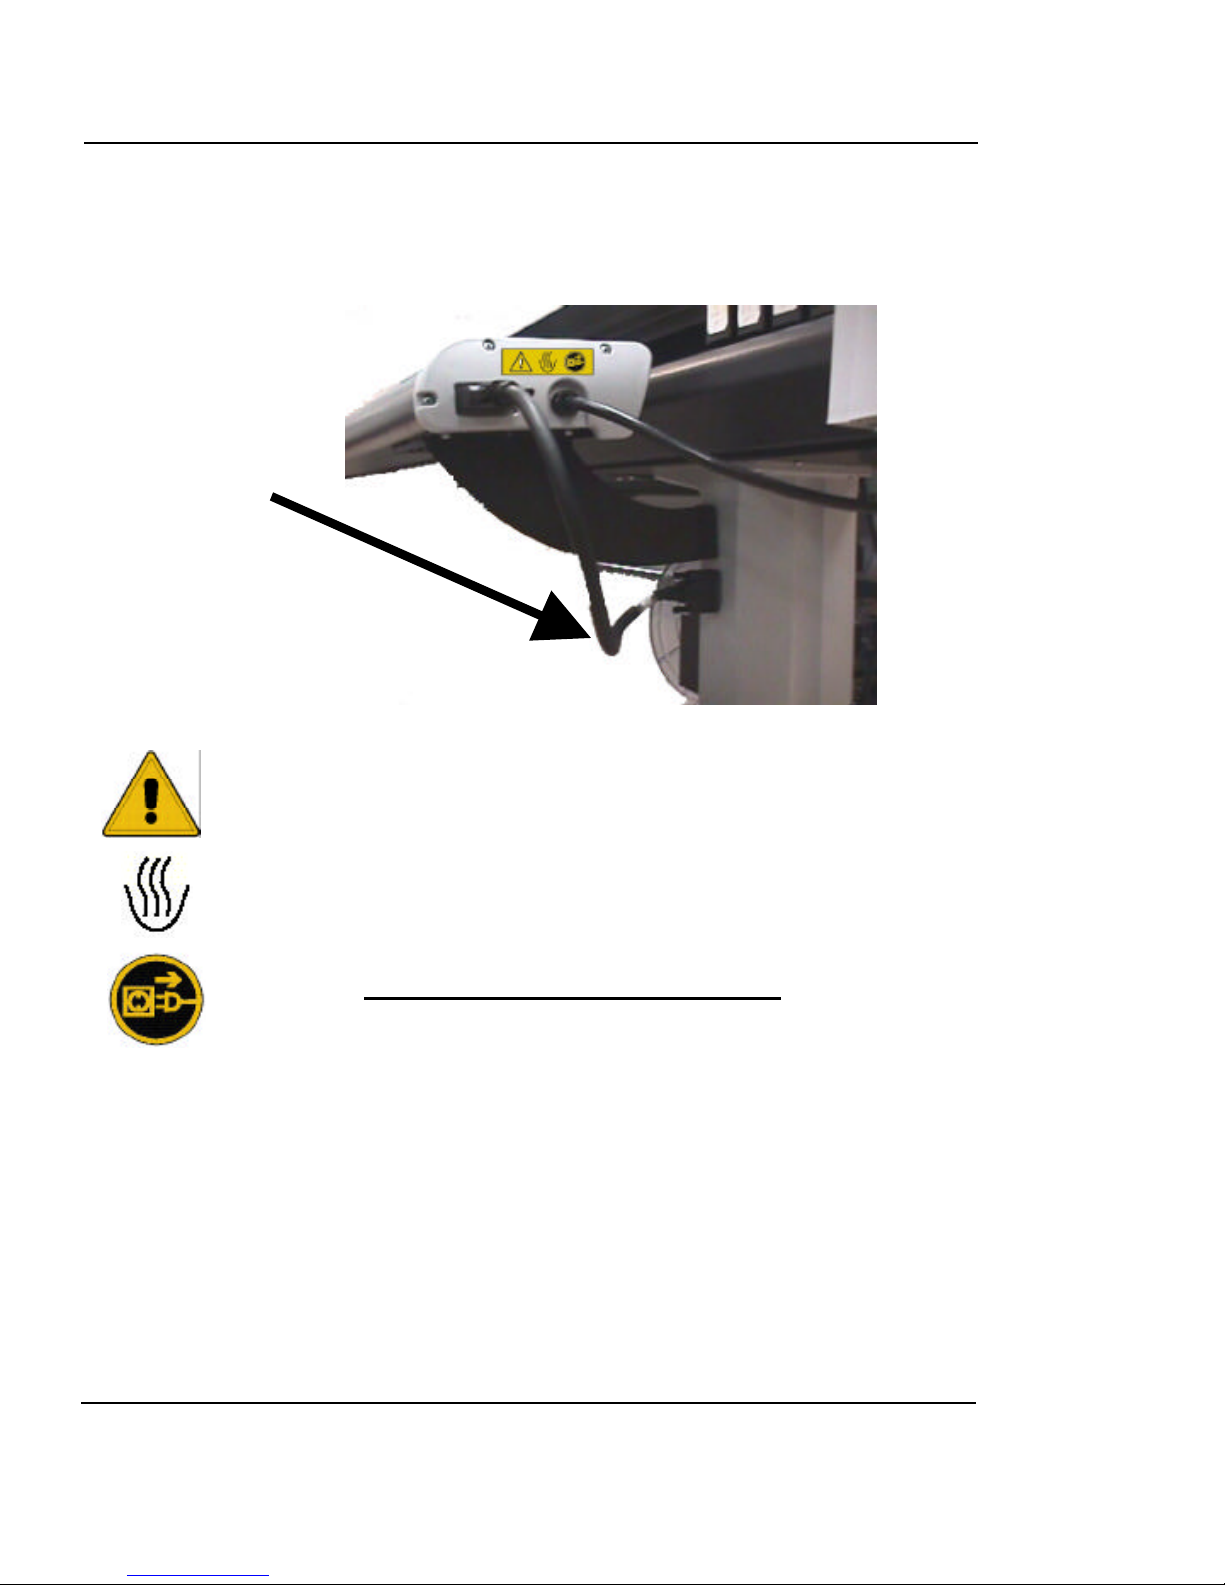
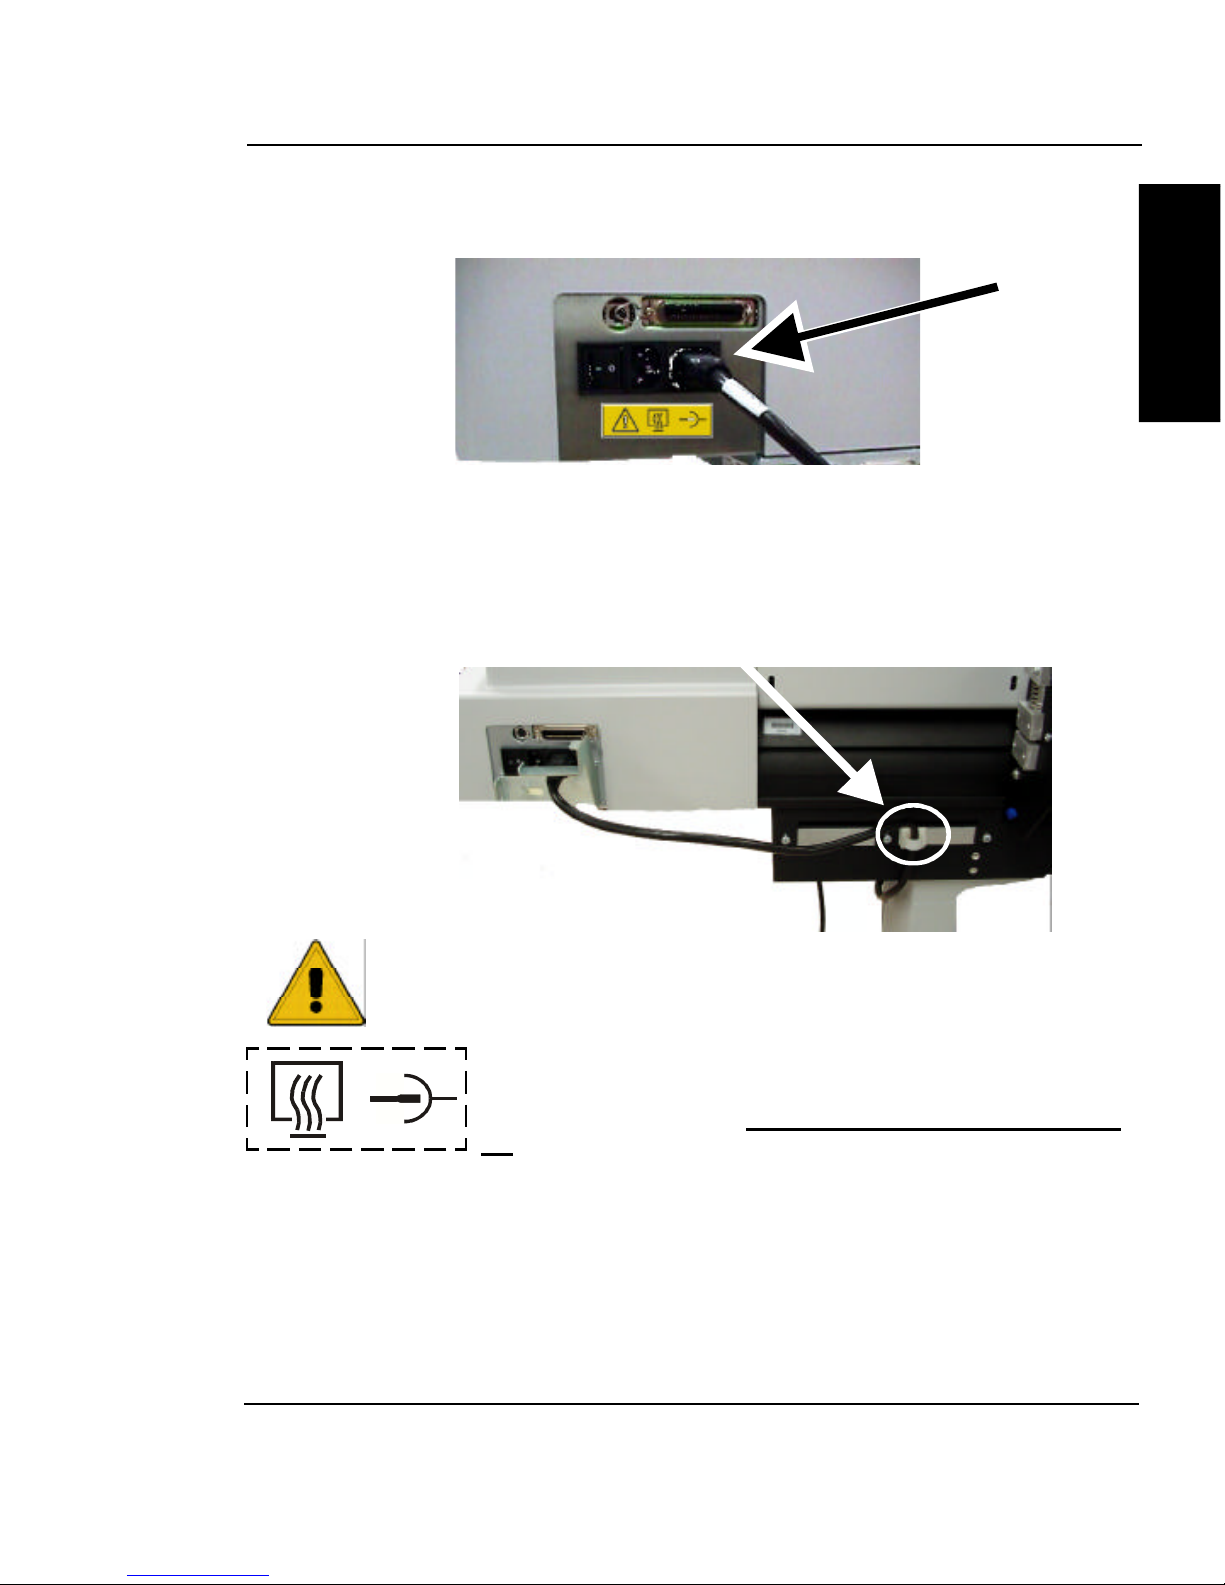
16 Plug the data cable into both the dryer and right stand leg as shown.
Note: The NovaJet 880 includes a longer pig-tail data cable to
accommodate the rotation of the dryer.
CAUTION: Never open the dryer. There are no user serviceable
parts inside. Refer servicing to qualified service personnel only.
CAUTION: This assembly emits heat by radiation.
CAUTION: Once the dryer is plugged in, there is continuous power
to the dryer, even when the printer is turned off.
DISCONNECT POWER CORD BEFORE SERVICING!
NovaJet 800 Series Printer Quick Start Guide
17 Plug the power cable from the dryer into the power receptacle on
the back of the printer.
18 A cable guide is included to keep the power cord out of the way.
Remove the liner covering the adhesive on the back of the cable
guide. On the NJ850, attach the cable guide to any convenient
location. On the NJ880, attach to a flat area above the leg as
shown in the following illustration.
ENGLISH
CAUTION: Never open the dryer. There are no user serviceable
parts inside. Refer servicing to qualified service personnel only.
Heating Chamber Power Connection/Plug
CAUTION: Once the dryer is plugged in, there is continu-
ous power to the dryer, even when the printer is turned
off.
Removing protective shipping material
CAUTION: Before turning on the printer, make sure to remove the protective
material that secures the carriage and remove the protective film from the
control panel. There is one shipping bracket located on the platen on 60"
NovaJet 850 printers. There are three shipping brackets located on the platen
on NovaJet 880 printers, plus two brackets on the back of the printer. Make
sure you remove these brackets.
13
NovaJet 800 Series Printer Quick Start Guide
14
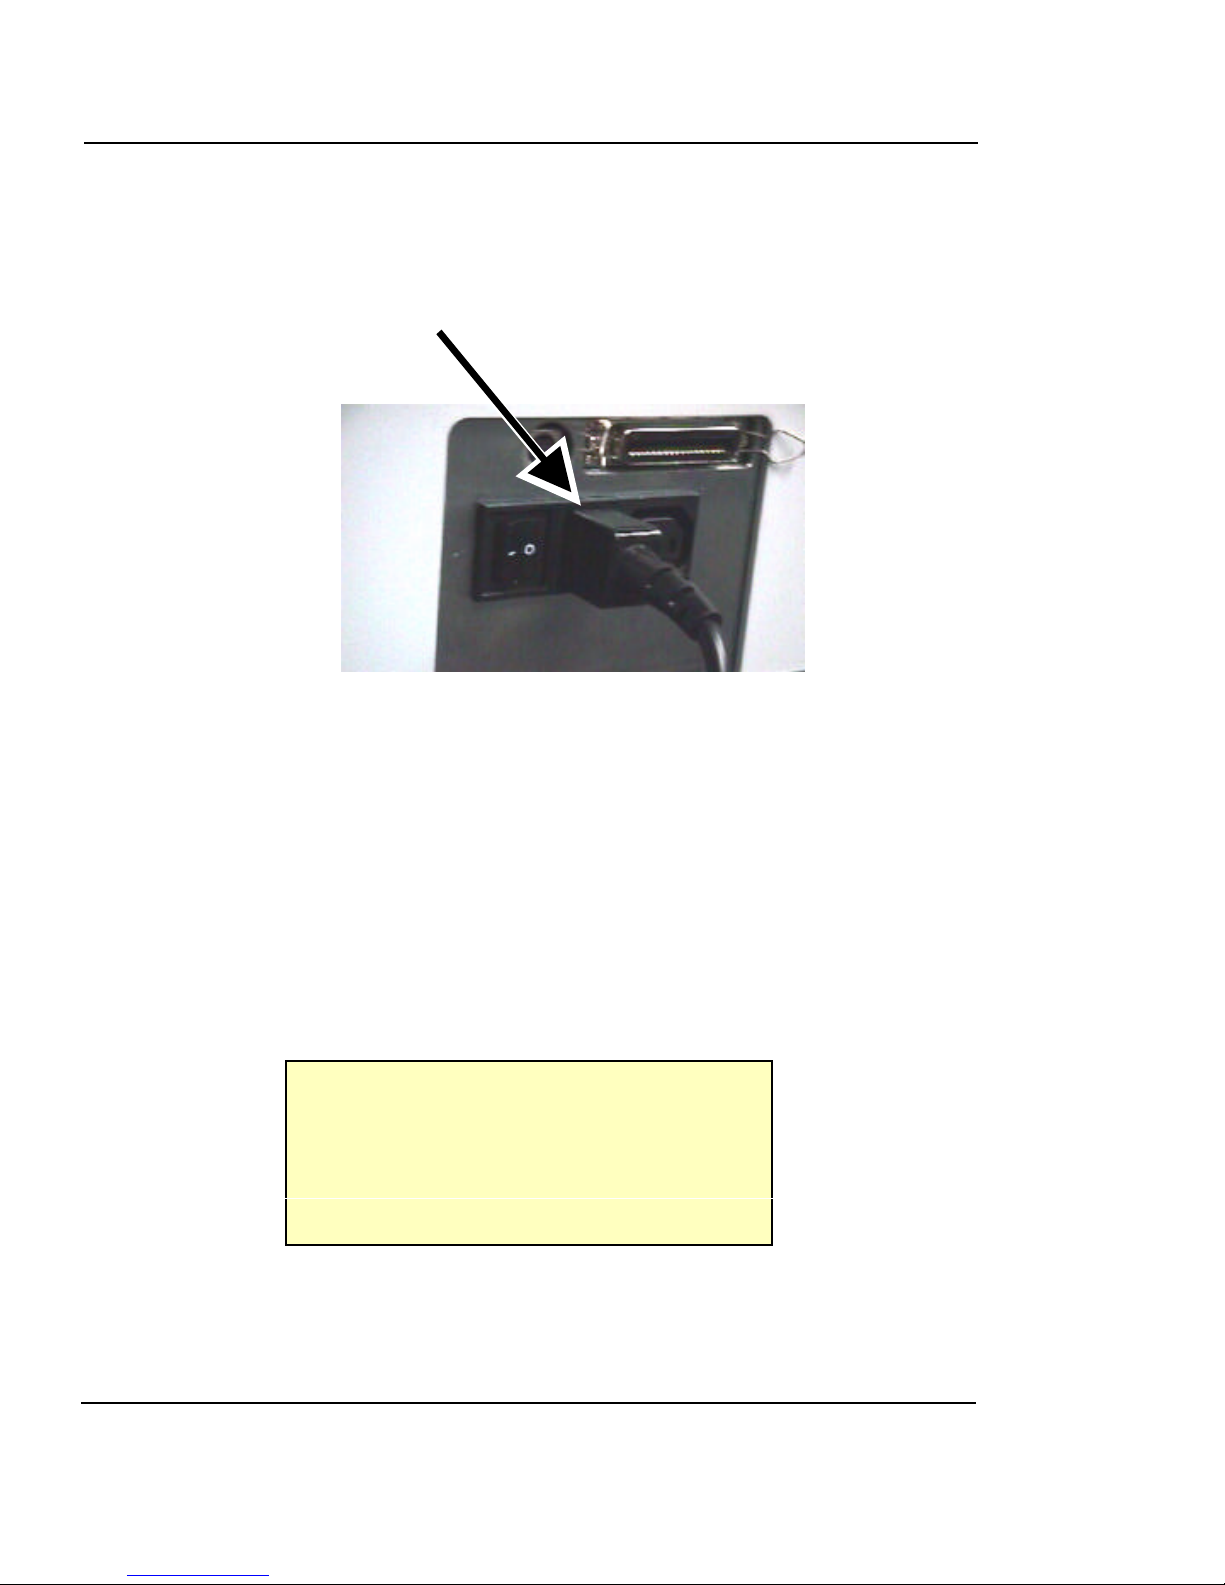
Connecting power
1 Plug the power cord into the power connector on the back of the
printer and plug the other end into an appropriately-rated, grounded
outlet.
2 To turn on the printer, turn the power switch on at the rear of the
printer. The control panel will display the printer's model name, the
firmware version, status and progress of the power on self-test, and
status.
Using the control panel
The control panel at the right side of the printer includes eight buttons and a
display which indicates modes and settings. An overview is provided here so that
you can load media and ink cartridges. Details on menu options are included in
the Reference Guide on the system CD-ROM. The menu tree in Appendix C of
the Reference Guide also gives you a summary of all the printer modes and their
functions.
l
Load Media Feed Media Menu
l
l
Cut Setup Menu
l
l
Pause Utility Menu
l
l
Reset
l
Two types of menus are displayed: action menus provide a list of additional
menus or immediate tasks to perform, such as Cut, Load Media, etc. Selection
menus let you view and modify values.
 Loading...