

Page 1
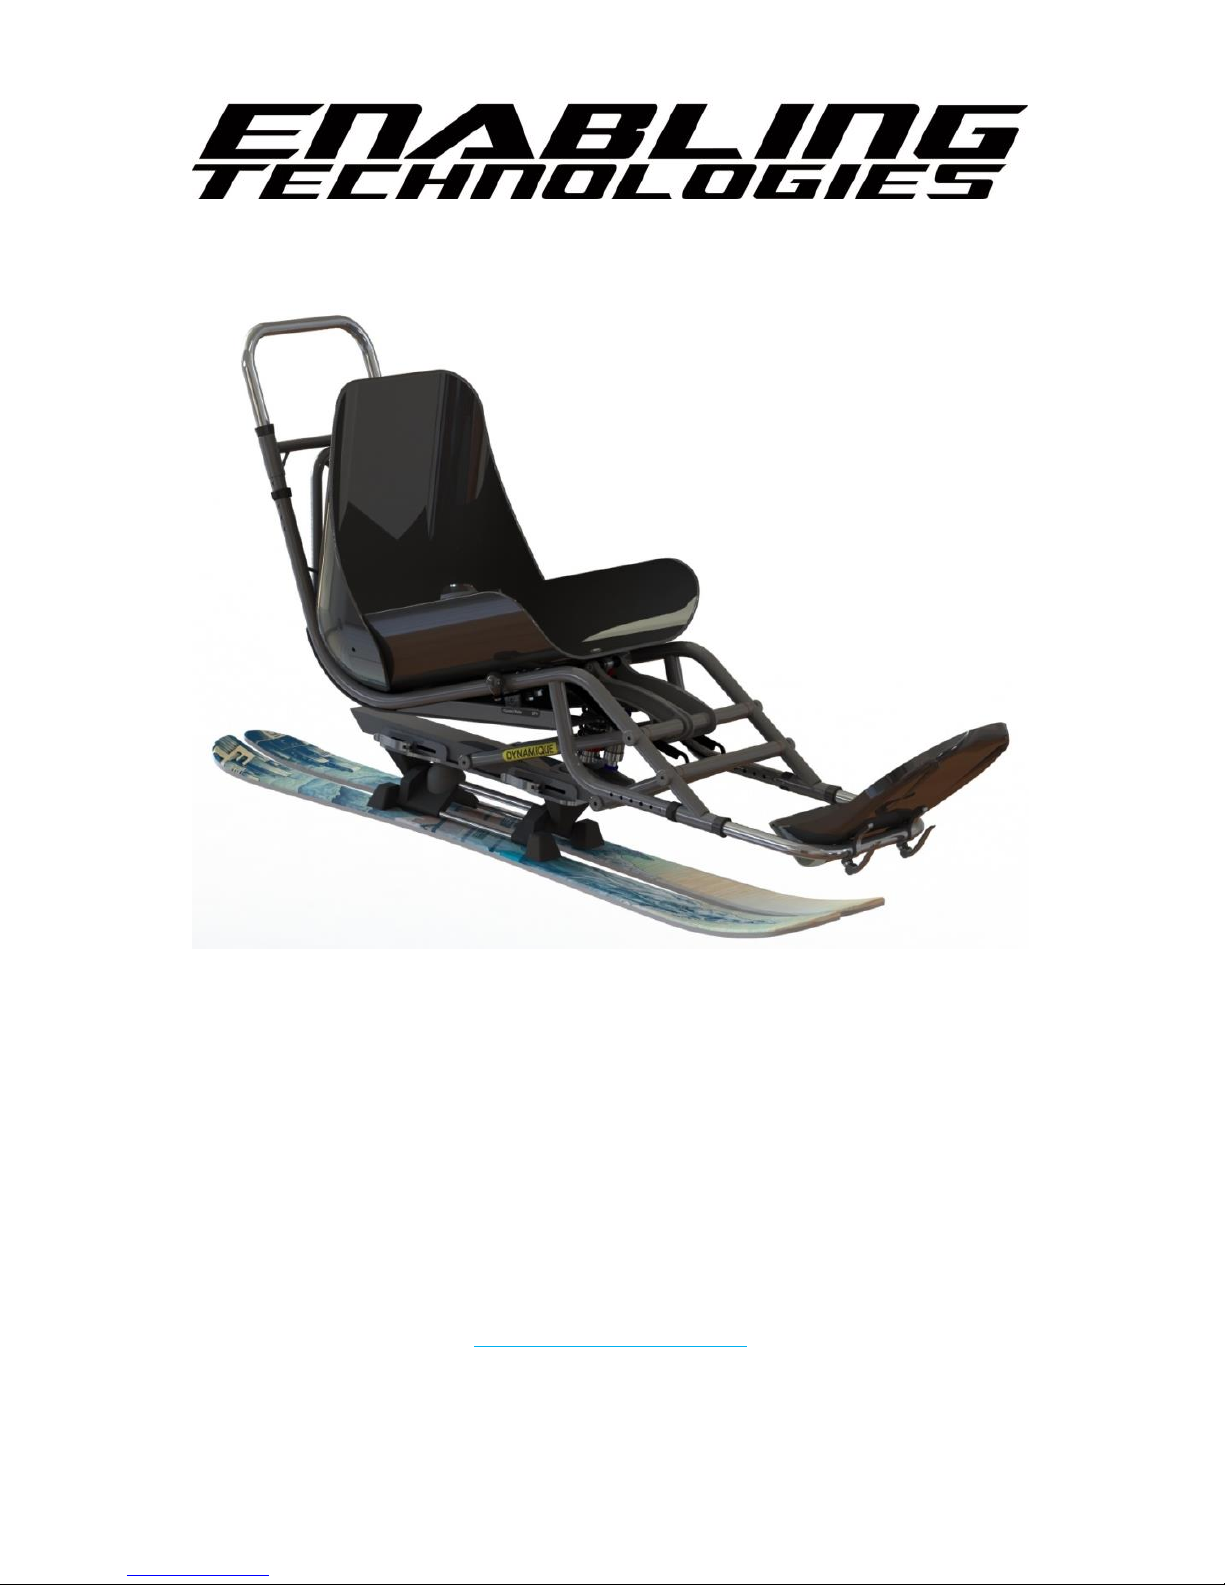
DYNAMIQUE
Owner’s Manual
Guidelines for setup, use and maintenance of your Bi Ski
Proudly designed & made in Colorado, USA
Enabling Technologies, LLC
www.enablingtech.com
Page 2
2
Introduction
Congratulations on the purchase of your new bi ski!
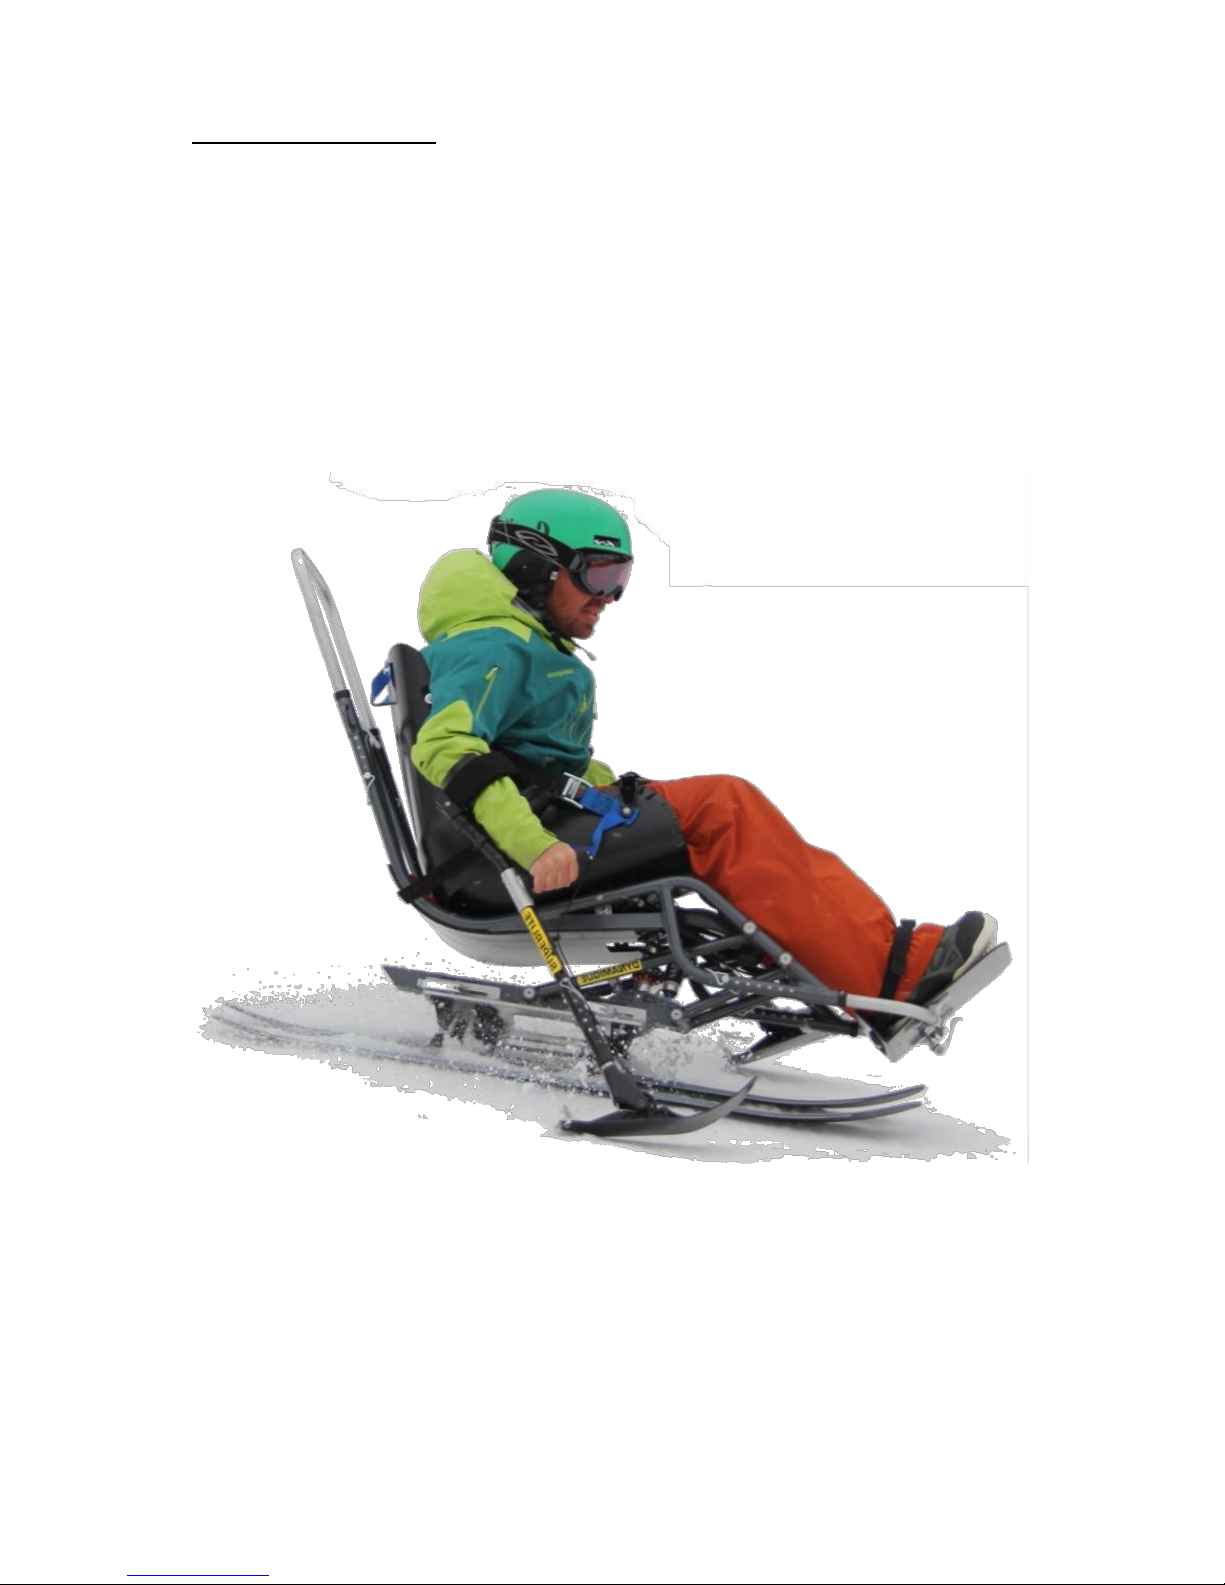
Building upon the success of the Bi-Unique, the Dynamique remains
“unique” while achieving a new level of “dynamic” versatility. The ski is
suitable for skiers of all ages and a wide range of ability levels.
The owner’s manual will help you understand your ski, provide general
guidelines for use and explain basic maintenance and repairs.
The manual is not intended to teach you how to ski, cover everything
you need to know about fitting or explain all maintenance and repairs.
For these, we recommend you seek out adaptive programs, professional
ski instructors and trained technicians to ensure the best and safest time
with your Dynamique.
Page 3

3
Table of Contents
Introduction
........................................................................................ 2
Set Up
.................................................................................................... 4
Initial Assembly ................................................................................... 14
Accessories .......................................................................................... 20
Use
........................................................................................................ 21
General Inspection .............................................................................. 23
Shock ................................................................................................... 23
Seat ..................................................................................................... 28
Footrest ............................................................................................... 30
Center of Mass .................................................................................... 32
Chairlift ................................................................................................ 33
Maintenance
.................................................................................... 41
Parts List .............................................................................................. 46
Warranty
............................................................................................. 50
Contact
............................................................................................... 52
Page 4

4
Set Up
The Dynamique was designed and intended to be a versatile bi ski for
programs and individuals. It builds upon the Bi-Unique’s heritage and
accommodates an even wider range of skier abilities. Its features create
a ski that performs just as well for independent skiers as it does for
skiers with more restrictive abilities.
Versatile Sizing: Only one frame size is needed to fit skiers from 4’1”
to 6’3”.
Lightweight Aluminum Construction: The frame is made from
aircraft grade 6061-T6 aluminum that has been professionally
welded, heat treated and trued. The result is a 43lb ski complete
with footrest, handle, mechanism and skis.
Loading the Chair Lift: An unprecedented load height and one of a
kind, tensioned load system were designed with varying height
chairlifts in mind. Together they allow the skier to "sit down" on the
chair. This makes loading and unloading very easy.
By moving the load components into the upper frame, we reduced
unsprung weight, eliminated cables and better protected the
system from snow and ice.
Sitting on the Chair Lift: The Dynamique moves the shock out of the
way allowing the skier to sit all the way back against the chair and
the rear frame triangle naturally leans the skier back eliminating any
“teter” sensation. An oversized skid plate facilitates getting on and
off the chair.
Page 5

5
A-Arm Design: While most bi skis use single pivot suspension, the
Dynamique uses A-arms like higher performance mono skis. They
improved the ride and allowed us to engineer where the frame is in
the load position. We "dowel test" skis to ensure the best ski
performance. The Dynamique dowel tests similar in both the ski and
up positions. This means it’s as easy to push in the lift line as it is to
ski.
Suspension: We use 3” of travel at the rear and approximately 1” at
the front to maintain a low center of gravity.
Footrest: The ankle angle is adjustable with quick release clamps.
The length is adjusted along the horizontal axis. Smaller
skiers maintain a low center of gravity and taller skiers do not have
to worry about the footrest bucketing out.
Seat Dump: Adjustable to 4 positions. The lowest position is flatter
than most bi skis on the market while the upper is similar to a BiUnique glove seat.
Instructor Handles: The handle has been pushed back from the Bi-
Unique to ease hands on lessons and allow a reclined position for
the chair lift or skiing. The narrow handle takes note from the
traditional Bi-Unique. The wide handle is shaped like a mountain
bike handle bar. The swoopy ends provide an easy grip for picking
skiers off the ground. Both handles are adjustable in height.
Mega III Skis: The Mega IIIs employ the same proven shape, side cut
and camber as the Mega IIs but with a new and improved flex
pattern. A stiffer core throughout adds the stability and
performance needed for a suspension bi ski. They also make loading
and unloading the chair easier.
Retrofittable: The Dynamique uses the same articulating
mechanism and similar skis as the Bi-Unique.
Page 6
6
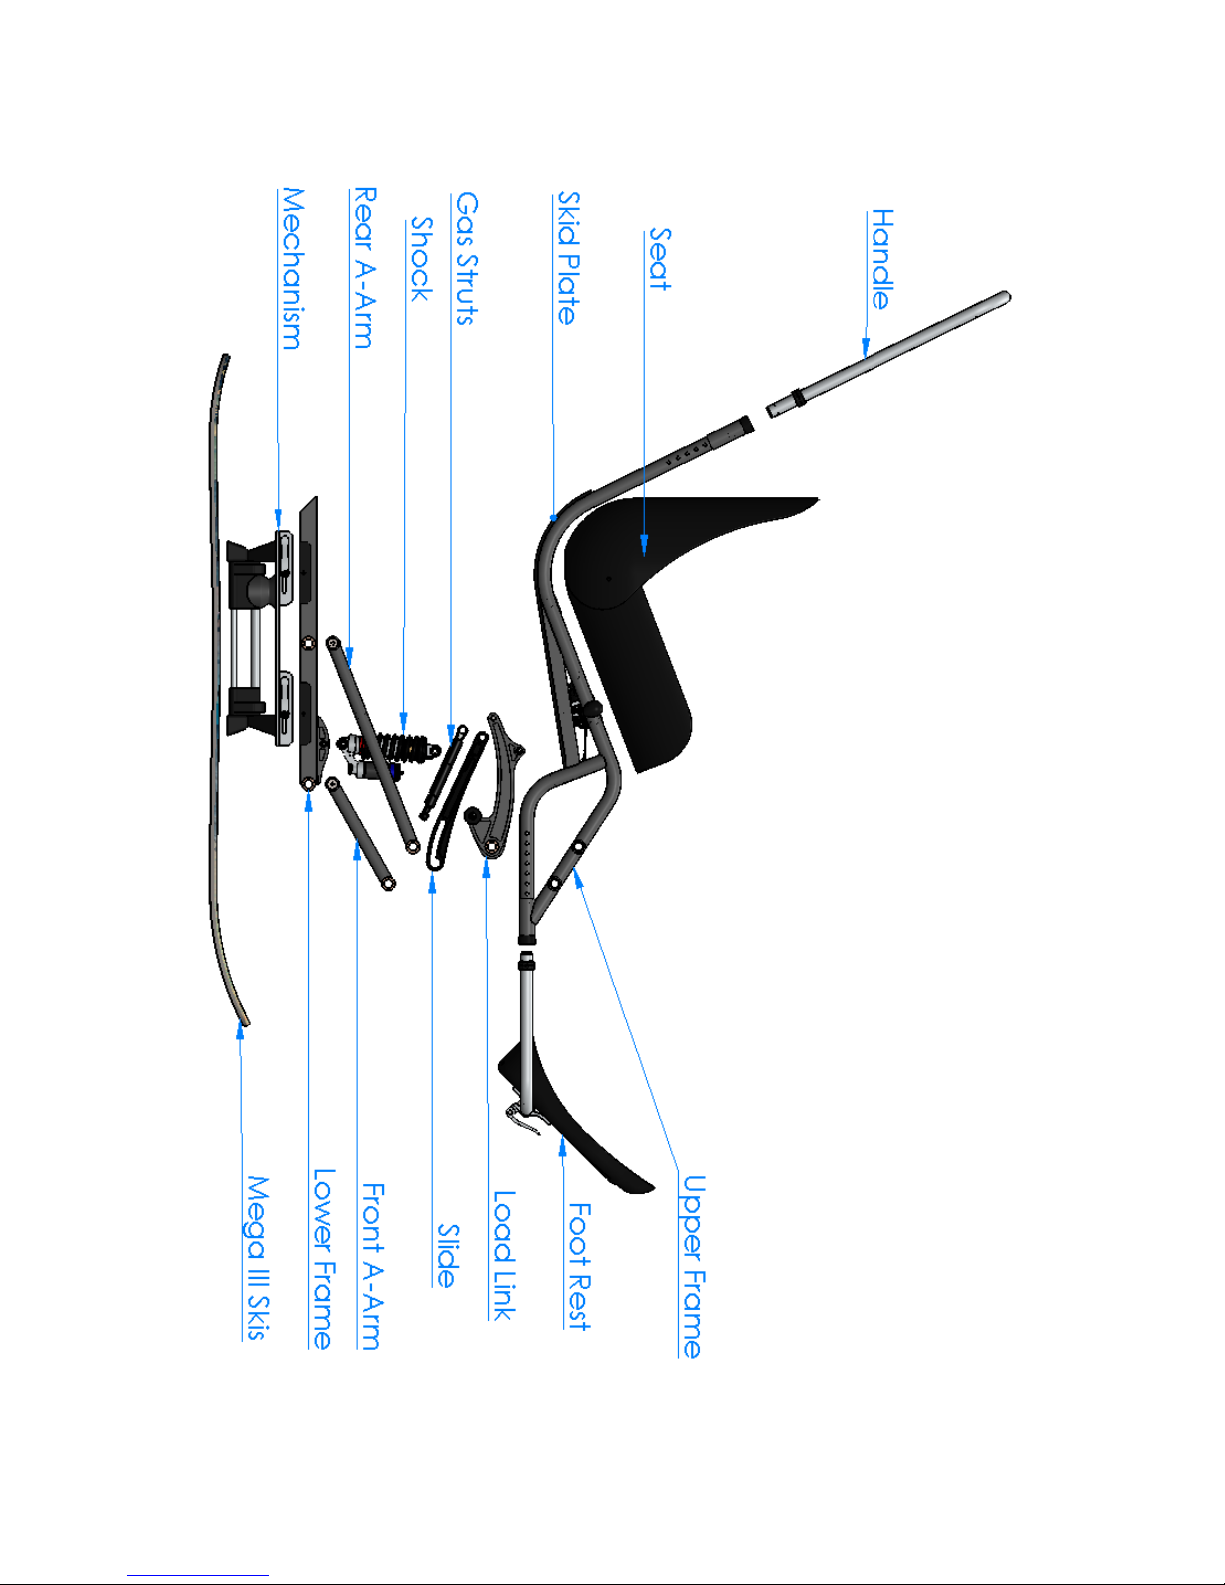
Below shows major component names that will be referenced to in
this manual.
More detailed drawings can be found in later sections.
Page 7
7
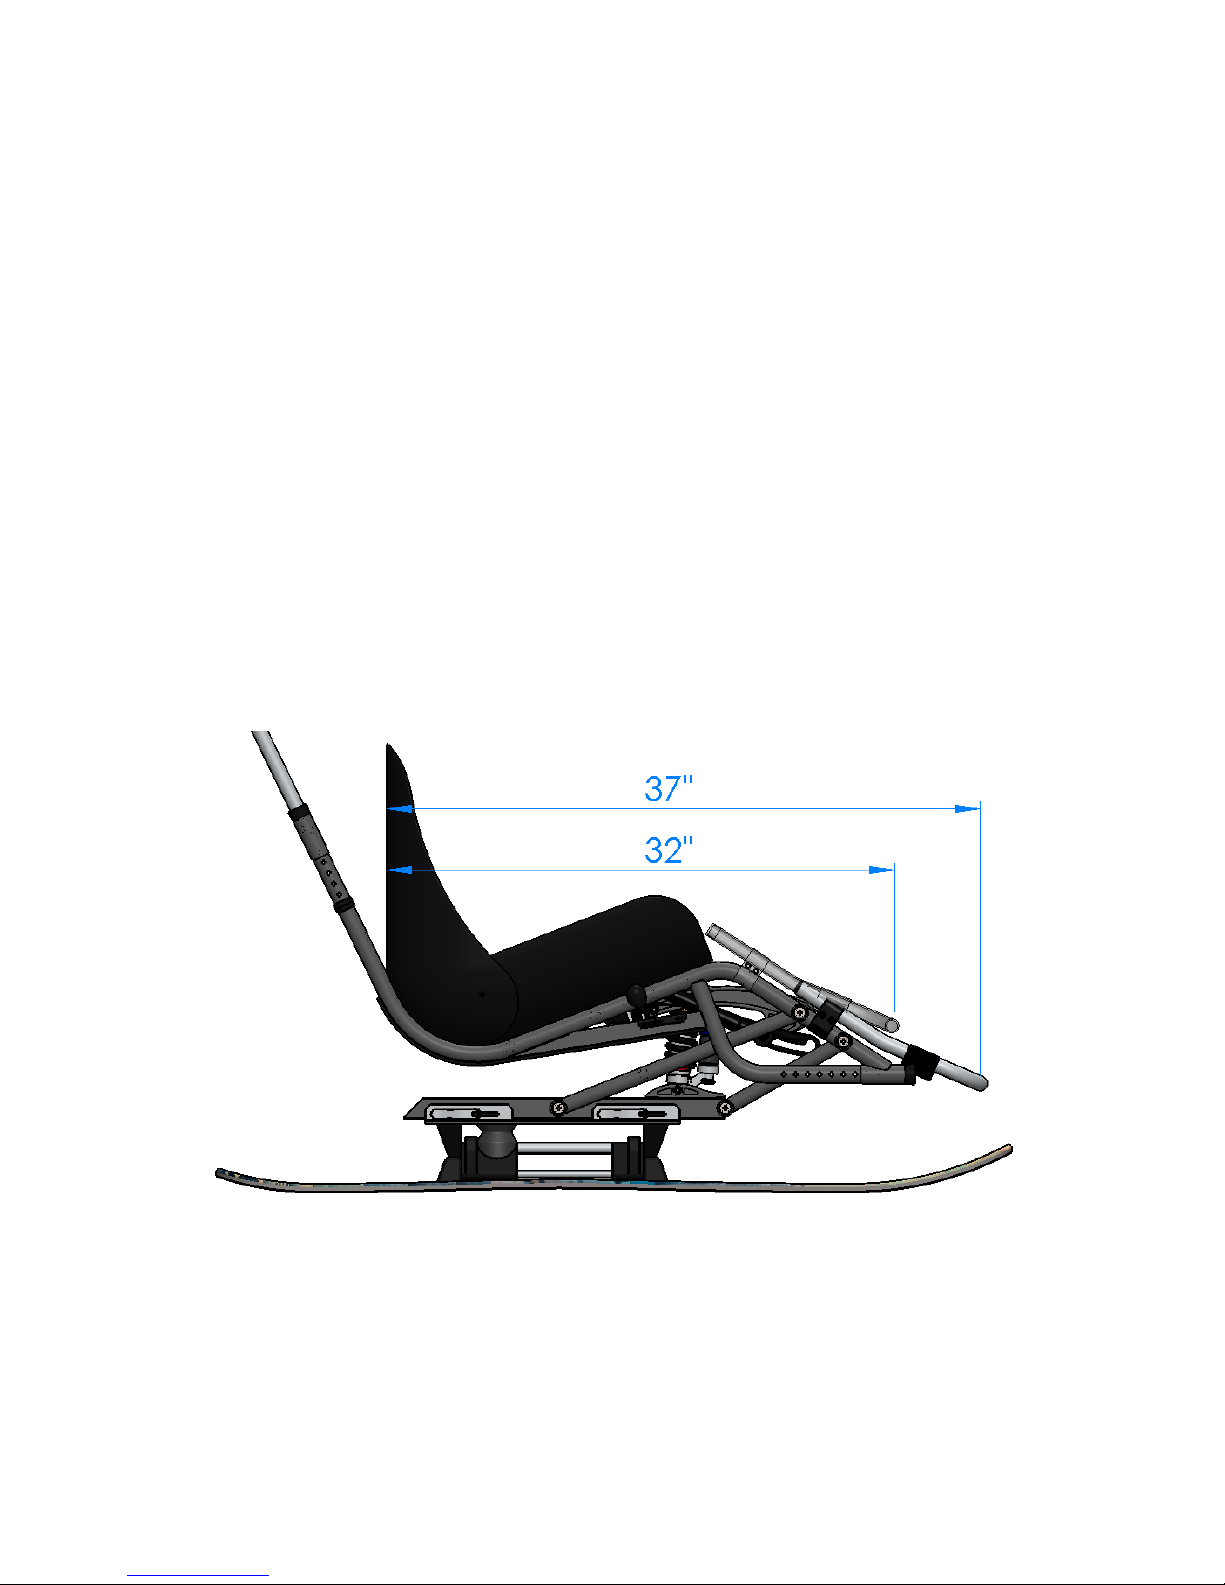
Sizing Guide
The Dynamique is designed for skiers from approximately 4’1” to 6’3”
tall.
One frame can accommodate the Child, Junior, Adult and Adult XL
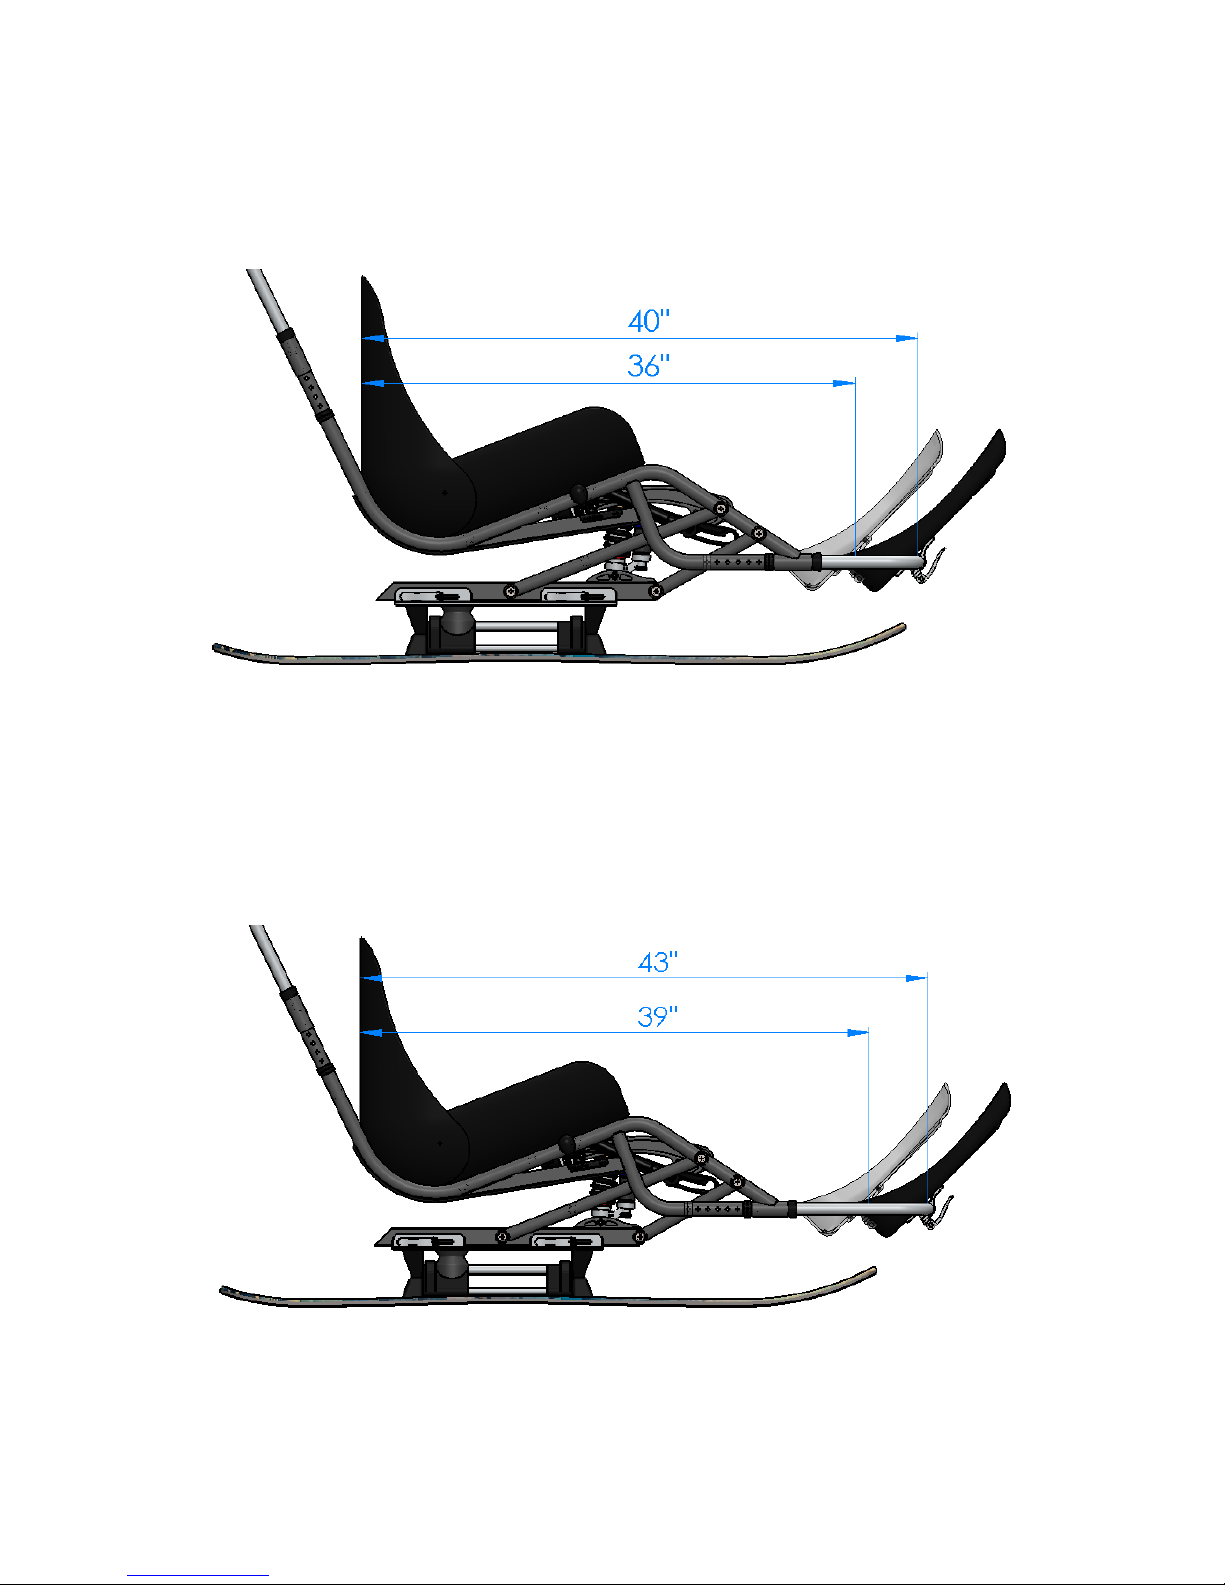
frame sizes of the Bi-Unique. This is achieved with three footrest
options and three seat size options. The options can be mixed and
matched to fit a wide range of skiers.
Your ski comes with one footrest, seat and handle. Extras are available
for purchase separately.
Child Footrest (4’1” – 5’1”)
The child footrest is designed for our smallest skiers. It attaches to the
main tubes of the upper frame with quick release clamps.
Page 8
8
Junior Footrest (5’0” – 5’8”)
The junior footrest adjusts along the horizontal axis. This ensures a
uniformly low center of gravity for all skiers
Adult Footrest (5’7” – 6’3”+)
The only difference between the junior and adult footrest is the tube
length. Taller skiers can be accommodated by increasing the seat dump
angle and tucking their knees more.
Page 9
9
Geometry
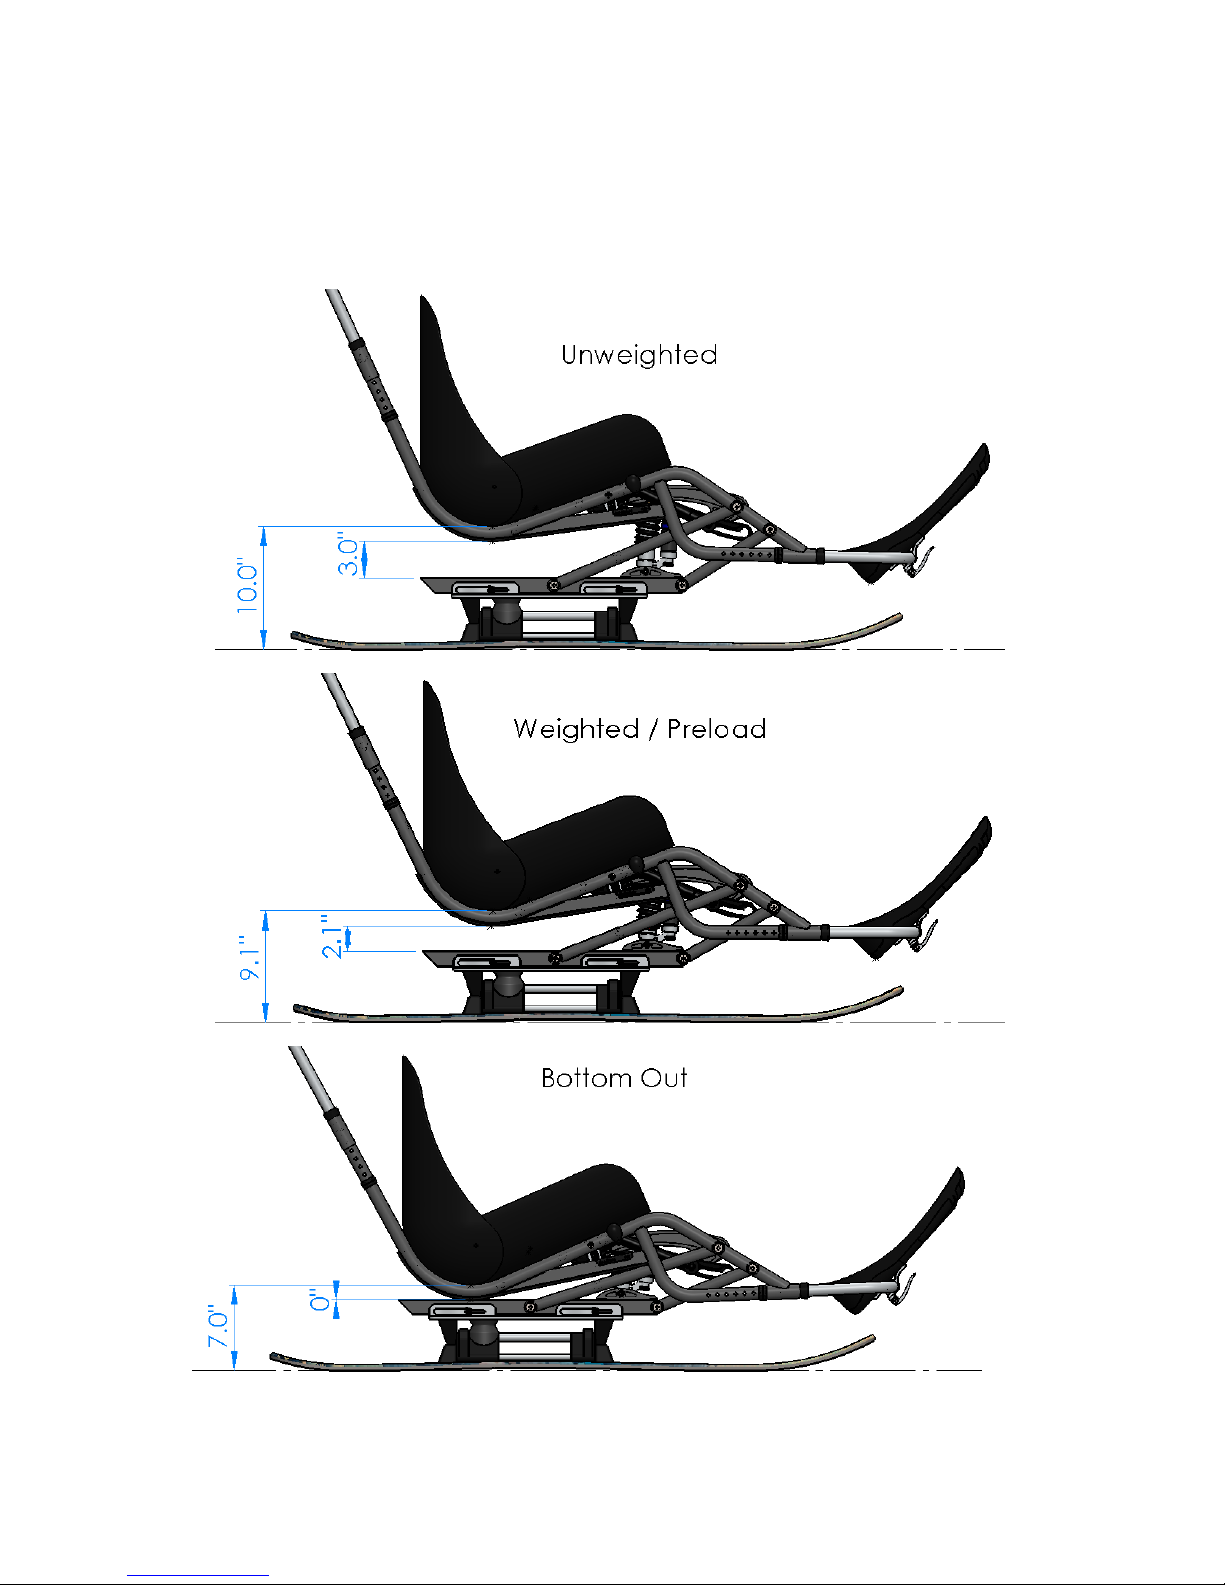
Ride Height
The Dynamique has 3” of suspension travel at the seat and
approximately 1” of suspension travel at the feet.
Page 10
10
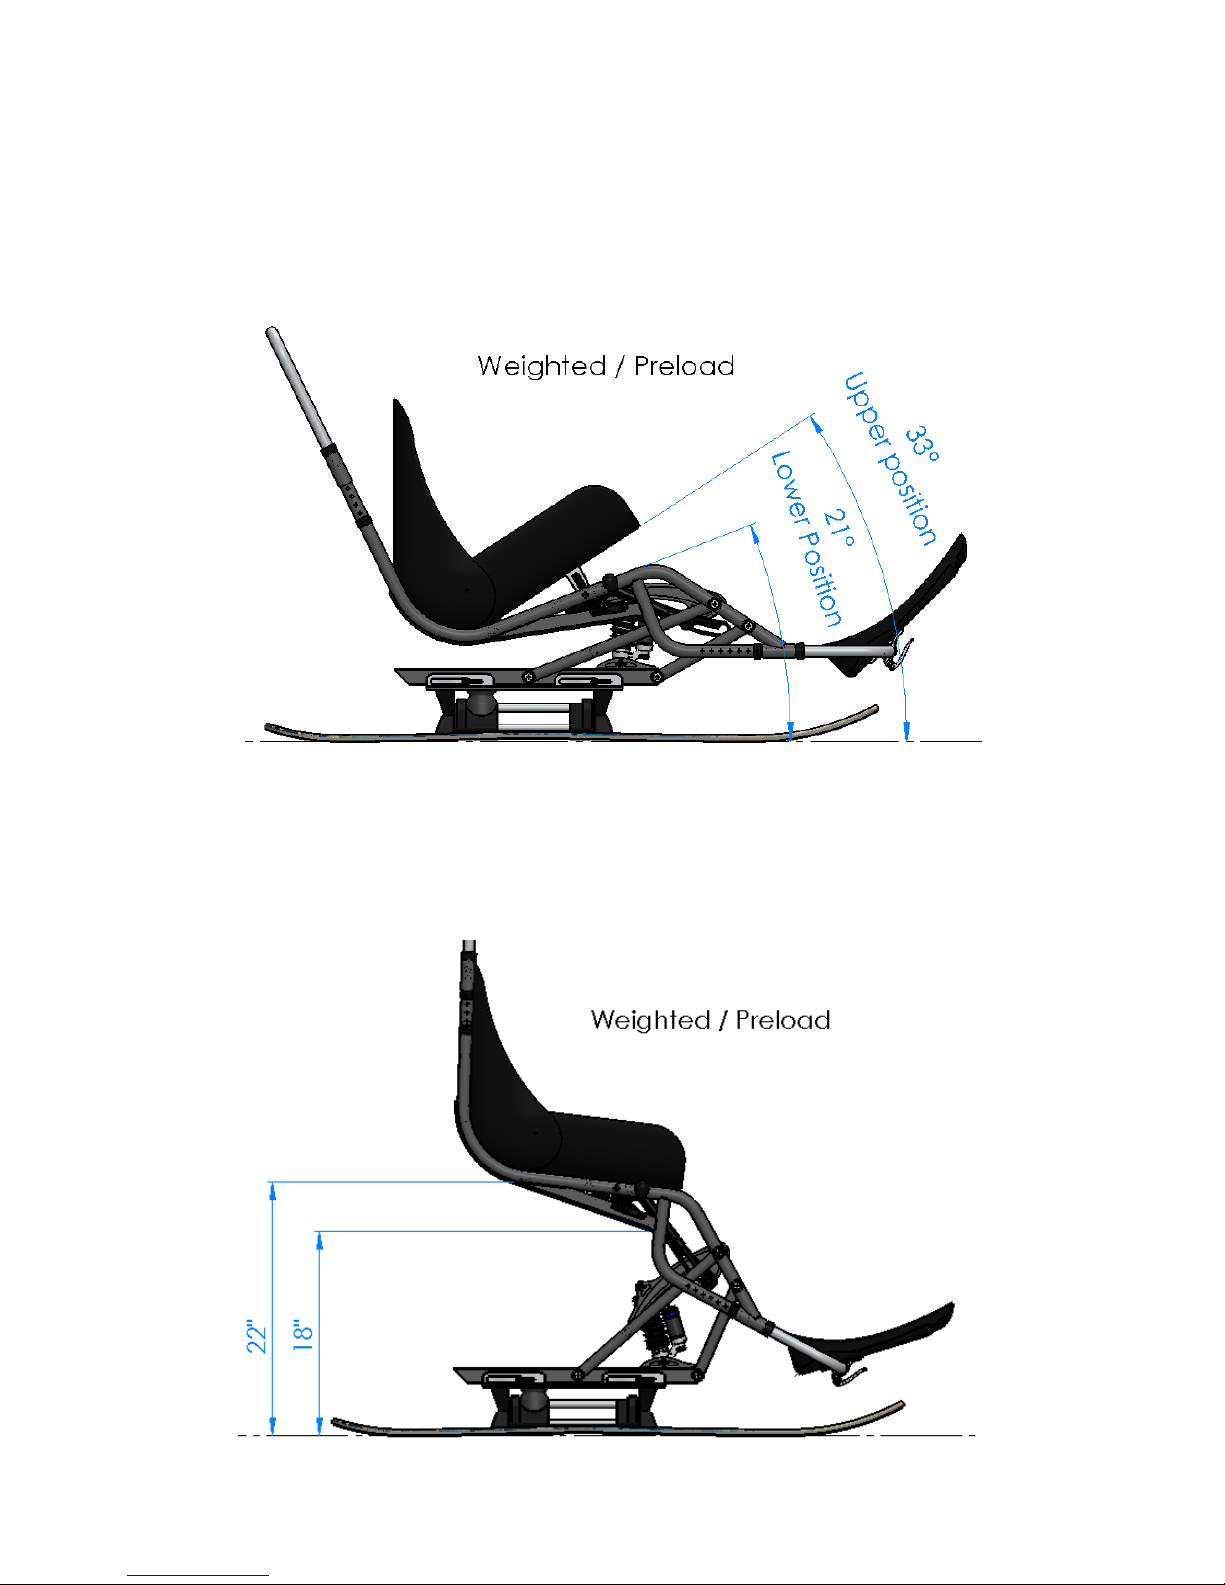
Seat Angle
The Dynamique’s seat angle is adjustable to four different positions in 3
degree increments. Weighted with a skier in the ski, the low position is
approximately 21 degrees. The highest position is approximately 33
degrees.
Load Height
The Dynamique was designed to load onto most chairlifts without
lifting. Weighted with a skier, the load height is approximately 18” at its
lowest.
Page 11
11
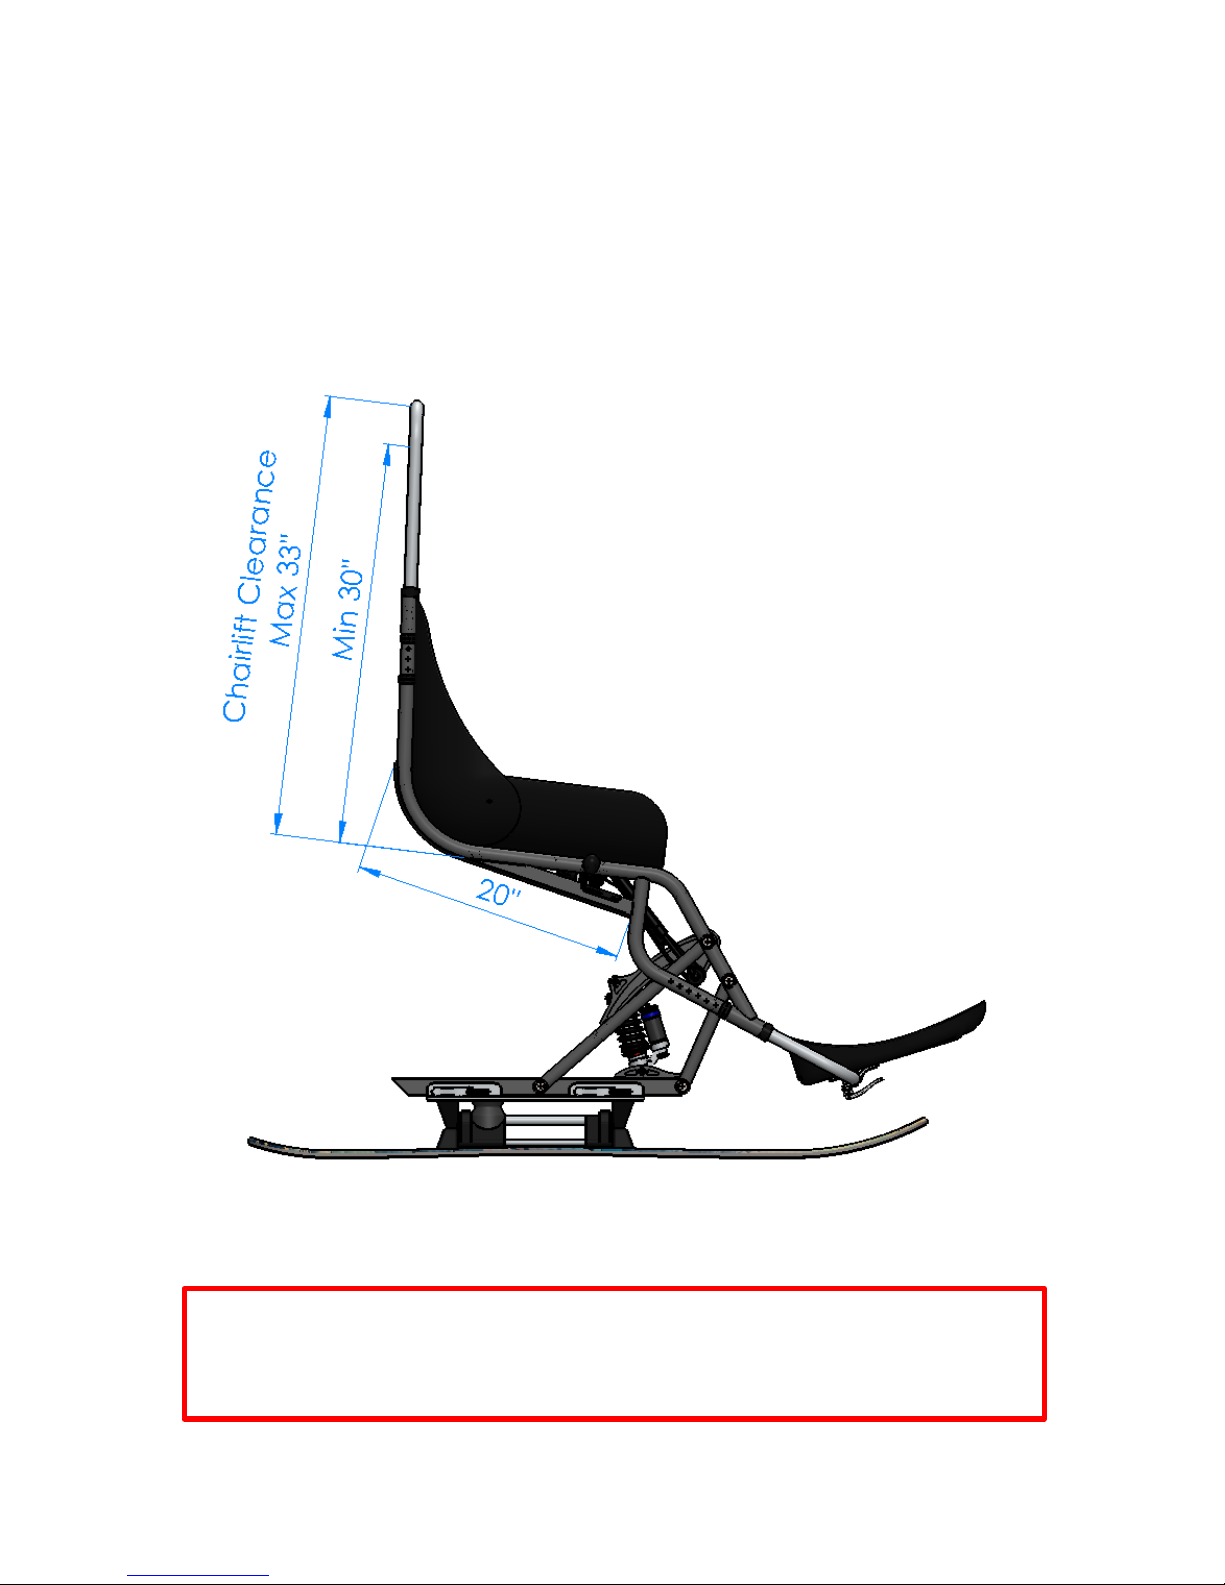
Chairlift Clearance
The Dynamique’s handles are designed to work with most chairlift
safety bars. Both the narrow and wide handles have the same clearance
on a chairlift. The skid plate was designed so the ski can sit all the way
back on most chairlifts. The rear frame triangle will naturally lean the
skier back into the chairlift.
Pay attention to where you sit down on the chairlift. Be aware of grab
handles, footrests, maps or other add-ons that may interfere with the
handle.
Page 12
12
Handles
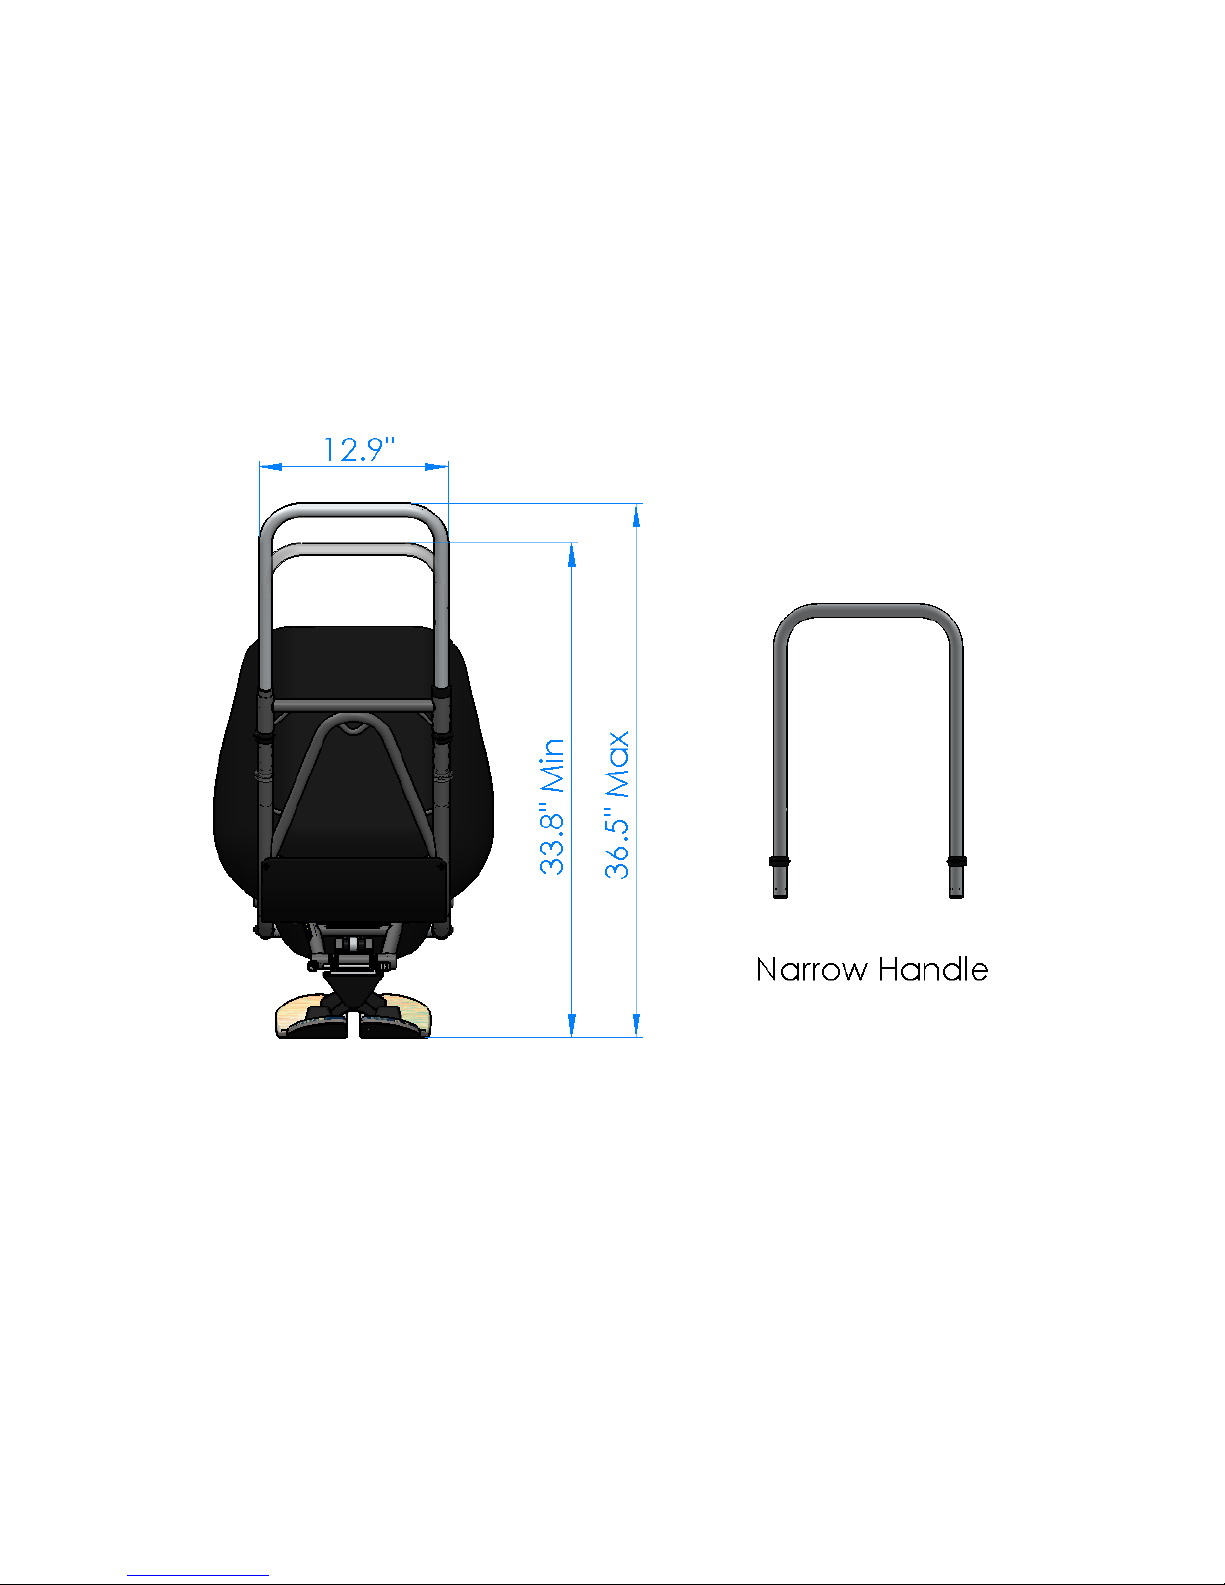
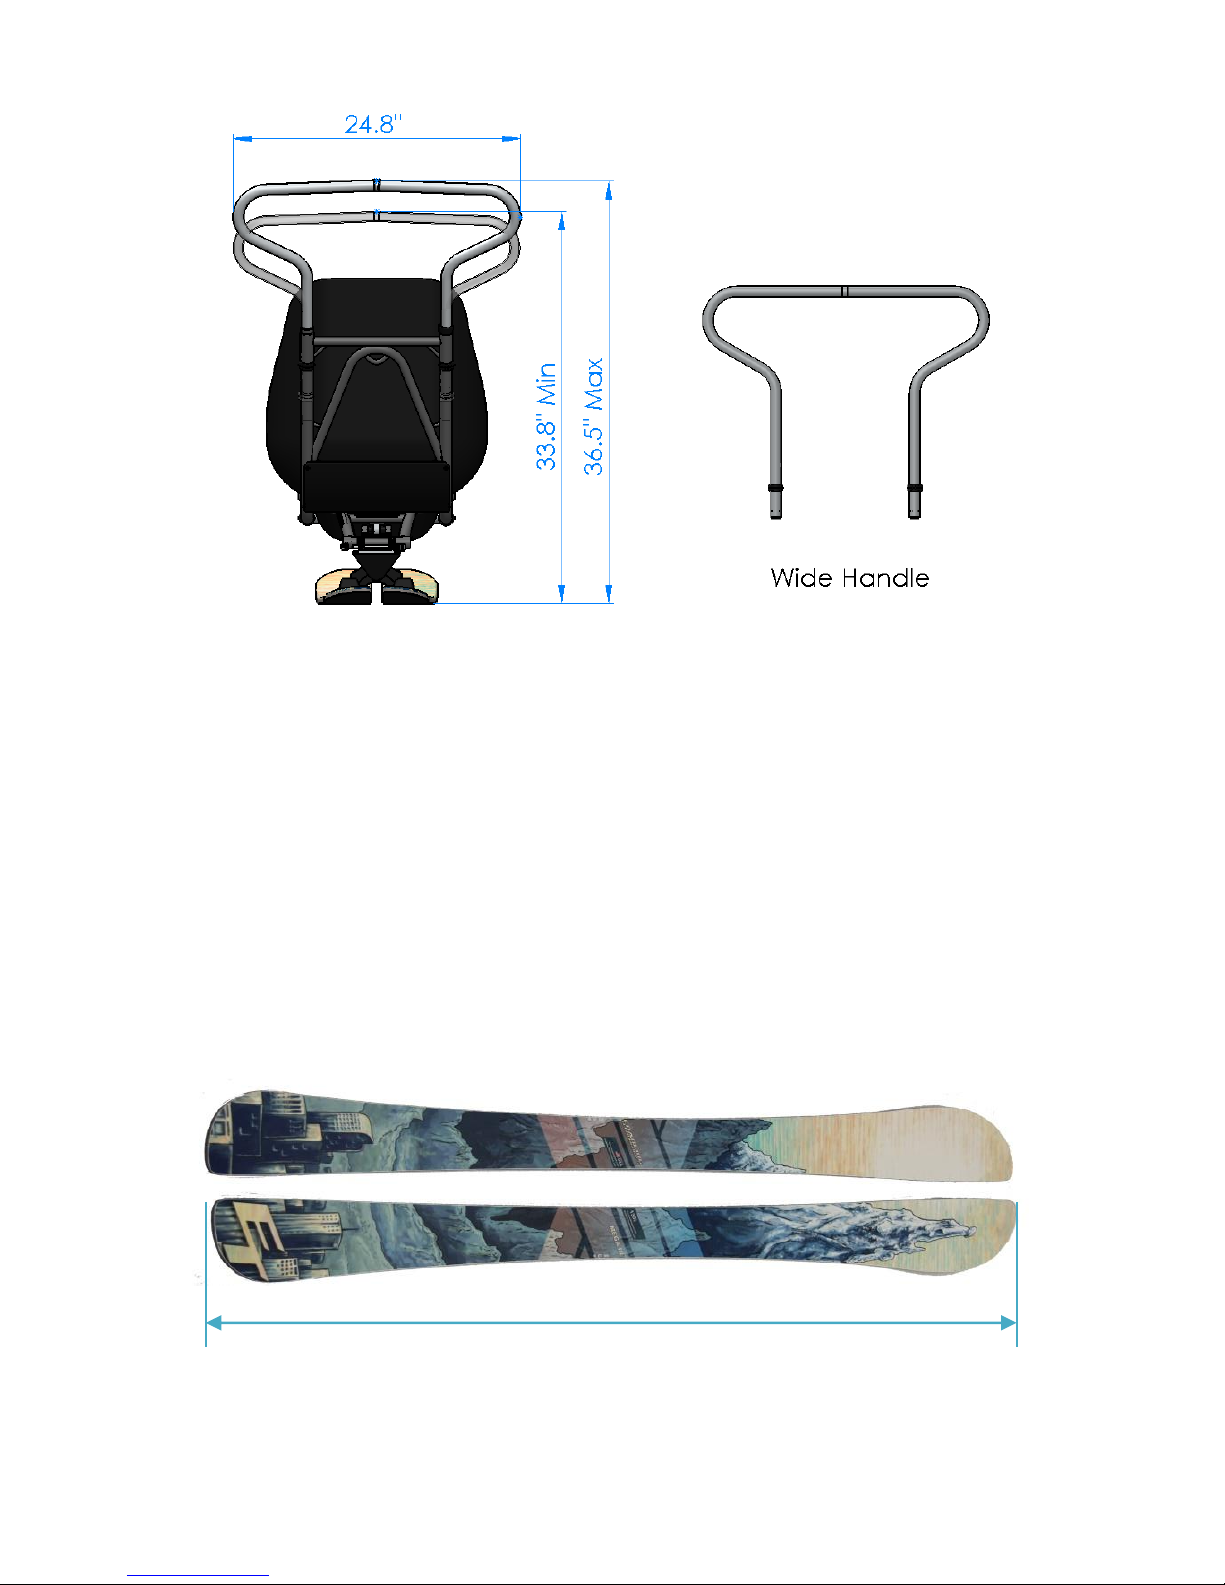
The Dynamique comes with narrow and wide handle options. Both
handles are the same height and adjust with quick release pins. The
handle height is measured in the ride position with the ski weighted.
The narrow handle is recommended for skiers who need occasional
hands-on use.
The wide handle is shaped like a mountain bike handlebar and provides
superior handling for hands-on lessons. The wide handle also provides a
hand grip that makes it easier for ski buddies to pick up a skier after
they have fallen.
Page 13
13
Mega III Skis
Mega III Bi Skis employ the same proven shape, side cut and camber as
the Mega II's but with a new and improved flex pattern. A stiffer core
throughout adds stability and performance. It also makes loading and
unloading the chair easier.
The skis are built using the same materials and methods as traditional
alpine skis. They employ a strong wood core, fiberglass top plate and
resin reinforced ski mounting area. Light weight at only 34.8 ounces.
130 cm
Page 14
14
Initial Assembly
Your Dynamique bi ski will come partially assembled. The steps how to
assemble your ski are outlined here.
Skis & Mechanism
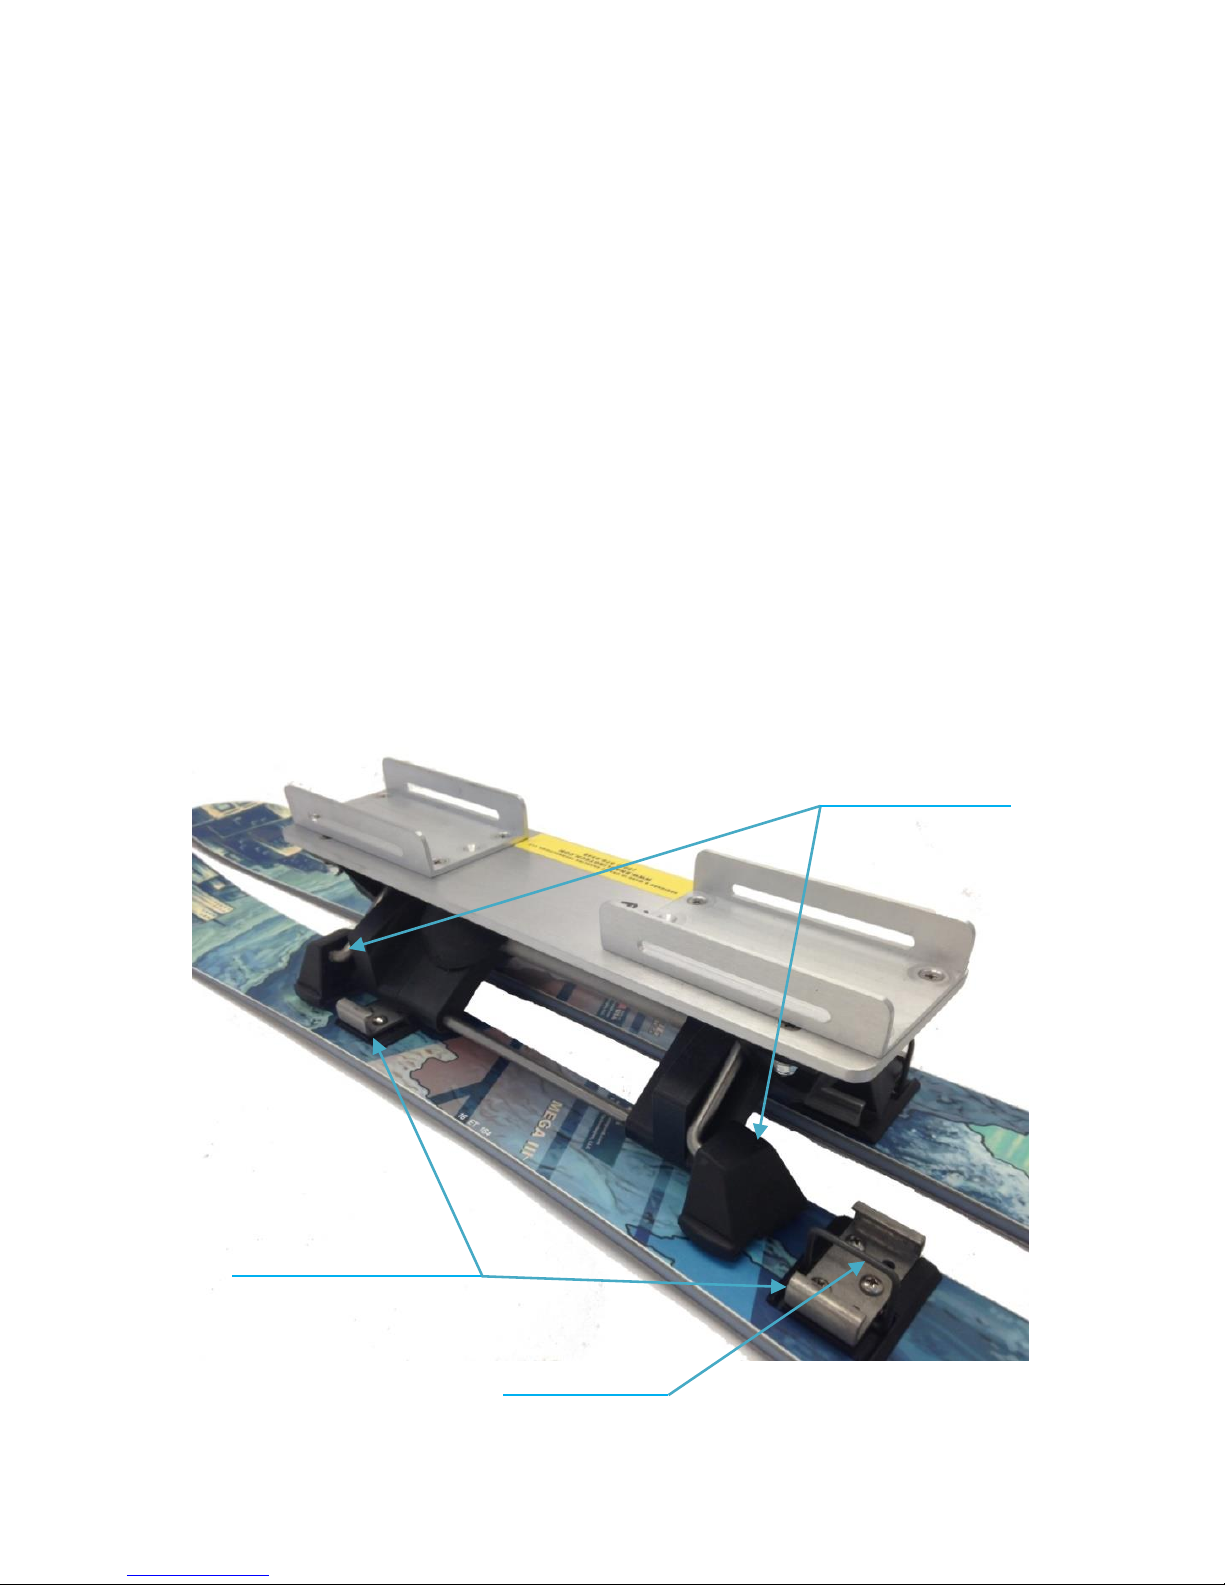
Mega III skis come with specially designed ski bindings. The bindings
allow you to quickly mount and dismount skis. They also allow the skis
to freely flex while skiing. This improves contact with the snow and
performance.
To mount the skis align the feet of the articulating mechanism behind
the ski binding brackets. The front binding has a retaining ring. Push
down on the retaining ring and tap / slide the mechanism forward into
the ski binding brackets. The retaining ring will snap into place. Repeat
this for both the left and right skis.
Ski Binding Brackets .
Retaining Ring
Mechanism Feet
Page 15
15
To dismount the skis push down on the binding retaining ring and tap /
slide the mechanism backwards out of the ski binding brackets. Repeat
this for both the left and right skis.
Mechanism & Frame
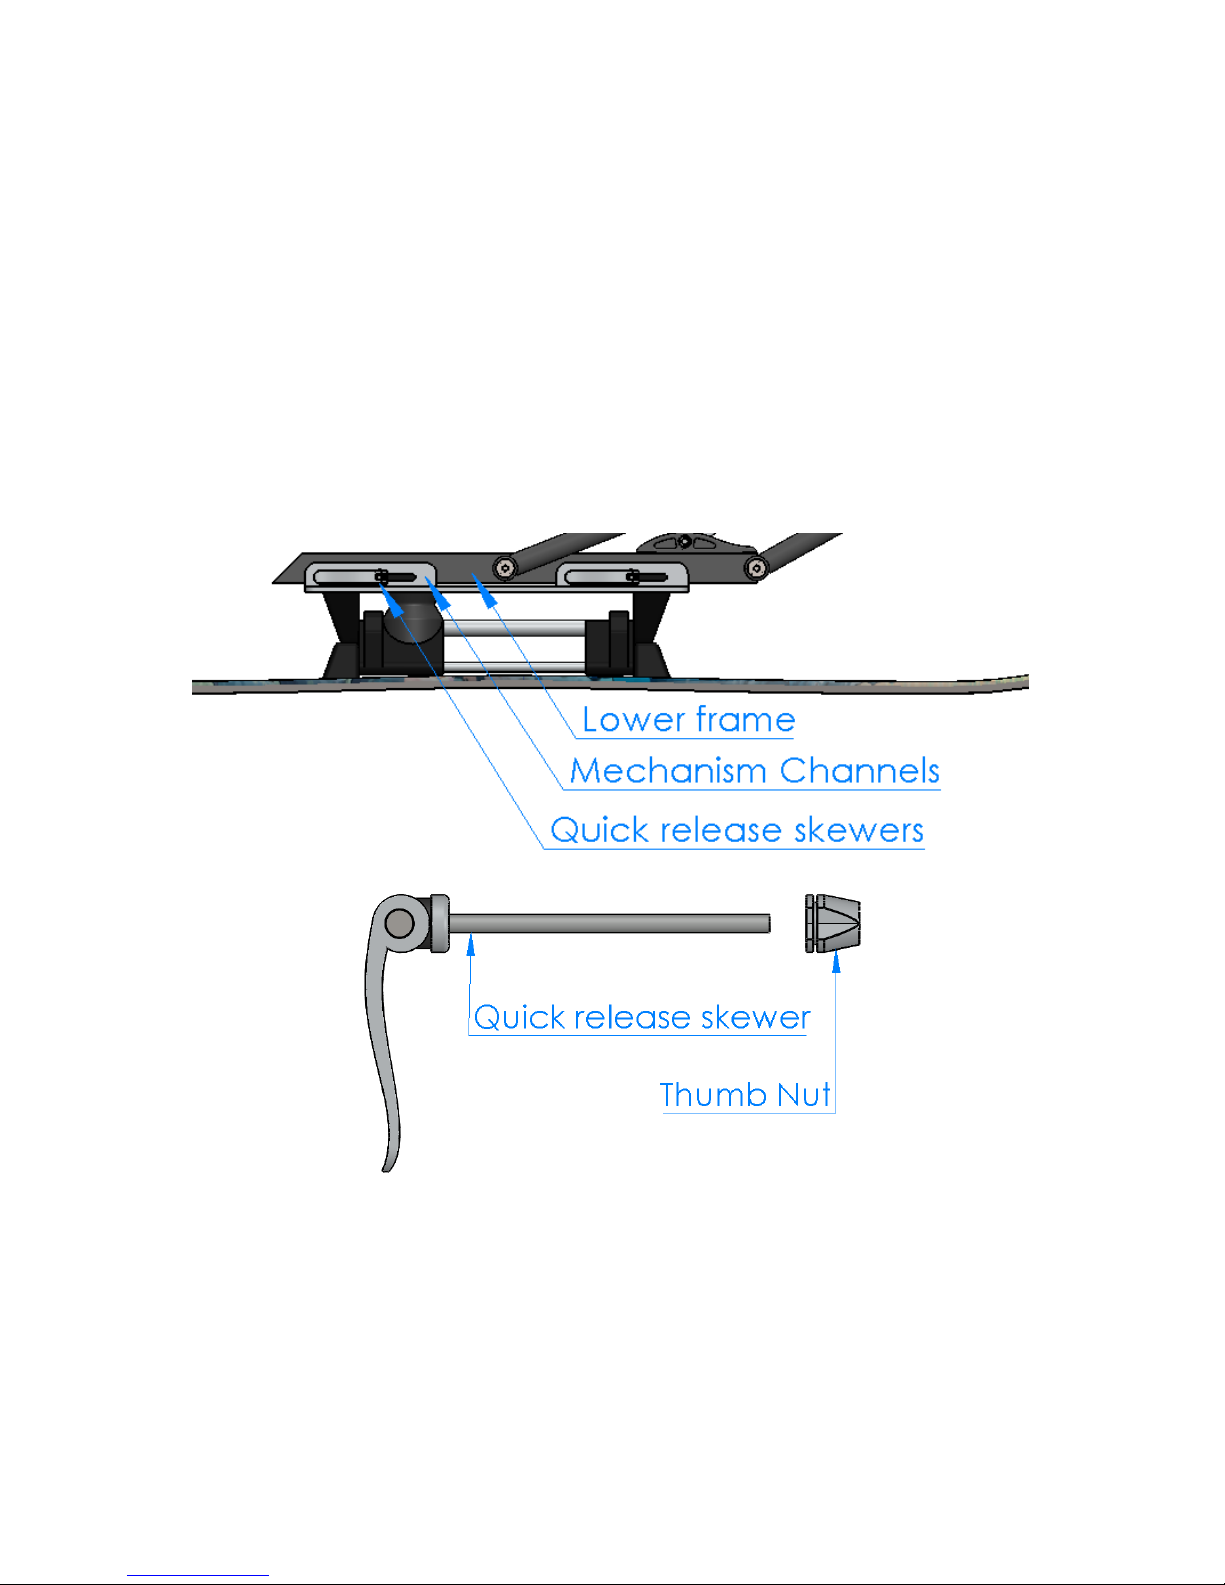
The articulating mechanism attaches to the frame with two quick
release skewers. Place the lower frame within the channels of the
mechanism and push two quick release skewers into the ski from the
right side. Two thumb nuts screw onto the lother side. Clamp down the
quick release skewer to secure the mechanism and frame into position.
For how to adjust the center of mass see the “Use” section
Page 16
16
Footrest & Frame
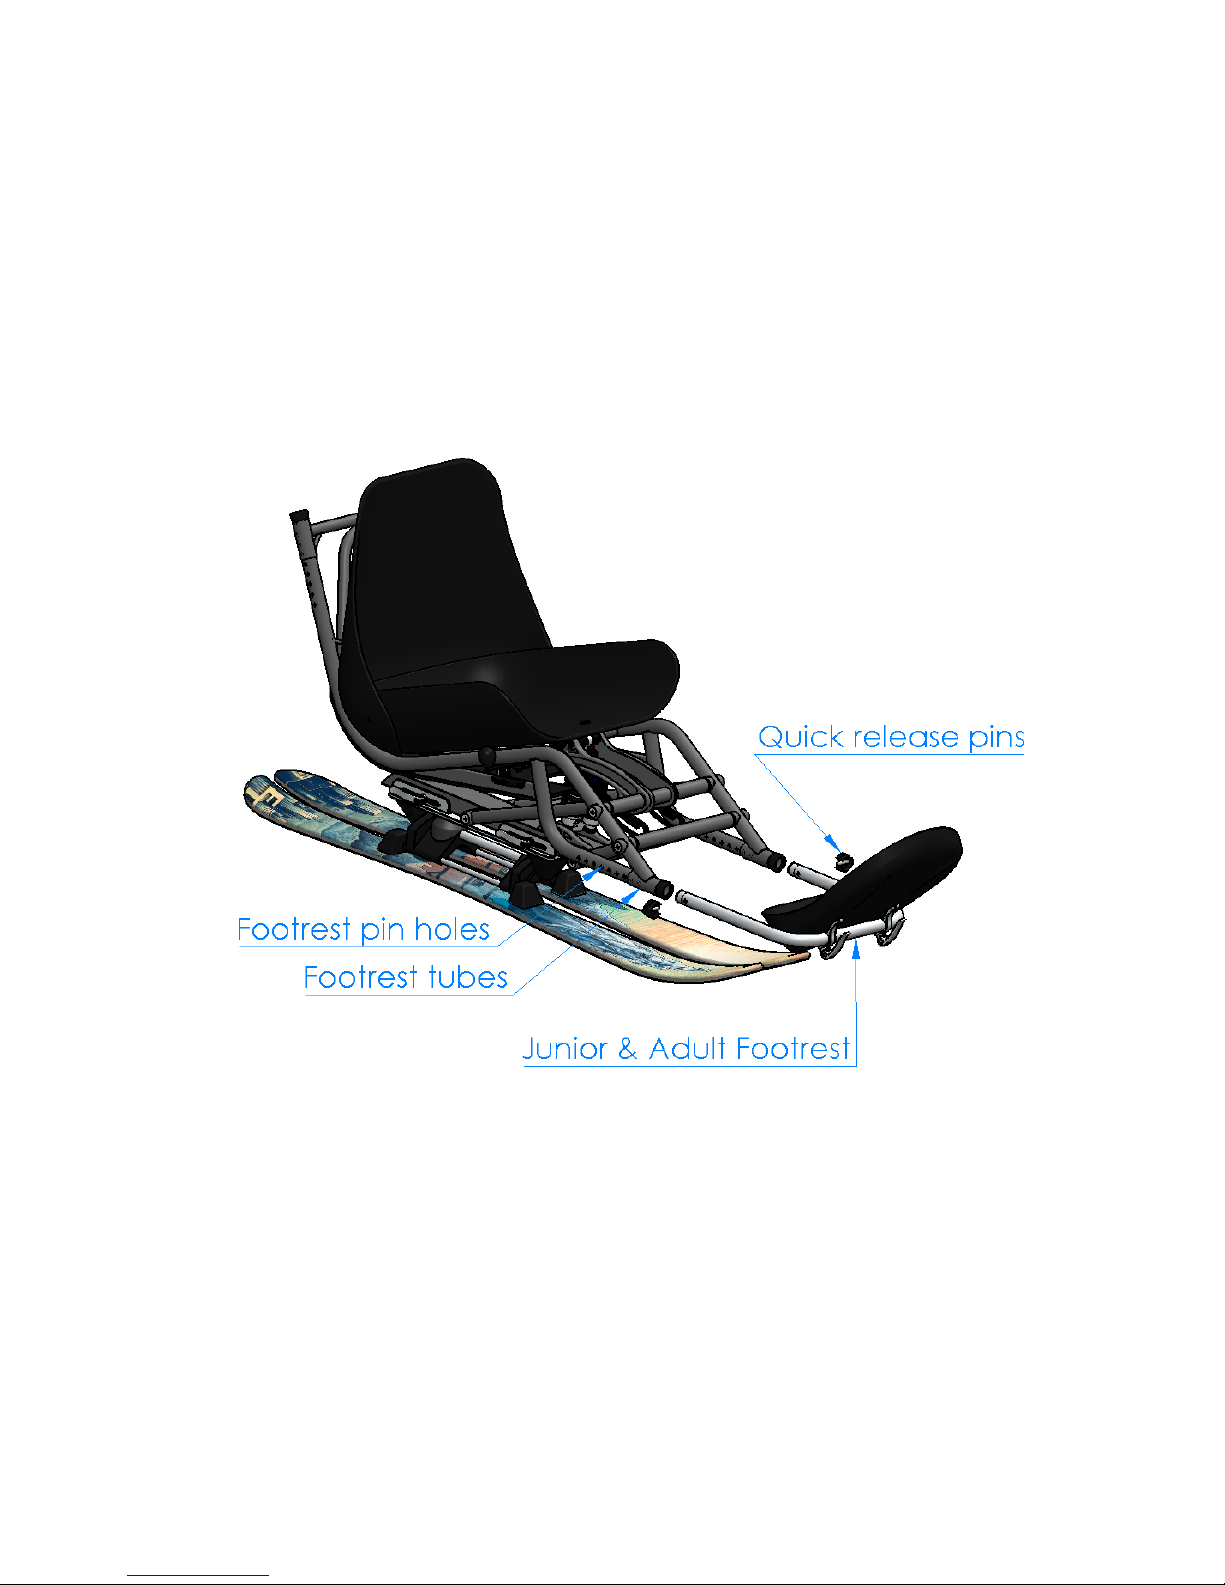
Start by sliding the footrest into the footrest tubes of the frame. White
lithium grease should be used to lube the parts. Be careful to slide each
side in straight and at the same time. Slide / tap the footrest into the
tubes. If necessary, a rubber mallet can be used to overcome initial
friction. Once inserted the footrest should move smoothly by hand.
Secure the footrest to the frame with quick release pins.
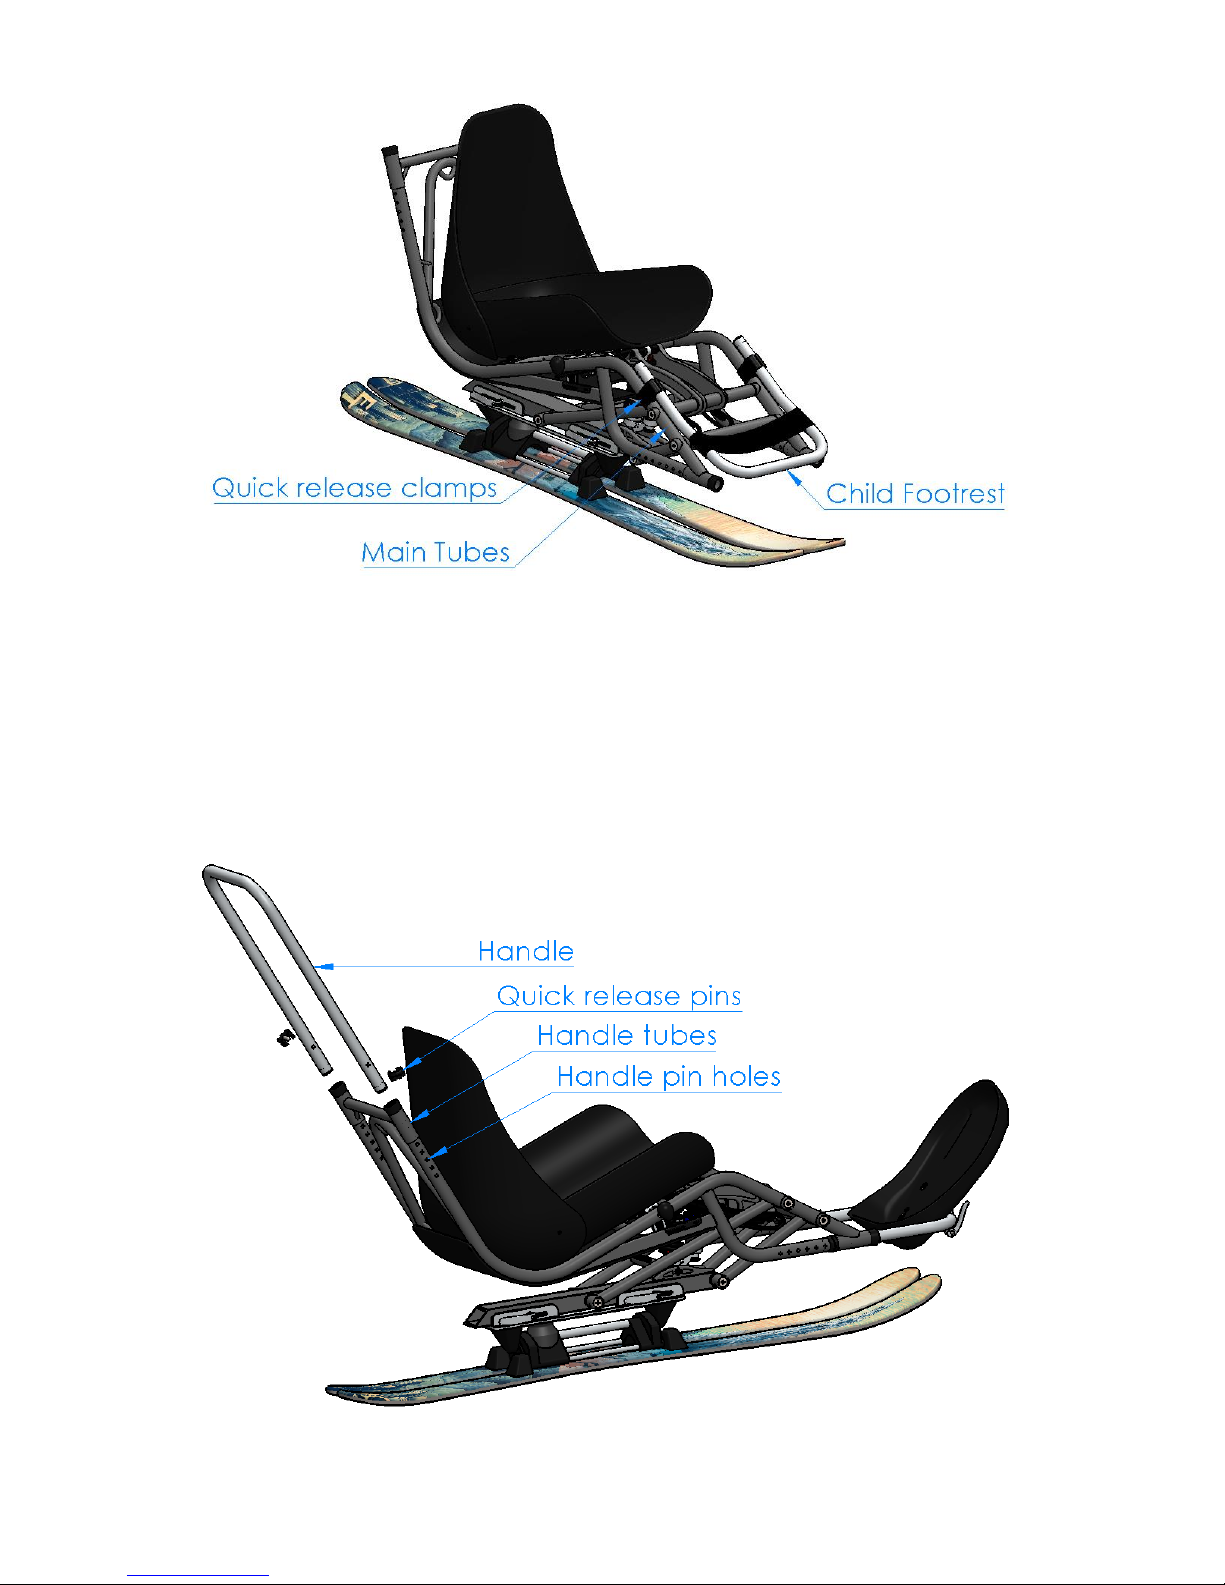
The child footrest attaches to the main tubes of the frame with clamps.
The 1” end of the clamps attach to the frame. The 7/8” ends of the
clamps attach to the straight section of the footrest. The clamps should
be vertical with the frame. They can be positioned anywhere along the
main tubes. Tighten the clamps to secure the footrest to the frame.
Page 17
17
Handle & Frame
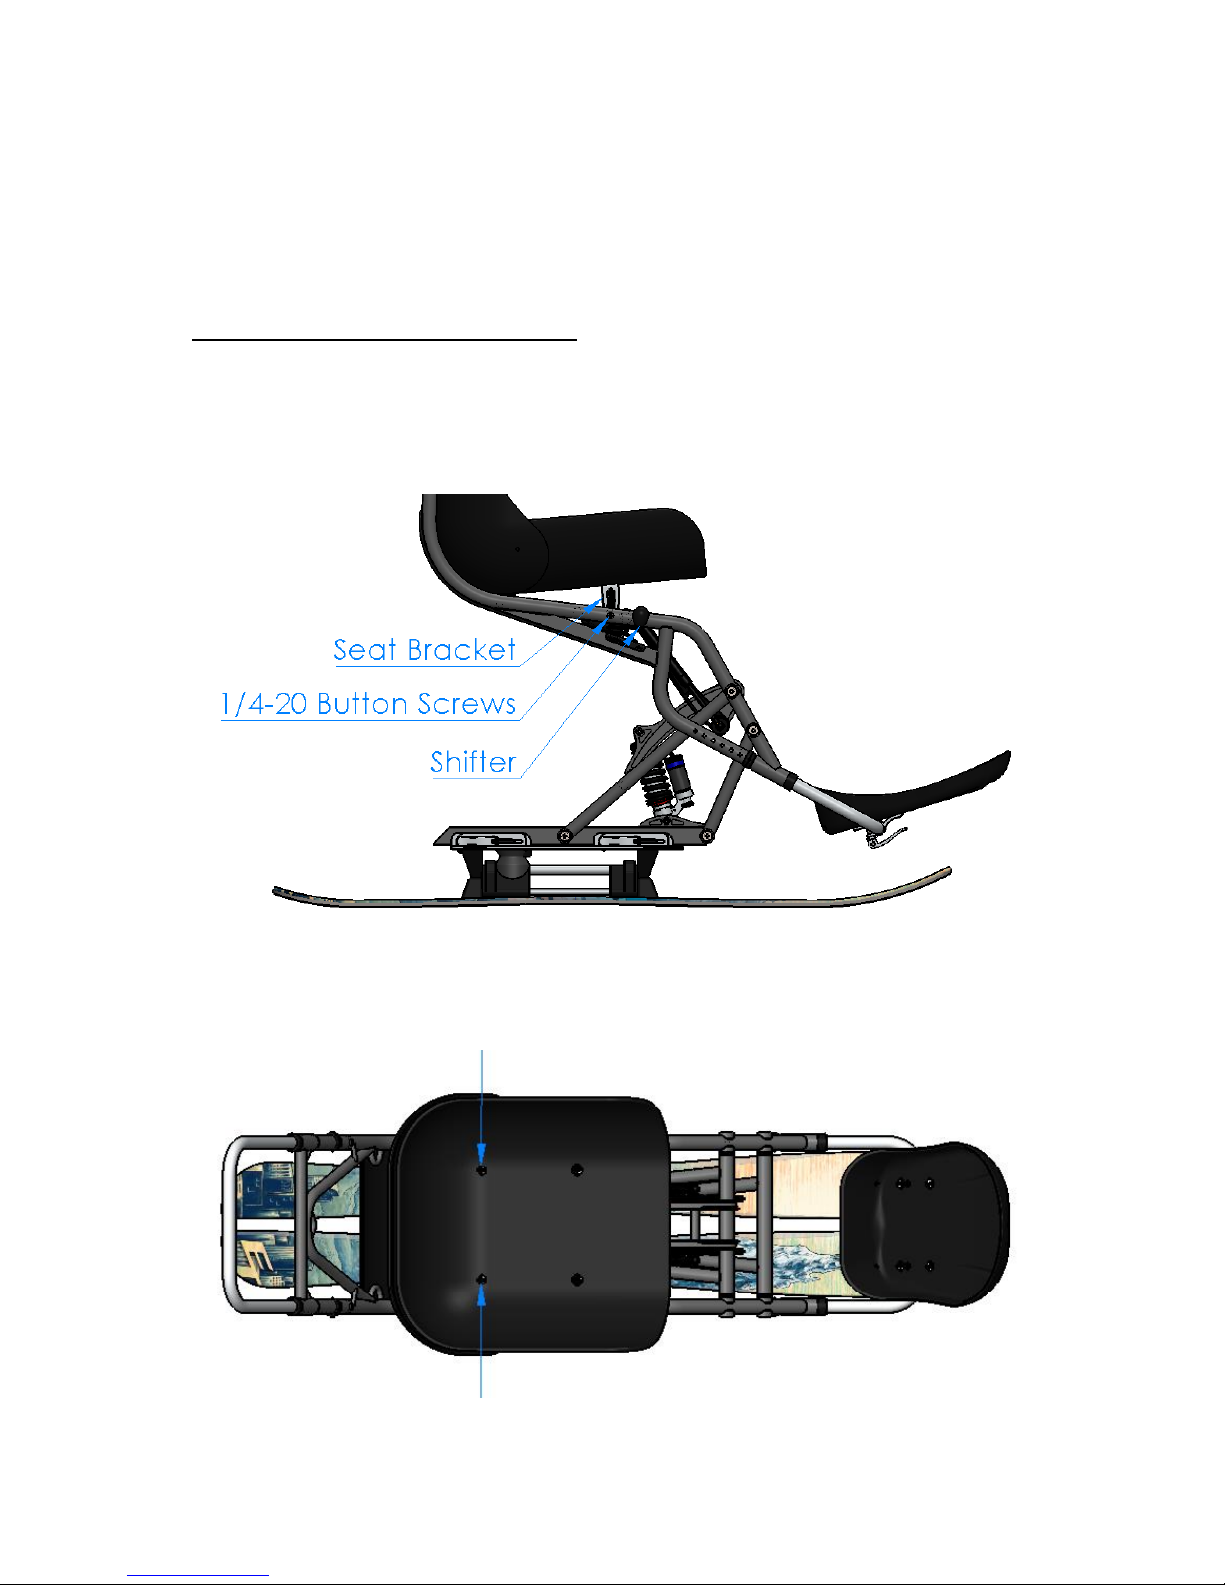
Handles are installed much like the adult and junior footrests. Slide the
handle into the handle tubes of the frame. White lithium grease should
be used to lube the parts. Secure the handle to the frame with quick
release pins.
Page 18
18
Changing Seats
The ski has been designed so different seat sizes can quickly be swapped
onto one frame. Your Dynamique is shipped with a seat installed but
additional seats can be purchased separately.
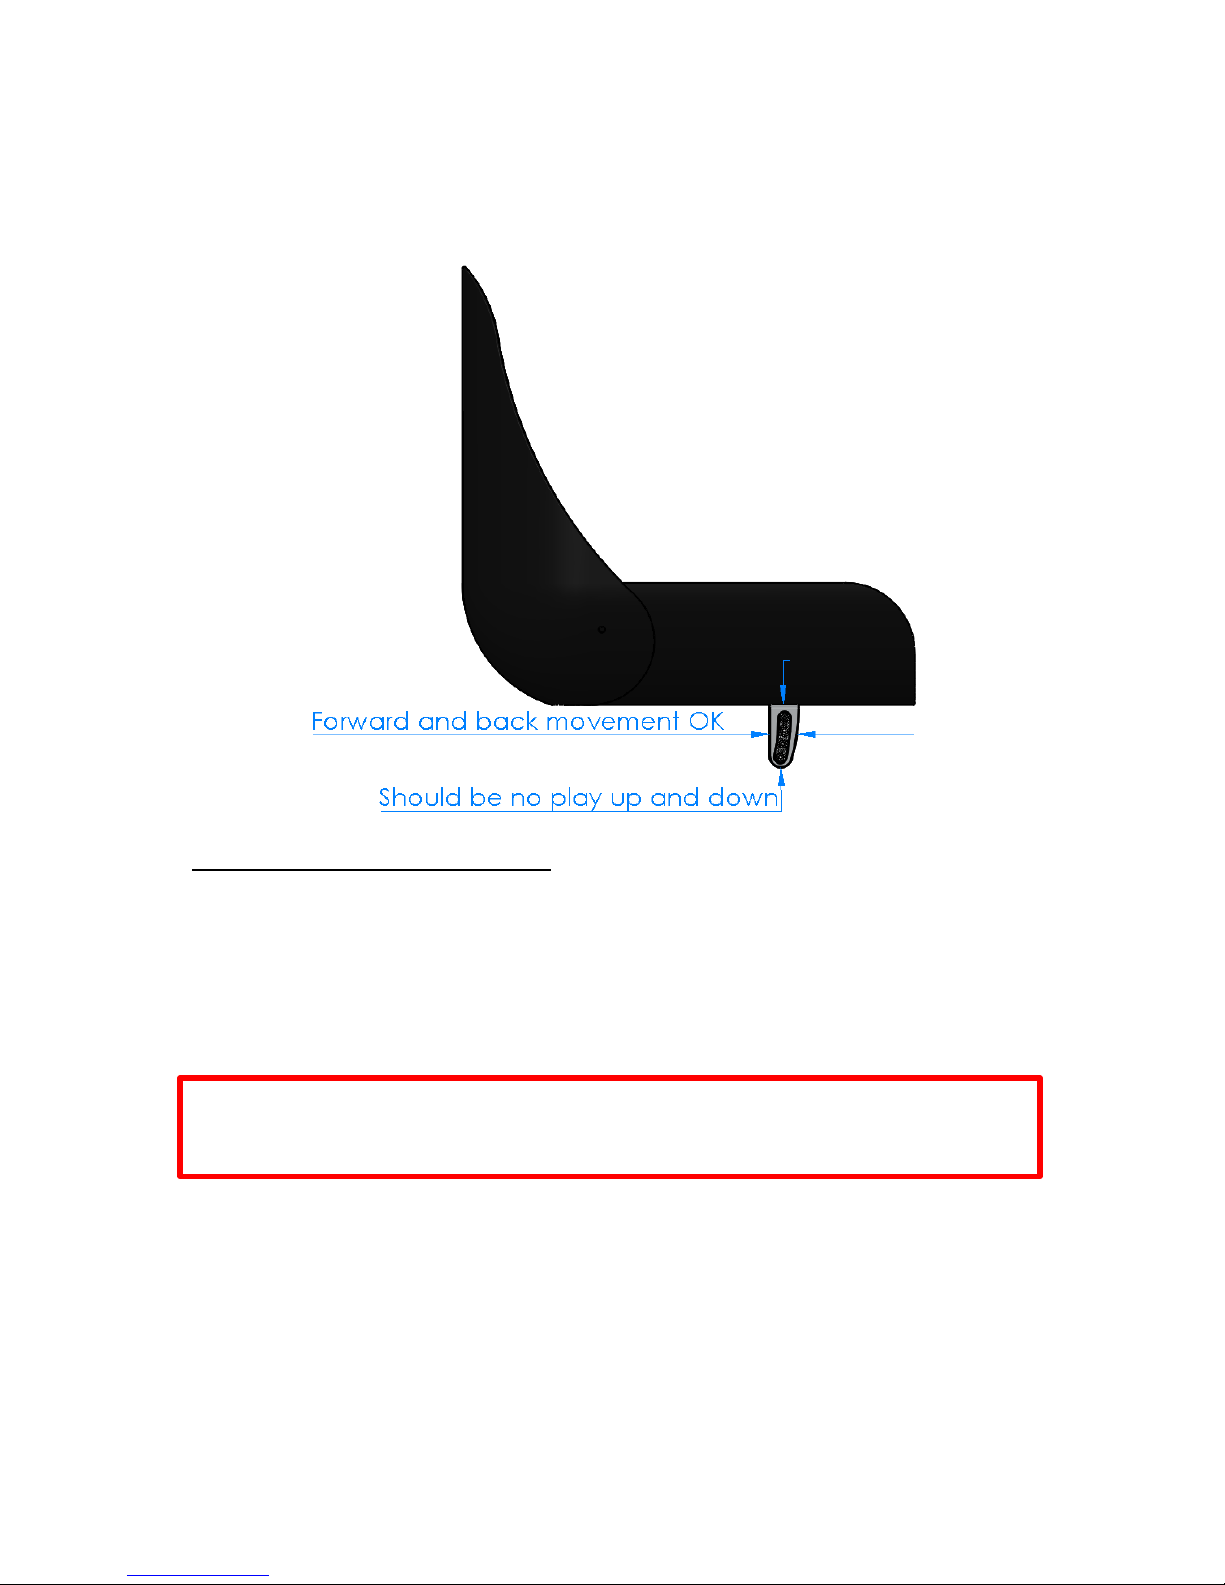
Remove the seat from the frame:
Shift the ski into the up position. This improves access to the bolt
behind the shifter. Unscrew the ¼-20 button screws on both sides using
a 3/16” Allan key.
Next take the seat liner out of the seat. Remove the two rear truss head
screws with a #2 screw driver. Remove the seat from the frame. The
seat bracket will still be attached to the seat.
Page 19
19
A seat bracket will already be installed to any spare seats. The seat
bracket might move forward and back along the mounting slots. This
movement is OK. There should not be any play up and down between
the seat and the seat bracket though.
Install a new seat to the frame:
Align the rear seat pivot plate parallel with the frame. Place the seat on
the frame. It will fall into its lowest position. Re-screw the two rear
truss head screws with a #2 screw driver. Make sure the seat and seat
pivot plate are flush with each other.
It is possible to cross thread the rear seat inserts if the rear plate and
seat are not flush with eachother.
Pick an adjustable dump position and align it with the hole in the frame.
If the seat bracket doesn’t immediately line up it can be loosened and
pulled forward or back along the mounting slot. Once the holes are
aligned thread one of the ¼-20 button screws in 2-3 turns. Go to the
other side and thread the second button screw in completely. Return to
the first button screw and finish tightening it into position.
Page 20
20
Accessories
Accessories are available for the Dynamique to accommodate a wider
range of skiers. All accessories are sold separately. Prices and more info
can be found online at www.enablingtech.com/collections/bi-ski-bi-
unique-parts-accessories/dynamique.
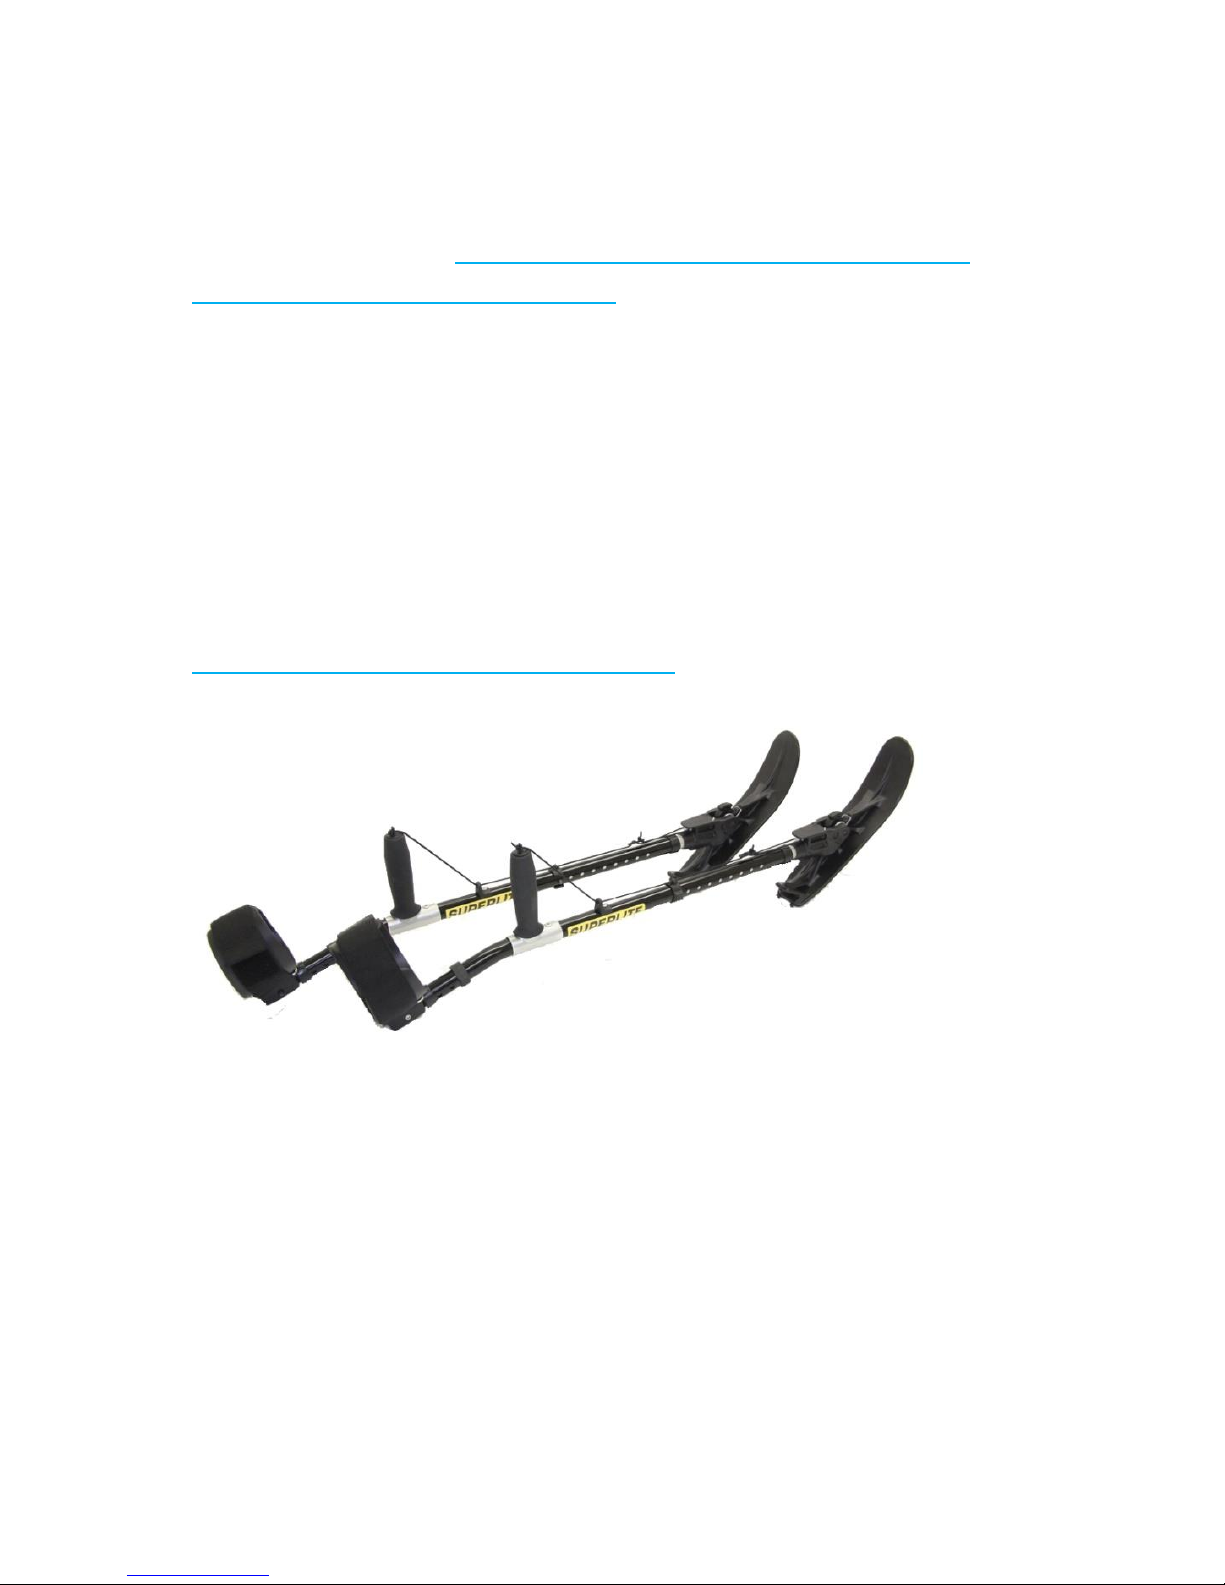
Superlite Outriggers
Superlite Outriggers are the most popular outriggers in the world.
Superlite's versatility comes from its set up options which help
accommodate a wide range of skiers. Used to assist in balancing,
stopping, turning, and getting on and off the lift, these outriggers will
enhance the skiing experience. If you are unfamiliar with outriggers it is
recommended to visit our website
www.enablingtech.com/pages/outriggers.
Page 21
21
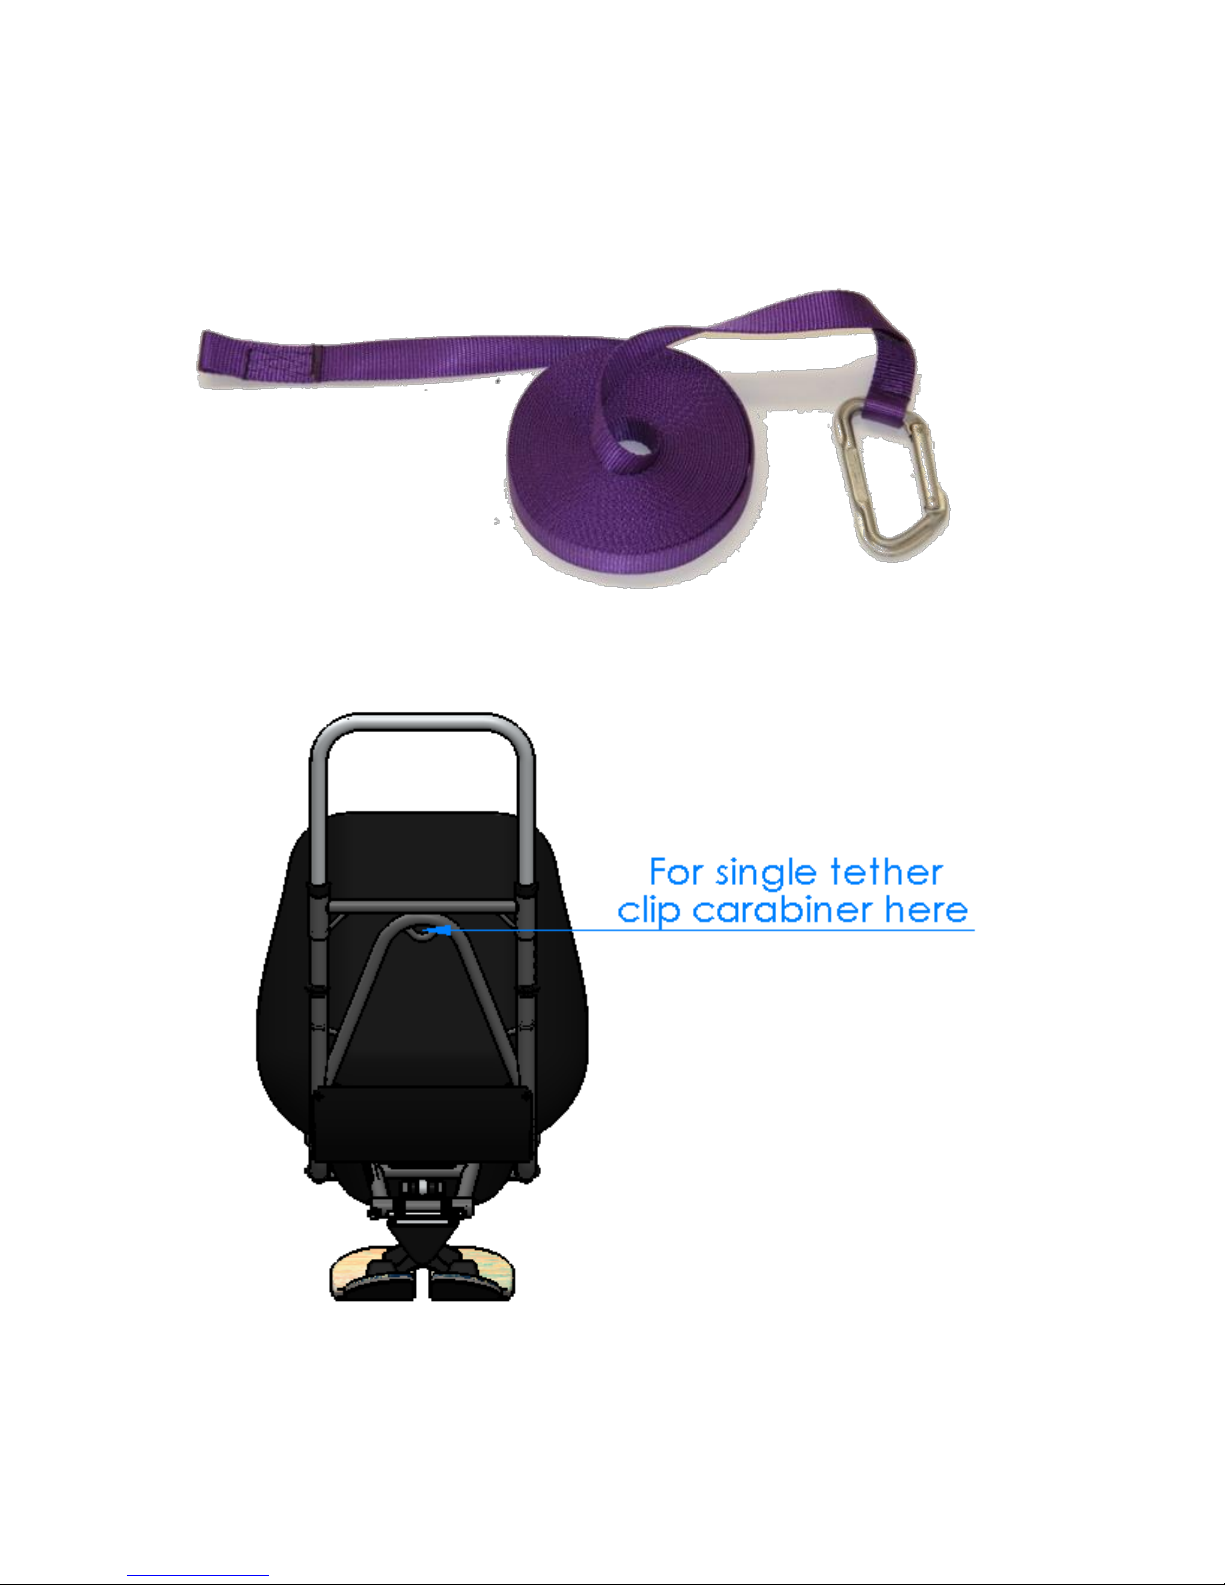
Single Tether & Carabiner
Single tethers allow an instructor or ski buddy to slow the Bi-Unique
from behind. The kit comes with one straight gate carabiner and a
12’x1” strap as shown.
For single tethers clip the carabiner to the middle anchor at the back of
the ski.
Tethering can be dangerous and should only be done if properly trained
or supervised by a trained professional
Page 22
22
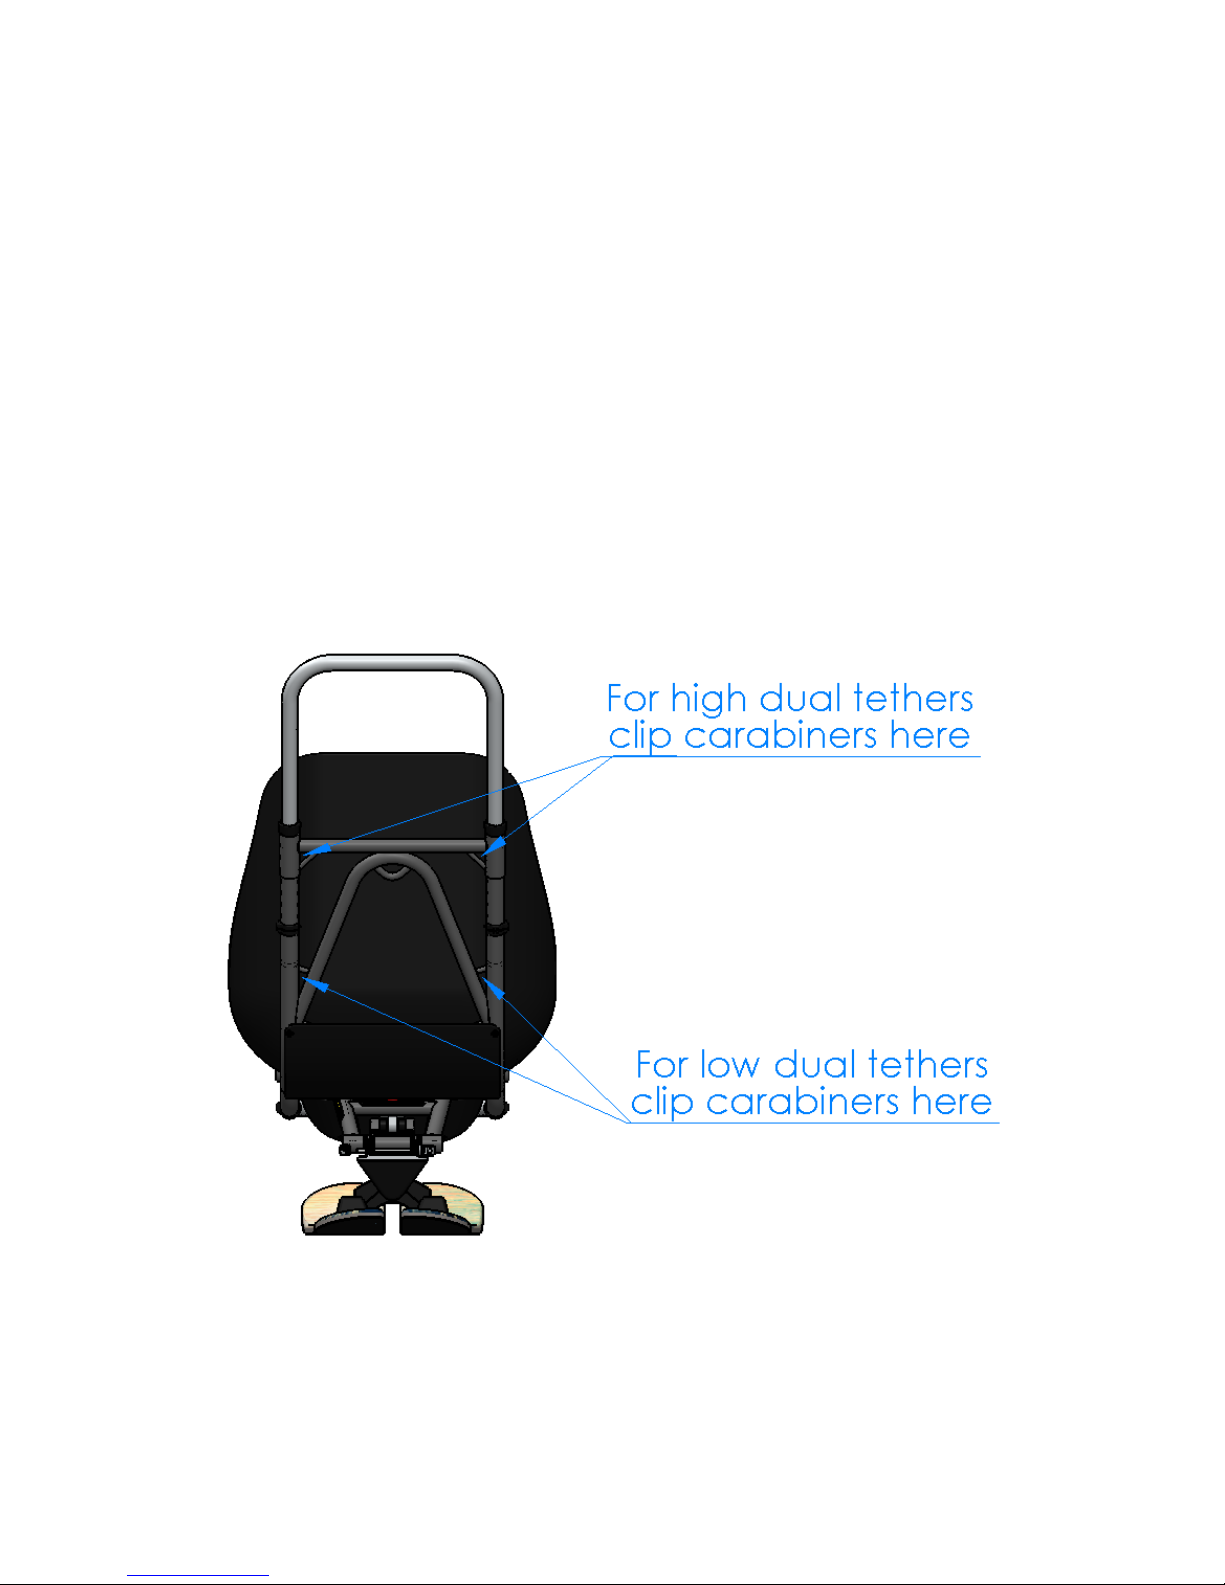
Dual Tethers & Carabiners
Dual tethers allow an instructor or ski buddy to control the Bi-Unique
from behind. The dual tether kit comes with two straight gate
carabiners and two 12’x1” straps. The continuous dual tether kit comes
with two straight gate carabiners but only one 24’x1” strap.
The Dynamique has high and low tether points for dual carabiners. The
high tethers tend to carve the ski while low tethers make it easier to
skid out the tail when desired. Clip the carabiners to the high or low
tether anchors as shown.
The tether points have been designed to reduce the risk of carabiners
inadvertently releasing while skiing.
Tethering can be dangerous and should only be done if properly trained
or supervised by a trained professional.
Page 23

23
Use
General Inspection
It is good practice to inspect and repair the ski as necessary before use.
Some of the things to check your machine for are:
Frayed or cut webbing
Loose or broken fasteners
Cracks within the frame or skis
The skis articulate as intended
The chairlift load mechanism works as intended
All adjustments are working smoothly
For more info see the “Maintain” section. We recommend that repairs
and servicing are done by a trained technician if you do not have the
means or skills to safely accomplish them.
Shock
The ski uses an MRP Raze 2CR shock for suspension. The shock is easy to
fine tune with adjustments for rebound and high & low speed
compression. It is also readily serviceable. A separate in depth shock
manual has been included from MRP or can be found online at
www.mrpbike.com/tech-resources
Choose the correct shock spring:
We recommend using a spring rate that is approximately twice the
skier’s weight (ex: 150lb skier = 300lb spring).
The Dynamique has a user weight limit of 250 lbs.
Page 24
24
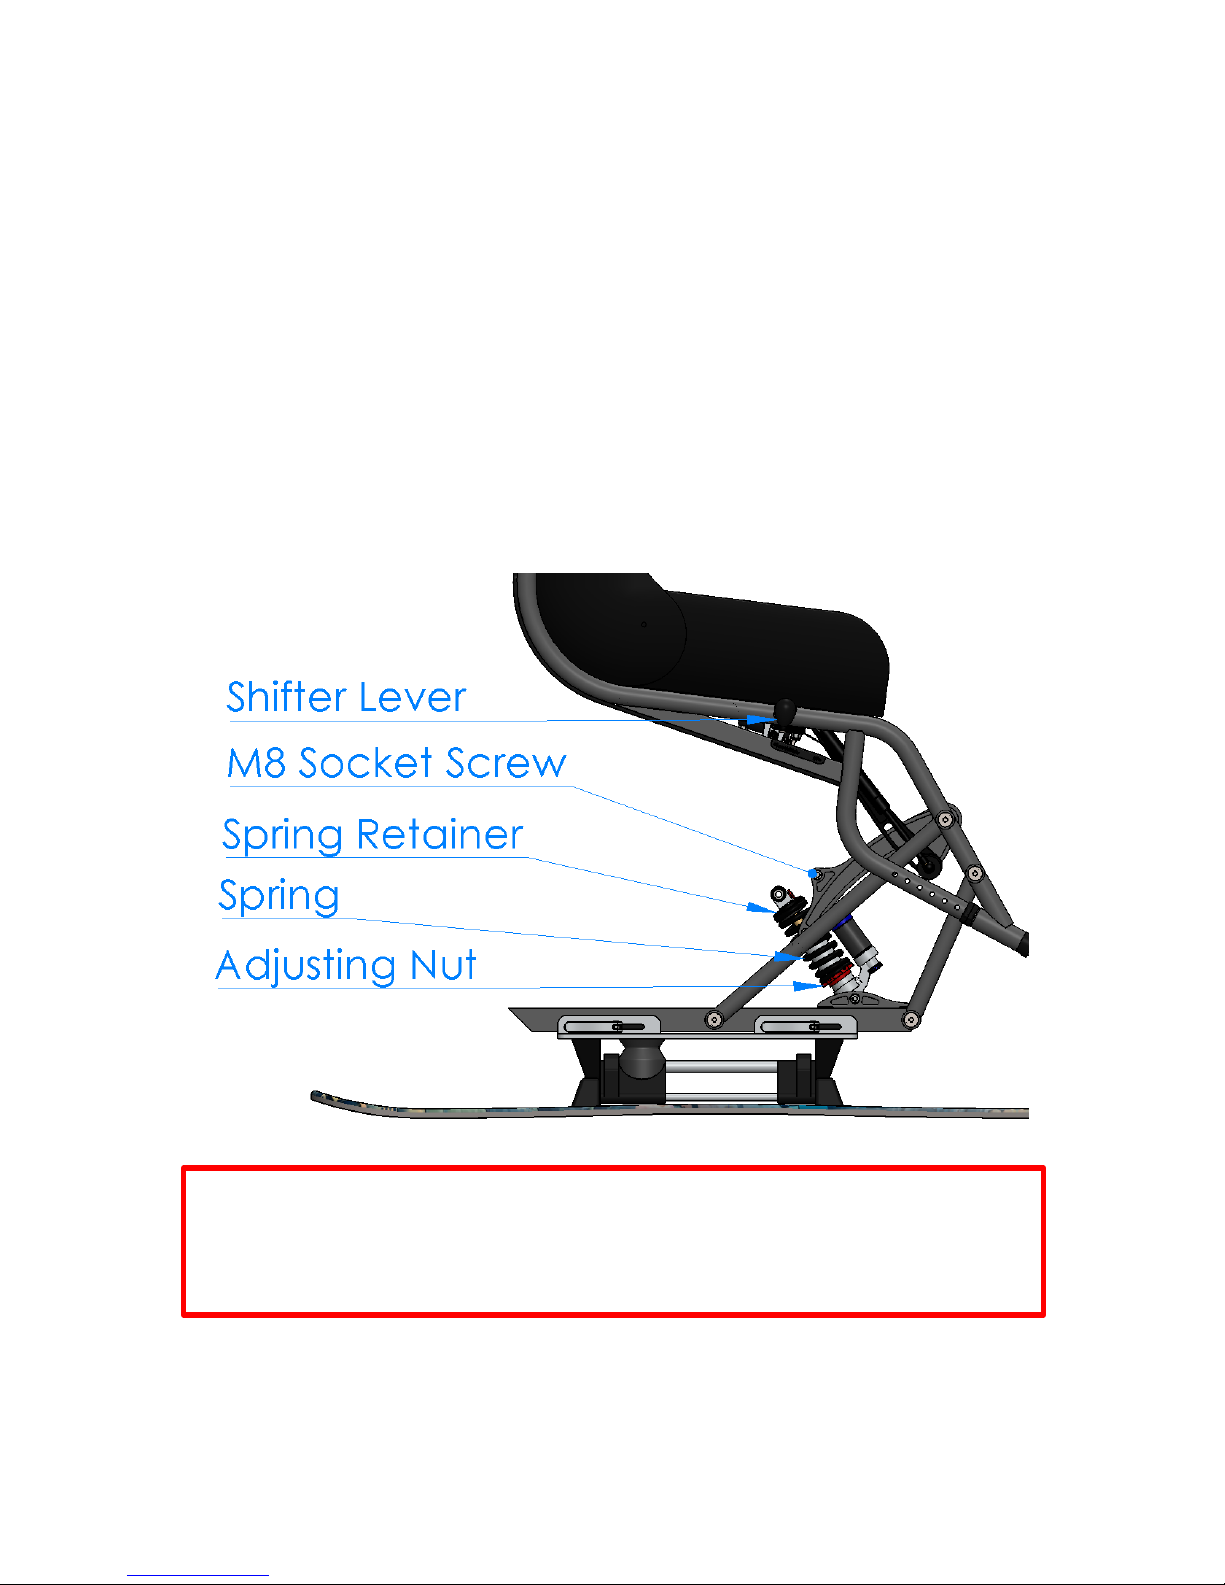
Change the spring:
Shift the ski into the up position by moving the shifter lever forward.
Raise the ski and lay it on its side. Remove the M8 socket screw from
the upper eyelet using a 6mm Allen key. Place the bolt and shock
spacers somewhere safe.
Completely loosen the red adjusting nut. Press down on the spring and
remove the black spring retainer from the top of the shocks shaft. You
can now pull out the spring.
Swap in the desired spring. Reinsert the spring retainer and refasten the
shock to the frame.
Using the correct spring ensures the shock will perform as intended.
Skipping this step could lead to a harsh ride and/or damaging the shock
and surrounding parts of the ski.
Page 25
25
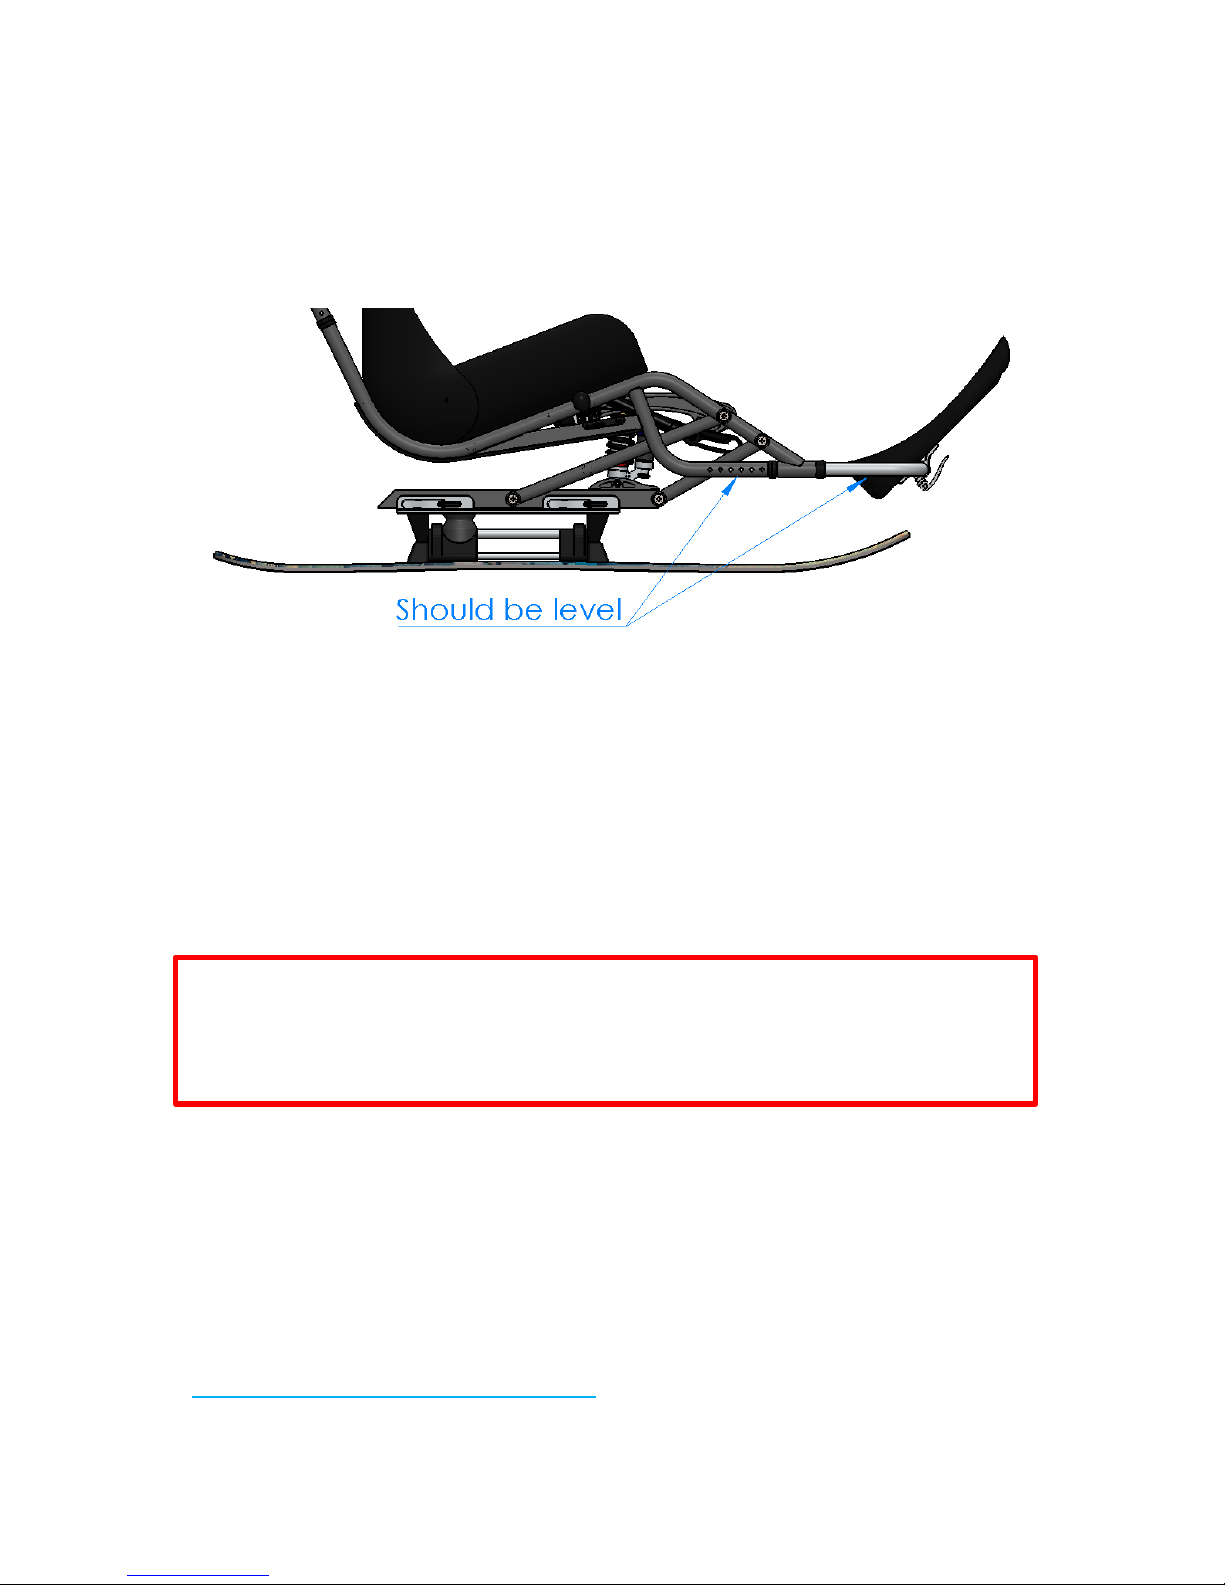
Set the shocks sag:
To set sag have the skier sit in the ski. Bounce up and down and let the
ski settle into its natural resting position. The footrest tube should be
approximately level.
If the sag needs to be adjusted have the skier get out of the ski and shift
it into the up position. This improves access to the adjusting nut.
If they were sitting too high in the suspension travel loosen the
adjusting nut. If the skier is too low in the suspension travel tighten the
adjusting nut. To avoid coil binding, the adjusting nut should not be
tightened more than 3/8” from its loose position. If you find this is
necessary it is best to swap to a heavier spring rate.
Setting sag ensures the shock will perform at its best. Skipping this step
could lead to a harsh ride and/or damaging the shock and surrounding
parts of the ski.
Fine tune your shock:
Once the sag has been set correctly, the shocks characteristics can be
fine-tuned.
We recommend familiarizing yourself with the separate MRP shock
manual that has been included or find it online at
www.mrpbike.com/tech-resources.
Page 26
26
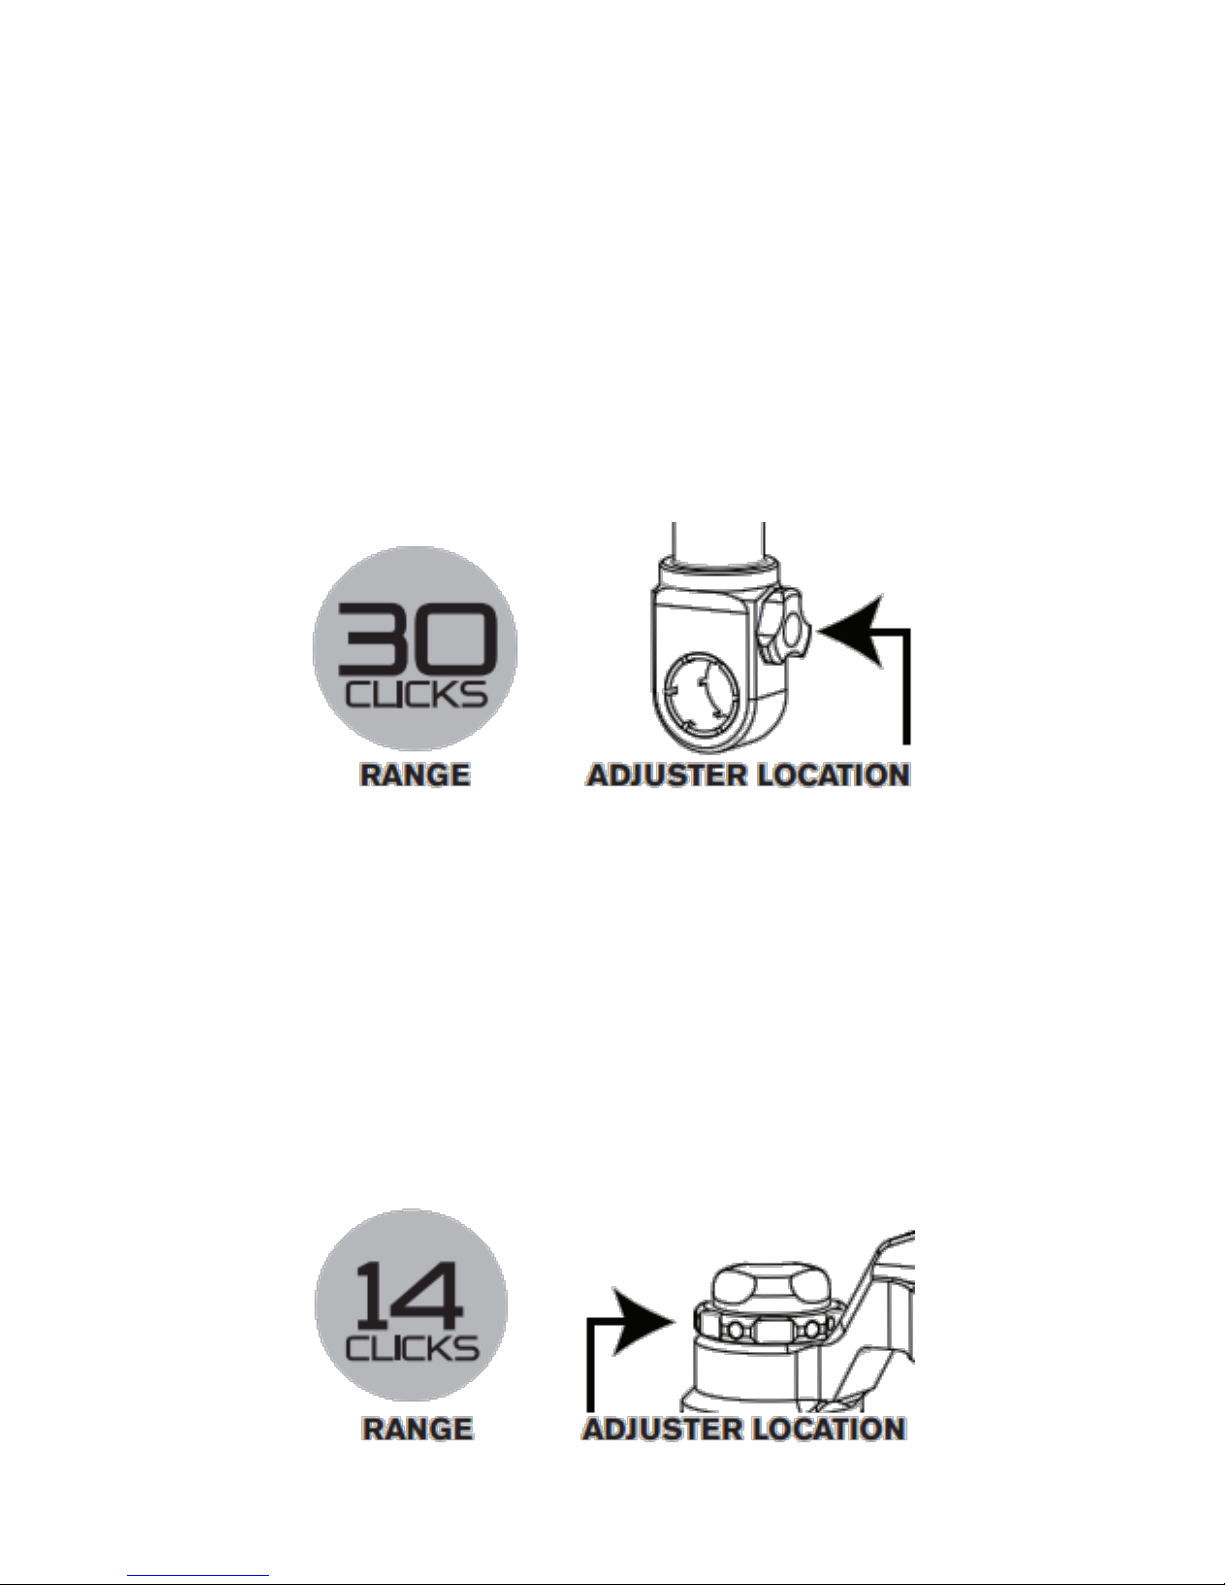
Rebound controls the speed at which the shock will return to its starting
position. When the rebound is set too slow, the shock may not have
time to fully return before the next hit. This can make the shock feel too
soft. When the shock is set too fast, the skier may feel catapulted
forward out of hits. Rebound also plays a large role in how the ski feels
coming out of turns.
To make the shock return slower after an impact turn the red
knob clockwise.
To make the shock return faster after an impact turn the red
knob counter clockwise.
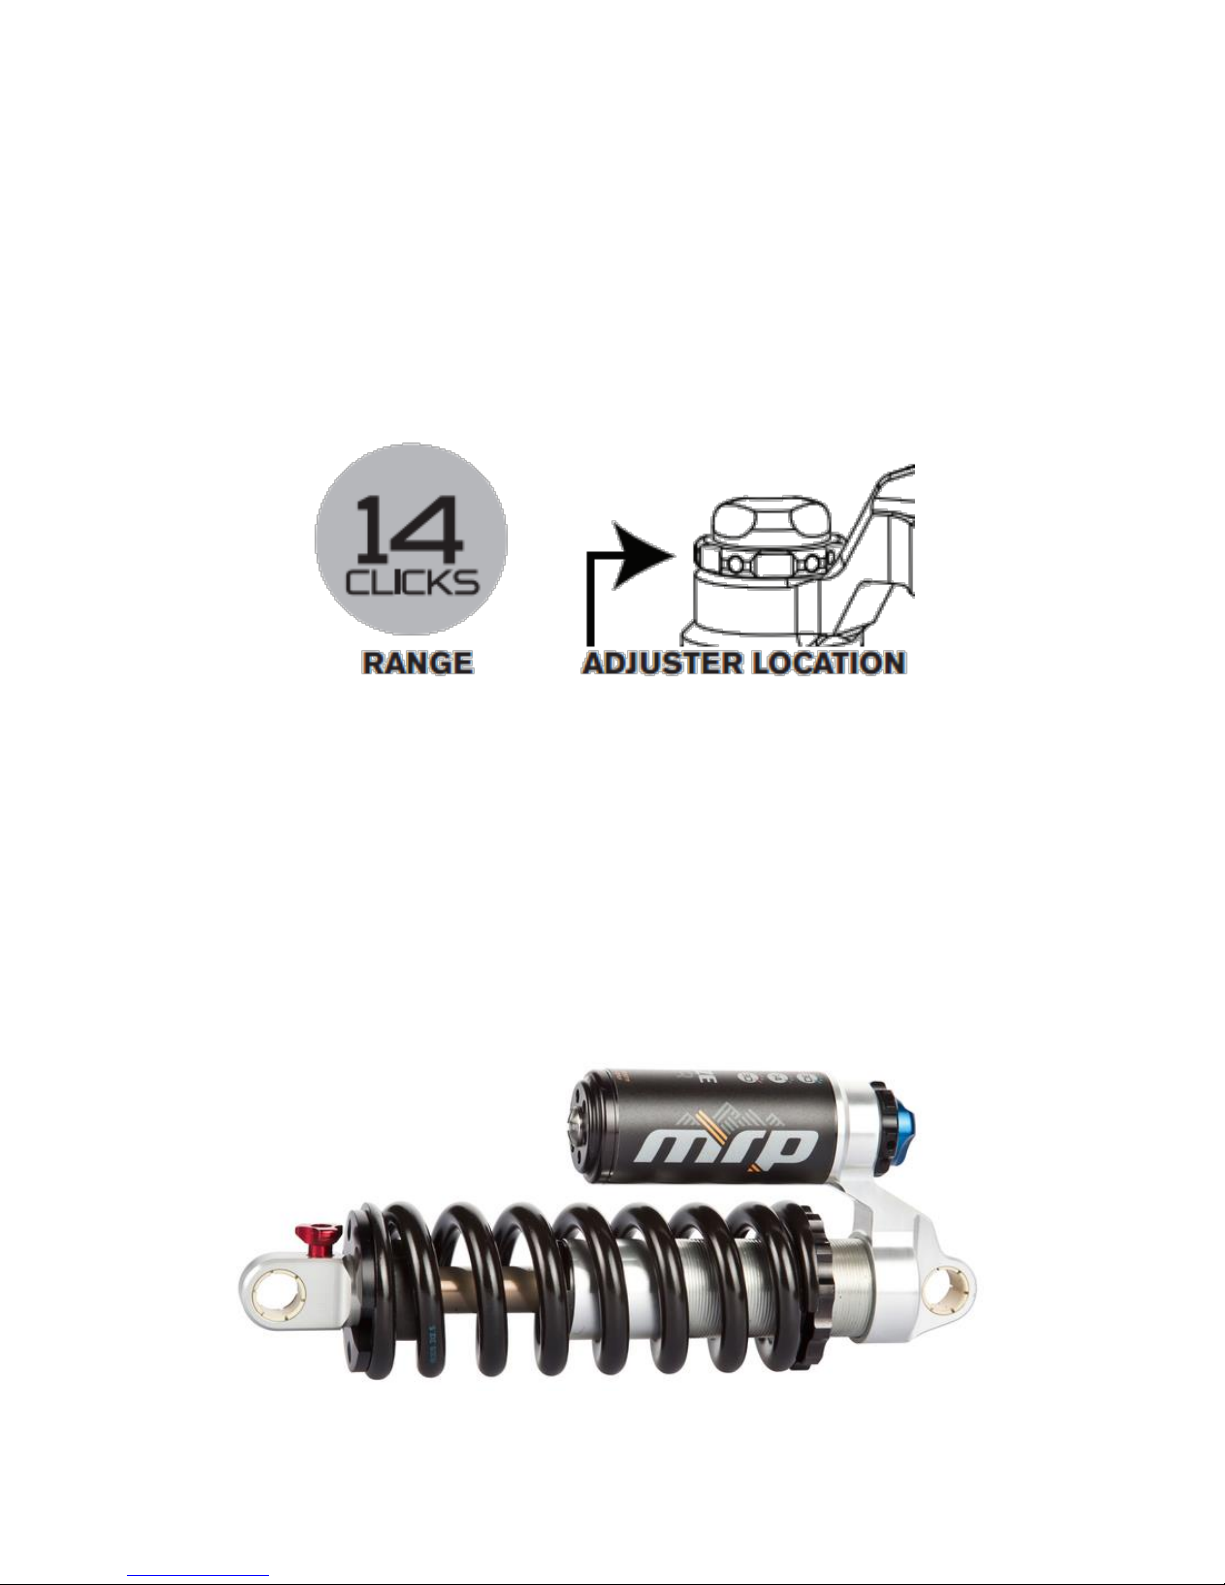
High speed compression (HSC) controls the shocks threshold for fast
movements. Such movements can be caused by quick impacts with
moguls or choppy trails. The goal is to run as little HSC as possible to
have a plush ride without bottoming out.
To make the shock harder and prevent bottoming out turn the
black knob clockwise.
To make the shock softer and feel less harsh turn the black knob
counter clockwise.
Page 27
27
Where high speed compression is for quick impacts, low speed
compression (LSC) controls resistance for slower movements. It plays a
major role in the stability of the ski and overall how stiff or soft it feels.
To make the suspension feel stiffer turn the blue knob
clockwise.
To make the suspension feel softer turn the blue knob counter
clockwise.
Shock tuning can be overwhelming at first and will take time to learn.
Ultimately though, it will help you better enjoy your time on the slopes.
Feel free to contact us with questions.
Page 28
28
Seat
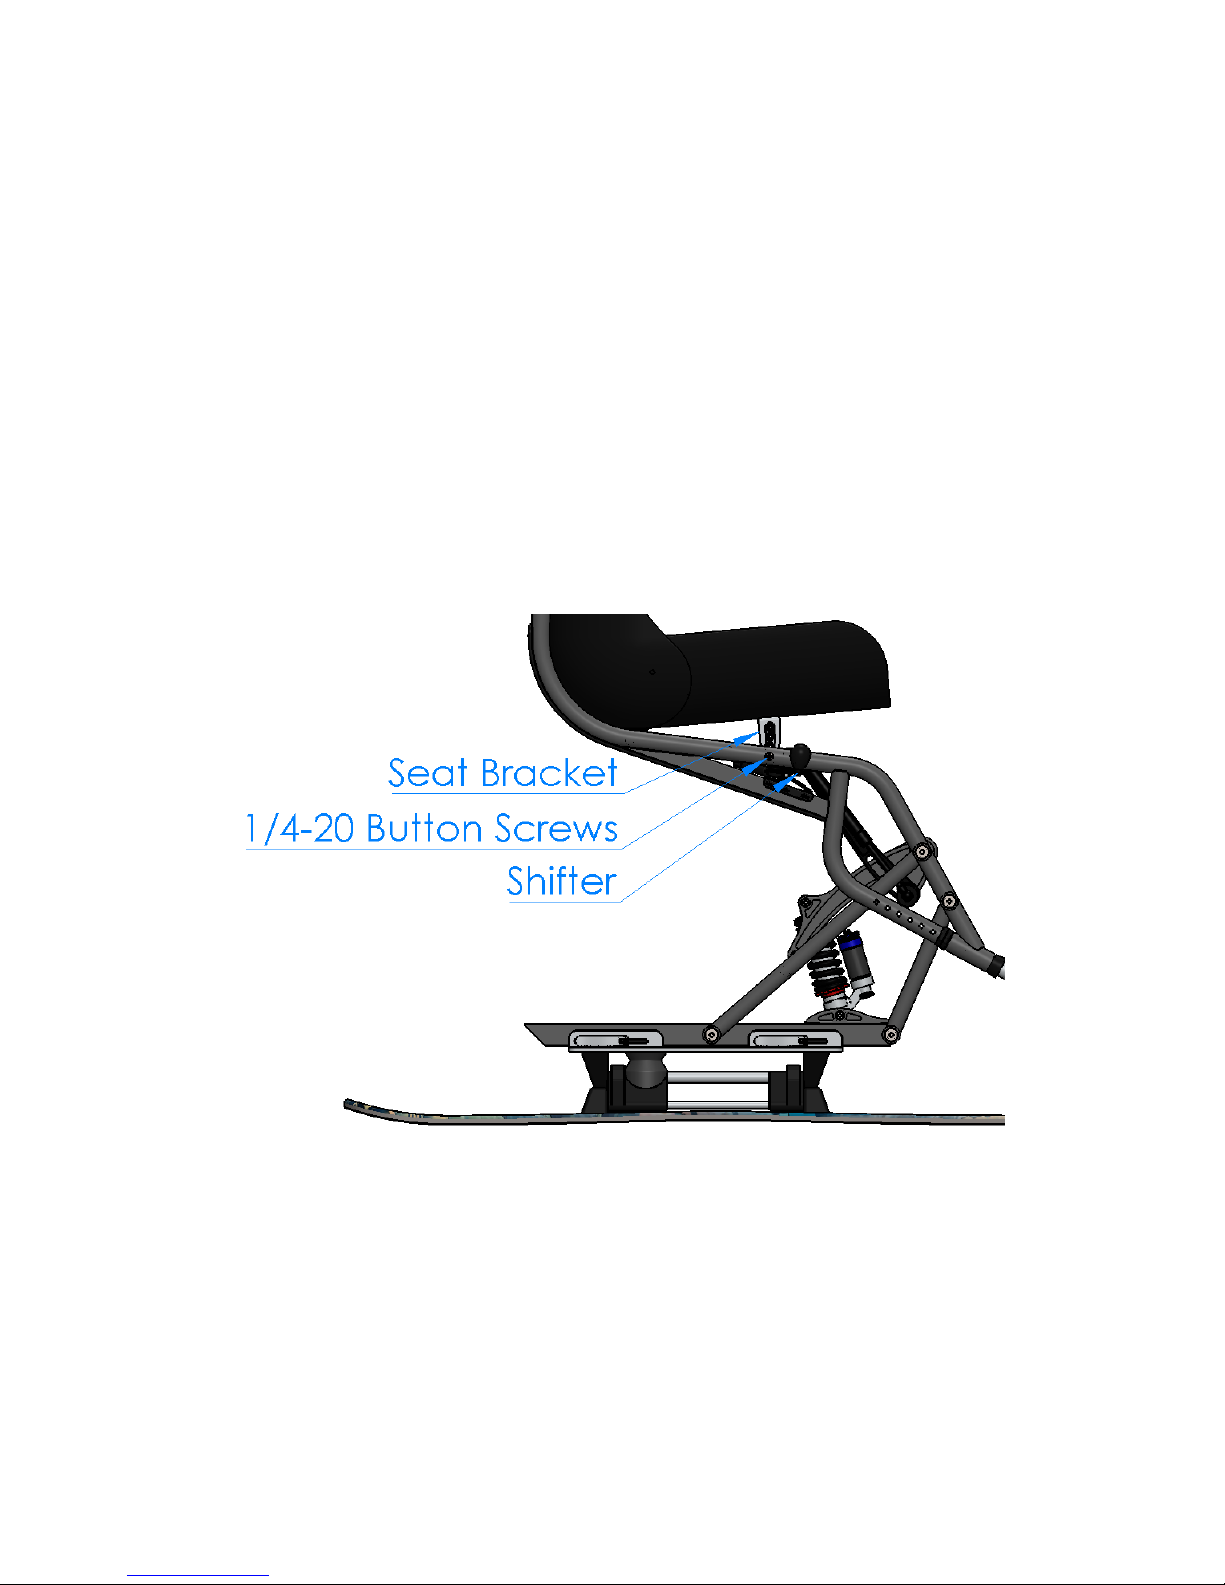
Adjusting seat angle:
The Dynamique seat is adjustable to four dump positions in 3 degree
increments.
It is easiest to adjust the seat’s dump when the skier is not in the ski.
We recommend laying the skier on their side if the adjustment must be
made on the slopes
Shift the ski into the up position. This improves access to the bolt
behind the shifter. Unscrew the ¼-20 button screws on both sides using
a 3/16” Allan key.
Pick a position and align it with the hole in the frame. If the seat
bracket doesn’t immediately line up it can be loosened and pulled
forward or back along the mounting slot. Once the holes are aligned
thread one of the ¼-20 Button sockets in 2-3 turns. Go to the other side
and thread the second button socket in completely. Return to the first
button socket bolt and finish tightening it into position.
Page 29

29
Buckling Up
We recommend opening all straps before getting into the ski. When
getting in the ski lean forward and position your pelvis as far to the rear
of the seat as possible. Straighten up and make sure your legs are
evenly positioned. You may need help to do this. Buckle the M2 straps
at your hips and thighs. Wiggle to the rear of the seat and tighten again.
The snugger you fit in your seat the more control you will have while
skiing. Your seat is the equivalent of a ski boot.
To adjust the back angle ratchet the ladder straps at each side of the
seat.
Add-ons are available to customize your seat such as a chest strap, high
back or neck support.
Page 30
30
Footrest
It is best to set the seat angle before adjusting the footrest.
Child
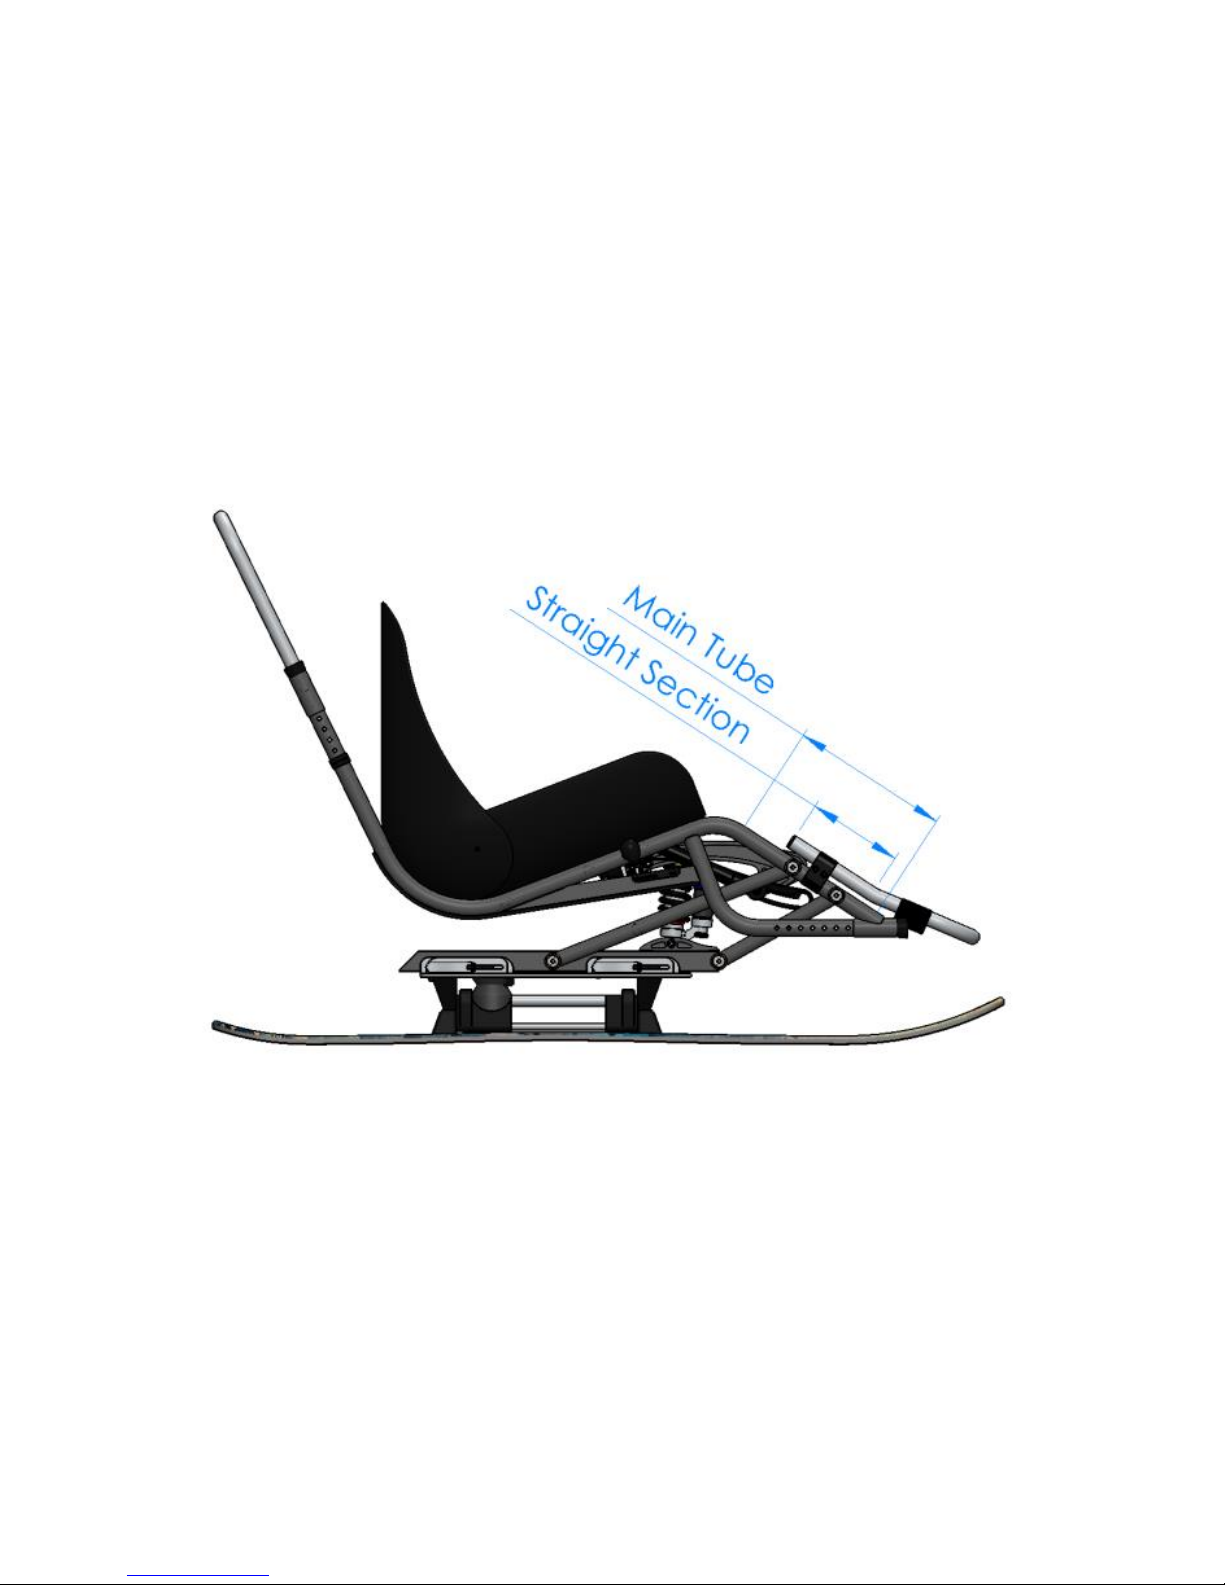
The child’s footrest does not have adjustments for ankle angle. The
clamps can be attached anywhere along the upper frames main tubes.
Once the quick release clamps have been attached to the frame the
length can fine-tuned along the straight section of the footrest.
Above shows the main tube and the straight section of the foot rest. Be
careful not to clamp on the bend of the footrest since this will decrease
clamping force and the rest may inadvertently slip.
Page 31
31
Junior & Adult
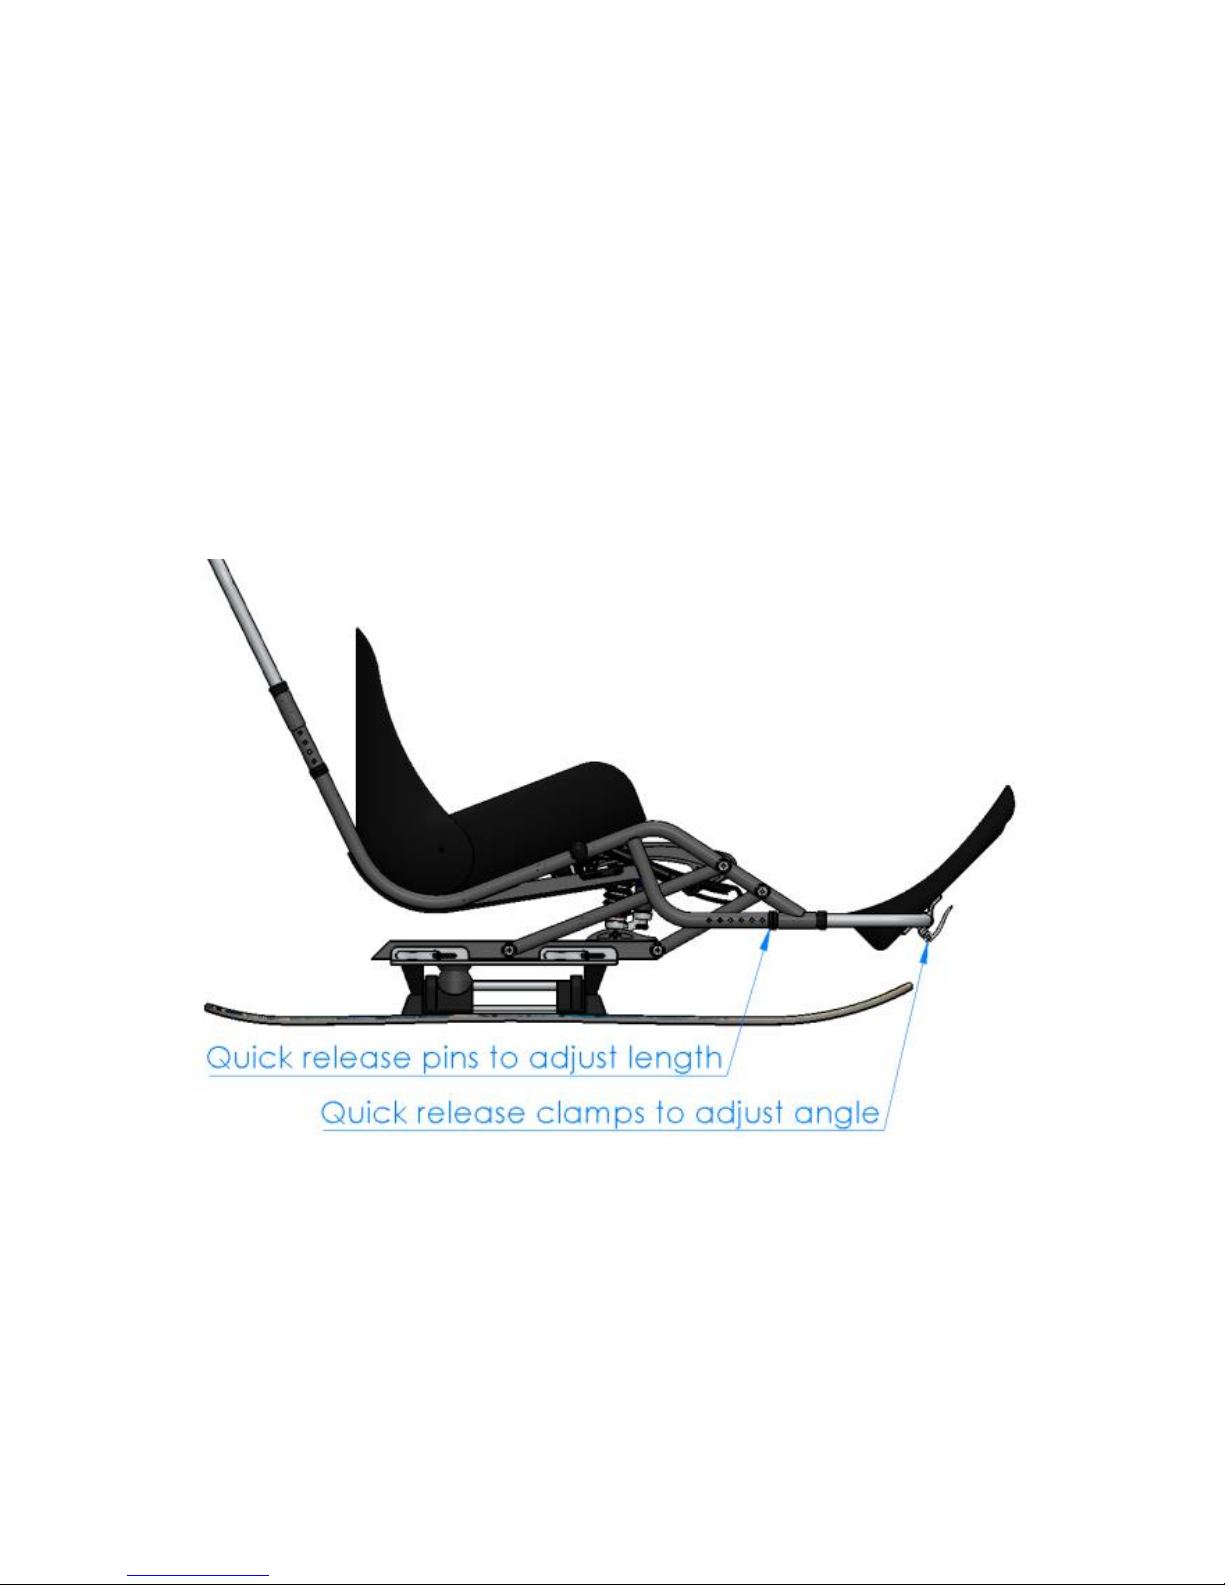
The footrest length adjusts along the horizontal access via quick release
pins. There are 7 holes at ¾” increments that can be used.
To adjust the footrest angle unclamp the two quick release clamps in
front of the footrest.
If the footrest angle inadvertently slips while skiing there are two M6
socket screws can be seen from the inside of the footrest. Tighten these
with an M5 Allen key. If an Allen key is not available press your thumb
into the socket head and spin the quick release clamp to tighten.
For individual owners, we recommend swapping the quick release pins
for the supplied ¼-20 x 1 ¼ hex cap bolts and nylocks once you have
settled on the best length. This will reduce rattle and increase frame
stiffness.
Page 32
32
Center of Mass
Once the seat angle and footrest have been adjusted find your bi skis
center of mass. This will improve its performance. Factors like upper
body mass and atrophied or amputated limbs affect the center of
balance.
Often adaptive programs will dowel test the skier before going onto the
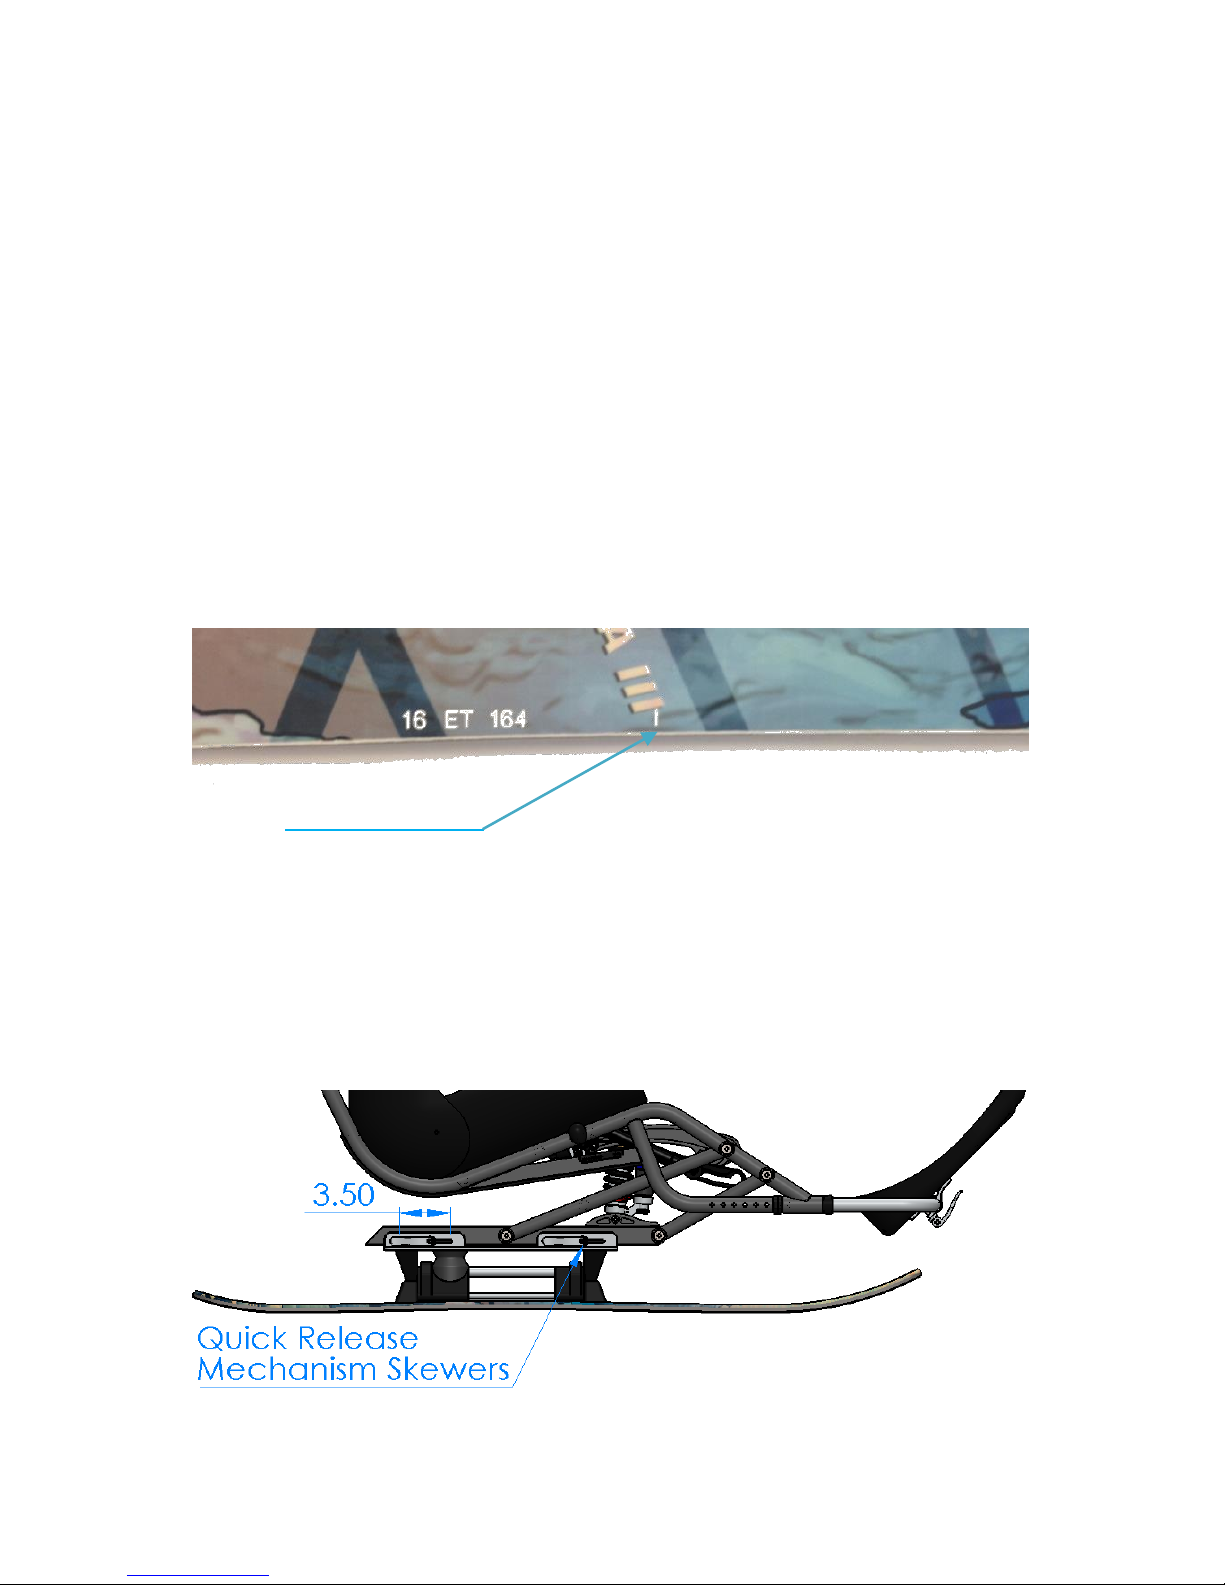
slopes. Your Mega III Skis have a line etched into them for this purpose.
Approximately 1” after the serial number is an etched white line at the
center of the ski under foot. This line is designed to be a starting point
for finding your center of mass. Your center of mass may need to be
fine-tuned once on the slopes.
Dowel Test Line
If the front or rear slides out while skiing you will need to shift your
weight toward the end that is sliding out. After stopping, release the
mechanism skewers. The mechanism has 3 ½” of adjustment. Slide the
frame toward the end that is sliding out. It may take several runs to find
the correct spot.
Page 33
33
Chairlift
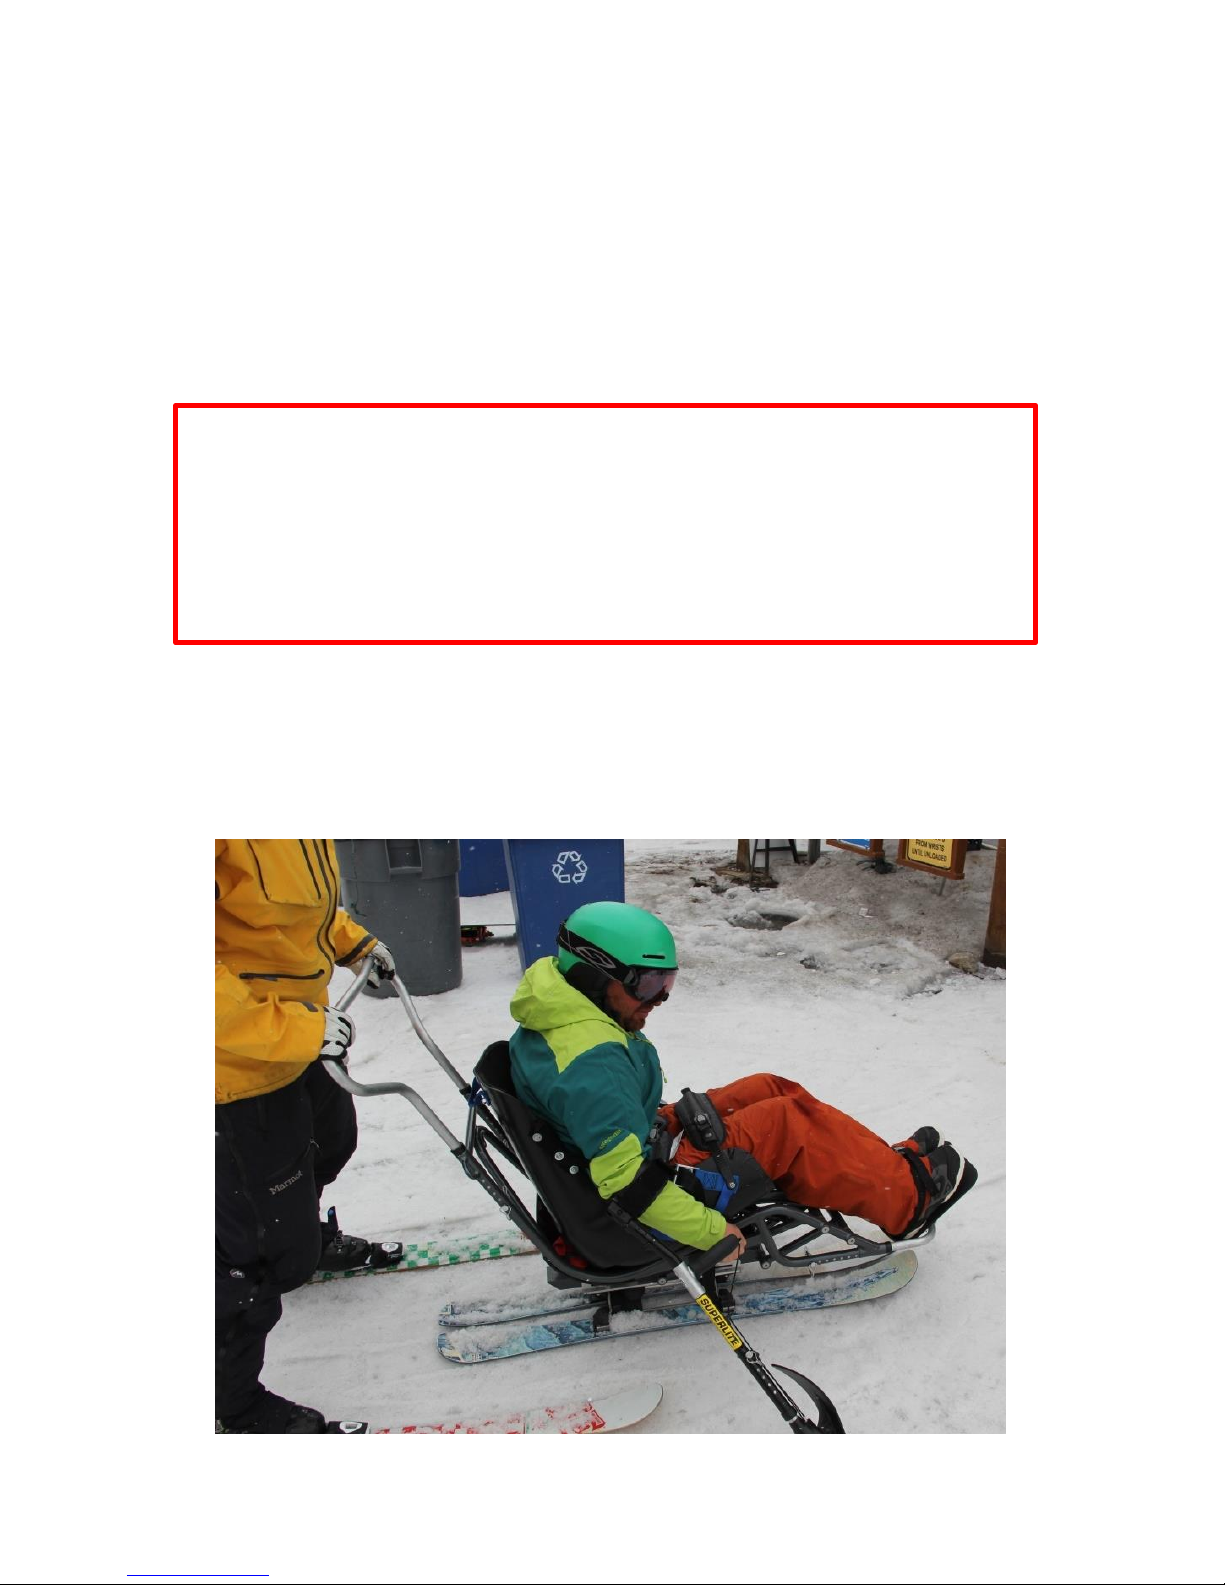
Sit skiers use numerous techniques for loading the chairlift depending
on their skill level, the rules of the ski area and the specifics of the lift
station. It is your responsibility to check the requirements of the area
before skiing. At the lift, inform the attendants of your needs. They
may slow down or stop the chair as necessary. It is not their job to
physically assist you in getting on the chair.
The Dynamique has a unique load system. It is imperative to familiarize
yourself with how to use it properly.
Not only will this ensure the best and safest time with your Dynamique
but it will also prolong the life of your ski and ensure it continues to
function as intended.
Loading the Chairlift
1) Before you push out to the chairlift push the shifter forwards into the
“Up” position.
Page 34
34
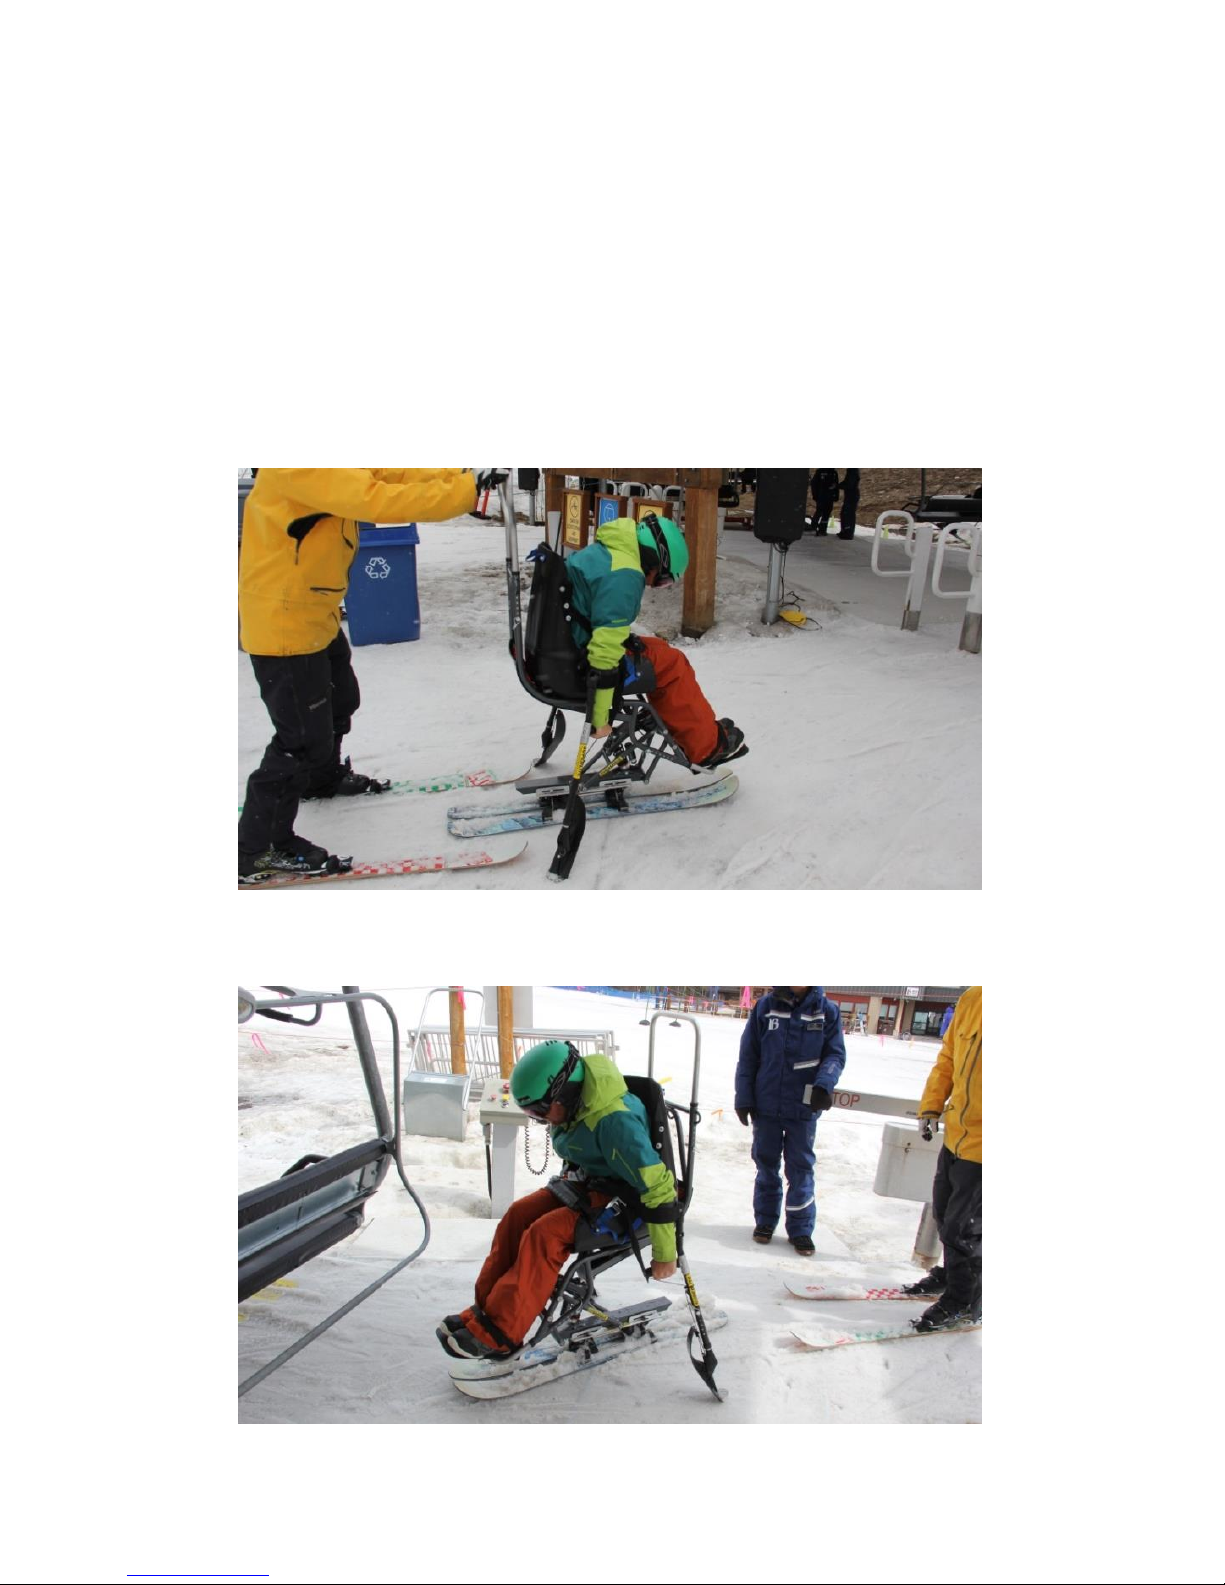
2) It is recommended to release the seat back angle ratchet strap before
lifting the ski up. This will minimize forward lean on the skis. It also
allows the skier to be more upright in the “up” position and lean back as
soon as they are on the chairlift. There is a ruler on the inside of the
ladders to help you remember where your strap was.
3) It is good practice to get as close to the ski lift as possible in the ski
position. That is, wait as long as possible before lifting up. Once ready,
lift the ski up. It will lock out in the up position.
4) Push out to the “Load here line”
Page 35
35
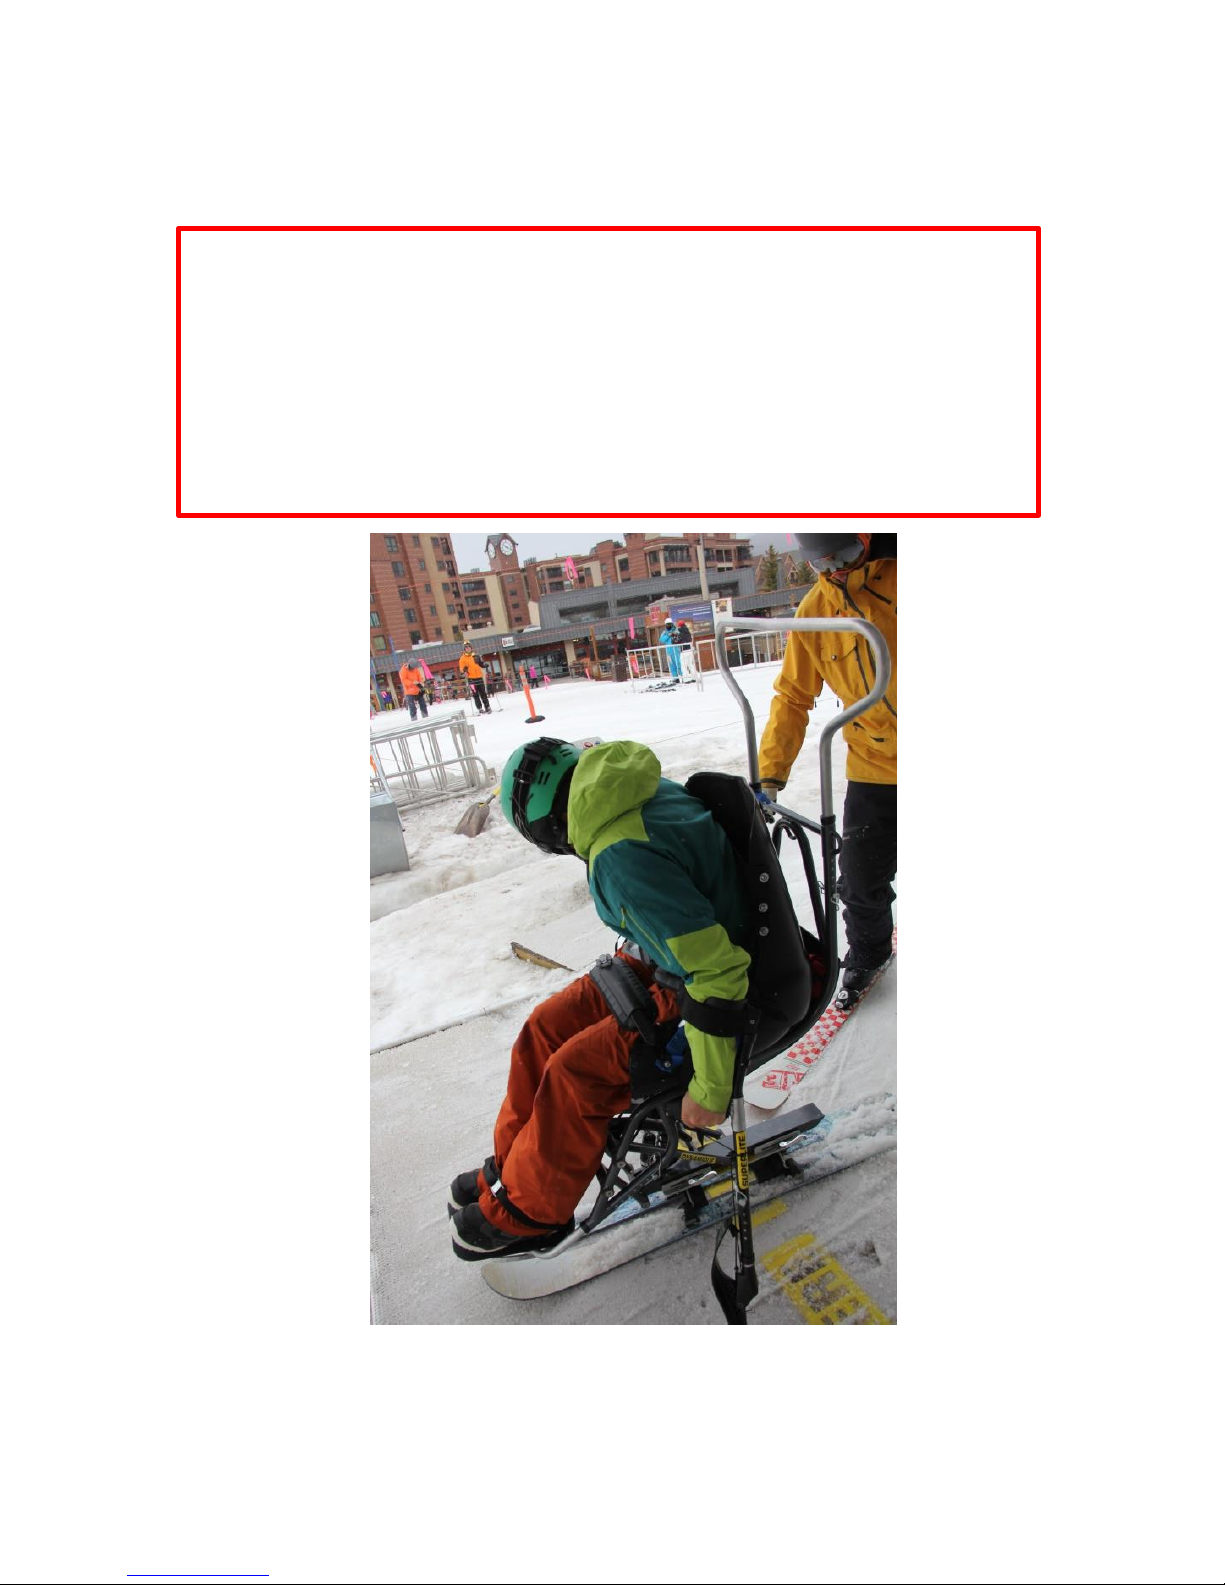
5) While waiting for the chair to come, push the shifter backwards into
the “Load/Ski” position. The ski will remain locked out but it is now
tensioned to load the chair.
Do not load the chairlift with the shifter in the up position. Doing so
places stresses on load components above what they were designed to
handle. This could lead to premature failure of parts.
Once the shifter has been tensioned calmly wait for the chairlift.
Repositioning or bouncing up and down could inadvertently unlock the
ski from its up position.
Page 36
36
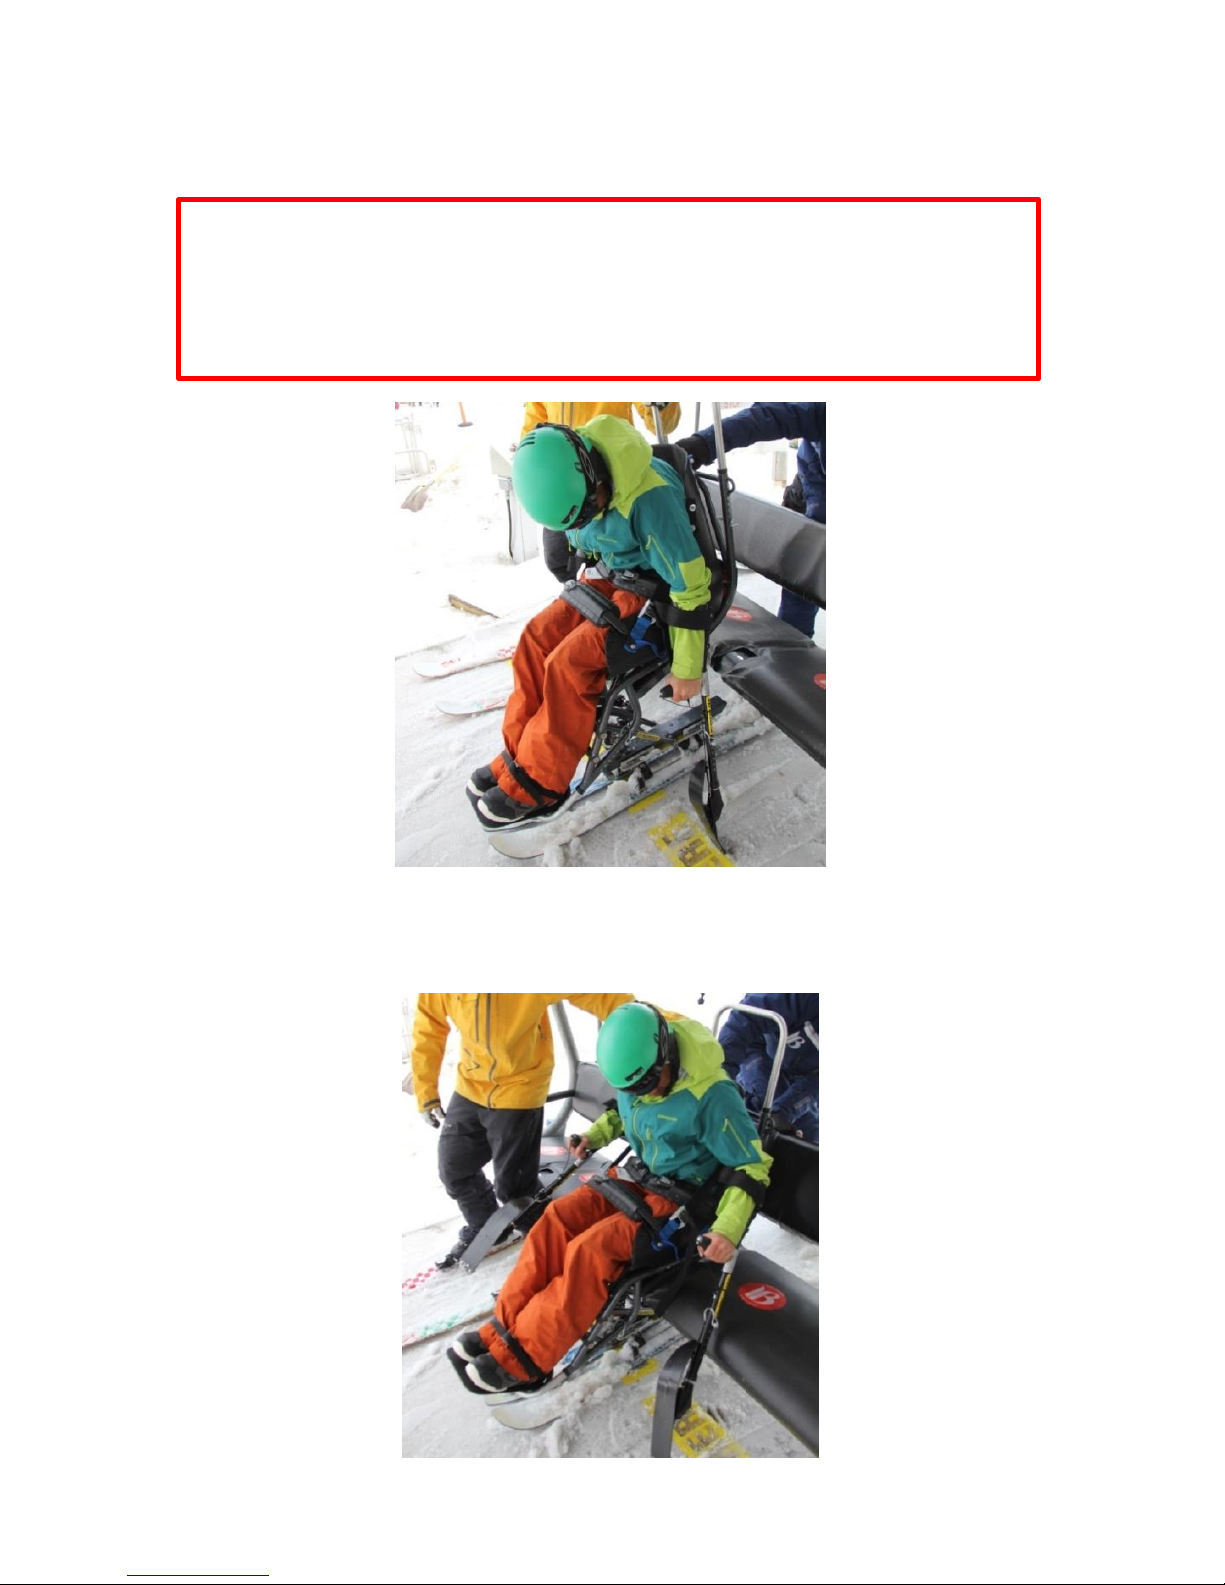
6) As the chair lift approaches, lift up slightly. This will unlock the ski and
allow the skier to sit down on the chair.
It is important to lift up or the ski will not unlock from the “up” position.
Forgetting this will make the skier feel uncomfortable. They will feel like
they are being pushed forwards off of the chairlift. It also places stresses
on load components above what they were designed to handle.
7) Sit down on the chair. The ski should sit as far back on the chair as
possible. The Dynamique’s unique tensioned load system allows the skis
to compress freely up and down as you exit the load area.
Page 37
37
On the Chairlift
8) We recommend lowering the chairlift safety bar as soon as possible if
it has one. Pay attention to where you sit down on the chairlift. Be
aware of grab handles, footrests, maps or other add-ons that may
interfere with the handle.
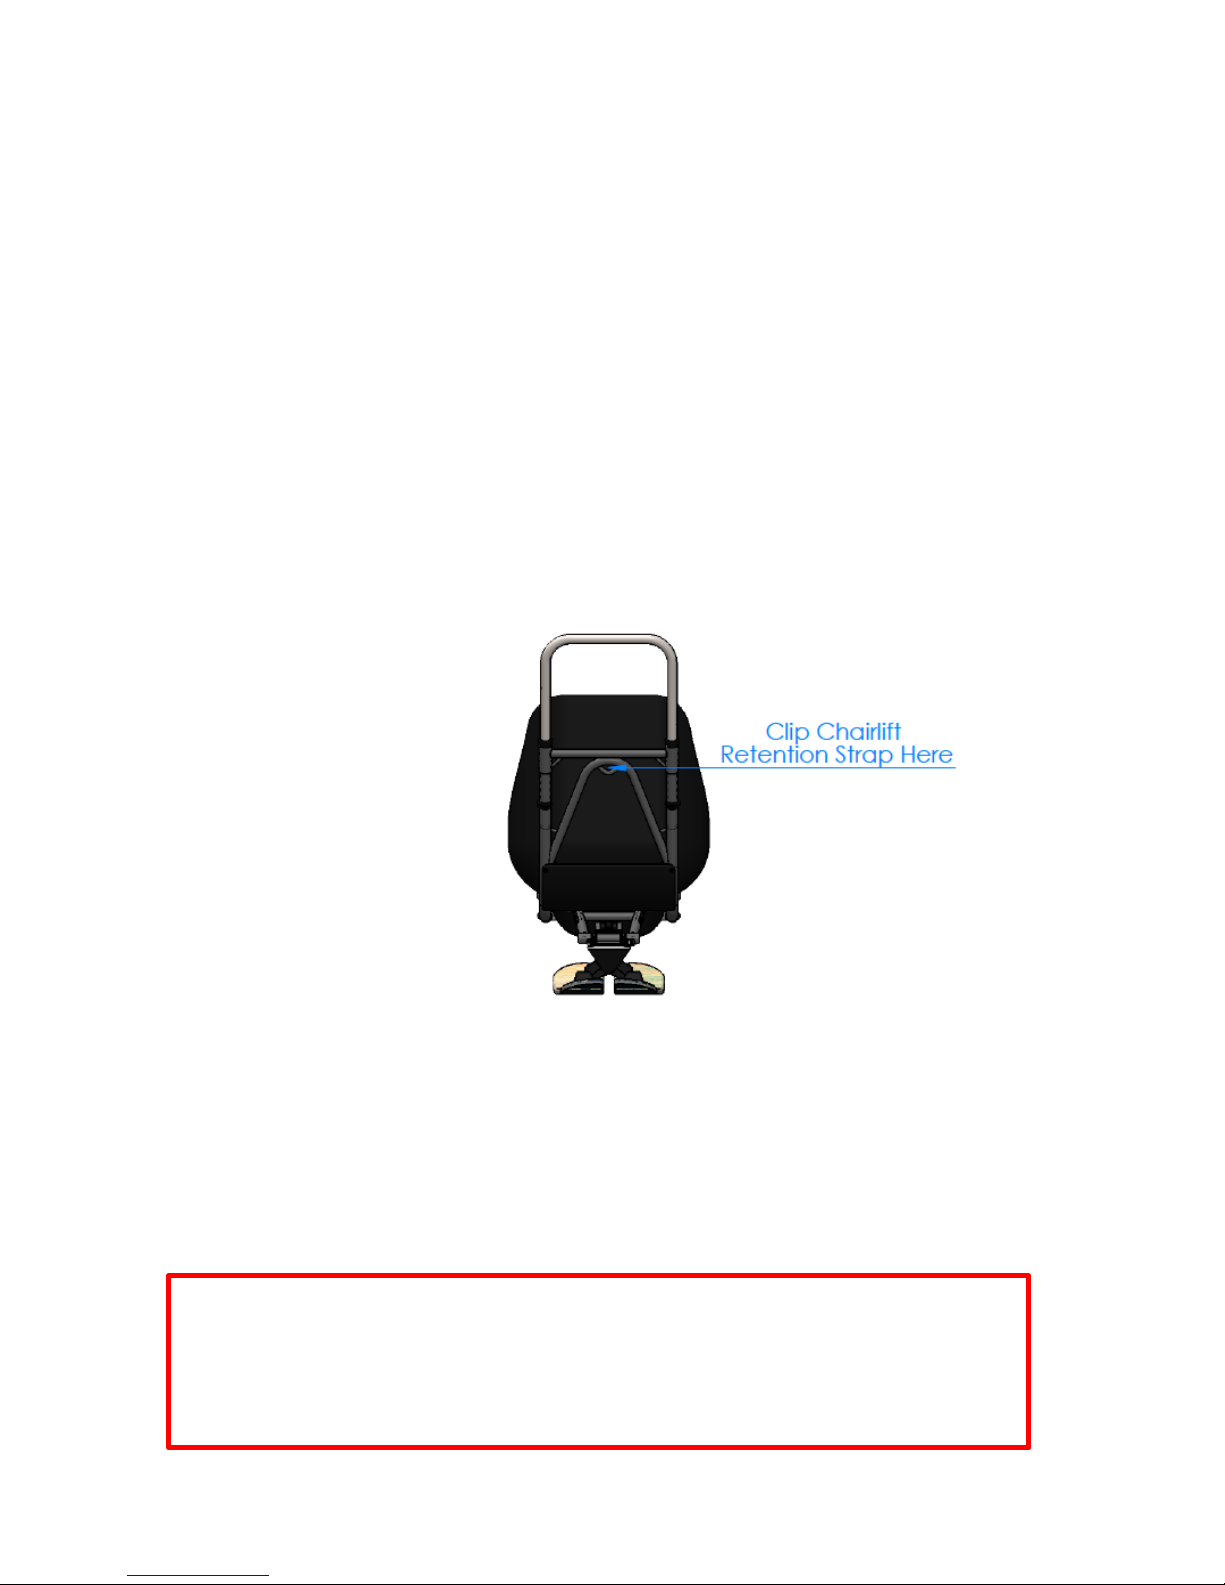
9) Your retention strap protects you from falling off the chairlift should
you lean too far forward or if the chairlift unexpectedly jolts on your
way up. Have a ski buddy loop the retention strap through the seat’s
grab handle, around some part of the chair lift frame and clip the
carabiner back to the middle single tether loop. You want to take as
much slack out of the retention strap as possible. This keeps you from
falling too far.
Preparing to Unload the Chairlift
10) Wait until you are as close as possible to the top before unbuckling
the carabiner and releasing the retention strap. Clip it back onto the
seats grab handle. Hold onto the chairlift and raise the chairlift safety
bar if needed
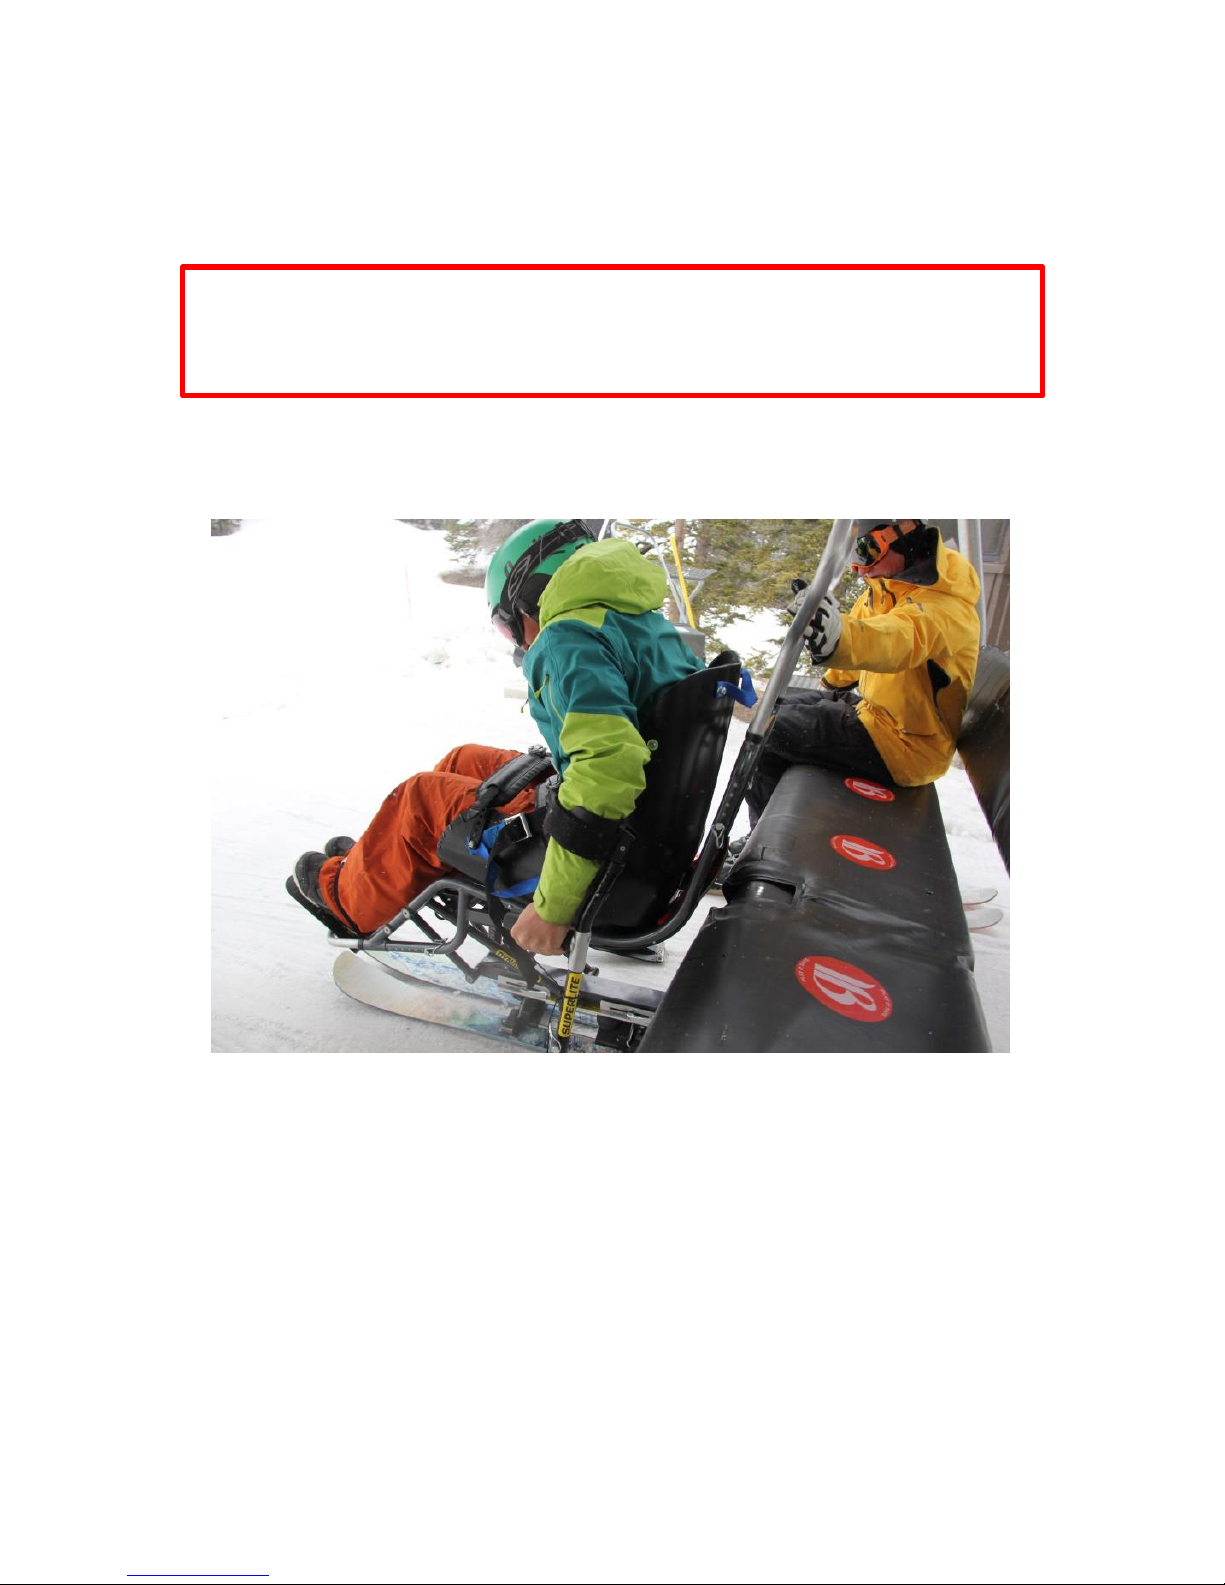
Pay attention. This is one of the most dangerous parts of the chairlift
ride. After the retention strap is released you could fall off the chair. If
you forget to unclip the retention strap, you could be dragged by the
chair and dangled from it as the chair rounds the wheel.
Page 38
38
Unloading the Chairlift
11) The ski is already unlocked and ready to unload the chairlift. You do
not need to shift before unloading.
Double check that the shifter is still in the “Load/Ski” position. The ski is
not intended to be unloaded in the “Up” position. Doing so places
stresses on load components above what they were designed to handle.
12) Push off the chair. Once off the chair, the chassis will smoothly
settle down and automatically lock into the ski position.
13) Ski away and enjoy.
Page 39
39
Chairlift Evacuation
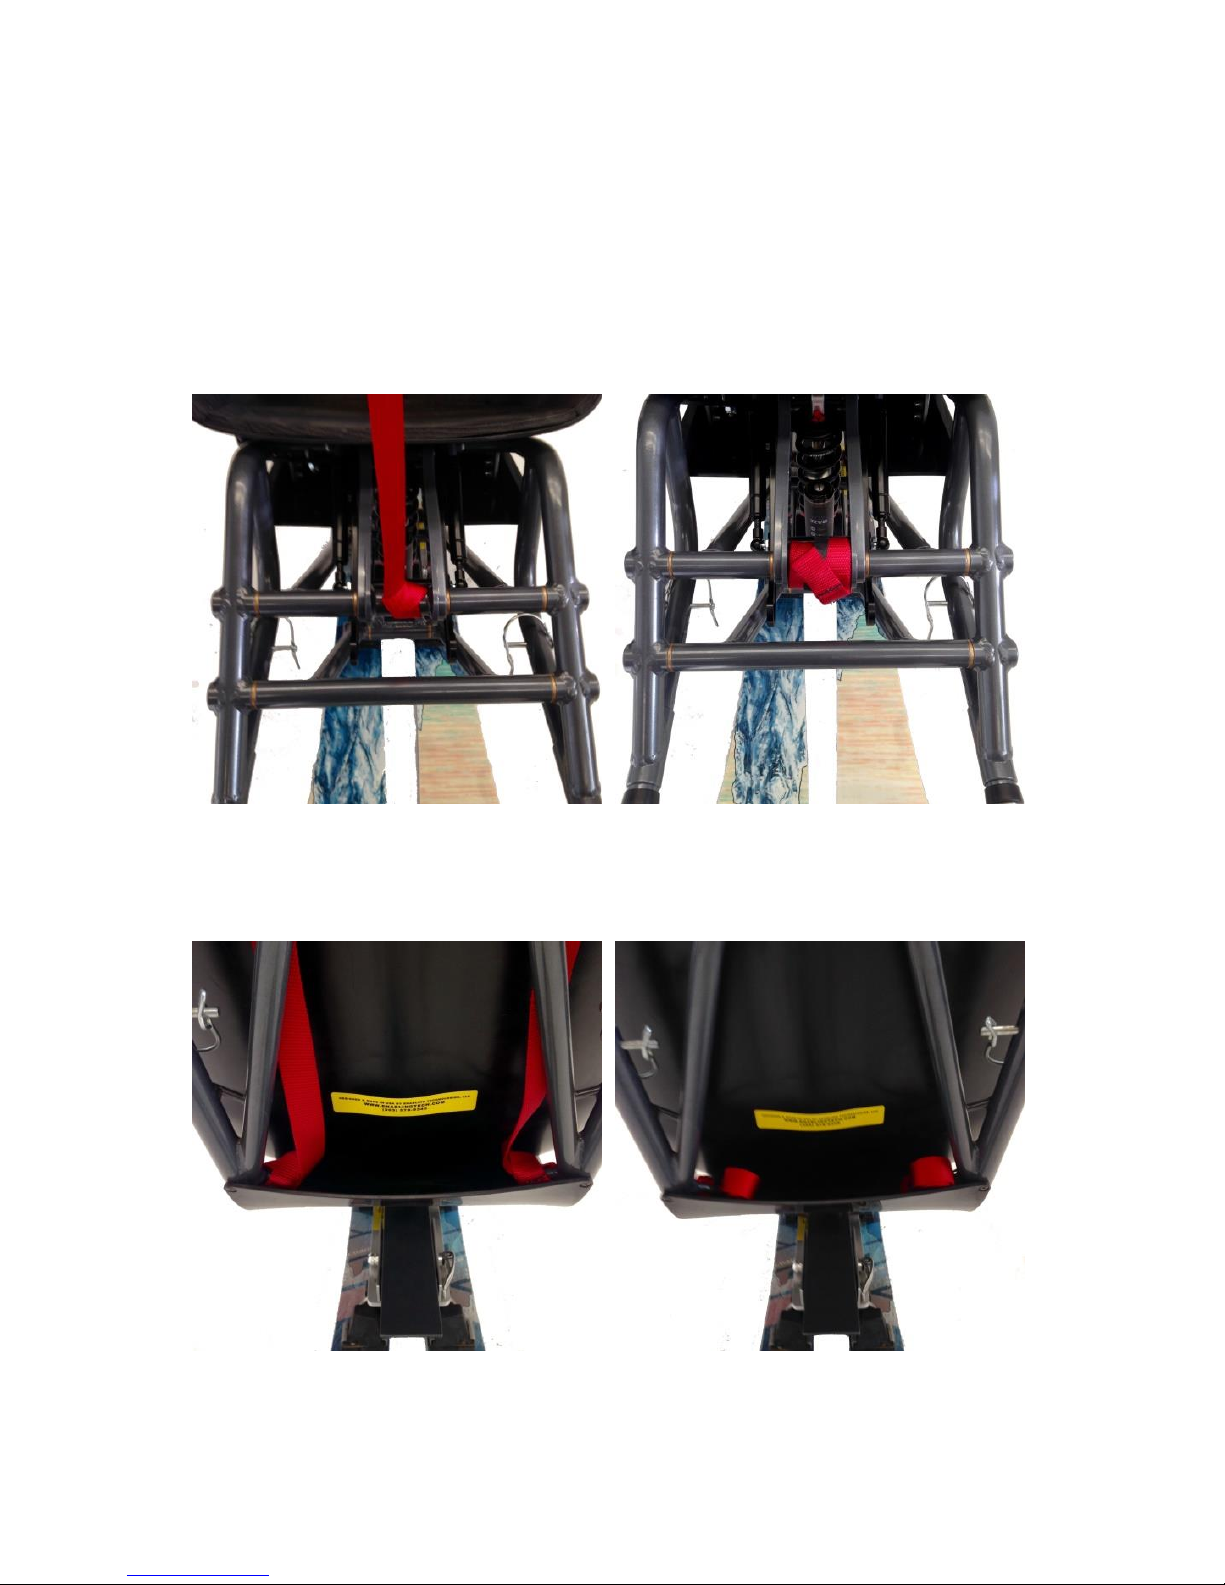
The chairlift evacuation straps should be permanently attached to your
Dynamique frame. All three straps are the same length. Slip knot the
front strap around the load link pivot as shown. Wrap the excess strap
around the load link pivot and use a Velcro loop to secure the front
strap.
Slipknot a strap to each of the rear evacuation loops as shown. Fold the
excess strap and use a Velcro loop to secure the rear straps.
Page 40
40
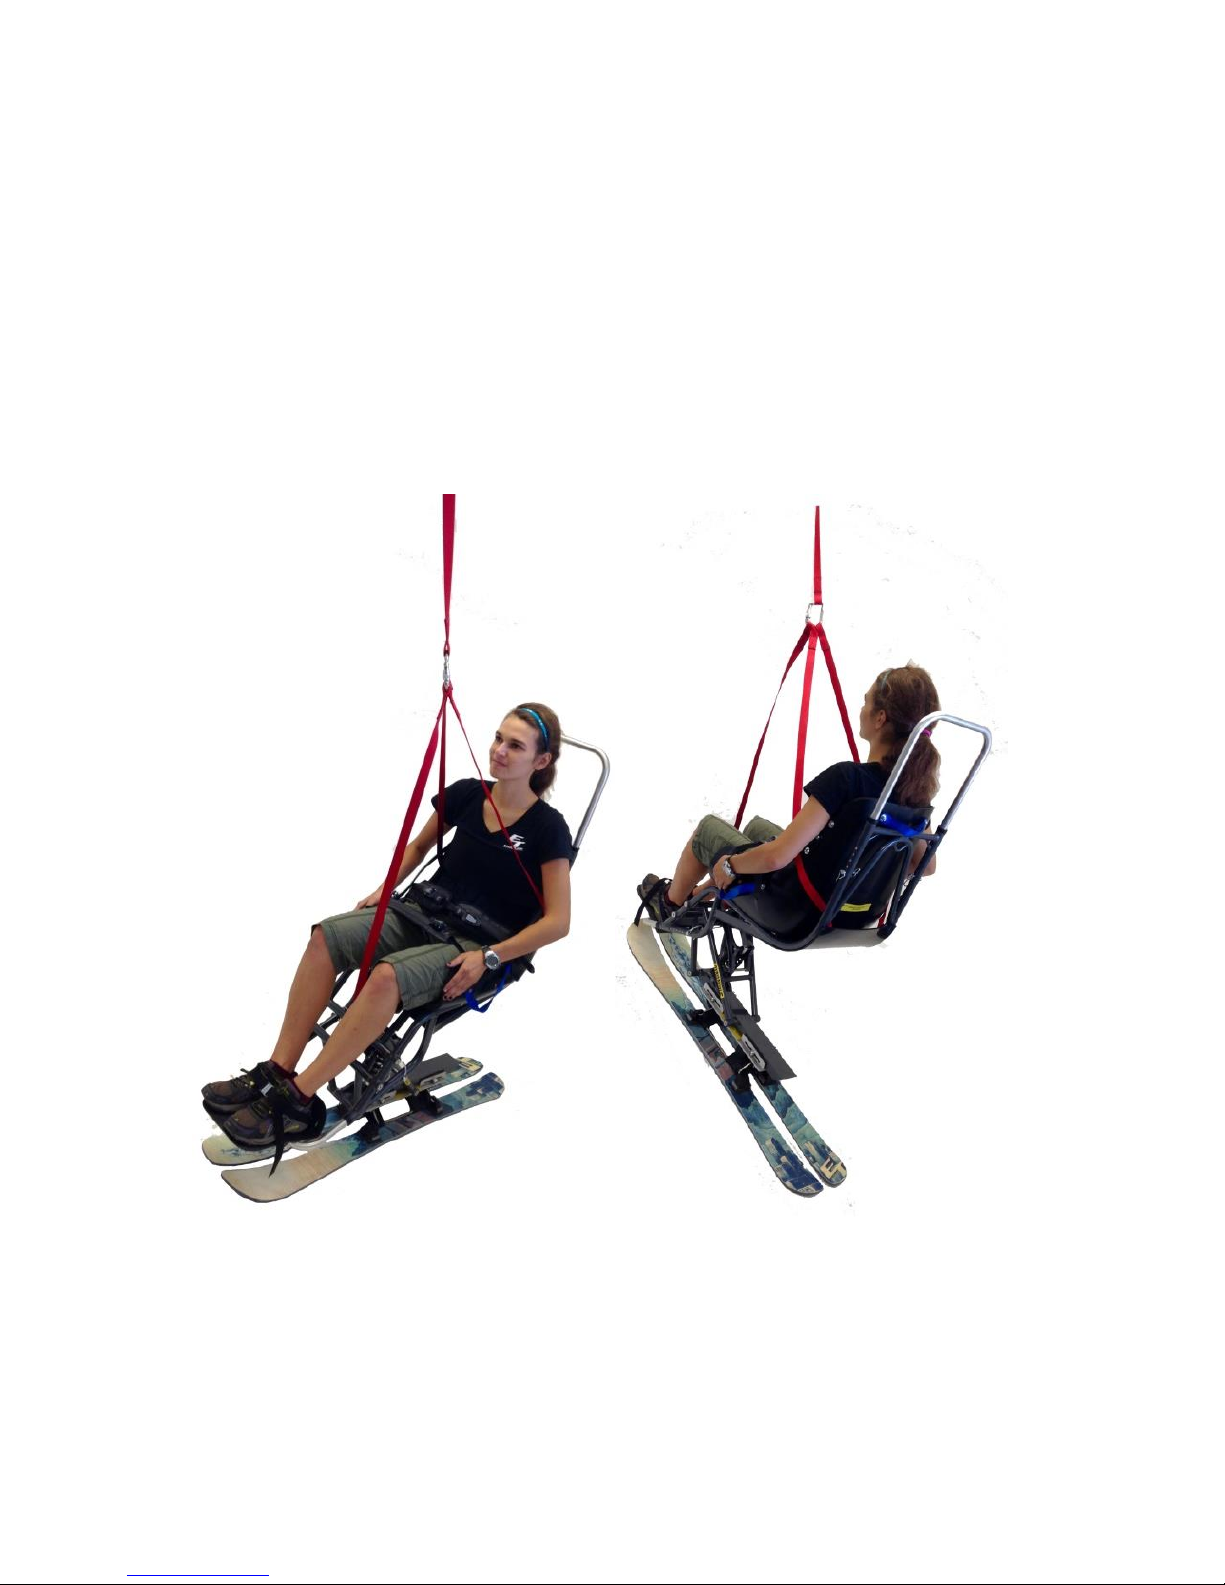
It is important to familiarize yourself with your ski areas procedures for
chairlift evacuations.
In the event of a chairlift failure wait for professionally trained rescue
professionals to deploy the evacuation system. It is designed so trained
professionals can lower the skier to the ground without having to take
the skier out of the ski. The straps make a 3 point system and should be
joined with a locking carabiner.
Page 41

41
Maintenance
Maintenance frequency can vary depending on how often the ski is used
and the conditions in which it is used. We recommend that repairs and
servicing are done by a trained technician if you do not have the means
or skills to safely accomplish them.
After each use
It is good practice to perform a basic inspection after each day on the
slope
1) Wipe down the ski with a towel and dry thoroughly
2) Check all fasteners and tighten any that may have come loose
3) Inspect for frayed or cut webbing
4) Inspect for any cracks within the frame or skis
Periodically
1) Wash the ski with mild soap and water. Dry thoroughly
2) Lube the footrests and handles with white lithium grease
3) Inspect shifter and load components for wear
4) Inspect gas struts are working as intended
Gas struts may prematurely wear due to the environment they are
used in. Elevation and cold temperatures can affect their reliability.
The ski has been designed to still work in the event of a gas strut
failure.
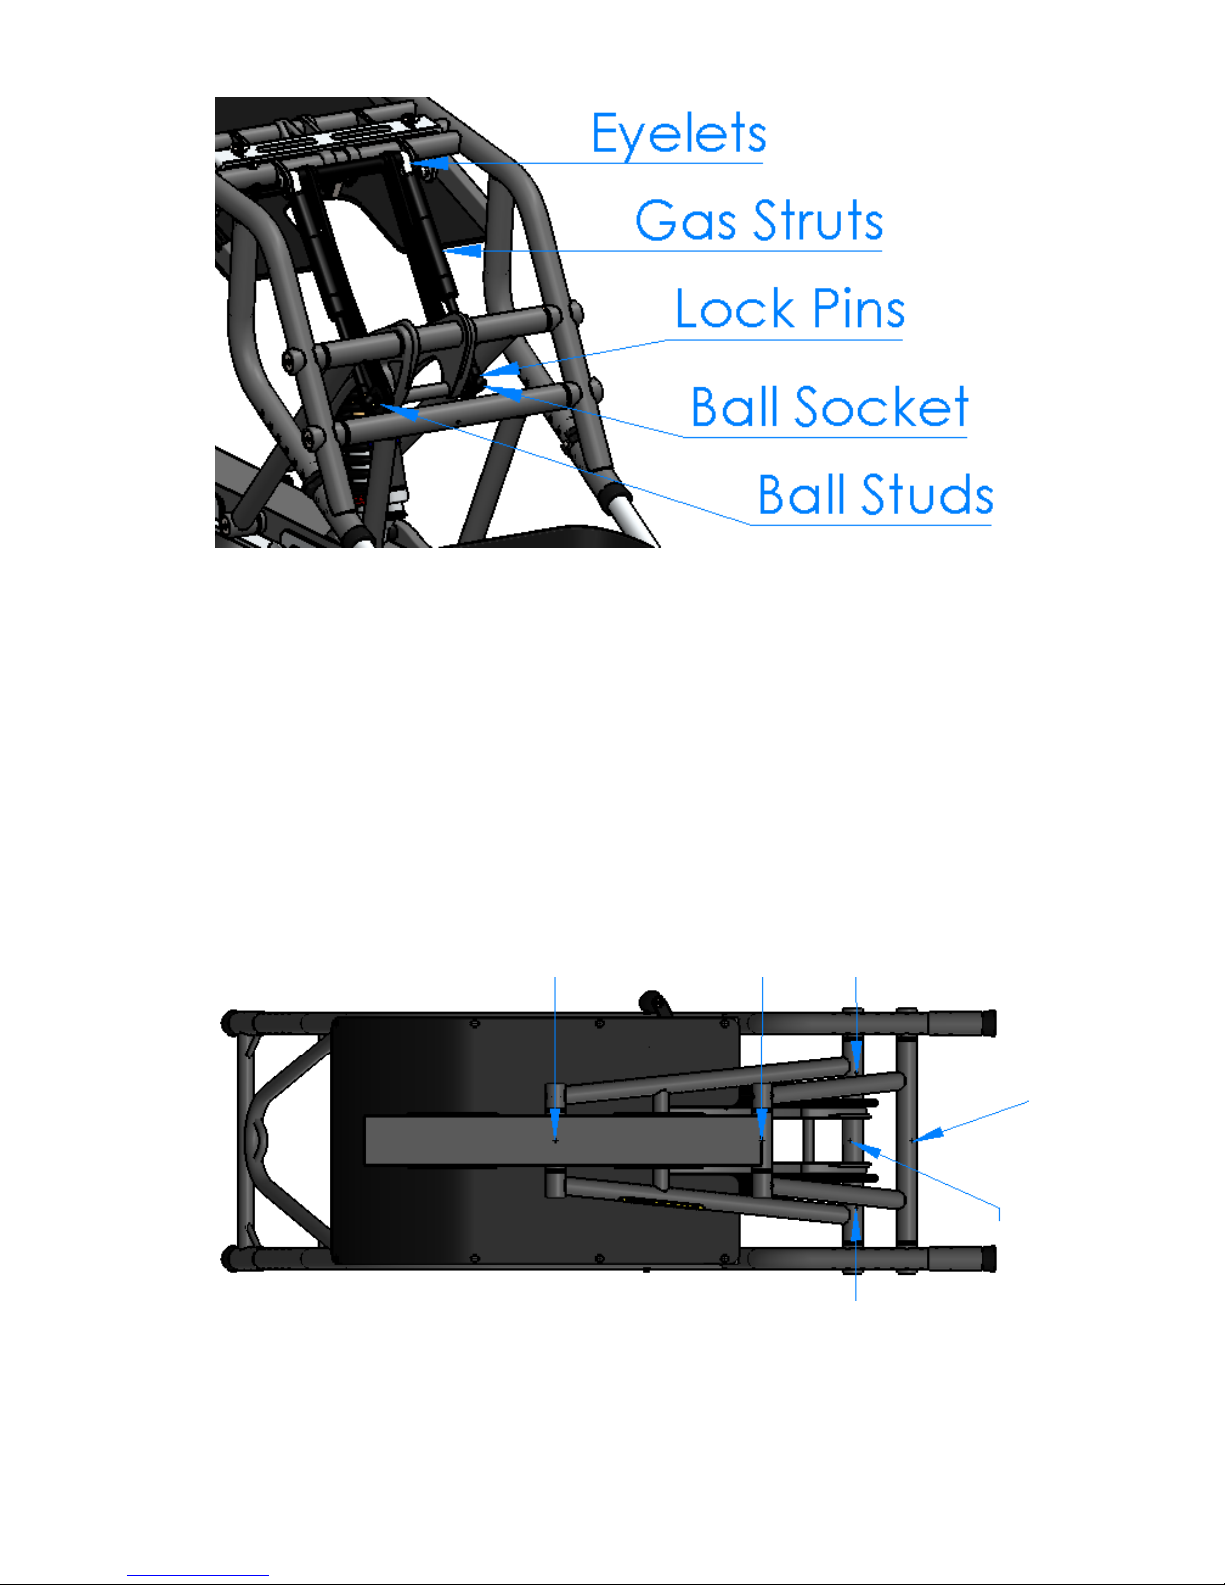
No tools are needed to check the gas struts. Shift the ski into the up
position. Remove the gold colored lock pins from the ball sockets.
Pop the ball socket off of the ball stud and unscrew the gas strut
from the upper eyelet. With the gas strut removed, use hand force
to compress it against a solid, firm surface. If the strut can be
compressed by hand contact us about a replacement.
Page 42
42
While the gas struts are off see if the frame moves freely. If it does
not please contact us to trouble shoot.
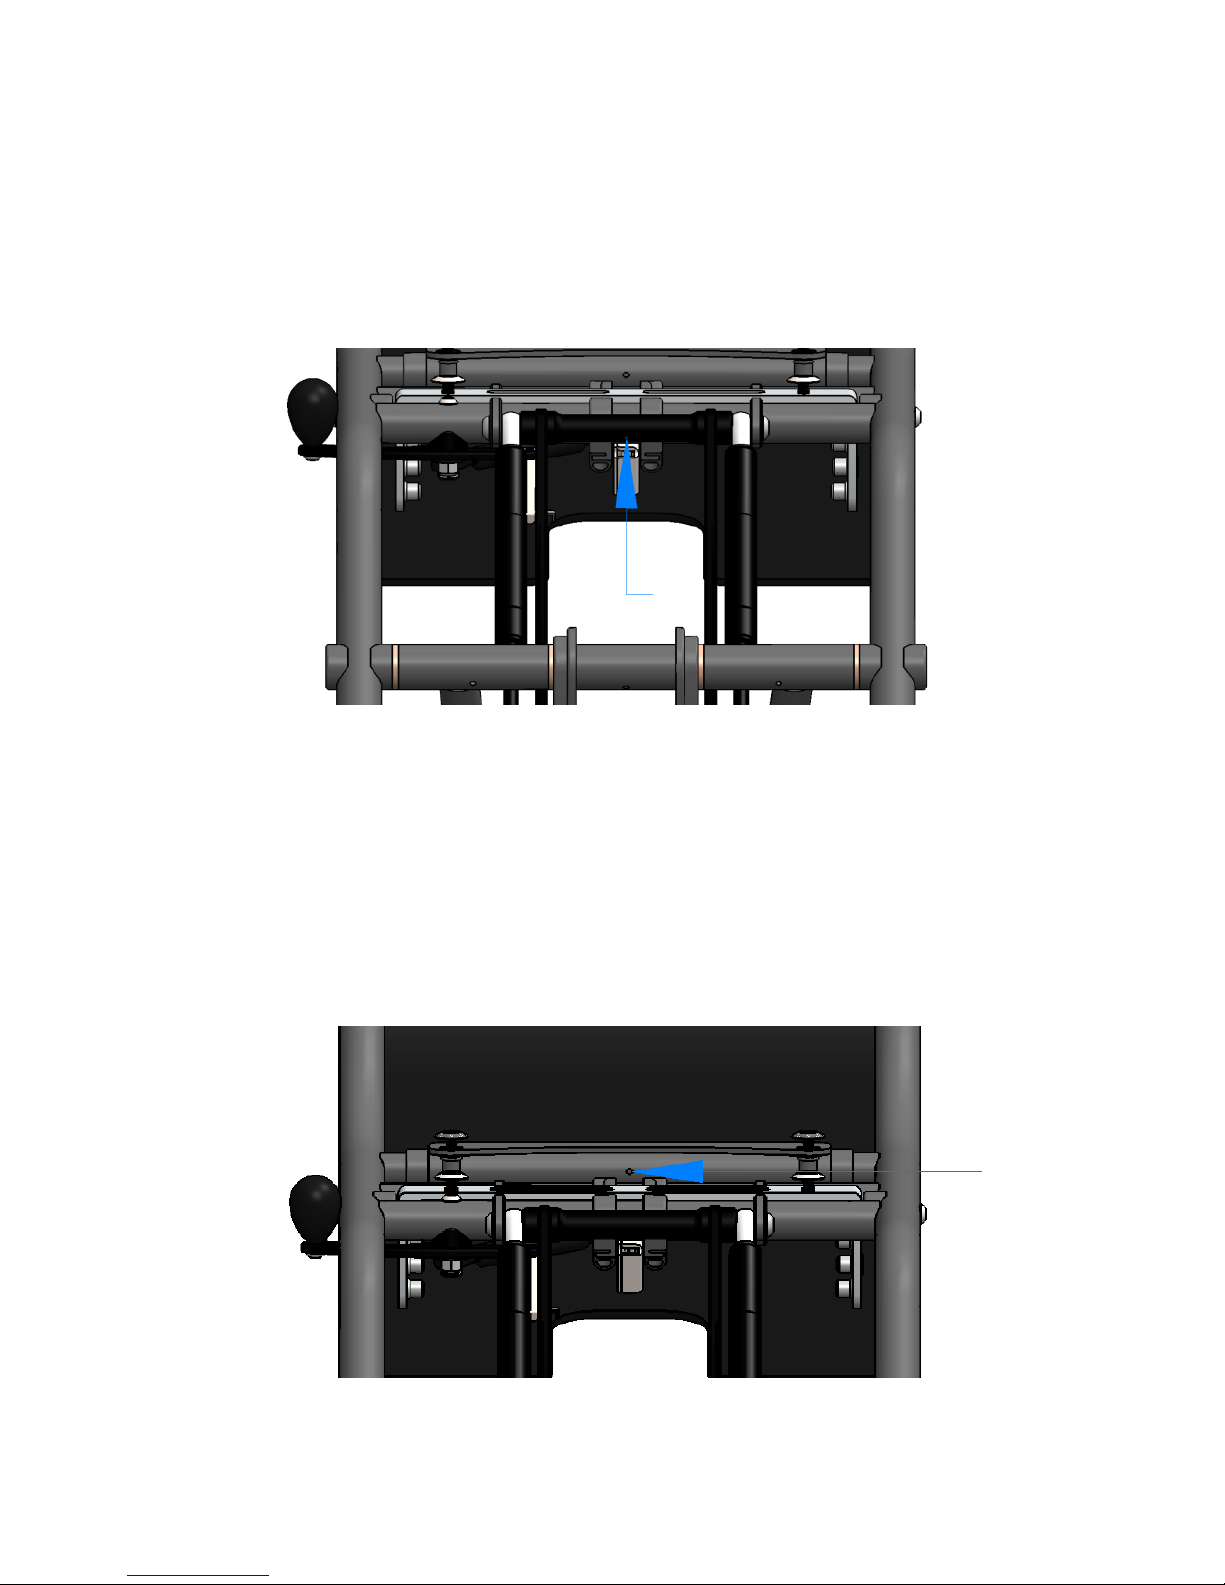
5) Grease bronze bushing pivots
Grease ports have been drilled from the underside of the frame for
the bronze bushings pivots. There are two ports in the lower frame.
You will have to remove the skis and mechanism to access these
ports. There is one port in the load link. You will have to remove
the chairlift evacuation strap to access it. There are two ports in the
rear A-arms upper pivots and one in the upper pivot of the front aarm.
Fill the grease ports using white lithium grease with a grease gun.
Stop filling when grease seeps out between the bushings or you feel
back pressure from the grease port.
Page 43
43
6) Grease the slide pivot
The slide has a grease port on the underside of its pivot. Shift the ski
into the up position. Squirt WD-40 into the grease port. Compress
the ski from the up position to the ski position a handful of times to
work in the WD-40.
7) Grease the seat pivot
The seat has a grease port on the underside of its rear pivot just
underneath the plate. Remove the seat from the frame by
unscrewing the ¼-20 button screws from the seat angle bracket and
the rear truss head screws at the back of the seat. Use a 3/16” Allan
key and #2 screwdriver respectively.
Page 44

44
Squirt WD-40 into the grease port and in the crack at the sides of
the pivot. Carefully move the pivot to work in the WD-40. Make
sure it is adequately lubed or the pivot may gall.
Re-attach the seat to the frame. Ensure the rear seat pivot plate is
flush with the seat. It is possible to cross thread the rear seat inserts
if it is not.
8) Tune your skis
The Mega III skis can and should be maintained just like alpine skis.
The edges of the ski can be tuned using conventional methods. You
should also wax your skis every 1-10 days depending on snow
conditions.
If you are not familiar with how to tune skis or do not have the
means we recommend visiting a local ski shop.
9) Wash your seat liner
The outer material of the seat liner can be hand washed with spray
cleaners or mild detergents. Oil and grease may need dry cleaning.
Avoid chlorine and bleach based cleaners.
The inner foam is not intended to be washed. Replacements are
available if necessary
Page 45
45
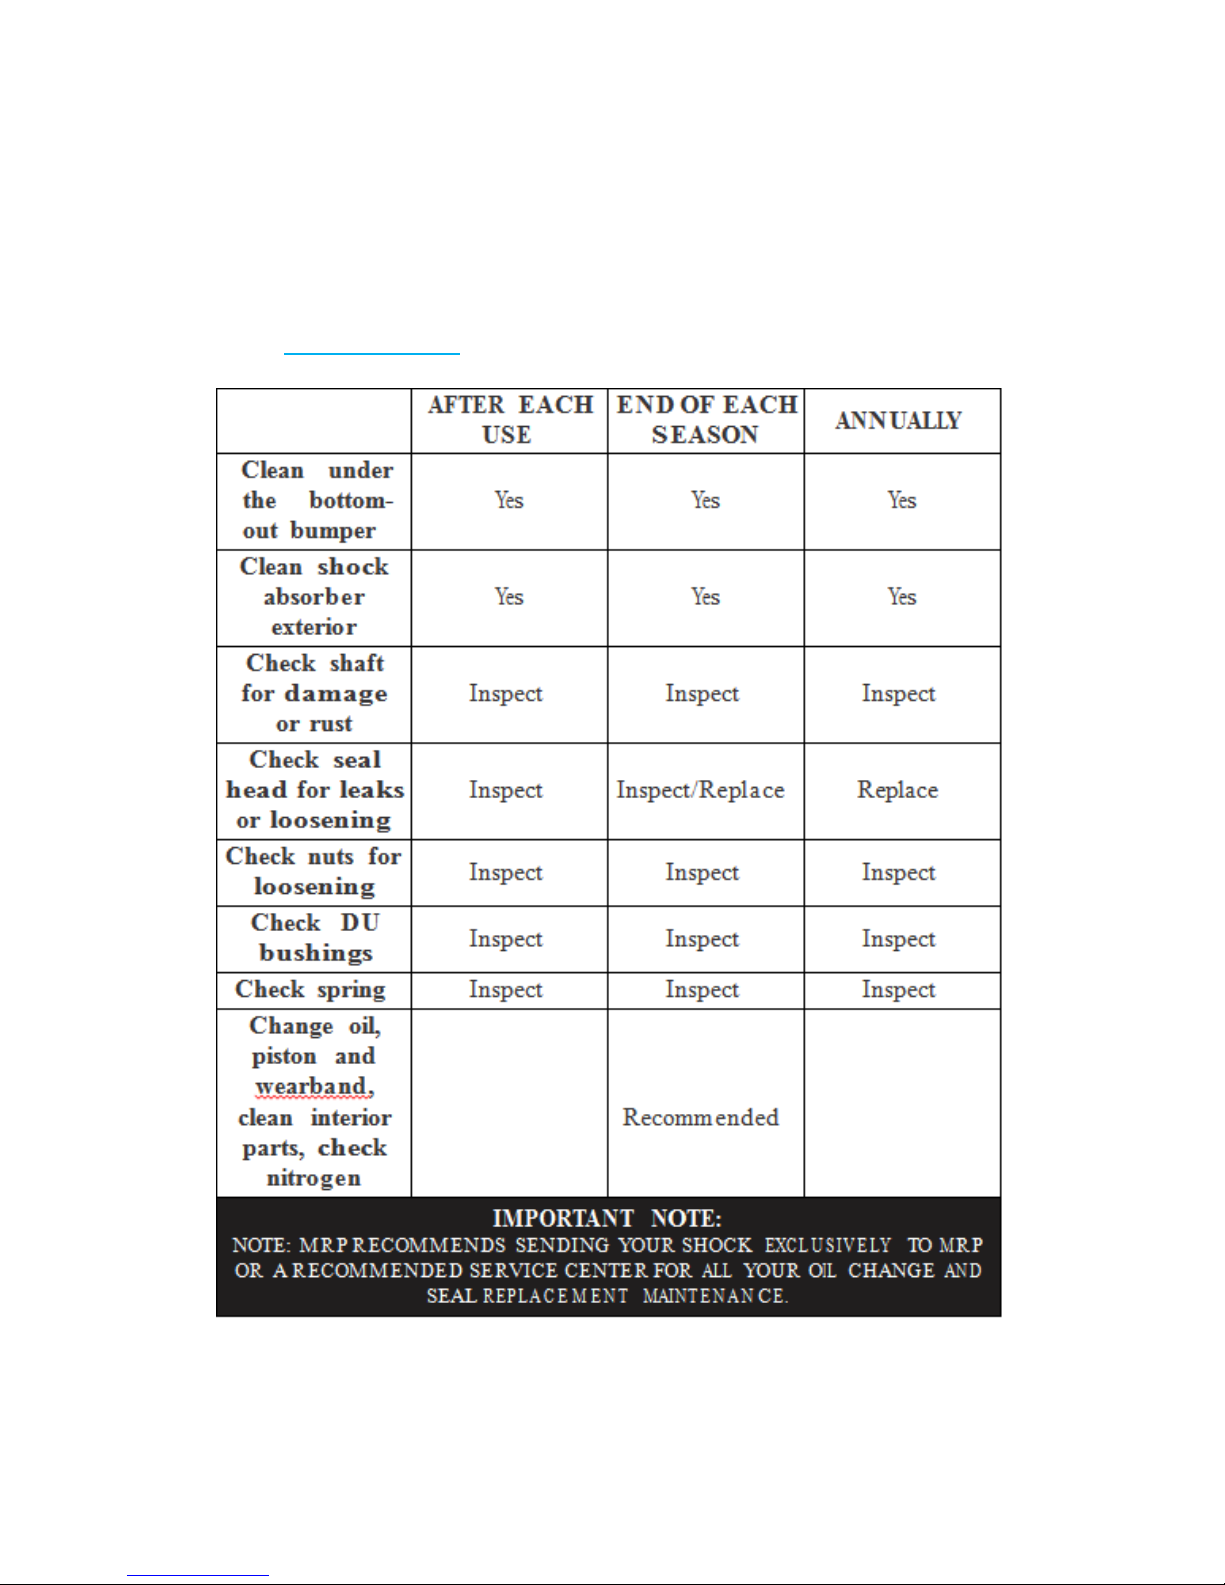
10) Service your shock
The table below shows the recommended maintenance and service
intervals for your MRP shock. For necessary service, shocks can be
sent to MRP in Grand Junction, CO or to one of their recommended
service centers. If you choose to send your shock to MRP you can
call (970) 241-3518 to receive an RA#.
Page 46
46
Parts List
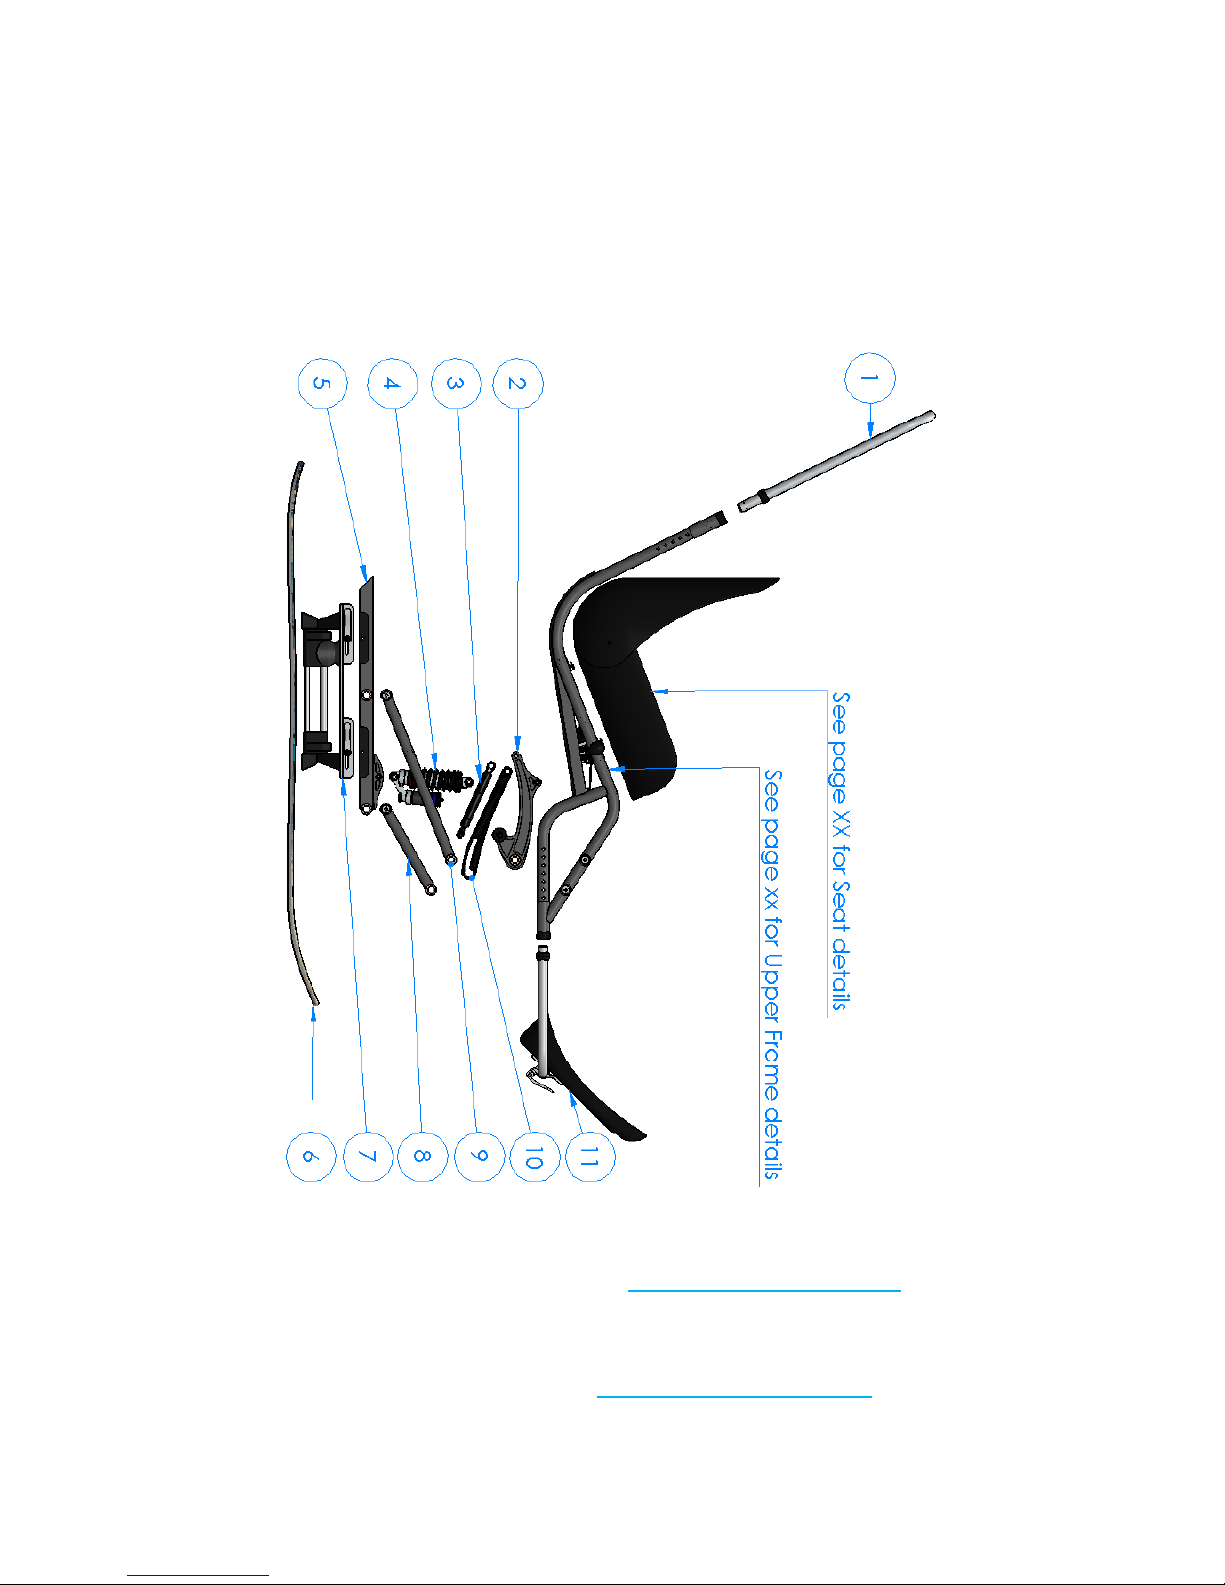
The following section is designed to help identify parts on the
Dynamique. We will always work with you to get your ski back in
working condition as quickly and affordably as possible. If a part is in
need of replacement or repair, please call or email us.
Within the parts list, black text designates standard available parts that
can be purchased online at www.enablingtech.com.
If you need a part listed with blue text or do not see a part you are
looking for please contact us at [email protected]. Including
pictures always helps.
Page 47

47
1) Handles
Narrow Handle
Wide Handle
Quick Release Pins (2)
2) Load Link
Flanged Bushings (2)
Shock Hardware (1)
Shock Spacers (2)
Gas Strut Ball Studs (2)
Black Nylon Washers (2)
3) Gas Struts
Gas Strut (without end fittings)
Ball Socket & Lock Pin (2)
Eyelet (2)
4) Shock
MRP Raze 2CR
300lb, 400lb or 500lb springs
Mounting Hardware Kit for Upper Eyelet (1)
Mounting Hardware Kit for Lower Eyelet (1)
5) Lower Frame
Flanged Bushings (4)
Mechanism Shims (4)
Shock hardware (1)
6) Mega III Skis (sold complete with bindings)
Ski Bindings (4)
7) Mechanism (sold complete with skewers)
Replacement parts available
8) Front A-Arm
Flanged Bushings (2)
Upper Axle & Hardware (1)
Lower Axle & Hardware (1)
Set Screw (1)
9) Rear A-Arm
Flanged Bushings (2)
Upper Axle & hardware (1)
Lower Axle & hardware (1)
Set Screw (1)
10) Slide
11) Footrests
Childs Footrest (not shown)
Junior Footrest
Adult Footrest
Footrest Plastic (1)
Foot Strap and hardware (1)
U-loop, end plugs & CNC clamps (1)
Quick Release Pins (2)
Quick Release Clamps (2)
Page 48
48
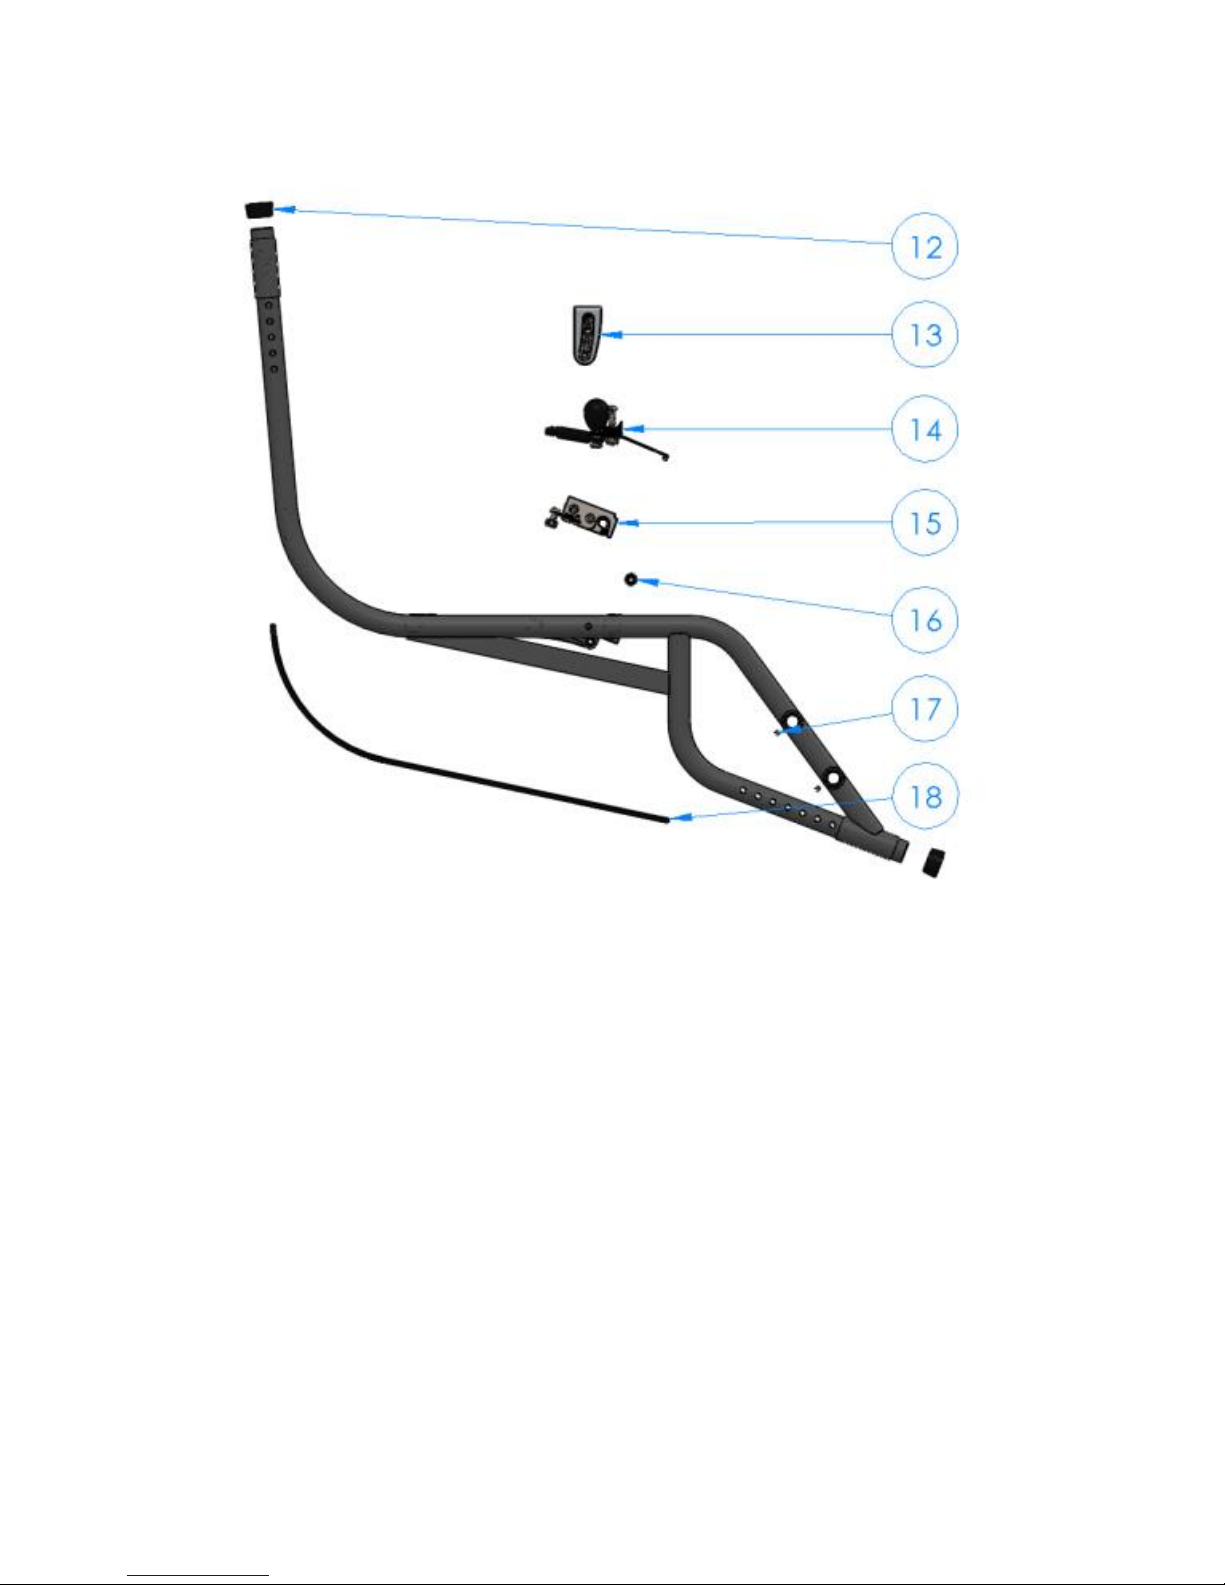
Upper Frame Details
12) Silencers (4)
13) Seat Bracket & hardware
14) Shifter
Knob (1)
Shifter Spring (1)
Pipe Saddle (1)
Rod End Adjuster (1)
Hardware
15) Rotary Lock & hardware
16) Slide Upper Axle & hardware
17) Set Screws
18) Skid Plate & rivets
Page 49
49
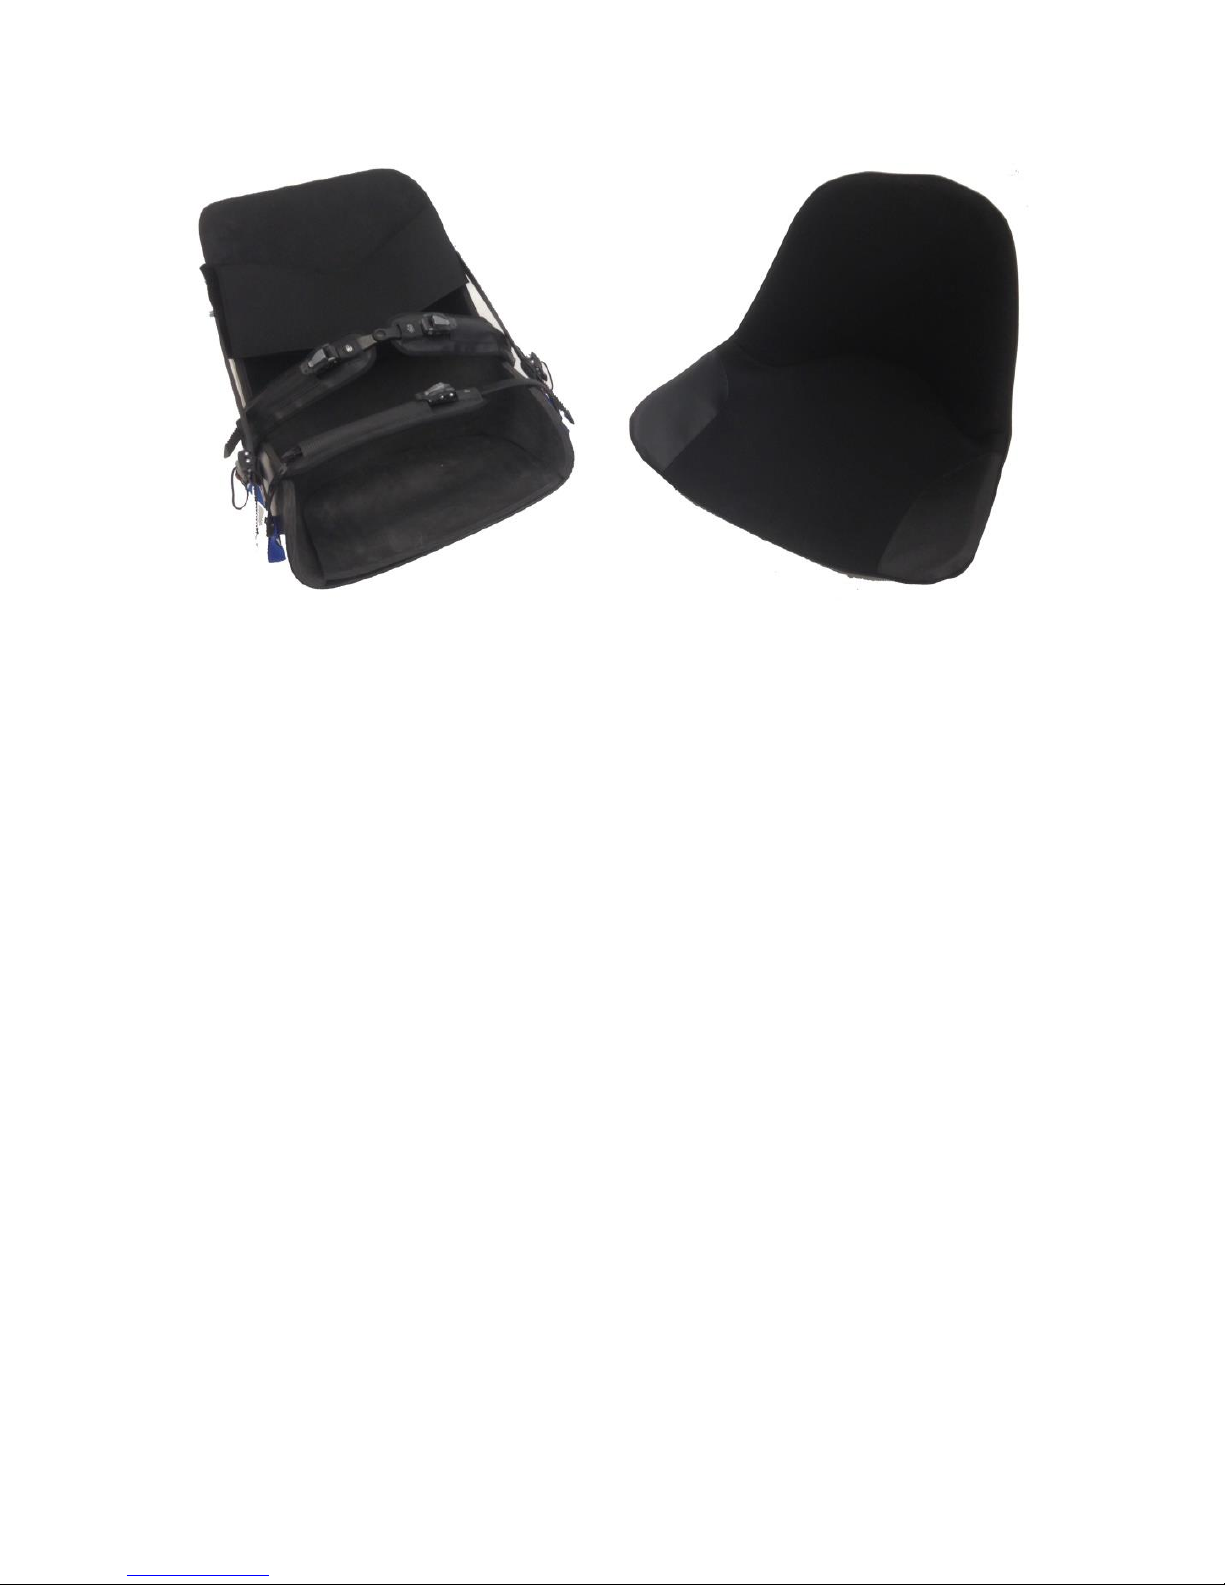
Seat Details
12) Clam Shell Seat (14”, 16”, 18”)
13) Seat Liner (1)
14) M2 Padded Ratchet V-Strap & hardware (1)
15) M2 Padded Ratchet Strap & hardware (1)
16) Ladder Strap and Ratchet (2)
17) Lift Assist Straps & hardware (2)
18) Pull Back Strap & hardware (1)
Page 50

50
Warranty
The Dynamique is covered under a Limited Warranty.
The Limited Warranty guarantees that this skiing equipment,
manufactured by Enabling Technologies LLC, is free from defects in
material and workmanship. This product is covered for ONE YEAR from
the date of purchase against such defects. This warranty does not
cover damage caused by misuse, skier error or other damage caused by
anything other than defects in materials or workmanship.
Page 51

51
Notes
Use this page to record notes on how your Dynamique is set up.
(Shock spring weight, rebound & compression settings, which footrest
hole is used, seat angle, etc.)
Page 52

52
Contact
Phone: (303) 578-9345
Email: [email protected]
Website: EnablingTech.com
Enabling Technologies LLC.
2200 S. Jason Street
Denver, CO 80223
USA
Last updated February 2, 2016
 Loading...