

Page 1
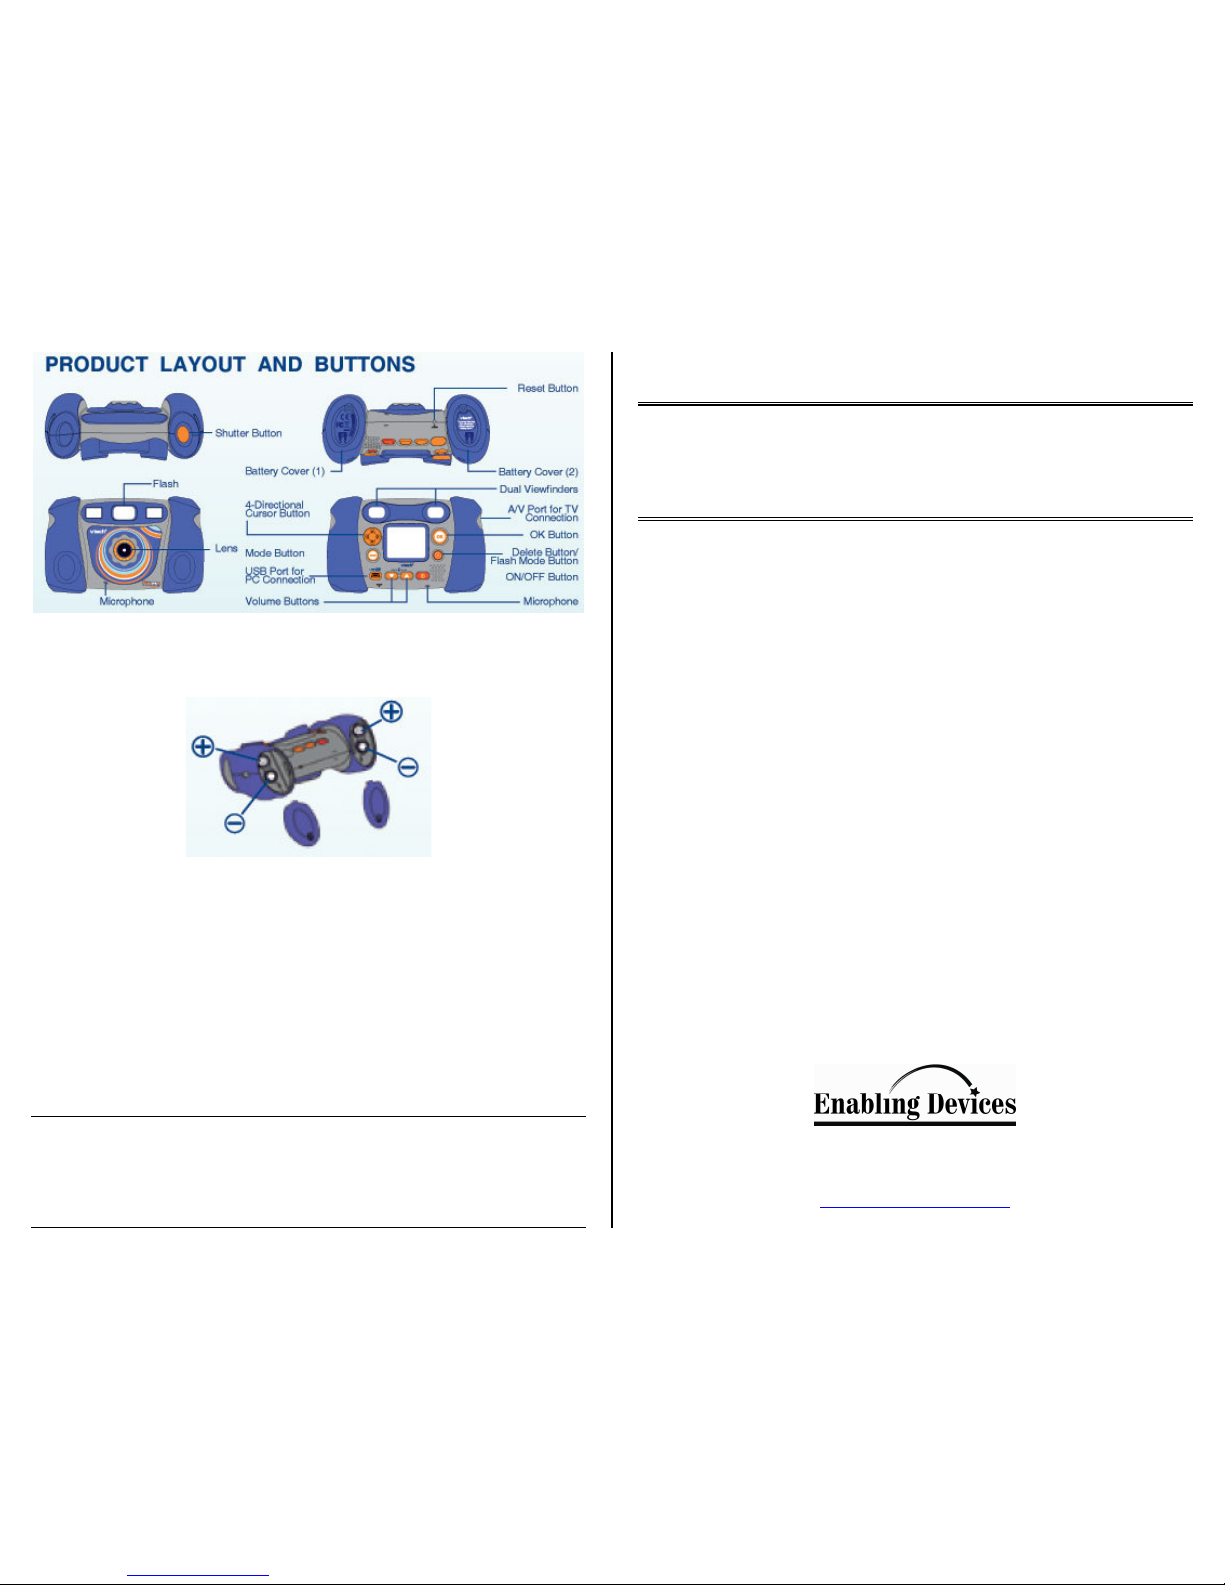
Fig. No.1
Fig. No.2
For Technical Support:
Call our Technical Service Department
Monday through Friday, 9 a.m. to 5 p.m. (EST)
1-800-TEC-TOYS or 1-800-832-8697
Adapted Digital Camera #5155
USER’S GUIDE
385 Warburton Avenue
Hastings-on-Hudson, NY 10706
Tel. 914.478.0960 / Fax 914.478.7030
www.enablingdevices.com
Page 2

Photos, movies and games all in one!
We’ve mounted this fantastic kid’s camera on a unique power-driven platform that can
tilt up and down and pan left or right to frame your picture before shooting. The
motorized platform pedestal has 3 adjustable feet to level the camera. The panning and
tilting function is controlled by the 5" orange disc on your black controller center. Use
the buttons on the control panel to turn the camera on and to take your picture. This
camera also takes movies and downloads easily to your PC. It has 2.0 Mega Pixels, 256
MB memory, SD memory card slot for memory expansion, and a photo editing program
on CD-Rom. The power-driven platform can be mounted on any size tripod by simply
screwing the base on the tripod just like any other camera. Size: Platform 10 1/2"H x
10"W x 10"D; Controller 1 1/2"H x 6"W x 11 1/2"D. Requires 12 AA Batteries. Camera
colors will vary.
Operation:
1. The Digital Camera requires 4 AA batteries (Not included). Use alkaline batteries
only (e.g. Duracell or Energizer brand). Do not use rechargeable batteries or any
other type of batteries because they supply lower voltage and the unit will not
perform properly. Never mix old and new batteries together or different brands or
types together.
2. Battery installation for the camera: Make sure the camera is turned OFF. Locate
the battery covers on the bottom of the camera. Loosen the screws using a
screwdriver and remove the battery covers. Install 4 new “AA” batteries (2 on each
side) as illustrated in Fig. No.2.
3. Battery installation for the power platform: The battery compartments are
located under the power base, carefully turn the base over and remove the screws
from the two black battery case coves. Next install 4 AA alkaline batteries in each
compartment. Replace covers and screws.
4. Place the camera on top of the power base, the camera and base are connected by
Velcro attachment. Press the camera down firmly enough to lock the two together.
Connect all cables from the power base to the camera. All cables are labeled for
proper connection.
4. Use the Big button control pad to move and point the camera. The center pad with
four arrows pans the camera right, left, up or down. The left button turns the
camera ON/OFF; the button on the right takes the picture when it is activated.
5. There are two Speed control knobs on the bottom of the power base, one controls
the speed of the right and left panning, the other controls the speed of the up and
down movement. Clockwise increases the speed, counter-clockwise decreases
speed.
6. The three feet on the bottom of the power base are adjustable to keep the camera
level. The feet are adjusted by turning them clockwise or counter-clockwise to
adjust their height. The power base will also accommodate any standard tripod.
Please Reference the original manufacture instructions for all of the cameras
functions and features and any additional troubleshooting info.
Troubleshooting:
Problem: Camera does not work.
Action #1: Check all batteries for proper (+) & (-) battery polarity.
Action #2: Replace all batteries with fresh new batteries. Never mix different brands or
old and new batteries.
Action #3: Make sure you have a memory card installed in the camera.
Problem: Power base works intermittently or very slowly.
Action #1: Check all batteries for proper (+) & (-) battery polarity.
Action #2: Replace all batteries with fresh new batteries. Never mix different brands or
old and new batteries.
Action #3: Make sure that there is nothing inhibiting the depression of the control plates
or holding any of the control plates down.
Care & Maintenance:
1. Keep the camera clean by wiping it with a slightly damp cloth.
2. Keep the camera out of direct sunlight and away from any direct heat source.
3. Remove the batteries when the camera is not in use for an extended period of time.
Please Note: To prevent data loss, copy all photos and movies from Camera to a PC
before removing batteries.
4. Do not drop the camera on a hard surface and do not expose it to moisture or immerse
it in water.
Rev 4/9/10
 Loading...