

Page 1
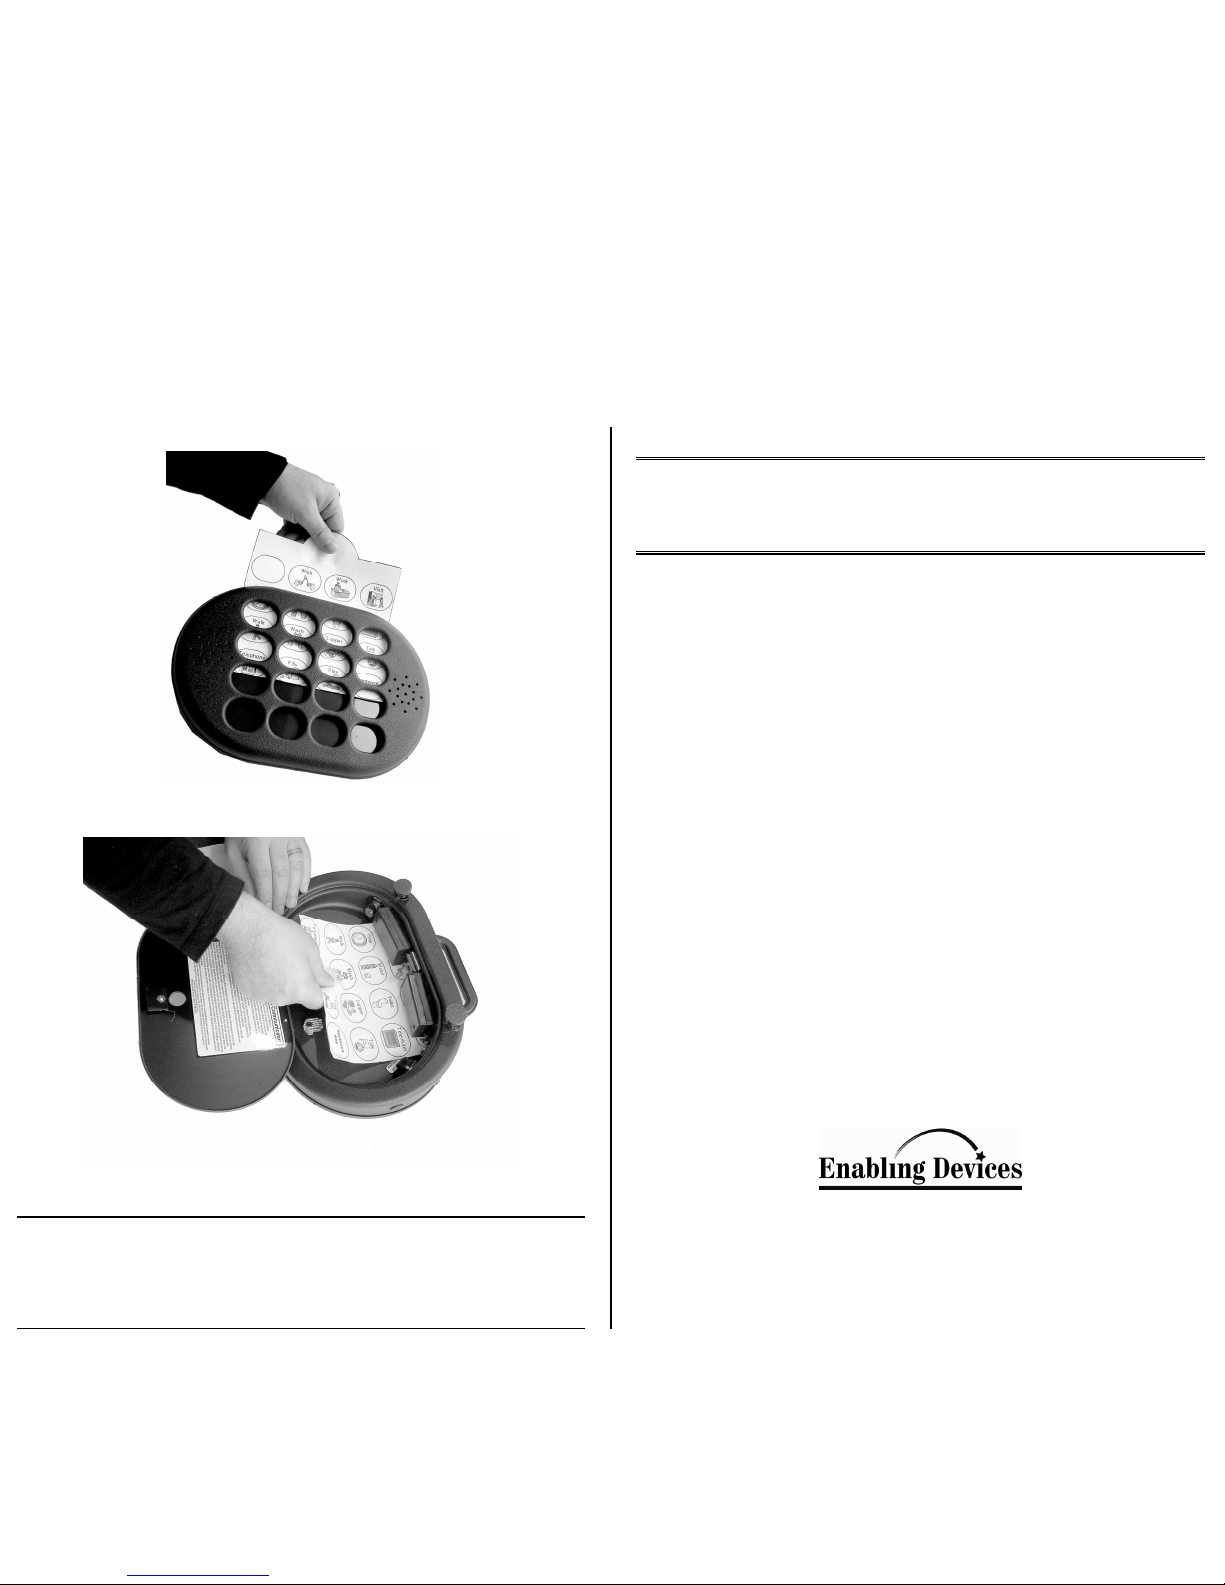
Figure No.1
Figure No.2
For Technical Support:
Call our Technical Service Department
Monday through Friday, 9 a.m. to 5 p.m. (EST)
1-800-TEC-TOYS or 1-800-832-8697
Phrase Maker Communicator- #2509
USER’S GUIDE
50 Broadway
Hawthorne, NY 10532
Tel. 914.747.3070 / Fax 914.747.3480
Toll Free 800.832.8697
www.enablingdevices.com
Page 2

Create Your Own Sentences! Open up a world of c ommunication choices with our new innovative
Phrase Maker. The device allows the user to combine 15 of your pre-recorded words or short phrases
to create their own unique sentences. Now those with non-functional speech have the freedom to say
what they really want! The device now has FOUR modes: Auditory Queing, Single Switch Message
Entry, Beep Acknowledgement, and Standard Communicator. The Phrase Maker has a total of 40
seconds of recording time per level for a total of 288 s econds for the unit. Comes with two adjustable
legs to increase the angle. Th e back of the device opens to store your icon sheets. The Phrase Maker
can also be used as a st andard 7-level communicator that speaks your pre-recorded message as you
press each key. Size: 12 3/4"L x 10 3/4"W x 3 3/4"H. Requires 4 AA Batteries.
BATTERY INSTALLATION:
Turn the unit over and open the back compartment door by pulling it open. Make sure the unit is in the
OFF position by rotating th e ON-OFF-VOLUME control counterclockwise until a "click" is heard.
Remove the small Phillips head screw in each of the two battery compartments and install 4 brand
new “AA” alkaline batteries i nto the compartments. Replace the battery covers and sc rews. Replace
batteries regularly. W eak batteries will cause the Phrase Maker to act erratically, such as shutting off
while playing messages.
Use brand name ALKALINE batteries ONLY (e.g. Dur acell or Eveready Energizer).
Do NOT use rechargeable batteries.
Do NOT mix new and old batteries.
Do NOT over tighten the battery compartment screw.
To extend battery life, always shut the Phrase Maker OFF when not in use. Always remove
batteries when the unit will not be used for extended periods of time. Dead batt eries often leak
acid and can cause permanent damage to the communicator.
OPERATION:
This communicator has 4 Modes of operation. W hen turning the unit ON, it will automatically set to
Mode 1. To change Modes: Pr ess cells 1 and 5 simultaneously and hold until unit beeps. The number
of beeps indicates Mode number. Release cells, wait 2 seconds and repeat to advance to next Mode.
Repeat in Mode 4 to return to Mode 1.
Mode 1: Standard Communicator Mode. Record and playback 15 diff erent words or short messages
(3 sec/message, 7 levels, 5 min total record time). T o record, press the record button first. Then press
the individual cells one at a time while speaking your message into the microphone. Note the 16th cell
located on the bottom right c orner is reserved for phrase playback in Modes 2, 3 and 4 only. It cannot
be used in mode 1. A rotary switch on the back ch anges levels.
Mode 2: Phrase Mode with Beep Acknowledgement. Playback only to construct your phrase. Press
individual cells one at a time. Each press will make a beep indicating the particular word is "entered".
When phrase is constructed, press sentence key loc ated in lower right corner and the completed
phrase/sentence will be announced.
Mode 3: Phrase Mode with Auditory Cue Acknowledg ement. Playback only. Same as Mode 2 except
when each cell is pressed, the individual word will play at reduced volume. Pr ess sentence key and
the completed phrase/s entence will be announced at
full volume.
Mode 4: Phrase Mode with Single Switch Message Entry. Playback only. Requires a capability switch
plugged into the jack on back. When plugging in your s witch, make sure ther e are no gaps between
the connections. Each switch activation will play each word in sequence at r educed volume. To enter a
particular word into the phr ase, wait 2, 4, or 6 seconds (see setting below) after playing word and the
unit will beep indicating th e particular message was " entered". Continue pressing the capability switch
to advance to the next message to be "entered" into the phrase. When the phrase is complete, wait
another 2 seconds after the beep and the completed phrase/sentence will be announced at full
volume. To increase the 2 s econd delay, press cells 9 and 13 simultaneously and hold. The unit will
beep 2 times indicating a 4 s econd delay. Release, wait 2 seconds and repeat until the unit beeps 3
times for 6 second delay. R epeating this procedure will return the unit to a 2 s econd delay.
Adjusting Rear Leg Height: The Phrase Maker’s back legs are adjustable. You c an raise the back of
the unit up to 1" by turning each foot clockwise: to raise, counterclockwise to lower. Do not turn the
feet out more then 1" to prevent damage to the legs.
PRECAUTIONS:
Never hit the icon surf ace with a hard object or permanent damage can result.
Never tape or affix anything directly to the icon surf ace.
Always keep liquids far away from the communicator to prevent permanent damage to the
internal circuitry from spillage.
Making and using your icon sheets:
Icon sheets can be made with our Universal Icon Maker CD item No.4049, (sold
separately), or with Mayer-Johnson’s BoardMaker CD program item No’s. 4008 for
Mac computers or 4009 (for Windows PC). If you do not have the most current version
of the BoardMaker program, you will need to download the template from
www.mayerjohnson.com. Please contact Mayer-Johnson directly with any questions or
concerns with BoardMaker program or downloading templates from their site. Enabling
Devices does not provide support for Mayer-Johnson’s products.
To place your icon sheet into the Phrase Maker, simply slide the sheet into the
opening on the grid frame (see figure 1. on back page) and push down until all your
icons line up with the grid frame. Icon sheets can be laminated, but we recommend
using only a thin laminate.
You can store up to seven sheets in the back storage compartment, by sliding one end
of each sheet under the space directly under the battery compartments until you feel
resistance ( see figure 2. on back page). Next secure the other end of each sheet
under the two clip holders and the other end of the compartment. Please Note: When
sliding the first sheet in, it should have a slight upward bend. This will make it easier to
slide the first sheet in. Laminating your icon sheets is recommended.
Troubleshooting:
Problem: The unit fails to operate, or operates incorrectly.
Action #1: Make sure that you have fresh batteries in the unit and that they are installed
according to proper polarity.
Action #2: Make sure that the volume is turned up to an audible level
Action #3: Make sure that there is nothing inhibiting the depression of the touch pad OR
pressing the touch pad down (i.e. icons, crumbs, sticky juice, etc.)
Action #5: If you are using an external capability switch, make sure that there is a TIGHT
connection between the switch and the unit (there should be NO gaps). Especially check
this when using adapters. Any gaps will cause the unit to function incorrectly or not work at
all.
Action #6: If you are using an external capability switch, test that switch with another
device to rule out the switch as the source of the problem. Do the same with any adapters
that you may be using.
Care of Unit:
The Phrase Maker can be wiped clean with any household multi-purpose cleaner and
disinfectant. We recommend Simple Green, which is a non toxic biodegradable all-purpose
cleaner.
Do not submerge the unit, as it will damage the contents and the electrical components.
Do not use abrasive cleaners, as they will scratch the surface of the unit.
 Loading...