

Page 1
Talk 4 12 Level Communicator - #2500,
2500V, 2500BV & 2500B
USER’S GUIDE
Page 2

Our Talk 4 Augmentative Communicator is a powerful communication tool loaded with many useful
features. The Talk 4 has 12 levels and single switch illuminated auto scanning. It has a unique slot so
you can easily slide in your icon overlay. The 2 1/8" X 2 1/8" icon area requires only the slightest touch
to play your “true voice” recording. The rugged and reliable Talk 4 is portable, lightweight and easy to
access. S ize: 11"L x 4"W x 2¾"H. Requires 4 AA Batteries.
BATTERY INSTALLATION:
Make sure unit is in the OFF position by rotating the ON-OFF-VOLUME control counter clockwise until
a "click" is heard. Remove each screw in both battery compartments and install two brand new “AA”
alkaline batteries into each - f our batteries total. Replace both battery covers and screws.
OPERATION:
Rotate the ON-OFF-VOLUME control to approximately its' midway position. After one second, you will
hear a s ound or a verbal mess age from the speaker. This is the Level Announcement Message. The
unit is now on Level One of the twelve levels provided in the Communicator.
PLAYING MESSAGES:
At this time, you can access each of the 4 messages on Level One by pressing any one of the four
icons, one at a time.
RECORDING MESSAGES:
Using one hand, press and hold the Record button on the underside of the unit. Using your other hand,
press the icon you wish to record and s peak into the microphone. Releasing the icon or Rec ord button
will cancel recording. If you are going to record mor e than one message, you may press and hold the
record button while pressing the appropriate icons to record your messages.
RECORDING LEVEL ANNOUNCEMENT MESSAGE:
Your Level Announcement Mess age may be changed at any time and can be renamed "Level One the
Food Level" or "Level One Jimmie's Messages", etc. Simply press the Record button first, then press
the Level button and speak your Level Announc ement Message into the microphone. Note: to hear
your new level message you must either cycle through all 12 levels by repeatedly pressing the Level
announcement button until it returns to Level One or turn the unit OFF, wait several seconds and turn
the unit back ON. Your new Level One Announcement Message will now play.
CHANGING LEVELS:
Each time the Level button is pressed, the Talk 4 will advance to the next level. Pressing the Level
button on Level T welve will return to Level One. Simply follow the instructions above to record each of
the four c ommunicator messages or your Level Announcement Message for each level. Remember, to
play your Level Announcement Message, you MUST cycle through all remaining levels and return to
that particular level to hear that Level Announcement Message.
VIBR ATION OPTION: (Special Order only)
If your Talk 4 is equipped with the optional Vibration Mode, pressing any of the four icons to play a
message will cause the Talk 4 front panel to vibrate. Among other uses, this enhances the ability of
someone who is hearing-impair ed to determine when the TALK 4 is playing. To turn the Vibration
Mode ON or OFF, press ic ons Three and Four simultaneously and hold until a “beep” is heard. Note:
Vibration does not activate while recording messages, changing Levels or during message scanning.
MESSAGE SCANNING:
The Talk 4 has built-in A utomatic Scanning. Plug a capability switch into the 1/8” jack located on the
rear of the Talk 4 and press the capability switch. Upon release, the unit will scan from left to right and
continue scanning until the next press of the capability switch.
SCAN SPEED:
You can control the speed of the Message Scanning by pressing the appropriate icons simultaneously
and holding them until a “beep” is heard to increase or decrease the pause time between each
message:
One and T wo = 2 seconds, One and Three = 6 seconds, One and Four = 9 s econds.
The Talk 4 will “r emember” your Scan Speed s etting until the next time you change it.
AUDITORY CUEING:
During Mess age Scanning you can enable the Talk 4 to speak the message being scanned, but at
reduced volume. This gives the user an auditory “preview” of the current message. Pressing the
capability switch again will play the current message at full volume. To turn Auditory Cueing ON or
OFF, press icons Two and Three simultaneously and hold until a “beep” is heard.
PAPER ICON INSERTS:
The Talk 4 uses paper ic on inserts that you print fr om your computer. You can download the PDF file
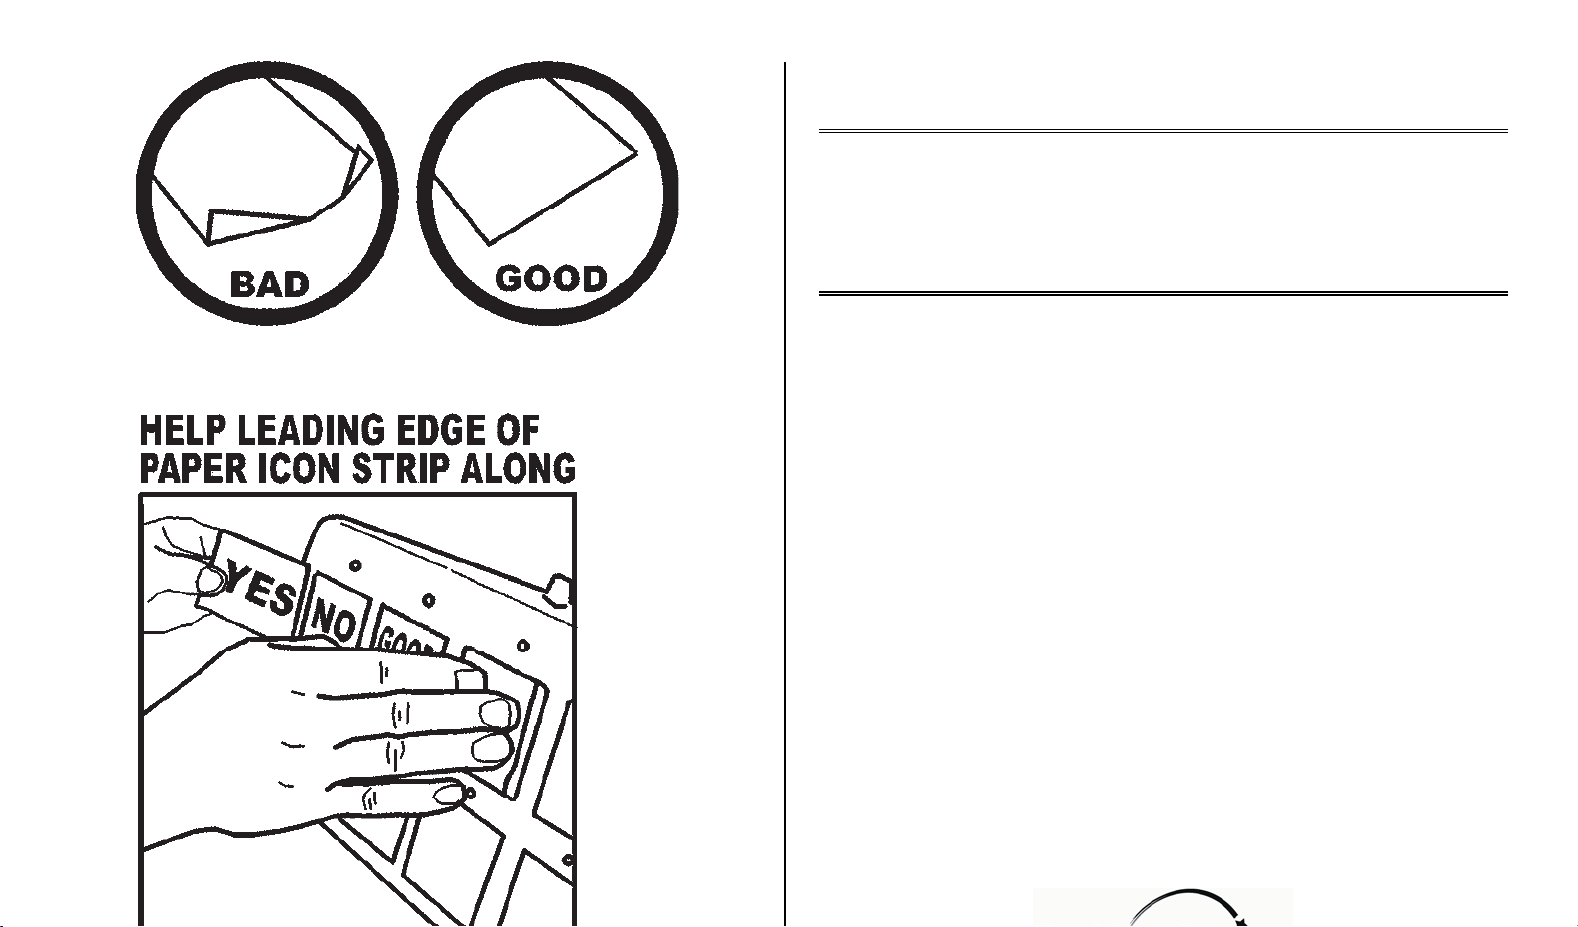
for the inset template from our website. Each icon template sheet makes thr ee inserts. Cut along the
dotted lines using scissors or a paper cutter. It is important to cut accurately along the dotted line so
the icon insert will slide into the Talk 4 icon slot properly. If the insert is cut too large it will get stuck.
(See illustrations on back page) Draw you picture or word on the icon insert before sliding into the Talk
4 slot. Never draw on the icon insert after it has been inserted into the Talk 4 as a pen can
permanently damage the surface of the cell. If you are going to use stickers on your icon insert
sheet, they must lay completely flat otherwise they will get stuck. When sliding the paper icon insert
into the Talk 4 slot, make sure you gently press down the leading edge of the paper so it will not get
stuck on the cell dividers. A small piece of tape may be us ed to hold the icon sheet from sliding out of
the slot if the T alk 4 will be moved around. Simply tape the left edge of the insert to the T alk 4 body
using a 1” long piece of tape. If you are laminating your paper icon insert, use a light laminate such as
“Magic Cover” self-adhesive vinyl covering. A ver y heavy laminate will decreas e the sensitivity of the
switch c ells. The leading edge of the icon sheet should not be “rabbit eared” or torn. If you have
Mayer J ohnson Boardmaker, you can download the Talk 4 template from their website.
REPLACING BATTERIES:
Replace batteries regularly. Weak batteries will cause the Talk 4 to act erratically, such as shutting off
while playing messages.
Use brand name ALKALINE batteries ONLY (e.g. Duracell or Eveready Energizer).
Do NOT use rechargeable batteries.
Do NOT mix new and old batteries.
Do NOT over tighten the battery compartment screws.
To extend battery life, always shut the Talk 4 OFF when not in use.
Always remove batteries when the unit will not be used for extended periods of time. Dead batteries
often leak acid and can cause permanent damage to the communicator.
CARRYING STRAP:
For safety purposes, the Carrying Strap has thumbscrews with a self-locking nut to prevent them from
being removed from the strap. To prevent a Choking Hazard, NEVER remove the self-locking nuts.
When attaching the carrying strap, tighten the thumbscrews finger-tight only.
DO NOT OVERTIGHTEN.
The Carrying Strap was designed to c arry the Talk 4 from the shoulder only.
NEVER carry the communicator from the neck.
PRECAUTIONS:
Never hit the icon surface with a hard object or permanent damage can result.
Never tape or affix anything directly to the icon surface.
Always keep a paper insert installed in the T alk 4 to protect the icons.
Always keep liquids far away from the communicator to prevent permanent damage to
the internal circuitry from spillage.
Rev 4/24/06
 Loading...