

Page 1
TitanSDR Receiver
User Manual
v.1.2e
Page 2
Enablia S.r.l. (Italy) 2012
Before using the receiver, read carefully the Installation Manual and the User
Manual.
The symbol of the crossed out wheelie bin indicates
that in the European Union this product, and all
items marked with this symbol, cannot be disposed
of as unsorted waste but must be disposed of
separately at the end of their useful life
Page 3

TitanSDR – User Manual 3
Index
1. Introduction .................................................................................. 5
1.1 User interface architecture ....................................................................... 6
1.2 Panoramic Scope, Wideband Scope and Narrowband Scope ....... 8
1.3 Software startup .......................................................................................... 9
2. Receiver Mode .......................................................................... 11
2.1 Panoramic Scope .................................................................................... 12
2.1.1 Front End settings ...................................................................................... 12
2.1.2 Spectrum settings ...................................................................................... 13
2.1.3 Management of wideband channels .................................................. 17
2.2 Wideband Scope ..................................................................................... 20
2.2.1 Spectrum settings ...................................................................................... 20
2.2.2 Management of narrowband channels ............................................... 23
2.2.3 Recording of wideband channels ......................................................... 27
2.3 Narrowband Scope ................................................................................. 29
2.3.1 Spectrum settings ...................................................................................... 30
2.3.2 Tuning of narrowband channel .............................................................. 34
2.3.3 Demodulation settings ............................................................................. 36
2.3.4 Listening demodulated audio ................................................................ 39
2.3.5 Gain control ............................................................................................... 41
2.3.6 Audio streaming through Virtual Audio Cables (VAC) ....................... 42
2.3.7 Audio streaming by LAN .......................................................................... 43
2.3.8 Recording of narrowband channels ..................................................... 47
3. Player mode ............................................................................... 49
4. Advanced Operations .............................................................. 52
4.1 Session saving and loading .................................................................... 52
4.1.1 Session saving ............................................................................................ 52
4.1.2 Session loading .......................................................................................... 54
4.2 NB Channels List ........................................................................................ 55
Page 4

TitanSDR – User Manual 4
4.3 Memory of narrowband channels ......................................................... 57
4.3.1 Memorization ............................................................................................. 58
4.3.2 Allocation of memorized channels ........................................................ 61
4.3.3 Memory settings modifications ............................................................... 62
4.3.4 Removal of memorized channels .......................................................... 63
4.4 Scheduling of recordings ........................................................................ 64
4.4.1 Scheduling of a new wideband\narrowband channel .................... 64
4.4.2 Task Editor window ................................................................................... 67
4.4.3 Managing scheduled channels ............................................................ 71
4.4.4 Allocation of scheduled channels ......................................................... 73
4.5 Options ....................................................................................................... 78
4.5.1 Independent View.................................................................................... 78
4.5.2 Panoramic ................................................................................................. 79
4.5.3 Wideband .................................................................................................. 79
4.5.4 Narrowband .............................................................................................. 81
4.5.5 Output Files Name .................................................................................... 83
4.5.6 Storage ....................................................................................................... 85
4.5.7 Session ......................................................................................................... 86
5. Appendix .................................................................................... 88
Page 5

TitanSDR – User Manual 5
1. Introduction
This manual describes the TitanSDR user interface and its mode of use.
Before using the product, make sure to have correctly performed all the steps in
the Installation Manual.
TitanSDR is an HF multi-channel receiver allowing up to four independent
wideband channels within the 0-40MHz band and several narrowband channels
(up to 8, 16 and 40 in the TitanSDR_8, TitanSDR_16 and TitanSDR_40 versions of the
product, respectively), which can be tuned within wideband channels.
Each narrowband channel supports, at the same time, demodulation, recording
(onto WAV files) and streaming of demodulated signals to: VACs (Virtual Audio
Cables), sound cards and Hoka Electronic CODE300 decoders (via LAN).
Figure 1 exemplifies diagrammatically the operation described above.
Figure 1 - Functional diagram
Page 6

TitanSDR – User Manual 6
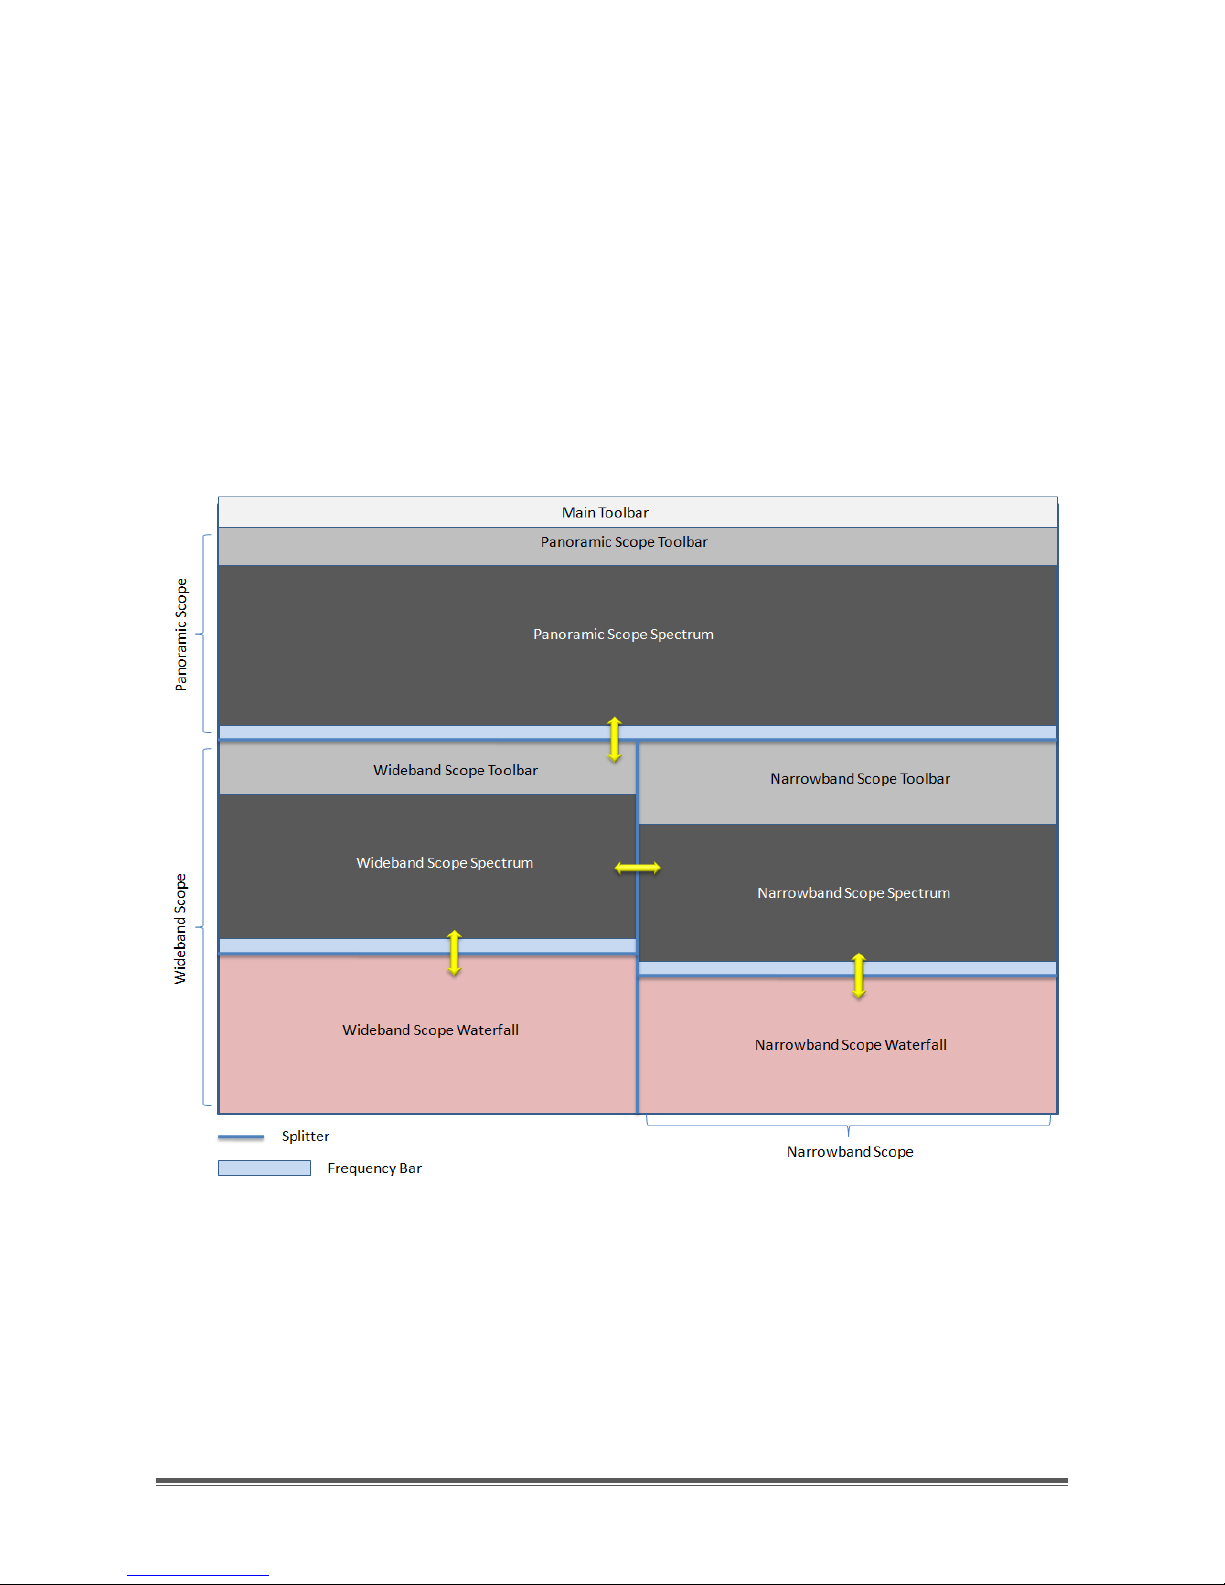
1.1 User interface architecture
Figure 2 shows schematically the user interface architecture.
Figure 2 - User interface architecture
The user interface is composed of:
Main Toolbar
Panoramic Scope
Wideband Scope
Narrowband Scope
On the Main Toolbar (Figure 3) there are a series of drop-down menus (File, Mode,
NB List, Memory, Schedule, View, Options) that allow to access the features
described in detail in Chapters 2, 3, 4 of this manual.
Figure 3 - Main Toolbar
Page 7
TitanSDR – User Manual 7
Panoramic Scope, Wideband Scope and Narrowband Scope are windows in
which visualization and control of panoramic spectrum, wideband channels and
narrowband channels, can be performed, respectively.
As illustrated in Figure 2, Wideband Scope and Narrowband Scope are positioned
under the Panoramic Scope, which in turn is just under the Main Toolbar.
In order to make resize of windows possible, these are separated by splitters,
namely graphics draggable separators, which allow to increase (or decrease) the
size of the window of interest, to the detriment (or advantage) of the others.
Clicking on a splitter, its position can be moved by mouse dragging (with the left
mouse button hold down).
Figure 4 - Splitters drag directions
Figure 4 shows directions in which splitters can be dragged inside the user
interface.
Note the presence of splitters also within windows of Wideband and Narrowband
Scope (see Chapter 1.2 for a detailed description). Figure 5 shows a screenshot of
the user interface during typical operation.
Page 8
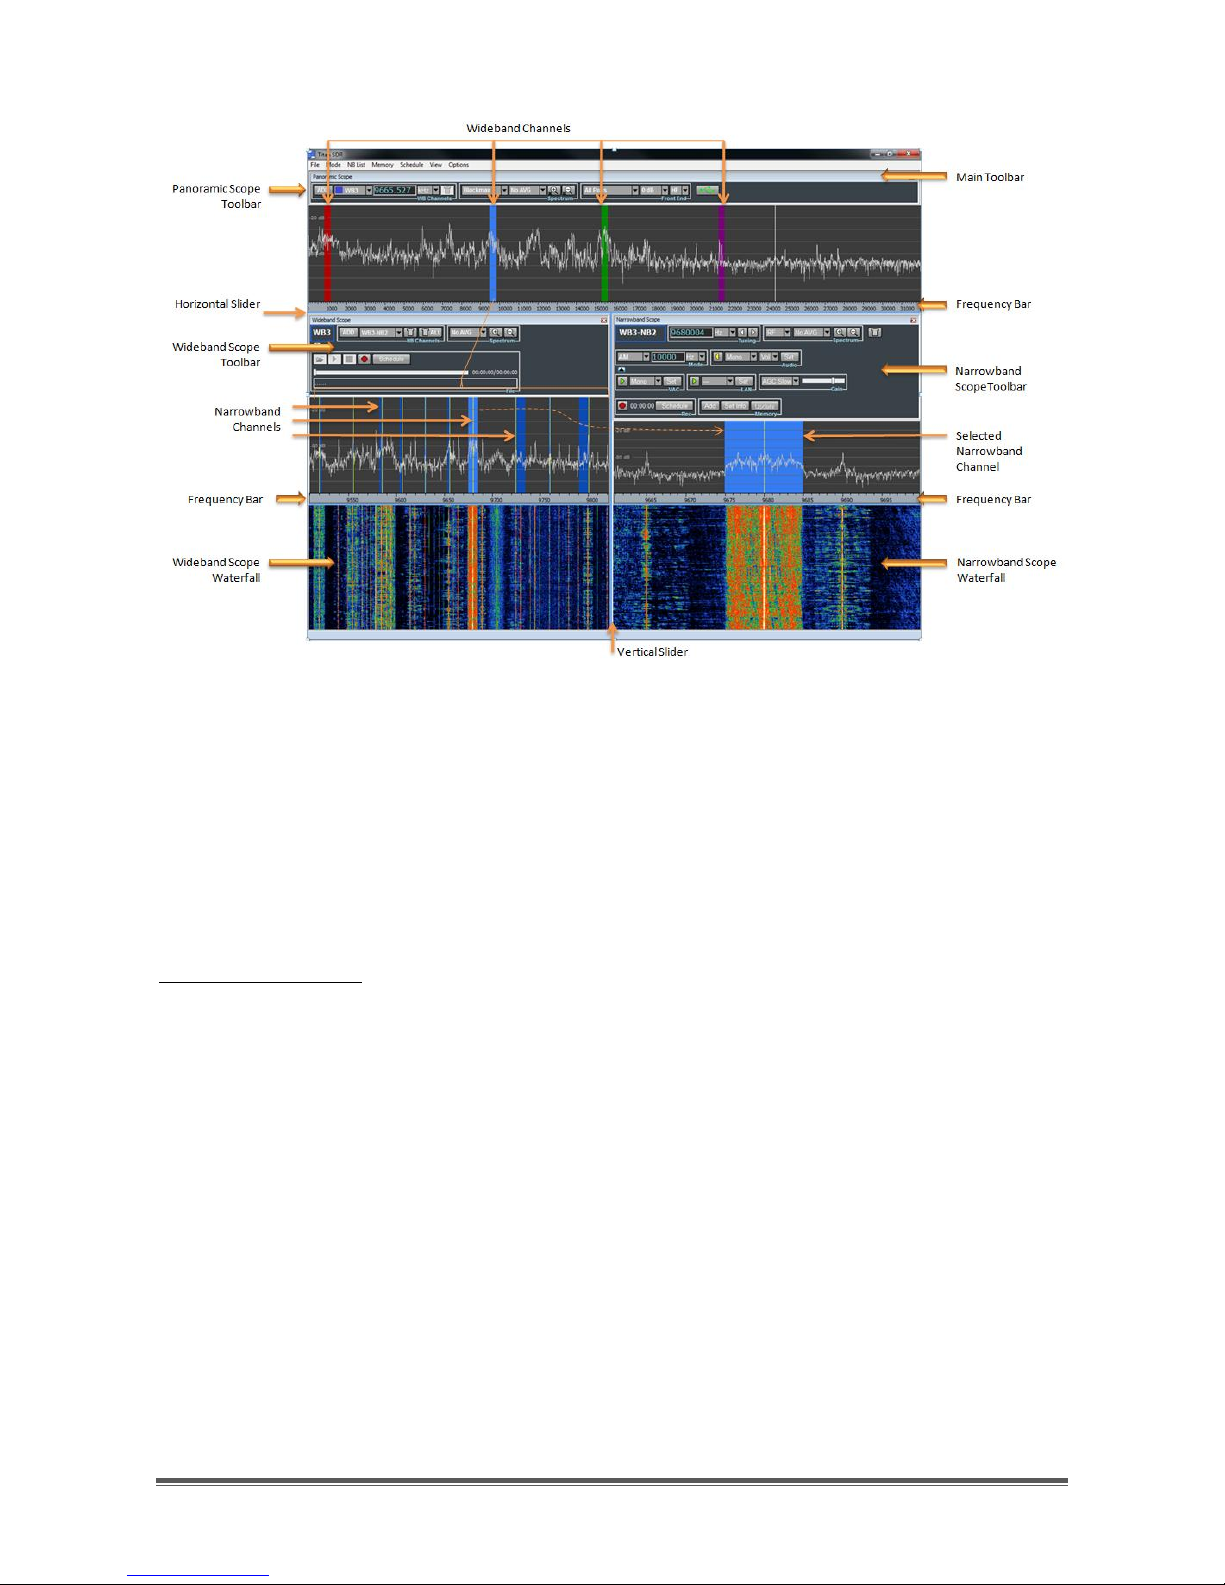
TitanSDR – User Manual 8
Figure 5 - TitanSDR user interface
1.2 Panoramic Scope, Wideband Scope and Narrowband Scope
In this paragraph, the high-level structure of Panoramic Scope, Wideband Scope
and Narrowband Scope is described.
Panoramic Scope:
It is composed of its own toolbar, a panoramic spectrum window and a reference
bar representing the frequency axis. The toolbar contains commands that allow to:
• control front-end settings
• manage spectrum settings
• allocate and deallocate wideband channels
The panoramic spectrum window shows spectrum of the 0 - 32MHz band
managed by the receiver (see par. 4.5.2 to show up to 40MHz). The reference bar
is draggable horizontally, after at least one frequency zoom-in step (see Chapter
2.1.2).
Page 9
TitanSDR – User Manual 9
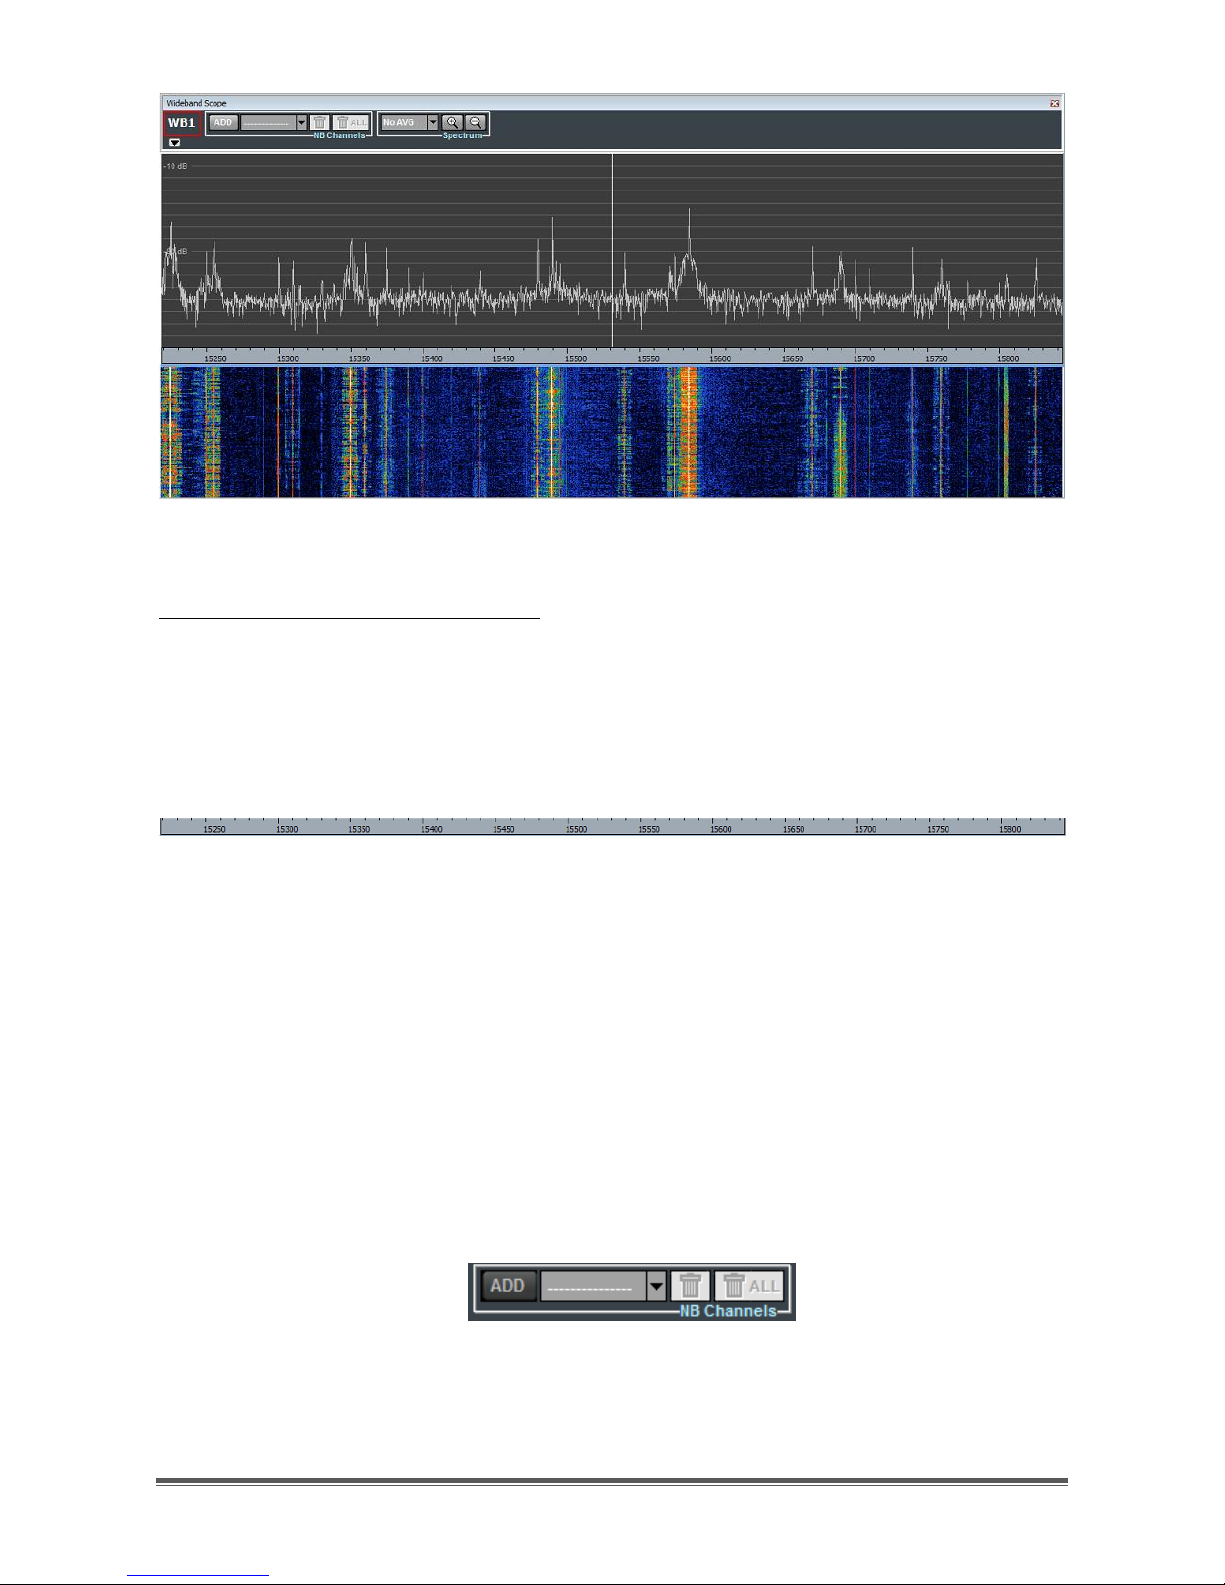
Wideband Scope:
The Wideband Scope shows the spectrum of the wideband channel which is
currently selected on the Panoramic Scope, at a higher resolution and its
“waterfall" representation. The frequency bar (placed below the spectrum plot) is
draggable horizontally after at least one frequency zoom-in step (see Chapter
2.2.1).
Spectrum plot and waterfall display are separated by a splitter, which allows to
vary the vertical dimension of the two windows (Figure 4).
Narrowband Scope:
The Narrowband Scope shows the spectrum of the narrowband channel which is
currently selected within the Wideband Scope, with a higher resolution and its
“waterfall” representation.
Spectrum plot and waterfall display are separated by a splitter, which allows to
vary the vertical dimension of the two windows (Figure 4).
Panoramic Scope, Wideband Scope and Narrowband Scope can be possibly
shown or hidden by selecting or deselecting the corresponding items of the "View"
drop-down menu on the main toolbar (Figure 6).
Figure 6 - View menu
1.3 Software startup
The user interface, shown in Figure 8, appears by double-clicking on the TitanSDR
software icon (see Figure 7).
Figure 7 - TitanSDR software icon
Page 10
TitanSDR – User Manual 10
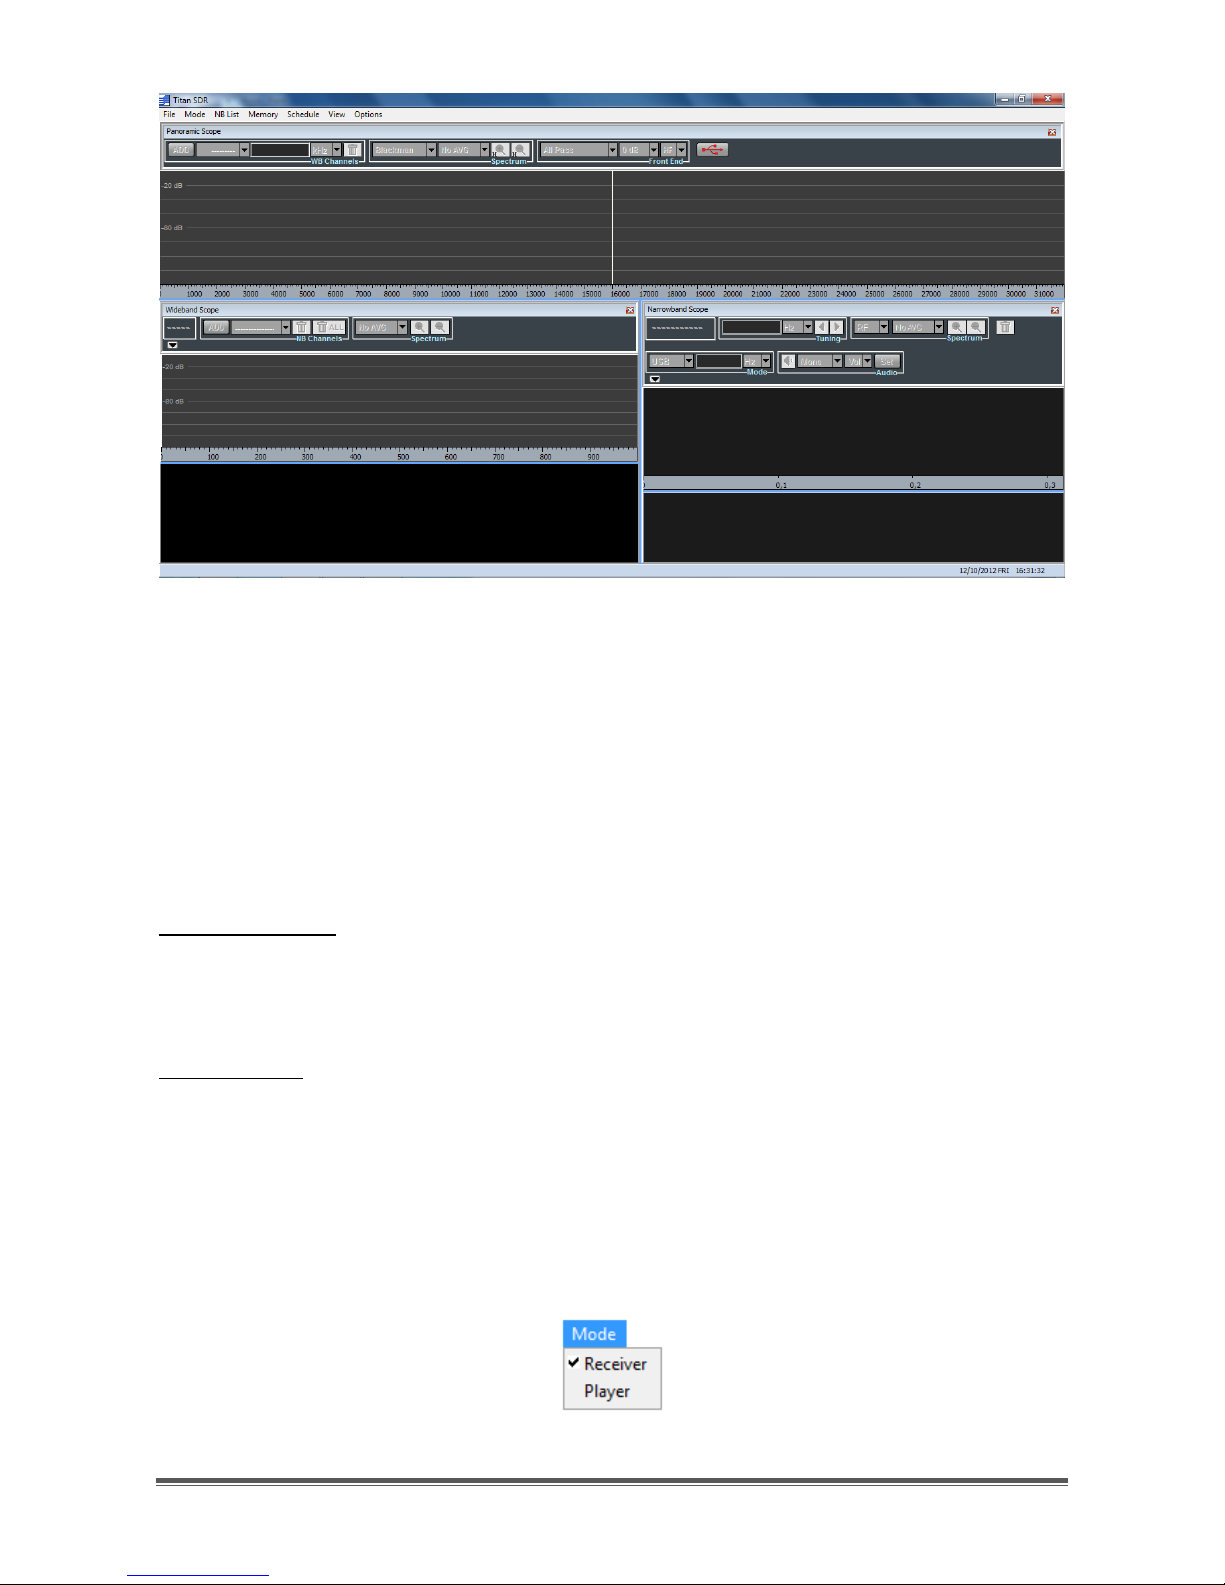
Figure 8 - User interface of TitanSDR
TitanSDR can be operated in the following two modes:
Receiver Mode
Player Mode
with the ability to switch between them without restarting the software.
Receiver Mode: software allows to control the receiver and to manage all
operations on radio channels (all of the functions of this mode are described in
Chapter 2).
Player Mode: software allows to playback files (written in a proprietary format)
which resulted from previous recording of wideband channels in Receiver Mode
(see Section 2.2.3) and to perform the same operations allowed on wideband
channels in Receiver Mode (allocation and recording of narrowband channels,
demodulation, listening of demodulated audio, data streaming by VAC, LAN, ...).
All Player Mode functions are described in Chapter 3.
Mode choice is made through the menu "Mode" (Figure 9) on the Main Toolbar.
The default setting is Receiver Mode.
Figure 9 - Mode setting
Page 11
TitanSDR – User Manual 11
2. Receiver Mode
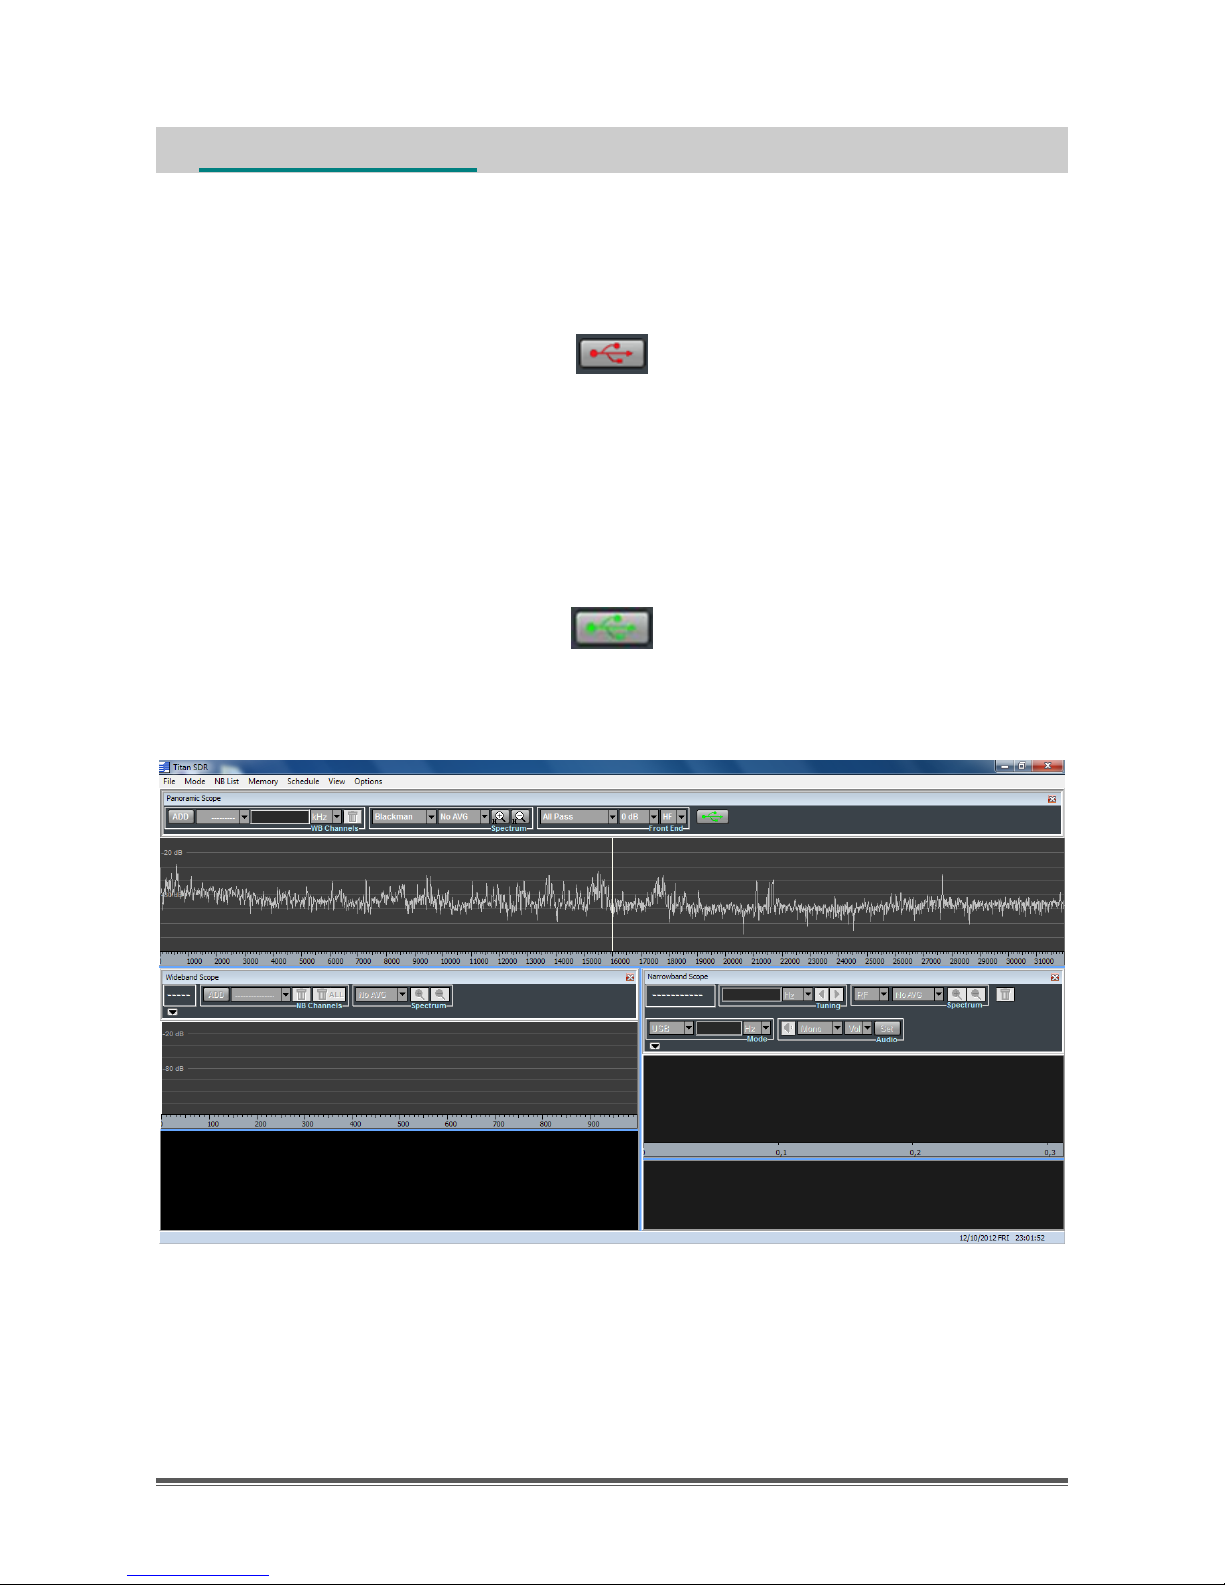
After selecting the Receiver Mode (from menu "Mode" on the Main Toolbar), as
shown in Figure 9, press the connect USB button illustrated in Figure 10.
Figure 10 - USB button before connection
This button is used to start communication between the software and the receiver.
If connection is successful, the button symbol changes color (from red to green,
see Figure 11) and the input 0-32MHz spectrum appears on the Panoramic Scope
(Figure 12).
Figure 11 - USB button after connection
Figure 12 - User interface after successful connection with receiver
Page 12
TitanSDR – User Manual 12
2.1 Panoramic Scope
2.1.1 Front End settings
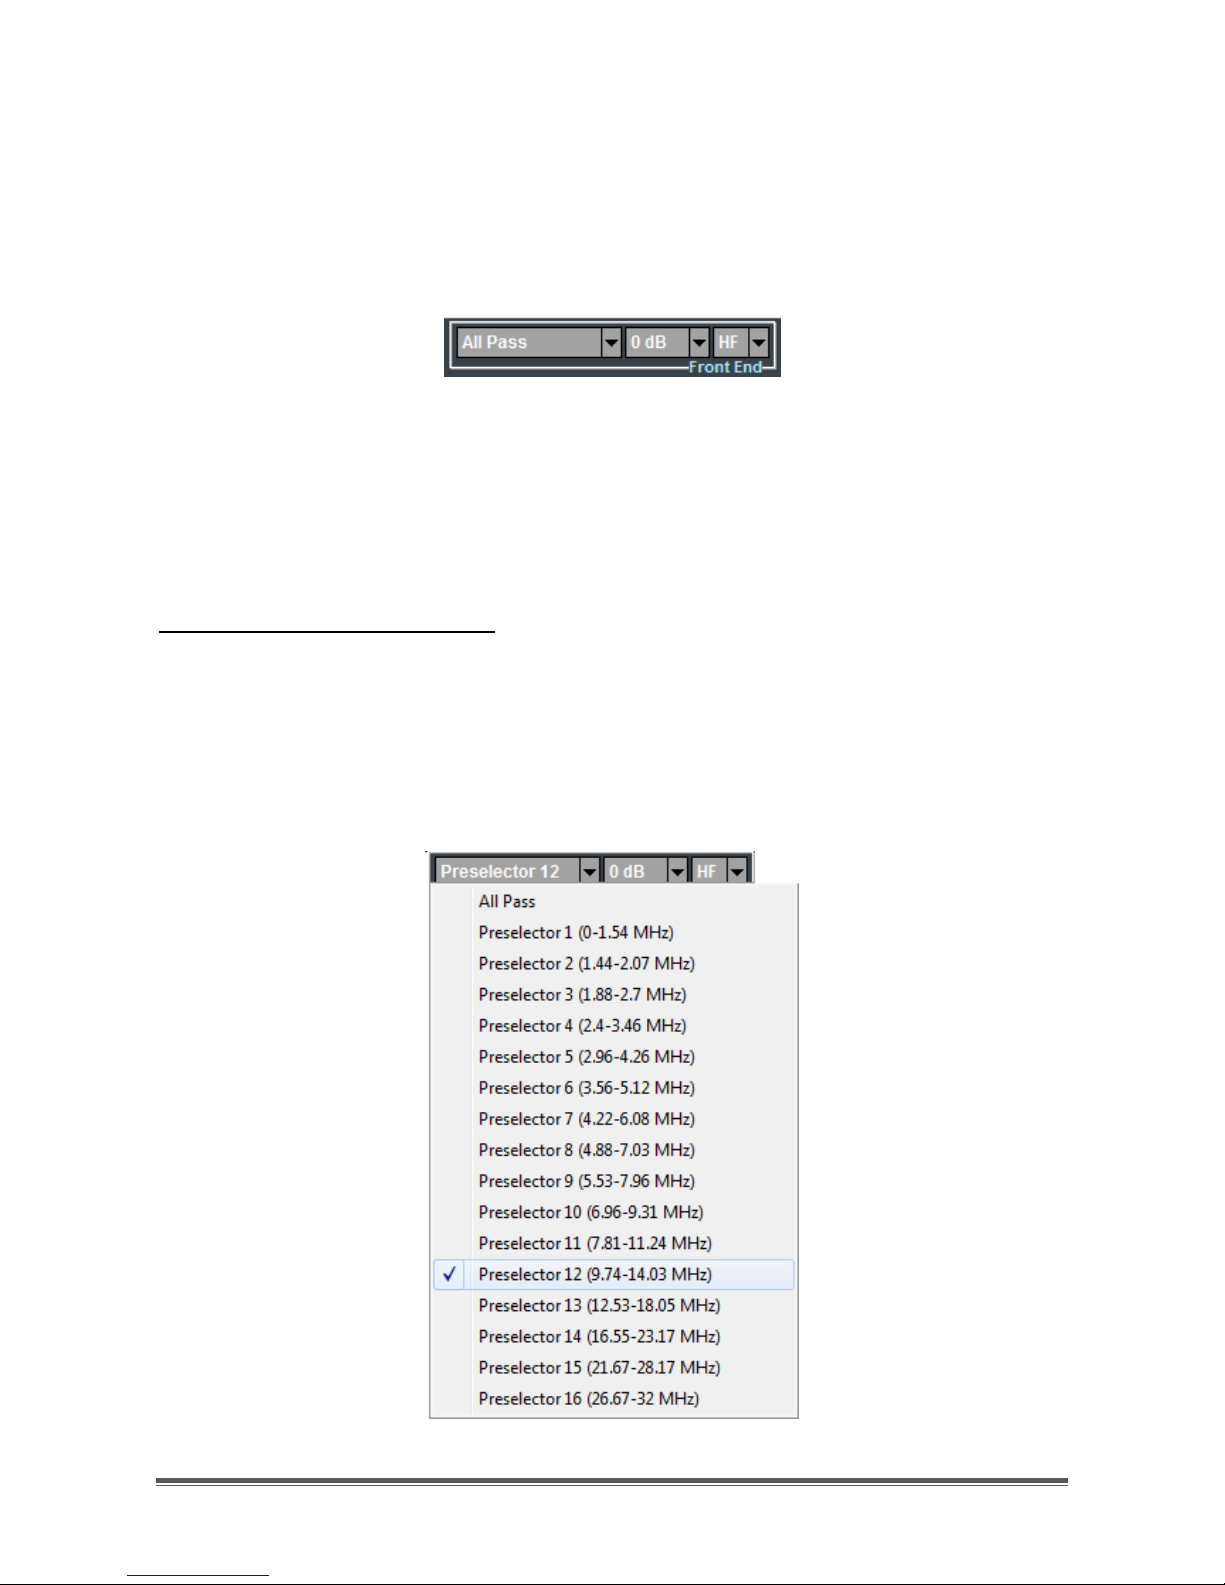
Receiver Front-end settings can be changed by the Front End controls group of the
Panoramic Scope toolbar (Figure 13).
Figure 13 - FrontEnd controls group
Settings may regard:
• Selection of a preselection filter
• Change of input attenuation value
• Receiver input selection
Selection of preselection filters:
The list of possible sixteen preselectors appears by clicking on the first drop-down
menu of the FrontEnd controls group (Figure 14). Each preselector/filter is
characterized by its own passband, whose frequency extremes are indicated in
the list. The All Pass choice is also possible (default), causing the receiver to
perform no preselection on RF input signal.
Figure 14 - Preselection filters list
Page 13
TitanSDR – User Manual 13
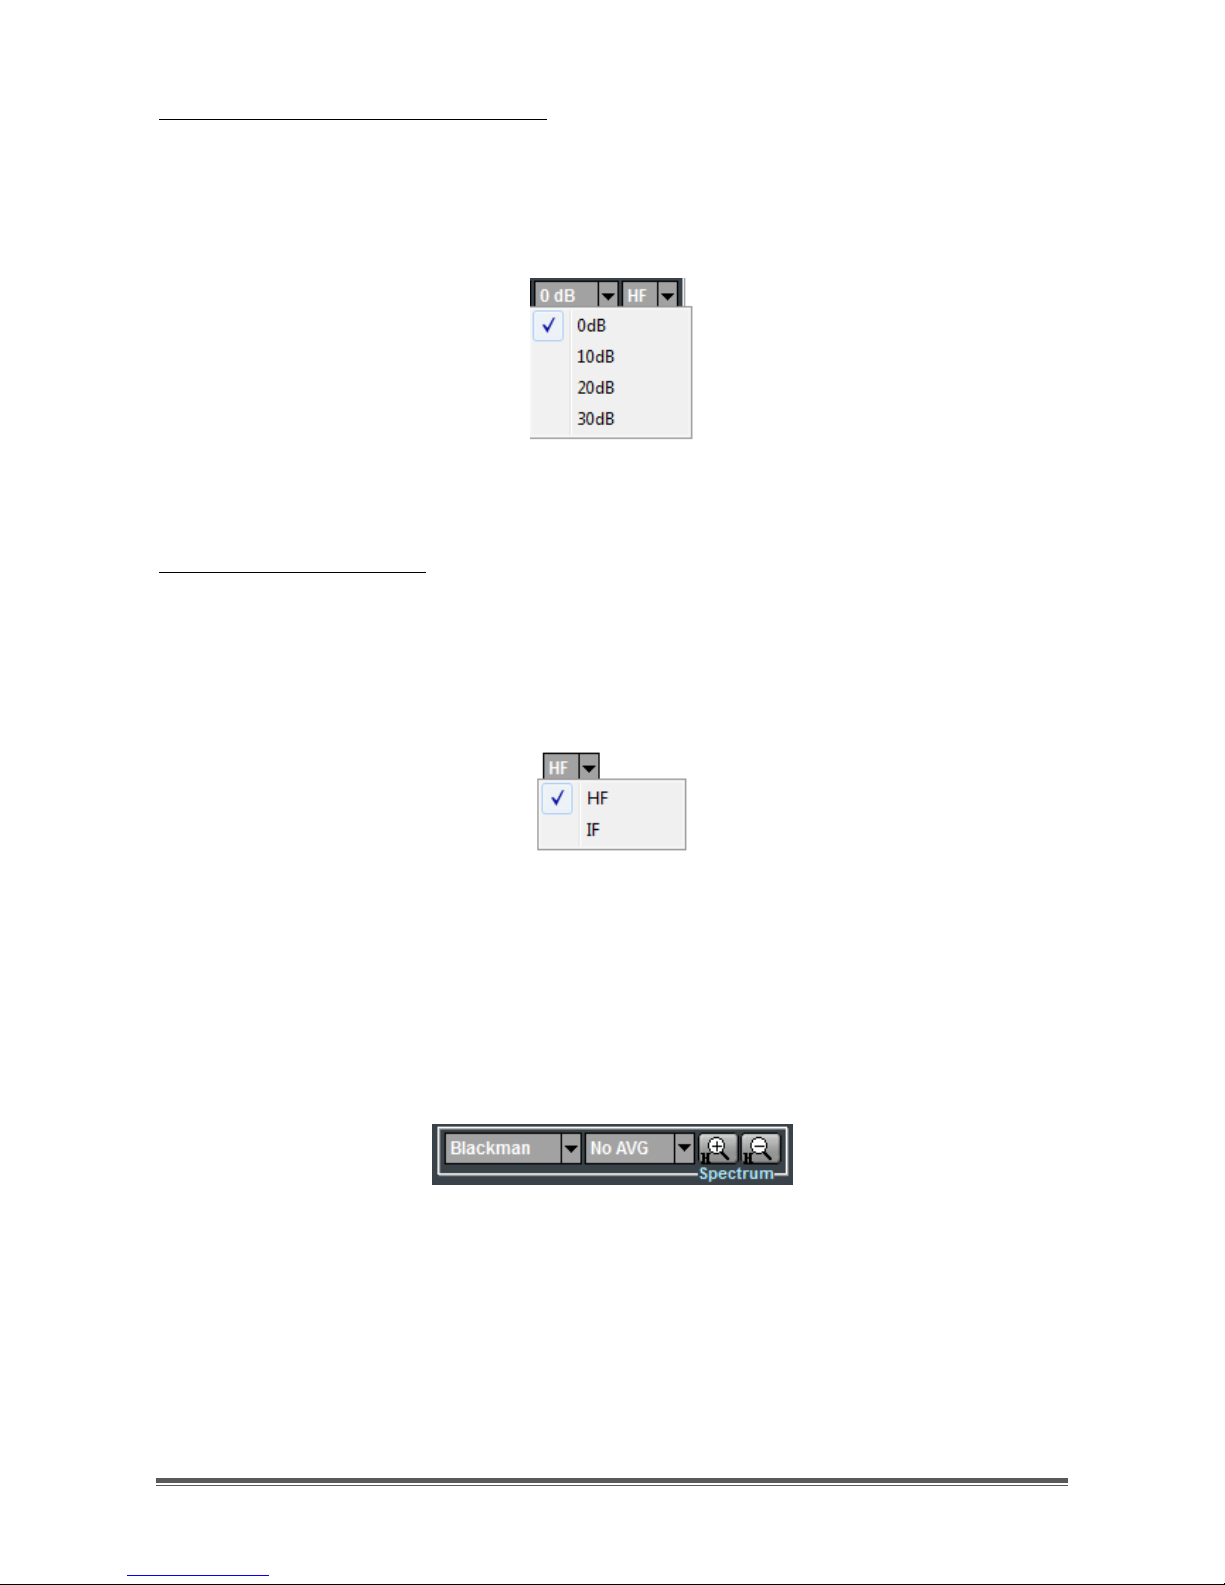
Setting of the RF attenuation value:
RF attenuation can be set from 0dB to 30dB, in steps of 10 dB. Clicking on the
second drop-down menu of the FrontEnd controls group, a list appears of
attenuation values that can be selected (Figure 15). Default value is 0dB.
Figure 15 - List of selectable attenuation values
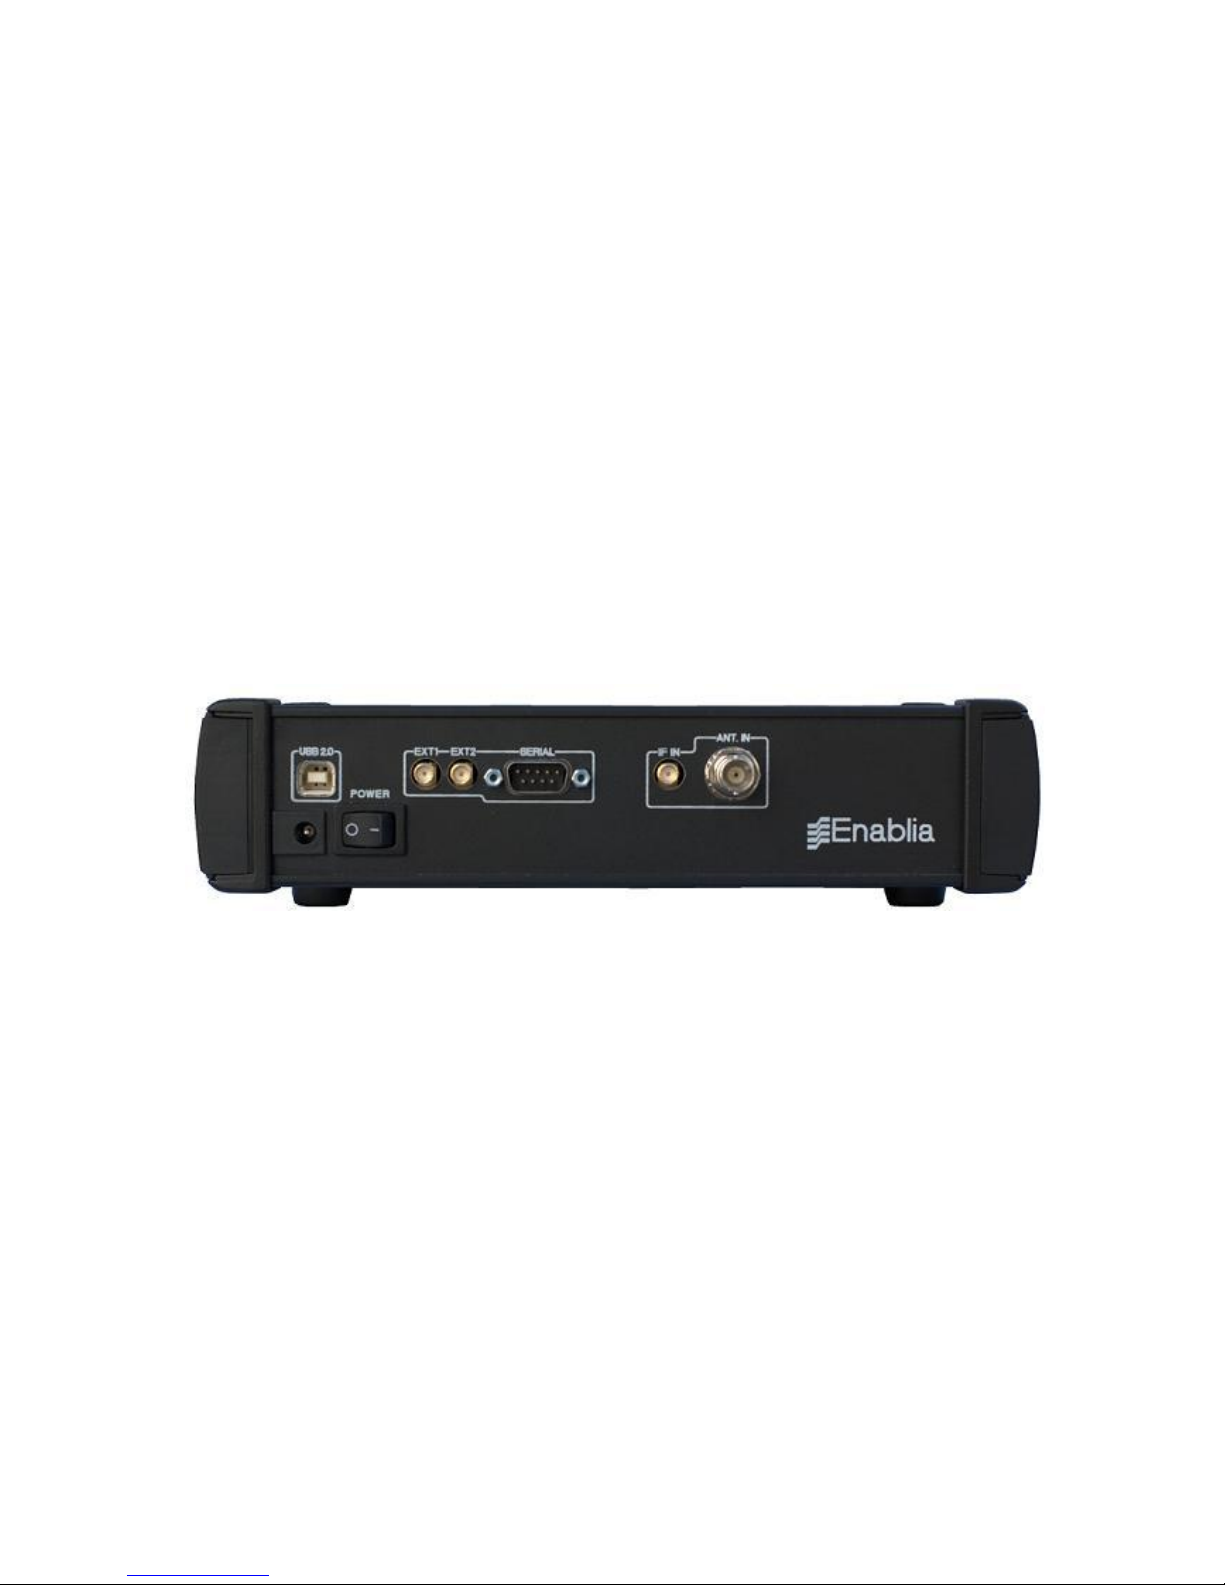
Receiver input selection:
By clicking on the third drop-down menu of the FrontEnd controls group, selection
can be made of the receiver input (Figure 16). The “IF” choice corresponds to the
SMA connector marked "IF IN" on the receiver rear panel, whilst the “HF” choice
corresponds to the BNC connector marked "ANT. IN ". Default receiver input is
“HF”.
Figure 16 - Receiver input selection
2.1.2 Spectrum settings
The graphical settings of the Panoramic Scope spectrum can be changed by the
Spectrum controls group of the Panoramic Scope toolbar (Figure 17).
Figure 17 - Spectrum controls group
The actions that can be performed are:
• selection of windowing (for FFT)
• selection of spectrum averaging time period
• spectrum zoom/dezoom
Furthermore, in order to shift the displayed frequency interval, dragging of the
frequency axis bar is also possible.
Page 14
TitanSDR – User Manual 14
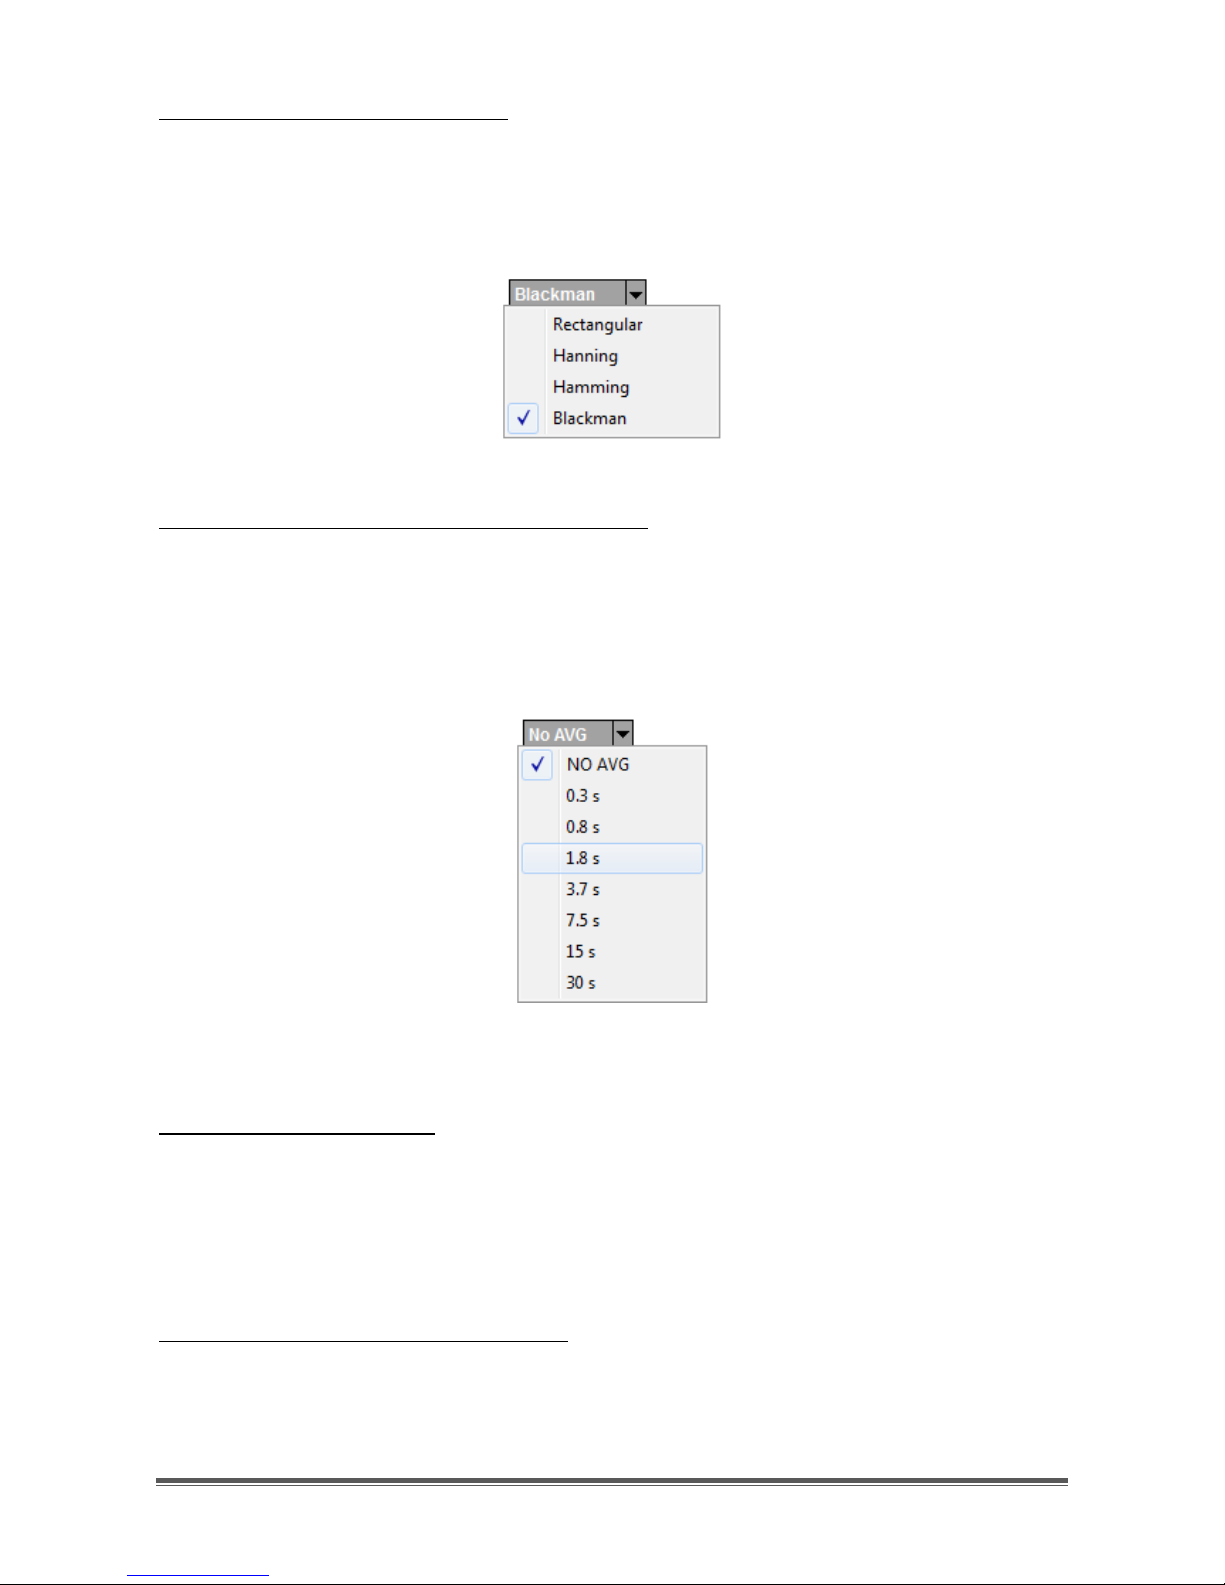
Selection of windowing (for FFT):
By clicking on the first drop-down menu of the Spectrum controls group, a list
appears of the four possible windows that can be selected (Figure 18). Default
window is “Blackman”.
Figure 18 - Windowing alternatives
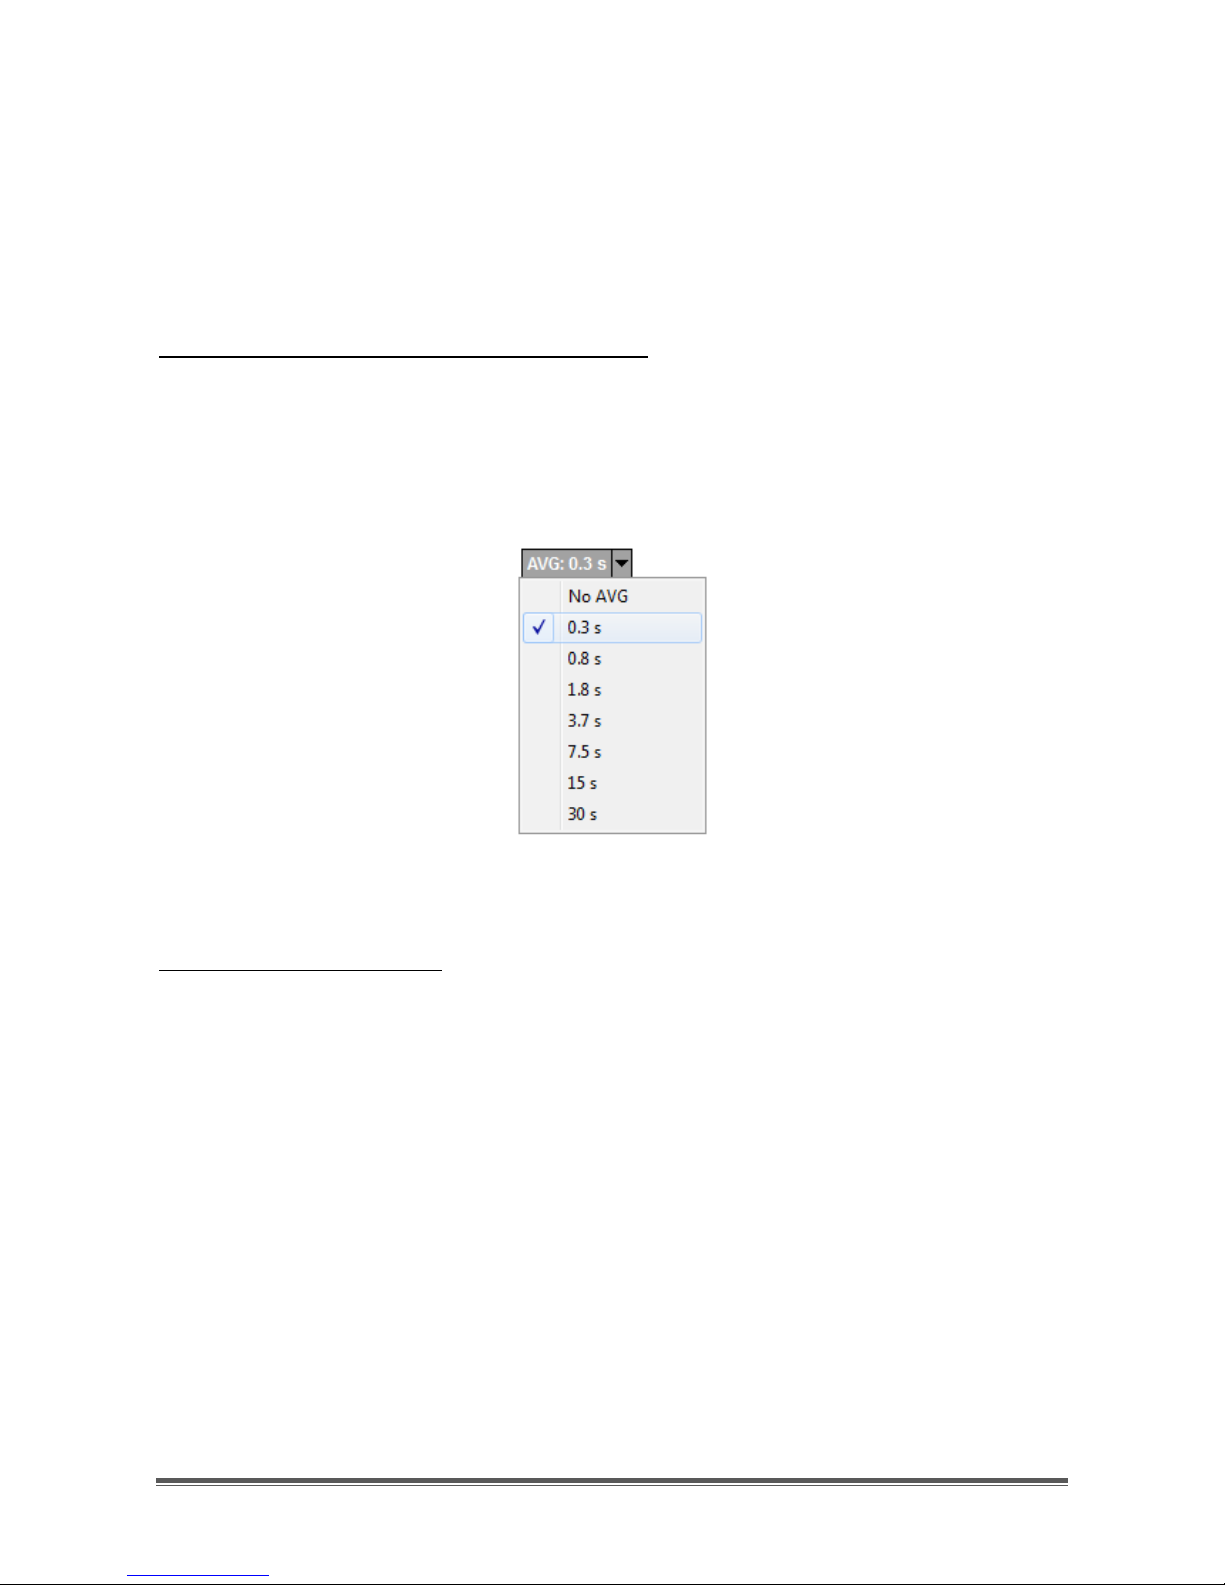
Selection of spectrum averaging time period:
By clicking on the second drop-down menu of the Spectrum controls group, a list
appears of possible averaging time periods that can be selected (Figure 19).
Default setting is "NO AVG", meaning that spectra are plotted on the Panoramic
Scope without any averaging.
Figure 19 - Spectrum averaging time periods
Spectrum zoom\dezoom
Spectrum can be zoomed/dezoomed with respect to :
• frequency (Horizontal zoom)
• amplitude (Vertical zoom)
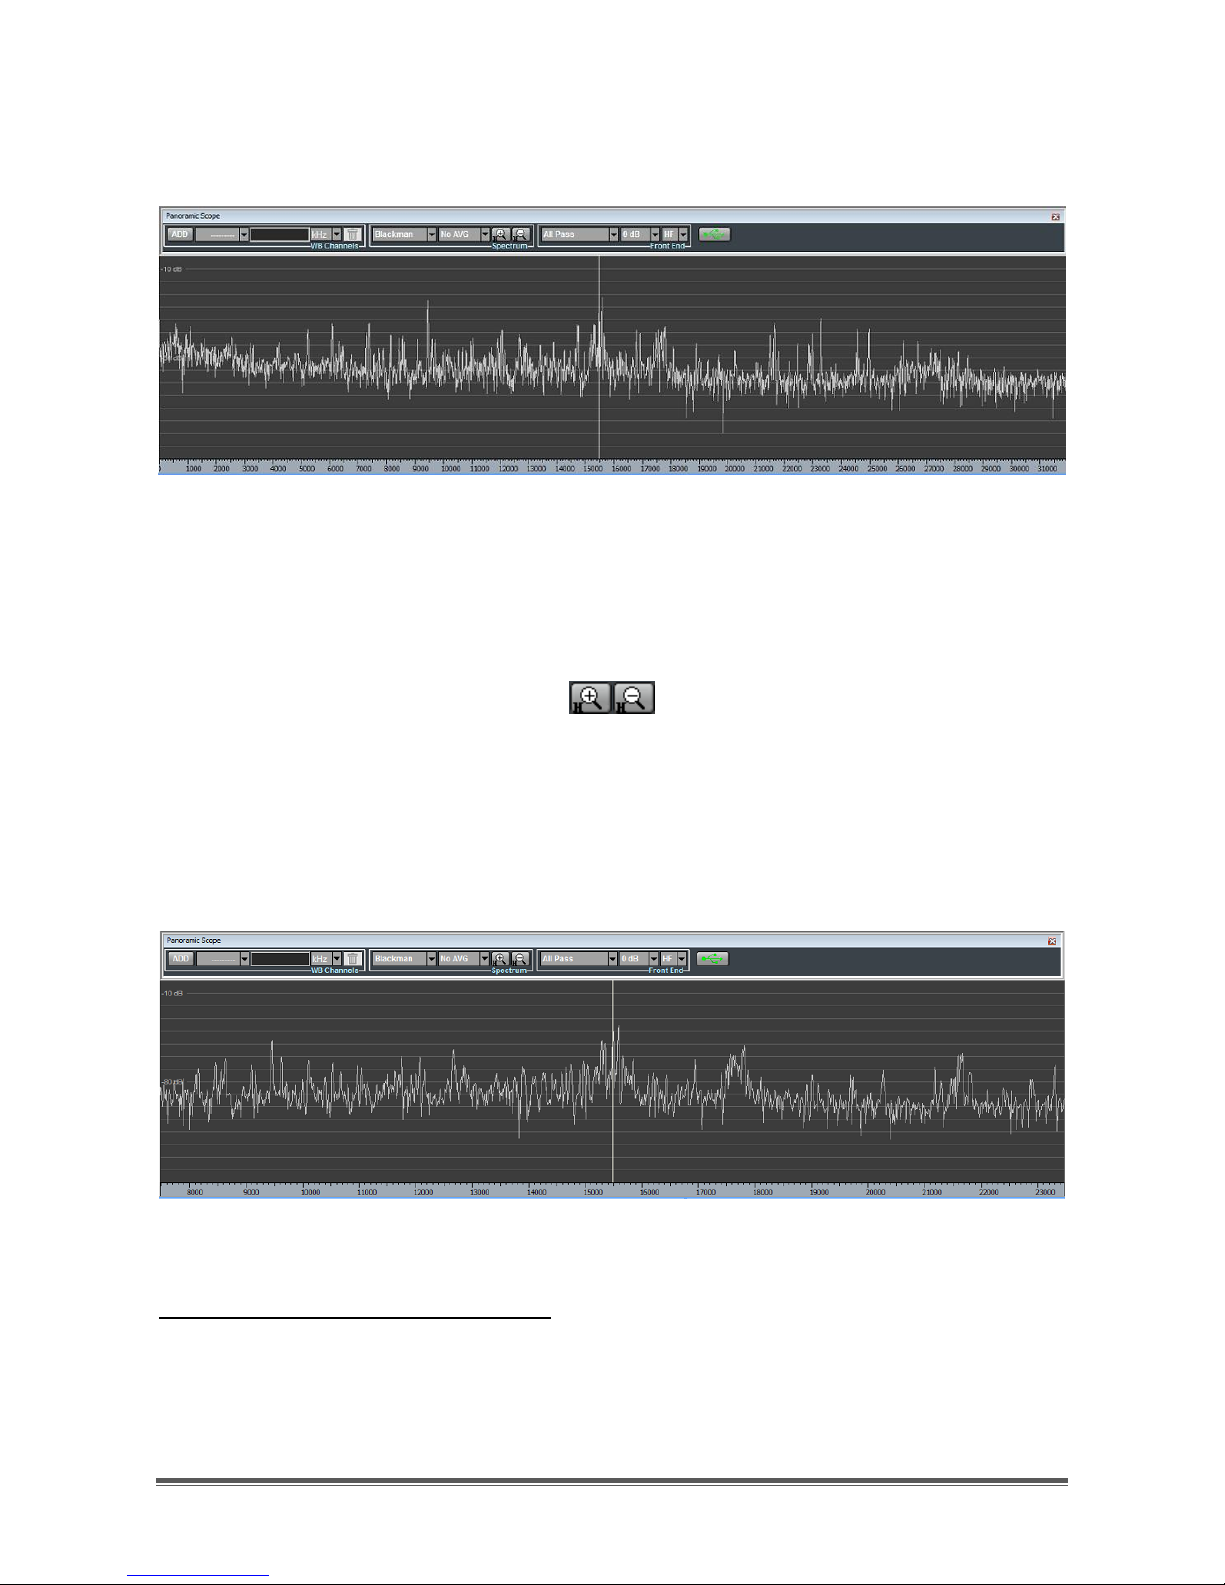
Horizontal (frequency) zoom/dezoom
Horizontal zoom/dezoom allows to halve/double the frequency spectrum span,
aiming at a specific center frequency value, corresponding to a vertical white line
which can be placed by left clicking on the wanted position (Figure 20). After
Page 15
TitanSDR – User Manual 15
mouse click a hint label appears near the vertical line indicating the
corresponding frequency.
Figure 20 - Panoramic Scope spectrum
Buttons for horizontal zoom/dezoom are shown in Figure 21 and are positioned
within the Spectrum controls group of the Panoramic Scope toolbar.
Figure 21 - Horizontal zoom/dezoom buttons
Figure 22 shows the Panoramic Scope after zooming the spectrum of Figure 20, by
clicking on the horizontal zoom button (the one marked with a “+”).
Figure 22 - Panoramic Scope after horizontal zoom
Vertical (amplitude) zoom/dezoom:
In order to perform also amplitude zoom/dezoom, it is necessary to make
corresponding buttons visible in the Spectrum controls group. To this aim, click on
the menu item "Centered zoom", after selecting “Panoramic” in the Main Toolbar
“Options” menu (Figure 23).
Page 16

TitanSDR – User Manual 16
Figure 23 - Centered Zoom option
This operation will cause a white horizontal line to appear also on the Panoramic
Scope spectrum (Figure 24) and the vertical zoom/dezoom buttons to appear
within the Spectrum controls group (Figure 25). Vertical zoom/dezoom allows to
halve/double the amplitude spectrum range, aiming at a specific center
amplitude value, corresponding to the horizontal white line, which can be set by
left clicking or selecting and dragging it on the wanted position.
Figure 24 - Centered zoom horizontal and vertical target lines
Figure 26 shows the Panoramic Scope after zooming the spectrum of Figure 24, by
clicking on the vertical zoom button (the one marked with a “+” and a “V”).
Figure 25 - Vertical zoom/dezoom buttons
Figure 26 - Panoramic Scope after vertical zoom
Page 17
TitanSDR – User Manual 17
The position of the horizontal and vertical white lines can be changed by left
clicking or selecting and dragging them to the desired position. After clicking, hint
labels appears near the vertical and horizontal lines indicating the corresponding
frequency and amplitude, respectively.
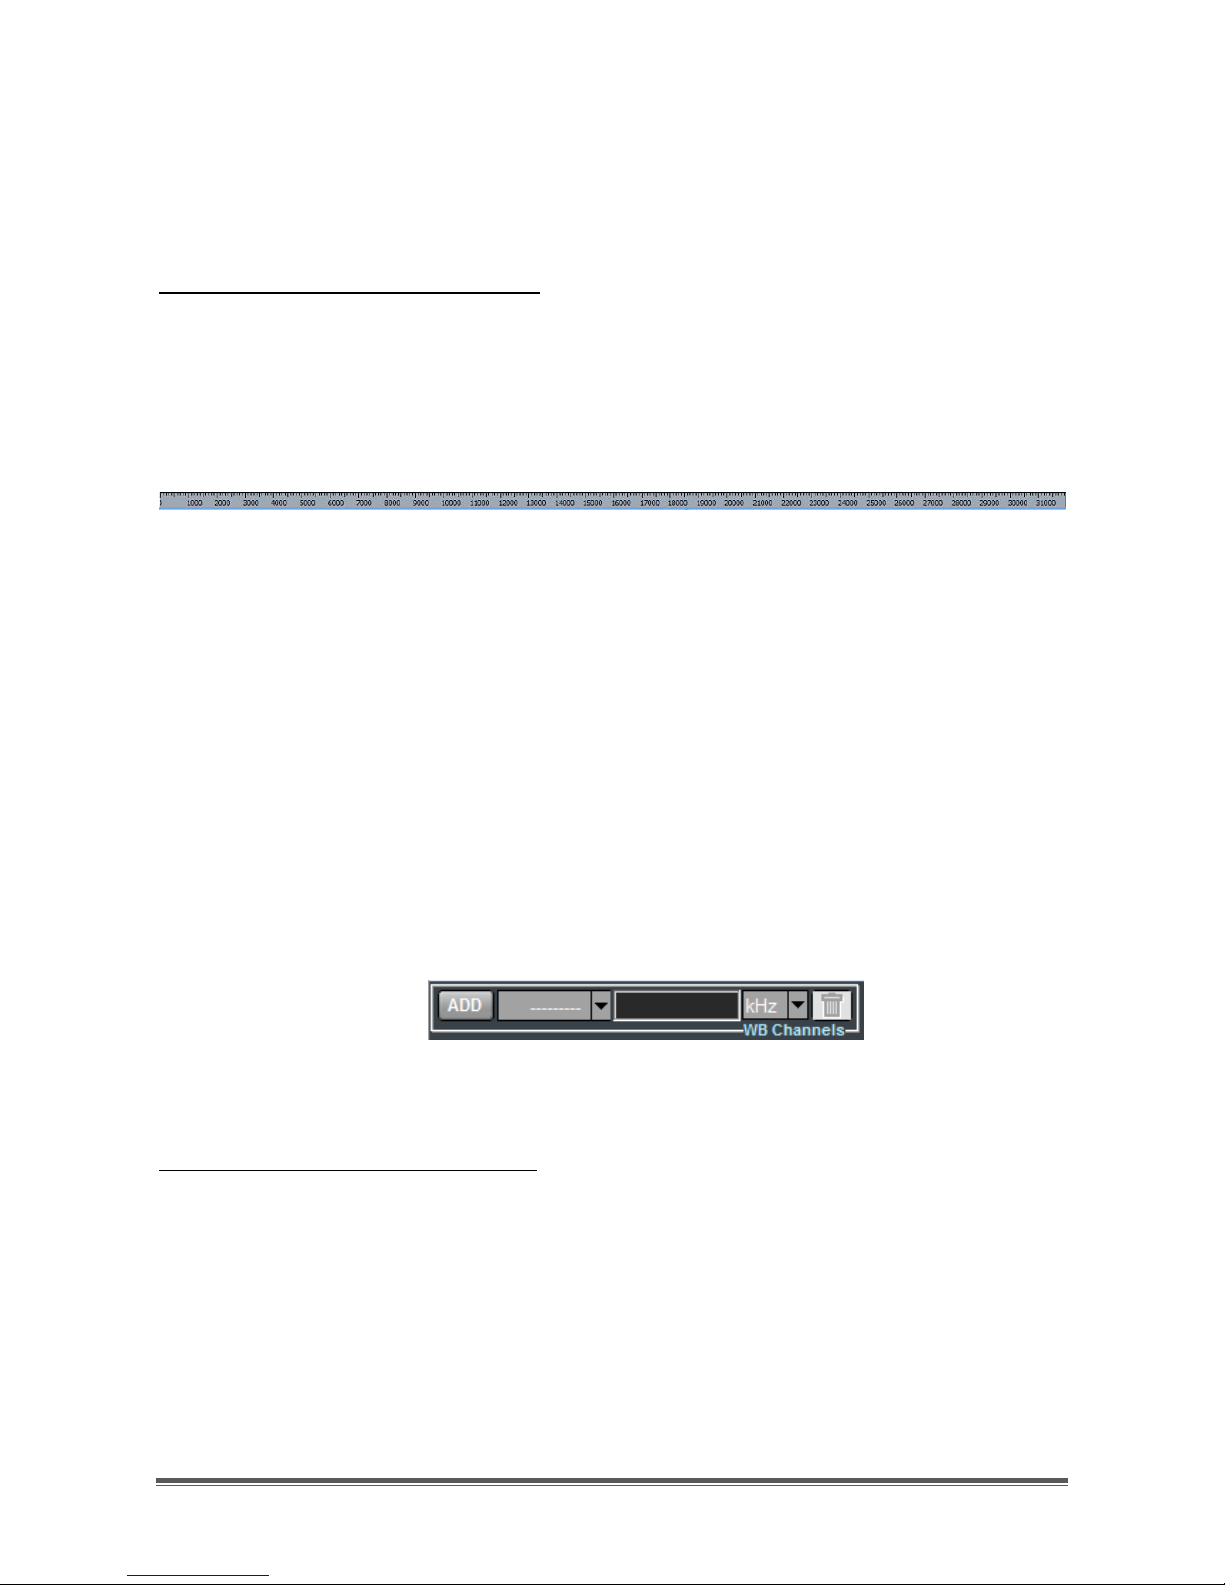
Dragging of the frequency axis bar
After having zoomed once (at least), the displayed frequency interval can be
shifted downwards or upwards by simply left clicking on the frequency axis bar of
the Panoramic Scope (Figure 27) and dragging it leftward or rightward,
respectively.
Figure 27 - Frequency axis bar of the Panoramic Scope
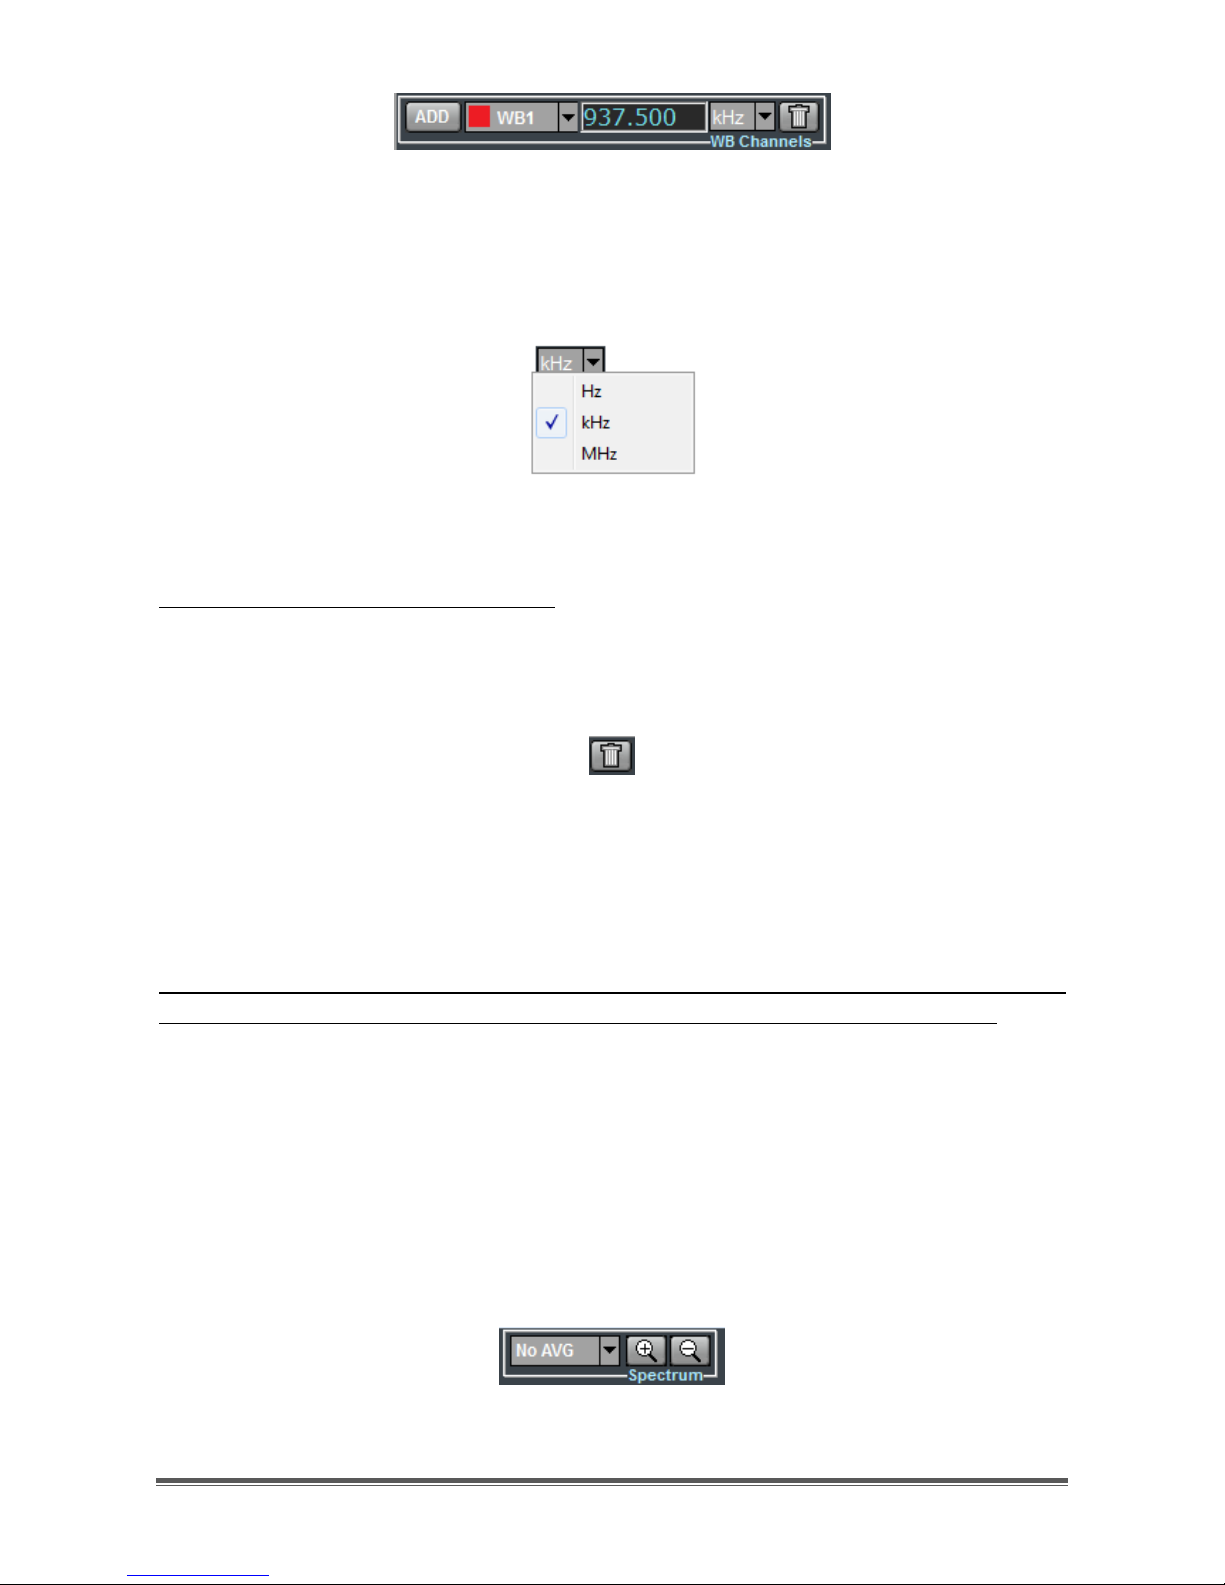
2.1.3 Management of wideband channels
The WB Channels controls group of the Panoramic Scope toolbar (Figure 28) allows
to perform the following operations:
allocation of a wideband channel
selection of a previously allocated wideband channel
tuning of a wideband channel (by mouse dragging and dropping its
shaded area)
deallocation (removal) of a wideband channel
Figure 28 - WB Channels controls group
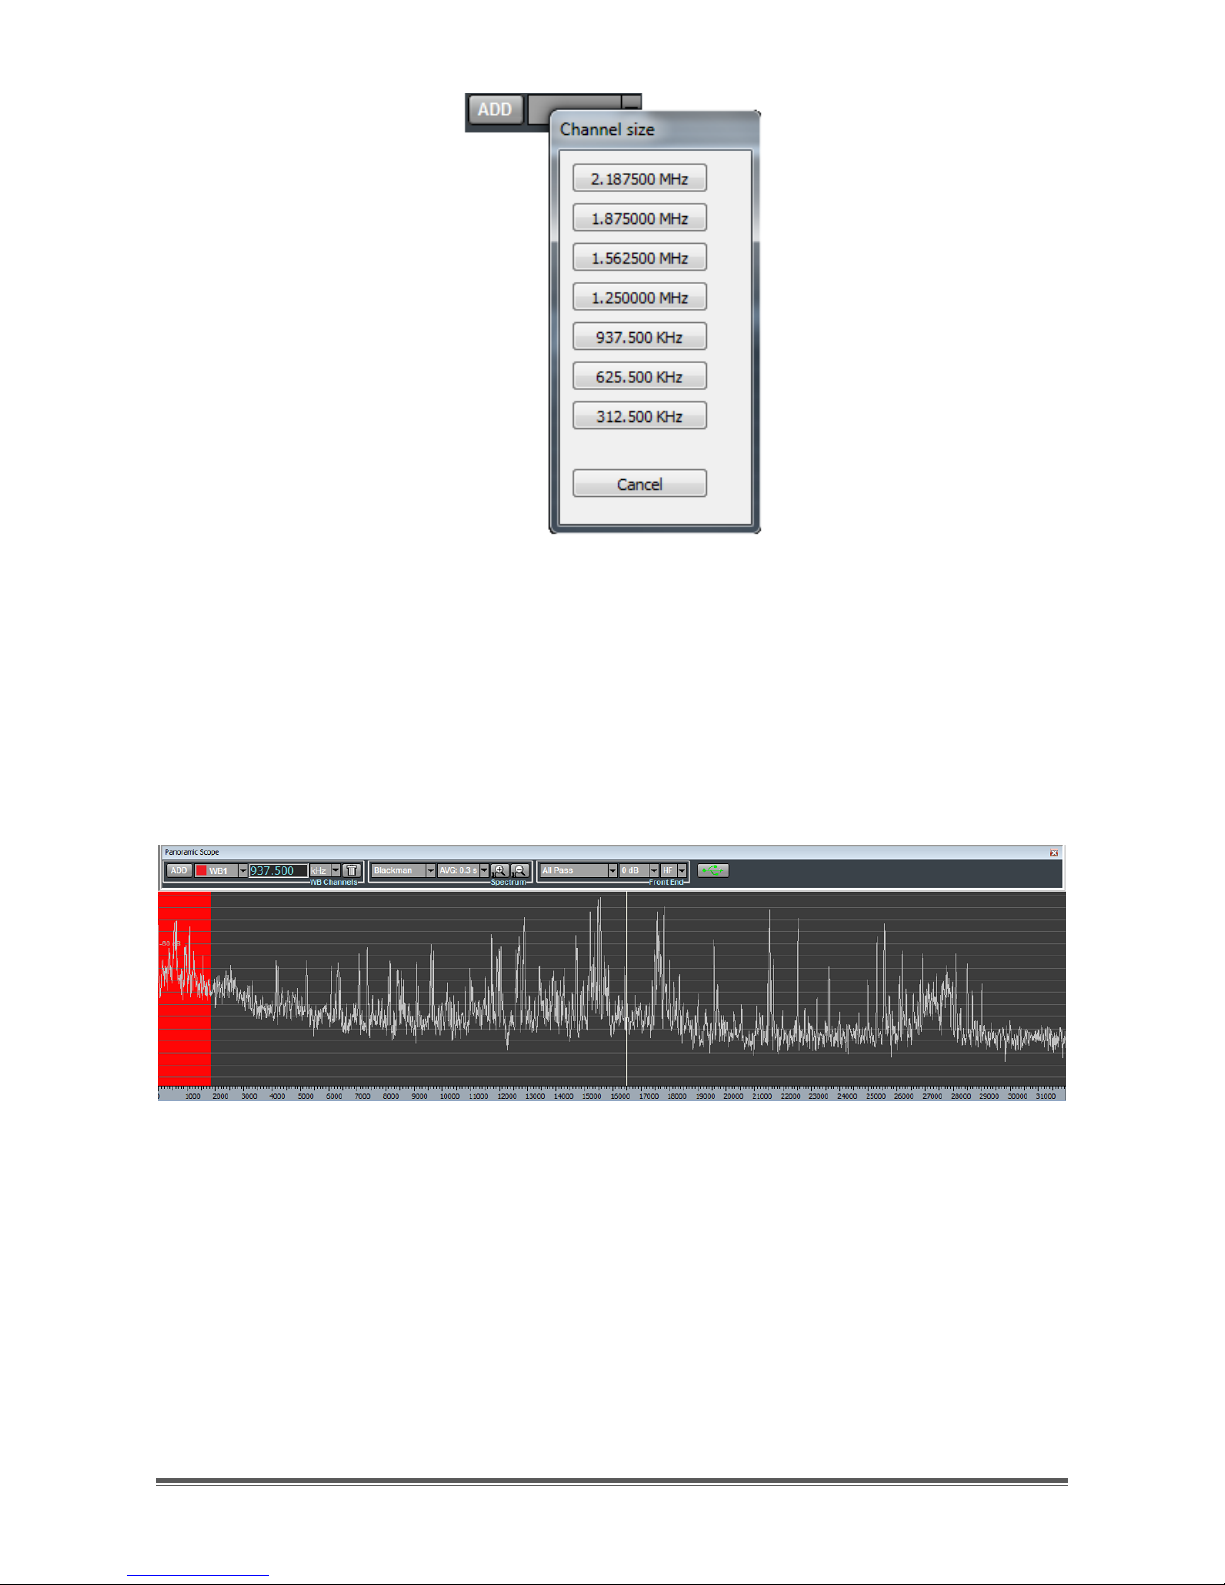
Allocation of a wideband channel:
By clicking on the "ADD" button of the WB Channels controls group, a list appears
of available bandwidth sizes (Figure 29) for the new wideband channel to allocate
(see Appendix).
Page 18
TitanSDR – User Manual 18
Figure 29 - List of available bandwidth sizes
A new wideband channel is allocated by clicking on one of the available
bandwidth sizes. Its position and frequency extent is represented by a colored
shaded area on the Panoramic Scope spectrum (Figure 30), whilst its center
frequency is indicated in the edit box of the WB Channels controls group (Figure
28).
Figure 30 - Wideband channel shaded area
By default the new wideband channel is allocated within the Panoramic Scope at
the far left of the displayed spectrum. The allocated channel is assigned one of
the following names: WB1, WB2, WB3, WB4.
To facilitate identification of wideband channels and to distinguish them from one
another, their shaded areas are assigned a color, based on the following color
convention:
- WB1: RED shaded area
- WB2: GREEN shaded area
Page 19
TitanSDR – User Manual 19
- WB3: BLUE shaded area
- WB4: PURPLE shaded area
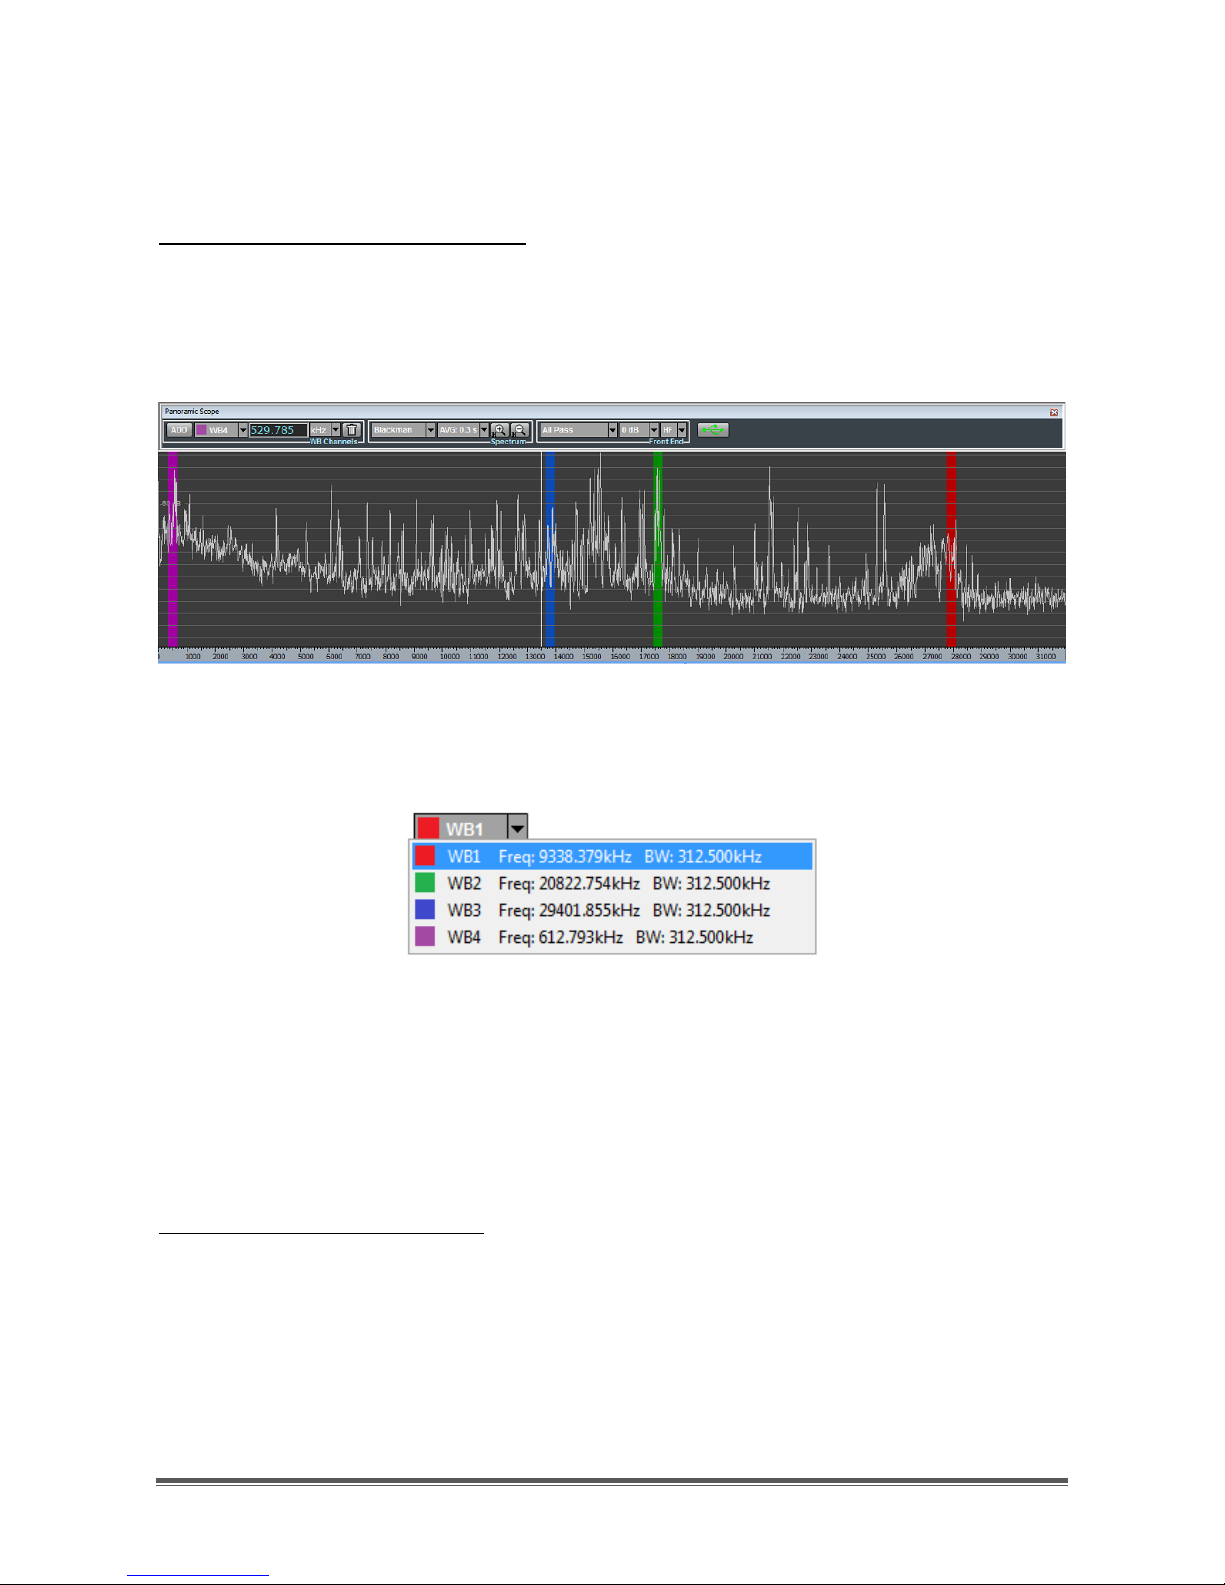
Selection of a wideband channel
When more than one wideband channel has been allocated (Figure 31), a
specific wideband channel can be selected by clicking on its name in the first
drop-down menu of the WB Channels controls group (Figure 32).
Figure 31 - Sample scenario with four wideband channels
Figure 32 - WB Channels drop-down menu
For each allocated wideband channel, both center frequency and bandwidth
are provided in the same drop-down menu. By selecting a wideband channel, its
shaded area becomes brightly colored.
Tuning of wideband channels
Tuning of the selected wideband channel within the Panoramic Scope spectrum
can be obtained by dragging its shaded area, after having clicked on it. While
dragging, the wideband channel center frequency is modified accordingly in the
frequency edit box of the WB Channels controls group (Figure 33).
Page 20
TitanSDR – User Manual 20
Figure 33 - Center frequency edit box
The unit of measurement of the wideband channel center frequency can be
selected by the second drop-down menu of the WB Channels controls group
(Figure 34). Possible choices are: Hz, KHz or MHz .
Figure 34 - Unit of measurement of WB channel center frequency
Deallocation of wideband channels
The selected wideband channel can be deallocated by clicking on the trash
button (Figure 35) of the WB Channels controls group (Figure 33).
Figure 35 - Trash button
As a result of this action, its shaded area disappears from the Panoramic Scope
spectrum and its name is removed from the wideband channels drop-down menu
(of Figure 32).
In order to perform deallocation of a wideband channel, it must be “empty”, i.e.
no narrowband channel must be present (allocated) inside it (see par. 2.2.2).
2.2 Wideband Scope
2.2.1 Spectrum settings
The graphical settings of the Wideband Scope spectrum can be changed by the
Spectrum controls group of the Wideband Scope toolbar (Figure 36).
Figure 36 - Spectrum controls group
Page 21
TitanSDR – User Manual 21
The following operations are possible:
• selection of spectrum averaging time period
• frequency zoom/dezoom
Furthermore, in order to shift the displayed frequency interval, dragging of the
frequency axis bar is also possible.
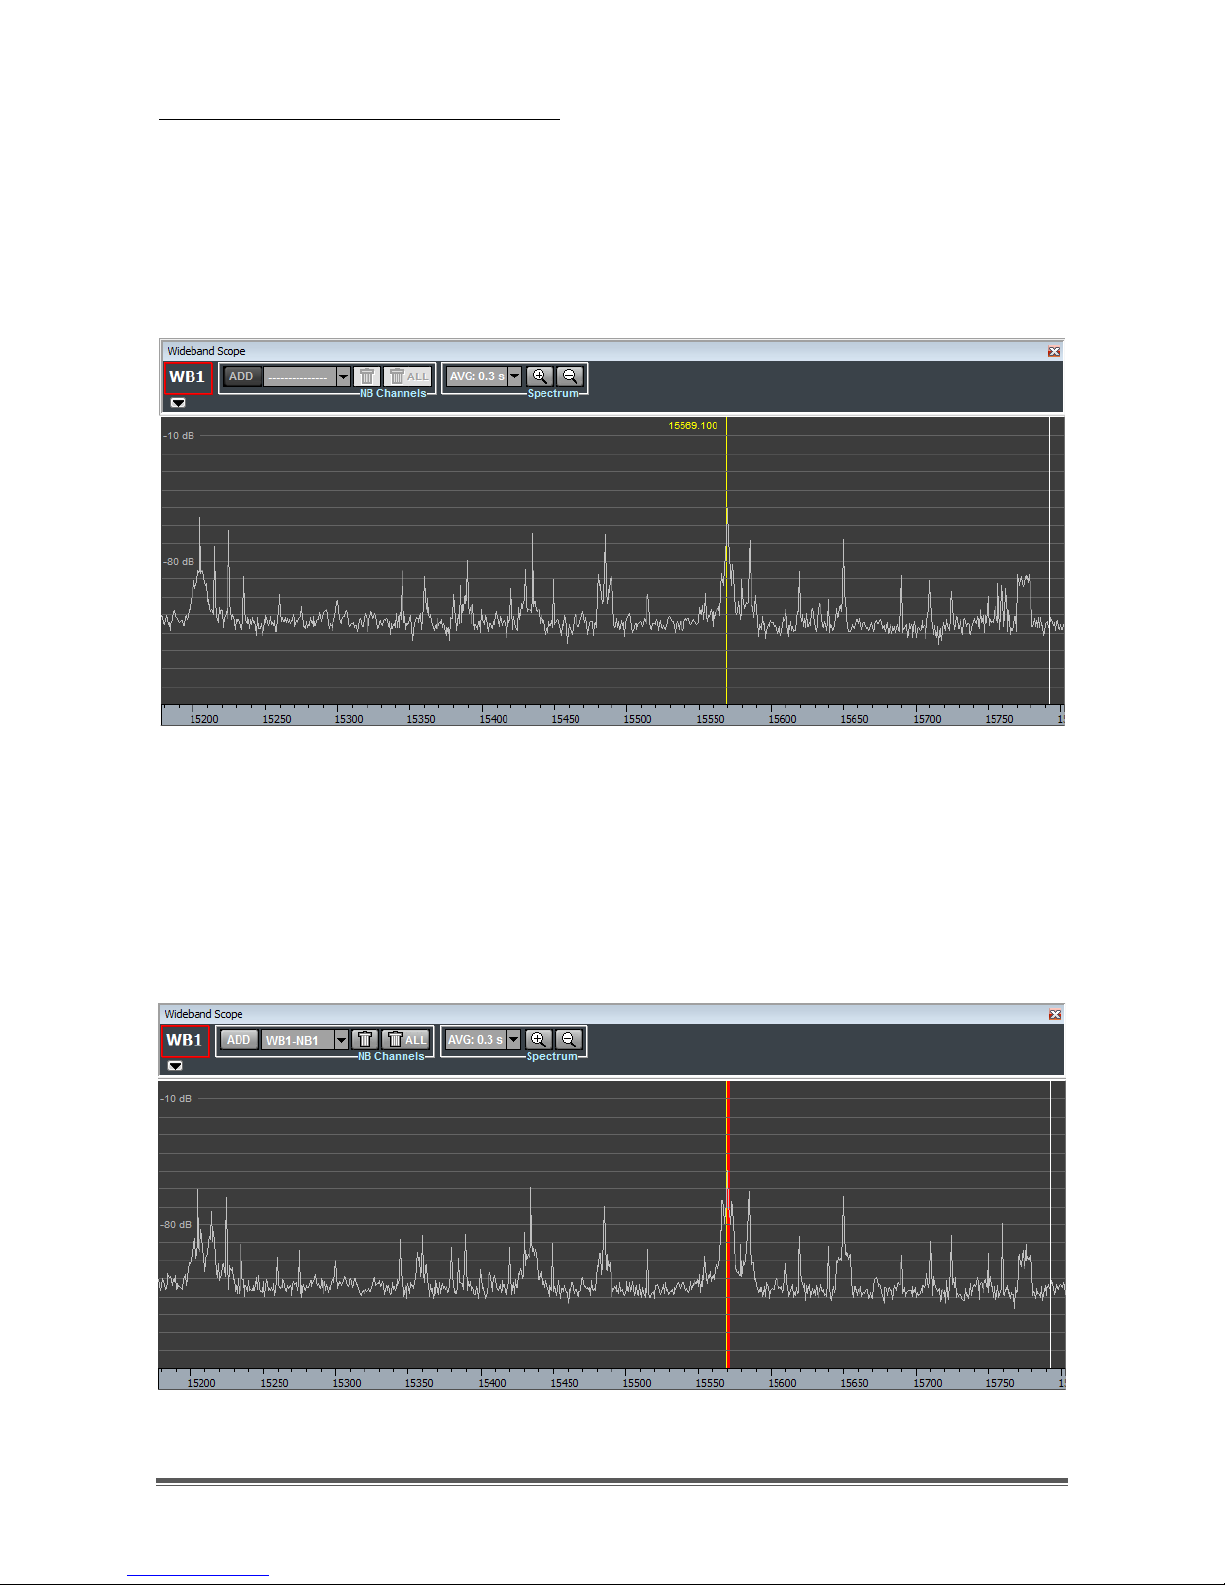
Selection of spectrum averaging time period:
By clicking on the drop-down menu of the Spectrum controls group, a list appears
of possible averaging time periods that can be selected (Figure 37). Default setting
is "NO AVG", meaning that spectra are plotted on the Wideband Scope without
any averaging.
Figure 37 - Spectrum averaging time periods
Frequency zoom/dezoom
Zoom/dezoom allows to halve/double the frequency spectrum span, aiming at a
specific center frequency value, corresponding to a vertical white line which can
be placed by left clicking on the desired position (Figure 38). After mouse click a
hint label appears near the vertical line indicating the corresponding frequency.
Page 22

TitanSDR – User Manual 22
Figure 38 - Wideband Scope spectrum and waterfall
Buttons for horizontal zoom/dezoom are shown in Figure 39 and are positioned
within the Spectrum controls group of the Wideband Scope toolbar.
Figure 39 - Zoom/dezoom buttons
Figure 40 shows the Wideband Scope after zooming the spectrum of Figure 38, by
clicking on the zoom button (the one marked with a “+”).
Page 23
TitanSDR – User Manual 23
Figure 40 - Wideband Scope after zooming
Dragging of the frequency axis bar
After having zoomed once (at least), the displayed frequency interval can be
shifted downwards or upwards by simply left clicking on the frequency axis bar of
the Wideband Scope (Figure 41) and dragging it leftward or rightward,
respectively.
Figure 41 - Frequency axis bar
2.2.2 Management of narrowband channels
The NB Channels controls group of the Wideband Scope toolbar (Figure 42) allows
to perform the following operations:
allocation of a narrowband channel
selection of a previously allocated narrowband channel
tuning of a narrowband channel (by mouse dragging and dropping its
shaded area)
deallocation (removal) of a narrowband channel
Figure 42 - NB Channels controls group
Page 24
TitanSDR – User Manual 24
Allocation of a narrowband channel:
By clicking on the "ADD" button of the NB Channels controls group, a vertical
yellow line appears on the Wideband Scope spectrum (Figure 43), representing
the carrier frequency of the narrowband channel to be allocated. Near to the
yellow line, a hint label appears also, indicating the corresponding frequency
value.
Figure 43 - Carrier frequency (yellow line) of narrowband channel to allocate
The carrier frequency can be set by mouse dragging the yellow line to the wanted
position and clicking the mouse left button. After clicking, the narrowband shaded
area appears on the Wideband Scope spectrum (Figure 44), to the right of the
yellow line, being USB the default mode.
Figure 44 - Allocated narrowband channel
Page 25
TitanSDR – User Manual 25
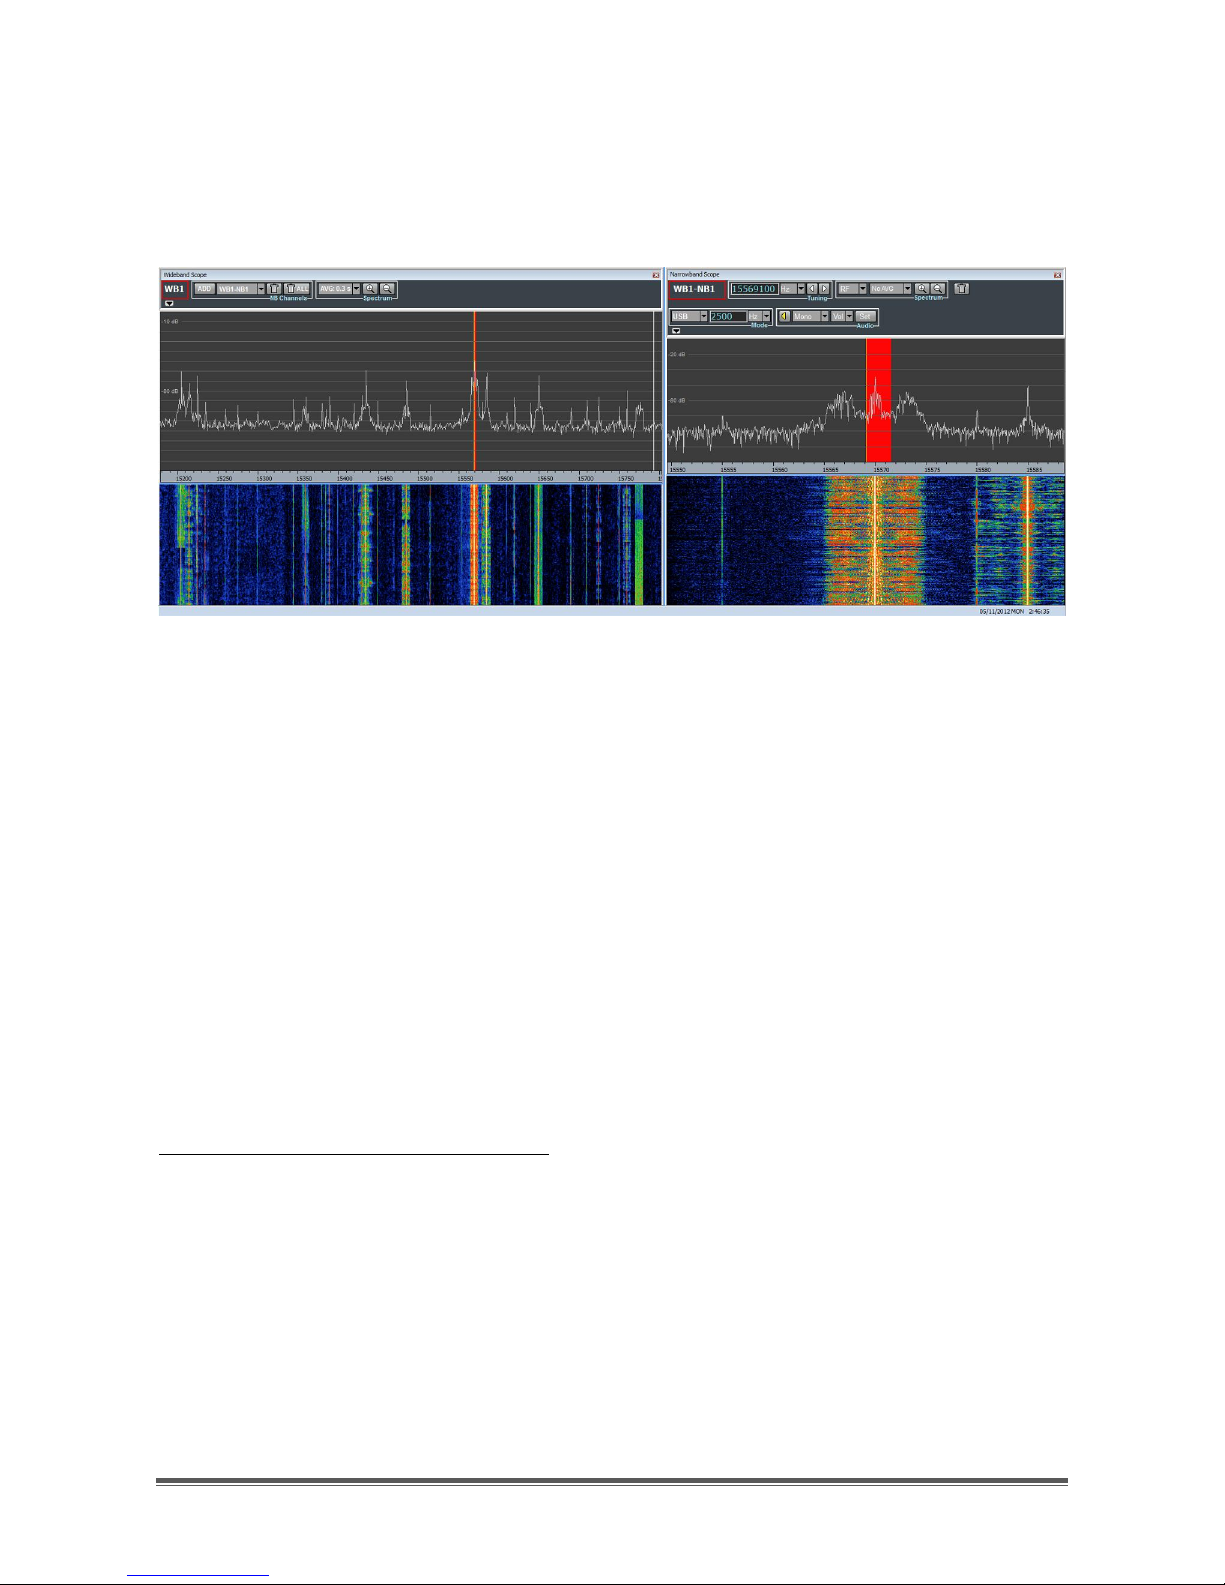
As a consequence of the same mouse click, the Narrowband Scope (Figure 45)
becomes ready to operate on the newly allocated narrowband channel,
displaying its spectrum and waterfall with higher resolution than the Wideband
Scope.
Figure 45 - Wideband Scope and Narrowband Scope
In order to set another mode (as written above, every new narrowband channel is
allocated as USB, by default), it must be selected from the modes drop-down
menu of the Narrowband Scope (within the Mode controls group, as specified in
par. 2.3.3).
Every narrowband channel is assigned a unique name, consisting of a prefix for the
name of its wideband channel (for instance, WB1), a separator “-” and a suffix
given by the string “NB” followed by the channel number, which is the first
available integer starting from 1. For example the fourth narrowband channel of
the second wideband channel will be assigned the name WB2-NB4.
Narrowband channels inherit the same color of their wideband channels, which in
turn is assigned according to the color convention indicated in par. 2.1.3.
Selection of a narrowband channel
In order to operate on a specific narrowband channel by the Narrowband Scope,
that channel must be previously selected. By selecting a narrowband channel, its
shaded area becomes brightly colored.
Selection of a narrowband channel can be done in three ways:
Selecting it in the narrowband channels drop-down menu of the Wideband
Scope toolbar (within the NB Channels controls group)
Left clicking on its shaded area (in the Wideband Scope spectrum)
Page 26
TitanSDR – User Manual 26
Opening the NB Channels List (see par. 4.2) and clicking on the
corresponding line
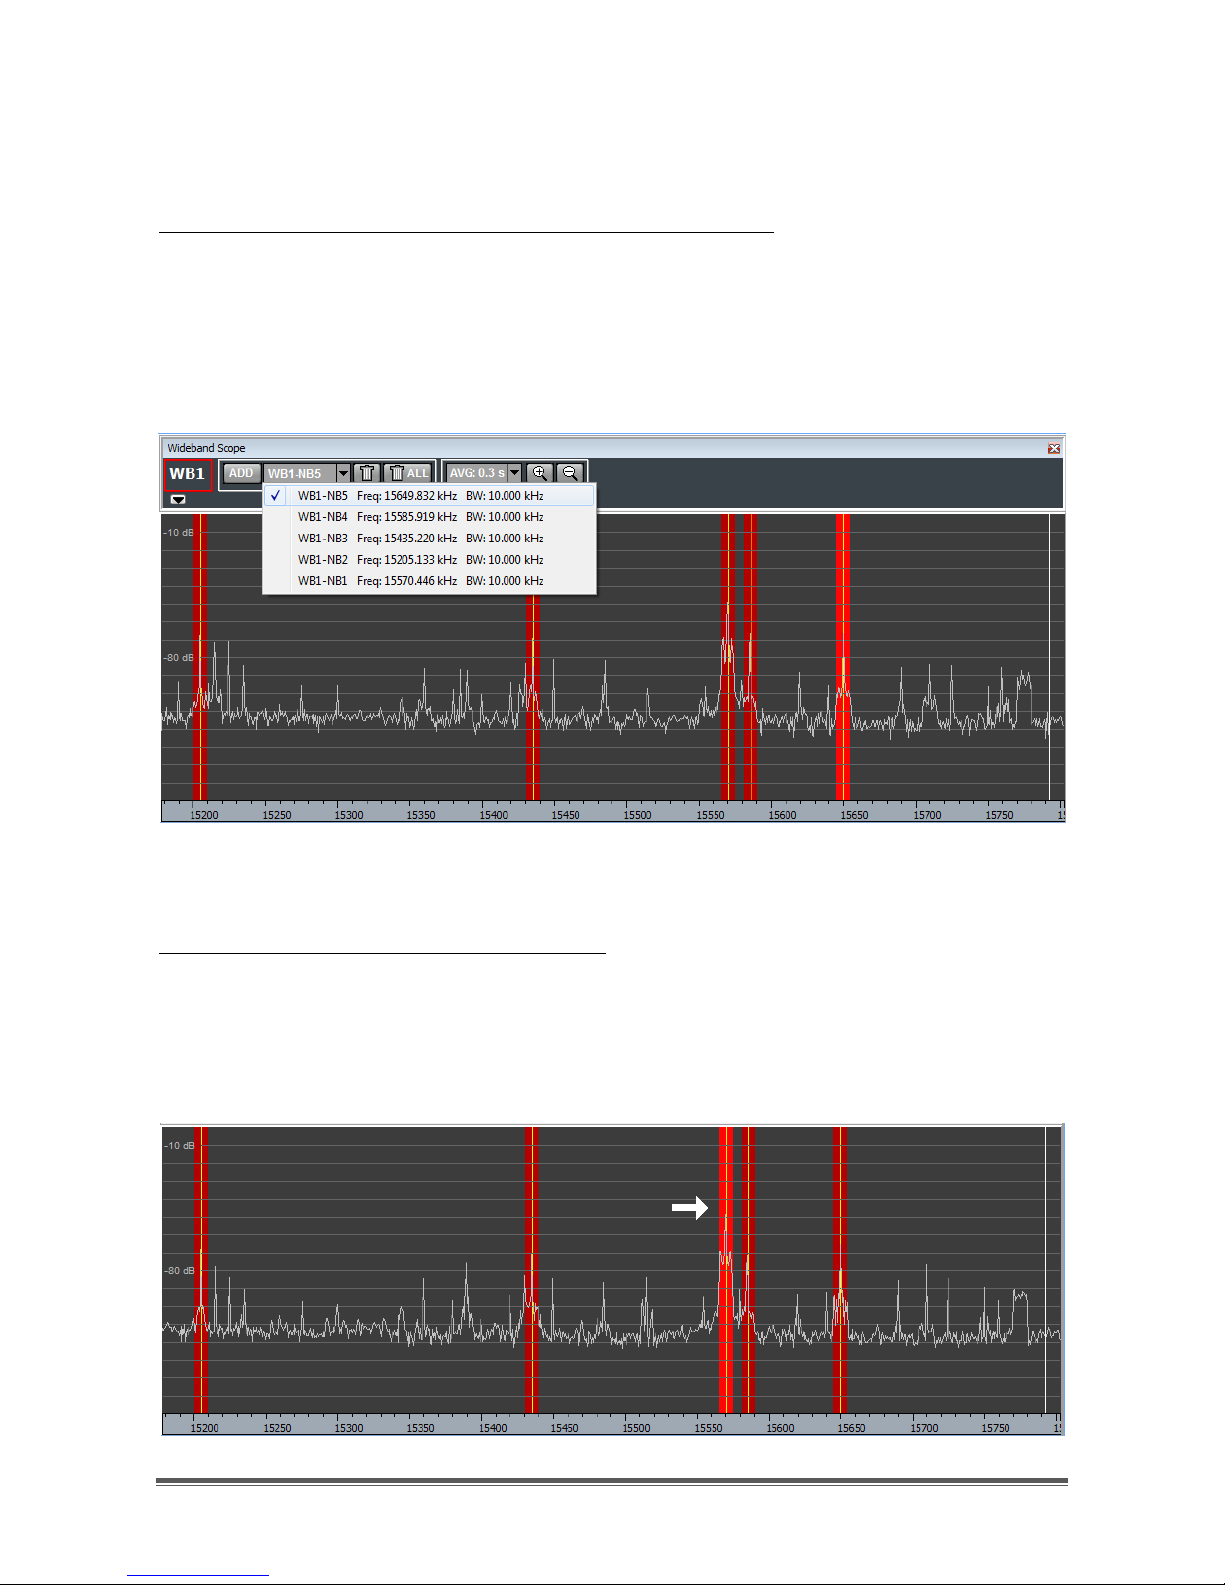
Selection in the narrowband channels drop-down menu
A narrowband channel can be selected within the list of allocated channels,
which appears (Figure 46) by clicking on the narrowband channels drop-down
menu of the Wideband Scope toolbar (within the NB Channels controls group).
Figure 46 - Narrowband channel selection by drop-down menu
Selection by left clicking on shaded area:
A narrowband channel can be selected by left clicking on its shaded area (Figure
47).
Figure 47 - Narrowband channel selection by mouse click
Page 27

TitanSDR – User Manual 27
Selection by NB Channels List
First of all, the NB Channels List must be opened by clicking on menu "NBList" (Figure
48) of the Main Toolbar. Each row of the NB Channels List, which is structured as a
table, contains data concerning a specific narrowband channel.
Figure 48 - Menu NB List
Selection of a narrowband channel can be accomplished by clicking on the
corresponding row of the NB Channels List.
Detailed information on how to employ the NB Channels List may be found in par.
4.2.
Tuning of narrowband channels
Tuning of a narrowband channel can be modified by left clicking on its shaded
area (within the Wideband Scope spectrum) and dragging it to the wanted
position (frequency).
Deallocation (removal) of narrowband channels
The selected narrowband channel can be deallocated (removed) by clicking on
the trash button of the NB Channels controls group (Figure 49).
Figure 49 - NB Channels controls group
In order to deallocate all narrowband channels of the selected wideband
channel (regardless of them being selected or not), click on the trash button
labeled “ALL”.
2.2.3 Recording of wideband channels
TitanSDR allows to record a wideband channel in a binary file (proprietary format)
with extension .bin, which is accompanied with a file having the same name, but
Page 28

TitanSDR – User Manual 28
extension .info. Both files are saved in the folder C:\Archives\WBChannels. If the
recording has to be moved to a different directory, both files must be moved. Files
names are assigned automatically (see par. 4.5.5 for details).
TitanSDR provides the user the possibility of setting the upper limit to the filling of the
hard disc. Ongoing recordings are stopped automatically when the available
space set by the user is exceeded (see par. 4.6.6 for details).
Recording can be:
manual
scheduled: see par. 4.4
Manual recording
In order to visualize the File controls group, expand the Wideband Scope toolbar
by clicking on the expansion button shown in Figure 50.
Figure 50 - Expansion button
Then, to start recording, click the start recording button (Figure 51) within the File
controls group (Figure 52).
Figure 51 - Start recording button
Figure 52 - Expanded Wideband Scope toolbar
Clicking the start recording button implies enabling the stop recording button
(Figure 53).
Figure 53 - Stop recording button
Page 29

TitanSDR – User Manual 29
2.3 Narrowband Scope
By selecting a narrowband channel (see par. 2.2.2 Selection of a narrowband
channel), its spectrum and waterfall, as well as its controls, appear in the
Narrowband Scope (Figure 54). Channel name is indicated at top left of window.
Figure 54 - Narrowband Scope visualizing narrowband channel WB2-NB1
Every narrowband channel is assigned a unique name, consisting of a prefix for the
name of its wideband channel (for instance, WB2), a separator “-” and a suffix
identifying the channel within the wideband channel (e.g. NB1). For example the
first narrowband channel of the second wideband channel is assigned the name
WB2-NB1.
Default spectrum span of the Narrowband Scope is greater than the actual
bandwidth of the narrowband channel, represented by its shaded area. This larger
view helps in fine tuning and adjusting of the channel bandwidth (by filtering).
Page 30

TitanSDR – User Manual 30
2.3.1 Spectrum settings
The graphical settings of the Narrowband Scope spectrum and waterfall can be
changed by the Spectrum controls group of the Narrowband Scope toolbar
(Figure 55).
Figure 55 - Spectrum controls group
The actions that can be performed are:
• selection of RF or Audio spectrum
• selection of spectrum averaging time period
• frequency zoom/dezoom
Selection of RF or Audio spectrum
The first drop-down menu of the Spectrum controls group allows to visualize the RF
spectrum (before demodulation) or the spectrum of the demodulated audio
signal (which results from the chosen mode/demodulator), by selecting “RF” or
“Audio”, respectively (Figure 56).
Figure 56 - RF/Audio selection
Figure 57 and Figure 58 show the Narrowband Scope for RF and Audio
visualizations, respectively, after tuning of the narrowband channel to an AM
transmission.
Page 31

TitanSDR – User Manual 31
Figure 57 - Narrowband Scope - RF visualization for an AM signal
Figure 58 - Narrowband Scope - Audio visualization for an AM signal
Page 32

TitanSDR – User Manual 32
Selection of spectrum averaging time period
By clicking on the second drop-down menu of the Spectrum controls group, a list
appears of possible averaging time periods that can be selected (Figure 59).
Default setting is "NO AVG", meaning that spectra are plotted on the Wideband
Scope without any averaging.
Figure 59 - Spectrum averaging time periods
Frequency zoom/dezoom
Zoom/dezoom allows to halve/double the frequency spectrum span, aiming at a
center frequency value which corresponds to the vertical yellow line, representing
the carrier (Figure 60).
Page 33

TitanSDR – User Manual 33
Figure 60 - Narrowband scope before zoom
Buttons for horizontal zoom/dezoom are shown in Figure 61and are positioned
within the Spectrum control group of the Narrowband Scope toolbar.
Figure 61 – Zoom/dezoom buttons
Figure 62 shows the Narrowband Scope after zooming the spectrum of Figure 60,
by clicking on the zoom button (the one marked with a “+”).
Page 34

TitanSDR – User Manual 34
Figure 62 - Narrowband scope after zoom
2.3.2 Tuning of narrowband channel
The carrier frequency is indicated in the Edit box of the Tuning controls group.
The highest/lowest possible carrier frequency is that which determines the
narrowband channel shaded area to have its upper/lower end matching the
wideband channel maximum/minimum frequency. Therefore the highest/lowest
possible carrier frequency depends on chosen modulation (mode).
Tuning of a narrowband channel can be modified by:
Editing the carrier frequency
Turning of mouse wheel up/down
Dragging the narrowband channel shaded area
Frequency shift buttons (of the Tuning controls group)
Tuning by editing the carrier frequency
The narrowband channel carrier frequency in the Edit box of the Tuning controls
group (Figure 63) can be edited and modified by keyboard.
Page 35

TitanSDR – User Manual 35
Figure 63 – Carrier frequency edit box
Any change in the Edit box is given effect to by pressing Enter. As a consequence
the shaded area and the vertical yellow line representing the carrier frequency
move accordingly in the Narrowband Scope, as well as in the Wideband Scope.
Tuning by turning of mouse wheel up/down
By selecting any one digit in the Edit box (Figure 64) and turning the mouse wheel
one step up/down, the narrowband channel carrier frequency
increases/decreases by (the frequency step of) a unitary increase/decrease of
that digit.
Figure 64 – Selection of a digit
Tuning by dragging the narrowband channel shaded area
The narrowband channel can be tuned within the Narrowband Scope spectrum
by dragging its shaded area, after having clicked on it. While dragging, the
narrowband channel carrier frequency is modified in the edit box accordingly.
Tuning employing the frequency shift buttons
By clicking and holding down the rightward/leftward arrow button of the Tuning
control group (Figure 65), the carrier frequency increases/decreases. In general
spectrum shifts in the opposite direction, while the shaded area doesn’t move
(except when the narrowband channel approaches one of the wideband
channel ends).
Figure 65 - Frequency shift arrow buttons
The unit of measurement of the narrowband channel carrier frequency can be
selected by the drop-down menu of the Tuning controls group (Figure 66). Possible
choices are: Hz, kHz or MHz .
Page 36

TitanSDR – User Manual 36
Figure 66 - Unit of measurement of narrowband channel carrier frequency
2.3.3 Demodulation settings
The Mode controls group of the Narrowband Scope toolbar (Figure 67) allows to
perform the following operations:
Mode selection
Setting of channel bandwidth
Setting of BFO frequency (for CW, FSK and DRM)
Figure 67 - Mode controls group
Mode selection
Supported modes are listed below:
a) Upper Side Band (USB)
b) Lower Side Band (LSB)
c) Amplitude Modulation (AM)
d) Continuous Wave (CW)
e) Narrowband Frequency Modulation (NFM)
f) Frequency Shift Keying (FSK)
g) Digital Radio Mondiale (DRM)
h) Extended Single Side Band Upper (eSSB-U)
i) Extended Single Side Band Lower (eSSB-U)
By clicking on the first drop-down menu of the Mode control group, a list appears
of supported modes that can be selected by mouse left clicking (Figure 68).
Page 37

TitanSDR – User Manual 37
Figure 68 - List of modes
Default RF bandwidths, minimum RF bandwidths and demodulated audio
sampling rates for supported modes are listed in the table below:
Mode
Default (RF)
bandwidths
Minimum (RF)
bandwidths
Audio sampling
rates
Default BFO
frequency
AM
10000 Hz
200 Hz
11025 Hz
NA
NFM
10000 Hz
400 Hz
22050 Hz
NA
CW
500 Hz
200 Hz
11025 Hz
800 Hz
FSK
2000 Hz
200 Hz
11025Hz
1750 Hz
USB
2500 Hz
100 Hz
11025 Hz
NA
LSB
2500 Hz
100 Hz
11025 Hz
NA
eUSB
10000 Hz
200 Hz
22050Hz
NA
eLSB
10000 Hz
200 Hz
22050Hz
NA
DRM
10000 Hz
400 Hz
Vista, W7: 44100 Hz
Win XP: 48000 Hz
12000 Hz
Setting of channel bandwidth
The RF bandwidth of a narrowband channel can be modified in the following
three ways:
a) In the RF spectrum visualization (see par. 2.3.1), by selecting and dragging
the shaded area edges
b) In the Audio spectrum visualization (see par. 2.3.1):
- by selecting and dragging each of the shaded area edges for modes
USB, LSB, eUSB, eLSB, CW, FSK and DRM
Page 38

TitanSDR – User Manual 38
- by selecting and dragging the rightmost edge (the other, the DC edge,
cannot be moved) for AM and NFM
c) By editing the channel bandwidth in the Edit box of the Mode controls group
and clicking Enter
RF bandwidths for AM and NFM are bounded above by their audio sampling rate
(see table above).
RF bandwidths for SSB modes (USB, LSB, eUSB and eLSB) are bounded above by
half their audio sampling rate (see table above).
Maximum RF bandwidths for modes CW, FSK and DRM depend on the BFO
frequency and are equal to:
- twice the BFO frequency, for BFO frequency lower than a quarter of their
audio sampling rate
- their audio sampling rate diminished by twice the BFO frequency, for other
BFO frequency values.
Figure 69 and Figure 70 show Audio and RF spectrum visualizations for the USB
mode, respectively, having set the channel bandwidth by selecting and dragging
the edges of the grey shaded area in the Audio spectrum visualization. Those
edges represent the lower and higher cutoff frequencies of bandpass limiting,
whose filtering effect can be clearly noticed on the demodulated audio
spectrum.
Figure 69 - Audio spectrum visualization for USB mode
Page 39

TitanSDR – User Manual 39
Notice also the correspondence between the red and grey shaded areas in the RF
and Audio spectrum visualizations (the yellow line, representing the carrier in the RF
spectrum, is indeed mapped to the 0 Hz value at the origin of Audio spectrum
abscissa).
Figure 70 - RF spectrum visualization for USB mode
Setting of BFO frequency
The BFO frequency can be set by:
Editing its value in the edit box which appears (at the right of the Audio
controls group) when any of modes CW, FSK and DRM is selected (Figure
71);
Left clicking and dragging the grey shaded area of the Audio spectrum
visualization.
Figure 71 - BFO controls group
2.3.4 Listening demodulated audio
The Audio controls group of the Narrowband Scope toolbar (Figure 72) allows to
manage listening of demodulated audio by PC loudspeakers/headset.
Page 40

TitanSDR – User Manual 40
Figure 72 - Audio controls group
In order to listen to demodulated audio, it is necessary to first choose the audio
card among the installed ones. By clicking on button “Set”, a window appears
(Figure 73) with the list of available audio cards: choose one and click “Ok”.
Figure 73 - Audio card selection
Note that the list includes also installed VACs (if any), since they are regarded by
the operative system as audio output devices and are not distinguished by real
audio cards. In order to stream demodulated audio to other applications (e.g.
software decoders) by VAC, do not select a VAC from this list, but make the
necessary settings by the VAC controls group of the Narrowband Scope toolbar
(see par. 2.3.6).
After having chosen audio card, select the audio mode (Mono, Left or Right) by
the drop-down menu of the Audio controls group (Figure 74).
Figure 74 – Audio mode selection
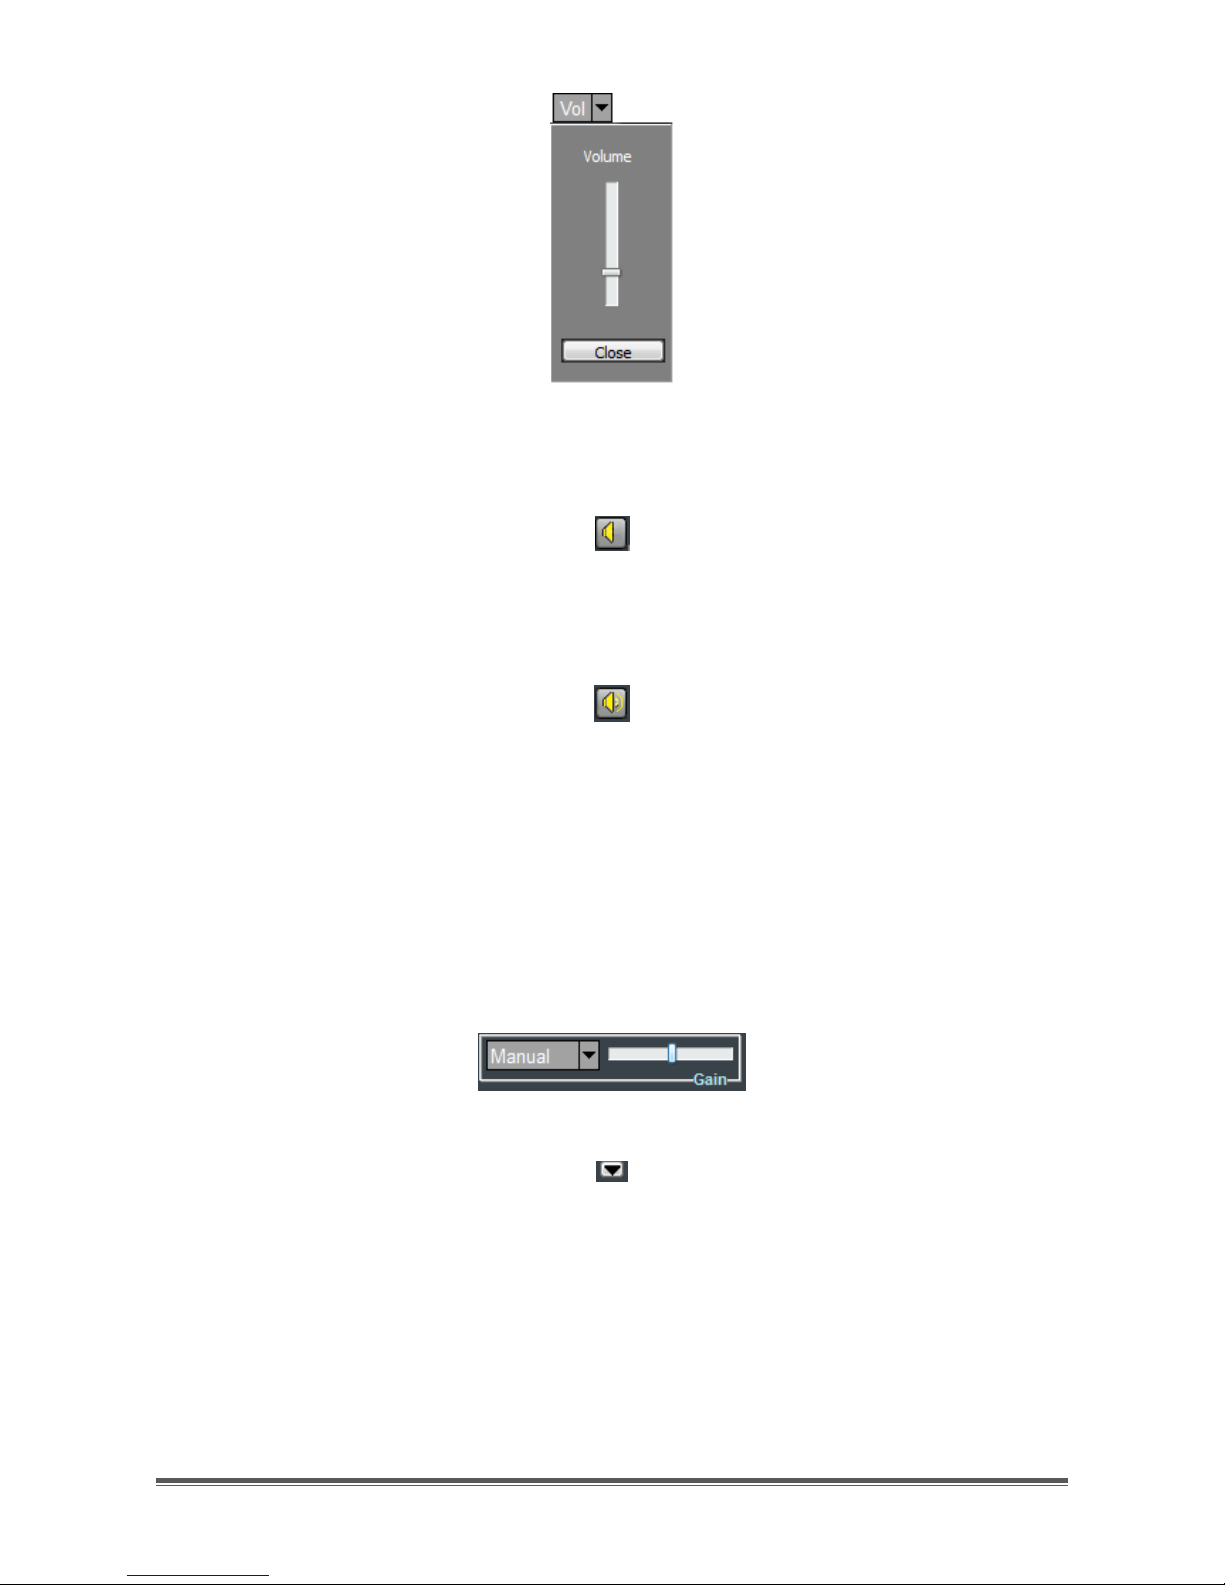
The volume can be adjusted by dragging the vertical slider of the Volume menu
(Figure 75).
Page 41
TitanSDR – User Manual 41
Figure 75 – Volume adjustment
To start audio, click on the speaker button (Figure 76).
Figure 76 – Speaker button when audio is off
When audio starts, the speaker button icon changes, symbolizing that audio is on
(Figure 77). Click again the speaker button to stop audio.
Figure 77 - Speaker button when audio is on
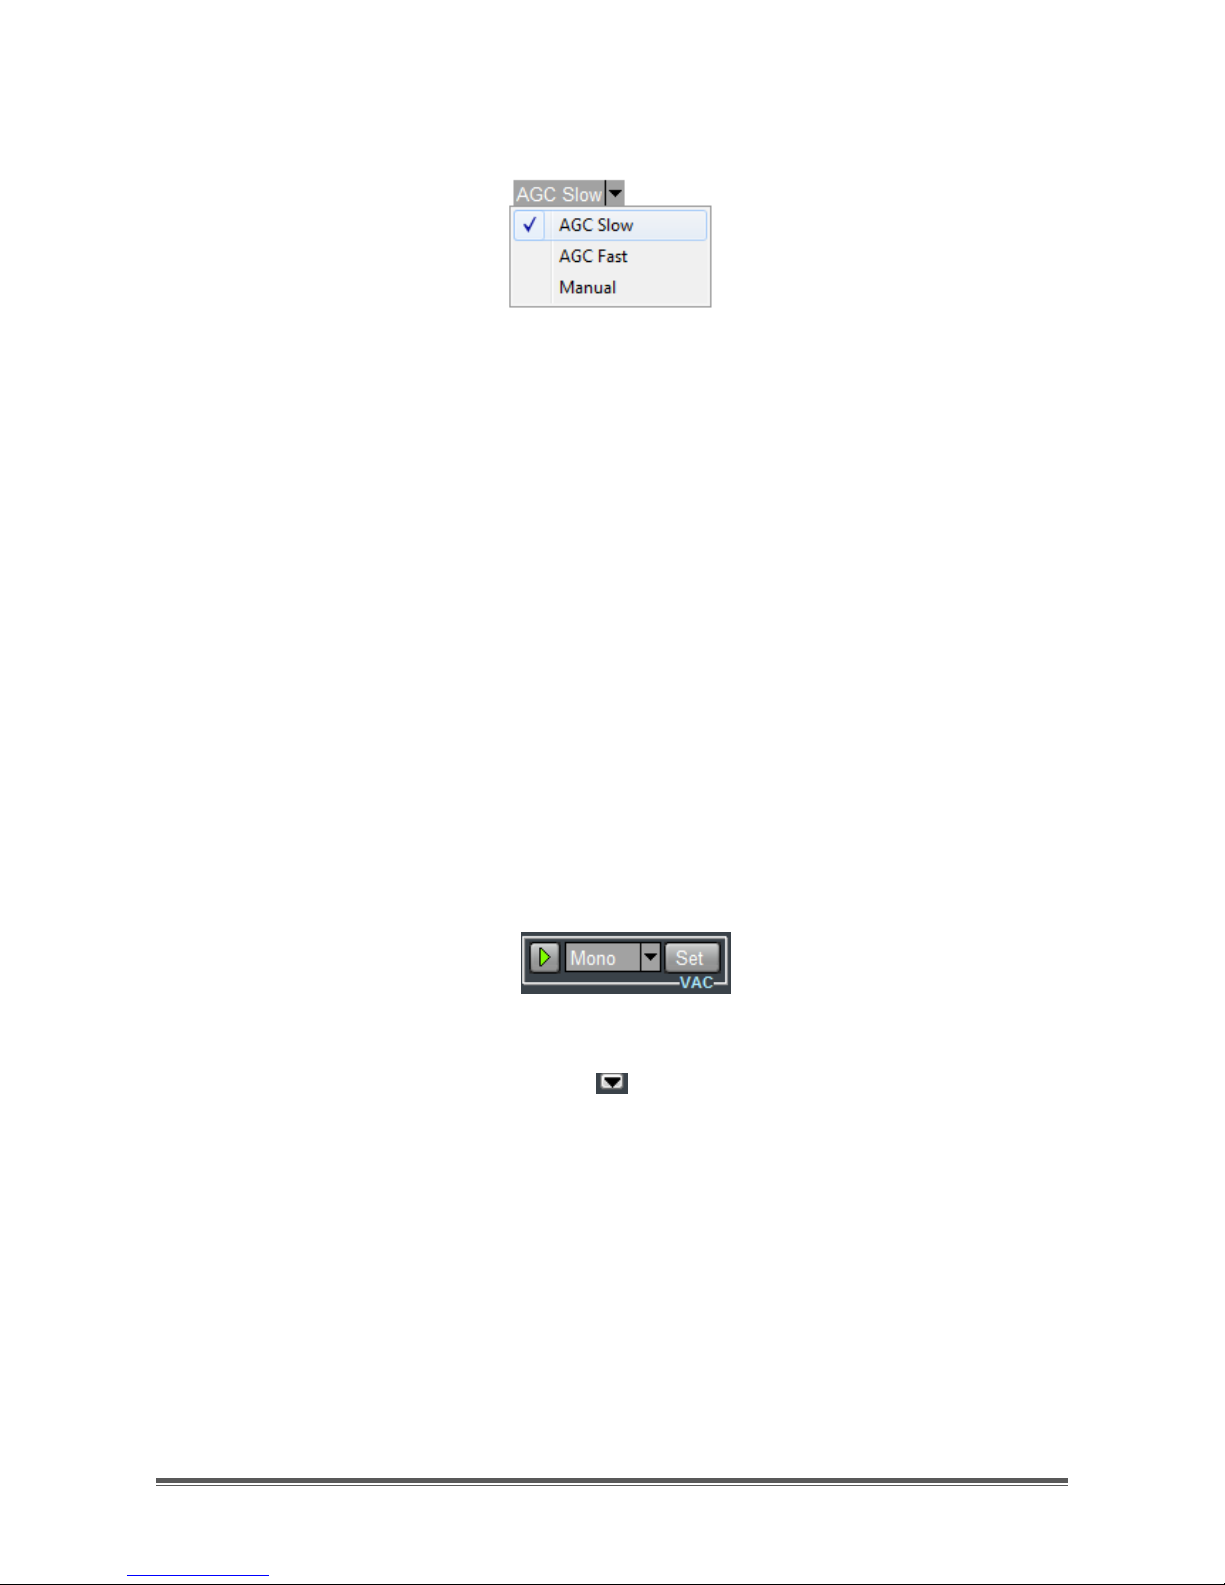
2.3.5 Gain control
The Gain controls group of the Narrowband Scope toolbar (Figure 78) appears
by clicking on the expansion button shown in Figure 79 and allows to manage gain
settings.
Figure 78 – Gain controls group
Figure 79 - Expansion button
The drop-down menu of the Gain controls group (Figure 80) allows to choose
among the following alternatives:
AGC Slow
AGC Fast
Page 42
TitanSDR – User Manual 42
Manual
Figure 80 – Gain drop-down menu
By selecting AGC (Automatic Gain Control) Slow or Fast, gain is adjusted
automatically and the horizontal slider (of the Gain controls group) allows to set
output (target) audio level. Furthermore “AGC Slow” features a higher decay time
than “AGC Fast”.
By selecting Manual, gain is constant and can be adjusted manually by the same
horizontal slider.
2.3.6 Audio streaming through Virtual Audio Cables (VAC)
The VAC (Virtual Audio Cable) controls group of the Narrowband Scope toolbar
(Figure 81) appears by clicking on the expansion button, shown in Figure 82, and
allows to manage streaming of demodulated audio to other applications (e.g.
software decoders) by VAC.
Figure 81 – VAC controls group
Figure 82 - Expansion button
By clicking on button “Set”, a window appears (Figure 83) with the list of installed
VACs: choose one and click “Ok”.
Page 43

TitanSDR – User Manual 43
Figure 83 - Installed VACs
Then select the audio mode (Mono, Left or Right) by the drop-down menu of the
VAC controls group (Figure 84).
Figure 84- VAC audio mode
To start streaming, click on the play button (Figure 85).
Figure 85 – Play button
When streaming starts, the play button icon changes, symbolizing that streaming is
on (Figure 86). Click again the same button to stop streaming.
Figure 86 – Stop button
2.3.7 Audio streaming by LAN
Demulated audio can be forwarded by LAN to other applications (e.g. CODE300
Hoka decoders), running on the same PC (by the loopback address 127.0.0.1) or
on other PCs of a network.
Page 44

TitanSDR – User Manual 44
The LAN controls group of the Narrowband Scope toolbar (Figure 87) appears by
clicking on the expansion button, shown in Figure 88.
Figure 87 – LAN controls group
Figure 88 - Expansion button
By the LAN control group, it is possible to:
Set a new TCP connection
Start and stop streaming on a TCP connection
Change parameters of an existing TCP connection
Remove a TCP connection
Configure Hoka CODE300 decoder based on an IP file
Request Hoka CODE300 decoder to generate an IP file
Set a new TCP connection
By clicking the “Set” button, a window appears (Figure 89) with a table that allows
to specify (up to eight) destination IP addresses and associated ports. Each line
refers to a specific destination TCP server. IP address and port can be entered by
editing the corresponding fields. The “Token” field may be edited to entry a name
for the TCP connection. In order to edit a cell, click on the line first (to select it),
then click on the cell.
Figure 89 – Table of TCP connections
Page 45

TitanSDR – User Manual 45
Start and stop streaming on a TCP connection
To start streaming of the narrowband channel on a specific TCP connection, select
the corresponding line of the table and click “Ok”.
Figure 90 – Selection of a TCP connection
Then select which channel/s to employ (Left, Right or Left+Right), by selecting the
corresponding item of the drop-down menu of the LAN controls group(Figure 91).
Figure 91 - Channels selection
Start streaming by clicking the play button (Figure 92).
Figure 92 – Play button
The channel/s employed (Left, Right, Left+Right) by the TCP connection is/are
indicated on the corresponding line of the table (Figure 93). In fact, if the
narrowband channel name appears in the Left or Right field, it means that the left
or right channel is being employed, respectively. If the name appears in both
fields, the same streaming is being transferred by both channels (left and right).
Page 46

TitanSDR – User Manual 46
Figure 93 – Narrowband channel WB1-B1 on channel Left
When streaming starts, the play button icon changes, symbolizing that streaming is
on (Figure 94). Click again the same button to stop streaming.
Figure 94 – Stop button
Change parameters of an existing TCP connection
To modify Token, IP Address and Port of an existing TCP connection, click on its line
first (to select it), then click and edit each cell.
Remove a TCP connection
To remove a TCP connection, click on its line first (to select it), then click the
“Clear” button.
Configure Hoka CODE300 decoder based on an IP file
By connecting a narrowband channel to an instance of the Hoka CODE300
decoder, it is possible to configure the decoder based on a specific IP file. To this
aim:
select the desired IP file from the browse window that opens after clicking
the “Configure Decoder” button;
click “Open” on the browse window .
Page 47

TitanSDR – User Manual 47
Request Hoka CODE300 decoder to generate an IP file
By clicking the “Generate IP File” button, a message is sent to the Hoka CODE300
decoder asking it to generate an IP file corresponding to its current settings. The IP
file is generated on PC hosting the decoder instance.
2.3.8 Recording of narrowband channels
TitanSDR allows to record narrowband channel demodulated output in a .wav file.
Files are saved in folder C:\Archives\Wav. Files names are assigned
automatically (see par. 4.5.5 for details).
TitanSDR provides the user the possibility of setting the upper limit to the filling of the
hard disc. Ongoing recordings are stopped automatically when the available
space set by the user is exceeded (see par. 4.6.6 for details).
Recording can be:
manual
scheduled: see par. 4.4
Manual recording
In order to visualize the Rec controls group, expand the Narrowband Scope
toolbar by clicking on the expansion button shown in Figure 95.
Figure 95- Expansion button
Then, to start recording, click the start recording button (Figure 96) within the Rec
controls group (Figure 97).
Figure 96 - Start recording button
Page 48

TitanSDR – User Manual 48
Figure 97 - Expanded Narrowband Scope toolbar
Clicking the start recording button implies enabling the stop recording button
(Figure 98).
Figure 98 - Stop recording button
The Rec controls group includes the recording time, which starts from 00.00.00,
begins to increase after clicking the start recording button and stops increasing at
stop of recording.
Stop of recording implies closing the .wav file. If a new recording is started, a new
.wav file is created (different from the previous one) .
Page 49

TitanSDR – User Manual 49
3. Player mode
Par. 2.2.3 describes how (in Receiver Mode) TitanSDR can record wideband
channels into binary files (proprietary format) with extension .bin.
As anticipated in par. 1.3, TitanSDR can be operated also in Player Mode, which
allows to playback a wideband recording and to allocate narrowband channels
on that recording, working with them as in Receiver Mode.
In order to operate TitanSDR in Player Mode, one of the following conditions must
be met:
The receiver is powered on and connected by USB cable to the PC
The provided USB dongle is plugged into a USB port
To switch to Player Mode, select “Player” from the drop-down menu “Mode” of
the Main Toolbar (Figure 99).
Figure 99 – Player Mode selection
In Player Mode only the Wideband and Narrowband Scope (not the Panoramic
Scope) are present (Figure 100).
Figure 100 - Player Mode
Page 50

TitanSDR – User Manual 50
To open a file, click the button in Figure 101 and browse the window that opens
after clicking (Figure 102).
Figure 101 – Open button
Figure 102 – Selection of a file
Wideband recordings are saved by default in folder C:\Archives. After selecting a
file, click on the play button (Figure 103) to start playback.
Figure 103 – Play button
As a result, the Wideband Scope shows spectrum and waterfall representation of
the recording (Figure 104).
Page 51

TitanSDR – User Manual 51
Figure 104 – Wideband recording playback
At this point, narrowband channels can be allocated performing the same steps
taken in Receiver Mode (Figure 105).
Figure 105 – Narrowband channels allocated on a recording
Page 52

TitanSDR – User Manual 52
4. Advanced Operations
4.1 Session saving and loading
In Receiver mode, TitanSDR allows to save session settings of receiver Front End,
wideband channels and narrowband channels into session files, with extension
.ssn. A session file includes:
receiver Front-End settings (see par. 2.1.1): selected preselection filter, input
attenuation value and receiver input (HF or IF);
settings of allocated wideband channels: bandwidths and center
frequencies;
settings of allocated narrowband channels:
o relevant wideband channel;
o narrowband channel name;
o narrowband channel (carrier) frequency;
o (demodulation) mode (par. 2.3.3);
o BFO frequency.
Sessions can be restored whenever desired. By restoring of a session, through its
session file, TitanSDR restores Front End settings, allocates automatically all
wideband and narrowband channels that were present when the session file was
saved and restores all their settings listed above.
4.1.1 Session saving
In order to save the current session, select “Save session as…” from the “File” dropdown menu of the Main Toolbar (Figure 106).
Figure 106 – Session save selection
Page 53

TitanSDR – User Manual 53
In the browse window that opens, enter the session file name (default folder is
TitanSDR\Session) and click “Save” (Figure 107).
Figure 107 – Browse window
Whenever software disconnects from the receiver (e.g. by clicking the USB button
or by switching from Receiver Mode to Player Mode), the save session message in
Figure 108 pops up automatically, asking whether to save the current session (into
a .ssn session file) or not.
Figure 108 – Save session message
Page 54

TitanSDR – User Manual 54
To circumvent the save session message, deselect “Ask for saving”, after choosing
“Session” from the “Options” drop-down menu of the Main Toolbar (Figure 109).
Figure 109– Options drop-down menu
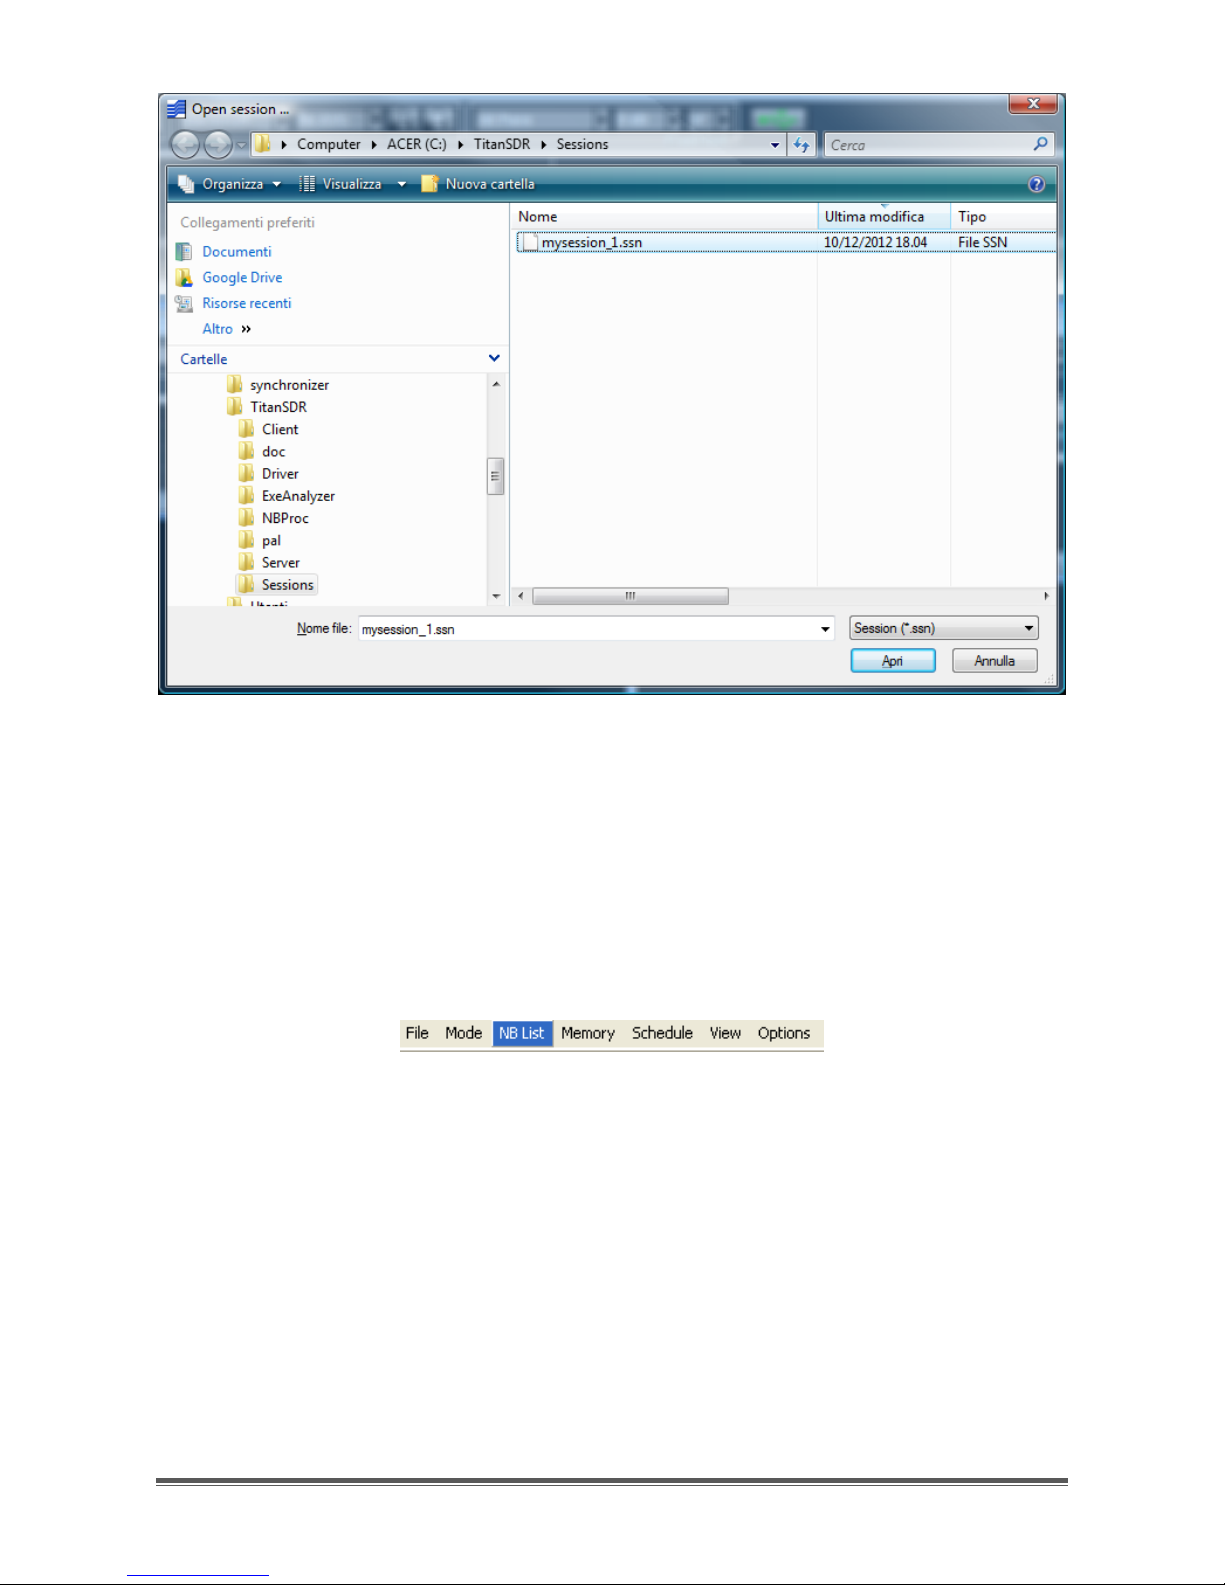
4.1.2 Session loading
In order to load (restore) a previous session, select “Load session…” from the “File”
drop-down menu of the Main Toolbar (Figure 110).
Figure 110 – Session selection
In the browse window that opens, select session file to load (default folder is
TitanSDR\Session) and click “Open” (Figure 111).
Page 55
TitanSDR – User Manual 55
Figure 111 - Browse window
4.2 NB Channels List
The NB Channels List is a table summarizing main settings for the allocated
narrowband channels. The NB Channels List opens by clicking “NB List” on the Main
Toolbar (Figure 112).
Figure 112 – “NB List” on Main Toolbar
Figure 113 shows the NB Channels List after allocation of several narrowband
channels on four distinct wideband channels: each line of the table refers to a
specific narrowband channel. By selecting a line, the Narrowband Scope switches
to the corresponding narrowband channel, showing its controls and its
spectrum/waterfall displays.
Page 56

TitanSDR – User Manual 56
Figure 113 - NB Channels List
In Figure 113 the selected channel is WB4-NB2 (the second of the fourth wideband
channel), so its settings could be modified by the Narrowband Scope.
Each line of the NB Channels List contains the following fields:
Name (of narrowband channel)
Frequency (of carrier expressed in kHz)
Bandwidth (of channel expressed in kHz)
Mode (type of demodulator)
Audio (mono, left or right)
Wav Rec (recording status: “On” of “Off”)
VAC (name of Virtual Audio Cable, if any, fed by demodulator output)
VAC Output (mono, left or right)
LAN (left, right, left+right: see par. 2.3.7)
Memory (memory number, if channel added to memory or allocated from
memory)
Page 57

TitanSDR – User Manual 57
4.3 Memory of narrowband channels
Narrowband channels can be memorized, together with stations info, in order to
be easily recognized from a Memory List, presenting all memorized data, and
rapidly allocated again with the same settings (carrier frequency, bandwidth and
mode).
The Memory List opens by clicking “Memory” on the Main Toolbar (Figure 114).
Figure 114 - “Memory” on Main Toolbar
Each row of the Memory List (Figure 115) contains the following fields:
Memory (name of)
Name (of narrowband channel, if allocated)
Frequency (of carrier expressed in kHz)
Bandwidth (of channel expressed in kHz)
Mode (type of demodulator)
Time (of insertion in memory)
Date (of insertion in memory)
Callsign
ITU
Station
User Description
Time format can be selected as UTC (Coordinated Universal Time) or local format
(Figure 115).
Figure 115 – Memory List window
Page 58

TitanSDR – User Manual 58
4.3.1 Memorization
To memorize a narrowband channel, first expand the Narrowband Scope toolbar
by clicking the expansion button (Figure 79), to access the Memory controls group
(Figure 116).
Figure 116 - Narrowband Scope with expanded toolbar
By clicking “Add” a new record is added to the Memory List, containing the
narrowband channels settings (carrier frequency, bandwidth and mode), as well
as the date and time of insertion in memory. Furthermore the assigned memory
number is indicated in the top left colored frame of the Narrowband Scope
window (note the string “Mem005” in Figure 117). By positioning the mouse cursor
over the same frame, the narrowband channel name appears again.
Page 59

TitanSDR – User Manual 59
Figure 117 - Narrowband Scope after clicking “Add”
In order to memorize the other fields (Callsign, ITU, Station, User Description), click
the “Set Info” button of the Memory controls group, edit them in the window that
shows up (Figure 118) and click “Close”.
Page 60

TitanSDR – User Manual 60
Figure 118 – Setting of additional info
The new memory entry appears in the Memory List (note the last line in Figure 119,
starting with “Mem005”).
Figure 119 - Memory List after insertion of new record Mem005
Page 61

TitanSDR – User Manual 61
4.3.2 Allocation of memorized channels
In order to allocate a narrowband channel from the Memory List, there must be
first a previously allocated wideband channel which can include it.
By selecting whatever record (line) of the Memory List, a vertical yellow line
appears on the Panoramic Scope spectrum window, in correspondence with the
carrier frequency of the memorized channel (Figure 120).
Figure 120 – Selection of a line (memorized station) and visualization of
corresponding carrier frequency (yellow line)
By dragging a wideband channel shaded area over the same yellow line, the
corresponding line of the Memory List is rewritten with bold characters, meaning
that the memorized channel can be allocated (Figure 121).
Page 62

TitanSDR – User Manual 62
Figure 121 – Wideband channel including Mem002
Finally, allocation of the memorized channel is obtained by clicking the “Allocate”
button. In general, by performing a multiple selection of lines in the Memory List
and clicking the “Allocate” button, a narrowband channel is allocated for each
line written with bold characters (i.e. whose memorized channel can be included
in a wideband channel).
4.3.3 Memory settings modifications
The settings of a memorized channel which can be modified are listed below:
Frequency
Bandwidth
Mode (type of demodulator)
Callsign
ITU
Station
Page 63

TitanSDR – User Manual 63
User Description
To modify these settings, it is first necessary to allocate it (see par. 4.3.2 ). Then they
can be modified by the Narrowband Scope controls.
Memory settings are modified also in the Memory List, but changes are not yet
saved on disk. In order to save changes applying to a specific narrowband
channel, click the “Update” button of its Memory controls group.
If changes are not saved on disk (by the “Update” button), the message in Figure
122 appears when software is closed, asking whether to save all memory changes
possibly made.
Figure 122 – Message for update of memories
A similar message appears also (Figure 123) if a single memorized channel, whose
memory settings have changed, is deallocated by the trash button of the
Narrowband Scope or the trash button of the NB Channels controls group (of the
Wideband Scope).
Figure 123 – Message for update of single memory
4.3.4 Removal of memorized channels
To remove a record from the Memory List, select its line and click the “Remove”
button.
Page 64

TitanSDR – User Manual 64
4.4 Scheduling of recordings
Both recording of wideband and narrowband channels can be scheduled. While
TitanSDR takes care to start/stop recordings on scheduled channels, the other
channels can be normally employed in parallel. This subject is divided in the
following paragraphs:
4.4.1 - Scheduling of a new wideband\narrowband channel: describes the
necessary steps to set recording tasks for a wideband\narrowband channel
and how recording tasks are handled.
4.4.2 - Task Editor window: gives practical examples for setting both not-
periodic and periodic tasks
4.4.3 - Managing scheduled channels: describes how it is possible to monitor
and manage all the recording activities from the Scheduled Channels
window
4.4.4 - Allocation of scheduled channels: describes how to newly allocate
scheduled channels from the Scheduled Channels window (after they have
been deallocated, even as a consequence of software shutdown)
4.4.1 Scheduling of a new wideband\narrowband channel
In order to schedule recordings of a wideband channel, click on the Schedule
button (Figure 124) within the File controls group (of the expanded Wideband
Scope toolbar), to open its Recording Schedule window (Figure 125).
Figure 124 - Expanded Wideband Scope toolbar
Page 65

TitanSDR – User Manual 65
Figure 125 - Recording Schedule window
In a similar way, to schedule recordings of a narrowband channel, click on the
Schedule button (Figure 126) within the Rec controls group (of the expanded
Narrowband Scope toolbar), to open its Recording Schedule window.
Figure 126- Expanded Narrowband Scope toolbar
The Recording Schedule window allows to set recording tasks for the channel:
each line corresponds to a specific task.
To add a new task, click the “Add” button. This opens the Task Editor window
(Figure 127), which allows to specify dates and times for start and stop of the
recording and to set possible repetitions (see par. 4.4.2 for examples). In fact tasks
can be periodic or not periodic. Not periodic tasks are executed once. Periodic
tasks are those which have to be executed on specific days of the week.
Page 66

TitanSDR – User Manual 66
Figure 127 - Task Editor window
After entering all task’s data, click “Ok”: the new task is added to the Recording
schedule window as a new line (Figure 128).
Figure 128 - Recording Schedule window with first entered task
A task can be active or not. Only active tasks are executed. A task is active if the
cell of the Active field (second column) is “Yes”. If this cell is “No”, the task will
never be executed. When a new task is created, it is activated by default (i.e.
Active field cell is “Yes”). In order to deactivate/activate a task, left click on this
cell.
The following rules apply:
If two tasks have overlapping recording time intervals, the one which is
executed is that with the earliest start time (the other one is not executed at
all)
Page 67

TitanSDR – User Manual 67
A recording tasks doesn’t start if recording of the same channel has been
already started manually
If a task is being executed (i.e. recording is ongoing), recording can be
stopped manually (before the task stop time)
During execution of a task, its start time and stop time can be modified
manually (which causes the recording to stop, if the stop time is set earlier
than current time or if the start time is set later than current time)
If a task is being executed and its Active field cell is set to “No”, recording is
stopped
4.4.2 Task Editor window
The following paragraphs address scheduling, through the Task Editor window, for:
Not Periodic tasks
Periodic tasks
Not Periodic schedule:
The maximum recording duration of a task is 24 hours. After specifying the start
date and the start time, it is possible to set the recording duration (Rec length) or
the stop date and stop time.
Find below two examples. In Examples 1, the recording duration is 14 hours and
both start and stop are in the same day. In Example 2, the recording duration is 21
hours and start and stop are in consecutive days.
Example 1:
START DATE=14/11/2012
START TIME=8:00
STOP DATE=14/11/2012
STOP TIME=21:00
Duration: 13 hours
DAY OF SCHEDULING: 03/11/2012
Page 68

TitanSDR – User Manual 68
Figure 129- Task Editor settings for Example 1
Example 2
START DATE=12/11/2012
START TIME=11:00
STOP DATE=13/11/2012
STOP TIME=06:00
Duration: 19 hours
DAY OF SCHEDULING: 03/11/2012
Page 69

TitanSDR – User Manual 69
Figure 130 - Task Editor settings for Example 2
Periodic schedule:
Set start date, start time, stop date and stop time of the task. Check the “Repeat
on” checkbox, to enable periodic scheduling. To specify the task’s subsequent
repetitions:
check the days of the week, when task must be repeated;
check the “Until” checkbox and set the last date for task repetition or leave
the “Until” checkbox not checked, for unlimited task repetitions.
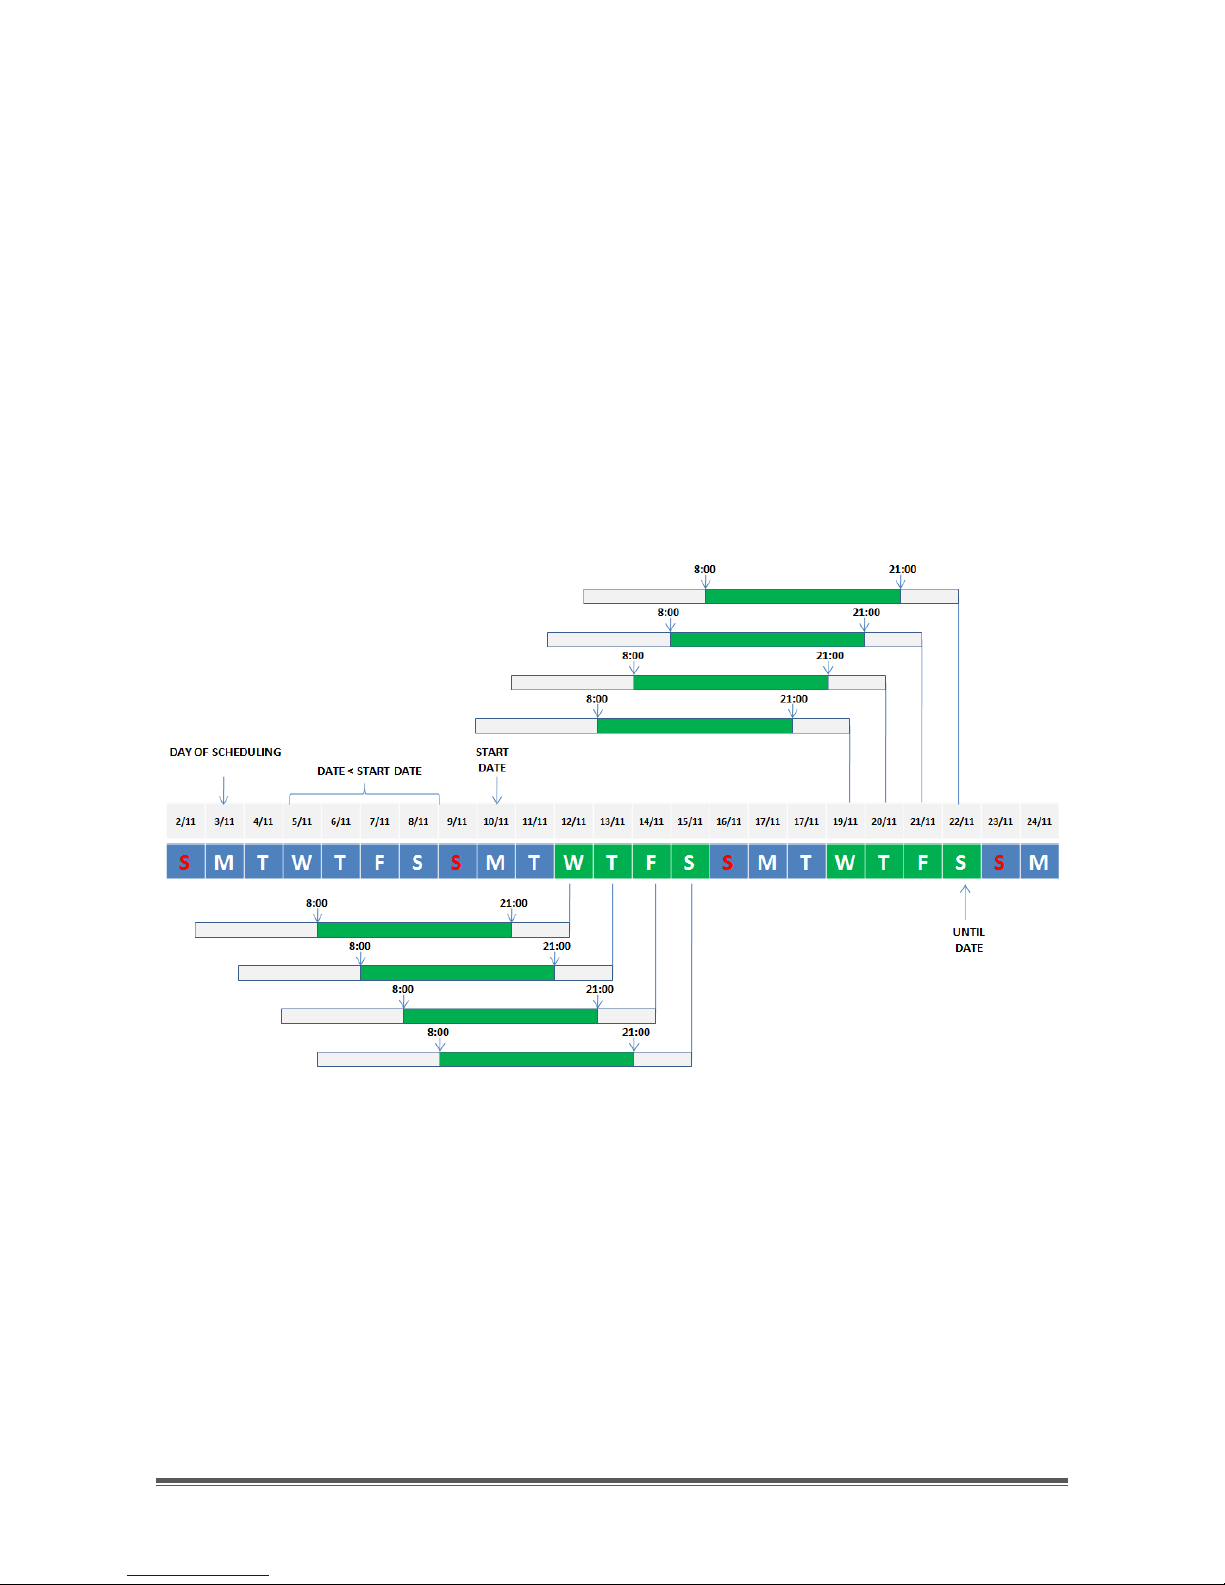
Example 3 below refers to a periodic task, which has to be executed on
Wednesday, Thursday, Friday and Saturday, from 8:00 to 21:00 (Figure 131).
Example 3:
START DATE=10/11/2012
START TIME=8:00
Page 70
TitanSDR – User Manual 70
STOP DATE=10/11/2012
STOP TIME=21:00
Duration: 13 hours
TASK REPETITIONS ON: Wednesday, Thursday, Friday and Saturday
UNTIL DATE: 22/11/2012
DAY OF SCHEDULING: 03/11/2012
Note that, even if the start date is 10/11, the task is executed first on 12/11, which
happens to be the first day (not preceding the start day) which matches one of
the days of week of interest (i.e. which are checked), that is Wednesday. The last
day the task is executed is 22/11.
Page 71

TitanSDR – User Manual 71
Figure 131- Task Editor settings for Example 3
4.4.3 Managing scheduled channels
All scheduled channels, both wideband and narrowband types, are listed in the
Scheduled Channels window, containing the list of scheduled wideband and
narrowband channels, which appears by clicking the “Schedule” menu of the
Main Toolbar.
For example, Figure 132 shows the Scheduled Channels window for two wideband
channels (Sch 001, Sch 002) and seven narrowband channels (Sch 003, …, Sch
009).
Figure 132 - Scheduled Channels window
Page 72

TitanSDR – User Manual 72
The Scheduled Channels window contains the following fields:
Schedule (name of)
Type (WB or NB, for a wideband or narrowband channel, respectively)
Name (of wideband or narrowband channel, if already allocated)
Frequency (center frequency for wideband channels, carrier frequency for
narrowband channels, expressed in kHz)
Bandwidth (of wideband or narrowband channel, expressed in kHz)
Mode (of narrowband channel)
Recording (“On” if recording is ongoing, “Off” otherwise)
Status (“Off” if channel is not allocated, “Enabled” if there are active tasks,
“Disabled” if there aren’t active tasks)
Scheduled recordings can be removed from the list by selecting them and clicking
the “Remove” button.
The Recording Schedule window, containing the tasks for a specific scheduled
channel, appears by selecting its line (on the list of Scheduled Channels) and
clicking the “Show Tasks” button. Figure 133 shows the Recording Schedule
window for Sch4 (Figure 132), i.e. for the narrowband channel WB3-NB2.
Figure 133 – Recording tasks for narrowband channel WB3-NB2
The settings of a task can be modified by the Task Editor window (see par. 4.4.2 for
details), which shows up by selecting the task line on the Recording Schedule
window and clicking the “Edit” button (Figure 134).
Page 73

TitanSDR – User Manual 73
Figure 134 - Task Editor window
4.4.4 Allocation of scheduled channels
Scheduled channels and their recording tasks are saved on disk and can be
recalled at any time, even after software shutdown and restart. In particular, the
Scheduled Channels window appears by clicking the “Schedule” menu of the
Main Toolbar.
Nevertheless, at software start, scheduled channels are not allocated and must be
allocated first, if their recording tasks are to be executed. The following paragraphs
describe how allocations of scheduled wideband and narrowband channels can
be accomplished, through the Scheduled Channels window.
Allocation of scheduled wideband channels
A scheduled wideband channel can be allocated if it appears in bold characters
in the Scheduled Channel window, meaning that there are sufficient resources
available for its allocation. Figure 135 shows, for instance, the Scheduled Channel
window with three wideband channels in bold characters. Therefore any of them
can be allocated.
Page 74

TitanSDR – User Manual 74
Figure 135 – Scheduled Channels window with an allocable wideband channel
selected
In order to allocate a WB channel, select its line and click the “Allocate” button.
Multiple selection of channels to allocate is also possible: they are allocated from
the highest to the lowest of selection, until resources are available, after clicking
the “Allocate” button once.
By selecting and allocating a wideband channel, the assigned wideband channel
name appears in the “Name” field (of the Scheduled Channels window list) and its
line is no longer written in bold characters. For instance, Figure 136 shows the
Scheduled Channels window after allocating the selected wideband channel in
Figure 135, as WB1. The red shaded area of WB1 is also visible in the Panoramic
Scope spectrum.
Page 75

TitanSDR – User Manual 75
Figure 136 – Allocation of Sch 001 as WB1
Continuing the example of Figure 135 and Figure 136, by selecting the second
wideband channel Sch 002 of the Scheduled Channel window list, as illustrated in
Figure 137, and allocating it, the corresponding (second) line of the list is now
written in normal characters (as expected), as well as the third line of Sch 003,
meaning that for the allocation of this last channel there aren’t enough resources
left (Figure 138).
Figure 137 – Selection of second wideband channel
Page 76

TitanSDR – User Manual 76
Figure 138 - Allocation of Sch 002 as WB2
Allocation of scheduled narrowband channels
By selecting a line of the scheduled narrowband channels in the Scheduled
Channels window list, a blue vertical line appears on the Panoramic Scope
spectrum in correspondence with its carrier frequency. This is the case of Sch 005 in
Figure 139.
Figure 139 – Selection of a scheduled narrowband channel
Page 77

TitanSDR – User Manual 77
By allocating a wideband channel and dragging its shaded area over the same
blue line, the corresponding line of the list is rewritten with bold characters,
meaning that the narrowband scheduled channel can now be allocated, as in
Figure 140 for Sch 005.
Figure 140 – Allocation and drag of a wideband channel
To allocate the narrowband channel click the “Allocate” button. Figure 141 shows
allocation of Sch 005 of Figure 140.
Figure 141 – Narrowband channel allocation
Page 78

TitanSDR – User Manual 78
4.5 Options
By the Options drop-down menu of the Main Toolbar, several advanced software
features can be managed (Figure 142). These options are described in the
following paragraphs.
Figure 142 - Menu Options
4.5.1 Independent View
By default this option is checked (Figure 143), meaning that:
By selecting a narrowband channel, the Wideband Scope is automatically
switched to its wideband channel (e.g. if WB2-NB16 is selected, then WB2 is
visualized on the Wideband Scope)
By selecting a wideband channel, the Narrowband Scope is automatically
switched to the narrowband channel which was last selected on this
wideband channel
By unchecking this option, narrowband channels can be visualized on the
Narrowband Scope independently of wideband channels and vice versa.
Figure 143 - Independent View item
Page 79

TitanSDR – User Manual 79
4.5.2 Panoramic
By selecting the Panoramic option, a list appears with the following items (Figure
144):
Spectrum Labels
Horizontal Zoom
Centered Zoom
32 MHz
40 MHz
Figure 144 – Items of Panoramic option
Spectrum Labels: by unchecking this item, the dB labels on the Panoramic Scope
spectrum disappear.
Horizontal Zoom\ Centered Zoom: this items are mutually exclusive. Horizontal
zoom is checked by default. See par. 2.1.2.
32MHz\40MHz: this items are mutually exclusive. “32MHz” is checked by default.
If “32MHz” or ”40MHz” is checked, the Panoramic Scope spectrum spans from 0Hz
to 32MHz or 40MHz, respectively.
4.5.3 Wideband
By selecting the Wideband option, a list appears with the following items (Figure
145):
Spectrum Labels
Palette Change
Palette Setting
Palette Range
Page 80

TitanSDR – User Manual 80
Figure 145 - Items of Wideband option
Spectrum Labels: by unchecking this item, the dB labels on the Wideband Scope
spectrum disappear.
Palette Change: by selecting this item, a list appears of selectable palettes for the
wideband waterfall display. TitanSDR provides a default set of 7 palettes. This set
can be extended by the user, by putting *.pal files within the C:\TitanSDR\pal
folder.
Palette Setting: this item allows to select mapping between palette colors and
spectrum amplitudes (ordinates), for the wideband waterfall display. Mapping
alternatives are listed below:
Default: the range of palette colors (from bottom to top color) matches the
ordinates range of wideband spectrum (from -160 to 0 dB)
Weak signals: bottom color spectrum ordinate is set automatically just above
the noise floor to ease recognition of weak signals. The range of palette
colors (from bottom to top color) maps to a 30 dB spectrum range (starting
from the bottom color spectrum ordinate).
Custom: when this item is selected, a colors map appears on the right of the
wideband spectrum (Figure 146), showing what color is associated to what
spectrum ordinate. Furthermore horizontal yellow lines are drawn, which can
be selected and adjusted by vertical dragging, marking the amplitude
range between bottom and top palette colors. Note that ordinates outside
this range are saturated to bottom or top palette colors.
Page 81

TitanSDR – User Manual 81
Figure 146 – Custom palette setting
Palette Range: unchecking this item after having chosen the “Custom” palette
setting, makes both the colors map and the horizontal yellow lines (marking the
amplitude range between bottom and top palette colors) disappear.
4.5.4 Narrowband
By selecting the Narrowband option, a list appears with the following items (Figure
147):
Spectrum Labels
Palette Change
Palette Setting
Palette Range
Figure 147 - Items of Narrowband option
Page 82

TitanSDR – User Manual 82
Spectrum Labels: by unchecking this item, the dB labels on the Narrowband Scope
spectrum disappear.
Palette Change: by selecting this item, a list appears of selectable palettes for the
narrowband waterfall display. TitanSDR provides a default set of 7 palettes. This set
can be extended by the user, by putting *.pal files within the C:\TitanSDR\pal
folder.
Palette Setting: this item allows to select mapping between palette colors and
spectrum amplitudes (ordinates), for the narrowband waterfall display (both of RF
and demodulated audio). Mapping alternatives are listed below:
Default: the range of palette colors (from bottom to top color) matches the
ordinates range of narrowband spectrum (from -160 to 0 dB for RF and from 100 to 0 dB for demodulated audio)
Weak signals: bottom color RF spectrum ordinate is set automatically just
above the noise floor to ease recognition of weak signals. The range of
palette colors (from bottom to top color) maps to a 30 dB RF spectrum
range (starting from the bottom color spectrum ordinate).
Custom: when this item is selected, a colors map appears on the right of the
narrowband spectrum of RF and demodulated audio (Figure 148), showing
what color is associated to what spectrum ordinate. Furthermore horizontal
yellow lines are drawn, which can be selected and adjusted by vertical
dragging, marking the amplitude range between bottom and top palette
colors. Note that ordinates outside this range are saturated to bottom or top
palette colors.
Page 83

TitanSDR – User Manual 83
Figure 148 – Custom palette setting for spectrum of demodulated audio
Palette Range: unchecking this item after having chosen the “Custom” palette
setting, makes both the colors map and the horizontal yellow lines (marking the
amplitude range between bottom and top palette colors) disappear.
4.5.5 Output Files Name
Wideband and narrowband channels can be recorded as described in par. 2.2.3
and 2.3.8, respectively.
Files names (*.bin and *.wav for wideband and narrowband recordings,
respectively) are assigned automatically and result from concatenation of various
possible fields. These fields can be specified in the “Output Files Customization”
window, which appears by selecting option “Output Files Name”, from the Main
Toolbar (Figure 149).
Page 84

TitanSDR – User Manual 84
Figure 149 - Output Files Customization window
Wideband recording:
The fields which can be concatenated to compose the names of *.bin files are
listed below:
User Defined String (“mynameWB” in Figure 149)
date (year, month and day of recording, formatted as: YYYYMMDD)
start rec time (recording start time, formatted as: HHMMSS)
Page 85

TitanSDR – User Manual 85
stop rec time (recording stop time, formatted as: HHMMSS)
minimum frequency in Hz (of wideband channel)
maximum frequency in Hz (of wideband channel)
central frequency in Hz (of wideband channel)
Time of fields “start rec time” and “stop rec time” can be UTC or local time (of PC),
based on corresponding selection.
Files names are composed by concatenation of the selected fields. Field
selection/deselection is by clicking the corresponding checkbox.
The top editbox shows how concatenation of selected fields will result.
Narrowband recording:
The fields which can be concatenated to compose the names of *.wav files are
listed below:
User Defined String (“mynameNB” in Figure 149)
Date (year, month and day of recording, formatted as: YYYYMMDD)
start rec time (recording start time, formatted as: HHMMSS)
stop rec time (recording stop time, formatted as: HHMMSS)
carrier frequency in Hz (of narrowband channel)
mode (of demodulation)
BFO (frequency)
Time of fields “start rec time” and “stop rec time” can be UTC or local time (of PC),
based on corresponding selection.
Files names are composed by concatenation of the selected fields. Field
selection/deselection is by clicking the corresponding checkbox.
The top editbox shows how concatenation of selected fields will result.
4.5.6 Storage
To prevent PC hard disk from being completely filled up by recording of
wideband/narrowband channels, it is possible to set the minimum hard disk space
Page 86

TitanSDR – User Manual 86
which must be left free. This can be done by the “HD Space Limiting” window,
which appears by selecting the “Storage” option of the Main Toolbar (Figure 150).
Minimum percentage of hard disk size to be left free can be entered in the edit
box. Ongoing (wideband and/or narrowband) recordings are automatically
stopped if hard disk free space becomes lower than this minimum.
Figure 150 - HD Space Limiting
4.5.7 Session
Whenever software disconnects from the receiver (e.g. by clicking the USB button
or by switching from Receiver Mode to Player Mode), the save session message in
Figure 151 pops up automatically asking whether to save the current session (into a
.ssn session file) or not.
Figure 151 – Save session message
To circumvent the save session message, deselect “Ask for saving”, after choosing
“Session” from the “Options” drop-down menu of the Main Toolbar (Figure 152).
Page 87

TitanSDR – User Manual 87
Figure 152 – Options drop-down menu
Page 88

TitanSDR – User Manual 88
5. Appendix
Table of limiting wideband channels combinations
Table below provides possible combinations of WB channels, which make
maximum use of resources (i.e. when these combinations are realized, no more WB
channels can be allocated)
No. of
Chs
WB channel size (kHz)
312,5
625,5
937,5
1250
1562,5
1875
2187,5
Combinations of WB Chs
1 1 2 1 3 1 1 4 1 1 5 1 1 6 2 7 1 1 8 2 1 9 1 2 10 2 1 11 4
Page 89

TitanSDR – User Manual 89
Enablia S.r.l.
Via Nicostene, 20 00124 – ROMA
Tel. +39.06.7259.4052
E-Mail: enablia@enablia.com
www.enablia.com
ENABLIA
 Loading...