

Page 1
!
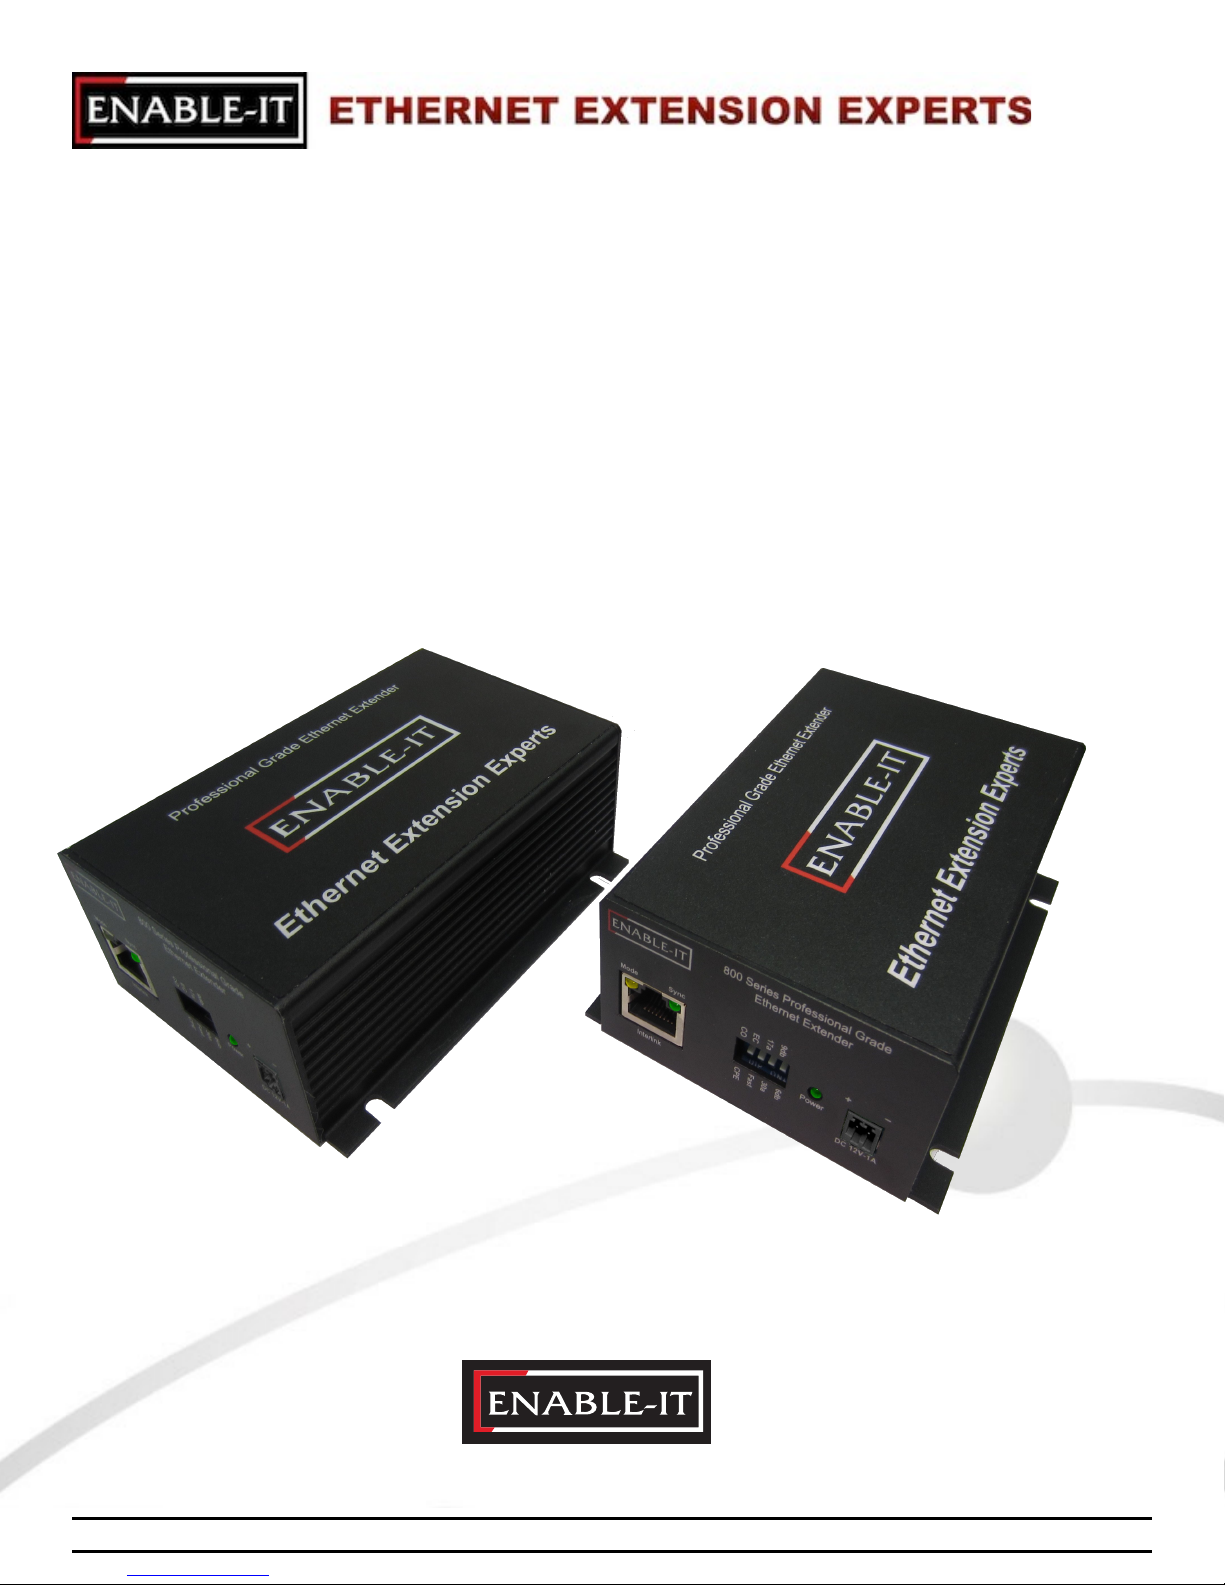
Enable-IT 860 PRO Rev C Gigabit
Professional Grade Ethernet Extender Kit
Quickstart Guide
All Rights Reserved © 1997 - 2015 Enable-IT™, Inc.
Page 2
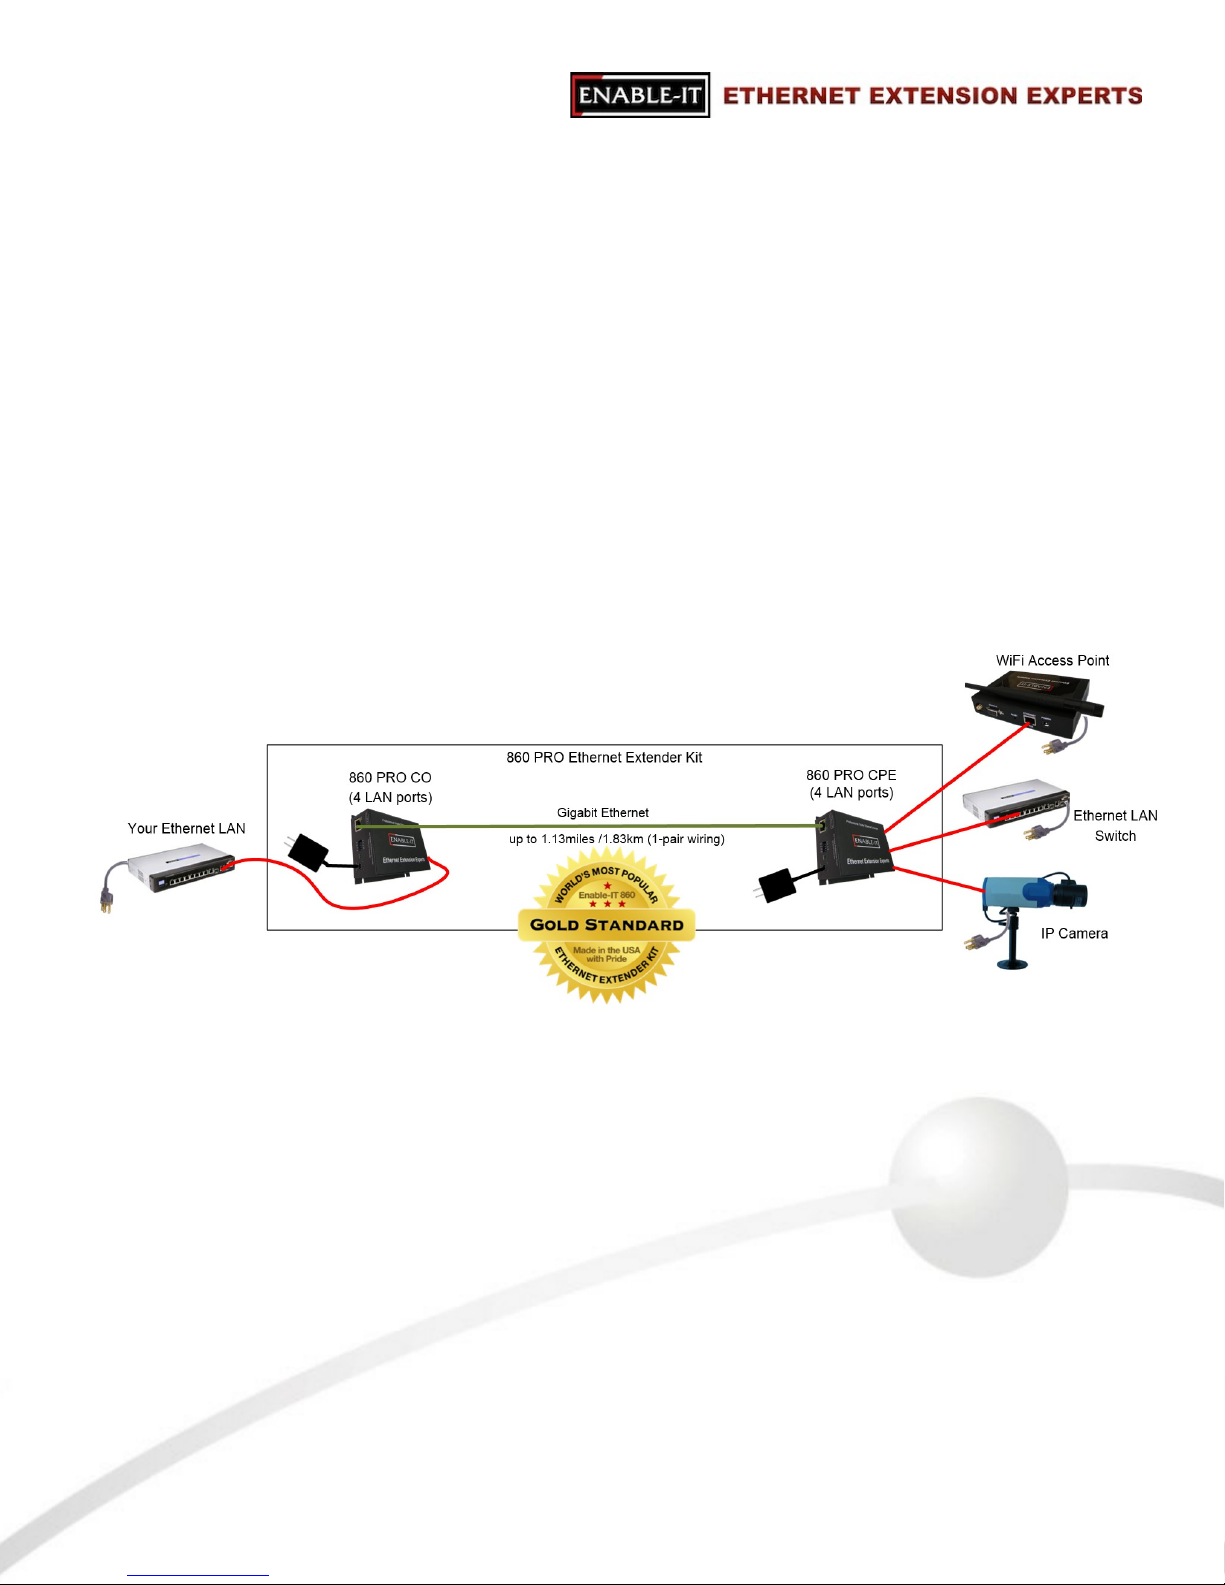
INSTALLING THE 860 PRO ETHERNET EXTENDER KIT
The Enable-IT 860 PRO Ethernet Extenders have a distance restriction of 6,000ft (1,829m) over
1-pair of Category 2, up to 4-pair CAT5e / CAT7, wiring from device extension to device
extension. Therefore a site survey of the wiring and installation planning are highly
recommended. For highest performance use CAT5e rated or higher spec for interlink wiring.
Perform an Out Of The Box Test (OOTBT)
We recommend that you perform a quick out of the box test to ensure the working order
of your Enable-IT 860 PRO Ethernet Extender units prior to installing. This will also serve
to familiarize you with how easy the process should be. Using one of the Ethernet patch
cords provided, attach it to the Interlink port of each 860 PRO unit.!
Power up both 860 PRO units using the provided secure locking 12V DC adapter. The
Green Sync LEDs will start flickering slowly and then fast as the units talk to each other.
After a few seconds you should see a solid Green Interlink Sync LED on each unit to
confirm a link is established. This confirms basic proper operation of the units. Next for
a more detailed test and to confirm your LAN Equipment works with the 860 PRO,
connect your Ethernet LAN and remote device to the 860 PRO LAN ports and test
connectivity. The Green Interlink Sync LED will pulse rapidly as it detects traffic.
LED indicators will provide visual operational status of the 860 PRO units.
Mode – Yellow Solid LED
Off = CO unit
On = CPE unit!
Sync – Green slow to fast flicker LED on power up – indicates negotiation of a link
– Green solid LED indicates link established and rapid pulse is traffic!
Act – Yellow LED
Off = No device attached or detected
On = Solid, indicates the presence of local LAN
On = Blinking, indicates the presence of local LAN traffic!
Power – Green Solid LED indicates the unit is receiving 12V power
All Rights Reserved © 1997 - 2015 Enable-IT™, Inc. Page ! of !2 9
Page 3
Performing the On-Site Installation
After removing the Enable-IT 860 PRO Ethernet Extender Kit from the box, and performing the
Out Of The Box Testing (OOTBT), all that remains to install the unit on-site is to mount the unit,
build the interconnect wiring, add voice lines if needed, and attach the LAN device cabling with
the provided Ethernet Patch cords.
Mounting the Enable-IT 860 PRO Ethernet Extender Units!
The Enable-IT 860 PRO extended Ethernet solution is designed for quick wall mounting.
Choose a location to mount each of the Enable-IT 860 PRO’s where the maximum distance
does not exceed 6,000ft (1,829m) total between devices to be connected. When wallmounting the Enable-IT 860 PRO unit it is recommended that you use the appropriate screw
anchors for your mounting surface. If mounting on existing plywood use wood screws; if
mounting onto drywall or sheetrock, use plastic drywall anchors to secure your installation.
Building the 860 PRO Interlink Wiring!
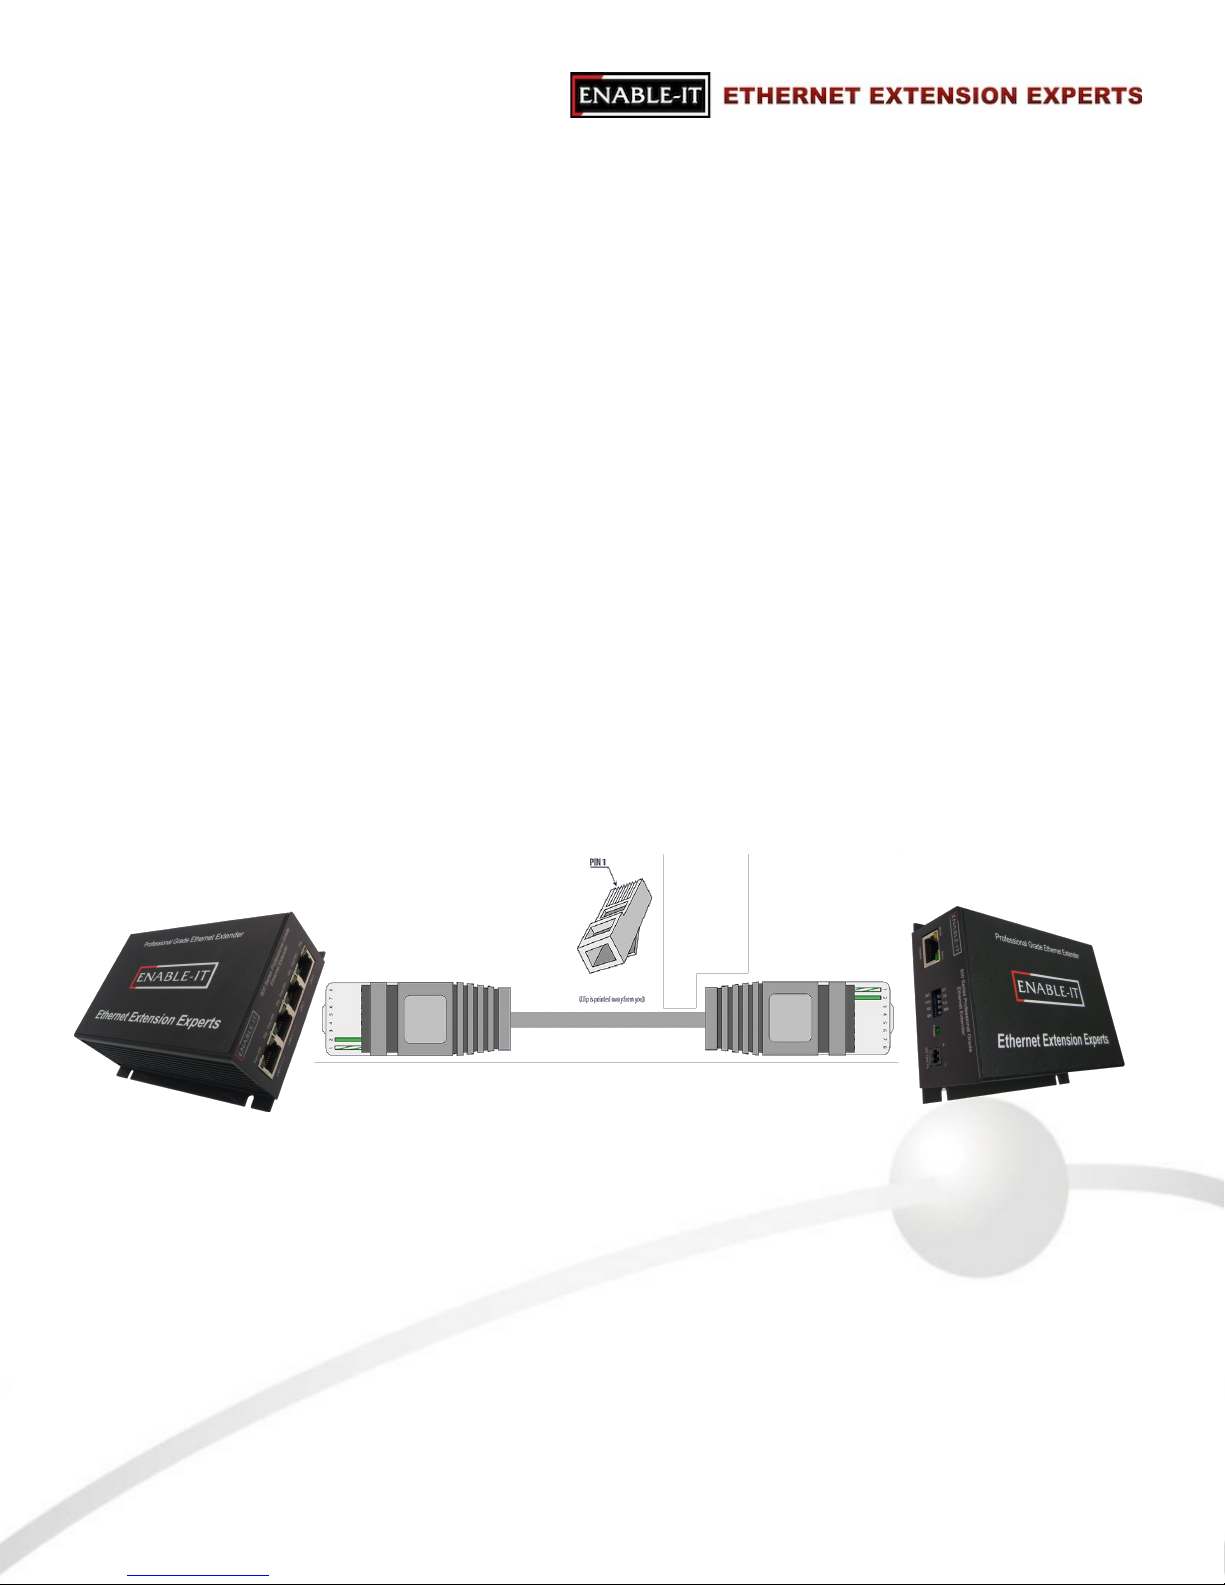
The most important aspect of the installation is the correct wiring of the Interlink cabling.
The 860 PRO Interlink port (RJ-45 interface) carries this 1-pair signaling over the RJ-45 (pins 1
& 2) - used as transport for 240Mbps VDSL2 data. If you use more than 1-pair of wiring, such
as a CAT5 segment, the remaining RJ-45 pins can transport native 802.3af PoE, or are unused.
For all wiring you will need to crimp a RJ-45 Male head to each end of the contiguous wire run
and using the following (pins 1 & 2) straight through. We recommend using a category rated
twisted pair cable as it is optimized for high throughput frequencies isolated from cross-talk
noise. Insert the completed RJ-45 ends into the 860 PRO Interlink port on each 860 PRO unit.
Cabling Devices to The Enable-IT 860 PRO Extended Ethernet Kit!
Attach your remote LAN device to the 860 PRO CPE unit LAN ports with Ethernet patch cord
provided. Attach your local LAN to the 860 PRO CO LAN ports with Ethernet patch cord
provided. Attach the power adapters to both 860 PRO units.
Attach your local Interlink cabling end to the 860 PRO CO unit Interlink port – Then do the same
for the remote end and plug into the 860 PRO CPE unit Interlink port. The Sync LED’s will
flicker in a sequence talking to each other until they go solid. Your equipment should now be
powered up and functioning.
LED indicators will provide visual operational status of the 860 PRO units.
All Rights Reserved © 1997 - 2015 Enable-IT™, Inc. Page ! of !3 9
860 PRO CPE
860 PRO CO
RJ-45 Interlink Cabling up to 6,000 feet
Pin 1 & 2
Pin 1 & 2
Page 4

Troubleshooting!
First examine the backbone wiring pair and make sure you have solid connections. The Interlink
Sync LED will be lit solid Green with rapid pulsing on each 860 PRO unit to show proper connection
and pairing. If the Interlink Sync LED Link is flashing slow to fast and never goes solid…. Then follow
the steps below:
1) Make sure your wiring is straight through and not connected to any Telco punch down
blocks; If so remove from the block and use Telco butt clips to bridge wire.!
2) Check for a firm connection of the RJ-45 connections in each 860 PRO unit, and power
is applied to the 860 PRO CO & CPE units.!
3) Yo u can ea sily i solat e any is sue by perform i ng an Out Of The Box Test (OOTBT). This
test will confirm the correct working order of your Enable-IT 860 PRO Ethernet
Extender Kit. This will point to a possible issue with your long distance Interlink wiring
being affected by possible outside interference.
!
Out Of The Box Test (OOTBT)
Using one of the Gigabit rated CAT5e Ethernet patch cords provided, attach it to both
Interlink ports on each of the 860 PRO units.!
!
Attach both secure locking 12V DC adapters provided to each of the 860 PRO units and
power them up.
Both Green Sync LEDs will start flickering slowly and then fast as the units talk to each
other to calculate the optimal parameters to use for the link. After a few seconds you
should see a solid Green Interlink Sync LED on each unit to confirm a link is established.
This confirms basic proper operation of the units. Next for a more detailed test and to
confirm your LAN Equipment works with the 860 PRO, connect your Ethernet LAN and
remote device to the 860 PRO LAN ports and test connectivity. The Green Interlink Sync
LED will pulse rapidly as it detects traffic.
All Rights Reserved © 1997 - 2015 Enable-IT™, Inc. Page ! of !4 9
Page 5
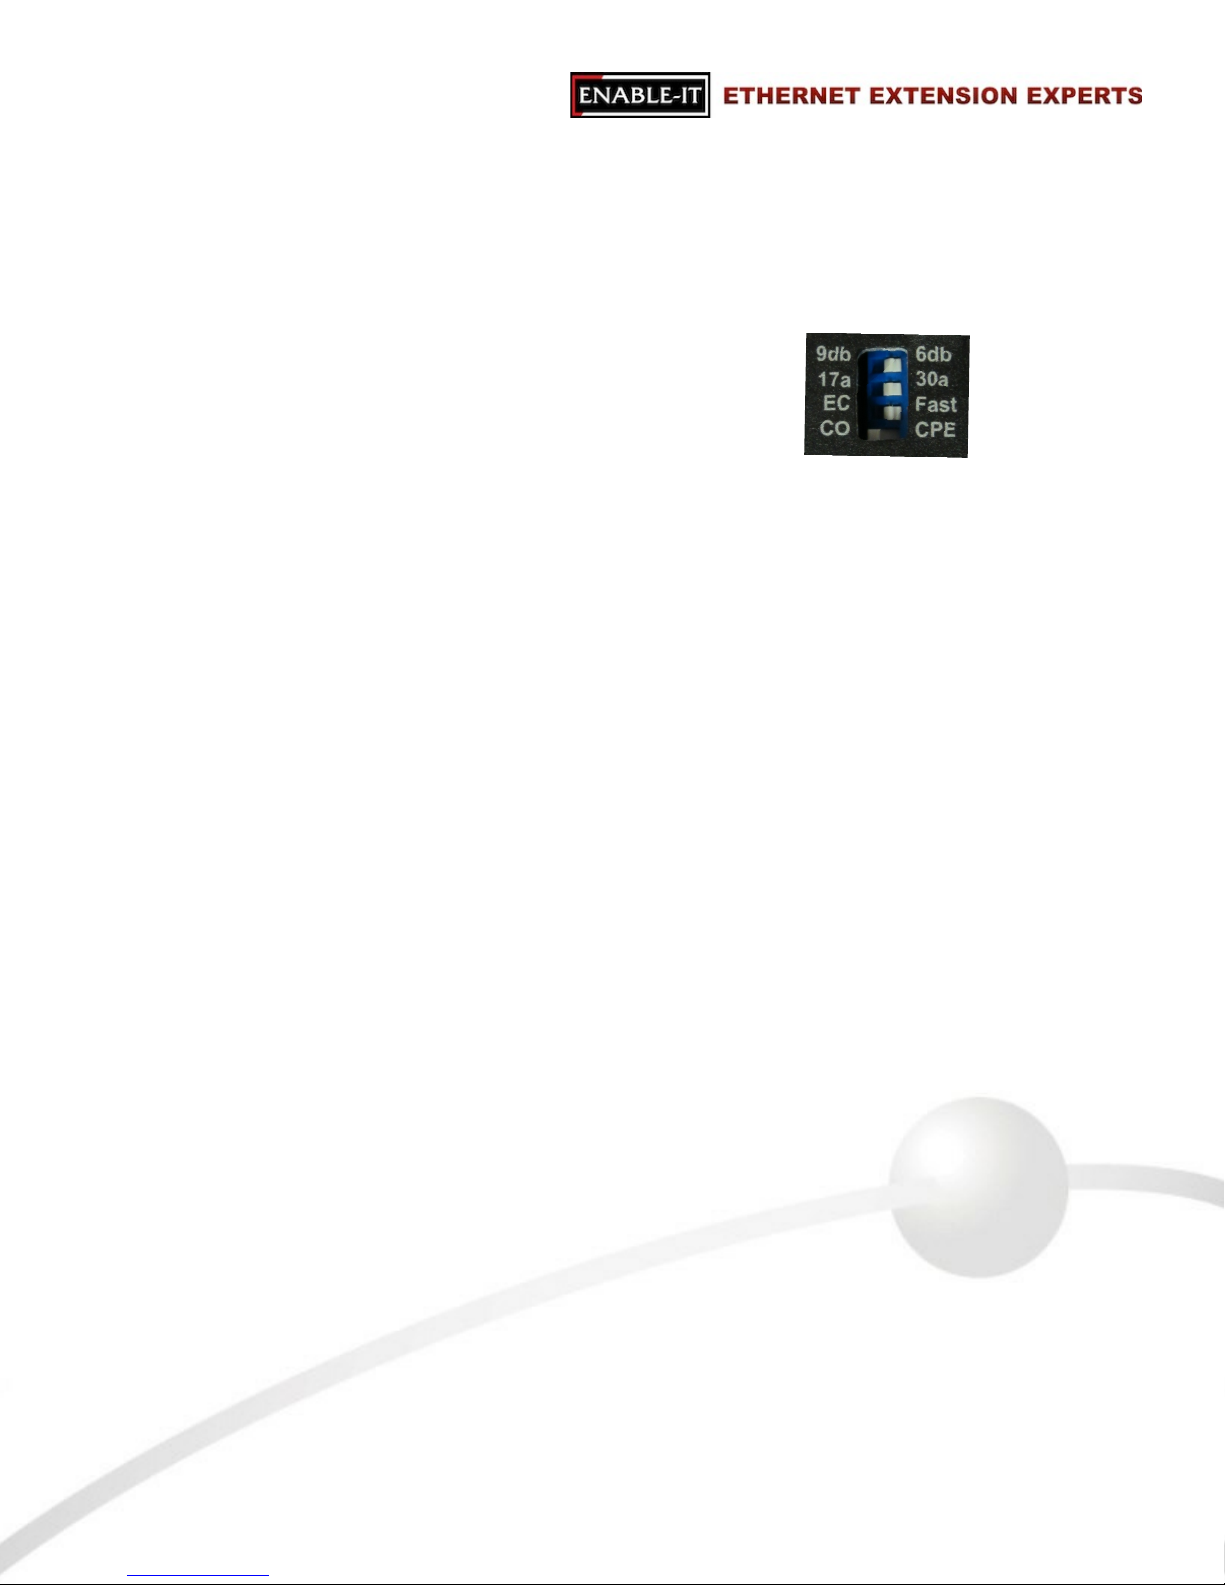
Performance Settings (DIP Switch)
If you are experiencing performance issues with your Ethernet connection you may use the following
DIP switch settings to adjust your application. For DIP switch 2-4 you must toggle both symmetrically,
in other words the CO and CPE must match. If you turn DIP switch 3 Up (Off) on the CO, then you
must do so for the CPE and vice-versa.
•
Switch 1: CO / CPE Mode!
CO Mode – Up / Off Position
CPE Mode – Down / On Position
Central Office Equipment (CO) is generally the equipment residing at the Carrier Telephone office
or the head end of a circuit. Customer Premise Equipment (CPE) is generally the equipment
residing on the customer side of a circuit. Typically you would place the CO at the local end and
the CPE at the remote end for reference only. CO’s only communicate with CPE’s.
•
Switch 2: Error Correction Mode!
Interleaved Error Correction Enabled – Up / Off Position – degrades performance
Fast Channel – Down / On Position (Default)
Interleaved Error Correction works better for file transfers, where the delivered data must be error
free but latency incurred by the retransmission of error packets is acceptable. Fast channel is
preferred for streaming multimedia, where an occasional dropped bit is not noticeable or
acceptable.
•
Switch 3: 17a (over 1,500ft) / 30a (under 1,500ft) Mode!
17a Mode – Up / Off Position
17a mode is only used for Interlink runs over 1,500ft to 6,000ft.
30a Mode – Down / On Position (Default)
30a mode is only enabled for Interlink runs under 1,500ft.
•
Switch 4: Signal-to-noise Noise Ratio (SNR)!
9dB – Up / Off Position
6dB – Down / On Position (Default)!
Signal-to-noise ratio is a measurement that refers to how much noise is in the output of a device,
in relation to the signal level. If you experience issues of noise bleeding over the lines, or high
interference in your environment, it is suggested that you switch to 6dB SNR. This may help
clean up any noise bleeding over your cabling.
All Rights Reserved © 1997 - 2015 Enable-IT™, Inc. Page ! of !5 9
Page 6

TECHNICAL SUPPORT
Enable-IT, Inc.’s Customer Care Team support is available directly to customers and distributors. All
support requests are processed through the online support portal. This allows us to provide assigned
support ticket numbers in order to bring closure to any technical issues.
Online Technical Services
The Enable-IT Support Portal is available 24/7 to open a ticket or check the status of one. Please use
this support website as your first source for help as it contains an on-line knowledge base of articles,
documentation, FAQ's and other problem-solving resources. This web-based support resource
provides the quickest solution to the most common technical support issues.
World Wide Web Site
http://support.enableit.com
Returning Products for Warranty Repair
Enable-IT, Inc. warrants to the original purchaser of the Product ("you" or the "End User") that, for the
four (4) year period commencing on the date the Product was purchased (the "Warranty Period"), the
Product will be substantially free from defects in materials and workmanship under normal use and
conditions. Electrical or water damage is not covered under this warranty, extended warranties
or Advanced Replacement Program (AREP).
In order to obtain an authorized RMA approval, the End User must complete the required information
online located at http://support.enableit.com. If you have questions or difficulty completing this
information you may contact the Customer Care Team at 888-309-0910 between the hours of 8:00
a.m. and 5:00 p.m. PT.
Please ship Authorized RMAs to:
RMA Warranty Repair Processing Facility
16600 Harbor Blvd, Suites H & I
Fountain Valley, CA 92708-1363
Returning Products for Refund
Enable-IT, Inc. offers a generous 45-Day refund on a single Ethernet Extender Kit only, and is
subject to a 15% Restocking Fee. Shipments without a valid or authorized RMA number, or
sent to our corporate Las Vegas address, can be refused and / or billed for additional shipping.
All Rights Reserved © 1997 - 2015 Enable-IT™, Inc. Page ! of !6 9
Page 7

ENABLE-IT, INC. LIMITED WARRANTY
Enable-IT, Inc. warrants the Enable-IT 860 PRO kit solely pursuant to the following terms and
conditions.
1.ENABLE-IT PRODUCT WARRANTY.
a. Express Warranty.
Enable-IT warrants to the original purchaser of the Product ("you" or the "End User") that, for
the four (4) year period commencing on the date the Product was purchased (the
“Warranty Period"), the Product will be substantially free from defects in materials and
workmanship under normal use and conditions. This warranty does not apply to Products,
which are resold as used, repaired or reconditioned, or consumables (such as batteries)
supplied with the Product. Electrical or water damage are not covered under this
warranty, extended warranties or Advanced Replacement Program (AREP).
!
Enable-IT does not make any warranty with respect to any third party product, software or
accessory supplied with or used in connection with the Product and such third party
products, software and accessories, if any, are provided "AS IS." Warranty claims related to
such third party products, software and accessories must be made to the applicable third
party manufacturer.
b. Remedies for Breach of Warranty.
In the event of a breach of the foregoing warranty, Enable-IT will, in its sole discretion and at its
cost, and subject to the terms of the following paragraph, repair the non-conforming Product,
replace the non-conforming Product with a new or reconditioned Product or refund the
purchase price for the Product. Any new or reconditioned Product provided pursuant to this
paragraph is warranted as provided herein for the remainder of the original Warranty Period.
THE REMEDY SET FORTH IN THIS PARAGRAPH SHALL BE THE END USER’S SOLE
AND EXCLUSIVE REMEDY FOR BREACH OF THE FOREGOING WARRANTY.
c. Conditions for Warranty Qualification.
If authorized by Enable-IT to return a Product which does not conform to the warranty set forth
above, the End User must: (1) obtain a return materials authorization (RMA) number from
Enable-IT by contacting the Customer Service Dept. at 888-309-0910 between the hours of
8:00 a.m. and 5:00 p.m. PST and otherwise fully comply with Enable-IT’s then-current RMA
policy; (2) return the Product to Enable-IT in its original packaging freight pre-paid; and (3)
provide to Enable-IT the original receipt or bill of sale establishing the date on which the
Product was purchased. Products returned to Enable-IT without an RMA number will be
returned to the End User. Enable-IT shall not be responsible for damage or loss during
shipment of the returned Product to Enable-IT.
d. Voiding of Warranty.
The express warranty set forth above shall not apply to failure of the Product if the Product has
been subjected to: (i) physical abuse, misuse, improper installation, abnormal use, power
failure or surge, or use not consistent with the operating instructions provided by Enable-IT; (ii)
modification (including but not limited to opening the Product housing) or repair by any party in
any manner other than as approved by Enable-IT in writing; (iii) fraud, tampering, unusual
physical or electrical stress, unsuitable operating or physical conditions, negligence or
accidents; (iv) removal or alteration of the Product serial number tag; (v) improper packaging of
Product returns; or (vi) damage during shipment (other than during the original shipment of the
Product to the End User from Enable-IT, if applicable).
All Rights Reserved © 1997 - 2015 Enable-IT™, Inc. Page ! of !7 9
Page 8

e. Warranty Disclaimers.
THE EXPRESS WARRANTY SET FORTH ABOVE IS IN LIEU OF ALL OTHER
WARRANTIES, WHETHER WRITTEN, ORAL, EXPRESS OR IMPLIED. ENABLE-IT
DISCLAIMS, TO THE MAXIMUM EXTENT PERMITTED BY LAW, THE IMPLIED
WARRANTIES OF MERCHANTABILITY, FITNESS FOR A PARTICULAR PURPOSE OR
NONINFRINGEMENT OF THIRD PARTY RIGHTS. NO PERSON (INCLUDING WITHOUT
LIMITATION, ENABLE-IT’S EMPLOYEES, AGENTS, RESELLERS, OEMS OR
DISTRIBUTORS) IS AUTHORIZED TO MAKE ANY OTHER WARRANTY OR
REPRESENTATION CONCERNING THE PRODUCT. IF THE DISCLAIMER OF ANY
IMPLIED WARRANTY IS NOT PERMITTED BY LAW, THE DURATION OF ANY SUCH
IMPLIED WARRANTY IS LIMITED TO ONE (1) YEAR FROM THE DATE OF PURCHASE.
SOME JURISDICTIONS DO NOT ALLOW THE EXCLUSION OF IMPLIED WARRANTIES
OR LIMITATIONS ON HOW LONG AN IMPLIED WARRANTY MAY LAST, SO SUCH
LIMITATIONS OR EXCLUSIONS MAY NOT APPLY. THIS WARRANTY GIVES THE END
USER SPECIFIC LEGAL RIGHTS AND THE END USER MAY ALSO HAVE OTHER
RIGHTS, WHICH VARY FROM JURISDICTION TO JURISDICTION. ENABLE-IT DOES
NOT WARRANT THAT THE OPERATION OF THE PRODUCT WILL BE UNINTERRUPTED
OR ERROR FREE. ENABLE-IT IS NOT RESPONSIBLE FOR ANY DAMAGE TO OR LOSS
OF ANY PROGRAMS, DATA, OR OTHER INFORMATION STORED ON OR TRANSMITTED
USING THE PRODUCT.
2. LIMITATION OF LIABILITY.
IN NO EVENT SHALL ENABLE-IT BE LIABLE TO THE END USER, OR ANY THIRD PARTY, FOR
ANY INDIRECT, SPECIAL, PUNITIVE, INCIDENTAL OR CONSEQUENTIAL DAMAGES IN
CONNECTION WITH OR ARISING OUT OF THE SALE OR USE OF THE PRODUCT (INCLUDING
BUT NOT LIMITED TO LOSS OF PROFIT, USE, DATA, OR OTHER ECONOMIC ADVANTAGE),
HOWEVER IT ARISES, INCLUDING WITHOUT LIMITATION BREACH OF WARRANTY, OR IN
CONTRACT OR IN TORT (INCLUDING NEGLIGENCE), OR STRICT LIABILITY, EVEN IF ENABLEIT HAS BEEN PREVIOUSLY ADVISED OF THE POSSIBILITY OF SUCH DAMAGE AND EVEN IF A
LIMITED REMEDY SET FORTH IN THIS AGREEMENT FAILS OF ITS ESSENTIAL PURPOSE. IN
NO EVENT SHALL ENABLE-IT’S LIABILITY TO THE END USER, OR ANY THIRD PARTY,
EXCEED THE PRICE PAID FOR THE PRODUCT. BECAUSE SOME JURISDICTIONS DO NOT
ALLOW THE EXCLUSION OR LIMITATION OF LIABILITY FOR CONSEQUENTIAL OR
INCIDENTAL DAMAGES, THE ABOVE LIMITATIONS MAY NOT APPLY TO THE END USER.
3. LICENSE AND LIMITATIONS.
The firmware and software embedded in the Product (the "Embedded Software") are licensed to you.
You r u se of th e P rod uc t i s y our acc ep tan ce of th e w ar ran ty te rm s a bo ve a nd th e t er ms bel ow. Yo u
may use the Embedded Software solely in conjunction with your use of the Product. All worldwide
right, title and interest in and to the Product, or any portion thereof (including but not limited to the
Embedded Software), including all copyrights, patent rights, trademarks, trade secrets, and other
intellectual property rights therein and thereto, are and shall remain the exclusive property of EnableIT and/or its licensors. You acknowledge and agree that you may not, and may not allow any third
party to, (i) use the Embedded Software in a manner that is inconsistent with the above express right
granted to you or (ii) modify, distribute, reproduce, decompile, disassemble, reverse engineer or
otherwise attempt to discover the source code for the Embedded Software.
All Rights Reserved © 1997 - 2015 Enable-IT™, Inc. Page ! of !8 9
Page 9

CONTACT US
Sales and Customer Care:
Toll Free US and Canada 888 309-0910
866 389-8605 Fax
Other International +1 702 924-0402
+1 702 800-2711 Fax
RMA Support:
http://support.enableit.com
All Rights Reserved © 1997 - 2015 Enable-IT™, Inc. Page ! of !9 9
 Loading...